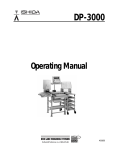
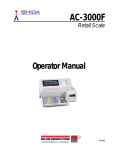
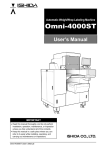
1
BC-3000 Retail Scale Operating Manual 44299 1 § You can help improve this manual by calling attention to errors and by recommending improvements. Please convey your comments to the nearest Ishida Company regional representative. Thank you! Copyright 1996 by Ishida Co., Ltd. All Rights Reserved. No part of this manual may be reproduced in any form, by mimeograph or any other means, without written permission of the publisher. CAUTIONS FOR USE §Always operate the scale on a level surface. §Do not disassemble the scale. §Do not expose the scale too long periods of direct sunlight. §Do not allow any liquids to come into contact with the scale or terminal. §Do not drop or apply a strong shock to the scale. §When cleaning the scale, only use a soft dry cloth or a cloth wetted with a neutral cleanser. Never use thinner or other volatile liquids. C A Always operate the scale with the same rated AC power supply shown on the specification plate. SAFETY CONSIDERATIONS To ensure safe operation, the general safety considerations below must be followed. Grounding This instrument is a Class 1 device which requires protective grounding for safe operation. To avoid potential shock hazards, a protective grounding conductor for the instrument must be securely connected to the main grounding provision by qualified service personnel. Do not remove covers or enclosures To avoid personal injury and shock, do not open or remove any covers or enclosures of the instrument unless specified in the manual. Do not perform unspecified maintenance For your personal safety, do not perform any maintenance procedures which are not specified in the manual. Disconnect power supply before servicing To ensure your personal safety, disconnect the power supply before servicing. Contents Chapter 1 Overview 1.1 Appearance ....................................................................................................................................... 2 1.2 Display ...............................................................................................................................................2 1.3 Operation Keys .................................................................................................................................. 3 1.3.1 1.3.2 1.3.3 1.4 Program Keys .................................................................................................................................... 6 1.4.1 1.4.2 1.4.3 1.5 Operation Key Sheet .............................................................................................................3 Basic Function Keys .............................................................................................................. 4 Additional Function Keys ....................................................................................................... 5 Program Key Sheet ............................................................................................................... 6 Program Key Functions ......................................................................................................... 7 Speed Key Functions .............................................................................................................8 Loading Label/Paper Roll................................................................................................................... 9 Chapter 2 Daily Operation 2.1 Pre-operation Inspection .................................................................................................................. 12 2.2 Power On ......................................................................................................................................... 13 2.3 Sales by Weight ............................................................................................................................... 14 2.4 Fixed-price Sales ............................................................................................................................. 15 2.5 Prepack for Sales by Weight ............................................................................................................ 16 2.6 Prepack for Fixed-price Sales .......................................................................................................... 17 2.7 Label Batch Print ............................................................................................................................. 18 2.8 Pack Count Sub-total ....................................................................................................................... 19 2.9 Mark Down Functions ...................................................................................................................... 20 2.9.1 2.9.2 2.9.3 Amount Discount ................................................................................................................. 20 Percentage Discount ........................................................................................................... 20 Special Price ........................................................................................................................ 20 2.10 Unit Price Override .......................................................................................................................... 21 2.11 Voiding the Last Label...................................................................................................................... 21 2.12 Switching from Sale by Weight to Fixed-price Sale ......................................................................... 21 2.13 Selecting Lower Preset Data ........................................................................................................... 21 2.14 Pack Date Override .......................................................................................................................... 22 2.15 Save Function .................................................................................................................................. 22 Chapter 3 3.1 Subtraction Subtraction Mode ............................................................................................................................. 24 Chapter 4 Total Reports 4.1 Total Reports .................................................................................................................................... 28 4.2 Total Mode ....................................................................................................................................... 28 4.3 Daily Total Report ............................................................................................................................. 29 4.3.1 4.3.2 4.4 Daily Report Categories ......................................................................................................29 Operation Procedure ...........................................................................................................30 Monthly Total Report ........................................................................................................................31 4.4.1 4.4.2 Monthly Report Categories ..................................................................................................31 Operation Procedure ...........................................................................................................32 4.5 Hourly Total Report ..........................................................................................................................33 4.6 Operator Total Report ......................................................................................................................34 4.7 Total Clear ........................................................................................................................................35 Chapter 5 Programming 5.1 Programming PLUs ..........................................................................................................................38 5.2 Deleting PLUs ..................................................................................................................................43 5.3 Programming Message Files ...........................................................................................................44 5.4 Deleting Message Files ...................................................................................................................45 5.5 Programming Date and Time ...........................................................................................................46 5.6 Programming Store Names and Addresses ....................................................................................47 5.7 Deleting Store Names and Addresses .............................................................................................48 5.8 Programming Preset Keys ...............................................................................................................49 5.9 Deleting All Preset Keys ..................................................................................................................50 5.10 Printing PLU/Message Information ..................................................................................................51 5.11 Programming Department Codes and Names .................................................................................53 5.12 Deleting Department Codes and Names .........................................................................................54 5.13 Programming Group Codes and Names ..........................................................................................55 5.14 Deleting Group Codes and Names ..................................................................................................56 5.15 Programming Operator Codes and Names .....................................................................................57 5.16 Deleting Operator Codes and Names ..............................................................................................58 5.17 Programming Nutrition Files ............................................................................................................59 5.18 Changing Unit Price/Fixed Price ......................................................................................................65 Chapter 6 6.1 Text Editing Text Entry Screen ............................................................................................................................68 6.1.1 6.1.2 Indicators ............................................................................................................................. 68 7-Segment Display Characters ............................................................................................68 6.2 Character Size .................................................................................................................................69 6.3 Text Editing Keys ..............................................................................................................................70 6.4 How to Create/Edit Text ...................................................................................................................71 6.5 How to Reverse Text ........................................................................................................................72 6.6 How to Insert Characters .................................................................................................................74 Chapter 7 Troubleshooting 7.1 Troubleshooting ................................................................................................................................76 7.2 Other Problems ................................................................................................................................75 CHAPTER 1 OVERVIEW Contents Contents 1.1 Appearance ..................................... 2 1.1 1.2 Appearance ..................................... 22 Display ................................................ 1.2 1.3 Display ................................................ Operation Keys ................................. 32 1.3 1.4 Operation Keys ................................. 63 Program Keys .................................... 1.4 1.5 Program Label/Paper Keys .................................... Loading Roll ................ 96 1.5 Loading Label/Paper Roll ................ 9 1.1 Appearance Customer Display Operator Display WEIGHT lb. ZERO NET Capacity UNIT PRICE SAVE $ TOTAL PRICE $ AUTO PLU 30 5 0.01 lb. Weigh Platter Side Cover Printer Power Switch Fuse Key Sheet Height Adjustment 1.2 Display WEIGHT lb. ZERO NET Capacity 30 × 0.01 lb. UNIT PRICE SAVE $ TOTAL PRICE $ AUTO PLU Indicators ZERO : Lights when weight value is true zero or temporary zero. NET : Lights when a tare is used. SAVE : Lights when the SAVE mode is used. AUTO : Lights when the AUTOMATIC PRINT mode is used. page 8 BC-3000 • User’s Manual • Rev 0 1.3 Operation Keys 1.3.1 Operation Key Sheet PACK COUNT ZERO VOID RESET PGM MODE LABEL LOWER BATCH PRESET DATE X MULTIPLY PRE PACK 7 8 9 4 5 6 1 2 3 0 CLR TARE PAPER FEED PRINT PLU Preset key Additional function key The following functions can be programmed. • DATE/TIME display • EXTRA MESSAGE No. • STORE NAME No. • POP MESSAGE No. • FIXED PRICE function • SAVE function • DISCOUNT • AMOUNT DISCOUNT • PERCENTAGE DISCOUNT Program Key Sheet Operation Key Sheet Insert the Operation Key Sheet over the Program Key Sheet. BC-3000 • User’s Manual • Rev 0 page 9 1.3.2 Basic Function Keys 0 NUMERIC ENTRY Keys 0 through 9 are used to enter numeric data. PRE PACK PRE-PACK Used to switch auto/manual label printing. to 9 CLR LABEL BATCH CLEAR Used to cancel incorrectly entered numeric data. LABEL BATCH Used to issue batches of labels. LOWER PRESET LOWER PRESET SELECT Used to access the second level of data programmed to the preset keys. X MULTIPLIER Used to multiply the entered quantity of fixed-price items. MULTIPLY PACK COUNT PAPER FEED PLU page 10 PACK COUNT SUB-TOTAL Used to issue a label that shows the number of labels (packs), total weight and amount which have been printed since this key was last pressed. PAPER FEED Used to advance labels to the correct printing position. PRINT PRINT Used to issue a label. PGM MODE PROGRAM MODE SELECT Used to access the Subtraction, Total Reports, and Programming menus. RESET RESET Used to initialize the scale. TARE DATE VOID ZERO TARE Used to subtract the tare weight from the total weight on the weigh platter. TEMPORARY DATE Used to change the current date of the scale temporarily. This allows labels to be produced ahead of time for prepacking items. VOID Used to cancel the previous label issued. ZERO ADJUSTMENT Used to return the scale to zero. This key will only function if nothing is on the weigh platter. PLU SELECT Used to access PLU data. BC-3000 • User’s Manual • Rev 0 1.3.3 Additional Function Keys DATE TIME DATE/TIME Used to display the current date and time. EXTRA MSSG EXTRA MESSAGE Used to access the extra message corresponding to the entered number. STORE NAME STORE NAME Used to access the store name corresponding to the entered number. POP MSSG POP MESSAGE Used to access the POP message corresponding to the entered number. FIXED PRICE SAVE SAVE Used to access the same stored PLU data as a short cut operation. DISCOUNT DISCOUNT Used to override a selling price and enter a special price. –$ –% AMOUNT DISCOUNT Used to subtract the entered amount. PERCENTAGE DISCOUNT Used to subtract the entered percentage. FIXED PRICE Used to temporarily change from sales by weight to fixed-price sales. Also used to enter a new fixed price. BC-3000 • User’s Manual • Rev 0 page 11 1.4 Program Keys The Program Key Sheet is accessed by removing the Operation Key Sheet. The keys will function as indicated on the following page when one of the following modes has been accessed. This is done by using a password in conjunction with the MODE key. • Total Report Mode (Chapter 4) • Programming Mode (Chapter 5) 1.4.1 Program Key Sheet The Program Key Sheet comes with a typewriter style keyboard layout. REPORT NAMES ¨ A O ’ Q ’’ Œ ¨ STORE NAME CHAR DELETE BS I E E ° A Æ Ø ß ZERO END RESET MODE HELP EDIT FUNCTIONS ¨ U LINE INSERT DELETE ~ < NORMAL > _ = # $ % & / W E R T Y U I O P A S D F G H J K L ; LOWER CASE Z X C V B N M , . EDIT ∗ ( ) SALES REPORTS SHIFT ➝ CHARACTER STYLE ~ N ¨ ! ¨ E PLU LIST ➝ DEPT. GROUP OPERATOR DATE TIME ➝ EDIT FUNCTIONS SPEED KEYS ➝ MESSAGE EXTRA TEXT GRAND TOTAL PRICE OVRDE SPACE Program Key Sheet : REVERSE + / C SIZE COPY EDIT PLU PAPER FEED ? 7 8 9 @ 4 5 6 PRINT 1 2 3 PLU 0 CLR TARE ENTER NEW LINE Operation Key Sheet Remove the Operation Key Sheet so that the Program Key Sheet under it can be used. page 12 BC-3000 • User’s Manual • Rev 0 1.4.2 Program Key Functions Alphanumeric Keys TARE ENTER CLEAR Used to return numeric values that have been entered incorrectly to zero. TARE Not used in the program mode. ENTER Used to store numeric entries after the value has been correctly typed. Also used to move up the menu items presented in the program mode, total mode and other menu screens. ➝ ➝ CLR ➝ The alphanumeric keys are used to enter data into fields available on the BC-3000. The LOWER CASE key is used to change to lower case letters upper and lower case characters. The SHIFT key is used to access the upper character of keys with two characters. END DOWN ARROW Used to move down the lines of text. Also used to move up the menu items presented in the program mode, total mode and other menu screens. RIGHT ARROW Used to move across the characters of text. Also used to view options available on menu lines of program menu items. LEFT ARROW Used to move across the characters of text. Also used to view options available on menu lines of program menu items. END Used to complete data entry in the program menu and return to the main menu. PLU Used to enter specific item numbers such as PLU numbers and message numbers. CHAR DELETE CHARACTER DELETE Used to delete the right most character on the display from text field. PRINT PRINT Used to obtain a sample label to confirm the entered text. BS BACK SPACE Used to delete the last entered character. PAPER FEED PAPER FEED Used to issue a blank label when applicable. LINE DELETE LINE DELETE Used to delete an entire line from text field. INSERT INSERT Used to change between inserting or overriding characters in editing of any text field. ➝ PLU UP ARROW Used to move up the lines of text. Also used to move up the menu items presented in the program mode, total mode and other menu screens. BC-3000 • User’s Manual • Rev 0 page 13 EDIT COPY NORMAL EDIT Used to enter the text entry mode for any text field. COPY Used to copy the text. REVERSE SIZE REVERSE After pressing this key, the following entered text is changed to reverse type. Text is changed back to normal type when the NORMAL key is pressed or when the REVERSE key is pressed again. SIZE Used to select different character sizes. After pressing the SIZE key, use the UP, DOWN , LEFT and RIGHT arrow to scroll through the character sizes available for printed text. NORMAL Used to switch from reverse type to normal type. 1.4.3 Speed Key Functions On the Program Key Sheet, there are various Speed Keys to jump directly to programming options. These Speed Keys reduce the dependence on the manual as they give direct access to menu items. SPEED KEYS SPPED KEYS Used to select the menu item for programming the preset keys. DATE TIME EDIT PLU EDIT PLU Used to select the menu item for creating, editing or deleting the extra text (sales) messages. PLU LIST EXTRA TEXT EXTRA TEXT Used to select the menu item for creating, editing or deleting the extra text (sales) messages. STORE NAME STORE NAME Used to select the menu item for programming the store name and address. DEPT. DEPARTMENT Used to select the menu item for creating, editing or deleting the department name for use in the total report. GRAND TOTAL GRAND TOTAL Used immediately to print the daily department total while in the total mode. GROUP GROUP Used to select the menu item for creating, editing or deleting the group name for use in the total report. PRICE OVRDE PRICE OVERRIDE Used to print all items with changed unit prices while in the total mode. OPERATOR page 14 DATE/TIME Used to select the menu item for programming the date and time. PLU LIST Used to select the menu item for generating a PLU and extra message file list. The file can be printed on a continuous strip (receipt) or on labels. OPERATOR Used to select the menu item for creating, editing or deleting the operator name for use in the total report. BC-3000 • User’s Manual • Rev 0 Loading Label/Paper Roll 1. Make sure that the power is off. 2. Open the side cover. 3. Pull the release lever to raise the printer head. 4. Insert a new roll onto the label holding shaft. 5. When using the label roll, remove labels from the first 30 cm (12 inches) of backing paper. 6. Thread the label paper as shown below. cm OFF 30 1.5 Release Lever Label Holding Shaft Printer Head Label Guide Printer Unit Peeling Bar Label Sensor Guide Shaft Check that the backing paper is: • threaded properly under the guide shaft. • threaded properly through the label sensor. • threaded properly over the peeling bar, making sure it passes through the groove. 7. When the label/paper needs to be wound up, wind the tip of the paper around the winding sleeve and fasten it with the U-pin. Release Lever Label Holding Shaft Printer Head Label Guide Printer Unit U-pin Peeling Bar Label Sensor Winding Sleeve Guide Shaft 8. Push the printer head down until it locks securely. 9. Close the side cover. 10. Turn on the power and press the PAPER FEED key to advance the label/paper to the correct printing position. ON a PAPER FEED CHAPTER 2 DAILY OPERATION Contents 2.1 Pre-operation Inspection ............... 12 2.2 Power On ......................................... 13 2.3 Sales by Weight ............................... 14 2.4 Fixed-price Sales ............................. 15 2.5 Prepack for Sales by Weight ......... 16 2.6 Prepack for Fixed-price Sales ........ 17 2.7 Label Batch Print ............................. 18 2.8 Pack Count Sub-total ..................... 19 2.9 Mark Down Functions ..................... 20 2.10 Unit Price Override .......................... 21 2.11 Voiding the Last Label .................... 21 2.12 Switching from Sale by Weight to Fixed-price Sale .......................... 21 2.13 Selecting Lower Preset Data ......... 21 2.14 Pack Date Override ....................... 22 2.15 Save Function ................................. 22 2.1 Pre-operation Inspection In order to maintain optimum scale performance, perform the following inspection before starting daily operations. Always turn off the power switch when performing this inspection. Caution 1. Make sure that the power is off. OFF 2. Check that the scale and the level device aperture are clean and free of foreign matter. If not, wipe any soiled areas with a dry cloth. 3. Clean the thermal head with a cotton swab at least once a week in order to maintain print quality. Thermal Head Dip the end of the cotton swab into cleaning fluid and wipe the thermal head. Caution Do not use metal tools to clean the thermal head as they may damage the head surface. 4. Remove any foreign matter, label adhesive, etc. to make the scale level. 5. Adjust the scale to level by using the height adjustment feet. Level Indicator Correct Incorrect Hight Adjustment 6. Make sure the label/paper amount is sufficient. BC-3000 • User’s Manual • Rev 0 page 17 2.2 Power On 1 Turn on the power. ON 2 Make sure that nothing is on the weigh platter. 3 Check that the ZERO indicator is lit. ZERO 4 If the ZERO indicator is not lit, press the ZERO key. page 18 ZERO BC-3000 • User’s Manual • Rev 0 2.3 Sales by Weight 1 Check that nothing is on the weigh platter. • Check that the ZERO indicator is lit. • If not, press the ZERO key. ZERO ZERO 2 Subtract the tare. ■ Weighing tare • Place the tare on the weigh platter. The tare weight will be displayed. • Press the TARE key. The displayed value will return to zero, and the NET indicator will light. ■ Fixed tare weight TARE NET Ex. Weight = 0.08 lb. • Enter the tare weight and press the TARE key. 8 s Tare look-up key ➔ TARE Ex. Access Tare #1 • Press the tare look-up (preset) key. TARE #1 3 Enter the PLU. ■ PLU number entry • Enter the PLU number and press the PLU key. ■ PLU (preset) key Ex. PLU No. = 350 3 5 0 ➔ PLU Ex. Access PLU10 PLU10 PLU90 • Press the preset key in which the PLU item data is set. Ex. Access PLU90 LOWER PRESET ➔ PLU10 PLU90 4 Weigh the item. • Place the item on the weigh platter. 5 Perform mark down operation if necessary. • Refer to page 20. 6 Print the label. ■ When not using the operator system • Press the PRINT key. ■ When using the operator system • Press the operator key. BC-3000 • User’s Manual • Rev 0 PRINT Ex. Operator = Susan Susan page 19 2.4 Fixed-price Sales 1 Enter the PLU. ■ PLU number entry Ex. PLU No. = 450 4 5 0 ➔ PLU • Enter the PLU number and press the PLU key. ■ PLU (preset) key Ex. Access PLU15 PLU15 PLU95 • Press the preset key in which the PLU item data is set. Ex. Access PLU95 LOWER PRESET ➔ PLU15 PLU95 2 Perform mark down operation if necessary. • Refer to page 20. 3 Multiply the quantity. • When selling more than one of the same item, enter the quantity and press the MULTIPLY key. • Otherwise, go to the next step. Ex. Three Items 3 ➔ X MULTIPLY 4 Print the label. ■ When not using the operator system • Enter the number of labels, and press the PRINT key. Note: Press the CLEAR key once to temporarily stop printing. To continue printing, press the PRINT key. To cancel printing, press the CLEAR key again. • If the number of labels is one, simply press the PRINT key. Ex. Three Labels 3 ➔ PRINT Ex. One Label PRINT ■ When using the operator system • Press the operator key. Ex. Operator = Mike Mike page 20 BC-3000 • User’s Manual • Rev 0 2.5 Prepack for Sales by Weight 1 Enter the prepack mode. • Press the PREPACK key to enter the prepack mode. PRE PACK • The AUTO indicator lights. AUTO 2 Check that the weight display reads zero. • Make sure that nothing is on the weigh platter and check that the ZERO indicator is lit. ZERO • If not, press the ZERO key. ZERO 3 Subtract the tare. ■ Weighing tare • Place the tare on the weigh platter. The tare weight will be displayed. • Press the TARE key. The displayed value will return to zero, and the NET indicator will light. TARE NET ■ Fixed tare weight Ex. Tare Weight= 0.08 lb. • Enter the tare weight and press the TARE key. 8 ➔ TARE ■ Tare look-up key Ex. Access Tare #1 • Press the tare look-up (preset) key. TARE #1 4 Enter the PLU. ■ PLU number entry Ex. PLU No. = 350 3 5 0 ➔ PLU • Enter the PLU number and press the PLU key. ■ PLU (preset) key Ex. Access PLU10 PLU10 PLU90 • Press the preset key in which the PLU item data is set. Note: Refer to page 22 when using the Save Function. Ex. Access PLU90 LOWER PRESET ➔ PLU10 PLU90 5 Weigh the item. • Place the item on the weigh platter. • The label is automatically printed. • Repeat this step until all the items are weighed. 6 Exit the prepack mode. • Press the PREPACK key. • The AUTO indicator turns off. BC-3000 • User’s Manual • Rev 0 PRE PACK page 21 2.6 Prepack for Fixed-price Sales 1 Check that nothing is on the weigh platter. • Check that the ZERO indicator is lit. • If not, press the ZERO key. ZERO ZERO 2 Enter the prepack mode. PRE PACK • Press the PREPACK key to enter the prepack mode. • The AUTO indicator lights. AUTO 3 Enter the PLU. ■ PLU number entry Ex. PLU No. = 450 4 5 0 ➔ PLU • Enter the PLU number and press the PLU key. ■ PLU (preset) key Ex. Access PLU15 PLU15 PLU95 • Press the preset key in which the PLU item data is set. Note: Refer to page 22 when using the Save Function. Ex. Access PLU95 LOWER PRESET ➔ PLU15 PLU95 4 Print the label. • Enter the number of labels, and press the PRINT key. Note: Press the CLEAR key once to temporarily stop printing. To continue printing, press the PRINT key. To cancel printing, press the CLEAR key again. • If the number of labels is one, simply press the PRINT key. Ex. Three Labels 3 ➔ PRINT Ex. One Label PRINT 5 Exit the prepack mode. • Press the PREPACK key. PRE PACK • The AUTO indicator turns off. page 22 BC-3000 • User’s Manual • Rev 0 2.7 Label Batch Print Used to set the number of fixed-price labels to be printed. 1 Check that nothing is on the weigh platter. • Check that the ZERO indicator is lit. • If not, press the ZERO key. ZERO ZERO 2 Enter the LABEL BATCH PRINT mode. • Press the LABEL BATCH key to enter the label batch print mode. LABEL BATCH 3 Enter the PLU. ■ PLU number entry • Enter the PLU number and press the PLU key. ■ PLU (preset) key Ex. PLU No. = 450 4 5 ➔ 0 PLU Ex. Access PLU15 • Press the preset key in which the PLU item data is set. PLU15 PLU95 Ex. Access PLU95 ➔ LOWER PRESET PLU15 PLU95 4 Enter the desired number of labels. • Enter the number of labels to be issued. (Max. 999) • Press the LABEL BATCH key. Ex. Twenty Labels 2 0 ➔ LABEL BATCH 5 Enter any additional PLUs. • Repeat steps 3 and 4 when labels for other PLUs are needed. A maximum of 20 PLUs can be entered. • Otherwise go to the next step. 6 Print the label. • Press the PRINT key. PRINT Note: Press the CLEAR key once to temporarily stop printing. To continue printing, press the PRINT key. To cancel printing, press the CLEAR key again. BC-3000 • User’s Manual • Rev 0 page 23 2.8 Pack Count Sub-total Used to print the number of labels, total weight and amount which have been issued since the last time the PACK COUNT key was pressed. 1 Enter the PACK COUNT SUB-TOTAL mode. • Press the PACK COUNT key. PACK COUNT Note: Press the CLEAR key to exit the pack count subtotal mode. 2 Print the pack count sub-total. • Press the PRINT key. page 24 PRINT BC-3000 • User’s Manual • Rev 0 2.9 Mark Down Functions The following mark down options are available before the label is printed. (1) Amount discount (2) Percentage discount (3) Special price Only one of these three options can be programmed for use. 2.9.1 Amount Discount 1 Enter the discount amount. ■ Discount amount entry • Enter the amount to be discounted and press the AMOUNT DISCOUNT key. Ex. Discount Amount = $0.50 5 0 ➔ –$ ■ AMOUNT DISCOUNT (preset) key $ –0.50 • Press the PRESET key in which the amount discount data is set. 2.9.2 Percentage Discount 1 Enter the discount percentage. ■ Discount percentage entry • Enter the percentage to be discounted and press the PERCENT DISCOUNT key. Ex. Discount Percentage = 10% 0 1 ➔ –% ■ PERCENT DISCOUNT (preset) key • Press the PRESET key in which the percentage discount data is set. 2.9.3 –10% Special Price 1 Enter the special price. Ex. Special Price = $4.50 4 2 Press the DISCOUNT key. BC-3000 • User’s Manual • Rev 0 5 0 DIS COUNT page 25 2.10 Unit Price Override This feature only functions for the weighed PLUs which are programmed to allow unit price override. When attempting to override a PLU that is set not to allow an override, the error beep will sound. 1 Enter the desired unit price. Note: If the entered unit price is not displayed at this point, the PLU is not programmed to allow price override, and its price cannot be changed. Ex. $3.50 3 5 0 2 Place the item on the scale. 2.11 Voiding the Last Label 1 Press the VOID key immediately after the label is issued. VOID 2.12 Switching from Sale by Weight to Fixed-price Sale 1 Enter the fixed price. Note: Skip this step if the fixed price is the same as the preset unit price. 2 Press the FIXED PRICE key. Ex. Fixed Price = $8.00 8 0 0 FIXED PRICE 2.13 Selecting Lower Preset Data A preset key can have two levels of preset data. Normally the upper preset data is accessed. Follow the steps below to access the lower preset data. 1 Press the LOWER PRESET key. Ex. Access PLU90 LOWER PRESET 2 Press an appropriate preset key. page 26 PLU10 PLU90 BC-3000 • User’s Manual • Rev 0 2.14 Pack Date Override This function is used to temporarily change the current date, allowing labels to be produced ahead of time for prepacking items. 1 Enter the six-digit date (MMDDYY). Ex. November 20, 1996 1 1 2 0 9 6 2 Press the DATE key. DATE 2.15 Save Function The SAVE key is one of the preset function options. When the SAVE indicator is lit, the selected PLU is retained (saved) after a label is issued. 1 Press the PREPACK key to enter the manual mode, if the scale is in auto mode. 2 Select the desired PLU if not already displayed. PRE PACK Select PLU 3 Press the SAVE key. The SAVE indicator lights. SAVE Note: To cancel the save mode, press the SAVE key again. BC-3000 • User’s Manual • Rev 0 page 27 CHAPTER 3 SUBTRACTION Contents 3.1 Subtraction Mode .......................... 24 3.1 Subtraction Mode The subtraction mode is used to correct the running totals. The totals require correction if accurate reports are to be generated. Some examples of when correcting the totals is necessary are listed below. a. product returned by customers b. incorrectly produced labels The totals are subtracted from the running totals by a PLU number. The operator has to enter the product number, the number of items (labels) to be returned, the total weight and total price. The best way to manage returns is to keep all incorrectly produced labels in one place and subtract each label in turn. Note: Confirm that the Operation Key Sheet, and not the Program Key Sheet, is being used for this operation. Step Description 1 • Access the Subtraction mode. Keys and Display 7 0 0 0 ➔ MODE Ex. Password = 7000 • Press the ENTER key. 2 ENTER • Enter the PLU number to be corrected followed by the PLU key. Ex. PLU No. 1 Note: 3 3 ➔ VOID • Enter the WEIGHT of the item (label) to be returned, followed by the VOID key. 5 0 0 ➔ VOID 3 7 5 ➔ VOID • Enter the AMOUNT of the item (label) to be returned, followed by the VOID key. Ex. $3.75 6 PLU • Enter the NUMBER of the item (label) to be returned, followed by the VOID key. Ex. Five (5) Pounds 5 ➔ If the PLU key is pressed again, the entered PLU number will be displayed for one second. Ex. Three (3) Labels 4 1 • Press the PRINT key when not using the operator system, or press the OPERATOR key when using the operator system. Note: If a mistake is made during entry, press the VOID key to display the previous screen with the mistake. Then re-enter the correct data. BC-3000 • User’s Manual • Rev 0 PRINT OR Susan page 29 Step Description 7 • Repeat steps 2 through 6 for any other items Keys and Display (labels) to be returned. When complete proceed to step 8. 8 • Press the MODE key to return to normal operation. page 30 MODE BC-3000 • User’s Manual • Rev 0 CHAPTER 4 TOTAL REPORTS Contents 4.1 Total Reports .................................... 28 4.2 Total Mode ...................................... 28 4.3 Daily Total Report ............................ 29 4.4 Monthly Total Report ...................... 31 4.5 Hourly Total Report ......................... 33 4.6 Operator Total Report .................... 34 4.7 Total Clear ....................................... 35 4.1 Total Reports The BC-3000 has the ability to print a large number of reports for the number of labels printed. This information can be broken down into various categories including daily and monthly reports. Note: Confirm that the Program Key Sheet, and not the Operation Key Sheet, is being used for these operations. 4.2 Total Mode TOTAL MODE TOTAL REPORT DAILY TOTAL TOTAL CLEAR page 32 DAILY CLEAR MONTHLY TOTAL MONTHLY CLEAR HOURLY TOTAL MONTHLY SALES TOTAL DAILY SALES TOTAL ALL CLEAR OPERATOR TOTAL MONTHLY ITEM DAILY ITEM MONTHLY DEPT. DAILY DEPT. MONTHLY GROUP DAILY GROUP MONTHLY DSN. TOTAL DAILY DSN. TOTAL MONTHLY PROFIT TOTAL DAILY PROFIT TOTAL MONTHLY DEPT. TOTAL DAILY DEPT. TOTAL MONTHLY GROUP TOTAL DAILY GROUP TOTAL BC-3000 • User’s Manual • Rev 0 4.3 Daily Total Report The Daily Total Report can be considered as the accumulated total for one day. The only difference between this set of total and the monthly total is the level at which the reports are cleared. 4.3.1 Daily Report Categories Daily Sales Total Report The Daily Sales Total Report is the accumulated totals for all items printed since the last time the report was cleared. Daily Item Report The Daily Item Report is a list of all PLUs that have had labels printed since the last time the Daily Sales Total was cleared. Daily Dept. Report The Daily Dept. Report is a list of all departments that have had labels printed since the last time the Daily Sales Total was cleared. Daily Group Report The Daily Group Report is a list of all groups that have had labels printed since the last time the Daily Sales Total was cleared. Daily Designated PLU Total Report The Daily Designated PLU Total Report allows the sales for a specified PLU to be printed. To specify a PLU enter the numeric value (1 ~ 999999) followed by the ENTER key. If the PLU number is correct press the PRINT key. Daily Profit Report The Daily Profit Report produces a printout indicating how much profit has been made from selling items. For this report, the cost of each PLU must be programmed in the BC-3000. Otherwise the percentage report will not be correct. Daily Department Total Report The Daily Department Total Report groups the PLUs together by the department number programmed for the items. The report lists each department in numeric order. Note: The report will only print if department numbers are programmed in the PLUs. Daily Group Total Report The Daily Group Total Report groups the PLUs together by the Group number programmed for the items. The report lists each group in numeric order. Note: The report will only print if group numbers are programmed in the PLUs. BC-3000 • User’s Manual • Rev 0 page 33 4.3.2 Operation Procedure Step Description 1 • Access the Total mode. Keys and Display 8 0 0 0 ➔ MODE Ex. Password = 8000 3 4 • Press number “2” followed by the ENTER key to access the Total Report menu. • Press the ENTER key to access the Report Category. ➔ ENTER ENTER ➝ • Press the UP or DOWN key to select the desired Report Category. F02-01-01 = Daily Sales Total F02-01-03 = Daily Item F02-01-04 = Daily Dept. F02-01-05 = Daily Group F02-01-06 = Daily Designated PLU Total F02-01-07 = Daily Profit Total F02-01-08 = Daily Department Total F02-01-09 = Daily Group Total 5 2 OR ➝ 2 Select Report Category • Press the PRINT key. PRINT 6 • Repeat steps 4 and 5 for any other reports. 7 • Press the END key to return to the main menu. 8 • Press the MODE key to return to normal operation. END MODE Note: Particular reports can be obtained by using the following speed keys. page 34 GRAND TOTAL GRAND TOTAL Used to immediately print the Daily Department Total while in the Total mode. PRICE OVRDE PRICE OVERRIDE Used to immediately print all items with changed unit prices while in the Total mode. BC-3000 • User’s Manual • Rev 0 4.4 Monthly Total Report The Monthly Total Report can be considered as the accumulated total for one month. The only difference between this set of total and the daily total is the level at which the reports are cleared. 4.4.1 Monthly Report Categories Monthly Sales Total Report Monthly Sales Total Report is the accumulated totals for all items printed since the last time the report was cleared. Monthly Item Report The Monthly Item Report is a list of all PLUs that have had labels printed since the last time the Monthly Sales Total was cleared. Monthly Dept. Report The Monthly Dept. Report is a list of all departments that have had labels printed since the last time the Monthly Sales Total was cleared. Monthly Group Report The Monthly Group Report is a list of all groups that have had labels printed since the last time the Monthly Sales Total was cleared. Monthly Designated PLU Total Report The Monthly Designated PLU Total Report allows the sales for a specified PLU to be printed. To specify a PLU enter the numeric value (1 ~ 999999) followed by the ENTER key. If the PLU number is correct press the PRINT key. Monthly Profit Report The Monthly Profit Report produces a printout indicating how much profit has been made from selling items. For this report, the cost of each PLU must be programmed in the BC-3000. Otherwise the percentage report will not be correct. Monthly Department Total Report The Monthly Department Total Report groups the PLUs together by the department number programmed to the items. The report lists each department in numeric order. Note: The report will only print if department numbers are programmed in the PLUs. Monthly Group Total Report The Monthly Group Total Report groups the PLUs together by the Group number programmed for the items. The report lists each group in numeric order. Note: The report will only print if group numbers are programmed in the PLUs. BC-3000 • User’s Manual • Rev 0 page 35 4.4.2 Operation Procedure Step Description 1 • Access the Total mode. Keys and Display 8 0 0 0 ➔ MODE • Press number “2” followed by the ENTER key to access the Total Report menu. 2 ➔ ENTER 3 • Press the UP or DOWN key to select the Monthly Total Report. ➝ OR ➝ Ex. Password = 8000 4 • Press the ENTER key to access the Report Category. 5 • Press the UP or DOWN key to select the desired Report Category. 6 • Press the PRINT key. 7 • Repeat steps 5 and 6 for any other reports. 8 • Press the END key to return to the main menu. ➝ F02-03-01 = Monthly Sales Total F02-03-03 = Monthly Item F02-03-04 = Monthly Dept. F02-03-05 = Monthly Group F02-03-06 = Monthly Designated PLU Total F02-03-07 = Monthly Profit Total F02-03-08 = Monthly Department Total F02-03-09 = Monthly Group Total ENTER OR ➝ 2 Select Report Category PRINT END 9 • Press the MODE key to return to normal operation. page 36 MODE BC-3000 • User’s Manual • Rev 0 4.5 Hourly Total Report The Hourly Total Report allows the manager to obtain a report that shows sales by the hour. This report can be used to assist with scheduling of employees to meet the busy periods. The following steps indicate how to obtain the Hourly Total Report. Step Description 1 • Access the Total mode. Keys and Display 8 0 0 0 ➔ MODE • Press number “2” followed by the ENTER key to access the Total Report menu. 2 ➔ ENTER 3 • Press the UP or DOWN key to select the Hourly Total report. ➝ OR ➝ Ex. Password = 8000 4 • Press the ENTER key to enter the print mode. 2 5 • Press the PRINT key to list the transactions by hour. 6 • Press the END key to return to the main menu. 7 • Press the MODE key to return to normal operation. BC-3000 • User’s Manual • Rev 0 ENTER PRINT END MODE page 37 4.6 Operator Total Report The Operator Total Report only functions when the BC-3000 is programmed to use the operator system. Transactions are listed with the information of operator numbers and names. Step Description • Access the Total mode. 1 Keys and Display 8 0 0 0 ➔ MODE 2 • Press number “2” followed by the ENTER key to access the Total Report menu. 2 ➔ ENTER 3 • Press the UP or DOWN key to select the Operator Total reports. ➝ OR ➝ Ex. Password = 8000 4 • Press the ENTER key to enter the print mode. 5 • Press the PRINT key to list the transactions by hour. 6 • Press the END key to return to the main menu. 7 • Press the MODE key to return to normal operation. page 38 ENTER PRINT END MODE BC-3000 • User’s Manual • Rev 0 4.7 Total Clear After printing the necessary reports, all of the accumulated totals have to be cleared so that the accumulation can begin from zero again. Step Description 1 • Access the Total mode. Keys and Display 8 0 0 0 ➔ MODE Ex. Password = 8000 3 ➔ • Press the UP or DOWN key to select the Total Report to be cleared. OR F03-01 = Daily Total Report F03-03 = Monthly Total Report F03-05 = All Total Reports ENTER ➝ 3 • Press number “3” followed by the ENTER key to access the Total Clear mode. ➝ 2 Select Report Note: When clearing one of the above Reports, the Hourly and Operator Total Reports will also be cleared. 4 • Press the ZERO key twice to clear the totals. 5 • Press the END key to return to the main menu. 6 • Press the MODE key to return to normal operation. BC-3000 • User’s Manual • Rev 0 ZERO ➔ ZERO END MODE page 39 CHAPTER 5 PROGRAMMING Contents 5.1 Programming PLUs .......................... 38 5.2 Deleting PLUs ................................... 43 5.3 Programming Message Files .......... 44 5.4 Deleting Message Files ................... 45 5.5 Programming Date and Time ....... 46 5.6 Programming Store Names and Addresses ........................................ 47 5.7 Deleting Store Names and Addresses ........................................ 48 5.8 Programming Preset Keys .............. 49 5.9 Deleting All Preset Keys .................. 50 5.10 Printing PLU/Message Information ...................................... 51 5.11 Programming Department Codes and Names ......................... 53 5.12 Deleting Department Codes and Names .............................................. 52 5.13 Programming Group Codes and Names .............................................. 55 5.14 Deleting Group Codes and Names .............................................. 56 5.15 Programming Operator Codes and Names...................................... 57 5.16 Deleting Operator Codes and Names .............................................. 58 5.17 Programming Nutrition Files ........... 59 5.18 Changing Unit Price/Fixed Price ... 65 5.1 Programming PLUs This section explains how to program a product (PLU) in the BC-3000. Some steps listed below may not be available. At the time of installation the BC-3000 may be configured to bypass unused steps. Note: Confirm that the Program Key Sheet, and not the Operation Key Sheet, is being used for this operation. Step Description 1 • Access the Programming mode. Keys and Display 9 0 0 ➔ 0 MODE Ex. Password = 9000 Note: To exit the Programming mode, press the MODE key again. 2 • Enter “1” followed by the ENTER key, or press the EDIT PLU key to select the PLU Programming mode. 3 • Enter the PLU number (Max. 6 digits) to be created or edited followed by the PLU key. ➔ 1 1 2 3 4 EDIT PLU OR ENTER 5 6 ➔ PLU Ex. PLU No. = 123456 4 • To edit or create the PLU name at this point, press the EDIT key. 5 • Enter the desired PLU name using the keyboard. EDIT PLU Name (See Chapter 6) Note: For text editing, refer to Chapter 6. ENTER • After entering the text, press the ENTER key. 6 • Press the ENTER key. ENTER Note: If confirmation of the entered PLU number and name is necessary, press the PRINT key. 7 • Select the product type, then press the ENTER key. 0 ➔ ENTER 0 = Weighed item 1 = Fixed-price item Ex. Weighed Item ENTER 9 • Press the ENTER key. BC-3000 • User’s Manual • Rev 0 page 41 Step Description 8 • Select the type of markdown by using the Keys and Display RIGHT and LEFT keys. • When other than “0” is selected, enter the respective price, amount or percentage, followed by the ENTER key. ➝ OR ➝ 0 = No markdown 1 = Special selling price 2 = Amount discount from total price 3 = Percentage discount from total price 4 = Special unit price 0 ➔ ENTER ➔ ENTER ➔ ENTER 5 0 Ex. Special Price = $5.00 • Press the ENTER key. 9 ENTER • Enter the unit price followed by the ENTER key. Ex. Unit Price = $1.00 1 0 • Press the ENTER key. 10 ENTER • Enter the fixed price followed by the ENTER key. Ex. Fixed Price = $8.00 0 8 • Press the ENTER key. 11 0 ENTER • Enter the fixed weight followed by the ENTER key. Ex. Fixed Weight = 3 oz. 3 • Press the ENTER key. 12 0 ➔ ENTER ENTER • Enter the registered code followed by the ENTER key. Ex. Registered Code = 2 2 ➔ ENTER • Press the ENTER key. ENTER Note: If this programming step is not necessary, proceed to the next step. page 42 BC-3000 • User’s Manual • Rev 0 Step 13 Description Keys and Display • Enter the pack quantity followed by the ENTER key. ➔ 5 Ex. Pack Quantity = 5 • Press the ENTER key. 14 ENTER • Enter the cost price followed by the ENTER key. Ex. Cost Price = $1.00 1 0 ENTER ENTER • Enter the tare weight followed by the ENTER key. Ex. Tare Weight = 0.50 lb. 0 5 • Press the ENTER key. 16 ➔ 0 • Press the ENTER key. 15 ENTER ➔ ENTER ENTER • Select the desired date format. 0 = Machine default 1 = No dates 2 = Pack date only 3 = Expiration date only 4 = Both dates 4 ➔ ENTER Ex. Both Dates ENTER • Press the ENTER key. 17 • Enter the shelf life (number of days) followed by the ENTER key. Ex. Shelf Life (number of days) = 5 5 • Press the ENTER key. 18 ➔ ENTER ENTER • Enter sales by date (max. 3 digits). Ex. To be sold within the next 5 days. 5 ➔ ENTER • Press the ENTER key. Note: If this programming step is not necessary proceed to the next step. BC-3000 • User’s Manual • Rev 0 ENTER page 43 Step Description • Enter the department code (used for tracking 19 Keys and Display totals) followed by the ENTER key. 3 Ex. Department Code = 3 • Press the ENTER key. 20 • Enter the group code (used for tracking totals) followed by the ENTER key. ➔ 5 • Press the ENTER key. ENTER ENTER • Enter the item code followed by the ENTER key. Ex. Item Code = 101011 1 0 0 1 • Press the ENTER key. 22 ENTER ENTER Ex. Group Code = 5 21 ➔ 1 1 ➔ ENTER ENTER • Select an optional POP message number followed by the ENTER key. Note: POP Message (1 ~ 6) Safe Handling Message (99) 1 ➔ ENTER Ex. POP Message No. 1 • Press the ENTER key. 23 ENTER • Select the optional extra message number (1 ~ 99) followed by the ENTER key. Ex. Extra Message No. = 2 2 • Press the ENTER key. 24 ➔ ENTER ENTER • Select the barcode type followed by the ENTER key. 0 = Machine default 1 = UPC 13 2 = UPC 8 3 = 10 DIGIT 13 4 = 5 DIGIT 8 1 ➔ ENTER Ex. UPC 13 • Press the ENTER key. page 44 ENTER BC-3000 • User’s Manual • Rev 0 Step Description • Enter the barcode prefix (if different from the 25 Keys and Display machine default) followed by the ENTER key. Ex. Barcode Prefix = 49 4 9 • Press the ENTER key. 26 ➔ ENTER ENTER • Enter the UPC or 10 digit barcode number followed by the ENTER key. 10 Digit Barcode Number • Press the ENTER key. 27 ➔ ENTER ENTER • Select whether or not the product is to allow price changes. 0 = Machine default 1 = Prohibit 2 = Allow 2 ➔ ENTER Ex. Price Change Allowed • Press the ENTER key. 28 ENTER • Select whether a tare weight is required or not. Then press the ENTER key. 0 = Machine default 1 = No 2 = Yes (Forced tare) 0 ➔ ENTER Ex. Machine Default • Press the ENTER key. ENTER 29 • Repeat steps 3 through 28 for any other PLU programming. 30 • When all desired PLUs have been programmed, press the END key. END • Press the MODE key to return to the normal mode. MODE 31 BC-3000 • User’s Manual • Rev 0 page 45 5.2 Deleting PLUs The following procedure is used to delete products (PLUs) from memory. Step Description • Access the Programming mode. 1 Keys and Display 9 0 0 0 ➔ MODE Ex. Password = 9000 Note: To exit the Programming mode, press the MODE key again. 2 3 • Enter “1” followed by the ENTER key, or press the EDIT PLU key to select the PLU Programming mode. • Enter the PLU number to be deleted followed by the PLU key. ➔ 1 1 2 3 4 EDIT PLU OR ENTER 5 6 ➔ PLU Ex. PLU No. = 123456 4 • To delete the complete PLU record, press the CHAR DELETE key. CHAR DELETE 5 • Press the CHAR DELETE key again to confirm the deletion. CHAR DELETE Note: Press the CLEAR key to cancel the deletion. 6 • Repeat steps 3 through 5 for all PLUs to be deleted. 7 • When all desired PLUs have been deleted, press the END key. 8 • Press the MODE key to return to the normal mode. page 46 END MODE BC-3000 • User’s Manual • Rev 0 5.3 Programming Message Files The following procedure is used to program a message file, that is used as an ingredient file linked to PLUs. Step Description • Access the Programming mode. 1 Keys and Display 9 0 0 0 ➔ MODE Ex. Password = 9000 Note: To exit the Programming mode, press the MODE key again. 2 3 • Enter “4” followed by the ENTER key, or press the EXTRA TEXT key to select the Message Programming mode. • Enter the message number (1 ~ 99) followed by the PLU key. 4 ➔ 5 ENTER ➔ OR EXTRA TEXT PLU Ex. Message No. = 5 4 • Press the ENTER key to select the Edit mode. 5 • Enter the required message using the keyboard. Note: For text editing refer to Chapter 6. ENTER Text Editing (See Chapter 6) ENTER • When complete, press the ENTER key. 6 • Repeat steps 3 through 5 for any other messages to be created/edited. 7 • When all desired messages have been programmed, press the END key. END 8 • Press the MODE key to return to the normal mode. MODE BC-3000 • User’s Manual • Rev 0 page 47 5.4 Deleting Message Files The following steps show how to delete messages. Step Description 1 • Access the Programming mode. Keys and Display 9 0 0 ➔ 0 MODE Ex. Password = 9000 Note: To exit the Programming mode, press the MODE key again. 2 3 • Enter “4” followed by the ENTER key, or press the EXTRA TEXT key to select the Message Programming mode. • Enter the message number (1 ~ 99) to be deleted followed by the PLU key. 4 ➔ 6 ENTER ➔ OR EXTRA TEXT PLU Ex. Message No. = 6 4 • Press the CHAR DELETE key to delete the message. CHAR DELETE 5 • Press the CHAR DELETE key again to confirm the deletion. CHAR DELETE Note: Press the CLEAR key to cancel the deletion. 6 • Repeat steps 3 through 5 for any other messages to be deleted. 7 • When all desired messages have been deleted, press the END key. 8 page 48 • Press the MODE key to return to the normal mode. END MODE BC-3000 • User’s Manual • Rev 0 5.5 Programming Date and Time Step Description 1 • Access the Programming mode. Keys and Display 9 0 0 0 ➔ MODE Ex. Password = 9000 Note: To exit the Programming mode, press the MODE key again. 2 • Enter “6” followed by the ENTER key, or press the DATE TIME key to select the Date/Time Programming mode. 6 ➔ ENTER DATE TIME OR Ex. Current Date = November 25, 1996 3 • Enter new date (MMDDYYYY) followed by the ENTER key. 1 1 2 6 1 9 9 6 0 0 ➔ ➔ ENTER Ex. New Date = November 26, 1996 • Press the ENTER key. 4 ENTER • Enter the time (hhmmss) followed by the ENTER key (24-hour clock). Ex. Current Time = 16:30:32 New Time = 17:31:00 5 • After the new date and time have been entered, press the END key. 6 • Press the MODE key to return to the normal mode. BC-3000 • User’s Manual • Rev 0 1 7 3 1 ENTER END MODE page 49 5.6 Programming Store Names and Addresses The BC-3000 can be programmed with store names and addresses, which allow the operator to select which store information is to be printed on labels. The following procedure shows how to program store name and address information. Step Description 1 • Access the Programming mode. Keys and Display 0 9 0 0 ➔ MODE Ex. Password = 9000 Note: To exit the Programming mode, press the MODE key again. 2 • Enter “7” followed by the ENTER key, or press the STORE NAME key to select the Store Programming mode. 3 • Enter the store reference number (1 ~ 9) followed by the PLU key. 7 ➔ ENTER OR 1 ➔ PLU STORE NAME Ex. Store Reference Number = 1 4 5 • Press the ENTER key to program the store name. • Enter the required store name using the keyboard. ENTER Store Name (See Chapter 6) Note: For text editing, refer to Chapter 6. • When text editing is complete, press the DOWN key. ➝ 5 • Press the ENTER key to program the store address. • Enter the required store address using the keyboard (max. 47 characters). Note: For text editing, refer to Chapter 6. 6 • Repeat steps 3 through 5 for any other store information to be programmed. 7 • When all desired store names and addresses have been entered, press the END key. 8 • Press the MODE key to return to the normal mode. page 50 ENTER Store Address (See Chapter 6) END MODE BC-3000 • User’s Manual • Rev 0 5.7 Deleting Store Names and Addresses The following steps show how to delete store names and addresses. Step Description 1 • Access the Programming mode. Keys and Display 0 9 0 0 ➔ MODE Ex. Password = 9000 Note: To exit the Programming mode, press the MODE key again. 3 • Enter “7” followed by the ENTER key, or press the STORE NAME key to select the Store Programming mode. • Enter the store reference number (1 ~ 9) followed by the PLU key. 7 ➔ ENTER 1 ➔ PLU 3 ➔ ➝ 2 OR STORE NAME Ex. Store Reference Number = 1 4 5 • Enter “3” followed by the DOWN key to select the Delete mode. • Press the ENTER key. ENTER • Press the CHAR DELETE key to delete the store information. CHAR DELETE Note: Press the CLEAR key to cancel the deletion. 6 • Repeat steps 3 through 5 for any other store information to be deleted. 7 • When all desired store information has been deleted, press the END key. END 8 • Press the MODE key to return to the normal mode. MODE BC-3000 • User’s Manual • Rev 0 page 51 5.8 Programming Preset Keys The BC-3000 has 88 keys which can be programmed as preset keys. Each preset key has two levels of preset records (upper case and lower case). The following steps indicate how to program preset keys. Step Description 1 • Access the Programming mode. Ex. Password = 9000 Keys and Display 9 0 0 0 ➔ MODE Note: To exit the Programming mode, press the MODE key again. 2 • Enter “8” followed by the ENTER key, or press the SPEED keys to select the Preset Key Programming mode. 3 • Press the ENTER key to program preset keys. 4 • Select the type of preset key by pressing the RIGHT key. 0 = No key function 1 = PLU 3 = Amount discount from total price 4 = Percentage discount from total price 5 = Message text 8 = Operator (Optional) Ex. PLU 5 • Enter the numeric value to be programmed, then press the desired key location. 8 ➔ ENTER OR SPEED KEYS ENTER ➝ 1 Upper Case ➔ PLU1 (Any preset key) Ex. PLU No. = 1 OR 6 • Repeat step 5 only for the same type of preset key. • Repeat steps 4 through 5 for any other preset keys to be programmed. 7 • When all preset keys have been programmed, press the END key. 8 • Press the END key again. 9 • Press the MODE key to return to the normal mode. page 52 Lower Case ➝ Note: To confirm the value programmed in the preset key, press the PRESET key and the value will be displayed on the screen. 1 ➔ PLU1 (Any preset key) END END MODE BC-3000 • User’s Manual • Rev 0 5.9 Deleting All Preset Keys All preset keys can be deleted by the following procedure. Step Description 1 • Access the Programming mode. Keys and Display 9 0 0 0 ➔ MODE Ex. Password = 9000 Note: To exit the Programming mode, press the MODE key again. 2 3 4 • Enter “8” followed by the ENTER key, or press the SPEED keys to select the Preset Key Programming mode. • Enter “2” followed by the ENTER key to select the Preset Key Delete mode. • Press the CHAR DELETE key to delete all preset keys. 8 ➔ 2 ENTER ➔ OR SPEED KEYS ENTER CHAR DELETE Note: Press the CLEAR key to cancel the deletion. 5 • When complete, press the END key. END 6 • Press the MODE key to return to the normal mode. BC-3000 • User’s Manual • Rev 0 MODE page 53 5.10 Printing PLU/Message Information Stored information can be printed on labels or receipt paper. The following steps indicate how this is done. Step Description 1 • Access the Programming mode. Keys and Display 9 0 0 0 ➔ MODE Ex. Password = 9000 Note: To exit the Programming mode, press the MODE key again. 2 3 • Enter “9” followed by the ENTER key, or press the PLU LIST key to select the Printing mode. 9 ➔ • To print all of the stored information, press the PRINT key. Otherwise skip this step. •• labels for checking PLU barcodes will be issued when the label is set, or •• programmed PLU information and extra messages will be printed when the receipt paper is set. ENTER OR PLU LIST PRINT Note: To stop printing, press the PRINT key. To continue printing, press the PRINT key again. • Proceed to step 9. 4 • Press the ENTER key, and select the type of list using the RIGHT or LEFT key. ENTER 0 = PLUs 1 = Messages (when receipt paper is set) OR ➝ ➝ Ex. Messages 4 • Press the ENTER key. ENTER 5 • Enter the star t number of the range to be listed followed by the ENTER key. 4 6 ➔ 5 Ex. Start No. = 5 • Press the ENTER key. ENTER ENTER • Enter the end number of the range to be listed followed by the ENTER key. Ex. End No. = 10 • Press the ENTER key. page 54 1 0 ➔ ENTER ENTER BC-3000 • User’s Manual • Rev 0 Step 7 Description • Press the PRINT key to bring the paper or label print out. Note: To stop printing, press the PRINT key. To continue printing, press the PRINT key again. 8 • After printing, press the PRINT key to return to the previous mode. 9 • When all desired PLU/Message information has been printed, press the END key. 10 Keys and Display • Press the MODE key to return to the normal mode. BC-3000 • User’s Manual • Rev 0 PRINT PRINT END MODE page 55 5.11 Programming Department Codes and Names Departments are used to link similar products together into a category for report purposes. The following steps show how to program a name for the reference code entered when PLUs are programmed. Step Description 1 • Access the Programming mode. Keys and Display 9 0 0 1 0 ➔ 5 ➔ MODE ENTER OR DEPT. ➔ PLU 0 Ex. Password = 9000 Note: To exit the Programming mode, press the MODE key again. 2 3 • Enter “10” followed by the ENTER key, or press the DEPT. key to select the Department Programming mode. • Enter the department code followed by the PLU key. 1 Ex. Department Code = 15 4 5 • Press the ENTER key to create/edit the department name. • Enter the required department name using the keyboard (max. 12 characters). • When complete press the ENTER key. ENTER Dept. Name (See Chapter 6) ENTER 6 • Repeat steps 3 through 5 for any other departments to be programmed. 7 • When all desired departments have been programmed, press the END key. END • Press the MODE key to return to the normal mode. MODE 8 page 56 BC-3000 • User’s Manual • Rev 0 5.12 Deleting Department Codes and Names The following steps show how to delete department codes and names. Step Description 1 • Access the Programming mode. Keys and Display 9 0 0 1 0 ➔ 6 ➔ MODE ENTER OR DEPT. ➔ PLU 0 Ex. Password = 9000 Note: To exit the Programming mode, press the MODE key again. 2 3 • Enter “10” followed by the ENTER key, or press the DEPT. key to select the Department Programming mode. • Enter the department code to be deleted followed by the PLU key. 1 Ex. Department Code = 16 4 • Press the CHAR DELETE key to delete the department. 5 • Press the CHAR DELETE key again to confirm the deletion. CHAR DELETE CHAR DELETE Note: Press the CLEAR key to cancel the deletion. 6 • Repeat steps 3 through 5 for any other departments to be deleted. 7 • When all desired departments have been deleted, press the END key. 8 • Press the MODE key to return to the normal mode. BC-3000 • User’s Manual • Rev 0 END MODE page 57 5.13 Programming Group Codes and Names Groups are used to link similar products together into a category for report purposes. The following steps show how to program a name for the reference number entered when PLUs are programmed. Step Description 1 • Access the programming mode. Keys and Display 9 0 0 0 ➔ MODE Ex. Password = 9000 Note: To exit the Programming mode, press the MODE key again. 2 3 • Enter “11” followed by the ENTER key, or press the GROUP key to select the Group Programming mode. • Enter the group code followed by the PLU key. 1 1 1 1 ➔ ENTER OR GROUP 1 ➔ PLU 1 Ex. Group Code = 1111 4 • Press the ENTER key to create/edit the group name. ENTER 5 • Enter the required group name as required using the keyboard (max. 12 characters). Group Name (See Chapter 6) • When complete press the ENTER key. ENTER 6 • Repeat steps 3 through 5 for any other group to be programmed. 7 • When all desired groups have been programmed, press the END key. END • Press the MODE key to return to the normal mode. MODE 8 page 58 BC-3000 • User’s Manual • Rev 0 5.14 Deleting Group Codes and Names The following steps show how to delete group codes and names. Step Description 1 • Access the Programming mode. Keys and Display 9 0 0 1 1 ➔ 0 ➔ MODE Ex. Password = 9000 Note: To exit the Programming mode, press the MODE key again. 2 • Enter “11” followed by the ENTER key, or press the GROUP key to select the Group Programming mode. 3 • Enter the group code to be deleted followed by the PLU key. 1 1 ENTER 1 2 OR ➔ GROUP PLU Ex. Group Code = 1112 4 • Press the CHAR DELETE key to delete the group. CHAR DELETE 5 • Press the CHAR DELETE key again to confirm the deletion. CHAR DELETE Note: Press the CLEAR key to cancel the deletion. 6 • Repeat steps 3 through 5 for any other groups to be deleted. 7 • When all desired groups have been deleted, press the END key. 8 • Press the MODE key to return to the normal mode. BC-3000 • User’s Manual • Rev 0 END MODE page 59 5.15 Programming Operator Codes and Names The following steps show how to program operator codes and names used in the operator system. Step Description 1 • Access the Programming mode. Keys and Display 9 0 ➔ MODE ENTER OR OPERATOR 0 0 Ex. Password = 9000 Note: To exit the Programming mode, press the MODE key again. 2 • Enter “12” followed by the ENTER key, or press the OPERATOR key to select the Operator Programming mode. 3 • Enter the operator code followed by the PLU key. 1 2 1 ➔ 1 ➔ PLU Ex. Operator Code = 11 4 • Press the ENTER key to create/edit the operator name. 5 • Enter the required operator name using the keyboard (max. 12 characters). • When complete press the ENTER key. ENTER Operator Name (See Chapter 6) ENTER 6 • Repeat steps 3 through 5 for any other operators to be programmed. 7 • When all desired operator information has been programmed, press the END key. END • Press the MODE key to return to the normal mode. MODE 8 page 60 BC-3000 • User’s Manual • Rev 0 5.16 Deleting Operator Codes and Names The following steps show how to delete operator codes and names. Step Description 1 • Access the programming mode. Keys and Display 9 0 0 0 ➔ MODE ➔ ENTER OR OPERATOR Ex. Password = 9000 Note: To exit the Programming mode, press the MODE key again. 2 • Enter “12” followed by the ENTER key, or press the OPERATOR key to select the Operator Programming mode. 3 • Enter the operator code to be deleted followed by the PLU key. 1 2 1 2 ➔ PLU Ex. Operator Code = 12 4 • Press the CHAR DELETE key to delete the operator. CHAR DELETE 5 • Press the CHAR DELETE key again to confirm the deletion. CHAR DELETE Note: To cancel the deletion, press the CLEAR key. 6 • Repeat steps 3 through 5 for any other operators to be deleted. 7 • When all desired operator information has been deleted, press the END key. END 8 • Press the MODE key to return to the normal mode. MODE BC-3000 • User’s Manual • Rev 0 page 61 5.17 Programming Nutrition Files Nutrition Files can be included with each PLU. The following steps show how to program Nutrition Files. Step Description 1 • Enter the Programming mode. Keys and Display 9 0 0 ➔ 0 MODE Ex. Password = 9000 Note: To exit the Programming mode, press the MODE key again. 2 3 • Enter “21” followed by the ENTER key to select the Nutrition File Programming mode. • Enter the PLU number followed by the PLU key. 1 2 1 ➔ ➔ ENTER PLU Ex. PLU No.1 4 5 • To confirm the entered PLU number on the display, press the PLU key. The entered PLU number will appear on the display for one second. • Enter “Serving Size” followed by the ENTER key. PLU Serving Size (Max. 10 characters) ENTER 6 • Press the ENTER key. ENTER 7 • Enter “Serving per Container” followed by the ENTER key. Serving per Container (Max. 4 characters) ENTER Note: The entered data will be printed when issuing nutrition label for fixed price items. For the weighed items, “varies” will always be printed. 7 • Press the ENTER key. • Enter “Total Calories” followed by the ENTER key. page 62 ENTER Total Calories (Max. 4 digits) ENTER BC-3000 • User’s Manual • Rev 0 Step Description 8 • Press the ENTER key. Keys and Display ENTER 3 • Enter “Calories from Fat” followed by the ENTER key. Calories from Fat (Max. 4 digits) ENTER • Press the ENTER key. ENTER ➝ 9 5 “mg” or “g” ➝ • Select the unit of weight (“mg” or “g”) by using the RIGHT or LEFT key. OR ➝ Select “mg” or “g” 0: mg 1: g Total Fat (Max. 3 digits) • Enter “Total Fat” followed by the ENTER key. 7 10 ENTER • Press the ENTER key. • Enter “Total Fat Percentage” followed by the ENTER key. ENTER Total Fat % (Max. 3 digits) ENTER • Press the ENTER key. ENTER ➝ 11 0: mg 1: g • Enter “Saturated Fat” followed by the ENTER key. 12 • Press the ENTER key. • Enter “Saturated Fat Percentage” followed by the ENTER key. “mg” or “g” ➝ • Select the unit of weight (“mg” or “g”) by using the RIGHT or LEFT key. OR ➝ Select “mg” or “g” Saturated Fat (Max. 3 digits) ENTER ENTER Saturated Fat % (Max. 3 digits) ENTER BC-3000 • User’s Manual • Rev 0 page 63 Step Description 13 • Press the ENTER key. Keys and Display ENTER ➝ • Select the unit of weight (“mg” or “g”) by using the RIGHT or LEFT key. • Enter “Cholesterol” Fat followed by the ENTER key. “mg” or “g” ➝ 0: mg 1: g OR ➝ Select “mg” or “g” Cholesterol (Max. 3 digits) ENTER 14 • Press the ENTER key. ENTER • Enter “Cholesterol Percentage” followed by the ENTER key. Cholesterol % (Max. 3 digits) ENTER • Press the ENTER key. 0: mg 1: g • Enter “Sodium” followed by the ENTER key. ➝ • Select the unit of weight (“mg” or “g”) by using the RIGHT or LEFT key. ENTER “mg” or “g” ➝ 15 OR ➝ Select “mg” or “g” Sodium (Max. 4 digits) ENTER 16 • Press the ENTER key. • Enter “Sodium Percentage” followed by the ENTER key. page 64 ENTER Sodium % (Max. 3 digits) ENTER BC-3000 • User’s Manual • Rev 0 Step Description 17 • Press the ENTER key. Keys and Display ➝ ENTER • Select the unit of weight (“mg” or “g”) by using the RIGHT or LEFT key. “mg” or “g” ➝ 0: mg 1: g • Enter “Total Carbohydrate” followed by the ENTER key. OR ➝ Select “mg” or “g” Total Carbohydrate (Max. 4 digits) ENTER 18 • Press the ENTER key. ENTER • Enter “Total Carbohydrate Percentage” followed by the ENTER key. Total Carbohydrate % (Max. 3 digits) ENTER 19 • Press the ENTER key. ENTER • Enter “Dietary Fiber” followed by the ENTER key. “mg” or “g” ➝ 0: mg 1: g ➝ • Select the unit of weight (“mg” or “g”) by using the RIGHT or LEFT key. OR ➝ Select “mg” or “g” Dietary Fiber (Max. 3 digits) ENTER 20 • Press the ENTER key. ENTER • Enter “Dietary Fiber Percentage” followed by the ENTER key. BC-3000 • User’s Manual • Rev 0 Dietary Fiber % (Max. 3 digits) ENTER page 65 Step Description 21 • Press the ENTER key. Keys and Display • Select the unit of weight (“mg” or “g”) by using the RIGHT or LEFT key. 0: mg 1: g ➝ ENTER “mg” or “g” Protein (Max. 3 digits) ENTER • Enter “Protein” followed by the ENTER key. 22 • Press the ENTER key. • Enter “Protein Percentage” followed by the ENTER key. ENTER Protein % (Max. 3 digits) ENTER • Press the ENTER key. 0: mg 1: g • Enter “Sugar” followed by the ENTER key. ➝ • Select the unit of weight (“mg” or “g”) by using the RIGHT or LEFT key. ENTER “mg” or “g” ➝ 23 OR ➝ Select “mg” or “g” Sugar (Max. 3 digits) ENTER 24 • Press the ENTER key. ENTER • Enter “Sugar Percentage” followed by the ENTER key. Sugar % (Max. 3 digits) ENTER 25 • Press the ENTER key. ENTER • Enter “Vitamin A Percentage” followed by the ENTER key. Vitamin A % (Max. 3 digits) ENTER page 66 BC-3000 • User’s Manual • Rev 0 Step Description 26 • Press the ENTER key. Keys and Display ENTER • Enter “Vitamin C Percentage” followed by the ENTER key. Vitamin C % (Max. 3 digits) ENTER 27 • Press the ENTER key. • Enter “Calcium Percentage” followed by the ENTER key. Calcium % (Max. 3 digits) ENTER 2 28 ENTER • Press the ENTER key. ENTER • Enter “Iron Percentage” followed by the ENTER key. Iron % (Max. 3 digits) ENTER 29 • Repeat steps 3 through 28 for any other Nutrition Files to be programmed. 30 • When all desired Nutrition Files have been programmed, press the END key. 31 • Press the MODE key to return to the normal mode. BC-3000 • User’s Manual • Rev 0 END MODE page 67 5.18 Changing Unit Price/Fixed Price The following steps show how to change the price recorded in the PLU. Step Description 1 • Access the Programming mode. Keys and Display 9 0 0 0 ➔ MODE Ex. Password = 9000 Note: To exit the Programming mode, press the MODE key again. 2 • Enter “22” followed by the ENTER key to select the Price Change mode. 3 • Enter the PLU No. followed by the PLU key. 2 2 1 ➔ ➔ ENTER PLU Ex. PLU No. = 1 Current price 4 • Enter the new price. 2 2 0 ➔ ENTER Ex. $2.20 New price 5 • Repeat steps 3 through 4 for any other prices to be changed. 6 • When all desired prices have been changed, press the END key. END • Press the MODE key to return to the normal mode. MODE 7 page 68 BC-3000 • User’s Manual • Rev 0 CHAPTER 6 TEXT EDITING Contents 6.1 Text Entry Screen ............................. 68 6.2 Character Size ................................ 69 6.3 Text Editing Keys .............................. 70 6.4 How to Create/Edit Text ................ 71 6.5 How to Reverse Text ....................... 72 6.6 How to Insert Characters ............... 74 6.1 Text Entry Screen 6.1.1 Indicators Line Counter Character Counter Character Size Shift Insert Lower Case Size Reverse 6.1.2 7-Segment Display Characters page 70 0 1 2 3 4 5 6 7 8 9 A B C D E F G H I J K L M N O P Q R S T U V W X Y Z ! ” # $ % & ’ ( ) + , – • / : ; < = ? [ \ ] ^ __ @ > BC-3000 • User’s Manual • Rev 0 6.2 Character Size The following text can be entered while in the Editing mode. Variable Character Size • PLU name • EXTRA message • Store name Fixed Character Size • Department name (max. 12 characters) • Group name (max. 12 characters) • Operator name (max. 12 characters) • Store address (max. 47 characters) Character Size Size 1 7 × 14 mm (Upper/Lower case) Max. 48 characters/line Size 2 10 × 20 mm (Upper case only) Max. 36 characters/line Size 3 15 × 30 mm (Upper case only) Max. 25 characters/line Size 4 20 × 40 mm (Upper case only) Max. 18 characters/line Size 5 30 × 60 mm (Upper case only) Max. 12 characters/line Size 6 40 × 80 mm (Upper case only) Max. 9 characters/line Size 7 60 × 120 mm (Upper case only) Max. 6 characters/line BC-3000 • User’s Manual • Rev 0 Print Examples page 71 6.3 Text Editing Keys Note: Confirm that the Program Key Sheet, and not the Operation Key Sheet, is being used for this operation. SIZE ➝ ➝ ➝ ➝ SIZE Used to select different character sizes available for printed text. Also used to return to standard text. CHAR DELETE CHARACTER DELETE Used to delete the right most character on the display. RIGHT ARROW Used to move across text characters. Also used to view options available on menu lines of program menu items. LINE DELETE LINE DELETE Used to delete complete words from text field. LEFT ARROW Used to move across text characters. Also used to view options available on menu lines of program menu items. COPY COPY Used to copy the text and other settings of a PLU to a new PLU. INSERT INSERT Used to change between inserting or overriding characters in editing text. NEW LINE NEW LINE Used to move to the next line (carriage return) when in the Editing mode. LOWER CASE Used to change to lower case letters. UP ARROW Used to move up text lines. DOWN ARROW Used to move down text lines. REVERSE REVERSE Used to reverse text type. Also used to return to standard text. LOWER CASE NORMAL NORMAL Used to switch from reverse type to normal type. SHIFT BS page 72 BACK SPACE Used to delete the last entered character, or the character to the left of the right most character. SHIFT Used to access the upper character of keys with two characters. Also used to move to end of a text line in combination with the RIGHT ARROW key, or used to move to the beginning of a text line in combination with the LEFT ARROW key. BC-3000 • User’s Manual • Rev 0 6.4 How to Create/Edit Text Step Description 1 • Make sure that the BC-3000 is in the Text Keys and Display ➝ Editing mode. Character size 2 • Select the desired character size. SIZE ➝ •• Press the SIZE key, and the size indicator will light. Size ➝ Size 3 ➝ ➝ Ex. OR Size 3 ➝ •• Press the UP or DOWN key to select the desired character size. • Enter the desired text on the 1st line. Character size F I L E T M I G N O Ex. FILET MIGNON SPACE 4 • Press the NEW LINE Key. N NEW LINE • Select the desired character size by pressing the UP or DOWN key. SIZE Size 2 5 • Enter the desired text on the 2nd line. ( < ( < B ➝ ➝ Ex. OR E E F ) > ) > Ex. ((BEEF)) 6 • Press the ENTER key. ENTER • Press the PRINT key to confirm the entered text. PRINT BC-3000 • User’s Manual • Rev 0 page 73 6.5 How to Reverse Text Step Description 1 • Make sure that the BC-3000 is in the Text Keys and Display ➝ Editing mode. Character size 2 • Select the desired character size. SIZE ➝ •• Press the SIZE key, and the SIZE indicator will light. Size ➝ Size 3 ➝ ➝ Ex. OR Size • Press the REVERSE key to select Text Reverse mode, and the REVERSE indicator will light. Big size REVERSE ➝ 3 ➝ •• Press the UP or DOWN key to select the desired character size. Reverse • Enter the desired text on the 1st line. F I L E T M I G N O OR NORMAL Ex. FILET MIGNON SPACE • Press the NORMAL key, or press the REVERSE key again to return to standard text. 4 REVERSE • Press the NEW LINE key. NEW LINE • Select the desired character size. •• Press the UP or DOWN key to select the desired character size. page 74 ➝ Size 2 SIZE OR ➝ Ex. N BC-3000 • User’s Manual • Rev 0 Step Description • Enter in the desired text on the 2nd line. 5 Keys and Display ( < ( < B E E F ) > ) > Ex. ((BEEF)) • Press the ENTER key. ENTER 6 • Press the PRINT key to confirm the entered text. BC-3000 • User’s Manual • Rev 0 PRINT page 75 6.6 How to Insert Characters Step Description 1 • "FIET" instead of "FILET" was entered by F I E T ➝ mistake. Keys and Display Insert 2 • Make sure that the INSERT indicator is lit. Note: If this indicator is not lit, press the INSERT key to turn on the INSERT indicator. ➝ • To insert the character "L" between "I" and "E". ➝ 3 •• Press the LEFT key twice to move two characters back. •• Type "L". •• Press the ENTER key. page 76 L ENTER BC-3000 • User’s Manual • Rev 0 CHAPTER 7 TROUBLESHOOTING Contents 7.1 Troubleshooting .............................. 76 7.2 Other Problems ............................... 77 7.1 Troubleshooting When errors occur, try to recover normal operations by using the following troubleshooting chart. WEIGHT lb ZERO NET Capacity Error No. UNIT PRICE SAVE $ TOTAL PRICE $ AUTO PLU 30 × 0.01 lb Description Too many characters. POP message is too long. Countermeasure Label printing is not possible because the number of entered characters is too great for the set label. Press the CLEAR key to return to the previous screen and try to enter data again. Extra message is too long. Store name/address is too long. Out of labels. Replace with a new roll of labels. Press the CLEAR key to return to the previous screen. Label size error. The label size may be different from the predetermined size. Press the CLEAR key to return to the previous screen. Confirm the label size and replace if necessary. Entered special price is equal to or over the preset price. Press the CLEAR key to return to the previous screen. Try to enter the special price again. Damaged memory. Contact the service engineer. Check the scale. The scale reading was not stable when power was turned on, or some item was left on the weigh platter. Remove any items left on the weigh platter. Remove items on the w eigh platter. page 78 BC-3000 • User’s Manual • Rev 0 7.2 Other Problems ◆ Printing is too light. The thermal head has become soiled. Use the attached cleaner set to clean the printer head. (Refer to page 12.) ◆ Labels are printed as soon as an item is placed on the weigh platter. The scale is set in the AUTO mode. (AUTO indicator is lit.) ◆ Labels are not issued. The printing position has slipped. Press the PAPER FEED key to align the paper with the correct printing position. BC-3000 • User’s Manual • Rev 0 page 79 44 SANNO-CHO SHOGOIN SAKYO-KU KYOTO, 606 JAPAN PHONE: (075) 771-4141 FACSIMILE: (075) 751-1634 TELEX: 05422065 SCALES J CABLE ADD: “SCALES”KYOTO IW512P1003