1
MINISTRY OF EDUCATION AND TRAINING
FPT UNIVERSITY
Capstone Project Document
Mobile Tracking System
Mobile Tracking System
Group
Members
Vũ Thúy Nhâm
00875
Nguyễn Trung Kiên
00801
Vũ Hoàng Giang
00848
Trần Phương Thảo
00943
Phạm Tùng Bách
01389
Supervisor Mr. Nguyen Tat Trung
Capstone MTS
Project code
- Hanoi, 12/2012-
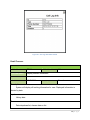
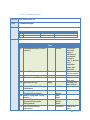
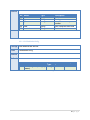
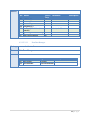
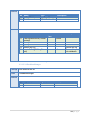
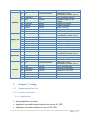
Record of Changes
Date
Change Item
Description
By
Version
10/09/2012
Create the document
BachPT
0.1
17/09/2012 Proposal
Update figure
NhamVT ,ThaoTP
0.2
21/09/2012 Software Project Plan
Add new
NhamVT, BachPT
0.3
18/10/2012 Software Design
Add new
ThaoTP
0.4
05/12/2012 Testing
Add new
BachPT
0.5
20/12/2012 All
Update comment
NhamVT
0.6
Table of Contents
Table of Contents .......................................................................................................................................... 1
Definitions and Acronyms .......................................................................................................................... 14
I.
Chapter I - Project Introduction .......................................................................................................... 15
1.1.
Project Information ..................................................................................................................... 15
1.2.
Purposes...................................................................................................................................... 15
1.3.
Background ................................................................................................................................. 15
1.4.
Literature Review of Existing Systems ........................................................................................ 16
1.5.
Our Proposal ............................................................................................................................... 17
By implementing a helpful tool, our product will have the following advantage: ................ 17
For smart phone, our product will have core functions below: ................................................ 17
For web base system, our product will have core functions below:........................................ 17
Functions Proposal ..................................................................................................................................... 18
Figure 3- Overall of RTS ............................................................................................................................... 19
II.
Chapter II - Software Project Management Plan ................................................................................ 19
2.1
Problem Identify ......................................................................................................................... 19
2.1.1
Core Business Case and Approach ...................................................................................... 19
1|Page
2.1.2
Project milestones and deliverables ................................................................................... 19
2.1.3
Project Standard Objectives................................................................................................ 20
2.2
Project Organize .......................................................................................................................... 21
2.2.1
Software Process Model ..................................................................................................... 21
Figure 4 – Iterative Software Process Model .............................................................................................. 21
2.2.2
Role and Responsibilities .................................................................................................... 21
Figure 5 - Project Team Members .............................................................................................................. 22
2.3
Project Management Plan .......................................................................................................... 22
Figure 6 - Project Management Plan .......................................................................................................... 22
2.4
Hardware and Software .............................................................................................................. 23
2.4.1
Hardware requirement ....................................................................................................... 23
2.4.2
Software requirement......................................................................................................... 23
2.5
Success Criteria ........................................................................................................................... 23
2.6
Risk Management ....................................................................................................................... 24
2.7
Coding Convention for Java ........................................................................................................ 25
2.7.1
File Name ............................................................................................................................ 25
2.7.2
File Organization ................................................................................................................. 26
2.7.3
Indentation.......................................................................................................................... 26
2.7.4
Declarations ........................................................................................................................ 27
Number per Line ..................................................................................................................................... 27
Placement ................................................................................................................................................ 27
Initialization ............................................................................................................................................. 28
Class and Interface Declarations ....................................................................................................... 28
2.7.5
Statements .......................................................................................................................... 29
Simple Statements ................................................................................................................................. 29
Compound Statements ......................................................................................................................... 29
Return Statements ................................................................................................................................. 29
2.7.6
White Space ........................................................................................................................ 32
Blank Lines .............................................................................................................................................. 32
Blank Spaces........................................................................................................................................... 32
2.7.7
III.
Naming Conventions ........................................................................................................... 33
Chapter III - Software Requirement Specification .......................................................................... 35
2|Page
3.1.
Communication protocol ............................................................................................................ 35
3.2.
High Level Requirements ............................................................................................................ 35
3.1.1
Domain Model .................................................................................................................... 35
Figure 7 – MTS Domain Diagram ................................................................................................................ 35
Domain Object Description ........................................................................................................................ 36
3.1.2
User Case Diagram .............................................................................................................. 37
Figure 8 - MTS Use Case Diagram ............................................................................................................... 37
Use case description................................................................................................................................... 37
3.1.3
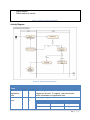
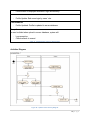
Business Process Flow ......................................................................................................... 38
Figure 9 - Business Process Flow ................................................................................................................. 39
Business Flow List ....................................................................................................................................... 39
3.2
Functional Requirement ............................................................................................................. 40
3.2.1
Function “Position Saving” .................................................................................................. 40
Position data: .......................................................................................................................................... 40
JSON Data Standard: ............................................................................................................................ 40
JSON Data Sample: ............................................................................................................................... 40
Detail Process:........................................................................................................................................ 41
Activity Diagram ..................................................................................................................................... 42
Figure 10 - Position Saving Diagram ........................................................................................................... 42
3.2.2
Function “Sms& Call Logs Saving” ....................................................................................... 44
SMS Data: ................................................................................................................................................. 44
JSON SMS Data Standard: .................................................................................................................. 44
JSON SMS Data Sample: ..................................................................................................................... 44
Call Logs Data: ....................................................................................................................................... 44
JSON Call Logs Data Standard: ......................................................................................................... 45
JSON Call Logs Data Sample: ............................................................................................................ 45
Detail Process:........................................................................................................................................ 45
Activity Diagram ..................................................................................................................................... 46
Figure 11 - Message and call logs saving .................................................................................................... 46
3.2.3
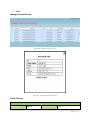
Function “Define Danger Area” .......................................................................................... 47
Danger Area data: .................................................................................................................................. 48
Define Danger Area Screen: ................................................................................................................ 48
3|Page
Figure 12 - Define Danger Area Screen ....................................................................................................... 48
Detail Process:........................................................................................................................................ 48
Activity Diagram ..................................................................................................................................... 50
Figure 13 - Define Danger Area Diagram .................................................................................................... 50
3.2.4
Function “Danger tracking”................................................................................................. 51
Dangerous Areas Data: ........................................................................................................................ 51
JSON Data Standard: ............................................................................................................................ 51
JSON Data Sample: ............................................................................................................................... 51
Detail Process:........................................................................................................................................ 51
Activity Diagram:.................................................................................................................................... 53
Figure 14 - Danger Tracking Diagram .......................................................................................................... 53
3.2.5
Function “Update configuration parameter” ..................................................................... 54
Syntax of configuration sms: “ON” .................................................................................................. 54
Detail Process:........................................................................................................................................ 54
Activity Diagram: .................................................................................................................................... 55
Figure 15 - Update Configuration Parameter Diagram ............................................................................... 55
3.2.6
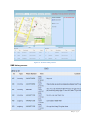
Function “Display statistic information” ............................................................................. 56
Position history screen: ....................................................................................................................... 56
Figure 16 - Position History Screen ............................................................................................................. 57
4|Page
SMS history screen:
.................................................................................................................................................................... 57
Figure 17 - SMS History Screen ................................................................................................................... 58
Figure 18 - SMS Information Detail............................................................................................................. 58
Call logs history screen:.............................................................................................................................. 58
Figure 19 - Call logs history screen ............................................................................................................. 58
Figure 20 - Call Logs Information Detail ...................................................................................................... 59
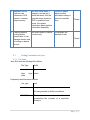
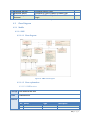
Detail Process:........................................................................................................................................ 59
5|Page
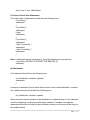
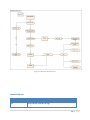
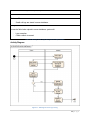
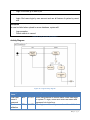
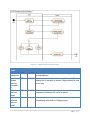
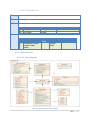
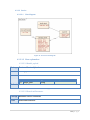
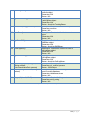
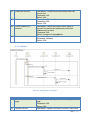
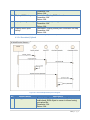
Activity Diagram:
act Display statistic information
consider User
consider System
View statistic
information
Initial
Select day to v iew
history
Load data from DB
Display on w ebsite
Final
.. 60
Figure 21 - Display statistic information diagram ....................................................................................... 60
3.2.7
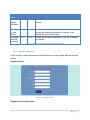
Function “Register” ............................................................................................................. 61
Register Screen: ..................................................................................................................................... 61
Figure 22 - Register Screen ......................................................................................................................... 61
Registration Confirm Screen .............................................................................................................. 61
Figure 23 - Registration Confirm Screen ..................................................................................................... 62
Detail Process:........................................................................................................................................ 62
Activity Diagram ..................................................................................................................................... 64
Figure 24 - Register Activity Diagram .......................................................................................................... 64
3.2.8
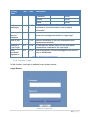
Function “Login” ................................................................................................................. 65
Login Screen ........................................................................................................................................... 65
Figure 25 - Login screen .............................................................................................................................. 65
Detail Process ......................................................................................................................................... 66
Activity Diagram ..................................................................................................................................... 67
Figure 26 - Login Activity diagram............................................................................................................... 67
3.2.9
Function “Update Profile” ................................................................................................... 68
Update Profile Screen ........................................................................................................................... 68
Figure 27 - Update Profile Screen ............................................................................................................... 68
Detail Process ......................................................................................................................................... 69
Activities Diagram .................................................................................................................................. 70
6|Page
Figure 28 - Update Profile Activity Diagram ............................................................................................... 70
3.2.10
Function “Manage Account” ............................................................................................... 71
Manage Account Screen: ..................................................................................................................... 72
Figure 29 - Update account screen ............................................................................................................. 72
Figure 30 - Account Information Detail ...................................................................................................... 72
Detail Process:........................................................................................................................................ 72
Activity Diagram ..................................................................................................................................... 73
Figure 31 - Update Account Activity Diagram ............................................................................................. 74
3.3
Non – Functional Requirement ................................................................................................... 75
3.3.1
Usability............................................................................................................................... 75
3.3.2
Reliability............................................................................................................................. 75
Bug or Defect Rate................................................................................................................................. 75
3.3.3
Availability ........................................................................................................................... 76
3.3.4
Security ............................................................................................................................... 76
3.3.5
Maintainability .................................................................................................................... 76
3.3.6
Portability ............................................................................................................................ 77
3.3.7
Performance........................................................................................................................ 77
Response time under 10 seconds ................................................................................................. 77
IV.
Chapter IV - Software Architecture Design ..................................................................................... 77
4.1
System Architecture Design ........................................................................................................ 77
Figure 32 - System Overview ...................................................................................................................... 77
4.1.1
Mobile ................................................................................................................................. 78
Figure 33 - Mobile Architecture Design ...................................................................................................... 78
4.1.2
Server .................................................................................................................................. 79
Figure 34 - Server Architecture Design ....................................................................................................... 79
4.2
Class Diagram .............................................................................................................................. 80
4.2.1
Mobile ................................................................................................................................. 80
4.2.1.1
SMS ..................................................................................................................................... 80
4.2.1.1.1
Class diagram .................................................................................................................. 80
Figure 35 - SMS Class Diagram .................................................................................................................... 80
4.2.1.1.2
4.2.1.1.2.1
Class explanation ............................................................................................................ 80
SMSReceiver................................................................................................................ 80
7|Page
4.2.1.1.2.2
SMSDataSource ........................................................................................................... 81
4.2.1.1.2.3
SMSSentObserver ....................................................................................................... 81
4.2.1.1.2.4
EnableConnectionService............................................................................................ 82
4.2.1.1.2.5
DataBaseManager ....................................................................................................... 83
4.2.1.1.2.6
SMSSentService........................................................................................................... 84
4.2.1.1.2.7
JSONParser .................................................................................................................. 84
4.2.1.1.2.8
ConfigDataSource........................................................................................................ 85
4.2.1.1.2.9
GetParametersConfig .................................................................................................. 85
4.2.1.1.2.10
ConfigBean .................................................................................................................. 86
4.2.1.1.2.11
SMSBean ..................................................................................................................... 86
4.2.1.1.2.12
GetMarkerConfig......................................................................................................... 87
4.2.1.2
Mobile Track ....................................................................................................................... 88
4.2.1.2.1
Class diagram .................................................................................................................. 88
4.2.1.2.2
Class explanation ............................................................................................................ 88
4.2.1.2.2.1
NetworkStateBroadcastReceiver ................................................................................ 88
4.2.1.2.2.2
BootUpReceiver .......................................................................................................... 89
4.2.1.2.2.3
PreferenceListener ...................................................................................................... 89
4.2.1.2.2.4
SMSSentService........................................................................................................... 90
4.2.1.2.2.5
MobileTrackService ..................................................................................................... 90
4.2.1.2.2.6
LocationTrackingListener ............................................................................................ 91
4.2.1.2.2.7
TrackerProvider ........................................................................................................... 92
4.2.1.2.2.8
TrackerEntry ................................................................................................................ 93
4.2.1.2.2.9
TrackDataHelper ......................................................................................................... 94
4.2.1.2.2.10
EnableConnectionService............................................................................................ 95
4.2.1.2.2.11
DataBaseManager ....................................................................................................... 96
4.2.1.3
Call Logs............................................................................................................................... 98
4.2.1.3.1
Class diagram .................................................................................................................. 98
4.2.1.3.2
Class explanation ............................................................................................................ 98
4.2.1.3.2.1
CallLogBean ................................................................................................................. 98
4.2.1.3.2.2
CallLogObserver .......................................................................................................... 99
4.2.1.3.2.3
CallLogDataSource ...................................................................................................... 99
4.2.1.3.2.4
DataBaseManager ..................................................................................................... 100
8|Page
4.2.1.3.2.5
4.2.1.4
CallLogReceiver ......................................................................................................... 102
Upload Service .................................................................................................................. 102
4.2.1.4.1
Class Diagram ................................................................................................................ 102
4.2.1.4.2
Class Explanation........................................................................................................... 103
4.2.1.4.2.1
EnableConnectionService.......................................................................................... 103
4.2.1.4.2.2
UploadDataService .................................................................................................... 103
4.2.1.4.2.3
UploadTracking ......................................................................................................... 104
4.2.1.4.2.4
CSVWriter .................................................................................................................. 104
4.2.1.4.2.5
JSONParser ................................................................................................................ 105
4.2.1.4.2.6
DatabaseManager ..................................................................................................... 106
4.2.1.4.2.7
CallLogBean ............................................................................................................... 107
4.2.1.4.2.8
TrackingBean ............................................................................................................. 107
4.2.1.4.2.9
AlarmManager .......................................................................................................... 108
4.2.2
Server ................................................................................................................................ 109
4.2.2.1
Account ............................................................................................................................. 109
4.2.2.1.1
Class diagram ................................................................................................................ 109
4.2.2.1.2
Class explanation .......................................................................................................... 109
4.2.2.1.2.1
ConfirmSite ............................................................................................................... 109
4.2.2.1.2.2
AccountDBFuntion .................................................................................................... 110
4.2.2.1.2.3
CheckLogin ................................................................................................................ 110
4.2.2.1.2.4
ChangePasswordDB .................................................................................................. 111
4.2.2.1.2.5
UpdateAccountDB..................................................................................................... 111
4.2.2.1.2.6
UpdateAccount ......................................................................................................... 111
4.2.2.1.2.7
Phpsqlajax_dbinfo ..................................................................................................... 112
4.2.2.2
Danger Area ...................................................................................................................... 112
4.2.2.2.1
Class diagram ................................................................................................................ 112
4.2.2.2.2
Class explanation .......................................................................................................... 113
4.2.2.2.2.1
GenParameter ........................................................................................................... 113
4.2.2.2.2.2
Phpsqlajax_genxmlMarkers ...................................................................................... 113
4.2.2.2.2.3
phpsqlinfo_addrow ................................................................................................... 113
4.2.2.2.2.4
phpsqlajax_dbinfo ..................................................................................................... 114
4.2.2.3
Service ............................................................................................................................... 115
9|Page
4.2.2.3.1
Class diagram ................................................................................................................ 115
4.2.2.3.2
Class explanation .......................................................................................................... 115
4.2.2.3.2.1
Handle_upload .......................................................................................................... 115
4.2.2.3.2.2
DownLoadParameter ................................................................................................ 115
4.2.2.3.2.3
phpsqlajax_dbinfo ..................................................................................................... 116
4.2.2.3.2.4
ImportCSV ................................................................................................................. 116
4.2.2.4
4.2.2.4.1
Class diagram ................................................................................................................ 117
4.2.2.4.2
Class explanation .......................................................................................................... 117
4.2.2.4.2.1
Phpsqlajax_genxml3 ................................................................................................. 117
4.2.2.4.2.2
Phpsqlajax_genxmlAllLocation.................................................................................. 118
4.2.2.4.2.3
GenSms ..................................................................................................................... 118
4.2.2.4.2.4
GenCallLog ................................................................................................................ 118
4.2.2.4.2.5
phpsqlajax_dbinfo ..................................................................................................... 119
4.3
Sequence Diagram .................................................................................................................... 119
4.3.1
Mobile ............................................................................................................................... 119
4.3.1.1
SMS ................................................................................................................................... 119
4.3.1.2
MobileTrack ...................................................................................................................... 121
4.3.1.3
Call Logs............................................................................................................................. 122
4.3.1.4
UploadData ....................................................................................................................... 123
4.3.1.5
Danger Track ..................................................................................................................... 125
4.3.2
Server ................................................................................................................................ 126
4.3.2.1
Danger Area Sequence ...................................................................................................... 126
4.3.2.2
Login .................................................................................................................................. 127
4.3.2.3
Register ............................................................................................................................. 128
4.3.2.4
Update............................................................................................................................... 129
4.3.2.5
Show History ..................................................................................................................... 130
4.3.2.6
Download/Upload ............................................................................................................. 131
4.4
V.
Show History ..................................................................................................................... 117
Database ................................................................................................................................... 132
4.4.1
Mobile ............................................................................................................................... 132
4.4.2
Server ................................................................................................................................ 134
Chapter V - Testing............................................................................................................................ 135
10 | P a g e
5.1
5.1.1
Feature to be tested ......................................................................................................... 135
5.1.1.1
Application ........................................................................................................................ 135
5.1.1.2
Website ............................................................................................................................. 136
5.1.2
Feature not to be tested ................................................................................................... 137
5.2
Test Strategy ............................................................................................................................. 137
5.2.1
Test Types ......................................................................................................................... 137
5.2.1.1
Function Testing ................................................................................................................ 137
5.2.1.2
User Interface Testing ....................................................................................................... 138
5.2.1.3
Performance Testing ......................................................................................................... 139
5.2.2
Test Environment .............................................................................................................. 140
5.3
Test cases .................................................................................................................................. 140
5.3.1
Application ........................................................................................................................ 140
5.3.1.1
Set Up ................................................................................................................................ 140
5.3.1.2
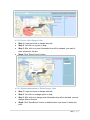
Running with 3G &GPS Are Turned On ............................................................................. 141
5.3.1.3
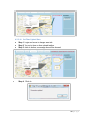
Check Danger Areas .......................................................................................................... 143
5.3.1.4
Check Receive Active Message ......................................................................................... 144
5.3.2
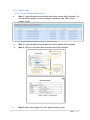
Central Web with Chrome ................................................................................................ 145
5.3.2.1
Login Screen ...................................................................................................................... 145
5.3.2.2
Register Screen ................................................................................................................. 146
5.3.2.3
Update Account Screen .................................................................................................... 150
5.3.2.4
Danger Area Screen .......................................................................................................... 155
5.3.2.5
History Screen ................................................................................................................... 157
5.3.2.6
Admin Screen .................................................................................................................... 160
5.4
VI.
Requirements for Test .............................................................................................................. 135
Test Summary Report ............................................................................................................... 163
5.4.1
Test Execution Summary................................................................................................... 163
5.4.2
Test Results ....................................................................................................................... 163
5.4.2.1
Summary of Incident Reports Raised During Project ........................................................ 163
5.4.3
Conclusion ......................................................................................................................... 164
5.4.3.1
System Test Success Criteria .................................................. Error! Bookmark not defined.
5.4.3.2
Conclusion .............................................................................. Error! Bookmark not defined.
Software User’s Manual ................................................................................................................ 164
11 | P a g e
6.1
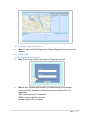
Installation Guide ...................................................................................................................... 164
6.1.1
Website ............................................................................................................................. 164
6.1.1.1
Setting Up the Environment at Server Side ...................................................................... 164
6.1.1.2
Deployment at Server Side ............................................................................................... 165
6.1.1.3
Setting Up the Environment at Client Side ....................................................................... 166
6.1.2
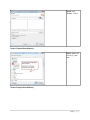
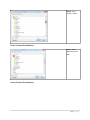
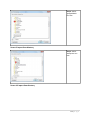
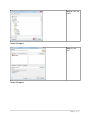
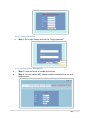
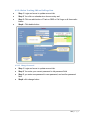
Application ........................................................................................................................ 166
6.1.2.1
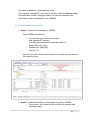
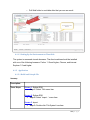
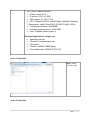
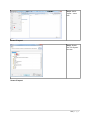
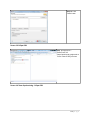
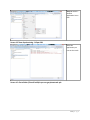
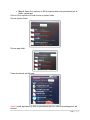
Build and Get apk File ....................................................................................................... 166
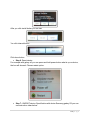
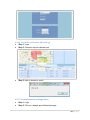
6.1.2.2
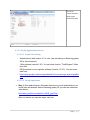
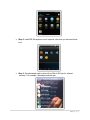
Set Up Application to Device ............................................................................................ 176
6.1.2.2.1
Prepare for Setting ........................................................................................................ 176
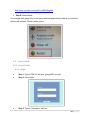
6.1.2.2.2
Set Up Application......................................................................................................... 176
6.2
User’s Guide .............................................................................................................................. 180
6.2.1
General Guide ................................................................................................................... 180
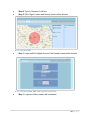
6.2.1.1
Login .................................................................................................................................. 180
6.2.1.2
View Profile ....................................................................................................................... 181
6.2.1.3
View Position, SMS, Call Logs of Current Day ................................................................... 181
6.2.1.4
View Danger Area Screen.................................................................................................. 182
6.2.2
Form Guide........................................................................................................................ 182
6.2.2.1
Register a New Account .................................................................................................... 182
6.2.2.2
Forgot Password ............................................................................................................... 183
6.2.2.3
User’s Update Information ............................................................................................... 183
6.2.2.4
Delete Tracking, SMS and Call Logs Data .......................................................................... 184
6.2.2.5
Change Password .............................................................................................................. 184
6.2.2.6
View History of Position, SMS, Call Logs ........................................................................... 185
6.2.2.7
View Information of Danger Point .................................................................................... 185
6.2.2.8
Create a New Danger Point............................................................................................... 186
6.2.2.9
Update Information or Delete Danger Point .................................................................... 186
6.2.2.10
VII.
Set Time Upload Data ................................................................................................... 187
6.2.3
Admin Guide ..................................................................................................................... 188
6.2.3.1
View All Information of Users ........................................................................................... 188
6.2.3.2
Update Information of Users or Delete Users .................................................................. 188
6.2.4
User Enables Update For Device by Sending Message ..................................................... 189
References .................................................................................................................................... 190
12 | P a g e
13 | P a g e
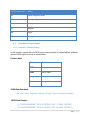
Definitions and Acronyms
Acronym
Definition
MTS
Mobile Tracking System
GPS
Global Position System
API
Application Programming Interface
JSON
JavaScript Object Notation
DB
Database
BF
Business flow
A
Activity
UP
User process
SP
System process
SMS
Source Message Service
Note
Table 1 - Definitions and Acronyms
14 | P a g e
I.
Chapter I - Project Introduction
1.1.
-
Project name: Mobile Tracking System
Project code: MTS
Product type: Android application and Web application
Timeline: from September 2012 to December 2012
1.2.
Project Information
Purposes
The first purpose is to fulfill the requirements for Capstone Project.
The second purpose we focus on creating a complete application, what has our
dramatically desire to help users can locate mobile on the map and track people
in real time.
1.3.
Background
All people want to protect their relatives and keep them safe. And we are going to
build mobile tracking application that helps them in securing life's most precious
assets. Mobile tracking system designed specifically for relatives tracking will provide
users the assurance that their relatives’ location can be accessed at any time day or
night.
For examples, your fiancée should be at work but she is not answering her phone
and you're afraid she may have had an accident. With mobile tracking system you
will know she's safe in the office. Your husband tells you he’s going to be late tonight
due to a business meeting. Is he really at the office, or is he having dinner
somewhere else? Your kids tell you that they are staying late with friends to study for
their test. Are they really there, or did they go somewhere else without letting you
know?
You can now find out where they are, at any time, as long as using MTS with some
features: locate mobile on map, track people in real time, alert when they are in
danger…And your loved one will never know their mobile is being tracked because
MTS remains completely hidden from the user. Once installed, you can secretly track
their mobile activities 24/7 from your MTS user account.
15 | P a g e
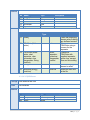
1.4.
Literature Review of Existing Systems
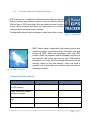
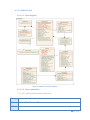
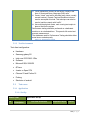
GPS Tracking Pro: is application that keeps users family and friends
safe by tracking their real-time location using any Android phone.
With the best in GPS technology, this app tracks the exact location
of your family members and alerts you when they are in trouble,
using the app's innovative check-in feature.
The application allows family members to locate each other on map.
Figure 2 - SMS Tracker Agent
Figure 1 - GPS Tracking
Pro
SMS Tracker Agent is application that tracking phone and
monitoring system for Android phones. Remotely track and
monitor all SMS, MMS, text messages, calls, and GPS
location. Users can remotely read all messages, photos sent
and received, view phone call logs and view GPS location
information on a map. All phone usage information can be
remotely viewed on any web browser. Users now have a
powerful took to help keep your relatives safe even without
physically see them.
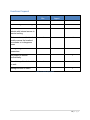
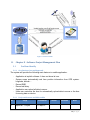
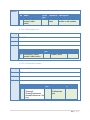
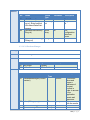
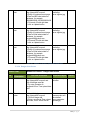
Compare Existing Systems
Functions
GPS Tracking Pro
Records movement location
by GPS tracking
Alerts users when tracked
mobile is in danger
SMS Tracker Agent
X
Saves messages and call
logs
X
Runs implicit
X
Table 2 - Compare Existing Systems
16 | P a g e
1.5.
Our Proposal
GPS Tracking Pro is application that tracks real time location to keep users' family and
friends safe. This application allows family members to locate each other on map. It
means not hidden by users, so doesn’t run implicit and also not have saving mobile
activities feature.
SMS Tracker Agent is tracking phone application. It allows remotely track and monitor
all SMS, MMS, text messages, calls, and GPS location. Users can remotely read all
messages, photos sent and received, view phone call logs and view GPS location
information on a map. This app is phone tracking, so focus on tracking all mobile
activities and hasn’t developed alert when tracked phone is in danger feature yet.
By implementing a helpful tool, our product will have the following advantage:
-
Application is installed as system application and cannot be removed in the usual
way.
Application is started automatically as soon as the phone is turned on.
Application cans automatically active 3G, wifi of mobile.
Application does not have a screen interface, runs fully implicit.
End users can supervise most of mobile activities via web server anytime.
For smart phone, our product will have core functions below:
-
Records movement locations.
Saves sms and call logs.
Synchronizes all information to website with internet access
Alerts users in case their tracked mobile crosses the locations’ boundaries or in
dangerous areas
For web base system, our product will have core functions below:
-
Allows register and login to system.
Let’s users secretly see tracking history of the tracked mobile (location, saved
sms and call logs).
Allows setting configuration parameters.
Manage account of users.
17 | P a g e
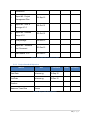
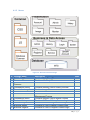
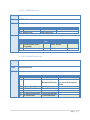
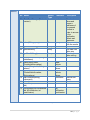
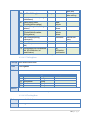
Functions Proposal
Functions
Record movement location
GPS Tracking
Pro
SMS Tracker
Agent
MTS
Save messages and call logs
Synchronize all information to
website with internet access to
remote tracking
Alert users in case their tracked
mobile crosses the locations’
boundaries or in dangerous
areas
Setting configuration
parameters
Run implicit to ensure
confidentiality
Show history of tracked mobile
on web
Manage account of users
Table 3 - Functions proposal
18 | P a g e
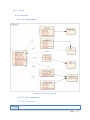
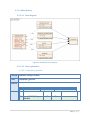
Figure 3- Overall of RTS
II.
Chapter II - Software Project Management Plan
2.1
2.1.1
Problem Identify
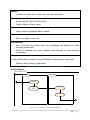
Core Business Case and Approach
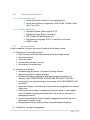
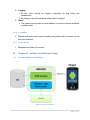
The system will provide the following main features in mobile application:
-
Application is implicit software. It does not show its icon.
System saves automatically real time position information from GPS system:
longitude, latitude …
Record SMS
Record call diary
Application can upload all data to server.
Users can customize the time for automatically upload data to server or the time
for saving data on device.
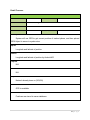
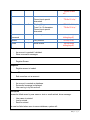
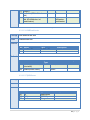
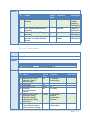
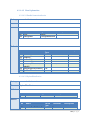
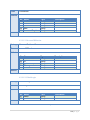
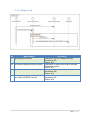
2.1.2
No
1
Project milestones and deliverables
Stage
Report #1 - Project
Committed
Actual
Deviation
Note
17-Sep-12
19 | P a g e
Introduction
2
3
4
5
6
7
Report #2 - Project
24-Sep-12
Management Plan
Report #3 - SRS &
08-Oct-12
prototype V1.0
Report #4 - Detailed
design V1.0
Final package
26-Nov-12
Report #5 – Software
Test Document
User Manual V1.0
22-Oct-12
03-Dec-12
05-Dec-12
Table 4 - Project Milestones and Deliverables
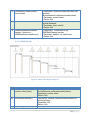
2.1.3
Project Standard Objectives
Metrics
Unit
Committed
Start Date
dd-mmm-yy
05-Sep-12
End Date
dd-mmm-yy
22-Dec-12
Person
5
Actual
Deviation
Duration
Maximum Team Size
Table 5 - Project Standard Objectives
20 | P a g e
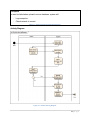
2.2
2.2.1
Project Organize
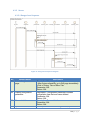
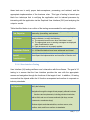
Software Process Model
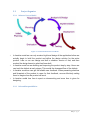
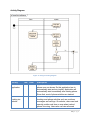
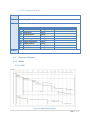
Figure 4 – Iterative Software Process Model
In iterative model we can only create a high-level design of the application before we
actually begin to build the product and define the design solution for the entire
product. Later on we can design and built a skeleton version of that, and then
evolved the design based on what had been built.
In iterative model we are building and improving the product step by step. Hence we
can track the defects at early stages. This avoids the downward flow of the defects.
In iterative model we can get the reliable user feedback. When presenting sketches
and blueprints of the product to users for their feedback, we are effectively asking
them to imagine how the product will work.
In iterative model less time is spent on documenting and more time is given for
designing.
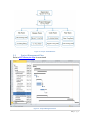
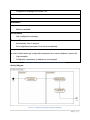
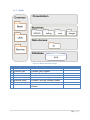
2.2.2
Role and Responsibilities
21 | P a g e
Figure 5 - Project Team Members
2.3
Project Management Plan
Refer to MST Master plan.mpp for more detail
Figure 6 - Project Management Plan
22 | P a g e
2.4
2.4.1
Hardware and Software
Hardware requirement
2.4.2
Software requirement
2.5
Smart phone with Android 2.3.3 operating system
Server with minimum configuration: 4GB of RAM, 100GB of hard
disk, Core 2 Duo
Operating System Client: Android 2.3.3
Operating System Server: Windows 7
IDE: Eclipse and phpDesigner v8.0
Development Language: PHP v7.0 and Java for Android
DBMS: mySql
Success Criteria
At the completion of project, we expect to achieve the following criteria:
Perspective on successful product
Good-looking and friendly interface with smart and simple design
Good performance
Value and stable
Convenience and easy to set up
Good server for backup data
Perspective on learning
Understanding the primary of process of making software
Apply this process for capstone project.
Research and apply technologies what have taught at university. For
example: JAVA, SMARTDRAW, ENTERPRISE ARCHITECT, MYSQL…
Learn how to use new technologies, for example: JAVA ON ANDROID, PHP,
and JSON…
Apply technologies to professional process what has suggested from masters
(supervisor).
Training process of project management with team leader. Leader always
store knowledge for getting necessary skills. She or he can use tools for
management control.
Capture the importance of project quality management and can use tools,
techniques for quality control.
Designer gets keys for making friendly, smart and simple interfaces.
Perspective on project management
23 | P a g e
Keep deadline
Achieve all quality requirement without overtime
Improve cohesion of members in team
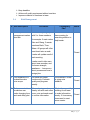
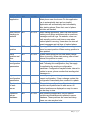
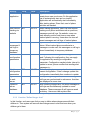
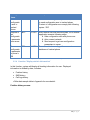
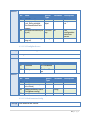
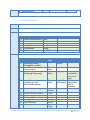
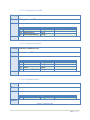
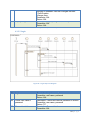
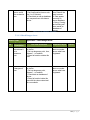
2.6
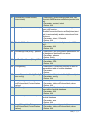
Risk Management
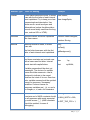
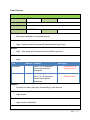
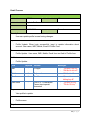
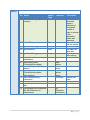
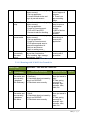
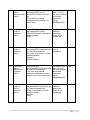
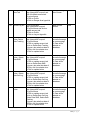
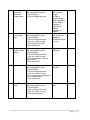
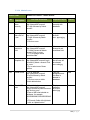
ID Risk Description
1
Poor experience of
management makes
plan late.
Avoidance
There is always a group
with 2 or three members,
for example: 2 main coders
Contingency
Plan
Status
All team members will
have meeting for
searching solution to
help leader.
Kien and Giang, 3 remain
members Bach, Thao,
Nham. All groups will often
meet least twice a week.
Closed
Leader will update result of
each meeting.
Leader need to take care
about team member, and
find some strength,
weakness … Learn more
about process and how to
assign jobs.
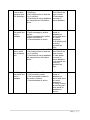
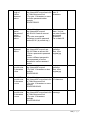
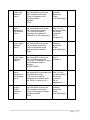
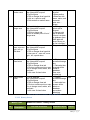
2
3
Poor experience of
evaluation make
miss scope.
List tasks and check
continuously. Evaluate
quality and progress
weekly.
We overtime if a task
is going miss
deadline
Bad communication
breakdown can
make changing time,
work and delay plan
We need using words more
clearly, talk with each other
more, note and send email
to confirm information.
Maybe there are daily
meeting for all team
to make information
clearly. If it necessary
team need to meet
some master.
Closed
Closed
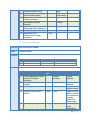
24 | P a g e
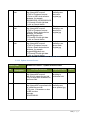
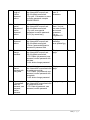
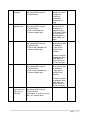
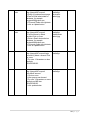
4
5
We don’t know when it
happens, and we can’t
avoid that storm. But the
time that storm impact to
GPS is small time and
rarely. We update
information about position
information frequently
Magnetic storms
from sun can
influence to GPS
system. It creates
large accuracy
Testing requests
We check status of device
rooting device
continuously
several time. It can
damage device, lead
to having no device
for test
We must update
about position
information always 1
second or smaller
time.
Closed
We prepare two
devices for risk.
Closed
Table 6 - Risk Management
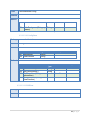
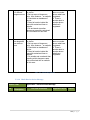
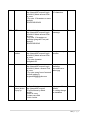
2.7
Coding Convention for Java
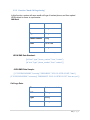
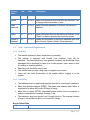
2.7.1 File Name
Java Soft uses the following file suffixes:
File Type
Suffix
Java source
.java
Java
code
byte .class
Frequently used file names include:
File Type
Use
GNUmakefile
The preferred name for makefiles.
We use gnumake to build our software.
README
The preferred name for the file that
summarizes the contents of a particular
directory.
25 | P a g e
2.7.2 File Organization
Java source files have the following ordering:
• Beginning comments
All source files should begin with a c-style comment that lists the programmer(s), the
date, a copyright notice, and also a brief description of the purpose of the program. For
example:
/*
* Classname
*
* Version info
*
* Copyright notice
*/
• Package and Import statements
The first non-comment line of most Java source files is a package statement. After that,
import statements can follow. For example:
packagejava.awt;
importjava.awt.peer.CanvasPeer;
2.7.3 Indentation
Four spaces should be used as the unit of indentation. The exact construction of the
indentation (spaces vs. tabs) is unspecified. Tabs must be set exactly every 8 spaces
(not 4).
Line Length
Avoid lines longer than 80 characters, since they’re not handled well by many terminals
and tools.
Note: Examples for use in documentation should have a shorter line length—generally
no more than 70 characters.
Wrapping Lines
When an expression wills not fit on a single line, break it according to these general
principles:
Break after a comma.
Break before an operator.
Prefer higher-level breaks to lower-level breaks.
26 | P a g e
Align the new line with the beginning of the expression at the same level on the
previousline.
If the above rules lead to confusing code or to code that’s squished up against
the rightmargin, just indent 8 spaces instead.
2.7.4 Declarations
Number per Line
One declaration per line is recommended since it encourages commenting. In other
words,
int level; // indentation level
int size; // size of table
is preferred over
int level, size;
In absolutely no case should variables and functions be declared on the same line.
Example:
longdbaddr, getDbaddr(); // WRONG!
Do not put different types on the same line. Example:
int foo, fooarray[]; //WRONG!
Note: The examples above use one space between the type and the identifier. Another
acceptable alternative is to use tabs, e.g.:
int level;
// indentation level
int size;
// size of table
Object currentEntry; // currently selected table entry
Placement
Put declarations only at the beginning of blocks. (A block is any code surrounded by
curly braces “{” and “}”.) Don’t wait to declare variables until their first use; it can confuse
the unwary programmer and hamper code portability within the scope.
voidMyMethod() {
int int1;
// beginning of method block
if (condition) {
int int2; // beginning of "if" block
...
}
27 | P a g e
}
The one exception to the rule is indexes of for loops, which in Java can be declared in
the for statement:
for (int i = 0; i <maxLoops; i++) { ...
Avoid local declarations that hide declarations at higher levels. For example, do not
declare the same variable name in an inner block:
int count;
...
func() {
if (condition) {
int count; // AVOID!
...
}
...
}
Initialization
Try to initialize local variables where they’re declared. The only reason not to initialize a
variable where it’s declared is if the initial value depends on some computation
occurring first.
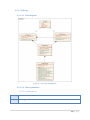
Class and Interface Declarations
When coding Java classes and interfaces, the following formatting rules should be
followed:
• No space between a method name and the parenthesis “(“starting its parameter
list
• Open brace “{” appears at the end of the same line as the declaration statement
• Closing brace “}” starts a line by itself indented to match its corresponding
opening statement, except when it is a null statement the “}” should appear
immediately after the “{“
class Sample extends Object {
int ivar1;
int ivar2;
Sample(int i, int j) {
ivar1 = i;
ivar2 = j;
28 | P a g e
}
intemptyMethod() {}
...
}
• Methods are separated by a blank line
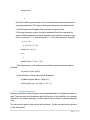
2.7.5 Statements
Simple Statements
Each line should contain at most one statement. Example:
argv++; argc--;
// AVOID!
Do not use the comma operator to group multiple statements unless it is for an obvious
reason.
Example:
if (err) {
Format.print(System.out, “error”), exit(1); //VERY WRONG! }
Compound Statements
Compound statements are statements that contain lists of statements enclosed in
braces “{statements}”. See the following sections for examples.
The enclosed statements should be indented one more level than the compound
statement.
The opening brace should be at the end of the line that begins the compound
statement; the closing brace should begin a line and be indented to the beginning
of the compound statement.
Braces are used around all statements, even singletons, when they are part of a
control structure, such as an if-else or for statement. This makes it easier to add
statements without accidentally introducing bugs due to forgetting to add braces.
Return Statements
A return statement with a value should not use parentheses unless they make the return
value more obvious in some way. Example:
return;
returnmyDisk.size();
29 | P a g e
return (size ? size : defaultSize);
if, if-else, if-else-if-else Statements
The if-else class of statements should have the following form:
if (condition) {
statements;
}
if (condition) {
statements;
} else {
statements;
}
if (condition) {
statements;
} else if (condition) {
statements;
} else if (condition) {
statements;
}
Note: if statements always use braces {}. Avoid the following error-prone form:
if (condition) //AVOID! THIS OMITS THE BRACES {}!
statement;
for Statements
A for statement should have the following form:
for (initialization; condition; update) {
statements;
}
An empty for statement (one in which all the work is done in the initialization, condition,
and update clauses) should have the following form:
for (initialization; condition; update);
When using the comma operator in the initialization or update clause of a for statement,
avoid the complexity of using more than three variables. If needed, use separate
statements before the for loop (for the initialization clause) or at the end of the loop (for
the update clause).
30 | P a g e
while Statements
A while statement should have the following form:
while (condition) {
statements;
}
An empty while statement should have the following form:
while (condition);
do-while Statements
A do-while statement should have the following form:
do {
statements;
} while (condition);
switch Statements
A switch statement should have the following form:
switch (condition) {
case ABC:
statements;
/* falls through */
case DEF:
statements;
break;
case XYZ:
statements;
break;
default:
statements;
break;
}
31 | P a g e
Every time a case falls through (doesn’t include a break statement), add a comment
where the break statement would normally be. This is shown in the preceding code
example with the /* falls through */ comment.
Every switch statement should include a default case. The break in the default case is
redundant, but it prevents a fall-through error if later another case is added.
try-catch Statements
A try-catch statement should have the following format:
try {
statements;
} catch (ExceptionClass e) {
statements;
}
2.7.6 White Space
Blank Lines
Blank lines improve readability by setting off sections of code that are logically related.
Two blank lines should always be used in the following circumstances:
• Between sections of a source file
• Between class and interface definitions
One blank line should always be used in the following circumstances:
• Between methods
• Between the local variables in a method and its first statement
• Before a block (see section 5.1.1) or single-line comment
Between logical sections inside a method to improve readability
Blank Spaces
Blank spaces should be used in the following circumstances:
• A keyword followed by a parenthesis should be separated by a space.
Example:
32 | P a g e
while (true) {
...
}
Note that a blank space should not be used between a method name and its
opening parenthesis. This helps to distinguish keywords from method calls.
• A blank space should appear after commas in argument lists.
• All binary operators except .should be separated from their operands by
spaces. Blank spaces should never separate unary operators such as unary
minus, increment (“++”), and decrement (“--”) from their operands. Example:
a += c + d;
a = (a + b) / (c * d);
while (d++ = s++) {
n++;
}
prints("size is " + foo + "\n");
• The expressions in a for statement should be separated by blank spaces.
Example:
for (expr1; expr2; expr3)
• Casts should be followed by a blank. Examples:
myMethod((byte) aNum, (Object) x);
myFunc((int) (cp + 5), ((int) (i + 3)) + 1);
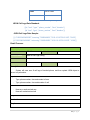
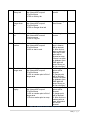
2.7.7 Naming Conventions
Naming conventions make programs more understandable by making them easier to
read. They can also give information about the function of the identifier—for example,
whether it’s a constant, package, or class—which can be helpful in understanding the
code.
The conventions given in this section are high level. Further conventions are given at
(to be determined).
33 | P a g e
Identifier Type
Rules for Naming
Classes
Class names should be nouns, in mixed class Raster;
case with the first letter of each internal
word capitalized. Try to keep your class class ImageSprite;
names simple and descriptive. Use
whole words—avoid acronyms and
abbreviations (unless the abbreviation
is much more widely used than the long
form, such as URL or HTML).
Interfaces
Interface names should be capitalized
like class names.
interface RasterDelegate;
Methods should be verbs, in mixed
case with
run();
Methods
the first letter lowercase, with the first
letter of each internal word capitalized.
Variables
Except for variables, all instance, class,
and class constants are in mixed case
with a lower-case first letter. Internal
words start with capital letters.
Example
interface Storing;
runFast();
getBackground();
int
char
float
i;
*cp;
myWidth;
Variable names should be short yet
meaningful. The choice of a variable
name should be mnemonic—that is,
designed to indicate to the casual
observer the intent of its use. One-charactor variable names should be avoided
except for temporary “throwaway”
variables. Common names for
temporary variables are i, j, k, m, and n
for integers; c, d, and e for characters.
Constants
The names of variables declared class
int MIN_WIDTH = 4;
constants and of ANSI constants should
int MAX_WIDTH = 999;
be all uppercase with words separated
by under-scores (“_”). (ANSI constants
int GET_THE_CPU = 1;
should be avoided, for ease of
debugging.)
34 | P a g e
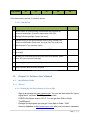
III.
Chapter III - Software Requirement Specification
3.1.
Communication protocol
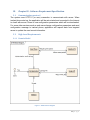
The system uses HTTP1.0 (or over) connection to communicate with server. When
tracked phone start up, the application will be auto started and connected to the Internet
to check with server if there is new configuration parameters which will be downloaded.
For some other services such as end users change configuration parameters and send
configuration message to tracked phone, application will request data from targeted
server to update the most recent information.
3.2.
High Level Requirements
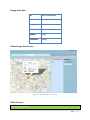
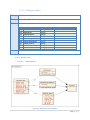
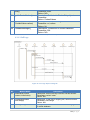
3.1.1 Domain Model
Figure 7 – MTS Domain Diagram
35 | P a g e
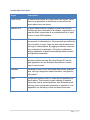
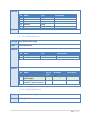
Domain Object Description
Object
Description
Smart Phone
A device which allows MTS application runs implicit. Users
can set up application on this device to track without let
smart phone user one knows.
Satellite GPS
A space-based satellite navigation system that provides
location and time information in all weather, anywhere on or
near the Earth, where there is an unobstructed line of sight
to four or more GPS satellites.
Web application
Website is developed to allow users remotely tracking all
movements of tracked phone. All movements are marked by
lots of position on map. Users can also read all saved sms,
call logs of tracked phone. By logging in website, users can
set configuration to application. Follow the configuration
setting, application is applied automatically when received
configuration parameters.
Google API
A service support users view all information of tracked
phone’s positions on map. By using Google API service,
web application can be developed few features to users
easy to remote track.
Database
Database is built to store all tracked data include: positions,
sms, call logs, dangerous areas information, configuration
information…
Users
People who directly use MTS. Users set up application on
smart phone. Then secretly remote tracking on website.
Users can view all tracked positions, view all saved sms&
call logs, send configuration parameter to application to let
application run following to what and when users want.
Table 7 – Domain Diagram Description
36 | P a g e
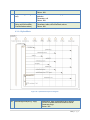
3.1.2 User Case Diagram
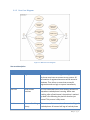
Figure 8 - MTS Use Case Diagram
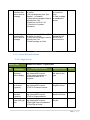
Use case description
Role
Use case Name
Description
End User
Register
This use case allows users register to login to system.
Each user must have an account to use system. All
information of registered accounts will be stored in
database. Then inform to users that successful
registration and can login to system immediately.
End User
View tracked
positions
This use case allows users track secretly positions on
map when tracked phone is moving. When start
tracking, after a fixed interval, the position is marked
by draw a line following the position that has just
passed. This process is fully secret.
End User
View sms& call logs
history
This use case allows users view all sms and call logs of
tracked phone. All smsand call logs of tracked phone
37 | P a g e
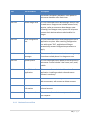
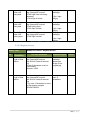
Role
Use case Name
Description
are stored in temporary database. Then update to
web server database after fixed times.
End User
Define danger area
This use case allows users define danger area on map
via web server. Danger areas includes name of area,
location, radius an comment about danger areas.
Following list of danger areas, system can help users
prevent their relatives when tracked mobile is in
danger.
End User
Send configuration
sms
This use case allows users send configuration sms to
application any time. After receiving configuration
sms with syntax “ON”, application will be get
automatically newest configuration parameter to
apply.
End User
Receive alert
messages
This use case allows users receive alert messages any
time when tracked phone is in dangerous area.
End User
Update profile
This use case allows users update profile anytime via
web server. Profile includes: User name, Imei, email,
mobile.
Admin
Install/Uninstall
Application
This use case allows admin install or uninstall
application. Installing as admin role and cannot
remove in usual way.
Admin
Update account
This use case allows admin update account such as:
add new account, edit account or delete account.
Admin
View account
information
This use case allows admin view information of
selected account.
Admin
Reset password
This use case allows admin reset password when end
user requests.
Table 8 – Use Case Description
3.1.3
Business Process Flow
38 | P a g e
Figure 9 - Business Process Flow
Business Flow List
Business Flow Code
Name
BF1
Save Position, SMS & Call Logs
39 | P a g e
Business Flow Code
Name
BF2
Check Dangerous Areas
BF3
Setting configuration Parameters
BF4
Display Statistic Information
BF5
Register
BF6
Login
BF7
Manage Account
Table 9 – Business Flow List
3.2
Functional Requirement
3.2.1 Function “Position Saving”
In this function, system will use GPS to get current position of tracked phone, and then
upload JSON object to server to synchronize.
Position data:
ID
Auto-incremented
IMEI
String
Time
DATETIME
Longitude
Long
Latitude
Long
Table 10 – Position Data Type
JSON Data Standard:
[{id,”imei”,”time“, longitude, latitude}, {id,”imei”,”time“, longitude, latitude}]
JSON Data Sample:
[{1,”012233423456098”,”2012-10-18T00:25:18Z“, 21.0409, 105.7981},
{2,”012233423456098”,”2012-10-18T00:12:23Z“, 34.0908, 102.2341}]
40 | P a g e
Detail Process:
Function Specification
Function No
BF1A1
Function Name
Position Saving
Author
MTS
Date
10/10/2012
Function Version
1.0
Priority
Normal
Description
System will use GPS to get current position of tracked phone, and then upload
JSON object to server to synchronize.
Inputs
Longitude and latitude of position
Source
Longitude and latitude of position by Android API
Outputs
N/A
Destination
N/A
Requires
Network already turns on.(3G,Wifi)
Pre-condition
GPS is available.
Post-condition
Positions are stored in server database.
41 | P a g e
Exception
In case be failed when upload to server database, system will:
-
Logs exception.
Check network to resend.
Table 11 – Position Saving Function Specification
Activity Diagram
Figure 10 - Position Saving Diagram
42 | P a g e
Activity
Auto start
application
Flow
BF1
Code
A1.SP1
Start remote
tracking via
website
BF1
A1.UP2
Get current
position
BF1
A1.SP3
Save
position real
time
Send
configuration
parameters
BF1
A1.SP4
BF1
A1.UP5
Update
configuration
parameters
Synchronize
to web
server
BF1
A1.SP06
BF1
A1.SP7
Update to
server
database
BF1
A1.SP8
Description
Application is set up on smart phone without let
smart phone user one knows. So this application
has to automatically start and run implicit.
Application will automatically start immediately
after starting phone. Since that, most of phone
activities are tracked.
When staring application, users can start remote
tracking most phone activities such as: positions,
messages and call logs. On website, users can
track secretly position real time on map when
tracked phone is moving. Users also can view all
saved messages and call logs of tracked phone
By using GPS satellite, this application can get
phone’s current position. When moving, position is
also updated.
System saves positions real time when tracked
phone is moving. When start moving, after a fixed
interval, the position is saved.
Users permitted set configuration for application on
web. Following this configuration, they can apply
for application by sending a configuration
parameter. Configuration maybe include: interval to
update to server, phone number that sending alert
messages to…
Before updating to server, system has to read
newest configuration. If has a change, update this
configuration immediately then continue to update.
After updating configuration, all just tracked
positions are synchronized to web server. All
tracked positions are displayed on map for users
can be easy to view.
After updating configuration, all just tracked
positions are simultaneously updated to server
database. These positions are saved as history.
Users can view anytime later.
Table 12 – Position Saving Process Description
43 | P a g e
3.2.2 Function “Sms& Call Logs Saving”
In this function, system will save sms& call logs of tracked phone, and then upload
JSON object to server to synchronize.
SMS Data:
ID
Auto-incremented
IMEI
String
Type
String
Phone Number
String
Time
DATETIME
Content
String
Table 13 –SMS Data Type
JSON SMS Data Standard:
[{id,”imei”,”type”,”phone_number”,”time“,”content”},
{id,”imei”,”type”,”phone_number”,”time“,”content”},]
JSON SMS Data Sample:
[{1,”012233423456098”,”incoming”,”0982248952”,”2012-10-18T00:25:18Z“,”Hello”},
{2,”012233423456098”,”outcoming”,”0982248952”,”2012-10-18T00:12:23Z“,”How are you”}]
Call Logs Data:
ID
Auto-incremented
IMEI
String
Type
String
Phone Number
String
44 | P a g e
Time
DATETIME
Duration
Time
Table 14 –Call Logs Data Type
JSON Call Logs Data Standard:
[{id, ”imei”, ”type”, ”phone_number”, ”time”,”duration”},
{id, ”imei”, ”type”, ”phone_number”, ”time”,”duration”}]
JSON Call Logs Data Sample:
[{1,”012233423456098”,”incoming”,”0982248952”,”2012-10-18T00:25:18Z“,”20:08”},
{2,”012233423456098”,”outcoming”,”0982248952”,”2012-10-18T00:12:23Z“,”10:09”}]
Detail Process:
Function Specification
Function No
BF1A2
Function Version
Function Name
SMS & Call Logs Saving
Author
MTS
Date
10/10/2012
Priority
1.0
Normal
Description
System will save sms & call logs of tracked phone, and then upload JSON object to
server to synchronize.
Inputs
-
Type, phone number, time and content of sms.
Type, phone number, time and duration of call.
Source
-
New sms: sent/received sms
New call: make/received call
Outputs
Destination
Requires
45 | P a g e
Network already turns on.(3G,Wifi)
Pre-condition
Post-condition
Sms& call logs are stored in server database.
Exception
In case be failed when upload to server database, system will:
-
Logs exception.
Check network to resend.
Table 15 - Message & Call Logs Saving Function Specification
Activity Diagram
Figure 11 - Message and call logs saving
46 | P a g e
Activity
Auto start
application
Flow
BF1
Code
A2.SP1
Start remote
tracking via
website
BF1
A2.UP2
Save
messages &
call logs to
temporary
database
Send
configuration
parameters
BF1
A2.SP3
BF1
A2.UP4
Update
configuration
parameters
Synchronize
to web
server
Update to
server
database
BF1
A2.SP5
BF1
A2.SP6
BF1
A2.SP7
Description
Application is set up on smart phone without let
smart phone user one knows. So this application
has to automatically start and run implicit.
Application will automatically start immediately
after starting phone. Since that, most of phone
activities are tracked.
When staring application, users can start remote
tracking most phone activities such as: positions,
messages and call logs. On website, users can
track secretly position real time on map when
tracked phone is moving. Users also can view all
saved messages and call logs of tracked phone
System saves all messages & call logs of tracked
phone. When tracked phone send/receive a
messages or make call, this messages or call log is
stored immediately in temporary database.
Users permitted set configuration for application on
web. Following this configuration, they can apply
for application by sending a configuration
parameter. Configuration maybe include: interval to
update to server, phone number that sending alert
messages to…
Before updating to server, system has to read
newest configuration. If has a change, update this
configuration immediately then continue to update.
After updating configuration, all saved messages &
call logs are synchronized to web server. And also
are displayed to users view.
After updating configuration, all saved messages &
call logs are simultaneously updated to server
database. These messages & call logs are saved
as history. Users can view anytime later.
Table 16 SMS and Call Logs Saving Process Description
3.2.3 Function “Define Danger Area”
In this function, end users can click on map to define where danger area with their
children is. Then system will save all about danger area to alert end user when your
children go to there.
47 | P a g e
Danger Area data:
ID
Auto-incremented
IMEI
String
Longitude
Long
Latitude
Long
Radius
Long
Comment
String
Table 17 – Danger Area Data Type
Define Danger Area Screen:
Figure 12 - Define Danger Area Screen
Detail Process:
Function Specification
48 | P a g e
Function No
BF2A1
Function Version 1.0
Function Name
Define Danger Area
Author
MTS
Date
10/10/2012
Priority
Normal
Description
End users can click on map to define where danger area with their children is.
Then system will save all about danger area to alert end user when your children go to
there.
Inputs
End users input Name, Radius and Comment into Define Danger Area popup.
Source
Name, Radius and Comment from text fields of Define Danger Area popup.
Outputs
Danger marker is added to list markers and displayed on the left of map.
Destination
Map of Danger Area screen.
Requires
Danger Area screen is displayed. Map is loaded.
Pre-condition
End users login by users’ role.
Post-condition
Sms & call logs are stored in server database.
Exception
In case be failed when save to server database, system will:
-
Logs exception.
Table 18 - Define Danger Area Function Specification
49 | P a g e
Activity Diagram
Figure 13 - Define Danger Area Diagram
Activity
Name
Choose a
danger point
on map
Flow
Code
Description
BF2
A1.UP1
Display
configuration
form popup
BF2
A1.SP2
Enter Name,
Radius &
Comment of
danger point
BF2
A1.UP3
Get
information
BF2
A1.SP4
Danger area link is displayed in home screen. When
user select danger area link, system will link to
“Danger Area” screen and start “define danger area”
flow. When map is loaded, users can pick a danger
point on map.
After users pick a danger point on map, the
configuration form popup is displayed, include:
Name: Name of danger area.
Radius: Distance between picked point and all
point around.
Comment: Information of danger area.
User must enter full of information about danger
area, include:
Name: Name of danger area.
Radius: Distance between picked point and all
point around.
Comment: Information of danger area.
When users click on “Save” button, system
executesupdating new parameter to database. All
50 | P a g e
Activity
Name
to update
danger area
to database
Flow
Code
Description
danger area information are updated immediately.
Table 19 - Define Danger Area Process Description
3.2.4 Function “Danger tracking”
In this function, according to list of dangerous areas, system will check and send alert
messages to end user if tracked phone in danger.
Dangerous Areas Data:
ID
Auto-increment
IMEI
String
LONGITUDE
Long
LATITUDE
Long
RADIUS
Long
Table 20 - Dangerous Areas Data
JSON Data Standard:
[{id, ”imei”, longitude, latitude},{id, ”imei”, longitude, latitude}]
JSON Data Sample:
[{1,”012233423456098”, 20.2345, 105.2345, 120}, {2,”012233423456098”, 20.1223,
102.2398, 30}]
Detail Process:
Function Specification
Function No
BF2A2
Function Name
Danger Tracking
Author
MTS
Date
10/10/2012
Function Version 1.0
Priority
Normal
51 | P a g e
Description
According to list of dangerous areas, system will check and send alert messages
to end user if tracked phone in danger.
Inputs
Longitude and latitude of current position.
Source
Longitude and latitude of current position by Android API
Outputs
An alert message
Destination
Delivered
Requires
Network
Pre-condition
Network already turns on.(3G,Wifi)
Post-condition
GPS is available.
Exception
Table 21 - Danger Tracking Function Specification
52 | P a g e
Activity Diagram:
Figure 14 - Danger Tracking Diagram
Activity
Auto start
application
Flow
BF2
Code
A2.SP1
Start remote
tracking via
website
BF2
A2.UP2
Description
Application is set up on smart phone without let smart
phone user one knows. So this application has to
automatically start and run implicit. Application will
automatically start immediately after starting phone.
Since that, most of phone activities are tracked.
When staring application, users can start remote
tracking most phone activities such as: positions,
messages and call logs. On website, users can track
secretly position real time on map when tracked
phone is moving. Users also can view all saved
53 | P a g e
Activity
Flow
Code
Description
messages and call logs of tracked phone
Get current
position
BF2
A2.SP3
Check
dangerous
area
BF2
A2.SP4
Send alert
messages
BF2
A2.SP5
Receive alert
messages
BF2
A2.UP6
By using GPS satellite, this application can get
phone’s current position. When moving, position is
also updated.
For each position, system will check dangerous
following list of dangerous areas. List of dangerous
areas are built by users. Users can define some
dangerous areas. If tracked phone moves in danger,
system returns true and call warning handing.
When tracked phone is in danger, system will
immediately send alert messages to users. Messages
may include dangerous location information.
Users will receive alert messages immediately after
system has just send. Receiving alert messages can
help users have a best solution to protect relatives or
own phone.
Table 22 - Danger Tracking Process Description
3.2.5 Function “Update configuration parameter”
In this function, when mobile receive configuration sms from end user, system will autoupdate newest configuration parameter which end user has changed.
Syntax of configuration sms: “ON”
Detail Process:
Function Specification
Function No
BF3A1
Function Version 1.0
Function Name
Update configuration parameter
Author
MTS
Date
10/10/2012
Priority
Normal
Description
When mobile receive configuration sms from end user, system will auto-update
newest configuration parameter which end user has changed.
Inputs
54 | P a g e
Configuration message with syntax “ON”
Source
Outputs
Destination
Requires
Mobile is available.
Pre-condition
Hide configuration message.
Post-condition
-
Automatically turn on network.
Get configuration parameter from server immediately.
Exception
In case be failed when get configuration parameter from server database, system will:
-
Logs exception.
Configuration parameter of database is not changed.
Table 23 - Update Configuration Parameter Function Specification
Activity Diagram:
Figure 15 - Update Configuration Parameter Diagram
55 | P a g e
Activity
Name
Send
configuratio
n sms to
tracked
phone
Request to
get
configuratio
n parameter
from server
Flow
Code
Description
BF3
A1.UP1
To active new configuration parameters, user needs
to send configuration sms to tracked phone.
Content of configuration sms comply with following
syntax: “ON”
BF3
A1.SP2
Save
configuratio
n parameter
to phone’s
DB
BF3
A1.SP3
After receive sms with defined syntax, MTS android
application execute following steps:
Hide configuration sms with phone user
Auto connect network
Send request to get new configuration
parameters to server
Save data which recently get from server to
database of tracked phone
Table 24 - Update Configuration Parameter Process Description
3.2.6 Function “Display statistic information”
In this function, system will display all tracking information for user. Displayed
information is divided by date, includes:
Position history
SMS history
Call logs history
<Refer data sample table in Appendix for more detail>
Position history screen:
56 | P a g e
Figure 16 - Position History Screen
SMS history screen:
57 | P a g e
Figure 17 - SMS History Screen
Figure 18 - SMS Information Detail
Call logs history screen:
Figure 19 - Call logs history screen
58 | P a g e
Figure 20 - Call Logs Information Detail
Detail Process:
Function Specification
Function No
BF4A1
Function Version 1.0
Function Name
Display statistic information
Author
MTS
Date
10/10/2012
Priority
Normal
Description
System will display all tracking information for user. Displayed information is
divided by date.
Inputs
History date.
Source
Date dropdown list, choose date on list.
59 | P a g e
Outputs
List data on chosen date, include: sms, call logs and position.
Destination
Sms & call logs: table of History screen.
Position: Map on History screen.
Requires
History screen is displayed. Map is loaded.
Pre-condition
End users login by users’ role.
Post-condition
-
Sms & call logs are selected from server database and displayed on table
according chosen date.
Position is selected from server database and displayed on map according
chosen date.
Exception
In case be failed when connect to server database to displayed data, system will:
-
System is busy! Please try again later!
Table 25 - Display Statistic Information Function Specification
Activity Diagram:
act Display statistic information
consider User
consider System
View statistic
information
Initial
Select day to v iew
history
Load data from DB
Display on w ebsite
Final
Figure 21 - Display statistic information diagram
60 | P a g e
Activity
Name
View
statistic
informatio
n
Select day
to view
history
Load data
from DB
to display
Flow
Code
Description
BF4
A1.UP1
User select “View statistic information” link from Home
screen.
BF4
A1.UP2
BF4
A1.SP3
Server store history during 30 days. But on screen,
system just displays information of one day. User
selects the day to view history.
System picks data of selected day from DB to display
on website.
Table 26 – Display statistic information process description
3.2.7 Function “Register”
In this function, system allows user create an account to login system and use tracking
service
Register Screen:
Figure 22 - Register Screen
Registration Confirm Screen
61 | P a g e
Figure 23 - Registration Confirm Screen
Detail Process:
Function Specification
Function No
BF5A1
Function Version 1.0
Function Name
Register
Author
MTS
Date
10/10/2012
Priority
Normal
Description
System allows user create an account to login system and use tracking service
Inputs
End users input User name, Password, Confirm password, IMEI, Phone and
Email into Register form.
Source
User name, Password, Confirm password, IMEI, Phone and Email from text
fields.
Validated
Item
IMEI
Required Validate
*
15 digits
Messages
-
“Tối thiểu 15 kí tự.”
62 | P a g e
-
“Dữ liệu là chữ
số.”
Username
*
From 6 to 12 characters.
Cannot input special
characters
-
“Tối thiểu 6 kí tự.”
“Tối đa 12 kí tự.”
Password
*
Display( *) type.
From 6 to 12 characters.
Cannot input special
characters
-
“Tối thiểu 6 kí tự.”
“Tối đa 12 kí tự.”
Equal to password.
-
“Dữ liệu nhập lại
không hợp lệ”
Confirm
password
Mobile
*
Only number
-
“Dữ liệu là số”
Email
*
Email format.
-
“Địa chỉ email
không hợp lệ”
Outputs
-
An account is created if validated.
Show successful messages.
Destination
Register Screen.
Requires
Register screen is loaded.
Pre-condition
End users has not an account.
Post-condition
-
An account is created on database.
Successful message is displayed.
User can log in by this account.
Exception
Incase be failed cause by user name or imei or email existed, show message:
-
User name is existed.
Imei is existed.
Email is existed.
In case be failed when save to server database, system will:
63 | P a g e
-
Logs exception.
Check network to resave.
Table 27 - Register Function Specification
Activity Diagram
Figure 24 - Register Activity Diagram
Activity
Name
Fill out
registration
form
Validate
input
Flow
Code
Description
BF5
A1.UP
1
BF5
A1.SP
2
When using website to remote track, users have to
register an account. To register, users must enter
profile information to registration form.
After registering, information is validated follow:
Item
Required
Type
IMEI
*
string
Username
*
string
64 | P a g e
Activity
Name
Flow
Code
Description
Password
*
string
Mobile
*
string
Email
*
string
Notify error
messages
A1.SP
3
Check
account
existence
Save to DB
A1.SP
4
If validation fails system will immediately notify
problems to user and remark to user re-enters
information
Check existence of account. In case account is existed,
show error message and redirect to Login page
A1.SP
5
A1.SP
6
A1.SP
7
Save all information of account to database when
registered successfully.
In case account already exists for the given email,
systemwill be forwarded to the login page.
User is registered. Success messages will be show to
user to authenticate.
Redirect to
Login Page
Notify
successful
registration
BF5
BF5
Table 28 – Register Process Description
3.2.8 Function “Login”
In this function, user login to website to use system service.
Login Screen
Figure 25 - Login screen
65 | P a g e
Detail Process
Function Specification
Function No
BF6A1
Function Version 1.0
Function Name
Login
Author
MTS
Date
10/10/2012
Priority
Normal
Description
User login to website to use system service.
Inputs
-
Login: End users input Username & Password into Login Form.
Source
-
Login: User name and Password from text fields Login form.
Validate
-
Login:
Item
Required Validate
Messages
Username
*
From 6 to 12 characters.
Cannot input special
characters
-
“Tối thiểu 6 kí tự.”
“Tối đa 12 kí tự.”
Password
*
Display( *) type.
From 6 to 12 characters.
Cannot input special
characters
-
“Tối thiểu 6 kí tự.”
“Tối đa 12 kí tự.”
Outputs
If account is exited, user login successfully by own account.
Destination
-
Login screen.
Requires
-
Login screen is displayed.
Pre-condition
66 | P a g e
-
Login: End users go to web by url
Post-condition
-
Login: End users login by own account and use all feature of system by users’
role.
Exception
In case be failed when upload to server database, system will:
-
Logs exception.
Check network to resend.
Table 29 - Login Function Specification
Activity Diagram
Figure 26 - Login Activity diagram
Activity
Name
Enter user
name &
password
Check
validation
Flow
Code
Description
BF6
A1.UP1
BF6
A1.SP2
When using website to remote track, users must login
to system. To login, users must enter user name and
password into login form.
After login, user name & password must be validated.
67 | P a g e
Activity
Name
Show error
Flow
Code
Description
BF6
A1.SP3
Incase username and password are invalid, notify user
by showing errors
Login
BF6
A1.SP4
Link to
history page
BF6
A1.SP5
In case username & password are valid, login
successfully.
After login successfully, system link to history page.
Table 30 - Login Process Description
3.2.9 Function “Update Profile”
In this function, system allows users update profile information. Updated information
includes:
User name
IMEI
Email
Mobile
Update Profile Screen
Figure 27 - Update Profile Screen
68 | P a g e
Detail Process
Function Specification
Function No
BF6A2
Function Version 1.0
Function Name
Update Profile
Author
MTS
Date
10/10/2012
Priority
Normal
Description
User can update profile in case having changes.
Inputs
-
Profile Update: When login successfully, input to update information about
account: User name, IMEI, Mobile, Email of Profile Form.
Source
-
Profile Update: User name, IMEI, Mobile, Email from text field of Profile form.
Validate
-
Profile Update:
Item
Required Validate
Messages
IMEI
*
15 digits.
-
“Tối thiểu 15 kí tự.”
“Dữ liệu là chữ số”
Mobile
*
Only number
-
“Dữ liệu là số”
Email
*
Email form
-
“Địa
chỉ email
không hợp lệ”
User name
*
From 6 to 12 characters.
Cannot input special
characters
-
“Tối thiểu 6 kí tự”
“Tối đa 12 kí tự”
Outputs
View profile to update.
Destination
-
Profile screen
Requires
69 | P a g e
-
Profile screen is displayed with data if login successfully.
Pre-condition
-
Profile Update: End users login by users’ role.
Post-condition
-
Profile Updated: Profile is updated to server database
Exception
In case be failed when upload to server database, system will:
-
Logs exception.
Check network to resend.
Table 31 - Update Profile Function Specification
Activities Diagram
Figure 28 - Update Profile Activity Diagram
70 | P a g e
Activity
Name
Login to
system
Select
“Update
Profile”
link
Load
account
informatio
n to
display
Select
“Update”
button
Flow
Code
Description
BF6
A2.UP1
Users must have login to system by registered account.
BF7
A1.SP2
After login successfully, Select “Update Profile ” link on
menu of home page.
BF7
A1.UP3
Profile information are loaded when user click on
“Update Profile” on home page menu. Profile
information includes: User name, IMEI, Mobile, Email.
BF7
A1.SP4
Select “Update” to update changed account information.
Select
“Change
pwd”
button
Validate
input
BF7
A1.UP5
Select “Change pwd” to change current password.
BF7
A1.SP6
When input changed data, system will validate
information.
Notify
error
message
Update to
database
BF7
A1.UP7
Incase data inputs are invalid, notify user by showing
errors
BF7
A1.UP8
Update all information of account to database after click
one of button: Update, Change pwd.
Table 32 - Update Profile Activity Description
3.2.10 Function “Manage Account”
In this function, system allows admin manage account information. Account managed
information includes:
User name
Role
IMEI
Mobile
71 | P a g e
Email
Manage Account Screen:
Figure 29 - Update account screen
Figure 30 - Account Information Detail
Detail Process:
Function Specification
Function No
BF7A1
Function Version 1.0
72 | P a g e
Function Name
Manage Account
Author
MTS
Date
10/10/2012
Priority
Normal
Description
System allows admin update account information.
Inputs
Admin input User name, Role, IMEI, Mobile, Email into Account Management
popup form.
Source
Password and Role from text fields of Account Management popup form.
Outputs
Account information are changed.
Destination
Account Management screen.
Requires
Account Management screen is displayed. Account information is loaded.
Pre-condition
Adminlogin by admin’s role.
Post-condition
Account information are updated and stored in server database.
Exception
In case be failed when upload to server database, system will:
-
Logs exception.
Check network to resave.
Table 33 - Update Account Function Specification
Activity Diagram
73 | P a g e
Figure 31 - Update Account Activity Diagram
Activity
Name
Login as
admin role
Load to
display
account
informatio
n
Select an
account
detail
Display
selected
account
detail
Flow
Code
Description
BF7
A1.UP1
BF7
A1.SP2
To manage accounts, admin must have login to system
as administrator.
System connect database to select all account. Then
display list of accounts to screen. Paging when list view
is too long.
BF7
A1.UP3
When view any account detail, admin can click on
username of account link on list to select.
BF7
A1.SP4
Information detail of selected account is displayed
immediately after click on. Display popup.
74 | P a g e
Activity
Name
Flow
Code
Description
Update
BF7
A1.UP5
Reset
password
BF7
A1.SP6
Admin can update account that have just selected. Edit
to change some information of user.
Admin can reset password of account that have just
selected.
Delete
BF7
A1.UP7
Update to
database
BF7
A1.UP8
Admin can delete account that have just selected. Click
“Delete” to remove selected account from system
Update all information of account to database after click
one of button: Update, Delete, Reset password.
Table 34 – Manage Account Process Description
3.3
Non – Functional Requirement
3.3.1 Usability
The website interface is clear, simple and out-standing.
The website is designed with friendly user interface. Input will be
validated. The user should only have general computer use knowledge. Error
messages will be displayed in case of an invalid request. Users need no time
for training or reading guideline.
Searching tool should be easy to use.
The website must provide a help page to support novice users.
Users can use main functionality of the system without logging in to the
system.
3.3.2 Reliability
The database must be backed up regularly and can be recovered if necessary
Mean time between failures (MTBF): The mean time between each failure is
expected to be about 480 hours (20 days) of using.
Mean time to repair (MTTR): Immediately when admin finds out problem or
website is attacked by someone. Average 1 day.
The maximum bugs per function are 2 bugs/a function. The average number
of bugs in the software is about to be around 0.5 bugs.
Bug or Defect Rate
Bug
Definition
75 | P a g e
Bug
Minor
Significant
Critical
Definition
Bugs related to GUI
Bugs related to minor business logic
Function can’t execute correctly, completely loss of data,
disconnect to the server
Table 35 – Bugs or Defect Rate
3.3.3 Availability
The system will be available 24/24 and should be closed 1 day for maintaining
every two months
Percentage of time available is about 95-97%. Because the system uses
client/server protocol through Internet network, we cannot control cases of
force majeure such as power failure, disconnected network…
3.3.4 Security
Privacy: the system should provide protection method for protecting user
information from outside or from other users. All the information of users must
not be available for anyone or software that is not part of the system. User
password is also invisible for the system administrator.
The system must provide methods to prevent common security attacks. E.g.
SQL injection…
Application is installed underground.
Transformation of confidential information must be encrypted.
The system must provide secure methods for users to recovery their
password, including the interference of system’s admin.
3.3.5 Maintainability
Coding standards and naming conventions
Output of the project must include coding standards and naming
conventions documentations. Implementation code must be easy to
maintain.
All code must be clearly commented, including class, method
documentations.
If some components are reused, the documentations of those components
must also be included.
Design
The design of the system must be loosely coupled that chances on some
module will not affect others.
76 | P a g e
Logging
All the errors should be logged, supporting for bug fixing and
maintenance.
All strange or sensitive situations should also be logged.
Email
The system must provide an email address to receive customer feedback
or send emails.
3.3.6 Portability
Website and smart phone can be used by any people with a browser and an
Internet connection.
3.3.7 Performance
Response time under 10 seconds
IV.
Chapter IV - Software Architecture Design
4.1
System Architecture Design
Figure 32 - System Overview
77 | P a g e
4.1.1 Mobile
Figure 33 - Mobile Architecture Design
ID
01
02
03
04
05
06
07
08
Package Name
Common Bean
Common Utils
Common Service
Business mbtrack
Business sms
Business callog
Business danger
Data Access DB
Description
Contains Bean Classes
Contains Utility Classes
Contains Service Classes
Notes
Contains SMSTracking Classes
Contains Call Logs Tracking Classes
Contains Database Interaction
Classes
Table 36 - Mobile Packages
78 | P a g e
4.1.2 Server
Figure 34 - Server Architecture Design
ID
01
02
03
04
05
06
07
Package Name
Common CSS
Common JS
Common Database
Common
Presentation History
Presentation Image
Presentation Marker
Presentation Account
08
09
10
11
12
Presentation Admin
Business History
Business Login
Business Marker
Business Register
Description
Contains Style Sheet Files
Contains JavaScript Files
Contains Database Access Classes
Notes
Contains Interface Files of History Process
Contains Image Files
Contains Interface Files of Marker Process
Contains Interface Files of Account
Management Process
Contains Interface Files of Admin Process
Contains All Files of History Process Logic
Contains All Files of Login Process Logic
Contains All Files of Marker Process Logic
Contains All Files of Register Process Logic
79 | P a g e
13 Business Service
14 Business Admin
15 Business Update
Account
Contains Service Files
Contains All Files of Admin Process Logic
Contains All Files of Update Account Process
Logic
Table 37 - Server Packages
4.2
Class Diagram
4.2.1 Mobile
4.2.1.1 SMS
4.2.1.1.1 Class diagram
Figure 35 - SMS Class Diagram
4.2.1.1.2 Class explanation
4.2.1.1.2.1 SMSReceiver
Package
com.android.mts.sms
Class
SMSReceiver
Attribute
No Name
01 mContext
02 smsSource
Type
Description
Context
SMSDataSource
80 | P a g e
03
specificPhoneNumber String
Method
No Name
01
onReceive(Context
context, Intent
intent)
Return Parameter
Type
context,
intent
Description
Table 38 - SMSReceiver
4.2.1.1.2.2 SMSDataSource
Package
com.android.mts.sms
Class
SMSDataSource
Attribute
No Name
01 database
02 smsDbHelper
Type
Description
SQLiteDatabase
DataBaseManager
Method
No Name
01
02
03
04
05
Return Parameter Description
Type
close()
createSMS(SMSBean
sms)
deleteSMS()
open()
SMSDataSource(Context
context)
sms
context
Table 39 - SMSDataSource
4.2.1.1.2.3 SMSSentObserver
Package
com.android.mts.sms
Class
SMSSentObserver
81 | P a g e
Attribute
No
01
02
Name
mContext
smsSource
Type
Context
SMSDataSource
Description
Method
No
Name
01
onChange(boolean
selfChange)
SmsSentObserver(H
andler handler,
Context ctx,
SMSDataSource
smsSource)
02
Return
Type
Parameter
Description
selfChange
Handler,ctx
,smsSourc
e
Table 40 - SMSSentObserver
4.2.1.1.2.4 EnableConnectionService
Package
com.android.mts.service
Class
EnableConnectionService
Attribute
No Name
01 URL
02 configData
Type
Description
String
ConfigDataSource
Method
No Name
01
02
03
04
05
06
07
Return Parameter
Type
T/F
isOnline()
onBind()
onCreate()
onDestroy()
onStart(Intent intent, int
startid)
getDangerousLocation() List
getTimeDuaration
int
Description
Intent, startid
Table 41 – EnableConnectionService
82 | P a g e
4.2.1.1.2.5 DataBaseManager
Package
com.android.mts.db
Class
DataBaseManager
Attribute
No Name
01 mContext
02 mDataBase
Type
Description
Context
SQLiteDatabase
Method
No Name
Return
Type
01
DataBaseManager(Context
context)
02
select(String query)
Cursor
03
04
getDataTracking()
getDataSMS()
Array
Array
05
getDataCallLog()
Array
06
deleteAllDataTable(String
tableName)
insert(String table,
ContentValues values)
delete(String table, String
where)
update(String table,
ContentValues values,
String where)
sqlCommand(String
command)
07
08
09
10
Parameter
Description
context
Constructor
takes and
keeps a
reference of
the passed
context in
order to access
to the
application
assets and
resources.
Return cursor
with the results
query
Get data from
table sms
Get data from
table call log
tableName
table,
values
table,
where
table,
values,
where
command
Make a raw
query
83 | P a g e
11
12
13
close()
onCreate(SQLiteDatabase
db)
onUpgrade(SQLiteDatabase
db, int oldVersion, int
newVersion)
db
db,
oldVersion,
newVersion
Table 42 - DatabaseManager
4.2.1.1.2.6 SMSSentService
Package
com.android.mts.sms
Class
SMSSentService
Attribute
No Name
01 smsSentObserver
02 smsSource
Type
Description
SMSSentObserver
SMSDataSource
Method
No Name
01
02
onStart(Intent intent,
int startId)
onBind(Intent intent)
Return Parameter
Type
intent, startId
Description
intent
Table 43 - SMSSentService
4.2.1.1.2.7 JSONParser
Package
com.android.mts.utils
Class
JSONParser
Attribute
No
01
02
03
Name
is
jObj
Json
Type
InputStream
JSONObject
String
Description
84 | P a g e
Method
No
Name
01
02
JSONParser()
makeHttpRequest(Strin
g url, String method,
List<NameValuePair>
params
getDataFromServer(Stri
ng url)
03
04
Return
Type
readParameterConfig(S
tring url)
Parameter
Description
Contructor
Get json from
url
JSONO
bject
JSONAr
ray
url
String
url
Get
configuration
data from
server
Table 44 - JSONParser
4.2.1.1.2.8 ConfigDataSource
Package
com.android.mts.config
Class
ConfigDataSource
Attribute
No
01
Name
Database
Type
SPLiteDatabas
e
DatabaseMana
ger
02
dbHelper
No
Name
01
02
close()
ConfigDataSource(Cont
ext context)
createParameterConfig(
ConfigBean config)
open()
Description
Method
03
04
Return
Type
Parameter
Description
context
config
Table 45 - ConfigDataSource
4.2.1.1.2.9 GetParametersConfig
Package
com.android.mts.service
85 | P a g e
Class
GetParametersConfig
Attribute
Method
No
01
Name
Return
Type
doInBackground(String…p String
arams)
Paramete
r
params
Description
Table 46 - GetParamatersConfig
4.2.1.1.2.10 ConfigBean
Package
com.android.mts.bean
Class
ConfigBean
Attribute
No Name
01 phoneNum
02 timeDuration
Type
String
String
Description
Method
No Name
01
02
03
04
getPhoneNum()
getTimeDuration()
setPhoneNum(String
phoneNum)
setTimeDuation(String
timeDuration)
Return Parameter
Type
String
String
phoneNum
Description
timeDuration
Table 47 - ConfigBean
4.2.1.1.2.11 SMSBean
Package
com.android.mts.bean
Class
SMSBean
86 | P a g e
Attribute
No
01
02
03
Name
id
type
phoneNum
Type
Long
String
String
04
05
time
content
String
String
Description
Id of sms
Sms type
Sent/received sms phone
number
Sent /Received sms time
Content of sms
Method
Table 48– SMSBean
4.2.1.1.2.12GetMarkerConfig
Package
com.android.mts.service
Class
GetMarkerConfig
Attribute
Method
No
01
Name
Return
Type
doInBackground(String…p String
arams)
Paramete
r
params
Description
Table 49 – GetMarkerConfig
87 | P a g e
4.2.1.2 Mobile Track
4.2.1.2.1 Class diagram
Figure 36 - Mobile Track Class Diagram
4.2.1.2.2 Class explanation
4.2.1.2.2.1 NetworkStateBroadcastReceiver
Package com.android.mts.mbtrack
Class
NetworkStateBroadcastReceiver
Attribute
88 | P a g e
Method
No Name
01
onReceive(Context
context, Intent
intent)
Return Parameter Description
Type
Context,
Listener + recorder for
intent
mobile or wifi updates
Table 50 - NetworkStateBroadcastReceiver
4.2.1.2.2.2 BootUpReceiver
Package com.android.mts.service
Class
BootUpReceiver
Attribute
Method
No Name
01
onReceive(Context
context, Intent intent)
Return Parameter
Type
Context, intent
Description
Table 51 - BootUpReceiver
4.2.1.2.2.3 PreferenceListener
Package
com.android.mts.mbtrack
Class
PreferenceListener
Attribute
Method
No
Name
Return
Type
01
onSharedPreference
Changed(
SharedPreferences
sharedPreferences, String
key)
Parameter
Descriptio
n
shared
Preferences,
key
Table 52 - PreferenceListener
89 | P a g e
4.2.1.2.2.4 SMSSentService
Package com.android.mts.sms
Class
SMSSentService
Attribute
No Name
01 smsSentObserver
02 smsSource
Type
Description
SMSSentObserver
SMSDataSource
Method
No Name
01
02
Return Parameter
Type
intent, startId
onStart(Intent intent,
int startId)
onBind(Intent intent)
Description
intent
Table 53 - SMSSentService
4.2.1.2.2.5 MobileTrackService
Packag
e
com.android.mts.sms
Class
SMSSentService
Attribut
e
No Name
01 mListeners
02 mNetwork
Type
List
NetworkState
BroadcastReceiver
03
04
05
06
07
Location
PhoneStateListener
PreferenceListener
TelephonyManager
TrackDataHelper
mNetworkLocation
mPhoneStateListener
mPrefListener
mTelephonyManager
mTrackerData
Description
Handlers and Receivers
for phone and network
state
90 | P a g e
Method
No
Name
01
02
doDebugLogging()
getDistanceFromNetwork
(Location location)
03
getLocationManager
04
getPreferences()
05
06
07
initLocationListeners()
onBind(Intent intent)
onCellLocationChanged
(CellLocation location)
onDestroy()
08
09
11
onSignalStrengthsChanged
(SignalStrength
signalStrength)
onStart(Intent intent, int
startId)
stopListeners()
12
13
trackGPS()
trackNetwork()
10
Return
Type
T/F
float
Parameter
Description
location
Determine
the current
distance
from given
location
Location
Manager
Shared
Preferences
IBinder
location
Shut down
this service
signalStrength
Intent, startId
De-registers
all location
listeners,
closes
persistent
storage
T/F
T/F
Table 54 - MobileTrackService
4.2.1.2.2.6 LocationTrackingListener
Packag
e
com.android.mts.mbtrack
Class
LocationTrackingListener
Attribute
91 | P a g e
Method
No
01
02
03
04
Name
Return Parameter
Type
onLocationChanged(Location
location
location
Description
Detail of
location
update to
tracking file
provider
Update to
tracking file
provider
Update to
tracking file
Provider,status, Update to
extras
tracking file
onProviderDisabled(String
provider)
onProviderEnable(String
provider)
onStatusChanged(String
provider, int status, Bundle
extras)
Table 55 - LocationTrackingListener
4.2.1.2.2.7 TrackerProvider
Package
com.android.mts.mbtrack
Class
TrackerProvider
Attribute
No
01
Name
mOpenHelper
Type
Description
DataBaseManager
Method
No Name
01
02
03
04
05
06
delete(Uri uri, String
selection, String[]
selectionArgs)
onCreate()
getType(Uri uri)
insert(Uri
uri,ContentValues
values)
query(Uri uri,String[]
projection,String
selection, String[]
selectionArgs, String
sortOrder)
update(Uri uri,
ContentValues values,
String selection, String[]
Return Parameter
Type
Int
uri, selection,
selectionArgs
T/F
String
Uri
Description
uri
uri, values
Cursor
uri, projection,
selection,
selectionArgs,
sortOrder
Int
uri, values, selection,
selectionArgs
92 | P a g e
selectionArgs)
Table 56 - TrackerProvider
4.2.1.2.2.8 TrackerEntry
Package com.android.mts.mbtrack
Class
TrackerEntry
Attribute
No
01
02
03
04
05
06
Name
mDistFromNetLocation
mLocation
mLogMsg
mTag
mTimestamp
mType
Type
Float
Location
String
String
String
EntryType
Description
Method
No Name
01
02
03
buildCreationString
(StringBuilder builder)
createEntry
(Cursor cursor)
createEntry
(String tag, String msg)
Return
Type
Parameter
Description
builder
Tracker
Entry
Tracker
Entry
04
createEntry
(Location loc, float
distFromNetLocation)
Tracker
Entry
05
getAsContentValues()
06
07
08
09
10
11
getDistFromNetLocation()
getLocation()
getLogMsg()
getTag()
getTimestamp()
getType()
Content
Values
Float
Location
String
String
String
Entry
Type
cursor
Tag,msg
Create a
rackerEntry
from a log
msg
Loc,distFrom Create a
NetLocation rackerEntry
from a
Location
93 | P a g e
12
13
14
15
16
17
18
setLogMsg(String msg)
setDistFromNetLocation(float
distFromNetLocation)
setTimestamp
(String timestamp)
setLocation(Location
location)
TrackerEntry
(String tag, EntryType type)
TrackerEntry(Location loc)
getNullableFloat
Float
(Cursor cursor, string
colName)
msg
distFrom
NetLocation
timestamp
location
Tag, type
loc
Table 57 - TrackerEntry
4.2.1.2.2.9 TrackDataHelper
Package com.android.mts.mbtrack
Class
TrackerProvider
Attribute
No Name
01 mFormatter
02 mContext
Type
IFormatter
Context
Description
Method
No Name
Description
01
Create
instance
02
03
Return Parameter
Type
TrackDataHelper(Context
Context,
context, IFormatter
formatter
formatter)
TrackDataHelper(Context
context
context)
deleteAll()
04
getNextOutput(Cursor
cursor)
String
05
getOutputFooter()
String
cursor
Create
instance
Delete all
tracker entries
Helper method
which converts
row referenced
by given
cursor to a
string output
Return output
footer
particular to
94 | P a g e
06
getOutputHeader()
String
07
query(string tag, int limit)
Cursor
08
query(int limit)
Cursor
09
query(String tag)
Cursor
10
writeEntry(TrackerEntry
entry)
11
writeEntry(Location loc,
float distFromNetLoc)
12
writeEntry(String tag,
String logMsg)
the associated
formatter
Return output
header
particular to
the associated
formatter
tag, limit
Query tracker
data filtering
by given tag
limit
Retrieves a
cursor that
starts at the
last limit rows
tag
Query tracker
data, filtering
by given tag
entry
Insert given
TrackerEntry
into content
provinder
loc,
Insert given
distFromNetLoc location into
tracker data
Tag, logMsg
Insert given
log message
into tracker
data
Table 58 - TrackDataHelper
4.2.1.2.2.10 EnableConnectionService
Package
com.android.mts.service
Class
EnableConnectionService
Attribute
No Name
01 URL
02 configData
Type
Description
String
ConfigDataSource
95 | P a g e
Method
No Name
01
02
03
04
05
06
07
Return Parameter
Type
T/F
isOnline()
onBind()
onCreate()
onDestroy()
onStart(Intent intent, int
startid)
getDangerousLocation() List
getTimeDuaration
int
Description
Intent, startid
Table 59 - EnableConnectionService
4.2.1.2.2.11
DataBaseManager
Package
com.android.mts.db
Class
DataBaseManager
Attribute
No Name
01 mContext
02 mDataBase
Type
Description
Context
SQLiteDatabase
96 | P a g e
Method
No Name
Return
Type
01
DataBaseManager(Context
context)
02
select(String query)
Cursor
03
04
getDataTracking()
getDataSMS()
Array
Array
05
getDataCallLog()
Array
06
deleteAllDataTable(String
tableName)
insert(String table,
ContentValues values)
delete(String table, String
where)
update(String table,
ContentValues values,
String where)
sqlCommand(String
command)
close()
onCreate(SQLiteDatabase
db)
onUpgrade(SQLiteDatabase
db, int oldVersion, int
newVersion)
07
08
09
10
11
12
13
Parameter
Description
context
Constructor
takes and
keeps a
reference of
the passed
context in
order to access
to the
application
assets and
resources.
Return cursor
with the results
query
Get data from
table sms
Get data from
table call log
tableName
table,
values
table,
where
table,
values,
where
command
Make a raw
query
db
db,
oldVersion,
newVersion
Table 60 - DataBaseManager
97 | P a g e
4.2.1.3 Call Logs
4.2.1.3.1 Class diagram
Figure 37 – Call Logs Class Diagram
4.2.1.3.2 Class explanation
4.2.1.3.2.1 CallLogBean
Package com.android.mts.bean
Class
CallLogBean
98 | P a g e
Attribute
No
01
02
03
04
05
Name
id
type
phoneNum
duration
time
Type
Long
String
String
String
String
Description
Method
Table 61 - CallLogBean
4.2.1.3.2.2 CallLogObserver
Package com.android.mts.callog
Class
CallLogObserver
Attribute
No Name
01 callLogSource
02 context
Type
Description
CallLogDataSource
Context
Method
No Name
01
02
onChange(boolean
selfChange)
CallLogObserver(Handler
handler, Context context)
Return Parameter
Type
selfChange
Description
Handler,context
Table 62 - CallLogObserver
4.2.1.3.2.3 CallLogDataSource
Package com.android.mts.callog
Class
CallLogDataSource
99 | P a g e
Attribute
No Name
01 callLogDbHelper
02 Database
Type
Description
DataBaseManager
SQLiteDatabase
Method
No Name
01
02
03
04
05
Return
Type
CallLogDataSource(Context
context)
close()
open()
deleteCallLog()
createCallLog(CallLogBean
call)
Parameter
Description
context
call
Delete call log
Save call log
into database
Table 63 - CalLogDataSource
4.2.1.3.2.4 DataBaseManager
Package
com.android.mts.db
Class
DataBaseManager
Attribute
No Name
01 mContext
02 mDataBase
Type
Description
Context
SQLiteDatabase
100 | P a g e
Method
No Name
Return
Type
01
DataBaseManager(Context
context)
02
select(String query)
Cursor
03
04
getDataTracking()
getDataSMS()
Array
Array
05
getDataCallLog()
Array
06
deleteAllDataTable(String
tableName)
insert(String table,
ContentValues values)
delete(String table, String
where)
update(String table,
ContentValues values,
String where)
sqlCommand(String
command)
close()
onCreate(SQLiteDatabase
db)
onUpgrade(SQLiteDatabase
db, int oldVersion, int
newVersion)
07
08
09
10
11
12
13
Parameter
Description
context
Constructor
takes and
keeps a
reference of
the passed
context in
order to access
to the
application
assets and
resources.
Return cursor
with the results
query
Get data from
table sms
Get data from
table call log
tableName
table,
values
table,
where
table,
values,
where
command
Make a raw
query
db
db,
oldVersion,
newVersion
Table 64 - DataBaseManager
101 | P a g e
4.2.1.3.2.5 CallLogReceiver
Package com.android.mts.callog
Class
CallLogReceiver
Attribute
No Name
01 callLogSource
02 mContext
Type
Description
CallLogDataSource
Context
Method
No Name
01
Return
Type
onReceive(Context
context, Intent
intent)
Parameter
Description
context,
intent
Table 65– CallLogReceiver
4.2.1.4 Upload Service
4.2.1.4.1 Class Diagram
Figure 38 - Upload Service Class Diagram
102 | P a g e
4.2.1.4.2 Class Explanation
4.2.1.4.2.1 EnableConnectionService
Package
com.android.mts.service
Class
EnableConnectionService
Attribute
No Name
01 URL
02 configData
Type
Description
String
ConfigDataSource
Method
No Name
01
02
03
04
05
06
07
Return Parameter
Type
T/F
isOnline()
onBind()
onCreate()
onDestroy()
onStart(Intent intent, int
startid)
getDangerousLocation() List
getTimeDuaration
int
Description
Intent, startid
Table 66 - EnableConectionService
4.2.1.4.2.2 UploadDataService
Package
com.android.mts.service
Class
UploadDataService
Attribute
No
01
Name
jsonParser
Type
JSONParser
No
Name
01
createCsvFileTableC
Description
Method
Return
Type
Parameter
Description
filename
103 | P a g e
02
03
04
05
06
07
08
allLog(String
filename)
createCsvFileTableS
MS(String filename)
createCsvFileTableTr
acking(String
filename)
onBind(Intent intent) IBinder
onHandleIntent(Inten
t intent)
scheduleNextUpdate
()
UploadDataService()
uploadFile(String
tableName)
filename
filename
intent
intent
tableName
Table 67 - UploadDataService
4.2.1.4.2.3 UploadTracking
Package com.android.mts.service
Class
UploadTracking
Attribute
Method
No Name
01
Return
Type
doInBackground(String…
args)
Parameter Description
Upload data
Table 68 - UploadTracking
4.2.1.4.2.4 CSVWriter
Package com.android.mts.utils
Class
CSVWriter
104 | P a g e
Attribute
No
01
02
03
04
05
Name
escapechar
lineEnd
pw
quotechar
separator
Type
Char
String
PrintWriter
Char
Char
Description
Method
No Name
Return Parameter
Type
01
close()
02
CSVWriter(Writer
writer)
03
CSVWriter(Writer
writer, char
separator, char
quotechar, char
escapechar, String
lineEnd)
flush()
04
05
writeNext(String[]
nextLine)
Description
Close the underlying
stream writer flushing
any buffered content
writer
Constructs
CSVWriter using a
comma for the
separator
Writer,
Constructs
separator,
CSVWriter with
quotechar,
supplied separator,
escapechar, quote char, escape
lineEnd
char and line ending
nextLine
Flush underlying
stream to writer
Writes the next line
to the file
Table 69 - CSVWriter
4.2.1.4.2.5 JSONParser
Package
com.android.mts.utils
Class
JSONParser
Attribute
No
01
02
03
Name
is
jObj
Json
Type
InputStream
JSONObject
String
Description
105 | P a g e
Method
No
Name
01
02
JSONParser()
makeHttpRequest(Stri
ng url, String method,
List<NameValuePair>
params
getDataFromServer(S
tring url)
03
04
Return
Type
Parameter
Description
Contructor
Get json from
url
JSONObj
ect
JSON
Array
url
readParameterConfig( String
String url)
url
Get
configuration
data from
server
Table 70 - JSONParser
4.2.1.4.2.6 DatabaseManager
Package
com.android.mts.db
Class
DataBaseManager
Attribute
No Name
01 mContext
02 mDataBase
Type
Description
Context
SQLiteDatabase
Method
No Name
Return
Type
01
DataBaseManager(Context
context)
02
select(String query)
Cursor
03
04
getDataTracking()
getDataSMS()
Array
Array
Parameter
Description
context
Constructor
takes and
keeps a
reference of
the past
context in
order to access
to the
application
assets and
resources.
Return cursor
with the results
query
Get data from
106 | P a g e
05
getDataCallLog()
06
deleteAllDataTable(String
tableName)
insert(String table,
ContentValues values)
delete(String table, String
where)
update(String table,
ContentValues values,
String where)
sqlCommand(String
command)
close()
onCreate(SQLiteDatabase
db)
onUpgrade(SQLiteDatabase
db, int oldVersion, int
newVersion)
07
08
09
10
11
12
13
table sms
Get data from
table call log
Array
tableName
table,
values
table,
where
table,
values,
where
command
Make a raw
query
db
db,
oldVersion,
newVersion
Table 71 - DatabaseManager
4.2.1.4.2.7 CallLogBean
Package com.android.mts.bean
Class
CallLogBean
Attribute
No
01
02
03
04
05
Name
id
type
phoneNum
duration
time
Type
Long
String
String
String
String
Description
Method
Table 72 - CallLogBean
4.2.1.4.2.8 TrackingBean
Package com.android.mts.bean
Class
TrackingBean
107 | P a g e
Attribute
No
01
02
03
04
05
06
07
08
09
10
11
12
13
Name
Accuracy
Altitude
Bearing
DebugInfo
DistFromNetLocation
id
Latitude
LocationTime
Longitude
Speed
Tag
Timestamp
Type
Type
String
String
String
String
String
String
Double
Double
Double
String
String
String
String
Description
Method
Table 73 - TrackingBean
4.2.1.4.2.9 AlarmManager
Package Android class
Class
AlarmManager
Attribute
Method
No Name
01
Return
Type
Set(PendingIntent
operation , long
triggerAtMillis, int type)
Parameter
Description
operation,
triggerAtmillis,
type
Table 74 - AlarmManager
108 | P a g e
4.2.2 Server
4.2.2.1 Account
4.2.2.1.1 Class diagram
Figure 39 - Account Class Diagram
4.2.2.1.2 Class explanation
4.2.2.1.2.1 ConfirmSite
Package
109 | P a g e
Class
ConfirmSite
Attribute
No
01
02
03
04
05
Name
email
imei
mobile
pwd
usernameRegister
Type
String
String
String
String
String
Description
Method
Table 75 - ConfirmSite
4.2.2.1.2.2 AccountDBFuntion
Package
Common.DatabaseCommon
Class
accountDBFuntion
Attribute
No
01
02
03
04
05
Name
email
id
imei
Phone_number
role
Type
String
String
String
String
String
Description
Method
Table 76 - AccountDBFunction
4.2.2.1.2.3 CheckLogin
Package
Business.Login
Class
CheckLogin
Attribute
No Name
01 name
02 pwd
Type
String
String
Description
Method
Table 77 - CheckLogin
110 | P a g e
4.2.2.1.2.4 ChangePasswordDB
Package
Business.UpdateAccount
Class
ChangePasswordDB
Attribute
No
01
02
03
Name
passwordNew
passwordOld
usernameSession
Type
String
String
String
Description
Method
Table 78 - ChangePasswordDB
4.2.2.1.2.5 UpdateAccountDB
Package
Business.UpdateAccount
Class
updateAccountDB
Attribute
No
01
02
03
04
Name
email
imei
mobi
usernameRegister
Type
String
String
String
String
Description
Method
Table 79 - UpdateAccountDB
4.2.2.1.2.6 UpdateAccount
Package
Business.UpdateAccount
Class
updateAccount
Attribute
No Name
01 updateAccount
Type
String
Description
Method
Table 80 - UpdateAccount
111 | P a g e
4.2.2.1.2.7 Phpsqlajax_dbinfo
Package
Database
Class
phpsqlajax_dbinfo
Attribute
No
01
02
03
04
05
06
07
08
09
Name
database
password
tableAccount
tableCallLog
tableDangerArea
tableParameters
tablePosition
tableSms
username
Type
String
String
String
String
String
String
String
String
String
Description
Method
Table 81 - Phpsqlajax_dbinfo
4.2.2.2 Danger Area
4.2.2.2.1
Class diagram
Figure 40 - DangerArea Class Diagram
112 | P a g e
4.2.2.2.2 Class explanation
4.2.2.2.2.1 GenParameter
Package Business.Marker
Class
genParameter
Attribute
No Name
01 imei
Method
Type
String
No Name
01
Description
Return Parameter Description
Type
xmlStr htmlStr
parseToXML(String
htmlStr)
Table 82 - GenParameter
4.2.2.2.2.2 Phpsqlajax_genxmlMarkers
Package Business.Marker
Clas
phpsqlajax_genxmlMarkers
Attribute
No Name
01 imei
Type
String
Description
Method
No Name
01
parseToXML(String
htmlStr)
Return Parameter Description
Type
xmlStr htmlStr
Table 83 - Phpsqlajax_genxmlMarkers
4.2.2.2.2.3 phpsqlinfo_addrow
Package Database
Class
phpsqlinfo_addrow
113 | P a g e
Attribute
No
01
02
03
04
05
06
07
Name
comment
imei
latitude
longitude
name
radius
tag
Type
String
String
String
String
String
String
String
Description
Method
Table 84 - Phpsqlinfo_addrow
4.2.2.2.2.4 phpsqlajax_dbinfo
Package Database
Class
phpsqlajax_dbinfo
Attribute
No
01
02
03
04
05
06
07
08
09
Name
database
password
tableAccount
tableCallLog
tableDangerArea
tableParameters
tablePosition
tableSms
username
Type
String
String
String
String
String
String
String
String
String
Description
Method
Table 85 - Phpsqlajax_dbinfo
114 | P a g e
4.2.2.3 Service
4.2.2.3.1
Class diagram
Figure 41 - Service Class Diagram
4.2.2.3.2 Class explanation
4.2.2.3.2.1 Handle_upload
Package Business.Service.Upload
Class
handle_upload
Attribute
No Name
01 target_path
Type
String
Description
Method
Table 86 - Handle_Upload
4.2.2.3.2.2 DownLoadParameter
Package Business.Service.Download
Class
downLoadParameter
115 | P a g e
Attribute
No Name
01 imei
Type
String
Description
Method
Table 87 - DownLoadParameter
4.2.2.3.2.3 phpsqlajax_dbinfo
Package Database
Class
phpsqlajax_dbinfo
Attribute
No
01
02
03
04
05
06
07
08
09
Name
database
password
tableAccount
tableCallLog
tableDangerArea
tableParameters
tablePosition
tableSms
username
Type
String
String
String
String
String
String
String
String
String
Description
Method
Table 88 - Phpsqlajax_dbinfo
4.2.2.3.2.4 ImportCSV
Package Business.Service.Upload
Class
importCSV
Attribute
No
01
02
03
Name
filename
header
imei
Type
String
String
String
Description
Method
Table 89 - ImportCSV
116 | P a g e
4.2.2.4 Show History
4.2.2.4.1 Class diagram
Figure 42- ShowHistory Class Diagram
4.2.2.4.2 Class explanation
4.2.2.4.2.1 Phpsqlajax_genxml3
Package
Business.History.Location
Class
phpsplajax_genxml3
Attribute
Method
No Name
01 imei
No Name
01
Type
Description
String
Return Parameter Description
Type
parseToXML(String
xmlStr htmlStr
htmlStr)
Table 90 - Phpsqlajax_genxml3
117 | P a g e
4.2.2.4.2.2 Phpsqlajax_genxmlAllLocation
Package
Business.History.Location
Class
phpsplajax_genxmlAllLocation
Attribute
Method
No Name
01 imei
No Name
01
Type
Description
String
Return Parameter Description
Type
parseToXML(String
xmlStr htmlStr
htmlStr)
Table 91 - Phpsqlajax_gemxmlAllLocation
4.2.2.4.2.3 GenSms
Package
Business.History.SMS
Class
genSms
Attribute
Method
No Name
01 imei
No Name
01
Type
Description
String
Return Parameter Description
Type
parseToXML(String
xmlStr htmlStr
htmlStr)
Table 92 - GenSMS
4.2.2.4.2.4 GenCallLog
Package
Business.History.CallLog
Class
genCallLog
Attribute
Method
No Name
01 imei
No Name
01
Type
Description
String
Return Parameter Description
Type
parseToXML(String
xmlStr htmlStr
htmlStr)
Table 93 - GenCallLog
118 | P a g e
4.2.2.4.2.5 phpsqlajax_dbinfo
Package
Database
Class
phpsqlajax_dbinfo
Attribute
No
01
02
03
04
05
06
07
08
09
Name
database
password
tableAccount
tableCallLog
tableDangerArea
tableParameters
tablePosition
tableSms
username
Type
String
String
String
String
String
String
String
String
String
Description
Method
Table 94 - Phpsqlajax_dbinfo
4.3
Sequence Diagram
4.3.1 Mobile
4.3.1.1 SMS
Figure 43 - SMS Sequence Diagram
119 | P a g e
No
01
Method Name
onReceive(Context context,
Intent intent)
02
onStart(Intent intent, int startId)
03
Enable 3G & wifi
04
doInBackground(String…params
)
05
getDataFromServer(String URL)
06
ConfigBean()
07
createParametersConfig(ConfigB
ean config)
08
09
insert(String table, String
nullColumnHack,ContentValues
values)
SMSBean()
10
createSMS(SMSBean sms)
11
insert(String table, String
nullColumnHack,ContentValues
values)
Description
-Description: When receiving new sms, call
function:SMSReceiver.onReceive(context,inte
nt).
-Parameter: context, intent
-Return: N/A
-Description: If received sms is configuration
sms, call function:
EnableConnectionService.onStart(intent,start
ed) to automatically enable network and hide
this sms.
-Parameter: intent, 120startId
-Return: N/A
-Description: Automatically turned on 3G &
wifi..
-Parameter: N/A
-Return: N/A
-Description: get configuration parameters/ list
of dangerous positions from server.
-Parameter: params
-Return: String
-Description: get data from server.
-Parameter: URL
-Return: N/A
-Description: Constructor function to save to
parameters table of mobile database.
-Parameter:
-Return:
-Description: Set value to ConfigBean object.
-Parameter: config
-Return: N/A
- Description: Insert to parameters table.
-Parameter: table,nullColumnHack,values
-Return: N/A
-Description: Constructor function to save to
sms table of mobile database.
-Parameter: N/A
-Return: N/A
-Description: Save all data to sms table of
mobile database
-Parameter: sms
-Return: N/A
- Description: Insert to sms table.
-Parameter: table,nullColumnHack,values
-Return: N/A
120 | P a g e
12
onReceive(Context context,
Intent intent)
13
onStart(Intent intent, int startId)
14
SMSSentObserver(Handler
hander, Context ctx ,
SMSDataSource smsSource)
-Description: When end users sent sms, call
function:
BootupReceiver.onReceive(context,intent).
-Parameter: context,intent
-Return: N/A
-Description: Get sms content to save to
mobile database.
-Parameter: intent, startId
-Return: N/A
-Description: Constructor to call
SMSSentObserver service.
-Parameter: handler, ctx, smsSource
-Return: N/A
Table 95 - SMS Sequence Description
4.3.1.2 MobileTrack
Figure 44 - Mobile Track Sequence Diagram
No
01
Method Name
onReceive(Context
context, Intent intent)
02
initLocationListeners()
03
writeEntry(TrackerEntry
Description
-Description: When start up mobile, call function :
BootUpReceiver.onReceive(context,intent).
-Parameter: context, intent
-Return: N/A
-Description: Initialize LocationListeners service to
tracking position.
-Parameter: N/A
-Return: N/A
-Description: Insert data into TrackerProvider object.
121 | P a g e
entry)
04
getAsContentValues()
05
insert(Uri uri,
ContentValues values)
06
DatabaseManager()
-Parameter: entry
-Return: N/A
-Description: Set data into TrackerEntry object.
-Parameter:
-Return: ContentValues
-Description: Insert to tracking table.
-Parameter: uri, values
-Return: Uri
-Description: Constructor to connect database.
-Parameter: N/A
-Return: N/A
Table 96 – Mobile Track Sequence Description
4.3.1.3 Call Logs
Figure 45 - Call Logs Sequence Diagram
No
01
Method Name
onReceive(Context
context, Intent intent)
02
onChange(boolean
selfChange)
03
CallLogBean()
Description
-Description: When have any new call, call this function.
-Parameter: context, intent
-Return: N/A
-Description: If new call is outgoing call, call this function.
-Parameter: seftChange
-Return: N/A
-Description: Constructor function to save to call_logs table
of mobile database.
122 | P a g e
04
05
-Parameter: N/A
-Return: N/A
createCallLog(CallLogBean -Description: Save all data to call_logs table of mobile
call)
database
-Parameter: call
-Return: N/A
insertOrThrow(String table, -Description: Insert to call_logs table
String nullColumnHack,
-Parameter: table,nullColumnHack,values
ContentValues values)
-Return: N/A
Table 97 – Call Logs Sequence Description
4.3.1.4 UploadData
Figure 46 - Upload Data Sequence Diagram
No
01
Method Name
doInBackground(String…args)
Description
-Description: After configuration time, call this
function to upload data from mobile to server.
-Parameter: args
-Return: N/A
123 | P a g e
02
TrackingBean()
03
getDataTracking()
04
writeNext(String[] nextLine)
05
smsBean()
06
getDataSMS()
09
CallLogBean()
10
getDataCallLog()
12
makeHttpRequest(String url,
String method,
List<NameValuePair> params)
delete(String tableName,String
where)
13
14
Log.e (“Upload”, “Fail!”)
-Description: Constructor function to save to
positions object.
-Parameter: N/A
-Return: N/A
-Description: Get data from mobile and save to
TrackingBean object
-Parameter: N/A
-Return: ArrayList<TrackingBean>
-Description: Write data to CSV file to upload.
-Parameter: nextLine
-Return: N/A
-Description: Constructor function to save to sms
object.
-Parameter: N/A
-Return: N/A
-Description: Get data from mobile and save to
SMSBean object.
-Parameter: N/A
-Return: ArrayList<SMSBean>
-Description: Constructor function to save to
CallLogBean object.
-Parameter: N/A
-Return: N/A
-Description: Get data from mobile and save to
CallLogBean object.
-Parameter: N/A
-Return: ArrayList<CallLogBean>
-Description: Get response from server.
-Parameter: url, method, params
-Return: JSONObject
-Description: If upload successfully, delete data that
saved in mobile database.
-Parameter: tableName,where
-Return: N/A
-Description: If upload fail, log event.
-Parameter: string, string
-Return: N/A
Table 98 - Upload Data Sequence Description
124 | P a g e
4.3.1.5 Danger Track
No
01
02
03
04
Method Name
getDangerousLocations
Description
-Description: get list of danger positions.
-Parameter: N/A
-Return: N/A
onLocationChanged(Location location) -Description: Process when location changed.
-Parameter: location
-Return: N/A
getPhoneNumber
-Description: get phone number of supervisor
-Parameter: N/A
-Return: N/A
sendTextMessage(DestinationAddress, -Description: Send sms to supervisor..
null, SMS_CONTENT,null,null)
-Parameter: N/A
-Return: N/A
Table 99 - Danger Track Sequence Description
125 | P a g e
4.3.2 Server
4.3.2.1 Danger Area Sequence
Figure 47 - Danger Area Sequence Diagram
No
01
Method Name
Link to danger area
page
02
Display configuration
parameter
03
Connect database
04
Update to database
Description
-Description: Ways to go to this page:
+ After login successfully, go to this page immediately
+Click to History Tab on Menu Tab
-Parameter: N/A
-Return: N/A
-Description: Configuration parameter includes
configuration time that end users defined.
-Parameter: N/A
-Return: N/A
-Description: Connect database.
-Parameter: N/A
-Return: N/A
-Description: If end users changed data, update these
126 | P a g e
05
Display danger area
changes to database. Data can changed includes:
+Time Duration
+Danger Area
-Parameter: N/A
-Return: N/A
-Description: Display danger area on map.
-Parameter: N/A
-Return: N/A
Table 100- Danger Area Sequence Description
4.3.2.2 Login
Figure 48 - Login Sequence Diagram
No
01
Method Name
Login
02
Check user name &
password
03
Connect to database
Description
-Description: Login to use system.
-Parameter: user name, password
-Return: N/A
-Description: Check user name & password to access.
-Parameter: user name, password
-Return: T/F
-Description: Connect databse
-Parameter: N/A
127 | P a g e
04
Switch to show history
05
Switch to admin page
06
Update account
07
Request user input
again
-Return: N/A
-Description: Login by end user role, go to history
page.
-Parameter: N/A
-Return: N/A
-Description: Login by admin role, go to admin page.
-Parameter: N/A
-Return: N/A
-Description: As admin role, if account information has
changed, update to database.
-Parameter: N/A
-Return: N/A
-Description: Re-input when input wrong.
-Parameter: N/A
-Return: N/A
Table 101 - Login Sequence Description
4.3.2.3 Register
Figure 49 - Register Sequence Diagram
No
Method Name
Description
128 | P a g e
01
Create an account
02
Validate user’s input
03
Check existence of
account
04
Connect to database
-Description: Create new account when hasn’t an
account yet.
-Parameter: N/A
-Return: N/A
-Description: Check valid data.
-Parameter: N/A
-Return: N/A
-Description: Check user name, imei & email of
account. In case has not existed yet, insert into
database else re-input.
-Parameter: N/A
-Return: ArrayList<TrackingBean>
-Description: Connect database
-Parameter: fileName
-Return: N/A
Table 102 - Register Sequence Description
4.3.2.4 Update
Figure 50 - Update Sequence Diagram
No
01
Method Name
Link to update account
page
02
Update account
Description
-Description: Click on Update Account tab, go to this
page.
-Parameter: N/A
-Return: N/A
-Description: Update information includes: user name,
129 | P a g e
information
03
Connect to database
04
Update password
imei, email, mobile.
-Parameter: N/A
-Return: N/A
-Description: Connect database
-Parameter: N/A
-Return: N/A
-Description: If user changed password, update to
database
-Parameter: N/A
-Return: N/A
Table 103 - Update Sequence Description
4.3.2.5 Show History
Figure 51 - Show History Sequence Diagram
No
01
Method Name
Link to show history
page
02
Display location history
03
Connect to database
Description
-Description: Ways to display history page:
+After login successfully, go to this page.
+Click on History tab on menu tab.
-Parameter: N/A
-Return: N/A
-Description: Display position information on map.
-Parameter: N/A
-Return: N/A
-Description: Connect database
130 | P a g e
04
Display SMS history
05
Display call logs history
06
Display freeze point
history
-Parameter: N/A
-Return: N/A
-Description: Display SMS information.
-Parameter: N/A
-Return: N/A
-Description: Display call logs information.
-Parameter: N/A
-Return: N/A
-Description: Display freeze point information on map.
-Parameter: N/A
-Return: N/A
Table 104 - Show History Sequence Description
4.3.2.6 Download/Upload
Figure 52 - Download/Upload Sequence Diagram
No
01
Method Name
Handle_upload
Description
-Description: After upload file from mobile to server,
mobile send JSON object to server to inform having
new upload file
-Parameter: N/A
-Return: N/A
131 | P a g e
02
Import CSV file
03
Connect to database
04
Request download
parameter
-Description: Read CSV file that upload from mobile to
save to database.
-Parameter: N/A
-Return: N/A
-Description: Connect database
-Parameter: N/A
-Return: N/A
-Description: When received request from mobile,
server select parameter data from database.
-Parameter: N/A
-Return: N/A
Table 105 - Download/Update Sequence Description
4.4
Database
4.4.1 Mobile
Figure 53 - Mobile Database
132 | P a g e
Table Name
No
01
Field Name
Data Type
id
int auto increment
02
03
type
phone_num
ber
duration
time
timestamp
id
varchar
text
varchar
text
04
05
06
01
type
phone_num
ber
content
time
timestamp
id
02
03
timestamp
tag
text
varchar
04
05
06
07
01
longitude
latitude
speed
time
id
double
double
double
text
int auto increment
danger_are
a
02
03
04
05
01
latitude
longitude
radius
comment
id
double
double
double
text
int auto increment
parameter
02
phone_num
ber
time_durati
on
text
Description
Primary key. This is
automatically increase value
1.
Type of call.
Phone number of
conversation.
Duration of conversation.
Start time of call
Start timestamp of call.
Primary key. This is
automatically increase value
1.
Type of sms
Phone number of
conversation
Content of sms
Start time of sms
Start timestamp of sms
Primary key. This is
automatically increase value
1.
Being timestamp position
Standard network to get
position
Longitude of position
Latitude of position
Speed of moving
Being time position
Primary key. This is
automatically increase value
1.
Latitude of danger area
Longitude of danger area
Radius of danger area
Comment of danger area
Primary key. This is
automatically increase value
1.
Phone number of supervisor
time
Time to update data
call_logs
04
05
06
01
sms
position
02
03
03
text
time
text
int auto increment
text
time
text
int auto increment
Table 106 - Mobile Database Description
133 | P a g e
4.4.2 Server
Figure 54 - Server Database
Table Name
call_logs
sms
No
01
Field Name
id
Data Type
int auto increment
02
03
04
05
06
07
01
imei
type
phone_number
duration
time
timestamp
id
varchar
varchar
text
text
time
text
int auto increment
02
03
04
05
06
type
phone_number
content
time
timestamp
varchar
text
text
time
text
Description
Primary key. This is
automatically increase value 1.
Imei of tracked mobile.
Type of call.
Phone number of conversation.
Duration of conversation.
Start time of call
Start timestamp of call.
Primary key. This is
automatically increase value 1.
Type of sms
Phone number of conversation
Content of sms
Start time of sms
Start timestamp of sms.
134 | P a g e
position
danger_are
a
parameter
account
07
01
imei
id
varchar
int auto increment
02
03
timestamp
tag
text
varchar
04
05
06
07
08
01
longitude
latitude
speed
time
imei
id
double
double
double
text
varchar
int auto increment
02
03
04
05
06
07
08
01
name
latitude
longitude
radius
comment
imei
create_at
id
String
double
double
double
text
varchar
time
int auto increment
02
03
04
01
phone_number
time_duration
imei
id
text
time
varchar
int auto increment
02
03
04
05
06
07
imei
username
password
roll
email
phone_number
varchar
varchar
varchar
int
text
text
Imei of tracked mobile.
Primary key. This is
automatically increase value 1.
Being timestamp position
Standard network to get
position
Longitude of position
Latitude of position
Speed of moving
Being time position
Imei of tracked mobile
Primary key. This is
automatically increase value 1.
Name of danger area
Latitude of danger area
Longitude of danger area
Radius of danger area
Comment of danger area
Imei of tracked mobile
Created time
Primary key. This is
automatically increase value 1.
Phone number of supervisor
Time to update data
Imei of tracked mobile
Primary key. This is
automatically increase value 1.
Imei of tracked mobile
Username of end users
Password of end users
Permission
Email of end users
Phone number of end users
Table 107 - Server Database Description
V.
Chapter V - Testing
5.1
Requirements for Test
5.1.1 Feature to be tested
5.1.1.1 Application
Setup Application on device.
Application runs with normal conditions ex: turn on 3G, GPS
Application runs with conditions ex: turn off 3G, GPS
135 | P a g e
Action after device is received active message.
Action when device stay at dangerous areas: Send message to number phone.
Send information to server after customized time.
Update new data from server
Get information automatically and implicitly from device: GPS, Call Logs, SMS
5.1.1.2 Website
UI of all Screens on Chrome and Firefox.
o Login
o Register
o Profile
o Danger
o History
o Admin
User access and security
o Check login, move to other screen, (on an account)
Admin Screen.
o Check user management: update (name, password, role), Delete account.
o Display information correctly from data.
o Check validation of all fields.
History Screen
o Show information of SMS, Call Logs, and Position correctly with time,
o + Call logs: phone numbers, type, time, duration.
o + SMS logs: Content, phone numbers, type, time.
o Test all hyperlinks, zoom on map.
o Show positions on map: name, time duration,
o Switch between SMS, Call log tab.
o Change Date dropdown list.
Danger Area Screen.
o Check create a new marker point
o Check show marker point
136 | P a g e
o Check show marker point list
o Check updates information of marker point.
o Test all hyperlinks, zoom on map.
Profile Screen.
o Check validation of all fields.
o Check updates information: IMEI, number phone, email, time.
o Check buttons: update, cancel.
Register Screen.
o Check validation of all fields.
o Button register.
Login Screen.
o Check validation of all fields.
o Test all hyperlink: create an account, forgot password
o Button sign in.
Test on multiple browsers.
Performance test:
o
Page loading on each click.
o How many people can access at the same time…
5.1.2 Feature not to be tested
Stable of application after device received active message. (3G and GPS are
turn off)
Try some special ways to remove application on device. (just normal)
5.2
Test Strategy
5.2.1 Test Types
5.2.1.1 Function Testing
Function testing of the target-of-test should focus on any requirements for test that can
be traced directly to use cases or business functions and business rules. The goals of
137 | P a g e
these tests are to verify proper data acceptance, processing, and retrieval, and the
appropriate implementation of the business rules. This type of testing is based upon
black box technique that is verifying the application and its internal processes by
interacting with the application via the Graphical User Interface (GUI) and analyzing the
output or results.
Table identified below is an outline of the testing recommended for each application.
Test Objective
Ensure proper target-of-test functionality, including navigation,
data entry, processing, and retrieval.
Completion Criteria
Execute each use case, use-case flow, or function, using valid
and invalid data, to verify the following:
The expected results occur when valid data is used.
The appropriate error or warning messages are displayed
when invalid data is used.
Each business rule is properly applied.
All planned tests have been executed.
All identified defects have been addressed and closed
Special
Identify or describe those items or issues (internal or external)
that impact the implementation and execution of function test
Technique
Considerations
Table 108 - Outline Testing Recommended
5.2.1.2 User Interface Testing
User Interface (UI) testing verifies a user’s interaction with the software. The goal of UI
testing is to ensure that the User Interface provides the user with the appropriate
access and navigation through the functions of the target-of-test. In addition, UI testing
ensures that the objects within the UI function as expected and conform to corporate or
industry standards.
Test Objective
Verify the following:
Navigation through the target-of-test properly reflects business
functions and requirements, including window-to-window,
field-to-field, and use of access methods (tab keys, mouse
movements, accelerator keys)
Window objects and characteristics, such as menus, size,
position, state, and focus conform to standards.
138 | P a g e
Technique
Create or modify tests for each window to verify proper navigation
and object states for each application window and objects.
Completion Criteria
Each window successfully verified to remain consistent with
benchmark version or within acceptable standard
Special Considerations
Not all properties for custom and third party objects can be
accessed.
Table 109 - User Interface Testing
5.2.1.3 Performance Testing
Performance profiling is a performance test in which response times, transaction rates,
and other time-sensitive requirements are measured and evaluated. The goal of
Performance Profiling is to verify performance requirements have been achieved.
Performance profiling is implemented and executed to profile and tune a target-of-test's
performance behaviors as a function of conditions such as workload or hardware
configurations.
Test Objective
Technique
Completion Criteria
Special Considerations
Verify performance behaviors for designated transactions or
business functions under the following conditions:
normal anticipated workload
anticipated worst case workload
Use Test Procedures developed for Function or Business
Cycle Testing.
Modify data files to increase the number of transactions or
the scripts to increase the number of iterations each
transaction occurs.
Scripts should be run on one machine (best case to
benchmark single user, single transaction) and be
repeated with multiple clients (virtual or actual, see Special
Considerations below).
Single Transaction or single user: Successful completion
of the test scripts without any failures and within the
expected or required time allocation per transaction.
Multiple transactions or multiple users: Successful
completion of the test scripts without any failures and
within acceptable time allocation.
Comprehensive performance testing includes having a
background workload on the server.
There are several methods that can be used to perform this,
including:
139 | P a g e
“Drive transactions” directly to the server, usually in the
form of Structured Query Language (SQL) calls.
Create “virtual” user load to simulate many clients, usually
several hundred. Remote Terminal Emulation tools are
used to accomplish this load. This technique can also be
used to load the network with “traffic”.
Use multiple physical clients, each running test scripts to
place a load on the system.
Performance testing should be performed on a dedicated
machine or at a dedicated time. This permits full control and
accurate measurement.
The databases used for Performance Testing should be either
actual size or scaled equally.
Table 110 - Performance Testing
5.2.2 Test Environment
Test client configuration:
a. Hardware
Samsung galaxy S2
Intel core i3 2310M 2.1Ghz
b. Software
Microsoft SQL 2008 R2
QTrace
Jmeter or Open STA
Chrome 23 and Firefox 16
Firebug
Simulator of android
5.3
Test cases
5.3.1 Application
5.3.1.1 Set Up
Module Code
ID
Test Case
Description
Application Set Up
Test Case Procedure
Expected Output
Result
140 | P a g e
A1
Display
1. Root Android device. (Login by
Admin account.)
2. Set up application.
3. Unroot Android device and
Login by normal account.
A2
Confirm after
setup
1. Root Android device. (Login by
Admin account.)
2. Set up application.
3. Login by normal account.
4. Turn on 3G and GPS
5. Access to web for checking.
A3
Check
unmemorable
A4
Check
automatically
after reset
device.
1. Root Android device. (Login by
Admin account.)
2. Set up application.
3. Login by normal account.
4. Find some normal ways to
remove this application ex:
+find icon and remove
+find it on setting menu…
1. After set up successfully on
device then reset device.
2.Go to setting, App, manage
applications, running.
1. There is no
icon of app on all
screens.
2. There is no
app on setting
menu.
1. Device will
send to serve a
confirmation
include:
+ IMEI of device.
+ Current
location.
1. There is not a
normal way to
remove this
application.
Pass
1. You can see it
running with 3
processes.
Pass
Untested
Untested
Table 111 - Set Up
5.3.1.2 Running with 3G &GPS Are Turned On
Module Code
ID
A5
A6
Application - 3G & GPS Are Turned On
Test Case
Description
Get GPS
information and
save correctly
in database.
With Stationary.
Test Case Procedure
Expected Output
1. Setup and turn on 3G and GPS.
2. Stationary.
3. Check data have just saved by
using it on GOOGLE.
4. Check data save correctly.
1. Data what
have just saved is
right.
2. Data saving
correctly for
example: right
columns, rows,
table, file
Pass
Get GPS
information and
save correctly
in database.
With Move.
1. Setup and turn on 3G and GPS.
2. Move.
3. Check data have just saved by
using it on GOOGLE.
4. Check data save correctly.
1. Data what
have just saved is
right.
2. Data saving
correctly for
example: right
columns, rows,
table, file…
Pass
Result
141 | P a g e
A7
Send GPS data
to server after
customize time.
With Stationary.
1. Setup and turn on 3G and GPS.
2. Stationary.
3. Set configure time on web site
(1 or 2 minutes).
4. Check data on server database
and compare them with data on
device
1. After customize
time Data will be
sent to server.
2.Data appear
correctly on
server database
Pass
A8
Get message
information and
save in
database.
1. Setup and turn on 3G.
2. Send a message to another
number.
3. Send a message from another
number to this device.
3. Check database on device.
Pass
A9
Send message
data to server
after customize
time.
1. Setup and turn on 3G and GPS.
2. Set configure time on web site
(1 or 2 minutes).
3. Check data on server database
and compare them with data on
device.
1. Data will be
saved on
database on
device after send
or receive
messages.
2. All sending and
receiving
numbers are
right.
1. After customize
time Data will be
sent to server.
2. Data appear
correctly on
server database.
+ All sending and
receiving
numbers are
right.
A10
Get Call log
information and
save in
database.
1. Setup and turn on 3G.
2. Call to another number.
3. Call from another number to
this number of device.
3. Check database on device.
1. Data will be
saved on
database on
device after send
or receive
messages.
2. Going, Coming
and missing call
have saved on
database of
device.
Pass
Pass
142 | P a g e
A11
Send call log
data to server
after customize
time.
1. Setup and turn on 3G and GPS.
2. Set configuration time on web
site (1 or 2 minutes).
3. Check data on server database
and compare them with data on
device.
1. After customize
time Data will be
sent to server.
2. Data appear
correctly on
server database.
+ Going, Coming
and missing call
have saved on
database of
server.
Pass
Table 112 - 3G & GPS Are Turned On
5.3.1.3 Check Danger Areas
Module Code
ID
A12
A13
Test Case
Description
Check when
device doesn't
go to
dangerous
area.
Check when go
to dangerous
area
Application - Check Danger Areas
Test Case Procedure
Expected Output
Result
1. Setup and turn on 3G and GPS
on device.
2. Set up dangerous point, time,
distance… on website.
3. Stand at location outside this
area.
1. There is no
alert on number
phone what have
registered.
Pass
1. Setup and turn on 3G and GPS
on device.
1. Set up dangerous point,
distance… on website.
2. Check data on database of
device.
3. Stand at location inside this
area with time less customized
time on website.
1. There is no
alert on number
phone what have
registered.
Pass
143 | P a g e
A14
Check when go
to 2 different
dangerous area
1. Setup and turn on 3G and GPS
on device.
2. Set up some of dangerous
point, time, distance… on website.
3. Check data on database of
device.
4. Stand at location inside this
area with customized time on
website.
5. Go and stand at another
dangerous area with customized
time on website for this area.
1. There is an
alert on number
phone what have
registered.
2. There is
another alert to
number phone
what have
registered.
A15
Check when go
one dangerous
area twice or
more
1. Setup and turn on 3G and GPS
on device.
2. Set up some of dangerous
point, time, distance… on website.
3. Check data on database of
device.
4. Stand at location inside this
area with customized time on
website.
5. Go outside and comeback then
standing at this dangerous area
with customized time on website
for this area.
1. There is an
alert on number
phone what have
registered.
2. There is
another alert to
number phone
what have
registered.
Pass
Table 113 - Check Danger Areas
5.3.1.4 Check Receive Active Message
Module Code
ID
Test Case
Description
Application - Receive Active Message
Test Case Procedure
Expected Output
Result
144 | P a g e
A16
Check
activation after
device receives
message.
1. Setup and turn off 3G and GPS
on device.
2. Set up dangerous point, time,
distance… on website.
3. Send Active message to device
following form: ON
4.Check turn on GPS + 3G.
5. Check turn on update
information.
1. 3G and GPS
are turned on
Auto.
2. Data is update
on database of
device.
Fail
A17
Check delete
message after
device receives
message.
1. Setup and turn off 3G and GPS
on device. on device.
2. Send Active message to device
following form: ON
3.Check message on inbox.
1. Message is
deleted and 3G
and GPS are
turned on Auto.
Pass
Table 114 - Receive Active Message
5.3.2 Central Web with Chrome
5.3.2.1 Login Screen
Module Code
ID
C1
Test Case
Description
Check
Password
textbox display
Website on Chrome – Login Screen
Test Case Procedure
Expected Output
Result
1. Go to Web site
http://giangvh007.zxq.net/
2.Enter some characters on
password textbox for ex:
tungbach...
Password textbox
will show on dot
type.
Pass
Pass
C2
Check Create
an Account
(hyperlink)
1. Go to Web site
http://giangvh007.zxq.net/
2.Click on Create an account.
Going on
Register Screen.
C3
Check Forget
password
(hyperlink)
Check Sign in
button with right
data
1.Go to Web site
http://giangvh007.zxq.net/
2.Click on forget password
1. Go to Web site
http://giangvh007.zxq.net/
2.Enter right User and password.
3. Click Sign In button.
Going on forget
Fail
password Screen.
C4
Going on History
Screen.
Pass
145 | P a g e
C5
C6
C7
Check Sign in
button with
wrong data
Check Sign in
button with
wrong data
Check Sign in
button with
nothing input
1. Go to Web site
http://giangvh007.zxq.net/
2.Enter right User and wrong
password.
3. Click Sign In button.
Display a error
message
1. Go to Web site
http://giangvh007.zxq.net/
2.Enter wrong User
3.Click Sign In button.
Display a error
message
1. Go to Web site
http://giangvh007.zxq.net/
2.Click Sign In button.
Pass
See : loginfail.jpg
See : loginfail.jpg
Display a error
message
Pass
Pass
See : loginfail.jpg
Table 115 - Website on Chrome - Login Screen
5.3.2.2 Register Screen
Module Code
ID
C8
C9
Test Case
Description
Check min
length of User
textbox
Check max
length of User
textbox
Website on Chrome - Register Screen
Test Case Procedure
Expected Output
Result
1.Go to Web site
http://giangvh007.zxq.net/
and click on Create an account
link
2.Enter 5 characters or less to
User textbox
example :12345
Display an error
message
please see
image. Errorregister.jpg
Pass
1.Go to Web site
http://giangvh007.zxq.net/
and click on Create an account
link
2.Try enter 13 characters or more
to User textbox example
12345567890123
Just can input
max 12
characters
Pass
146 | P a g e
C10
Check enter
special
characters User
textbox
1.Go to Web site
http://giangvh007.zxq.net/
and click on Create an account
link
2.Try enter some special
characters to User textbox ( by
normal way )
You cannot enter
them. You just
can enter number
and normal
characters.
For ex:
#$#$#$bach123
Pass
C11
Check min
length of
Password
textbox
1.Go to Web site
http://giangvh007.zxq.net/
2.Enter 5 characters to Password
textbox example
12345
Display an error
message
please see
image. Errorregister.jpg
Pass
C12
Check max
length of
Password
textbox
1.Go to Web site
http://giangvh007.zxq.net/and click
on Create an account link
2.Try enter 13 characters or more
Password textbox
example
12345567890123
Just can input
max 12
characters
Pass
C13
Check enter
special
characters of
Password
textbox
1.Go to Web site
http://giangvh007.zxq.net/and click
on Create an account link
2.Try enter some special
characters to Password textbox
example :$%^&*( by normal way )
You cannot enter
them. You just
can enter number
and normal
characters.
For ex
@$@#4bach123
Pass
C14
Check min
length of
Confirm
Password
textbox
1.Go to Web site
http://giangvh007.zxq.net/and click
on Create an account link
2.Enter 5 characters to confirm
password textbox
example
12345
Display an error
message
please see
image. Errorregister.jpg
Pass
147 | P a g e
C15
Check max
length of
Confirm
Password
textbox
1.Go to Web site
http://giangvh007.zxq.net/and click
on Create an account link
2.Try enter 13 characters or more
to confirm password textbox
example
12345567890123
Just can input
max 12
characters
Pass
C16
Check enter
special
characters of
confirm
Password
textbox
1.Go to Web site
http://giangvh007.zxq.net/
and click on Create an account
link
2.Try enter some special
characters to confirm password
textbox $%^&*( by normal way )
You cannot enter
them. You just
can enter number
and normal
characters.
For ex:bach123
Pass
C17
Confirm
Password
textbox
1. Go to Web site
http://giangvh007.zxq.net/ and
click on Create an account link
2. Enter a password to password
textbox
3. enter a different password to
above password to confirm
password to confirm password
textbox
Display an error
message
See : errorregister.jpg
Pass
C18
Check IMEI text
box with enter
13 characters
or less
1.Go to Web site
http://giangvh007.zxq.net/
2.Try enter 13 characters or less
example
1234567890123
Display an error
message
See : errorregister.jpg
Pass
C19
Check IMEI text
box with enter
16 characters
or more
1.Go to Web site
http://giangvh007.zxq.net/and click
on Create an account link
2.Try enter 16 characters or more
example
1234567890123456
You cannot enter
16 characters.
Pass
C20
Check IMEI text
box with enter
15 characters
or more
1.Go to Web site
http://giangvh007.zxq.net/and click
on Create an account link
2.Try enter 15 characters
example
123456789012345
There is no
message.
Pass
148 | P a g e
C21
check enter
characters
(tungbach) to
IMEI textbox
1.Go to Web site
http://giangvh007.zxq.net/
and click on Create an account
link
2.Try enter some characters to
IMEI textbox
fx :tungbach123
you just can input
number
Pass
C22
check enter
characters to
Mobile textbox
1.Go to Web site
http://giangvh007.zxq.net/and click
on Create an account link
2.Try enter character to Mobile
textbox
fx:bach123
you just can input
number
Pass
C23
Check form for
Email textbox
1.Go to Web site
http://giangvh007.zxq.net/and click
on Create an account link
2.Try enter wrong form of an email
fx: bach99@@@yaho.om
Display an error
message
See : errorregister.jpg
Pass
C24
Check Register
with right data
1. Go to Web site
http://giangvh007.zxq.net/
2.Click on Create an account.
3. Fill right any fills.
4. Click Register button.
1. Data will be
saved in
database.
Pass
C25
Check Register
with wrong data
1. Display a error
message.
See :errorregister.jpg
Pass
C26
Check Summit
button with
nothing
1. Display a error
message.
See : summiterror-register.jpg
Pass
C27
Check click
login active.
1. Go to Web site
http://giangvh007.zxq.net/
2.Click on Create an account.
3. Fill wrong one fill.(user
username )
4.Click Register button.
1. Go to Web site
http://giangvh007.zxq.net/and click
on Create an account link
2.Click on Create an account.
3. Click Summit button.
1. Go to Web site
http://giangvh007.zxq.net/and click
on Create an account link
2.Click on Create an account.
3. Click Login button.
Going on Login
Screen.
Pass
C28
Check
username exist
1. Go to Web site
http://giangvh007.zxq.net/
2.Click on Create an account.
3. Enter a username what exited
on database. for example, bachpt
4. Fill remain fill with right data
5. click on Summit button
Display a error
message
See :registererror name.jpg
Pass
149 | P a g e
C29
Check IMEI
exist
C30
Check Email
exist
C31
Check mobile
exist
1. Go to Web site
http://giangvh007.zxq.net/
2.Click on Create an account.
3. Enter an IMEI what exited on
database. for example
000000000000,359199020254432
4. Fill remain fill with right data
5. click on Summit button
1. Go to Web site
http://giangvh007.zxq.net/
2.Click on Create an account.
3. Enter a Email what exited on
database. for example
[email protected]
4. Fill remain fill with right data
5. click on Summit button
1. Go to Web site
http://giangvh007.zxq.net/
2.Click on Create an account.
3. Enter a Email what exited on
database. for example
[email protected]
4. Fill remain fill with right data
5. click on Summit button
Display a error
message see
iemi-existregister.jpg
Pass
Display a error
message, see
email-existregister.jpg
Pass
Display a error
message ,see
phone-existregister.jpg
Pass
Table 116 - Website on Chrome - Register Screen
5.3.2.3 Update Account Screen
Module Code
C32
Test Case
Description
User name field
C33
IMEI text box
ID
Website on Chrome – Update Account Screen
Test Case Procedure
Expected Output
Result
1.Go to Web site
http://giangvh007.zxq.net/
and click on update account tab
2.Try to enter some characters to
username field
Cannot enter
anything to
username field
Pass
1.Go to Web site
http://giangvh007.zxq.net/and click
on update account tab
2.Try enter 13 characters or less
to IMEI text box
example
1234567890123
Display an error
message see
error-update1.jpg
Pass
150 | P a g e
C34
IMEI text box
1.Go to Web site
http://giangvh007.zxq.net/and click
on update account tab
2.Try enter 16 characters or less
to IMEI text box example
1234567890123456
You cannot enter
16 characters.
Pass
C35
IMEI text box
1.Go to Web site
http://giangvh007.zxq.net/and click
on update account tab
2.Try enter 15 characters or less
to IMEI textbox example
123456789012345
There is no
message.
Pass
C36
Mobile textbox
1.Go to Web site
http://giangvh007.zxq.net/and click
on update account tab
2.Try enter character to mobile
textbox
fxtungbach123
You just can input
number
Pass
C37
Email textbox
1.Go to Web site
http://giangvh007.zxq.net/and click
on update account tab
2.Try enter wrong form of an email
text box
fx tungbach99@@@yaho.com
Display an error
message
see errorupdate1.jpg
Pass
C38
Check Update
button with
nothing change
1.Go to Web site
http://giangvh007.zxq.net/ and
click on update account tab
2.Login success
3.Click on update account tab
4.Click update button
1. Login success
Pass
2.Display profile
screen
3.There is nothing
change in
database
C39
Check Update
button with
change
1.Go to Web site
http://giangvh007.zxq.net/and click
on update account tab
2.Login success
3.Click on Profile
4.Change phone number or email
...
5.Click update button
1. Login success
2.Display profile
screen
3.Data is updated
in database.
Pass
C40
Check History
Tab
1.Go to Web site
http://giangvh007.zxq.net/and click
on update account tab
2.Login success
3.Click on Profile
4.Click on History tab
Going on History
screen.
Pass
151 | P a g e
C41
Check Danger
Area Tab
1.Go to Web site
http://giangvh007.zxq.net/ and
click on update account tab
2.Login success
3.Click on Profile
4.Click on Danger Area hyperlink
Going on Danger
Area screen.
Pass
C42
Check Log out
1.Go to Web site
http://giangvh007.zxq.net/
2.Login success and click on
update account tab
3.Click on Profile
4.Click on Log out hyperlink
Back to login
screen
Pass
C43
Check radio
button Delete
Data Tracking
1. Go to Web site
http://giangvh007.zxq.net/
2.Login success
3.Click on update account tab
4.tick on Delete Data Tracking
5.chose a day what has data of
GPS by click on calendar icon.
6.Click on update button
1. Display a
success message
or success page
2. Data will be
deleted on
database.
Pass
C44
Check radio
button Delete
Data SMS
1. Go to Web site
http://giangvh007.zxq.net/
2.Login success
3.Click on update account tab
4.tick on Delete Data SMS
5.chose a day what has data of
GPS by click on calendar icon.
6.Click on update button
1. Display a
success message
or success page
2. Data will be
deleted on
database.
Pass
C45
Check radio
button Delete
Data Call Log
1. Go to Web site
http://giangvh007.zxq.net/
2.Login success
3.Click on update account tab
4.tick on Delete Data Call Log
5.chose a day what has data of
GPS by click on calendar icon.
6.Click on update button
1. Display a
success message
or success page
2. Data will be
deleted on
database.
Pass
C46
Check all radio
button
1. Go to Web site
http://giangvh007.zxq.net/
2.Login success
3.Click on update account tab
4.tick on Delete Data Call Log,
Delete Data SMS, Delete Data
Tracking
5.chose a day what has data of
GPS by click on calendar icon.
6.Click on update button
1. Display a
success message
or success page
2. Data will be
deleted on
database.
Pass
152 | P a g e
C47
Check min
length of old
Password
textbox
1.Go to Web site
http://giangvh007.zxq.net/ and
click on update account tab
2.Enter 5 characters to old
password textbox
example
12345
Display an error
message
please see
image.
error-update2.jpg
Pass
C48
Check enter
special
characters of
old Password
textbox
1.Go to Web site
http://giangvh007.zxq.net/ and
click on update account tab
2.Try enter some special
characters to old password
textbox /$%^&*( by normal way )
You cannot enter
them. You just
can enter number
and normal
characters.
For ex
:tungbach123
Pass
C49
Check min
length of New
Password
textbox
1.Go to Web site
http://giangvh007.zxq.net/ and
click on update account tab
2.Enter 5 characters to new
password textbox example
12345
Display an error
message
please see
image.
error-update2.jpg
Pass
C50
Check max
length of New
Password
textbox
1.Go to Web site
http://giangvh007.zxq.net/ and
click on update account tab
2.Try enter 13 characters or more
to new password textbox
example
12345567890123
Just can input
max 12
characters
Pass
C51
Check enter
special
characters of
old Password
textbox
1.Go to Web site
http://giangvh007.zxq.net/and click
on update account tab
2.Try enter some special
characters to old password text
box :$%^&*( by normal way )
You cannot enter
them. You just
can enter number
and normal
characters.
For ex
tungbach123
Pass
C52
Check min
length of
Confirm
Password
textbox
1.Go to Web site
http://giangvh007.zxq.net/ and
click on update account tab
2.Enter 5 characters to confirm
password example
12345
Display an error
message
please see
image.
error-update2.jpg
Pass
153 | P a g e
C53
Check max
length of
Confirm
Password
textbox
1.Go to Web site
http://giangvh007.zxq.net/ and
click on update account tab
2.Try enter 13 characters or more
to confirm password :example
12345567890123
Just can input
max 12
characters
Pass
C54
Check enter
special
characters of
confirm
Password
textbox
1.Go to Web site
http://giangvh007.zxq.net/ and
click on update account tab
2.Try enter some special
characters to confirm password :
$%^&*( by normal way )
You cannot enter
them. You just
can enter number
and normal
characters.
For ex
tungbach123
Pass
C55
Confirm
Password
textbox
1.Go to Web site
http://giangvh007.zxq.net/ and
click on update account tab
2. Enter a password different to
password in password field
Display an error
message
error-update2.jpg
Pass
C56
Check button
change
password
1. Go to Web site
http://giangvh007.zxq.net/ and
click on update account tab
2. Fill 3 fields: old password, new
password, confirm password with
right data
4. click button change password
Display a success Pass
page
C57
Check button
change
password with
wrong data
1. Go to Web site
http://giangvh007.zxq.net/and click
on update account tab
2. Fill 3 fields: old password, new
password, confirm password with
wrong data
4. click button change password
Display error
page
Pass
C58
Check display
in 3 password
fields old
password, new
password,
confirm
password
1. Go to Web site
http://giangvh007.zxq.net/and click
on update account tab
2. Fill 3 field old password, new
password, confirm password
Display dot type
Pass
154 | P a g e
C59
Check IMEI
exist
1. Go to Web site
http://giangvh007.zxq.net/
2.Going on update account page
3.Enter an IMEI what exited on
database. for example
000000000000,359199020254432
4. Fill remain fill with right data
5. click on Update button
Display a error
message
error-register.jpg
Pass
C60
Check Email
exist
1. Go to Web site
http://giangvh007.zxq.net/
2.Going on update account page
3.Enter a Email what exited on
database. for example
[email protected]
4. Fill remain fill with right data
5. click on Update button
Display a error
message
error-register.jpg
Pass
C61
Check mobile
exist
1. Go to Web site
http://giangvh007.zxq.net/
2.Going on update account page
3.Enter a Email what exited on
database. for example
[email protected]
4. Fill remain fill with right data
5. click on Update button
Display a error
message
error-register.jpg
Pass
Table 117 - Website on Chrome - Update Account Screen
5.3.2.4 Danger Area Screen
Module Code
ID
C62
C63
Test Case
Description
Time duration
Check ok
button
Website on Chrome – Danger Area Screen
Test Case Procedure
Expected Output
Result
1.Go to Web site
http://giangvh007.zxq.net/ and
click on danger area tab
2.Try enter character fx:
tungbach123 on Time upload data
field
You just can input
number
Pass
1. Go to Web site
http://giangvh007.zxq.net/
2. Click on danger tab
3. Enter a number to Time upload
data field, for ex 10000 click ok
A success
message box will
be showed
see: parameterupdate.jpg
Fail
155 | P a g e
C64
Check display
default with
data about
danger areas.
1.Go to Web site
http://giangvh007.zxq.net/
2.Login success
3.Click on Danger Area tab
1. Screen look
like following
image
2. Data is
displayed right
data in database
name ,Radius ,
comment,
+Number of
Marker
+Position of
Marker
1. After save data
will be save on
database.
2,Show this point
on map.
Pass
C65
Check creates
a new danger
point.
1. Go to Web site
http://giangvh007.zxq.net/
2.Login success.
3. Click on Danger Area tab
4. click on a point on map,
5 fill right data on 3 fields
6 click save button
C66
Check min
length of Name
textbox
1. Go to Web site
http://giangvh007.zxq.net/
2.Login success.
3. Click on Danger Area tab
4. click on a point on map,
5 enter 5 characters or less to
name textbox
6 click save button
Display an error
message
Pass
C67
Radius textbox
1. Go to Web site
http://giangvh007.zxq.net/
2.Login success.
3. Click on Danger Area tab
4. click on a point on map,
5 Try to enter some characters or
less to radius textbox
6 click save button
You just can input
number
Pass
C68
Check Close
button
1. Go to Web site
http://giangvh007.zxq.net/
2.Login success
3.Click on Danger Area tab
4. click on a point on map,
5.Click on close button.
Disappear the
box.
Pass
Pass
156 | P a g e
C69
Check click on
marker name
1. Go to Web site
http://giangvh007.zxq.net/
2.Login success
3.Click on Danger Area hyperlink
4. click on a point on map,
5.Click random on marker name
C70
Check List of
danger area
1. Go to Web site
http://giangvh007.zxq.net/
2.Login success
3. Click on danger tab
4.click on random point of list of
danger area
C71
Check zoom in
zoom out move
right , left ,up
and down.
1. Go to Web site
http://giangvh007.zxq.net/
2.Login success
3.Click on Danger Area hyperlink
4. Use zoom in , zoom out, move
right , left ,up and down.
C72
Check Save &
close button
1. Go to Web site
http://giangvh007.zxq.net/
2.Login success
3.Click on Danger Area tab
4. Click on a marker point on map,
5.try to change name, radius, and
comment.
6. click save & close button
C73
Check Delete
button
1. Go to Web site
http://giangvh007.zxq.net/
2.Login success
3.Click on Danger Area tab
4. Click on a marker point on map,
5.try to change name, radius, and
comment.
6. click save & close button
This point will be
Pass
showed.
+Show position
+Show box with
name, radius, and
comment
note: see ….
image
1. All danger
Pass
points will be
showed.
2. Danger point
will be showed.
if there is no data
in database, then
SMS table will
show "Khong co
du lieu cho ngay "
They work well.
Pass
1. Display
success message
box
2. Data what has
changed will be
saved to
database.
See: errorregister.jpg
1. Display
success message
box
2. data what has
chosen will be
delete on
database
see markerdelete.jpg
Fail
Pass
Table 118 - Website on Chrome - Danger Area Screen
5.3.2.5 History Screen
Module Code
ID
Test Case
Description
Website on Chrome – History Screen
Test Case Procedure
Expected Output
Result
157 | P a g e
C74
Check default
of display
1.Go to Web site
http://giangvh007.zxq.net/
2.Login success
C75
Check Day
calendar icon
1. Go to Web site
http://giangvh007.zxq.net/
2.Login success
3.Click on calendar icon
4. choose random day
C76
SMS table
1. Go to Web site
http://giangvh007.zxq.net/
2.Login success
3.Click on day calendar icon
4. choose random day
C77
C78
Call Logs table
Check zoom in
zoom out move
right , left ,up
and down.
1. Go to Web site
http://giangvh007.zxq.net/
2.Login success
3.Click on day calendar icon
4. choose random day
1. Go to Web site
http://giangvh007.zxq.net/
2.Login success
3.Use zoom in, zoom out, move
right , left ,up and down.
1. Screen will
display all data of
current day.
+SMS log
information
+positions on
map
1. The day what
has chosen will
be display on
textbox beside
2. All data of SMS
and call log will
be showed on 2
table (SMS, call
logs)
1.Screen will
show exactly data
in database
- type, phone
number, time,
content…
if there is no data
in database, then
SMS table will
show "Khong co
du lieu cho ngay "
1.Screen will
show exactly data
in database
- type, phone
number, time,
duration
if there is no data
in database, then
SMS table will
show "Khong co
du lieu cho ngay "
They work well.
Pass
Pass
Pass
Pass
Pass
158 | P a g e
C79
Check click
History tab
1.Go to Web site
http://giangvh007.zxq.net/
2.Login success
3.Click on History tab
Going on History
screen.
Pass
C80
Check click
Danger Area
tab
1.Go to Web site
http://giangvh007.zxq.net/
2.Login success
3.Click on Danger Area tab
Going on Danger
Area screen.
Pass
C81
Check click Log
out
1.Go to Web site
http://giangvh007.zxq.net/
2.Login success
3.Click on Log out
Back to login
screen
Pass
C82
Check List of
location
1. Go to Web site
http://giangvh007.zxq.net/
2.Login success
3.click on start or end.
Pass
C83
Check List of
danger area
1. Go to Web site
http://giangvh007.zxq.net/
2.Login success
3. click on random point of list of
danger area
C84
Check Map
display
1. Go to Web site
http://giangvh007.zxq.net/
2.Login success
3. click on random point of list of
danger area
4. Click on marker point on map
1. Start and end
point, distance
will be showed,
2. After click on
start or end point
then start or end
point will be
showed on map.
if there is no data
in database, then
SMS table will
show "Khong co
du lieu cho ngay "
1. All danger
points will be
showed,
2. Danger point
will be showed.
if there is no data
in database, then
SMS table will
show "Khong co
du lieu cho ngay "
1. All danger
points will be
showed,
2. danger point
will be showed.
3. After click on a
marker point on
map, information
box will be
showed.
Pass
Pass
Table 119 - Website on Chrome - History Screen
159 | P a g e
5.3.2.6 Admin Screen
Module Code
ID
C85
Test Case
Description
Check data
show
correctly
Website on Chrome – Admin Screen
Test Case Procedure
Expected Output
Result
1. Go to Web site
http://giangvh007.zxq.net/
2. Login success by Admin
account
Data show
correctly with
database
Pass
C86
Check pop up
after click on
a row
1. Go to Web site
http://giangvh007.zxq.net/
2. Login success by Admin
account
3. Click on a row.
Pop up will be
showed
see : pop-up.jpg
Pass
C87
Check ID and
username
field
1. Go to Web site
http://giangvh007.zxq.net/
2. Login success by Admin
account Click on a row.
3. Try to change Id and
username field
You cannot
change id and
username field
Pass
C88
Role
dropdown list
1. Go to Web site
http://giangvh007.zxq.net/ Login
success by Admin account Click
on a row.
2.Try to select one of three
options
The option what
has chosen will
be showed
see :roles.jpg
Pass
C89
Delete button
1. Go to Web site
http://giangvh007.zxq.net/
2.Login success by Admin
account
3. Click on a row on table
4.click delete button
This row
disappears and
this data is
deleted in
database.
Pass
C90
Check IMEI
exist
1. Go to Web site
http://giangvh007.zxq.net/
2Login success by Admin account
and click on a row
3.Enter a IMEI what existed on
database. for example
:000000000000,35919902025443
2
4. Fill remain fields with right data
5. click on Update button
Display a error
message
imei-existadmin.jpg
Pass
160 | P a g e
C91
Check Email
exist
1. Go to Web site
http://giangvh007.zxq.net/
2.Going on update account page
3.Enter a Email what exited on
database. for example
[email protected]
4. Fill remain fields with right data
5. click on Update button
Display a error
message
imei-existadmin.jpg
Pass
C92
Check mobile
exist
1. Go to Web site
http://giangvh007.zxq.net/
2.Login success by Admin
account Click on a row.
3. Enter a Email what exited on
database. for example
[email protected]
4. Fill remain fields with right data
5. click on Update button
Display a error
message
mobile-existadmin.jpg
Pass
C93
IMEI text box
1. Go to Web site
http://giangvh007.zxq.net/Login
success by Admin account Click
on a row.
2.Try enter 13 characters or less
example
1234567890123
Display an error
message
Pass
C94
IMEI text box
1. Go to Web site
http://giangvh007.zxq.net/
with admin account.
2. Click on a row.
3. After pop up was showed
2.Try enter 14 characters or more
example on IMEI box.
1234567890123
5. click update button
Display an error
message
Fail
161 | P a g e
C95
IMEI text box
1. Go to Web site
http://giangvh007.zxq.net/ Login
success by Admin account Click
on a row.
2.Try enter 16 characters or more
example
1234567890123456
You cannot enter
16 characters.
Pass
C96
IMEI text box
1. Go to Web site
http://giangvh007.zxq.net/ Login
success by Admin account Click
on a row.
2.Try enter 15 characters or
morehttp://giangvh007.zxq.net/
example
123456789012345
There is no
message.
Pass
C97
Mobile
textbox
1. Go to Web site
http://giangvh007.zxq.net/ Login
success by Admin account Click
on a row.
2.Try enter character
fxtungbach123
You just can input
number
Pass
C98
Email textbox
1.Go to Web site
http://giangvh007.zxq.net/ Login
success by Admin account Click
on a row.
2.Try enter wrong form of an email
to email textbox fx
tungbach99@@@yaho.com
Display an error
message
see email-erroradmin.jpg
Pass
C99
Check x
(close) button
of pop up.
1. Go to Web site
http://giangvh007.zxq.net/
2.Login success by Admin
account
3.click on a row.
4. clean some field
5.click x button
1. pop up will be
closed
2. nothing change
on database
Pass
162 | P a g e
C100
Check Log
out
1.Go to Web site
http://giangvh007.zxq.net/
2.Login success by Admin
account
3.click on log out
Back to login
screen
Pass
Table 120 - Website on Chrome - Admin Screen
5.4
Test Summary Report
Test Execution Summary
Pass
Fail
Number of Test cases
190
0
190
Permission
8
0
8
Performance
8
0
8
206
0
100%
Function
Test coverage
Test coverage
Test successful
coverage
5.4.1 Test Execution
100%
Table 121 – Test Execution Summary
Summary
5.4.2 Test Results
5.4.2.1 Summary of Incident Reports Raised During Project
Severity
Total
Defect
Open Defect
Assigned
Corrected
Accepted
Total Open
defects
Fatal
0
0
0
0
0
Serious
4
4
3
3
4
Medium
36
36
36
36
36
Cosmetic
0
0
0
0
4
163 | P a g e
Total (Status)
40
40
39
36
40
Table 122 - Summary of Incident Report
Total defects above exclude “Cancelled” defects.
5.4.2.2 Conclusion
#
Criteria
Status
All the inputs of system testing are baselined and approved by
relevant stakeholders (Common requirement, ADD, SRS,
1 Design,Software package, System test cases).
System testing is over and all known issues (if any) are aware by
relevant stakeholders (Team lead, Test lead, PM, Tech lead) and
2 documented in Test summary report.
All planned Test Cases have been executed (100% test execution
3 coverage)
At least 95% executed system test cases have to be passed. (More
4 than 95% test successful coverage)
5 100% high priority test cases in scope are passed.
6 Only Cosmetic defects can be accepted
Table 123 - System Test Success Criteria
VI.
Chapter VI - Software User’s Manual
6.1
Installation Guide
6.1.1
Website
6.1.1.1 Setting Up the Environment at Server Side
- Sign up an account for www.zymmic.com .You can see instruction file “zymicsignup.docx” on folder “Tool&Support/” from disk
- FILEZILLA software version 3.6.0.2. You can get from Disk on folder
“Tool&Support”.
- Package for deployment you can get it from disk on folder “Web”
- Create a database on http://www.zymic.com/ with your host name, username.
164 | P a g e
And name of database: “yourhostname_sever”
(Our example: “giangvh007_zxq_sever”) and you must see database design
for create table, column, and type of data. You can see instruction link:
http://www.youtube.com/watch?v=wJr_H0t9NkA
6.1.1.2 Deployment at Server Side
Step 1: Connect to file manager by FileZilla.
Open FileZilla software and
o You can post your host to Host field(fx:
http://giangvh007.zxq.net )
o You enter your username to username field ( fx:
giangvh007_zxq_user)
o Password (fx :giang156)
o Post (fx: 21)
After that you click Quickconnect button (You should use your account
for connect to host)
Step 2: Transfer Web folder to file manager of zymic by FileZilla.
o You choose “web” folder at local site field (for example with
following image.)
165 | P a g e
o Pull Web folder to next table after that you can see result
6.1.1.3 Setting Up the Environment at Client Side
The system is accessed via web browsers. The client machine should be installed
with one of the following browsers: Firefox 11.0 and higher, Chrome, and Internet
Explorer 7.0 and higher.
6.1.2 Application
6.1.2.1 Build and Get apk File
Summary
Description:
Trace Steps:
Screen 1: Eclipse SDK
Step 1: Select 'File' menu item
Screen 2: Eclipse SDK
Step 2: Select 'Import...' menu item
Screen 3: Import
Step 3: Double click 'File System' tree item
166 | P a g e
Screen 4: Import
Step 4: Click 'Browse...' button
Screen 5: Import from directory
Step 5: Select 'Đĩa Cục bộ (C:)' tree item
Screen 6: Import from directory
Step 6: Click 'Position' button
Screen 7: Import from directory
Step 7: Select 'Người dùng' tree item
Screen 8: Import from directory
Step 8: Select 'giangvh00848' tree item
Screen 9: Import from directory
Step 9: Select 'workspace' tree item
Screen 10: Import from directory
Step 10: Click 'OK' button
Screen 11: Import
Step 11: Click here
Screen 12: Import
Step 12: Click 'Finish' button
Screen 13: Eclipse SDK
Step 13: Right click '> PhoneTrack 135
[https://androinexp.googlecode.com/svn/: PhoneTrack]' tree item
Screen 14: Team Synchronizing - Eclipse SDK
Step 14: Select '1 Android Application' menu item
Screen 15: Team Synchronizing - Eclipse SDK
Environment:
System Information
Microsoft Windows 7 Ultimate Edition Service Pack 1 (build
167 | P a g e
7601), 64-bit, Major=6 Minor=1
qTrace version:2.6.2.1
IE version: 9.0.8112.16421
ADO version: 6.1.7601.17514
CPU: 4 Speed=2.05GHz, Intel64 Family 6 Model 42 Stepping
7, GenuineIntel, Intel(R) Core(TM) i3-2310M CPU @ 2.10GHz
Total physical memory: 4043.86MB
Available physical memory: 2104.12MB
User: TungBach (Admin rights=1)
Recorded Application 1: eclipse.exe
Application version:
File path: E:\eclipse\eclipse.exe
File version:
File size: 0.30MB (319488 Bytes)
File modified date: 06/08/2012 07:59:32
Screen 1: Eclipse SDK
Step 1: Select
'File' menu item
Screen 2: Eclipse SDK
168 | P a g e
Step 2: Select
'Import...' menu
item
Screen 3: Import
Step 3: Double
click 'File System'
tree item
Screen 4: Import
169 | P a g e
Step 4: Click
'Browse...' button
Screen 5: Import from directory
Step 5: Select 'Đĩa
Cục bộ (C:)' tree
item
Screen 6: Import from directory
170 | P a g e
Step 6: Click
'Position' button
Screen 7: Import from directory
Step 7: Select
'Người dùng' tree
item
Screen 8: Import from directory
171 | P a g e
Step 8: Select
'giangvh00848'
tree item
Screen 9: Import from directory
Step 9: Select
'workspace' tree
item
Screen 10: Import from directory
172 | P a g e
Step 10: Click 'OK'
button
Screen 11: Import
Step 11: Click
here
Screen 12: Import
173 | P a g e
Step 12: Click
'Finish' button
Screen 13: Eclipse SDK
Step 13: Right click '>
PhoneTrack 135
[https://androinexp.googlecode.co
m/svn/: PhoneTrack]' tree item
Screen 14: Team Synchronizing - Eclipse SDK
174 | P a g e
Step 14: Select '1
Android
Application' menu
item
Screen 15: Team Synchronizing - Eclipse SDK
After Run
application you
can see the result.
Screen 16 : Go to folder \PhoneTrack\bin you can get phonetrack.apk
175 | P a g e
You Go to
“PhoneTrack\bin“
folder to get
PhoneTrack.apks
6.1.2.2 Set Up Application to Device
6.1.2.2.1 Prepare for Setting
- Android device with version 2.3 or over. (we are testing on Samsung galaxy
-
S2 for this document)
Odin software (version 1.85). You can down load on “Tool&Support” folder
from disk
ES file explorer or root explorer software (Version 1.6.2.3). You can down
load from:
https://play.google.com/store/apps/details?id=com.estrongs.android.pop&hl
=en
6.1.2.2.2 Set Up Application
Step 1: Root android device. Because there are too much android device so
we will take an example: device Samsung galaxy S2 you can see instruction
video below:
http://www.youtube.com/watch?v=WYE_gpqCUgc
After root device you can see super user icon
176 | P a g e
Step 2: Install ES file explorer or root explorer, after that you can see below
icon.
Step 3: Get phonetrack.apk to device from Disk to SD card or internal
memory. For example: /sdcard/phonetrack.apk
177 | P a g e
Step 4: Open Root explorer or ES file explorer and move phonetrack.apk to
folder: system/app.
Click on Root explorer Icon and choose on parent folder.
Choose system folder
Choose app folder.
Paste phonetrack.apk file here.
Step 5: Install application by click on phonetrack.apk Icon, after that message box will
showed
178 | P a g e
After you click install button you can see
You click internal button.
Click done button.
Step 6: Reset device.
For example with galaxy s2 you can press and hold power button what is up on device,
the box will showed. Choose restart option.
Step 7: UNROOT device. Specification with device Samsung galaxy S2 you can
see instruction video below:
179 | P a g e
http://www.youtube.com/watch?v=tW6x29ug5Ms.
Step 8: Reset device.
For example with galaxy s2 you can press and hold power button what is up on device,
the box will showed. Choose restart option.
6.2
User’s Guide
6.2.1 General Guide
6.2.1.1 Login
Step 1: Type in 'Địa chỉ' edit box: 'giangvh007.zxq.net'
Step 3: Type in 'Username:' edit box:
Step 2: Press Enter
180 | P a g e
Step 4: Type in 'Password:' edit box:
Step 5: Click 'Sign in' button and History screen will be showed
6.2.1.2 View Profile
Step 1: Login andClick Update Account Tab Update screen will be showed
6.2.1.3 View Position, SMS, Call Logs of Current Day
Step 1: Login and History screen will be showed
181 | P a g e
6.2.1.4 View Danger Area Screen
Step 1: Login and Click Danger Area Tab and Danger Area screen will be
showed
6.2.2 Form Guide
6.2.2.1 Register a New Account
Step 1: Go to login Screen and click on “Create an account”
-
Step 2: After Register was showed, you need to enter all information
User name field, password, confirm password must be from 6 to 12
characters.
IMEI must be exactly 15 characters
EMAIL must be right form of email.
Number phone just is a number
182 | P a g e
6.2.2.2 Forgot Password
Step 1: Go to login Screen and click on “Forgot password”
6.2.2.3 User’s Update Information
Step 1: Login and move to update account tab.
Step 2: You can update IMEI, phone number, email after that you click
update button
183 | P a g e
6.2.2.4 Delete Tracking, SMS and Call Logs Data
Step 1: Login and move to update account tab.
Step4: Click delete button
Step 2: You click on calendar icon choose a day and
Step 3: Click on radio button of Track or SMS or Call Logs or all three radio
button.
6.2.2.5 Change Password
Step 1: Login and move to update account tab.
Step4: click change button
Step 2: You enter your current password to old password field
Step 3: you enter new password to new password, and confirm password
field
184 | P a g e
6.2.2.6 View History of Position, SMS, Call Logs
Step 1: Login
Step 3: click ok button for result.
Step 2: Choose a day on calendar icon
6.2.2.7 View Information of Danger Point
Step 1: Login
Step 2: Click on a danger point like below image.
185 | P a g e
6.2.2.8 Create a New Danger Point
Step 1: Login and move to danger area tab.
Step4: Click “Save & close” button
Step 2: You click on a point on map
Step 3: After click on a point information box will be showed, you need to
enter all data for this box.
6.2.2.9 Update Information or Delete Danger Point
Step 1: Login and move to danger area tab.
Step4: Click “Save&close” button or delete button if you want to delete this
point
Step 2: You click on a danger point on map
Step 3: After click on a danger point information box will be showed, you can
change data on this box.
186 | P a g e
6.2.2.10 Set Time Upload Data
Step 1: Login and move to danger area tab.
Step 2: You set a time on time upload textbox
Step 3: click ok button, a message box will be showed
Step 4: Click ok
187 | P a g e
6.2.3 Admin Guide
6.2.3.1 View All Information of Users
Step 1: Login with admin account after that admin screen will be showed. You
can see all information of users: username, password, role, IMEI, phone
number, email.
6.2.3.2 Update Information of Users or Delete Users
Step 1: Login with admin account after that admin screen will be showed.
Step 2: click on a row after that information box will be showed
Step 3: Admin can change role, imei, phone number, email
188 | P a g e
6.2.4 User Enables Update For Device by Sending Message
Step 1: After user Register, and set up application successfully on device,
Send a message with special format (admin will give you) to number of phone
what has IMEI registered.
189 | P a g e
VII. References
1. https://play.google.com/store/apps
2. http://en.wikipedia.org/wiki/Google_Maps
3. https://play.google.com/store/apps/details?id=com.kendroid.android.routetracker
&feature=search_result#?t=W251bGwsMSwxLDEsImNvbS5rZW5kcm9pZC5hb
mRyb2lkLnJvdXRldHJhY2tlciJd
4. https://play.google.com/store/apps/details?id=com.fsp.android.c&hl=vi
5. https://play.google.com/store/apps/details?id=com.gizmoquip.smstracker&hl=vi
6. http://www.youtube.com/watch?v=wJr_H0t9NkA
7. http://www.youtube.com/watch?v=WYE_gpqCUgc
8. http://www.youtube.com/watch?v=tW6x29ug5Ms.
9. https://play.google.com/store/apps/details?id=com.estrongs.android.pop&hl=en
190 | P a g e