1
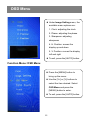
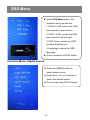
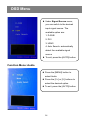
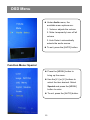
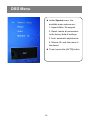
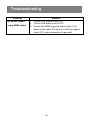
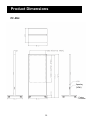
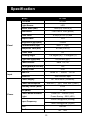
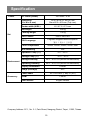
2 Table of contents Safety warnings and precautions .................................................... 4 Product Description .......................................................................... 7 Parts and functions ........................................................................... 8 Input/Output Terminals ........................................................................ 8 Rear side buttons ................................................................................ 8 OSD Menu .......................................................................................... 9 OSD Main Menu .................................................................................. 9 Function Menu: Color .......................................................................... 9 Function Menu: Image setting ............................................................. 11 Function Menu: OSD Menu ................................................................. 12 Function Menu: Signal source ............................................................. 13 Function Menu: Audio.......................................................................... 14 Function Menu: Special ....................................................................... 15 Installation Notes .............................................................................. 17 Troubleshooting ................................................................................ 19 Product Dimensions ......................................................................... 21 Specification ...................................................................................... 22 3 Safety warnings and precautions WEEE Information for users applicable in European Union countries. The symbol on the product or its packaging signifies that this product has to be disposed separately from ordinary household wastes at its end of life. Please kindly be aware that this is your responsibility to dispose electronic equipment at recycling centers so as to help conserve natural resources. Each country in the European Union should have its collection centers for electrical and electronic equipment recycling. For information about your recycling drop off area, please contact your local related electrical and electronic equipment waste management authority or the retailer where you bought the product. 4 Safety warnings and precautions Please read these instructions before using the product, and retain for future reference. Please comply with standard operating methods stipulated for this product. Please ensure that the voltage provided at the site of use is compatible with the products voltage requirements. Do not block the heat ventilation ports at the back of the display. Be sure to leave some space around the display for ventilation and heat dissipation. Do not open the rear cover of the display. Any damage caused by improper operations will not be included in the scope of our warranty. In order to prevent potential damages and to extend the effective usage life of the display, please comply with the following points when installing and operating the display: When the display power is switched on, do not cover or block any ventilation ports or openings. It is regaired to clean the ventilation ports on the equipment periodically to ensure effective heat dissipation. Please ensure that candles or other fame-producing devices are kept far from the display to prevent accidental fires. Please do not insert your finger or other objects into the gap between the display and lower frame, in order to prevent causing injuries to the person or structural damage to the display. Please do not subject the display to excessive pressure or force to prevent damaging its structure. 5 Safety warnings and precautions Please do not place the display in close proximity to water, such as bathing pools or swimming pools, and do not place the display at areas that may be exposed to water splashes such as windows. Please do not place the display under direct sunlight or strong lighting. Excessive heat from sunlight may damage the display, while direct exposure to strong light may also affect the quality of the displayed contents. Please do not place the display in close proximity to sinks, electric heaters, radiators, and Other heat-generating products(including sound amplifiers) Please do not place the display on unstable, sloped, or poorly secured platforms or carts as this may cause the display to topple or fall, leading to serious equipment damage or human injury. We recommend secure the display at a fixed location. This will help prevent the display from falling over during earthquakes. Please pay attention and comply with all warning and instruction labels on the display. Please do not place the display in a poorly ventilated environment. 6 Product Description Package Contents When unpacking, check if the following items are included in the package. If any of them is missing or damaged, contact your dealer. Kiosk Display Power Cord HDMI Cable 7 User’s Manual Parts and functions Input/Output Terminals Rearside buttons PW PW Press this button to turn the display on or off LED LED AUTO Green: ON Red: OFF 1. When the OSD menu screen is not activated, press this button to automatically switch to another input source. 2. When the OSD menu screen is active, press this button to return to the previous menu. 1. When the OSD menu screen is active, press this button to select a menu or sub menu or to reduce the value of the selected menu option. 2. In VGA mode, press this button to perform Auto adjust function. 3. No functions in HDMI/DVI mode. 4. To adjust the volume, press [V+] first to activate the volume function. Then press this button to decrease the volume level. 1. When the OSD menu screen is not activated, press this button to increase the volume level. 2. When the OSD menu screen is active, press this button to select a menu or sub menu or to increase the value of the selected menu option. 1. When the OSD menu screen is not activated, press this button to open the OSD menu. 2. When the OSD menu screen is active, press this button to enter the submenu. AUTO V- V- V+ MENU V+ MENU 8 OSD Menu OSD Main Menu Press the [MENU] button to call out the OSD window. Press the [V+] or [V-] buttons to select the desired option. To exit, press the [AUTO] button. Function Menu: Color Press the [MENU] button to select Color. Press the [V+] or [V-] buttons to select the Color option. To exit, press the [AUTO] button. 9 OSD Menu Under Color menu, the available menu options are: 1. Contrast 2. Brightness 3. Color Adjust 4. Color Temp (color temperature) Select Contrast / Brightness and press the [MENU] button, then use [V+] or [V-] buttons to adjust the values. Color Adjust is used to adjust the display color. To use this function, set the Color Temp setting to User mode. To exit, press the [AUTO] button. 10 OSD Menu Color Temp is used to adjust color temperature according to the user's requirements. When the Color Temp setting is set to User mode, you may implement display color adjustments in Color Adjust. To exit, press the [AUTO] button. Function Menu: Image setting Press the [MENU] button to bring up the menu. Use the [V+] or [V-] buttons to select the item desired. Select Image Setting and press the [MENU] button to enter. Image setting is only available for VGA input. To exit, press the [AUTO] button. 11 OSD Menu Under Image Setting menu, the available menu options are: 1. Clock: adjusting the clock 2. Phase: adjusting the phase 3. Sharpness: adjusting sharpness 4. H. Position: moves the display up and down 5. V. Position: moves the display left and right To exit, press the [AUTO] button. Function Menu: OSD Menu Press the [MENU] button to bring up the menu. Use the [V+] or [V-] buttons to select the item desired. Select OSD Menu and press the [MENU] button to enter. To exit, press the [AUTO] button. 12 OSD Menu Under OSD Menu menu, the available menu options are: 1. OSD H. POS: moves the OSD menu position up and down 2. OSD V. POS: moves the OSD menu position left and right 3. OSD Timer: selects the OSD interface dwelling time 4. Language: selects the OSD language To exit, press the [AUTO] button. Function Menu: Signal source Press the [MENU] button to select signal source Press the [V+] or [V-] buttons to select the desired option. To exit, press the [AUTO] button. 13 OSD Menu Under Signal Source menu, you can switch to the desired input signal source. The available option are: 1. D-SUB 2. DVI 3. HDMI 4. Auto Search: automatically detect the available signal source To exit, press the [AUTO] button. Function Menu: Audio Press the [MENU] button to select Audio Press the [V+] or [V-] buttons to select the desired option. To exit, press the [AUTO] button. 14 OSD Menu Under Audio menu, the available menu options are: 1. Volume: adjusts the volume 2. Mute: temporarily turns off all volume 3. Auto Select: automatically selects the audio source To exit, press the [AUTO] button. Function Menu: Special Press the [MENU] button to bring up the menu. Use the [V+] or [V-] buttons to select the item desired. Select Special and press the [MENU] button to enter. To exit, press the [AUTO] button. 15 OSD Menu Under Special menu, the available menu options are: 1. Aspect Ratio: No support. 2. Reset: resets all parameters to the factory default settings 3. Auto: automatic adjustments 4. Monitor ID: sets the name of the device To exit, press the [AUTO] button 16 Installation Notes 17 Installation Notes Space for IPC Remark: B1: M3 screw x 7L B2: M4 screw x 7L B3: M4 screw x 8.4L B4: M4 screw x 9.4L Space: 550 x 376 x 50 mm 18 Troubleshooting Problem Shift in displayed picture Adjusting the resolution No image No sound(when using VGA / DVI cable) Solution 1. Check if the HDMI cable between PC/Media player and the display is properly plugged in. Replace the HDMI cable if it appears to be damaged 1. Enter the graphics card adjustment menu (click the right button of the mouse on any location on the desktop to enter display control panel) 2. Make sure the player supports 1920 X 1080 resolution, if not please change with a suitable one. 1. Check if the red LED signal light on the KEYPAD is on. If not, turn on the main switch at the back of the display and use the KEYPAD to turn on the power. 2. Once the LED signal light turned green, the display will detect the signal automatically. 3. If there is still no image on the screen, press “MENU” and then “Source”, choose HDMI, VGA or DVI. 1. When using VGA / DVI input source, an extra audio cable should plugged in Audio In port from PC/Media player. 2. If the Audio Out port is connected with a device, the internal speakers will be switched off 3. Go to PC/Media player Control Panel/Sound/Play, and select the designated external speakers, and press OK. 4. Check if the audio cable from PC/Media player is plugged in the Audio In port on the display correctly. If the audio cable appeared to be damaged please change to another audio cable. 5. Check if the external speaker has been turned on. 19 Troubleshooting Problem No sound (When using HDMI cable) Solution 1. Check if the volume is set to 0. 2. Check if the audio is set to OFF. 3. Ensure the HDMI supports audio output. If so, select video under DVI source. If still not support, select PC (audio connection is required). 20 Product Dimensions PF-55H Speaker (10W) Caster 21 Specification Model PF-55H LCD Size 55 inch Light Source LED Active Area (mm) 1209.6(H) x 680.4(V) Resolution FHD 1080 x 1920 (pixels) Pixel Pitch 0.63(H) x 0.63 (V) mm Aspect Ratio 16:9 Brightness (typ)/(min) Panel 700nits Contrast Ratio (typ.) 4000 : 1 ( typ ) Response Time (ms) 6.5 ms (G to G) Frame Rate 60 Viewing Angle 178 degree (H) / 178 degree (V) Light Life (typ)/(min) 50,000 hrs (typ.) Panel Surface Input Haze 11%,3H Color gamut (x% NTSC) 72% Display Color 8 bit Basic IO HDMI x1 、VGA x1、DVI x1 Other I/O USB function input Power supply Power consumption Power AC 100V~250V ( 50/60Hz) 90W±20% (Typ.) 120W ±20%(Max.) Standby Power (Watt) <=1W Off (Watt) <= 1W Power Mode Indicator Light Power On:GREEN (LED) Power Saving:RED (LED) 1920X1080@60Hz (Analog) Input Frequency 1920X1080@60Hz (Digital) DDC DDC2B 8Ω、10W Audio 22 Specification Power AC Outlet (inside) 100~240V / 5.3A Dimension (H x W x D mm) 1975 x 815x 67/ 651(D) mm Stand:815 x 651mm (Top view) Border width (U/R/L) Set 65 / 67.3 / 67.3 mm Net weight 105 kg Packing weight 115 kg OSD Control 5 KEY KEYPAD OSD Language English/Frangais/Deutsch/Espanol/ 繁中 / 简中 / 日本語 Color Temperature 5800K, 6500K, 9300K, sRGB, User Wall Mounting N/A Operation Temp (°C) Environment 0°C ~ 40°C Storage Temp (°C) -10°C ~ 50°C Storage Humidity 20% ~ 80% RH (without condensation) Operating Humidity 20% ~ 80% RH (without condensation) Display Orientation Portrait Usage (hrs/days) 20/7 Power cable Accessory AC 100~240V (1.8m) x1 (EU) HDMI 1.8m x1 User manual English version Company Address: 5F-1, No. 3-1, Park Street, Nangang District, Taipei, 11503, Taiwan. 23