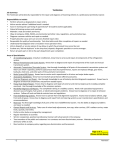
1
User’s Manual for the Astro-Smart Integrated Computerized Dew Annihilator Pro For Meade LX200 GPS Series Telescopes(Model iCDAP-M) Copyright Jan 2013 User’s Manual for the Astro-Smart Integrated Computerized Dew Annihilator Pro (Model iCDAP-M) Contents A. Overview ............................................................................................................2 B. Contents of Box..................................................................................................4 C. Specifications.....................................................................................................4 D. Design Features ................................................................................................. 5 E. iCDAP Front Panel And Connector Diagram: ..................................................6 F. Basic Functionality ............................................................................................ 7 ¾ BootUp: Default................................................................................................. 7 ¾ Default Operation (Automated Dew Control)...................................................8 ¾ Automated & Manual Operation (Apply PWM Heat As Desired) ................. 10 ¾ Standard Keypad Entry Instructions(MSG > Wait/Done)..............................11 ¾ Keypad Entry Commands (System Control)................................................... 12 G. External Temperature Sensor Hints: ...............................................................17 H. Accessories....................................................................................................... 18 Astro-Smart LLC P.O. Box 33753 Indialantic, FL 32903 Page 1 Providing the Astronomical Community with Premier Products, Services, and Training astro-smart.com Jan 2012 Integrated Computerized Dew Annihilator Pro (Model iCDAP-M) A. Overview Astro-Smart LLC is the innovator of this elegant solution to the dew problem. We incorporate the iCDAP-M into the fork arm of the very telescope you are using. Most users of the LX200 GPS/R/ACF and RCX400 ACF don't use, let alone rely on, the battery compartment to run their telescope. Our unique approach offers the clean and efficient use of this space to bring you the dew control you need. We utilize the wasted space of your telescope to minimize loading and wire clustering to provide a complete replacement solution to the existing battery compartment and cover. This way your investment can be brought back to its original condition without alteration in the event you need to send your scope back to the manufacturer or want to sell in the future. Since, the inception of this unique product at Astro-Smart LLC, the iCDAP-M was many years in the making, over long periods in astronomy using existing products on the market to control dew, identifying their weaknesses and limitations making the product you see before you. Features such as patent pending heat distribution which minimizes heat currents on optics during imaging, Dew point, humidity and differential temperature alarms and decision making on dew control, Updateable Firmware, Intelligent software GUI interface with Large LCD and keypad to name a few. The iCDAP-M is finally here! The Astro-Smart integrated Computer Differential Dew Heater Module (iCDAP-M) is currently offered for Meade 7"-14" LX200GPS/R/ACF and 8"-14" RCX400 ACF telescopes. The iCDAP-M was designed with the same Astro-Smart USER-Friendly design philosophy as all our other products: - Usable, - Serviceable, - Elegant, - Reliable and USER-Friendly ! Page 2 Providing the Astronomical Community with Premier Products, Services, and Training astro-smart.com Jan 2012 It is this integrated module that incorporates a four port heater capability controlled by two channels using two remote temperature sensors (one optional). It will work with one remote temperature sensor, but you may desire a second remote sensor (available separately) making your corrector dew control independent from your eyepiece dew control for instance. The Astro-Smart integrated Computer Differential Dew Heater Module (iCDAP-M-M) has these innovative and unique features: 1. Full Computer Driven Or Manual Operated Dew Control Solution. 2. 4 Output Port Control Automated or User Controlled. 3. 4 line Multi-Readout Sensor and Port Activity Backlit LCD Display. 4. Full 12 Keypad user interface for entry of System Parameters and Control Functions. 5. Pulse Width Modulation(PWM) for Efficient Heat Output Suited For Imaging. 6. Audible Alarms For Dew Point Approaching(DWP) and Differential Delta Monitoring. 7. Dual Differential Temperature and Humidity measurement and Control. 8. Automated Dew Point and Temperature Variance set point for Dew Control. 9. Dual Fahrenheit or Celsius Temperature Display Feature. 10. Updatable Firmware and Software GUI Interface. 11. Void of RFI(Radio Frequency Interference) protected to enhance Astro-Imaging . 12. High quality design employs multi-layer PCB form factor and only the best quality components. 13. Price point set much below competing models while providing more features. Page 3 Providing the Astronomical Community with Premier Products, Services, and Training astro-smart.com Jan 2012 It is this integrated module that incorporates a four port heater capability controlled by two channels using two remote temperature sensors (one optional). It will work with one remote temperature sensor, but you may desire a second remote sensor (available separately) making your corrector dew control independent from your eyepiece dew control for instance. The user simply turns on the button and system monitors and applies pulse width modulated heat to devices based on temperature differential on local ambient temperature, humidity and dew point calculation and conditions. The data is constantly collected, calculated and monitored while automatically adjusting heat pulses efficiently to reduce heat on optics which is extremely important for imaging. This patent pending technique eliminates heat waves on optics during a PWM cycle by a reciprocal approach. When dew point approaches, the system can warn the user merely for information purposes to clean other surfaces of your telescope of dew but, the system is in full control and will remove all dew from the optics up to 4 channels. The 4 line LCD display provides the user with a clear and bright view of ambient and two channels of differential temperature probing, humidity, dew point, messages to user and power output PWM to the 4 channel heat straps optionally supplied. Temperature can be easily configured to use Fahrenheit or degree Celsius calibrated at factory or by user preference. In addition, the user can enter in commands and or customized control of the iCDAP-M by the provided 12 key keypad interface. Each iCDAP-M comes with one remote temperature sensor and built in ambient and humidity sensors. You simply collocate the sensor head with your primary heater. B. Contents of Box 1. User Manual for iCDAP-M. 2. iCDAP-M Controller Module 3. Differential Temperature Sensor. C. Specifications The iCDAP-M requires the following: • 12 Volts at 3 amps minimum using a 2.5mm DC power connector on your AC/DC supply. Note: This current drawn through the iCDAP-M is dependent on the resistance of each dew strap being used with the iCDAP-M. The total current for all the dew straps must not exceed the power supply current rating. Page 4 Providing the Astronomical Community with Premier Products, Services, and Training astro-smart.com Jan 2012 The total resistance of all the dew straps used with the iDDHM must follow this equation for SAFE operation: Current Rating of Power Supply Voltage output of Power Supply 1 = Rstrap 1 + 1 + Rstrap 2 1 + Rstrap 3 1 Rstrap 4 Astro-Smart LLC assumes no responsibility if this warning is not heeded. • Center positive voltage, sleeve ground, sees Figure 1. Deleted: <sp> Positive (+) 12V Grounded Sleeve Figure 1 DC power plug • Uses dew straps manufactured by other astronomical vendors. D. Design Features The Astro-Smart integrated Differential Dew Heater Module, iCDAP-M, has these innovative and unique features: • • • High quality components and construction utilizing multilayer board designs with conformal coatings to aid in corrosion prevention in the elements. Astro-Smart uses only the best quality components and engineering practices in design, construction and fabrication. It can keep optical surfaces free of moisture in many different circumstances. Page 5 Providing the Astronomical Community with Premier Products, Services, and Training astro-smart.com Jan 2012 E. iCDAP Front Panel And Connector Diagram: Integrated Computerized Dew Annihilator Pro (Model- iCDAP) Configuration . See Figure 3 below. 4X Line DSP On/Off SW Ch 1-2 UP/Down Ch 3-4 UP/Down PWR In External Temp Sensors Keypad Figure 2 iCDAP-M Overview Page 6 Providing the Astronomical Community with Premier Products, Services, and Training astro-smart.com Jan 2012 F. Basic Functionality The user can watch as the iCDAP-M adjusts heat and controls dew on your telescope based on humidity, dew point, local ambient and temperature differential from optical interfaces with the surrounding environmental conditions. The automatic bootup default control summary features are explained below with user override options for manual control during standard operation described below in next section. An online video demo of operation can be found on our website at : http://www.astro-smart.com/index.php?p=1_24 ¾ BootUp: Default I. II. III. IV. Fix all connections to your iCDAP-M as depicted in Figure 1. This includes heater straps CH1/CH2(Default Operation) and at least one external temperature sensor plugged in TC12 (Default Operation) and power supply interface as specified in Figure 2, Figure 3. Turn On power switch up from center toggle Off position. Power On Reset Interrupt. Note: Boot up sequence on display and power illuminated. All functions go “Beep” will be heard at the init logo. Note: After about 5 secs, TPA, T12, RLH, P12, DWP and MSG are now active information in operation as the system default with P34 and T34 ***** not used until plugged in and recognized by system. Note: display readout for reference . Page 7 Providing the Astronomical Community with Premier Products, Services, and Training astro-smart.com Jan 2012 ¾ Default Operation (Automated Dew Control) 1. Case 1. (Emergency Heat) Conditions: i. (Optic temperatures < Ambient temperatures by 10 degs or more) Optics very cold and need immediate warm up. (ie, T12, T34 by 10 degrees F or more). a. Dew point has been calculated and reached, in which case the user will be notified that conditions for dew in the environment are present but the system will respond by abating the issue by applying moisture heat control on the optics. b. 1KHz Alarm On Warning Heard. This tells the user Dew may form and the system can control it automatically or the user can override as well. Default operation expects TC12 temp channel plugged in with P12 under dew control. c. Power to Dew Straps. (Optic temperatures < Ambient temperatures.) In this case the optic differential channel will have a P12, P34 power on display shown as PWM % during operation and heat strap output by touch. In this case the MSG> window shows that the corrector optics are 10 deg F less than the surrounding ambient temperature. This forces the system to apply heat to the optics as shown at a 100% PWM heat rate shown on P12> which is the MAX temperature duty rate. Page 8 Providing the Astronomical Community with Premier Products, Services, and Training astro-smart.com Jan 2012 2. Case 2. (Normal Automated Dew Control, CPU PWM Controlled Heat) Conditions: i. (Optic temperatures < Ambient temperatures by 5 degs or less) a. Dew point has been calculated and displayed in which case the user will be notified that conditions for dew in the environment are present but the system will respond by abating the issue by applying moisture heat control on the optics. b. No alarm is heard unless dewpoint is approaching. No alarm heard as optics are approaching ambient temperatures. c. Power to Dew Straps. (Optic temperatures < Ambient temperatures.) In this case the optic differential channel will have a P12, P34 power on display shown as PWM % during operation and heat strap output by touch. In this case the MSG> window shows that the corrector optics are 1 deg F less than the surrounding ambient temperature. This forces the system to apply heat to the optics as shown at a 20% PWM heat rate shown on P12> which is the LOW temperature duty rate. Page 9 Providing the Astronomical Community with Premier Products, Services, and Training astro-smart.com Jan 2012 ¾ Automated & Manual Operation (Apply PWM Heat As Desired) 3. Case 3. (Automatic and Manual Operation, Apply PWM Heat As Desired) Conditions: i. (Optic temperatures < Ambient temperatures by 5 degs or less) a. Dew point has been calculated and displayed in which case the user will be notified that conditions for dew in the environment are present but the system will respond by abating the issue by applying moisture heat control on the optics. b. No alarm is heard unless dewpoint is approaching. No alarm heard as optics are approaching ambient temperatures. c. Automated Power to Dew Straps Channels P12. (Optic temperatures < Ambient temperatures.) In this case the optic differential channel will have a P12, P34 power on display shown as PWM % during operation and heat strap output by touch. In this case the MSG> window shows that the corrector optics are 1 deg F less than the surrounding ambient temperature. This forces the system to apply heat to the optics as shown at a 20% PWM heat rate shown on P12> which is the LOW temperature duty rate. Note: T12, P12 Automated Mode. Manual Power to Dew Strap Channels P34. In this case, Manual Operation can be achieved by user as well on either channels as shown below in standard operations section. This example shows full blown capability with T12, T34, P12 and P34 in use. Note: display readout for reference . Also, note the +PW or –PW display for T12> or T34> which indicates PWM in alternate current rates to reduce heat on optics while applying heat. Note: T34, P34 in Manual Mode. Page 10 Providing the Astronomical Community with Premier Products, Services, and Training astro-smart.com Jan 2012 ¾ Standard Keypad Entry Instructions(MSG > Wait/Done) 1. Keypad Activation Instructions Below: 2. Press first keypad number sequence mode desired and “Wait” for blinking cursor on end of MSG> line. 3. Release, and note wait message. MSG>Wait 4. Press next desired keypad value and hold for 2 secs. 5. Release and note message done button. MSG> Done Page 11 Providing the Astronomical Community with Premier Products, Services, and Training astro-smart.com Jan 2012 6. New value and or mode should now be in effect. ¾ Keypad Entry Commands (System Control) Note: Use keypad entry instructions above when using buttons on keypad. ¾ ‘*’ Enter: on keypad adds T34 and P34 to the system. Only use this option if you have a 2nd TC sensor plugged in system. See example below. ‘0’ Enter: on keypad will display all temperature readings in deg F and deg C. See example below. Page 12 Providing the Astronomical Community with Premier Products, Services, and Training astro-smart.com Jan 2012 ‘#’ Enter: on keypad and you change back to T12,P12 only removing T34,P34 sensor and heat strap channels associated with it. See example below. ‘ 1’ Enter: on keypad is used if user wishes to set a variance setpoint between optic and ambient temperature T12 or re-calibrate T12 channel. This has been done at factory. Default activation on power up and reset subtracts from sensor value. For example pressing 1 followed by another 1 using instructions in section VII, will cause T12 to be lowered by 1 deg F. If it is desired to add value to T12, mode 5 must be pressed to go into add mode before performing operation. See below in option 5. Page 13 Providing the Astronomical Community with Premier Products, Services, and Training astro-smart.com Jan 2012 ‘ 2’ Enter: on keypad is used if user wishes to set a variance setpoint between optic and ambient temperature T34 or re-calibrate T34 channel. This has been done at factory. Default activation on power up and reset subtracts from sensor value. For example pressing 2 followed by pressing a 1 using instructions in section VII, will cause T34 to be lowered by 1 deg F. If it is desired to add value to T34, mode 5 must be pressed to go into add mode before performing operation. See below in option 5. ‘ 3’ Enter: on keypad is used if user wishes to set a variance setpoint between ambient and optic temperature TPA or re-calibrate TPA channel. This has been done at factory. Default activation on power up and reset subtracts from sensor value.. For example pressing 3 followed by pressing a 1 using instructions in section VII, will cause TPA to be lowered by 1 deg F. If it is desired to add value to TPA, mode 5 must be pressed to go into add mode before performing operation. See below in option 5. ‘ 4’ Enter: on keypad is used if user wishes to set a variance setpoint between humidity and dew point DWP calculation or re-calibrate Humidity sensor. This has been done at factory. Default activation on power up and reset subtracts from sensor value.. Default activation on power up and reset subtracts from sensor value. For example pressing 4 followed by pressing a 1 using instructions in section VII, will cause RLH to be lowered by 1 deg F. If it is desired to add value to RLH, mode 5 must be pressed to go into add mode before performing operation. See below in option 5. ‘ 5’ Enter: on keypad is used if user wishes to set a variance add mode setpoint between sensors by using a value offset in add mode. This has been done at factory. Default activation on power up and reset subtracts from sensor value. For example pressing 5 followed by a 1 and then another 1 using instructions in section VII, will cause T12 to be increased by 1 deg F. If it is desired to return to subtract mode, either reset the system or use the mode 6 button to return to subtract value mode. See example below. ‘ 6’ Enter: on keypad is used if user wishes to set a variance subtract setpoint between sensors by using a value offset in subtract mode. This has been done at factory. Default activation on power up and reset subtracts from sensor value. For example pressing 6 followed by a 1 and Page 14 Providing the Astronomical Community with Premier Products, Services, and Training astro-smart.com Jan 2012 then another 1 using instructions in section VII, will cause T12 to be decreased by 1 deg F. See example below. ‘7’ Enter : on keypad to enter manual operation mode. The user will have the ability to manually operate dew power to straps. The offering is PWM at 20-40-60% to all 4 channels at the users discretion if automated control is not wanted. The steps are shown below to achieve this. Press 7 and hold until the MSG>Wait is seen then release and press the desired power percent and channel to contol. For example. • • • Pressing “7”then a “1” offers 20% PWM on channel P12. Pressing the number “0” will exit the manual mode and return to automated mode. • Pressing “7”then a “5” offers 40% PWM on channel P34. Note pictures below. Page 15 Providing the Astronomical Community with Premier Products, Services, and Training astro-smart.com • Jan 2012 Pressing the number “0” will exit the manual mode and return to automated • mode. ‘8’ Enter: on keypad and you regain dew point sound alarms(Sound On). The DSP and LED readout will be the only mode of user inspection if this mode is used. Default mode at power up and reset is with dew point alarm sound on. ‘9’ Enter: on keypad and you remove dew point sound alarms(Sound Off). The DSP and LED readout will be the only mode of user inspection if this mode is used. Default mode at power up and reset is with dew point alarm sound on. Page 16 Providing the Astronomical Community with Premier Products, Services, and Training astro-smart.com Jan 2012 G. External Temperature Sensor Hints: Install the Remote Sensor at each location under the dew strap with the flat face of the sensor facing the telescope piece. Try to attach to an area where no heating element is in contact with the sensor. You want to monitor optic temperature, not the heating element. See Figure Figure 4 Remote Sensor Placement Page 17 Providing the Astronomical Community with Premier Products, Services, and Training astro-smart.com Jan 2012 Route the remote sensors cables along with the dew strap cables. A convenient way to do this is to braid the two cables together, Figure 5. If you have two Remote Sensors route one with the dew strap that is used for your telescope’s front corrector. Route the second Remote Sensor cable along with either the dew strap that is used for your eyepieces or your finderscope. Figure 5 Route Sensor cable with Dew Strap cable H. Accessories You may use a power supply you already have that meets the specifications listed above, or you may purchase one from Astro-Smart. Our power supplies provide 12v at 3.3 amps will provide years of dependable service along side your iCDAP-M. Page 18 Providing the Astronomical Community with Premier Products, Services, and Training astro-smart.com Jan 2012 Figure 6 Remote Sensor accessory An optional second remote sensor is available (2RSCDDDH-D), Figure . This 2nd Remote Sensor allows you to control the heating of separate optical elements. For instance, one remote sensor would be placed with your heater at the corrector. A second sensor could be placed at your eyepiece or finder scope objective lens. In this setup each pair of heaters is controlled by their respective sensor. This allows greater control for the user. This item can be purchased at the same time as you purchase your iCDAP-M or at a later time. If you only use the included remote sensor, then all four heater connectors are controlled by the one sensor; and it can be plugged into either remote sensor jack. Another convenient accessory that Astro-Smart offers is a right angle heater connector (RACiDDHM-M), Figure 7. This allows your heater to be connected to the iCDAP-M at a right angle. This may be convenient for you to alleviate any bending that you have of your heater connector and wire. Figure 7 Right Angle dew strap connector Please note that when purchasing the Astro-Smart integrated Differential Dew Heater Module (iCDAP-M), you can use the heater straps you may already have. Visit Astro-Smart for more astronomical products, services, and training at www.astro-smart.com . Page 19 Providing the Astronomical Community with Premier Products, Services, and Training astro-smart.com Jan 2012 Return Policy All items must be in new (mint) condition. Returned items cannot show evidence of use or wear, dirt, or blemishes of any kind. Merchandise must be returned in its original packaging and should include all supplied materials, instructions, warranty cards, original accessories, hardware, and any software provided. Astro-Smart LLC is not responsible for lost or damaged packages. Return shipping costs are the responsibility of the customer. A 20% restocking fee will apply to returnable items if they are returned within 15 days of shipment from us. Items must be in "as new" condition and unopened. We ask that you open and inspect your order upon receipt since no insurance or damage claims will be accepted more than three days after delivery. All Customers MUST call before returning products for warranty or repair to get an RMA# (Return Merchandise Authorization) or an SRO# (Service Repair Order) as well as return shipping instructions and return shipping address. Items being returned from the continental US must be sent 'PARCEL POST', unless directed by Astro-Smart LLC to do otherwise. Failure to do so will result in customs and administration charges being charged to the customer's account or the shipment being refused. Product is to be returned with delivery and insurance charges prepaid and these charges are not refundable. Limited Warranty Upon receipt of returned product, Astro-Smart LLC will assess the item/s to determine if they comply with the conditions of our warranty. Items that do comply will be fixed or replaced free of charge. Items that are deemed to be out of warranty or have had their warranty voided will, with the customer's knowledge, be fixed at our costs specified below or replaced with new product paid for at full retail value. Please note that items that have been returned for repair or assessment and are deemed to be in proper working order will have a $60.00 bench charge applied as well as return shipping costs. Repairable items that are out of warranty will be charged $70.00 per hour plus parts as well as return shipping costs. Our warranty does not cover damage due to misuse, accidental, incidental or intentional abuse, tampering or the wear and tear of normal use. Astro-Smart iCDAP-M Dew Remover System Controller: 90 days for parts and labor. Sensors: 90 days for parts and labor. In no event shall Astro-Smart LLC be liable for any claim for incidental or consequential damage arising out of or in connection, manufacture, delivery or use of any product offered on this website or by information received by US mail, E-mail, data files or fax. Astro-Smart LLC is not responsible for damage caused by the freight carrier, i.e.: UPS, FED EX, etc., to our product. Warranty coverage excludes normal wear and tear, or damage caused by improper installation, any modification, abuse, misuse, improper maintenance, and unauthorized repairs or modifications to the original product. Warranty does not cover those parts prone to failure under normal wear and tear. Any product repair request must be submitted and approved before shipment to Astro-Smart LLC. Shipper is responsible for proper packaging, shipping and insurance on approved repair items. Page 20