1
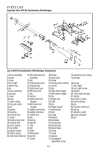
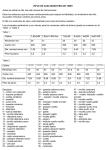
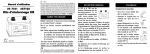
Table of Contents:
Safety Instructions and Warnings…………………………….………2-3
Description, Ammunition, and Controls………………………………4-5
Malfunctioning…………………………………………………….…….6-7
Magazine Loading…………………………………………………...……7
Exploded View and Parts List……………………………………...….8-9
Firing………………………………………………………………………10
Unloading ……………………………………………………..………….11
Dry-firing……………………………………………………….………….11
Disassembly……………………………………………..……………11-13
Assembly……………………………………………………………...13-14
Maintenance, Cleaning, and Lubrication…………………….…….14-15
Service and Warranty………………………………………………..15-16
REV # 0510
1
KEL-TEC PMR-30 Pistol
SAFETY, INSTRUCTION & PARTS MANUAL
STATEMENT OF LIABILITY
This firearm may be classified as a dangerous weapon and is surrendered by KEL-TEC
CNC INDUSTRIES INC. with the understanding that the purchaser assumes all liability
resulting from unsafe handling or any action that constitutes a violation of any applicable
laws or regulations. Firearms can cause serious injury and death. Safety must be the
prime consideration of anyone who handles firearms. Always treat a firearm as
though it were loaded. Always keep the muzzle pointed in a safe direction. In owning
a firearm, you are responsible for the firearm’s safety and security. Always secure
firearms from children.
READ THESE INSTRUCTIONS AND WARNINGS CAREFULLY, BE SURE YOU
UNDERSTAND THESE INSTRUCTIONS AND WARNINGS BEFORE USING THIS
FIREARM.
This SAFETY, INSTRUCTION & PARTS MANUAL should always accompany this firearm
and be transferred with it upon change of ownership or when the firearm is loaned or
presented to another person. A copy of the SAFETY, INSTRUCTION & PARTS MANUAL
is available FREE upon request and can also be downloaded from the internet at:
http://www.kel-tec-cnc.com.
READ AND CAREFULLY FOLLOW THESE WARNINGS AND INSTRUCTIONS
These warnings and instructions are provided to assure the safe functioning of the firearm.
Failure to heed these instructions may result in improper functioning and serious injury.
Kel-Tec firearms are designed to function reliably with proper care and knowledgeable use.
Do not use your firearm unless you fully understand these instructions, and the safe
operation of your firearm.
Only safe gun-handling habits will ensure the safe use of your firearm. This is your
responsibility. Accidents are the result of violating the rules of safe gun handling noted
below and common sense.
Before handling a firearm, understand its operation.
Never accept or pick up a firearm without checking the magazine and the chamber to
assure the weapon is empty. Do not trust the extractor to clear the chamber, always look
and feel.
Always make sure the muzzle is pointed in a safe direction at all times.
Never point a firearm at anyone or anything you do not intend to shoot.
Make sure your “audience” is at least 5 feet behind you, not next to you when firing.
Keep your firearm unloaded when not in use. Never keep a loaded firearm in the home or
vehicle. Never store a firearm with a cartridge in the chamber.
Never store firearms and ammunition together, keep them locked up and away from
children.
2
Never touch the trigger when working the action.
Never alter any components of your firearm.
Never take medications, drugs, or alcohol when handling firearms.
Never load or unload a firearm without assuring the muzzle is pointed in a safe direction.
Never load a firearm except immediately before shooting.
SAFE GUN HANDLING IS YOUR RESPONSIBILITY
Discharging firearms in poorly ventilated areas, cleaning firearms, or handling
ammunition may result in exposure to lead and other substances known to
cause birth defects, reproductive harm, and other serious physical injury.
Have adequate ventilation at all times. Wash hands thoroughly after
exposure.
Never discharge a firearm without proper shooting glasses and ear protection. Never
shoot at any water surface or any surface where a ricochet can occur.
Never shoot until you are sure of your backstop and what lies beyond it.
If the gun does not discharge after pulling the trigger, do not change its direction for at least
30 seconds, you could be having a “hang fire”, and the cartridge could go off when you do
not expect it. After waiting 30 seconds, remove the magazine and remove the unfired case,
while keeping the firearm pointed in a safe direction
Always be aware of other people so that they cannot accidentally walk into the line of fire.
When firing on a target range, be alert and follow the range officer’s commands. Never
cross obstacles such as fences or streams with a loaded firearm.
Do not allow a firearm to be used by individuals who do not understand its safe
operation and the rules of safe gun handling.
CAUTION: After firing several rounds the exterior metal parts of the
firearm get VERY hot and can cause severe burns if touched.
Be sure all accessories are compatible with the firearm and that the accessories do not
interfere with safe operation of the firearm.
When transporting your firearm, be sure your firearm is unloaded and on SAFE.
If you do not understand how to operate any of our products or have any questions about
their safe handling, please write, call, or email us.
KEL-TEC CNC INDUSTRIES INC
1475 Cox Road
Cocoa FL 32926
Telephone Number: 321-631-0068
Toll free: 1-800-515-9983
Hours: M-F 8am-4pm EST (excluding holidays)
Website: http://www.kel-tec-cnc.com/
Email: [email protected]
3
INTRODUCTION
The PMR-30 pistol is an auto-loading firearm chambered for the .22WMR cartridge. Only
standard, commercially manufactured, brass-cased ammunition should be used. It accepts
a proprietary magazine that holds up to 30 rounds, unless limited by law. Where limited by
law, magazine capacity may be reduced, and may be noted on the magazine.
AMMUNITION NOTE:
The PMR-30 pistol is designed and chambered for the .22WMR cartridge. The type of
ammunition is also marked on the barrel of the pistol. Do not use any other ammunition.
Only use US made, SAAMI spec, commercially manufactured ammunition, clean, dry, and
in good condition. Never use non-standard, reloaded or damaged cartridges. Use only
brass-cased ammunition. Any other ammunition is considered non-standard and use of it
may void the warranty on this firearm.
Never use ammunition where the pressure levels exceed industry standards. Kel-Tec
firearms are manufactured from high quality materials. They will provide extended service
life. However, all warranties, expressed or implied, are voided and Kel-Tec will not be liable
for property damage or personal injury and consequential damages, if faulty, non-standard,
or reloaded ammunition is used in any Kel-Tec firearm.
The PMR-30 pistol functions best with high power ammo, often with bullet weights of 40gr
and up. This includes, but is not limited to, the following:
-CCI Maxi Mag 40gr
-Winchester Super-X 40gr
-Remington Premier Magnum 33gr
Low power ammo and/or light-weight bullets may cause failure to feed problems due to the
lack of energy to cycle the slide all the way back. The following are currently low power,
and may not function reliably in the PMR-30 pistol, especially if the grip is not held firmly:
-Winchester Dynapoint 45gr
-Winchester Supreme 30gr
Please take the ammo type into account before sending your pistol in for repair work. All
testing at the factory will be done with high-power ammo.
CONSTRUCTION
The grip assembly, magazine, and slide cover, are made of an impact-resistant, glassreinforced Nylon. The rear portion of the grip houses an aluminum receiver (sometimes
called frame) which houses the firing mechanism, guides the slide, supports the magazine,
ties the grip halves together, and has the serial number engraved into it, which is visible
from the rear of the pistol. A picatinny accessory rail is integrated just forward of the trigger
guard, under the barrel, to allow for the attachment of accessories such as a bi-pod,
flashlight, or laser. Check with federal and local laws before attaching ANY type of
extra grip to this rail.
The firing mechanism is hammer fired and of conventional single action type. There is an
ambidextrous safety lever on both sides located at the rear of the grip. Down is FIRE mode
and red coloring should be visible, up is SAFE mode and the lever should fully cover any
red coloring. The Safety disconnects the trigger mechanism and fully blocks the sear so
the hammer cannot drop. The sear is also balanced so it cannot be activated by dropping
the pistol.
4
The magazine is a unique double-stack double-feed style polymer magazine. The
magazine body and follower are impregnated with molybdenum disulfide dry lubricant for
enhanced reliability. The magazine release is on the heel of the grip (bottom rear) and must
be pressed in to be able to remove the magazine. The PMR-30 will automatically lock back
the slide when the magazine is emptied during normal firing. There is also a manual slide
lock lever accessible on the left side of the pistol, just in front of the safety lever. This is
not meant as a slide release.
The slide, barrel, and barrel block are made of hardened steel. The rear of the slide is
covered with an injection molded nylon cover that also houses the rear fiber-optic sights.
Dual extractors and the firing-pin are housed under the slide cover. The front sight is also
fiber-optic and housed in aluminum, which is dovetailed into the steel slide and is drift
adjustable for windage. The recoil springs and steel guide rod are captive and hold the
polyurethane buffer in place. A steel cross-pin holds the upper assembly which includes the
slide, barrel, barrel block, recoil springs and buffer to the grip assembly.
INSTRUCTIONS FOR USE
Safety
To achieve operator safety, combined with ease of handling, the PMR-30 pistol’s manual
safety, when applied, disconnects the trigger from activating the sear, and positively blocks
the sear from rotating, which blocks the hammer from falling. The safety can only be
applied when the hammer is fully cocked. If the safety will not activate, the hammer is
already dropped, or only partially cocked. Fully cycle the slide to fully cock the hammer,
5
and then the safety can be engaged. Only when the red color near the safety lever is fully
obscured is the safety engaged, and the gun considered “on safe”. Obviously the safest
condition of the pistol is magazine removed, with the slide locked back. Other modes of
storing or carrying will gradually improve readiness at the cost of safety. Always take steps
to avoid unauthorized users, like children, from gaining access to a firearm.
MALFUNCTIONING
Proper function of your firearm is directly related to proper maintenance and care, and to
the quality of ammunition you use. Your pistol should be cleaned and LIGHTLY lubricated
with a light gun oil or dry-film lubricant after each use to insure proper functioning.
Excessive lubrication will likely combine with powder residue and gum-up the operation of
the firearm and cause many of the malfunctions listed bellow. Some of the more common
types of malfunctions which may occur are as follows:
Failure to Fire (FTFR): A failure to fire or an unusual sound upon firing is always a signal
to cease firing and examine the misfired cartridge and possibly the bore of the firearm,
before continuing to fire. It is not sufficient to just pull the slide back and examine the
cartridge and chamber. You must remove the magazine, clear the chamber, lock the slide
open, or remove the barrel and inspect the bore visually - and with a rod if necessary - to
be certain it is completely clear of any obstruction. Failure to detect and remove a bore
obstruction can result in serious injury or death to the shooter and bystanders, as
well as damage to the firearm.
WARNING: DO NOT ATTEMPT TO REMOVE A LODGED BULLET OR ANY
OTHER OBSTRUCTION BY USING A BLANK CARTRIDGE, OR A
CARTRIDGE WITH THE BULLET REMOVED, OR BY ANY MEANS OTHER
THAN THE USE OF THE PROPER SIZE CLEANING ROD (WITHOUT A TIP
OR BRUSH) AND REASONABLE FORCE APPLIED TO THE ROD. BE
CERTAIN ALL LOOSE POWDER HAS BEEN REMOVED FROM THE BORE
AND ACTION BEFORE INTRODUCING THE ROD INTO THE BORE.
Failure to Feed (FTFD): This occurs when a cartridge has been fed from a magazine but
not fully chambered, or is not stripped from the magazine at all. If this occurs, keep the
firearm pointed in a safe direction, remove the magazine, lock the slide back, remove the
cartridge, re-insert the magazine, firmly slap the base of the magazine to ensure it is fully
seated, release the slide and continue shooting. If the problem continues, change the
magazine or ammunition type and clean the firearm and magazine. The most common
causes are improperly loaded or damaged magazines, dirt or foreign objects in the
magazine impeding the cartridges or magazine follower, faulty or underpowered
ammunition, or a dirty chamber or slide.
Failure to Extract (FTEX): A fired case is not fully extracted from the chamber of the
firearm. Keep the firearm pointed in a safe direction, remove the magazine, clear the
firearm by operating the slide and locking it back, remove the case, and continue firing as
usual. If the problem continues, change the magazine and ammunition type. The most
common causes are damaged or dirty extractors, dirty chamber, or faulty ammunition.
Improperly loaded or sized cartridges can also cause this. If any of the above problems are
not solved by cleaning the firearm, including brushing the bore and chamber, or by use of
other brands of ammunition, stop firing, unload and un-chamber, and contact the Kel-Tec
CNC service department for possible repair or replacement of the firearm.
6
Failure to Eject (FTEJ): A fired case is extracted from the chamber, but not correctly
ejected from the firearm. This is also commonly called a “stove-pipe jam” as the empty
case is often pointing out of the ejection opening and resembles an old-time stove pipe.
Keep the firearm pointed in a safe direction, remove the magazine, clear the firearm by
operating the slide and locking it back, remove the case, and continue firing as usual. If the
problem continues, change the magazine and ammunition type. The most common causes
are damaged or dirty extractors, damaged ejector, dirty or faulty chamber, or faulty
ammunition. Improperly loaded or sized cartridges can also cause this. If any of the above
problems are not solved by cleaning the firearm, including brushing the bore and chamber,
or by use of other brands of ammunition, stop firing, unload and un-chamber, and contact
the Kel-Tec CNC service department for possible repair or replacement of the firearm.
LOADING THE MAGAZINE
Loading the PMR-30’s double stack magazine is very different from loading most other
magazines. Failure to load the magazine properly can result in rim-lock which will lead to a
FTFD malfunction. To load, fill the magazine by pressing a cartridge downward in the
center of the magazine, with the rim situated within the rim window. Then slide the round
back all the way before pushing another round down on top of it.
Loading the magazine by pushing the round down, and then sliding the round back
After loading about 5 rounds lightly tap the back of the magazine against a flat surface,
like a table, to help seat the rounds, and keep the rims arranged correctly. Once 15 to 20
rounds have been loaded, the magazine will start to get more difficult to load and
tapping the back should be done after every 1 or 2 rounds.
Tapping the back of the magazine on a flat surface to seat rounds and ease loading
Do not load more than 30 rounds in the magazine. The last round should be on the left side
of the magazine when 30 rounds are loaded. The view ports on the side of the magazine
are spaced for every 5 rounds, but only if the round is fully seen in the view port, not just
partially seen.
7
273
185
227
225
185
115
320
303
330
170
236
125
226
190
185
185
185
170
228
185
185
154
422
181
184
148
181
118
202
183
184
276
160
121
159
152
182
172
111
151
164
275
282
104
285
254
212
153
256
310
212
270
150
422
200
210
163
196
201
159
160
162
163
164
165
170
172
181
182
183
184
FIBER FRONT SIGHT
RECOIL SPRING GUIDE
RECOIL SPRING CATCH
RECOIL SPRING GUIDE LOCK RING
OUTER RECOIL SPRING
INNER RECOIL SPRING
REAR SIGHT FIBER
FRONT SIGHT FIBER
EXTRACTOR AXIS
EXTRACTOR RIGHT
EXTRACTOR LEFT
EXTRACTOR SPRING
205
PMR-30
PISTOL PARTS
195
210
210
BARREL 4.3
ASSEMBLY PIN
EJECTOR
FIRING PIN
HAMMER
SEAR
TRIGGER AXIS
TRIGGER
BARREL BLOCK
SLIDE
BUFFER
SLIDE COVER
212
198
210
210
185
104
111
115
118
121
125
148
150
151
152
153
154
212
185
165
212
279
211
305
162
212
148
PART#202 EXCHANGE ONLY
185 SLIDE COVER SCREW
190 RECEIVER SCREW
195 MAG CATCH
196 MAG CATCH SPRING
198 MAG CATCH AXIS
200 GRIP LEFT
201 GRIP RIGHT
202 RECEIVER
205 FEEDRAMP
210 M3-10 SOCKET HEAD
211 M3-16 SOCKET HEAD
212 M3 NUT
225 SAFETY
226 SAFETY LEVER RIGHT
227 SAFETY LEVER LEFT
228 SAFETY SNAP
236 EJECTOR PIN
254 TRIGGER BAR
256 TRIGGER SPRING
270 HAMMER SPRING CATCH
273 SEAR SPRING
275 HAMMER SPRING
276 HAMMER SPRING PIN
279 SLIDE STOP SPRING
282 SLIDE STOP BRAZEMENT
285 SLIDE STOP BUTTON
303 MAGAZINE SPRING
305 MAGAZINE SPRING PLATE
310 MAGAZINE BOTTOM PLATE
320 MAGAZINE FOLLOWER
330 MAGAZINE BODY
422 SEAR AXIS
th
Full Magazine: 30 round fully visible in view port, top round on left side of magazine
INSERTING THE MAGAZINE AND FIRING
Hold the firearm in your shooting hand with the safety on “safe” (lever up), keep the muzzle
pointed in a safe direction and your finger outside the trigger guard, pointing forward. Insert
the loaded magazine into the bottom of the grip of the firearm all the way in until it clicks in.
Firmly slap the butt of the magazine to ensure it is fully seated. Grab the polymer slide
cover, firmly pull the slide all the way back and release the slide. Do not follow the slide
forward with your hand as this will slow the slide and it may not fully chamber the first round
in the magazine.
Slapping the base of the full magazine and pulling slide back to chamber a round
Sweeping the safety lever down for fire, or up for safe
Take aim at a safe target, disengage the safety by sweeping the safety lever down with
your thumb. Slowly squeeze the trigger until a round is fired. Release the trigger and you
are ready to fire another round. Upon firing, the slide moves rearward extracting and
ejecting the fired round and returns to the forward position feeding another round
10
automatically. This sequence can be repeated until the last round has been fired. The slide
will automatically lock back after the last round is fired.
Remove the empty magazine by grabbing the bottom of the magazine and the magazine
catch with your thumb and pointer finger. Squeeze the mag catch and pull the magazine
out in one motion. If you wish to continue firing, insert a loaded magazine, and slap the
butt of the magazine to ensure it is fully seated. Then simply pull the slide back a small
amount and release it to chamber the first round. The firearm is now ready to fire again.
After the last magazine is emptied, sweep the safety lever up to “safe” with your thumb.
Remove the magazine. Pull back the slide and SLOWLY follow it forward. It is not
recommended that you release the slide to slam closed on an empty chamber, as
this puts extra stress on the slide and barrel where they contact.
UNLOADING
To safely unload the firearm, sweep the safety lever up for “safe”. Remove the empty
magazine by grabbing the bottom of the magazine and the magazine catch with your thumb
and pointer finger. Squeeze the mag catch and pull the magazine out in one motion. Grab
the slide cover and pull and hold it all the way back in one fast motion to eject the round in
the chamber. While holding the slide back, use your thumb to slide and hold the slide stop
button up. Now slowly release the slide and it should be held open by the slide stop.
Visually inspect the chamber to be sure it is empty. To close the slide, pull back the slide
and SLOWLY follow it forward. It is not recommended that you release the slide to
slam closed on an empty chamber, as this puts extra stress on the slide and barrel
where they contact.
To unload a full or partially full magazine, use a cartridge or small tool to push each round
forward and out of the magazine. Continue until all rounds are pushed out.
Unloading the magazine by pushing rounds forward
DRY-FIRING
Dry-firing is pulling the trigger and dropping the hammer when the chamber is empty.
Excessive dry-firing is not recommended, but it can be done occasionally without worry of
damaging the firearm. Remove the magazine and unload your firearm as discussed in
section entitled “Unloading” above. Before dry-firing, always be 100% sure that the
chamber is empty, the magazine is removed, and always point the firearm in a safe
direction.
DISASSEMBLY
NOTE: Basic disassembly, also called field stripping, can be performed with only a small
pointed tool, or a cartridge. None of the screws on the firearm should ever need to be
removed for general maintenance.
11
Remove the magazine and unload your firearm as discussed in the section entitled
“Unloading” above. Manually cycle the slide to be sure that there is no round in the
chamber. Make sure the safety is engaged. With the tip of a cartridge or other pointed
object, push out and remove the assembly pin. Grab the slide and guide the upper
assembly forward off of the lower grip assembly.
Removing the assembly pin and sliding the upper assembly forward and off the grip
Flip the slide assembly upside down so you can access the captive recoil springs. Grab
the springs near the barrel block and compress the springs until the guide rod is free of the
barrel block. Slowly lift the spring assembly up and carefully release the tension on the
springs. The captive recoil spring assembly can now be set aside. Remove the buffer from
the front of the slide and set it aside. Slide the barrel block fully forward and lift it out of the
slide. Tip the slide over and the barrel should fall out of the slide easily. The firearm is now
fully field stripped and ready for cleaning. Always use polymer safe cleaners designed for
firearms. NEVER DROP THE HAMMER WITH THE SLIDE ASSEMBLY REMOVED
FROM THE GRIP ASSEMBLY. This can damage the receiver.
Slide assembly removed from grip assembly and compressing the recoil springs
Removing the recoil spring assembly and the buffer
12
Sliding the barrel block forward and lifting it out
Barrel now can be removed from the slide
Fully Field Stripped
ASSEMBLY
Insert the barrel into the slide. Be sure the large end of the barrel tabs are oriented out of
the slide, or the barrel will not sit level. Slide the barrel all the way forward, so the muzzle
sticks out of the front of the slide. Place the barrel block into the slide rails through the
cutouts at the front of the slide. The recoil spring slot should be oriented forward, it will not
go in backwards. You may have to jiggle the barrel slightly to allow the barrel block to drop
fully into the slide rails. Now push the barrel block all the way back towards the extractors.
Insert the buffer into the two slots for it at the front of the slide. The buffer should be
oriented so the rounded edges point to the front of the slide, it will not fit correctly if put in
backwards. DO NOT FORGET THE BUFFER, NEVER FIRE THE PMR-30 WITHOUT A
BUFFER INSTALLED.
13
Inserting the barrel and sliding it fully forward
Slide the squared off end of the recoil spring assembly through the slot in the buffer, and
into the hole in the slide. Then compress the springs and snap the spring assembly into the
slot in the barrel block.
Slide the upper slide assembly onto the lower grip assembly and pull it all the way back to
line up the assembly pin hole in the grip with the hole in the barrel block. Push the
assembly pin fully into the hole in the grip from either side. Now cycle the slide by hand to
be sure it moves smoothly.
Dropping the barrel block in, sliding it back, and inserting the buffer
Snapping the captive recoil springs in place
Sliding the upper assembly back on the grip and inserting the assembly pin
SIGHT ADJUSTMENT
The PMR-30 pistol’s rear sight is not adjustable, but the front sight is drift adjustable for
windage. However this adjustment requires special tools and techniques in order to not
damage the front sight or the firearm’s finish. Please consult with a local gunsmith before
attempting front sight adjustment.
MAINTENANCE
Your firearm is a precision instrument and to ensure reliable function, it is necessary to
follow a routine maintenance procedure. After firing your pistol, be sure to unload it
following the procedure outlined in the section entitled “Unloading” before any cleaning or
maintenance procedure.
14
CLEANING SOLVENT WARNING:
Never use automotive brake cleaner, or any solvent not designed for polymer firearms on
the polymer parts of the firearm including, but not limited to the buffer and front and rear
sight tubes. Doing so will damage or destroy the parts and this abuse will not be covered by
any warranty. Always use polymer-safe solvents designed for firearms when cleaning
polymer firearm parts.
Routine cleaning, after every shooting session:
Remove the upper assembly as stated in the disassembly section of this manual.
Thoroughly clean the bolt face and all interior sides of the slide with solvent and a brush.
Brush the barrel bore and chamber with a good powder removing solvent and bore brush.
Wipe the areas clean with patches or a swab. Using a small brush dipped in solvent,
remove all deposits from around the breech of the barrel and slide, as well as the insides of
the slide and barrel block (including the rails, chamber, and adjacent areas) which have
been subjected to powder or primer residue. Remove any residue on the receiver with light
brushing and a polymer safe solvent. After cleaning the entire gun, use a cloth to apply a
light coating of high quality gun oil to all external and internal surfaces and wipe clean.
There should only be a light film of oil on the slide and barrel. Reinstall the upper assembly
and firearm as stated in the assembly section of this manual. DO NOT FORGET TO
REINSTALL THE BUFFER. Manually cycle the bolt back and forth to check the function of
the firearm. If any parts are damaged or badly worn or the firearm does not work correctly
the firearm should not be fired and should be returned to Kel-Tec for servicing immediately.
LUBRICATION WARNING:
Firing a firearm with oil, grease, or any other material even partially obstructing the
bore may damage the firearm and injure the shooter and those nearby.
Do not spray or apply lubricants directly on ammunition. If the powder charge of a
cartridge is affected by the lubricant, it may not be ignited, but the energy from the
primer may be sufficient to push the bullet into the bore where it may become
lodged. Firing a subsequent bullet into the obstructed bore will damage the firearm
and may injure the shooter and bystanders. Use lubricants properly. You are
responsible for the proper care and maintenance of your firearm.
WARNING:
It is not recommended that you disassemble the grip; the hammer spring is
constantly under tension and can easily injure you or others. If the need arises to
lubricate the trigger assembly do so through the top of the receiver.
SERVICE
Should your firearm require adjustment, or repair, it should be returned unloaded to the
factory. Always remove any non-factory accessories including scopes and muzzle devices
before sending in for repairs. Kel-Tec CNC IND INC cannot be held responsible for lost or
damaged accessories sent in with the firearm. In shipping the firearm, be sure to adhere to
the following rules:
Individuals who wish to return the firearm for service can do so by shipping via UPS
prepaid. No return authorization number is required.
15
Include a letter of instruction, full name, address, phone number, email, and the
gun’s serial number. Retain a copy of the serial number for your records to use in tracking
your repair. This will insure prompt service and handling once your firearm has been
received. You will receive a quotation for anything other than warranty work. You will be
notified of full charges and no work will commence before receiving your approval of our
quotation if non-warranty work is necessary. Please see the warranty page at the end of
this manual or contact Kel-Tec directly for more details. All quotations are payable by
C.O.D., VISA, M.C. or money orders only. No personal checks accepted.
WARRANTY
This warranty is granted by Kel-Tec CNC Industries, Inc. P.O. Box 236009, Cocoa, FL
32923. This lifetime warranty is effective from the date of purchase and applies to the
original owner of a Kel-Tec firearm.
Kel-Tec firearms are warranted to be free from defects in material and workmanship. Any
such defects of which Kel-Tec receives written notice by the original owner, will be
remedied by Kel-Tec without charge within a reasonable time after such notification and
delivery of the product as provided below.
Warranty claims (in writing) and the gun concerned should be delivered (transportation
charges pre-paid) to:
Kel-Tec CNC, Inc
Service Department
1475 Cox Road
Cocoa, FL 32926.
No return authorization number is required. In addition, a copy of a bill of sale in the
owner’s name, or a copy of ATF Form 4473, indicating date of purchase must be included.
In order to expedite service, warranty claims should state the model and serial number of
the gun concerned and a description of the difficulty experienced. It is recommended that
shipments be insured by the owner, since Kel-Tec will accept no responsibility for loss or
damage in transit.
Transportation and insurance charges for return to owner will be paid by Kel-Tec if the
claim is covered by the warranty.
Under no circumstances shall Kel-Tec be responsible for incidental or consequential
damages with respect to economic loss or injury or property damage, whether as a result of
breach of express or implied warranty, negligence or otherwise. Some states do not allow
the exclusion or limitation of incidental or consequential damages, so the above limitation
or exclusion may not apply to you.
Kel-Tec will not be responsible for defects resulting from careless handling, unauthorized or
unsafe adjustments or modifications, non-standard, defective, or improper ammunition,
corrosion, neglect, fire damage, water damage, theft, abuse, ordinary wear and tear, or
unreasonable use.
16