1
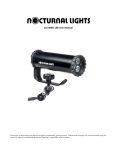
Burn time with max output: (hours)
LED ALTERNATIVE \
BATTERY
CREE XM-L2 TRIPLE
LED
CREE XM-L2 SINGLE
LED
User Manual
Nanight Sport Dive light
Thank you for choosing a dive light from Nanight! The lamp is
designed for diving at depths of up to 100m. We at Nanight
hope your new lamp will give you many rewarding days and
nights of diving!
2
1
3
PRODUCT DESCRIPTION
•
•
•
•
•
LED Type: Cree XM-L2 U2
Battery: 14,4V Panasonic Li-Ion, 3350 mAh,
4-step dimming
Operating temperature: 0 – 35°C
Operating voltage: 5 - 20V
LI-ION 14,4V
6 X AA
1
45 min
3
2
NANIGHT SPORT INCLUDES THE FOLLOWING PARTS
•
•
•
•
Dive Light
Charger
Lens 5, 15 or 35 degrees
Battery holder
BEFORE USE
3.1
CHARGE THE BATTERY
•
•
Open the dive light by unscrewing the sealing plastic
plug counterclockwise.
Disconnect the battery connector by pressing down on
the latch and pull the connectors apart (see picture).
Luminous Flux: (emitter-lumen)
LED ALTERNATIVE \
BATTERY
CREE XM-L2 TRIPLE
LED
CREE XM-L2 SINGLE
LED
LI-ION 14,4V
6 X AA
3000
1500
1000
600
•
Connect the charger connector to the battery
connector. It is important that the connectors are
•
•
•
•
•
3.2
connected to each other in the correct orientation
(see picture).
Plug the charger into a wall outlet. The charger's
indicator light turns from red to green when the battery
is fully charged.
When the battery is fully charged, disconnect the
charger connector and reconnect the dive light
connector. It is important that the connectors are
connected to each other in the correct orientation
(see picture).
Inspect the o-rings, clean any debris and replace them
immediately if damage exists.
Make sure that the velcro strap around the battery is
tight and keeps cords and plugs in place.
Close the dive light by pushing the plastic plug into the
pipe, past the first o-ring. Tighten the plastic cap by
turning clockwise. Be careful so that the parts threading
properly against each other.
CHANGING THE LENS
•
•
•
•
Open the dive light by unscrewing the sealing plastic
plug counterclockwise. Note that after having
unscrewed the plug, the negative pressure in the lamp
head may require some force to pull the parts apart.
Remove the lens manually by gently wiggling it.
Insert the new lens, being careful so that its legs are
aligned correctly in the lamp base.
Close the dive light by pushing the plastic plug into the
pipe, past the first o-ring. Tighten the plastic cap by
turning clockwise. Be careful so that the parts threading
correctly to each other.
•
3.3
ANVÄNDNING
Lampans funktioner styrs av det droppformade vredet.
Vredets tröghet kan justeras genom att lossa eller dra åt
skruven.
3.4
USAGE
The drop-shaped knob controls the functionality of the lamp.
Loosening or tightening the screw can adjust wrath of inertia.
3.5
SWITCH ON THE LIGHT
•
•
Turn the knob clockwise.
If the lamp has not been used for at least 2 minutes, a
number of short flashes indicate battery charge status:
Flashes
Battery Level
4
75-100%
3
50-75%
2
25-50%
1
5-25%
If the battery level falls below 5%, the amount of light will
automatically be reduced to save the battery, and allow the
user to terminate the dive safely.
3.6
SWITCH OFF THE LIGHT
Turn the knob counterclockwise until it touches the
locking position, the light will go off with a delay of 2
seconds.
• Turn the knob counterclockwise past the locking
position, to ensure that the light does not come by
accident, for example during transport.
3.7 DIM THE LIGHT
•
•
Turn the knob counterclockwise until it touches the
locking poisition, and back again within 2 seconds.
• Repeat the maneuver for further dimming.
• In this way, the light is dimmed gradually in four steps,
and back again to the highest brightness
Note that the light automatically dims down to 10%
brightness when reaching 5% battery level.
•
4
AFTER USE
4.1
MAINTENANCE
•
•
•
•
5
Rinse the dive light in fresh water after use.
Lubricate the seals with silicone grease if necessary.
Disconnect the battery if the light is not used for long
periods or when transporting by air.
Make sure the o-rings are clean from debris and
undamaged. Replace o-rings if necessary.
•
•
•
6
Nanight Sport is a bright light. Never direct the light
directly into the eyes of yourself or others.
When using the dive light above water, it may become
hot. Be careful not to burn yourself or others.
Do not disassemble the dive light while its still wet.
Do not recharge the battery if the water has penetrated
into the dive light.
RECYCLING
This product contains electronic components and must not be
disposed of with household waste. Leave the product for
recycling in designated areas, such as municipal recycling
center.
7
WARRANTY
Provided the product is used as intended, one year of
warranty is given on the lamp. The warranty is valid provided
that a receipt of the purchase can be presented, and includes
repair or replacement of defective parts.
8
CONTACT INFORMATION
Nanight AB
[email protected]
http://divelight.nanight.se
For information in English, please visit
http://divelight.nanight.se
WARNINGS AND PRECAUTIONS
9
•
When diving in dark water, a backup dive light should
always be brought. Nanight Sport Backup is a great
addition.
ACCESSORIES
Goodman handle
Battery holder
Cree XM-L2 Triple LED module
Cree XM-L2 Single LED module