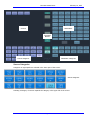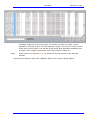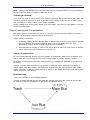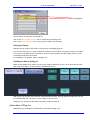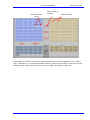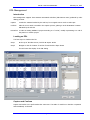
1
Operator Reference Manual 14 February 2013 Software Version 4.0 Issue 001 Important Notice COPYRIGHT The material in this document is copyright to Fairlight.AU Pty Ltd, and may not be quoted or reproduced in any form without written permission from the company. Fairlight is a trademark of Fairlight.AU Pty Ltd. All other trademarks are the property of their respective owners. LIM IT ED WARRANT Y POLICY All the software and hardware provided with, or purchased especially for, Fairlight products has been tested for functionality. Fairlight.AU Pty Ltd will make its best efforts to correct reported defects for future releases subject to technical practicalities. Fairlight.AU will also replace any defective media on which software has been delivered provided that the item to be replaced is returned to the dealer who supported the product within 90 days of purchase. Fairlight.AU Pty Ltd makes no warranty or representation either expressed or implied with respect to the system's performance or fitness for a particular purpose. In no event will Fairlight.AU Pty Ltd be liable for direct or indirect damages arising from any defect in the product or its documentation. Further, Fairlight.AU Pty Ltd will not accept any liability for any programs, sounds, audio recording or sequences stored in or used with Fair light products, including the cost of recovery of such data. Product features and specifications are subject to change without notice. Fairlight.AU reserves the right to change any part of this document without notice. The warranties, remedies and disclaimers above are exclusive and take precedence over all others, oral or written, express or implied, to the extent permitted by law in the geographical area of the product's use. No employee of Fairlight.AU, agent, distributor or employee of an agent or distributor is authorized to offer any variation from this policy. Copyright © 2008 Fairlight.AU Pty Ltd, Unit 3, 15 Rodborough Rd, Frenchs Forest, NSW 2086, AUSTRALIA. Telephone +61 2 9975 1777 Fax +61 2 9975 1999 END USER LICENSE AGREEM ENT You have acquired a device (“DEVICE”) which includes software licensed by Fairlight.AU from one or more software licensors (“Fairlight.AU's Software Suppliers”). Such software products, as well as associated media, printed materials, and “online” or electronic documentation (“SOFTWARE”) are protected by international intellectual property laws and treaties. The SOFTWARE is licensed, not sold. All rights reserved. IF YOU DO NOT AGREE TO THIS END USER LICENSE AGREEMENT (“EULA”), DO NOT USE THE DEVICE OR COPY THE SOFTWARE. INSTEAD, PROMPTLY CONTACT Fairlight.AU FOR INSTRUCTIONS ON RETURN OF THE UNUSED DEVICE(S) FOR A REFUND. ANY USE OF THE SOFTWARE, INCLUDING BUT NOT LIMITED TO USE ON THE DEVICE, WILL CONSTITUTE YOUR AGREEMENT TO THIS EULA (OR RATIFICATION OF ANY PREVIOUS CONSENT). GRANT OF SOFTWARE LICENSE. This EULA grants you the following license: You may use the SOFTWARE only on the DEVICE. NOT FAULT TOLERANT. THE SOFTWARE IS NOT FAULT TOLERANT. Fairlight.AU HAS INDEPENDENTLY DETERMINED HOW TO USE THE SOFTWARE IN THE DEVICE, AND Fair light.AU'S SOFTWARE SUPPLIERS HAVE RELIED UPON Fairlight.AU TO CONDUCT SUFFICIENT TESTING TO DETERMINE THAT THE SOFTWARE IS SUITABLE FOR SUCH USE. NO WARRANTIES FOR THE SOFTWARE. THE SOFTWARE is provided “AS IS” and with all faults. THE ENTIRE RISK AS TO SATISFACTORY QUALITY, PERFORMANCE, ACCURACY, AND EFFORT (INCLUDING LACK OF NEGLIGENCE) IS WITH YOU. ALSO, THERE IS NO WARRANTY AGAINST INTERFERENCE WITH YOUR ENJOYMENT OF THE SOFTWARE OR AGAINST INFRINGEMENT. IF YOU HAVE RECEIVED ANY WARRANTIES REGARDING THE DEVICE OR THE SOFTWARE, THOSE WARRANTIES DO NOT ORIGINATE FROM, AND ARE NOT BINDING ON, Fairlight.AU'S SOFTWARE SUPPLIERS. Note on Java Support. The SOFTWARE may contain support for programs written in Java. Java technology is not fault tolerant and is not designed, manufactured, or intended for use or resale as online control equipment in hazardous environments requiring fail-safe performance, such as in the operation of nuclear facilities, aircraft navigation or communication systems, air traffic control, direct life support machines, or weapons systems, in which the failure of Java technology could lead directly to death, personal injury, or severe physical or environmental damage. Sun Microsystems, Inc. has contractually obligated Fairlight.AU's Software Suppliers to make this disclaimer. No Liability for Certain Damages. EXCEPT AS PROHIBITED BY LAW, Fairlight.AU'S SOFTWARE SUPPLIERS SHALL HAVE NO LIABILITY FOR ANY INDIRECT, SPECIAL, CONSEQUENTIAL OR INCIDENTAL DAMAGES ARISING FROM OR IN CONNECTION WITH THE USE OR PERFORMANCE OF THE SOFTWARE. THIS LIMITATION SHALL APPLY EVEN IF ANY REMEDY FAILS OF ITS ESSENTIAL PURPOSE. IN NO EVENT SHALL Fairlight.AU'S SOFTWARE SUPPLIERS BE LIABLE FOR ANY AMOUNT IN EXCESS OF U.S. TWO HUNDRED FIFTY DOLLARS (U.S.$250.00). Limitations on Reverse Engineering, Decompilation, and Disassembly. You may not reverse engineer, decompile, or disassemble the SOFTWARE, except and only to the extent that such activity is expressly permitted by applicable law notwithstanding this limitation. SOFTWARE TRANSFER ALLOWED BUT WITH RESTRICTIONS. You may permanently transfer rights under this EULA only as part of a permanent sale or transfer of the Device, and only if the recipient agrees to this EULA. If the SOFTWARE is an upgrade, any transfer must also include all prior versions of the SOFTWARE. Obtaining T echnical Support Users requiring technical support should contact their local distributor. Information can also be found on the world wide web at: http://www.fairlightau.com M anual Errors and Omission To help ensure that Fairlight provides the most accurate and comprehensive documentation, please report any errors or omissions to: [email protected] T able of Contents INTRODUCTION.........................................1 RECORDING............................................ 39 Congratulations .............................................. 1 About This Manual ......................................... 1 What Else You Nee d to Know .......................... 1 Some Important Terms .................................. 1 Anything Missing? .......................................... 2 Basics ......................................................... 39 Recording and Editing Multiple Takes ............ 45 ADR ............................................................ 46 Background Recording ................................. 46 SOLO OVERVIEW .....................................4 Introduction ................................................ 50 The ADR List ............................................... 50 Import Cue List from a Text File ................... 50 Import fr om CSV File ................................... 51 Adding Cues Manually .................................. 51 ADR Preferences .......................................... 53 The ADR Display .......................................... 54 Exporting the ADR List ................................. 56 Signal Flow Diagram ....................................... 4 Hardware Components ................................... 6 Graphics ........................................................ 6 Starting the System ........................................ 9 System Shutdow n .......................................... 9 Graphic Themes ........................................... 10 “SELECTION” AND “CALLING” ............11 Selection Types ............................................ 11 How to Select .............................................. 11 How to Call .................................................. 11 CHANNELS ..............................................12 Introduction................................................. 12 Set Number of Tracks in Project.................... 12 Displaying Channels ..................................... 12 Pyxis Track – Displaying Video ...................... 13 Track Colours............................................... 13 The Clip....................................................... 14 Selecting Channels ....................................... 18 Solo, Mute and Arm ..................................... 19 Zooming ...................................................... 20 Timescale display ......................................... 20 Audio Scrollers ............................................. 22 Solo and Mute .............................................. 24 Naming ....................................................... 27 PATCHING SIGNAL PATHS ...................28 Over view ..................................................... 28 The Patch I/O Page ...................................... 28 The Multi Button .......................................... 32 The Info Button ........................................... 32 TRANSPORT ............................................34 Basic Transport Controls ............................... 34 Jog Commands ............................................ 34 Looping ....................................................... 34 Jumping ...................................................... 34 Locate to Timecode ...................................... 37 Locate to Clip by Name ................................ 37 ADR .......................................................... 50 EDITING ................................................... 57 Basic Concepts – the Audio Clip .................... 57 Other Clip Types .......................................... 58 Using the Mouse .......................................... 58 The Edit Toolbar .......................................... 62 Display Layering .......................................... 66 Group Clips .................................................. 67 Fade and Crossfade ..................................... 68 Clip Equalisation .......................................... 72 EQ display ................................................... 72 Mouse Edit Menus ........................................ 75 AUDIOBASE, CLIP SEARCH, CLIPSTORES........................................... 78 AudioBase ................................................... 78 Clip Search .................................................. 80 Clip Bins ...................................................... 82 ClipStores .................................................... 83 Preview from Windows Explorer.................... 83 GROUPING .............................................. 85 Introduction ................................................ 85 Summary of Gr oups ..................................... 85 Link Groups ................................................. 85 Fader Groups (VCAs) .................................... 89 Naming a Group .......................................... 92 MIXING ..................................................... 93 Introduction ................................................ 93 Bussing ....................................................... 93 Zoom Panels...............................................113 Processing Order ........................................119 Path Copy.................................................. 120 Inser ts ...................................................... 120 Direct Outputs ........................................... 120 Oscillator ................................................... 120 The Librar y ................................................ 122 AUTOMATION........................................125 Introduction............................................... 125 Automation Basics ...................................... 125 How to Use Automation.............................. 126 Enabling Mix Items ..................................... 128 Mix Item Status ......................................... 128 Touch Write............................................... 131 Saving and Loading Mixes ........................... 131 Mix Undo ................................................... 132 'System Mix' - Save function ....................... 132 Automation with Link Groups ...................... 133 Mix Editing................................................. 133 Copy Project Segment ................................ 133 Automation Cur ves ..................................... 134 Data Storage ............................................. 138 Mix "T hinning" ........................................... 138 PLUG-INS AND REWIRE ......................139 Introduction............................................... 139 General Capabilities .................................... 139 VST and VSTi............................................. 139 Using VST Effects in SOLO .......................... 140 Plug-in Latency and Compensation.............. 141 Instantiation .............................................. 142 Controlling Plug-ins on Screen .................... 143 Automation of Plug-ins ............................... 145 Clip based Plug-ins ..................................... 146 Using VST Instruments in SOLO .................. 146 ReWire ...................................................... 147 MONITORING AND TALKBACK ..........151 Set Monitor Levels, Mute and Dim ............... 151 The Monitor Control Window ...................... 151 METERS .................................................157 Introduction............................................... 157 Master Screen Meters ................................. 157 Meter Sets ................................................. 160 Peaks ........................................................ 162 Stereo Compound Meters ........................... 162 Parameter Setup ........................................ 163 PYXIS TRACK ........................................165 Introduction............................................... 165 Creating a Pyxis Track ................................ 165 Adding a Second Pyxis Track .......................166 Hiding and Showing the Video Track ............166 Loading Video into Pyxis Track ....................168 Capturing Video into Pyxis Track ..................170 Encr yption ..................................................172 The Pyxis Window .......................................173 Watermarking.............................................176 Editing the Video Track ...............................177 Using Pyxis Track as a Machi ne ...................177 The Pan T heatre .........................................177 MIDI TRACKS ........................................ 181 Introduction ...............................................181 File Compatibility – IMPORTANT ..................181 Conver t Tracks to MIDI ...............................181 Patching to MIDI Tracks ..............................182 Metronome .................................................182 Recording MIDI Clips ..................................183 Editing MIDI Clips .......................................184 MIDI Note Editing .......................................184 PROJECT AND FILE MANAGEMENT . 187 Introduction ...............................................187 Basic File Commands ..................................187 Project Formats ..........................................187 MT Projects ................................................189 DR2 Projects ..............................................190 Waveform Profiles .......................................193 Revealing the Pr oject File ............................193 Backup Files ...............................................193 Automatic File Saving ..................................194 Undo Files ..................................................194 Video Files ..................................................195 Typical SOLO Drive Configuration ................196 Designating Media Device ............................196 Creating New Projects .................................197 Backup Project to Folder .............................197 Media Scanning ..........................................197 Detailed Media Management........................198 Importing Files ...........................................201 Export ........................................................203 EDL Management .......................................207 SYNC AND MACHINE CONTROL........ 211 Introduction ...............................................211 Setting up Machines ....................................211 Machine Control Indicators ..........................216 Timecode Generator ...................................216 Putting Machines Online ..............................217 Editing with Machine Control .......................217 Timecode Setup..........................................218 INTRODUCTION February 14, 2013 Introduction Congratulations You’re reading the manual. This is a great way to learn SOLO. SOLO is a large audio production system with very strong support for video recording and editing. If offers a variety of work surface components, and modular furniture About This Manual The SOLO User Manual provides all the information necessary to rapidly become proficient at operating the system in a professional audio environment. This manual is designed to familiarize sound editors and engineers with the facilities provided by SOLO. The terminology and concepts used in this manual assume a reasonable knowledge of audio principles and studio procedures. Finding the Information You Need Read through the chapters in the order presented to learn all the features of the system or use the Table of Contents or Index to quickly find the specific information you require. What Else You Need to Know Installation If you need to install or re-install the system, please read the manual: SOLO Quickstart Guide.pdf. This manual is installed on your hard disk. For Windows XP systems, it is usually in the folder C:\Program Files\Fairlight\Dream II\Docs. For Windows 7 systems, it is in C:\Program Files (x86)\Fairlight\Dream II\Docs. First Startup Even if someone else has installed the system for you, there are some things you need to do the first time you start the system. The Quickstart manual mentioned in the previous paragraph includes a chapter on this subject, called Launching SOLO for the First Time. Please read this before using SOLO, or at least have it standing by in case things get confusing. Some Important Terms Throughout this manual we will use some terms that you need to understand. Transport This refers to the movement of the system along the timeline. For example, when we “put the transport into Play” it means we cause forward movement along the timeline. This applies to the disk audio tracks, Pyxis Track (if enabled), the timecode generator (if enabled), and any machines that are being controlled by the system. Transport commands include Play, Stop, Record, Jog, Rewind, Shuttle and FF. The timeline is shown at the top of the Edit Screen. Page 1 INTRODUCTION February 14, 2013 Play Head The line in the center of the Edit Screen is called the Play Head. This is the current point where the system plays audio and video. It is also the point where most edits occur. The timecode display shows the position of the Play Head. Project The file created by Fairlight software containing the stored audio and its editing and mixing instructions. Physical Input/Output An analog or digital audio input or output. Track Feed A signal path (channel) feeding to or from the disk recorder which can be processed and routed to mix buses and monitoring. Live Feed A signal path (channel) fed from a live, real time signal that has been brought from a physical input and can be processed and routed to mix buses and monitoring. Bus Destination of a mixing operation. Feeds are usually routed to buses via a multiformat surround panner. Buses may be configured with various multichannel formats such as stereo, LCRS or 5.1. Multitrack buses provide bus paths for summing feeds to be recorded to disk or other I/O. Bus Element One component signal of a bus (e.g. left, right, centre or surround). Bus elements are automatically allocated to individual buses as they are created. Each system has a finite number of bus elements which will limit the format of buses as they are created. A full-sized SOLO has 72 available bus elements allowing, for example: 1 X 5.1 main bus, 4 x 5.1 subbuses, 2 X 5.1 auxes, 12 X stereo auxes and 3 multi-track buses. Anything Missing? If you find there’s some aspect of SOLO that is not explained (or Xplained) adequately, please let us know. You can email me: [email protected] Page 2 INTRODUCTION February 14, 2013 With new releases of software you’ll sometimes get a new version of this manual that adds more information. You can also download the latest version from Fairlight’s website: www.fairlightau.com Page 3 SOLO OVERVIEW February 14, 2013 SOLO Overview Signal Flow Diagram 1 2 3 4 5 6 7 8 1. I/O Configuration 2. Patching connects paths in the system – see page 28. 3. Recording – see page 39. 4. Editing – see page 57. 5. Processing – see page 99. 6. Bus Assignment assigns channels to Buses – see page 97. 7. Mixing – see page 93 8. Bus Format (mono, stereo, 5.1 etc) – see 94. Mix Automation – see page 125. 9. Monitor Configuration sets up speakers for control room and studio – see page 151. 9 Page 4 SOLO OVERVIEW February 14, 2013 SOLO is configurable with up to 192 disk recorder tracks, up to 212 physical inputs and outputs. It integrates recording and editing capability with a fully featured, fully automated mixing engine capable of delivering multiple final mixes in any format up to 5.1 surround. In addition it provides recording and basic editing of video in a variety of formats up to and including HD. Signal paths may be configured in formats from mono up to 5.1 surround. Tracks and Live Feeds Up to 192 Track Feeds Up to 48 Live Feeds 4 band automated EQ: Bell, Shelf - High & Low, Notch 2 band automated Filters: High Pass and Low Pass at 12 pr 24 dB per octave Compressor plus Limiter plus Expander / Gate Insert Direct Out Track Metering Aux Sends: 12, each in any bus format up to 7.1 Fader and Mute Panning: up to 7.1 surround Link Groups Up to 8 members with linked parameter controls and support for advanced surround panning features. Main Bus 1 x Main Bus Formats: Mono, Stereo, LCR, LCRS, LCRSS, 5.1, 7.1 Compressor and Limiter Insert Direct Out Master Fader and Mute Sub-Buses 8 x Sub-Buses Formats: Mono, Stereo, LCR, LCRS, LCRSS, 5.1, 7.1 Compressor and Limiter Insert Direct Out Master Fader and Mute Page 5 SOLO OVERVIEW February 14, 2013 Aux Buses 12 x Aux Buses Formats: Mono, Stereo, LCR, LCRS, LCRSS, 5.1, 7.1 Compressor and Limiter Insert Direct Out Master Fader and Mute Compressor and Limiter Insert Master Fader and Mute Multi Track Buses 24 x Multi - Track Buses Mono Format Master Fader and Mute Groups 32 x Group Masters, also known as VCAs (after Voltage Controller Amplifiers, from earlier analog consoles). VST Plug-ins Up to 6 instantiations per channel Total of 96 channels Hardware Components SOLO is made up of five interconnected hardware devices: PC containing CC-1 Engine Audio Interface and Sync box (SX-8, SX-12 or SX-20) Recorder/Editor Video Monitor Optional Mixer Video Monitor Plus additional optional components: Extra audio I/O boxes (SX-48s) loaded with analog and/or digital I/Os MADI interface cards Graphics Recorder/Editor Display Features The graphical display provides status information, clip and waveform display and visual feedback for editing functions. Page 6 SOLO OVERVIEW February 14, 2013 A number of optional windows can be selected, displaying a small mixer, the video playback, Video Locators, or a combination of these. To select these, use your mouse with the View Menu above the screen. Page 7 SOLO OVERVIEW Range display Zoom range Pyxis Track (video) Timecode position Edit toolbar February 14, 2013 Available recording time on current drive Pyxis window Track Panel (Arm, Solo, Mute, Select, Fader, Pan, Automation) Smart Pane Mixer Track and clip area Smart Pane This area contains a number of different displays at different times. It may show Meters, Clip EQ parameters, Fade parameters, and so on. Each editing mode automatically displays its appropriate Smart Pane. You can also force the display of any pane, or no Smart Pane at all, by selecting View Smart Pane at the top of the Edit Screen. Range Display This area contains three timecode values associated with Editing Ranges. They are, respectively, the Range In time, Range Out time, and Range duration. When Range is switched off, these numbers show the last range that was created, which can be restored by clicking the Range On key, or selecting the Range On command from the Edit Menu. Track and Clip Area This area shows a selection of the available tracks, and the audio clips on them. A complete description of all its functions is contained in the chapter on Editing, page 57. Page 8 SOLO OVERVIEW February 14, 2013 Timecode Display This line shows the timecode at the left and right of the screen, and also at the centre line (or Play Cursor position). To the right of the timecode display are two lights which change colour as follows: Sync – shows green if the system has a viable sync signal, otherwise red Position – shows green if the system sees a viable position signal, such as timecode or 9-pin, otherwise red. Status View This area shows information such as the Project name, and status and alert messages from the system. Starting the System Step 1 Start the host computer (PC) by turning on its power switch. The PC will boot the Windows XP operating system and display your PC desktop. Video monitor(s) should be powered up and displaying the Windows desktop. Step 2 Power on the audio interface box(es) (SX-20 and one or more SX-48s). In most installations they can be left powered on all the time, and will “wake up” when the PC starts up and the CC -1 board initialises. Step 3 Power on the SOLO mixer surface. Step 4 Start the SOLO application by double-clicking its desktop icon by selecting it in the Start Menu under the Fairlight group. If the system is correctly configured, the FMC mixer application will also start automatically with Dream II. Step 1 Start the host computer (PC) by turning on its power switch. The PC will boot the Windows XP operating system and display your PC desktop. Video monitor(s) should be powered up and displaying the Windows desktop. Step 2 Start the SOLO application by double-clicking its desktop icon by selecting it in the Start Menu under the Fairlight group. If the system is correctly configured, the FMC mixer application will also start automatically with Dream II. System Shutdown Step 1 Exit SOLO by selecting Exit from the File Menu, or by clicking the Edit Screen close box, or by the keystroke combination Alt-F4 when the edit screen is in focus (click anywhere on that screen to bring it into focus if necessary). Page 9 SOLO OVERVIEW Step 2 February 14, 2013 If a project is open, the system will prompt you to save any changes that have occurred since it was opened. Click Yes if you want to save the changes in the project. This may take a minute or so, during which a progress bar will grow in size. Step 3 You may now power down the SOLO surface, and shut down your PC if desired. It is recommended that the audio interface boxes remain powered up unless you are dismantling the installation. Graphic Themes SOLO allows a choice of colour schemes, which are called themes. Three themes are provided. The most common choice is the Solo theme, which will be preset on your system. It has the latest features, particularly for mouse editing. To choose a theme, do the following: Step 1 Click the Setup menu item above the Edit Screen Step 2 Click General Preferences Options Themes Step 3 Choose one of the themes from the list The Solo and Evo themes are dark grey, while the Classic theme is light grey, blue and white. It is possible to build your own theme. If you wish to do this, contact Fairlight in Australia. Page 10 “S ELECTION” AND “CALLING” February 14, 2013 “Selection” and “Calling” Selection Types There are three kinds of selection in the SOLO system: Selection One or more signal paths. When a path is selected, it responds to mixing automation commands like IN and OUT, and is available for Touch Write. If it is a track, it also becomes a target for editing commands like cut clip and fade head. Called Channel One “path” i.e. Track, Live, Bus, Group, or Monitors. Also known as the "Current Channel ". The Current Channel is the target of all signal processing commands, like changes in panning and EQ. It appears in the SOLO Pad. Current Track One track only, the last one that was selected. In most cases it is also the Current Channel. It becomes the target for some special edit commands that can be performed on only one track. How to Select To select, do one of the following: Click a track number in the Editing Screen Click in the body of a track on the Editing Screen (but avoid clips) The last track you select in this way becomes the Current Track How to Call To Call a channel, do one of the following: In the Mixer Screen, click on a channel name In the Mixer Screen, double-click on a channel’s Pan, EQ, Dynamics, Aux or Plug-in graph. Select a channel, as described in the previous section. The last channel you select is always called. Page 11 CHANNELS February 14, 2013 Channels Introduction SOLO provides six types of channel: Video Tracks – include record and playback capability, plus basic editing. Audio Tracks – include record and playback capability, plus full editing and mixing. MIDI Tracks – can record and edit MIDI parts. Live Feeds – bring audio straight from an input to the mix, with full processing. Buses – the destination for mixing. Include Main, Sub-Buses and Aux Buses Group Masters – also known as “VCAs” Video and MIDI tracks are described in their own chapters. Set Number of Tracks in Project The number of tracks refers to both Audio and MIDI tracks. For a New Project When a project is created, you can specify the number of tracks. To do this, Click the File New command in the menu above the Edit screen. With Open Project If you wish to change the number of tracks in your project: Click the Tracks Set Track Count command in the menu above the Edit screen. You will see a dialog where the number of tracks can be changed. WARNING: If you remove tracks containing clips, the contents will be destroyed, with no UNDO. Displaying Channels Audio and MIDI tracks are displayed on the Edit Screen. Live Feeds and Buses can also be displayed, but only when mix automation is active (Mix On is on). The latter is intended for displaying automation graphs. All channels are displayed on the Mixer Screen. They are fixed in width, and can be scrolled from side to side. Number of Tracks on Edit Screen Hold down the ctrl key and turn the Mouse Wheel to change the number of tracks on the Edit Screen. Centered Track Display A further option for track display automatically places the current track (most recently selected) in the vertical center of the Edit screen, with the chosen number of tracks distributed above and below. To adopt this option, select the checkbox at: Setup General Preferences Display Centers on current track Page 12 CHANNELS February 14, 2013 Pyxis Track – Displaying Video Full details about Pyxis Track are given in the chapter Pyxis Track, on page 165. Track Colours Each track has a colour that is shown at the left, and which can be given to the clips on that track. Selected clips are always shown red, i.e. those touching the cursor or in a range, on selected tracks. Selected clips are always red Tracks show colour tabs Clips normally show the track colour. Clips can also be given special colours To select track colours, Step 1 Select tracks you want to colour. Step 2 Use the menu: Tracks Set Track Colour Click to choose a colour for all selected tracks. Click to display a mixer for special colours. Page 13 CHANNELS February 14, 2013 When you choose a track colour, all clips on the track that currently have its old colour are given its new colour. This applies to all clips for which you have never explicitly chosen a colour. The Clip When audio is recorded or imported into SOLO it is displayed as a clip. The clip is a reference to the audio data stored on disk. Clips can be cut, copied or moved without affecting the original audio data. When new clips are recorded or pasted above existing clips, the clips become layered one above the other. Normally only the top clip is seen and heard during play-back. DREAM II now allows all layers to be seen simultaneously. Display Layering To do this: Click the Layering button in the Toolbar Layering button Select View Display Layering from the Menu Bar While Display Layering is on, you can drag clips from one layer to another using the mouse. The left end of the clip is known as the head. The right end is the tail. Clips also contain information about the original timecode location of the audio data when recorded, and the current timecode location of the displayed clip. If a clip shows only a portion of the associated audio data on disk, it may be trimmed to show more. Page 14 CHANNELS February 14, 2013 This picture combines a non- layered view (top) and the same clips with layers shown below. Each view has its advantages. Add Clip You can create a new clip in a few ways: Recording into the system (see the chapter "Recording", page 39) Importing clips from other projects (see page 58) Directly adding a clip To directly add a clip, use the Track menu as follows: Step1 Use the command Tracks Add Clip The system displays the following dialog: Step2 Choose the track where you want the clip to be placed Page 15 CHANNELS Step3 February 14, 2013 Choose the audio file that will be played by the clip. You may type in the name of the file if you know it, including its full path Alternatively, click the Browse button (labeled “…”) and find the file in your disk storage Step4 Choose a name for the clip. Step5 You may audition the clip at any stage to confirm that you have the right audio Step 6 Click OK to create the clip. It will be placed at the current timecode position, on the track that you chose. Clip Display Information You can choose which information is displayed in clips using the command: View Displayed Clip Information. The system displays a dialog like this: Note that Frame Rate, Video Size and Codec are only shown on Video clips (see the chapter "Pyxis Track", on page 165, for details about video). Choosing Clip Colours To explicitly choose clip colours, do the following: Step 1 Select tracks containing the clips you want to colour. Step 2 Move the transport so the clips are under the cursor, or make a range using the From and To keys. The clips should be red. Step 3 Use the menu: Edit Set Clip Colour Page 16 CHANNELS February 14, 2013 Click to choose a colour for all selected (red) clips. Click to display a mixer for special colours. Click to return the selected clips to their track colour. Multichannel Clips Multichannel clips are linked for editing operations. They are displayed with no separating line, and a little smaller in height. The picture below shows two stereo multichannel clips. You can create multichannel clips in two ways: By importing a multi-channel Wave or other file By Recording into a Link Group of tracks Once a clip has been defined as multichannel, operations on one channel of the clip (eg – EQ) affect all other channels. Multichannel clips can be broken apart using the command Edit Cleave Multi-Channel Clips. Clips that have previously been cleaved can be restored using Edit Restore Multi-Channel. Page 17 CHANNELS February 14, 2013 Selecting Channels Selecting channels makes them the target for commands and parameter changes. With audio tracks, clips on the selected ones are targeted for clip-based editing. Clicking Screen Track buttons – additive selection Press a dark onscreen track selection key to add that track to the selection. Press a lit onscreen track selection to remove that track from the selection. Click and drag your mouse in the onscreen track selection pane to select/deselect multiple tracks. Click here to select track 8 for editing Click here to deselect Track 14 Click any track here to select the Link Group starting at track 19 To select a single track, double click its number. All other tracks will be deselected. Clicking in a Track – exclusive selection Clicking in the body of a track will make it the only selected track. All other tracks will be deselected. Clicking and dragging vertically will select a range of tracks (but NOT if there is a clip under the original click – then it will drag the clip instead). Ctrl-clicking in the body of a track will add it to the existing selection – this is useful for working with non-contiguous ranges of tracks. Page 18 CHANNELS February 14, 2013 Solo, Mute and Arm The buttons at the left of the Edit Screen can be used to set arming, Mute, Solo and more. Click to select Video Track Link Groups The first track is “master”. Clicking its Solo or Mute button affects the whole group. Double-click here to collapse the Link Group to one-track width. Individual tracks within the group can be soloed or muted. Uncollapsed Stereo Link Group Arming any linked track will arm all of them, as long as they have a patched Input. Click the number to select a single track or Link Group. Click to cycle through automation display parameters: Fader, Mute or Pan Click to put track into automation record MIDI Track (indication only). Click to arm track for recording (must have audio input) Indicates Audio Track. Click and drag for fader level and pan position. Collapsed 5.1 Link Group Link Groups For arming, the Link Group always behaves as a single entity, so arming any member of the group arms all. For mute and solo, selecting the first member (the “Master”) soloes or mutes all members, but the other members can be soloed or muted individually when the group is expanded. Double clicking near the left edge of the tracks expands or contracts a Link Group. Automation The Auto button puts a track in and out of Automation Record. This is only available if Automation is switched on (use the Mix On screen button or surface button). Page 19 CHANNELS February 14, 2013 The Mix On screen button The Graph button allows you to choose an Automation curve for each track, out of Fader, Mute and Pan. Other choices are available in the Automation software (see Automation chapter) Fader automation, chosen for graph display Mute automation, chosen for graph display Pan automation, chosen for graph display Zooming The track display represents a 24 hour continuous loop. The timescale can be zoomed from a few samples across the screen to eight hours. The Zoom number and screen width are shown at the bottom left of the screen. To change zoom range: Click on the Edit Screen to put it in focus, the turn the Mouse Wheel. Hover the mouse over the track display while turning the wheel. Track display selection and zooming is possible while playing and recording. Timescale display Timecode positions can be displayed in whole frames, frames with subframes, frames with subframes and samples, feet and frames in either film format, or Bars and Beats. For all timescale choices, select View Timescale and choose one of the options. Page 20 CHANNELS February 14, 2013 Bar/Beat display Positions can be displayed in bars and beats. To enable this, use the Edit Screen menus, and click View Timescale Bars and Beats. The Edit Screen shows dark bar lines and light beat lines. To set up parameters, go to Setup Bars and Beats Setup. This displays a dialog with the following parameters: Page 21 CHANNELS February 14, 2013 Tempo Expressed as beats per minute. The box on the right allows you to choose the beat value used in specifying the tempo. In some cases you may wish to specify beats differently from the time signature. Time This is the time signature, expressed in the usual way. Origin Time This is the timecode where the first bar starts. To set it, locate to the timecode of the first bar, and click the button labeled “Set 1.1.1”. You may move the transport earlier than the first bar, which is negative bar territory. Note: there is no zero bar – the number goes from -1 straight to 1. Snap Snap editing is used when dragging clips with the mouse. You may set the snap points to any musical interval in the bar. To switch snapping on, click Edit Snap Editing. Note that several types of snap may operate at the same time e.g. clip and beat. This can lead to conflicts if two snap points are in close proximity. BPM from Range The system will calculate accurate tempos based on fitting to a range. To do this, mark the In and Out points of the range using the From and To keys. Now enter the number of bars that should fit in the range, and click the button labelled “BPM from Range”. Audio Scrollers Audio Scrollers give you an optional close-up waveform view of one or two tracks that can be useful for editing or mixing. Page 22 CHANNELS February 14, 2013 They effectively provide an extra zoom range to use on tracks of particular interest, while the rest of the screen gives more contextual information. To enable Scrollers, use Setup General Preferences Scrollers Page 23 CHANNELS February 14, 2013 Select the tracks you wish to see. Only two tracks may be displayed. You can only select a track if less than two are already on the screen. While audio scrollers are displayed you can: Click at any point to locate to that position. Click and drag the scroller to move the transport. Zoom the scroller by floating the mouse above it and turning the mouse wheel. Other scroller preferences: Scrollers as outline – you can display the scroller waveform in solid or outline format. Scrollers on full screen video – you can choose to have the scroller display present when full screen video has been chosen. This is useful for moving the timeline. Scrollers follows current track – the scroller automatically chooses the most-recently-selected track for display. Note: the Video Scroller is described in the chapter called Pyxis Track Solo and Mute SOLO has a number of ways to solo and mute. Briefly, here they are: Editor Screen Click a Solo button in the Editor Screen to toggle solo on any track. Click a Mute button in the Editor Screen to toggle mute on any track. Page 24 CHANNELS Mute Solo Click a Solo button and drag up or down to solo lots of tracks. Click a Mute button and drag up or down to mute lots of tracks. Mixer Screen Click a Solo button in the Mixer Screen to toggle solo on any track. Click a Mute button in the Mixer Screen to toggle mute on any track. Page 25 February 14, 2013 CHANNELS February 14, 2013 Solo ON / OFF Mute ON / OFF Solo Safe When a channel is soloed, it works by muting all the other (unsoled) channels. Sometimes you want to prevent this e.g. when channels returning reverb or other signals that affect the sound of the current channel. Solo safe means “cannot be muted by soloing another channel”. Channels can be prevented from being soloed using the Virtual Channel (double-click a channel’s Name Plate in the Mixer Screen to open this). Page 26 CHANNELS February 14, 2013 Solo safe Naming Naming Inputs and Outputs Inputs and outputs are named outside the SOLO application. This is because they are a permanent fixture in the studio, and it’s best to have their names in a separate file. WARNING: what follows is a technical operation which can result in loss of resources. Please follow the instructions carefully. The naming file is called I-O Config.txt and can be found in the following folder: For Windows XP: C:\Program Files\Fairlight\FMC\Data For Windows 7: C:\ProgramData\Fairlight\FMC\Data It contains information other than names, and this should not be disturbed. The instructions for naming are contained in the file itself, which can be opened and edited with any text editing applicati on. System Ports System output ports can only be accessed from the Monitor Setup Patch Outputs menu. Using system ports for control room monitors prevents the operator from inadvertently patching signals direct to the power amplifier inputs. To define a system port enter an attribute value of 1 as described in the I-O Config file. Naming Paths Click Edit Rename Track to name the currently selected track. Renaming Live Feeds and Buses can be done when Automation is active ( Mix On has been toggled ON). At this time the Edit Screen displays all active signal paths, and you can select any one of them, making it the current "Track". Renaming is then possible using the Rename Track command. Page 27 PATCHING S IGNAL PATHS February 14, 2013 Patching Signal Paths Overview Every signal path in the SOLO system originates or terminates in the Patching system. This is shown in the system flow diagram on page 4. Connecting any signal path to another is done in the Patch I/O page, which is the subject of this chapter. Note: there is one exception to this statement - assigning to Buses. For Tracks and Live Feeds this is done in the Bus Assignment screen (see page 97). The Patch I/O Page To display the Patch I/O Page: Click Mixer Patch I/O. Click the Patch icon on the Solo Toolbar. Patch Icon Here the mouse is used to select sources and destinations, then patch them together. Note: you can patch one source to many destinations, but not vice versa. Sources are shown on the left of the screen, while Destinations are shown at the right. Page 28 PATCHING S IGNAL PATHS February 14, 2013 Destinations Sources Command Buttons Source categories Destination categories Source Categories Categories of signal paths are selected in the lower part of the screen. Source categories Selecting a category of sources expands the category in the upper left of the screen. Page 29 PATCHING S IGNAL PATHS February 14, 2013 In this case Analog Inputs have been selected. Destination Categories Destination categories Selecting a category of destinations expands it into the upper right of the screen. Page 30 PATCHING S IGNAL PATHS February 14, 2013 In this case Track Inputs are shown. Making a Patch Select a source and a destination then click the Patch button in the center. Afterwards the tiles used in the patch will show the results. Source is always shown above destination. Source Source Destination Destination Notes: You can select multiple sources and multiple destinations and patch them all with one command. For example, select Analog Inputs 1 to 8 and Track Inputs 9-16, then click the Patch command once. Any source can be patched to any destination. For example a Bus Element can be patched to a Track Input, for recording purposes. To illustrate, select the Category Sub-Bus Out (the outputs of all the Sub Page 31 PATCHING S IGNAL PATHS February 14, 2013 Busses.) The expanded view will show the Sub-Bus elements separately, and they can be selected and patched to track inputs for recording. To deselect all the signal paths you have selected, touch the Clear button. The Multi Button Clicking the Multi button allows you to patch the same sources multiple times. Normally after a patch, both sources and destinations are deselected, but if Multi is ON, the sources remain selected through as many patchings as you like. View Buttons The View buttons control which names appear on the tiles. If you choose View System, the names shown are the functional system names like Track 5, Live 3 etc. If you choose View User, the names will be the ones you have given to these signal paths. For signal paths where you have not given a name, the system name is used. The Info Button Pressing the Info button allows you to see more detail about specific tiles. To do this, press Info, then click on any tile. The system will show a box with information about the source and destination patching associated with that tile. What are the Categories? Each category name has two parts. The first part can be Track – a recording track Live – a Live Feed, which is a full-featured channel bringing audio directly to a bus Page 32 PATCHING S IGNAL PATHS February 14, 2013 Main – the Main mix bus MT-Bus – a Multi-track bus, as used in traditional mixing systems Sub-Bus – a multi-Element bus used for extra mixing functions Aux-Bus – a mono or stereo bus, tied to the Auxiliary sends on the channels Mon – shows the elements of the Control Room and Studio monitor paths Analog – an analog physical input or output Digital – an AES-EBU physical input or output MADI – a MADI physical input or output Osc – the system oscillator and noise generator The second part can be: In – the input of a signal path (not a physical input) Out – the output of a signal path (not a physical output) Direct – each signal can have a Direct Output Send – Insert Send from a signal path Return – Insert Return to a signal path Talkback – the Talkback system – shows Comm1 and Comm2 Inputs – physical inputs (analog or digital) Outputs – physical outputs (analog or digital) Meters – the components of the current Meter Set (see Meters page 157) So, for example Analog Inputs means the physical analog input ports, while Aux-Bus Send means the Insert Sends from the Aux Busses. Page 33 T RANSPORT February 14, 2013 Transport Basic Transport Controls The PLAY, STOP, FF and REW controls work in a similar manner to a tape machine. Press FF and REW multiple times to accelerate through 8, 24, 60, 150 and 360 times play speed. To enter record click the Record button. The Spacebar on the QWERTY keyboard can also be used to toggle the transport between Play and Stop. Jog Commands Jog is a mode where the transport moves as you right-click-and-drag the mouse horizontally. Both video and audio move along in sync. To enter Jog mode, click the Jog button above the Edit Screen Looping Overview Looping means playing the same section over and over. There will normally be a pause at the start of the loop while the system loads audio from the hard disk ready to play. Click the Loop icon in the toolbar to start looping the current range. Changing the range points while looping does not change the loop. Jumping Overview The Jump keys locate the transport instantly to your choice of Jump Targets, such as clip heads and tails, fades and marks. Use the Toolbar jumps to reach strategic places in the project: Previous Previous Mark Add Next Clip Next Mark Mark Clip Page 34 T RANSPORT February 14, 2013 A Mark is a stored timecode point in the project. Click Add Mark to make a new one. Click Next Mark or Previous Mark to jump to marks. For more info about Marks, see Using Marks below. The Left and Right Arrow keys can also be used to jump. They target whatever is selected in the menu Edit Settings Jump to Fade Place where the Fade In ends, or Fade out begins, in a clip XFade Place where a XFade is centered in a clip Point (Head, Tail or Sync Point of a clip, on any selected track) The Sync Point is placed in a clip just so you can jump there. To set the sync point, locate to the place in the clip where you want it, and use Clip Set Sync Point. Mark (stored timecode location in the Project) Bar (Jumps by the length of one music bar). To set bars and tempo, use the menu Setup Bars and Beats Setup To display bar lines over the Edit Screen, use the menu View Timescale Bars and Beats Using Marks Overview SOLO allows you to create up to 100 timecode Marks, which are stored in the Project file. Marks can be edited and named. They can also be used in Jump and Go To commands as target locations. Page 35 T RANSPORT February 14, 2013 Create New Mark To create a mark, click the Add Mark button in the toolbar. This will put a Mark at the current timecode position. Placing of Marks can be undone, using the Undo button or the Undo command in the Edit Menu. It is also possible to remove the undoability of marks. This is done by clicking Setup General Preferences Projects, and unselecting Marks are undoable. Edit Marks You can display all the Marks you have made, and change their names and timecodes, remove them, and more. To display the list of Marks: Choose View Marks The list of marks appears over the Edit screen. To select a Mark, click it with the mouse. To change the timecode stored in the mark, click the Set Time screen button and type in a timecode, then press Enter. To rename the mark, click the Rename screen button and type in a name, then press Enter. To change the mark index, click the Set Index screen button and type in a Index number, then press Enter. To locate the transport to a Mark, click the Jump To button, or double-click the Mark. Click Close or press Enter to close the dialog. Page 36 T RANSPORT February 14, 2013 Normally marks are displayed at the top of the Edit Screen. To display the mark as a vertical yellow line, check the Line Marker box. The middle mark below is a line marker, while the other two are normal. Jump to Mark Click the Previous Mark or Next Mark button in the toolbar. Locate to Timecode To locate to a timecode, click the Timecode field above the tracks. A dialog appears containing the current timecode. Type a new timecode and click OK or press Enter to locate there. Before clicking OK you can select any pair of digits in the Timecode and start overtyping the time from that point. Locate to Clip by Name A Clip is a piece of audio. Clips are created by recording and editing. They all have names. You can see a list of those names and use them for various purposes by clicking: View Clip Search The Clip Search dialog appears on the Edit Screen. Page 37 T RANSPORT February 14, 2013 This dialog displays every clip in the project. You can filter it (reduce the number of clips displayed) in a number of ways. The most important is to type in all or part of a name, into the Search box (as shown above). This will hide all clips except those with names containing what you typed. In the example, shown above, all the clips contain the letters “bi”. Step 4 Having chosen your clip, press ENTER (or double-click the clip) to locate to the clip’s start timecode. The Clip Search dialog has many other capabilities. Please see the section starting page 80. Page 38 RECORDING February 14, 2013 Recording Basics Overview SOLO lets you record on multiple tracks at the same time, using the Record transport button to punch in. It will punch in from Play or Stop, and can punch out with gapless monitoring of playback. There are two recording modes, New and Tape Mode. The choice is made with a soft key in the Arm Menu. In New Mode, each time a track enters record, a new clip is created on that track. If there is already a clip present, the new one goes “on top” of the previous one. The upper clip is always heard on playback. In Tape Mode, existing audio can be destructively replaced. See the section on Tape Mode below. To record on a track, it must be armed. Before being armed, a track must have a source, or patched input. Patching Inputs Before you can record on a track, it needs an audio source, called an Input. This could be a physical input or an internal path in the system, such as a Bus element or an insert send. The next section “Patch Inputs to Tracks” explains patching in detail. Here we will just get something patched and move on to recording. Display the Patch I/O screen by doing one of the following: Click the Patch icon in the toolbar. Patch Button Select Mixer Patching The Mixer Screen shows a Patching dialog. We are going to patch (connect) a physical input to the track where it will be recorded. Page 39 RECORDING February 14, 2013 Ensure Track Input is selected at the lower right, then select a track number to be recorded, in the upper right. Click Analog Inputs or Digital Inputs at the lower left of the screen. Select any Input in the upper left of the screen. Click Patch to connect the physical input to the track. Exit Patching by selecting another menu or by right-clicking the Patch I/O display. Note: Patching is used for all system connections between paths. Please see Patching Signal Paths on page 28 for more details. Arming Tracks Tracks can be armed in the following ways. Click the Arm button near a track number on the Edit screen. The button should turn red. Page 40 RECORDING February 14, 2013 Click to Arm You can click one Arm button, thus toggling it, and then drag up or down to toggle others to the same value (armed or disarmed), without being careful to drag exactly over the buttons (only vertical mouse position is taken into account). Click … … then drag, to arm multiple tracks The illustrated move will cause tracks 5 to 14 to be armed, as long as they have patched inputs. Page 41 RECORDING February 14, 2013 Click an Arm button on the SOLO Mixer Screen. Click to Arm The same click-and-drag move can be used to arm or disarm multiple tracks, but this time using horizontal dragging. If the track has no input, the system will display the error message: "No input patched to Track ..." To fix this, go to the Patch page, as described above in “Patching Inputs”, and give it an input. Once a track is armed, use the Record button to punch into record – Play, Stop, REW, FF or Jog to punch out. Record Monitoring When a track is armed, you can choose whether to listen to its input signal, its playback signal (REPRO), a switched combination, or nothing. To control what is heard, click Setup Record Settings and select a radio button in the Monitor group. The Monitor settings work as follows: Input – always monitors the input to the track. Auto – monitors repro in Play or Jog, otherwise input. Record – mutes the track when stopped, otherwise as AUTO Mute – mutes the track while in Record, otherwise repro Repro – always monitors recorded audio Page 42 RECORDING February 14, 2013 Tape Mode Overview When Tape Mode is selected, you can punch in on existing Tape Mode clips and replace the audio media. This can save filling up disks with unwanted material, and results in a cleaner, simpler project with fewer clips. You can also create new Tape Mode clips by recording, or using the “Make Tape” command. Select Tape Mode by clicking Process Tape Mode Tape Mode Using Tape Mode If you punch into record over existing Tape Mode clips (shown yellow) the audio media will be replaced as you record. If you continue to record past the end of the clip, it will be extended. If you punch into record in empty track space, or over an Edit Mode clip (shown red or blue) the system will create a new Tape Mode clip. Note: if you extend beyond the end of a clip, you may be overwriting media that has been trimmed from the end of the clip. This is illustrated below. Before: clip exposes only part of the original media. During Tape Mode recording: Media is being replaced Recording reaches the end of the clip and continues: clip is extended, and now the hidden media is being replaced. CAUTION: This media might be used by other clips, in which case their sound will change. To prevent this, you can use Replace Mode. This is a variation where the system will not punch in until it is playing over a clip, and will punch out automatically when it reaches the end of that clip. This ensures that you cannot overwrite any media that is not exposed, nor can you create a new clip by punching in too early. To select Replace Mode, select Process Tape Mode Replace Mode Creating Tapes If you would like to ensure that only one clip per track is created by recording, you can start by making a Tape, which is a Tape Mode that is ready to overwrite. You have the choice of making a Tape from existing audio clips, or starting with a fresh blank tape. Use one of the following commands: Process Make Tape - Selected Tracks This command will make a single Tape Mode clip on each armed track, copying all the audio that is already in the range on the armed tracks. Afterwards you can replace any parts that are not correct by recording over them. Page 43 RECORDING February 14, 2013 Process Make Blank Tape - Selected Tracks This command will make a blank (zero waveform) Tape Mode clip on each armed track, filling the range. Both Blank Tape and Render Tape run quite fast – about 10 seconds for each hour of track time (depending on computer and hard disk speed). The advantage of using them is that you do not need to record sequentially – you can move around anywhere in the Tape and replace the parts you are ready to work on. Add Recording Handle Overview A Handle is an extra piece of audio at the beginning of a recording. The system automatically adds this piece, just as if you entered recording earlier. This can be very useful when trying to capture performances, as it gives you extra time to react. Change the Handle size by selecting Setup Record Settings and changing the number in the Handle group. Note: if the transport has not been rolling for as long as the handle before you issue the record command, the system will create a shorter handle. Auto Name Clips Overview Every clip is given an automatic name when you record it. This name consists of a seedname and a number. The seedname is applied first, then a number is appended, incrementing by one for each new clip. Each Track has its own seedname. You can change the seedname for each track, and also set the starting number at any time. The Seed Name dialog can also be accessed at any time by selecting Tracks Set Record Seed Name The Seedname Dialog Use the QWERTY keyboard to type the name, then Tab to or click the Starting Seed Number, and use the keyboard to set it. Page 44 RECORDING February 14, 2013 You can also choose the Add Track Name checkbox. When this is selected, the name of the track being recorded will be prepended to the clip name, as well as the other items in the seed name. Click OK or press Enter to finish. You can do this while in Record. Note: If you give more than one track the same seed name at the same time, their clips increment as a group, preventing repeated names. Clip Naming Each clip can be given a typed name. For existing clips, you select them and issue the clip name command. You can also name clips while they are being recorded. To name clips, open the clip name dialog by clicking Clip Rename Clip Enter a new name, or edit the existing one, then click OK or press Enter. Punch Into Tracks Independently Overview Clicking the Record button punches all armed tracks into and out of record. What if you want to punch individual tracks in and out, without affecting others? Using the track arming buttons, you can have individual control of which tracks are in record. The methods for arming and disarming tracks are described earlier in this chapter, on page 40. Recording and Editing Multiple Takes Introduction In many situations we need to record multiple takes of the same audio, in sync to picture or existing audio. Examples are Post Sync dialog (ADR), Foley and music recording. SOLO allows you to record multiple takes on a single track, then easily audition and edit them into shape. Viewing Takes To see all the layers of audio on your tracks, turn on Display Layering. This can be done in an number of ways as follows: Click the Layering button in the Toolbar Layering button Select View Display Layering from the Menu Bar Page 45 RECORDING February 14, 2013 The Takes Smart Pane The Takes Smart Pane allows you to bring different takes to the top of the stack, for auditioning and editing. Click View Smart Pane Clip Takes The system displays a Smart Panel showing the individual layers on the current editing track, at the cursor position. As the transport moves to different places, or as you select different tracks, the Takes display updates at regular intervals to show the current stack of clips at the cursor position. The top layer is selected by default, but you may move the selection downwards using the Down Arrow or by clicking on a clip in the display. Clicking the on-screen pop button brings the selected clip to the top of the stack, making it audible. You can also move a clip between layers by dragging it up or down. ADR Automation Dialog Replacement is described in its own chapter on Page 50. Background Recording Background recording allows you to make continuous background recordings of the Main Bus and/or the armed tracks, independently of all other activity in the system. The background recordings can be brought into the current project as clips at any time. Uses Recording the Main Bus can be useful for creating sound effects using real time controls on the system. For example, you can jog or shuttle the transport to create a speeding up or slowing down effect, and this will be captured into the background recorder. Recording the armed tracks means that you will capture every sound made by artists in your studio, even if they enter early, play a miraculous phrase that could never happen while the red light is on, or crack a wonderful joke while you are listening to the creative director’s opinion of the last take. Licensing The Background Recorder is a system option, requiring a licence. The following applies only to licensed systems. Please contact your Fairlight distributor if you to purchase a licence. Cache or Linear Recording The background recording process has two recording modes: Linear Just like a normal recording, it captures everything from GO to STOP. Cached Records an audio loop on the disk, whose length you can control. For example, if you set the length to 10 minutes, the recording always contains the last 10 minutes of source audio. Page 46 RECORDING February 14, 2013 User Interface To control background recording, open the Background Recorder using the following command: Setup Background Recorder Options Destination Displays the “holding tank” folder where background recordings will be temporarily stored. Click the … button to browse to the folder you want to use Click the Reveal button to open the destination folder in Windows Explorer Cache Length Controls the amount of storage used when in Cached mode (see above) Armed Tracks Slider Choose the number of armed tracks you want to record in the background. If you choose a number higher than the actual number of armed tracks, the system will record the number of files shown in the Armed Tracks box. The actual armed tracks will occupy as many of these recordings as they need, and the other recordings will record zeroes but are ready for you to arm at any time, whereupon their inputs will be switched into the recording tracks. If you choose a number lower than the actual number of armed tracks, the system will record the lowest-numbered armed tracks. You can change the number of tracks to be recorded while a recording is in progress. To do this, move the slider, then click the Apply button (where Go and Stop usually are). Record Source Main Bus Send You may select the Cached or Linear checkbox for Main Bus Send. In either case, the system will be ready to record the output of the Main Bus, one recording stream for each element of that bus. If you select Cached, the last few minutes of audio will be continuously stored on disk Page 47 RECORDING February 14, 2013 (controlled by the Cache Length slider). If you select Linear, the Main Bus output will be recorded continuously from the time you press Go until the time you press Stop. Armed Tracks You may select the Cached or Linear checkbox for Armed Tracks. In either case, the system will be ready to record the inputs to a number of armed tracks (as described under Armed Tracks Slider above), one recording stream for each track. Harvest This is used to get access to the material stored by the background recorder. When you press Harvest, the current contents of the destination holding tank are moved to the project’s media folder. The media folder is opened so you can see the new recordings. From there you can drag them into the project, or just leave them for later use. If background recording was in progress when you clicked Harvest, the current recording is terminated to allow its media to be moved, and a new recording started immediately. Note: Harvest is NOT available when recording into MT files, only DR2 files. Clipboard This is the same as Harvest, except that it also puts the recorded material into clips on the clipboard (one clip for each recording). You will see the “ghosts” of the recorded clips hovering over the selected tracks. Clipboard is available for MT and DR2 projects. Paste This places a copy of the clipboard at the current cursor position. It’s exactly the same as pressing the Enter button when you are in the Cut or Copy menu. Go / Stop button Go Starts the background recording. This button is only available when the background recorder is stopped. If there is a recording already in the destination holding tank, it will be discarded. This could happen if you are recording, then click Stop, then click Go, without using Harvest or Clipboard in between. Stop Stops the background recording. This button is only available when the background recorder is recording. Apply Allows you to change the number of armed tracks to the recording while it is in motion, or change the size of the recording cache. This button is only available when the background recorder is recording, and after you have changed the number of armed tracks using the Armed Tracks slider, or changed the size of the cache using the Cache Length slider. Notes about the Background Recorder It uses system resources: a) the audio channels are sent to the disk via AudioBridge channels, so those channels are not available to plug-ins or virtual instruments b) disk bandwidth is used, which may impact normal high-track-count recordings. Page 48 RECORDING February 14, 2013 Of course, you are using disk capacity as well, so it’s a good idea to remain aware when the recorder is on, or at least to check on the holding tank now and then. But by and large the recorder is self-cleaning, because it throws away old recordings when you click the Go button. Page 49 ADR February 14, 2013 ADR Introduction SOLO provides the ability to automate recording using a list of In and Out points with a simple interface. The ADR menu includes functions for setting pre and post-roll and features for automatic dialogue replacement. The ADR List The ADR List allows you to set up a list of recordings – cues – that you want to take. Each one has a controlled In and Out point, and text that can be displayed on the screen. To open the ADR List, use the command ADR ADR List When it is first opened, the list is empty of cues. Import Cue List from a Text File You may import an entire script through the use of the Import button in the ADR List. This can import a short script that has been written in a word processor. Each line of text in the file is treated as a separate line of ADR cue text. Each line of text can optionally have one or more timecode numbers at the start of the line: 00:00:00:00 This line has one timecode number or 00:00:00:00 00:00:01:12This line has two timecode numbers Page 50 ADR February 14, 2013 The first timecode number becomes the cue-in point and the second, if present, the cue out point. Timecodes must contain 4 individual numbers separated by colons: 01:00:23:12 or semicolons if the timecode is drop-frame based: 01;01;00;02 Here is an example of a text file in the correct syntax with timecode numbers at the start of each line: 00:02:19.19 Her eyes shined bright and true 00:04:57.07 00:09:42.18 Do not look now, but.... 23:58:39.03 00:02:58.19 Haven't I seen you before. Import from CSV File SOLO can also open ADR lists in comma-separated-variable (CSV) format. In this case the Character should be included. The format is as follows: 2 columns of timecode, Then next column is the character (default is "-") Then next column is the text. Example: 23:58:39:03,00:02:58:19,Andrew,Haven't I seen you before 00:02:19:19,00:03:19:19,Bill,froggs are really cool 00:04:57:07,00:09:42:18,-,Do not look now Commas occuring in the text field will confuse the software unless the field is surrounded by quotation marks e.g. 00:02:19:19,00:03:19:19,Bill,"froggs are cool, really cool" Adding Cues Manually Step 0 Optionally, create a range covering the cue you want to add. This is probably the quickest way to set the In and Out times for your cue. (If there is no range, the cue will be created with the transport position as its In time, and 5 seconds duration.) Step 1 Click Add A dialog appears for writing the text of your cue. Step 2 Enter the text and click OK Step 3 If necessary set the In Point of the cue: locate the transport to that point and click From. Your current position will be shown in a dialog. You may accept this by clicking OK. Page 51 ADR February 14, 2013 OR Click From, type the timecode you want, and click OK. Step 4 If necessary set the Out Point of the ADR cue in the same way. The cue is shown as below. ADR Characters Your project may contain a list of characters, and the cues assigned to different ones. Creating characters Step 1 Click in the Character box (which normally shows <Show all>) Step 2 Type the name of a new character Step 3 Click the Add button Filter by character To show only one character’s lines, use the Character drop down menu to select one character. Page 52 ADR February 14, 2013 Sort by character To sort the list by character, click the Character tab at the top of the ADR list box. In the same way you can sort by From time, To time or dialog alphabetically. Click any one of these a second time to reverse sort. ADR Preferences Once you have entered all the cues that you want to use, you may set up your preferences by clicking the ADR Menu and selecting ADR Preferences. The following screen is displayed. Page 53 ADR February 14, 2013 The main purpose of this dialog is to control beeps and the streamer. The streamer is a pair of vertical lines moving across the Pyxis screen during the Preroll to the cue. At the same time as the audible beeps, the line extends upwards and downwards briefly. The two lines come together at the cue point, and a large cross is shown. The extensions and cross can be given a different colour to the lines. Note: the number of beeps (and corresponding streamer crosses) is controlled in this dialog, but the Preroll must be long enough to accommodate them. If the Preroll is too short, some of the beeps will be omitted. See below for instructions on setting the Preroll. The text referred to is that shown on the Decklink output from the Pyxis Track. The font, colour, height control and Wrap Text control are used to customise the text display. Note: this text display is not shown on the Edit Screen Pyxis Window, only on the independent monitor fed by your Decklink card (if fitted). Use the ADR Display, described below, to show text over the Edit Screen. The ADR Display The ADR Display is a band across the screen which displays the ADR text, and also gives an indication of the start point for the cue. An example of the streamer is shown below. The text is shown, and the indicators converge on the centre of the screen, arriving at precisely the In time of the cue. To turn it on, use the toggle ADR ADR Display. Page 54 ADR February 14, 2013 Cycle The Cycle command is used to initiate ADR actions. It will execute rehearsal, recording and playback, depending on the mode of the ADR system. See below for details. Preroll and Postroll It’s usually necessary to set a preroll for recording. This allows the recording artist to get ready for the start. Postroll is useful for hearing how the new recording fits into the track. Set preroll and postroll using the appropriate fields in the ADR List. Rehearsing a cue You may rehearse cues before recording them. Is this needed in a system where all recording is nondestructive? Your call. Step 1 Click the Rehearse button. This puts the ADR system in Rehearse mode. Step 2 Select a cue. The transport will locate to its In Time. Step 3 Click Cycle. This will cause the transport to drive through the In and Out points once, switching the track from repro to input, simulating the record experience. Click the Stop button at any time to stop the take (or use the Stop button in the transport controls). Note: When the ADR is in Rehearse mode, double-clicking a cue will select it and initiate a rehearsal Cycle. Recording a cue Step 1 Click the Rec/Playback button until its label is RECORD. This puts the ADR system in Record mode. Step 2 Select a cue. The transport will locate to its In Time. Step 3 Click Cycle. This will cause the transport to drive through the In and Out points, recording a take, then cycle through again for playback. Click the Stop button at any time to stop the take. Note: When ADR is in Record mode, double-clicking a cue will select it and initiate a recording Cycle. Playing Back a cue Step 1 Click the Rec/Playback until its label is PLAYBACK. This puts the ADR system in Playback mode. Step 2 Select a cue. The transport will locate to its In Time. Step 3 Click Cycle. This will cause the transport to drive through the In and Out points once, playing back the audio. Note: When the ADR is in Playback mode, double-clicking a cue will select it and initiate a playback Cycle. Page 55 ADR February 14, 2013 Pre-Record Pre-Record automatically enters record a little earlier than the time of the cue. This is useful when recording artists that tend to anticipate the entrance. The streamer will still indicate the cue in time, but you are able to capture the audio a little earlier. Early In Early In can be clicked during the preroll of a record cycle. It causes recording to start immediately. Rec Out If desired, the system can ignore the Out time of the cue, and just keep recording until you exit manually (using Stop, Jog, Rewind etc). The Rec Out button can be toggled ON (programmed exit) or OFF (keep recording until manual exit). Keep Playing At the end of a cycle you may wish to keep playing, in order to hear the next section of track. Pressing the keep playing button at any time during a cycle will cause the postroll to be ignored, and the system will enter normal Play mode after the cue’s Out time. Exporting the ADR List Clicking the Export button will cause a file to be created, in CSV format, containing all the cues in your ADR List. The format is as follows: 2 columns of timecode, Then next column is the character (default is "-") Then next column is the text. Example: 23:58:39:03,00:02:58:19,Andrew,Haven't I seen you before 00:02:19:19,00:03:19:19,Bill,froggs are really cool 00:04:57:07,00:09:42:18,-,Do not look now Page 56 EDITING February 14, 2013 Editing Basic Concepts – the Audio Clip An Audio Clip plays audio from a single Media File. It may play all of that file, or only part. Audio Clip Media file on disk – the highlighted section is played by the clip. The Audio Clip has properties that you can change by editing: Name Head trim Fade in Curve Fade in Point Fade out Point Fade out Curve Tail trim Head Trim – the first audio sample of the media file played by the clip Tail Trim – the last audio sample of the media file played by the clip Clip Sync Point – one of the clip’s audio samples is locked to a timecode position. Fade In Point – the place where the Fade In is completed Fade Out Point – the place where the Fade Out starts Fade Curves – the shape of the Fade In and Fade Out Clip Level – a single level value for the clip Clip EQ – a four-band parametric equaliser for each clip Page 57 EDITING February 14, 2013 Also clip Name, Colour, Grouping, Multi-channel format etc. Other Clip Types Video Clips Video clips are much the same as audio clips, but have fewer editable properties. Head Trim – the first audio sample of the media file played by the clip Tail Trim – the last audio sample of the media file played by the clip Clip Sync Point – one of the clip’s audio samples is locked to a timecode position. Fade In Point – the place where the Fade In is completed Fade Out Point – the place where the Fade Out starts Also clip Name The properties above can be edited by the same methods as audio clips, and at the same time. For these edits, selecting a video track makes its clips into targets for editing. They are fully described in the chapter Pyxis Track, starting on page 165. When you perform an audio edit with the “Target” set to “Both” an audio edit and an automation edit occur at the same time. In the Undo List, this will be seen as a single audio edit, and will be undone in a single step. Using the Mouse The mouse can be used to move the transport, select and zoom tracks, make ranges and edit clips. Transport Transport buttons are provided in the “Solo” theme. To select this, click Setup General Preferences Options Themes. Then select Solo from the drop down menu. With this theme active you may click on the transport buttons at the top of the screen. Clicking REW and FF multiple times will increase the speed of movement each time. Clicking the Loop button when a range is present will cause the transport to loop the range, if any is present. The spacebar on your qwerty keyboard can also be used to toggle between Play and Stop. Right click in Timescale: locate transport to that time, and center that time on the screen Dragging and Scrolling the Transport Very fast locating is possible using right-click-and-drag horizontally anywhere inside the track area of the Edit Screen. To scroll the tracks up and down, right-click-and-drag vertically, anywhere inside the track area of the Edit Screen. Page 58 EDITING February 14, 2013 Right click and drag vertically to scroll the tracks Right click and drag horizontally to move the transport The tracks can also be scrolled using their scroll bar at the right. If the Play Head is unlocked, you can locate the transport just by right-clicking anywhere in the track area or the timeline above it. Note: Unlocked Play Head means that the clips are stationary, while the Play Head moves left to right. To unlock the Play Head click Setup Locked Playhead until the tick is removed. Mouse Jogging When the Jog button is toggled on, you may move the transport as usual with the Jog Wheel, or rightclick and drag it with the mouse, in order to hear audio. Zooming To Zoom the tracks horizontally, turn the Mouse Wheel. To Zoom the tracks vertically, hold the ctrl button down and turn the Mouse Wheel. Track Selection There are two ways to select tracks with the mouse: Click anywhere in a track. This will select that track, and deselect all others. Click any track number to toggle its selection. This does not affect the selection of other tracks. Double-click a track number to make it the sole selection. There are also short cuts for selecting multiple tracks: Click empty space in a track (not on a clip!) and drag upwards or downwards. Every track you touch will be selected, and all others will be deselected. If you drag sideways as well, you will make a range. Hold the ctrl key and click empty space on any number of tracks. Each track you click is added to the selection. Click a track number and drag upwards or downwards. Each track number you reach will be added to the selection. This does not affect selection of untouched tracks. Page 59 EDITING February 14, 2013 Mouse-Based Ranges A range is a time interval bounded by an In Time and an Out Time. It can be used to edit multiple clips and parts of clips. The mouse can be used at any time to create a range. Simply click an empty space (one where there is no clip) and drag an area on the Track display, and a range will be created. The tracks that you touch while dragging will be selected, and all other tracks deselected. If you need to make a range where clips are present, hold down the ctrl and Shift buttons while dragging. This will prevent clips being relocated. To remove the current range, click (but don’t drag) empty space in the track area. This will also make that track the sole selection. You can also toggle the range using the keyboard shortcut " r". You can make or extend the range to exactly include a clip by holding down ctrl and clicking the clip. The Range Panel Sets the Range In point at the current timecode position Sets the Range Out point at the current timecode position Toggles the range on and off The Range panel, in the upper left of the Edit Screen, can be used to set precise range in and out points. Move the transport to a time where you want the Range In point to be, then click the From button (or keyboard shortcut "f"). Move the transport to a time where you want the Range Out point to be, then click the To button (or keyboard shortcut "t"). Click the Range button to toggle the range on and off (or keyboard shortcut "r"). Selecting Clips - not Clips cannot be selected, as such, with the mouse. They can be edited using their 7 points, as described below, included in a range with other clips, or dragged to different places. But selection is always and only determined by clips touching the playhead, or by inclusion in the Range. At this time they are shown in red, and are targeted by commands from menus and from the keyboard. Moving Clips Clips can be dragged horizontally and vertically with the mouse. This changes the clip timecode and track respectively. When there is no range, simply click and drag any single clip to another time or track. When there is a range, click on any selected (red) clip or part of a clip, and drag it – all other red clips will also be dragged along with the one you clicked. To constrain movement to only vertical, or only horizontal, press the Shift button after clicking with the mouse (but before moving the clips). Page 60 EDITING February 14, 2013 7-Point Editing Each clip can display 7 points that can be moved with the mouse. The points are displayed when the mouse hovers over the clip. Fade In point Fade Out point Fade Out Curve point Fade In Curve point Trim Tail point Trim Head point Clip Level point Trim Points The Trim Head and Trim Tail points can be dragged horizontally to expose or hide more of the recorded media for the clip. When you first click a Trim point, the clip expands to its maximum possible extent in that direction i.e. shows all the media at that end of the original recording. After you drag the mouse to the point you want and release it, the clip is trimmed to that position. Fade Points Dragging a Fade In or Fade Out point horizontally lengthens or shortens the fade at that end of the clip. Fade Curve Points The Fade In Curve Point and the Fade Out Curve Point can be dragged vertically to change the X -Level of the fade, and horizontally to change the X-Point of the fade. Clip Level Point The Clip Level point can be dragged vertically to change the playback level of the clip. The waveform of the clip will change to reflect this new level. Double Clicks Double click on Trim point: extend to maximum Double click on Fade point: remove fade Double click on Curve point: make fade linear Double click on Level point: set Level to 0 dB Edit While Playing All SOLO edits can be performed while the transport is in play. If the clip you are editing is actually being played at the time, it will take a second or two to update and resume play. To make editing easier while playing, you can view the tracks as stationary clips with a moving Play Head. To do this click Setup Locked Playhead until the tick is removed. Page 61 EDITING February 14, 2013 The Edit Toolbar The Edit Toolbar is shown only when the Solo theme is selected. To do this, click Setup General Preferences Options Themes. Then select Solo from the drop down menu. Audiobase Smart Pane Display layering Meters Smart Pane Clip EQ Smart Pane Fade Tail Fade Head Clip Search Window Redo (reverse last undo) Undo last edit Cut selected clips or range Erase selected clips or range Paste clipboard Copy selected clips or range Trim Head Split Clip Nudge +1 frame Nudge -1 frame Patch I/O page Trim Tail Name Clip Mute Clip Not active Clip Level Jump to previous mark Add Mark Jump to previous point Jump to next mark Jump to next point Display Layering Toggles the display of clip layers on tracks. This is explained on page 66. AudioBase Smart Pane Opens the AudioBase Smart Pane, where you can search for sound effects, audition them, and paste them into your project. This is explained starting at page 78. Clip EQ Smart Pane Opens the Clip EQ Smart Pane, where you can add a four-band equaliser to any clip. This is explained starting at page 72. Page 62 EDITING February 14, 2013 Meters Smart Pane Opens the Meters Smart Pane. This is the default display at the top of the Edit Screen. It shows a meter for every track in the project. Clip Search Window Opens a window showing every clip in the project, plus ClipStore projects. From here you can audition, locate or paste any clip into your current project. This is explained starting at page 80. Patch I/O Page Opens a window where every signal path in the system can be accessed and connected to any other path. This is explained starting at page 28. Undo and Redo Undo reverses the effect of the last edit performed. The system has an unlimited number undo steps. Each one saves a complete copy of the edit list to disk and can be recalled later if need. Redo reverses the effect of the last undo. You can see a list of the available undo steps in your project using Edit Undo List You can see a list of the available redo steps in your project using Edit Redo List Erase Selected If there is no range, this command will erase all clips on selected tracks that are touching the Play Head. These clips are coloured red. Warning: This may include clips on tracks that are not visible at the time. If there is a range, this command will erase all clips and parts of clip on selected tracks that lie inside the range. The same warning applies. Cut Selected Cut is the same as Erase, except that the clips are removed and placed on the clipboard, ready to paste into the project at any time and on any track(s). If there is no range, this command will cut all clips on selected tracks that are touching the Play Head. These clips are coloured red. Warning: This may include clips on tracks that are not visible at the time. If there is a range, this command will cut all clips and parts of clip on selected tracks that lie inside the range. The same warning applies. Copy Selected Cut is the same as Cut, except that the clips are not removed from their original position. They are copied to the clipboard, ready to paste into the project at any time and on any track(s). If there is no range, this command will copy all clips on selected tracks that are touching the Play Head. These clips are coloured red. Warning: This may include clips on tracks that are not visible at the time. If there is a range, this command will copy all clips and parts of clip on selected tracks that lie inside the range. The same warning applies. Paste Clipboard This command pastes the clipboard at the current timecode position, starting from the lowest-numbered selected track. Page 63 EDITING February 14, 2013 Note: the clipboard includes a reference to the position of the playhead at the time of cutting or copying. When pasting, the system places that reference position in the clipboard at the current timecode. This is illustrated below. Before clips are cut / copied. Tracks 6 and 7 are selected, and there is no range. After the cut / copy. A "ghost" appears showing the clipboard contents. Note that the sync reference is indicated by the position of the clips and the Play Head. We select tracks 25 and 26. The ghost shows where the clipboard would go if pasted. Page 64 EDITING February 14, 2013 After pasting - the clips are synchronised in relation to the Play Head in the same way as when they were cut or copied. Fade Head Inserts a fade from the head of the clip to the Play Head. If there was already a fade at the head, it is replaced. The curve parameters of the inserted fade are the ones that would be visible in the Cross Fade Smart Pane. To view this, click View Smart Pane Cross Fade. Fade Tail As Fade Head. Split Clip This command breaks clips into two pieces. This will happen to all clips on selected tracks that are touched by the Play Head. Trim Head This command trims the Head of the clip(s) touching the cursor on selected tracks. The clip is trimmed at the Play Head position. Trim Tail As Trim Head. Nudge The command moves selected clips forward or backward by one frame. If there is no range it will affect clips on selected tracks touching the Play Head. If there is a range it will affect all clips that are wholly inside the range, on selected tracks. Mute Clip This command toggles the Mute state of the selected clip(s). When a clip is muted it is shown darker, and its audio is not heard. If there is a range, this command affects clips that are wholly inside the range, on selected tracks. Page 65 EDITING February 14, 2013 Name Clip Opens a dialog where you can rename clips. Clip Level Opens a dialog where you can set the volume level of selected clips. Add Mark Adds a timecode Mark to the timeline. This can be used for location, either by jumping, or by locating to Marks. They can also be named. To see a list of Marks, rename or locate to them, click View Marks Jump to Mark Moves the transport to the next or previous timecode Mark. Jump to Point Moves the transport to the next or previous head or tail of clips on selected tracks. Display Layering When clips are placed “on top” of each other, only the uppermost is heard, or at most a crossfade between the top and second layers. The software allows you to see all the layers as follows: Select Display Layering from the View menu Click the Display Layering button in the Toolbar Display layering The layers of clips are shown on all tracks, with the clips becoming thinner as needed to fit the available space. Page 66 EDITING February 14, 2013 The mouse can be used to change the order of clips. To do this, simply click and drag a clip from one level to a higher or lower level. Changing levels in this way can be combined with dragging a clip to a different track or timecode. Note that there is always a space at the top of each track, equal to the width of one clip. This is to allow room for you to drag a clip into the top position. To prevent a clip from changing its sync while dragging it to another layout, hold down the Shift key while dragging it. Group Clips SOLO can create grouped clips that behave like individual clips. To do this: Step 1 Create a range containing the clips you want to group Step 2 Use the command Edit Group Clips. A grouped clip appears in green when not selected. If you have more than one track selected, the group clip will look like a multi-channel linked clip. Editing of a grouped clip is the same as all other clips. Double-clicking a grouped clip shows it temporarily as separate clips, allowing editing inside the group. Double-click again to restore the group. Use Edit Ungroup Clips to ungroup permanently. Page 67 EDITING February 14, 2013 Fade and Crossfade Simple fades have been described under 7-Point Editing earlier in this chapter. Here is a more detailed description, using the Cross Fade Smart Pane. In the Cross Fade Smart Pane we can place level ramps at the begining (fade-in) and end (fade-out) of each clip. A fade-in starts from silence and ends at the full level of the clip, and a fade-out does the opposite. Crossfades between two clips are created by first layering one clip on top of another, then putting a fade in the upper clip. This induces a complementary fade in the lower clip. We can also control the fade profile i.e. its shape, using the X-Level and X-Point parameters. Operation Head and Tail Fade Step 1 Open the Cross Fade Smart Pane by clicking View Smart Pane Cross Fade. Step 2 Locate the transport so that the cursor crosses the middle of (at least) one clip. Identify the track containing that clip, and double-press its button to make it the only selected track. (If necessary, use the Bank key.) The target clip should now be the only red clip on the screen. Red means ready to edit. Step 3 Click the Head button. The clip now fades from its beginning to the cursor position. The shape (or curve) of the fade is that one shown above in the Smart Pane. The Head and Tail buttons are used to create most simple fades. Fade Shape (Curves) X-Point X-Level Duration A fade’s shape includes the following parameters: X-Level – controls how loud the fade is (compared to the full Level of the clip) at the Crossover point. Page 68 EDITING February 14, 2013 Varying X-level changes the loudness at the Crossover – (shown for clarity in a crossfade) X-Point – this controls the percentage of the fade’s duration when it reaches the Crossover Point. Varying X-point moves the Crossover earlier or later in the fade – (shown for clarity in a crossfade) Duration – the total length of the fade, in frames. (Duration is not really part of the shape, but its control is close by). Example: Percentage = 30%, Attenuation = -3 dB, Duration = 20 This means that the fade will last for 20 frames. The crossover point will be 6 frames into the fade, at which time the level will be -3 dB compared with full Level. Setting Fade Curve Parameters Click in the X-Level or X-Point field in the Smart Pane. Use the Up and Down Arrows or type numbers to set these values. Press Enter to accept those values or click Head or Tail to create a new fade using those values. You can also use the Mouse: click on the red dot in the Fade Curve and drag it up/down to change X Level, or left-right to change X-Point Page 69 EDITING February 14, 2013 Drag red point to change X-Level and X-point Copy Fade You can copy fade characteristics from one clip to another. Now press the copy button. Locate to the middle of the clip where you placed fades. Click the copy clip button. Now jog about half the clip's length to the right and press Enter. You have pasted a copy of the clip on top of itself. The beginning of the newly-pasted clip now interacts with the clip underneath, inducing a crossfade. You can see the line of the crossfade in the lower clip. Move the top clip backwards and forwards to see how the fades interact. Also, go back to the Fade Menu and experiment by changing the fade-in point. XFade – New Method Making a crossfade between two clips requires that they overlap. The new Crossfade method creates the overlap at the same time as the crossfade. Get Ready Issue the command Fades Xfade The Xfade dialog appears, showing the last-used parameters. The Duration is depicted with a yellow overlay to show the region of overlap. Page 70 EDITING February 14, 2013 Turn the Jog Wheel so that the Duration is increased. The Yellow region expands accordingly. You may also change the X-Point value (labelled %) or the X-Level value (labelled dB). This can be done by tabbing to those fields and using the Jog Wheel, or by mouse-dragging the red point. To apply the specified crossfade, press Enter or click the Xfade button in the dialog. See more details about crossfading later in this chapter. Page 71 EDITING February 14, 2013 Clip Equalisation SOLO provides clip based, four-band parametric Equalisation (plus shelving) which can be applied to a single clip or range of clips within a Project. EQ is performed by the system on a copy of the original media, therefore applying an EQ change does not affect the audio data on disk. The clip-based EQ is independent of the track feed mixer EQ. Note: Clip EQ is a multi-track operation. Applying EQ Step 1 Click the clip EQ button in the Edit Toolbar, or click View Smart Pane Clip EQ. Clip EQ Button Step 2 Locate the cursor over the clip or define a Range of clips. Step 3 To start editing, drag one of the curve points in the EQ display (see below). Step 4 Change parameters as you like, listening to the changes by playing the transport over the clip (you may use solo and mute or fader levels to concentrate on a one or a few clips). Parameters can be changing using the Value Grid (see below), or by dragging the curve points in the display. Step 5 Apply the changes by clicking the Apply button. Each equalisation band has three parameters you can change. They are: centre frequency of the band, gain (cut or boost) at that frequency, and Q-factor (sharpness of the band) or whether it is a high or low shelf. EQ display Left side of display. When a clip’s EQ is being edited, the dots change from black to red (as shown here). They can be moved with the mouse, changing frequency and gain values. These values are updated in the value grid as you move the mouse. You can also hear the changes in the audio if it is playing, after a short delay. Page 72 EDITING Range Filter Type Frequency Gain Q-Factor February 14, 2013 Enables Right side of display. The value grid shows the parameters of the EQ being applied to the clip (or range of clips). At any time you may A/B the changes you have made with the previous EQ setting for the clip being edited. To do this, click the Old or New button. For any clip, whether or not it is being edited, you can click the In or Out button to toggle its Clip EQ on and off. If you want to escape without changing the Clip EQ settings, click Cancel. Clip EQ Parameters Band There are four EQ bands that you can apply. They are given the names commonly used on mixing consoles, but actually they are not in fixed ranges – you have the full frequency range available on each of them. Filter Type Choices are: P Band pass filter >- High pass filter -< Low pass filter Each band can be set to any filter type. Mouse-click on the button to cycle amongst the choices. Frequency The centre frequency of each band. Gain The gain of the band. Range -99 to +20dB. Q This displays the Q of the band or indicates the type of shelf. Range 0-99. Enables Used with the Apply command. Only the Enabled bands are applied to the selected clips. Page 73 EDITING February 14, 2013 Value Grid The Value Grid shows all the current parameters of the EQ being changed. Changing a Parameter To choose a parameter numerically, click with the mouse in the cell you would like to change. You may move across the grid using the Tab key (going towards the right) or Shift-Tab (going towards the left) There are several ways to change the value of a parameter once chosen: Type a number on the QWERTY keyboard. If you type a number that is out of range, the field background turns red. In this case, use the Backspace button to remove digits, until the red colour disappears. The minus sign can be used in the Gain fields. Use the up and down arrows to make small changes. The Frequency and Gain values can directly be chosen and changed with the mouse by dragging the red dots in the graph area. Notes: There is no limit to the frequency Range for each band, so you can have your low frequency higher than your high frequency if you want. When you are using a Range, it is possible to change one or more bands for the entire Range, while leaving other bands as they were. So, for example, the clips might have different settings for LOW EQ but the same setting for HIGH EQ. Applying the Changes To apply your changes, click the Apply button. Only the bands whose Enable checkboxes are selected will be applied. To escape without applying your changes, click the Esc button. New or Old Whilst adjusting an EQ parameter it is possible to toggle between the new and old settings using the New or Old radio buttons, until you apply the changes. In or Out Toggle the EQ on and off with the In and Out radio buttons. Copying an EQ The EQ parameters of a clip can be copied to another clip or Range of clips. Step 1 Locate the cursor over the source clip. Step 2 Click the Copy button on the screen. Page 74 EDITING February 14, 2013 Step 3: The enable checkboxes allow you to choose which of the bands are pasted into your target clip(s) Step 5 Locate the cursor over the destination clip or define a Range of clips. Step 6 Click the Apply button. EQ In/Out Use the EQ In/Out Soft key to toggle the EQ on or off at any time. This action will affect the clip under the cursor, or all clips in the Range, if any. The on/off position of this switch is stored in the clip along with the settings of the EQ parameters. Saving EQ Presets The system allows you to save the current EQ settings and later retrieve and apply them. To save an EQ setting, do the following: Step 1 Type a new name into the Presets field (or use an old name if you want to change its settings) Step 2 Set the EQ values to the ones you want to save, by editing, or simply by “picking up” the values by touching an existing clip. Click the Save button. To retrieve an EQ setting, select it from the Preset drop list. It can then be applied immediately to the currently selected clip or range of clips. A saved EQ setting can be deleted by first selecting it from the drop list, then clicking the Delete button. A special preset can be created called “default”. Whenever the Clip EQ display is opened for a clip with no EQ, this preset will automatically be loaded into the display. Mouse Edit Menus The screen Edit Menus provide many commands that are available elsewhere in the system, and some that are not. The mouse can be used to access these commands. Page 75 EDITING February 14, 2013 Undoes the last edit Redoes the last edit that was undone Shows a list of the edits that can be undone Shows a list of the edits that can be redone Cuts the selected clip or range to the clipboard Cuts the head of the clip at the cursor position, to the clipboard Cuts the tail of the clip at the cursor position, to the clipboard Copies the selected clip or range to the clipboard Copies the head of the clip at the cursor position, to the clipboard Copies the tail of the clip at the cursor position, to the clipboard Pastes a copy of the clipboard at the current position Allows characteristics of the first clip on the clipboard to be pasted. Erases the selected clip or range Erases the head of the clip at the cursor position Erases the tail of the clip at the cursor position Extends the clip head to use all the recorded audio Extends the clip tail to use all the recorded audio Splits the selected clips into two at the cursor Heals split in audio clips (must be positioned together) Unlinks linked clips Relinks previously linked clips For stereo clips, swaps the left and right channels. Opens a menu of Broadcast Wave commands Cycles clip layers, sending top layer to bottom. Reverse cycles clip layers, bringing bottom to top. Allows the selected clips to be renamed Syncs the selected clips to their record timecode Reverses the audio in the clips Opens a palette of colours for applying to clips. Allows the level of selected clips to be set Inverts the audio phase of selected clips Allows the selected clips to be renamed Syncs the selected clips to their record timecode Reverses the audio in the clips Positions the Sync point in the clip. Can be used for Jumping Page 76 EDITING February 14, 2013 Edit Settings Menu Controls Range On/Off and sets head and tail of range Controls the number of layers affected by edits Turns Razor edit on and off Toggles range selection type between inclusive and exclusive Turns Snap Editing On or Off Defines where clips snap to when mouse editing Defines Jump destination points for speedy project navigation Fade Menu Fades can be applied to clips using the binnacle keys as described in the Chapter on Fades on p.139. It is also possible to apply fades using the Fades Menu. This is located at the top of your Dream II window and looks like this: Uses Playback head location on a clip to guess desired fade Fades to head of Clip(s) Fades to tail of Clip(s) Makes a crossfade at the current position (see page ) Makes a one second overlap by pulling out the head and tail of butted clips Page 77 AUDIOBASE, CLIP S EARCH, CLIPS TORES February 14, 2013 AudioBase, Clip Search, ClipStores AudioBase and Clip Search provide different ways of managing sound effects and clips. AudioBase has database capabilities which make it suitable for large scale and shared sound library capability. Clip Search is more suited to fast storage of clips and groups, and provides searching within the current project and attached library projects. AudioBase AudioBase is a library database which allows you to search for WAV files on your Medialink2 server via a standard Windows network. Once a WAV file has been found, it may be auditioned, and then imported into the current open Project. Creating and Maintaining Databases Refer to the AudioBase3 User Guide for details on creating and maintaining clip databases. Searching for Sounds AudioBase uses a simple search interface to find clips: Step 1 Open the AudioBase window by clicking the Audio Base button in the Toolbar. Audio Base Button Alternatively click View Smart Pane Audio Base. The search field becomes active. Step 2 Enter the text you wish to find and click the Seach button. All relevant database fields will be searched. Use quotes to find whole phrases. An AudioBase search can be stopped by clicking the Search button again. Page 78 AUDIOBASE, CLIP S EARCH, CLIPS TORES February 14, 2013 Placing Sounds In A Project Step 1 After searching the database, a list of matching clips is displayed. Ensure the transport is in ST OP , then use the Up and Down arrows to highlight the clip you want, or simply select one with the mouse. Step 2 Click the Preview button. While Preview is lit, the highlighted WAV file in the list will loop repeatedly, emerging directly in the Monitor output (not connected to any track or bus. You can use the Up and Down arrows to move the highlight up and down the list. Each time you highlight a new clip, it starts to preview. An alternative method gives you more control of the clip’s final position. Step 2A Click the Audition button in the Smart Pane. While Audition is lit, the highlighted WAV file in the list will play as a clip on the current track, while everything else is frozen (if necessary take M1 off line to prevent the video moving). Step 3 Double-Click the selected WAV file to paste it at the playhead on the active track, or drag and drop a clip to any track at any point on the timeline. Notes: Page 79 AUDIOBASE, CLIP S EARCH, CLIPS TORES February 14, 2013 The AudioBase3 results pane can be displayed underneath the Pyxis Track, allowing easy placement of sounds to picture. To hide the AudioBase3 results list, Select a different Smart Pane. Set up your AudioBase3 Server in Setup/General Preferences. Example: http://192.168.1.100/AudioBase/MFX/search_d2.php (Where 192.168.2.100 is the IP Address of your MediaLink2 Server. Entering text in the “Search For” field causes the software to look in all the relevant fields. Entering text in the more specific fields at the right, like Clip Name and Description, confines the search to the fields you have specified. The “Search For” field takes precedence if you have entered text in both places. The AudioBase3 results pane can be displayed underneath the Pyxis Track, allowing easy placement of sounds to picture. Wildcards can be used to aid searches. These include the following: o * stands for one or more characters e.g. dog* means “anything starting with ‘dog’” o ? stands for one character e.g. dog? means “starts with ‘dog’ and contains one more character” o & means AND e.g. *dog* & *cat* means “contains ‘dog” and also contains ‘cat’” o | means OR e.g. *dog* | *cat* means “contains ‘dog” or contains ‘cat’” Clip Search Clip Search is useful for handling clips in your current project, your attached library project, your project Bin and any ClipStores you can access. It does not require any database setup or software. Clip Search incorporates the following capabilities Search for clips by name, within the current project and attached libraries Search within Clip Bins and ClipStores Preview or audition found clips Paste found clips into the project Locate to found clips Pop (change layers of) clips within the project Page 80 AUDIOBASE, CLIP S EARCH, CLIPS TORES February 14, 2013 Export clips Accessing Clip Search To access Clip Search, click View Clip Search While the Clip Search dialog is open you can: Filter the list by typing a sequence of characters in the text box. Only clip names containing that sequence will be displayed. Sort the clips in track order, start order, end order or duration or clip colour, by clicking on the column header. Clicking the header a second time reverses the sort order. Double click any clip to locate to its timecode. Select the Under Playhead checkbox, to display only clips touching the cursor. This is updated as the transport moves. Select the Pop button, to bring the currently selected clip to the top layer on its track. This can be used to manage multiple takes of the same recording, layered on a single track. Select the Only Offline Clips button, to reduce the list to only those clips for which media are not currently available. Click the Reveal File button to display a Windows Explorer window, showing the file containing the media for the clip. Resize the dialog by dragging with the mouse on any of its sides. Page 81 AUDIOBASE, CLIP S EARCH, CLIPS TORES February 14, 2013 Change the order of displayed fields by dragging the field names horizontally with the mouse. Paste the selected clip(s) at the current time by clicking the Paste button, or by dragging one or more clips from the window to the Track display (if multiple clips are selected, they will be placed end-to-end at the destination). What is Displayed By default the window displays clips from the current project. By clicking the various checkboxes you can access your choice of: The current project Attached Library projects (for information about libraries see “Import” on Page 58) Your project Bin (described in the next section) Your Clipstores (described in the next section) You can filter the display in the following ways: Type a sequence into the Search field. The display will show only clips whose names contain the sequence. Select the Under Playhead check box. The display will show only clips touching the cursor. This can be extremely useful for working with multiple takes, for example. Select the Only Offline Clips check box. This can be useful for finding missing clips, by seeing which files they were originally referencing. Clip Bins Every project has a "Clip Bin". This is a place to store clips not being used at the moment. They are copied directly to the Project Bin using Clip Copy Clips to Bin OR Clip Cut Clips to Bin The command will target the currently selected clip(s). If a Range is present, only wholly included clips will be copied. To access them, open the Clip Search dialog as follows: Click View Clip Search Page 82 AUDIOBASE, CLIP S EARCH, CLIPS TORES February 14, 2013 In the Clip Search dialog there is a checkbox for Bins. When this is checked the dialog shows all the clips in the Bin, which can be auditioned, previewed and pasted in the normal way. Note: the Bin can only be seen by the project from which it was created. ClipStores ClipStores work in a similar way to Bins, but can be located anywhere on your network, and are accessible to all users. ClipStores can be created at any time using: File New Clipstore Clipstore files have the extension .CLIPS. To open a ClipStore, use: File Open Clipstore and browse to the file you want. The project remembers which ClipStores have been used recently these can be accessed via the File Menu also. Multiple ClipStores can be opened at the same time, and by multiple users. To place clips in a ClipStore, select them then use: Clip Publish Clips to Clipstore While this dialog is open, you can choose which of the open ClipStores to target. If you have selected multiple clips, you can save them as a Grouped Clip, and give them a name. If your ClipStore is to be shared on a network, the Publish Media as Well checkbox should be used, so that the media is placed in the appropriate folder under the ClipStore file. This will allow users from anywhere on the network to audition and paste the audio. Multiple users can publish at almost the same time to the same ClipStore. Because the clip metadata is very small, the ClipStore is only opened for Write for a short time, making clashes between users relatively unlikely. If a clash occurs, the later publish command will be held off until the earlier one is finished, which will hang the late-publishing system for a short period. To access audio from an open Clipstore, open the Clip Search dialog in one of the following ways: Click View Clip Search In the Clip Search dialog there is a checkbox for each open Clipstores. When this is checked the dialog shows all the clips in the selected Clipstores, which can be auditioned, previewed and pasted in the normal way. Group Clips can be auditioned and pasted as well. This allows the possibility of collecting complex effects into the Clipstore and reusing them at any time. Preview from Windows Explorer Audio files can be previewed directly from Windows Explorer. To do this, click: File Import Audio File(s) This allows you to open up a custom Explorer window allowing Preview, Auto-Preview (click and hear) and Audition of individual audio files on the Windows file path. You can then either drag/drop multiple files directly to the timeline, select Paste to place the selected media at the playhead, or select Import to place the media at the playhead and exit the dialog. This is only available in Windows 7. Page 83 AUDIOBASE, CLIP S EARCH, CLIPS TORES Page 84 February 14, 2013 GROUPING February 14, 2013 Grouping Introduction Grouping is a fast and convenient method of controlling more than one signal path from a single fader or parameter control. There are two types of groups: Link Groups and Edit Groups. Link groups are designed for controlling groups of feeds in multichannel formats. Link groups simplify many tasks associated with working in surround formats and share many of the operational features of surround format buses. Link groups can include up to eight members. The simplest link group has two members and fulfils the function of a stereo channel. Fader Groups are similar to other VCA or DCA grouping schemes and allow a master fader to control a group of signal paths. Fader Groups can include any number of members. Summary of Groups Type Member Type Master Fader Selection to Channel Panel Stem Structure Fold on Creation Link Group Live Feed or Track Feed Link Group Master - level equal to first member. Select Master Yes Yes Fader Group Live Feed or Track Feed Fader Group Master Fader Group menu key and soft Speaker Set key No No Link Groups Link groups allow the control of up to eight feeds with one fader. They can only include track feeds or live feeds, not a mixture of both. Link groups can be created in any standard multichannel format, or without any format. Link Group Format When a link group is created, you have the option to apply default pans. If you do this, the number of members determines the format of the link group. If default pans are selected each member of the group is panned to one element of the system bus that has the same number of elements. Normally the factory bus formats are used, and this works out as follows: If 2 Feeds are linked, they are panned L R. If 3 Feeds are linked they are panned L C R. If 4 Feeds are linked they are panned L C R S. If 5 Feeds are linked they are panned L C R LS RS. If 6 Feeds are linked they are panned L C R LS RS B. If 7 Feeds are linked they are panned L C R LS CS RS B. If 8 Feeds are linked they are panned L LC C RC R LS RS B Page 85 GROUPING February 14, 2013 Link Group Features Linking feeds in link groups has the following effects: Step 1 Selecting one member selects the entire link group. There is only one fader for the group. When the group is created, the group master fader adopts the level of the first fader in the group. When the fader is adjusted, the member’s fader levels are offset by the amount the master fader is moved in dBs. When a group is created the master pan control is centred. The Spread and Rotate controls become active when the link group master is called to the Master Fader. These pan parameters offer unique and flexible panning controls to multichannel link groups. See “The Spread Control, below. Click Mixer Link Groups The Link Group Window appears on the screen above. Feeds that currently belong to link groups are shown with yellow links. Step 2 Select the first feed of the group. Its key lights up, and all other buttons are dimmed, except for 7 before and 7 after the one you selected (maximum 8 feeds per group). Step 3 Click one of the feed selection keys to make it the last feed of the group. Link groups can only include track feeds or live feeds, not a mixture of both. Link groups can only include up to eight members, which must have contiguous numbers e.g. 3 to 10. Step 4 Select one of the following options: all defaults applies pan settings to each member to set the link group into a surround format as described above under “Link Group Format”. All defaults also applies the feed parameter values of the first member of the group to all the members. Parameters modified are fader level, pan, EQ, dynamics, aux sends, inserts and direct out state. default pans applies pan settings to each member to set the link group into a surround format as described above under “Link Group Format”. Default pans affects the pan parameter only. feed params applies the feed parameter values of the first member of the group to all the members, excluding pan. Parameters modified are fader level, EQ, dynamics, aux sends, inserts and direct outs. no defaults no feed parameters are modified. Page 86 GROUPING February 14, 2013 Link Group Display If composed of Track Feeds, a Link Group is shown in the Editing Screen like this. Double-click here to collapse or expand the linked tracks. You can collapse linked tracks down to the width of one track by double-clicking any of the linked tracks, close to its left side. Do the same thing to expand them. Destroying a Link Group Link groups are destroyed from the Link Group window: Step 1 Click Mixer Link Groups The Link Group Window appears on the screen above. Feeds that currently belong to link groups are shown with yellow links. Step 2 Select a Link Group. Step 3 Select unlink. Panning Link Groups When a Link Group is the Current Path, the pan controls act on each Link Group member at the same time. The system maintains a Spread Box for each Link Group, which affects panning behaviour. Page 87 GROUPING February 14, 2013 Link Group with default panning. Spread box is set to maximum size, so Link Group members are panned as wide as possible. Spread box is set to 70%, so members are brought inwards. Now the whole Spread box can be moved LR and FB. The Spread Control The spread control is only available when a link group is selected. The spread control adjusts the perceived size of a surround mix. The spread control range is from 0 to 100%. At 0 the display reads POINT, meaning point source. At 100 the display reads FULL, meaning full surround. At FULL spread the Page 88 GROUPING February 14, 2013 LR and FB pan controls have no effect as each member of the link group is hard panned to their respective bus elements. As the spread is reduced, the panning of each link group member is made to converge with the location of the link group master pan control. With the spread control less than full, the pan control enables the sound field to be moved to favour the location of the pan target. As the spread control approaches POINT, the panning of each member becomes closer to the pan location of the link group master. This has the effect of mixing the signals of each link group member so that they all emerge from the same loudspeakers as determined by the link group master pan. When a link group is created with default pans, spread is set to maximum, divergence is set to minimum and rotation is set to zero. The spread control can be used to great effect when it is desired to collapse the surround sound field to a point source. This may occur for instance, where the camera moves continuously from an interior shot to an exterior or visa versa. The surround field can be established for the interior and then as the camera moves through the door or window, the surround field collapses and pans and fades down to the location of the window. As this is occurring a pre-mixed surround field for the exterior can be growing from the rear speakers and spread out to the entire speaker system as the exterior shot is established. Fader Groups (VCAs) There are 32 VCA-style Fader groups on SOLO. Members of a Fader Group have their fader levels controlled by a Master, and can also be accessed individually to set relative levels within the group. Control Faders in a group are controlled relatively by the Group Master fader. To do this, you must either: Add the Group Master to a fader set. CALL the Group Master, then control it with the Pad Level control. To call the Group Master, click on its Name Plate on the SOLO Mixer Screen. Use the mouse directly on the Mixer Screen, by moving the Group Master faders. Page 89 GROUPING February 14, 2013 Displaying Group Membership The SOLO Mixer Screen screen always displays VCA group membership, as shown below. Assignment to Fader Groups Global Assignment Fader Group membership can be controlled globally using the Grouping Window. To open this, Click Mixer VCA Assign Page 90 GROUPING February 14, 2013 To use this window: Step 1 Select a VCA group at the bottom of the window. Step 2 Toggle signal paths in and out of the group. Step 3 Use Page Up and Page Down to access more Tracks and Live Feeds. Step 4 To close this display, type SHIFT+ctrl+V again or esc, or right-click on the window. Assignment from the Virtual Channel Membership of fader groups can also be controlled in the Virtual channel, which is accessed by rightclicking a channel tile in the Mixer screen. Page 91 GROUPING February 14, 2013 Click here to change the Fader Group of the called channel. Zero means no Fader group membership. Naming a Group Groups are named the same way as other signal paths, using the Name Path function (see page 27). Calling a Group Master Group Masters are shown in the path displays in #NAME when called. To CALL a Group Master, do one of the following: Click its name on the Mixer Screen. If not visible, scroll the mixer screen. Note: a Group Master is only visible if its group has members. Page 92 MIXING February 14, 2013 Mixing Introduction This chapter describes everything you need to know about mixing in the SOLO system. The informa tion is organised in sections as follows: Bussing – types, formats, assignment Signal Processing using Tactile controls Screen Mix Controls Inserts and Direct outputs Faders Preset Library Bussing Definitions Bus – a mix destination where many channels are summed in desirable proportions. Bus Format – the number and order of outputs that a Bus addresses. Typically the format matches that of a speaker set in the final listening environment. Common format examples include Mono, Stereo and 5.1. Newer 3D formats can also be addressed. SOLO provides all the commonly used formats ready to go. You can also create custom formats for special speaker sets, and the #NAME panning system will follow your instructions for distributing energy between the speakers. SOLO can also be licensed to allow 3D formats. In this case you would set speaker positions including a Down-Up parameter for the third dimension, and the system will display and enable a set of Down-Up pan controls. Bus Element – one output from a Bus e.g. Left or Center. Buses may have any number of elements up to 24. Note: the SOLO Monitoring system has eight channels, so buses with more than eight elements must be monitored using special control setups. The system provides a fixed number of elements e.g. 54 or 72 depending on your operating licence. These elements are consumed by the buses according to their format e.g. a Stereo bus uses two elements, while a 5.1 bus uses 6. Bus Types SOLO supports four types of buses. MAIN The main mixing destination for the system, often used to create the final product of a project. Cannot be turned off. Page 93 MIXING February 14, 2013 Sub-Buses 1 to 8 Sub Buses are extra buses to which channels can be assigned. In turn, they can be assigned to feed into the Main bus. Fader send the same levels to all Subs and Main at the same time. Auxes 1 to 12 Aux buses are typically used to create independent mixes for effect sends and for headphone mixes. The sends to these buses are controlled from each channel, and can be sent pre/post fader – also pre/post mute. Auxes can take any available bus format. For details, see Setting Bus Format below. Multi-Track (MT) MT buses were created to allow traditional multi track tape bussing. There can be up to 24 of them, and their format is either mono or off. This guide shows you how to set formats for your buses. Note: The total number of bus elements is finite! Setting Bus Format Use the Bus Format Dialog to set all Bus Formats, including Bus Reduction, as explained below. The Bus Format Dialog The Bus Format Dialog is used to set all Bus Formats. To display it click Mixer Bus Format in the menus above the Edit Screen. The Bus Format dialog lists only buses with non-zero format i.e. buses in use. Page 94 MIXING February 14, 2013 You can add a Sub Bus or Aux bus by clicking in the Add group, or by selecting an existing bus and clicking Duplicate – this will create a new bus with the same format. Format is set using a dropbox in the Format column – the Width column is a read-only indicator of how many elements are used by each bus. Click the Bus Assign button to open the Bus Assign dialog. To use Bus reduction, click the Reduce checkbox on any Sub bus. Custom Bus Formats You can create new Bus Formats as follows: Step 1 Exit from the SOLO software Step 2 Open the Fairlight Setup Utility by clicking Start and then typing “setup” into the edit box, then select Fairlight Setup Utility from the list of matching applications. Step 3 Click the Bus Format tab. The Bus Format tab shows all the currently available formats in your system. The “factory” Page 95 MIXING February 14, 2013 formats are shown in grey, and cannot be edited. Clicking on an element, as shown above, displays its position in 3D space as a red square, with numerical equivalents below. Step 4 To create a new format, press Add (creates a blank format) or Duplicate (creates a copy of the selected format, which you can edit). In this case, we select the factory 5.1 format and click Duplicate. Step 5 Double click the name of the new format (which appears as 5.1(D) for duplicate) and edit it to read 5.1 (SMPTE). The SMPTE 5.1 format requires a different element order from the factory 5.1 format (based on Dolby). Step 6 Click on the Centre Element Page 96 MIXING February 14, 2013 Step 7 Click the Down button until the Centre element is in the correct position (below Right) Step 8 In the same way, move the Boom element to its correct position (below) Centre Step 9 Click Save When you restart the SOLO software, the new Bus Format will appear in the Bus Format dialog. Note: The DU (Down-Up) parameter cannot be altered unless you have purchased a 3D licence from Fairlight. Bus Assign Overview Assigning a path to a bus means sending it to that mix destination. Every path in the system has separate assignment to Main and each Sub Bus, meaning that you can choose which paths go to which buses. Bus-to-bus assignment is limited. Sub-Buses and Aux Buses can be assigned to the Main Bus, but not to each other. Main and MT Buses cannot be assigned to any other bus. To display the Bus Format Dialog click Mixer Bus Assign. The Bus Assign Screen The Bus Assign screen is operated with the mouse. Page 97 MIXING February 14, 2013 Select a destination bus at the bottom of the screen (in the picture, Sub 1 is selected). Each path already assigned to that bus is highlighted (tracks 88 to 90 are highlighted). Each path shows the buses to which it is currently assigned. Note: all Aux Buses and Sub Buses can now be assigned to Main bus. Click any path to toggle it on or off the destination bus. To toggle multiple paths, click and drag the mouse over them. Page 98 MIXING February 14, 2013 Use Page Up and Page Down to reach more paths. Sub-Buses are at the bottom of the second page. They are grayed out unless Main is the selected destination. Assigning Subs to Main (this picture is distorted to save space). Choosing Your Mixer Screen In V3.0 software, Fairlight software gained a new mixer screen. By default it is displayed in preference to the old one, but you have a choice. The old screen is called FMC, and the new one is called EVO Mixer Screen. V4.0 software enables this new mixer screen by default; however it can be specifically enabled or disabled from within the Themes setup dialog in: Setup General Preferences Themes To enable the Evo Mixer Screen, ensure that its checkbox is selected, and choose the desired monitor using the Monitor Index drop list. The monitor can be the same as your Editing Screen, but this can be inconvenient. Be very careful not to choose the screen used by the SOLO Center Section – this is awkward to reverse. Use the Identify button to show the monitor numbers on the physical screens. These may not be the same numbers shown in the Windows Screen Resolution dialog. Now you may restart Dream II. If you choose EVO Mixer Screen, it will appear on the nominated monitor. EVO Mixer Screen was originally designed to work on a 1600 x 900 monitor, displaying 40 faders. If your monitor is taller than 900 pixels, the faders will be taller, but everything else will look the same. If it is narrower or wider than 1600 pixels, it will display fewer or more faders. Page 99 MIXING February 14, 2013 The EVO Mixer Screen Automation section Bus Faders and meters Channels Channel Scroll Bar The EVO Mixer Screen shows only those Live Feeds which have inputs patched (plus one more ready to patch). Similarly VCA Group faders are shown only for groups with members. Scrolling Scrolling of the mixer screen can be done by: Dragging the Scroll Bar with the mouse Solo, Mute, Arm Soloing, muting or arming a succession of channels can be done quickly as follows: Step 1 Click on the arm, mute or solo button of the first channel Step 2 Drag the mouse to the right or left to toggle the other channels. You do not need to do this accurately, as the horizontal position is the only criterion for choosing. Page 100 MIXING February 14, 2013 Bus Meters The Bus Meter section shows all busses with non-zero format (see Bus Format on page 94 to learn about changing this). As you add busses to your project, the meters become thinner to accommodate them. Page 101 MIXING February 14, 2013 Plug-ins Single click bypasses plug Double click opens screen GUI Right click opens plug-in Config window Insert Single click toggles insert Input Double click opens Patch I/O Aux Sends Double click opens Aux Zoom page EQ Single click toggles EQ in/out Double click opens EQ Zoom page Dynamics Double click opens Dyn Zoom page Pan Single click toggles Pan on/off Double click opens Pan Zoom page Bus Assign Single click on Main or any Sub-bus to toggle assignment Arm Single click toggles Arm Solo Single click toggles solo Mute Single click toggles Mute Channel Name Single click to select as current Double click opens Virtual Channel Fader Level Channel System Name Shows the number of the track, live, bus or group. Link group numbering is shown. Fader Set level with mouse Double click to set 0 dB Colour indicates automation status Channel Meter Link Group metering is shown Page 102 MIXING February 14, 2013 Pan Clicking on the Pan display toggles Pan Defeat in and out. When Pan Defeat is on, the red and yellow indicators disappear. The column at the left represents Boom level. It is brighter when on and darker when off. Double clicking on the Pan graph brings the Pan Zoom display to the screen. EQ Clicking on the EQ display toggles EQ in and out. When EQ is out, the graph line goes dull grey. Double clicking on the EQ graph brings the EQ Zoom display to the screen. Dyn The blue lines on the Dynamics display indicate Limiter (at the top) Compressor (in the middle) and Gate/Expander. It is possible to have all of them on. Double clicking on the Dyn graph brings the Dyn Zoom display to the screen. Aux The Aux graph shows only sends for Aux buses with non-zero-format. The bars represent the amount of level being sent to the active aux buses. Where the send is muted, the bar is dark, as shown at left. Double clicking on the Aux graph brings the Aux Zoom display to the screen. Page 103 MIXING February 14, 2013 The FMC (Old Mixer) Screen Live Feed tiles “Called” channel Main bus Sub-bus tiles Track Feed tiles Aux bus tiles Group tiles Automation Fat Channel Tiles A Tile shows basic information about the Feed it represents. Bus tiles show only fader information. Track Feed and Live Feed tiles display more information, and provide control for a group of functions, as shown below. Page 104 MIXING February 14, 2013 Dynamics In (indicator only – appears when any dynamics present) Click here to cycle the display between Pan, EQ and Dyn Solo ON / OFF Mute ON / OFF Fader Control Click here to add this channel to the MultiTrim group (the number goes red) Insert IN / OUT EQ IN / OUT Called Channel One channel can be controlled in detail. It is the “Called” channel. In the picture above, it is Track 6. To call a channel from the mixer screen, simply click on its tile, or operate any of the controls inside it. You can also call a channel using the CALL menu. Track Feed and Live Feed Channel Tiles Each Track and Live Feed is represented with the track name and fader level, plus indicators for EQ, dynamics, insert, solo, solo defeat, and mute. The parameter window within each channel tile provides a condensed display of the current settings of the Channel Panel for EQ, dynamics or pan. Click in the window to cycle around these three display options. EQ – a graph displays the EQ transfer response. Dynamics - a simplified transfer function for compressor, limiter, expander, gate, and the various combinations of these can be displayed. Page 105 MIXING February 14, 2013 Pan - a miniature display of the pan surround field with the red pan position is displayed. The pan position changes in real time. Buses The fader levels of the Main, sub and auxiliary buses are displayed. Signal level meters for the Main bus are also displayed. Fat Channel The Fat Channel provides a detailed display of the signal processing and routing for the called channel. Its only control functions are the fader and the Pan dot, while the other graphics are for display only. Right clicking in the EQ, DYN or PAN sections causes display of the Zoom panels. See below. The Fat Channel shows a detailed display of the parameters for the currently called signal path. A signal path may be a mono live or track feed, a bus or a multichannel surround format link group which can be selected and modified from a single set of controls. The user and system names of the signal path are displayed at the top left. The input box at the left of the signal path, indicates the format or element name of the path and the user name and system name of the physical input from which it is patched The input meter shows the signal level at the input of the signal path. If a track feed is selected, the input fader level is shown. The EQ display shows a graph of the equaliser response. The dynamics display shows the composite transfer function of the entire dynamics section. The display also includes gain reduction signal meters for all three sections. If the dynamics are switched IN the graph is highlighted, if switched OUT the graph is dimmed. The insert send and receive I/O patching is displayed. If the insert is switched IN the insert display is highlighted, if switched OUT the display is dimmed. The main fader level for the signal path is displayed with a numeric display of the fader gain. This is an active control. The direct out level, pre/post status and output patching is displayed. If the direct out is switched ON the direct out display is highlighted, if switched OFF the display is dimmed. The direct out level is shown with a horizontal bar. If the direct out is switched ON the bar is yellow, if switched OFF the bar is violet. The section of the bar above 0dB of gain is shown in red. Page 106 MIXING February 14, 2013 The Auxiliary bus display shows the status of each aux send. The send level is shown with a horizontal bar. If the send is switched ON the bar is yellow, if switched OFF the bar is violet. The section of the bar above 0dB of gain is shown in red. The pan display offers a sophisticated representation of the signal path panner. The display always shows a 5.1 sound field as the panning information for any path can be applied to any format bus to which it is assigned. The red circle indicates the current pan position. If a link group has been called, the pan display shows a red circle for the pan position of each member and a yellow circle for the position of the virtual link group master. When diverge is applied, a white circle represents the perceived image size. When a bus is called, the output box displays the output patching, showing each bus element and the user and system names of the physical outputs to which they are connected. Additional Mixer Screens Mouse Control Every switch and control in the Mixer Screen may be changed using mouse clicks. For switches this is simply a case of clicking on them to toggle their values. For faders, the “knob” must be clicked and dragged up or down. While you are doing this, the current value is displayed. For rotary knobs, as in the EQ Zoom panel shown below, first click and hold near the center, then drag the mouse in a ring around the knob. A tooltip shows you the current value. Click the up/down buttons for fine change. Box shows the current value. Click here. Then drag the mouse around the knob. Hover over any knob and use the mouse wheel to change its setting. Double-clicking on any fader, gain or aux send knob sets its value to 0 dB. Mouse Wheel Control The mouse wheel can be used to control knob and fader settings. This behaviour must be enabled first. Step 1 Step 2 Access the System Variables display by holding down Shift and Ctrl then typing U. In the Mouse Control group (right side of dialog box) enable Use Mouse Wheel. The Mixer Screen must be in focus – if the Editor Screen is in focus, the mouse wheel causes zooming of the tracks. To get the Mixer Screen in focus, simply click anywhere on the screen. For mouse wheel control of any fader or rotary knob, in any of the Mixer Screen displays, hover the mouse pointer over the control and turn the wheel. Page 107 MIXING February 14, 2013 For fine control, hold down the SHIFT button while turning the mouse wheel. Virtual Channel All other functions can be controlled using the DREAM II Virtual Channel, shown below. Click on any switch to toggle it. Click on any knob and drag around it to change its value. Hover the mouse over any box or knob and use the mouse wheel to change its value. Click and drag the fader. Click + and – to change channels. To open the Virtual Channel, double-click a channel name in the EVO Mixer Screen screen. In the above example, we have selected Track 8. To close the Virtual Channel, right click anywhere inside it. While it is open, you may move to the next or previous channel by clicking the + and – buttons next to the channel name. Click to select next or previous channel Page 108 MIXING February 14, 2013 Input Section 48 V and Mic Control Used for Fairlight Mic preamps Recording Section Available only when a track is the current channel. Arm means ready to record – press this button only if there is an audio source patched to the current track. Thru means the track will monitor its input, but will not respond to a record command. The Thru state makes the track equivalent to a Live Feed. Press the Thru button only if there is an audio source patched to the current track. Rec Level controls the level going to the Disk before recording. It does not affect the track when in Thru mode. Trim controls the level as the channel enters the mixer. For tracks this is after coming back from Disk, and does not affect level being recorded. Phase flips the audio phase at the input to the mixer. It does not affect the signal being recorded on a track. Direct Send and Insert Direct In toggles the Direct Output on and off Pre toggles the Direct Output pre and post the main channel fader Level controls the level going from the channel to the Direct Output Note: Direct outputs are only heard if patched to a physical output, or to the input of another path. This is done in the Patch I/O screen (press the Patch I/O button). Insert In controls the Insert Return only. When In, the channel listens to its Insert Return, otherwise the Channel listens to the straight-through path. The Insert Send, on the other hand, is always active (though it must be patched somewhere before it can be heard). Note: Insert sends and returns are only heard if patched to physical outputs / inputs, or to other paths. Sends can be sent to the input of any path in the system, and returns can come from the output or send of any path. This is done in the Patch I/O screen (press the Patch I/O button). Page 109 MIXING February 14, 2013 Panning Dream II supported surround formats are: Stereo; LCRS, LCRSS; 5.1, 6.1 and 7.1. Panning IN / OUT Boom send ON / OFF While operating the pan controls, the Pad gives a visual representation of the pan position and divergence. A complex example is shown below. Panning of 6-way Link Group showing Rotation and Divergence Basic Panning Use the L-R and F-B controls for basic panning. If the Main Bus format does not have surround channels, the F-B control will still be shown, but will do nothing. Spread Only available when a link group is selected. The spread control adjusts the pe rceived size of a surround mix. Diverge Spreads the signal of an individual feed across more of the adjacent loudspeakers, making the perceived size of the sound source larger. Rotate Rotate controls the left/right and front/back pan control to rotate the surround mix around the centre of the room. Boom Sending level to the Boom channel can be done pre or post fader. Page 110 MIXING February 14, 2013 Equalisation Lo-Pass Filter or Low Shelf Hi Shelf Parametric EQ (bandpass) Lo Shelf Hi-Pass Filter or High Shelf EQ Type Gain Compensation EQ IN / OUT The channel mixer provides four bands of parametric equalization and two filters. Each parametric section can be switched in or out independently. The Hi and Lo Pass filter sections can be switched to shelves using the mouse wheel. The parametric bands can be switched between Bell, Lo-Shelf, Hi-Shelf and notch using the mouse wheel. Their frequency ranges can also be switched between Low, Low -mid, High-mid and High. EQ Type Clicking the + or – buttons changes the EQ display to show different types of controls. There are four types available, each with its own sound. Page 111 MIXING February 14, 2013 Dynamics The Dream II Dynamics comprises three sections, compressor, limiter, and expander or gate. Make-up gain Sidechain In/Out Linking for Buses and Link Groups Compressor IN / OUT Limiter IN / OUT Gate/Expander IN / OUT Toggle Expander or Gate Each section has an independent IN / OUT control. All three may be active at the same time if required. The transfer function of the dynamics is shown in the Mixer Screen channels and the Dynamics Zoom screen. Page 112 MIXING February 14, 2013 Aux Sends Satellite-AV provides 12 aux sends. Each send from each channel has an independent Pre/Post switch and In/Out control. Aux 2 send IN / OUT Zoom Panels It is possible to see more detail when adjusting EQ, Dynamics and Pan control, using Zoom Panels. In particular, numeric values for all parameters are shown, and update as they are changed. To display a zoom panel, do one of the following (it will stay on the screen until removed): Double click a graph in the SOLO Mixer Screen screen. Page 113 MIXING ##NAME Mixer Screen – Double-click Right click the corresponding display in the FMC Fat Channel. FMC – Right-Click Double click a graph in the SOLO Mixer Screen screen. To remove the current zoom panel from the screen, do one of the following: Right-click the Zoom Panel Click the Close box in the upper right corner of the Zoom Panel Page 114 February 14, 2013 MIXING The Equalizer Panel The Dynamics Panel Page 115 February 14, 2013 MIXING The Pan Panel Use the mouse to move the red dot around the pan field. The 3D Panner There is also a 3D display for pan, as shown below: Page 116 February 14, 2013 MIXING February 14, 2013 The yellow ball is used when a Link Group is displayed. It can be moved with the mouse. The third dimension controls (D-U and Distance) have no effect on the audio in this version of software. To enable the 3D panner, open the System Variables dialog: Step 1 Type ctrl + Shift + U The System Variables dialog box is displayed. Step 2 Select the 3D Panner checkbox Step 3 Close the System Variables dialog Page 117 MIXING February 14, 2013 The Video button toggles the Pan Theatre. Having enabled it here, open the Pyxis Window to use the Pan Theatre. The Pan Theatre The Pan Theatre offers a combination of the 3D panner with the Pyxis window, as shown below. This allows you to adjust surround panning directly in front of the pictures. You can use the mouse to move the yellow or red balls, or use the regular panning controls and joystick. Page 118 MIXING February 14, 2013 The Aux Panel Processing Order Overview The Path Order Menu allows you to change the order of the Equaliser, Dynamics and Insert Point in any Track or Live Feed. To use this: Step 1 Select the source path. Step 2 Type Shift+Ctrl+I. Repeating this sequence cycles through all six ways of ordering Insert, EQ and Dynamics. The FMC2 screen changes to show the order. Path Order I>E>D Path Order D>E>I Path Order D>I>E Page 119 MIXING February 14, 2013 Path Copy Overview Path Copy allows you to copy all or part of the settings from one path to another. It works by first copying the all the settings from a source path into a clipboard, then pasting the desired parts into a destination path. To use Path Copy: Inserts Overview There are two types of inserts available in the #NAME software. The first is a “physical” insert, where a signal exits a channel, undergoes some external treatment, then comes back into the same channel. The second is a “Plug-in” where the same thing happens, but using software running within the original channel. Toggling Inserts Both types of inserts can be switched on and off as follows: Use the mouse to click on the Insert button in the EVO Mixer screen. Setting Physical Inputs and Outputs for Inserts The Insert points in any channel are available in the general patching system. Patching is covered in detail in Patching Signal Paths, page 28. Note that Insert Sends and Returns may be patched to other channels within the #NAME system, not only sent to physical outputs. Plug-ins are described in detail in the Chapter Plugins and Rewire, page 139. Direct Outputs Overview Most channels, particularly Tracks and Live Feeds, are assigned to buses where they are mixed with other channels. A Direct Output is an additional feed of a channel signal path, that can be patched anywhere you like, in addition to its normal output to buses. The Direct Output can be sent pre or post fader, and may have its own independent level offset and mute. Direct Output levels are controlled in the Path display. Setting the Destination The Direct outputs in any channel are available in the general patching system. Patching is covered in detail in Patching Signal Paths, page 28. Oscillator The system oscillator has three channels: Tone Page 120 MIXING Noise (switchable between White and Pink) Beeps (used by the ADR program) February 14, 2013 Each of the channels can be routed to a different point in the patching system. The Tone and Noise outputs are both toggled on together, while the Beeps are turned on and off independently by the ADR program. The Tone and Noise channels use the same Level control (see below). The settings for Beeps are controlled by the ADR program. To access these settings, click on the menu item ADR ADR Preferences The oscillator is controlled using the System Variables dialog. To open this, type: Shift+Ctrl+u Use this dialog to set the oscillator frequency and level, and to toggle it on or off. If you are using the Noise channel, you can toggle it between White or Pink spectrum characteristics. Click OK to accept your changes, or Cancel to close the dialog without changing anything. To route the Oscillator or Noise Generator to any system destination, use the Patch I/O page. Step 1 Click the Patch button in the toolbar to access the Patch I/O page. Step 2 Select the Osc button at lower left, then the desired channel at upper left. Step 3 Use the Category buttons at lower right to select a type of destination channel. Step 4 Select one of the channels in the chosen category at upper right. Step 5 Click the Patch button. To route it to a Bus, first patch it to a Live Feed or Track (and arm the Track), then assign the Live or Track to the desired destination Bus. Page 121 MIXING February 14, 2013 The Library Introduction The Library provides storage for Equaliser, Dynamics, Plugins, whole Channel presets or complete SOLO snap shots. Up to 100 of each type of preset can be stored. These presets can be recalled and applied to any signal path in any project. To access the Library menu, click Mixer Library. Select the preset type by pressing the chan EQ, chan dyn, all chan or all console soft key. Select the library function by pressing the Save, Load or Delete keys. The presets and functions are described below. all chan means all the parameters in the currently selected signal path. The Library page is shown above, with EQ selected. The EQ presets are shown in the upper left section of the window. Presets Equaliser A library of 100 equaliser settings is provided. Each equaliser preset stores all the parameter settings of the equaliser section on the signal path currently called to the Master fader. Click the EQ button on the Library page to select equaliser presets. Page 122 MIXING February 14, 2013 Dynamics A library of 100 dynamics settings is provided. Each dynamics preset stores all the parameter settings of the dynamics section on the signal path currently called to the Master fader. Click the DYN button on the Library page to select equaliser presets. Plug-In A library of 100 Plug-in settings is provided. Each preset stores all the parameter settings of the Plug-in section on the signal path currently called to the Master fader. Click the Plug-In button on the Library page to select equaliser presets. Channel A library of 100 channel settings is provided. Each channel preset stores all the parameter settings on the signal path currently called to the Master fader, excluding I/O patching. ALL Console A library of 100 Console settings is provided. Each Console preset stores all mixer parameters for all feeds and buses. All patching, routing and name settings are also stored. Default Console Template A special Console library file named default is used to store the default setup of the SOLO on power up. You may overwrite this file with any setup that suits your requirements. Saving a Preset Follow these steps to save a preset: Step 1 Click Mixer Library to display the library menu and screen page. Step 2 Click the chan EQ, chan dyn, all chan or all console button to select the type of preset you wish to save. Step 3 Click the Save screen button and type a new name for the library preset. The previously entered name is displayed by default. To remove it, press the DEL button. Step 6 Click OK to save the preset or Cancel to cancel the operation. Loading a Preset Follow these steps to load a preset: Step 1 Click Mixer Library to display the library menu and screen page. Step 2 Click the chan EQ, chan dyn, all chan or all console button to select the type of preset you wish to save. Step 3 On the screen, click the preset you wish to load. Step 4 Select the destination signal path(s). Step 5 Click the Apply button. If you choose an all console preset, it doesn’t matter which signal path is selected, because the whole console will be loaded. Page 123 MIXING February 14, 2013 Deleting a Preset Unwanted library presets can be deleted by following these steps: Step 1 Click Mixer Library to display the library menu and screen page. Step 2 Click the chan EQ, chan dyn, all chan or all console screen button to select the type of preset you wish to delete. Step 3 Click the library preset you wish to delete. Step 4 Click Delete then click OK to confirm the operation. Page 124 AUTOMATION February 14, 2013 Automation Introduction The SOLO automation system provides simple, flexible and comprehensive facilities for recording and editing mix automation data. All feed and bus mix parameters can be automated and played back i n perfect synchronisation with the project audio. In addition to the channel parameters, bus assignments, inserts and direct outs may also be recorded. The SOLO automation system is designed to allow the operator to record all the static and dynamic parameter changes involved in balancing the mix of tracks played back from the disk recorder and live feeds from external sources. Mix moves may be recorded on one or more parameters or channels at a time. More moves may be added with each pass, resulting in complex and detailed mixes that can be played back identically every time the project and mix are loaded. This chapter does not cover basic operation of the mixer. Refer to the chapters on “Patching and Routing”, “Faders”, “On-Screen Mixing” and “The InLine Panel” for a complete overview of mixer operation. “Automation Basics” below provides an intro to the fundamentals of the automation system. Example procedures are detailed later in the chapter. Automation Basics Write, Trim and Read In Automation, we use the terms Write, Trim and Read. Write means to record absolute values of parameters. Trim means to record changes to stored values of parameters. Read means to play back the parameter values that have been written. The word “record” is used in this chapter to mean “Write or Trim”. The Mix Item A mix item is one parameter for one signal path. Examples are: Track 47 – Main Bus Fader Level Live 11 – EQ Band 1 Q-factor Sub Bus 2 – Mute There are literally thousands of mix items in the SOLO system. The automation system can write the changing values or states of every mix item over the duration of your project, and read it starting at any position. These written values and states are called mix automation data. Mix ON When the Mix ON key is OFF, all mixing and routing functions are manually operated and the mixer will not write or read automation. When the Mix ON key is ON, all mix items for which automation data is written will read that data, and the user has no manual control of them. Mix items with no written automation data can be manually controlled by the user. In addition, most automation functions are hidden until Mix On is turned ON. To toggle Mix On, you may do any of the following: Page 125 AUTOMATION Click the Mix On button above the Mixer Screen Click the Mix On button above the Edit Screen (Solo Theme only) February 14, 2013 Note: In all methods described below, it is assumed that Mix On has been selected. Mix Duration The automation data for a project starts at a timecode location one frame after timecode midnight and finishes one frame before midnight. However, the system requires a minimum preroll of at least one second and it is advisable to start projects at a location of at least one minute after midnight to provide adequate preroll. Static Snapshots Project Snapshot Every project contains a snapshot of the state of the mixer when the project was last closed. When a project is opened, the mixer state is updated and all parameters are recalled. Mix Snapshot Every saved mix contains a snapshot of the state of the mixer when the mix was saved. When a mix is loaded the mixer state is updated and all mix items are recalled. So it is not necessary to write automation data for non-critical items – they will be reset to their correct static values when the mix is loaded. A large number of complete mixes can be saved within a project. How to Use Automation Using Screen Auto Buttons Automation is entered using Auto buttons, as shown below. The following steps will get the system into Write or Trim, depending which is selected in the Automation Pane. Write/Trim toggle Step 1 Enable parameter(s) – see Enable Parameters below Step 2 Click Auto on one or more Faders – this puts them into WRITE (or TRIM – see below). There are Auto buttons in the Edit Screen and the Mixer Screen. See pictures below Page 126 AUTOMATION February 14, 2013 Auto Buttons Auto Buttons Step 3 Click Play to move the transport – automation data starts writing Step 4 Click Stop – automation stops writing and Auto buttons are extinguished Using Touch – Snap Works on any displayed signal path. Step 1 Click the Touch button in the Edit screen until Snap is displayed Touch Button (shown Off) Step 2 Enable parameter(s) – see Enable Parameters below. Step 3 Press Play to move transport Step 4 Touch (or click) and move the control of any enabled mix item – it enters record and starts writing automation. Step 5 Release the control – it leaves record. The mix items that will be recorded are only those you have touched, and only while you were touching them. Notes: Page 127 AUTOMATION Only enabled mix items can be written by this method. See Touch – Auto Enable below for a more powerful version. February 14, 2013 Using Touch - Latch This is the same as Touch – Snap, except once a control is touched, it stays in record even after you release it. Use Stop or other standard methods to exit all recording, or press Auto to take the current signal path out of record. Enabling Mix Items Typically mix items are recorded a few at a time, often only one. To put a mix item into automation record, we must first enable it, then put it into write or trim (this is just like arming tracks before recording audio on to them.) Enabling mix items simply requires enabling their parameters. Enable Parameters The Edit Screen displays enables for Fader, Mute and Pan. These are the only parameters that can be enabled in Solo products. Screen Enables Enable plug ins using the button in the Automation Panel of the Mixer Screen. Mix Item Status Mix items can be in one of three states: Read, Write and Trim. The current state of each parameter is displayed by coloured illumination of fader knobs, rotary encoders and switches, plus parameter values in the ILP. The three parameter states are described below. Read When mix items are in Read the automation system takes control of their values and the physical position of their controls. Controls are illuminated green. A mix item can be in Read whenever any automation data has been recorded for it, anywhere in the project. Write/Trim Mix items must be explicitly placed in Write or Trim. The Write/Trim key is toggled to the Write or Trim position, for the whole console. WRITE: automation is armed for record and absolute values are written for the selected mix items. Indicators are illuminated red. TRIM: automation is armed for record and relative values are written for the selected mix items. Indicators are illuminated amber. Page 128 AUTOMATION February 14, 2013 In trim mode, moving a control applies an offset to the values already recorded for that mix item. For example, in trim mode, increasing a fader level by 10dB will add 10dB to the previously recorded fader levels retaining all the relative changes in the previously recorded data. In Trim mode the control continues to move as it follows the previously recorded data. As soon as the control is touched it becomes stationary, and any changes made to the control’s position are written as offsets to the underlying data. If the control is touched but not moved no changes are made. If the control is moved then released, when not in Touch Snap, the system continues to playback the original moves at the offset or trimmed level. If the system is in Touch Snap, the system drops back into Read. Recording Mix Data Mix Events Mix data is recorded as discrete events. Each event occurs at a specific timecode location and relates to a specific mix item. When a new mix is started there are no events recorded and all controls will remain static as the project is played. Once mix data is recorded, it is played back or read when the transport runs past the timecode at which the event is recorded. If the transport is located to any point in the project, the mixer state will reflect the result of all the events that have occurred from the start of the project to the current timecode. The static snapshot recorded with every mix preserves the basic setup and balance of the mix. Dynamic move events are added to this to create the final complete mix. Entering Automation Record There are two ways to enter automation record: Click the AUTO button associated with any fader. Enabled parameters on the channel are put into record. There are AUTO buttons on the Edit Screen and Mixer Screen. Use Touch mode and use the mouse to move any fader or pot on the following screens: o Faders and Mutes can be moved on the Mixer Screen. o Faders, Left-Right Panpots and Mutes can be moved on the Edit Screen, by clicking the numerical fields next to the Auto button. Click and drag left/right for pan change Click and drag up/down for fader change o o Pan parameters can be moved with the mouse on the Virtual Channel screen (more details page 108). Touch-write must be used to enable the parameters as you move them. Page 129 AUTOMATION o February 14, 2013 Pan parameters can be accessed and moved using the graphical Pan Zoom panel (more details page 113). Touch-write must be used to enable the parameters as you move them. Leaving Automation Record There are four ways to exit automation record: Cause the transport to leave PLAY (or REC) using any transport. Toggle any lit AUTO button off. When in Touch Snap mode, release any fader, pot or switch. Click the Mix ON button to disable the mix automation system (desperate measure, but it works). Transitions – Using Glide When the automation system makes a transition from Write or Trim to Read, Glide out data will be written to smooth the parameter transition as described below. The Glide Out transition starts at the point where the system leaves record and finishes at the Out point plus the Glide Out time. When a transition is made from Preview to Write, Glide In data will be written. The Glide In transition starts before the point that the system entered record (In point minus Glide In time) and finishes at the point where the system entered record. Glide times are set in the System Variables window. To access this, Type Shift+Ctrl+U. On Stop Mix items currently in Write or Trim return to Read when the system leaves automation record using the Stop command. The data that is written after the mix item returns to Read is determined by the On Stop menu item in the Mix Menu. If On Stop Hold is selected, all the following mix events are deleted, so the last written value remains in force for the rest of the project. If On Stop Return is selected, the parameter ramps to the previously recorded value at the end of the Glide Out time – see page 130. If On Stop Event is selected, the last written value remains in force until a previously recorded event is encountered. To set the On Stop value: Click the On Stop button in the Automation pane of the Edit Screen. On Stop button Automation Playback The #NAME automation system ensures that your mix will always play back exactly as recorded. There are two main forms of automation data recorded in a project. The first is the static snapshot of all parameters which is recorded whenever a mix is saved. The second type of data are the dynamic automation events that are recorded every time a parameter is modified while the system is writing or trimming mautomation. Page 130 AUTOMATION February 14, 2013 Once a dynamic event has been recorded on a feed or bus, that parameter will be in READ whenever Mix ON is engaged and the transport is in PLAY. When the system detects that a parameter control has changed while in Write or Trim, a dynamic event is recorded that stores the previous value and the new value (FROM value and TO value) of that speci fic parameter at a specific timecode location. When Mix ON is engaged and the transport is located to any position on the time line, the automation system looks back and forward in time to find any events previously recorded for the parameter. If no dynamic events have been recorded for the parameter, the parameter is “free”, meaning you can move it manually. The current value for any parameter is determined in the following order: 1. The parameter is set to the TO value of the most recent previous event (or the current event if the transport is right on top of a data change). 2. If no previous event exists, the parameter is set to the FROM value of the next future event. 3. If no future or previous event exists, the parameter is not changed. If the project was just loaded, it will be at its value in the saved snapshot. Touch Write Touch write is a super-fast way to automate your mix. When properly set up, you can simply grab the controls you want to change and write the changes straight into the automation. Setting up for touch write is simple. Step 1 Make sure that Mix On is enabled Step 2 Click the Touch button to enabled Snap or Latch Step 3 Enable one or more of Fader, Mute and Pan. Step 3 Start the transport playing, then click and drag the control you want to w rite. Latch and Snap Latch means that once you touch the control it stays in Write (or Trim) until the system goes back into Read. Snap means that the parameter enters Write (or Trim) when you touch it, and returns to Read when you release it, using the Glide Out time (see page 130). Saving and Loading Mixes Up to 256 complete mixes may be saved in each project and recalled later. The System automatically saves the last mix you made, calling this the “System Mix”. If you want to keep any other mix versions, they must be saved explicitly. The available space left in the project file for new mixes or mix data is displayed in the Mix menu. When the space left falls below 2% the Save soft key becomes disabled. Saving a Mix Step 1 Click Mixer Load/Save Mix. Step 2 Click the Save Mix button. Page 131 AUTOMATION February 14, 2013 Loading a Mix Step 1 Click Mixer Load/Save Mix. Step 2 Click the Name button of the mix you want to load. Step 3 Click the Load Mix button. Step 4 Confirm (or cancel) by clicking the Yes (or No) button. Deleting a Mix Step 1 Click Mixer Load/Save Mix. Step 2 Click the Name button of the mix you want to load. Step 3 Click the Delete Mix button. Step 4 Confirm (or cancel) by clicking the Yes (or No) button. Creating a New Mix Follow these steps to create new empty mix with no automation data: Step 1 Click Mixer Load/Save Mix. Step 2 Click the New Mix button. This new mix must be named and saved once new data has been written. Mix Undo The automation system supports multiple levels of mix undo. These are interleaved with audio edits, making a single undo list for the whole project. To undo the last edit, click the Undo button in the toolbar, or type ctrl+z This can be done as many times as you like, right back to the first edit since the project was opened. To redo the last undone edit, click the Redo button in the toolbar, or type ctrl+y This can be done as many times as you like, right back to the first edit since the project was opened. To work with a list of the undo steps available: Step 1 Click Edit Undo List A dialog box is shown with a list of the undo and redo events in the project. The red items are those which have been undone already. Step 2 Click an edit in the list to undo it, plus all edits before it. For the purposes of automation, an undo step is recorded each time the system enters or leaves write (or trim), or when undo data is changed by graphical curve editing. 'System Mix' - Save function System Mix is a way of making sure that the last Automation pass loaded or recorded will be saved with the project automatically. This means you can return to the point where you left off previously. In Solo products the System Mix is always saved automatically. Page 132 AUTOMATION February 14, 2013 Automation with Link Groups Link groups are useful for dealing with groups of feeds carrying audio in a multi-channel format such as stereo or 5.1. See “Grouping” on page 85 for an overview of link groups. Link groups should be established before any automation is written. If members are added to a group when automation data is present on either the master or the members, the data on the members is erased. If the link group is destroyed or unlinked after automation is recorded for the group, the automation data remains on the group master but not the slaves. Only the parameters on the link group master can be automated – the slave member’s parameters follow the master. Mix Editing Copy Project Segment This command in the Edit Menu copies all audio and automation data, on all channels in the system, from a range to the cursor position. To do this: Step 1 Make a range around the segment you want to copy. Step 2 Click Edit Copy Project Segment Step 3 Locate to the timecode where you want to paste. Step 4 Paste the clipboard using any of the following: Click Edit Paste Type Ctrl-v on a qwerty keyboard - the first copies the clips and all automation in a range into the clipboard, which can then be manually pasted at the playhead. The copy is still selection independent. The audio from all tracks will be copied (whether selected or not), plus the automation from all signal paths and all parameters (whether enabled or not). You can also use this command to copy a project segment from an import project and paste it into the main workspace. The controls in the upper left of the screen correspond with controls in the menus and on the console surface. Page 133 AUTOMATION February 14, 2013 On-Screen Automation Controls Pan in TRIM Pan in READ Pan in WRITE Fader in WRITE Fader in TRIM Fader in READ The controls in the lower right of the screen correspond with controls in the menus and on the SOLO picture keys. The Mix On checkbox is equivalent to the Mix On button. Automation Curves Automation data for Tracks, Live Feeds, Buses and VCA Groups can be shown on the Edit Screen using the following command sequence: View Smart Pane Automation, Click to toggle automation graphs on or off Click to remove automation display parameter Pull down menu of automation display parameter Preset controls To display automation curves on one or more tracks: Step 1 Select the tracks where the automation is to be displayed Step 2 Click the Display button Page 134 Edit Controls AUTOMATION Step 3 February 14, 2013 Select the parameter to be displayed – use either the pull down menu or a preset. Note that each signal path may show its own selected parameter. The Display button is also used to turn the curves off. To remove the display of automation curves: Step 1 Select the tracks where the automation is to be displayed Step 2 Click the Clear button Curves for Buses, Lives and Groups (Mixer Tracks) When Mix On is toggled ON, the Edit Screen is appended with a set of “Mixer Tracks” corresponding with Live Feeds, Buses and VCA Groups. These displays are always shown at the bottom of the Edit Screen, after the Tracks. To see the Mixer Tracks, you may do any of the following: Use the mouse and scroll bar in the Edit Screen to scroll down to the bottom Select a Bus, Live Feed or VCA Group in the normal way, and it will become the current Track. This will cause it to be displayed on the Edit Screen. Presets Presets are used to quickly access a particular parameter. The first six buttons are provided with factory presets, but you can replace them with your own. To apply a preset, simply click on it when the Display button is selected. To create a preset: Step 1 Turn Display on if necessary Step 2 Select a parameter to be displayed using either the pull down menu Step 3 Click the Save button Step 4 Click a preset button Step 5 The system will request a name for the preset. You may use the suggested name or choose your own. The Curve Display Automation data is shown as a green line, with the name of the parameter to the right of the cursor. Page 135 AUTOMATION February 14, 2013 For switched parameters like Mutes, the line is shown high when the channel is on, and low when it is muted, as shown below. When writing automation, the graph is shown in red. Existing automation data is shown in green, allowing you to target punch out points easily. Note that, in this case, the red line continues past the cursor. This shows accurately what will happen when Write is exited, because the system On Stop setting is EVENT, meaning the current value will be held until the next change in automation value. Here is how it looks when On Stop is set to HOLD: Page 136 AUTOMATION February 14, 2013 In this case the red line continues at the same value to the end of the screen, because this value will be written to the end of the project. Editing Automation Curves Automation data can be edited graphically using the mouse. To do this, click the Edit button. There are two ways to edit, Events and Draw. Events To edit Events, click on the Events button. Events are shown as red squares. Note that each event is a value of the parameter. After an event the value stays constant until just before the next event, when it ramps up or down to the next value. When events are close together, as shown above, they are joined by a smooth line, reflecting this ramp. Otherwise the values are held constant and shown with a horizontal line. While Events are displayed you may do any of the following: Move an individual event with the mouse. You may change the event value (move up or down) or its timecode (move left or right). The timecode position is bounded by the next and previous events. The timecode and current value of the event are shown in the Automation Edit group of the Smart Pane. Page 137 AUTOMATION February 14, 2013 Select one or more events by making a box (marquee) with the mouse. Selected events may be: Dragged up and down or left and right. Left and right movement is bounded by the next and previous events. The value of the highest point is shown in the display above. Deleted using the Del key Create a new event by clicking where there is currently no event. Combine moving and creating by clicking above or below the line. If there is no point at the timecode where you clicked, one will be created, but if there is one within a quarter -frame of where you clicked, it will be raised or lowered to your mouse position. Drawing Drawing allows you to create automation data using the mouse. To begin drawing, click the Draw button. Now click and drag on any selected track to create or replace automation data. Undo Automation changes made by editing or redrawing can be undone using Undo in the normal way. An unlimited number of undo steps is provided. Data Storage All the mix data of the current mix is stored in system memory. This data must be explicitly saved to disk as a named mix. If a new project is loaded, the previous mix data is retained in memory and may be saved as a mix in the new project. Mix "Thinning" SOLO offers a Mix "thinning" algorithm that "ignores" identical static mix data, This is especially useful for large amounts of mix data as it can largely reduce the actual number of mix events. When automation is written, there can be events that are nothing more than a block of "static" infor mation e.g. nothing more than an "in and out" point with no "dynamic" information in between. These neutral events can nonetheless add up to a lot of data. With Mix Thinning turned on, multiple identical events of this nature are only identified once therefore creating less events data in the global mix. The feature operates transparently. If desired, this functionality needs to be turned on: Instructions: Step 1 Quit the Dream II software by clicking the Close Box in the upper right of the Edit screen. Step 2 Navigate in Windows to C:\ProgramData\Fairlight\FMC\Data and open the file System_Variables.TXT Step 3 There is a line in that file: MIX_THINNING_ENABLED, 0 Set the 0 to a 1 and save the file. Restart the system, and Mix Thinning will be operating. Page 138 PLUG-INS AND REWIRE February 14, 2013 Plug-ins and ReWire Introduction SOLO provides powerful support for 3rd party hardware and software plug-ins via the industry standard VST, VSTi and ReWire protocols. General Capabilities Plug-ins can be instantiated (placed) in Track Feeds and Live Feeds. This is done as an Insert to the feed. See Inserting a Plug-in below. You can instantiate up to 6 plug-ins per feed. A total of 96 channels of plug-ins can be instantiated. These are mono equivalents e.g. a stereo plug-ins uses two of these channels. Control of plug-ins can be graphical, using the mouse, or fader-based using “fleximaps”. The graphical controls are supplied by each third party manufacturer of plug-ins. Fleximaps allow physical control of plug-in parameters, and this how they are automated. Access to control of Plug-ins is via the Plug-in button in the Channel Panel, or via mouse, clicking on the Fat Channel in the Mixer Screen. Details below. VST and VSTi About VST VST (Virtual Studio Technology) is an audio plug-in standard created by Steinberg. The VST standard allows third party developers to create VST plug-ins for use within VST host applications, or to create VST host applications themselves. The VST plug-in standard is the most widespread plug-in standard in use today, with thousands of available plug-ins. The VST Host A VST host is a software application or hardware device that allows VST plug-ins to be used in a logical context, interacting with digital audio and MIDI elements. Dream II is a VST host, enabling VST plug-ins to interact with the Dream II mix environment. As of this writing, Dream II uses version 2.4 of the VST SDK (Software Development Kit). VST Effects versus VST Instruments (VSTi) A VST effect is a type of VST plug-in that is used to process audio. A VST effect might be a Reverb, Compressor, Flanger or EQ. A VST Instrument is typically used to synthesize sound or play back sampled audio. VSTi’s have rapidly replaced hardware synthesizers and dedicated samplers due to their flexibility, repeatability and low cost. Using VST Effects on Fairlight systems. Some typical scenarios include: Insert a VST Compressor or EQ plugin directly on a track or live input, busses, and Auxes. Page 139 PLUG-INS AND REWIRE February 14, 2013 Patch an Aux Output to a Live Input, then insert an VST Reverb or Flanger on the Live input. Now all channels feeding the Aux will be routed through the VS T Effect. Please note that Fairlight supports VST effects from Mono to 5.1 - and beyond. These can be inserted on mono channels or on Link Groups. If a stereo VST Effect is inserted on a LCR, LCRS or 5.1 Link Group , the left and right channels will be allocated to left and right Link Group channels automatically. Using VST Effects in SOLO Setup and installation Step 1 Install your plug-ins as outlined by your plug-in manufacturer. The plug-in will generate a file with extension ‘DLL’ in the folder that your plug-in has been installed (most commonly located in C:\Program Files\VSTPlug-ins). Step 2 Copy the DLL file and paste into C:\Program Files\Fairlight\Dream II\Effects\VSTs. Step 3 Restart the Dream II PC. Block Size You can control the size of blocks sent to your plug-ins over the AudioBridge. (The AudioBridge connects the real-time CC-1 audio environment to the block-based audio environment in the PC, where plug-ins are performed). Larger block size means more reliable operation, but longer latency. Fairlight recommends using 1024 samples. To set block size, click Setup General Preferences, and click the Audio Plugins tab. Use the slider to set the Block Size. Latency for each block size is shown. Page 140 PLUG-INS AND REWIRE February 14, 2013 NOTE: Latency is also affected by the processing delay of the VST plug-in itself i.e. the time it takes for the CPU to execute. Block size makes no difference to this. Scanning on Startup If you check the Scan on Startup button in the General Preferences dialog shown above, the system will scan all your plug-ins each time it starts. If you have a large number of plug-ins, this can take a long time, especially since many of them require dongle verification. Another strategy is to use the Rescan button in the same dialog, only when you have added or removed plug-ins from the system. Plug-in Latency and Compensation Each plug-in takes a certain amount of time to run, and this effectively delays the audio in the track or live feed. The delay time is called the latency of the plug-in. Latency has two components: AudioBridge latency, which is the time taken to get the audio from the Crystal engine to the CPU where the plug-ins are executed, and back again. This is unavoidable due to the VST specification requiring blocks of samples to be sent for processing. Processing time of the plug-in, which is how long it takes the CPU to process a block of samples. This is reported by each manufacturer of VST plug-ins. Latency Compensation For Track Feeds containing plug-ins, the track playback is automatically advanced by the amount of the latency. Note: this is not possible for Live Feeds, as they happen in (slightly retarded) real time. When Buses contain plug-ins, the tracks feeding that bus are automatically advanced by the amount of the latency. If a track is feeding more than one bus, the amount by which the track is advanced is decided by a priority system: Main Bus is highest, then Sub Buses in numerical order, then Aux buses. With a track feeding more than one bus, the timing will only be correct for the highest prior ity bus (and others which happen to have the same latency). Bus Balancing There is one exception to the preceding statement: If a track is feeding the Main Bus and one other bus, and the other bus is also routed to the Main Bus, the system will correctly compensate for the latency. See diagram below: Page 141 PLUG-INS AND REWIRE February 14, 2013 In this instance, “special channels” are used to create the necessary timing changes to correctly compensate for latencies. Notes: Bus Balancing is enabled in the Audio Plugins General Preference Tab by selecting the “Bus Balancing Enabled” option. Since this new mechanism uses system resources, it is Disabled by default. The new mechanism only works for Main Assign. this mechanism is not invoked. For this to work, a track can only be assigned to one bus, plus Main e.g. If Track1 is simultaneously assigned to Sub1 -> Main and Aux1 ->Main, then the old priority mechanism is invoked and only the Sub1 correctly compensated. If a bus feed is not also assigned to the Main bus, then the mechanism is not invoked, and the old bus priority mechanism used. No more than 12 buses can be balanced in this way. Each balanced bus uses special channels which “copy” the elements of the Main bus. For a 5.1 Main bus, 6 such channels are used (stereo uses 2). There are a total of 24 special channels available for bus balancing. If a track is not assigned to the Main bus, Instantiation Inserting a Plug-in on a Signal Path Method 1: via Plug-in Config Step 1 Right click an empty slot in the Plug-in area of an SOLO Mixer channel Right click . Step 2 The Plugin List appears, showing all the plug-ins installed in your system. Step 3 Click Add After some time the plug-in will be loaded. This may take a minute or so if the plug-in is dongled. Page 142 PLUG-INS AND REWIRE February 14, 2013 The plug-in popup will now appear on the Editor display, where the mouse can be used to change its parameters. Removing a Plug-in Step 1 Right click an empty slot in the Plug-in area of an SOLO Mixer channel Step 2 The Plugin List appears, showing all the plug-ins installed in your system. Step 3 Click Remove Controlling Plug-ins on Screen Each Plug-in comes with a graphical user interface (GUI) designed by its manufacturer). To display the GUI, do one of the following: Double-click a Plug-in in the SOLO Mixer Screen Channel Double click to display Click an indvidual plug-in once to bypass it . Click to bypass all plug-ins Page 143 PLUG-INS AND REWIRE February 14, 2013 Plug-in GUI controls Each plug-in GUI is contained in a window including a close box and several icons. Close Button Lock Insert/Bypass Opens Plug-in Control Box Plug-in Name Channel Name Close Clicking the Close button makes the Plug-in window disappear, but does not unload it. You will continue to hear its effect. After closing the plug-in window, it can be restored to the screen by double-clicking that plug-in name in the SOLO Mixer screen. Lock Clicking the Lock icon prevents that window from disappearing – it will continue to display that Plug-in for that channel, regardless of other selections you make, until you unlock it, then close or delete it. Insert / Bypass By default, Plug-ins are inserted in the channel where you instantiated (load) them. By clicking the Insert / Bypass icon, you can bypass a specific plug-in. Note that other plug-ins in the channel will remain inserted. To bypass all plug-ins, use the channel Insert control, which can be found in the Mixer Screen. Plug-in Control Box If more than one plug-in is inserted into a channel, you can change the order in which they process the audio. To do this, click the Plug-in Control Box icon. The following window is displayed. Page 144 PLUG-INS AND REWIRE February 14, 2013 Insert/Bypass Use the mouse to select one of the plug-ins. Click on the Move Up or Move Down icon to change the processing order. Click on the Insert/Bypass icon of any plug-in to bypass its processing. Using the Library Saving a Plug-in preset in the Library is a great way of managing plug-ins. You can save any plug-in, or chain of plug-ins, with their current values, as a Library preset. This makes it very easy to load plug-ins into any track or live feed, partly because the Library page shows an array of named presets at the same time. For instructions on using the Library see page 122. Sending an Aux to a Plug-in Patch an Aux Output to the Input of a Live Feed, using the Patch I/O screen. Use a stereo Aux and two Live Feeds if the Plug-in is stereo (shown schematically below). Add a Plug-in to the Live Feed using the method described above. Now all channels feeding the Aux will be routed through the VST Plug-in, to the output of the Live Feed. Assign the Live Feed to the Bus where the Plug-in output is required. Automation of Plug-ins Enabling Plug-in parameters for automation is described on page 128. Page 145 PLUG-INS AND REWIRE February 14, 2013 Clip based Plug-ins Plug-ins may be separately applied to individual clips. The sound is written into new media on the hard disk, and a new clip is placed on top of the original. To do this: Step 1 Click Process Render Plugin Effect The Plug-in window will open, showing the available plug-ins Step 2 Click on the desired plug-in to be used on this clip. Step 3 Click Select soft key to display the plug-in controls. Step 4 Park the timeline on the clip that you would like to process and click the Preview button in the Plug-in control. The clip will automatically start looping and you can now adjust all parameters in real time. Step 5 When the clip sounds the way you want, click the render button. This will directly render your plug-in processing to the clip. Note: the original clip is still there, on an underneath layer so that you can quickly go back to the original recording if required. Note: DREAM II systems provide full “native” processing on every channel including EQ, Filters, Dynamics, and surround panning. This means plug-ins can be reserved for “special” applications. Using VST Instruments in SOLO While Dream II does not include a MIDI sequencer, VST Instruments can still be played “live” through the system. This can be useful for: Foley, using a VSTi sampler. Live musical performance. Tuning vocals with a VSTi sampler and MIDI controller with pitch wheel. Page 146 PLUG-INS AND REWIRE February 14, 2013 Live effects triggering with a VSTi sampler. VSTi’s can easily be recorded to tracks or inserted on Lives depending on your needs. ReWire About ReWire ReWire is a software protocol jointly developed by Propellerhead and Steinberg. It enables remote control and data transfer among digital audio editing and related software. Originally appearing in the ReBirth software synthesizer in 1998, the protocol has since SOLOlved into an industry standard. The ReWire Mixer The ReWire protocol is designed to allow a number of ReWire Clients to communicate with a single ReWire Mixer. Only one ReWire mixer can be active at a time. Dream II is always the ReWire Mixer. The ReWire Mixer can accept up to 256 inputs from each of the connected ReWire clients. Dream II currently supports 96 of these ReWire inputs. When a ReWire Mixer and ReWire Client are connected together, transport controls and position information are automatically transmitted in both directions between the Mixer and Client(s). Diagram of a running ReWire session Page 147 PLUG-INS AND REWIRE February 14, 2013 Using ReWire Devices in SOLO Setup and installation Step 1 Install your software as outlined by your the manufacturer. Step 2 Run the software at least once in standalone mode. Step 3 The software should now appear in the list of available ReWire devices. Launching a Rewire Application In order to patch a Rewire device, a Rewire application must be installed first (e.g. Reason, Ableton Live). Step 1 Click on ‘Setup’ in the Dream II toolbar. Step 2 Select ‘Setup Instruments’ to launch the dialogue box. Your Rewire application should appear in this list. Step 3 Click on the name of the desired Rewire application so it is highlighted. Page 148 PLUG-INS AND REWIRE February 14, 2013 Highlight rewire application Click Edit to launch Step 4 Click on ‘Edit’ at the bottom of the dialogue box. Note: Some programs (eg – Reason) will launch automatically. Others (eg - Ableton Live) need to be launched manually. Step 5 Open or create a project within your Rewire application (demo projects that accompany the application are a good starting point). Patching a Rewire Application Once your Rewire Application is launched, it’s time to patch Rewire inputs to track or live feeds. Step 1 Open the Patch I/O page by clicking Mixer Patch I/O. or click the Patch icon on the Solo Toolbar. Step 2 Click on Instrument Inputs located on the left hand side of the Patch I/O page. You see inputs labeled according to the Rewire applications you have installed. If you have installed more than one application, click ‘Page Down’ on the patch I/O page until you find the input for your Rewire application. Step 3 Select the desired instrument input (e.g. If using Reason, select the inputs labeled Mix L and Mix R for a stereo mix). Step 4 Select Track, Live or other patch destinations located on the lower right hand side of the Patch I/O page. Step 5 Select destinations to patch in the upper right, and click the Patch button to complete the patch. Page 149 PLUG-INS AND REWIRE Select instrument input Click on Patch to complete February 14, 2013 Select live inputs You should now be able to hear a stereo signal generated by your Rewire application on Live feeds 1 and 2. Alternatively, you can patch instrument inputs to track feeds, but make sure the track is record enabled in order to hear your Rewire device (see the chapter "Recording" on page 39). Page 150 MONITORING AND T ALKBACK February 14, 2013 Monitoring and Talkback The Monitor system provides summing and switching to handle speaker formats of up to 8 channels. It offers the flexibility of multiple speaker sets of any format, selectable sources amongst any system bus and up to 16 external sources, and fold-up/fold-down facilities to manage any combination of the above. Set Monitor Levels, Mute and Dim In the Solo theme, Control Room Level, Mute and Dim controls are available in the upper right corner of the screen. Mute Dim Level The Monitor Control Window Monitor sources, speaker sets and listening format are controlled in the Monitor Control Window. To open this click Mixer Monitoring Page 151 MONITORING AND T ALKBACK February 14, 2013 Basic Controls Click Mute to silence the monitoring system Click Dim to reduce level by 15 dB Fixed Level For some applications the Control Room monitors must be set to a fixed level, and afterwards not respond to monitor pots. Click Fixed to set the Monitor level to -50 dB, and defeat the Monitor Level control. Choose Monitor Source By default the system listens to the Main Bus. You can listen to any Sub Bus or Aux Bus by clicking on its button. Note: If a Sub Bus or Aux Bus has zero format, or if nothing is being sent to it, you will not hear anything. You can listen to any external source by clicking on its button. External sources are those coming directly from physical inputs to the system. To set up these sources, click the Configure button at right. Page 152 MONITORING AND T ALKBACK February 14, 2013 Choose Speaker Set By default the system listens to the Main speaker set. You may create up to 7 more sets, and choose them by clicking on their buttons. The system will perform downmixing to play “wide” mixes into narrower formats. For example, if the chosen source is a 5.1 bus, and the chosen speaker set is stereo, then the system will downmix the 5.1 source into stereo and play it from the Left and Right speakers. To configure speaker sets, click the Configure button at right. Page 153 MONITORING AND T ALKBACK February 14, 2013 Choose Listening Format By default the monitoring system adopts the format of the current speaker set. You can listen to a different format by clicking the 5.1, Mono or Stereo button. If the chosen format “fits into” the current speaker set, the system folds the mix down to the chosen format and then plays it from the appropriate speakers. For example, if the Main Speaker set (and the Main Bus) are formatted at 5.1, then choosing to listen in Stereo will cause the 5.1 mix to be folded down to Stereo and played from the Left and Right speakers of the Main 5.1 Speaker set. If the chosen format does not fit the current speaker, further downmixing may take place. For example, if the current speaker set is Stereo, then choosing to listen in Mono will cause the stereo mix to be folded down to Mono, but then played at -3dB from both Left and Right speakers. Configure Speaker Sets A speaker set is defined by a set of physical outputs, which connect as a standard format (mono, stereo, 5.1 etc). To configure speaker sets, click the Configure button at right, then work on the screen as follows: Step 1 Click Mixer Monitor Setup. Page 154 MONITORING AND T ALKBACK February 14, 2013 Configuring Speaker Sets Step 1 Choose a Speaker set at the lower left. Step 2 Click the Increase Format button until you see the desired format for this speaker set. Step 3 Select all its Elements (Left, Center, Right etc) at the top left. Step 4 Click Analog (or Digital) outputs at lower right. Step 5 Choose the right number of free outputs to match the number of speakers. Click Patch. Step 6 Click Name if you want to name the Speaker set Step 7 To exit, click the Close box in the upper right corner, or right-click anywhere in the dialog. Page 155 MONITORING AND T ALKBACK February 14, 2013 Configure External Source Click the Configure button at the right, and work on the screen that appears. Step 1 Choose the external source you wish to define Step 2 Choose Analog Inputs or Digital Inputs at lower left. Step 3 Choose the inputs you want to use at upper left and their destination Monitor Elements at the upper right. Click Patch. Step 4 If desired, click Rename to name the set. Step 5 To exit, click the Close box in the upper right corner, or right-click anywhere in the dialog. Page 156 METERS February 14, 2013 Meters Introduction Signal level metering is available in the various system video displays. Master Screen Meters SOLO provides a set of eight Master Screen Meters. To toggle them on and off: Click on the Mixer screen and type ctrl+SHIFT+Space. These meters can be dragged, by their Title Bar, to any point on the Edit Screen or Mixer Screen, or to a third video monitor, if your system has one installed. Page 157 METERS February 14, 2013 Choose Aux or Meter Set for the 12 buttons above. Shows maximum value since meters opened. Shows average value since meters opened. Selection of metering source for the Master Screen Meters: With Aux selected, click Main, Sub-Buses (B1, B2…) and Aux buses (A1, A2…) to toggle them on or off the meters. You can add any number of buses, and the system will display meters for up to eight Bus elements, starting at the top of the selected buses. With Meter Set selected, select one Meter Set or a number of Main and Sub buses. Meter Sets cannot be added to other sets or buses. Page 158 METERS February 14, 2013 Choose a meter set here Click here to define the current meter set Click here to display auxes instead of meter sets Metering History The Master Screen Meters keep a history of the ten loudest peaks for each meter, with the timecode where each peak occurred. The peaks camn be displayed in order of loudness. Overshoots of up to +8.6 dB are shown, although the audio is actually clamped to 0 dB at the channel output. To display history click in the Peak or RMS level display for a meter. Page 159 METERS February 14, 2013 Click here to delete history and start again. Also clears peaks and displayed maximum values. Click any one of these fields to display (or hide) Peak or RMS history. Click on any timecode to locate there. Meter Sets A meter set contains eight sources, which cqn come from a combination of any signal paths in the system. These can be displayed the Master Screen Meters. There are 9 meter sets in the system. There are two ways to choose sources for the Meter Sets. Using the Master Screen Meters Step 1 Click Meter Sets and choose a meter set (you can change your choice later) Step 2 Click the Define button. The system displays the Patch I/O page. Page 160 METERS Step 3 Select the source type you want in the lower left section. Step 4 Select one or more signal paths to patch to the meters. February 14, 2013 If you wish to display Tracks or Live Feeds, choose their Insert Send, which always sends, even if Insert is not switched on (it’s the Return that is affected by the switch). Note the position of the insert in the channel, which can be controlled on the Path Menu. Choosing Direct Out is also possible, but is subject to the Direct Out on/off switch, pre/post switch and level control. Step 5 Select one or more individual meters to patch in the upper right of the screen. Step 6 Click the Patch button. This patches the sources to the selected meters and saves the Meter Set. Whole Bus Patching – Expandable If you patch a whole bus to the meters in one gesture, it becomes resizable. “One gesture” means that you selected all the bus elements, and the same number of consecutive meters, and clicked Patch. “Resizable” means that, if you change the bus format, it will grab as many meters as it needs, pushing the next signals to the right when it expands (potentially off the end) and pulling them to the left when it contracts. Page 161 METERS February 14, 2013 If you leave blanks to the right of a resizable bus, it will consume the blanks before starting to push other channels to the right. Peaks The numeric peak levels displayed on the mixer display bus meters have a variable threshold. The level at which these values are displayed can be set in the C:\Program Files\ Fairlight\FMC\Data\System_Variables.txt file. Edit the following line in the file: PEAK_DISPLAY_LIMIT,950 The value is from 0 to 1000 in 0.1dB steps where 1000 = full scale level. In the example above the value of 950 will cause the numeric display to first be shown when the signal level reaches -5dB below full scale. 970 will set the threshold to -3dB, 990 will set the threshold to -1dB, and so on. Clear Peak Stereo Compound Meters The system offers a new compound stereo meter including PPM and Loudness metering, as well as Phase indication. To enable it, click Setup Meters View Compound Stereo Meter Now you will see the new meters if you are using the new SOLO Mixer Screen Mixer Screen (see above), and on the ILP2 screen (if you have one). It will only be present if your Main bus has stereo format. The Loudness metering has stereo LEQ meters and a mono LU meter. The blue and white numbers give running reports on level according to ITU R BS 1770 standard, known as LKFS. They represent the subjective loudness of the audio program. The right number gives a rolling average over 10 seconds, and the left number gives an average over the entire length of program i.e. since you started playing. Page 162 METERS February 14, 2013 The long-term average level ignores anything below -18 dB, so it won’t go down when the system is in Stop. You can reset the long-term average by clicking the left number. Note that readings amongst different brands of meters commonly differ, because there are no agreed standards for some metering characteristics. In particular the “integration” time of a meter, which represents the length of time signal needs to be at a particular level before the meter reaches that level, and the decay time when the level drops, are not defined as standards. For this reason, the Fairlight meters may not match the levels shown by other meters. Parameter Setup The Compound meters are controlled by accessing: Setup General Preferences Meters The compound meter contains 2 individual components, a BarGraph and a Loudness meter. The compound meters source can be selected as either the Control room source (pre -volume control), or fixed to the main meter from the Source selection in the meter preferences. The Width of the individual components is defined by the source, and so if for example you have the control room selected as the source, and change the monitoring source between a 5.1 main, and a stereo sub bus, the compound meter source and format will follow. The Bargraph can be chosen from several scales: Peak; PPM – BBC; PPM – DIN; RMS. The Bargraph can also be individually disabled if this component is not required. The Loudness meter component offers BS1770-1 compliant loudness metering consisting of simultaneous momentary, short term and infinite integration RLB2 weighted meters. These meters are referenced to a target LKFS value, and offer either a standard -18 - +9 LU scale, or an optional -36 - +18 LU scale for material with a wider dynamic range (e.g. long form). Settings for the loudness component include: RMS Window: The length of the momentary sliding window (in ms). Target Reference (in LKFS). Short Window: The length of the short-term sliding window meter integration time (in seconds). Integrated Gate: An optional Gate can be applied to the Infinite (programme) integration. Page 163 METERS February 14, 2013 The blue numbers give running reports on level according to ITU R BS 1770-1 standard as a referenced LKFS value (LK). They represent the subjective loudness of the audio program. The right-hand number gives a rolling average over the defined short term window length, and the left-hand number gives an average over the entire length of program i.e. since you last reset the meter. You can reset the longterm average (infinite integration) by clicking the number. The long-term average level can additionally have a gate applied in the meter preferences, in order to allow it comply with the R128 EBU Standard. Page 164 PYXIS T RACK February 14, 2013 Pyxis Track Introduction Pyxis Track is SOLO’s built-in video disk recorder and editor. It can import files of many formats, and export to many formats. Some of these formats require special licences to operate. See below for import / export information. Creating a Pyxis Track Before using Pyxis Track, a video track must be added to the project. This can be done in tw o ways. When creating a new project, select the Add Pyxis Track checkbox, shown below. For a project that is already created, use the command Tracks Add Pyxis Track Page 165 PYXIS T RACK February 14, 2013 Once created, the Video track appears at the top of the Edit Screen: Adding a Second Pyxis Track Note: This feature is licensed – if you wish to purchase a licence, please contact your Fairlight distributor. It is possible to add a second Pyxis Track, using the same command Tracks Add Pyxis Track. Adding a second track puts more demand on system resources, particularly memory and CPU bandwidth. If you plan to use a second video track, particularly with HD formats, we recommend upgrading your host PC to Windows 7 64-bit, and bringing the amount of RAM up to 6 GBytes. The second video track can be used to play out 2 video streams when used in conjunction with Black Magic Design 3D Extreme HD card. This enables Dream II to play 3D footage. NOTE: BMD 7.8 drivers (rc27 or later) required. Capturing, importing and editing the second video track is done the same way as for the first (see sections below). To select one or both video tracks for these activities, use the mouse to click the V1 or V2 button at the left of the tracks. Startup with Dual Tracks To use the second video track, the system must be started with the -3D option. To do this, edit the shortcut used to start the system. If you are using a desktop icon to start the system, add the phrase -3D to the “target” field – it will then look something like this: "C:\Program Files\Fairlight\Dream II\Dream II.exe" -3D If you are using the SOLO “X” button to start the system, you need to edit the file: C:\Program Files\Fairlight\SOLO\Layouts\Dream II\layout.txt The first line should become APPLICATION,{app}\Fairlight\Dream II\Dream II.exe -3D If you are using a Decklink card, you will also need to add the –PRO2 to the startup string. Hiding and Showing the Video Track To hide or show the video track on the Edit Screen: Use the menu commands: View Show Pyxis Track Show and View Show Pyxis Track Hide Page 166 PYXIS T RACK February 14, 2013 Video Track Display Offset When using a monitor with an inbuilt display, such as an LCD or plasma screen, the picture may be one or two frames late at play speed. You can adjust for this using the General Preferences dialog. To access this, click Setup at the top of the Edit Screen, then click General Preferences, then Playback. The control allows you to advance or retard playback by a number of frames. While in stop or Jog, the correct frame is output, but in play the offset is activated. You can have a separate setting for your Decklink output and your VGA output, since they are likely to feed different monitors. Page 167 PYXIS T RACK February 14, 2013 Loading Video into Pyxis Track There are two methods for loading video into Pyxis Track. In both cases, the video track must be visible on screen. Importing a Video File Step 1 Make sure that a Pyxis track is displayed. If not, see above. Step 2 Click File Import Video File. Step 3 The following dialog box is displayed Click here to browse for the file you want to import The following file types can be imported using this method: Quicktime (.mov), Avi (.avi), Windows media format (.wmv) Mpeg4 files (.mp4) Mpeg 1 or 2 (.mpg, .m2v, .mvf), dv25 (.dv or .dif) Bitmap (.bmp) or Cineon (.cin) sequence of images ( in sequentially numbered files, 1 frame per file) Final Cut Pro, XML project – note that nested sequences are not imported Page 168 PYXIS T RACK February 14, 2013 jpeg also any Dream/Pyxis native files which are … - uncompressed (.vmu) - dv25 (.dif) - mjpeg (.vmj) - lossless (Huffman compression) (.vmh) Import by Drag and Drop A quick way to import video files is to use Drag and Drop, as follows: Step 1 Make sure that a Pyxis track is displayed. If not, see above. Step 2 Open Windows Explorer (or My Computer) and find the video file you wish to import. Step 3 Drag the video file from the Windows Explorer window and drop it on the video track in the SOLO Edit Screen. The following file types can be imported using drag and drop: Quicktime (.mov) – any more than 2 accompanying audio tracks must be imported – the system will prompt if this is necessary Avi (.avi), Windows media format (.wmv) Mpeg4 files (.mp4) Mpeg 1 or 2 (.mpg, .m2v, .mvf), dv25 (.dv or .dif) MXF (.mxf) containing dv25, dv50, dv100(DVCPro HD) or IMX mpeg compressed video Omf video files (.omf) containing mjpeg, dv25, or uncompressed video. Thomson/Grass valley dv25 files (.vid) Bitmap files (single still image) .bmp – useful for a clapper board. LongGop (requires mxf licence option, mpeg licence option, plus MXFReader2.1 beta or later*. Final Cut Pro, XML project – note that nested sequences are not imported also any Dream/Pyxis native files which are … - uncompressed (.vmu) - dv25 (.dif) - mjpeg (.vmj) - lossless (Huffman compression) (.vmh) MXF files require an MXF licence (dongle) IMX Mpeg requires an IMX Mpeg licence. Dv50, dv100 require a DVCPro Licence (dongle) Page 169 PYXIS T RACK February 14, 2013 Playing a QuickTime or AVI file requires that the latest available codec for that file type has been installed. Fairlight recommends that automatic update be switched on to ensure that the version remains current. In some cases a specific codec must be installed e.g. QuickTime files from Avid require the Avid codec to play them. For a good indication of playability, double-click a file in Windows Explorer. If the operating system plays the file immediately, it will almost certainly play in Pyxis Track. Capturing Video into Pyxis Track The following assumes your system is equipped with a Decklink Video capture card. For the purposes of the example, we will be operating in Standard Definition mode. Pyxis Track allows an incoming video signal to be captured directly onto the timeline. This requires correct configuration of both the Decklink card and Dream II. Configuration of the Decklink card Configure the required settings for your Decklink card by navigating to START Setting Control Panel Decklink It is critical that you select the appropriate Inputs for your system. In the example, we are intending to capture video from a Digital Betacam VTR, via the Decklink Component inputs. If you will be consistently using the same physical inputs for all video capture duties, you should be able to “set and forget” this value. Page 170 PYXIS T RACK February 14, 2013 Configure SOLO Video Capture options With the software launched, and a Project with Pyxis track open, navigate to Setup General Preferences Video Capture This window configures the Dream II part of the video capture system. “Capture Size” is a default value, based on whether Dream II is launched in Standard or High Definition mode, and the current project sync settings (See View Smart Pane Sync) If this setting is not the format you are wishing to capture, it is recommended you consider exactly what format you wish your project to be, and configure it in consequence. The “Device” value tells Dream II which video hardware capture unit will provide the incoming video signal. Under normal conditions, this will be “Decklink Video Capture”. “Input Source” is currently not activated. Setting the correct Video Input must be performed within the Decklink Control Panel. (See above). Page 171 PYXIS T RACK February 14, 2013 “Record Format” is the video file and codec format for capturing the incoming video signal. The options available are: - DV25 (DV Codec, 3.5Mb/sec, SD NTSC or PAL ONLY) - MPJEG - Uncompressed - Huffman Lossless For Standard Definition systems, “DV25” is the recommended setting. For High Definition systems, “Huffmann Lossless” is a good reliable option. Invoke Video Capture Mode Unlike an audio recorder, digital video capturing equipment must be in a specific “Video Capture Mode” in order to record an incoming signal. In DreamII, you can invoke this mode by navigating to Setup Video Capture Mode With Video Capture Mode ON, your decklink card will act as a loopthough device, and will display the incoming video signal. This is in contrast to its normal mode, where the Decklink card displays whatever video is already on the Pyxis track. With Video Capture Mode ON, you may ARM the Pyxis track, and record the incoming video signal, in the same way as you would record audio. Encryption Video files can be encrypted as they are recorded. This will prevent anyone from seeing the video without applying the password. If you wish to capture to an encrypted format, do the following: Page 172 PYXIS T RACK February 14, 2013 Step 1 Open the dialog box at Setup System Preferences Video Capture Step 2 Enter an encryption password in the lower part of the page. Confirm by repeating entry of the password. Step 3 Capture a video file. The same password must be entered to unlock encrypted video media, each time the project is opened. Once you have entered the password you can open any files encrypted with that password. The Pyxis Window To show a window displaying your video, use the command: Click View Pyxis This window is resizeable, as shown below. Drag here to resize Pyxis window. Click here to scroll video locators list. Video locators Page 173 PYXIS T RACK February 14, 2013 Full Screen Pyxis To make Pyxis go full screen (covering the Edit Screen), double click anywhere in the Pyxis window. Video Locators While the Pyxis window is displayed, you may click on an empty marker at anytotime. This will capture Drag here the current video frame and display it, with a timecode number. resize Pyxis window. To locate to any video locator, simply click it. To re-order the locators, drag and drop them with the mouse. To delete a locator, drag it far to the right and drop it when the delete icon is displayed. Delete icon Video locators are also displayed in the Edit Marks list (Locators list) and can be edited there. The Video Scroller The Video Scroller is a line of frames across the bottom of the screen, centered at the current frame. These frames cover the same width as the audio tracks. The Video Scroller is useful because you can see specific frames and scene changes coming up, and use it for easy location. To Display the Video scroller, click: Setup General Preferences Scrollers Page 174 PYXIS T RACK Select the Video checkbox. Note: Audio Scrollers are discussed on page 22. While the Video Scroller is active you can: Click on any part of any frame to locate the transport to that position. Drag the scroller left or right to move the transport. Note: there is no zoom control on the video scroller. Page 175 February 14, 2013 PYXIS T RACK February 14, 2013 Watermarking Watermarking allows you to superimpose a graphic design with partial transparency over your video file, either on capture or while playing. If you capture the file with the watermark, it is permanently written into the video file. Controls for watermarking are found in Setup General Preferences on the Watermark tab. This tab is present if a Decklink video card is present and active. See your Fairlight distributor for information about video cards. Choose the bitmap you wish to superimpose by typing its name in the Bitmap field, or by pressing the Browse buton. Selecting the movement checkbox causes the watermark bitmap to periodically move on the video output. The direction of the movement is specified with the pulldown, with choices: L->R, R->L, Top>Bottom, Bottom->Top Selecting the dynamic checkbox causes the watermark bitmap to periodically turn on and off. The time for each cycle is specified. Page 176 PYXIS T RACK February 14, 2013 Editing the Video Track Selection To select the video track Click on the V symbol at the left of the video track (double clicking makes it the only selection) Click Here. Video track is shown selected. Editing Video clips can be dragged left and right, but not up and down (across tracks). Using Pyxis Track as a Machine Selecting Pyxis Track as one of your machines allows you to take it “offline” the same way as physical machines. For information about setting Pyxis as a machine, see Machine Control, page 211. The Pan Theatre The Pan Theatre offers a combination of the 3D panner with the Pyxis window, as shown below. Page 177 PYXIS T RACK February 14, 2013 This allows you to adjust surround panning directly in front of the pictures. You can use the mouse to move the yellow or red balls, or use the regular panning controls and joystick. To enable the Pan Theatre, first enable the 3D panner using the System Variables dialog: Step 1 Type ctrl + Shift + U The System Variables dialog box is displayed. Page 178 PYXIS T RACK Step 2 Check the 3D Panner checkbox Step 3 Close the System Variables dialog February 14, 2013 Now open the 3D Panner by double-clicking the Pan Graph in SOLO Mixer Screen, right-clicking the Pan graph in FMC, or double-pressing the Path button in SOLO / XCS… Page 179 PYXIS T RACK … and click the video button. The Pyxis Window will now display the Pan Theatre. Page 180 February 14, 2013 MIDI T RACKS February 14, 2013 MIDI Tracks Introduction A licence is required to access the MIDI features, so what follows only applies if you have purchased it. Any number of tracks on the Edit Screen can be made into MIDI tracks (by default they are all “audio”) tracks). The software can: Create MIDI Tracks Record MIDI events in realtime Load MIDI song files Cut and paste MIDI clips Edit the contents of MIDI clips Setup A registry entry is required for MIDI commands to be visible. Your Fairlight distributor should set this up for you when your licence is purchased. The registry entry is as follows: HKEY_CURRENT_USER\Software\FairlightAU\Dream II\Global Setup\midiTracksEnabled Its value must be 1. You will need a MIDI controller (keyboard or other) and at least one MIDI instrument to play out. These must be installed before starting Dream II software. File Compatibility – IMPORTANT Project files containing MIDI tracks CANNOT BE LOADED by earlier software. Project files created by v3.1 software that do not contain MIDI tracks can be loaded by earlier software. If all MIDI tracks are converted back to audio tracks (losing all MIDI data) the project can be saved and then loaded into earlier software. NOTE: v3.0 software has a prototype version of MIDI tracks, using the Add MIDI Track command in the Track Menu. This is incompatible with the MIDI implementation in v3.1, and you are advised NOT TO USE IT. Convert Tracks to MIDI Each non-video track in the system is either audio or MIDI. By default all tracks are audio. You can convert from audio to MIDI, or vice versa, by selecting tracks in the Editor and issuing the command: MIDI Convert to or From Midi Tracks If you select some audio and some MIDI tracks before issuing the command, all the selected tracks will end up the same – majority rules. The audio and MIDI tracks are distinguished visually by a new pair of icons in the bar at the left. Page 181 MIDI T RACKS February 14, 2013 MIDI Audio Patching to MIDI Tracks To patch MIDI inputs to tracks and their outputs to instruments, use Setup Instruments on the Edit Screen. Patching is done in three steps: 1. Load an instrument and patch a controller to it 2. Patch the instrument’s audio outputs to tracks or lives so you can hear it 3. Patch a controller to be recorded on a track, and patch the track’s output to an instrument to play it. Step 1 On the input (left) side, load an instrument using the Add command. Choose any of your installed instruments from the dropdown menu that is displayed. The GUI for that instrument will appear on the screen. Now assign a MIDI controller (MIDI Device In) and choose the MIDI channel (or OMNI) that the instrument will play (it will not respond to other MIDI channels from the controller). The MIDI controller you assign will play the instrument “live”. Step 2 To hear the output of that instrument, it must be patched to one or more Track or Live Feed inputs. This is done on the Patch I/O page in the normal way. Step 3 The output (right) side shows all the tracks you have converted to MIDI. Choose the MIDI controller (MIDI Device In) to be recorded on each track. Normally this is the same controller for all tracks, which would be your MIDI keyboard. Patch the track output to any instrument you have loaded. Metronome To set up a metronome, use Setup Bars and Beats Setup Page 182 MIDI T RACKS February 14, 2013 The metronome is created by the Oscillator. To hear it, use the Patch I/O page to patch the output of the Oscillator Noise channel to an open track or live feed. Recording MIDI Clips Arm the MIDI track by clicking on the record button at the left of the screen. Put it in record using the normal transport commands. MIDI clips can be recorded on top of each other, just like audio clips. As usual, the top layer is heard. Fades and crossfades have no effect. Page 183 MIDI T RACKS February 14, 2013 MIDI clips show black and white notes at their relative pitches. Editing MIDI Clips MIDI clips can be edited using the Cut, Copy and Erase menus, just like audio clips. Head, tail, cl ip and range are all understood in the same way. The Trim head and tail commands, plus the Slip Clip command, work as expected. In addition the clips can be mouse-dragged, individually or in ranges, and edited with QWERTY shortcuts in the same way as audio clips. Each copy of an original MIDI recording is independent, so if MIDI Note Editing (see below) is used on one of them, the other one will not change. MIDI clips cannot be pasted on to audio tracks or the video track, nor vice versa. Names can be added to the MIDI clips, then changed if desired, using the Clip Rename command. MIDI Note Editing The system will only note-edit MIDI clips containing a single MIDI channel. If you have recorded or imported notes from multiple MIDI channels into one clip, you can separate them using the command MIDI Separate MIDI Notes by Channel The system creates one clip for each channel, and places them on the tracks below the selected one. For this to work, there must be sufficient MIDI tracks to take all the clips. MIDI clips can be edited in detail using MIDI Edit MIDI Notes Another way to do this is View Smart Pane MIDI Events, then click the Edit Events button. Either way, one MIDI clip at a time can be edited – the one on the current track (blue name and blue tab at left) under the cursor (the clip must be red). MIDI Note Editing opens a piano-roll editor where each MIDI event (note ON + note OFF) is shown as a clip-like object. Only mouse editing is available in this window. Note: NO AUDIO OR VIDEO PLAYBACK OCCURS WHILE THE MIDI NOTE EDITOR IS OPEN. Page 184 MIDI T RACKS February 14, 2013 The Edit Events button toggles the Edit Screen between the MIDI Note Editor and the normal Track Display. MIDI Events Play head Current length of MIDI clip being edited The Play Head is set to Unlocked when you enter the MIDI Note Editor. This is to allow easy editing of MIDI events while in Play. The lighter background shows the current length of the MIDI clip. Notes can be outside this area if you have trimmed the original MIDI clip (or copied its tail etc). You can edit notes inside and outside the area. The notes outside the area cannot be heard in the MIDI Note Editor or the normal Track Display. Notes can be dragged horizontally, in time, or vertically, in pitch. Ranges of notes can also be selected with a mouse lasso (marquee) and dragged horizontally or vertically. Notes dragged outside the limits of the MIDI clip will not be heard after editing, but they are not erased. The Note Editor Smart Pane Commands in the Note Editor Smart Pane are issued by clicking on the buttons. Notes can be selected by moving the transport over them, like audio clips. In addition you can select a range of notes in time and in pitch with the mouse lasso. The commands are described in detail below. Page 185 MIDI T RACKS February 14, 2013 Quantizes the selected note(s) to the current note value. Click to toggle the track display between the Piano Roll and normal tracks. To set the velocity of the selected note(s), move the slider to show the required value, then click Set. Click one of these three buttons to set the mouse click action. It can be used to select clicked notes, add a note where you click, or delete notes where you click. To Trim the velocity of the selected note(s), move the slider to show a positive or negative value, then click Trim. Set the current Note Value, used by Add Note, Duration and Quantise. To Trim the pitch of the selected note(s), move the slider to show a positive or negative value, then click Trim. Shows advanced quantize options. These commands act on the selected note(s). They set duration to the current note value, or add/subtract the note value’s duration. To change the MIDI channel of the selected note(s), move the slider to show a channel number, then click Set. Control how many octaves are shown on the piano. Toggle the metronome on and off. Set a playback loop and start it. Only MIDI events are played, not audio. Notes can be added. To do this, click the Select button in the Left Click group, then click a note value from the array. Now move the mouse cursor into the piano roll and you’ll see the note length. Click to create a note of any pitch at any position. Deleting notes is done by selecting the Delete tool, then clicking on individual notes. Page 186 PROJECT AND FILE MANAGEMENT February 14, 2013 Project and File Management Introduction File handling in SOLO supports legacy formats from previous products, but also introduces powerful modern Project and File management capabilities. This chapter details the way the sys tem looks after files. Basic File Commands New Project Click File New The New File dialog box is shown. This is described in detail below. Open Project Click File Open The Open File dialog box is shown. Browse, select a project and click OK. Save Project Click File Save or type ctrl-s Save Project As Click File Save As Close Project Click File Close Load Recent Projects Click File File Name (a list of recent projects) Project Formats In SOLO, three “native” project formats are supported. The newer format has the extension DR2. It has the strongest feature set, and is recommended for use where compatibility with older systems is not required. The older formats are MT and MT-MFX3. The MT format was introduced in the DREAM I product series, also known as QDC systems, and is maintained with full backward compatibility by SOLO. The MT-MFX3 format is for much older systems (you’ll know if you need to use it!) Choosing Format At the time of creating a project file, the system offers the choice of project formats in the New Project dialog: Page 187 PROJECT AND FILE MANAGEMENT February 14, 2013 There is no way to change project format after creation, but you can save a copy of the current project in the “other” format using the File Save As command. If you save a project into the MT format, it will load and play on QDC systems. If you save a project into the MT-MFX3 format, it will load and play on MFX3+ systems. Page 188 PROJECT AND FILE MANAGEMENT February 14, 2013 MT Projects The MT Project format is designed for backward compatibility with Fairlight QDC systems running software version 19.2.11 or higher. SOLO can also open MT files created on older Fairlight systems, dating back to MFX3+ systems running rev 15.x software. If you are planning to swap projects with QDC systems, always use the MT format when creating new projects. Recording Files (FUFs) When using the MT project format on a SOLO system, new audio recordings are stored in ‘FUF’ files. ‘FUF’ stands for ‘Fairlight Universal Format’, and a FUF file acts as an ‘audio container’ with many individual audio files bundled inside it. FUFs are saved as soon as the recording is complete. At this point the audio media is written to disk, but it is still not “safe”. The clip(s) that appear in the edit screen immediately after recording are the ONLY reference to the recorded material. They are stored in the Project (MT) file, and until that file is saved, the audio is not secure. FUFs can only grow to a maximum 4GB to maintain QDC compatibility, and new FUF files are generated automatically as required. FUFs are automatically named based on their parent project. So, a project named MyProject.MT might have FUF files named MyProject_001.FUF, MyProject_002.FUF, MyProject_003.FUF and so on. FUF files are automatically created in the same subfolder as the MT project. You must not delete FUF files unless you wish to remove audio from your project! When copying MT projects to a compliant QDC engine, you must always be sure to copy all associated FUF files. Otherwise, the QDC will not be able to find all of the audio data used in the MT project. The picture above shows the typical file layout with an MT file. The FUF file contains the audio, while the MT file contains the Edit list, mix information, and automation files. Note: The FUF file will generally get much larger, up to 4 GB, while the MT file already contains a full complement of mix data (even if mostly zero values), and will only get bigger when automation files are saved. Page 189 PROJECT AND FILE MANAGEMENT February 14, 2013 When the first FUF file reaches 4 GB, another one is automatically created. Stuffing FUFs SOLO allows external files to be dragged and dropped onto the timeline. Since these files are not recorded into the SOLO MT Project, they are not automatically added to the FUF files associated with the MT Project. If you want to transfer the MT project and all external audio files to QDC or to anothe r SOLO or DREAM II system, select: Process Stuff Fufs – All Clips or Process Stuff Fufs – Selected Clips This will copy all external media into the Project’s Fuf files. Please note that this process can take some time, depending on the quantity and size of external files that need to be stuffed. “Stuffing Fufs’ is a background task, so you can keep working while Dream II is processing. However, you cannot save your project until Fuf Stuffing is complete. When dragging and dropping files onto the Dream II timeline, you may notice some files are ‘Fuf Stuffed’ automatically. Dream II performs Fuf Stuffing automatically when it is required for QDC compatibility (for example, if you drag a file larger than 4 GB onto the timeline). Dream II users can also copy clips from one MT project to another. In doing so, the user creates a relationship between Fuf files belonging to one project and Fuf files belonging to another. Using ‘Save As’ with an MT file has the same effect, and creates a ‘Parent/Child’ relationship between the original MT Project and the saved version. To break any such inter-Project dependencies, select: Process Detach from the Dream II menus. After detaching your MT Project, you can select Process Stuff Fufs – All Clips or Process Stuff Fufs – Selected Clips to consolidate all audio into Fufs associated with your current project. If you are unsure of what file a clip is stored in, you can find out by selecting View Clip Search from the Dream II menus. You will see the filename associated with each clip in the list, and you can click the ‘Reveal File’ button to display a file in Windows Explorer. Note that you can rearrange columns in the clip search window by dragging and dropping column headers. You may need to scroll to the right to view all available clip search columns. Always take great care not to delete files associated with your MT Project. You may not be able to recover files once they have been deleted! DR2 Projects DR2 (Dream II) projects are a new project format designed specifically for Dream II. DR2 files are not backwardly compatible with older Fairlight products, although they can be converted to MT projects with FUF files as described above. The DR2 file format provides enhanced capabilities compared with the legacy MT file format, and all future development will focus on the DR2 file format. Recording in DR2 When using the DR2 format, new audio recordings are stored as industry standard Broadcast WAV Files. SOLO Broadcast WAV Files are stored in the ‘Media’ subfolder of the DR2 Project folder. The WAV files are created when recording starts, and they are refreshed at regular time intervals during recording. When this happens, all but the last part of the recording is safely on disk. This means that audio recordings in DR2 format are quite secure – even if the project file is lost (or never saved) the WAV files are viable stand-alone containers for audio media. References to them can easily be imported Page 190 PROJECT AND FILE MANAGEMENT February 14, 2013 and re-synchronised in a new project, or in any other project. This process is described below as “Recovering Lost WAVs”. The picture above shows the typical file layout with a DR2 file. The Media folder, which is automatically created by the system, contains the audio in the form of WAV files, while the DR2 file contains the Edit list, mix information, and automation files. The Media folder looks like this. The WAV files are named as follows: Clip Name _ Track number _ GUID.wav The Clip name is the automatic name given to the clip by the system. Or you may have named the c lip while recording it. The Track number is the one on which the audio was first recorded. The GUID is a system number, discussed below. GUIDs SOLO Broadcast WAV Files are named using ‘GUIDs’. A GUID is a unique ID that makes it easy for the system to locate files in a database. Since GUIDs are hard to read, Fairlight has created the Fairlight Shell Extension for Windows Explorer. The Fairlight Shell extension is installed by default, and allows users to view hidden iXML metadata in the Fairlight Broadcast WAV Files. The Project Name, Clip Name Page 191 PROJECT AND FILE MANAGEMENT February 14, 2013 and Frame Rate are embedded in each WAV file by SOLO during recording, and can be viewed with the Fairlight Shell Extension. Using the Fairlight Windows Explorer Shell Extension: 1. Open Windows Explorer. 2. Under the 'View' menu, select 'Details'. 3. Right click a column header (eg - 'Name') and select 'More' from the popup. 4. Scroll down to the bottom of the list and add the desired iXML columns (eg - 'Project') you wish to view. 5. Click 'Ok'. Localize Localizing audio means putting the files in the same folder as the Project file. Any audio which is referenced out of other folders is copied into the Media folder for the current Project file, as new WAV files. Once a project is localized, it is much easier to move it to another system, or back it up, because all the media is in one place. To localize files in a DR2 project, select the Localize command from the Process Menu above the Editing screen. The displayed dialog will ask whether you want to localize all files, or just the s elected ones. Handles Localizing only copies those sections of the original recordings that have been actually used in the project. Anything that has been edited out will not be present. To provide insurance for future editing you can save “Handles” on each piece of audio. These are extra pieces of audio that can be exposed using the Trim menu. It’s advisable to use handles unless the edit is absolutely final. Recovering Lost WAVs If a DR2 project has not been saved recently, any recordings made since the last save will not appear in the project next time it is opened. These recordings can be recovered and resynced, as follows: Step 1 Open the DR2 Project Step 2 Open the folder in Windows Explorer that contains this project. Open its Media folder. Step 3 Identify the WAVs that are missing from the project. These will normally be the most recent ones i.e. the ones with the latest modification date. Step 4 Drag the missing WAV files from their folder to the DREAM II track display, and drop them there. Step 5 For each WAV file that you have dropped, select it and notice the track number embedded in its Page 192 PROJECT AND FILE MANAGEMENT February 14, 2013 name. Place it on that track. Step 6 For each WAV file select it by moving the transport until it is underneath the play head, then issue the command Edit Resync to Record Time. This will place the clip at the time where it was originally recorded. Waveform Profiles Dream II stores waveform profiles for all the media in your projects, allowing it to display full screen waveforms at any zoom range. The waveform profiles are extracted and stored in the background during and after any recording or import function, or whenever a piece of media does not have a profile. If a number of clips have no profiles, selected ones are given preference during calculation and display. After some time the number of profiles can get quite large and use a lot of space on your computer. The system automatically deletes profiles if they have not been used for a certain number of days. To control how many days, use the command Setup General Preferences Projects The default is set at 90 days, but you may change that to any time you like. Revealing the Project File To display a Windows Explorer Window containing the currently loaded project, use the command File Reveal Project File Backup Files Each time a DR2 file is saved, an optional backup of the previous saved version can be made. This will only happen if your system is set up correctly. To enable backup saving, issue the command Setup General Preferences, and go to the Projects tab. Page 193 PROJECT AND FILE MANAGEMENT February 14, 2013 Set the number of backups you would like to keep. The system default is 5, which means the 5 mostrecent saved versions of your file will be retained. Automatic File Saving Automatic File Saving allows you to save your project automatically at regular time intervals. To set this up, issue the command Setup General Preferences, and go to the Projects tab. Set the desired interval for Auto Save, or turn it off. Note: When the time for an Auto Save arrives, it will wait until the transport is stationary, then take control of the system. While saving, it will prevent the transport from starting, and mute all audio at the outputs. This is necessary to prevent unwanted interaction with the automation system. Undo Files SOLO allows unlimited UNDOs for audio editing. It does this by storing a copy of the Edit list each time an edit is made. The undo files are stored in the folder C:\Program Files\Fairlight\Dream II\Undo Each time a project is opened, the system starts writing undo files for it, star ting with a file called UndoFile_00.1. This file name does not contain the project for which it was created, because the system is designed only to work with the currently open project file. (Immediately after reopening any file the UNDO command cannot be issued – it only works on edits made in the current sessions.) If there is an UndoFile_00.1 already in the folder (which there almost certainly is) it will be replaced with this one. Page 194 PROJECT AND FILE MANAGEMENT February 14, 2013 This means that undo files from older projects are difficult to identify. But if you have wrongly (and very recently) saved a project, and you wish to access a previous version of the edit list, take the following steps: Step 1 Open the folder C:\Program Files\Fairlight\Dream II\Undo Only these two files are from the most recent project. Step 2 Choose the undo file you want to open. Rename this file so that it has an extension “dr2” (upper or lower case – it doesn’t matter). Step 3 Move this file to a Media Device. The simplest is to move it to the folder on your audio drive where the original project is stored. Step 4 Open this file by issuing the File Open command or using the Project Menu open soft key. Video Files SOLO supports drag and drop import of a variety of video file formats, as well as direct video recording to the SOLO timeline. For correct operation, video files must be played from and recorded to a separate hard disk than the audio data. **WARNING: If you attempt to play video and audio data from the same hard disk, you will experience SEVERE performance problems!! The disk bandwidth required for video is governed by the type of video you wish to play back. Some types of compressed Standard Definition video may play back from a single 10,000 RPM SATA drive, while uncompressed High Definition Video may require a large, fast RAID array. Please contact your Fairlight distributor to discuss your specific needs. Page 195 PROJECT AND FILE MANAGEMENT February 14, 2013 Typical SOLO Drive Configuration Designating Media Device When SOLO is first started it displays a dialogue box requesting that a default project device be selected. Select the devices (Audio and Video) you wish to use from the list of available drives. To prepare the drive for use with SOLO, select Setup Media and Project Management from the SOLO main menu. Select the device from the devices list and click on Convert to Media device . Please also set the Device Info accordingly (in most cases, this is set automatically and does not need to be changed). Click here for folder display Page 196 PROJECT AND FILE MANAGEMENT February 14, 2013 To use a network connected device, first create a mapped network drive or folder in Windows Explorer. This can now be selected in the device panel and converted to a SOLO Media Device as above. ** Please note that audio and video files can only be played from a designated Media Device. If you try to play files from any other disk, you will receive an error message. Creating New Projects Once Media Devices have been set up on your SOLO system for Audio and Video, you are ready to create a New Project. To do this, Press the Project key on your SOLO controller followed by the New softkey – or, select File New from the SOLO pulldown menu. You will see the following dialog: Choose a Project Type (MT or DR2). By default, your project is created in its own subfolder named with the Project Name. This is the recommended practice, as it helps keep your SOLO system organized. If you prefer, you can place your projects elsewhere – as long as you select a designated Media Device. If you enter a comment, this text will appear in the Title Bar of the Edit screen whenever the project is loaded. Give your project a name and select the appropriate options. You are ready to begin! Backup Project to Folder Both MT files and DR2 files can be backed up using File Backup Project to Folder option. This feature copies the project file and all the associated media files (audio and video) to the designated folders. Backup Project to Folder places all files associated with a project in a single place, making it easy to restore them later. Many facilities use inexpensive USB drives for backup. Restoring files is simply a matter of dragging and dropping files from the backup folder to the appropriate Audio and Video Media Devices. Media Scanning Normally the system scans all available media to ensure that it is up to date with available files. This takes some system bandwidth and memory in particular. If you do not need this function i.e. if your Page 197 PROJECT AND FILE MANAGEMENT February 14, 2013 storage contents are not being changed by other computers, you may turn off background scanning in Setup General Preferences Projects. If you open a project whose media is not online, and then you bring the media online, it will not be found if background scanning is switched off. You can, however, force the system to find the relevant media for the current project using Process Relink Media. Detailed Media Management To work on media and project management, select Setup Media and Project Management from the SOLO main menu. Controlling Scanned Folders You may wish to save time when the system starts by omitting the scan of some folders in your system. This is particularly useful when the system is connected to a network. In the Media and Project Management dialog you can display all storage devices, folders and files. While this pane is open, click on one of the devices shown above, and its folders will be displayed. Now you can select folders and click “Stop scanning selected folders”. Clicking Reveal folder will open a Windows Explorer window showing the selected folder and its contents. Double-clicking a folder in the list of Scanned Folders will display its subfolders (if any) in the Subfolders window, and the projects (if any) contained inside it, in the Projects window. Select a project in the right hand list, then click List Media in Project to display a new window containing all media in the Media folder of the project. Click Delete Project to remove the project from the hard disk. You will be prompted to remove all the media in the Media folder. Discarding Unused Media It is possible to create a number of recordings which end up not being used. To remove these from your hard disk automatically, select a project and use the command: Setup Media and Project Management Discard Unused Media Page 198 PROJECT AND FILE MANAGEMENT Selected Project February 14, 2013 Discard command This command moves the unused media into a recycle bin, of which there is one for each media device. Specifically, it removes media in the selected project’s media directory that is not used by any project in the selected project’s current directory . It will only remove native (recorded or localized) media, not files that have been imported from other systems. The device list has a column reporting how much space a device's recycle bin is taking up. To clean up the recycle bins there is a button on the dialog called 'Empty Recycle Bins'. This can be used when you are sure you do not need any media from them anymore. The new recycle bins are located on each media device under the 'FairlightAU' folder. Note: the same thing can be achieved using Process Discard Unused Media, with one difference: this will remove unused media from UNDO files as well, so UNDO is not possible afterwards. This is great for recording sessions with a lot of useless takes, because only the ones used in the project survive. Recovering Lost Media (Orphaned Media) When you UNDO a recording, or erase all its resulting clips, the media is still stored on the hard disk – you just don’t have a clip in the project referencing it. You can, of course, find it in the Windows system and drag it back into the project, but there is an easier way. Note: this can only be used during the session where the recording was made. Once you close that project, the references are gone. To see a list of the media that was recorded in the current session, and is now unreferenced, use the mouse: View Orphaned Media Page 199 PROJECT AND FILE MANAGEMENT Type a text string here to only files whose names contain that string Click to sort the list by this parameter February 14, 2013 Drag headings left or right to re-order the display Select one file, then click on the commands at the bottom of the dialog, as follows: Reveal File Opens Windows Explorer at the folder containing the selected file Page 200 PROJECT AND FILE MANAGEMENT Locate February 14, 2013 Moves the transport to the start time of the original recording Paste Here Creates a clip using this media at the current timecode position, on the current Edit Track. Refresh The display is updated to include the latest recordings to have been erased or pasted (not normally necessary, as the display updates automatically) Preview Plays the selected recording through the monitor system. Press the same button again to stop playback. ReSync Creates a clip using the selected media, at the original recording timecode and on the original track. Close Closes this dialog box. The Escape button can also be used Importing Files SOLO has a number of features to allow the import and export of audio clips and Projects. File Types DREAM II can import the following file types: Video Files – these can be displayed on the Pyxis track Pyxis Projects – these are projects created using the program “Pyxis” OMF Files – these are files from other manufacturers ML Files – these are files from older Fairlight products. AES-31 Files – these are files from other manufacturers AAF Files – these are files from other manufacturers MXF Files – these are files from other manufacturers Importing Video Files See Pyxis Track on page 165. Importing an OMF Step 1 Click on File, then choose import, OMF Step 2 Browse to the location of the omf and select it. Press OK Step 3 The following dialog box is displayed Page 201 PROJECT AND FILE MANAGEMENT February 14, 2013 Import Media “Preview Media” references the audio files from the omf – this may cause slowdowns on large projects Note If the project is an *.MT project, stuffing the fuffs will render all audio to the current project If the project is a *.DR2 project, using the “Localise” command will place all the audio in a folder inside the project folder. This brings all the audio used by the project into one place so that it can be easily backed up or copied. “Fully Import Media” automatically places the audio from the omf in either your FUF or Media folder inside the folder of the current project Clip Naming “Standard” derives the names of clips from the omf “Master Clip” within the omf file. “Sub-Composition” - OMF’s created in AVID often derive clips from either the “Master clip” and the “Sub Composition”. This option derives the names of clips from the “Sub-Composition”. Use this setting to give your clips more logical names if they are coming from an AVID and not displaying logical clip names. Offset Entering a timecode offset moves the whole composition forwards on the timeline. Entering a track offset moves the whole composition down in the track display. Importing Individual Sound Files Sound files of various types can be imported directly into your Dream II project. These include the following: MP2, MP3, WAV, BWAV, AAC and more. To import one use Windows Explorer (or My Computer) to locate the file, then drag and drop it on to the Dream II Edit Screen. The file will be placed at the cursor position (or in the range), on the track where you drag it (unless you use the options below). Found at Setup General Preferences Options: Place Files at Embedded Timecode Some audio files carry a timecode with them. Checking this option for a particular file type causes it to be placed at that timecode, no matter where you drag it with the mouse. Place Files on Embedded Track Some audio files carry a track number with them. Checking this option for a particular file type causes it to be placed on that track, no matter where you drag it with the mouse. Importing Multiple Sound Files If you select multiple files in the Windows Explorer (or My Computer) dialog, you can drag and drop them all to the timeline. By default, the files will be placed head-to-tail along the track where you drag them. Page 202 PROJECT AND FILE MANAGEMENT February 14, 2013 If you hold down the ctrl key while dragging the files, they will be placed on successive tracks, at the same timecode point. Individual Localisation Individual clips can be localised as follows: Step 1 Select a range of clips on one or more tracks. Step 2 Hold down the BLUE key and press ENTER. Sample Rate Conversion Sometimes the files you import are at a different sample rate than the project. When this happens, Dream II automatically turns on real-time sample rate conversion to ensure the audio has the same pitch and duration as the original. Clips subject to sample rate conversion are marked with a black SR label. The quality of sample rate conversion may be varied using the dialog Setup General Preferences General: Fast Puts a small load on the computer system, but doesn’t sound so good. Very useful when there are a lot of clips to be sample rate converted, or a lot of plug-ins in the project. High Quality Sounds good but loads down the CPU If you need good quality and have lots of clips to sample rate convert, you can localise the media, which performs the best quality sample rate conversion and re-references the clip. Step 1 Select the clips that need to be sample rate converted Step 2 Issue the command Process Localise Audio Use handles if the clip has been edited, and might need to be re-extended Select all clips using this media before localising, and the system will only produce a single piece of media which they can all reference. Export Exporting Audio You can export audio from a Project in the following formats: WAV Broadcast WAV Aif AES-31 – This consolidates your project into a file used by other manufacturers Step 1 Select the clip or clips to be exported. Ranges of clips can also be selected. Step 2 Click the File menu command above the Track display. Page 203 PROJECT AND FILE MANAGEMENT Step 3 Choose Export, then Audio Tracks/Clips Step 4 The following dialog box appears. February 14, 2013 Make your selections and click OK. File Type Select Wav, BWave or AIF files. BWave files will be exported with the timecode stamp from the Dream II timeline. Export With Select Clip EQ, Clip Level and/or Clip Fades to render those modifications into the exported file(s). Normalize Normalize will examine the level in every clip you have selected, find the maximum level of all the clips, then show the gain increase needed to bring it up to 0 dB. Then all the clips will be amplified by this amount, giving you the loudest (best quality) signal possible while maintaining correct balance Audio Type Select bit depth and Sample Rate for exported file(s). Defaults to Project sample rate and bit depth. Mixdown Select ‘Entire Project’ to export the entire project (one file per track in Multiple Mono Mode). Select ‘Between Range’ to export all audio in the current range (one file per track in Multiple Mono Mode). Select ‘Selected Clips’ to only export selected (red) clips (always one file per clip, regardless of selected Channels). Check ‘Selected Tracks Only’ to only export selected tracks. Check ‘Align to Video Frame Boundaries’ to align exported file(s) with the video frame edges. Check ‘Export Empty Tracks’ to export blank files for empty tracks (if Multiple Mono files have been selected). Then select the location you want the exported audio to go and hit “OK” Channels Page 204 PROJECT AND FILE MANAGEMENT February 14, 2013 Allows you to select the format of the files being created by export. Mono files, 1 per track Creates a single mono media file for each track in the export i.e. all tracks or selected tracks, depending whether the Selected Tracks Only checkbox is selected Stereo files, 1 per track pair For each pair of tracks in the export, a single stereo media file is created Mono/Stereo files (automatically choose) If a track is mono, and contains no multi-channel clips, its contents will be exported as a stereo media file. If a pair of tracks are linked as a Link Group, their contents will be exported as a stereo media file. If a track contains a two-channel clip, its contents will be exported as a stereo media file. Mix Track to a single Mono File All tracks in the export are mixed together to form a mono mix, and this is recorded into a mono media file. Mix Track to a single Stereo File All tracks in the export are mixed together to form a stereo mix, and this is recorded into a stereo media file. Single MultiChannel File (all selected tracks) A single file is created with multiple linked media, one for each track in the export. Note: The 'description' field inside a BWave file is preserved when a clip is exported as BWF. The default value for the BWF 'originator' field can now be specified. See Setup General Preferences Options Page 205 PROJECT AND FILE MANAGEMENT February 14, 2013 Exporting Video You can export the video straight from a project and automatically combine it with your choice of audio from a project. To do this, choose click on the File Menu and choose Export then Video This box pops up: Step 1 Choose the video format into which you wish to export Step 2 Choose whether you want to export the whole project or a selected range Note: to export as a Quicktime file you must have the latest version of Quicktime installed Note: some file types require licences for export. Please consult your Fairlight distributor for details Export Cue Sheet You can export the clip data from your project as a comma-separated (CSV) file. To do this: Step 1 Issue the command File Export Cue Sheet Step 2 Use the Save dialog to select a destination for the file Step 3 Press Enter Page 206 PROJECT AND FILE MANAGEMENT February 14, 2013 EDL Management Introduction EDL Management supports three activities associated with EDLs (Edit Decision Lists) produced by other editing products. Capture records the material needed by the edit list, from original sources such as video tape Conform edits the source audio recorded in the capture process, placing it at the destination locations indicated by the edit list Reconform re-edits an existing DREAM II project according to a “cut list”, usually representing a re-edit of the pictures in a video project Loading an EDL The first step is to load an EDL file. Step 1 At the top of the Edit Screen, click File Import EDL Step 2 Navigate to the file location of an EDL file and click the Open button This will cause the display of the EDL dialog Capture and Conform Capture and Conform are performed at the same time. The audio for each line in the EDL is captured and immediately conformed. Page 207 PROJECT AND FILE MANAGEMENT February 14, 2013 Before starting, we must set some parameters. Step 1 Set up Track Mapping Track mapping chooses the tracks where you will record in your currently open project. DREAM II lists each type of edit that it finds in the EDL e.g. A12, A 3 etc., and allows you to choose which audio tracks to record for each type. (Often it will be the same set of tracks for all edit types.) Click in the Record Trks column for each type of edit, and choose from the drop down list. The Rec Tracks drop down list provides a convenient way to quickly fill in the track mapping for a specific number of tracks per EDL track. Presets allow you to save a track mapping for reuse. Type a name into the field and click Save. To load a preset, simply select it from the drop down list. Step 2 Select Edits to Capture The system will capture only the highlighted events in the EDL display. Use the mouse to highlight the required events. You can select a range of events by selecting the first, then holding down SHIFT and selecting the last in the range. You can add or subtract an event from the selection by holding down ctrl and clicking it. Events that are marked with an R will not be recorded, even if they are selected. Each time the system performs a recording, the events that successfully record are Page 208 PROJECT AND FILE MANAGEMENT February 14, 2013 automatically marked this way. You may also click in the checkbox for any event to mark or unmark it manually. Step 3 Capture Settings Handles – you can capture more audio than indicated by the EDL event. This can be very useful for adding fades or capturing ambience around the event for use in smoothing. Preroll – sets the time that the source machine will run up to the recording. Set this value to suit the type of source machine being used. Typically tape-based machines require at least 3 seconds to lock properly. Postroll – sets the time that the source machine will keep running after the recording. Step 4 Set up Patching Connect the source machine outputs to some of your DREAM II inputs, and use the Patch I/O page to patch them through to the recording tracks. The Patch I/O page is discussed in detail in Patching Signal Paths, on Page 28. Step 5 Set up Destination tracks for Conform. The Destination tracks are those to which the audio will be copied to match the Rec Start time for the EDL events. You need only specify the first destination track – the software uses the following tracks to place audio for events requiring more tracks. Step 6 Click the Capture button The EDL Capture and Conform will now go ahead. The software will request the first source reel to be loaded on to the source machine. It will then capture all the audio needed from that reel, optimizing to reduce the amount of shuttle time. The software will then request the next reel, and continue in this vein until the conform is complete. Events that cannot be recorded are marked E (Error). Reasons for this can include: Bad timecode causing lost sync before the end of a recording Tape machine not locating to the pre-roll point The software will continue after errors of this type, and complete as much of the conform as it can. Reconform Reconform uses an existing project (or more than one project) as the source audio for a Conform. There is no Capture process, as the audio is already present on hard disk, but otherwise the process is very similar to Conform. Each reel in the EDL may be mapped to a different audio project. Page 209 PROJECT AND FILE MANAGEMENT Step 1 February 14, 2013 Set up Track Mapping (as for Capture) Commonly all tracks will be involved. The Record Tracks correspond with the source tracks from the existing Source Project. Step 2 Select Edits to Reconform (as for Capture) Step 3 Link Reels Each reel can come from a different project if required. Use the Reel Linking dialog to choose the project for each reel: select a reel, then click the Project button and browse to the correct Project to be linked. Multiple reels can be selected at the same time and linked to a single project. Step 6 Set up destination tracks If all tracks will be involved, choose Track 1 as the destination. Step 7 Click the Reconform button If one of the linked projects is not found, an error message will be displayed, and the reconform will stop. If there is no audio between the source In and Out times for an event, an error message will be displayed, but the reconform will continue with the following events. Additional Facilities Selecting a reel in the Reel Linking dialog also selects all of the EDL events associated with that reel. Clicking the A button in the Sort group causes the EDL events to be sorted according to the EDL event numbers. Clicking the C button in the Sort group causes the EDL events to be sorted according to source reel. Page 210 S YNC AND MACHINE CONTROL February 14, 2013 Sync and Machine Control Introduction SOLO can communicate with industry standard Sony 9 pin serial controlled machines (with a timecode reader installed) providing control over external video (or audio) machines, directly from the SOLO. SOLO can control up to three machines: M1, M2 and M3. Of these, two can be physical VTRs, and the third can be Linear Timecode or MIDI Timecode. Setting up Machines To choose a machine type for M1, M2 or M3. Step 1 Click View Smart Pane Machine Control Step 2 The following Smart Pane is displayed Step 3 Use the type soft key or ‘Type’ list box to select one of the following machine types: TC Master – the selected machine is the 9 Pin timecode master. Chase (slave) - the selected machine is in 9 Pin chase mode. Remote (slave) – SOLO will respond to 9 Pin remote commands like a “virtual VTR”. LTC Master – the selected machine is set to chase external Longitudinal Time Code. MTC Master – the selected machine is set to chase external MIDI Time Code. MMC Remote (Slave) – when this is selected SOLO responds to MIDI Machine Control commands Page 211 S YNC AND MACHINE CONTROL February 14, 2013 Pyxis – selecting Pyxis Track as one of your machines allows you to take it “offline” the same way as physical machines. See Editing with Machine Control on page 217 to see how this works. No Port – No port selected Note: You can have only one Master machine at a time, but you can have as many slave machines as you like (limited only by available ports). Master and Slave machines can be used concurrently. Press M1 and/or M2 keys or use the ‘Online’ checkbox, or click the M1, M2, M3 screen buttons to place machines online. Enter an Offset if desired. Use the red Video, Analog and Digital LEDs to arm tracks on your remote device as required. Note: The master ‘Video Arm Enabled’ box must be checked and each video ‘Arm En’ box must also be checked on the desired device before the Video arm LED can be used to arm the video track. Click the ‘Eject’ button to eject tape from the desired device. Note that controls will only appear if they are relevant to the selected device type. Config Click the Config button to set transport ballistics for the different machine types. TC Master When a machine (M1 or M2) with this setting is placed on-line, it means that SOLO will control the transport of a 9-pin machine, but will chase the position of that machine in all transport modes. In this case the Config Window looks like this: Page 212 S YNC AND MACHINE CONTROL February 14, 2013 Locate Method Select between Cue Only (operates only in Cue mode) or Unlace (unlaces a tape machine and puts it in Fast Forward or Rewind when the locate distance more than the number in the Lace Window. This allows for faster locates for video tape recorders. Lace Window Causes the machine to unlace if it is given a locate command outside the range of this window. Unlacing allows the machine to travel faster, and reduces head wear. Tracking Algorithm Determines how the machine performs when searching for timecode. Each machine may perform better with either choice of algorithm. Bi-Directional Control When switched on, allows either the Master or the Slave to instigate transport commands (e.g. Play, Stop etc). Page 213 S YNC AND MACHINE CONTROL February 14, 2013 Edit Delay (frames) Each VTR has a built-in delay between receiving the Edit command (equivalent to a pre-programmed Record command) and actually entering the Edit mode. If you the Edit Delay to match the machine’s behaviour, SOLO will issue the Edit command early so that the VTR enters Edit at the right time. Confidence Head Switches the video machine’s Confidence Head on or off. Stop Command Allows the option of keeping the VTR tape on the heads when the machine stops. This will allow it to start playing much quicker, but it does increase head wear. Head Protect Specifies a time after which the tape is removed from the heads automatically, to prevent wear. Play Tracking Determines how many incorrect frames the system must see before it jumps to be in sync with the incoming timecode, or stops if no timecode is coming in. This allows the system to keep playing over timecode that has gaps. Record Tracking As with Play Tracking, but recording uses a different number. This is because recording sometimes needs to be more tolerant. Note that, if timecode sync is lost during recording, then re-established, the transport will go back into Play, but not into Record. Run Lock If the Play Run Lock checkbox is ticked, the system will continue to play after first achieving lock to timecode, no matter what the timecode does. The lower Run Lock checkbox provides the same option when recording. As for TC Master, but there is an individual choice of tracking algorithm for Play and Jog. Page 214 S YNC AND MACHINE CONTROL February 14, 2013 Remote (Slave) Mode When a machine (M1 or M2) with this setting is placed on-line, it means that SOLO emulates a 9-pin machine, and will obey commands sent to it. It is the master for timecode. At the same time, its transport controls are active. Select 9-pin ID Allows you to choose the type of machine being emulated by SOLO. This allows for slight variations in the 9-pin protocol. Status Sense Play Tally Controls an aspect of 9-pin performance. This parameter controls the value of bit0 #0 Byte#1 in the Sony Protocol command: “0x7X 0x20” Status Data (sent from SOLO system to the Sony master device, in response to the “0x61 0x20” Status sense command.). If “Play Only” is set, the value of this bit is 1 only when SOLO is in Play or Record modes. If “Play and varispeed” is set, the value of this bit is 1 when SOLO is in Play, Record or varispeed modes. Some equipment (e.g. DspMedia postation) requires this parameter to be set to Play only, to work correctly. Some equipment, (e.g. SoundMaster), requires this parameter to be set to Play and Varispeed to work correctly. LTC Chase When a machine (M1 or M2) with this setting is placed on-line, it means that SOLO will chase Longitudinal Time Code entering the SMPTE In port on the SX-20. Play Tracking Determines how many incorrect frames the system must see before it jumps to be in sync with the incoming timecode, or stops if no timecode is coming in. This allows the system to keep playing over timecode that has gaps. Page 215 S YNC AND MACHINE CONTROL February 14, 2013 Record Tracking As with Play Tracking, but recording uses a different number. This is because recording sometimes needs to be more tolerant. Note that, if timecode sync is lost during recording, then re -established, the transport will go back into Play, but not into Record. Run Lock If the Play Run Lock checkbox is ticked, the system will continue to play after first achieving lock to timecode, no matter what the timecode does. The lower Run Lock checkbox provides the same option when recording. MTC Chase When a machine (M1 or M2) with this setting is placed on-line, it means that SOLO will chase MIDI Time Code entering the MIDI In port on the SX-20. The settings are identical to those for LTC Chase. Machine Control Indicators Name Name of the 9 Pin Device. Servo LEDs The left Servo LED is green when the 9 Pin device has servo lock. The right Ser vo LED is green when the 9 Pin device has sync lock. For correct operation with 9 Pin devices, both LEDs should be green. Timecode Displays the current timecode position of the external device. Status Displays the device status. Offset Displays the device offset. Asm Indicates the 9 Pin device is in Assembly Edit Mode. Inh Indicates the 9 Pin device is in Record Inhibit mode. Ref Indicates the 9 Pin device is receiving a valid external sync reference. Timecode Generator The LTC and MTC generators are independent of the machines controlled from the Smart Panel. The checkboxes shown below are used to turn these on and off. Page 216 S YNC AND MACHINE CONTROL February 14, 2013 The timecode generators have their own offset field, shown above. When the In Stop checkbox is ticked, a repeated timecode frame is gener ated when the transport is stationary. Otherwise, timecode is generated only in Play. MIDI Timecode is always output from the MIDI port at the rear of the SX -20 sync box. Putting Machines Online Machines stay in stop and are ignored by the SOLO system while offline. To put a machine online, do one of the following: Press the M1 or M2 button on the SOLO Center section. Select one of the Online checkboxes on the Machine Control Smart Pane. Editing with Machine Control All the transport controls and locating methods operate with a 9 pin remote machine online. The following procedure is used to place new recordings or previously used clips to picture. Press the M1 key to toggle the 9 pin machine on or off. SOLO s transport will locate to the timecode from the 9 pin machine. The system defaults to M1 controlling 9 pin Port A. Placing Sound to Picture Step 1 With M1 online, locate the video at the desired frame. Step 2 Take M1 offline. Step 3 Locate the transport so the cursor lies on the sync point of the clip. Step 4 CUT or COPY the clip to the clipboard. Step 5 Place M1 online – the transport will relocate to the video at the desired frame. Step 6 Press <Enter> to paste the clip. Page 217 S YNC AND MACHINE CONTROL February 14, 2013 Timecode Setup Introduction The Setup Menu is used to configure the Project’s synchronisation setup. Step 1 Press the Setup key or click View Smart Pane Sync Setup Step 2 The following dialog is displayed Sample Rate This value can only be set when creating a new project. Frame Rate Can be changed at any time. Normally it is best to choose the frame rate of the Master video device in your system, or of the timecode being chased, if any. Record Bit Depth Can be changed at any time. All subsequent recordings will have this depth. Video Resolution This is the format of the external video reference applied to the SX-12V or SX-20. It must be set to match the incoming video signal for correct sync. Pull Up/Down Allows setting of Pull Up and Pull Down, often used in NTSC video setups. Detailed explanation below. Sync Source The system sample rate is synchronised to its clock source. There are many choices, but normally you will use the SX20 as a sync source, and lock it to whichever sync signal your studio is running. Synchronization Indicators True Rate True Sample Rate shows the speed at which SOLO is running. It also shows the real frame rate, after adjusting for Pull Up/Down setting. Video Detect The Video Clock Detected indicator is green when a valid Video Clock reference is detected and red when Video Clock is missing or invalid. Seeking Lock The Seeking Lock indicator is green when seeking lock, and red when not in use. Page 218 S YNC AND MACHINE CONTROL February 14, 2013 Sync The Sync indicator is green when a valid Clock Sync Source reference is detected, and red when the Clock Sync Source is missing or invalid. Progressive Detect SX-20 supports both Progressive and Interlaced clocks. If the Progressive Clock Detect indicator is green, a Progressive Clock reference has been detected and is being used as the primary sync reference. Clock In Range The Clock In Range indicator is green when the Clock reference is in range and red when the clock reference is out of range. Position Sync When synchronising with an external machine such as a video machine, audio recorder or digital audio workstation, a positional source allows the machines to “tell” each other where they are. The Position Sync Source indicator is green when a valid Position Sync Source reference is detected, and red when the Position Sync Source is missing or invalid. Synchronization Details SOLO can track the position and motion of external transports such as a video tape recorder, timecodestriped audio tape or a timecode generator. The disk recorder will play in time with the Master Timecode source so that sound and picture coincide. Position This is an absolute location reference to a sequence of pictures or audio. It is used to determine whether the disk recorder is playing the right part of its Project. For video, position reference is usually provided by 9 pin (Sony protocol from an RS-422 port). For audio tapes LTC is normally used (though 9 pin is also a possibility). Motion The motion of an external machine is a measure of its speed, and the disk recorder must move at the same speed to remain in sync. This translates into producing the correct number of samples every second, which is called the Master Clock rate. This can be locked to a Digital Word Clock, a video signal, an AES/EBU signal, by the internal crystal, a timecode source, or a digital audio source which is being recorded. If the Position Reference and Motion References are not the same, it is possible that they will drift apart over time. This will be shown by a warning at the top of SOLO ’s video screen which indicates when an inconsistent timecode frame was encountered. How SOLO Synchronises SOLO goes through a number of steps in achieving synchronization in play mode: 1. Read the position reference and start loading up the corresponding audio on all active tracks. 2. When ready, start playing, but with the outputs muted. Use variable speed to reduce the error between the SOLO position and the Position Reference until it is very small. 3. Switch to the Motion Reference for continued playback. The system is said to be locked once this switch is made, and the audio is unmuted. 4. Warn of error status if the sync error increases, if a reference signal is lost etc. Page 219 S YNC AND MACHINE CONTROL February 14, 2013 Synchronization Conflicts When you are recording a digital source, it must be synchronised to the same Master Clock Reference as SOLO, or an overflow (too many samples) or underflow (too few samples) may occur at the input. This causes a characteristic, periodic form of digital distortion called a whisper. A whisper sounds like a brief, glassy or metallic buzz, and occurs about once every few seconds, depending how fast the samples are overflowing or underflowing. The best solution to digital sync conflicts is to drive all digital devices from a single, studio-wide word clock signal. Then all devices will have identical word rates, so whispers never occur and digital interconnections may made with ease. In this instance, the sync HOUSE option is always used. Pull-Up and Pull-Down The normal sample rates used by the digital audio industry are 32,000, 44,056. 44,100, 48,000 and 96,000 samples per second. The normal frame rates are 24, 25, 29.97 and 30. These last two may cause confusion when used together. SOLO can alter its sample rates far enough to accommodate the small speed change caused by going from 30 to 29.97 frames per second and back again. In other words, if you slow down the frame rate from 30 to 29.97, SOLO can slow its internal sample rate to match. This is called Pull-up or Pull-down, depending in which direction you are taking the speed. When you choose a frame rate you are telling SOLO what frame rate to expect. To put it more accurately, you are telling it the frame rate at which the chosen sample rate will be accurately reproduced. For example, if you tell SOLO that the NTSC frame rate is 30 (in the Setup Menu) and the sample rate is 44,100, it will pull down the sample rate to 44,056 if you feed in timecode at 29.97. If, however, you change the NTSC field to 29.97, SOLO will play at 44,100 at 29.97 frames per second, and will pull up to a sample rate of 44,144 when timecode runs at 30 frames per second. It is advisable to choose a sample rate at which you want to make the final transfer of the Project. Then record your material at whichever frame rate is going to be used during that final transfer. The importance of this choice is that you do not want to compromise the quality of your final product by using sample rate conversion at the moment it leaves SOLO for the last time. You should make these choices at the very beginning of the Project, and then you may use any other combination that suits your purposes temporarily during the recording and editing process. Page 220