1
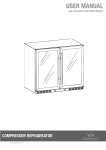
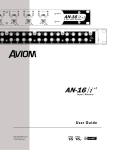
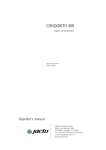
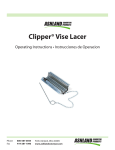
Blade Hand Dryer
Instructions Manual
Table of Contents
Product Dimensions
Product Dimensions
3
Names of the Various Components
4
Product Features, Technical Specifications & Package Contents
5
Installation Instructions
6
Installation & Safety Guidelines
8
Operation Guidelines
9
Cleaning & Maintenance Guidelines
10
Warranty Details
11
2
Product:
Title:
Blade Hand Dryer
Technical Drawings & Dimensions
3
Product:
Title:
Names of the Various Components
Product Features, Technical Specifications
& Package Contents
Product Features:
•
The contemporary, ergonomic style gives the Blade its streamlined look
•
A heavy-duty Stainless Steel casing offers excellent protection from corrosion
and vandalism
•
The automatic ‘no touch’ operation makes this a hygienic system
•
Air is exerted from its double injection air-flow system which removes moisture
from both sides of your hands – drying time is just eight seconds
•
Auto cut-off eliminates energy wastage
•
Minimal power consumption, maximum output – the Blade reduces your carbon
footprint
•
Reduced noise levels make this a discrete dryer
•
Its unique high-brightness blue LED light indicator helps users position their
hands directly in the warm air stream for maximum efficiency
•
Heating and power controller enables you to control output settings
•
Easy to install and with a removable drip trap and air filter, it is effortless to
maintain
•
Finishes available in Brushed Metal, Polished Chrome and Arctic White
Technical Specifications:
•
Shell material/s: ABS Plastic and
304 Stainless Steel
•
Standard finishes: Brushed Metal,
Silver, White
•
Rated voltage: AC 220-240V
•
Rated frequency: 50 / 60 Hz
•
Rated power: 1,650W (With heater)
/ 0.800W (Without heater)
•
Installation: wall mounted
•
Drying time: 8 seconds
•
Air speed: 95 M/s
•
Noise output: 68dB
•
Operation: infrared automatic ‘no
touch’
•
Timing protection: 60 seconds auto
cut off
4
•
•
•
•
•
•
Thermal protection: cut off above
70C
Drip proof: IPX1
Unit dimensions: 300 W x 222 D x
730 H mm
Net weight: 12.0 kg
Warranty: 2 Years
Certification: CE, RoHs
Package Contents:
•
Hand dryer
•
Wall mounting bracket
•
Fixtures and fittings
•
User manual and installation guide
5
Installation Instructions Blade Hand Dryer
Installation Instructions
Installation Instructions Blade Hand Dryer
Drill the fixing points:
• Offer the installation panel up to the
mounting surface and mark the five
fixing points through the holes in the
backplate. Drill the five marked fixing
holes and insert the supplied wall plugs.
Offer the installation panel up to the
wall, and insert the five fixing screws
through the panel into the wall plugs.
• Drill a further fixing hole 615mm down
from the top centre of the installation
panel and insert the supplied wall plug.
Drill
Drill the
the fixing
fixing points:
points:
1)
1)
•• Offer
Offer the
the installation
installation panel
panel up
up to
to the
the
mounting
mounting surface
surface and
and mark
mark the
the five
five
Drill
the
Drillfixing
the fixing
points:
fixing
fixing
points
points
through
through
the
the points:
holes
holes in
in the
the
• Offer
• Drill
the
Offer
installation
the
installation
panel
panel
up to the
up to the
backplate.
backplate.
Drill
the
the
five
five
marked
marked
fixing
fixing
mounting
mounting
surface
surface
and
mark
and
the
mark
five
the five
holes
holes and
and insert
insert the
the supplied
supplied wall
wall plugs.
plugs.
fixing
points
fixing points
through
through
the
holes
the
holes
the in the
Offer
Offer the
the installation
installation
panel
panel
up
up to
to
the
the in
backplate.
backplate.
Drill
the
Drill
five
the
marked
five marked
fixing fixing
wall,
wall, and
and
insert
insert
the
the
five
five
fixing
fixing
screws
screws
holes
holes
insert
and
the
theplugs.
supplied
wall plugs.
wall plugs.
through
through
the
theand
panel
panel
into
intoinsert
the
thesupplied
wall
wall
plugs.
the
Offer
installation
the
installation
panel panel
up
to the
up to the
•• Drill
Drill aaOffer
further
further
fixing
fixing
hole
hole
615mm
615mm
down
down
wall,top
and
wall,
insert
andof
insert
the
the
fixing
five screws
fixing screws
from
from the
the
top
centre
centre
of
the
thefive
installation
installation
through
thethe
panel
the
panel
into the
into
wall
theplugs.
wall plugs.
panel
panelthrough
and
and insert
insert
the
supplied
supplied
wall
wall
plug.
plug.
• Drill
• a Drill
further
a further
fixing hole
fixing615mm
hole 615mm
down down
from
top
the
centre
top centre
of the of
installation
the installation
Wire
Wire the
thefrom
unit:
unit:the
panel
and
insert
andcover
insert
the supplied
the supplied
wall plug.
wall plug.
•• Remove
Remove
the
thepanel
terminal
terminal
cover
mounting
mounting
Installation
Installation
Instructions
Instructions
Blade
Blade
Hand
Hand
Dryer
Dryer
1)
•
Remove the terminal cover mounting
screw and remove the cover itself.
• Wire the unit accordingly.
fixing points:
1)
he installation panel•up to
the
Replace
the terminal cover once
ng surface and mark the five
oints through the holes complete.
in the
2)
3)
3)
Mounting
Heights
Measurements are from the bottom of the
hat the power cable is not
d behind the unit. installation panel to the floor
2)
1)
2)
filter.
filter.
Fix the
Fixunit
thein
unit
place:
in of
place:
•• Engage
Engage
the
the
panel
panel
hooks
hooks
of the
the
• Firstly,
• panel
Firstly,
remove
remove
the
drain
theof
tank
drain
tankairand air 3)
3)
installation
installation
panel
on
on
the
the back
back
of
the
theand
filter.
filter.
unit.
unit.
• Engage
• the
Engage
the
panel
thecable
panel
hooks
of the of the
•• Check
Check
that
that
the
power
power
cable
is
ishooks
not
not
installation
installation
panel
panel
on theon
back
theof
back
the of the
trapped
trapped
behind
behind
the
the
unit.
unit.
•• Gently
Gentlyunit.
press
pressunit.
the
the unit
unit onto
onto the
the wall,
wall, and
and
• fix
Check
that
that
power
the
cable
is
cable
not is not
then
then
fix
itit• in
inCheck
place
placethe
using
using
the
thepower
mounting
mounting
behindbehind
the unit.
the unit.
screw
screwtrapped
at
at the
thetrapped
bottom.
bottom.
• Gently
•theGently
presstank
press
the unit
theonto
unit
the
onto
wall,
theand
wall, and
•• Replace
Replace
the
drain
drain
tank
and
and
air
air
filter.
filter.
then fix
then
it infix
place
it in using
place the
using
mounting
the mounting
screw screw
atMounting
the at
bottom.
the bottom.
Recommended
Recommended
Mounting
Heights
Heights
• Replace
• Replace
the
drain
the
tank
drain
and
tankair
filter.
air filter.
Measurements
Measurements
are
are
from
from
the
the
bottom
bottom
of
ofand
the
the
4)
4)
3)
3)
4)
5)
5)
4)
4)
5)
5)
•
•
Mens
• Mens
/ Ladies:
/ Ladies:
850mm
850mm
Disabled:
• Disabled:
730mm
730mm
Visit www.tekflo.com or email enquiries@tekflo.com for more information
VisitVisit
www.tekflo.com
www.tekflo.com
or email
or email
enquiries@tekflo.com
enquiries@tekflo.com
for more
for more
informa
info
4)
5)
press the unit onto the wall, and
it in place using the mounting
• Mens / Ladies: 850mm
t the bottom.
Disabled: 730mm
e the drain tank and• air filter.
nded Mounting Heights
ents are from the bottom of the
panel to the floor
Ladies: 850mm
d: 730mm
6
5)
installation
installation panel
panel to
to the
the floor
floor
Recommended
Recommended
Mounting
Mounting
Heights
Heights
Measurements
Measurements
are from
arethe
from
bottom
the bottom
of the of the
•• Mens
Mens
// Ladies:
Ladies:
850mm
850mm
installation
installation
panel panel
to theto
floor
the floor
•• Disabled:
Disabled:
730mm
730mm
unit.
unit:
e the terminal cover• mounting
Check that the power cable is not
nd remove the cover itself.
trapped behind the unit.
e unit accordingly.
Gently press the unit onto the wall, and
e the terminal cover•once
te.
then fix it in place using the mounting
screw at the bottom.
nit in place:
emove the drain tank
air
• and
Replace
the drain tank and air filter.
the panel hooks of the
Recommended
ion panel on the back
of the
1)
2)
2)
screw
screw and
and remove
remove the
the cover
cover itself.
itself.
Wire
Wire
the unit:
•• Wire
Wire
the
thethe
unit
unitunit:
accordingly.
accordingly.
• Remove
•theRemove
the terminal
the
terminal
cover
mounting
mounting
•• Replace
Replace
the
terminal
terminal
cover
cover
once
once cover
screw screw
and remove
and remove
the cover
the cover
itself. itself.
complete.
complete.
• Wire
• the
Wire
unit
theaccordingly.
unit accordingly.
• unit
Replace
• in
the terminal
the terminal
cover cover
once once
Fix
Fix the
the
unit
inReplace
place:
place:
complete.
•• Firstly,
Firstly,complete.
remove
remove
the
the drain
drain tank
tank and
and air
air
allationWire
Instructions
Blade Hand Dryer
the unit:
te. Drill the five marked fixing
nd insert the supplied wall plugs.
Fix the unit in place:
he installation panel up to the
• screws
Firstly, remove the drain tank and air
d insert the five fixing
h the panel into the wallfilter.
plugs.
urther fixing hole 615mm down
Engage the panel hooks of the
e top centre of the•installation
nd insert the supplied wall
plug.
installation
panel on the back of the
2)
Visit www.tekflo.com or email enquiries@tekflo.com for more information
Visit www.tekflo.com or email enquiries@tekflo.com for more information
7
Installation & Safety Guidelines
Operation Guidelines
•
All electrical installation and repair work should be carried out by a qualified
electrician in accordance with current locals codes or regulations.
1.
Before inserting hands under the dryer, shake off any excess water.
2.
•
Do not attempt any disassembly or modification of the unit that is not expressly
stated in this manual.
This hand dryer incorporates no touch sensor activation for hygienic use. Simply
place your hands within the air outlet compartment and the hand dryer will be
automatically activated.
•
Do not install when the product (power cable) is electrified.
3.
Remove your hands away from the air outlet and the hand dryer will be
deactivated after 2 seconds.
•
Install securely in a location strong enough to support the weight of the unit.
4.
•
Install the hand dryer on a smooth surface and in an area where people are not
likely to collide with the object once installed.
The hand dryer will automatically cut off after running for 60 seconds if the
sensor is activated for this period. If need be, remove hands from the sensor and
return your hands and the dryer will re-activate.
•
Do not scratch, damage, process, excessively bend, pull, twist or bundle the
power cable, and do not place heavy objects onto it or trap it.
•
Do not use in a hot location such as a shower room, where condensation may
form on the unit, or where water may splash directly at the unit.
•
Do not install this hand dryer above sources of water such as sinks or taps.
•
Do not install in locations where salt damage may occur, or where corrosive,
neutral, or reductive gases are present.
8
9
Cleaning & Maintenance Guidelines
Warranty Details
Cleaning and maintenance should be carried out by service personnel only, after
ensuring that the unit is disconnected from the power supply. It is recommended
that cleaning be carried out regularly every week.
•
All Tekflo Hand Dryers are guaranteed to be free from defects in parts and
manufacture for 2 years from the date of purchase, provided that the product is
used under the normal operating conditions stated within the manual.
A) Cleaning the unit body
1. Simply wipe down the exterior of the dryer with a damp cloth, removing any
build of up dirt, paying particular attention to the sensor.
•
The warranty is only available to the original purchaser and is not transferable.
Your consumer rights are not affected.
•
If there are any defects with your hand dryer please contact the provider stating
your invoice number, date of purchase, full name and address.
B) Draining and cleaning the drain tank
1. Remove the drain tank component.
2. Open the cover of the drain tank and empty the water. Wash out the interior of
the drain tank.
3. Close the cover of the drain tank, and replace the drain tank back within the
body.
4. To ensure that the drain hole (within the air outlet compartment) is not blocked,
you can pour a small cup of water through the drain hole and ensure that it
arrives in the drain tank.
•
Do not attempt to repair or take apart the hand dryer your self. If the hand dryer
has been tampered with before it arrives with us, the warranty will be void.
•
We advise that all customers retain original packaging should the unit need to be
returned.
•
If your hand dryer occurs a problem outside of the warranty period, we offer a
repair service where we can collect and professionally repair your hand dryer.
C) Cleaning the air filter
1. Remove the air filter component
2. For a light clean – use a vacuum cleaner
to remove any build of dirt. For a more
thorough clean – soak the air filter in
warm water.
3. Replace the air filter back within the body.
10
11
Visit www.tekflo.com or email [email protected]
for more information
12