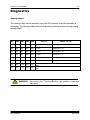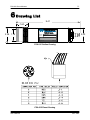
1
PSA-916
Sonar Altimeter
User’s Manual
Revision B, Mar 2006
P/N 007217
Teledyne Benthos, Inc., Inc.
49 Edgerton Drive
North Falmouth, MA 02556
www.benthos.com
Tel: 508-563-1000
Fax: 508-563-6444
e-mail: [email protected]
PSA-916 Sonar Altimeter
i
Preface
This User Manual provides complete instructions on using and maintaining
the PSA-916 Sonar Altimeter. Please read it prior to deploying the
equipment and keep it where it can provide a reference during setup and
operation of the altimeter. This manual is divided into the following eight
sections:
1
2
3
4
5
6
7
8
Description
Specifications
Setup and Deployment
Theory of Operation
Packing List
Drawing List
Return Procedures
Warranty
Proprietary Information
The information, description, and illustrations in this manual are the
property of Teledyne Benthos, Inc. Materials may not be reproduced or
disseminated without the prior written consent of Teledyne Benthos, Inc.
Changes
Teledyne Benthos, Inc. reserves the right to make changes to meet new
specifications at any time without incurring any obligation to modify
previously installed units. This manual is provided for informational and
reference purposes only and is subject to change without notice.
Notes and Warnings
Where applicable, special notes and warnings are presented as follows:
NOTE:
A reminder to check that certain criteria are met before
proceeding further in a step or sequence.
WARNING:
A reminder that dangerous consequences could result if
certain recommended procedures are not followed
User’s Manual
Mar. 2006
PSA-916 Sonar Altimeter
ii
Table of Contents
1
Description ...................................................................................................................................... 1
Applications ............................................................................................................................... 2
2
Specifcations ................................................................................................................................. 3
3
Setup and Deployment ............................................................................................................ 5
Unpacking and Disassembly........................................................................................... 5
Connection.................................................................................................................................. 6
Connector Pin-out....................................................................................................................... 6
RS-232 Input/Output................................................................................................................... 7
Error Output................................................................................................................................ 8
Analog Output............................................................................................................................. 8
External Key................................................................................................................................ 8
FSI Mode ..................................................................................................................................... 8
Configuration ............................................................................................................................. 9
Predeployment ....................................................................................................................... 10
Deployment............................................................................................................................... 11
Maintenance ............................................................................................................................ 12
4
Theory of Operation................................................................................................................. 13
Operating Principle.............................................................................................................. 13
Board Level Description................................................................................................... 14
Power Supply ............................................................................................................................ 14
Transmitter................................................................................................................................ 14
Receiver ..................................................................................................................................... 14
Microcontroller......................................................................................................................... 14
Firmware Description ........................................................................................................ 14
Main Program........................................................................................................................... 15
Averaging Algorithm ................................................................................................................ 15
Diagnostics ............................................................................................................................... 16
Analog output............................................................................................................................ 16
Error Message .......................................................................................................................... 17
5
Packing List .................................................................................................................................. 18
6
Drawing List.................................................................................................................................. 19
7
Return Procedures ................................................................................................................... 20
8
Warranty.......................................................................................................................................... 21
User’s Manual
Mar. 2006
PSA-916 Sonar Altimeter
1
1 Description
The PSA-916 Sonar Altimeter is a microprocessor-controlled, self-contained,
underwater acoustic product. It generates a narrow beam acoustic signal and
measures the travel time for the signal to bounce back from the target surface.
The unit provides range data in both analog and digital formats for analysis and
process control.
The PSA-916 Sonar Altimeter is the same as the standard PSA-916 Sonar
Altimeter except it is housed in a corrosion-resistant pressure case. It is O-ring
sealed and rated for operation in water depths up to 6,000 meters. The external
6-pin connector provides connections for external power source input, external
key source/RS-232 input, analog, and RS-232 output.
PSA-916 Sonar Altimeter
User’s Manual
Mar. 2006
PSA-916 Sonar Altimeter
2
Applications
The Model PSA-916 Sonar Altimeter with the built-in flexibility of its microprocessor
design, cost-effectively meets a wide variety of sonar measurement applications with
a single self-contained instrument.
The most common use of the Model PSA-916 Sonar Altimeter is for altitude
measurement (height above bottom). Other uses include:
Wave height measurement
Obstacle avoidance
Altitude of an ROV and other submersibles
Surveying of shallow waters
Sediment transport studies
User’s Manual
Mar. 2006
PSA-916 Sonar Altimeter
3
2 Specifcations
TRANSMIT
FREQUENCY:
200 kHz
TRANSMIT PULSE
WIDTH:
250 microseconds
BEAM PATTERN:
14° conical
PULSE REPETITION
RATE:
Selectable: Internal or External
Internal - 5 pulses per second
External - customer controlled rate, up
to 5 pulses per second
RANGE:
100 meters full scale;
1.0 meter guaranteed
minimum; 0.8 meter typical
ANALOG OUTPUT:
0 to 5 VDC
DIGITAL OUTPUT:
RS-232, baud rate 9600, 4800, 2400 or
1200, (user selectable)
RESOLUTION:
RS-232: 1 cm
Analog: 2.5 cm
POWER
REQUIREMENT:
6 to 24 VDC
CURRENT:
50 mA @ 15 VDC
100 mA @ 6 VDC
OPERATING DEPTH:
6,000 meters
CONNECTOR:
Part Number: Impulse XSG-6-BLC-3/416, or equivalent
MATING PIGTAIL:
Part Number: Impulse RMG-6-FS, or
equivalent
DIMENSIONS:
2 1/4 in. OD x 9.38 in. long
WEIGHT:
In Air: 1.4 lb
In Water: 0.8 lb
User’s Manual
Mar. 2006
PSA-916 Sonar Altimeter
4
Configuration
Standard
FSI Mode
Custom
Description of Configuration
Key (SW 1 & 2)
Internal
Internal
Serial Output (SW 1 &
2)
Every Cycle
N/A
Gain (SW 3)
High
High
Under Range Detection
(SW 4)
Disabled
Disabled
Baud (SW 5 & 6)
9600
9600
FSI Mode (SW 7)
Disabled
Enabled
RS-232 Mode (SW 8)
Enabled
Enabled
SW 1
OFF
OFF
SW 2
ON
OFF
SW 3
ON
ON
SW 4
ON
ON
SW 5
OFF
OFF
SW 6
OFF
OFF
SW 7
OFF
ON
SW 8
OFF
OFF
JP1
Installed
Installed
JP2
Installed
Installed
JP3
1-2 (RS-232 Out)
1-2 (RS-232 Out)
Dip Switches
Jumpers
JP4
1-2 (External Key In)
Installed
2-3 (RS-232 In)
Configuration:
Standard
______
FSI Mode
______
Custom
______
NOTE:
User’s Manual
The configuration is set by the dip switches. This page describes how
the unit was configured when shipped to you. Any changes to the dip
switches will change the configuration. Refer to Section 3.
Mar. 2006
PSA-916 Sonar Altimeter
5
3 Setup and Deployment
This section provides information on unpacking, installation and general operation of
the PSA-916 Sonar Altimeter.
Unpacking and Disassembly
As with any sophisticated electronic equipment, Teledyne Benthos, Inc.'s products
should be handled with a reasonable amount of care when unpacking, transporting or
storing.
When shipped from the factory, the units are packed in weatherproof cartons. Every
effort is made at the factory to pack the equipment so as to protect it during shipment
and to minimize the effect of any mishandling.
Carefully inspect each instrument for physical damage as it is unpacked. Report any
damage to the freight carrier and to the Teledyne Benthos, Inc. sales office. Store the
shipping cartons and packing materials in a cool, dry place for later use in system
transport.
The unit is shipped completely assembled and internally configured. Should an internal
inspection be deemed necessary, the unit can be opened by turning the delrin closure
ring counter-clockwise. The transducer and electronics should slide easily from the
pressure case. Caution is advised as the electronics is connected to the interface
connector at the opposite end of the pressure case.
NOTE:
User’s Manual
An O-ring seal is designed into the pressure case/end cap to protect the
electronic components from moisture. A failure of these seals will result in
the unit flooding and subsequent loss. Whenever the unit is
disassembled, carefully inspect the O-rings for cracks, tears, and proper
fit. Replace any damaged O-rings. The end cap O-ring grooves and
housing O-ring mating faces should also be checked for tool marks or
abrasions.
Mar. 2006
PSA-916 Sonar Altimeter
6
Prior to reassembling the unit, clean O-rings and O-ring surfaces, apply a coat of
silicone lubricant to the O-rings. Reposition the internal components in the casing
and tighten the closure ring, turning it in a clockwise fashion.
WARNING:
DO NOT apply excessive torque to the closure ring. Overtightening of the closure ring could damage the ring and
make any future disassembly difficult
If you suspect that there are items missing, or if you suspect that there has been any
damage to the equipment, contact Teledyne Benthos, Inc. immediately.
Connection
The PSA-916 Sonar Altimeter outputs data and receives power through a 6 pin
connector. The PSA-916 Sonar Altimeter is supplied with the mating pigtail and a
dummy plug. Whenever the pigtail is not installed, install the dummy plug to protect
the connector pins.
Connector Pin-out
The functional assignments of the six pin connector is as follows:
Pin Number
NOTE:
Function
1
2
RS-232 Input/External Key Input *
External power ground
3
RS-232 Output/Error Output†
4
Analog output
5
Analog output ground
6
External power (6 - 24V)
*To select RS-232 Input install a jumper between JP4 pins 2 & 3. To select
External Key Input install a jumper between JP4 pins 1 & 2.
†To select RS-232 Output install a jumper between JP3 pins 1 & 2. To
select Error Output install a jumper between JP3 pins 2 & 3.
User’s Manual
Mar. 2006
PSA-916 Sonar Altimeter
7
Connector view, looking at the PSA-916 Sonar Altimeter
RS-232 Input/Output
The RS-232 communications port is set to the following parameters:
Baud:
Number of Data Bits:
Number of Stop Bits:
Parity:
1200,2400,4800, or 9600 user selectable
8
1
none
On power up the following banner message will be output:
“Benthos PSA-916 V1.2"
Where the number following the V is the firmware version. The serial output will
be in the following format:
Rxx.xx<cr><lf>
where xx.xx can range from 0.80 to 99.99. If no echo was received the output
will be R99.99E<cr><lf>. If an echo was missed or the value does not meet the
averaging criteria then an “E” will be appended to the previous value. If under
range detection is selected and the value is under range then a ‘<’ will be
appended to the data.
If the unit is not functioning correctly, “E1,<cr><lf>” will be output. If this occurs
see section 4.4.3.
User’s Manual
Mar. 2006
PSA-916 Sonar Altimeter
8
Error Output
This output is useful for indicating the validity of the data whenever the analog
output is the source of range output. This line will be a logic 1 (5 volts) whenever no
echo was detected in the last range interrogation cycle. Essentially this line is high
whenever it would be necessary to output an E on the serial output. This line also
goes high if error condition E1 occurs. If this line is low it can be assumed that the
altimeter is functioning normally and the analog output is valid.
Analog Output
The analog output ranges from 0 VDC to 4.98 VDC, which represents 0.00 to
99.99 meters. Note that if no echo is received, the output will go to full scale
(4.98 VDC).
External Key
This line is used to tell the PSA-916 Sonar Altimeter to take a range reading. The
altimeter looks for a transition from a logic 1 (5 volts) to a logic 0 (0 volts). Once the
transition is detected the altimeter will take a range reading and wait 200 ms before
looking for the next transition. Thus the minimum time between key pulses is 200 ms.
However, there is no maximum limit to the time between key pulses. Note that the
analog value will be valid 200 ms after sending the external key.
FSI Mode
In FSI mode the unit acquires range information once every 200 ms, but only
reports the range data over the RS-232 output after receiving a #Z through the RS232 input.
User’s Manual
Mar. 2006
PSA-916 Sonar Altimeter
9
Configuration
There are eight switches which determine the mode of operation. The different
combinations are listed in the table below.
DIP SWITCHES - All dip switch changes will take affect immediately,
except for the baud rate. To change baud rate the unit must be reset
(i.e. cycle power).
Description
SW1
SW2
Test mode - see section 4.4
ON
ON
External key - 200 ms min. between keys
ON
OFF
Internal key - serial out every depth cycle
OFF
ON
Internal key -serial out every fifth depth
cycle
OFF
OFF
SW3
SW5
SW6
1200 baud (rep rate may be > 200 ms)
ON
ON
2400 baud
ON
OFF
4800 baud
OFF
ON
9600 baud
OFF
OFF
More gain
ON
Less gain
OFF
Disable under-range detection
Under-range detection
SW4
SW7
SW8
ON
OFF
(if range is less than 0.8, then output is ’0.8<’)
RS-232 off
ON
RS-232 on
OFF
FSI mode disabled
OFF
FSI mode enabled
ON
User’s Manual
Mar. 2006
PSA-916 Sonar Altimeter
10
Predeployment
Always test the altimeter immediately before deployment to ensure that the unit can
transmit and receive acoustic signals and that the system parameters are correctly
set.
NOTE:
Always test the operation of each PSA-916 Sonar Altimeter as a
stand-alone instrument before integrating it into another system.
Teledyne Benthos, Inc. recommends that an in-air test be performed followed by a
short range in-water test prior to the actual deployment.
A major source of problems with acoustic equipment is that the transducer is not
clean and acoustic signals are masked. We strongly recommend that prior to each
deployment that the user clean the exterior of the pressure casing and transducer
with fresh water and a mild detergent. Do not use glass cleaner.
To perform the in-air test:
Turn the altimeter ON by applying power.
Verify that the RS-232 output is 99.99E and that the analog output is 4.98V. Note
that if under-range detection is enabled, verify the RS-232 output is’0.8<’ and the
analog output is 39.8 mv.
If under-range detection is not enabled, tap on transducer face with a finger, and
verify that the RS-232 and analog output changes.
If the in-air test was successfully completed, proceed to an in-water test. Make sure
the transducer is well below the keel of the boat and away from prop wash and
noise. A test tank or barrel filled with water can be used provided the water depth is
at least three feet.
User’s Manual
Mar. 2006
PSA-916 Sonar Altimeter
11
Deployment
Once you are confident that the unit is operating properly on its own, you can then
integrate it with other instrumentation used in your application.
If acoustic energy generated by other instruments is strong enough, it can adversely
affect PSA-916 Sonar Altimeter operation, even if the acoustic output of the other
instrumentation is at different frequencies. You may have to relocate or reposition the
PSA-916 Sonar Altimeter to achieve reliable results.
Make sure sources of noise and turbulence such as the boat propeller and ROV thruster
motors are not between the altimeter and the target surface, and that they are well away
from the transducer.
Securely fasten the PSA-916 Sonar Altimeter to its platform, vehicle or instrument
package, making sure there are no obstructions between the transducer face and the
intended target. When mounting be sure the anodized finish is not scratched or gouged
by clamps, bolts, etc.
If the unit is mounted on an underwater vehicle, be sure that the sound beam path is
perpendicular to the horizontal flying position of the vehicle. Note that excessive pitch or
roll motion will influence the PSA-916 Sonar Altimeter range measurement. The PSA916 Sonar Altimeter radiation pattern is 14°.
Make sure the altimeter is attached to the bottom of the ROV so that it is not affected by
echoes from the skids.
In applications using multiple altimeters within each others range, their transmissions
should be externally triggered to avoid crosstalk between the units.
The sound beam pattern is an important consideration. The pattern consists of the main
beam and small side lobes stemming from it. Certain conditions may cause range errors
from side-lobe reflections.
A strong acoustic reflector close to the instrument reflects a side-lobe
signal before the main beam echo is received.
When using a towed vehicle to measure depth, a steep slope reflects the side
lobe before the main beam is reflected by the bottom directly below the instrument.
The side lobe reflects off the bottom before a main beam aimed diagonally at the
seabed.
User’s Manual
Mar. 2006
PSA-916 Sonar Altimeter
12
Maintenance
If you exercise reasonable care, your Teledyne Benthos, Inc. products should
provide you with years of reliable service.
To ensure an even greater level of reliability, Teledyne Benthos, Inc. recommends
that you take a few preventive maintenance measures and that you contact
Teledyne Benthos, Inc. early in your efforts to troubleshoot an altimeter malfunction.
We have found that most problems are related to the acoustic environment and can
be solved with applications planning and pre-deployment testing.
The following steps will help you maintain protection against damage to the
altimeter.
When you retrieve the unit at the completion of a project, follow these
preventive maintenance procedures:
Turn the unit OFF by unplugging the mating connector.
Clean the exterior of the pressure casing and transducer with fresh water and a
mild detergent. DO NOT USE GLASS CLEANER.
NOTE:
It is important to clean the transducer face so that film does not
build up on the transducer face and attenuate acoustic signals.
Dry the unit with a cloth.
Inspect the transducer and the exterior of the casing for signs of wear and
damage.
Clean the connector on the unit using a lint free alcohol wipe.
Lubricate the connector O-ring mating surface with a light coat of silicone and
place the protective dummy plug on the connector.
Store the unit, in its original packing case, in a cool, dry place.
Teledyne Benthos, Inc. recommends that the O-rings in this unit be inspected
after every deployment and changed if there is any sign of wear or damage.
Otherwise, O-rings should be changed every two years per manufacturer
recommendations.
Size
2-125 Transducer O-ring
2-029 Transducer Housing O-ring
User’s Manual
Mar. 2006
PSA-916 Sonar Altimeter
13
4 Theory of Operation
This section describes the operation of the PSA-916 Sonar Altimeter. DO NOT
ATTEMPT REPAIR of the PSA-916 Sonar Altimeter unless you are a trained
electronics technician. For help with any questions about using or maintaining the
instrument, contact your local Teledyne Benthos, Inc. representative, or call
Teledyne Benthos, Inc. Customer Service at 508-563-1000.
Operating Principle
The PSA-916 Sonar Altimeter determines the round trip time for a sound pulse to
travel from the transducer through the water, reflecting off a surface and returning to
the transducer. Since the speed of sound is known, the altimeter can determine the
range utilizing this equation:
R = 1/2 (Cs)(t +/-∆ t)
Where:
Cs - the speed of sound in meters per second
t - the total round-trip travel time in seconds
R - range in meters
The nominal speed of sound is 1,500 meters per second in water, and is used by the
PSA-916 Sonar Altimeter. Note that the speed of sound is affected by temperature,
salinity, and pressure.
The ∆ t factor is the jitter or the ability of the detectors to accurately determine the
presence or absence of a pulse. Jitter is a function of operating frequency, system
bandwidth and signal to noise ratio. In the PSA-916 Sonar Altimeter ∆t is
approximately 5 microseconds or approximately +/-0.4 cm total distance. Since the
total travel time is divided by two in the above formula, the jitter error is +/-0.2 cm.
User’s Manual
Mar. 2006
PSA-916 Sonar Altimeter
14
Board Level Description
Power Supply
The input power can range from 6 to 24 volts, and is diode protected by CR1 to prevent
reverse polarity. The power supply regulates the input power to 5 VDC and 12 VDC.
Transmitter
The microprocessor generates a key pulse putting the transceiver into the transmit
mode for the duration of the pulse. A train of 1 µs pulses is output from the
transceiver at the oscillator frequency of 200 kHz, which are later stretched to 1.8 µs
pulses. These pulses are then boosted to drive the transducer with a sinusoidal 200 kHz
burst lasting for the duration of the key pulse.
Receiver
The transmit pulse and any received echoes are input to the receiver through a
transmit/receive network. The receive signal is attenuated during transmit and
during the first few milliseconds of the receive cycle, when the returned echoes are
likely to be the strongest. Once the transceiver senses the receive signal, it goes
through a high gain amplifier, and uses the same circuitry as the transmitter, so the
receiver and transmitter are always tuned to the same frequency.
Microcontroller
The microcontroller provides the system timing and computing power operating a
crystal controlled clock frequency of 12 MHz and is initialized via a power reset
when power is applied. The microcontroller also generates the error output and
sends data to the 12-bit digital to analog converter for the analog output and the RS-232
driver.
User’s Manual
Mar. 2006
PSA-916 Sonar Altimeter
15
Firmware Description
Main Program
The program generates the key pulse, which causes a 200 kHz burst to be
transmitted as described in section 4.2.2. The transmission is detected by interrupt
1, which starts a 1µs timer. If the transmission is not detected, the program will
output “E1" on the RS-232 output. The program then waits 133 ms for an echo.
Once an echo is received, it stops the timer, and calculates the range. If no echo is
received, the timer is stopped and the range is assumed to be 99.99 meters. The
range is then sent to the RS-232 and Analog outputs, and the error output is set or
cleared as required. If in internal Key mode the microcontroller will wait 200 ms from
the previous key before sending another key pulse, thus starting the whole cycle
over again. If in external Key mode, the microcontroller will wait for a low going pulse
on the key In input, before sending the next key pulse.
Averaging Algorithm
A moving weighted average is used. Each new range is given a weight of 25%,
while the previous value is given a weight of 75%. In addition if the new range differs
significantly from the old range then the new range will be skipped and the old range
will be used. Note that the algorithm will not skip more than two consecutive ranges.
If two consecutive ranges have been skipped, then the next new range will be used.
Note that if a range is skipped then an “E” is appended to the data and the error
output is goes to a logic ‘1' (5VDC).
User’s Manual
Mar. 2006
PSA-916 Sonar Altimeter
16
Diagnostics
Analog output
The analog output can be tested by using the DIP switches to put the altimeter in
test mode. The following table shows the dip switch settings and the corresponding
analog output.
SW1
SW2
SW3
SW4
SW5
OUTPUT
SERIAL OUTPUT
ON
ON
ON
ON
ON
0 Volts
Analog out - 0V
ON
ON
ON
ON
OFF
1 Volt
Analog out = 1V
ON
ON
ON
OFF
ON
2 Volts
Analog out = 2V
ON
ON
ON
OFF
OFF
3 Volts
Analog out = 3V
ON
ON
OFF
ON
ON
4 Volts
Analog out = 4V
ON
ON
OFF
ON
OFF
5 Volts
Analog out = 5V
ON
ON
OFF
OFF
ON
ON
ON
OFF
OFF
OFF
Teledyne Benthos, Inc.
Use
Teledyne Benthos, Inc.
Use
WARNING: Do not set to the " Teledyne Benthos Use" position, or damage
may result.
User’s Manual
Mar. 2006
PSA-916 Sonar Altimeter
17
Test Points:
TP1
Detector: normally a logic 1 (5 VDC), whenever a transmission or a
received echo is detected the line goes to a logic 0 (0 VDC) for the duration
of the detection.
TP2
Transmit Pulse: normally a logic 1 (12 VDC). During transmit a train of
1.8 µs pulses at the transmit frequency.
TP3
Oscillator during Transmit cycle, and amplified output of the receiver. Note
that the scope capacitance will alter the signal.
TP5
Transmitter Key: Normally 0 VDC, during transmit it is at 0.6 VDC lasting
for 250 µs.
TP6
2.5 VDC
TP7
Analog Output
TP8
12 VDC
TP9
5 VDC
Top side view of PCB assembly
Error Message
If Error message E1 is continuously output, it means the receiver is unable to detect
the transmission of the transmitter. Check that Jumper JP1 is installed, and that the
ground wire from the end cap to J2 is connected. Otherwise the most likely source of
the failure is something within the transceiver circuitry. Contact Teledyne Benthos,
Inc. for repair information or refer to Section 7 Return Procedures in this User’s
Manual.
User’s Manual
Mar. 2006
PSA-916 Sonar Altimeter
18
5 Packing List
Item
Qty
1
1
2
1
RMG-6-FS
3
1
RMG-6-FSD-HP
4
1
007217
5
2
G-FLS-P-F
User’s Manual
Part No.
—
Manufacturer
Description
Teledyne
Benthos, Inc.
Impulse, or
equivalent
Impulse, or
equivalent
Teledyne
Benthos, Inc.
Impulse, or
equivalent
PSA-916 Sonar AltimeterTop Assembly
Connector, 6 pin, pigtail
Connector, 6 pin, dummy
Manual, PSA-916 Sonar
Altimeter
Locking Sleeve-Female
Mar. 2006
PSA-916 Sonar Altimeter
19
6 Drawing List
9.41
1.60
2.38 1.78
Model #
Serial #
2.00
PSA-916
XXXX
PRESSURE TESTED TO XXXXX PSI
www.benthos.com
Made in USA
PSA-916 Outline Drawing
PSA-916 Pinout Drawing
User’s Manual
Mar. 2006
PSA-916 Sonar Altimeter
20
7 Return Procedures
If you need to return an PSA-916 Sonar Altimeter for warranty service,
contact Teledyne Benthos, Inc. for a Return Material Authorization (RMA)
number and shipping instructions.
Teledyne Benthos, Inc.
Tel: 508-563-1000
Fax: 508-563-6444
e-mail: [email protected]
You will need to provide the following information to receive a Return
Material Authorization (RMA):
Reason for return
Number of altimeters to be returned
Serial number of each unit
Shipping method, if applicable
NOTE:
User’s Manual
Do not ship an altimeter without a Return Material Authorization.
Mar. 2006
PSA-916 Sonar Altimeter
21
8 Warranty
LIMITED WARRANTY. Teledyne Benthos, Inc. warrants that the products sold hereunder shall be free
from defects in materials and workmanship under normal use and service when correctly installed, used
and maintained for a period of 12 months from date of shipment from Teledyne Benthos, Inc.
Purchaser’s receipt of any product delivered hereunder shall be an unqualified acceptance of and a
waiver by Purchaser of the right of Purchaser to make a claim with respect to such product unless
Purchaser gives Teledyne Benthos, Inc. notice of any claim within 12 months after the receipt of such
product. This warranty is limited to repair or replacement of the said product at Teledyne Benthos, Inc.
plant in North Falmouth, Massachusetts, providing the product was not abused or operated other than in
accordance with the Teledyne Benthos, Inc. instruction manuals. Since all Teledyne Benthos, Inc.
oceanographic instruments are pressure tested to rated depth prior to shipment, Teledyne Benthos, Inc.
does not assume responsibility for any damage due to leakage or implosion. Teledyne Benthos, Inc.
reserves the right to modify its warranty at any time, in its sole discretion. THIS LIMITED WARRANTY IS
NOT TRANSFERABLE.
LIMITATION OF LIABILITY. TELEDYNE BENTHOS, INC. MAKES NO OTHER WARRANTY
REGARDING ITS PRODUCTS OR THE PRODUCTS OF OTHERS EITHER EXPRESS OR IMPLIED;
AND, ANY IMPLIED WARRANTY OF MERCHANTABILITY OR FITNESS FOR A PARTICULAR
PURPOSE WHICH EXCEEDS THE FORGOING WARRANTIES IS HEREBY DISCLAIMED BY
TELEDYNE BENTHOS, INC. AND EXCLUDED FROM ANY AGREEMENT MADE BY ACCEPTANCE OF
ANY ORDER. TELEDYNE BENTHOS, INC. DOES NOT ACCEPT LIABILITY BEYOND THE REMEDIES
SET FORTH HEREIN INCLUDING ANY LIABILITY FOR PRODUCTS NOT BEING AVAILABLE FOR
USE OR FOR LOST OR CORRUPTED DATA, LOSS OF BUSINESS, LOSS OF PROFITS, LOSS OF
USE OF THE PRODUCT OR ANY ASSOCIATED EQUIPMENT, COST OF CAPITAL, COST OF
SUBSTITUTE OR REPLACEMENT PRODUCT, FACILITIES OR SERVICES, DOWN-TIME, CHARGES
FOR PURCHASER’S TIME AND EFFORT, THE CLAIMS OF THIRD PARTIES, INJURY TO
PROPERTY, OR ANY OTHER DIRECT, INDIRECT, SPECIAL, RELIANCE, INCIDENTAL OR
CONSEQUENTIAL DAMAGES, REGARDLESS OF THE NATURE OF THE CLAIM AND WHETHER OR
NOT FORESEEABLE AND WHETHER OR NOT BASED ON BREACH OF WARRANTY, CONTRACT
OR TORT (INCLUDING NEGLIGENCE) OR STRICT LIABILITY, EVEN IF TELEDYNE BENTHOS, INC.,
INC. HAS BEEN ADVISED OF THE POSSIBILITY OF SUCH DAMAGES, OR FOR ANY CLAIM BY ANY
THIRD PARTY EXCEPT AS EXPRESSLY PROVIDED HEREIN.
THIS LIMITATION OF LIABILITY APPLIES BOTH TO PRODUCTS AND SERVICES AND SUPPORT
PROVIDED PURCHASER UNDER THIS AGREEMENT. NO ORAL OR WRITTEN INFORMATION OR
ADVICE GIVEN BY TELEDYNE BENTHOS, INC. ITS AGENTS OR EMPLOYEES SHALL CREATE A
WARRANTY OR IN ANY WAY INCREASE THE SCOPE OF THE LIMITED WARRANTY PROVIDED
ABOVE. ANY AND ALL LIABILITY OF TELEDYNE BENTHOS, INC. IS EXPRESSLY LIMITED TO THE
PRICE PURCHASER HAS PAID FOR THE PRODUCTS. PURCHASER’S SOLE REMEDY AGAINST
TELEDYNE BENTHOS, INC. IN ANY DISPUTE UNDER THIS AGREEMENT SHALL BE TO SEEK
RECOVERY OF THE AMOUNTS PURCHASER PAID, PURSUANT TO THE LIMITED WARRANTY
PROVIDED ABOVE, UPON THE PAYMENT OF WHICH TELEDYNE BENTHOS, INC. ITS AGENTS
AND EMPLOYEES, AND AFFILIATES, WILL BE RELEASED FROM AND DISCHARGED OF ALL
FURTHER OBLIGATIONS AND LIABILITY TO PURCHASER.
THE LIMITED WARRANTY OF TELEDYNE BENTHOS, INC. GIVES PURCHASER SPECIFIC LEGAL
RIGHTS, AND PURCHASER MAY ALSO HAVE OTHER RIGHTS THAT VARY FROM STATE TO
STATE. SOME STATES DO NOT ALLOW LIMITATIONS ON HOW LONG AN IMPLIED WARRANTY
LASTS OR THE EXCLUSION OR LIMITATION OF INCIDENTAL OR CONSEQUENTIAL DAMAGES, SO
THE ABOVE LIMITATIONS OR EXCLUSIONS MAY NOT APPLY TO PURCHASER.
User’s Manual
Mar. 2006