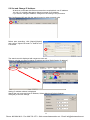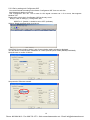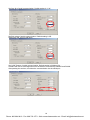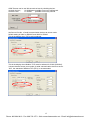
1
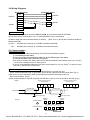
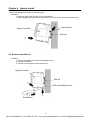
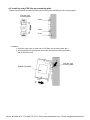
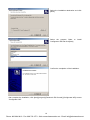
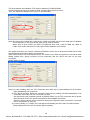
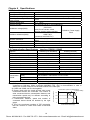
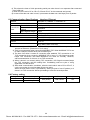
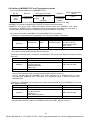
Phone: 800.894.0412 - Fax: 888.723.4773 - Web: www.ctiautomation.net - Email: [email protected]
Cautions for Your Safety
Read the manual carefully before installing, running and maintenance for proper operation.
Before using, master the knowledge of the equipment, safety information and all of other
notes.
This manual uses two safety flags to indicate different levels of danger.
WARNING
A handling error could cause serious physical injury to an operator
and in the worst case could even be fatal.
●Always take precautions to ensure the overall safety of your system, so that the whole
system remains safe in the event of failure of this product or other external factor.
●Do not use this product in areas with inflammable gas. It could lead to an explosion.
●Exposing this product to excessive heat or open flames could cause damage to the
lithium battery or other electronic parts.
CAUTION
A handling error could cause serious physical injury to an operator
or damage to the equipment.
●To prevent abnormal exothermic heat or smoke generation, use this product at the
values less than the maximum of the characteristics and performance that are assured
in these specifications.
●Do not dismantle or remodel the product. It could lead to abnormal exothermic heat or
smoke generation.
●Do not touch the terminal while turning on electricity. It could lead to an electric shock.
●Use the external devices to function the emergency stop and interlock circuit.
●Connect the wires or connectors securely. The loose connection might cause abnormal
exothermic heat or smoke generation.
●Do not allow foreign matters such as liquid, flammable materials, metals to go into the
inside of the product. It might cause exothermic heat or smoke generation.
●Do not undertake construction (such as connection and disconnection) while the power
supply is on.
Copyright and trademark
●Panasonic Electric Works, Ltd. owns the copyright of this manual.
●We stiffly refuse the reproduction of without permission from this manual.
●Modbus Protocol is a communication protocol that the Modicon Inc.developed for PLC.
●Windows, Windows NT and Microsoft Internet Explorer are the trademarks or registered
trademarks of Microsoft Corporation of United States of America and each company.
●Ethernet is the trademark of Xerox Corporation.
● Other company names and the product names are the trademarks or registered
trademarks of each company.
Phone: 800.894.0412 - Fax: 888.723.4773 - Web: www.ctiautomation.net - Email: [email protected]
Introduction
Thank you very much indeed for purchasing
“KS1 Signal Converter”.
In this manual, we explain the usage of “KS1 Signal
Converter” in detail.
Please use it correctly after understanding the content
enough.
Phone: 800.894.0412 - Fax: 888.723.4773 - Web: www.ctiautomation.net - Email: [email protected]
Table of Contents
Cautions before using ............................................................................................................................ⅰ
Chapter 1 Unit’s Features and Structure....................................................................................................... 1
1-1 Features................................................................................................................................................... 1
1-2 Unit’s Name and Part Numbers............................................................................................................... 1
1-2-1 Main unit......................................................................................................................................... 1
1-2-2 Accessories .................................................................................................................................. 1
1-2-3 Options........................................................................................................................................... 1
1-2-4 Tool software ................................................................................................................................. 1
Chapter 2 Parts Name and Working ............................................................................................................. 2
2-1 Parts Names ............................................................................................................................................ 2
Chapter 3 Wiring and Installing Space............................................................................................................ 3
3-1 Main unit terminal arrangement............................................................................................................... 3
3-2 Wiring Diagrams ...................................................................................................................................... 4
3-3 Communication........................................................................................................................................ 4
3-4 Installing space ........................................................................................................................................ 5
Chapter 4 How to Install.................................................................................................................................. 6
4-1. Install to DIN rail ..................................................................................................................................... 6
4-2. Remove from DIN rail ............................................................................................................................. 6
4-3. Install by using FP0 Slim type mounitng plate........................................................................................ 7
4-4. Install by using FP0 Flat type mounitng plate......................................................................................... 8
Chapter 5 Setting............................................................................................................................................... 9
5-1 Install IP address search tool .................................................................................................................. 9
5-2 Set and Change IP Address .................................................................................................................. 11
5-3 Communication Setting ......................................................................................................................... 12
5-3-1 Set by the communication set switches on the unit..................................................................... 12
5-3-2 Set by setting tool Configurator WD ............................................................................................ 13
Chapter 6 Specifications ............................................................................................................................... 19
6-1 Main unit ................................................................................................................................................ 19
6-2 Communication Specifications Interface: RS232C, RS485................................................................ 19
6-3 Communication Specifications Interface: Ethernet ............................................................................. 20
6-4 Factory setting ....................................................................................................................................... 20
6-5 Outline of MODBUS TCP and Transmission format ............................................................................. 21
6-5-1 Connections (When set to MODBUS TCP) ................................................................................. 21
6-5-2 Compare Packet of MODBUS TCP and MODBUS (RTU and ASCII)......................................... 21
Chapter 7 Error indication and Clear Error ...................................................................................................... 23
7-1 Error indication....................................................................................................................................... 23
7-2 How to clear the error ............................................................................................................................ 23
Phone: 800.894.0412 - Fax: 888.723.4773 - Web: www.ctiautomation.net - Email: [email protected]
Cautions before using
■ Installation environment
◇Do not use the Unit in the following environments.
・Where the unit will be exposed to direct sunlight and where the ambient temperature is outside
the range of 0 to 55 °C.
・Where the ambient humidity is outside the range of 30 to 85 % RH (at 20℃ non-condensing)
and where condensation might occur by sudden temperature changes
・Where inflammable or corrosive gas might be produced
・Where the unit will be exposed to excessive airborne dust or metal particles
・Where the unit will be exposed to water, oil or chemicals
・Where organic solvents such as benzene, paint thinner, alcohol, or strong alkaline solutions
such as ammonia or caustic soda might adhere to the product
・Where direct vibration or shock might be transmitted to the product, and where water might wet
the product
・Places unaffected by power transmission lines, high voltage equipment, power cables, power
equipment, radio transmitters and any other equipment that would generate high switching
surge.
◇Please use the Unit according to the specifications described in this manual. Otherwise, it
may malfunction or cause fire and an electric shock.
・Connect to the power supply in compliance with the rating.
・Refer to the wiring diagram to ensure proper wiring for the power supply, input and output.
・Do not perform wiring or installation with a live line. It may also lead to circuit burnout or fire.
・Do not add voltage and current to an output terminal from outside.
■ Static electricity
・Discharge static electricity touching the grounded metal etc. when you touch the unit.
・Excessive static electricity might be generated especially in a dry place.
■ Cleaning
・Wipe dirt of the main unit with soft cloth etc. When thinner is used, the unit might deform or be
discolored.
■ Power supply
・Connect a breaker to the voltage input part for safety reasons and to protect the device.
・Do not turn on the power supply or input until all wiring is completed.
・Do not add abnormal voltage directly, otherwise it might damage internal circuit.
■ Before power on
Please note the following points when turning on power at the first time.
・Confirm there are neither wiring rubbish nor especially an electrical conduction when installed.
・Confirm neither the power supply wiring, the I/O wiring nor the power-supply voltage are wrong.
・Tighten the installation screw and the terminal screw surely.
・Use an electric wire applicable to the rated current.
■ Others
・Please note that it might take time to approve the communication again after power on and
breaking the communication.
i
Phone: 800.894.0412 - Fax: 888.723.4773 - Web: www.ctiautomation.net - Email: [email protected]
Chapter 1
Unit’s Features and Structure
1-1 Features
KS1 signal converter is a signal converter of the DIN rail installation type that converts
serial-communication data (RS232C, RS485) into Ethernet data (Ethernet).
Data exchange by personal computers or PLC etc. is achieved by converting serial-communication data
to Ethernet data and connecting directly with LAN cable.
Ethernet
⇔
RS232C/RS485
1-2 Unit’s Name and Part Numbers
1-2-1 Main unit
Convert signal
Ethernet ⇔ RS232C/RS485
1-2-2 Accessories
Product name
Power supply cable
Rating
24V DC
Model No.
AKS1202
Model No.
AFPG805
1-2-3 Options
Product name
Mounting rail
Fastening plate
Terminal screw driver
FP0 Slim type mounting plate
Type 30 (10pieces)
FP0 Slim type mounting plate
(10 piece)
FP0 Flat type mounting plate
1-2-4 Tool software
Product name
IP Address searching tool
Contents
DIN rail
Use to fix to DIN rail
Using when wiring Phoenix terminal
Mounting plate that is used to install a
unit vertically against the panel.
Mounting plate that is used to install
each unit vertically against the panel.
Mounting plate that is used to install
each unit horizontally against the panel.
Model No.
AT8-DLA1
ATA4806
AFP0806
AFP0811
AFP0803
AFP0804
File name
ConfiguratorWD.exe
You can download IP address search tool:ConfiguratorWD.exe from our website.
Please refer to the help in Configurator WD for the way to set.
Note) In case of setting by “Configurator WD”,
MODE 4 of ④switch 1 should be set to OFF (software).
NOTICE!
Ethernet communication port of PC is required to transmit the settings to
Signal converter.
1
Phone: 800.894.0412 - Fax: 888.723.4773 - Web: www.ctiautomation.net - Email: [email protected]
Chapter 2
Parts Name and Working
2-1 Parts Names
①Status indicator LED
②Input / Output indicator
LED (LAN)
③Input / Output indicator
LED (RS232C/RS485)
④Communication
set switch 1
⑤Communication
set switch 2
⑥Reset switch
⑦LAN connector
⑧RS232C/RS485
terminal stand
⑨Power supply connector
Lighting or blinking according to the unit status
・POWER: Lighting when power on
・RESET: Lighting while pressing ⑥ reset switch
・ERROR: Blinking when error occurs with this unit
Lighting or blinking according to LAN communication status
・LINK/ACT: Lighting when the link is approved
Blinking during packet corresponding
・SPEED: Turn off when 10BASE-communication
Lighting when 100BASE-communication
Blinking according to serial communication status
・SD: Blinking when this unit send data to the connected device.
・RD: Blinking when this unit is received data from the connected device.
Use to set communication conditions
Only when MODE 4 switch of ④communication set switch 1 set
to ON(hard), ④⑤ switches are available.
Refer to 5-3-1 in detail.
*All switches set to ON at initial.
Pressing for 2 or more seconds makes system reset
・It can be cleared by power off and on again.
・However it can not be cleared when the serial-communication or wiring
are wrong.
・In order to initialize all settings by Configurator WD, turn the power on
with pressing this switch.)
Use to connect Signal converter and PC etc. by Ethernet cable
Connector: RJ45
Cable:UTP(Category 5) or more
Use to wire RS485 and RS232C lines
Use to connect the power supply
・Please use the attached power supply cable (AFPG805).
2
Phone: 800.894.0412 - Fax: 888.723.4773 - Web: www.ctiautomation.net - Email: [email protected]
Chapter 3
Wiring and Installing Space
3-1 Main unit terminal arrangement
Be sure to wire correctly according to the terminal arrangement and wiring diagrams.
⑦LAN Connector
Connector: RJ45
Cable: UTP (Category 5 or more)
This unit recognizes automatically the cable, cross or straight.
Select cable according to the connected devices.
⑧RS232C/RS485 terminal stand
Terminal No.
No.
1
1
RS232C
SD
2
2
RS232C
RD
3
3
RS232C
SG
4
4
RS485
+
5
5
RS485
-
6
6
RS485
+
7
7
RS485
-
8
8
RS485
E
Terminal shape
Functions
Terminal name
⑨Power supply connector
Use the attached power supply cable (AFPG805)
to connect power supply.
Mark
Cable
+
Brown
24V DC
-
Blue
0V
Green
Function earth
Wiring of attached power supply cable
Note)
1. Please use twisted lines for power supply line (brown and blue) in order to reduce the noise
effect from outside.
2. Please use a power supply of the insulation type with built-in protection circuit in order to protect
against an abnormal voltage from power supply line.
3. Regulator on the unit is non-insulation type.
4. Use power supply voltage within the range of allowable voltage.
Rated voltage
24V DC
Operating voltage range
21.6~26.4V DC
3
Phone: 800.894.0412 - Fax: 888.723.4773 - Web: www.ctiautomation.net - Email: [email protected]
3-2 Wiring Diagrams
Signal Converter
SD
RD
RS232C
SG
+
-
RS485
+
-
E
Connected device
RD
RS232C
SD
SG
+
-
RS485
Cautions for wiring
(1)Terminal fastening torque should be 0.22 to 0.25 N・m. (Use terminal driver AFP0806.)
(2) Use wire with its cross section of 0.3~1.0mm2(AWG#22~16) for the terminal.
(3) When using this unit as terminal station of RS485, -(No.5 or No.7) and E (No.8) terminal should be
shorted externally.
(4) Two + terminals (No.4 and No.6) of RS485 are shorted internally.
Two - terminals (No.5 and No.7) of RS485 are shorted internally.
3-3 Communication
Recommended Cable
Use the transmission cables shown below for RS-485 communication system.
1) Use shielded type twist cables.
2) Use only one type of the transmission cables. Do not mix different types of the cables.
3) Use twist pair cables under a bad noise environment.
4) Be sure to connect with daisy chain the RS-485 transmission line between each unit. Connect
one end of the shielded wire to an earth ground.
5) Use 2 recommended cables with the same cross section of 0.3 to 0.34mm2 to connect to the
RS-485 (+) and RS-485 (-) terminals.
RS-485 Wiring and setting of terminal station
1) When using shielded cable for the RS-485 transmission line, ground one end.
Use a class D dedicated earth for grounding. Do not share a ground with other earth lines. (Fig.1)
2) Be sure to connect with daisy chain the RS-485 transmission line between each unit.
Do not use a splitter. (Fig.2)
3) With a terminal station, RS-485 (E) (No.8) and RS-485 (-) (No.5 or No.7) should be shorted. (Fig.1)
(Fig.1)
Signal Converter or slave
General station
+
-
+
-
Sheilded cable
Signal Converter or slave
Terminal station
E
+
-
+
Sheilded cable
-
E
Shorted
To RS-485 device
Class D grounding
(Fig.2)
Correct wiring
Class D grounding
Terminal
station
Terminal
station
○
Incorrect wiring
×
4
Phone: 800.894.0412 - Fax: 888.723.4773 - Web: www.ctiautomation.net - Email: [email protected]
3-4 Installing space
・Leave the unit at least 50mm from both the wiring duct and the other device to allow heat
radiation and unit replacement as shown below.
50mm or more
50mm or more
Other device or
Panel
・Leave the unit at least 100mm from both a device that
generate noise radiation, and the power line in order to
avoid adverse affects of noise radiation and heat.
100mm or more
Signal
Converter
5
Phone: 800.894.0412 - Fax: 888.723.4773 - Web: www.ctiautomation.net - Email: [email protected]
Chapter 4
How to Install
4-1. Install to DIN rail
You can install Signal Converter to DIN rail easily.
Procedure:
1. Hook the upper hook of main unit on DIN rail like 1
2. With supporting the upper hook, push main unit to DIN rail like 2 and fix the lower hook.
Mount Panel
Signal Converter
DIN rail
4-2. Remove from DIN rail
Procedure:
1. Insert a screwdriver in the DIN rail installation lever.
2. Pull the lever below.
3. Lift main unit and remove from the DIN rail.
Signal Converter
DIN rail
DIN rail installation lever
Screwdriver
6
Phone: 800.894.0412 - Fax: 888.723.4773 - Web: www.ctiautomation.net - Email: [email protected]
4-3. Install by using FP0 Slim type mounitng plate
Please use M4 screws to install FP0 slim type mounting plate (AFP0803) in the mounting plate.
FP0 Slim type
mounting plate
Screw
Screw
6 mm
Procedure:
1. Hook the upper hook of main unit on FP0 Slim type mounting plate like 1.
2. With supporting the upper hook, push main unit to the mounting plate like 2,
and fix the lower hook.
FP0 Slim type
mounting plate
Signal Converter
7
Phone: 800.894.0412 - Fax: 888.723.4773 - Web: www.ctiautomation.net - Email: [email protected]
4-4. Install by using FP0 Flat type mounitng plate
Please use M4 screws to install FP0 flat type mounting plate (AFP0804) in the mounting plate.
FP0 Flat type
mounting plate
Screws
Procedure:
1. Please lift the expanding hooks of the upper surface and the bottom.
2. Please set up main unit in FP0 flat type mounting plate.
3. Please match the plate and the expanding hook, and push in the opposite direction.
FP0 Flat type
mounting plate
NOTICE!
Signal converter with FP0 Flat type mounting plate is installed to DIN rail
even if it is set from the side.
DIN rail
FP0 Flat type
mounting plate
8
Phone: 800.894.0412 - Fax: 888.723.4773 - Web: www.ctiautomation.net - Email: [email protected]
Chapter 5 Setting
5-1 Install IP address search tool
A personal computer with Windows and Ethernet interface is required in order to set Signal
converter.
You can download the software from the homepage of Panasonic Electric Works, Ltd.
http://panasonic-denko.co.jp/ac/e/dl/software-info/common/tol_configwd.jsp
Download “Configurator WD” (IP Address search tool) V1.21 or more and install in a PC according to
the below procedure.
When the setup program is booted, a
confirmation dialog box is displayed.
Confirm the contents and click [Next].
License agreement confirmation box is
displayed.
If you agree to all of the items in the
displayed license agreement, click [Yes].
Fill in the [User Name] and [Company
Name] and click [Next].
9
Phone: 800.894.0412 - Fax: 888.723.4773 - Web: www.ctiautomation.net - Email: [email protected]
Select the installation destination and click
[Next].
Select the program folder to
Configurator WD and click [Next].
install
Confirm the completion of the installation.
After complete the installation, click [start]-[program]-[Panasonic EW Control]-[Configurator WD] to start
“Configurator WD”.
10
Phone: 800.894.0412 - Fax: 888.723.4773 - Web: www.ctiautomation.net - Email: [email protected]
5-2 Set and Change IP Address
All devices connected with Ethernet network are required their own IP address.
192.168.1.5 is initially allocated to Signal converter as IP address.
If you want to change IP address, change here according to the procedure.
Start Configurator WD and click the search button in order to search units.
Before start searching, click [Option]-[Option]
and confirm “Signal Converter” in “Search Unit”
is checked.
The search result is displayed with respect to each unit.
Select a unit that you want to change IP address and click [Edit]-[Setting IP address].
Setting IP address window is displayed.
Specify the unit name and input IP address, Subnet Mask and Default Gateway.
Click [OK] to set new settings.
11
Phone: 800.894.0412 - Fax: 888.723.4773 - Web: www.ctiautomation.net - Email: [email protected]
5-3 Communication Setting
You can set communication conditions by 2 methods, using the communication set switches on the
front of main unit and using the setting software (Configurator WD).
5-3-1 Set by the communication set switches on the unit
Use ④Communication set switch 1 and ⑤Communication set switch 2 to set communication setting.
④Communication set switch 1
MODE
Item
OFF
⑤Communication set switch 2
ON
No.
Item
OFF
ON
1
Parity
Not available
Available
2
Parity
Even number
Odd number
3
Stop bit
2
1
4
vacant
1
2
Transmission
speed
Below table
3
Setting
method
4
Software
Hardware
note1)
<Table>
MODE 1
OFF
ON
OFF
ON
OFF
ON
OFF
ON
MODE 2
OFF
OFF
ON
ON
OFF
OFF
ON
ON
MODE 3
OFF
OFF
OFF
OFF
ON
ON
ON
ON
Transmission speed
115200bps
2400bps
4800bps
9600bps
19200bps
38400bps
57600bps
115200bps
Note 1)Only when MODE 4 of ④switch 1 is set to ON(Hardware),
④ and ⑤ switches’ setting is available.
2)When MODE 4 of ④switch 1 is set to OFF (Software),
④ and ⑤ switches’ setting is not available.
3)Data length is fixed with 8 bit.
4)Setting conditions are read when power turns on. You should set them before power turns on.
If you change the settings while power turns on, some malfunctions might be occurred.
5)When setting by hardware (communication set switches), RS232C and RS485 communication
settings are set as same. (If individual setting for RS232C and RS485 is required, use the
setting software.)
12
Phone: 800.894.0412 - Fax: 888.723.4773 - Web: www.ctiautomation.net - Email: [email protected]
5-3-2 Set by setting tool Configurator WD
You can download the setting tool software “Configurator WD” from our web site.
http://panasonic-denko.co.jp/ac/e/
Use “Configurator WD” ver. 1.42 or more for KS1 signal converter ver. 1.03 or more, that supports
Modbus TCP.
Please refer to the help in Configurator WD for the way to set.
Note) In case of setting by “Configurator WD”,
MODE 4 of ④switch 1 should be set to OFF (software).
Select a Signal converter which is to be set.
Click [Edit]-[Communication setting], and Communication setting window is displayed.
You can set the communication conditions for COM1 (RS232C) and COM2 (RS485) individually.
Note) Be sure to confirm COM No.
Set protocol of Ethernet network.
13
Phone: 800.894.0412 - Fax: 888.723.4773 - Web: www.ctiautomation.net - Email: [email protected]
This is the display when you select MODBUS TCP (RTU).
This it the display when you select MODBUS TCP (ASCII).
Set action mode of PLC/PC for Ethernet network. At present, you can select only Server mode.
14
Phone: 800.894.0412 - Fax: 888.723.4773 - Web: www.ctiautomation.net - Email: [email protected]
Set Baud rate of serial communication.
Default setting is 9600bps.
You can set it for COM1 (RS232C) and COM2 (RS485) individually.
When setting by hardware (communication set switches), the settings of COM1 and COM2 are
common.
Set Data length of serial communication. At present, it fixes 8bit.
Set Parity of serial communication. Default setting is “Odd”.
15
Phone: 800.894.0412 - Fax: 888.723.4773 - Web: www.ctiautomation.net - Email: [email protected]
Set Stop bit of serial communication. Default setting is “1 bit”.
Set End codes of serial communication. Default setting is CR.
Select from CR, CR+LF and None.
Set COM Timeout of serial communication. Default setting is 5000ms (5s).
It means the time to wait responses from the devices connected by RS232C and RS485.
After passing the set time, it finishes the communication via the serial port.
16
Phone: 800.894.0412 - Fax: 888.723.4773 - Web: www.ctiautomation.net - Email: [email protected]
COM Timeout can be set 300 seconds or less by checking the box.
Uncheck the box :
10-60000msec possible to set every millisecond
Check the box :
61-300sec
possible to set every second
Set Source Port No. of serial communication devices at server mode.
Default setting is 9094 for RS232C and 9095 for RS485.
This is the display when TCP mode is selected.
This is the display when Modbus TCP mode is selected for COM1 (RS232C).
It shows that the source port number of serial communication device to server.
“502”, the standard of Modbus TCP (RTU), is recommended.
17
Phone: 800.894.0412 - Fax: 888.723.4773 - Web: www.ctiautomation.net - Email: [email protected]
This is the display when Modbus TCP mode is selected for COM2 (RS485).
It shows that the source port number of serial communication device to server.
”502”, the standard of Modbus TCP (RTU), is recommended.
Note) The same port number can not be set for COM1 and COM2. Set the main serial port for Modbus
TCP connection to “502” and set the other port to another number.
When “502” is set to COM1, set “9095” to COM2 and when “502” is set to COM2, set “9094” to
COM1. And confirm that there is not the port number repetition from a client.
KS1 Signal Converter can connect 3 devices as RS232C server and 3 devices as RS485 server. Max
connected devices as server side is 6 connections.
When some devices are connected as server, set Timeout time. When no signal from one server after
setting timeout time, signal converter cut the connection with the server and wait for the next
connection.
Default setting is 60sec.
Note1) In case of setting “60”,it cut TCP connection when there are no communication for 60 seconds,
after establishing TCP connection.
2) KS1 Signal converter keeps the connection until time out setting time after establishing TCP
connection if the client cut TCP connection correctly.
Set the timeout with considering break of Ethernet cable, cut out TCP connection due to power
discontinuously of the unit and the case when it can’t establish connection.
When the client connects a new connection during KS1 Signal converter connection, it connects
max 3 connections for one port.
3) In case of setting “0”, it keeps TCP connection until passing two hours with no communication
(After passing two hours, the connection will be opened.)
18
Phone: 800.894.0412 - Fax: 888.723.4773 - Web: www.ctiautomation.net - Email: [email protected]
Chapter 6
Specifications
6-1 Main unit
Rated operating voltage
Rated power consumption
Allowable operating voltage range
Allowable momentary
power-off time
Ambient temperature
Ambient humidity
Breakdown voltage(initial)
Insulation resistance(initial)
Vibration resistance
Shock resistance
Dimensions (mm)
Weight
24V DC
2.4VA
21.6~26.4V DC (90%~110% of rated operating voltage)
10ms
0 ~ +55℃
30~85%RH (at 20℃ non-condensing)
Between the isolated circuits:
500V/1min
note) Cut-off current: 10mA
RS485⇔ Power supply,
However protective varistor excluded.
Earth
Between the isolated circuits:
100MΩ以上
(measured with 500V DC)
10 to 55Hz (1cycle/min) double amplitude:0.75mm (1h on 3
axes)
Min. 294m/s2 (5 times on 3 axes)
25 x 60 x 90
Approx. 80g
6-2 Communication Specifications
Interface: RS232C, RS485
Connected devices
Interface
RS232C (non-insulated)
RS485 (insulated)
TCP port number
note1)
9094 (initial)
9095 (initial)
Convert COM port
note2)
COM1
COM2
Communication mode
1:1
1:N
Number of connected units
1
99
Communication method
Full-duplex
Half-duplex
Synchronous system
Synchronous communication method
Connected number
note 5)
3
3
Transmission distance
15m
Max.1200m note2,3)
Transmission speed
2400,4800,9600,19200,38400,57600,115200bps
COM receive time-out note 6)
Setting range 10ms to 60s
Setting range 10ms to 60s
Data length
8bit (fixed)
Not available / Odd number / Even number
Transmission Parity
Format
Stop bit
1, 2
CR, CR+LF, None
End code
Serial ⇔ Ethernet Conversion method Command response method
Note1)TCP port number is set from the range of 1 to 32767 by using the tool, Configurator WD and it
compares to COM port. When connecting MODBUS TCP, “502” is recommended. In case of
setting 502 to main COM port, set another number to the other port.
2) COM1 and COM2 can be used together.
Transmission speed 115.2kbps setting
3) Please check with the actual devices when some
57.6kbps setting
commercial devices are connected. The number of
99
other connected devices, transmission distance, and
transmission speed may be different according to
70
using connected devices.
4 ) Transmission distance, speed and number of
40
connected device should be decided by the right
graph.
0
700
1000 1200
5) This is the maximum numbers of TCP connection
Transmission distance(m)
that can connect to COM1 and COM1 as Ethernet
sides.
19
Phone: 800.894.0412 - Fax: 888.723.4773 - Web: www.ctiautomation.net - Email: [email protected]
6) This shows the time to finish processing serial port when there is no response after command
from COM port.
7) When the end code is CE or CR+LF, CR and CR+LF in the command are ignored.
8) In case of that the end code is none, it processes the data max 1460 byte per a IP packet.
6-3 Communication Specifications
Interface
Connector
Transmission speed
Transmission Communication
specs.
method
Max. segment length
Transmission cable
Transmission method
Source port number
No transmission connection timeout
Protocol
Interface: Ethernet
IEEE802.3u, 10BASE-T / 100BASE-TX
RJ45
100Mbps / 10Mbps
Baseband
100m
UTP(Category 5 or more)
Server connection
1 to 32767 note2)
0 to 1800sec (initial: 60sec) note3,4,5)
TCP / IP
Auto-negotiation
Function
MDI / MDI-X Auto-cross over
Note1) You can select MODBUS TCP (RTU, ASCII) added to TCP for transport layer
protocol of Ethernet. (Firmware V1.03 or more)
2) “502” is recommended when connecting MODBUS TCP. When MODBUS TCP is set
to main COM port, set the other port to another port.
3) The time from when it comes no connection after establish TCP connection to cut
TCP connection when connect by MODBUS TCP. If set to “0”, KS1 Signal converter
keeps TCP connection until when MODBUS TCP client cut correctly. However,
without transmission for 2 hours, it cut TCP connection.
4) When it doesn’t cut correctly during TCP connection, KS1 Signal converter keeps
the TCP connection until the setting time. Considering read out cycle of using
application, set the timeout.
5) With serial communication conditions, when the end code is set to CR or CR+LF, it
cut the connection by receiving data 4k byte ore more.
When the end code is none, it proceeds by 1460 byte (max of one IP packet) or it
doesn’t cut TCP connection without proceeding to store the several packets.
6-4 Factory setting
Setting method
Hardware
Software
Transmission speed
115200 bps
9600 bps
Data length
Parity
Stop bit
8 bit (Fixed)
Odd number
1 bit
20
Phone: 800.894.0412 - Fax: 888.723.4773 - Web: www.ctiautomation.net - Email: [email protected]
6-5 Outline of MODBUS TCP and Transmission format
6-5-1 Connections (When set to MODBUS TCP)
Serial communication
・RS232C
device
→②command
MODBUS
TCP
server
MODBUS
Slave
TCP
←③response
convert
Client
・RS485
Serial port
・MODBUS TCP server (KS1 Signal converter) is connected from MODBUS TCP client.
・MODBUS TCP server is designated by specific IP address and port number.
・ MODBUS TCP server (KS1 Signal converter) converts data from MODBUS TCP client
(command) to MODBUS RTU or MODBUS ASCII and send from the serial port. After that, it
converts data from the serial port (response) and send to MODBUS TCP client.
PC etc.
Ethernet
→①command
←④response
KS1 Signal converter
6-5-2 Compare Packet of MODBUS TCP and MODBUS (RTU and ASCII)
①Example of Command data from MODBUS TCP client to MODBUS TCP server
Item
Transmit ID
Protocol ID
Transmit byte
Transmit data
Ex. of setting value 0001
0000
0006
0103238D0001
ID of
Fixed
Number of byte Slave unit No.01
Transmit unit
value
of transmit data
Function code 03
Meaning
Data address 238D
Data 1 byte
Setting range
00 to FF
Fix to 0000 Any value
Any value
This shows the command to read out 1 byte data designated by 238D send from MODBUS
TCP client to serial communication device number 01.
②Example of MODBUS RTU Command from MODBUS TCP server (KS1 Signal converter) to Serial
slave unit
Item
Data
CRC
Ex. of setting value 0103238D0001
1FA5
Slave unit No. 01
Function code 03
Meaning
CRC value of data
Data address 238D
Data 1 byte
Setting range
Any value
Calculated value 2 bytes
・This shows the command to read out data designated by 238D send from MODBUS TCP
server (KS1 Signal converter) to serial communication device number 01.
・Pick up transmit data from MODBUS TCP client, and when it is MODBUS RTU, it send
command with additional CRC, and when it is MODBUS ASCII, it send command with
additional LRC.
③Example of MODBUS RTU response from serial communication device to MODBUS TCP server
(KS1 Signal converter)
Item
Data
CRC
Ex. of setting value 0103020128
B9CA
Slave unit No. 01
Function code 03
Meaning
CRC value of data
Data 2 byte
Data value 0128 (Hex)
Setting range
Calculated value 2 bytes
・This shows the response to send 2 bytes data 0128(Hex) designated 238D send from serial
communication device number 01 to MODBUS TCP server (KS1 Signal converter).
21
Phone: 800.894.0412 - Fax: 888.723.4773 - Web: www.ctiautomation.net - Email: [email protected]
④Example of response from MODBUS TCP server to MODBUS TCP client
(Normal)
Item
Transmit ID
Protocol ID
Transmit byte
Transmit data
Ex. of setting value 0001
0000
0006
0103238D0001
ID of
Fixed
Number of byte Slave unit No.01
Transmit unit
value
of transmit data
Function code 03
Meaning
Data bytes 2
Data 0128(Hex)
Setting range
00 to FF
Fix to 0000
・This shows the response to send from MODBUS TCP server (KS1 Signal converter) to MOSBUS
TCP client after conversion 2 bytes data 0128(Hex) designated 238D send from serial
communication device number 01 to transmit data.
・When it is MODBUS RTU, it converts to transmit data delete CRC, and when it is MODBUS ASCII,
it converts to transmit data delete LRC.
Transmit data is total 5 bytes and the number of byte of transmit data is 0005.
⑤Example of response from MODBUS TCP server to MODBUS TCP client
(Error) Data error 1
Item
Transmit ID
Protocol ID
Transmit byte
Transmit data
Ex. of setting value 0001
0000
0003
00800A
ID of
Fixed
Number of byte
Meaning
Error code 0A
Transmit unit
value
of transmit data
・This shows the example of error response when it send command without transmit ID, protocol ID
and transmit byte.
・It response ”0A” in case of the below.
Transmit byte is under 6 bytes.
MOSBUS TCP command format error
MODBUS address in MODBUS TCP command error
Receive 4kbyte or more response from MODBUS slave unit.
(Error) Data error 2
Item
Transmit ID
Protocol ID
Transmit byte
Transmit data
Ex. of setting value 0001
0000
0003
01830B
ID of
Fixed
Number of byte
Meaning
Error code 0B
Transmit unit
value
of transmit data
・It response "0B" when it doesn’t receive response such as there is no slave or serial line is
opened etc.
22
Phone: 800.894.0412 - Fax: 888.723.4773 - Web: www.ctiautomation.net - Email: [email protected]
Chapter 7 Error indication and Clear Error
7-1 Error indication
You can see some errors’ contents by Configurator WD status error code.
Error code
0x26
0x21
0x60
0x61
0x62
Item
ROM error
RAM error
System error 1
System error 2
System error 3
Contents
Flash ROM setting read failure
RAM read failure
Task formation failure
RS485, RS232C initialize failure
TCP initialize failure
Error indication
7-2 How to clear the error
You can clear signal converter’s error when error LED is blinking by the below 2 methods.
・Power off and on again or pressing for 2 or more seconds make system reset.
・Turn the power on with pressing reset switch in order to initialize the settings.
(It initializes all settings by software.)
23
Phone: 800.894.0412 - Fax: 888.723.4773 - Web: www.ctiautomation.net - Email: [email protected]
Revision History
Issue Date
June, 2007
August, 2007
Manual no.
ARCT1F437E
ARCT1F437E-1
Content of revision
First edition
Second edition
Added the explanation of the new features of the
setting Timeout along with the upgrade of KS1
Signal Converter and Configurator WD.
October, 2007
ARCT1F437E-2
March, 2010
ARCT1F437E-3
Third edition
Added the explanation of the new features of the
setting Ethernet Timeout along with the upgrade of
KS1 Signal Converter.
Fourth edition
Added the explanation about MODBUS TCP along
with the upgrade of KS1 Signal Converter.
24
Phone: 800.894.0412 - Fax: 888.723.4773 - Web: www.ctiautomation.net - Email: [email protected]