Transcript
300-3000-001 RCD 3.5” Rearview Mirror/Monitor User Manual
Product Features
Safety and Installation Instructions
‣ Secure the monitor in such a way that it cannot become loose
under any circumstances (i.e. sudden braking, rough roads,
automotive accident) and cause injury to the vehicleʼs
occupants.
‣ Do not attach the monitor in an area that may be used by an
airbag as this could cause injury if the airbag is triggered.
‣ Do not open the monitor.
‣ Do not submerge the monitor in water. The monitor is not
waterproof.
‣ When mounted, the monitor should not impair your vision.
‣ Do not operate the monitor if the housing has been
damaged.
‣ To prevent damage to the unit, or failure of the fuse, ensure
correct power polarity.
‣ Do not press the LCD display.
‣ Do not drop the monitor.
Cleaning and Maintenance
‣ Built-in support for two video inputs.
‣ The rearview image will appear automatically on the screen
when the vehicleʼs reverse gear is activated.
‣ Includes parking gridline overlay.
‣ The mirror/monitor can be used with 12-volt systems.
‣ Anti-glare coating for eyesight protection.
‣ High/Low/Short circuit protection.
CAM Select
Power
CLEANING
If your vehicle has been parked in direct sunlight resulting in a considerable rise in temperature inside the vehicle, allow the unit to cool
before operating. As well, if your vehicle has been parked in extreme cold conditions, allow the unit to warm-up before operation.
Unplug or power off the unit before cleaning. Do not use liquid cleaners or aerosol cleaners. Use only a damp cloth for cleaning. Never
use strong solvents such as thinner or benzine as they might damage the finish of the unit.
VENTILATION
Holes in back of the unit are provided for ventilation and ensure reliable operation of the monitor by protecting against overheating.
These holes must not be blocked or covered.
SERVICING
Do not attempt to service this system by yourself as opening or removing covers may expose you to dangerous voltage or other hazards.
This may also void your manufacturerʼs warranty.
CAM Select
Monitor Controls/Settings
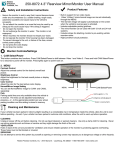
1. CAM Select/Power
Power
Press the Power button on the mirror once to power off. Press once more to power on again.
Press CAM Select button on the mirror to change from CAM 1 to CAM 2.
MENU
2. MENU
Brightness Control
Press MENU button on remote one time. Use left or right arrow buttons to increase or decrease.
Contrast Control
Press MENU button on remote two times. Use left or right arrow buttons to increase or decrease.
Color Control
Press MENU button on remote three times. Use left or right arrow buttons to increase or decrease.
Tint Control
Press MENU button on remote four times. Use left or right arrow buttons to increase or decrease
Reset All Settings
Press RESET button on remote one time.
Connection
Rostra Precision Controls, Inc. - 2519 Dana Dr. - Laurinburg, NC 28352 - 1-800-782-3379 - www.rostra.com
RESET
