1
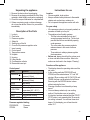
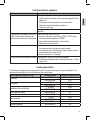
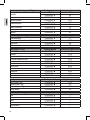
Instruction Manual Dampfdruck-Kochtopf PC-DDK 1048 Pressure cooker 14.10.2013 HF ENGLISH ......................................................................................................... page 2 19 Übersicht der Bedienelemente Location of Controls 3 User manual General Notes Thank you for selecting our product. We hope that you will enjoy use of the appliance. Read the operating instructions carefully before putting the appliance into operation and keep the instructions including the warranty, the receipt and, if possible, the box with the internal packing. If you give this device to other people, please also pass on the operating instructions. Symbols in this user manual Important notes for your safety are marked distinctively. Pay absolute attention to them to avoid accidents and damage to the device: WARNING: Warns of dangers for your health and indicates potential risks of injury. CAUTION: Indicates potential dangers for the device or other objects. NOTE: Highlights tips and information for you. Contents Location of Controls................................................ 3 General Notes.......................................................19 Important safety instructions.................................20 Supplied parts........................................................22 Unpacking the appliance.......................................23 Description of the Parts.........................................23 Instructions for use................................................23 Getting started.......................................................25 Operation...............................................................25 Problems with the appliance.................................27 Cooking time tables...............................................27 Cleaning.................................................................29 Storage..................................................................30 Technical Data.......................................................30 Desposal................................................................30 • The appliance is designed exclusively for private use and for the envisaged purpose. This appliance is not fit for commercial use. • Do not use it outdoors. Keep it away from sources of heat, direct sunlight, humidity (never dip it into any liquid) and sharp edges. Do not use the appliance with wet hands. If the appliance is humid or wet, unplug it immediately. • When cleaning or putting it away, switch off the appliance and always pull out the plug from the socket (pull the plug itself, not the lead) if the appliance is not being used and remove the attached accessories. • Do not operate the machine without supervision. If you leave the room you should always turn the device off. Remove the plug from the socket. • The device and the mains lead have to be checked regularly for signs of damage. If damage is found the device must not be used. • In order to ensure your children’s safety, please keep all packaging (plastic bags, boxes, polystyrene etc.) out of their reach. WARNING! Don’t let small children play with foils for danger of suffocation! 19 Important safety instructions Read through all instructions carefully! Warning symbols are displayed on the product: WARNING: Danger of scalding by escaping steam! • Keep face and hands away from the pressure regulator when the appliance is in use. • Only open the lid when the steam has been fully released. • Take care when opening the lid after cooking. An information plate can be found inside the housing: To reduce the risk of electric shock, cook only in removable cooking pot. WARNING: • Never use the pressure cooker close to children. • Do not put the pressure cooker into a hot oven or onto a hot source of heat. • Take great care when moving the pressure cooker when it is under pressure. Do not touch the hot surfaces, but use the side handles and buttons. If necessary, use oven gloves. • Never lift the pressure cooker by the lid handle. • This appliance is intended exclusively for normal domestic use. It is not intended for use in the following locations: • in staff kitchens in shops, offices, and other commercial facilities; • in agricultural enterprises; • by guests in hotels, motels, and other accommodation facilities; • in bed & breakfast establishments. • Only use the pressure cooker for the purpose for which it is intended. 20 WARNING: • Food is prepared under pressure in this pot. Incorrect use of the appliance may cause burns. Make sure that the pressure cooker has been properly closed before operation. Information on this can be found in the chapter “Instructions for use”. • Never use force to open the pressure cooker. Before opening, ensure that the internal pressure has been fully released and that the pressure valve is in the “STEAM” position. More information can be found in the chapter “Instructions for use”. • Never use the pressure cooker without water. The appliance becomes badly damaged without water. For the BROWN function, follow the instructions given in the chapter “Operation”. • Never fill the pressure cooker over the MAX (⅔) mark. If you are preparing food such as e.g. rice, which swells during cooking, fill the pressure cooker to a maximum of half of its nominal volume (2.3 liters). • If you have cooked meat with skin on it, e.g. beef tongue, which inflates under pressure, then do not pierce the meat while the skin is inflated. You may be scalded by sputtering. More information can be found in the chapter “Instructions for use”. • If you are preparing pulpy foods (e.g. dried peas, rhubarb), the pressure cooker must be shaken gently before opening. This prevents the food from sputtering when opening the lid. • Do not use the pressure cooker to fry food under pressure with oil. • Do not cover the pressure valves! Danger of explosion! • Before using the pressure cooker, always ensure that the valves are not blocked. More information can be found in the chapter “Cleaning”. If it is found that the valve is defective, contact our customer service or a specialist. 21 WARNING: • Do not tamper in any way with the safety system. Limit handling of the safety systems to the steps for cleaning. • Before cleaning, always remove the power cord. • This appliance is not designed to be immersed in water during cleaning. Follow the instructions given in the chapter “Cleaning”. • Only use original accessories for this model. Only use housing, lid, and sealing ring from the same manufacturer. • Do not repair the device by yourself. Please contact authorized personnel. If the power cord of this appliance is damaged, it must be replaced by a special power cord which is available from the manufacturer or his customer service. • This appliance shall not be used by children. • Keep the appliance and its cord out of reach of children. • Children shall not play with the appliance. • Appliances can be used by persons with reduced physical, sensory or mental capabilities or lack of experience and knowledge if they have been given supervision or instruction concerning use of the appliance in a safe way and if they understand the hazards involved. CAUTION: Only use the insert pot as an accessory for this appliance. It is not suitable for other cooking zones! Keep these instructions for future reference! Supplied parts Housing with integrated hotplate Safety lid Insert pot Steamer insert holder 22 Steamer insert Power cord Spoon Measuring cup Unpacking the appliance Instructions for use 1. Remove the device from its packaging. 2. Remove all packaging materials like foils, filling materials, cable holders, and carton packaging. 3. Check the scope of deliveries for completeness. 4. If there are missing parts or obvious damage, do not use the device. Return it to your retailer immediately. Location • Choose a stable, level surface. • Keep a sufficient safety distance to flammable objects such as furniture, curtains, etc. • Do not operate the appliance under wall units. Description of the Parts 1 Lock pin 2 Float valve 3 Pressure regulator 4 Safety lid 5 Sealing ring of the lid 6 Cover for the pressure regulator valve 7 Inner housing 8 Control panel 9 Temperature sensor 10Hotplate 11Housing 12Lifting handle 13Condensation collector 14Removable insert pot Control panel Button Function Set pressure time for high PRESSURE pressure (0.6 bar) Set pressure time for low PRESSURE pressure (0.3 bar) WARM Keep warm STEAM Steam cooking Slow cooking at low SLOW COOK temperature (82° - 85° C) BROWN Browns meat TIMER Time-delayed cooking START / STOP On/Off Pressure regulator labeling PRESSURE:Pressure STEAM: Steam For your safety • If the pressure cooker is not properly sealed, no pressure will build up in the pot. • The appliance has 5 safety systems: - The float valve activates the lock pin if enough pressure has built up. The lock pin prevents the lid from accidentally opening under pressure. - The valve under the pressure regulator releases steam in the event of excess pressure. - Three electronic safety systems regulate the temperature. • Before use, always check that the valves are in a clean and defect-free condition. More information can be found in the chapter “Cleaning”. Functions of the appliance • The display shows the operating status and the set value. • In the cooking methods PRESSURE and STEAM, set the value between “01” and “99” minutes. When cooking with SLOW COOK and TIMER, the time can be selected in half-hours. Browning with the BROWN button is done without entering the time. • Pressing of buttons is confirmed by a beep sound. • You must always select only one cooking method. Combinations are not possible. • If a function has been selected and the START / STOP button is not pressed within 30 seconds, the setting is cleared. You will hear three short beeps. On the display, you will see the start status “0 0”. 23 • The countdown of the set cooking time only begins when the optimum cooking temperature is reached in the pot. This will be indicated by the flashing dot on the display. • During cooking, excess condensate is collected in the condensation collector. • At the end of the cooking process, the display shows “0.0”. The keep warm function is activated. The control lamp of the WARM button lights. • You can interrupt or end any action with the START / STOP button. Capacity • Never operate the appliance without water! The minimum capacity is around 250 ml (8 oz). For the BROWN (browning) function, follow the instructions which are given in the chapter “Operation”. • The maximum capacity (the net capacity) is 3 liters (MAX ⅔ marking). If you are preparing food such as e.g. rice, which swells during cooking, fill the pressure cooker to a maximum of half its nominal capacity (2.3 liters). • Food which is cooked in the insert pot may not touch the lid of the pressure cooker. Closing the lid 1. Ensure that the sealing ring is properly fitted in the lid. 2. Check the permeability of the valves. 3. Place the lid onto the housing so that the lock pin is positioned above the condensation collector. 4. Turn the lid anticlockwise as far as it will go. The lock pin latches into place. 5. Ensure that the pressure regulator is fitted in the correct position on the valve. The dot “●” next to STEAM or PRESSURE on the pressure regulator must lie above the dot on the lid. 24 Opening the lid WARNING: Danger of scalding! • Use oven gloves or a spoon. • Keep your face away from the lid. 1. Switch off the appliance with the START / STOP button. 2. Do not pull off the pressure regulator! Turn it carefully to STEAM. The steam escapes from the valve of the pressure regulator. The pressure is released. 3. Wait until no more steam escapes. 4. If the lock pin has locked the lid, you can open the pressure cooker. Turn the lid clockwise to remove it. Tips • The “Cooking time tables” give recommendations on the selection of the cooking method. • For fresh fruit or soft foods, the cooking methods PRESSURE or STEAM are the most suitable ones. • The cooking method PRESSURE is suited to meat, stews, and similar dishes. • Do not prepare food with milk in the pressure cooker. Milk boils and sticks to the valves in the lid! • Food such as apple sauce, cranberries, rhubarb, pearl barley, peas, oatmeal, noodles, and other pasta should not be cooked under pressure in the pressure cooker. They also tend to foam. This may block the pressure valve. • To reduce the build-up of foam when cooking beans, add a small piece of butter or a tablespoon of oil to the water. • In the case of recipes with alcohol, this must be evaporated before the lid is sealed. • In order to check the doneness of a cooked tongue, pierce the meat on the tip or on the underside which does not contain any skin. If the beef/pork tongue is cooked, cool off under cold water. Allow the tongue to cool somewhat so that you can hold it. The skin can now be removed, best starting from the end to the tip of the tongue. Getting started Electric Connection • Before inserting the power plug into the outlet, check that the mains voltage to be used matches that of the device. You can find the required information on the nameplate. • Plug the power cord into the connection socket on the appliance. • Connect the device only to a correctly installed safety socket. The display indicates the operating status with “0 0”. Before initial use 1. Clean all parts of the appliance as described under “Cleaning”. 2. Place the insert pot into the housing. 3. Position the accessories (steamer insert holder and steamer insert) in the insert pot. 4. Fill the insert pot with 3 liters of warm water (up to the MAX mark). 5. Close the appliance with the lid. 6. Operate the pressure cooker for 15 minutes with pressure (see the chapter “Operation”). 7. Release the steam by setting the pressure cooker to STEAM. 8. Allow the insert pot to cool to room temperature before emptying and cleaning again. Operation PRESSURE – Cooking with pressure 1. Fill the insert pot with at least 250 ml (8 oz) of water. 2. If necessary, insert the accessories. Add the food according to your recipe. 3. Close the appliance with the lid. 4. Turn the pressure regulator to the PRESSURE position. 5. Select the cooking method using the PRESSURE or buttons. The control lamp of the button flashes. “01” appears on the display. Set the required cooking time by pressing the button once for each further minute or keeping the button pressed. 6. Press the START / STOP button to start the cooking process. The control lamp of the PRESSURE button is lit continuously. NOTE: During the cooking process it is normal that steam escapes via the float valve or the pressure regulator valve. Hissing can be heard. 7. The appliance begins with the countdown in minutes when the corresponding pressure has built up. 8. The end of the cooking process is confirmed by two beeps. The keep warm function is then automatically activated. If you do not end operation with the START / STOP button, the appliance beeps at intervals for about 3 minutes as a reminder. 9. Press the START / STOP button. Wait about 5 minutes until the appliance has released the pressure by itself (also known as the natural release method). 10.Release the residual pressure by setting the pressure regulator to the STEAM position. 11.Open the lid carefully. BROWN - Browning 1. Add fat according to your recipe in order to brown food in the insert pot. Leave the pot open. 2. Press the BROWN button. The control lamp of the button flashes. The display shows “0.0”. 3. Press the START / STOP button to start the heating process. The control lamp of the BROWN button is lit continuously. 4. After about 5 minutes of pre-heating, add the meat. Brown as normal. NOTE: If you close the lid in this mode, the appliance beeps every 10 minutes as a warning due to the high temperature. CAUTION: Do not leave the appliance unattended! 25 SLOW COOK - Slow (gentle) cooking at low temperature 1. Add at least 250 ml (8 oz) of water to the insert pot. 2. If necessary, insert the accessories. Add the food according to your recipe. 3. Close the appliance with the lid. 4. Turn the pressure regulator to the STEAM position. 5. Press the SLOW COOK button. The control lamp of the button flashes. The display shows “0.5”. This corresponds to a cooking time of half an hour. 6. Set the required cooking time by pressing the button once for each further half hour or keeping the button pressed. The longest cooking time is 9½ hours at a temperature of about 82 °C – 85 °C. 7. Press the START / STOP button to start the cooking process. The control lamp of the SLOW COOK button is lit continuously. 8. The appliance begins with the countdown at half-hourly intervals when the corresponding temperature is reached. STEAM - Steaming 1. Add at least 250 ml (8 oz) of water to the insert pot. 2. Insert the accessories. Add the food according to your recipe. 3. Close the appliance with the lid. 4. Turn the pressure regulator to the STEAM position. 5. Press the STEAM button. The control lamp of the button flashes. The display shows “01”. 6. Set the required cooking time by pressing the button once for each further minute or keeping the button pressed. The longest cooking time is 99 minutes. 7. Press the START / STOP button to start the cooking process. The control lamp of the STEAM button is lit continuously. 26 NOTE: The lid can be opened carefully during cooking to check the progress of the food. TIMER – Time-delayed cooking This function enables you to delay the cooking by up to 8 hours. You can activate the time delay on the settings PRESSURE, SLOW COOK and STEAM. NOTE: Do not use the TIMER function for food which is easily spoiled. 1. Press the TIMER button. The display shows “0.5”. This corresponds to a half hour time delay. 2. Set the required time delay by pressing the button once for each further half hour or by keeping the button pressed. 3. Select the cooking method. Set the required cooking time. 4. Press the START / STOP button to activate the TIMER. The appliance starts the cooking process after the set time has elapsed. WARM – Keep warm With this function, you can keep the cooked food warm for a long period. 1. Add the cooked food to the insert pot. 2. Close the appliance with the lid. 3. Turn the pressure regulator to the STEAM position. 4. Press the WARM button. The control lamp of the button flashes. The display shows “0.0”. 5. Press the START / STOP button to start the function. The control lamp of the WARM button is lit continuously. Ending operation 1. Press the START / STOP button. The display shows “0 0”. 2. Disconnect the power cord from the socket. Problems with the appliance Problem The appliance does not work. Cause / remedy The appliance has no power supply. • Check whether the power cord is properly plugged into the appliance. • Is the power cord connected to the mains socket? • Check the socket with another appliance. • Check the main fuse. If the appliance is defective, contact our customer service or a specialist. The countdown proceeds in the PRES- There is too little water in the pot. 1. Stop the cooking process with the START / STOP button. SURE cooking method although the appliance has not built up any pressure. 2. Turn the pressure regulator to STEAM. 3. Remove the lid and add about 1 cup of water. 4. Restart the cooking process. Steam escapes at the rim of the lid. Ensure that, • the pressure cooker has been properly sealed; • the sealing ring is in a defect-free, clean condition and has been inserted correctly in the lid. See also the chapter on “Cleaning”. The lid cannot be opened after cooking. The pressure in the pot is not yet fully released. • Proceed as described under “Instructions for use” “Opening the lid”. Cooking time tables The following cooking times are approximate times. They should be used as a general guideline. The quantity and consistency of the food influence the cooking times. Fresh vegetables (approx. 500 g) Artichokes Aubergines Cauliflower, Broccoli (florets) Beans, green or string Peas, green Carrots (sliced) Cabbage (red or white) Kohlrabi (chopped) Cooking method STEAM PRESSURE ▲ STEAM PRESSURE ▼ STEAM PRESSURE ▼ PRESSURE ▼ PRESSURE ▼ STEAM PRESSURE ▼ PRESSURE ▲ PRESSURE ▼ Cooking time (approx. min.) 30 8-10 15-18 3-4 20-25 3-4 5-7 3-5 18-20 4-6 3-5 5-8 27 Fresh vegetables (approx. 500 g) Celery (chopped) Asparagus Spinach Cooking method STEAM PRESSURE ▼ PRESSURE ▲ PRESSURE ▼ STEAM PRESSURE ▼ PRESSURE ▼ PRESSURE ▼ PRESSURE ▼ Cooking time (approx. min.) 16-18 5-8 3-5 8-10 24-26 4-5 2-3 5-6 2-3 Starches (approx. 500 g) Yeast dumplings Potatoes (whole, medium sized) Brown rice White rice Cooking method PRESSURE ▼ PRESSURE ▲ PRESSURE ▲ PRESSURE ▲ Cooking time (approx. min.) 6 10-12 8-9 6-7 Meat (approx. 500 g) Pork knuckle Goulash Roast hare/rabbit (Cured and smoked) chop Lamb (boneless) Roast beef Beef tongue Roulades Roast pork Pork tongue Boiled beef in broth Cooking method PRESSURE ▲ PRESSURE ▲ PRESSURE ▲ PRESSURE ▲ PRESSURE ▲ PRESSURE ▲ PRESSURE ▲ PRESSURE ▲ PRESSURE ▲ PRESSURE ▲ PRESSURE ▲ Cooking time (approx. min.) 30-40 15-20 10-15 10-12 20-25 30-40 45-55 15-20 30-35 30 40-45 Poultry Duck (breast / leg) Goose (breast / leg) Chicken (breast / leg) Turkey breast Cooking method PRESSURE ▲ PRESSURE ▲ PRESSURE ▲ PRESSURE ▲ Cooking time (approx min.) 10-15 30 10-15 30 Fisch (approx. 1000 g) Cod Salmon Perch Sole Tuna (steaks) Cooking method PRESSURE ▼ PRESSURE ▼ PRESSURE ▼ PRESSURE ▼ PRESSURE ▼ Cooking time (approx. min.) 7 7 7 4 7 Pumpkin Corn cob Peppers (stuffed) Brussels sprouts 28 Cleaning WARNING: • Before cleaning, switch the device off and pull the power plug. • Allow the appliance with insert pot to cool. • Under no circumstances should you immerse the device in water for cleaning purposes. Otherwise this might result in an electric shock or fire. CAUTION: • Do not use a wire brush or any abrasive items. • Do not use any acidic or abrasive detergents. • The individual parts are not dishwasher-safe. Always clean the appliance and accessories after use. 1. Remove the insert pot and accessories. 2. Always clean the inside and outside of the housing with a damp dishcloth. 3. Pull the condensation collector (13) down to empty and clean it. After drying, slide it up again onto the housing until it clicks into place. 4. Clean the insert pot and accessories in a bowl of hot water. To help remove stubborn dirt, you can use a nylon brush. 5. Then dry everything off. Lid 1. Pull off the pressure regulator (3) by turning it. Clean it under running water. 2. Remove the sealing ring (5) from the inside of the lid. Clean it in a bowl of warm water. Rinse and dry thoroughly. 3. Pull off the cover of the pressure regulator valve (6). Check that the valve is not blocked by holding it against the light. If necessary, remove food residues with a toothpick. Clean the cover under water with a nylon brush and then dry it. 4. Clean the lid with a sponge and detergent under running hot water. Wipe it dry. 5. Check the mobility of the float valve (2): Hold the lid horizontally with the float valve facing upwards. The float valve must be easily pushed in without resistance. 6. Check the sealing ring for damage. There must be no cracking. If the sealing ring is damaged, do not use the appliance! Contact our customer service at www.sli24.de. Insert the sealing ring again by pressing it on the inner rim of the lid under the metal ring. The metal ring must be positioned in the groove of the sealing ring. If the sealing ring is incorrectly positioned, the appliance will not function. 7. Fit the cover back onto the pressure regulator valve. 8. Fit the pressure regulator back onto the valve. 29 Replacement sealing rings can be ordered via our Internet service portal www.sli24.de under “Ersatzteile & Zubehör (Replacement parts and accessories)”. Storage • Clean the device as described. Let the accessories dry completely. • Place the lid onto the pressure cooker with the inside facing upwards. This protects the valves and regulator on the top of the lid. If the appliance is stored with the lid closed, stale smells may build up. • We recommend that you store the device in its original packaging when it is not to be used for a longer period. • Always store the device at a well ventilated and dry place outside the reach of children. Technical Data Model:............................................... PC- DDK 1048 Power supply:..................................... 230 V~ 50 Hz Power rating:................................................... 900 W Protection class:....................................................... I Maximum operating pressure:����������������������60 kPA Maximum safety pressure:.......................... 230 kPa Net capacity:................................................... 3 liters Net weight...........................................approx. 5.3 kg The right to make technical and design modifications in the course of continuous product development remains reserved. This device complies with all current CE directives, such as electromagnetic compatibility and low voltage directive and is manufactured according to the latest safety regulations. 30 Disposal Meaning of the “Wheelie Bin” Symbol Take care of our environment, do not dispose of electrical appliances via the household waste. Dispose of obsolete or defective electrical appliances via municipal collection points. Please help to avoid potential environmental and health impacts through improper waste disposal. You contribute to recycling and other forms of utilization of old electric and electronic appliances. Your municipality provides you with information about collecting points. PC-DDK 1048 24 Monate Garantie gemäß Garantieerklärung • 24 months warranty according to warranty declaration • 24 maanden garantie volgens garantieverklaring • 24 mois de garantie selon la déclaration de garantie • 24 mesi di garanzia secondo la dichiarazione di garanzia • 24 meses de garantía de acuerdo con la declaración de garantía • 24 meses de garantia, de acordo com a declaração de garantia • 24 måneders garanti i henhold til garantibetingelsene • 24 miesiące gwarancji na podstawie oświadczenia gwarancyjnego • záruka 24 měsíců podle prohlášení o záruce • 24 mjesečno jamstvo u skladu s jamstvenom deklaracijom • 24 luni garanţie conform declaraţiei de garanţie • 24 месеца гаранция в съответствие с гаранционната декларация • 24-mesačná záruka podľa vyhlásenia o záruke • 24-mesečna garancija, skladno z garancijsko izjavo • 24 hónap garancia a garanciafeltételekben leírtak szerint • гарантія на 24 місяці відповідно заяві про гарантію • Гарантия 24 месяца согласно заявленным гарантийным правилам • ةدمل نامض24 نامضلا نايبل ًاقفو ًارهش Kaufdatum, Händlerstempel, Unterschrift • date of purchase, dealer stamp, signature • aankoopdatum, dealerstempel, handtekening • date d‘achat, tampon du concessionnaire, signature • data di acquisto, timbro del rivenditore, firma • fecha de compra, sello del distribuidor, firma • data de compra, carimbo do distribuidor, assinatura • kjøpsdato, forhandlerstempel, signatur • data zakupu, pieczęć sprzedawcy, podpis • datum zakoupení, razítko prodejce, podpis • datum kupovine, žig trgovca, potpis • data de achiziţie, ştampila furnizorului, semnătura • Дата на покупката, Печат на Продавача, Подпис • dátum nákupu, pečiatka obchodníka/predajcu, podpis • datum nakupa, žig trgovca, podpis • vásárlás dátuma, kereskedő bélyegzője, aláírás • дата придбання, печатка продавця, підпис • Дата приобретения, Штамп продавца, Подпись • ءارشلا خيرات, ليكولا متخ/عئابلا, عيقوتلا www.proficook.de Internet: http://www.proficook.de Stand 09/13 GARANTIEKARTE warranty card • garantiekaart • carte de garantie • scheda di garanzia • tarjeta de garantía • cartão de garantia • garantikort • karta gwarancyjna • záruční list • kartica jamstva • carte de garanţie • Гаранционна карта • záručný list • garancijski list • garanciajegy • гарантійнийформуляр • Гарантийный талон • نامض ةقاطب