1
ProjeQtOr User guide
Release 5.1
ProjeQtOr
November 13, 2015
Contents
1
2
3
4
5
Features
1.1 Planning management . . .
1.2 Resource management . . .
1.3 Tickets management . . . .
1.4 Costs management . . . . .
1.5 Quality management . . . .
1.6 Risks management . . . . .
1.7 Perimeter management . . .
1.8 Documents management . .
1.9 Commitments management
1.10 Tools . . . . . . . . . . . .
.
.
.
.
.
.
.
.
.
.
.
.
.
.
.
.
.
.
.
.
.
.
.
.
.
.
.
.
.
.
.
.
.
.
.
.
.
.
.
.
.
.
.
.
.
.
.
.
.
.
.
.
.
.
.
.
.
.
.
.
.
.
.
.
.
.
.
.
.
.
.
.
.
.
.
.
.
.
.
.
.
.
.
.
.
.
.
.
.
.
.
.
.
.
.
.
.
.
.
.
.
.
.
.
.
.
.
.
.
.
.
.
.
.
.
.
.
.
.
.
.
.
.
.
.
.
.
.
.
.
.
.
.
.
.
.
.
.
.
.
.
.
.
.
.
.
.
.
.
.
.
.
.
.
.
.
.
.
.
.
.
.
.
.
.
.
.
.
.
.
.
.
.
.
.
.
.
.
.
.
.
.
.
.
.
.
.
.
.
.
.
.
.
.
.
.
.
.
.
.
.
.
.
.
.
.
.
.
.
.
.
.
.
.
.
.
.
.
.
.
.
.
.
.
.
.
.
.
.
.
.
.
.
.
.
.
.
.
.
.
.
.
.
.
.
.
.
.
.
.
.
.
.
.
.
.
.
.
.
.
.
.
.
.
.
.
.
.
.
.
.
.
.
.
.
.
.
.
.
.
.
.
.
.
.
.
.
.
.
.
.
.
.
.
.
.
.
.
.
.
.
.
.
.
.
.
.
.
.
.
.
.
.
.
.
.
.
.
.
.
.
.
.
.
.
.
.
.
.
.
.
.
.
.
.
.
.
.
.
.
.
.
.
.
.
.
.
.
.
.
.
.
.
.
.
.
.
.
.
.
.
.
.
.
.
.
.
.
.
.
.
.
.
.
.
.
.
.
.
.
.
.
.
.
.
.
.
.
.
.
3
4
6
7
8
9
10
11
12
13
14
Concepts
2.1 ProjeQtOr roles . . . . . . .
2.2 Profiles definition . . . . . .
2.3 Stakeholder definition . . .
2.4 Project affectation . . . . .
2.5 Activity assignment . . . .
2.6 Resource function and cost .
2.7 Resource calendar . . . . .
2.8 Photo . . . . . . . . . . . .
.
.
.
.
.
.
.
.
.
.
.
.
.
.
.
.
.
.
.
.
.
.
.
.
.
.
.
.
.
.
.
.
.
.
.
.
.
.
.
.
.
.
.
.
.
.
.
.
.
.
.
.
.
.
.
.
.
.
.
.
.
.
.
.
.
.
.
.
.
.
.
.
.
.
.
.
.
.
.
.
.
.
.
.
.
.
.
.
.
.
.
.
.
.
.
.
.
.
.
.
.
.
.
.
.
.
.
.
.
.
.
.
.
.
.
.
.
.
.
.
.
.
.
.
.
.
.
.
.
.
.
.
.
.
.
.
.
.
.
.
.
.
.
.
.
.
.
.
.
.
.
.
.
.
.
.
.
.
.
.
.
.
.
.
.
.
.
.
.
.
.
.
.
.
.
.
.
.
.
.
.
.
.
.
.
.
.
.
.
.
.
.
.
.
.
.
.
.
.
.
.
.
.
.
.
.
.
.
.
.
.
.
.
.
.
.
.
.
.
.
.
.
.
.
.
.
.
.
.
.
.
.
.
.
.
.
.
.
.
.
.
.
.
.
.
.
.
.
.
.
.
.
.
.
.
.
.
.
.
.
.
.
.
.
.
.
.
.
.
.
.
.
.
.
.
.
.
.
.
.
.
.
.
.
.
.
.
.
.
.
.
.
.
.
.
.
.
.
.
.
.
.
.
.
.
.
.
.
.
.
.
.
15
16
18
20
24
26
27
28
30
Graphical user interface
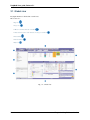
3.1 Global view . . . . . .
3.2 Alerts . . . . . . . . .
3.3 Themes . . . . . . . .
3.4 Multilingual . . . . .
3.5 Keyboard functionality
3.6 Common sections . .
3.7 User parameters . . .
.
.
.
.
.
.
.
.
.
.
.
.
.
.
.
.
.
.
.
.
.
.
.
.
.
.
.
.
.
.
.
.
.
.
.
.
.
.
.
.
.
.
.
.
.
.
.
.
.
.
.
.
.
.
.
.
.
.
.
.
.
.
.
.
.
.
.
.
.
.
.
.
.
.
.
.
.
.
.
.
.
.
.
.
.
.
.
.
.
.
.
.
.
.
.
.
.
.
.
.
.
.
.
.
.
.
.
.
.
.
.
.
.
.
.
.
.
.
.
.
.
.
.
.
.
.
.
.
.
.
.
.
.
.
.
.
.
.
.
.
.
.
.
.
.
.
.
.
.
.
.
.
.
.
.
.
.
.
.
.
.
.
.
.
.
.
.
.
.
.
.
.
.
.
.
.
.
.
.
.
.
.
.
.
.
.
.
.
.
.
.
.
.
.
.
.
.
.
.
.
.
.
.
.
.
.
.
.
.
.
.
.
.
.
.
.
.
.
.
.
.
.
.
.
.
.
.
.
.
.
.
.
.
.
.
.
.
.
.
.
.
.
.
.
.
.
.
.
.
.
.
.
.
.
.
.
.
.
.
.
.
.
.
.
.
.
.
.
.
.
.
.
.
.
.
.
.
.
.
.
.
.
.
.
.
.
.
.
.
.
.
.
.
.
31
32
66
68
68
68
69
77
Planning elements
4.1 Project . . . . . .
4.2 Activity . . . . . .
4.3 Milestone . . . . .
4.4 Common sections
.
.
.
.
.
.
.
.
.
.
.
.
.
.
.
.
.
.
.
.
.
.
.
.
.
.
.
.
.
.
.
.
.
.
.
.
.
.
.
.
.
.
.
.
.
.
.
.
.
.
.
.
.
.
.
.
.
.
.
.
.
.
.
.
.
.
.
.
.
.
.
.
.
.
.
.
.
.
.
.
.
.
.
.
.
.
.
.
.
.
.
.
.
.
.
.
.
.
.
.
.
.
.
.
.
.
.
.
.
.
.
.
.
.
.
.
.
.
.
.
.
.
.
.
.
.
.
.
.
.
.
.
.
.
.
.
.
.
.
.
.
.
.
.
.
.
.
.
.
.
.
.
.
.
.
.
.
.
.
.
.
.
.
.
.
.
.
.
79
81
82
84
86
Real work allocation
.
.
.
.
.
.
.
.
95
i
5.1
6
Real work allocation . . . . . . . . . . . . . . . . . . . . . . . . . . . . . . . . . . . . . . . . . . .
Follow-up
6.1 Today . . . . . . .
6.2 Gantt chart . . . .
6.3 Planning . . . . .
6.4 Projects portfolio .
6.5 Resource Planning
6.6 Diary . . . . . . .
6.7 Reports . . . . . .
.
.
.
.
.
.
.
.
.
.
.
.
.
.
.
.
.
.
.
.
.
.
.
.
.
.
.
.
.
.
.
.
.
.
.
.
.
.
.
.
.
.
.
.
.
.
.
.
.
.
.
.
.
.
.
.
.
.
.
.
.
.
.
.
.
.
.
.
.
.
.
.
.
.
.
.
.
.
.
.
.
.
.
.
.
.
.
.
.
.
.
.
.
.
.
.
.
.
.
.
.
.
.
.
.
.
.
.
.
.
.
.
.
.
.
.
.
.
.
.
.
.
.
.
.
.
.
.
.
.
.
.
.
.
.
.
.
.
.
.
.
.
.
.
.
.
.
.
.
.
.
.
.
.
.
.
.
.
.
.
.
.
.
.
.
.
.
.
.
.
.
.
.
.
.
.
.
.
.
.
.
.
.
.
.
.
.
.
.
.
.
.
.
.
.
.
.
.
.
.
.
.
.
.
.
.
.
.
.
.
.
.
.
.
.
.
.
.
.
.
.
.
.
.
.
.
.
.
.
.
.
.
.
.
.
.
.
.
.
.
.
.
.
.
.
.
.
.
.
.
.
.
.
.
.
.
.
.
.
.
.
.
.
.
.
.
.
.
.
.
.
.
.
.
.
.
.
.
.
.
.
.
.
.
.
.
.
.
.
.
.
.
.
.
.
.
.
.
.
.
.
.
.
.
.
.
.
.
96
105
106
113
113
114
115
116
118
7
Document management
121
7.1 Documents . . . . . . . . . . . . . . . . . . . . . . . . . . . . . . . . . . . . . . . . . . . . . . . . 122
8
Ticket management
8.1 Tickets . . . . . . . . . . . . . . . . . . . . . . . . . . . . . . . . . . . . . . . . . . . . . . . . . .
8.2 Tickets (simple) . . . . . . . . . . . . . . . . . . . . . . . . . . . . . . . . . . . . . . . . . . . . .
8.3 Multi-version selection . . . . . . . . . . . . . . . . . . . . . . . . . . . . . . . . . . . . . . . . . .
129
129
135
136
9
Requirements et Tests
9.1 Requirements . . . . . . . . .
9.2 Test cases . . . . . . . . . . .
9.3 Test sessions . . . . . . . . .
9.4 Summary of test cases section
10 Financial
10.1 Individual expense .
10.2 Project expense . . .
10.3 Expense detail lines
10.4 Quotations . . . . .
10.5 Orders . . . . . . .
10.6 Bills . . . . . . . . .
10.7 Terms . . . . . . . .
10.8 Activities prices . .
10.9 Payments . . . . . .
.
.
.
.
.
.
.
.
.
.
.
.
.
.
.
.
.
.
.
.
.
.
.
.
.
.
.
.
.
.
.
.
.
.
.
.
.
.
.
.
.
.
.
.
.
.
.
.
.
.
.
.
.
.
.
.
.
.
.
.
.
.
.
.
.
.
.
.
.
.
.
.
.
.
.
.
.
.
.
.
.
.
.
.
.
.
.
.
.
.
.
.
.
.
.
.
.
.
.
.
.
.
.
.
.
.
.
.
.
.
.
.
.
.
.
.
.
.
.
.
.
.
.
.
.
.
.
.
.
.
.
.
.
.
.
.
.
.
.
.
.
.
.
.
.
.
.
.
.
.
.
.
137
137
141
144
149
.
.
.
.
.
.
.
.
.
.
.
.
.
.
.
.
.
.
.
.
.
.
.
.
.
.
.
.
.
.
.
.
.
.
.
.
.
.
.
.
.
.
.
.
.
.
.
.
.
.
.
.
.
.
.
.
.
.
.
.
.
.
.
.
.
.
.
.
.
.
.
.
.
.
.
.
.
.
.
.
.
.
.
.
.
.
.
.
.
.
.
.
.
.
.
.
.
.
.
.
.
.
.
.
.
.
.
.
.
.
.
.
.
.
.
.
.
.
.
.
.
.
.
.
.
.
.
.
.
.
.
.
.
.
.
.
.
.
.
.
.
.
.
.
.
.
.
.
.
.
.
.
.
.
.
.
.
.
.
.
.
.
.
.
.
.
.
.
.
.
.
.
.
.
.
.
.
.
.
.
.
.
.
.
.
.
.
.
.
.
.
.
.
.
.
.
.
.
.
.
.
.
.
.
.
.
.
.
.
.
.
.
.
.
.
.
.
.
.
.
.
.
.
.
.
.
.
.
.
.
.
.
.
.
.
.
.
.
.
.
.
.
.
.
.
.
.
.
.
.
.
.
.
.
.
.
.
.
.
.
.
.
.
.
.
.
.
.
.
.
.
.
.
.
.
.
.
.
.
.
.
.
.
.
.
.
.
.
.
.
.
.
.
.
.
.
.
.
.
.
.
.
.
.
.
.
.
.
.
.
.
.
.
.
.
.
.
.
.
.
.
.
.
.
.
.
.
.
.
.
.
.
.
.
.
.
.
.
.
.
.
.
.
.
.
.
.
.
.
.
.
.
.
.
.
.
.
.
.
.
151
151
153
155
157
159
161
169
171
172
11 Risk & Issue Management
11.1 Risks . . . . . . . . . . . .
11.2 Opportunities . . . . . . . .
11.3 Criticality value calculation
11.4 Issues . . . . . . . . . . . .
11.5 Actions . . . . . . . . . . .
.
.
.
.
.
.
.
.
.
.
.
.
.
.
.
.
.
.
.
.
.
.
.
.
.
.
.
.
.
.
.
.
.
.
.
.
.
.
.
.
.
.
.
.
.
.
.
.
.
.
.
.
.
.
.
.
.
.
.
.
.
.
.
.
.
.
.
.
.
.
.
.
.
.
.
.
.
.
.
.
.
.
.
.
.
.
.
.
.
.
.
.
.
.
.
.
.
.
.
.
.
.
.
.
.
.
.
.
.
.
.
.
.
.
.
.
.
.
.
.
.
.
.
.
.
.
.
.
.
.
.
.
.
.
.
.
.
.
.
.
.
.
.
.
.
.
.
.
.
.
.
.
.
.
.
.
.
.
.
.
.
.
.
.
.
.
.
.
.
.
.
.
.
.
.
.
.
.
.
.
.
.
.
.
.
.
.
.
.
.
.
.
.
.
.
173
173
175
177
178
179
12 Review logs
12.1 Meetings . . . . .
12.2 Periodic meetings
12.3 Attendees section .
12.4 Progress section .
12.5 Decisions . . . . .
12.6 Questions . . . . .
.
.
.
.
.
.
.
.
.
.
.
.
.
.
.
.
.
.
.
.
.
.
.
.
.
.
.
.
.
.
.
.
.
.
.
.
.
.
.
.
.
.
.
.
.
.
.
.
.
.
.
.
.
.
.
.
.
.
.
.
.
.
.
.
.
.
.
.
.
.
.
.
.
.
.
.
.
.
.
.
.
.
.
.
.
.
.
.
.
.
.
.
.
.
.
.
.
.
.
.
.
.
.
.
.
.
.
.
.
.
.
.
.
.
.
.
.
.
.
.
.
.
.
.
.
.
.
.
.
.
.
.
.
.
.
.
.
.
.
.
.
.
.
.
.
.
.
.
.
.
.
.
.
.
.
.
.
.
.
.
.
.
.
.
.
.
.
.
.
.
.
.
.
.
.
.
.
.
.
.
.
.
.
.
.
.
.
.
.
.
.
.
.
.
.
.
.
.
.
.
.
.
.
.
.
.
.
.
.
.
.
.
.
.
.
.
.
.
.
.
.
.
.
.
.
.
.
.
.
.
.
.
.
.
181
181
184
186
186
187
188
13 Environmental parameters
13.1 Products . . . . . . . . . . . . . . . . . . . . . . . . . . . . . . . . . . . . . . . . . . . . . . . . .
13.2 Versions . . . . . . . . . . . . . . . . . . . . . . . . . . . . . . . . . . . . . . . . . . . . . . . . .
13.3 Affectations . . . . . . . . . . . . . . . . . . . . . . . . . . . . . . . . . . . . . . . . . . . . . . .
191
191
193
195
ii
.
.
.
.
.
.
.
.
.
.
.
.
.
.
.
.
.
.
.
.
.
.
.
.
.
.
.
.
.
.
.
.
.
.
.
.
.
.
.
.
.
.
.
.
.
.
.
.
.
.
.
.
.
.
.
.
.
13.4
13.5
13.6
13.7
13.8
13.9
13.10
13.11
13.12
Users . . . . . . . . .
Resources . . . . . . .
Teams . . . . . . . . .
Calendar . . . . . . .
Customers . . . . . .
Contacts . . . . . . .
Recipients . . . . . .
Contexts . . . . . . .
Document directories .
.
.
.
.
.
.
.
.
.
.
.
.
.
.
.
.
.
.
.
.
.
.
.
.
.
.
.
.
.
.
.
.
.
.
.
.
.
.
.
.
.
.
.
.
.
.
.
.
.
.
.
.
.
.
.
.
.
.
.
.
.
.
.
.
.
.
.
.
.
.
.
.
.
.
.
.
.
.
.
.
.
.
.
.
.
.
.
.
.
.
.
.
.
.
.
.
.
.
.
.
.
.
.
.
.
.
.
.
.
.
.
.
.
.
.
.
.
.
.
.
.
.
.
.
.
.
.
.
.
.
.
.
.
.
.
.
.
.
.
.
.
.
.
.
.
.
.
.
.
.
.
.
.
.
.
.
.
.
.
.
.
.
.
.
.
.
.
.
.
.
.
.
.
.
.
.
.
.
.
.
.
.
.
.
.
.
.
.
.
.
.
.
.
.
.
.
.
.
.
.
.
.
.
.
.
.
.
.
.
.
.
.
.
.
.
.
.
.
.
.
.
.
.
.
.
.
.
.
.
.
.
.
.
.
.
.
.
.
.
.
.
.
.
.
.
.
.
.
.
.
.
.
.
.
.
.
.
.
.
.
.
.
.
.
.
.
.
.
.
.
.
.
.
.
.
.
.
.
.
.
.
.
.
.
.
.
.
.
.
.
.
.
.
.
.
.
.
.
.
.
.
.
.
.
.
.
.
.
.
.
.
.
.
.
.
.
.
.
.
.
.
.
.
.
.
.
.
.
.
.
.
.
.
.
.
.
.
.
.
.
.
.
.
.
.
.
.
.
.
.
.
.
.
.
.
.
.
.
.
.
.
.
.
.
.
.
.
.
.
.
.
.
.
.
.
.
.
.
196
199
203
204
206
207
209
210
211
Emails sent . . . .
Alerts . . . . . . .
Messages . . . . .
Import data . . . .
Automatic import .
.
.
.
.
.
.
.
.
.
.
.
.
.
.
.
.
.
.
.
.
.
.
.
.
.
.
.
.
.
.
.
.
.
.
.
.
.
.
.
.
.
.
.
.
.
.
.
.
.
.
.
.
.
.
.
.
.
.
.
.
.
.
.
.
.
.
.
.
.
.
.
.
.
.
.
.
.
.
.
.
.
.
.
.
.
.
.
.
.
.
.
.
.
.
.
.
.
.
.
.
.
.
.
.
.
.
.
.
.
.
.
.
.
.
.
.
.
.
.
.
.
.
.
.
.
.
.
.
.
.
.
.
.
.
.
.
.
.
.
.
.
.
.
.
.
.
.
.
.
.
.
.
.
.
.
.
.
.
.
.
.
.
.
.
.
.
.
.
.
.
.
.
.
.
.
.
.
.
.
.
.
.
.
.
.
.
.
.
.
.
.
.
.
.
.
.
.
.
.
.
.
.
.
.
.
.
.
.
.
.
.
.
.
.
.
.
.
.
.
.
213
213
214
215
216
219
15 Controls & Automation
15.1 Workflows . . . .
15.2 Mails on event . .
15.3 Delays for tickets .
15.4 Indicators . . . . .
15.5 Predefined notes .
15.6 Checklists . . . .
15.7 Receivers list . . .
.
.
.
.
.
.
.
.
.
.
.
.
.
.
.
.
.
.
.
.
.
.
.
.
.
.
.
.
.
.
.
.
.
.
.
.
.
.
.
.
.
.
.
.
.
.
.
.
.
.
.
.
.
.
.
.
.
.
.
.
.
.
.
.
.
.
.
.
.
.
.
.
.
.
.
.
.
.
.
.
.
.
.
.
.
.
.
.
.
.
.
.
.
.
.
.
.
.
.
.
.
.
.
.
.
.
.
.
.
.
.
.
.
.
.
.
.
.
.
.
.
.
.
.
.
.
.
.
.
.
.
.
.
.
.
.
.
.
.
.
.
.
.
.
.
.
.
.
.
.
.
.
.
.
.
.
.
.
.
.
.
.
.
.
.
.
.
.
.
.
.
.
.
.
.
.
.
.
.
.
.
.
.
.
.
.
.
.
.
.
.
.
.
.
.
.
.
.
.
.
.
.
.
.
.
.
.
.
.
.
.
.
.
.
.
.
.
.
.
.
.
.
.
.
.
.
.
.
.
.
.
.
.
.
.
.
.
.
.
.
.
.
.
.
.
.
.
.
.
.
.
.
.
.
.
.
.
.
.
.
.
.
.
.
.
.
.
.
.
.
.
.
.
.
.
.
.
.
.
.
.
.
.
.
.
.
.
.
.
.
.
.
.
.
.
.
.
.
.
.
.
.
.
.
.
.
.
.
221
221
224
225
226
227
228
230
16 Access rights
16.1 Profiles . . . . . . . . . . . . . . . . .
16.2 Access modes . . . . . . . . . . . . .
16.3 Access to forms . . . . . . . . . . . .
16.4 Access to reports . . . . . . . . . . . .
16.5 Access to data (project dependant) . . .
16.6 Access to data (not project dependant) .
16.7 Specific access . . . . . . . . . . . . .
16.8 Translatable name . . . . . . . . . . .
.
.
.
.
.
.
.
.
.
.
.
.
.
.
.
.
.
.
.
.
.
.
.
.
.
.
.
.
.
.
.
.
.
.
.
.
.
.
.
.
.
.
.
.
.
.
.
.
.
.
.
.
.
.
.
.
.
.
.
.
.
.
.
.
.
.
.
.
.
.
.
.
.
.
.
.
.
.
.
.
.
.
.
.
.
.
.
.
.
.
.
.
.
.
.
.
.
.
.
.
.
.
.
.
.
.
.
.
.
.
.
.
.
.
.
.
.
.
.
.
.
.
.
.
.
.
.
.
.
.
.
.
.
.
.
.
.
.
.
.
.
.
.
.
.
.
.
.
.
.
.
.
.
.
.
.
.
.
.
.
.
.
.
.
.
.
.
.
.
.
.
.
.
.
.
.
.
.
.
.
.
.
.
.
.
.
.
.
.
.
.
.
.
.
.
.
.
.
.
.
.
.
.
.
.
.
.
.
.
.
.
.
.
.
.
.
.
.
.
.
.
.
.
.
.
.
.
.
.
.
.
.
.
.
.
.
.
.
.
.
.
.
.
.
.
.
.
.
.
.
.
.
.
.
.
.
.
.
.
.
.
.
.
.
231
231
234
235
235
236
236
237
239
17 Lists of values
17.1 Functions . . . . .
17.2 Status . . . . . . .
17.3 Quality levels . . .
17.4 Health status . . .
17.5 Overall progress .
17.6 Trends . . . . . .
17.7 Likelihoods . . . .
17.8 Criticalities . . . .
17.9 Severities . . . . .
17.10 Urgencies . . . . .
17.11 Priorities . . . . .
17.12 Risk levels . . . .
17.13 Feasibilities . . . .
17.14 Efficiencies . . . .
17.15 Payment deadlines
17.16 Payment methods .
17.17 Delivery modes . .
17.18 Measure units . . .
.
.
.
.
.
.
.
.
.
.
.
.
.
.
.
.
.
.
.
.
.
.
.
.
.
.
.
.
.
.
.
.
.
.
.
.
.
.
.
.
.
.
.
.
.
.
.
.
.
.
.
.
.
.
.
.
.
.
.
.
.
.
.
.
.
.
.
.
.
.
.
.
.
.
.
.
.
.
.
.
.
.
.
.
.
.
.
.
.
.
.
.
.
.
.
.
.
.
.
.
.
.
.
.
.
.
.
.
.
.
.
.
.
.
.
.
.
.
.
.
.
.
.
.
.
.
.
.
.
.
.
.
.
.
.
.
.
.
.
.
.
.
.
.
.
.
.
.
.
.
.
.
.
.
.
.
.
.
.
.
.
.
.
.
.
.
.
.
.
.
.
.
.
.
.
.
.
.
.
.
.
.
.
.
.
.
.
.
.
.
.
.
.
.
.
.
.
.
.
.
.
.
.
.
.
.
.
.
.
.
.
.
.
.
.
.
.
.
.
.
.
.
.
.
.
.
.
.
.
.
.
.
.
.
.
.
.
.
.
.
.
.
.
.
.
.
.
.
.
.
.
.
.
.
.
.
.
.
.
.
.
.
.
.
.
.
.
.
.
.
.
.
.
.
.
.
.
.
.
.
.
.
.
.
.
.
.
.
.
.
.
.
.
.
.
.
.
.
.
.
.
.
.
.
.
.
.
.
.
.
.
.
.
.
.
.
.
.
.
.
.
.
.
.
.
.
.
.
.
.
.
.
.
.
.
.
.
.
.
.
.
.
.
.
.
.
.
.
.
.
.
.
.
.
.
.
.
.
.
.
.
.
.
.
.
.
.
.
.
.
.
.
.
.
.
.
.
.
.
.
.
.
.
.
.
.
.
.
.
.
.
.
.
.
.
.
.
.
.
.
.
.
.
.
.
.
.
.
.
.
.
.
.
.
.
.
.
.
.
.
.
.
.
.
.
.
.
.
.
.
.
.
.
.
.
.
.
.
.
.
.
.
.
.
.
.
.
.
.
.
.
.
.
.
.
.
.
.
.
.
.
.
.
.
.
.
.
.
.
.
.
.
.
.
.
.
.
.
.
.
.
.
.
.
.
.
.
.
.
.
.
.
.
.
.
.
.
.
.
.
.
.
.
.
.
.
.
.
.
.
.
.
.
.
.
.
.
.
.
.
.
.
.
.
.
.
.
.
.
.
.
.
.
.
.
.
.
.
.
.
.
.
.
.
.
.
.
.
.
.
.
.
.
.
.
.
.
.
.
.
.
.
.
.
.
.
.
.
.
.
.
.
.
.
.
.
.
.
.
.
.
.
.
.
.
.
.
.
.
.
.
.
.
.
241
242
243
244
244
245
245
246
246
247
247
248
248
249
249
250
250
251
251
14 Tools
14.1
14.2
14.3
14.4
14.5
.
.
.
.
.
.
.
.
.
.
.
.
.
.
.
.
.
.
.
.
.
.
.
.
.
.
.
.
.
.
.
.
.
.
.
.
.
.
.
.
.
.
.
.
.
.
.
.
.
.
.
.
.
.
.
.
.
.
.
.
.
.
.
.
.
.
.
.
.
.
.
.
.
.
.
.
.
.
.
.
.
.
.
.
.
.
.
.
.
.
.
.
.
.
.
.
.
.
.
.
.
.
.
.
.
.
.
.
.
.
.
.
.
.
.
.
.
.
.
.
.
.
.
.
.
.
.
.
.
.
.
.
.
.
.
.
.
.
.
.
.
.
.
.
.
.
.
.
.
.
.
.
.
.
.
.
.
.
.
.
.
.
.
.
.
.
.
.
.
.
.
.
.
.
.
.
.
.
.
.
.
.
.
.
.
.
.
.
.
.
.
.
.
.
.
.
.
.
iii
18 Lists of types
18.1 Projects types . . . . . . .
18.2 Tickets types . . . . . . .
18.3 Activities types . . . . . .
18.4 Milestones types . . . . .
18.5 Quotations types . . . . .
18.6 Orders types . . . . . . .
18.7 Individual expenses types
18.8 Project expenses types . .
18.9 Expenses details types . .
18.10 Bills types . . . . . . . .
18.11 Payments types . . . . . .
18.12 Risks types . . . . . . . .
18.13 Opportunities types . . . .
18.14 Actions types . . . . . . .
18.15 Issues types . . . . . . . .
18.16 Meetings types . . . . . .
18.17 Decisions types . . . . . .
18.18 Questions types . . . . . .
18.19 Messages types . . . . . .
18.20 Documents types . . . . .
18.21 Contexts types . . . . . .
18.22 Requirements types . . .
18.23 Test cases types . . . . . .
18.24 Test sessions types . . . .
18.25 Customers types . . . . .
18.26 Behavior section . . . . .
.
.
.
.
.
.
.
.
.
.
.
.
.
.
.
.
.
.
.
.
.
.
.
.
.
.
.
.
.
.
.
.
.
.
.
.
.
.
.
.
.
.
.
.
.
.
.
.
.
.
.
.
.
.
.
.
.
.
.
.
.
.
.
.
.
.
.
.
.
.
.
.
.
.
.
.
.
.
.
.
.
.
.
.
.
.
.
.
.
.
.
.
.
.
.
.
.
.
.
.
.
.
.
.
.
.
.
.
.
.
.
.
.
.
.
.
.
.
.
.
.
.
.
.
.
.
.
.
.
.
.
.
.
.
.
.
.
.
.
.
.
.
.
.
.
.
.
.
.
.
.
.
.
.
.
.
.
.
.
.
.
.
.
.
.
.
.
.
.
.
.
.
.
.
.
.
.
.
.
.
.
.
.
.
.
.
.
.
.
.
.
.
.
.
.
.
.
.
.
.
.
.
.
.
.
.
.
.
.
.
.
.
.
.
.
.
.
.
.
.
.
.
.
.
.
.
.
.
.
.
.
.
.
.
.
.
.
.
.
.
.
.
.
.
.
.
.
.
.
.
.
.
.
.
.
.
.
.
.
.
.
.
.
.
.
.
.
.
.
.
.
.
.
.
.
.
.
.
.
.
.
.
.
.
.
.
.
.
.
.
.
.
.
.
.
.
.
.
.
.
.
.
.
.
.
.
.
.
.
.
.
.
.
.
.
.
.
.
.
.
.
.
.
.
.
.
.
.
.
.
.
.
.
.
.
.
.
.
.
.
.
.
.
.
.
.
.
.
.
.
.
.
.
.
.
.
.
.
.
.
.
.
.
.
.
.
.
.
.
.
.
.
.
.
.
.
.
.
.
.
.
.
.
.
.
.
.
.
.
.
.
.
.
.
.
.
.
.
.
.
.
.
.
.
.
.
.
.
.
.
.
.
.
.
.
.
.
.
.
.
.
.
.
.
.
.
.
.
.
.
.
.
.
.
.
.
.
.
.
.
.
.
.
.
.
.
.
.
.
.
.
.
.
.
.
.
.
.
.
.
.
.
.
.
.
.
.
.
.
.
.
.
.
.
.
.
.
.
.
.
.
.
.
.
.
.
.
.
.
.
.
.
.
.
.
.
.
.
.
.
.
.
.
.
.
.
.
.
.
.
.
.
.
.
.
.
.
.
.
.
.
.
.
.
.
.
.
.
.
.
.
.
.
.
.
.
.
.
.
.
.
.
.
.
.
.
.
.
.
.
.
.
.
.
.
.
.
.
.
.
.
.
.
.
.
.
.
.
.
.
.
.
.
.
.
.
.
.
.
.
.
.
.
.
.
.
.
.
.
.
.
.
.
.
.
.
.
.
.
.
.
.
.
.
.
.
.
.
.
.
.
.
.
.
.
.
.
.
.
.
.
.
.
.
.
.
.
.
.
.
.
.
.
.
.
.
.
.
.
.
.
.
.
.
.
.
.
.
.
.
.
.
.
.
.
.
.
.
.
.
.
.
.
.
.
.
.
.
.
.
.
.
.
.
.
.
.
.
.
.
.
.
.
.
.
.
.
.
.
.
.
.
.
.
.
.
.
.
.
.
.
.
.
.
.
.
.
.
.
.
.
.
.
.
.
.
.
.
.
.
.
.
.
.
.
.
.
.
.
.
.
.
.
.
.
.
.
.
.
.
.
.
.
.
.
.
.
.
.
.
.
.
.
.
.
.
.
.
.
.
.
.
.
.
.
.
.
.
.
.
.
.
.
.
.
.
.
.
.
.
.
.
.
.
.
.
.
.
.
.
.
.
.
.
.
.
.
.
.
.
.
.
.
.
.
.
.
.
.
.
.
.
.
.
.
.
.
.
.
.
.
.
.
.
.
.
.
.
.
.
.
.
.
.
.
.
.
.
.
.
.
.
.
.
.
.
.
.
.
.
.
.
.
.
.
.
.
.
.
.
.
.
.
.
.
.
.
.
.
.
.
.
.
.
.
.
.
.
.
.
.
.
.
.
.
.
.
.
.
.
.
.
.
.
.
.
.
.
.
.
.
.
.
.
.
.
.
.
.
.
.
.
.
.
.
.
.
.
.
.
.
.
.
.
.
.
.
.
.
.
.
.
.
.
.
.
.
.
.
.
.
.
.
.
.
.
.
.
.
.
.
.
.
.
.
.
.
.
.
.
.
.
.
.
.
.
.
.
.
.
.
.
.
.
.
.
.
.
.
.
.
.
.
.
.
.
.
.
.
.
.
.
.
.
.
.
.
.
.
.
.
.
.
.
.
.
.
.
.
.
.
.
.
.
.
.
.
.
.
.
.
.
.
.
.
.
.
.
.
.
.
.
.
.
.
.
.
.
.
.
253
255
256
256
257
257
258
258
259
260
261
261
262
262
263
263
264
264
265
265
266
266
267
267
268
268
269
19 Plug-ins
271
19.1 Plug-ins management . . . . . . . . . . . . . . . . . . . . . . . . . . . . . . . . . . . . . . . . . . 271
20 Administration
273
20.1 Administration console . . . . . . . . . . . . . . . . . . . . . . . . . . . . . . . . . . . . . . . . . . 273
20.2 Audit connections . . . . . . . . . . . . . . . . . . . . . . . . . . . . . . . . . . . . . . . . . . . . 274
20.3 Global parameters . . . . . . . . . . . . . . . . . . . . . . . . . . . . . . . . . . . . . . . . . . . . 275
21 Glossary
281
21.1 Glossary . . . . . . . . . . . . . . . . . . . . . . . . . . . . . . . . . . . . . . . . . . . . . . . . . 281
iv
ProjeQtOr User guide, Release 5.1
ProjeQtOr is a Quality based Project Organizer, as a web application.
ProjeQtOr focuses on IT Projects, but is also compatible with all kinds of Projects.
Its purpose is to propose a unique tool to gather all the information about the projects.
The fact is that many Project Management softwares just focus on planning. But it is a much too restrictive point of
view. Of course, planning is an important activity of Project Management and is one of the keys to Project success,
but it is not the only one.
Project Managers need to foresee all what can happen, measure risks, build an action plan and mitigation plan.
It is also important to track and keep traces of all what is happening to the Project : incidents, bugs , change requests,
support requests, ...
In this objective, ProjeQtOr gives visibility at all levels of Project Management.
At lower level, the Project follow-up consists in gathering all information, and maintain it up to date. This involves all
the operational teams.
At upper level, Project Steering uses the follow-up data to take the decisions and build the action plan. This allows to
bring the adjustments needed to target on the objectives of the project.
The goal of ProjeQtOr is to be Project Management Method independent. Whatever your choice of the method, you
can use ProjeQtOr.
Contents
1
ProjeQtOr User guide, Release 5.1
2
Contents
CHAPTER 1
Features
ProjeQtOr is a “Quality based Project Organizer”.
It is particularly well suited to IT projects, but can manage any type of project.
It offers all the features needed to different Project Management actors under a unique collaborative interface.
3
ProjeQtOr User guide, Release 5.1
Features
•
•
•
•
•
•
•
•
•
•
Planning management
Resource management
Tickets management
Costs management
Quality management
Risks management
Perimeter management
Documents management
Commitments management
Tools
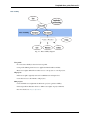
1.1 Planning management
ProjeQtOr provides all the elements needed to build a planning from workload, constraints between tasks and resources
availability.
Project
The project is the main element of ProjeQtOr.
It is also the highest level of visibility and definition of access rights based on profiles.
You can define profiles , some have visibility on all projects, others only on the projects they are assigned to.
You can also define sub-projects of a project and sub-project of sub-projects without limit to this hierarchical organization.
This allows for example to define projects that are not real projects , but just a definition of the structure for your
organization.
Activity
An activity is a task that must be planned, or includes other activities.
This is usually a task that has a certain duration and should be assigned to one or more resources.
Activities appear on the Gantt Planning view.
Milestone
A milestone is an event or a key date of the project.
Milestones are commonly used to track delivery dates or force a start date of activity.
They can also be used to highlight the transition from one phase to the next one.
Unlike activities , milestones have no duration and no work.
4
Chapter 1. Features
ProjeQtOr User guide, Release 5.1
Resources
Resources can be assigned to activities.
This means that some work is defined on this activity for the resource.
Only the resources affected to the project of the activity can be assigned to the activity.
Real work allocation
Resources enter their time spent on the Real work allocation screen.
This allows for a real-time monitoring of work.
Moreover, updating the left work allows to recalculate the planning taking into account the actual progress on each
task.
Planning
The planning is based on all the constraints defined:
• left work on each activity
• availability of resources
• rate of resource affectation to projects and assignment rate of resources to activities
• planning mode for each activity (as soon as possible, fixed duration, ... )
• dependencies between activities
• priorities of activities and projects
The planning is displayed as a Gantt chart.
Project Portfolio
The planning can also be viewed as a Project Portfolio, which is a Gantt planning view restricted to one line per
project, plus optionally selected milestones.
1.1. Planning management
5
ProjeQtOr User guide, Release 5.1
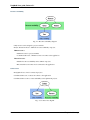
1.2 Resource management
ProjeQtOr manages the availability of resources that can be affected to multiple projects. Tool calculates a reliable,
optimized and realistic planning.
Resources
Resources are the persons working on the project activities.
A resource can also be a group of persons (team) for which you do not want to manage individual detail.
You can manage this through the capacity of the resource, that can be greater than 1 (for a group of people) or less
than 1 (for a person working part-time).
Affectations
The first step is to affect each resource to the projects on which it has to work, specifying the affectation rate (% of
maximum weekly time spent on this project).
Assignments
Then you can assign resources to project activities.
This means that some work is defined on this activity for the resource.
Only the resources affected to the project of the activity can be assigned to the activity.
Calendars
To manage off days, you have a global calendar.
This calendar can be split into multiple calendars, to manage distinct availability types :
• you can create a calendar “80% ” with every Wednesday as off day
• you can manage distinct holidays when working with international teams.
Each resource is then assigned to a calendar.
Real work allocation
Resources enter their time spent on the Real work allocation screen. This allows for a real-time monitoring of work.
Moreover, updating the left work allows to recalculate the planning taking into account the actual progress on each
task.
6
Chapter 1. Features
ProjeQtOr User guide, Release 5.1
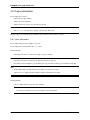
1.3 Tickets management
ProjeQtOr includes a Bug Tracker to monitor incidents on your projects, with possibility to include work on planned
tasks of your projects.
Ticket
A Ticket is any intervention not needing to be planned (or that cannot be planned).
It is generally a short activity for which you want to follow advancement to describe (and possibly provide) a result.
For example, bugs or problems can be managed through Tickets:
• You can not schedule the bugs before they are identified and registered
• You must be able to give a solution to a bug (workaround or fix).
Simple tickets
Simple tickets are just simplified representations of Tickets for users that will “create” tickets but not “treat” them.
Elements created as simple tickets are also visible as Tickets, and vice versa.
1.3. Tickets management
7
ProjeQtOr User guide, Release 5.1
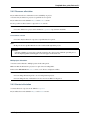
1.4 Costs management
All elements related to delays can also be followed as costs (from resources work) and managing other expenses all
costs of the project are monitored and can generate invoices.
Projects
The Project is the main entity of ProjeQtOr. In addition to tracking work on projects, ProjeQtOr can track the costs
associated with this work.
Activities
An Activity is a task that must be planned, or includes other activities. Work assigned to resources on activities is
converted into associated costs.
Resource cost
To calculate the cost of expenses ProjeQtOr defines the Resources cost. This cost may vary depending on the role of
the resource and may change over time.
Project expenses
Projects expenses can also record expenses not related to resource costs (purchase , lease, sub-contracting).
Individual expenses
Individual expenses can record expenses generated by a given resource.
Quote, Orders, Term, Bill
ProjeQtOr can manage various financial elements found on a project: Quotation (proposals), Orders (received from
customers), the invoicing Terms and Bills.
8
Chapter 1. Features
ProjeQtOr User guide, Release 5.1
1.5 Quality management
The specificity of ProjeQtOr is that it is Quality Oriented : it integrates the best practices that can help you meet the
quality requirements on your projects.
This way, the approval stage of your Quality Systems are eased, whatever the reference (ISO, CMMI, ...).
Workflows
Workflows are defined to monitor changes of possible status.
This allows, among other things, to restrict certain profiles from changing some status.
You can, for instance, limit the change to a validation status to a given profile, to ensure that only an authorized user
will perform this validation.
Delays for tickets
You can define Delays for ticket. This will automatically calculate the due date of the Ticket when creating the Ticket.
Indicators
Indicators can be calculated relative to respect of expected work, end date or cost values.
Some indicators are configured by default , and you can configure your own depending on your needs.
Alerts
Non respect of indicators (or the approach of non-respect target) can generate Alerts.
Checklists
It is possible to define custom Checklists that will allow, for instance, to ensure that a process is applied.
Reports
Many Reports are available to track activity on projects, some displayed as graphs.
All is traced
Finally, thanks to ProjeQtOr , everything is traced.
You can follow-up, in a centralized and collaborative way, the various elements you used to follow-up (or not) in many
Excel sheets : list of Questions & Answers, recording Decisions impacting the project, management of documents
configuration, follow-up of meetings ...
In addition, all updates are tracked on each item to keep (and display) an history of the life of the item.
1.5. Quality management
9
ProjeQtOr User guide, Release 5.1
1.6 Risks management
ProjeQtOr includes a comprehensive risks and opportunities management, including the action plan necessary to
mitigate or treat them and monitoring occurring problems.
Risks
A Risk is a threat or event that could have a negative impact on the project, which can be neutralized, or at least
minimize, by predefined actions.
The risk management plan is a key point of the project management. Its objective is to :
• identify hazards and measure their impact on the project and their probability of occurrence,
• identify avoidance measures (contingency) and mitigation in case of occurrence (mitigation),
• identify opportunities,
• monitor the actions of risks contingency and mitigation,
• identify risks that eventually do happen (so they become issues).
Opportunities
An Opportunity can be seen as a positive risk. This is not a threat but an opportunity to have a positive impact on the
project.
They must be identified and followed-up not to be missed out.
Issues
Issue is a risk that happens during the project.
If the risk management plan has been properly managed, the issue should be an identified and qualified risk.
Actions
Actions shall be defined to avoid risks, not miss the opportunities and solve issues.
It is also appropriate to provide mitigation actions for identified risks that did not occur yet.
10
Chapter 1. Features
ProjeQtOr User guide, Release 5.1
1.7 Perimeter management
ProjeQtOr allows you to monitor and record all events on your projects and helps you in managing of deviations, to
control the perimeter of projects.
Meetings
Follow-up and organize Meetings, track associated action plans, decisions and easily find this information afterwards.
Periodic meetings
You can also create Periodic meetings, which are regularly recurring meetings (steering committees, weekly progress
meetings, ... )
Decisions
Decisions follow-up allows you to easily retrieve the information about the origin of a decision :
• who has taken a particular decision ?
• when?
• during which meeting ?
• who was present at this meeting?
Not revolutionary, this feature can save you many hours of research in case of dispute .
Questions
Tracking Questions / Answers can also simplify your life on such exchanges, which often end up as a game of Ping Pong with a poor Excel sheet in the role of the ball (when it is not a simple email exchange... ).
Product and Version
ProjeQtOr includes Product management and Product Versions.
Each version can be connected to one or more projects.
This allows you to link your activities to target version.
This also allows to know, in the case of Bug Tracking, the version on which a problem is identified and the version on
which it is (or will be) fixed.
1.7. Perimeter management
11
ProjeQtOr User guide, Release 5.1
1.8 Documents management
ProjeQtOr offers integrated Document Management.
This tool is simple and efficient to manage your project and product documents.
ProjeQtOr supported only digital document. Document file will be stored in the tool as versions.
Document can be versioning and an approver process can be defined.
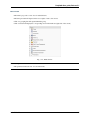
Directories structure management
• Allows to define a structure for document storage.
• Directories structure is defined in Document directories screen.
Document management
• Documents screen allows to manage documents.
Document access
• Global definition of directories is directly displayed in the document menu, to give direct access to documents
depending on the defined structure.
• See: «Menu» and «Documents» windows.
12
Chapter 1. Features
ProjeQtOr User guide, Release 5.1
1.9 Commitments management
ProjeQtOr allows you to follow the requirements on your projects and measure at any time coverage progress, making
it easy to reach your commitments.
In addition to the standard functionalities to manage your projects and monitor costs and delays, ProjeQtOr provides
elements to monitor commitments on products.
By linking these three elements, you can obtain a requirements covering matrix, simply, efficiently and in real time.
Requirements
Requirements management helps in describing requirements explicitly and quantitatively monitor progress in building
a product.
Test cases
The definition of Test cases is used to describe how you will test that a given requirement is met.
Test sessions
Test sessions group test cases to be executed for a particular purpose.
1.9. Commitments management
13
ProjeQtOr User guide, Release 5.1
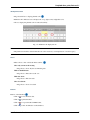
1.10 Tools
ProjeQtOr includes some tools to generate alerts, automatically send emails on chosen events, import or export data
in various formats.
Imports
ProjeQtOr includes an import feature for almost all elements of project management, from CSV or XLSX files.
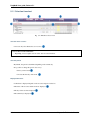
CSV and PDF exports
All lists of items can be printed and exported to CSV and PDF format.
The details of each item can be printed or exported in PDF format.
MS-Project export
The Gantt planning can be exported to MS-Project format (XML).
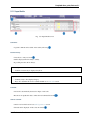
Alerts
Internal alerts can be generated automatically based on defined events.
Emails
These alerts can also be dispatched as emails.
It is also possible to manually send emails from the application, attaching the details of an item.
It is also possible to retrieve answers to this type of email to save the message in the notes of the relevant item.
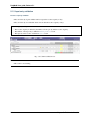
Administration
ProjeQtOr provides administrative features to manage connections, send special alerts and manage background tasks
treatments.
CRON
Moreover, the tool features its own CRON system, independent of the operating system and able to handle the PHP
stop and restart.
14
Chapter 1. Features
CHAPTER 2
Concepts
This chapter defines the concepts of ProjeQtOr.
They can be referred in the following chapters.
15
ProjeQtOr User guide, Release 5.1
2.1 ProjeQtOr roles
A stakeholder can play many roles in ProjeQtOr.
Roles depends on Stakeholder definition.
Specific roles are defined to allow:
• To categorize the stakeholders involved in the projects.
• To identify the stakeholders on items.
• To regroup the stakeholders to facilitate information broadcasting.
Use to
• In items of elements.
• As reports parameters.
• As recipients list to mailing and alert.
Administrator
• An administrator is a user with “Administrator” profile.
• Has a visibility over all the projects.
Contact
• A contact is a person in a business relationship.
• A contact can be a person in the customer organization.
• Used as contact person for contracts, sales and billing.
• Contacts management is performed on Contacts screen.
Issuer
• An issuer is a user who created the item.
See also:
Creation information
• The issuer name and creation date of an item are displayed in the Creation information zone.
Project leader
• A project leader is a resource affected to a project with a “Project Leader” profile.
Project manager
• A project manager is a resource defined as the manager on a project.
See also:
Accelerator button
• This button allows to set current user is the project manager.
• More detail, see: Assign to me button.
Project team
16
Chapter 2. Concepts
ProjeQtOr User guide, Release 5.1
• All resources affected to a project.
Requestor
• A requestor is a contact.
• Used to specify the requestor for ticket, activity and requirement.
• Only contacts affected to the selected project can be a requestor.
Responsible
• A responsible is a resource in charge of item treatment.
• Usually, the responsible is set when the status of the item is handled.
• Only resources affected to the selected project can be a responsible.
See also:
GUI behavior
• It is possible to define that responsible field is mandatory on handled status.
• The element type screens allow to set this parameter to several elements.
• More detail, see: Behavior section.
See also:
Set automatically the responsible
• It is possible to set automatically the responsible.
• More detail, see: Global parameters.
See also:
Accelerator button
• This button allows to set current user is the responsible.
• More detail, see: Assign to me button.
See also:
Access rights
• It is possible to define a combination of rights to permit access for elements the user is responsible for.
• More detail, see: Access modes screen.
Resource
• Human or material resource involved in the projects.
• It is possible to define the resource availability to the projects.
• Resources management is performed on the Resources screen.
User
• User allows to connect to the application.
• User profile define general access rights. But it does not necessarily give access to project data.
• Users management is performed on the Users screen.
2.1. ProjeQtOr roles
17
ProjeQtOr User guide, Release 5.1
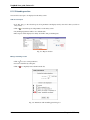
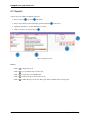
2.2 Profiles definition
The profile is a group used to define application authorization and access rights to the data.
A user linked to a profile belongs to this group who share same application behavior.
Note:
• You can define profiles to be conformed to the roles defined in your organization.
• Access rights management is done on Access rights screens
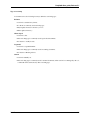
Used for
• The profile is used to define access rights to application and data, first.
• Also, the profile is used to send message, email and alert to groups.
Selected profile in project affectation
• A profile can be selected to a user, resource or contact in project affectation.
• The profile selected is used to give data access to elements of the projects.
Workflow definition
• The profile is used to define who can change from one status to another one.
• You can restrict or allow the state transition to another one according to the profile.
• Workflow definition is managed in Workflows screen.
18
Chapter 2. Concepts
ProjeQtOr User guide, Release 5.1
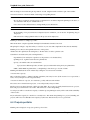
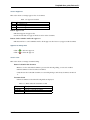
Predefined profiles
• ProjeQtOr offer some predefined profiles.
Administrator profile
• This profile group all administrator users.
• Only these users can manage the application and see all data without restriction.
• The user “admin” is already defined.
Supervisor profile
• Users linked to this profile have a visibility over all the projects.
• This profile allows to monitor projects.
Project leader profile
• Users of this profile are the project leaders.
• The project leader has a complete access to owns projects.
Project member profile
• A project member is working on projects affected to it.
• The user linked to this profile is a member of team projects.
Project guest profile
• Users linked to this profile have limited visibility to projects affected to them.
• The user “guest” is already defined.
Predefined profiles (External)
• ProjeQtOr allow to involve client employees in their projects.
• The distinction between this profile and its equivalent, user access is more limited.
2.2. Profiles definition
19
ProjeQtOr User guide, Release 5.1
2.3 Stakeholder definition
ProjeQtOr allows to define roles of stakeholders.
The stakeholder definition is made with profile and a combination with user/resource/contact definition.
The combinations user/resource/contact allow to define:
• Connection to the application or not.
• Data visibility.
• Resource availability.
• Contact roles.
The next matrix shows the different possibilities.
Connection
Visibility
Availability
URC
UR
UC
U
R
Row legend
• U = User, R = Resource, C = Contact
20
Chapter 2. Concepts
ProjeQtOr User guide, Release 5.1
Data visibility
Fig. 2.1: Data visibility diagram
User profile
• To a user, data visibility is based on its user profile.
• User profile defined general access to application functionalities and data.
• Base access rights defined if a user has access to own projects or over all projects.
All projects
• This access right is typically reserved for administrators and supervisors.
• Users have access to all elements of all projects.
Own projects
• Users with this access right must be affected to project to get data visibility.
• Selected profile in affectation allows to define access rights on project elements.
• For more detail, see: Project affectation.
2.3. Stakeholder definition
21
ProjeQtOr User guide, Release 5.1
Resource availability
Fig. 2.2: Resource availability diagram
• Only resource can be assigned to project activities.
• Project affectation allows to define the resource availability on project.
Human resource
• Human resource is a project member.
• Combined with a user, a human resource can connect to the application.
Material resource
• Material resources availability can be defined on projects
• But, material resource must not be connected to the application.
Contact roles
• ProjeQtOr allows to involve contacts in projects.
• Combined with a user, a contact can connect to the application
• Combined with a resource, contact availability can be planned in projects.
Fig. 2.3: Contact roles diagram
22
Chapter 2. Concepts
ProjeQtOr User guide, Release 5.1
2.3.1 Shared data
For a stakeholder, data on user, resource and contact are shared.
Project affection and user profile are also shared.
Note:
• For a stakeholder, you can define and redefine the combination without losing data.
2.3. Stakeholder definition
23
ProjeQtOr User guide, Release 5.1
2.4 Project affectation
Project affectation is used to:
• Defines project data visibility.
• Defines resource availability.
• Defines the period of access to project data by the user.
Note:
• The Affectations screen allows to manage overall project affectations.
The following sections describe project affectation, performed for user, resource or contact.
2.4.1 User affectation
Project affectation gives data visibility on a project.
Project affectation can be defined in the Users screen.
Profile selection
• Selected profile allows to define access rights on project elements.
Hint:
• Selected profile allows to define the role played by the user in a project.
• For instance, the user might be a project manager in a project and it could be a project member in another.
Note:
• Profile defined in project affectation does not grant or revoke access to users.
• General access to application functionalities and data is defined by user profile.
Period selection
• Allow to define the period of project data visibility.
Hint:
– Can be used to limit access period, according to services agreement.
24
Chapter 2. Concepts
ProjeQtOr User guide, Release 5.1
2.4.2 Resource affectation
Project affectation allows to define the resource availability on project.
A resource may be affected to projects at a specified rate for a period.
Project affectation can be defined in Project and Resources screens.
It is also possible to affect a team to a project in Teams screens.
Note:
• A resource affected to a project can be defined as responsible of project items treatment.
Period & Rate selection
• A resource may be affected to a project at a specified rate for a period.
Note:
• If the period is not specified then the resource is affected throughout the project.
Attention:
• Activities planning process trying to plan the assigned work to the resource within the specified period.
• If a incompletely planned tasks happen a brown bar appear in the Gantt view.
Multi-project affectation
A resource can be affected to multiple projects in the same period.
Make sure that the affectation to projects for a period not exceeding 100%.
In the section Affectations in Resources screen, a tool allows to displayed conflicts.
Hint: How resolve conflicts?
• You can change affectation period to avoid overlap between projects.
• You can change the rate of affectation for it does not exceed 100% for the period.
2.4.3 Contact affectation
A contact affected to a project can be defined as requestor.
Project affectation can be defined in Project and Contacts screens.
2.4. Project affectation
25
ProjeQtOr User guide, Release 5.1
2.5 Activity assignment
• Activity assignment is used to assign resource to project activities.
• Project activities are activity, meeting and test session.
Note:
• Only resources affected to the project of the activity can be assigned to the activity.
26
Chapter 2. Concepts
ProjeQtOr User guide, Release 5.1
2.6 Resource function and cost
Function
• The function defines the generic competency of a resource.
• It is used to define the role play by the resource on specific activity.
• In real work allocation screen, the function name will be displayed in the real work entry in this activity.
• You can specify a function in field main function or in resource cost definition.
• You can manage function list in Functions screen.
Main function
• A main function can be defined in a resource.
• Allows to define a default function to a resource.
Resource cost definition
• Allows to define for a resource the daily cost for a specific period of time, for a specific function.
• Allows to define distinct cost for different resource function.
Example
• A resource can work in a different function in a different department from the same company.
• Allows to define distinct cost to the same function but for different period of time.
Example
• You can set the salary increase of the resource (cost) for the next period.
Real cost calculation
• When real work is entered, the real cost is calculated with work of the day and daily cost for this period.
Planned cost calculation
• When the project planning is calculated, resource cost is used to calculate planned cost.
• Planned cost is calculated with planned work of the day and daily cost for this period.
Note:
• Function and cost are defined in Resources screen.
2.6. Resource function and cost
27
ProjeQtOr User guide, Release 5.1
2.7 Resource calendar
A calendar defines the working days in a the year.
A calendar is defined for each resource.
Used for
Planning process
• Calendars ares used in planning process whose dispatches work on every working day.
• During the planning process, the assigned work to a resource is planned in its working days.
Note:
• You must re-calculate an existing planning to take into account changes on the calendar.
Shows the availability of resources
• Working days defined in a calendar allows to show availability of resources.
Default calendar
• The default calendar is used to define the working days in the year.
• By default, this calendar is defined for all resources.
Specific calendar
• A specific calendar can be created to define days off and work to a resource.
Note:
• A calendar is set in Resources screen.
• The calendar can be defined in Calendar screen.
28
Chapter 2. Concepts
ProjeQtOr User guide, Release 5.1
Use case
Public holiday
• You can use the default calendar to set public holidays.
Personal calendar
• You can create a calendar to a resource.
• This calendar will indicate the personal days off and vacations.
Work schedule
• You can define a different work schedule to some resources.
• This calendar defined exceptions to normal working days.
2.7. Resource calendar
29
ProjeQtOr User guide, Release 5.1
2.8 Photo
A photo can be defined for a user, a resource and a contact.
It is a visual identification associated with the name.
Note:
• To enlarge, move the cursor over the picture.
Photo management
• Click on
or photo frame to add an image file. To complete instruction see: Attachment file.
• Click on
to remove the image.
• Click on image to display the photo.
Note:
• Photo management can be done in User parameters, Users, Resources , Contacts screens.
30
Chapter 2. Concepts
CHAPTER 3
Graphical user interface
ProjeQtOr provides a very rich user interface.
It may be frightening at first glance because of the very numerous elements it provides, but once you’ll get familiar
to the structure of the interface you’ll discover that it is quite simple as all screens have the same frames and sections
always have simular structure and position.
31
ProjeQtOr User guide, Release 5.1
3.1 Global view
ProjeQtOr interface is divided into several areas.
Those areas are :
• Top bar
• Logo area
• «Menu» and «Documents» windows
• «External shortcuts» and «Console messages» windows
• List window
• Detail window
• Info bar
Fig. 3.1: Global view
32
Chapter 3. Graphical user interface
ProjeQtOr User guide, Release 5.1
Area separation
• The splitters allow resizing areas in the interface.
• The green splitter allows to resize the areas «Menu and Documents window» and «Message and Link window».
• The red splitter allows to resize the areas left and right.
• The orange splitter allows to resize the areas «List window» and «Detail window».
Fig. 3.2: Area separation
3.1. Global view
33
ProjeQtOr User guide, Release 5.1
3.1.1 Top bar
Fig. 3.3: Top bar
Menu buttons
Fig. 3.4: Menu buttons zone
• The menu buttons
• The arrows
give rapid access to main elements.
allow to scroll buttons list.
Contextual menu buttons
• Allows to select a work context to limit the displayed buttons.
34
Chapter 3. Graphical user interface
ProjeQtOr User guide, Release 5.1
Project selector
Fig. 3.5: Project selector zone
• Allows restricting the visibility of all objects of the dedicated project, including sub-projects if any.
• The selection will also define the “default” project for new items.
Project selector parameters
• Click on
to display the project selector parameters dialog box, you can select :
– View closed projects.
– Change the project selector format.
– Refresh the list.
Fig. 3.6: Project selector parameters dialog box
3.1. Global view
35
ProjeQtOr User guide, Release 5.1
Navigation buttons
Fig. 3.7: Navigation buttons zone
• The navigation buttons
give access to previous and next items in the history.
Button «New tab»
• Allows to open a new tab within the same session.
Fig. 3.8: Button «New tab» zone
36
Chapter 3. Graphical user interface
ProjeQtOr User guide, Release 5.1
3.1.2 Logo area
Fig. 3.9: Logo area
Information about the software
• Click on «Logo Area» will display the software information box.
Fig. 3.10: Software information box
Online user manual
• Click on
screen.
or use shortcut key F1 will open the online user manual, to the page corresponding to the current
Note:
– You can change logo with your own.
– Refer to administration guide to replace the logo.
3.1. Global view
37
ProjeQtOr User guide, Release 5.1
3.1.3 «Menu» and «Documents» windows
Fig. 3.11: «Menu» and «Documents» windows
Note: Toggling between windows
• To toggling between windows, just click on window header.
38
Chapter 3. Graphical user interface
ProjeQtOr User guide, Release 5.1
Menu window
• The menu is proposed as a tree view of reachable items.
• The items presented will depend on the access rights of user to the screens.
• Click on a grouping line will expand-shrink the group.
• Click on an item will display the corresponding screen in the main area (right side of the screen).
Fig. 3.12: Menu window
Note: User parameter “Icon size in menu”
• This parameter defines the size of icons in the menu.
3.1. Global view
39
ProjeQtOr User guide, Release 5.1
Documents window
• Document directories give direct access to documents contained in the directory.
Fig. 3.13: Documents window
Document directories
This icon
40
gives direct access to the Document directories screen.
Chapter 3. Graphical user interface
ProjeQtOr User guide, Release 5.1
3.1.4 «External shortcuts» and «Console messages» windows
Fig. 3.14: «External shortcuts» and «Console messages» windows
Note: Toggling between windows
• To toggling between windows, just click on window header.
3.1. Global view
41
ProjeQtOr User guide, Release 5.1
External shortcuts window
• Display hyperlinks to remote web pages.
• These links are defined as hyperlink attachments on projects.
• Links displayed here depend on the selected project.
Fig. 3.15: External shortcuts window
Console messages window
• Displays information about main actions: insert, update, delete.
• The timestamp indicates when the action was done.
Fig. 3.16: Console messages window
Note:
• Messages displayed here are not stored and will be flushed when user logout.
42
Chapter 3. Graphical user interface
ProjeQtOr User guide, Release 5.1
3.1.5 List window
Fig. 3.17: List window
Fig. 3.18: List window zone
1 - Element identifier
• Displays the element name and the count of items in the list.
• Each element is identified with a distinctive icon.
3.1. Global view
43
ProjeQtOr User guide, Release 5.1
2 - Rapid filter
• Rapid filtering fields are proposed : «Id», «Name» and «Type».
Any change on «Id» and «Name»
• Will instantly filter data.
• Search is considered as «contains», so typing «1» in «Id» will select «1», «10», «11», «21», «31» and so
on.
Selecting a «Type»
• Will restrict the list to the corresponding type.
3 - Buttons
• Click on
to execute a textual search. (See: Quick search)
• Click on
to define an advanced filter. (See: Advanced filter)
• Click on
to define the columns displayed. (See: Displayed columns)
• Click on
to get a printable version of the list.
• Click on
to export it to PDF format.
• Click on
to export data of the selected items in a CSV format file. (See: Export to CSV format)
• Click on
to create a new item of the element.
4 - Checkbox «Show closed items»
• Flag on «Show closed items» allows to list also closed items.
5 - Column headers
• Click a column header to sort the list on that column (first ascending, then descending).
Note: Sorting is not always on the name displayed
• If the sorted column is linked to a reference list with sort order value, the sorting is executed on this sort value.
For instance
• Sorting on the «Status» allows to sort values such as defined in the workflow.
6 - Items list
• Click on a line (any column) will display the corresponding item in the detail window.
44
Chapter 3. Graphical user interface
ProjeQtOr User guide, Release 5.1
Quick search
The quick search allows to execute a textual search.
Fig. 3.19: Quick search zone
• Click on
to execute the search.
• Click on
to close the quick search.
3.1. Global view
45
ProjeQtOr User guide, Release 5.1
Advanced filter
The advanced filter allows to define clause to filter and sort.
• The advanced filter definition dialog box is divided into two sections.
Fig. 3.20: Advanced filter definition dialog box
1 - Active filter
• This section allows to define the filter and sort clauses.
Add criteria
• Define the clauses of filter or sort in «Add a filter or sort clause».
• Select the name of the field, the operator and the value to the clause.
• Click on
to add additional criteria.
• Click on OK button to apply the filter.
• Click on Cancel button to revert to previous filter.
Remove criteria
• To remove a criteria, click on
• To remove all criteria, click on
on the line.
on the header.
• Click on the Clear button to reset the active filter.
Save active filter
• Active filter can be saved to reuse.
• Fill the filter name and click on
46
to save the filter definition.
Chapter 3. Graphical user interface
ProjeQtOr User guide, Release 5.1
2 - Saved filters
• This section allows to manage saved filters.
• Click on a saved filter to retrieve its definition.
• Click on
from a saved filter to delete it.
• Click on the Default button to to define the active stored filter as the default, kept even after disconnection.
Note: Default filter
• The default filter is defined for the user.
• The filter will be automatically applied in the next connection.
List of filters
• The filter list allows to select a stored filter.
• To see the filter list, move the cursor over the advanced filter icon.
Fig. 3.21: Stored filters
• Click on the filter name to apply.
• Click on «no filter clause» to reset the filter.
3.1. Global view
47
ProjeQtOr User guide, Release 5.1
Displayed columns
This functionality allows to define columns displayed in the list for this element.
• Click on OK button to apply changes.
• Click on Reset button to reset the list to its default format.
Note:
• The columns display is defined for the user.
• The definition will be automatically applied in the next connection.
Fig. 3.22: Select columns to display dialog box
Column selection
• Use checkboxes to select or unselect columns to display.
Note:
• Id and name are mandatory fields.
• They cannot be removed from display.
Columns order
• Use the selector area to reorder fields with drag & drop feature.
48
Chapter 3. Graphical user interface
ProjeQtOr User guide, Release 5.1
Column size
• Use the spinner button
to change the width of the field.
• Width is in % of the total list width.
• The minimum width is 1%.
• The maximum width is 50%.
Note: Field: Name
• The width of the field is automatically adjusted so that the total list width is 100%.
• The width of the field cannot be less than 10%.
Warning: Total width over 100%
• The total width must be limited to a maximum 100%.
• The exceedance will be highlighted beside the buttons.
• This may lead to strange display, over page width, on list, reports and PDF export, depending
on the browser.
3.1. Global view
49
ProjeQtOr User guide, Release 5.1
Export to CSV format
This functionality allows to export data of list in a CSV file.
The fields are regrouped and presented in the order as they appear in the item description.
• Click on OK button to export data.
• Click on Cancel button to close the dialog box.
Note:
• The active filter defined will be applied to export data.
• The CSV exported files can directly be imported through the import functionality. (See: Import data)
• The export definition is defined for each user.
• The same definition can be applied in the next export.
Fig. 3.23: Export dialog box
Fields selection
• Use the checkbox to select or unselect all fields.
• Click on «Select list columns» button to restrict selected fields to the ones that are currently displayed in the
list.
Id or name for references
• For fields that reference another item, you can select to export either the id or the clear name for the referenced
item.
50
Chapter 3. Graphical user interface
ProjeQtOr User guide, Release 5.1
3.1.6 Detail window
Fig. 3.24: Detail window
1 - Item identifier
• Identifies the item with the element name and the item id.
• Each element is identified with a distinctive icon.
2 - Creation information
• Information on the item (issuer and creation date).
Note:
• Administrator can change information.
3.1. Global view
51
ProjeQtOr User guide, Release 5.1
3 - Buttons
• Click on
to create a new item.
• Click on
or use shortcut key Control-s to save the changes.
• Click on
to get a printable version of the details.
• Click on
to get a printable version of the details in PDF format.
• Click on
to copy the current item. (See: Copy item)
• Click on
to cancel ongoing changes.
• Click on
to delete the item.
• Click on
to refresh the display.
• Click on
to send details of item by email. (See: Email detail)
• Click on
to update several items in one operation. (See: Multiple update)
• Click on
to show the checklist form. (See: Checklist)
• Click on
to show history of changes. (See: History of changes)
Note:
• Some buttons are not clickable when changes are ongoing.
•
button is clickable only when changes are ongoing.
Warning:
• When changes are ongoing, you cannot select another item or another menu item.
• Save or cancel ongoing changes first.
4 - Drop file area
• This area allows to add an attachment file to the item.
– Drop the file in the area.
– Or click on the area to select a file.
52
Chapter 3. Graphical user interface
ProjeQtOr User guide, Release 5.1
5 -Sections
• The fields are regrouped under a section.
• All sections can be folded or unfolded, clicking on the section title.
• The sections are organized in columns.
– Maximum three columns can be displayed.
• Some sections are displayed on almost all screens. (See : Common sections)
Item count in the list
• When the section contains a list, the item count is displayed at right of the header.
Fig. 3.25: Header section dialog box
3.1. Global view
53
ProjeQtOr User guide, Release 5.1
Copy item
• Allows copied an item of the element.
• The options displayed in dialog box depends on whether the element is simple or complex.
Fig. 3.26: Copy element dialog box
Simple element
• Simple element (environment parameters, lists,. . . ) can only be copied “as is”.
Complex element
• Complex element (Tickets, Activities, . . . ), it is possible to copy them into a new kind of elements.
• For instance, it is possible to copy a Ticket (the request) into an Activity (the task to manage the request).
• It is possible to select:
– New kind of element.
– Select new type (corresponding to the kind of element).
– Change the name.
– Select whether the initial element will be indicated as the origin of the copied one.
– For main items, it is also possible to choose to copy links, attachments and notes.
– For Projects and Activities, it is also possible to copy the hierarchic structure of activities (sub-projects,
sub-activities).
Note:
• The new item has the status “copied”.
54
Chapter 3. Graphical user interface
ProjeQtOr User guide, Release 5.1
Email detail
Allows to send an informative email to defined recipients list.
Fig. 3.27: Email detail dialog box
Recipients list
• The list is defined according to the role of the recipient. (See: ProjeQtOr roles)
• Flag on the role checkbox to define the recipients list.
Checkbox “other”
• Flag on the checkbox “other” to manually enter email addresses.
Message
• The message that will be included in the body of the email, in addition to a complete description of the item.
Save as note
• Flag on to indicate the email message will be saved as a note.
3.1. Global view
55
ProjeQtOr User guide, Release 5.1
Multiple update
Allows to update several items in one operation.
• The fields that can be updated depends on the element.
• The fields are grouped by section.
• Click on
to quit the multiple mode window.
Select items
• The selection of items can be done by selecting them in the list window.
• Or use checkboxes to select/unselect all items in the list.
• The count of items selected is displayed.
Fig. 3.28: Multiple mode item selection
Fig. 3.29: Multiple mode window
Apply updates
• Click on
to save updates on selection.
• Click on
to delete all selected items.
• The update will be applied to all the items (if possible) and a report will be displayed on the right.
56
Chapter 3. Graphical user interface
ProjeQtOr User guide, Release 5.1
Checklist
Allows to fill a checklist form.
A checklist is available, whether a checklist form is already defined for the element or the element type.
Note:
• The checklist forms are defined in Checklists screen.
Note:
• The access to view the checklist depends on your access rights.
Displaying the checklist
• The user parameter «Display checklists» allows to define whether the checklist appears in a section or in a dialog
box.
• If the value “On request” is set, the button
– Click on
appears on the detail header window.
to display the checklist form.
• With other value the “Checklist” section appears in the detail window.
Fig. 3.30: Checklist dialog box
Fig. 3.31: Checklist section
How to use
• The user just has to check information corresponding to the situation.
• When done, the user name and checked date are recorded and displayed.
• Each line can get an extra comment, as well as globally on the checklist.
3.1. Global view
57
ProjeQtOr User guide, Release 5.1
History of changes
All the changes items are tracked.
They are stored and displayed on each item.
Note:
• On creation, just an insert operation is stored, not all the initial values on creation.
Table 3.1: Fields of changes
Field
Operation
Data
Value before
Value after
Date
User
Description
The operation on the item (insert or update).
The field modified.
The value of the field before the update.
The value of the field after the update.
Date of change operation.
Name of the user who operated the change.
Displaying the history of changes
• The user parameter «Display history» allows to define whether the history of changes appears in a section or in
a dialog box.
• If the value “On request” is set, the button
– Click on
appears on the detail header window.
to display the history of changes.
• If the value “Yes” is set, the “Change history” section appears in the detail window.
Fig. 3.32: History of changes dialog box
Fig. 3.33: Change history section
Show/Hide work
• This button allows to show or hide work changes done in “Real Work Allocation”.
• For section «Change history» the display of work is defined in user parameter «Display history».
58
Chapter 3. Graphical user interface
ProjeQtOr User guide, Release 5.1
Special fields
This section describes the ProjeQtOr special fields.
Accelerator buttons
Move to next status button
• This button allows to skip to the next status without having to open the list.
• The next status is defined by the workflow linked to the type of element.
Fig. 3.34: Move to next status button
Assign to me button
• This button allows to set the current user in the related field.
Fig. 3.35: Assign to me button
3.1. Global view
59
ProjeQtOr User guide, Release 5.1
Combo list field
• Combo list field allows to search, view or create item associated with the field.
Note:
• The access to view or create item depends on your access rights.
• Some buttons can be not available.
Fig. 3.36: Combo list field
• Click on
• Click on
to get the list of values.
will directly go to the selected item.
Note:
– Click on
60
to return to the last screen. (More detail, see: Top bar)
Chapter 3. Graphical user interface
ProjeQtOr User guide, Release 5.1
• Click on
to access item details.
• The next action depends on whether the field value is filled or not.
Field value is filled
• If the field value is filled, the details of item associated are displayed.
Fig. 3.37: Detail of list element dialog box
• Click on
to re-select an item.
• Click on
to close the dialog box.
Field value is empty
• If the field value is empty, the list of items is displayed, allowing to select an item.
Fig. 3.38: Detail of list element (list) dialog box
• Click on
• Click on
• Click on
to select items.
to create a new item.
to close the window.
Note: Window header
• You have access to Rapid filter, Quick search and Advanced filter.
Note: Select several items
• Some elements is possible to select several items, use Control or Shift.
3.1. Global view
61
ProjeQtOr User guide, Release 5.1
Long text field
• Long text fields allow to write description, results, notes, ...
• A mini editor is provided.
• Text zone is extendable.
Fig. 3.39: Long text field
Note: User parameter “Editor mode always on”
• This parameter defines that the editor is always activated on long text fields.
62
Chapter 3. Graphical user interface
ProjeQtOr User guide, Release 5.1
Origin field
• This field allows to determine the element of origin.
• The origin is used to keep track of events (ex.: order from quote, action from meeting).
• The origin may be selected manually or automatically inserted during copying an element.
Fig. 3.40: Origin field
Origin element
• Click on
to add a orgin element.
• Click on
to delete the link.
Fig. 3.41: Add an origin element dialog box
Table 3.2: Fields of add an origin element dialog box
Field
Type of the orign
Origin element
Description
Type of element to be selected.
item to select.
Set color field
• This field allows to set the color of an item.
• Used to differentiate items in list or report.
• Click on list of colors to select.
• Click on “Reset” button to erase.
Fig. 3.42: Set color field zone
3.1. Global view
63
ProjeQtOr User guide, Release 5.1
3.1.7 Info bar
Fig. 3.43: Info bar
Fig. 3.44: Info bar zone
1 - Log out button
• Allows to disconnect the user.
Note: User parameter “Confirm quit application”
• This parameter defines whether a disconnection confirmation will be displayed before.
2 - User parameters button
• Allows to access user parameters.
3 - Hide and show menu button
• Allows to hide or show the menu section.
Note: User parameter “Hide menu”
• This parameter defines whether the menu is hidden by default.
64
Chapter 3. Graphical user interface
ProjeQtOr User guide, Release 5.1
4 - Switched mode button
• Allows to enable or disable switched mode that allows to switch between list and detail windows.
• Window selected is displayed in “full screen” mode.
• Hidden window are replaced by a gray bar.
• Click on the gray bar to switch between windows.
Note: User parameter “Switched mode”
• This parameter defines whether switching mode is enabled or not.
5 - Database name
• Display database name.
6 - Version button
• Displays the application version.
• Click on button to access to ProjeQtOr site.
3.1. Global view
65
ProjeQtOr User guide, Release 5.1
3.2 Alerts
Users may receive some information displayed as pop-up on the bottom right corner of the screen.
Three kinds of information may be displayed:
• Information
• Warning
• Alert
Fig. 3.45: Information pop-up
Alert response
Two possible actions:
• Select to remind you in a given number of minutes (message will close and appear again in the given number of
minutes).
• Mark it as read to definitively hide it.
Note:
• Possibility to mark the alert as read in Alerts screen.
Send alert
An alert can be sent by the administrator or indicator calculation.
By the administrator
• The administrator can send alert by administration console. (See: Administration console)
Indicator calculation
• Indicator calculation sends only warning and alert message.
• Alert coming from indicator calculation message contains more information:
• Item id and type.
• Indicator description.
• Target value.
• Alert or warning value.
• The indicators are defined in Indicators screen.
66
Chapter 3. Graphical user interface
ProjeQtOr User guide, Release 5.1
Alert icon
On indicatorable items, you may see a small icon on top left of the detail of the item.
Just move the mouse over the icon to display, which indicator has been raised.
Fig. 3.46: Alert icon
3.2. Alerts
67
ProjeQtOr User guide, Release 5.1
3.3 Themes
Users can select colors Theme to display the interface.
The new theme is automatically applied when selected.
Note: User parameter “Theme”
• This parameter defines the theme to display.
3.4 Multilingual
ProjeQtOr is multilingual.
Each user can choose the language to display all the captions.
Note: User parameter “Language”
• This parameter defines the language used to display captions.
3.5 Keyboard functionality
Shortcut keys
• Control-s to save the changes.
• F1 to open the online user manual, to the page corresponding to the actual screen.
Numeric keypad
• The point will be replaced by a comma if the numeric format requires it.
68
Chapter 3. Graphical user interface
ProjeQtOr User guide, Release 5.1
3.6 Common sections
Some sections are displayed on almost all screens.
Those sections allows to set information or add information to an item of the element.
3.6.1 Description section
This section allows to identify items of the element.
• Information grouped under this section are:
– Id
– Element type
– Name
– Description
– Current situation
– Stakeholder
– Objective
– Reference
– Link
3.6.2 Treatment section
This section contains information about item treatment.
Depending on the element, this section may have a different name.
• Information grouped under this section are:
– Status and Dates
– Responsible
– Link
– Outcome
– Comment
3.6. Common sections
69
ProjeQtOr User guide, Release 5.1
3.6.3 Affectations section
Concepts
• Profiles definition
• Project affectation
This section allows to manage project affectations.
Table 3.3: Fields of affectations list
Field
Id
Project
Resource
Profile
Start date
End date
Rate
Description
Unique Id for the affectation.
Project affected to.
Name of the affected resource.
Selected profile.
Start date of affectation.
End date of affectation.
Affectation rate for the project (%).
Fields: Project & Resource
• If the project affectations management is done on the «Project» screen, the field «resource» will be
displayed.
• If the project affectations management is done on the screen «Resources», «Contacts» or «Users», the
field «project» will be displayed.
Affectation list management
• Click on
to create a new affectation.
• Click on
to update an existing affectation.
• Click on
to delete the corresponding affectation.
Fig. 3.47: Affectation dialog box
70
Chapter 3. Graphical user interface
ProjeQtOr User guide, Release 5.1
Table 3.4: Fields of affectation dialog box
Field
Project
Resource
Profile
Rate
Start date
End date
Closed
Description
Project list.
Resource list.
Profile list.
Rate (in %) of the affectation to the project.
Start date of affectation.
End date of affectation.
Flag to indicate that affectation in not active anymore, without deleting it.
* Required field
Field: Resource
• This field can contain a list of users, resources or contacts according to which screen comes from project
affectation.
Field: Profile
• The user profile defined will be displayed first.
• If the profile field is not available, the profile defined for each resource will be selected.
Field: Rate
• 100% means a full time affectation.
Note:
• Depending on which screen is used to manage project affectations, the behavior of fields will change.
3.6. Common sections
71
ProjeQtOr User guide, Release 5.1
3.6.4 Linked Elements section
This section allows to manage link between items of elements.
Table 3.5: Fields of linked elements list
Field
Element
Name
Date
User
Status
Description
Type and id of the linked element.
Name of the linked element.
Date of creation of the link.
User who created the link.
Actual status of the linked element.
Used for
• Allows to associate items on different elements in the same project.
• A project can be linked with other.
• Click on an item name to directly move to it.
Note:
– Click on
to return to the last screen. (More detail, see: Top bar)
Reciprocally interrelated
• If Item A is linked to Item B, Item B is automatically linked to Item A.
Note:
• A link between items has no impact on them treatment.
72
Chapter 3. Graphical user interface
ProjeQtOr User guide, Release 5.1
Linked elements management
• Click
• Click on
to create a new link.
to delete the corresponding link.
Fig. 3.48: Add a link with element dialog box
Link with Document
• Click on
to download the file of document.
Specified version
• A link with a document element offer the possibility to select a specific version.
• A direct link to version of the document is created.
Not specified version
• If the version is not specified, the last version will be selected.
• The download will transfer always the last version of the document.
3.6. Common sections
73
ProjeQtOr User guide, Release 5.1
3.6.5 Attachments section
This section allows to attach files or hyperlinks to items of elements.
Table 3.6: Fields of attachments list
Field
Id
File
Date
User
Description
Unique Id for the attachment.
File name or hyperlink.
Date of creation of the attachment.
User who created the attachment.
Select an attachment
• Select an attachment depends on whether is a file or a hyperlink.
– Click on
to download attachment file.
– Click on
to access to hyperlink.
– Click on
to view the PDF file online.
Delete an attachment
• Click on
74
to delete an attachment.
Chapter 3. Graphical user interface
ProjeQtOr User guide, Release 5.1
Add an attachment
to add an attachment file to an item.
• Click on
– Dialog box “Attachment file” will be displayed.
to add hyperlink to an item.
• Click on
– Dialog box “Hyperlink” will be displayed.
Attachment file
Note: To upload a file
• Select file with “Browse” button or drop the file in “drop files here” area.
• Attached files are stored on server side.
• Attachments directory is defined in Global parameters screen.
Fig. 3.49: Attachment file dialog box
Hyperlink
Note: Hyperlink
• Enter hyperlink in «Hyperlink» field.
Fig. 3.50: Hyperlink dialog box
Table 3.7: Fields of attachment dialog box
Field
Description
Public
Team
Private
Description
Description of attachment.
Attachment is visible to anyone.
Attachment is visible to every member of the creator’s team.
Attachment is visible only to the creator.
3.6. Common sections
75
ProjeQtOr User guide, Release 5.1
3.6.6 Notes section
This section allows to add notes on items of elements.
Notes are comments, that can be shared to track some information or progress.
Table 3.8: Fields of notes list
Field
Id
Note
Date
User
Description
Unique Id for the note.
Text of the note.
Date of creation or modification of the note.
Name of the user who created the note.
Predefined note
• The list of values appears whether a predefined note exists for an element or an element type.
• Selecting a predefined note will automatically fill in the note text field.
• Predefined notes are defined in Predefined notes screen.
Note visibility
• Public: Visible to anyone.
• Team: Visible to every member of the creator’s team.
• Private: Visible only to the creator.
Notes list management
• Click on
to add a note to an item.
• Click on
to edit the note.
• Click on
to delete the note.
Fig. 3.51: Note dialog box
76
Chapter 3. Graphical user interface
ProjeQtOr User guide, Release 5.1
3.7 User parameters
Concepts
• Photo
User parameters screen allows configuration of personal settings.
Note:
• User parameters are efficient even without saving.
• Saving parameters will retrieve the selected parameters on each connection.
Section: Display parameters
• Generic display parameter for user.
Section: Graphic interface behavior
• Selection of graphic interface behavior.
Section: Print & Export parameters
• Selection of printing history for detailed items and destination for printing and PDF export.
Section: Miscellaneous
• Default selected project and choice of character used to indent lists of projects, to represent the WBS structure
of projects and sub-project (cannot be a “space”, can be “none” to get flat lists).
Section: Photo
• Photo of the user.
Section: Password
• Changes the user’s password.
3.7. User parameters
77
ProjeQtOr User guide, Release 5.1
78
Chapter 3. Graphical user interface
CHAPTER 4
Planning elements
ProjeQtOr provides all the elements needed to build a planning from workload, constraints between tasks and resources
availability.
79
ProjeQtOr User guide, Release 5.1
Planning elements
•
•
•
•
Project
Activity
Milestone
Common sections
– Assignment
– Progress
– Predecessor and Sucessor element
Planning elements are : Project, Activity, Milestone, Test session, Meetings and Periodic meetings.
All previous elements can be planning, following with Gantt chart.
Progress
• All planning elements have own progress data.
• Some metrics are consolidate on top activities and project.
80
Chapter 4. Planning elements
ProjeQtOr User guide, Release 5.1
4.1 Project
Other sections
•
•
•
•
•
•
Progress
Affectations
Predecessor and Sucessor element
Linked element
Attachments
Notes
Section: Description
Table 4.1: Project description section fields
Field
Id
Name
Type
Customer
Bill contact
Project code
Contract code
Customer code
Is sub-project of
Sponsor
Manager
Color
Status
Health status
Quality level
Trend
Overall progress
Fix planning
Done
Closed
Cancelled
Description
Objectives
Description
Unique Id for the project.
Short name of the project.
Type of project.
The customer of the project.
Billing contact.
Code of the project.
Code of the contract of the project.
Code of the customer of the project.
Name of the top project if this project is a sub-project.
Name of the sponsor of the project.
Name of the resource who manages the project.
Color of the project, to be displayed in some reports.
Actual status of the project.
Global health status of the project, displayed on today screen.
Estimation of quality level of project (result of audits).
Trend of global project health.
Overall progress to be selected in a defined list.
Selector to fix the planning of the project, and its sub-projects.
Flag to indicate that project is been finished.
Flag to indicate that project is archived.
Flag to indicate that project is cancelled.
Complete description of the project.
Objectives of the project.
* Required field
Section: Version linked to this project
Section: Sub projects
4.1. Project
81
ProjeQtOr User guide, Release 5.1
4.2 Activity
An activity is a kind of task that must be planned, or that regroups other activities.
It is generally a long time activity, that will be assigned to one or more resources.
Activities will appear on Gantt planning view.
For instance, you can manage as activities :
• Planned tasks.
• Change requests.
• Phases.
• Versions or releases.
Activities regroupment
• Activities can have parents to regroup activities.
• So a WBS (work breakdown structure number) is calculated for the activities.
• Activities can be sorted inside their parent activity, on the Gantt planning view, using drag and drop.
• Parent activity must belong to the same project.
Assigned ressources
• Resources are can be assigned to activities.
• This means that some work is planned on this activity for the resources.
• See : Assignment
Other sections
•
•
•
•
•
•
82
Assignment
Progress
Predecessor and Sucessor element
Linked element
Attachments
Notes
Chapter 4. Planning elements
ProjeQtOr User guide, Release 5.1
Section: Description
Table 4.2: Activity description section fields
Field
Id
Name
Activity type
Project
External reference
Requestor
Origin
Description
Description
Unique Id for the activity.
Short description of the activity.
Type of activity.
The project concerned by the activity.
External reference of the activity.
Contact at the origin of the activity.
Element which is the origin of the activity.
Complete description of the activity.
* Required field
Section: Treatment
Table 4.3: Activity treatment section fields
Field
Parent activity
Status
Responsible
Handled
Done
Closed
Cancelled
Target version
Result
Description
Parent activity for grouping purpose.
Actual status of the activity.
Resource who is responsible for the activity.
Flag to indicate that activity is taken into account.
Flag to indicate that activity has been treated.
Flag to indicate that activity is archived.
Flag to indicate that activity is cancelled.
The target version of the product that will deliver the object of the activity.
Complete description of the treatment done on the activity.
* Required field
4.2. Activity
83
ProjeQtOr User guide, Release 5.1
4.3 Milestone
A Milestone is a flag in the planning, to point out key dates.
Milestones are commonly used tom check delivery dates.
They can also by used to highlight transition from one phase to the following one.
Opposite to Activities, Milestones have no duration and no work.
Floating milestone
• This milestone will automatically move to take into account dependencies.
Fixed milestone
• This milestone is fixed in the planning, not taking into account predecessor dependencies.
• This kind of milestone is interesting for instance to set-up start date for some tasks.
Other sections
•
•
•
•
Predecessor and Sucessor element
Linked element
Attachments
Notes
Section: Description
Table 4.4: Milestone description section fields
Field
Id
Name
Milestone type
Project
Origin
Description
Description
Unique Id for the milestone.
Short description of the milestone.
Type of milestone.
The project concerned by the milestone.
Element which is the origin of the milestone.
Long description of the milestone.
* Required field
84
Chapter 4. Planning elements
ProjeQtOr User guide, Release 5.1
Section: Treatment
Table 4.5: Milestone treatment section fields
Field
Parent activity
Status
Responsible
Handled
Done
Closed
Cancelled
Target version
Result
Description
Parent activity for grouping purpose.
Actual status of the milestone.
Resource who is responsible for the milestone.
Flag to indicate that milestone is taken into account.
Flag to indicate that milestone has been treated.
Flag to indicate that milestone is archived.
Flag to indicate that milestone is cancelled.
The target version of the product that will deliver the object of the milestone.
Complete description of the treatment done on the milestone.
* Required field
Section: Progress
Field
Validated due date
Planned due date
Real due date
Requested due date
Description
Committed end date : milestone should not end later.
Calculated end date, taking into account all the constraints.
Real end date, when milestone is set to “done”.
Wished end date.
Field: WBS
• Hierarchical position of the milestone in the global planning.
List of value: Planning mode
• Planning mode for the milestone (floating or fixed).
4.3. Milestone
85
ProjeQtOr User guide, Release 5.1
4.4 Common sections
86
Chapter 4. Planning elements
ProjeQtOr User guide, Release 5.1
4.4.1 Assignment
Resources can be assigned to activities.
It is possible to assign several times the same resource to an activity.
It can for instance be used to add extra work without modifying initial assignment.
Go to
• Click on the resource name will directly move to the resource.
Project affectaion
• Only resources affected to the project of the activity can be assigned.
• Affectations may have start and end dates.
• So, for a given assignment planned work will not start before affectation start date on project of the activity and
will stop on affectation end date.
• This can lead to incompletely planned tasks. These would appear as brown bars in the Gantt view.
Assignment Popup
Click on
to assign a new resource. An “Assignment” pop up will be displayed.
Click on
to modify the assignment.
Click on
to delete the assignment.
Note:
• If real work exists for an assignment, it can not be deleted.
Fig. 4.1: Assignment dialog box
4.4. Common sections
87
ProjeQtOr User guide, Release 5.1
Table 4.6: Assignment dialog box fields
Field
Resource
Function
Cost
Rate
Assigned work
Real work
Left work
Planned work
Comments
Description
Name of the resource assigned to the activity.
The function of the resource on this assignment.
The daily cost of the assignment.
The max rate (in %) to plan the resource on the activity by day.
Work initially planned to complete the task.
Real work entered by the resource on his weekly report, on the “real work allocation” screen.
Work left to complete the task.
The new total work planned to complete the task.
Any comment on the affectation.
Fields: Function and Cost
• Function determine the daily cost of the assignment.
• Cost is automatically updated from the function of the resource.
Field: Rate
• For instance, if rate is 50%, the resource will not be planned more than half days on the activity.
Field: Left work
• Calculated as “Assigned Work” – “Real Work”.
• Must be updated by the resource on the “real work allocation” screen to reflect the really estimated work
needed to complete the task.
Field: Planned work
• “planned work” = “real work” + “left work”
Field: Comments
• When a comment exists, the icon will appear on the Assignment section, and on the description of the
activity on the “real work allocation” screen.
• Moving the mouse over the description will display the comment.
88
Chapter 4. Planning elements
ProjeQtOr User guide, Release 5.1
4.4.2 Progress
The progress allows to follow up planning element.
This section cover progress to planning element : project, activity and test session.
Reassessed metrics
• Reassessed is the sum of real and left metrics.
Expense reassessed metrics
• Assigned minus real metrics.
Consolidating metrics
• fdfdf
Real metrics
• Real metrics input entered by an resource on the “Real work allocation” screen.
Duration metrics
• Allow to determine planning elements duration for project, activity and test session.
Calculating duration
• Duration is the work days numbers between end and start dates.
End date
• If not set, end date is the start date + duration.
4.4. Common sections
89
ProjeQtOr User guide, Release 5.1
Table 4.7: Duration metrics fields
Field
Validated start date
Validated end date
Validated duration
Planned start date
Planned end date
Planned duration
Real start date
Real end date
Real duration
Requested start date
Requested end date
Requested duration
Description
Planning element should not start later.
Planning element should not end later.
Planning element should not last longer.
Calculated start date, taking into account all the constraints.
Calculated end date, taking into account all the constraints.
Calculated duration.
Date of the first real work input.
Date of the last real work input.
Calculated duration.
Wished start date.
Wished end date.
Wished duration.
Field: Real end date
• The real end date appearing only when planning element status is “done”.
Work metrics
• Planning elements work is the sum of tasks like activity, test session and meeting.
Table 4.8: Work metrics fields
Field
Validated work
Assigned work
Real work
Left work
Reassessed work
Progress
Expected
Margin
Description
Work of the planning element should not be more.
Sum of all the work for the assignments on the planning element.
Sum of all the work really spent on the planning element.
Left work to complete.
Work needed to complete.
Actual progress of the work, in percent real under planned.
Expected progress of work, in percent real under validated.
Margin between validated and planned work.
Field: Margin
• Metrics available only in project progress section.
Cost metrics
Planning elements cost
• Planning elements cost is the sum of tasks like activity, test session and meeting.
90
Chapter 4. Planning elements
ProjeQtOr User guide, Release 5.1
Expense cost
• Expense cost is the sum of individual and project expense.
• Metrics available only in project progress section.
Table 4.9: Cost metrics fields
Field
Validated cost
Assigned cost
Real cost
Left cost
Reassessed cost
Validated expense
Assigned expense
Real expense
Left expense
Reassessed expense
Margin
Description
Cost of the planning element should not be more.
Sum of all the cost for the assignments on the planning element.
Sum of all the cost really spent on the planning.
Left cost to complete.
Cost needed to complete.
Expense of the project should not be more.
Sum of all the expense on project for the planned amount.
Sum of all the expense on project for the real amount.
Alaways zero for expense.
Sum of all the expense on project for reassessed amount.
Margin between total validated and total planned cost.
Field: Margin
• Metrics available only in project progress section.
Total cost
• Sum of planning elements and expense cost.
• Metrics available only in project progress section.
Ticket metrics
• Allows to display global work for tickets linked with the activity.
• Metrics available only in activity progress section.
Table 4.10: Ticket metrics fields
Field
Number
Estimated
Real
Left
Description
Numbers of ticket linked with the activity.
Sum of all planned work of ticket linked with the activity.
Sum of all real work of ticket linked with the activity.
Sum of all left work of ticket linked with the activity.
Others metrics
Field: WBS
• Hierarchical position of the planning element in the global planning.
4.4. Common sections
91
ProjeQtOr User guide, Release 5.1
Field: Priority
• Planning priority of the planning element.
List of values: Planning
• ddfd
92
Chapter 4. Planning elements
ProjeQtOr User guide, Release 5.1
4.4.3 Predecessor and Sucessor element
Planning element can have predecessors and successors, to generate dependencies.
Click on the corresponding section to add a predecessor or successor. An “add predecessor” or “add successor” pop
up will be displayed.
Select the type of element to add as predecessor or successor.
• The list of items below will then be automatically updated.
Click on
to edit the dependency.
Click on
to delete the corresponding dependency.
Fig. 4.2: Predecessor or Successor element dialog box
Note:
• Recursive loops are controlled on saving.
• Predecessors and successors must belong to the same project or be a project.
Linked element
• Click on to show element detail.
• Depends on whether the element is selected or not a pop up is displayed.
• Detail about pop up, see Combo list fields
Multi-value selection
• Multi-line selection is possible using Control key while clicking.
Delay (late)
• Days between predecessor end and successor start.
4.4. Common sections
93
ProjeQtOr User guide, Release 5.1
Reciprocally interrelated
• If element A is a predecessor of element B, element B is automatically successor of element A.
Dependency information
Field
Element
Name
Date
User
Status
Description
Type and id of the predecessor or successor.
Name of the dependency.
Date of creation of the dependency.
User who created the dependency.
Actual status of the dependency.
Go to
• Click on the name of a predecessor or successor will directly move to it.
94
Chapter 4. Planning elements
CHAPTER 5
Real work allocation
As ProjeQtOr implements Effort Driven planning (work drives planning calcuation), one of the key to manage project
progress is to enter the real work and re-estimate left work for all ongoing tasks.
ProjeQtOr provides a dedicate screen for this feature, to ease this input so that entering real work is as quick as
possible.
95
ProjeQtOr User guide, Release 5.1
Contents
• Real work allocation
– Selection timesheet
– Input fields
– Input entry validation
5.1 Real work allocation
This screen is devoted to input of real work.
Resource enters work day by day, on each assigned task.
The input is for one resource, on a weekly basis.
Note:
• The corresponding cost to the real work is automatically updated to the assignment, activity and project.
Fig. 5.1: Timesheet zone screen
Selection timesheet
• Allows to select a timesheet for a resource and for a period.
• More detail about selection timesheet, see : Selection timesheet.
96
Chapter 5. Real work allocation
ProjeQtOr User guide, Release 5.1
Show planned work
• Flag selected allows to display planned work.
• Planned work is indicated over each input cell, on top right corner, in light blue color.
• Allow to display the planned work of each task each day.
Fig. 5.2: Planned work displayed zone
Note:
• The planned work will be deleted when the real work is entered (to avoid duplication of work in reports).
Filters
• Filters allow to show or hide task in the task list.
Show only current week meeting
• Flag allows to show only the week meeting task.
Hide not handled items
• Flag allows to hide task not take over.
Hide done items
• Flag allows to hide done task.
Show closed items
• Flag allows to show closed task.
Buttons
Buttons of the timesheet:
• Click on
to save timesheet data.
• Click on
to print timesheet.
• Click on
to export timesheet in PDF format.
• Click on
to undo modification on the timesheet.
5.1. Real work allocation
97
ProjeQtOr User guide, Release 5.1
Data entry validation
Buttons allow to send and validate real work.
Button: Submit work
• Users can send works to project leader.
Button: Validate work
• Project leaders can validate works.
Scroll bar
•
Scroll bar allows the scrolling on imputation lines.
• The header of table stays visible.
• The footer of the table (with the sum of inputs) remains visible, fixed, as soon as the number of lines is greater
than 20.
Input fields
• Input fields in timesheet.
• More detail about, see : Input fields
98
Chapter 5. Real work allocation
ProjeQtOr User guide, Release 5.1
Tasks list
Task list allows to display each resource affectation task.
Fig. 5.3: Task list zone
Tasks
• Tasks are regrouped by project.
• Tasks displayed in the list depends on :
– Assigned tasks planified during this period.
– Selected filter flags.
– Behavior defined in Global parameters screen.
• Click on the name of the activity to access it.
• Click on the icon of the activity to display it detail without leaving the current screen.
Function of the assignement
• The function on the assignment is displayed in blue after the name of the task.
• A resource assigned to the same task with many functions, several input line is displayed.
Comment on the assignment
• The icon
indicates there is a comment on the assignment.
• Just move the mouse over the activity to see the comment.
Task metrics
• Planned dates: Planned start and end dates for the task.
• Assigned: Assigned work for the task.
• Real: Sum of real work for the task.
• Left: Left work for the task.
• Reassessed: Reassessed work for the task
5.1. Real work allocation
99
ProjeQtOr User guide, Release 5.1
5.1.1 Selection timesheet
Fig. 5.4: Timesheet selector zone
Selection of the resource
• Users can only select themselves as a resource.
Access to other resources timesheet
• Depending on access rights, user can select other resource timesheet.
Selection period
• By default, the period is determined depending on the current day.
• It is possible to change the period of two ways:
– Select year and week.
– Or select the first day of the week.
Displayed timesheet
• A timesheet is displayed depends on the resource and period selection.
• The name of the resource and the week are displayed.
• The days of the week are displayed.
• The current day is displayed.
100
Chapter 5. Real work allocation
ProjeQtOr User guide, Release 5.1
5.1.2 Input fields
Fig. 5.5: Input timesheet zone
Comments
• A global comment can be added on the weekly follow-up.
Real work entry
• Area allows to entry real work.
• Week is displayed from monday to sunday.
• It possible put real work in off days.
Current day
• Columns of current day is displayed in yellow.
Days off
• Columns of days off is displayed in grey.
• Days off is determine in resource calendar definition, see: Calendar screen.
Left work
• Left work is automatically decreased on input of real work.
• Resources can update this data to reflect the real estimated left work.
Unit for real work
• Unit for real work allocation is set Global parameters screen.
• Selected unit is displayed on left at bottom window
5.1. Real work allocation
.
101
ProjeQtOr User guide, Release 5.1
5.1.3 Input entry validation
Resource capacity validation
• The total of the day is green whether entries respects the resource capacity of days.
• The total of the day is red whether entries is more than the resource capacity of days.
Resource capacity of days
• The resource capacity is defined by the number of hours per day and the resource capacity.
• The number of hours per day is defined in Global parameters screen.
• The capacity of the resource is defined Resources screen.
Fig. 5.6: Columns validation zone
Note:
• This control is not blocking.
102
Chapter 5. Real work allocation
ProjeQtOr User guide, Release 5.1
Automatic status change
Status can change automatically depending on whether real work is entered or no more left work.
Automatic status change is defined in Global parameters screen.
Display of icons
• An icon will be displayed on the task if a status change is applicable.
•
Due to real work is entered, the task status will be changed to the first ‘handled’ status.
•
The real work is entered, but the task status will not change because at issue is occurring.
•
Due to no more left work, the task status will be changed to the first ‘done’ status.
•
No more left work, but the task status will not change because at issue is occurring.
Note:
• Move the cursor over the icon to see the message.
Common issue
• If a responsible or a result are set as mandatory in element type definition for the task. It’s impossible
to set those values by real work allocation screen.
• The change status must be done in treatment section on the task definition screen.
Entering real work is in excess of the number of days specified
• This alert box appears when the real work to a resource is entering ahead of time.
• The number of days in advance, resource can enter his real work is defined in “max days to book work” parameter in Global parameters screen.
Fig. 5.7: Real work over expected days alert
5.1. Real work allocation
103
ProjeQtOr User guide, Release 5.1
104
Chapter 5. Real work allocation
CHAPTER 6
Follow-up
The main activity of Project Leader is to measure progress, analyse situation and take decisions. In order to ease his
work, ProjeQtOr provides several reporting tools, from the well know Gantt chart, to many reports.
105
ProjeQtOr User guide, Release 5.1
Contents
• Today
– Section: Messages
– Section: Start guide
– Section: Projects
– Sections: Tasks
– Extending section
6.1 Today
This screen allows user to have a global view of its projects and tasks.
Note:
• This screen is the first to be displayed on each connection.
• You can define other screen will be displayed in Users parameters screen.
6.1.1 Section: Messages
Fig. 6.1: Messages section
Messages
• Messages are displayed depends on affected project or user profile.
• Every message is component by title
and message
.
• Messages are defined in Messages screen.
Print
• Click on
106
to print Today screen.
Chapter 6. Follow-up
ProjeQtOr User guide, Release 5.1
Parameters
• Click on
to access screen parameters.
Fig. 6.2: Today parameters dialog box
Period for task selection
• Allows to define the period for tasks will be displayed.
Field: Due date
• Select only items with due date less than today plus this selected period.
Field: Or not set
• Select also items with due date not set.
Items to be displayed
• Allows to define sections displayed on the screen.
Note:
• Allows to reorder sections displayed with drag & drop feature.
• Using the selector area button icon drag .
6.1. Today
107
ProjeQtOr User guide, Release 5.1
6.1.2 Section: Start guide
• Start page for new installations to assist the administrator in the first configuration steps.
• A progress display
allows to determine the percent of complete installation.
• You can hide this section on startup, just unchecked
.
– This section will not be displayed anymore.
– To show it again, select it as the start page in Users parameters screen.
Fig. 6.3: Start guide section
108
Chapter 6. Follow-up
ProjeQtOr User guide, Release 5.1
6.1.3 Section: Projects
A quick overview of projects status.
The projects list is limited to the project visibility scope of the connected user.
Fig. 6.4: Projects section
Scope of the numbers counted
• Checkboxes allow to filter displayed projects:
– To do: Projects to do.
– Not closed : Projects to do and done.
– All : Projects to do, done and closed.
Projects name
• Click on the name of a project will directly move to it.
Manuel indicators
• Manuel indicator can be set on project.
• Trend and health status indicators are displayed.
Icon: Trend
• This icon allows to display the trend of the project.
Icon: Health status
• This icon allows to display the health status of the project.
6.1. Today
109
ProjeQtOr User guide, Release 5.1
Progress
• Calculated progress and overall progress are displayed.
Calculated progress
• Actual progress of the work of project.
Note: On mouse over the bar
• On each project shows part of “to do” (red) compared to “done and closed” (green).
Overall progress
• Additional progress manually selected for the project.
Project metrics
• Some metrics are displayed on each project.
Table 6.1: Fields of project metrics
Field
Left
Margin
End date
Late
Description
Left work for the project.
Work margin.
Planified end date of the project.
Number of late days in project.
Numbers of elements concerned to project
• Numbers of elements concerned to a project are displayed.
Note: On mouse over the bar
• On each element shows part of “to do” (red) compared to “done and closed” (green).
110
Chapter 6. Follow-up
ProjeQtOr User guide, Release 5.1
6.1.4 Sections: Tasks
Here are listed, as a “To do list” all the items for which the connected user is either “assigned to”, “responsible of” or
“issuer or requestor of”.
Click on an item will directly move to it.
Note: Parameter: Max items to display
• Number of items listed here are limited to a value defined in Global parameters.
Field
id
Project
Type
Name
Due date
Status
Issuer
Resp.
Description
Unique Id for the item.
The project concerned by the item.
Type of item.
Name of the item.
Planned end date or due date.
Actual status of the item.
Flag on indicate the user is the issuer for the item.
Flag on indicate the user is the responsible for the item.
Column: Id
• Id column displayed unique Id and specific icon for the item.
6.1. Today
111
ProjeQtOr User guide, Release 5.1
6.1.5 Extending section
You can select any report to be displayed on the Today screen.
Add selected report
• To do this, just go to the selected report, select parameters and display result (to check it is what you wish on
today screen).
• Click on
to insert this report with parameter on the Today screen.
• Any unchanged parameter will be set as default value.
• These reports will be displayed on Today screen like other pre-defined parts.
Fig. 6.5: Report selection
Manage extending section
• Click on
to access screen parameters.
• You can reorder like any other parts.
• Click on
to completely remove them from the list.
Fig. 6.6: Parameters with extending parts dialog box
112
Chapter 6. Follow-up
ProjeQtOr User guide, Release 5.1
Gantt
•
•
•
•
Gantt chart
Planning
Projects portfolio
Resource Planning
6.2 Gantt chart
Scale
• Scale available : daily, weekly, monthly or quater
chart detail
• Overdue tasks appear in red.
Calculate planning
6.3 Planning
Planning is displayed as a Gantt chart, showing dependencies between tasks.
Overdue tasks appear in red, others in green.
Milestones appear as squares, filled if completed, empty if not.
You can change the scale to have a daily, weekly or monthly view of the chart.
You can select to show tasks’ WBS before the names.
You can select to show resource name or initials (depending on parameter) on right on tasks.
You can change the starting or ending date to display the chart.
You can also choose to save these dates to retrieve the same display on every connection.
You can select the columns displayed on the left part of the chart, except for the name of tasks (always displayed).
You can reorder columns with drag & drop on the handle in the selection list.
You can directly create a Project or an Activity or a Milestone using the create button.
The result can be printed or exported to MS-Project XML format.
Recalculate
To recalculate the planning, click on .
Calculation is not automatic.
You then have to select the project to re-calculate, and the start date for the new planning.
As WBS is taken into account for planning priority, you may wish to change tasks order.
6.2. Gantt chart
113
ProjeQtOr User guide, Release 5.1
This can simply be done with a drag & drop method on tasks, using the handle on leftmost part of the task line.
You can also increase or decrease indent of task using corresponding buttons
Note:
• If a resource is assigned to several projects, re-calculation for one will not impact the planning for the others, so
new calculation will only use available time slots.
• Use correct resource affectation rate to manage multi-projects affectations.
Note:
• If the planning of one project must not be impacted by new calculation, you can use the “fix planning” flag on
this project.
• This will avoid to change planned values for this project and its subprojects.
Planning is calculated “as simply as possible”.
This means that no complex algorithm, with high level mathematic formula, is involved.
The principle is simply to reproduce what you could do on your own, with a simple Excel sheet, but automatically.
Planning is Cross-Project, through affectation rate on the projects.
All the left work is planned, from starting date, to the max date to be able to plan the work.
Calculation is executed task by task, ordering thanks to :
• dependencies (if an activity has a predecessor, the predecessor is calculated first),
• planning mode : regular between dates are planned first
• priority : the smaller values are calculated first
if projects have different priorities, all tasks of project with smaller value priority are planned first.
• WBS : smaller WBS are planned first, so that planning is done from top to bottom of Gantt
Planning will distribute left work on future days, taking into account several constraints :
A resource has a capacity
Most of the time Capacity = 1 FTE (1 full time equivalent), but it may be more (if the resource is not a person but a
team) or less (if the person work only partial time).
A resource is affected to a project, at a certain rate, possibly with start and end dates
If resources are not shared between projects, so rate will probably always be 100%.
But if resources are shared, then rate could be less than 100%. If a resource is equally shared between two projects,
then each project should enter a rate of 50%. This will lead to control that planning
for each project will not overtake rate capacity, so that first project planning its activity will not take all the availability
of the resource.
Project affectation capacity is controlled on a weekly basis. This means that planning for a project (including subprojects) will not be more than (Resource Capacity) x (Resource affectation rate) x 5 for a given week.
6.4 Projects portfolio
Planning can be displayed on a projects portfolio point of view.
114
Chapter 6. Follow-up
ProjeQtOr User guide, Release 5.1
Only projects and milestones are displayed.
This is a good way to display projects synthesis and projects dependencies, without messing with projects activities..
It is possible to select milestones to be displayed, from none to all, or select one milestones type to display only
milestones of this type
6.5 Resource Planning
Planning can be displayed on a resource basis.
One group line is displayed for each resource.
One group line can be display for projects level, depending on selection .
One line is displayed per activity. The Gantt bars for activities are hare split in two : real work in grey, planned work
in green. This makes appear some planning gap between started work and planned work.
Links between activities are displayed only into the resource group. Links existing between tasks on different resources
are not displayed.
Left work can be displayed on the right of task bars, using corresponding selection .
All others behaviors are similar to the task planning screen. .
6.5. Resource Planning
115
ProjeQtOr User guide, Release 5.1
6.6 Diary
Allows to display planned task to a resource on a calendar view.
This view can be monthly, weekly or daily.
Just click on any task to access directly.
Note: On mouse over the task
• You can see a short information about the task.
Day colors
• Yellow day : Current day
• Grey days : Days off
116
Chapter 6. Follow-up
ProjeQtOr User guide, Release 5.1
Calendar selector
Fig. 6.7: Calendar selector
Period
• Display the month, week, or day.
1st day
• Allows to select the displayed calendar.
• The first day of mouth or the week is displayed.
Resource
• Allows to select the resource calendar.
Show done items & Show closed items
• Allows to display or not the done and closed items.
Top buttons
• Allows to change current month, week, or day.
Left side buttons
• Click on
to go to week display mode.
• Click on
to return to the last display mode.
Day number button
• Click on the day number button to go day display mode.
6.6. Diary
117
ProjeQtOr User guide, Release 5.1
6.7 Reports
A list of reports is available in different categories.
1. Select a category
, report list
will update.
2. Select a report in the list, this will display specific parameters
for the report.
3. Update the parameters to get the information you need.
4. Click on a button to produce the report.
Fig. 6.8: Reports screen
Buttons
• Click on
to display the report.
• Click on
to get a printable version of the report.
• Click on
to export the report as PDF format.
• Click on
to display this report on the Today screen.
• Click on
to define this report as favorite. This report will be available in favorite reports list.
118
Chapter 6. Follow-up
ProjeQtOr User guide, Release 5.1
6.7.1 Favorite reports
See your favorite reports when you move your cursor over the reports menu icon (in the top bar).
Fig. 6.9: Favorite reports tooltip
Favorite reports tooltip
• Allows to reorder reports displayed with drag & drop feature.
• Using the selector area button icon drag .
• Click on
to remove the report from the list.
Direct display
Select a report to display (in print mode), without leaving the current screen.
Fig. 6.10: Print preview dialog box
6.7. Reports
119
ProjeQtOr User guide, Release 5.1
120
Chapter 6. Follow-up
CHAPTER 7
Document management
ProjeQtOr integrates an easy to use Document Management feature.
121
ProjeQtOr User guide, Release 5.1
7.1 Documents
A document is a referential element that gives a description of a product or a project.
A document must be linked either to a project (for project documentation), to a product (for product document) or
both.
Document item describes general information about the document.
The file document will be stored in the tool as versions.
Document files storage
• Document will always refer to a directory where the file is physically stored.
• Directories are defined in Document directories screen.
Document versioning
• Document versioning allows to keep different version at each evolution of the document.
• Document can evolve and a new file is generated at each evolution.
• Type of versioning must be defined for a document.
Approval process
• You can define approvers to a document.
• When all approvers have approved the document version, it is considered as approved and then appears
with a check in the list of versions.
• When creating an approver in the list, the approver is also automatically added to the latest version of the
document.
• When adding a version to the document, the approvers are automatically added to the version.
122
Chapter 7. Document management
ProjeQtOr User guide, Release 5.1
Type of versioning
A document can evolve following four ways defined as versioning type :
Evolutive
• Version is a standard Vx.y format.
• It is the most commonly used versioning type.
• Major updates increase x and reset y to zero.
• Minor updates increase y.
Chronological
• Version is a date.
• This versioning type is commonly used for periodical documents.
• For instance : weekly boards.
Sequential
• Version is a sequential number.
• This versioning type is commonly used for recurring documents.
• For instance : Meeting reviews.
Custom
• Version is manually set.
• This versioning type is commonly used for external documents, when version is not managed by the tool,
or when the format cannot fit any other versioning type.
7.1. Documents
123
ProjeQtOr User guide, Release 5.1
Other sections
• Linked element
• Notes
Section: Description
Table 7.1: Description section fields
Field
Id
Name
Type
Project
Product
Directory
Document reference
External reference
Author
Closed
Cancelled
Description
Unique Id for the document.
Short description of the document.
Type of document.
The project concerned by the document.
The product concerned by the document.
Place where the document is stored to organize document structure.
Document reference name.
External reference of the document.
User or Resource or Contact who created the document.
Flag to indicate that document is archived.
Flag to indicate that document is cancelled.
* Required field
Field: Document reference
• Document reference name is calculated from format defined in the Global parameters screen.
Field: Author
• Positioned by default as the connected user.
• Can be changed (for instance if the author is not the current user).
124
Chapter 7. Document management
ProjeQtOr User guide, Release 5.1
Section: Versions
This section allows to manage version list of document.
Table 7.2: Version list fields
Field
Versioning type
Last version
Status
Description
Type of versioning for the document.
Caption of the last version of the document.
Status of the last version of the document.
* Required field
Version list management
• Click on
to add a new version.
• Click on
to modifiy a version.
• Click on
to delete a version.
• Click on
to download file at this version.
Note: Name of download file
• The name of download file will be the document reference name displayed in description section.
• If you want to preserve the uploaded file name, set the parameter in the Global parameters screen.
Fig. 7.1: Document version dialog box
Table 7.3: Document version dialog box fields
Field
File
Last version
Update
New version
Date
Status
Is a reference
Description
Description
This button allows to upload locale file.
Caption of the last existing version.
Importance of the update concerned by the new version.
New caption for the created version.
Date of the version.
Current status of the version.
Flag to set that this version is the new reference of the document.
Description of the version.
7.1. Documents
125
ProjeQtOr User guide, Release 5.1
Field: Update
• A version can have a draft status, that may be removed afterwards.
Field: Is a reference
• Should be checked when version is validated.
• Only one version can be the reference for a document.
• Reference version is displayed in bold format in the versions list.
Field: Description
• May be used to describe updates brought by the version.
• This icon appears when the description field is filled.
• Moving the mouse over the icon will display description text.
126
Chapter 7. Document management
ProjeQtOr User guide, Release 5.1
Section: Approvers
This section allows to manage approver list of a document.
Table 7.4: Approver list fields
Field
Id
Name
Status
Description
Id of the approver.
Name of the approver.
Status of the approval of the last version of document.
Button: Approve now
• This button appears in approver list.
• Just click on the button to approve the latest version of the document.
Button: Send a reminder email to the approvers
• This button allows to send a reminder email to all the approvers who have not yet approved the document.
Approver list management
• Click on
to add a new approver.
• Click on
to delete the approver.
Section: Lock
This section allows to manage document locking.
Button: lock/unlock this document
• Button to lock or unlock the document to preserve it from being editing, or new version added.
• When document is locked it cannot be modified.
• Only the user who locked the document, or a user with privilege to unlock any document, can unlock
it.
Document locked
• When a document is locked the following fields are displayed.
Table 7.5: Fields when the document is locked
Field
Locked
Locked by
Locked since
7.1. Documents
Description
Flag to indicated that the document is locked.
User who locked the document.
Date and time when document was locked.
127
ProjeQtOr User guide, Release 5.1
128
Chapter 7. Document management
CHAPTER 8
Ticket management
Contents
• Tickets
• Tickets (simple)
• Multi-version selection
8.1 Tickets
A ticket is a kind of task that can not be unitarily planned.
It is generally a short time activity for a single ticket, that is interesting to follow unitarily to give a feedback to the
issuer or to keep trace of result.
It can be globally planned as a general activity, but not unitarily.
For instance, bugs should be managed through tickets :
• You can not plan bugs before they are registered.
• You must be able to give a feedback on each bug.
• You can (or at least should) globally plan bug fixing activity.
Planning activity
• Planning activity field allows to link the ticket with a planning activity.
• Work on the ticket will be included in this activity.
Put the real work from tickets to the resource timesheet
• When a resource has entered the real work on the ticket and the ticket is linked to a planning activity.
• The resource is automatically assigned to this activity.
• Real work set on tickets is automatically set in resource timesheet.
129
ProjeQtOr User guide, Release 5.1
Restrict the entry of real work in the ticket.
• Possibility to define that only the responsible of ticket can enter real work.
• This behavior can be set in Global parameters screen.
Due dates
• Initial and planned due date allows to define a target date for solving the ticket.
Initial due date
• If a definition of ticket delay exists for giving ticket type and urgency the date is automatically
calculated with this delay.
• Else date is initialized to current day.
• Delays for tickets screen allows to define ticket delay.
Planned due date
• Is used to define a target date after evaluation.
• Automatically initialized to the initial due date.
Indicators
• Possibility to define indicators to follow the respect of dates values.
• See: Indicators screen.
Version of product
• Is used to determine original version where the ticket has been identified and target version that will deliver
the object of the ticket.
• Only versions of product linked with the project are available.
Multi-version selection
• Allows to select multi-version of orginal and target version.
• Is used to specify versions of product referenced to this ticket.
• See: Multi-version selection.
130
Chapter 8. Ticket management
ProjeQtOr User guide, Release 5.1
Other sections
• Linked element
• Attachments
• Notes
Section: Description
Table 8.1: Tickets description section fields
Field
Id
Name
Ticket type
Project
External reference
Urgency
Requestor
Origin
Duplicate ticket
Context
Product
Original version
Description
Description
Unique Id for the ticket.
Short description of the ticket.
Type of ticket.
The project concerned by the ticket.
External reference of the ticket.
Urgency for treatment of the ticket, as requested by the issuer.
Contact at the origin of the ticket.
Element which is the origin of the ticket.
Link to another ticket, to link duplicate tickets.
List of 3 items describing the context of the ticket.
The product where ticket has been identified.
Version of product where ticket has been identified.
Complete description of the ticket.
* Required field
Field: Context
• Contexts are initialized for IT Projects as “Environment”, “OS” and “Browser”.
• This can be easily changed values in Contexts screen.
Field: Original version
• Click on
8.1. Tickets
to add a other version, see Multi-version selection.
131
ProjeQtOr User guide, Release 5.1
Section: Treatment
Table 8.2: Tickets treatment section fields
Field
Planning activity
Status
Responsible
Criticality
Priority
Initial due date
Planned due date
Estimated work
Real work
Left work
Handled
Done
Closed
Cancelled
Target version
Result
Description
Activity where global work for this kind of ticket is planned.
Actual status of the ticket.
Resource who is responsible for the ticket.
Importance of impact on the system, as determined after analysis.
Priority of treatment.
Initial target date for solving the ticket.
Actual target date for solving the ticket.
Estimated workload needed to treat the ticket.
Real workload spent to treat the ticket.
Left workload needed to finish the ticket.
Flag to indicate that ticket is taken into account.
Flag to indicate that ticket has been treated.
Flag to indicate that ticket is archived.
Flag to indicate that ticket is cancelled.
The target version of the product that will deliver the object of the ticket.
Complete description of the resolution of the ticket.
* Required field
Field: Priority
• Automatically calculated from Urgency and Criticality values. See: Priority value calculation.
• Can be changed manually.
Field: Left work
• Automatically calculated as Estimated – Real.
• Set to zero when ticket is done.
Field: Target version
• Click on
132
to add a other version, see Multi-version selection.
Chapter 8. Ticket management
ProjeQtOr User guide, Release 5.1
Button: Start/End work
• This button is clock on/off timer.
• If connected user is a resource, he has the possibility to start working on the ticket.
• When work is finished, he will just have to stop the timer.
Note:
• Closing the application or starting work on another ticket will automatically stop the current ongoing work.
• The spend time will automatically be converted as real work, and transferred on planning activity if it is set
(decreasing left work on the activity).
Button: Dispatch
This button allows to dispatch ticket.
Fig. 8.1: Dispatch work dialog box
• Click on
to add a line.
Table 8.3: Dispatch work dialog box fields
Field
Date
Resources
Work
8.1. Tickets
Description
Dispatch date.
Work dispatch to a resource.
Planned work to this resource.
133
ProjeQtOr User guide, Release 5.1
8.1.1 Priority value calculation
Priority value is automatically calculated from Urgency and Criticality values.
Priority, Urgency and Criticality values are defined in lists of values screens. See: Priorities, Urgencies and Criticalities screens.
In the previous screens, a name of value is set with numeric value.
Priority numeric value is determined by a simple equation as follows:
Equation
• [Priority value] = [Urgency value] X [Criticality value] / 2
• For example:
– Critical priority (8) = Blocking (4) X Critical (8) / 2
Default values
• Default values are determined.
• You can change its values while respecting the equation defined above.
134
Chapter 8. Ticket management
ProjeQtOr User guide, Release 5.1
8.2 Tickets (simple)
Simple ticket is just a restricted view of Ticket, with limited write access to “Description” section, and limited view
on “treatment” section.
This view is dedicated to provide access to Ticket to users who should not be able to change treatment of Tickets, such
an External Team members, but can possibly create new ones.
Other sections
• Attachments
• Notes
Section: Description
Table 8.4: Simple ticket description section fields
Field
Id
Name
Project
Urgency
Context
Version
Description
Description
Unique Id for the ticket.
Short description of the ticket.
The project concerned by the ticket.
Urgency for treatment of the ticket, as requested by the issuer.
List of 3 items describing the context of the ticket.
Version of product where ticket has been identified.
Complete description of the ticket.
* Required field
Field: Context
• Contexts are initialized for IT Projects as “Environment”, “OS” and “Browser”.
• This can be easily changed values in Contexts screen.
Field: Version
• Click on
to add a other version, see Multi-version selection.
8.2. Tickets (simple)
135
ProjeQtOr User guide, Release 5.1
Section: Treatment
Table 8.5: Simple ticket treatment section fields
Field
Status
Responsible
Due date
Handled
Done
Closed
Cancelled
Target version
Result
Description
Actual status of the ticket.
Resource who is responsible for the ticket.
Actual target date for solving the ticket.
Flag to indicate that ticket is taken into account.
Flag to indicate that ticket has been treated.
Flag to indicate that ticket is archived.
Flag to indicate that ticket is cancelled.
The target version of the product that will deliver the object of the ticket.
Complete description of the resolution of the ticket.
* Required field
Note:
• Except for status, all these fields are “readonly” and can only be updated through the Ticket view.
8.3 Multi-version selection
For version fields, it possible to set multi version of product.
Main and other version
• The version with smaller id will appear in the select list and is considered as the main version.
• Other versions are listed above.
• It is possible to set an ‘other’ version as the main version using the button .
• Click on
to add a other version.
• Click on
to delete a version.
Fig. 8.2: Add other version dialog box
136
Chapter 8. Ticket management
CHAPTER 9
Requirements et Tests
Contents
•
•
•
•
Requirements
Test cases
Test sessions
Summary of test cases section
9.1 Requirements
Requirement is a rule that must be defined to a product or a project. It can be applied to both.
In most IT projects, requirement can be a functional rule for a software.
It allows to define and monitor cost and delays.
It can be linked to test cases, it’s used to describe how you will test that a given requirement.
Target version
• A given version of the product can be defined, meaning the rule is valid at this version.
Rights management
• Linking requirements to a project will limit the visibility, respecting rights management at project level.
Requirement link to test cases
• Test cases can be linked to a requirement in linked element section.
• Linking a requirement to a test case will display a summary of test case run (defined in test session).
• This way, you will have an instant display of test coverage for the requirement.
137
ProjeQtOr User guide, Release 5.1
Requirement link to tickets
• When test case run status is set to failed, the reference to a ticket must be defined (reference to the incident).
• When the requirement is linked to a test case with this run status, ticket is automatically linked to the requirement.
Initial and planned due dates
• Possibility to define indicators to follow the respect of dates values.
• See: Indicators screen.
Predecessor and successor elements
• Requirements can have predecessors and successors.
• This defines some dependencies on the requirements.
• The dependencies don’t have specific effects. It is just an information.
138
Chapter 9. Requirements et Tests
ProjeQtOr User guide, Release 5.1
Other sections
•
•
•
•
•
Predecessor and Sucessor element
Summary of test cases
Linked element
Attachments
Notes
Section: Description
Table 9.1: Description section fields
Field
Id
Name
Requirement type
Project
Product
External reference
Requestor
Origin
Urgency
Initial due date
Planned due date
Description
Description
Unique Id for the requirement.
Short description of the requirement.
Type of requirement.
The project concerned by the requirement.
The product concerned by the requirement.
External reference for the requirement.
Contact who requested the requirement.
Element which is the origin of the requirement.
Urgency of implementation of the requirement.
Initial due date.
Planned due date.
Long description of the requirement.
* Required field
Fields: Project and Product
• Project or product must be set.
• You can set both.
9.1. Requirements
139
ProjeQtOr User guide, Release 5.1
Section: Treatment
Table 9.2: Treatment section fields
Field
Top requirement
Status
Responsible
Criticality
Feasibility
Technical risk
Estimated effort
Handled
Done
Closed
Cancelled
Target version
Result
Description
Parent requirement, defining a hierarchic structure.
Actual status of the requirement.
Resource who is responsible for the requirement.
Level of criticality of the requirement for the product.
Result of first analysis to check the feasibility of the implementation of the requirement.
Result of first analysis to measure the technical risk of the implementation of the requirement.
Result of first analysis to measure the estimated effort of the implementation of the requirement.
Flag to indicate that requirement is taken into account.
Flag to indicate that requirement has been treated.
Flag to indicate that requirement is archived.
Flag to indicate that requirement is cancelled.
Version of the product where the requirement will be active.
Description of the implementation of the requirement.
* Required field
Section: Lock
A requirement can be locked to ensure that its definition has not changed during the implementation process.
Button: Lock/Unlock requirement
• Button to lock or unlock the requirement to preserve it from being changed.
• Only the user who locked the requirement or a habilitated user can unlock a requirement.
Requirement locked
• When a requirement is locked the following fields are displayed.
Table 9.3: Fields when the requirement is locked
Field
Locked
Locked by
Locked since
140
Description
Flag to indicated that the requirement is locked.
User who locked the requirement.
Date and time when the requirement was locked.
Chapter 9. Requirements et Tests
ProjeQtOr User guide, Release 5.1
9.2 Test cases
Test cases are elementary actions executed to test a requirement.
You may define several tests to check a requirement, or check several requirements with one test.
Test case must be defined to a product or a project. It can be applied to both.
Product version
• A given version of the product can be defined, meaning the test case is valid at this version.
Rights management
• Linking test case to a project will limit the visibility, respecting rights management at project level.
Predecessor and successor elements
• Test case can have predecessors and successors.
• This defines some dependencies on the test case.
• Dependencies don’t have specific effects. It is just an information.
Other sections
•
•
•
•
Predecessor and Sucessor element
Linked element
Attachments
Notes
9.2. Test cases
141
ProjeQtOr User guide, Release 5.1
Section: Description
Table 9.4: Description section fields
Field
Id
Name
Test type
Project
Product
Product version
External reference
Environment
Description
Description
Unique Id for the test case.
Short description of the test case.
Type of test case.
The project concerned by the test case.
The product concerned by the test case.
Version of the product where the test case will be valid.
External reference for the test case.
List of 3 items describing the context of the test case.
Complete description of the test case.
* Required field
Fields: Project and Product
• Project or product must be set.
• You can set both.
Field: Environment (Context)
• Contexts are initialized for IT Projects as “Environment”, “OS” and “Browser”.
• This can be easily changed values in Contexts screen.
Field: Description
• The description of test case should describe the steps to run the test.
142
Chapter 9. Requirements et Tests
ProjeQtOr User guide, Release 5.1
Section: Treatment
Table 9.5: Treatment section fields
Field
Parent test case
Status
Responsible
Priority
Handled
Done
Closed
Cancelled
Prerequisite
Expected result
Summary
Description
Parent test case, defining a hierarchic structure for test cases.
Actual status of the requirement.
Resource who is responsible of the test case.
Level of priority for the test case.
Flag to indicate that test case is taken into account.
Flag to indicate that test case has been treated.
Flag to indicate that test case is archived.
Flag to indicate that test case is cancelled.
List of steps that must be performed before running the test.
Description of expected result of the test.
Summary of test case run status.
* Required field
Field: Prerequisite
• If left blank and test case has a parent, parent prerequisite will automatically be copied here.
Section: Test case runs
• This section allows to display a complete list of test case runs.
• These are links of the test to test sessions.
• This list also displays the current status of the test in the sessions.
Note:
• To go, click on the corresponding test session.
Table 9.6: Test case runs list fields
Field
Test session
Status
Description
Composed of session type, Id and description.
Current status of the test case run in the test session.
9.2. Test cases
143
ProjeQtOr User guide, Release 5.1
9.3 Test sessions
A test session defines all the tests to be executed to reach a given target.
Define in the test case runs all test cases will be running to this test session.
For each test case run sets the status of test results.
Test case run status Test case run status is:
•
Planned: Test to be executed.
•
Passed: Test passed with success (result is conform to expected result).
•
Blocked: Impossible to run the test because of a prior incident (blocking incident or incident on preceding test) or missing prerequisite.
•
Failed: Test has returned wrong result.
Note:
• When status is set to failed, the reference to a ticket must be defined (reference to the incident).
• The referenced ticket is automatically added in linked element.
Test session must be defined to a product or a project. It can be applied to both.
Product version
• A given version of the product can be defined, meaning the test session is valid at this version.
Rights management
• Linking test session to a project will limit the visibility, respecting rights management at project level.
Planning element
• A test session is a planning element like activity.
• A test session is a task in a project planning.
• Allows to assigned resource and follow up progress.
Predecessor and successor elements
• Test sessions can have predecessors and successors.
• This defines some dependencies on test cases or planning constraints.
144
Chapter 9. Requirements et Tests
ProjeQtOr User guide, Release 5.1
Other sections
•
•
•
•
•
•
•
Assignment
Progress
Summary of test cases
Predecessor and Sucessor element
Linked element
Attachments
Notes
Section: Description
Table 9.7: Description section fields
Field
Id
Name
Session type
Project
Product
Product version
External reference
Description
Description
Unique Id for the test session.
Short description of the test session.
Type of test session.
The project concerned by the test session.
The product concerned by the test session.
Version of the product where the test session will be valid.
External reference for the test session.
Complete description of the test session.
* Required field
Fields: Project and Product
• Project or product must be set.
• You can set both.
Section: Treatment
Table 9.8: Treatment section fields
Field
Parent activity
Parent session
Status
Responsible
Handled
Done
Closed
Cancelled
Result
Description
Parent activity, to define hierarchic position in the Gantt.
Parent session, to define session of sessions.
Actual status of the test session.
Resource who is responsible of the test session.
Flag to indicate that test session is taken into account.
Flag to indicate that test session has been treated.
Flag to indicate that test session is archived.
Flag to indicate that test session is cancelled.
Summary result of the test session.
* Required field
9.3. Test sessions
145
ProjeQtOr User guide, Release 5.1
Section: Test case runs
This section allows to manage test case runs.
Table 9.9: Test case runs list fields
Field
Test case
Detail
Status
Description
Information about test case (type, Id and name).
Detail of test case.
Status of test case run.
Field: Test case
• This icon appears when the test case run comment field is filled.
• Moving the mouse over the icon will display the test case run comments.
Field: Detail
• Moving the mouse over the icon
• Moving the mouse over the icon
• Moving the mouse over the icon
will display the test case description.
will display the test case expected result.
will display the test case prerequisite.
Field: Status
• If status of test case run is failed, information about selected ticket is displayed too.
146
Chapter 9. Requirements et Tests
ProjeQtOr User guide, Release 5.1
Manage test case runs list
• Click on
to add a test case run. A Test case run dialog box will be appear.
• Click on
to edit a test case run. A Test case run detail dialog box will be appear.
• Click on
to remove a test case run.
• Click on
to mark test case run as passed.
• Click on
to mark test case run as failed.
• Click on
to mark test case run as blocked.
Fig. 9.1: Test case run dialog box
Table 9.10: Test case run dialog box fields
Field
Test cases
Allow duplicate
Description
Test cases list.
Flag on if you permit that test case is use more one time in a test session.
Fig. 9.2: Test case run detail dialog box
Table 9.11: Test case run detail dialog box
fields
Field
Test case
Status
Ticket
Comments
Description
Selected test case.
List of test case run status.
List of ticket.
Comments of test case run.
9.3. Test sessions
147
ProjeQtOr User guide, Release 5.1
Field: Ticket
• Field appear only whether status of test case run is failed.
148
Chapter 9. Requirements et Tests
ProjeQtOr User guide, Release 5.1
9.4 Summary of test cases section
This section summarizes the status of test case runs to requirement and test session.
Requirement
• This section summarizes the status of test case runs for test cases are linked to the requirement.
Field: Total
• Because a test case can be linked to several test sessions, total can be greater than linked to the requirement.
Test session
• This section summarizes the status of test case runs in the test session.
Summary of test case run status
•
Not planned: No test case planned.
•
Planned: No test failed or blocked, at least one test planned.
•
Passed: All tests passed.
•
Failed: At least one test failed.
•
Blocked: No test failed, at least one test blocked.
Table 9.12: Summary of test cases fields
Field
Total
Planned
Passed
Blocked
Failed
Summary
Issues
Description
Number of test case runs whatever the status.
Number of test case runs with the status Planned.
Number of test case runs with the status Passed.
Number of test case runs with the status Blocked.
Number of test case runs with the status Failed.
Summary of test case run status.
Number of tickets linked to the requirement or the test session.
Note:
• Percent to each status is displayed.
9.4. Summary of test cases section
149
ProjeQtOr User guide, Release 5.1
150
Chapter 9. Requirements et Tests
CHAPTER 10
Financial
Expense
• Individual expense
• Project expense
• Expense detail lines
10.1 Individual expense
An individual expense stores information about individual costs, such as travel costs or else.
Individual expense has detail listing for all items of expense.
This can for instance be used to detail all the expense on one month so that each user opens only one individual expense
per month (per project), or detail all the elements of a travel expense.
Planned amount
Planned amount will help to have an overview of project total costs, even before expense is realized.
Other sections
•
•
•
•
Expense detail lines
Linked element
Attachments
Notes
151
ProjeQtOr User guide, Release 5.1
Section: Description
Field
Id
Name
Type
Resource
Project
Description
Description
Unique Id for the expense.
Short description of the expense.
Type of expense.
Resource concerned by the expense.
The project concerned by the expense.
Complete description of the expense.
* Required field
Section: Treatment
Field
Status
Planned date
Planned amount
Real date
Real amount
Closed
Cancelled
Description
Actual status of the expense.
Planned date of the expense.
Planned amount of the expense.
Real date of the expense.
Real amount of the expense.
Flag to indicate that expense is archived.
Flag to indicate that expense is cancelled.
* Required field
Fields: Planned date and amount
• When planned date or planned amount is set, other must also be set.
Fields: Real date and amount
• When real date or real amount is set, other must also be set.
Field: Real amount
• If detail lines are entered, real amount is automatically calculated as sum of detail amounts, and is then
locked.
152
Chapter 10. Financial
ProjeQtOr User guide, Release 5.1
10.2 Project expense
A project expense stores information about project costs that are not resource costs.
This can be used for all kinds of project cost :
• Machines (rent or buy).
• Softwares.
• Office.
• Any logistic item.
Planned amount
Planned amount will help to have an overview of project total costs, even before expense is realized.
Other sections
•
•
•
•
Expense detail lines
Linked element
Attachments
Notes
Section: Description
Field
Id
Name
Type
Project
Description
Description
Unique Id for the expense.
Short description of the expense.
Type of expense.
The project concerned by the expense.
Complete description of the expense.
* Required field
10.2. Project expense
153
ProjeQtOr User guide, Release 5.1
Section: Treatment
Field
Status
Planned date
Planned amount
Real date
Real amount
Closed
Cancelled
Description
Actual status of the expense.
Planned date of the expense.
Planned amount of the expense.
Real date of the expense.
Real amount of the expense.
Flag to indicate that expense is archived.
Flag to indicate that expense is cancelled.
* Required field
Fields: Planned date and amount
• When planned date or planned amount is set, other must also be set.
Fields: Real date and amount
• When real date or real amount is set, other must also be set.
154
Chapter 10. Financial
ProjeQtOr User guide, Release 5.1
10.3 Expense detail lines
Section: Expense detail lines
This section is common to individual and project expenses.
It allows to enter detail on expense line.
Fields: Real amount and date
• When a line is entered, expense real amount is automatically updated to sum of lines amount.
• Real date is set with the date in the firts detail line.
Field
Date
Name
Type
Detail
Amount
Description
Date of the detail line.
Name of the detail line.
Type of expense.
Detail depends on the type of expense.
Amount of the detail line.
Detail lines management
• Click on
to add a detail line.
• Click on
to modify an existing detail line.
• Click on
to delete the detail line.
Fig. 10.1: Expense detail dialog box
Table 10.1: Fields of expense detail
dialog box
Field
Name
Date
Type
Amount
Description
Name of the detail.
Date of the detail.
Type of expense.
Amount of the detail.
Field: Date
• This allows to input several items, during several days, for the same expense, to have for instance one
expense per travel or per month.
10.3. Expense detail lines
155
ProjeQtOr User guide, Release 5.1
Field: Type
• Depending on type, new fields will appear to help calculate of amount.
• Available types depending on whether individual or project expense.
• See: Expenses details types.
Field: Amount
• Automatically calculated from fields depending on type.
• May also be input for type “justified expense”.
156
Chapter 10. Financial
ProjeQtOr User guide, Release 5.1
Quotation and Order
• Quotations
• Orders
10.4 Quotations
A quotation is a proposal estimate sent to customer to get approval of what’s to be done, and how must the customer
will pay for it.
On the quotation form, you can record all the information about the sent proposal, including attaching some file
completely describing the proposal with details terms and conditions.
Transform quotation to order
• A quotation can be copied into an order when corresponding document is received as customer agreement.
Bill lines section
• This section allows to detail the quotation modality.
Other sections
•
•
•
•
Bill lines
Linked element
Attachments
Notes
Section: Description
Field
Id
Name
Quotation type
Project
Origin
Customer
Contact
Request
Additional info.
Description
Unique Id for the quotation.
Short description of the quotation.
Type of quotation.
The project concerned by the quotation.
Element which is the origin of the quotation.
Customer concerned by the quotation.
Contact in customer organization to whom you sent the quotation.
Request description.
Any additional information about the quotation.
* Required field
Field: Customer
• Automatically updated from project field.
10.4. Quotations
157
ProjeQtOr User guide, Release 5.1
Section: Treatment
Field
Status
Responsible
Sent date
Send mode
Offer validity
Likelihood
Handled
Done
Closed
Cancelled
Planned end date
Activity type
Payment deadline
Amount
Estimated work
Comments
Description
Actual status of the quotation.
Resource who is responsible for the quotation.
Date when quotation is sent to customer contact.
Delivery mode.
Limit date of the validity of the proposal.
The probability that the proposal will be accepted.
Flag to indicate that quotation is taken into account.
Flag to indicate that quotation is done (execution processed).
Flag to indicate that quotation is archived.
Flag to indicate that quotation is cancelled.
Target end date of the activity object of the quotation.
Type of the activity object of the quotation.
The payment deadline is stated on the quotation.
Total amount of the quotation.
Work days corresponding to the quotation.
Comment about the treatment of the quotation.
* Required field
Fields: Amount
Columns:
• Ex VAT: Amount without taxes.
• Tax: Applicable tax.
• Full: Amount with taxes.
Column: Ex VAT
• The column value is automatically updated with the sum of bill line amounts.
Hint: Activity type
• The activity should be created only after approval.
158
Chapter 10. Financial
ProjeQtOr User guide, Release 5.1
10.5 Orders
An order (also called command) is the trigger to start work.
On the order form, you can record all the information of the received order.
Work on the activity
• An order can be linked to an activity. It then represents the command of the work on the activity.
• In that case, validated work of the activity is the sum of the orders linked to the activity.
Bill lines section
• This section allows to detail the order modality.
Other sections
•
•
•
•
Bill lines
Linked element
Attachments
Notes
Section: Description
Field
Id
Name
Order type
Project
Customer
Contact
External reference
Submitted date
Receive mode
Origin
Description
Additional info.
Description
Unique Id for the order.
Short description of the order.
Type of order.
The project concerned by the order.
Customer concerned by the order.
Contact in customer organization to whom you sent the order.
External reference of the order (as received).
Date when order is sent to customer.
Delivery mode.
Element which is the origin of the order.
Complete description of the order.
Any additional information about the order.
* Required field
Field: Customer
• Automatically updated from project field.
10.5. Orders
159
ProjeQtOr User guide, Release 5.1
Section: Treatment
Field
Status
Responsible
Handled
Done
Closed
Cancelled
Activity type
Linked activity
Initial
Amendment
Total
Start date
End date
Comments
Description
Actual status of the order.
Resource who is responsible for the order.
Flag to indicate that order is taken into account.
Flag to indicate that order is done (execution processed).
Flag to indicate that order is archived.
Flag to indicate that order is cancelled.
Type of the activity object of the order.
Activity representing the execution of the order.
Initial values.
Additional values.
Sum of the initial values and amendment.
Initial start date of the execution of the order.
Initial and validated end date of the execution of the order.
Comment about the treatment of the order.
* Required field
Fields: Initial, Amendment and Total
Columns:
• Ex VAT: Amount without taxes.
– The column value is automatically updated with the sum of bill line amounts.
• Tax: Applicable tax.
• Full: Amount with taxes.
• Work: Work days corresponding to the order.
– The column value is automatically updated with the sum of bill lines quantities.
– When the measure unit is “day”.
Field: Amendment
• The columns values “Ex VAT” and “Work” are automatically updated with the sum of billing lines with
selected amendment checkboxes.
Fields: Start and end date
• Initial : Initial dates
• Validated : Validated dates
Hint: Activity type
• The activity should be created only after approval.
160
Chapter 10. Financial
ProjeQtOr User guide, Release 5.1
Bill
•
•
•
•
Bills
Terms
Activities prices
Payments
10.6 Bills
A bill is a request for payment for delivered work.
Billing will depend on billing type defined for the project.
10.6. Bills
161
ProjeQtOr User guide, Release 5.1
Billing types
Each bill is linked to project, a project has a project type, and a project type is linked to a billing type.
So the billing type is automatically defined for the selected project.
Billing type will influence bill line format.
At terms
• A term must be defined to generate the bill, generally following a billing calendar.
• Used for instance for: Fixed price projects.
On produced work
• No term is needed.
• The billing will be calculated based on produced work for resources on selected activities, on a
selected period.
• Used, for instance for: Time & Materials projects.
On capped produced work
• No term is needed.
• The billing will be calculated based on produced work for resources on selected activities, on a
selected period.
• Used, for instance for: Capped Time & Materials projects.
Note:
• Taking into account that total billing cannot be more than project validated work.
Manual
• Billing is defined manually, with no link to the project activity.
• Used, for instance for: Any kind of project where no link to activity is needed.
Not billed
• No billing is possible for these kinds of projects.
• Used, for instance for: Internal projects & Administrative projects.
162
Chapter 10. Financial
ProjeQtOr User guide, Release 5.1
Other sections
• Linked element
• Attachments
• Notes
Section: Description
Field
Id
Name
Bill type
Project
Date
Payment deadline
Payment due date
Customer
Bill contact
Recipient
Origin
Billing type
Description
Unique Id for the bill.
Short description of the bill.
Type of bill.
The project concerned by the bill.
Date of the bill.
Payment deadline.
Due date for payment (read only).
Customer who will pay for the bill.
Contact who will receive the bill.
Recipient who will receive the payment for the bill.
Element which is the origin of the bill.
Project billing type.
* Required field
Field: Payment due date
• The value is calculated with date of bill + payment deadline.
Fields: Customer & Bill contact
• Automatically updated from project fields.
10.6. Bills
163
ProjeQtOr User guide, Release 5.1
Section: Treatment
Field
Status
Responsible
Sent date
Send mode
Done
Closed
Cancelled
Amount
% of order
Payment
Comments
Description
Actual status of the bill.
Resource who is responsible for the bill.
Date when bill is sent to customer contact.
Delivery mode.
Flag to indicate that the bill has been treated.
Flag to indicate that the bill is archived.
Flag to indicate that the bill is cancelled.
Total amount of the bill.
Percentage of the bill balance over order amount.
Payment of bill.
Comments for the bill.
* Required field
Fields: Amount
Columns:
• Ex VAT: Amount without taxes.
– The value is automatically updated with the sum of bill line amounts.
• Tax: Applicable tax.
– Automatically updated from customer field.
• Full: Amount with taxes.
Fields: Payment
Columns:
• Date: Date of payment.
• Amount: Payment amount.
• Complete: Flag to indicate that complete payment.
164
Chapter 10. Financial
ProjeQtOr User guide, Release 5.1
Section: Bill lines
Input for each bill line depends on billing type.
Field
Id
N°
Description
Detail
Unit price
Quantity
Sum
Description
Unique Id for the bill line.
Number of the line for the bill.
Description of the line.
Detail of the line.
Unitary price of billed element.
Quantity of billed element.
Total price for the line (Price x Quantity).
Bill lines management
• Click on
to add a bill line. A different “Bill line” dialog box will be displayed depends on billing type.
• Click on
to modify an existing bill line.
• Click on
to delete the bill line.
10.6. Bills
165
ProjeQtOr User guide, Release 5.1
Bill line: At terms
Fig. 10.2: Bill line dialog box - At terms
Table 10.2: Fields of bill line dialog box - At
terms
Field
N°
Term
Description
Detail
Price
Description
Number of the line for the bill.
Project terms to be selected.
Description of line.
Detail of the line.
Real amount of term.
* Required field
Field: Description
• Automatically set with the term name.
• Can be modified on update.
Field: Detail
• Can be set on update.
166
Chapter 10. Financial
ProjeQtOr User guide, Release 5.1
Bill line: On produced work & On capped produced work
Fig. 10.3: Bill line dialog box - On produced work & On capped produced work
Table 10.3: Fields of bill line dialog box - On produced work &
On capped produced work
Field
N°
Resource
Activity price
Start date
End date
Description
Detail
Price
Quantity
Amount
Description
Number of the line for the bill.
Project resources to be selected.
Project activities price to be selected.
Start date of the period to take into account.
End date of the period to take into account.
Description of line.
Detail of the line.
Price of the activity.
Quantity of element.
Amount for the line (Price x Quantity).
* Required field
Field: Description
• Automatically set with selected resource, activity price name and dates.
• Can be modified on update.
Field: Detail
• Can be set on update.
10.6. Bills
167
ProjeQtOr User guide, Release 5.1
Bill line: Manual billing
Fig. 10.4: Bill line dialog box - Manual billing
Table 10.4: Fields of bill line dialog box - Manual billing
Field
N°
Amendment
Description
Detail
Price
Quantity
Amount
Description
Number of the line.
Flag to indicate this is an amendment line.
Description of the line.
Detail of the line.
Unitary price of element / measure unit.
Quantity of element.
Amount for the line (Price x Quantity).
Field: Amendment
• This field is used for amendment values in order detail.
168
Chapter 10. Financial
ProjeQtOr User guide, Release 5.1
10.7 Terms
A term is a planned trigger for billing.
You can define as many terms as you wish, to define the billing calendar.
Note:
• Terms are mandatory to bill “Fixed price” project.
• A term can be used just one time. The bill name will be displayed.
A term has triggers
• You can link the activities that should be billed at this term.
• A summary of activities is displayed for validated and planned amount and end date.
• Validated and planned values play the role of reminder.
• You can use these values to set real amount and date.
Other sections
• Notes
Section: Description
Field
Id
Name
Project
Bill
Closed
Description
Unique Id for the term.
Short description of the term.
The project concerned with the term.
Bill name that uses this term.
Flag to indicate that term is archived
* Required field
Section: Fixed price for term
Field
Real amount
Real date
Validated amount
Validated date
Planned amount
Planned date
Description
Defined amount for the term.
Defined date for the term.
Sum of validated amounts of activities defined as triggers (Read only).
Max of validated end dates of activities defined as triggers (Read only).
Sum of planned amounts of activities defined as triggers (Read only).
Max of validated end dates of activities defined as triggers (Read only).
Fields: Amount and Date (Planned & Validated)
• When a trigger is entered, the values of planned and validated are automatically updated with the sum and
the max of triggered amounts.
10.7. Terms
169
ProjeQtOr User guide, Release 5.1
Section: Trigger elements for the term
This section allows to manage element trigger.
Trigger element management
• Click on
to add an element trigger.
• Click on
to delete an element trigger.
Fig. 10.5: Add a trigger element to term dialog box
Table 10.5: Fields of add a trigger element to term dialog box
Field
Linked element type
Linked element
170
Description
Type of element to be selected (Activity, Meeting, Milestone, Project, Test session).
Item to be selected.
Chapter 10. Financial
ProjeQtOr User guide, Release 5.1
10.8 Activities prices
Activity price defines daily price for activities of a given activity type and a given project.
This is used to calculate a billing amount for billing type On produced work and On capped produced work.
Section: Description
Field
Id
Name
Project
Activity type
Price of the activity
Sort order
Closed
Description
Unique Id for the activity price.
Short description of the activity price.
The project concerned with the activity price.
Type of activities concerned with the activity price.
Daily price of the activities of the given activity type and the given project.
Number to define order of display in lists.
Flag to indicate that activity price is archived.
* Required field
10.8. Activities prices
171
ProjeQtOr User guide, Release 5.1
10.9 Payments
Allow to define payment of bills.
The bill keeps track of payment.
Section: Description
Field
Id
Name
Payment type
Description
Description
Unique Id for the payment.
Short description of the payment.
Type of payment.
Description of the payment.
* Required field
Section: Treatment
Field
Payment mode
Payment date
Payment amount
Payment fee
Payment credit
Bill
Bill reference
Customer
Recipient
Bill amount
Closed
Description
The mode of payment.
Date of payment.
Amount of the payment.
Payment of the fee.
Balance of payment amount less payment fee.
Bill concerned with the payment.
Reference of bill.
Customer of bill.
Recipient of bill.
Amount of bill.
Flag to indicate that payment is archived.
* Required field
172
Chapter 10. Financial
CHAPTER 11
Risk & Issue Management
Contents
•
•
•
•
•
Risks
Opportunities
Criticality value calculation
Issues
Actions
11.1 Risks
A risk is any threat of an event that may have a negative impact to the project, and which may be neutralized, or at
least minimized, through pre-defined actions.
The risk management plan is a key point to project management :
• Identify risks and estimate their severity and likelihood.
• Identify mitigating actions.
• Identify opportunities.
• Follow-up actions.
• Identify risks that finally occur (becoming an issue).
Initial and planned end dates
• Possibility to define indicators to follow the respect of dates values.
• See: Indicators screen.
Other sections
• Linked element
• Attachments
• Notes
173
ProjeQtOr User guide, Release 5.1
Section: Description
Field
Id
Name
Type
Project
Severity
Likelihood
Criticality
Cost of impact
Project reserved cost
Origin
Cause
Impact
Description
Description
Unique Id for the risk.
Short description of the risk.
Type of risk.
The project concerned by the risk.
Level of importance of the impact for the project.
Probability level of the risk to occur.
Global evaluation level of the risk.
Impact cost of the risk.
The reserve amount according to the risk likelihood.
Element which is the origin of the risk.
Description of the event that may trigger the risk.
Description of the estimated impact on the project if the risk occurs.
Complete description of the risk.
* Required field
Field: Criticality
• Automatically calculated from Severity and Likelihood values. See: Criticality value calculation.
• Value can be changed.
Field: Project reserved cost
• Automatically calculated from the percentage defined to the likelihood.
Section: Treatment
Field
Status
Responsible
Priority
Initial end date
Planned end date
Handled
Done
Closed
Cancelled
Result
Description
Actual status of the risk.
Resource who is responsible for the treatment of the risk.
Expected priority to take into account this risk.
Initially expected end date of the risk.
Updated end date of the risk.
Flag to indicate that risk is taken into account.
Flag to indicate that risk has been treated.
Flag to indicate that risk is archived.
Flag to indicate that risk is cancelled.
Complete description of the treatment done on the risk.
* Required field
174
Chapter 11. Risk & Issue Management
ProjeQtOr User guide, Release 5.1
11.2 Opportunities
An opportunity can be seen as a positive risk. It is not a threat but the opportunity to have a positive impact to the
project.
The risk management plan is a key point to project management :
• Identify risks and estimate their severity and likelihood.
• Identify mitigating actions.
• Identify opportunities.
• Follow-up actions.
• Identify risks that finally occur (becoming an issue).
Other sections
• Linked element
• Attachments
• Notes
Section: Description
Field
Id
Name
Type
Project
Significance
Likelihood
Criticality
Expected improvement
Project reserved gain
Origin
Opportunity source
Impact
Description
Description
Unique Id for the opportunity.
Short description of the opportunity.
Type of opportunity.
The project concerned by the opportunity.
Level of importance of the impact for the project.
Evaluation of the estimated improvement, or positive impact, on the project of the opportunity.
Global evaluation level of the opportunity.
Expected amount of the opportunity.
The estimated gain, according to the opportunity likelihood.
Element which is the origin of the opportunity.
Description of the event that may trigger the opportunity.
Description of the estimated positive impact on the project.
Complete description of the opportunity.
* Required field
Field: Criticality
• Automatically calculated from Significance and Likelihood values. See: Criticality value calculation.
• Value can be changed.
Field: Project reserved gain
• Automatically calculated from the percentage defined to the likelihood.
11.2. Opportunities
175
ProjeQtOr User guide, Release 5.1
Section: Treatment
Field
Status
Responsible
Priority
Initial end date
Planned end date
Handled
Done
Closed
Cancelled
Result
Description
Actual status of the opportunity.
Resource who is responsible for the opportunity.
Expected priority to take into account this opportunity.
Initially expected end date of the opportunity.
Updated end date of the opportunity.
Flag to indicate that opportunity is taken into account.
Flag to indicate that opportunity has been treated.
Flag to indicate that opportunity is archived.
Flag to indicate that opportunity is cancelled.
Complete description of the treatment of the opportunity.
* Required field
176
Chapter 11. Risk & Issue Management
ProjeQtOr User guide, Release 5.1
11.3 Criticality value calculation
Criticality value is automatically calculated from Severity (Significance) and Likelihood values.
Criticality, Severity (Significance) and Likelihood values are defined in lists of values screens. See: Criticalities,
Severities and Likelihoods screens.
In the previous screens, a name of value is set with numeric value.
Criticality numeric value is determined by a simple equation as follows:
Equation
• [Criticality value] = [Severity value] X [Likelihood value] / 2
• For example:
– Critical (8) = High (4) X High (4) / 2
Default values
• Default values are determined.
• You can change its values while respecting the equation defined above.
11.3. Criticality value calculation
177
ProjeQtOr User guide, Release 5.1
11.4 Issues
An issue is a problem that occurs during the project.
If the risk Management plan has been correctly managed, issues should always be occurring identified risks.
Actions must be defined to solve the issue.
Initial and planned end dates
• Possibility to define indicators to follow the respect of dates values.
• See: Indicators screen.
Other sections
• Linked element
• Attachments
• Notes
Section: Description
Field
Id
Name
Type
Project
Criticality
Priority
Origin
Cause
Impact
Description
Description
Unique Id for the issue.
Short description of the issue.
Type of issue.
The project concerned by the issue.
Level of importance of the impact for the project.
Priority requested to the treatment of the issue.
Element which is the origin of the issue.
Description of the event that led to the issue.
Description of the impact of the issue on the project.
Complete description of the issue.
* Required field
Section: Treatment
Field
Status
Responsible
Initial end date
Planned end date
Handled
Done
Closed
Cancelled
Result
Description
Actual status of the issue.
Resource who is responsible for the issue.
Initially expected end date of the issue.
Updated end date of the issue.
Flag to indicate that issue is taken into account.
Flag to indicate that issue has been treated.
Flag to indicate that issue is archived.
Flag to indicate that issue is cancelled.
Complete description of the treatment of the issue.
* Required field
178
Chapter 11. Risk & Issue Management
ProjeQtOr User guide, Release 5.1
11.5 Actions
An action is a task or activity that is set-up in order to :
• Reduce the likelihood of a risk
• or reduce the impact of a risk
• or solve an issue
• or build a post-meeting action plan
• or just define a “to do list”.
The actions are the main activities of the risk management plan.
They must be regularly followed-up.
Initial and planned due dates
• Possibility to define indicators to follow the respect of dates values.
• See: Indicators screen.
Other sections
• Linked element
• Attachments
• Notes
Section: Description
Field
Id
Name
Action type
Project
Priority
Description
Description
Unique Id for the action.
Short description of the action.
Type of action.
The project concerned by the action.
Priority requested to the treatment of the action.
Complete description of the action.
* Required field
11.5. Actions
179
ProjeQtOr User guide, Release 5.1
Section: Treatment
Field
Status
Responsible
Initial end date
Planned end date
Handled
Done
Closed
Cancelled
Efficiency
Result
Description
Actual status of the action.
Resource who is responsible for the action.
Initially expected end date of the action.
Updated end date of the action.
Flag to indicate that action is taken into account.
Flag to indicate that action has been treated.
Flag to indicate that action is archived.
Flag to indicate that action is cancelled.
Evaluation of the efficiency the action had on the objective (for instance on the risk mitigation).
Complete description of the treatment of the action.
* Required field
180
Chapter 11. Risk & Issue Management
CHAPTER 12
Review logs
Contents
•
•
•
•
•
•
Meetings
Periodic meetings
Attendees section
Progress section
Decisions
Questions
12.1 Meetings
Meeting items are stored to keep track of important meetings during the project lifecycle :
• Progress Meetings
• Steering committees
• Functional workshops
In fact, you should keep track of every meeting where decisions are taken, or questions answered.
This will provide an easy way to find back when, where and why a decision has been taken.
Project activity
• Meeting is a project activity.
• You can assign project resources (named attendees).
• You have progress section that allows for followed resources work and cost.
181
ProjeQtOr User guide, Release 5.1
Other sections
•
•
•
•
•
•
Attendees
Progress
Predecessor and Sucessor element
Linked element
Attachments
Notes
Section: Description
Table 12.1: Description section fields
Field
Id
Name
Meeting type
Project
Meeting date
Location
Description
Description
Unique Id for the meeting.
Short description of the meeting.
Type of meeting.
The project concerned by the meeting.
Date of the meeting (initially expected date), including start and end time.
Place (room or else) when meeting will stand.
Description of the meeting.
* Required field
Field: Name
• If not set, will automatically be set to meeting type completed with meeting date.
Hint: Description can be used to store agenda.
Button: Email invitation
• Allows to send the email to attendees.
• They will receive the invitation in their calendar management tool.
182
Chapter 12. Review logs
ProjeQtOr User guide, Release 5.1
Section: Treatment
Table 12.2: Treatment section fields
Field
Parent activity
Status
Responsible
Handled
Done
Closed
Cancelled
Minutes
Description
Parent activity of the meeting.
Actual status of the meeting.
Resource who is responsible for the organization of the meeting.
Flag to indicate that meeting has been taken into account.
Flag to indicate that meeting has been held.
Flag to indicate that meeting is archived.
Flag to indicate that meeting is cancelled.
Minutes of the meeting.
* Required field
Field: Parent activity
• In the WBS structure, under which the meeting will be displayed in the Gantt planning.
Minutes
• You can enter here only a short summary of the minutes and attach the full minutes as a file.
12.1. Meetings
183
ProjeQtOr User guide, Release 5.1
12.2 Periodic meetings
Periodic meeting is a way to define some meetings that will occur on a regular basis.
Note:
• Most fields fit meeting fields, but some information for the meeting is not present for periodic meetings, such as
Minutes or Status.
• It is because these fields won’t be set through periodic meeting definition, but must be set directly on the
meetings.
Periodic meeting process
• When saving periodic meeting, elementary meetings are automatically created.
• Changes can then be done in elementary meetings. In most cases, these changes won’t be erased by periodic
meeting updates.
Update on a periodic meeting
• On each update of a periodic meeting, meetings are re-evaluated.
• This may lead to deletion of some meetings.
• This will also reposition meetings, even if their planned dates were elementary updated.
Attendees assignment
• Attendees can be defined on a periodic meeting.
• They will be copied on the elementary meetings.
• The periodic meetings will not be planned, only elementary meetings will be.
• So left work will always be set to zero on periodic meetings.
Other sections
•
•
•
•
184
Attendees
Progress
Predecessor and Sucessor element
Notes
Chapter 12. Review logs
ProjeQtOr User guide, Release 5.1
Section: Description
Table 12.3: Description section fields
Field
Id
Name
Meeting type
Project
Location
Description
Description
Unique Id for the periodic meeting.
Short description of the meeting.
Type of meeting.
The project concerned by the meeting.
Place (room or else) when meeting will stand.
Description of the meeting. Can be used to store Agenda.
* Required field
Field: Name
• If not set, will automatically be set to meeting type completed with meeting date.
Section: Treatment
Table 12.4: Treatment section fields
Field
Parent activity
Responsible
Closed
Description
Parent activity of the meeting.
Resource who is responsible for the organization of the meeting.
Flag to indicate that periodic meeting is archived.
Field: Parent activity
• In the WBS structure, under which the meeting will be displayed in the Gantt planning.
Section: Periodicity
Table 12.5: Periodicity section fields
Field
Period
Time
Periodicity
Only on open days
Description
Start date and end date or number of occurrences to define the range of the periodicity.
Start and end time for all the meetings.
Frequency of the meeting, on proposed bases (daily, weekly monthly).
Specify that meetings will not be set on off days.
* Required field
Field: Periodicity
• Several periodicity is proposed:
– Every day
– Same day every week
– Same day every mouth
– Same week every mounth
12.2. Periodic meetings
185
ProjeQtOr User guide, Release 5.1
12.3 Attendees section
This section allows to define the list of attendees to the meeting.
Attendee list
• Meeting is an activity you can assign project resources.
• A possibility to assign work to some attendees (project resources). So meeting works of these attendees are
booked in the project.
• More detail about how assigned project resources, see: Assignment section.
Other attendees
• Extra list of persons attending (or expecting to attend) the meeting, in completion to resource in the attendee
list.
Attendees entry
• You can enter attendees by email address, resource or contact name, user name or initial without caring
about.
• Just separate attendees with commas or semicolons.
Note:
• Duplicate email addresses in the attendee list will automatically be removed.
12.4 Progress section
This section is common to meeting and periodic meeting.
It allows to follow-up the progress of a meeting.
Table 12.6: Progress section fields
Field
Validated work/cost
Assigned work/cost
Real work/cost
Left work/cost
Description
Committed work/cost, work/cost of the meeting should not be more.
Work/cost for the assignments on the meeting.
Work/cost really spent on the meeting.
Work/cost needed to complete the meeting.
Priority
• Planning priority of the meeting.
186
Chapter 12. Review logs
ProjeQtOr User guide, Release 5.1
12.5 Decisions
Decisions are stored to keep track of important decisions, when, where and why the decision was taken.
You can link a decision to a meeting to rapidly find the minutes where the decision is described.
Other sections
• Linked element
• Attachments
• Notes
Section: Description
Table 12.7: Description section fields
Field
Id
Name
Decision type
Project
Description
Description
Unique Id for the decision.
Short description of the decision.
Type of decision.
The project concerned by the decision.
Complete description of the decision.
* Required field
Section: Validation
Table 12.8: Validation section fields
Field
Status
Decision date
Origin
Accountable
Closed
Cancelled
Description
Actual status of the decision.
Date of the decision.
Origin of the decision.
Resource accountable for the decision.
Flag to indicate that decision is archived.
Flag to indicate that decision is cancelled.
* Required field
Field: Origin
• It can be either the reference to a meeting where the decision was taken (so also add the reference to the
meetings list), or a short description of why the decision was taken.
Field: Accountable
• The person who took the decision.
12.5. Decisions
187
ProjeQtOr User guide, Release 5.1
12.6 Questions
Question are stored to keep track of important questions and answers.
In fact, you should keep trace of every question and answer that have an impact to the project.
The questions can also afford an easy way to track questions sent and follow-up non-answered ones.
This will provide an easy way to find back when, who and precise description of the answer to a question.
Also keep in mind that some people will (consciously or not) be able to change their mind and uphold it has always
been their opinion. . .
You can link a question to a meeting to rapidly find the minutes where the question was raised or answered.
Initial and planned due dates
• Possibility to define indicators to follow the respect of dates values.
• See: Indicators screen.
Other sections
• Linked element
• Attachments
• Notes
Section: Description
Table 12.9: Description section fields
Field
Id
Name
Question type
Project
Description
Description
Unique Id for the question.
Short description of the question.
Type of question.
The project concerned by the question.
Complete description of the question.
* Required field
188
Chapter 12. Review logs
ProjeQtOr User guide, Release 5.1
Section: Answer
Table 12.10: Answer section fields
Field
Status
Responsible
Initial due date
Planned due date
Replier
Handled
Done
Closed
Cancelled
Response
Description
Actual status of the decision.
Resource who is responsible for the follow-up of the question.
Initially expected date for the answer to the question.
Updated expected date for the answer to the question.
Name of the person who provided the answer.
Flag to indicate that question has been taken into account.
Flag to indicate that question has been answered.
Flag to indicate that question is archived.
Flag to indicate that question is cancelled.
Complete description of the answer to the question.
* Required field
12.6. Questions
189
ProjeQtOr User guide, Release 5.1
190
Chapter 12. Review logs
CHAPTER 13
Environmental parameters
Contents
• Products
• Versions
13.1 Products
Product is the element a project is built for.
A project works on one or more versions of the product .
A product is any element delivered by the project. For IT/IS projects, products are generally applications.
Other sections
• Attachments
• Notes
Section: Description
Table 13.1: Description section fields
Field
Id
Name
Designation
Customer
Prime contractor
Is sub-product of
Closed
Description
Description
Unique Id for the product.
Name of the product.
Trade name of the product known outside the company.
The customer the product should be delivered to.
The contact, into customer organization, who will be responsible for the product delivery.
Name of the top product if this product is a sub-product.
Flag to indicate that product is archived.
Complete description of the product.
* Required field
191
ProjeQtOr User guide, Release 5.1
Section: Product versions
List of the versions defined for the product.
192
Chapter 13. Environmental parameters
ProjeQtOr User guide, Release 5.1
13.2 Versions
Version is the declination of the product life.
A project works on one or more versions of the product .
A version of product is any stable status of the element delivered by the project.
For IT/IS projects, versions are generally applications versions.
Other sections
• Attachments
• Notes
Section: Description
Table 13.2: Description section fields
Field
Id
Product
Name
Prime contractor
Responsible
Entry into service
End date
Description
Description
Unique Id for the version.
The product on which the version applies.
Name of the version.
The contact, into customer organization, who will be responsible for the version delivery.
Resource responsible of the version.
Initial, planned and real entry into service date of the version.
Initial, planned and real end dates of the version.
Complete description of the version.
* Required field
Field: Prime contractor
• Can be different from product prime contractor.
Field: Entry into service
• Done is checked when real is set.
Field: End date
• Done is checked when real is set, corresponding to closed version.
13.2. Versions
193
ProjeQtOr User guide, Release 5.1
Section: Projects linked to this version
Projects can be directly linked to version.
Link version to projects management
• Click on
to create a new link to project.
• Click on
to update an existing link to project.
• Click on
to delete the corresponding link to project.
Fig. 13.1: Project - Version link dialog box
Table 13.3: Project - Version link dialog box fields
Field
Project
Version
Start date
End date
Closed
194
Description
Project linked to the version.
Current version.
Start date for validity of the link.
End date for validity of the link.
Flag to indicate that link is not active any more, without deleting it.
Chapter 13. Environmental parameters
ProjeQtOr User guide, Release 5.1
13.3 Affectations
Concepts
• Profiles definition
• Stakeholder definition
• Project affectation
Allows to manage project affectations.
Offers a global view of affectation.
Hint:
• You can use filters.
Section: Description
Field
Id
Resource
Or contact
Profile
Project
Rate
Start date
End date
Closed
Description
Description
Unique Id for the affectation.
Name of the affected resource.
Name of the affected contact.
Selected profile.
Project affected to.
Affectation rate for the project (%).
Start date of affectation.
End date of affectation.
Flag to indicate that the affectation is archived.
Complete description of the affectation.
* Required field
Fields: Resource & Contact
• You can select resource or contact.
• If none is selected then the user connected is used to define the affectation.
• If a contact is a resource and inversely, then resource or contact name will be selected too.
13.3. Affectations
195
ProjeQtOr User guide, Release 5.1
13.4 Users
Concepts
•
•
•
•
ProjeQtOr roles
Profiles definition
Stakeholder definition
Photo
The user is a person that will be able to connect to the application.
Note:
• To be able to connect, the user must have a password and a user profile defined.
ProjeQtOr and LDAP users
• ProjeQtOr offers two modes of authentication.
ProjeQtOr users
• Users’ information is kept in the application database.
• Password policy and login behavior are managed by the application (Defined in Global parameters
screen).
• The users “admin” and “guest” are created during installation.
LDAP users
• Allows users defined in an external directory to login at ProjeQtOr by the LDAP protocol.
• Users’ information and password policy are managed in the external directory.
• LDAP protocol parameters are set in Global parameters screen.
Default user profile
• A general user profile can be set during user creation.
• A different default profile can be set for ProjeQtOr and LDAP users.
Web Service
• ProjeQtOr provides an API to interact with its elements. It is provided as REST Web Service.
• An API key is defined for the user.
• This API key is used to encrypt the data for methods: PUT, PUSH and DELETE.
196
Chapter 13. Environmental parameters
ProjeQtOr User guide, Release 5.1
Other sections
• Affectations
Section: Description
Table 13.4: Users description section fields
Field
Id
Photo
User name
Real name
Initials
Email address
Profile
Locked
Is a contact
Is a resource
Closed
Description
Description
Unique Id for the user.
Photo of the user.
login id of the user.
Name of the user.
Initials of the user.
Email address of the user.
Profile of the user.
Flag used to lock the user, to prohibit connections.
Is this user also a contact?
Is this user also a resource?
Flag to indicate that user is archived.
Complete description of the user.
* Required field
Field: User name
• The user name must be unique.
Field: Is a contact
• Check this if you want created a contact to this user.
• This user will then appear in the “Contact” list
Field: Is a resource
• Check this if you want created a resource to this user.
• The user will then also appear in the “Resources” list.
13.4. Users
197
ProjeQtOr User guide, Release 5.1
Section: Miscellanous
Button: Reset password
• This button allows to reset password to default password.
• Default password value is defined in Global parameters screen.
• Reset password button is available only for ProjeQtOr users.
Table 13.5: Users miscellaneous section fields
Field
Don’t receive team mails
Comes from LDAP
API key
Description
Flag to indicate that the user don’t want to receive team mails.
Flag to indicate that the user come from LDAP.
Key string used by web service consumer.
Button: Send information to the user
• This button allows to send by email to the user the login information.
198
Chapter 13. Environmental parameters
ProjeQtOr User guide, Release 5.1
Contents
• Resources
• Teams
• Calendar
13.5 Resources
Concepts
•
•
•
•
•
ProjeQtOr roles
Profiles definition
Stakeholder definition
Photo
Resource calendar
Human and material resource are involved in the project.
Project affectation defines its availability.
As group of person
• A resource can be a group of person.
• Useful in initial project planning.
• You create the fictitious resource with capacity > 1.
Example
• If you want a group of three peoples then resource capacity must be set to 3.
Other sections
• Affectations
13.5. Resources
199
ProjeQtOr User guide, Release 5.1
Section: Description
Table 13.6: Resources description section fields
Field
Id
Photo
Real name
User name
Initials
Email address
Profile
Capacity (FTE)
Calendar
Team
Phone
Mobile
Fax
Is a contact
Is a user
Closed
Description
Description
Unique Id for the resource.
Photo of the resource.
Name of the resource.
Name of user.
Initials of the resource.
Email address of the resource.
Profile of the user.
Capacity of the resource, in Full Time Equivalent.
Calendar defines the availability of the resource.
The team to which the resource belongs.
Phone number of the resource.
Mobile phone number of the resource.
Fax number of the resource.
Is this resource also a contact?
Is this resource also a user?
Flag to indicate that the resource is archived.
Complete description of the resource.
* Required field
Field: Capacity (FTE)
• 1 (full time).
• < 1 (for part time working resource).
• > 1 (for virtual resource or teams, to use for instance to initialize a planning).
Field: Is a contact
• Check this if the resource must also be a contact.
• The resource will then also appear in the “Contacts” list.
Field: Is a user
• Check this if the resource must connect to the application.
• You must then define the User name and Profile fields.
• The resource will then also appear in the “Users” list.
200
Chapter 13. Environmental parameters
ProjeQtOr User guide, Release 5.1
Section: Function and cost
Concepts
• Resource function and cost
This section allows to define functions and cost of the resource.
Table 13.7: Function and cost section fields
Field
Function
Cost
Start date
End date
Description
Function of the resource for the selected cost.
Daily cost of the resource for the selected function.
Start date for the cost of the resource, for the selected function.
End date for the cost of the resource, for the selected function.
Field: End date
• The end date is set when a new resource cost is defined in the same function.
• The end date is the day before the start date in the new resource cost entry.
Resource cost management
• Click on
to create a new resource cost.
• Click on
to update an existing resource cost.
• Click on
to delete the resource cost.
Fig. 13.2: Resource cost dialog box
Table 13.8: Resource cost dialog box fields
Field
Function
Cost
Start date
Description
Function to be selected.
Daily cost of the resource for the selected function.
Start date for the cost of the resource, for the selected function.
Field: Function
• The resource main function will be displayed first.
Field: Start date
• Start date must be set when a new resource cost is created for the same function.
13.5. Resources
201
ProjeQtOr User guide, Release 5.1
Section: Miscellanous
Table 13.9: Miscellanous section fields
Field
Don’t receive team mails
202
Description
Flag to indicate that resource don’t want to receive team mails.
Chapter 13. Environmental parameters
ProjeQtOr User guide, Release 5.1
13.6 Teams
The team is a group of resources gathered on any criteria.
Note:
• A resource can belong to only one team.
Use for
• To affect all team members of a project.
• To filter resource data in work, cost and planning reports.
• To set attachment, note and document visibility to the team.
Section: Description
Table 13.10: Description section fields
Field
Id
Name
Closed
Description
Description
Unique Id for the team.
Name of the team.
Flag to indicate that team is archived.
Complete description of the team.
Section: Team members
• List of the resources members of the team.
Button: Affect all team members of a project
• This button allows to affect all team members of a project.
• The affectation dialog box will be displayed.
13.6. Teams
203
ProjeQtOr User guide, Release 5.1
13.7 Calendar
Concepts
• Resource calendar
This tool allows to define calendars.
How it works
• It allows to define exceptions to the default definition.
• In default definition, week days are days work and weekend days are days off.
Note:
• Exceptions can be defined for the current year and the next years.
Default calendar
• A calendar named “default” is already defined.
• By default, this is the calendar of all resources.
• Days off defined in this calendar is displayed in Gantt, real work allocation and diary.
• It cannot be deleted.
Specific calendar
• A specific calendar can be created to define days off and work to a resource.
• Days off defined in this calendar is displayed in real work allocation and diary.
Import calendar definition
• It is possible to import exceptions definition of a calendar in another.
• Existing exceptions of current calendar are not changed.
Note:
• The calendars are not linked.
• You have to re import the definition to apply changes.
204
Chapter 13. Environmental parameters
ProjeQtOr User guide, Release 5.1
Section: Description
Table 13.11: Description section fields
Field
Id
Name
Description
Unique Id for the calendar.
Name of the calendar.
Section: Year
Field : Year field
• Select year of displayed calendar.
Button : Import this year from calendar
• Copy exceptions of the selected year of the selected calendar into current calendar.
Section: Calendar days
Fig. 13.3: Year calendar
A calendar of selected year is displayed to give a global overview of the exceptions existing.
• In white, days work.
• In gray, days off.
• In red, exception days work.
• In blue, exception days off.
• In bold, current day.
Just click on one day in the calendar to switch between off and work day.
13.7. Calendar
205
ProjeQtOr User guide, Release 5.1
Contents
• Customers
• Contacts
13.8 Customers
The customer is the entity for which the project is set.
It is generally the owner of the project, and in many cases it is the payer.
It can be an internal entity, into the same enterprise, or a different enterprise, or the entity of an enterprise.
The customer defined here is not a person. Real persons into a customer entity are called “Contacts”.
Other sections
• Attachments
• Notes
Section: Description
Field
Id
Customer name
Type of customer
Customer code
Payment deadline
Tax
Tax number
Closed
Description
Description
Unique Id for the customer.
Short name of the customer.
Type of customer.
Code of the customer.
The payment deadline is stated on the bill for this customer.
Tax rates that are applied to bill amounts for this customer.
Tax reference number, to be displayed on the bill.
Flag to indicate that the customer is archived.
Complete description of the customer.
* Required field
Section: Address
• Full address of the customer.
Section: Projects
• List of the projects of the customer.
Section: Contacts
• List of the contacts known in the entity of the customer.
206
Chapter 13. Environmental parameters
ProjeQtOr User guide, Release 5.1
13.9 Contacts
Concepts
•
•
•
•
ProjeQtOr roles
Profiles definition
Stakeholder definition
Photo
A contact is a person in a business relationship with the company.
The company keeps all information data to be able to contact him when needed.
A contact can be a person in the customer organization.
A contact can be the contact person for contracts, sales and billing.
Other sections
• Affectations
Section: Description
Field
Id
Photo
Real name
User name
Initials
Email address
Profile
Customer
Function
Phone
Mobile
Fax
Is a resource
Is a user
Closed
Description
Description
Unique Id for the contact.
Photo of the contact.
Name of the contact.
Name of user.
Initials of the contact.
Email address of the contact.
Profile of the user.
The customer the contact belongs to.
Function of contact.
Phone number of the contact.
Mobile phone number of the contact.
Fax number of the contact.
Is this contact also a resource ?
Is this contact also a user ?
Flag to indicate that contact is archived.
Complete description of the contact.
* Required field
Field: Is a resource
• Check this if the contact must also be a resource.
• The contact will then also appear in the “Resources” list.
13.9. Contacts
207
ProjeQtOr User guide, Release 5.1
Field: Is a user
• Check this if the contact must connect to the application.
• You must then define the User name and Profile fields.
• The contact will then also appear in the “Users” list.
Section: Address
Full address of the contact.
Section: Miscellanous
Field
Don’t receive team mails
208
Description
Flag to indicate that resource don’t want to receive team mails.
Chapter 13. Environmental parameters
ProjeQtOr User guide, Release 5.1
13.10 Recipients
The recipient is the beneficiary of bill payments.
Recipients are mainly defined to store billing information.
Section: Description
Field
Id
Name
Company number
Legal notice
Tax number
Tax free
Contact name
Contact email
Contact phone
Closed
Description
Unique Id for the recipient.
Short name of the recipient.
Company number, to be displayed on the bill.
Legal notice for the recipient.
Tax reference number, to be displayed on the bill.
Flag to indicate that tax is automatically set to zero for this recipient.
Name of contact for the recipient.
Email of contact for the recipient.
Phone of contact for the recipient.
Flag to indicate that the recipient is archived.
* Required field
Section: International Bank Account Number
Field
Bank
International number (IBAN)
Bank code (BIC)
National account number
Description
Bank name.
IBAN for the recipient.
BIC for the recipient.
Full account number defining the BBAN account code.
Section: Address
• Full address of the recipient.
13.10. Recipients
209
ProjeQtOr User guide, Release 5.1
13.11 Contexts
The contexts defines a list of elements selectable to define ticket context and test case environment.
Contexts are initially set to be able to define contexts for IT Projects, for three context types :
• Environment
• Operating System
• Browser
They can be changed to be adapted to any kind of project.
Section: Description
Field
Id
Context type
Name
Sort order
Closed
Description
Unique Id for the context.
One of the three context type.
Name of the context.
Number to define the order of display in lists
Flag to indicate that the context is archived.
* Required field
Fields: Context type
• The list is fixed.
• Captions are translated and so can be changed in language file.
210
Chapter 13. Environmental parameters
ProjeQtOr User guide, Release 5.1
13.12 Document directories
Document directories management allows to define a structure for document storage.
• The files of document will be stored in the folder defined by the parameters «Document root» and «Location».
• «Document root» is defined in Global parameters screen.
Section: Description
Field
Id
Name
Parent directory
Location
Project
Product
Default type
Closed
Description
Unique Id for the directory.
Name of the directory.
Name of the parent directory to define hierarchic structure.
Folder where files will be stored.
Directory is dedicated to this project.
Directory is dedicated to this product.
Type of document the directory is dedicated to.
Flag to indicate that directory is archived.
* Required field
Field: Parent directory
• The current directory is then a sub-directory of parent.
Field: Location
• Location is automatically defined as «Parent directory» / «Name».
Field: Project
• This project will be the default to new stored documents in this directory.
Field: Product
• This product will be the default to new stored documents in this directory.
Field: Default type
• This document type will be the default to new stored documents in this directory.
13.12. Document directories
211
ProjeQtOr User guide, Release 5.1
212
Chapter 13. Environmental parameters
CHAPTER 14
Tools
Contents
•
•
•
•
Emails sent
Alerts
Messages
Import data
– File format
– Data import process
• Automatic import
14.1 Emails sent
Users can have a look at the list of the automatic emails sent.
All the information about the email, including the status showing whether the email was correctly sent or not.
213
ProjeQtOr User guide, Release 5.1
14.2 Alerts
Users can have a look at the alerts sent.
By default, administrators can see all the alerts sent, and other users only see their own alerts.
Fig. 14.1: Alert screen
Button: Mark as read
• The button is available if the user alert is not tagged “read” yet.
214
Chapter 14. Tools
ProjeQtOr User guide, Release 5.1
14.3 Messages
Concepts
• Profiles definition
You can define some message that will be displayed on the Today screen of users.
Optionally, the message can be shown on login screen.
You can limit the display to some profile and project.
The message will be displayed in a color depending on the message type.
Section: Description
Table 14.1: Message description section fields
Field
Id
Title
Message type
Profile
Project
Show on login screen
Closed
Description
Unique Id for the message.
Header of the message.
Type of message.
The profile of users who will see the message.
The project to limit display.
Show this message on login screen.
Flag to indicate that the message is archived.
* Required field
Field: Project
• Only resources affected to the project will see the message.
Section: Message
Table 14.2: Message message section fields
Field
Message
Description
Complete text of the message.
14.3. Messages
215
ProjeQtOr User guide, Release 5.1
14.4 Import data
Imports data from CSV or XLSX files.
How to do
1. Select the element type from the list.
2. Select file format (CSV or XLSX).
3. Select the file.
4. Click on Import data button to start importing.
Report of the import
• Data that is not imported because not recognized as a field appear in grey text in the result table.
• Data that are voluntarily not imported (because must be calculated) appear in blue text in the result table.
Note: Import users
• The password field must be cut and pasted from the database because it is encrypted.
• If you enter some readable password, the users will not be able to connect.
Attention:
• If you want to create new users don’t put any id because if id already exists, it will be overridden by the
new (with possibility to erase admin user. . . ).
• Always keep in mind that your import may have some impact on administrator user.
• So be sure to keep an operational admin access.
216
Chapter 14. Tools
ProjeQtOr User guide, Release 5.1
14.4.1 File format
The content of the imported file must fit the element type description.
To know the data that may be imported, click on the
button.
Names of columns
• The first line of the file must contain the name of the fields.
Note:
• Names of columns can contain spaces (to have better readability).
• The spaces will be removed to get the name of the column.
Hint:
• Look into the model class. The names are the same.
Date format
• Dates are expected in format “YYYY-MM-DD”.
14.4. Import data
217
ProjeQtOr User guide, Release 5.1
14.4.2 Data import process
Operations are performed, depending on whether the element type, the column or the column value.
Column Id
You may or may not add an “id” column in the file.
Column “id” exists and “id” is set in a line
• The import will try to update the corresponding element, and will fail if it does not exist.
Column “id” does not exist or if “id” is not set in a line
• The import will create a new element from the data.
Linked tables
For columns corresponding to linked tables (“idXxxx”), you can indicate as the column name either “idXxxx“ or
“Xxxx” (without “id”) or the caption of the column (as displayed on screens).
Numeric value
• If the value of the column is numeric, it is considered as the code of the item.
Non numeric value
• If the value of the column contains non numeric value, it is considered as the name of the item, and
the code will be searched for the name.
Columns with no data
• In any case, columns with no data will not be updated.
• Then you can update only one field on an element.
Clear data
• To clear a data, enter the value “NULL” (not case sensitive).
Planning elements
• Insertion into “Planning” elements (activity, project), automatically inserts an element in the table “PlanningElement”.
• The data of this table can be inserted into the import file.
218
Chapter 14. Tools
ProjeQtOr User guide, Release 5.1
14.5 Automatic import
Imports can be automated.
Files placed on a defined directory will automatically be imported.
Note:
• Automatic import parameters must be set in Global parameters screen.
• Background task must be started by Administration console screen.
The files must respect some basic rules.
File name format
• File name format is : “Class”_”Timestamp”.”ext”
• Example of import file name: Ticket_20131231_235959.csv
Class
• The type of item to be imported (Ticket, Activity, Question, . . . ).
Timestamp
• Timestamp defined to be able to store several files in the directory.
• Format is free.
• The recommended format is “YYYYMMDD_HHMMSS”.
Ext
• File extension, representing its format.
• Valid extensions are CSV and XLSX.
File format
• The files must follow the ProjeQtOr File format.
• Files must be full and consistent.
Hint:
– The files should not be directly created in the import folder.
– They must be created in a temporary folder and moved afterwards.
14.5. Automatic import
219
ProjeQtOr User guide, Release 5.1
Import process
• Correctly imported files are moved to a “done” sub folder of the import folder.
• If an error occurs during import of a file, the full file is moved to “error” sub-folder of the import folder, even if
there is only one error over many other items correctly integrated.
• You can get the result as a log file and/or email summary.
220
Chapter 14. Tools
CHAPTER 15
Controls & Automation
Contents
•
•
•
•
•
•
•
Workflows
Mails on event
Delays for tickets
Indicators
Predefined notes
Checklists
Receivers list
15.1 Workflows
Concepts
• Profiles definition
A workflow defines the possibility to go from one status to another one, and who (depending on profile) can do this
operation for each status.
Once defined, a workflow can be linked to any type of any item.
Section: Description
Field
Id
Name
Sort order
Closed
Description
Description
Unique Id for the workflow.
Name of the workflow.
Number to define the order of display in lists.
Flag to indicate that workflow is archived.
Complete description of the workflow.
* Required field
221
ProjeQtOr User guide, Release 5.1
Button: Select status to show or hide
• This button
can be used to hide some unnecessary status.
Fig. 15.1: Select status to show or hide dialog box
Section: Workflow Diagram
• The workflow diagram presents a visual representation of the workflow displaying all possible transitions (independently to profile rights).
Fig. 15.2: Workflow Diagram
222
Chapter 15. Controls & Automation
ProjeQtOr User guide, Release 5.1
Section: Habilitation to change from a status to another
• The habilitation table helps defining who can move from one status to another one.
• Each line corresponds to the status from which you want to be able to move.
• Each column corresponds to the status to which you want to be able to go.
• It is not possible to go from one status to itself (these cells are blank).
• Just check the profile (or “all”) who is allowed to pass from one status to the other.
Fig. 15.3: Habilitation table
In the upper example:
• Anyone can move an item from “recorded” to “assigned” and from “recorded” to “cancelled”.
• No one can move an item from “qualified” status to any other status. In this case, pay attention that it must never be possible
to move an item to “qualified” status, because it will not be possible to leave this status.
15.1. Workflows
223
ProjeQtOr User guide, Release 5.1
15.2 Mails on event
The application is able to automatically send mails on updating event.
Events are defined on an element and element type.
Note:
• The mail message is formatted to display item information.
• Mail titles is defined in Global parameters screen.
Section: Description
Field
Id
Element updated
Type
New status
Or other event
Closed
Description
Unique Id for the event.
Type of elements that will be concerned by automatic emailing.
Type of the selected element updated.
Positioning the elements to this status will generate an email.
Other event that will possibly generate an email.
Flag to indicate that status mail is archived.
Field: Type
• If not set, the event is valid for every type of the element.
Section: Mail receivers
• List of addresses of the mails.
• The list is not nominative, but defined as roles on the element.
• Each addressee will receive mail only once, even if a person has several “checked” roles on the element.
• See: Receivers list for receivers detail.
224
Chapter 15. Controls & Automation
ProjeQtOr User guide, Release 5.1
15.3 Delays for tickets
It is possible to define a default delay for tickets, for each ticket type and each ticket urgency.
Note:
• On creation, the due date will automatically be calculated as creation date + delay.
Section: Description
Field
Id
Ticket type
Urgency
Value
Closed
Description
Unique Id for the delay definition.
Ticket type the delay applies to.
Urgency of ticket the delay applied to.
Value of delay.
Flag to indicate that delay definition is archived.
* Required field
Field: Value
• Unit for the value can be :
– Days : simple calculation as days.
– Hours : simple calculation as hours.
– Open days : calculation excluding days off (weekends and days off defined on “calendar”).
– Open hours : calculation only on the “standard open hours” defined in Global parameters screen.
15.3. Delays for tickets
225
ProjeQtOr User guide, Release 5.1
15.4 Indicators
It is possible to define indicators on each type of element.
Depending on type of elements the type of indicators that can be selected in list differs.
Some indicators are based on delay (due date), some on work, some on cost.
For each indicator a warning value and an alert value can be defined.
Section: Description
Field
Id
Element
Type
Indicator
Reminder
Alert
Closed
Description
Unique Id for the indicator definition.
The elements the indicator applies to.
Type of the elements the indicator applies to.
Indicator applies to.
Delay before due date or % of work or % or cost to send a warning.
Delay before due date or % of work or % or cost to send an alert.
Flag to indicate that delay definition is archived.
Section: Mail receivers
• List of addresses of the mails.
• The list is not nominative, but defined as roles on the element.
• Each addressee will receive mail only once, even if a person has several “checked” roles on the element.
• See : Receivers list for receivers detail.
Section: Internal alert receivers
• List of addresses of the internal alert.
• The list is not nominative, but defined as roles on the element.
• See : Receivers list for receivers detail.
226
Chapter 15. Controls & Automation
ProjeQtOr User guide, Release 5.1
15.5 Predefined notes
The predefined note set the possibility to define some predefined texts for notes.
When some predefined notes are defined for an element and / or type a list will appear on note creation.
Selecting an item in the list will automatically fill in the note text field.
Section: Description
Field
Id
Name
Element
Type
Closed
Text
Description
Unique Id for the predefined note.
Name of the predefined note.
Kind of item (Ticket, Activity, . . . ) for which this predefined note will be proposed on note creation.
Type of element for which this predefined note will be proposed on note creation.
Flag to indicate that delay definition is archived.
Predefined text for notes.
* Required field
Field: Element
• If not set, predefined note is valid for every element type.
Field: Type
• If not set, predefined note is valid for every type of the element.
15.5. Predefined notes
227
ProjeQtOr User guide, Release 5.1
15.6 Checklists
It is possible to define checklist forms for each type of element.
When a checklist form exists for a given element, the checklist is available for the element.
Section: Description
Field
Id
Element
Type
Closed
Description
Unique Id for the checklist definition.
The elements the checklist applies to.
Type of the elements the checklist applies to.
Flag to indicate that checklist definition is archived.
Section: Checklist lines
A checklist is built from checklist lines.
• Click on
to create a new checklist line.
• Click on
to update an existing checklist line.
• Click on
to delete the corresponding checklist line.
Fig. 15.4: Choices for the checklist lines dialog box
Table 15.1: Choices for the checklist lines dialog box fields
Field
Name
Sort order
Choice #n
Exclusive
228
Description
Name of the subject of the checklist line.
Order of the line in the list.
Possible choices (checks) for the list (up to 5 choices).
Are the choices exclusive (select one will unselect others).
Chapter 15. Controls & Automation
ProjeQtOr User guide, Release 5.1
Details of dialog box
• Each line has a name, an order and up to 5 check choices.
• A line with no check choice will be displayed as a section title.
• Name and Choices have 2 fields :
1. Displayed caption.
2. Help text that will be displayed as tooltip.
• Checks can be exclusive (select one will unselect others) or not (multi selection is then possible).
15.6. Checklists
229
ProjeQtOr User guide, Release 5.1
15.7 Receivers list
Receivers can receive email and alert.
A description of receivers below.
Requestor
• The contact defined as requestor on current item; sometimes appears as “contact” (on quotation and order, for
instance) and sometimes have no meaning (for instance for milestone).
Issuer
• The user defined as Issuer.
Responsible
• The resource defined as responsible.
Project team
• All resources affected to the project.
Project leader
• The resource(s) affected to the project with a “Project Leader” profile.
Project manager
• The resource defined as the manager on a project.
Assigned resource
• All resources assigned.
Other
• Provides an extra field to manually enter email addresses.
• If “other” is checked, an input box is displayed to enter a static mail address list.
• Several addresses can be entered, separated by semicolon.
230
Chapter 15. Controls & Automation
CHAPTER 16
Access rights
Contents
•
•
•
•
•
•
•
•
Profiles
Access modes
Access to forms
Access to reports
Access to data (project dependant)
Access to data (not project dependant)
Specific access
Translatable name
16.1 Profiles
Concepts
• Profiles definition
The profile is a group of authorization and access rights to the data.
Each user is linked to a profile to define the data he can see and possibly manage.
Display format
• In the next screens, the name of profiles is displayed in columns.
• Access rights and options are displayed in rows.
• This display format allows to manage easily authorizations for each profile.
Value of Field “Name”
• The value of field “Name” is not the name displayed, but it is a code in the translation table.
• The name displayed at right of the field is the translated name.
231
ProjeQtOr User guide, Release 5.1
• See: Translatable name.
New profile
• The value of field “Name” must be a significant name and must not contain spaces or special characters.
• Ideally, the value of the field should start with “profile” (to be easily identified in the translation table).
232
Chapter 16. Access rights
ProjeQtOr User guide, Release 5.1
Section: Description
Field
Id
Name
Profile code
Sort order
Closed
Description
Description
Unique Id for the profile.
Name of the profile.
A code that may be internally used when generating emails and alerts.
Number to define order of display in lists.
Flag to indicate that profile is archived.
Complete description of the profile.
Field: Profile code
• ADM: will designate administrator.
• PL: will designate project leader.
16.1. Profiles
233
ProjeQtOr User guide, Release 5.1
16.2 Access modes
The access mode defines a combination of rights to read, created, update or delete items.
Each access is defined as scope of visible and updatable elements, that can be :
• No element: No element is visible and updatable.
• Own elements: Only the elements created by the user.
• Elements he is responsible for: Only the elements the user is responsible for.
• Elements of own project: Only the elements of the projects the user/resource is affected to.
• All elements on all projects: All elements, whatever the project.
Value of Field “Name”
• The value of field “Name” is not the name displayed, but it is a code in the translation table.
• The name displayed at right of the field is the translated name.
• See: Translatable name.
New access mode
• The value of field “Name” must be a significant name and must not contain spaces or special characters.
• Ideally, the value of the field should start with “accessProfile” (to be easily identified in the translation
table).
Section: Description
Field
Id
Name
Read rights
Create rights
Update rights
Delete rights
Sort order
Closed
Description
Description
Unique Id for the access mode.
Name of the access mode.
Scope of visible items
Scope of possibility to create items.
Scope of updatable items.
Scope of deletable items.
Number to define order of display in lists
Flag to indicate that access mode is archived.
Complete description of the access mode.
* Required field
234
Chapter 16. Access rights
ProjeQtOr User guide, Release 5.1
16.3 Access to forms
This screen allows to define screen access for each profile.
Users belonging to a profile can see the corresponding screen in the menu.
How to do
• Screens are grouped as seen in the menu.
• Click on checkbox to permit or revoke access to the screen for a profile.
Fig. 16.1: Access to forms screen
16.4 Access to reports
This screen allows to define report access for each profile.
Users belonging to a profile can see the corresponding report in the report list.
How to do
• Reports are grouped by report categories.
• Click on checkbox to permit or revoke access to the report for a profile.
Fig. 16.2: Access to reports screen
16.3. Access to forms
235
ProjeQtOr User guide, Release 5.1
16.5 Access to data (project dependant)
This screen allows to set element access mode for each profile.
Allows to define scope of visibility and updating of data in elements for users and resources.
This screen is only for the elements reliant on a project.
How to do
• For each element, selected the access mode granted to a profile.
Fig. 16.3: Access to data (Project dependant) screen
16.6 Access to data (not project dependant)
This screen allows to set for each profile, elements access rights.
Allows to grant access rights (read only or write) to users, to data on specific elements.
This screen is only for the elements not reliant on a project.
How to do
• For each element, select the access rights granted to a profile.
Fig. 16.4: Access to data (Not project dependant) screen
236
Chapter 16. Access rights
ProjeQtOr User guide, Release 5.1
16.7 Specific access
This screen groups specific functionalities options.
Users belonging to a profile can have access to the application specific functions.
Depending on options of functionality, allows to grant access rights, to define data visibility or to enable or disable
option.
How to do
• For each option, select the access granted to a profile.
Fig. 16.5: Specific access screen
Section: Real work allocation and Diary
This section allows to:
• Defines who will be able to see and update “real work” for other users.
• Defines who can validate weekly work for resource.
• Defines who have access on diary for resources.
Note: Validate real work
• In most cases, it is devoted to project leader.
Section: Work and Cost visibility
• This section defines for each profile the scope of visibility of work and cost data.
Section: Assignment management
• This section defines the visibility and the possibility to edit assignments (on activities or else).
16.7. Specific access
237
ProjeQtOr User guide, Release 5.1
Section: Display specific buttons
• This section defines whether some button will be displayed or not.
Display of combo detail button
• This option defines for each profile whether the button
combo list box.
will be displayed or not, facing every
• Through this button, it is possible to select an item and create a new item.
• This button may also be hidden depending on access rights (if the user has no read access to corresponding elements).
Access to checklist
• Defines visibility or not to the checklist (if defined).
Section: Planning access rights
• This section defines access to planning functionality.
Calculate planning
• This option defines for each profile the ability to calculate planning or not.
Access to resource planning of others
• This option defines for each profile the ability to see the resource planning of others.
Section: Unlock items
• This section defines for each profile the ability to unlock any document or requirement.
• Otherwise, each user can only unlock the documents and requirements locked by himself.
Section: Reports
• This section defines for each profile the ability to change the resource parameter in reports.
Section: Specific update rights
• Defines for each profile the ability to force delete items.
• Defines for each profile the ability to update creation information.
238
Chapter 16. Access rights
ProjeQtOr User guide, Release 5.1
16.8 Translatable name
For profiles and access modes, the value of field “Name” is translatable.
The field “Name” in screens Profiles and Access modes is not the name displayed, but it is a code in the translation
table.
The name displayed at right of the field is the translated name.
The translated name depends on user language selected in User parameters screen.
Note:
• If translated name is displayed between [], then the value of field “Name” is not found in the translation table.
Translation table files
• In ProjeQtOr, a translation table file is defined for each available language.
• The files are named “lang.js” and are localized in a directory named with ISO language code.
– For instance: ../tool/i18n/nls/fr/lang.js.
How to modify the translation file?
• You can edit file “lang.js” to add translation of new value or to modify the existing value translation.
• Or, you can download Excel file named “lang.xls”, available on ProjeQtOr site. You can modify the translation
tables of all languages and produce files “lang.js”.
16.8. Translatable name
239
ProjeQtOr User guide, Release 5.1
240
Chapter 16. Access rights
CHAPTER 17
Lists of values
241
ProjeQtOr User guide, Release 5.1
Contents
•
•
•
•
•
•
•
•
•
•
•
•
•
•
•
•
•
•
Functions
Status
Quality levels
Health status
Overall progress
Trends
Likelihoods
Criticalities
Severities
Urgencies
Priorities
Risk levels
Feasibilities
Efficiencies
Payment deadlines
Payment methods
Delivery modes
Measure units
17.1 Functions
The function defines the generic competency of a resource.
Section: Description
Field
Id
Name
Sort order
Closed
Description
Description
Unique Id for this value.
Name of this value.
Number to define order of display in lists.
Flag to indicate this value is archived.
Complete description of this value.
* Required field
242
Chapter 17. Lists of values
ProjeQtOr User guide, Release 5.1
17.2 Status
The status is an important element of items lifecycle.
It defines the progress of the treatment of the element.
Some automations are implemented, depending on status definition, to set on items.
Handled status
• This status specifies that the treatment of item is taken over.
• A responsible can be determined.
• It is possible to require the appointment of a responsible when the status change to “handled”.
Done status
• This status specifies that the treatment of item is done.
• A result can be specify.
• It is possible to require a result when the status change to “done”.
Closed status
• This status specifies that the item is closed.
• This item is archived, and it disappeared in the list.
• Item can reappear when “show closed item” is checked.
Cancelled status
• This status specifies that the item is cancelled.
Section: Description
Field
Id
Name
Handled status
Done status
Closed status
Cancelled status
Color
Sort order
Closed
Description
Unique Id for this value.
Name of this value.
Defines whether ‘handled’ flag is automatically set for this status.
Defines whether ‘done’ flag is automatically set for this status.
Defines whether ‘closed’ flag is automatically set for this status.
Defines whether ‘cancelled’ flag is automatically set for this status.
Color to display the status in element lists.
Number to define order of display in lists.
Flag to indicate this value is archived.
* Required field
17.2. Status
243
ProjeQtOr User guide, Release 5.1
17.3 Quality levels
The quality is a manual indicator for the conformity of a project to quality processes.
It defines in a visual way the global conformity of the project.
Section: Description
Field
Id
Name
Color
Icon
Sort order
Closed
Description
Unique Id for this value.
Name of this value.
Color to display the quality level in element lists and on today screen.
Icon that can be displayed for this quality level.
Number to define order of display in lists.
Flag to indicate this value is archived.
* Required field
Field: Icon
• If no icon is defined, color is used.
• You can define your own icons list (see: administration guide).
17.4 Health status
The health status is a manual indicator for the health of a project.
It defines in a visual way the global health of the project.
It is displayed on Today screen, for each project, as a Red / Amber / Green traffic light.
Section: Description
Field
Id
Name
Color
Icon
Sort order
Closed
Description
Unique Id for this value.
Name of this value.
Color to display the health status in element lists and on today screen.
Icon that can be displayed for this health status.
Number to define order of display in lists.
Flag to indicate this value is archived.
* Required field
Field: Icon
• If no icon is defined, color is used.
• You can define your own icons list (see: administration guide).
244
Chapter 17. Lists of values
ProjeQtOr User guide, Release 5.1
17.5 Overall progress
The overall progress is a manual indicator for global progress of a project.
It defines in a visual way the global progress of the project, independently from work progress.
It is displayed on Today screen, for each project.
Section: Description
Field
Id
Name
Sort order
Closed
Description
Unique Id for this value.
Name of this value.
Number to define order of display in lists.
Flag to indicate this value is archived.
* Required field
17.6 Trends
The trend is a manual indicator for the global trend of project health.
It defines in a visual way the health trend of the project.
It is displayed on Today screen, for each project.
Section: Description
Field
Id
Name
Color
Icon
Sort order
Closed
Description
Unique Id for this value.
Name of this value.
Color to display the trend in element lists and on today screen.
Icon that can be displayed for this trend.
Number to define order of display in lists.
Flag to indicate this value is archived.
* Required field
Field: Icon
• If no icon is defined, color is used.
• You can define your own icons list (see: administration guide).
17.5. Overall progress
245
ProjeQtOr User guide, Release 5.1
17.7 Likelihoods
The likelihood is the probability of a risk or an opportunity to occur.
Section: Description
Field
Id
Name
Value
% value
Color
Sort order
Closed
Description
Unique Id for this value.
Name of this value.
Value of likelihood.
Value in percent.
Color to display the likelihood in element lists
Number to define order of display in lists.
Flag to indicate this value is archived.
* Required field
Field: % value
• This field is used to calculate a reserve amount according to the likelihood of risk or opportunity.
17.8 Criticalities
The criticality is the importance of an element to its context.
Risk and Opportunity
• The criticality designs the level of impact the risk or opportunity may have to the project.
Ticket
• The criticality is the estimated impact that the subject of the ticket may have for the product.
Section: Description
Field
Id
Name
Value
Color
Sort order
Closed
Description
Unique Id for this value.
Name of this value.
Value of criticality.
Color to display the criticality in element lists.
Number to define order of display in lists.
Flag to indicate this value is archived.
* Required field
246
Chapter 17. Lists of values
ProjeQtOr User guide, Release 5.1
17.9 Severities
The severity designs the level of negative or positive impact the risk or opportunity may have for the product.
Section: Description
Field
Id
Name
Value
Color
Sort order
Closed
Description
Unique Id for this value.
Name of this value.
Value of severity.
Color to display the severity in element lists.
Number to define order of display in lists.
Flag to indicate this value is archived.
* Required field
17.10 Urgencies
The ticket urgency is an element given by the requestor to indicate the quickness of treatment needed for the ticket.
Section: Description
Field
Id
Name
Value
Color
Sort order
Closed
Description
Unique Id for this value.
Name of this value.
Value of urgency.
Color to display the urgency in element lists.
Number to define order of display in lists.
Flag to indicate this value is archived.
* Required field
17.9. Severities
247
ProjeQtOr User guide, Release 5.1
17.11 Priorities
The ticket priority defines the order to treat different tickets.
Section: Description
Field
Id
Name
Value
Color
Sort order
Closed
Description
Unique Id for this value.
Name of this value.
Value of priority.
Color to display the priority in element lists.
Number to define order of display in lists.
Flag to indicate this value is archived.
* Required field
17.12 Risk levels
The risk level measures the technical risk of implementation of a requirement.
Section: Description
Field
Id
Name
Color
Sort order
Closed
Description
Unique Id for this value.
Name of this value.
Color to display the risk level in element lists.
Number to define order of display in lists.
Flag to indicate this value is archived.
* Required field
248
Chapter 17. Lists of values
ProjeQtOr User guide, Release 5.1
17.13 Feasibilities
The feasibility defines the first analysis of implementation of a requirement.
Section: Description
Field
Id
Name
Color
Sort order
Closed
Description
Unique Id for this status.
Name of this status.
Color to display the feasibility in element lists.
Number to define order of display in lists.
Flag to indicate this status is archived.
* Required field
17.14 Efficiencies
The efficiency measures the result of an action.
Section: Description
Field
Id
Name
Color
Sort order
Closed
Description
Unique Id for this value.
Name of this value.
Color to display the efficiency in element lists.
Number to define order of display in lists.
Flag to indicate this value is archived.
* Required field
17.13. Feasibilities
249
ProjeQtOr User guide, Release 5.1
17.15 Payment deadlines
The payment deadline is stated on the bill.
Section: Description
Field
Id
Name
Number of days
End of month
Sort order
Closed
Description
Unique Id for this value.
Name of this value.
Delay in payment (in days).
Flag to indicate that delay for payment is set at the end of month.
Number to define order of display in lists.
Flag to indicate this value is archived.
* Required field
17.16 Payment methods
The mode of payment.
Section: Description
Field
Id
Name
Sort order
Closed
Description
Unique Id for this value.
Name of this value.
Number to define order of display in lists.
Flag to indicate this value is archived.
* Required field
250
Chapter 17. Lists of values
ProjeQtOr User guide, Release 5.1
17.17 Delivery modes
The mode of delivery.
Section: Description
Field
Id
Name
Sort order
Closed
Description
Unique Id for this value.
Name of this value.
Number to define order of display in lists.
Flag to indicate this value is archived.
* Required field
17.18 Measure units
The measure units.
Section: Description
Field
Id
Name
Plural of name
Sort order
Closed
Description
Unique Id for this value.
Name of this value.
Plural form of name.
Number to define order of display in lists.
Flag to indicate this value is archived.
* Required field
17.17. Delivery modes
251
ProjeQtOr User guide, Release 5.1
252
Chapter 17. Lists of values
CHAPTER 18
Lists of types
Every element is linked to a type, defining some mandatory data or other GUI behavior.
253
ProjeQtOr User guide, Release 5.1
Contents
•
•
•
•
•
•
•
•
•
•
•
•
•
•
•
•
•
•
•
•
•
•
•
•
•
•
254
Projects types
Tickets types
Activities types
Milestones types
Quotations types
Orders types
Individual expenses types
Project expenses types
Expenses details types
Bills types
Payments types
Risks types
Opportunities types
Actions types
Issues types
Meetings types
Decisions types
Questions types
Messages types
Documents types
Contexts types
Requirements types
Test cases types
Test sessions types
Customers types
Behavior section
Chapter 18. Lists of types
ProjeQtOr User guide, Release 5.1
18.1 Projects types
Project type is a way to define common behavior on group of projects.
Code of the project type
• Some important behavior will depend on code of the project type.
OPE : Operational project
• Most common project to follow activity.
Note: All new types are created with OPE code.
ADM : Administrative project
• Type of project to follow non productive work : holidays, sickness, training, . . .
• Every resource will be able to enter some real work on such projects, without having to be affected to the
project, nor assigned to project activities.
• Assignments to all project task will be automatically created for users to enter real work.
TMP : Template project
• These projects will not be used to follow some work.
• They are just designed to define templates, to be copied as operational projects.
• Any project leader can copy such projects, without having to be affected to them.
Other sections
• Behavior
Section: Description
Field
Id
Name
Code
Workflow
Sort order
Billing type
Closed
Description
Description
Unique Id for the type.
Name of the type.
Code of the project type.
Defined the workflow ruling status change for items of this type (see: Workflows).
Number to define order of display in lists.
Will define billing behavior (see: Billing types).
Flag to indicate that type is archived.
Description of the type.
* Required field
18.1. Projects types
255
ProjeQtOr User guide, Release 5.1
18.2 Tickets types
Ticket type is a way to define common behavior on group of tickets.
Other sections
• Behavior
Section: Description
Field
Id
Name
Code
Workflow
Sort order
Closed
Description
Description
Unique Id for the type.
Name of the type.
Code of the type.
Defined the workflow ruling status change for items of this type (see: Workflows).
Number to define order of display in lists.
Flag to indicate that type is archived.
Description of the type.
* Required field
18.3 Activities types
Activity type is a way to define common behavior on group of activities.
Other sections
• Behavior
Section: Description
Field
Id
Name
Code
Workflow
Sort order
Closed
Description
Description
Unique Id for the type.
Name of the type.
Code of the type.
Defined the workflow ruling status change for items of this type (see: Workflows).
Number to define order of display in lists.
Flag to indicate that type is archived.
Description of the type.
* Required field
256
Chapter 18. Lists of types
ProjeQtOr User guide, Release 5.1
18.4 Milestones types
Milestone type is a way to define common behavior on group of milestones.
Other sections
• Behavior
Section: Description
Field
Id
Name
Code
Workflow
Sort order
Closed
Description
Description
Unique Id for the type.
Name of the type.
Code of the type.
Defined the workflow ruling status change for items of this type (see: Workflows).
Number to define order of display in lists.
Flag to indicate that type is archived.
Description of the type.
* Required field
18.5 Quotations types
Quotation type is a way to define the way the concerned activity should be billed.
Other sections
• Behavior
Section: Description
Field
Id
Name
Code
Workflow
Sort order
Closed
Description
Description
Unique Id for the type.
Name of the type.
Code of the type.
Defined the workflow ruling status change for items of this type (see: Workflows).
Number to define order of display in lists.
Flag to indicate that type is archived.
Description of the type.
* Required field
18.4. Milestones types
257
ProjeQtOr User guide, Release 5.1
18.6 Orders types
Order type is a way to define the way the activity references by the order will be billed.
Other sections
• Behavior
Section: Description
Field
Id
Name
Code
Workflow
Sort order
Closed
Description
Description
Unique Id for the type.
Name of the type.
Code of the type.
Defined the workflow ruling status change for items of this type (see: Workflows).
Number to define order of display in lists.
Flag to indicate that type is archived.
Description of the type.
* Required field
18.7 Individual expenses types
Individual expense type is a way to define common behavior on group of individual expense.
Other sections
• Behavior
Section: Description
Field
Id
Name
Workflow
Sort order
Closed
Description
Description
Unique Id for the type.
Name of the type.
Defined the workflow ruling status change for items of this type (see: Workflows).
Number to define order of display in lists.
Flag to indicate that type is archived.
Description of the type.
* Required field
258
Chapter 18. Lists of types
ProjeQtOr User guide, Release 5.1
18.8 Project expenses types
Project expense type is a way to define common behavior on group of project expense.
Other sections
• Behavior
Section: Description
Field
Id
Name
Workflow
Sort order
Closed
Description
Description
Unique Id for the type.
Name of the type.
Defined the workflow ruling status change for items of this type (see: Workflows).
Number to define order of display in lists.
Flag to indicate that type is archived.
Description of the type.
* Required field
18.8. Project expenses types
259
ProjeQtOr User guide, Release 5.1
18.9 Expenses details types
Expense detail type is a way to define common behavior and calculation mode on group of expense details.
Section: Description
Field
Id
Name
Sort order
Value / unit
Closed
Description
Description
Unique Id for the type.
Name of the type.
Number to define order of display in lists.
Define calculation mode for the detail type.
Flag to indicate that type is archived.
Description of the type.
* Required field
Field: Value / unit
• If unit is set and not value, this line will be imputable.
• If both unit and value are set, the line will be read only.
• Result cost will be the multiplication between each of the three non empty line values.
Section: Scope
Field
Individual expense
Project expense
260
Description
Details type of individual expense.
Details type of project expense.
Chapter 18. Lists of types
ProjeQtOr User guide, Release 5.1
18.10 Bills types
Bill type is a way to define common behavior on group of bills.
Other sections
• Behavior
Section: Description
Field
Id
Name
Code
Workflow
Sort order
Closed
Description
Description
Unique Id for the type.
Name of the type.
Code of the type.
Defined the workflow ruling status change for items of this type (see: Workflows).
Number to define order of display in lists.
Flag to indicate that type is archived.
Description of the type.
* Required field
18.11 Payments types
Payment type is a way to define common behavior on group of payments.
Other sections
• Behavior
Section: Description
Field
Id
Name
Workflow
Sort order
Closed
Description
Description
Unique Id for the type.
Name of the type.
Defined the workflow ruling status change for items of this type (see: Workflows).
Number to define order of display in lists.
Flag to indicate that type is archived.
Description of the type.
* Required field
18.10. Bills types
261
ProjeQtOr User guide, Release 5.1
18.12 Risks types
Risk type is a way to define common behavior on group of risks.
Other sections
• Behavior
Section: Description
Field
Id
Name
Code
Workflow
Sort order
Closed
Description
Description
Unique Id for the type.
Name of the type.
Code of the type.
Defined the workflow ruling status change for items of this type (see: Workflows).
Number to define order of display in lists.
Flag to indicate that type is archived.
Description of the type.
* Required field
18.13 Opportunities types
Opportunity type is a way to define common behavior on group of opportunities.
Other sections
• Behavior
Section: Description
Field
Id
Name
Code
Workflow
Sort order
Closed
Description
Description
Unique Id for the type.
Name of the type.
Code of the type.
Defined the workflow ruling status change for items of this type (see: Workflows).
Number to define order of display in lists.
Flag to indicate that type is archived.
Description of the type.
* Required field
262
Chapter 18. Lists of types
ProjeQtOr User guide, Release 5.1
18.14 Actions types
Action type is a way to define common behavior on group of actions.
Other sections
• Behavior
Section: Description
Field
Id
Name
Code
Workflow
Sort order
Closed
Description
Description
Unique Id for the type.
Name of the type.
Code of the type.
Defined the workflow ruling status change for items of this type (see: Workflows).
Number to define order of display in lists.
Flag to indicate that type is archived.
Description of the type.
* Required field
18.15 Issues types
Issue type is a way to define common behavior on group of issues.
Other sections
• Behavior
Section: Description
Field
Id
Name
Code
Workflow
Sort order
Closed
Description
Description
Unique Id for the type.
Name of the type.
Code of the type.
Defined the workflow ruling status change for items of this type (see: Workflows).
Number to define order of display in lists.
Flag to indicate that type is archived.
Description of the type.
* Required field
18.14. Actions types
263
ProjeQtOr User guide, Release 5.1
18.16 Meetings types
Meeting type is a way to define common behavior on group of meetings.
Note:
• Meeting type is also used for periodic meetings definition.
Other sections
• Behavior
Section: Description
Field
Id
Name
Code
Workflow
Sort order
Closed
Description
Description
Unique Id for the type.
Name of the type.
Code of the type.
Defined the workflow ruling status change for items of this type (see: Workflows).
Number to define order of display in lists.
Flag to indicate that type is archived.
Description of the type.
* Required field
18.17 Decisions types
Decision type is a way to define common behavior on group of decisions.
Other sections
• Behavior
Section: Description
Field
Id
Name
Code
Workflow
Sort order
Closed
Description
Description
Unique Id for the type.
Name of the type.
Code of the type.
Defined the workflow ruling status change for items of this type (see: Workflows).
Number to define order of display in lists.
Flag to indicate that type is archived.
Description of the type.
* Required field
264
Chapter 18. Lists of types
ProjeQtOr User guide, Release 5.1
18.18 Questions types
Question type is a way to define common behavior on group of questions.
Other sections
• Behavior
Section: Description
Field
Id
Name
Code
Workflow
Sort order
Closed
Description
Description
Unique Id for the type.
Name of the type.
Code of the type.
Defined the workflow ruling status change for items of this type (see: Workflows).
Number to define order of display in lists.
Flag to indicate that type is archived.
Description of the type.
* Required field
18.19 Messages types
Message type is a way to define common behavior on group of messages (appearing on today screen).
Other sections
• Behavior
Section: Description
Field
Id
Name
Color
Sort order
Closed
Description
Description
Unique Id for the type.
Name of the type.
Display color for messages of this type.
Number to define order of display in lists.
Flag to indicate that type is archived.
Description of the type.
* Required field
18.18. Questions types
265
ProjeQtOr User guide, Release 5.1
18.20 Documents types
Document type is a way to define common behavior on group of documents.
Other sections
• Behavior
Section: Description
Field
Id
Name
Code
Workflow
Sort order
Closed
Description
Description
Unique Id for the type.
Name of the type.
Code of the type.
Defined the workflow ruling status change for items of this type (see: Workflows).
Number to define order of display in lists.
Flag to indicate that type is archived.
Description of the type.
* Required field
18.21 Contexts types
Context type is defining a fixed list of environmental context to describe ticket or test case.
Only three context types exist, corresponding to the three selectable fields.
Note:
• Only the name of the context types can be changed.
• No new context type can be added.
• No context type can be deleted.
Section: Description
Field
Id
Name
Closed
Description
Description
Unique Id for the type.
Name of the type.
Flag to indicate that type is archived.
Description of the type.
* Required field
266
Chapter 18. Lists of types
ProjeQtOr User guide, Release 5.1
18.22 Requirements types
Requirement type is a way to define common behavior on group of requirements.
Other sections
• Behavior
Section: Description
Field
Id
Name
Code
Workflow
Sort order
Closed
Description
Description
Unique Id for the type.
Name of the type.
Code of the type.
Defined the workflow ruling status change for items of this type (see: Workflows).
Number to define order of display in lists.
Flag to indicate that type is archived.
Description of the type.
* Required field
18.23 Test cases types
Test case type is a way to define common behavior on group of test cases.
Other sections
• Behavior
Section: Description
Field
Id
Name
Code
Workflow
Sort order
Closed
Description
Description
Unique Id for the type.
Name of the type.
Code of the type.
Defined the workflow ruling status change for items of this type (see: Workflows).
Number to define order of display in lists.
Flag to indicate that type is archived.
Description of the type.
* Required field
18.22. Requirements types
267
ProjeQtOr User guide, Release 5.1
18.24 Test sessions types
Test session type is a way to define common behavior on group of test sessions.
Other sections
• Behavior
Section: Description
Field
Id
Name
Code
Workflow
Sort order
Closed
Description
Description
Unique Id for the type.
Name of the type.
Code of the type.
Defined the workflow ruling status change for items of this type (see: Workflows).
Number to define order of display in lists.
Flag to indicate that type is archived.
Description of the type.
* Required field
18.25 Customers types
Customer type is a way to define different status of customers (prospects or clients).
Other sections
• Behavior
Section: Description
Field
Id
Name
Sort order
Closed
Description
Description
Unique Id for the type.
Name of the type.
Number to define order of display in lists.
Flag to indicate that type is archived.
Description of the type.
* Required field
268
Chapter 18. Lists of types
ProjeQtOr User guide, Release 5.1
18.26 Behavior section
• This section is common to several element types.
• Allows to determine some GUI behavior, according to element types.
Note:
• Depending on the element type the following fields can be displayed.
Description or Comments
• This field allows to define that description field to this element type is mandatory.
Responsible
• This field allows to define that responsible field to this element type is mandatory when the status to treatment
of an item is handled.
Result
• This field allows to define that result field to this element type is mandatory when the status to treatment of an
item is done.
Flag status
• Those fields allow to determine whether flags status are locked or not.
• When a flag status is locked, move to this status through status change.
18.26. Behavior section
269
ProjeQtOr User guide, Release 5.1
270
Chapter 18. Lists of types
CHAPTER 19
Plug-ins
19.1 Plug-ins management
Plug-ins allows to add non generic features to ProjeQtOr.
Plug-in deployment
• Plug-in will be deployed during installation.
• The result of deployment will be available in the log file (See: Administration console).
Section: Installed plug-ins
This section lists the installed plug-ins.
Table 19.1: Detail of installed plug-ins list
Field
Name
Description
Version
Deployed date
Deployed on
Compatible since
Description
Plug-in name.
Plug-in description.
Plug-in version.
Deployed date.
The version when the module has been installed.
Compatibility version.
271
ProjeQtOr User guide, Release 5.1
Section: Available plug-ins (local)
This section allows to manage local plug-ins.
Available plug-ins list
• The button allows to select plug-in file.
• The file will be uploaded and it will be added in plugin-ins list.
Table 19.2: Detail of available plug-ins list
Field
File
Date
Size
Description
Plug-in file name.
File date.
File size.
Plug-in installation
• Click on
to install plug-in.
• Click on
to display the description of plug-in.
Fig. 19.1: Description plug-in dialog box
Note:
• Plug-in is removed from the list after installation.
Section: Available plug-ins (remote)
This section allows to manage remote plug-ins.
Note:
• This feature will be available later.
272
Chapter 19. Plug-ins
CHAPTER 20
Administration
Contents
• Administration console
• Audit connections
• Global parameters
– Special fields
Note:
• The screens described below are restricted to users with administrator profile.
• Users with others profiles can have access whether access rights is granted.
20.1 Administration console
Administration console allows to execute administration tasks on application.
Section: Background tasks
• Allows to start and stop background task is a specific threaded treatment that regularly checks for indicators to
generate corresponding alerts, warnings and automatic import when needed.
Section: Send an internal alert
• Allows to send an internal alert to users.
Section: Manage connections
• Allows to force disconnection of active users and close the application for new connections.
Button: Disconnect all users
• Allows to disconnect all connected users except your own connection.
• The application status is displayed below.
273
ProjeQtOr User guide, Release 5.1
Note:
• Disconnection will be effective for each user when his browser will ckeck for alerts to be displayed.
• The delay for the effective disconnection of users will depend on the parameter “delay (in second)
to check alerts” in Global parameters screen.
Button: Open/Close application
• Allows to open and close application.
• When the application is closed the message below will appear on login screen.
Section: Maintenance of Data
• The administrator has the possibility to:
– Close and delete sent emails and alerts.
– Delete history of connections.
– Updating references for any kind of element.
Section: Log files maintenance
• The administrator has the possibility to:
– Delete old log files.
– Show the list and specific log file.
20.2 Audit connections
• Audit connection proposes a view of “who is online”.
Note:
• The administrator has the possibility to force the disconnection of any user (except his own current connection),
see: Administration console.
274
Chapter 20. Administration
ProjeQtOr User guide, Release 5.1
20.3 Global parameters
Global parameters screen allows configuration of application settings.
Note: Tooltip
• Moving the mouse over the caption of a parameter will display a tooltip with more description about the parameter.
Section: Daily work hours
• Definition of regular “work hours”.
• Used to calculate delays based on “open hours”.
Section: Units for work
• The parameters to real work allocation and workload.
Fields: Unit for real work allocation and for all work data
• Definition of the unit can be in days or hours.
Note:
• If both values are different, rounding errors may occur.
• Remember that data is always stored in days.
• Duration will always be displayed in days, whatever the workload unit.
Number of hours per day
• Allows to set number of hours per day.
Max days to book work
• Allows to set a max of days resource can enter real work without receiving an alert.
Section: Planning
• Specific parameters about Gantt planning presentation.
Show resource in Gantt
• Select if the resource can be displayed in a Gantt chart, and format for display (name or initials).
Max projects to display
• Defines maximum number of projects to display.
• To avoid performance issues.
Print Gantt with ‘old style’ format
• Propose possibility to display “old style” Gantt.
• May cause performance issues, but could fix some display issue on browsers.
20.3. Global parameters
275
ProjeQtOr User guide, Release 5.1
Consolidate validated work & cost
• Select if validated work & cost are consolidated on top activities and projects :
– Never : Not consolidate
– Always : Values are replaced on activities and project.
– Only is set : Replaces values, only if not already set.
Apply strict mode for dependencies
• Defines if a task can begin the same day as the preceding one.
Section: Real work allocation
• Defines behavior of tasks in the real work allocation screen.
Display only handled tasks
• Display only tasks with “handled” status.
Set to first ‘handled’ status
• Change status of the task to the first “handled” status when real work is entered.
Set to first ‘done’ status
• Change status of the task to the first “done” status when no left work remains.
Section: Responsible
• Behavior about management of responsible, including automatic initialization of responsible.
Auto set responsible if single resource
• Automatically set responsible if not set and only one resource if affected to the project.
Auto set responsible if needed
• Automatically set responsible to current resource if not set and the responsible is required (depending
on status).
Only responsible works on ticket
• Only responsible can enter some real work on the ticket.
Section: User and password
• Security constraints about users and passwords.
Section: Ldap management parameters
• Information about LDAP connection and behavior on creation of new user from LDAP connection.
276
Chapter 20. Administration
ProjeQtOr User guide, Release 5.1
Section: Format for reference numbering
• Allows to define reference formats for items of element, documents and bills.
Reference format for items of element
•
Global parameters for reference formatting
• Prefix : can contain {PROJ} for project code, {TYPE} for type code, {YEAR} for current year and
{MONTH} for current month.
Global parameters for document reference formatting
• format : can contain {PROJ} for project code, {TYPE} for type code, {NUM} for number as computed for reference, and {NAME} for document name.
• Suffix : can contain {VERS} for version name.
Section: Localization
• Localization and internationalization (i18n) parameters.
Section: Miscellanous
Miscellaneous parameters :
• Auto check (or not) for existing new version of the tool (only administrator is informed);
• Separator for CSV files (on export and export);
• Memory limit for PDF generation.
Section: Display
• Selection of graphic interface behavior and generic display parameter for users.
• Icon size are default : user can overwrite these values
Section: Files and Directories
Definition of directories and other parameters used for Files management.
Warning: Attachments Directory
Should be set out of web reach.
Warning: Temporary directory for reports
Must be kept in web reach.
20.3. Global parameters
277
ProjeQtOr User guide, Release 5.1
Section: Document
Definition of directories and other parameters used for Documents management.
Warning: Root directory for documents
Should be set out of web reach.
Section: Management of automated service (CRON)
Parameters for the “Cron” process.
Defined frequency for these automatic functions
• It will manage :
– Alert generation : Frequency for recalculation of indicators values.
– Check alert : Frequency for client side browser to check if alert has to be displayed.
– Import : Automatic import parameters.
Warning: Cron working directory
Should be set out of web reach.
Warning: Directory of automated integration files
Should must be set out of web reach.
Defined parameters for the “Reply to” process
• It will manage connection to IMAP INBOX to retrieve email answers.
Note: Email input check cron delay
• Delay of -1 deactivates this functionality.
Note: IMAP host
• Must be an IMAP connection string.
• Ex: to connect to GMAIL input box, host must be: {imap.gmail.com:993/imap/ssl}INBOX
Automatic import
Field: Automatic import cron delay
•
Field: Directory of automated integration files
•
278
Chapter 20. Administration
ProjeQtOr User guide, Release 5.1
Field: Log destination
•
Field: Mailing list for logs
•
Section: Emailing
Parameters to allow the application to send emails.
Section: Mail titles
• Parameters to define title of email depending on event (1).
(see: Special fields)
20.3. Global parameters
279
ProjeQtOr User guide, Release 5.1
20.3.1 Special fields
Special fields can be used in the title and body mail to be replaced by item values :
• ${dbName} : the display name of the instance
• ${id} : id of the item
• ${item} : the class of the item (for instance “Ticket”)
• ${name} : name of the item
• ${status} : the current status of the item
• ${project} : the name of the project of the item
• ${type} : the type of the item
• ${reference} : the reference of the item
• ${externalReference} : the external reference of the item
• ${issuer} : the name of the issuer of the item
• ${responsible} : the name of the responsible for the item
• ${sender} : the name of the sender of email
• ${sponsor} : the name of the project sponsor
• ${projectCode} : the project code
• ${contractCode} : the contact code of project
• ${customer} : Customer of project
• ${url} : the URL for direct access to the item
• ${login} the user name
• ${password} the user password
• ${adminMail} the email of administrator
280
Chapter 20. Administration
CHAPTER 21
Glossary
21.1 Glossary
Closed
• Flag to indicate that item is archived.
• Item will not appear in lists any more, unless “show closed” is checked.
Description
• This field allows to define a description on an item.
• Depending on the element type, name of field can be different.
See also:
GUI behavior
• It is possible to define that description field is mandatory.
• The element type screens allow to set this parameter to several elements.
• More detail, see: Behavior section.
Done
• Flag to indicate that item has been done.
• Date of done is saved.
External reference
• This field allows fill free input.
• It uses to refer information from an external source.
• External reference value can be put in email message with externalReference special field.
• More detail, see: Administration guide.
Handled
• Flag to indicate that item has been taken into account.
• Date of handling is saved.
• This generally means that responsible has been named.
Id
281
ProjeQtOr User guide, Release 5.1
• Every item has a unique Id, automatically generated on creation.
• Id is chronologically affected, for all kind of items (Activity, Ticket).
• Id is shared for all projects and all types (i.e. incident) of the same kind items (i.e. Ticket).
• Reference is displayed after id, automatically generated on creation.
• Reference depends on defined format, see under “Format for reference numbering” section in Global
parameters screen.
• Default format defines an numbering specific for each project and each type of items.
Origin
• Determines the element of origin.
• The origin is used to keep track of events (ex.: order from quote, action from meeting).
• More detail, see : Origin field.
Status
• The status determines the life cycle of items.
• It defines the progress of the treatment of the item.
• Item is linked to a element type, element type is linked to a workflow.
• A workflow defines the possibility to go from one status to another one, more detail, see: Workflows.
See also:
Accelerator button
• This button allows to skip to the next status.
• More detail, see: Move to next status button.
Planning priority
• This priority allows to define planned order among planning element.
• The smaller priority element is planned first.
• The default priority is 500 (medium).
• If projects have different priorities, all elements of project with smaller value priority are planned first.
Result
• A result is a description of the treatment of an item.
• Usually, the result is set when the status of the item is done.
See also:
GUI behavior
• It is possible to define that result field is mandatory on done status.
• The element type screens allow to set this parameter to several elements.
• More detail, see: Behavior section.
WBS
• Work Breakdown Structure.
• Hierarchical position of the element in the global planning.
282
Chapter 21. Glossary