1
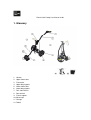
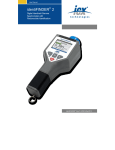
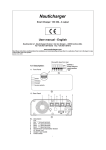
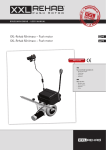
Electric Golf Caddy User Manual S103
Warning:Please follow all assembly instruction and read and understand the operating
instruction before you operate the caddy
Electric Golf Caddy User Manual S103
1. Glossary
1.
2.
3.
4.
5.
6.
7.
8.
9.
10.
11.
12.
Handel
Upper frame tube
Frame lock
Upper bag support
Lower frame tube
Lower bag support
Twin front wheels
Rear wheels
Frame support
Wheel cap
Charger
Toolkit
Electric Golf Caddy User Manual S103
2. Packing list
Standard parts
1 x caddy frame
2x rear wheels
1x battery pack (battery, bag, lead)
1x charger
1x assembly & operating instruction, warranty
Optional accessories
--Score holder
--Umbrella holder
--Rain cover
3. Assembly instructions
Please read and follow these instruction carefully and your trolley will be ready to go
in a few minutes
1. Unfold the frame by pulling the lower and the upper frame tubes apart and locking them
tighter with the frame lock mechanism. The lock has two notches to adjust the handle
height.
Electric Golf Caddy User Manual S103
2. Fit the rear wheel by releasing the quick catch on the outside of the wheel
while inserting the wheel onto the axel. Push the wheel all the way in so that
the two pins on the axel fit into the wheel to engage the clutch and release the
quick catch. The wheel should be fully secured. Make sure that the right wheel
is attached to the right side and the left wheel to the left: Reverse the action to
remove the wheel. In case the wheels are fitted upside down than the trolley
will not have traction. In this case reverse the wheels.
3. The battery cable is fitted in 2 ways , one with 2 poles for the trolley , one with 3 holes
for charger connect to either the trolley or the batterycharger. Place the
b a tte ry i n th e b a tte ry tra y a n d s e c u re th e b a tte ry u s in g th e
velcro strap. Insert the battery connector into the plug on the caddy.
Make sure the caddy's power button is not pressed and speed dial is pulled back.
Electric Golf Caddy User Manual S103
4. Handle
control functions
(1) Short distance and Total distance: two of the distance can be reset at any time, allowing
you to measure the distance of your drives, or measure how far past a yardage marker your ball is,
or even measure how far you've walked on your entire round. There is also a total distance reading
which can't be reset, which measures the lifetime distance of the cart in miles. The readings are
very accurate as they are taken from the revolutions of the axle. Please note distances will only be
correct on the occasions where you can travel in a straight line to your ball!
(2)
the button controls the trolley’s power, press it 2-3 seconds for the trolley ON/OFF. In
addition, the short distance (figure) will be clear out when press it, this function is only suit to the
short distance.
(3)
Press this button, enter into the preset distance and set up the distance you want the
trolley walk by turning the knob, and then press it again the trolley will walk out of the distance you
set up and stop it by itself. When the trolley is walking, you will see ‘A-B’ is read out and flash on the
screen .when the trolley runs this function; you can adjust the speed by the speed knob. If you want
to cancel this function but the trolley is walking, just need press this button again.
(4)
When the trolley is walking, this sign continue to flash and disappear after trolley stop.
(5)
it
When the screen come out this sign, here is the problem of cable or motor, please check
(6)
It is the battery meter.
(7)
Speed level: adjust speed knob to choose the speed.
(8)
set up.
GO/STOP function: Press this button for stop or go, and will remember last speed you
5. Operating instructions
5.1. Operating your caddy
In order to turn the caddy on push the red button on the front handle. The battery charge
LED should light up.
While holding on to the handle start dialing the speed control with your finger slowly
clockwise. The caddy will start moving forward, Adjust the speed seamlessly to the
desired pace.
To stop or slow the caddy down either dial the speed control know anticlockwise or push
for two seconds the red button until the light will switch off.
Electric Golf Caddy User Manual S103
5.2 Operating in the rain
No one caddy is water proof. If you want to use it in a very dump or rainy days you must
take care to cover the electronic parts from been wet.
The electronics parts inside the handle and the controller box are similar to the one in your
mobile phone. Take the same care of your phone and of your trolley.
The water can damage or oxidize the connection and your trolley will not work anymore.
Damages from rain are not covered by warranty.
5.3 Battery use and care
Please abbey these precautions for battery use & care
a. please do not charge the battery in a sealed container or in upside down position. It is
recommended to charge the battery in a well ventilated area.
b. please do not charge the battery near a heater or where heat accumulation may occur
or in direct sunshine.
c. in order to prolong the service life of the battery, please avoid complete discharge and
charge the battery after every use. When the trolley is not in use for an extended period
of time, it is recommended to charge the battery once a month.
d. the battery's poles red color stands for positive, and the black for negative
In case of battery replacement please reconnect the poles of the battery correctly.
Otherwise your caddy could suffer severe damage.
e. please do not disassemble the battery or throw it into the fire.
EXPLOSION!!!
f. NEVER TOUCH THE ELECTRIC POLES OF THE BATTERY!!! SAFETY HAZARD!!
Battery has 1 year warranty if used in a proper way.
How to charge the battery:
Charge the battery by plugging the charger into the battery and then plug the charger in
the main electricity supply. Charge the battery after each round of golf. Charging is
complete when charger light (see type of chargers) changes color. There are two types of
battery chargers; the charges in LED in colors for these different chargers are as follows:
1. The LED turns green when connecting the battery and changes to red once connected
to an outlet indicating that the battery is being charged.
The LED will revert to green once the battery is fully charged.
2. The LED light starts as steady green. If the battery requires charge and while charging
the LED will revert to flashing green, when the battery is fully charged, the LED will stop
flashing and revert to steady green.
If you leave the charger connected to the battery and the main for a long period after
charged consider that the red light on the charged is operating by battery
so when you will get the power will not be 100% but less.
Electric Golf Caddy User Manual S103
6. General maintenance
The steps below will ensure that you get a prolonged and reliable lift out of your Caddy.
1. The caddy has been designed so that the user can concentrate on playing golf , while
the caddy does the work of carrying your bag. In order to keep your caddy looking at its
best, we advise that you wipe any mud or grass from the frame, wheels and chassis
after every round with a damp cloth or paper towel.
2. DO NOT USE ANDY HIGH-PRESSURE JET WASHERS to prevent moisture entering
the electronic system, motors or gear boxes of the caddy.
The use of high pressure cleaners will affect the warranty
3. Remove the rear wheels every few weeks and remove any debris that might cause the
wheels to drag. You might also apply some lubricant, such WD-40 to keep moving parts
smooth.
4. A four-five hour round of golf played once a week for 12 months is equivalent to caddy,
four years use of a lawnmower, so please inspect your cart at least once a year
thoroughly, and if you notice any symptoms of wear, contact your caddy service center.
Alternatively you can have your caddy inspected and turned by our service center, so
it's always in great shape for new season.
Always disconnect the battery when store the caddy, and always put your caddy
together before re connecting the battery. If you are not planning to play for at least a
month, store the battery in a warm and dry place (not on concrete floor)
All of these recommendations will help to keep your caddy in top condition and ensure
that it remains your reliable partner both on and off the links.
7. Trouble shooting guide
Symptom action
Caddy does not have power:
-check the fuse in the battery case
-check all wiring connections and plugs
-check battery charge
-check if wheels & clutches are in order
Motor is running but wheels don't turn
-check if wheels are secured to axel by split pin
-check right and left wheel position
Electric Golf Caddy User Manual S103
Trolley pulls to left or right
-check if wheels is fitted over the clutch and latched to axel
-check if clutch pin is visible at both sides of the axel
-check clutch turn freely in one direction only
Battery lacks power
-check cable connections
-check fuse 30A is working
-check charger function
Problems attaching wheels
remove the outer cap and adjust quick release catch
Rubber cover of wheels gets off the wheel
in rainy conditions the glue between rubber and plastic get week clean and sand the
plastic and glue part, connect with rubber glue.
Full dimensions: 1200x520x1000mm
Folded dimensions: 905x515x325mm
Trolley weight (without battery):9.0kg
Battery weight 0.7 kg
Max,. Load capacity 25 kg
Climbing capability: 20 degrees
Average running distance per charge: 20 Km (more than 27 holes)
Motor: 24v 150W
Battery: 24v 10ah
Frame: aluminum
This product is subject to directive 2002/96/EC of the European
parliament and the council of the European Union on waste
electrical and electronic equipment (WEEE) and, in
jurisdictions adopting that Directive, is marked as being put on
the market after August 13,2005, and should not be disposed
of as unsorted municipal waste. Please utilize your local
WEEE collection facilities in the disposition of this product and
otherwise observe all applicable requirements for further
information on the requirements regarding the disposition of this product
and collection facilities that may be available to you, please visit
www.usr.com.weee
2 years warranty
made in china
imported by
Essepiemme sas
via Garibaldi 59
13836 Cossato Bi Italy
www.essepiemmegolf.com