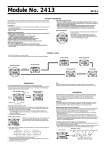
1
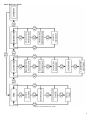
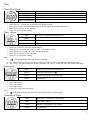
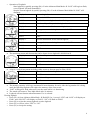
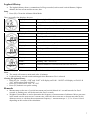
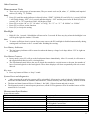
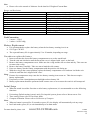
ULTRAK 590 Altimeter and Compass Watch
Instruction Manual
Overview
Figure 1 LCD display description
Features
• Hour, minute, second, year,
month, day, day of week
•
Auto calendar
•
12/24 hour format display
•
Stopwatch
•
•
Difference measurement of
Altimeter and Barometer
Logbook and logbook
history
•
Daily alarm
•
Dual time
•
Countdown timer
•
Altimeter – Barometer Use
•
•
4 day memory in Barometer
•
24 hour memory in
Altimeter
Current absolute
atmospheric
•
Sea level pressure
•
Temperature display
•
Compass
•
Electro – luminescent back
lighted LCD
•
Low battery indicator
•
Diagnostics (System Reset)
Care and Maintenance
• Protect your watch from shocks, extreme heat and directly exposure to sunlight.
• Don’t try to remove the housing or button of the watch.
• Don’t insert any object into the watch.
• Always put the watch in a clear, dry and room temperature environment when the watch is not used.
• Follow the procedure discussed in the manual only.
• Make sure the area around the sensors is free of dust or strong chemical.
1
Quick Reference Guide
Figure 2 Quick Reference Guide
2
Time
Time Main Mode
Path
Field 1
Field 2
Field 3
Outer Circumference
Adjust
o
o
o
o
Press (S1) until the mode indicator points to the “TIME”
Day of week, barometer trend indicator
Hour, Minute, Second
Month, day
Second animation
Hold (S2) for 1 second, the second digit will begin to flash
Press (S2) to select second minute hour 12/24hour year
Press (S3) or (S4) to set the function
Press (S1) to accept the setting
month
day
Daily Alarm
Path
Adjust
o
o
o
o
o
Note
Press (S2) ×1 from Time Main Mode
Field 1
“ON” or “OFF”
Field 2
Time of a particular alarm
Field 3
Current time
Press (S3) or (S4) to select the alarm number
Hold (S2) for 1 second, the “ON” or “OFF” will begin to flash
Press (S2) to select “ON” or “OFF” hour minute
Press (S3) or (S4) to set the function
Press (S1) to accept the setting
“
” will be displayed when any alarm is enabled.
The alarm will beep for 30 seconds when the timer reaches. Press any button to disable beeping.
Two “beep” will sound when the alarm is enabled. One “beep” will sound when any alarm is disabled.
Stopwatch
Path
Setup
o
o
o
o
Note
Press (S2) ×2 from Time Main Mode
Field 1
Hour and stopwatch icon
Field 2
Minutes, second and 1/100 second
Field 3
Current time
Press (S4) to start
Press (S3) to split
Press (S4) to stop
Press (S3) to reset the stopwatch
“ ” will begin to flash when user leave the mode while it is functioning.
Countdown Timer
Path
Press (S2) ×3 from Time Main Mode
Field 1
Hour and “TIMER”
Field 2
Minutes, second and 1/100 second
Field 3
Current time
3
Adjust
o
o
o
o
o
o
Notes
Hold (S2) for 1 second, second will begin to flash
Press (S2) to select second minute hour
Press (S3) or (S4) to set
Press (S1) to accept the setting
Press (S4) to start stop
Press (S3) to reset
The timer will beep for 30 seconds when the timer reaches zero. Press any button to disable beeping.
“TIMER” will begin to flash when user leave the mode while it is functioning
Dual Time
Path
Adjust
o
o
o
o
Press (S2) ×4 from Time Main Mode
Field 1
“dUA”
Field 2
Current time
Field 3
Dual time
Hold (S2) for 1 second, the hour digit will begin to flash
Press (S2) to select hour minute
Press (S3) or (S4) to set the function
Press (S1) to accept the setting
Altimeter
Altimeter Main Mode
Path
Field 1
Field 2
Field 3
Outer Circumference
Press (S1) until the mode indicator points to “ALTI”
Vertical ascent and decent rate, barometer trend indicator
Current altitude
Current time
Altitude Animation. A complete circle represents 1000 meter or
1000ft
Notes
The watch will be back to Time Main Mode after 12 hours.
Altimeter – Barometer Use Selection
•
•
When Altimeter Use is selected, all pressure changes are interpreted as altitude change.
When Barometer Use is selected, all pressure changes are interpreted as weather change.
Path
Press (S2)×1 from Altitude Main Mode
Field 1
Display the “REF”
Field 2
Current altitude
Field 3
“USE”
Altitude animation. A complete circle represents 1000 meter or
Outer Circumference
1000ft
Setup
o Altimeter – Barometer Use Selection
Press (S3) or (S4) to switch the direction of arrow (“Altimeter Use” or “Barometer Use”)
Press (S1) to accept the setting
4
o Reference Altitude Adjustment
Hold (S2) for 1 second Current altitude on field 2 will begin to flash. Press (S3) or (S4) to set the
function Press (S1) to accept the setting
Note
Setting of the reference altitude of a current location will also change the sea level pressure. If the user is
at a known altitude, adjustment of the reference altitude to this correct altitude will give the present sea
level atmospheric pressure.
Altimeter Difference Measurement
•
Enable user to measure the absolute altitude difference between the start and stop time.
Path
Press (S2)×2 from Altitude Main Mode
Field 1
Vertical ascent or decent rate and “DIFF”
Field 2
Current altitude
Field 3
Running time
Altitude animation. A complete circle represents 1000 meter or
Outer Circumference
1000ft
Setup
o Hold (S2) for 1 second, “SET” will display on Field 1 and a zero value will begin to flash on Field 2
o Press (S3) or (S4) to select a non-flashing altitude (the previous altitude difference record) to resume the
previous difference measurement. User selects the flashing zero will start a new difference measurement.
For a new difference measurement, the time will start running automatically.
o Press (S1) to accept the setting
Stop or Resume Difference Measurement
o In the Altimeter Difference Measurement mode Press
to stop or resume the measurement
Notes
Altimeter different measurement cannot start when Barometer Use is selected.
“ : ” in field 3 will begin to flash to indicate the difference measurement mode is in operation.
“DIFF” will begin to flash when user leave the mode while it is functioning
The watch will return to Time Main Mode after 12 hours.
Running time displays up to 99 hours and 59 minutes. Afterwards, (--:--) appears in Field 3.
24 hour Memory
•
This is the altitude record for the last 24 hours
Path
Press (S2)×3 from Altitude Main Mode
Field 1
Vertical ascent or decent rate and “MEM”
Field 2
Current altitude
Field 3
Flashing hour
Altitude animation. A complete circle represents 1000 meter or
Outer Circumference
1000ft
o Viewing Information
Press (S3) or (S4) to scroll forward and backward to view the corresponding altitude, ascent and
decent rate of the particular hour
Notes
Either select Altimeter Use or Barometer Use to record the on-the-hour information for the last 24-hours.
The watch will return to Time Main Mode after 10 minutes.
Logbook
•
•
It records the average vertical ascent and descent rate, total vertical distance travelled, elapsed time, date,
lap number and log number.
The logbook has five displays. The display automatically displays the first frame for 7 seconds, and the
rest for 4-seconds.
o View Logbook
Press (S2)×4 from Altitude Main Mode
Press (S3) or (S4) to scroll the records
5
o Operation of Logbook
Start logbook by quickly pressing (S4) ×2 in the Altimeter Main Mode “LOG” will begin to flash,
a new logbook will start immediately
Stop the current logbook by quickly pressing (S4) ×2 in the Altimeter Main Mode “LOG” will
disappear
Display 1
Current log information
Field 1
Year and “LOG”
Field 2
“LO” with current logbook number flashing
Field 3
Month and day of the particular logbook number
Display 2
Ascent information for the current logbook
Field 1
Average ascent rate during the event and “LOG”
Field 2
Total vertical ascent
Field 3
“ASC”
Display 3
Descent information for the current logbook
Field 1
Average descent rate during the event and “LOG”
Field 2
Total vertical descent
Field 3
“dSC”
Note
The maximum ascent and descent that can be shown in one logbook is 9999999 m/ft.
Display 4
Number of laps
Field 1
“LOG”
Field 2
Total number of ascent and descent
Field 3
“LAP”
Note
A lap is a vertical movement including either ascent or descent equal to 50m (150 ft).
Display 5
Time duration of recording information
Field 1
“LOG”
Field 2
Total time of log
Field 3
“dUr”
Notes
The memory capacity is 99 logs, maximum 20 hours duration for each. After the log number 99 is being
used, the following logbook will replace the memory of the first record.
“LOG” will begin to flash when user leave the mode while it is functioning.
The watch will return to Time Main Mode after 10 minutes
Logbook will not function when Barometer Use is selected.
Clearing logbook
o Press (S2) ×4 from Altimeter Main Mode. Hold (S2) for 1 second, “CLR” and “LOG” will display on
Field 1 and “LOG-XX” will display on Field 2. “NO” will flash on Field 3
o Press (S2) to select the current logbook or entire logbook
o Press (S3) or (S4) to select “YES” or “NO”
o Press (S1) to accept the setting
6
Logbook History
•
The logbook history shows a summation of all logs recorded, such as total vertical distance, highest
altitude, the best ascent and decent rate, date.
Setup
o Press (S2)×5 from the Altimeter Main Mode
There are totally four displays, they are:
Display 1
Current logbook history
Field 1
Year of the last cleared logbook history and “LOG”
Field 2
“HIS”
Field 3
Month and day of the last cleared logbook
o Press (S3) or (S4) to scroll the records
Display 2
The highest Record
Field 1
Flashing “HI” and “LOG”
Field 2
Highest altitude recorded since the last date cleared
Field 3
Year and date interchange for 4 secs
Display 3
Accumulative ascent Record
Field 1
Flashing “ASC” and “LOG”
Field 2
Total accumulative vertical ascent since the last reset
Field 3
Blank
Display 4
Accumulative descent record
Field 1
Flashing “dSC” and “LOG”
Field 2
Total accumulative vertical descent since the last reset
Field 3
Blank
o Press (S1) or (S2) to exit this activity and back to Altimeter Main Mode
Notes
The watch will return to main mode after 10 minutes
Logbook history records remain unchanged when Barometer Use is selected
Clearing the logbook history
o Hold (S2) for 1 second, “CLR” and “LOG” will display on Field 1 “HIS” will display on Field 2
“NO” will begin to flash on Field 3
o Press (S3) or (S4) select “YES “ or “NO”
o Press (S1) button to accept the setting
Remarks
•
•
Measurement on the rate of vertical movement and vertical altitude in 1-second intervals for first 2
seconds. A flashing zero will be shown in the first 2 seconds.
Weighted Current Rate is used to determine the frequency of measurement of altimeter. Micro processor
in the watch uses the most recent 3 current rates, which are the ascent rate or descent rate taken by the
altimeter sensor, to calculate the measurement frequency. 1 measurement per 1, 2, 5 or 10 secs is used
depending on the results of the calculation.
7
Barometer
Barometer Main Mode
Path
Field 1
Field 2
Field 3
Outer Circumference
Press (S1) until the mode indicator is directly below “BARO”
Current temperature, barometer trend indicator
Sea level pressure
Current time or current absolute atmospheric pressure
Pressure animation. One complete circle shows the atmospheric
pressure over 100 mbar or 1 inHg
o Press (S4) to select current time or current absolute atmosphere pressure on field 3
Notes
The absolute atmospheric pressure is the actual pressure in any location at any given time.
When Altimeter Use is selected, only the current atmosphere pressure reading will change.
Barometer Trend Indicator
•
Barometric trend is comprised of two lines forming an arrow. The left line represents the trend from –6 to
-3 hours and the right arrow represents the trend from –3 to the present time. They can indicate 9 different
patterns in the barometric trend.
Situation last 3 hours
Situation 3-6
hours ago
Drop heavily
Remaining stable
Rise heavily
Drop heavily
Remaining stable
Rise heavily
Notes
Rise or drop heavily means drop or raise more than 2 mbar within 3 hours.
When the Altimeter Use is selected, the trend indicator is not shown, except the 4-day memory mode.
Altimeter – Barometer Use Selection
•
•
Select the Altimeter Use or Barometer Use.
Adjust the sea level pressure.
Path
Press (S2)×1 from the Barometer Main Mode
Field 1
“SEA”
Field 2
Sea level pressure
Field 3
“USE”
Pressure animation. One complete circle shows the atmospheric
Outer Circumference
pressure over 100 mbar or 1 inHg
Setup
o Altimeter – Barometer Use Selection
Press (S3) or (S4) to switch the direction of arrow (“Altimeter Use” or “Barometer Use”)
Press (S1) to accept the setting
o Sea Level Pressure adjust
Hold (S2) for 1 second Sea level pressure on field 2 will begin to flash. Press (S3) or (S4) to set
the sea level pressure. Press (S1) to accept the setting
Notes
Information on the current sea level pressure can be obtained through newspaper, local news and radio
weather reports, local airport or the Internet.
8
When Altimeter is selected, Barometer Difference Measurement cannot be started.
Pressure Difference Measurement
•
It measures the absolute difference in barometric pressure within a start and stop time.
Path
Press (S2)×2 from the Barometer Main Mode
Field 1
Change in temperature, barometer trend indicator, “DIFF”
Field 2
Change in sea level pressure
Field 3
Duration time
Pressure animation. One complete circle shows the atmospheric
Outer Circumference
pressure over 100 mbar or 1 inHg
Setup
o Hold (S2) for 1 second, “SET” will display on Field 1 and a zero value will begin to flash on Field 2
o Press (S3) or (S4) to select a non-flashing pressure difference (the previous pressure difference record) to
resume the previous difference measurement or select the flashing zero to start a new difference
measurement. For a new difference measurement the time will start running automatically.
o Press (S1) to accept the setting
o Press (S4) to stop or resume the measurement
Notes
Every time this mode is entered, the reading will start with flashing zero.
“DIFF” will begin to flash when user leave the mode while it is functioning
When Altimeter Use is selected, all information will not change in this mode.
The watch will return to Time Main Mode after 12 hours.
4 day Memory Mode
•
The changes in pressure in the last 4-days help the user to forecast the weather condition.
Path
Press (S2)×3 from the Barometer Main Mode
Field 1
Day of week, barometric trend indicator and “MEM”
Field 2
Sea level pressure
Field 3
Particular flashing hour
Pressure animation. One complete circle shows the atmospheric
Outer Circumference
pressure over 100 mbar or 1 inHg
o Press (S3) or (S4) to view records
Notes
The latest 6 records are taken in 1-hour intervals. Other records are taken in 6-hour intervals
Barometer trend indicator only appears in this mode when Altimeter Use is selected.
The watch will return to main mode after 10 minute.
Calibration of Absolute Pressure
• User can calibrate the absolute atmosphere pressure.
Adjust
o In the Barometer Main Mode, hold (S2) for 1 second, the absolute atmosphere pressure value will begin to
flash on field 2
o Press (S3) or (S4) to set,
o Press (S1) to accept the setting
Important notes
• The absolute pressure is calibrated by factory, it is not recommended for the user to set the value in daily
use.
9
•
•
•
When there is a physical characteristic shift of sensor due to aging, or when the watch has been left
unused for more than one year, calibrating the absolute pressure is recommended.
To find out an accurate pressure value, use a professional barometer to calibrate the absolute pressure.
User can also adjust the watch at seaside after getting an accurate sea level value from local weather
observatory.
Remarks
•
•
•
Pressure and temperature changes are measured in intervals of 10 seconds.
Barometric values are measured at 1-hour intervals to estimate the barometric trend.
Temperature range: -10 °C to 60 °C (14 ° F to 140 ° F ). “LL” will be displayed when the temperature is
lower than -10 °C and “HH” will be displayed when the temperature is higher than 60 °C .
Compass
Compass Mode
•
Direction showing in the current location
Path
Field 1
Field 2
Field 3
Outer Circumference
Press (S1) until the mode indicator is directly below “COMP”
Cardinal point abbreviation
Bearing in degree
Current time
Graphically displays the North and South Arrows, where 1 –
segment lit is the North
Use of Compass
o Compass displays actively for 30 second goes into sleep mode and “- --o” will show on field 2
either (S3) or (S4) to reactive the compass
Notes
Calibration of compass is required for the first time or after battery replacement.
Press
Calibration of Compass
•
Compass should be calibrated when it is subjected to close proximity of magnetic sources, extreme cold
weather, every time the battery is replaced or suspected that any environmental conditions have affected
the compass reading.
Adjust
o Hold (S2) for 1 second, “CMP” will be displayed on field 1, “PUSH-” will begin to flash on field 2 and
“CAL” will display on field 3.
o Press (S3) to start the calibration “ 360° ” will be displayed on field 2 and the outer circumference
displays all segment lit
o Hold the watch on observer level and slowly rotate it in either clockwise or anti – clockwise direction, for
1 complete turn. “DONE” will be displayed on field 2 when all segments disappear Press (S1) to
accept the setting
Note
The watch will return to Time Main Mode after 30 minutes.
10
Other Functions
Measurement Units
•
There are two unit groups of measurement, They are metric such as (M, mbar, °C , M/Min) and imperial
such as (Ft, inHg, ° F , Ft/Min)
Setup
o Press (S1) until the mode indicator is directly below “TIME” Hold (S1) and (S2) for 1 second Field
1 will firstly display “SET” for 2 second, and then display “UNI” and the preset units Hold (S2) for 1
second, “M” or “Ft” located on field 2 will begin to flash
o Press (S2) to select “M” or “Ft” “mbar” or “inHg” “ °C ” or “ ° F ” “M/Min” or “Ft/Min”
o Press (S3) or (S4) to set the function
o Press (S1) to accept the setting
Backlight
o Hold (S1) for 1 second, backlight will turn on for 5 seconds Press any key when the backlight is on
will keep the light for another 5 seconds
Note
To ensure sufficient electric current for pressure sensor, the EL backlight is disabled automatically during
sensing and it will turn on for 5 seconds after finishing the sensing.
Low Battery Indicator
•
The low battery indicator will be turned on when the battery voltage level drops below 2.5V in eight out
of ten times.
Fast Button Features
•
•
In any mode, press (S3) will go to the fast button feature immediately. After 12 seconds, it will return to
the original mode that you were viewing before.
The Fast button feature allows the user to check the cumulative vertical ascent or descent, the number of
laps of current logbook or the last logbook. These three displays will show sequentially with a 4 second
interval.
Key tone
•
Press any button will have a “beep” sound.
System Reset and diagnostics
•
•
•
After resetting the watch, the system will be reinstalled. All memories such as logbook, logbook history,
difference measurements in altimeter and barometer, 24-hour memory and 4-day memory, will be cleared.
The date and time format will be at 12:00am, 1 Jan 2002, 12 hour format and unit is metric.
The diagnostic mode is entered upon system reset; all the LCD segments will be lit and the buzzer will be
turned on for 3 seconds.
Measurement Specification
Sensor Measurement
Mode
4 day memory mode
24 hour memory mode
Altimeter main mode
Barometer main mode
Compass main mode
Difference measurement in Altimeter mode
Frequency of measurement
1 per hour
1 per hour
1 per sec for the first 2 secs, thereafter is depended on
the Weighted Current Rate.
1 per 10 secs
Deactivate after 30 secs
1 per 10 secs
11
Note
Please refer to the remark of Altimeter for the details of Weighted Current Rate.
Ranges and Resolution
Range
Altimeter
Barometer
Calendar
Sea Level Pressure
Temperature
Resolution
Altimeter
Barometer
Compass
Temperature
-499m to 9001m or –1600ft to 29500ft
299mbar to 1101mbar or 8.9inHg to 32.40inHg
1 Jan, 2002 to 31 Dec, 2099
299mbar to 1101mbar or 8.9inHg to 32.40inHg
-10 °C to 60 °C or 14 ° F to 140 ° F .
1m or 3 ft
1mbar or 0.05inHg
1° for bearing and ± 3° for North – South Direction
0.1 °C or 0.1 ° F
Unit Conversion
o 1 meter = 3.28 ft
o 1 mbar = 0.0295 inHg
Battery Replacement
•
•
•
It is recommended to replace the battery when the low battery warning icon is on.
Cell Type: CR 2032
The expected battery life is approximately 12 to 24 months, depending on usage.
Procedure to replace the battery
1. Insert a coin into the slot on the battery compartment cover on the watch back.
2. Turn the coin anti-clockwise until the dot on the cover is aligned with ‘open’ on the back.
3. Remove the battery compartment cover. Make sure the o-ring and the slot are clean and dry. Take care not
to remove the o-ring.
4. Remove the battery carefully. Take care not to bend the side contact.
5. Put a new battery into the battery compartment with the positive side facing up.
6. With the o-ring in the correct position, replace the battery compartment cover and turn it with the coin
clockwise until the dot is aligned with ‘close’.
Notes
1. Extreme low temperatures may cause the low battery warning icon to turn on. This does not require
battery replacement.
2. Frequent use of the electroluminescent backlight reduces battery life.
3. Battery replacement should be performed with extreme care so as to ensure the watch is still waterproof.
Initial Setup
•
1.
2.
3.
Notes
•
•
When the watch is used the first time or after battery replacement, it is recommended to set the following
functions:
Unit setting (Default setting is metric unit). For imperial system, please refer to Measurement Unit.
Time setting. Please refer to Time Main Mode.
Compass calibration. Please refer to Calibration of Compass.
When no button is pressed for 30 seconds or press (S1), the display will automatically exit any setup.
In all sub modes, press (S1) to exit immediately to its main mode.
For more details, please visit
www.CEI-ULTRAK.com
F18BK
Printed in China
12