1
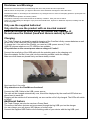
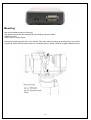
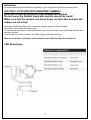
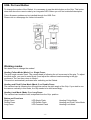
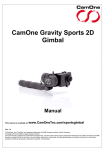
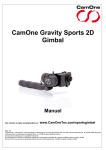
CamOne
Gravity Sports 3D Gimbal
Manual
Vers. 1.0
"FlyCamOne" and "CamOne" are registered trademarks of ACME the game company GmbH, Germany
© copyright 2014 by ACME the game company GmbH
This user manual is protected by international copyright laws. No part of this manual may be reproduced without the prior written permission of ACME
the game company GmbH in any form or by any means, electronic or mechanical, including photocopying, recording or storing in any information
storage and retrieval reproduced, distributed, translated, or transmitted.
10
Safety Advice
SERVICE & SUPPORT
WARNING:
Follow these instruction to prevent damage of the unit:
• DO NOT USE UNPROTECTED IF RAIN OR WATER.
PREVENT CONTACT WITH ANY KIND OF LIQUIDS
• USE RECOMMENDED ACCESSORIES ONLY
• DO NOT DISASSEMBLE
• THERE ARE NO PARTS AT THE INSIDE THAT NEED
TO ME MAINTAINED
REPAIRS SHOULD BE MADE BY QUALIFIED
PERSONNEL ONLY
ACME the game company GmbH
Boikweg 24
33129 Delbrück
Germany
Phone: +49 2944 9738 30
[email protected]
or
http://www.camonetec.com
Warning Li-Ion batteries
WARNING Li-Ion BATTERY
• Mishandling the battery may occur explosion, fire and
smoke including damage of health or goods. It will
also reduce battery performance.
• Never charge a damaged LiPo battery pack.
• Stop charging if the Li-Ion battery pack is getting
deformed (blown up).
• Charge and store the Li-Ion
battery pack at a temperature of
0°C to 40°C – avoid a
temperature higher than 50°C
when discharging.
• Do not shortcut – Risk of
explosion and fire!
CE Declaration
WEEE Reg. Nr.: DE64989527
Herewith we declare that this item is in accordance with the
essential requirements and other relevant regulations of the
directive 2004/108/EC. A copy of the original declaration of
conformity can be obtained at the address above.
Information for disposal of crossed
Bin marked products
To dispose the battery, remove it and take it to a resource
recovery facility.
This symbol is marked on a product or
packaging, it means that the product
including the batteries must not be
disposed of with your general household
waste. Only discard electrical/electronic
items in separate collection schemes,
which cater for the recovery and recycling
of materials contained within. Your cooperation is vital to ensure the success of
these schemes and for the protection of
the environment.
11
Content of the box
Please check the completeness before you use the product.
Gimbal
Camera bracket 2x
3x Adaptor for Typ 16430
3x Li-Ion cells Typ 16340
CamOne Triple Charger
USB-Cable 1x
Important Note!
More information and updates on this manual are available at CamOneTec (http://www.CamOneTec.com).
Please follow this manual before you assemble the product!
Index
Safety advice……...………………...…………………………………………………………………………………......2
Content of the box / required components………………………………….……………….….…………………..…..3
Important notes….……………………………………………………………………………………………….……..….3
Index……………..…………………………………………………………………………………………………….……3
Disclaimer………………………………...…………..………………...…………….……………………….…………...4
Charging and inserting the battery …………………………………..………………………...…………………….…5
Mounting..…………………………………………………..……………………….……………………………….…….5
Maximum Axis- Rotation…………………………………………………………………………………………………..6
Inserting the battery………………………………………………………………………………………………………..6
Activation………………………………………..………………………………………………………………………….7
LED Description……………………………………………………………………………………………………………7
USB- Port and Button……..………………………………………………………………………………………………8
Working modes…………..………………………………………………………………………………………………..8
Handling and Operation………….….……………………………………………………………..……………………..8
Warranty…………………...…………………………………………………………..…………….……………………..9
12
Disclaimer and Warnings
Read these instructions before commissioning and use of the product and its components!
With the launch of the product, you agree to the terms of the disclaimer and agree to the instructions.
Assemble the items on according to the instructions. Any changes to this or uses of Third-party products / spare parts can
cause damage.
This excludes the acquisition of warranty claims!
The product is already in a functional state in the delivery condition. Take your time to start it.
There is no responsibility for damage or injury from the manufacturer, importer or distributor acquired, resulting from the
use of the product.
Only use the supplied batteries!
Only start to use the product with an inserted camera!
External influences while using the gimbal may damage it!
Do not move the Gimbal (head and camera mount) by hand!
Charging
The Triple Charger is constued for parallel charging of the CamOne infinity camera batteries as well
as the cells of the CamOne Gravity Sports Gimbal cells.
To charge the Li-Ion cells of the Gimbal, you need an USB- power source (5 Volt).
USB-Cell phones adaptors or a PC-USB-port are suitable.
!! Pay attention on the correct power source voltage of 5 volts!!
Connect the small plug of the USB cable with the matching port on the charging unit.
Place the adaptor for the Li-Ion cells into the matching sockets inside the charger.
Make sure that these are placed firmly and have steady contact.
Now insert the Li-Ion cells.
!!Pay attention on the Plus/Minus directions!!
Connect the USB- Cable to the USB- power source.
The cells will be charged automatically now, this will be displayed by the small red LEDs that are
placed next to each cell.
Charging will be switched off automatically, as soon as the cell is fully charged. The LEDs will switch
to Green.
Additional feature
The Triple Charger can also be used as a Power Bank.
This means, that other devices can be powered through the big USB- port on the charger.
You can charge your cell phone, MP3 player or further units.
Connect the supplied USB Cable or the matching cable of your device with the big USB- port.
13
Mounting
Use the enclosed screws for mounting.
The gimbal comes with two brackets for the following camera models:
-CamOne infinity
-GoPro Hero 3 / 3plus series
Choose the matching bracket for your camera. Take care when mounting the bracket that it is not tilted
or jammed. Place the camera as shown on the below picture. Screw it with the supplied M2x22 screws.
14
Maximum Rotation of the Axis
Please note that every axis has a maximum deflection as shown below.
More bigger movements can’t be corrected.
Inserting the batteries
For the operation of the gimbal, the three Li-Ion cells from the content are required. Charge these with
the included charger. This is indicated by a green LED on, when battery is fully charged.
If all three cells are charged, place them with the positive pole towards the gimbal head, one after the
other into the handgrip. Note that no foreign bodies or volatilities are included.
Close the grip by screwing on the cap, with the Power Switch.
15
Activation
All components were observed and mounted by you in accordance with the previous points.
!DO ONLY ACTIVATE WITH INSERTED CAMERA!
External influences while use may damage the Gimbal!
Do not move the Gimbal (head and camera mount) by hand!
Make sure that the motors can move freely on their axis and that the
cables are not stuck.
Hold the Gimbal-Grip upright and motionless and then press the Power Switch.
The LEDs of the motors will flash in blue.
The Gimbal will adjust itself automatically after a few seconds. Now move the Gimbal carefully and
test the functions.
If the Gimbal is not hold smoothly, the LEDs of the motors will shine red.
Make sure that the functionality of the Gimbal is not influenced by dirt or moisture!
LED Description
16
USB- Port and Button
To change the modes of the Gimbal, it is necessary to use the white button on the Grip. This button
does also show the current mode by an integrated LED. Below you will find a detailed description.
Future firmware updates can be installed through the USB- Port.
Please visit our homepage for further information.
Working modes
See below how to change the modes!
Heading Follow Mode (Mode 1) >> Single Press:
The pitch angle remains fixed. The camera head is following the roll movement of the grip. To adjust
the pitch angle, you need to enter Mode 2 and adjust the camera head according to the grip
movement. You can then return to Mode 1.
This mode is automatically activated after switching on the Gimbal.
Heading and Pitch Follow Mode (Mode 2) >> Double Press:
The camera head is following the roll angle as well as the pitch angle of the Grip. If you wish to use
the camera vertically in this mode, the Grip needs to be hold accordingly.
Heading Lock Mode (Mode 3) >> Long Press:
The camera head remains fixed, independet from the Grip- position.
Button and Functions
Single Press
Double Press
Long Press
LED Single Flash
LED Double Flash
LED Constant Flash
17
Heading Follow Mode
Heading and Pitch Follow Mode
Heading Lock Mode
Warranty
The consumer is without prejudice to any claim against the seller a Manufacturer's Guarantee under the
conditions set out below:
» New devices and their components , or arising from manufacturing and /Material faults within 24 months of
purchase develop a fault , are of ACME the game company GmbH exchanged at its option against a prior -art
device to the original purchaser or repaired free of charge . For wear parts, this warranty is valid for 3 months
from purchase.
"This warranty does not apply if the device defect is attributable to improper treatment and / or non-observance
of the information presented is based.
"This warranty does not extend to self- paid by the customer services (eg conversions).
»Warranty claims are to be claimed at once, to the knowledge of the warranty claim .
"Ownership of devices or components that are returned to ACME the game company GmbH in the framework
of exchange, become the property ACME the game company GmbH.
» By services rendered under warranty, the warranty period is not extended
“Insofar as no Guarantee default exists, ACME the game company GmbH reserves the right to charge the
customer for replacement, repair, or shipping costs. The customer will be informed in advance.
Service & Support
ACME the game company GmbH
Westwood
Boikweg 24
33129 Delbrück
Germany
Phone: +49 2944 9738 30
E-Mail: [email protected]
18