1
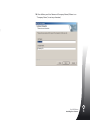
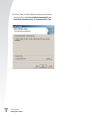
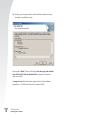
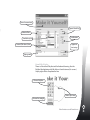
English 1-01
Stitch & Sew
Manual supplement
Thank you purchasing Stitch & Sew, designed especially for
the home embroiderer.
This supplemental manual contains information on additions
and new features of the version 1.5. The new Stitch & Sew version 1.5 contains numerous exciting new features that have
been additionally incorporated since version 1.0.
The brochure you are holding serves as a supplement to the
explanations and guidance provided with the three original
manual booklets that can be found within this package.
What is more, the new Stitch & Sew is now protected with
the use of a USB hardware key.
This results in a differentiated installation procedure in comparison to the installation of the original 1.0 version.
In the following pages you will find instructions on how
to successfully install the new Stitch & Sew software along with
detailed explanations on all new features.
Please study this supplement along with the rest of manual
booklets provided to learn the most about this exciting software product!
Please read the installation instructions carefully.
IMPORTANT: Do not connect the USB key before you are
prompted by the installation utility to do so!
Installation:
1
English 1-01
2
Installation:
Installing the Software
Contents of package – Accessories
Stitch & Sew now is protected with the use of a USB hardware key .
English 1-01
Inside this package you will find the following items:
> One (1) CD-ROM containing the Stitch & Sew software
> Three (3) User’s manual booklets for the Stitch & Sew software
> One (1) USB key
Stitch & Sew
Software
(1 CD-ROM)
User’s
Manuals
(3 pcs)
USB device
(1 pc)
Please report immediately to point of purchase, in case any
of these is missing from the Stitch & Sew package.
Installation:
Installing the software
3
System Requirements
> PC with PENTIUM II or faster processor
> Windows OS: Windows 95 / 98 / 2000 / ME / XP
> 64MB of RAM (128MB or more recommended)
> CD-ROM drive
> 500 MB (or more recommended) of available hard-disk space
for installation
> Color standard (640X480 pixels, 16colors) VGA adapter connected
with a color VGA monitor (1024x768 pixel; 65,000 colors recommended)
> Microsoft compatible mouse
4
Installation:
Installing the software
English 1-01
The following is a list of specifications for your PC (personal
computer).
You can install and use the software on a PC which fulfils
at least this specification list.
Installation of the software
English 1-01
In order to start using the software you have to first install the contents of the CD to your PC. This procedure is referred to as “installation procedure”. Please follow the below listed instructions
in order to successfully install Stitch & Sew on your personal
computer.
IMPORTANT: Do not connect the USB key before you are
prompted by the installation utility to do so!
The Stitch & Sew software comes on a CD-ROM disc.
In most personal computers the default drive setting for a CD-ROM
drive is “D:”
1. Please insert the Stitch & Sew CD-ROM into the CD-ROM disc receiver in your PC. After some seconds, the Installation procedure
of the software will start automatically.
If this does not occur after a short while, you can run the installation procedure manually by going to the “Start” option of Windows, select “Run”, type “D:\SNSSetup.exe” and click on OK.
2. In the window shown below select the “Required Components”
option.
Installation:
Installing the software
5
English 1-01
This is required to install the special drivers for the USB key, it will
only be required the first time you will install the software.
(Again, please note not to attach the USB key before prompted
by the software to do so!)
The required components will not be
required to be installed again after first
time of installation.
6
Installation:
Installing the software
3. After checking and installing the required components, a message prompting you to insert your USB key will come up.
English 1-01
Now, attach the USB key that came with the software to the USB
port of the PC and press “OK”.
Attention:
In case of problems proceeding with the next step,
please press the “Check for Card” button after having been prompted to attach the key. The program
will look for the successfully and it will show its serial
number as soon as it is found.
Installation:
Installing the software
7
English 1-01
4. After the required components (USB driver) have been succesfully installed, the “Main Application” option will be made active
and you are now ready to proceed to the next step with the
installation of the main application.
Click on the “Main Application” option to proceed.
8
Installation:
Installing the software
5. At this stage you are requested to insert the Product key.
This is provided to you in a file, to be sent to you via e-mail.
In cases where no e-mail address is available the key is provided
in an extra CD-ROM.
English 1-01
At this stage, a screen like the one shown below will come up,
prompting you to insert the product key.
Installation:
Installing the software
9
The usual name for this type of file will be
the term “Dongle_” followed by the serial
number of your USB key and the extension
compcert.
7. Browse to the folder where you saved the product key file, select
it and press the “Open” button. The required fields will automatically fill with the product key number.
10
Installation:
Installing the software
English 1-01
6. The easiest way to insert is to click on “Browse”. The following
window will allow you to browse for the product key file (that had
either been sent to you by e-mail or on a separate CD).
If the information provided is correct the installation procedure will
move forward by pressing the “OK” button.
English 1-01
8. You are now ready to install the Stitch & Sew software.
Click on “Next” to continue.
Installation:
Installing the software
11
English 1-01
9. After reading and agreeing with the terms given in the License
Agreement, please click on “Yes”.
12
Installation:
Installing the software
10. Now define your User Name and Company Name (if there is no
“Company Name”, insert any character).
English 1-01
Installation:
Installing the software
13
English 1-01
11. Click on “Next”, and then select the directory where the software should be installed. It would be recommended to use
the default selected directory: C:\Compucon\Stitch_Sew.
14
Installation:
Installing the software
12. Now you are prompted to select the Program Folder where
the shortcut for the software will be stored.
English 1-01
Simply click on “Next” to continue.
Installation:
Installing the software
15
English 1-01
13. Finally, you are requested to confirm all the selections made
during the installation setup.
Pressing the “Next” button will finally start the copy and installation of the Stitch & Sew software files to the given directory
on the hard disk.
A progress bar will indicate the stage at which the installation
procedure is. It will finish when it has reached 100%.
16
Installation:
Installing the software
English 1-01
Installation:
Installing the software
17
English 1-01
As a last step, and while the installation procedure is finalizing,
you are prompted to register your product by completing the registration form shown below and send it to Compucon by pressing
the “Send to Compucon” button.
If you do not wish to register Stitch & Sew at this time you can press
“Close” and register some other time.
If the installation utility identifies a lack of available space on your
hard disk, an error message will prompt you to free some hard
disk space before proceeding with the installation.
You can always abort the installation procedure by clicking
on “Cancel”.
18
Installation:
Installing the software
Tip!
If for any reason you would like to uninstall
the software, select from “Start” -> “Settings” -> “Control Panel” -> “Add/Remove
Programs” icon. From the appearing
window scroll down until you find the Stitch
& Sew selection and click on the “Add/
Remove” button.
English 1-01
Installation:
Installing the software
19
English 1-01
20
Installation:
Installing the software
English 1-01
New features and functions
Some exciting new features have been added to Stitch & Sew.
This booklet covers (only) the topics not discussed in the initial
manuals. Each topic makes reference to sections in the original
manual where details and relevant information exists.
New features and functions:
21
English 1-01
22
New features and functions:
Additional Read & Write Formats
Following is a list of available formats that can be read into Stitch & Sew:
Format Extension
English 1-01
See “Inside Open Designs” for detailed
information about reading formats.
Compucon Home Embroidery Designs
Compucon Designs
Compucon Designs
Barudan FDR
Brother Bernina-Babylock
Brother Bernina-Babylock
Happy
Husqvarna Viking
Husqvarna Viking
Janome
Janome
Melco Designs
Tajima
Pfaff
Pfaff
*All Files
.CHE
.XXX
.REF
.FDR
.PEC
.PES
.TAP
.HUS
.SHV
.JEF
.SEW
.EXP
.DST
.PCS
.VIP
*.*
Following is a list of available formats that can be written from Stitch & Sew:
Format
Compucon Home Embroidery
Compucon Designs
Barudan Fdr
Brother-Bernina-Babylock
Brother-Bernina-Babylock
Galaxy PES
Husqvarna Viking
Janome
Janome
Melco Design
Tajima
Pfaff
Extension
.CHE
.XXX
.FDR
.PEC
.PES
.PES
.HUS
.JEF
.SEW
.EXP
.DST
.PCS
New features and functions:
23
Freeform Extras
There are some exciting new features available for Freeform tool:
See “Inside Freeform” for more details.
Freeform’s Running Stitch - New Stitch Types
There are occasions when more is needed than a “plain” run stitch.
For example, if you need to travel out and then back in the same
path, “Return” handles it in one step.
Normal Running Stitch.
Point “A” to point “B”.
Return With Offset.
Return, with different
penetrations.
Return Running Stitch.
Point “A” to point “A”.
Triple.
Point “A” to point “B”;
then repeated.
Motif.
Special patterns repeated
on (center) line.
24
New features and functions:
English 1-01
> Additional Running Stitch (fill method) stitch types.
> New Appliqué fill method.
> Normal Fill- Degrade Density option.
> Normal Fill- Automatic Outline- either Running Stitch or Satin Line.
> Normal Fill- Additional stitch types. Patterns & lace!
Running Stitch Embroidery Settings
The “Normal” (default) stitch type for Running Stitch has but one
setting- the length of the run stitch. “Motif” has more options.
Just look at the catalogue of Motif patterns and choose one that fits
the needs of your border or design element.
English 1-01
Selected Motif view
See Inside Embroidery Settings for details.
Selected Motif i.d.
Motif choices list
Motif size
Motif spacing
New features and functions:
25
See “Freeform Fill Methods” for more
details.
English 1-01
Freeform’s Appliqué Fill Method
Appliqué automatically places a running stitch “guide” and STOP
code (for placement of fabric); tacks the fabric; and then places
a satin line around the Freeform block. All these processes with
only one outline!
Thread color
Run stitch length
Final Satin pass
Run stitch tack
Density of Satin
Width of Satin
>1. Run stitch guide
With ONE step...
Use Holes freely
>2. Run stitch tack
>3. Satin line
on top
26
New features and functions:
Change Appliqué color in System
Parameters. Also, use Appliqué with
geometric Shapes, too!
Freeform’s Normal Fill - Degrade Density
Add sophistication and excitement to an ordinary block
by changing the density gradually, and, automatically!
Simply enable “Degrade” in Embroidery Settings box.
English 1-01
See Inside Embroidery Settings for details.
No more
ordinary blocks!
Enable Degrade
New features and functions:
27
English 1-01
Freeform’s Normal Fill - Automatic Outline
Add an outline, either Running Stitch or Satin Line, automatically!
Simply enable (Satin or Running Stitch) “Outline” in Embroidery
Settings box.
See Inside Embroidery Settings for details.
With one input
(block), choose Satin
or Run stitch.
Enable outline
Change outline color
28
New features and functions:
English 1-01
Freeform’s Normal Fill- Pattern, Elastic and Motif Stitch Types
These are stitch types that have repeated patterns. Step Pattern
and Elastic are like “carved” shapes inside a block. Motif has “lacy”
elements that typically leave the background showing.
Step Pattern can be found in the following: Freeform & Shapes/
Normal Fill; Column/ Normal Fill. Motif can be found: Freeform
& Shapes/ Normal Fill & Running Stitch.
See Inside Stitch Types for details.
Use Stitch Types
To use these stitch types, choose one from the Stitch Types list.
Then, click on “Catalog” and choose a pattern or motif from the list.
Click “Apply” and the pattern will be generated in the block.
Step Pattern
Stitch Type
Increase values for
LARGER, and decrease
for SMALLER pattern.
Motif
Pattern list
New features and functions:
29
Column Extras
There are some exciting new features available for Column tool:
> Outline Block
> Jagged Edge
See Automatic Outline for Freeform
blocks (above). Methods are identical.
English 1-01
Automatic
Satin Outline
Use Random Stitch Type
Activate jagged edges for Satin or Random Step stitch types.
See Inside Stitch Types for more detail.
Jagged edges
for fur or feathers.
Stitch Type
Fill step size
% of random
Enable Edge
30
New features and functions:
Draw Package
Stitch & Sew has a bitmap drawing package on-board. Create new
drawings and modify existing images to be used for embroidery.
English 1-01
Use Draw Package
Choose “New Bitmap” in the Create drop-down menu. You will
be directed to the Draw Package screen after approving or setting
the size for the drawing.
Main Tool Bar
The tool bar has different sections for drawing needs. Just click
on a tool, and draw in the white box.
Sections
Active Scenario
Selection
Render
Pencil tool
Line
Paint
Shapes
Text
Active tool options
Active color
Lightest line
weight
Black lIne color
Basic colors
New features and functions:
31
English 1-01
Change Color
Whether you are about to use a drawing, painting, or text tool, you
may need to establish a color for drawing. If there isn’t a color in the
basic color blocks, double-click the foreground (front) color to open
the color palette. Choose a color and value, and save as a Custom
color if desired.
Active color
Active hue & value
Click anywhere
Add to Custom list
Create Text
If there is lettering in your logo, create it with the Draw Package.
Simply click on the Text icon and follow the dialogue box.
32
New features and functions:
View of current text
English 1-01
Special handling
Selected font
Justification
Available style
Current (Windows) font
Approve
text setup
Typing area
Draw With Polyline
There is a Pencil and Polyline tool for freehand drawing. Use the
Polyline like digitizing with left clicks at short distances (for curves).
Simply right-click to complete the line.
Choose Polyline
Click to join lines
Choose line weight
New features and functions:
33
Fill With Color
If you close a line, it can be filled with color using the Paint Bucket.
Also, make geometric shapes with the different tools.
English 1-01
Click Paint Bucket
Click inside line
Continue Drawing
Use all the different tools and have fun making a new drawing.
Use the Airbrush to add sophistication.
Choose
Airbrush
Spray size...
“Spray”
...and
paint color
34
New features and functions:
Use New Drawing
Exit the Draw Package and create embroidery in Stitch & Sew.
Use Magic Wand to make easy work of it.
English 1-01
Click to exit
Draw Package
Choose
Magic Wand
& click!
Modify Existing Images
The Draw Package has a sophisticated Image Processor to enhance
images. For example, most images need to have “Brightness & Contrast” adjusted to be a good candidate for PhotoStitch.
New features and functions:
35
Import Image and Open Draw Package
Choose “Import Image” from the Create drop-down menu.
Then choose “Draw Package”. Click on the Image Processing icon
and choose from a variety of options.
English 1-01
EXPERIMENT for desired results.
Image Processing Icon & Box
Current image
Proposed changes
Click to Zoom
Reduce colors
Bright & Contrast
Clean & soften
Flip & Rotate
Resize image
Relevent information
Mirror Image
Categories change
relative to subject
36
New features and functions:
Draw on Image, too
Have you ever had the irresistible urge to paint a moustache
on your friend? Now’s your chance. Use any of the drawing tools
to further enhance the image.
English 1-01
Draw new eye color
Enhancing images for PhotoStitch helps
to make better quality. For example, draw
darker nostrils; thicker eyelashes, lips,
and brows; add or erase hair... “Bolder
is better” for PhotoStitch!
New features and functions:
37
English 1-01
38
New features and functions:
My Notes
English 1-01
New features and functions:
My Notes
39
English 1-01
40
New features and functions:
My Notes