1
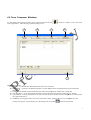
Composer Tuner™ USER’S MANUAL Preliminary 1 Information contained within this document is accurate at the time of publication. HED ®, Inc. reserves the right to change specifications without notice. No part of this publication may be reproduced or used in any form, including graphic, electronic, or mechanical including photocopying, recording, taping, or information storage and retrieval systems, without the express written permission of Hydro Electronic Device s, Inc. © 2007 Hydro Electronic Devices, Inc.- All Rights Reserved. 2 IMPORTANT NOTICE - PLEASE READ FIRST THIS SOFTWARE IS USED AT YOUR OWN RISK. IMPROPER USE OF THIS SOFTWARE MAY RESULT IN IMPROPER FUNCTIONING OF A MODULE. THE USER IS SOLELY RESPONSIBLE FOR THE RESULTS OF ANY USE OF THE SOFTWARE. HED MAKES NO REPRESENTATIONS OR WARRANTIES OF ANY KIND, EXPRESS OR IMPLIED, WITH REGARD TO THE SOFTWARE, ITS USE, OR ANY RESULT THAT MAY BE OBTAINED THROUGH ITS USE. USE OF THE SOFTWARE REQUIRES PROFESSIONAL JUDGMENT AND IT IS SOLELY THE USER'S RESPONSIBILITY TO ASSESS THE APPROPRIATENESS OF ANY APPLICATION OF THE SOFTWARE. HED WILL NOT BE LIABLE TO THE USER OR ANY THIRD PARTY FOR ANY DAMAGES OF ANY KIND, DIRECT, CONSEQUENTIAL OR OTHERWISE, REGARDLESS OF THE LEGAL THEORY, ARISING FROM OR ASSOCIATED WITH THE SOFTWARE OR ITS USE. DISCLAIMER OF WARRANTY. The Software is provided on an "AS IS" basis, without warranty of any kind, including, without limitation, the warranties of merchantability, fitness for a particular purpose and non infringement. The entire risk as to the quality and performance of the Software is borne by You. Should the Software prove defective, You, not Vendor or its licensors, assume the entire cost of any service and repair. If the Software is intended to link to, extract content from or otherwise integrate with a third party service, Vendor makes no representation or warranty that Your particular use of the Software is or will continue to be authorized by law in Your jurisdiction or that the thir d party service will continue to be available to You. This disclaimer of warranty constitutes an essential part of the agreement. VENDOR HEREBY EXPRESSLY DISCLAIMS ALL OTHER WARRANTIES, EXPRESS OR IMPLIED, INCLUDING BUT NOT LIMITED TO, THE IMPLIED WARRANTIES OF MERCHANTABILITY, TITLE, NONINFRINGEMENT AND FITNESS FOR A PARTICULAR PURPOSE. LIMITATION OF LIABILITY. UNDER NO CIRCUMSTANCES AND UNDER NO LEGAL THEORY, TORT, CONTRACT, OR OTHERWISE, SHALL VENDOR OR ITS LICENSORS BE LIABLE TO YOU OR ANY OTHER PERSON FOR (AND VENDOR HEREBY EXPRESSLY DISCLAIMS ANY AND ALL LIABILITY FOR) ANY INDIRECT, SPECIAL, PUNITIVE, INCIDENTAL, OR CONSEQUENTIAL DAMAGES OF ANY CHARACTER INCLUDING, WITHOUT LIMITATION, DAMAGES FOR WORK STOPPAGE, COMPUTER FAILURE OR LOSS OF REVENUES, PROFITS, GOODWILL, USE, DATA OR OTHER INTANGIBLE OR ECONOMIC LOSSES. IN NO EVENT WILL VENDOR OR ITS LICENSORS BE LIABLE FOR ANY DAMAGES IN EXCESS OF THE AMOUNT PAID TO LICENSE THE SOFTWARE, EVEN IF YOU OR ANY OTHER PARTY SHALL HAVE INFORMED VENDOR OR ITS LICENSORS OF THE POSSIBILITY OF SUCH DAMAGES, OR FOR ANY CLAIM. NO CLAIM, REGARDLESS OF FORM, MAY BE MADE OR ACTION BROUGHT BY YOU MORE THAN ONE (1) YEAR AFTER THE BASIS FOR THE CLAIM BECOMES KNOWN TO THE PARTY ASSERTING IT. INDEMNIFICATION. You and Your agents will indemnify and hold harmless Vendor and its officers, directors, shareholders, employees, agents, successors, assigns and affiliates from and against any award of costs or damages brought against Vendor to the extent that such award is (i) based on a claim regarding the use, installation or configuration of Software by You or Your agents; or (ii) based on a claim regarding modification, translation, customization or localization to the Software by You or Your agents. Vendor shall indemnify and hold You harmless against liability to third parties (only for liability solely the fault of Vendor) to the extent arising from the violation of any third party's copyright rights in connection with the use by You of the Software (a) as delivered by Vendor to Youand (b) in accordance with this License Agreement, provided that (i) Vendor shall have the right to conduct any defense and/or settlement in any such third party action arising as described herein, (ii) You shall fully cooperate with such defense, and (iii) Vendor receives prompt written notice from You. In no event shall You settle any such claim, lawsuit, or proceeding without Vendor's prior approval, and Vendor shall have no liability for any such unapproved settlement so made. This indemnification isimited l to the Software delivered to You or as modified by Vendor and does not cover third party claims arising from modifications to or uses of the Software in a manner not authorized by Vendor. FULL TEXT OF THE CANLink ® Composer™™ LICENSE IS INCLUDED WITH THE SOFTWARE 3 Table of Contents Table of Contents ................................ ................................ ................................ ................................ ................................ .................4 1.0 Introduction................................ ................................ ................................ ................................ ................................ ...................5 2.0 Dongles ................................ ................................ ................................ ................................ ................................ .........................5 3.0 General Information................................ ................................ ................................ ................................ ................................ .....5 4.0 Tuner Composer Windows................................ ................................ ................................ ................................ ..........................7 4.1 Processes Tab ................................ ................................ ................................ ................................ ................................ ...............8 4.2 Create / Edit Processes................................ ................................ ................................ ................................ ................................ .9 4.3 Create / Edit Steps................................ ................................ ................................ ................................ ................................ ......10 4.4 Create / Edit Actions................................ ................................ ................................ ................................ ................................ ..11 4.5 Station Files Tab................................ ................................ ................................ ................................ ................................ .........13 4.6 Setup Tab ................................ ................................ ................................ ................................ ................................ ....................15 4.7 User Data Entry Tab................................ ................................ ................................ ................................ ................................ ...17 4 1.0 Introduction Orchestra’s Tuner™ enables a user to create step-by-step instructions for vehicle setup, calibration, trouble shooting, etc. Multiple Processes may be created in Composer and thenexecuted using Tuner. When running Tuner, the user will connect to the CANLink Master module, similar to Conductor. Instead of displaying all the Data Item values like Conductor, Tuner will display instructions, images and possibly some valuesthat are currently required for the Action the user is trying to complete. 2.0 Dongles To create/edit the Tuner Processes in Composer a HED® Blue Dongle (Part Number:CL-012-300 or CL-012-304) or HED Red Dongle (Part Number: CL-012-302) is required. The BlueDongle gives access to all of the standard Composer features (Data Items, Modules,and Rungs) where as the Red Dongle only gives access to the TunerProcesses. Any of theDongles may be used to run Tuner but when creating theProcesses in Composer the user can set different levels so only certain level of end users can execute/bypass certain Processes. 3.0 General Information Tuner is designed with 3 levels of logic: Processes (groups of Steps), Steps (groups of Actions), and Actions. Throughout this manual, the following definitions apply: User = person using the Tuner functionality of the Compos er. End User = person using the Tuner stand-alone application (Ex: tester, production, service department, etc…). 18 different Actions (all Actions have option to display an Image) Instruction a. Displays the text. Blind Step a. This Action is completed without any end user interaction(besides clicking “next” button). b. This Step can be used to set EEPROMS and/or Timers without theend user knowing about it. c. It sets the “Data Item Set” to the “Value Set” . Capture Data Item MIN a. This Action is used to keep track of the Minimum value seen in the Watched Data Item during the Action. b. It sets the “Data Item Set” to thevalue of “Data Item Watch” upon clicking the “next” button. Capture Data Item MAX a. This Action is used to keep track of the Maximum value seen in the Watc hed Data Item during theAction. b. It sets the “Data Item Set” to the value of “Data Item Watch” upon clicking the “next” button . Capture Set point – No Control a. This Action is used to keep track of the value seen in the Watched Data Item during the action. b. It sets the “Data Item Set” to the value of “Data Item Watch” upon clicking the “next” button . Capture Set point – With Control a. This Action is used to keep track of the value seen in the Watched Data Item during the action. During this Action, the end useris able to control the value of the “Data Item Debug”. b. It sets the “Data Item Set” to the value of “Data Item Watch” upon clicking the “next” button. Set Option a. This Action is used to allow the end user to select multiple (AND) or a single (OR) option . b. It sets the “Data Item Set” to thebinary value of selected options upon clicking the “next” button. Set Preference a. This Action is used to allow the end user to select a value to set for this action using the user interface given. b. It sets the “Data Item Set”to the value of control used in the user interfaceupon clicking the “next” button. Watch/Display Value a. This Action is used to keep track of the value seen in the Watched Data Item during the Action. b. It displays the “Data ItemDisplay” to the screen. c. The Action ends, upon clicking the “next” button. 5 Control Data Item a. During this Action, the end user is able to control the value of the “Data Item Debug”. b. There is no “Set” for this Action. c. The control and Action ends, upon clicking the “next” button. Equal a. This Action is used to compare the value seen in the Watched Data Itemto the value seen in the Displayed Data Item during the Action. b. There is no “Set” for this Action. c. Upon clicking the “next” button, if the compare is True the Action passes. If the comp are is False, the Action fails. Not Equal To a. This Action is used to compare the value seen in the Watched Data Item to the value seen in the Displayed Data Item during the Action. b. There is no “Set” for this Action. c. Upon clicking the “next” button, if the ocmpare is True the Action passes. If the compare is False, the Action fails. Less Than a. This Action is used to compare the value seen in the Watched Data Item to the value seen in the Displayed Data Item during the Action. b. There is no “Set” for this Action. c. Upon clicking the “next” button, if the compare is True the Action passes. If the compare is False, the Action fails. Less Than or Equal To a. This Action is used to compare the value seen in the Watched Data Item to the value seen in the Displayed Data Item during the Action. b. There is no “Set” for this Action. c. Upon clicking the “next” button, if the compare is True the Action passes. If the compare is False, the Action fails. Greater Than a. This Action is used to compare the value seen in the Watched Datatem I to the value seen in the Displayed Data Item during the Action. b. There is no “Set” for this Action. c. Upon clicking the “next” button, if the compare is True the Action passes. If the compare is False, the Action fails. Greater Than or Equal To a. This Action is used to compare the value seen in the Watched Data Item to the value seen in the Displayed Data Item during the Action. b. There is no “Set” for this Action. c. Upon clicking the “next” button, if the compare is True the Action passes. If the compare False, is the Action fails. Save EEPROMS and Timers a. This Action is used to save all the changes made to the “Set” EEPROM and Timer values that occurred during a Process, Step and/or Action. b. There is no “Set” for this Action. Reset System a. This Action is used to reset the system and hence put the system into a know state of reset . b. There is no “Set” for this Action. 6 4.0 Tuner Composer Windows To start editing/creating Tuner Processes, open Composer and press the icon Tuner Application.” This will bring up the following screen: A B C E or under the “options” menu– click “Edit D F Main tabs and controls: A) Processes – Create/Edit the differentProcesses that Tuner canexecute. B) Station Files – Create files for different stations so Tuner wil l only execute selected Processes for that particular Station. C) Setup – Set the default password andset the file name and storinglocation of the Tuner’s results file. D) User Data Entry – Create the prompts theend user will be asked to fill in when first co nnecting to a module. E) Cancel Button – Pressing this button at any time will exit the Tuner window and any changes made since the window was opened will be lost. F) OK Button - Pressing this button at any time will exit the Tuner window and store any changes made since the window was opened. To permanently save the changes the save button will need to be pressed. 7 4.1 Processes Tab A B C D E F G A) This window lists all of the Processes that have been created. Clicking ona line highlights itso it can be deletedor moved up or down. Double clicking will allow the user to edit theProcess. B) Pressing this button will create a newProcess by bringing up the edit window to edit the newly created Process. C) Pressing this button will delete the currently selected Process. D) Pressing this button will make a copy of the currently selected Process and will bring up the edit window to edit the newly copied Process. E) Pressing this button will bring up the edit window for the currently selected Process. F) Pressing this button will move the currently selectedProcess up 1 spot. G) Pressing this button will move the currently selectedProcess down 1 spot. 8 4.2 Create / Edit Process es A) Enter the name of the Process. B) Enter a memo for theProcess (Optional). C) Minimum Execute Level– This sets what levelDongle and password combination needs to be used toexecute this Process. a. Example: If Level 2 is selected- only Level 1 and Level 2 are allowed to execute this Process. D) Minimum Bypass Level – This sets what levelDongle and password combination needs to be used tobe given the option to bypass this Process. a. Example: If Level 3 is selected– Level 1, Level 2 and Level 3 are given the option to bypass this Process. E) This window lists all theSteps that have been created for this Process. Clicking on a line highlights it so it can be deleted or moved up or down. Double clicking will allow the user to edit the Step . F) Pressing this button will create a newStep by bringing up the edit window toedit the newly created Step. G) Pressing this button will delete the currently selectedStep. H) Pressing this button will make a copy of the currently selected Step and will bring up the edit window to edit the newly copied Step. I) Pressing this button will bringup the edit window for the currently selectedStep. J) Pressing this button will move the currently selectedStep up 1 spot. K) Pressing this button will move the currently selectedStep down 1 spot. L) Cancel Button – Pressing this button at any time will exit th e “Create / Edit Processes” window and any changesmade since the window was opened will be lost. M) OK Button - Pressing this button at any time will exit the “Create / Edit Process es” window and store any changes made since the window was opened. To permanently save the changes the save button will need to be pressed. 9 4.3 Create / Edit Step s A B I J C D E F G H A) Enter the name of the Step. B) This window lists all theActions that have been created for thisStep. Clicking on a line highlights itso it can be deleted or moved up or down. Double clicking will allow the user to edit the Action. C) Pressing this button will create a newAction by bringing up the edit window to edit the newly created Action . D) Pressing this button will delete the currentl y selected Action. E) Pressing this button will make a copy of the currently selected Action and will bring up the edit window to edit the newly copied Action. F) Pressing this button will bring up the edit window for the currently selected Action. G) Pressing this button will move the currently selectedAction up 1 spot. H) Pressing this button will move the currently selectedAction down 1 spot. I) Cancel Button – Pressing this button at any time will exit the “Create / Edit Steps” window and any changes made since the window was opened will be lost. J) OK Button - Pressing this button at any time will exit the “Create / Edit Steps” window and store any changes made since the window was opened. To permanently save the changes the save button will need to be pressed. 10 4.4 Create / Edit Action s A) B) C) D) E) Action Type selects the type ofAction to take. A brief description of what thecurrently selectedAction does. Enter the text for theAction in this text box. This will be displayed to theend user when running Tuner. Clicking this check box will enable the use of an image for this Action. Clicking on the browse button will bring up thebrowse window where the image for theAction can be selected. a. To fit properly, images up to 336w x 225h pixels insize may be used. F) Once an image has been selected, it will be displayed in this window . G) Set: This box is enabled for theActions that need to set a value upon completion. Double clicking this box will bring up the Multi-View window where an EEPROM or Timer may be selected. Only EEPROM and Timersmay be selected for this box. 11 H) Debug: This box is enabled for the Actions that allow a Data Item to be debugged. Double clicking this box will bring up the Multi-View window where the Data Item to be debugged may be selected. Only Data Itemsmay be selected for this box. I) Debug Min: This box is enabled for theActions that allow a Data Item to be debugged. Enter the minimum value that you will allow the end user to be able to debug theData Item in the debug box to. This box can not be linked to a Data Item, a number has to be entered and beless than then the debug max value. J) Debug Max: This box is enabled for the Actions that allow aData Item to be debugged. Enter the maximum value that you will allow the enduser to be able to debug the Data Item in the debug box to. This boxmay not be linked to a Data Item, a number has to be entered and be greater than then the debug min value. K) Watch: This box is enabled for theActions that are using aData Item value for display, capture or comparison. Double clicking this box will bring up the Multi-View window where the Data Item to be watched may be selected. Only Data Items may be selected for this box. L) Display: This box is enabled for theActions that are using a Data Item value for display or comparison. Either a number may be entered or click the linked box to link it to aData Item. If it is linked double clicking this box will bring up the Multi-View window where the Data Item may be selected. M) Set: This box is enabled for the Actions that are using a Data Item value for set (Blind Action). Either a number may be entered or click the linked box to link it to a Data Item. If it is linked double clicking this box will bring up the Multi-View window where the Data Item may be selected. N) Min: This box is enabled for the Actions that allow aData Item to be set, but must fall within a given range (Min and Max). Either a number may be entered or click the linked box to link it to a Data Item. If it is linked double clicking this box will bring up the Multi-View window where the Data Item may be selected. O) Max: This box is enabled for the Actions that allow a Data Item to be set, but must fall within a given range (Min and Max). Either a number may be entered or clickthe linked box to link it to a Data Item. If it is linked double clicking this box will bring up the Multi-View window where the Data Item may be selected. P) Enter in the text for what the “Next” button will display in Tuner (Ex: OK, Ready, Set, Done, etc…). Q) If the Action fails this text will be displayed to theend user in Tuner. R) Clicking this check box will cause theAction in Tuner to be stopped if theAction fails. The user will have to either quit the Tuner application or restart theProcess. S) Delay Type: This box determines what type of delay thisAction will have. a. Delay: The “Next” button will not be enabled until after the delay time has run out. b. Delay Then Check: When doing a comparisonAction the Tuner will pause for the delay time and then continue to run the check until the next button is clicked. The next button will be enabled afterthe delay time has run out. c. Delay While Checking: When doing a comparisonAction the Tuner will continue to run the checkuntil the next button is clicked. The next button will be enabled after the delay time has run out. T) Delay: This is how long the delay will be.Displayed in milliseconds. U) Cancel Button – Pressing this button at any time will exit the “Create / Edit Actions” window and any changesmade since the window was opened will be lost. V) OK Button - Pressing this button at any time wi ll exit the “Create / Edit Actions ” window and store any changesmade since the window was opened. To permanently save the changes the save button will need to be pressed. 12 4.5 Station Files Tab General Use: Station Files may be used to authorize or prevent certain Processes from being executed on a particular work station (P.C.). A) This window shows all of theStations that have been created. Clicking ona line highlights it so it can be deleted and brings all the information up to be edited . B) The Station Data displays all the information about the currently selected station . C) Name: This is the name of the current station . D) Password: This is the password required to execute the Processes included for thisStation. a. This may be the same or different than the defaultTuner password. b. This may be used to limit who canexecute a specific Station file. E) Clicking the “Specify unique file path for thisStation” will enable box “F” so thata specific location for this station may be used. If this box is not checked the default location will be used (defined in the Setup tab). F) This is the folder location for where theTuner results file will be stored. G) Clicking this button will bring up the browse-for-folder window. By clicking on a folderin this window, it will fill in the “Save results to this location”. H) Pressing this button will create a newStation. I) Pressing this button will delete the currently sel ected Station. J) Pressing this button will update the currently selectedStation with all the information currently entered . 13 K) This box displays all the currently definedProcesses. By double clicking any of theProcesses it will add put a check mark next to the Process and include it in theStation or if it was already included , it will be excluded. 14 4.6 Setup Tab A B C D E F G H I A) Tuner Results File c. After Tuner is doneexecuting, it creates a file with information about all the Processes that were just executed. d. This section allows the user to setup where the file is stored and what type of prefix to give. it B) This checkbox determines if the file location should be displayed to the end user or not. By checking the box, the location will be displa yed. C) This sets the location the file will be saved to. It can be either a local or network location. D) Clicking this button will bring up thebrowse-for-folder window. By clicking on a folder in this window, it will fill in the “Save to this location”. E) Each file will be stored with a time stamp appended to the name. This field gives the user an option to select what the beginning of the file name will be. F) There is an option button to select between two different options: e. Prefix Text i. This text will alwaysbe the first part of the file name . ii. Ex: Big_Red_Truck and end user executed Tuner on October 30, 2009 at 9:16:01am, would yield the following file: Big_Red_Truck_TunerResults_Oct 30 2009_091601 .txt. f. User Data Entry # i. This will use what theend user entered for one of the data entry items as the first part of the file name. 15 ii. Ex: If the first data entry was the truck serial number . The end user entered “34516”, and executed Tuner on October 30, 2009 at 9:16:01am, would yield the following file: 34516_TunerResults_Oct 30 2009_091601 .txt. G) By checking the “Safe Mode Functionally is enabled” check box while running Tuner the end user can press the “Space Bar” and the system will go into safe mode. By un -checking this box the there will be no way forthe end user in Tuner to enter safe mode. H) Default Tuner Password (2 uses): a. Station files are used, but Station file passwords are not defined. b. If no Station files are used, but security is still required for execution, use a Default Tuner Password. I) The Level 2 and Level 3 passwords are listed here for reference only. 16 4.7 User Data Entry Tab This screen is wherethe Tuner end user prompts are created. There is a max of 10 prompts.Every time Tuner connects to the Mater module, if prompts have been created, the nd e user will have to enter in text for each prompt. This data will be stored in the Tuner results file. A) This box lists the current Prompts text and Order . a. Double clicking a prompt in this window will move the focus to the text box “F” where text for the prompt may be edited. B) Pressing this button will add another prompt to the window. C) Pressing this button will delete the currently selected prompt . D) Pressing this button will move the currently selected prompt up 1 spot . E) Pressing this button will move the currently selected promptdown 1 spot. F) This is the text box where the text for the selected promptmay be created/edited. G) Pressing this button will update the eslected prompt with text that is currently listed in the text box “F”. a. Using the Enter Key also updates the selected prompt. 17