1
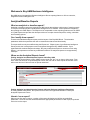
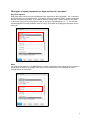
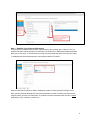
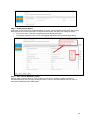
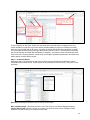
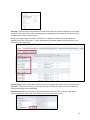
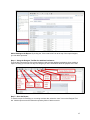
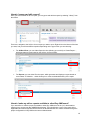
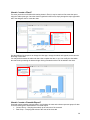
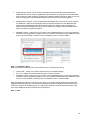
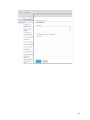
Business Intelligence Solution
User Manual
Buy A&M Business Intelligence
TABLE OF CONTENTS
WELCOME TO BUY A&M BUSINESS INTELLIGENCE .................................................................................................... 3
ANALYTICAL/BASELINE REPORTS ............................................................................................................................. 3
WHAT ARE ANALYTICAL OR BASELINE REPORTS?...................................................................................................................... 3
CAN I MODIFY THESE REPORTS?........................................................................................................................................... 3
WHERE ARE THE ANALYTICAL REPORTS FOUND? ..................................................................................................................... 3
HOW DO I RUN A REPORT? ................................................................................................................................................. 3
WHAT ARE THE OUTPUT OPTIONS FOR REPORTS? .................................................................................................................... 4
WHAT TYPES OF REPORT PARAMETERS ARE THERE AND HOW DO I USE THEM? .............................................................................. 5
AD HOC REPORTING................................................................................................................................................. 7
WHAT IS AD HOC REPORTING AND HOW DOES IT RELATE TO THE BUY A&M DATABASE? ............................................................... 7
HOW DO I ACCESS AD HOC REPORTING? .............................................................................................................................. 7
CREATING AN AD HOC REPORT FROM A DOMAIN ................................................................................................................... 7
CREATE AN AD HOC REPORT FROM A TOPIC ........................................................................................................................ 12
HOW DO I REOPEN AND EDIT A REPORT? ............................................................................................................................. 19
HOW DO I MAKE MY AD HOC REPORTS AVAILABLE TO OTHER BUY A&M USERS? ......................................................................... 19
HOW DO I CREATE A CHART? ............................................................................................................................................ 20
HOW DO I CREATE A CROSSTAB REPORT? ............................................................................................................................ 20
WHAT OTHER RESOURCES ARE AVAILABLE TO ASSIST ME WITH AD HOC REPORT DEVELOPMENT? ................................................... 21
DASHBOARDS .........................................................................................................................................................22
HOW DO I VIEW THE DASHBOARD CREATED FOR MY BUY A&M ROLE? ...................................................................................... 22
HOW DO I VIEW THE DASHBOARD ASSIGNED TO MY SPECIFIC USER ID? ...................................................................................... 22
HOW DO I CHANGE THE DASHBOARD ASSIGNED TO MY USER ID? .............................................................................................. 22
HOW DO I CREATE DASHBOARDS WITHIN BUY A&M? ........................................................................................................... 23
APPENDIX A – UNDERSTANDING BUY A&M DOMAINS ............................................................................................26
FAQS AND HELPFUL HINTS .............................................................................................................................................. 26
APPENDIX B – UNDERSTANDING BUY A&M STANDARD REPORTS ..........................................................................27
ANALYTIC REPORTS ......................................................................................................................................................... 27
INVENTORY REPORTS ...................................................................................................................................................... 28
PURCHASING REPORTS .................................................................................................................................................... 29
2
Welcome to Buy A&M Business Intelligence
Buy A&M has an integrated the Business Intelligence Server reporting feature to offer an extensive,
integrated business intelligence tool.
Analytical/Baseline Reports
What are analytical or baseline reports?
Analytical or baseline reports are pre-built Buy A&M reports that address a wide range of reporting needs.
The reports are deployed when the Business Intelligence tool is installed. These reports are designed in
the reporting tool called iReport. The iReport tool is comparable to other reporting products such as SSRS
or Crystal Reports and provides the developer with more complex view development, coding, calculation
and formatting options.
Can I modify these reports?
These are the standard analytical reports provided as part of the Buy A&M BI tool. The selectable
parameters within the report allow the user to customize the data set and functionality.
The report itself can only be modified using the iReport tool. iReport is part of your Business Intelligence
Server product, but is a development tool not supported through the Buy A&M BI module. If your
organization has a trained iReports developer, they may modify these reports or create new ones using
iReport. It is important to note that any modifications made to an analytical report are not supported by
Periscope.
Where are the Analytical Reports found?
Finding Analytical and Administrative Reports within Buy A&M
The Analytical Reports feature of Buy A&M is located under the “pie” icon on the top right corner. From
here, users can see a list of reports assigned to their user role and run those reports as needed. Users
will not see this icon if their role has no reports authorized
Finding Analytical and Administrative Reports within the Business Intelligence Repository
As a Buy A&M BI administrator, the reports can be found in the organizational folder> Periscope>
Analytical Reports and Forms.
How do I run a report?
When a user first opens a report, a version of the report will display and will list any predefined
parameters. Once the user has entered/selected the appropriate parameters for their report, they should
click ok to run the report.
3
What are the output options for reports?
All Buy A&M BI reports, both analytical and ad hoc, can be rendered in several formats:
• PDF
• Excel (paginated or not)
• Word document (DOCX)
• Rich Text Format in Word
• Flash
• ODT
• ODS
• CSV
4
What types of report parameters are there and how do I use them?
Drop Down Options
Drop-down options can be used several different ways, depending on the configuration. You must select
at least one option in a drop-down menu. If you want to select more than one option, hold the control key
and click the selections you want. If you want all options in a drop-down, there is usually an “all” option.
To find it in a long list of drop down options, click on any option and start typing A –L – L. You can also
use this approach to find any parameter option in a long list of values by simply typing the option you are
looking for.
Dates
You must enter all dates in YYYY-MM-DD format. If there is a date range with a begin and an end date, to
include all of the items up to midnight of the day you must XXXXXXX. It is recommended to use the
calendar feature to select dates.
5
Open Fields
Open fields, where it is possible to type the specific document number or text can accept one of three
options: the exact entry of the number/name; a like statement to return information with that number/text in
it and a wild card symbol that will return all options for that field. Examples of each are below:
•
•
•
To find all possibilities in a field, use “%”
To find possibilities with some number or text contained, use “%22” if you want to find
everything that ends in 22 or use “%22% if you want to find everything that has a 22 in it
anywhere.
To find the exact data, use the exact text or number contained within the field
6
Ad Hoc Reporting
What is Ad Hoc Reporting and how does it relate to the Buy A&M database?
The Ad Hoc reporting component of Buy A&M BI allows users to create their own reports on a one-time
basis or to be run regularly. To make ad hoc reporting user friendly, the database has been grouped into
useful DOMAINS of data. Domains also put user-friendly labels on the data fields, helping the user tie the
data back to screens seen within the Buy A&M application. Ad Hoc report users do not have rights to
create Domains. Domains are used to create reporting TOPICS. Topics further narrow the data that will be
used on a report and allow users to establish the data parameters for the report. The ad hoc report allows
users to select the data that will appear in the report, in what order and how.
BuySpeed
Database
Domains
Topics
Ad Hoc Report
Buy A&M BI Ad Hoc Reporting users can create ad hoc reports in one of three ways:
• By building a report from a Domain: Select Domain>Create Topic>Design Report
• By building a report from an existing Topic: Select Topic>Design Report
• By modifying an existing Topic(save as new): Open Topic in Design View/Modify/Save>Design
Report
• By modifying an existing ad hoc report: Select Report in Design View>Modify
How do I Access Ad Hoc Reporting?
Creating an Ad Hoc Report from a Domain
To create a report from a Domain the user must first build a Topic from that Domain before designing the
report: Click on “Domain” on the Ad Hoc Report window.
7
Step 1 – Selecting the Domain
Click “Create a Report” or use the drop down menu under the “Create” tab and select Ad Hoc Report.
Select the domain you want to use to develop your Topic/Report, and click “Choose Data…”
Step 2 –Choose Data for the Topic
The next step is to further narrow the data from the Domain you chose. This step creates a Topic from
which you will build your report.
On this screen, you will choose the data for your Topic. If you realize at this point that you chose the
wrong domain, you can change it:
Select the data fields from the Domain to create the reporting Topic. If you have questions about the
purpose of a specific field, hover your mouse over the field and a popup will define the field for you.
8
Step 3 – Establish Topic Filters and Parameters
The next step is to establish specific filters or parameters for the reporting topic, if desired. This is a
powerful tool when creating a report from a Domain, as it allows you to establish selectable parameters
when you run the report. It also allows you to further narrow the data that will be returned in the report.
To establish topic filters and parameters, click the button labeled “Pre-filters”.
Select the data field for which you want to establish a condition or filter by double-clicking the field.
Once you have selected the data field, select the parameters you wish to include in the topic and the
range of criteria, and click “OK” when done. If you want to lock the parameter down so that it is always
used with the Topic, check the “Locked” box.
9
Step 4 – Update Display Names
At this step, you may choose to re-label the data in your topic. As the domains already have user-friendly
labels and you can rename fields when creating the report layouts, this step is not usually necessary.
• To move the order of the data, use the up and down arrows to the right.
• To change the display name of a field, just highlight and double click the field to begin editing.
Step 5 – Save Topic to Repository Folder
Save the topic by clicking “Save as Topic” so that you can use it to create more than one report or
correct/modify items once you begin creating the report. Save it to the folder labeled with your name or
other folder established by the administrator.
10
Step 6 – Design Report
Go to Creating an Ad Hoc Report from a Topic
11
Create an Ad Hoc Report from a Topic
If you have just finished creating a Topic from a Domain, skip to Step 2. Otherwise, login to Buy A&M and
click the “magic wand” Ad Hoc Reporting icon in the top right corner. This will open the Business
Intelligence Ad Hoc Reporting window.
Step 1 – Select a Reporting Topic
Ensure that the Topic tab is selected. Highlight the topic that contains the information on which you wish
to report. Once you have highlighted a Topic, more information about the contents can be found in the
description box at the bottom.
Select the type of report you wish to create:
• Table
• Chart
• Crosstab
You can change this selection after you begin creating the report layout, but it is often easier to start with
the intended layout.
When you are ready to move to the next step, click “Open Report” to begin designing the report items and
layout.
Step 2 – Select Data for the Report
The report designer view is where you can select which data will appear in the report:
12
To put a data field on the report, double click the arrow next to that field (and it will appear in the next
column available) or right click to get more options (including adding as a group or creating a new filter).
When you select a data field for the report, a selection of sample data for the report will appear to assist
you in formatting and determining if the right data field was selected. NOTE: Sometimes the parameters
are set narrowly that no sample data is available for designing – an example of this is the date parameter.
If this is the case, use the parameter control boxes on the right to broaden the parameters and allow some
data to appear to assist with the design.
Step 3 -- Customize Report
Selecting a field or column and then right clicking will provide a list of additional configuration options
associated with that field/column. Some options are only available for numeric fields. They can be used
as follows:
Edit Label: Selecting this allows the user to edit the column label.
Move Left/Move Right: This allows the user to move the columns over without dragging/dropping.
Change Data Format: When the column is a number, the number format can be changed to show
negatives in a different way or to eliminate the decimals.
13
Grouping: To group items on the report by one of the data fields, first ensure the data field is not already
a column on the report. Then, add it back as a group by highlighting it on the topic list and right clicking to
reveal the options. Select “add as group”.
Doing so, groups the data on the report by that field. It is important to note that a grouped data field
appears as two lines on the report – once at the beginning of the data related to that specific group and
once at the end of that group.
Use for sorting: This will allow you to use the column for sorting the data on the report. If more than one
data field is being used for sorting, you can select the order in which the sorting occurs and whether the
sorting is ascending or descending order.
Add Summary: Will add a total line for the selected column. If the column is a number, it will add the
numbers together to get the total. If the column is text, it will summarize a count.
14
Create Filter: This allows the user to establish a filter for that data field that did not previously exist for the
topic. In the example below, by selecting the dollar amount column, the user was able to establish a filter
for results between 500 and 9000.
Create Custom Field (add calculations): This allows the user to create a new column with a calculated
field.
In this example, a % of Total (value) was selected and the new column added.
15
Custom fields are designed to allow for basic calculations, but combinations of calculated fields can allow
the ad hoc report designed to create some more complex calculations:
Once a custom field is created, it does not need to appear in the report to still be used. For example, the
first column can be deleted from the table and the second column can still appear – even though the
second column uses data from the first created field.
Once a custom field is created when designing a report, it remains in the topic list for reuse before
the report is saved.
16
Add a Heading to the Report: By clicking the “Click to add a title” bar at the top of the report designer,
you can add a report title.
Step 4 – Using the Designer Tool Bar for additional assistance
The bar with icons at the top of the report designer view provides additional assistance when creating a
report. Hovering your cursor over any icon will give you more information about the purpose of the icon.
Step 5 -- Save the Report
To save the report for modifying or re-running at a later date, select the “save” icon on the Designer Tool
bar. Add the report name and select the repository folder in which to save it.
17
Step 6 -- Run the report
To display the report in a final format and save it to your workstation, the report must be run using one of
the available formats. Click the “run report” icon on the designer tool bar and a new window will open for
selecting the format and updating the parameter selections.
18
How do I reopen and edit a report?
Once you have created an ad hoc report, you may open and edit that report by selecting “Library” from
the toolbar.
From here, navigate to the Ad Hoc view or report you want to open. Right-click on the Name of the item
you want, and you will have different options depending on the type of item you are choosing:
•
For Ad Hoc Views, you can either Open the view (allowing you to edit it) or Create Report…,
which generates a report based on the Ad Hoc view as it exists.
•
For Reports, you can either Run the report, which generates and displays a report based on
current data, or Schedule… which allows you to create a scheduled delivery of the report.
How do I make my ad hoc reports available to other Buy A&M users?
If you would like to make the report accessible to other Buy A&M users via the “pie” administrative
reporting icon, contact your Buy A&M BI Administrator. They should save a copy of the report in the
Organizational>Custom Reports folder and then the BI administrator can make it available through the
proper configurations in Buy A&M as the Internal Administrator.
19
How do I create a Chart?
For some users who are familiar with creating charts in Excel, it may be easier to first create the report
using the Table report type. Once the data is organized in this format, simply change the report type while
still in the designer view to create the chart.
Use the additional chart options to change the chart type, change the labels and legends, and customize
the design of the chart.
You may switch between the table and chart view to update the data, or you can modify the data within
the chart view by selecting the data and right clicking to determine how it will be added to the chart.
How do I create a Crosstab Report?
Cross tab reports generate summary data in a grid where the rows and columns represent groups of data.
There are three types of data added to a cross tab report:
• Column Group – Grouping that makes up the columns of the cross tab
• Row Group – Grouping that makes of the rows of the cross tab
20
•
Measure – the information tabulated by the column and row
To add the data field as one of the three types, highlight the data field and right click to select the correct
option.
In the example below, the cross tab report is designed to display the total dollar amount of POs issued by
each buyer for each Org ID.
To do this:
• The BUYER data field was added as a column group.
• The ORG ID was added as a row group.
• The PURCHASE ORDER TOTAL AMOUNT was added as the measure. This provided a count
of POs by buyer, by status.
What other resources are available to assist me with Ad Hoc Report
development?
As an ad hoc report user, the Business Intelligence Help button exists in the top right corner of the screen.
Clicking this feature will take you to the Business Intelligence online help.
21
Dashboards
The BI Administrator establishes the default dashboard that is viewable to each role. However, users with
Ad Hoc reporting rights can create dashboards and all users with Dashboard rights can choose which
Dashboard appears on their home page (different from the one established as the user default).
How do I view the dashboard created for my Buy A&M role?
Login to Buy A&M and select the role for which you wish to view the dashboard (not all roles may be setup with dashboards). Click the “bar chart” icon in the top left corner to open the dashboard.
How do I view the dashboard assigned to my specific user ID?
Go to your home page and click on the dashboard tab. If you do not have a dashboard tab, contact your
BI Administrator for assistance in establishing the dashboard rights.
How do I change the dashboard assigned to my user id?
Click “my account” and click edit to view the options.
22
How do I create dashboards within Buy A&M?
If you have ad hoc reporting rights within Buy A&M, you can create a dashboard. However, a Buy A&M BI
Administrator must assign that dashboard as the default for your user role after it is created to make it
accessible through the dashboard icon in Buy A&M. Or you can save the dashboard to your user role
folder and select it as the default on your home page.
To begin creating a dashboard, click on the Home icon, and then click Create>Dashboard.
Step 1 – Select the Reports
To add a report to the dashboard, either double-click on the report name or right-click and select “Add to
Dashboard.” You may add multiple reports to the dashboard.
Some reports have parameters that should be added to the dashboard to allow the user to update the
data shown.
Step 2 – Add Report Controls (Parameters) to the Dashboard
Under the Special Content folder there are several report control options. By selecting the arrow next to
them, you can add them to the dashboard. Clicking and dragging will allow you to position them anywhere
on the dashboard screen.
23
•
Single Report Controls – these are the parameters associated with the reports added to the
dashboard and each is unique to a particular report. Add them by clicking the arrow and position
near the report to which it applies. Changing the parameter default information (which you can do
while in the designer view) will update only the report for which the parameter applies.
•
Multiple Report Controls – these are parameters associated with more than one report added to
the dashboard. Add them by clicking the arrow and position anywhere on the dashboard that
makes sense understanding that it will impact the results on multiple reports. Changing the
parameter default information (which you can do while in the designer view) will update all the
reports for which the parameter applies.
•
Standard Controls -- allows you to put “buttons” on the dashboard for the user to reset parameter
information, submit parameter changes (if you don’t add this the parameters will update the report
as soon as the new data is entered), view in a printable screen, or add text labels.
Step 3 – Customize Layout
Additional elements within Special Content allow the user to customize the layout:
•
•
•
Custom URL – allows you to add an external link on the dashboard page
Free Text -- allows you to add explanatory text or labels as needed
Standard Controls -- allows you to put “buttons” on the dashboard for the user to reset parameter
information, submit parameter changes (if you don’t add this the parameters will update the report
as soon as the new data is entered), view in a printable screen, or add text labels.
Using the edge of the report you can resize any report. You can also modify the layout by clicking and
dragging dashboard elements. The dotted layout background allows for alignment and indicates which
items are moving off the viewable screen. To change the resolution, resize or preview the layout, right
click on the dashboard layout and select from the dropdown.
Step 4 – Save
24
25
Appendix A – Understanding Buy A&M Domains
Each domain contains a description and more detailed information about the data fields included. This
section is meant to help users determine which domains are most helpful in meeting their specific
reporting needs.
Domain Name
Accounting
Domain
Quote Domain
Solicitation
Domain
PO Domain
Vendor Domain
Inventory Site
and Item
Domain
General Contents
Accounting Transactions from
all document types
All Bid Quotes, Revisions
All Bid Documents, Bid
Acknowledgements and
Vendor Information (excludes
Quotes)
All PO Documents Header
and Item level data.
Vendor record data including
vendor categories and
addresses
Contains the data fields on
the master stock item tab, the
detailed item tabs associated
with each site and the site
tabs
Common Use
• Encumbrance reports for data entry or
reconciliation
• For reports on opened bids
• For reports not requiring quote information
•
Any PO reports
•
Reports outlining specific vendor data, not
specifically associated with a document
•
Reports to view the current status of an item
price, or QOH, QOB or QOO
Reports to view information about a single
item across multiple sites
•
FAQs and Helpful Hints
1. My report has multiple lines for the same PO, why? Some domains combine item level and
header level data together, which means that for some fields, there is more than one line of data
for the particular document within the Domain. Another example is with vendors – each vendor
record may have multiple addresses, which would result in multiple lines on the report. There are
two ways to deal with this: either set a parameter narrowly to eliminate the duplicate (such as set
the address type to only one kind for a vendor, if you don’t need more address information in the
report) or use the specially created “header domains”. The header domains are designed to allow
reporting at higher level, so as not to create the duplicate line item entries.
26
Appendix B – Understanding Buy A&M Standard Reports
Analytic Reports
•
•
•
•
•
•
•
•
•
•
•
•
•
•
•
•
•
•
•
Contract Utilization - The report is designed to display the releases and spend for blankets and
contracts. Information includes blanket start/end and the release amounts with ordering
department and location.
Bid Processing Cycle Times - Bid report that captures in days the amount of time a particular
bid stayed at each document status. Displays the current status and totals the number of days for
all status changes. Accepts a wildcard parameter or a specific bid number as input.
PO Cycle Time Detail - The PO Cycle Time report summarizes the number of days for a
purchase order to be processed. The detail report shows the number of days taken to process
from each PO status as well.
PO Cycle Time Summary - The PO Cycle Time report summarizes the number of days for a
purchase order to be processed by buyer. The report also calculates the average number of days
overall by organization.
Requisition Approval Cycle Detail - The Requisition Approval Cycle report calculates the
number of days it takes the requisition to go from Ready for Approval to Ready for Purchasing.
The detail report shows the individual requisitions.
Requisition Approval Cycle Summary - The Requisition Approval Cycle report calculates the
number of days it takes the requisition to go from Ready for Approval to Ready for Purchasing.
The summary report shows the average number of days needed per requisition type.
Open PO Remaining Balance - The report is designed to tally the remaining encumbered
amounts for purchase orders by account code.
PO Received But Not Invoiced - The report is designed to tally the PO receipts and then display
the dollar amount that has not been invoiced.
Unpaid Receipts - The report will tally the PO receipts and the amount that has not been paid.
The calculation sums the receipt totals and invoice totals and shows the difference.
NIGP Spend Analysis Detail - The report is designed to show the total amount of spend by
NIGP code. The detail report includes listing the individual releases for each department.
NIGP Spend Analysis Summary - This report is designed to show the total amount of spend by
NIGP code. The summary report summarizes spend by each department and does not show
individual PO documents.
On/Off Contract Spend Analysis Detail - On and Off Contract Spend Analysis report is
designed to show the total amount of spend on contract (releases) and off contract. The detail
reports displays the individual documents included in the calculation.
On/Off Contract Spend Analysis Summary - On and Off Contract Spend Analysis report is
designed to show the total amount of spend on contract (releases) and off contract. The summary
report displays the sum total but does not display the individual documents in the calculation.
Purchasing Statistics - Statistics on the number of requisitions and purchase orders by
Organization and department. Captures number of documents, number of line items, average line
items, and total dollar amounts.
Spend by Vendor Category Detail - The report is designed to show the total amount of spend by
the agency defined vendor categories. It then displays spend by category type and individual
vendors including the PO document numbers.
Spend by Vendor Category Summary - This report is designed to show the total amount of
spend by the agency defined vendor categories. The report summarizes by the category and
category types.
Vendor Spend Analysis by Purchase Method Detail - The Vendor Spend Analysis by
Purchase Method report lists the total amount of spend by vendor according to the purchase
method on the PO. The detail report includes the purchase order document numbers.
Vendor Spend Analysis by Purchase Method Summary - The Vendor Spend Analysis by
Purchase Method report lists the total amount of spend by vendor according to the purchase
method on the PO.
Bid Opening Report - Report intended for external use,that displays quotes submitted to a given
bid in a format that differs according to the bid type. Some bids types get a blank page, some get
27
•
•
•
•
•
•
•
•
•
a list of quotes, and some get a grid like pattern of the quotes.
Vendor Award by Category - The Vendor Award by Category report lists the awarded vendors
on bids and their categories and category types.
Vendor Bid Notification by Category - The report is designed to list the vendors that were
selected to be notified of a formal bid by vendor category and category type.
Vendor Bid Notification by Category Type - This report is designed to list the vendors that were
selected to be notification of a formal bid by vendor category and category type. A selection
criterion includes user entered beginning and ending input parameters.
Vendor Participation by Category - The Vendor Participation by Bid and Category report lists
the vendor category and category types for each vendor who responded with a quote on the
bids selected.
Vendor Participation by Category Type - The Vendor Participation by Category and Category
Type report summarizes the number of vendors of each category and category types that
responded with a quote for the bid selected.
Vendor PO by Category - The Vendor PO by Category report lists the category and category
type of the awarded vendors on POs and the summary of the number of POs to each category
type.
Blanket/Contract Dollar Thresholds - Contract report that shows the control tab information for
blankets/contracts including dollar amounts remaining in contract limit and each department's
spend to date.
Workload Analysis by Buyer - The total number of days a particular requisition or purchase
order is in process up until the purchase order is ready to send to the vendor.
Expiring Contracts - The report is designed to display contracts whose expiration dates are
within the range selected by the user. This will include the dollars spent to date. User may select
from range of days to expiration.
Inventory Reports
•
•
•
•
•
•
•
•
•
Aisle/Bin Bar Code - Not currently used anywhere in the app, but can be used to generate a bar
code from an aisle/bin number.
Analysis Recap - Groups data by Stock Item Category. Calculates period ending value, how
many times items in the category went out of stock and how many times stock turned over within
a year of period ending date.
Analysis Recap FIFO (Oracle/SQL Server versions) - Groups data by Stock Item Category.
Calculates period ending value, how many times items in the category went out of stock and how
many times stock turned over within a year of period ending date.
Analysis Recap LIFO (Oracle/SQL Server versions) - Groups data by Stock Item Category.
Calculates period ending value, how many times items in the category went out of stock and how
many times stock turned over within a year of period ending date.
Charge to Department - Inventory Transaction Summary sorted by transaction date. Lists
charge to Departments and accounts, extended amount, total cost, overhead amount, restock
charges for each inventory document number.
Charge to Department Accounting Detail - Inventory Transaction Summary with Detailed
Accounting information. Sorted by Department, Site, Stock Item Number, Document Number and
Item Number. Lists charge to Departments and accounts, Destination and Transfer Sites,
quantity, extended amount, overhead amount, restock charges for each inventory document and
item number.
Charge to Recap - Groups total transactions by date or site: Issues, Adjustments In,
Adjustments Out, Transfers In, Transfers Out, Receipts, Returns. For each transaction type, Cost
Total, Overhead, Total (Cost Total + Overhead), Restock and Overall (Total - Restock) Total is
calculated.
Inventory ABC Analysis - Groups data by A, B, C Priority Code and provides a summary total
for each group. Lists site and stock item information, issue quantity, quantity on hand, Class-Item
for each item.
Inventory Forecast Analysis - Lists the last twelve months of activity and makes a forecast for
the next twelve months. Historical/forecast quantity and dollar amount for each stock item is
28
•
•
•
•
•
•
•
•
•
reported.
Inventory Item Catalog - Lists inventory catalog stock item numbers, descriptions and prices per
unit. Sorted by Site.
Inventory Items on Order - Lists inventory stock items on order, details about each stock item
including quantity on hand, quantity on order and associated vendor and purchase order details.
Inventory Performance Analysis - Calculates fiscal year stock outs and turn ratio for each stock
item. Lists the last date a stock item was issued, current price, quantity on hand.
Inventory PO Receiving - Lists Purchase Order and Receipt Details including order and
receiving quantities and dates.
Inventory Transaction Log Doc ID Sort - Inventory Transaction Log Sorted by Document ID.
Inventory Item List - Basic Item List: Lists Location, Stock Item, Aisle Bin, Description, Order
Method, Class Item and Term Item. Details and History: Lists Location, Stock Item, Aisle Bin,
Issue UOM, Quantity on Hand, Current Price, Overhead %, and numerous other details. Also
gives an issue history by month for each stock item. Reorder and History: Lists Location, Stock
Item, Aisle Bin, Issue UOM, Quantity on Hand, Current Price, Overhead %, and numerous other
details. Also lists reorder and issue history by month for each stock item.
Stock Item Bar Code - Not currently used anywhere in the app, but can be used to generate a
bar code from a stock item number.
Transaction Log - Inventory Transaction Log Sorted by Date.
Value Analysis - Calculates on hand value of stock items. Lists current price, quantity on hand.
Purchasing Reports
•
•
•
•
•
•
•
•
•
•
•
•
•
•
•
•
•
•
•
•
•
•
•
•
•
•
•
•
•
Approval Paths - Provides data on all approval paths in the system.
CST_POBUY - POs by Buyer
CST_PODEPT - POs by Department
CST_POTOT - Total PO
CST_POTYPE - POs by Type Code
CST_REQDEP - Requisitions by Department
CST_REQTOT - Total Requisitions
Dept by User - Department by User
Dept by User and Role - Department by User and Role
Dept by Location - Department by Location
PO_SEND - POs in Sent status
PO_SUM_DETAIL - PO Summary Detail Report
PO_SUM - PO Summary Report
PO_SUM_GROUP - PO Summary by Group
PO_SUM_THRESHOLD_BOTH - PO Threshold Report
REQ_ACCNT_ITEM - Requisition Accounting Report
REQ_ACCNT_SUM_BYCODE - Requisition Accounting Summary by Acct Code
REQ_ACCNT_SUM - Requisition Accounting Summary
REQ_APPRV_BY_APPROVER - Requisition Approval Report by Approver
REQ_APPRV - Requisition Approval Report
REQ_STATUS - Requisition Status Detail
REQ_SUM - Requisition Summary
REQ_SUM_ITEM - Requisition Detailed Summary
Subcontractor Payment by Vendor - Payments to subcontractors listed by vendor.
Subcontractor POs - POs with subcontractors.
Subcontractor Unacknowledged by Buyer - Buyers that have no acknowledged subcontractor
payments.
VB_CHGORDS - Approved Change Order
VEN_PURCH_LIST - Vendor Purchase History
VEND_Q_3 - Vendor Class Item
29
•
Vendor Contract Usage - Provides information about spend against contracts.
30