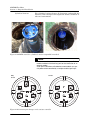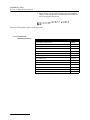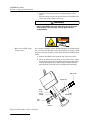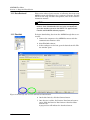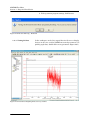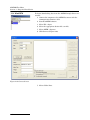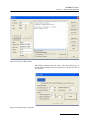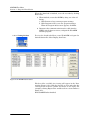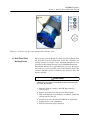
1
® ADFM Pro20/Hot Tap Acoustic Doppler Flow Meters Installation and Operation Guide Part #69-7103-001 of Assembly #60-7004-025 Copyright © 2013. All rights reserved, Teledyne Isco Revision J, June 2013. Foreword This instruction manual is designed to help you gain a thorough understanding of the operation of the equipment. Teledyne Isco recommends that you read this manual completely before placing the equipment in service. Although Teledyne Isco designs reliability into all equipment, there is always the possibility of a malfunction. This manual may help in diagnosing and repairing the malfunction. If a problem persists, call or e-mail the Teledyne Isco Technical Service Department for assistance. Simple difficulties can often be diagnosed over the phone. If it is necessary to return the equipment to the factory for service, please follow the shipping instructions provided by the Customer Service Department, including the use of the Return Authorization Number specified. Be sure to include a note describing the malfunction. This will aid in the prompt repair and return of the equipment. Teledyne Isco welcomes suggestions that would improve the information presented in this manual or enhance the operation of the equipment itself. Teledyne Isco is continually improving its products and reserves the right to change product specifications, replacement parts, schematics, and instructions without notice. Contact Information Customer Service Phone: (800) 228-4373 (USA, Canada, Mexico) (402) 464-0231 (Outside North America) Fax: (402) 465-3022 Email: [email protected] Technical Support Phone: Email: Toll Free (866) 298-6174 (Samplers and Flow Meters) Toll Free (800) 775-2965 (Syringe Pumps and Liquid Chromatography) [email protected] Return equipment to: 4700 Superior Street, Lincoln, NE 68504-1398 Other Correspondence Mail to: P.O. Box 82531, Lincoln, NE 68501-2531 Email: [email protected] Revised September 2012 ADFM® Flow Meter Safety ADFM® Flow Meter Safety General Warnings Before installing, operating, or maintaining this equipment, it is imperative that all hazards and preventive measures are fully understood. While specific hazards may vary according to location and application, take heed of the following general warnings: WARNING Avoid hazardous practices! If you use this instrument in any way not specified in this manual, the protection provided by the instrument may be impaired. AVERTISSEMENT Éviter les usages périlleux! Si vous utilisez cet instrument d’une manière autre que celles qui sont specifiées dans ce manuel, la protection fournie de l’instrument peut être affaiblie; cela augmentera votre risque de blessure. Safety Precautions This section contains a list of items you should be aware of every time you use your ADFM Flow Meter. • Servicing instructions are for use by service-trained personnel. To avoid dangerous electric shock, do not perform any service unless qualified to do so. • Do not install substitute parts or perform any unauthorized modifications to the instrument. • Any maintenance and repair of the opened instrument under voltage should be avoided as much as possible, and when inevitable, should be carried out only by skilled and qualified personnel. Hazard Severity Levels • Capacitors inside the instrument may still be charged even if the instrument has been disconnected from power. This manual applies Hazard Severity Levels to the safety alerts, These three levels are described in the sample alerts below. CAUTION Cautions identify a potential hazard, which if not avoided, may result in minor or moderate injury. This category can also warn you of unsafe practices, or conditions that may cause property damage. WARNING Warnings identify a potentially hazardous condition, which if not avoided, could result in death or serious injury. iii ADFM® Flow Meter Safety DANGER DANGER – limited to the most extreme situations to identify an imminent hazard, which if not avoided, will result in death or serious injury. Hazard Symbols The equipment and this manual use symbols used to warn of hazards. The symbols are explained below. Hazard Symbols Warnings and Cautions The exclamation point within the triangle is a warning sign alerting you of important instructions in the instrument’s technical reference manual. The lightning flash and arrowhead within the triangle is a warning sign alerting you of “dangerous voltage” inside the product. Symboles de sécurité Ce symbole signale l’existence d’instructions importantes relatives au produit dans ce manuel. Ce symbole signale la présence d’un danger d’électocution. Warnungen und Vorsichtshinweise Das Ausrufezeichen in Dreieck ist ein Warnzeichen, das Sie darauf aufmerksam macht, daß wichtige Anleitungen zu diesem Handbuch gehören. Der gepfeilte Blitz im Dreieck ist ein Warnzeichen, das Sei vor “gefährlichen Spannungen” im Inneren des Produkts warnt. Advertencias y Precauciones Esta señal le advierte sobre la importancia de las instrucciones del manual que acompañan a este producto. Esta señal alerta sobre la presencia de alto voltaje en el interior del producto. iv ADFM® Flow Meter Table of Contents Section 1 Introduction 1.1 1.2 1.3 1.4 1.5 Overview . . . . . . . . . . . . . . . . . . . . . . . . . . . . . . . . . . . . . . . . . . . . . . . . . . . . . . . . . . Initial Inspection . . . . . . . . . . . . . . . . . . . . . . . . . . . . . . . . . . . . . . . . . . . . . . . . . . . . Technical Specifications . . . . . . . . . . . . . . . . . . . . . . . . . . . . . . . . . . . . . . . . . . . . . . Operating Principles . . . . . . . . . . . . . . . . . . . . . . . . . . . . . . . . . . . . . . . . . . . . . . . . . Communication and Data Interfacing . . . . . . . . . . . . . . . . . . . . . . . . . . . . . . . . . . . 1.5.1 Optional Interfacing Tools . . . . . . . . . . . . . . . . . . . . . . . . . . . . . . . . . . . . . . . 1-1 1-2 1-2 1-5 1-8 1-8 Section 2 Setup and Installation 2.1 Software . . . . . . . . . . . . . . . . . . . . . . . . . . . . . . . . . . . . . . . . . . . . . . . . . . . . . . . . . . . 2-1 2.2 Flowlink Software . . . . . . . . . . . . . . . . . . . . . . . . . . . . . . . . . . . . . . . . . . . . . . . . . . . 2-1 2.3 WinADFM Software . . . . . . . . . . . . . . . . . . . . . . . . . . . . . . . . . . . . . . . . . . . . . . . . . 2-8 2.3.1 Setup . . . . . . . . . . . . . . . . . . . . . . . . . . . . . . . . . . . . . . . . . . . . . . . . . . . . . . . . 2-8 2.3.2 Connecting to the ADFM . . . . . . . . . . . . . . . . . . . . . . . . . . . . . . . . . . . . . . . 2-15 2.4 Preparing for Installation . . . . . . . . . . . . . . . . . . . . . . . . . . . . . . . . . . . . . . . . . . . . 2-18 2.4.1 Installation Checklist . . . . . . . . . . . . . . . . . . . . . . . . . . . . . . . . . . . . . . . . . 2-18 2.4.2 Basic Configuration . . . . . . . . . . . . . . . . . . . . . . . . . . . . . . . . . . . . . . . . . . . 2-19 2.4.3 Power Selection . . . . . . . . . . . . . . . . . . . . . . . . . . . . . . . . . . . . . . . . . . . . . . 2-21 2.4.4 Site Requirements . . . . . . . . . . . . . . . . . . . . . . . . . . . . . . . . . . . . . . . . . . . . 2-22 2.4.5 Installing the Electronics Controller . . . . . . . . . . . . . . . . . . . . . . . . . . . . . 2-22 2.5 Sensor Installation . . . . . . . . . . . . . . . . . . . . . . . . . . . . . . . . . . . . . . . . . . . . . . . . . 2-25 2.5.1 General Cabling and Connection . . . . . . . . . . . . . . . . . . . . . . . . . . . . . . . . 2-25 2.6 Pro20 Sensor Installation . . . . . . . . . . . . . . . . . . . . . . . . . . . . . . . . . . . . . . . . . . . . 2-25 2.6.1 Pro20: Channel Geometry . . . . . . . . . . . . . . . . . . . . . . . . . . . . . . . . . . . . . . 2-25 2.6.2 Sensor Positioning . . . . . . . . . . . . . . . . . . . . . . . . . . . . . . . . . . . . . . . . . . . . 2-27 2.6.3 Pro20: Cabling . . . . . . . . . . . . . . . . . . . . . . . . . . . . . . . . . . . . . . . . . . . . . . . 2-28 2.6.4 Circular Channels . . . . . . . . . . . . . . . . . . . . . . . . . . . . . . . . . . . . . . . . . . . . 2-29 2.6.5 Large Flows and Moving Debris . . . . . . . . . . . . . . . . . . . . . . . . . . . . . . . . . 2-33 2.6.6 Rectangular Channels . . . . . . . . . . . . . . . . . . . . . . . . . . . . . . . . . . . . . . . . . 2-33 2.6.7 Applications With Permanent Silt . . . . . . . . . . . . . . . . . . . . . . . . . . . . . . . 2-35 2.6.8 Pro20 Sensor Mounting Hardware . . . . . . . . . . . . . . . . . . . . . . . . . . . . . . . 2-38 2.7 Hot Tap Sensor Installation . . . . . . . . . . . . . . . . . . . . . . . . . . . . . . . . . . . . . . . . . . 2-39 2.7.1 Forced Depth and Scaling Constant (Hot Tap only) . . . . . . . . . . . . . . . . . 2-40 2.8 Insertion: Early Version HTI . . . . . . . . . . . . . . . . . . . . . . . . . . . . . . . . . . . . . . . . . 2-41 2.9 Insertion: Current HTI . . . . . . . . . . . . . . . . . . . . . . . . . . . . . . . . . . . . . . . . . . . . . . 2-46 2.10 Applying Power . . . . . . . . . . . . . . . . . . . . . . . . . . . . . . . . . . . . . . . . . . . . . . . . . . . 2-51 2.10.1 Box Controller Batteries . . . . . . . . . . . . . . . . . . . . . . . . . . . . . . . . . . . . . . 2-51 2.10.2 Box Controller On and Reset Switches . . . . . . . . . . . . . . . . . . . . . . . . . . . 2-53 2.10.3 Canister Controller Batteries . . . . . . . . . . . . . . . . . . . . . . . . . . . . . . . . . . 2-54 2.10.4 Resetting the ADFM Canister . . . . . . . . . . . . . . . . . . . . . . . . . . . . . . . . . 2-55 2.11 Built In Tests (BITs) (Box Controller Only) . . . . . . . . . . . . . . . . . . . . . . . . . . . . 2-56 2.11.1 Testing Interval . . . . . . . . . . . . . . . . . . . . . . . . . . . . . . . . . . . . . . . . . . . . . 2-56 2.11.2 Test Record . . . . . . . . . . . . . . . . . . . . . . . . . . . . . . . . . . . . . . . . . . . . . . . . . 2-56 2.11.3 Power-up BIT Procedure/Sequence . . . . . . . . . . . . . . . . . . . . . . . . . . . . . . 2-56 2.12 Data Retrieval . . . . . . . . . . . . . . . . . . . . . . . . . . . . . . . . . . . . . . . . . . . . . . . . . . . . 2-58 2.13 Flowlink . . . . . . . . . . . . . . . . . . . . . . . . . . . . . . . . . . . . . . . . . . . . . . . . . . . . . . . . . 2-58 2.13.1 Viewing the Data . . . . . . . . . . . . . . . . . . . . . . . . . . . . . . . . . . . . . . . . . . . . 2-60 v ADFM® Flow Meter Table of Contents 2.14 WinADFM . . . . . . . . . . . . . . . . . . . . . . . . . . . . . . . . . . . . . . . . . . . . . . . . . . . . . . . 2-62 2.14.1 Viewing the Data . . . . . . . . . . . . . . . . . . . . . . . . . . . . . . . . . . . . . . . . . . . . 2-64 Section 3 Maintenance and Troubleshooting 3.1 How to Obtain Service . . . . . . . . . . . . . . . . . . . . . . . . . . . . . . . . . . . . . . . . . . . . . . . 3-1 3.1.1 Cleaning . . . . . . . . . . . . . . . . . . . . . . . . . . . . . . . . . . . . . . . . . . . . . . . . . . . . . 3-1 3.1.2 Packaging . . . . . . . . . . . . . . . . . . . . . . . . . . . . . . . . . . . . . . . . . . . . . . . . . . . . 3-1 3.2 Desiccant . . . . . . . . . . . . . . . . . . . . . . . . . . . . . . . . . . . . . . . . . . . . . . . . . . . . . . . . . . 3-2 3.2.1 Box Controller Desiccant . . . . . . . . . . . . . . . . . . . . . . . . . . . . . . . . . . . . . . . . 3-2 3.2.2 Canister Controller Desiccant . . . . . . . . . . . . . . . . . . . . . . . . . . . . . . . . . . . . 3-4 3.3 Real Time Clock Backup Battery . . . . . . . . . . . . . . . . . . . . . . . . . . . . . . . . . . . . . . . 3-5 3.4 Troubleshooting the ADFM . . . . . . . . . . . . . . . . . . . . . . . . . . . . . . . . . . . . . . . . . . . 3-6 3.4.1 Troubleshooting Tables . . . . . . . . . . . . . . . . . . . . . . . . . . . . . . . . . . . . . . . . . 3-6 3.4.2 Troubleshooting Steps . . . . . . . . . . . . . . . . . . . . . . . . . . . . . . . . . . . . . . . . . . 3-7 3.4.3 BIT Not Executing (Box Controller Only) . . . . . . . . . . . . . . . . . . . . . . . . . . 3-8 3.4.4 BIT Determines a Problem Associated with the Sensor . . . . . . . . . . . . . . . 3-9 3.4.5 Sensor Malfunction With Canister Controller . . . . . . . . . . . . . . . . . . . . . . 3-10 Appendix A Parts and Accessories A.1 A.2 A.3 A.4 General Spare Parts and Accessories . . . . . . . . . . . . . . . . . . . . . . . . . . . . . . . . . . . A-1 Standard Pro20 Mounting Rings . . . . . . . . . . . . . . . . . . . . . . . . . . . . . . . . . . . . . . . A-2 Pro20 Debris Fairing Kits . . . . . . . . . . . . . . . . . . . . . . . . . . . . . . . . . . . . . . . . . . . . A-2 Secondary Depth Sensors. . . . . . . . . . . . . . . . . . . . . . . . . . . . . . . . . . . . . . . . . . . . . A-2 Appendix B Material Safety Data Sheets List of Figures 1-1 Typical Pro20 Installation (2 of 4 profiles shown) . . . . . . . . . . . . . . . . . . . . . . . . . 1-5 1-2 ADFM Pro20 dimensions and beam geometry . . . . . . . . . . . . . . . . . . . . . . . . . . . . 1-6 1-3 ADFM Hot Tap beam geometry . . . . . . . . . . . . . . . . . . . . . . . . . . . . . . . . . . . . . . . . 1-7 1-4 Optional accQcomm Interface Module . . . . . . . . . . . . . . . . . . . . . . . . . . . . . . . . . . 1-8 1-5 Optional 2105 Interface Module . . . . . . . . . . . . . . . . . . . . . . . . . . . . . . . . . . . . . . . 1-9 2-1 Flowlink Site Info tab . . . . . . . . . . . . . . . . . . . . . . . . . . . . . . . . . . . . . . . . . . . . . . . 2-2 2-2 Flowlink Devices tab . . . . . . . . . . . . . . . . . . . . . . . . . . . . . . . . . . . . . . . . . . . . . . . . 2-3 2-3 Flowlink Measurements tab . . . . . . . . . . . . . . . . . . . . . . . . . . . . . . . . . . . . . . . . . . 2-4 2-4 Flowlink Flow Rate tab: Rectangular channel . . . . . . . . . . . . . . . . . . . . . . . . . . . . 2-5 2-5 Flowlink Flow Rate tab: Multi-point channels . . . . . . . . . . . . . . . . . . . . . . . . . . . . 2-6 2-6 Flowlink Data tab . . . . . . . . . . . . . . . . . . . . . . . . . . . . . . . . . . . . . . . . . . . . . . . . . . . 2-7 2-7 Creating a new Station file . . . . . . . . . . . . . . . . . . . . . . . . . . . . . . . . . . . . . . . . . . . 2-8 2-8 Site Tab window . . . . . . . . . . . . . . . . . . . . . . . . . . . . . . . . . . . . . . . . . . . . . . . . . . . . 2-9 2-9 Channel Tab window . . . . . . . . . . . . . . . . . . . . . . . . . . . . . . . . . . . . . . . . . . . . . . . 2-10 2-10 Irregular Channel Configure window . . . . . . . . . . . . . . . . . . . . . . . . . . . . . . . . . 2-11 2-11 Communication tab . . . . . . . . . . . . . . . . . . . . . . . . . . . . . . . . . . . . . . . . . . . . . . . 2-12 2-12 Profiling tab . . . . . . . . . . . . . . . . . . . . . . . . . . . . . . . . . . . . . . . . . . . . . . . . . . . . . 2-13 2-13 Connect screen . . . . . . . . . . . . . . . . . . . . . . . . . . . . . . . . . . . . . . . . . . . . . . . . . . . 2-15 2-14 Connected screen (status window) . . . . . . . . . . . . . . . . . . . . . . . . . . . . . . . . . . . 2-16 2-15 Real-time Data screen . . . . . . . . . . . . . . . . . . . . . . . . . . . . . . . . . . . . . . . . . . . . . 2-17 2-16 ADFM System configuration with box controller . . . . . . . . . . . . . . . . . . . . . . . . 2-19 2-17 ADFM System configuration with canister controller . . . . . . . . . . . . . . . . . . . . 2-20 2-18 Pigtail DC power cable . . . . . . . . . . . . . . . . . . . . . . . . . . . . . . . . . . . . . . . . . . . . . 2-21 2-19 ADFM controller: wall mounting . . . . . . . . . . . . . . . . . . . . . . . . . . . . . . . . . . . . . 2-22 2-20 ADFM controller: environmental console enclosure . . . . . . . . . . . . . . . . . . . . . 2-23 2-21 ADFM controller: cylindrical canister suspended in manhole . . . . . . . . . . . . . . 2-24 vi ADFM® Flow Meter Table of Contents 2-22 Connector port changes in the canister controller . . . . . . . . . . . . . . . . . . . . . . . 2-24 2-23 Common pipe and channel shapes . . . . . . . . . . . . . . . . . . . . . . . . . . . . . . . . . . . 2-26 2-24 Sensor positioning . . . . . . . . . . . . . . . . . . . . . . . . . . . . . . . . . . . . . . . . . . . . . . . . 2-27 2-25 Mount sensor flat on channel floor . . . . . . . . . . . . . . . . . . . . . . . . . . . . . . . . . . . 2-27 2-26 Sensor alignment with channel wall . . . . . . . . . . . . . . . . . . . . . . . . . . . . . . . . . . 2-28 2-27 Sensor cable direction . . . . . . . . . . . . . . . . . . . . . . . . . . . . . . . . . . . . . . . . . . . . . 2-28 2-28 Securing the cable(s) with SST straps . . . . . . . . . . . . . . . . . . . . . . . . . . . . . . . . 2-29 2-29 Scissors Ring . . . . . . . . . . . . . . . . . . . . . . . . . . . . . . . . . . . . . . . . . . . . . . . . . . . . . 2-30 2-30 Flatten six center tabs on base section . . . . . . . . . . . . . . . . . . . . . . . . . . . . . . . . 2-31 2-31 Assembling the ring and mounting the sensor . . . . . . . . . . . . . . . . . . . . . . . . . . 2-31 2-32 Ring assembled, ready for installation . . . . . . . . . . . . . . . . . . . . . . . . . . . . . . . . 2-32 2-33 Expand and secure the ring against the channel wall . . . . . . . . . . . . . . . . . . . . 2-33 2-34 Attaching the sensor to a mounting plate . . . . . . . . . . . . . . . . . . . . . . . . . . . . . . 2-34 2-35 Rectangular frame mounting . . . . . . . . . . . . . . . . . . . . . . . . . . . . . . . . . . . . . . . . 2-34 2-36 Installation example . . . . . . . . . . . . . . . . . . . . . . . . . . . . . . . . . . . . . . . . . . . . . . 2-35 2-37 Fairing and spacers for added lift . . . . . . . . . . . . . . . . . . . . . . . . . . . . . . . . . . . . 2-36 2-38 Inserting the threaded couplers . . . . . . . . . . . . . . . . . . . . . . . . . . . . . . . . . . . . . 2-36 2-39 Attaching the mounting plate . . . . . . . . . . . . . . . . . . . . . . . . . . . . . . . . . . . . . . . 2-37 2-40 Sensor with fairing and fairing spacer . . . . . . . . . . . . . . . . . . . . . . . . . . . . . . . . 2-37 2-41 Threaded couplers: break off at joint . . . . . . . . . . . . . . . . . . . . . . . . . . . . . . . . . 2-38 2-42 Early and current versions of the HTI sensor . . . . . . . . . . . . . . . . . . . . . . . . . . 2-39 2-43 Location of the QS value on Hot Tap label . . . . . . . . . . . . . . . . . . . . . . . . . . . . . 2-40 2-44 Early HTI: Component measurements and sensor positioning . . . . . . . . . . . . . 2-42 2-45 Early HTI Hardware . . . . . . . . . . . . . . . . . . . . . . . . . . . . . . . . . . . . . . . . . . . . . . 2-43 2-46 Align the edges of the box parallel to flow . . . . . . . . . . . . . . . . . . . . . . . . . . . . . 2-43 2-47 Secondary collar installation . . . . . . . . . . . . . . . . . . . . . . . . . . . . . . . . . . . . . . . . 2-44 2-48 Early version Hot Tap with secondary collar installed . . . . . . . . . . . . . . . . . . . 2-45 2-49 Current HTI: Component measurements and sensor positioning . . . . . . . . . . . 2-47 2-50 Current HTI Hardware . . . . . . . . . . . . . . . . . . . . . . . . . . . . . . . . . . . . . . . . . . . . 2-48 2-51 Align the edges of the box parallel to flow . . . . . . . . . . . . . . . . . . . . . . . . . . . . . 2-49 2-52 Attaching the tether chain . . . . . . . . . . . . . . . . . . . . . . . . . . . . . . . . . . . . . . . . . . 2-49 2-53 Adjust chain to proper length . . . . . . . . . . . . . . . . . . . . . . . . . . . . . . . . . . . . . . . 2-50 2-54 Safety Installation Kit . . . . . . . . . . . . . . . . . . . . . . . . . . . . . . . . . . . . . . . . . . . . . 2-50 2-55 Box controller: remove the battery compartment . . . . . . . . . . . . . . . . . . . . . . . . 2-51 2-56 Box: Battery compartment . . . . . . . . . . . . . . . . . . . . . . . . . . . . . . . . . . . . . . . . . . 2-52 2-57 Reinstalling the battery compartment lid . . . . . . . . . . . . . . . . . . . . . . . . . . . . . 2-52 2-58 Control box power switches . . . . . . . . . . . . . . . . . . . . . . . . . . . . . . . . . . . . . . . . . 2-53 2-59 Canister: remove battery compartment lid . . . . . . . . . . . . . . . . . . . . . . . . . . . . . 2-54 2-60 Remove battery retaining cover and screw . . . . . . . . . . . . . . . . . . . . . . . . . . . . . 2-54 2-61 Canister: Battery compartment . . . . . . . . . . . . . . . . . . . . . . . . . . . . . . . . . . . . . . 2-55 2-62 Site Info tab: Connect and Retrieve Data buttons . . . . . . . . . . . . . . . . . . . . . . . 2-58 2-63 Flowlink: Data download . . . . . . . . . . . . . . . . . . . . . . . . . . . . . . . . . . . . . . . . . . . 2-59 2-64 Erasure warning - Flowlink . . . . . . . . . . . . . . . . . . . . . . . . . . . . . . . . . . . . . . . . . 2-59 2-65 Timeout warning - Flowlink . . . . . . . . . . . . . . . . . . . . . . . . . . . . . . . . . . . . . . . . 2-59 2-66 Restart warning - Flowlink . . . . . . . . . . . . . . . . . . . . . . . . . . . . . . . . . . . . . . . . . 2-60 2-67 Flowlink: Graphing data (velocity shown) . . . . . . . . . . . . . . . . . . . . . . . . . . . . . 2-60 2-68 Flowlink: Drag & drop data parameters on graph (velocity and flow shown) . 2-61 2-69 Connect Screen . . . . . . . . . . . . . . . . . . . . . . . . . . . . . . . . . . . . . . . . . . . . . . . . . . . 2-62 2-70 Collect/Erase Data . . . . . . . . . . . . . . . . . . . . . . . . . . . . . . . . . . . . . . . . . . . . . . . . 2-63 2-71 Data transfer indicator . . . . . . . . . . . . . . . . . . . . . . . . . . . . . . . . . . . . . . . . . . . . 2-63 2-72 ADFM Data window . . . . . . . . . . . . . . . . . . . . . . . . . . . . . . . . . . . . . . . . . . . . . . . 2-64 2-73 Viewing data in Expert View . . . . . . . . . . . . . . . . . . . . . . . . . . . . . . . . . . . . . . . . 2-65 3-1 Internal desiccant canister . . . . . . . . . . . . . . . . . . . . . . . . . . . . . . . . . . . . . . . . . . . 3-3 3-2 Canister controller: opening the electronics lid . . . . . . . . . . . . . . . . . . . . . . . . . . . 3-4 3-3 Canister case desiccant and humidity indicator card . . . . . . . . . . . . . . . . . . . . . . 3-5 3-4 Box controller sensor interface board connections . . . . . . . . . . . . . . . . . . . . . . . . 3-10 3-5 Canister controller: opening the electronics lid . . . . . . . . . . . . . . . . . . . . . . . . . . 3-11 3-6 Canister controller sensor interface board connections . . . . . . . . . . . . . . . . . . . . 3-11 vii ADFM® Flow Meter Table of Contents List of Tables 1-1 1-2 1-3 2-1 2-2 3-1 3-2 viii Technical Specifications: ADFM Controller . . . . . . . . . . . . . . . . . . . . . . . . . . . . . . 1-2 Technical Specifications: Pro20 Open Channel Velocity Sensor . . . . . . . . . . . . . . 1-4 Technical Specifications: Hot Tap Insertion Velocity Sensor . . . . . . . . . . . . . . . . 1-4 List of Pro20 Sensor Mounting Accessories . . . . . . . . . . . . . . . . . . . . . . . . . . . . . 2-38 BIT Hexadecimal Code Definitions . . . . . . . . . . . . . . . . . . . . . . . . . . . . . . . . . . . . 2-57 Troubleshooting on Power-Up . . . . . . . . . . . . . . . . . . . . . . . . . . . . . . . . . . . . . . . . . 3-6 Troubleshooting During Operation . . . . . . . . . . . . . . . . . . . . . . . . . . . . . . . . . . . . . 3-7 ADFM® Flow Meter Section 1 Introduction 1.1 Overview The ADFM Pro20 Velocity Profiler is designed for high accuracy flow measurement for applications in pipe diameters/flow depths up to 20 feet (6.1m), and in channels up to 10 feet (3m) wide. Common applications include installation in circular, rectangular, or trapezoidal channels. The system is also frequently installed in irregular shaped (multi-point) channels. A variety of hardware accessories for sensor installation is available from Teledyne Isco (see Table 2-1 in Section 2.6.8). In many cases, these accessories can be adapted for use in other channel shapes. The ADFM Intrinsic Safety Pro20 Velocity Profiler is certified by Factory Mutual Research Corporation. An IS system consists of the flow meter located in a nonhazardous location, connected to a sensor located in a class I, II, and III, Division 1, Groups C, D, E, F, and G, or Class I, Zone 0, IIB hazardous (classified) locations with Type 6P protection; indoor/outdoor locations; and/or connection to a Druck Inc. PTX 1830 sensor in a class I, II, and III, Division 1, Groups A, B, C, D, E, F, and G hazardous (classified) locations. C o m p l e t e inf o r m ati o n ab o u t IS systems is provided in Appendix B. The ADFM Hot Tap Velocity Profiler measures flow rates in full and pressurized pipes and forced mains with inner diameter of 1.5 feet (457 mm) to 9 feet (2.74m). The Hot Tap Insertion sensor (HTI) is inserted through the pipe wall via an industry standard, two-inch corporate-stop or ball valve and tapping saddle. Both Pro20 and HTI systems use pulse-doppler velocity profiling technology to measure the velocity distribution within the flow. For either system, the controlling electronics are housed in a wall or console mountable box enclosure, or in a cylindrical canister housing for suspension mounting in a manhole or other wet environment. All ADFM systems can be powered by external 24 VDC power. Internal batteries provide backup power for continuous operation. Ordering information for parts and accessories for these systems can be found in Appendix A in the back of this manual. 1-1 ADFM® Flow Meter Section 1 Introduction 1.2 Initial Inspection Upon receipt, inspect the shipping container for any damage. If the shipping container or packing material shows signs of damage, it should be retained until the contents have been inspected for completeness and the system has been checked both mechanically and electrically. If the contents are incomplete or damaged, or if the system indicates a failure in some component during initial testing, notify Teledyne Isco as soon as possible, and notify the carrier regarding any damage to the shipping container and packing material. Contact Information Technical assistance for the ADFM flow meter can be obtained from: Teledyne Isco 4700 Superior St. Lincoln NE 68504 Phone: (866) 298-6174 or (402) 464-0231 Fax: (402) 465-3022 E-mail: [email protected] 1.3 Technical Specifications The following tables provide technical specifications for the ADFM box and cylindrical electronics controllers, and for the Pro20 open channel and Hot Tap Insertion velocity sensors. Table 1-1 Technical Specifications: ADFM Controller Physical Electronics Unit Enclosures Wall or console-mounted box, or cylindrical canister Operating Temperature -15 to 125 °F (-26 to 52 °C) Storage Temperature -65 to 160 °F (-54 to 71 °C) Packaging Box Canister NEMA 4X (IP66) NEMA 6P (IP68) Dimensions Box Canister 17.5 x 14.8 x 6.7 in. (445 x 375 x 170 mm) 28.5 x 10 in. (724 x 254 mm) Weight Box Canister 24 lbs (11 kg) 36 lbs (16 kg) Measurement Performance Flow Accuracy 2% of reading in typical conditions Velocity Maximum Velocity ±30.0 ft/s (± 9m/s) Velocity Bin Size 2 to 12 inches (50 to 3000 mm) - user selectable 1-2 ADFM® Flow Meter Section 1 Introduction Table 1-1 Technical Specifications: ADFM Controller (Continued) Nominal Profiling Depth Range (for particle concentrations of 50-1000 ppm): Pro20 Hot Tap Accuracy Pipe Sizesa 9 inches to 20 feet (230 mm to 6 m) 9 to 108 inches (230 to 2.7 m) 1.0% of reading ± 0.01 ft/sec (3.0 mm/s) (Hot Tap only) 15 to 108 inches (380 mm to 2.7 m) Acoustic Frequency Frequency 1.23 MHz Water Level (Pro20 Only) Measurement Range 4.5 inches to 20 feet (110 mm to 6 m) Accuracy 0.5% of reading ± 0.2 inches (0.5 mm) Data Management ADFM Data Types Q, V, D Discharge, Average Velocity, Depth Velocity Velocity profile data (relative to acoustic beam directions) per beam and bin Echo Intensity Echo intensity data (relative backscatter intensity) per beam and bin Data Quality Profile data quality indicators (Correlation magnitude) per beam and bin Temperature Transducer temperature output range: 20 to 140 °F (-7 to 60 °C) Sound Speed One output for speed of sound data Leader Output of general leader information (time, data, record number, etc.) Data Storage and I/O Storage Capacity 32 MB st. (140 days of data at one-minute intervals) I/O Interface RS232 std. Multiple industry-std analog and digital protocols optional. Transfer Rate Configurable to 57,600 bps Power Internal Battery Voltage 24 VDC nominal Internal Battery Capacity 26 Ah @ 75 °F (24 °C) - Alkaline Battery life: 22 weeks at 15 minute sampling interval External DC 12 - 36 VDC; 10 VDC absolute minimum; 36 VDC/3W absolute maximum Software WinADFM for data retrieval and analysis. BBTalk terminal emulation software tool included. Flowlink® 5.1 software may be purchased optionally. Call factory for details. a. For pipes smaller than 18” ID, the site must be qualified by your Isco representative. 1-3 ADFM® Flow Meter Section 1 Introduction Table 1-2 Technical Specifications: Pro20 Open Channel Velocity Sensor Sensor Body Operating Temperature 23 to 95 °F (-5 to 35 °C) Housing Material Urethane Static Pressure 250 psi nominal Dimensions 8 x 3 x 1.5 inches (200 x 75 x 40 mm) Weight 3.2 lbs (1.5 kg) Beam Angles 1 & 3: 10°front-back; 20°to side 2 & 4: 20° front-back; 30° to side Sensor Signal Cable Operating Temperature -40 to 125 °F (-40 to 52 °C) Material Polyethyline jacket Length 50 ft (15 m) std. 100 ft (30 m) and 150 ft. (45 m) optional lengths available Minimum Bend Radius 6 in (150 mm) Outer Diameter 0.5 in (13 mm) nominal Table 1-3 Technical Specifications: Hot Tap Insertion Velocity Sensor Sensor Body Operating Temperature 23 to 95 °F (-5 to 35 °C) Housing Plastic transducer assembly on corrosion resistant stainless steel stem. Rated NEMA 6P, IP68, defined as validated for submersion to 20 feet of depth for 48 hours. Static Pressure 200 psi nominala Dimensions: Sensor Head Diameter Std stem lengthb Insertion 1.375 in. (35 mm) 2 feet (610 mm) Fits 2 inch NPT (50 mm) standard tap Weight (includes 50 ft. cable) 15 lbs (6.8 kg) Beam Angles 1 & 3: 10°front-back; 20° to side 2 & 4: 20° front-back; 30° to side Sensor Signal Cable Operating Temperature -40 to 140 °F (-40 to 60 °C) Material Polyethylene jacket Length 50 ft (15 m) std; 100 ft (30 m) optionalc Minimum Bend Radius 6 in (150 mm) Outer Diameter 0.5 in (13 mm) nominal a. Use safety installation kit (60-7007-030) for pressures above 100psi. Applications with pressures between 200 and 300 psi require a schedule 80 nipple (contact factory). b. Custom stem lengths are available; call factory for more information. c. Custom cable lengths are available; call factory for more information. 1-4 ADFM® Flow Meter Section 1 Introduction 1.4 Operating Principles Figure 1-1 shows a typical ADFM Pro20 installation for measuring open channel flow in a pipe. The sensor is mounted on the invert of a pipe or channel. The sensor’s piezoelectric ceramics emit short pulses along narrow acoustic beams pointing in different directions. Echoes of these pulses are backscattered from particles or bubbles suspended in the flow. As this material has motion relative to the transducer, the echoes are Doppler shifted in frequency. Measurement of this frequency enables the calculation of the flow speed. A fifth ceramic mounted in the center of the transducer assembly and aimed vertically is used to measure the depth. Velocity profile #2 Velocity profile #1 Velocity bins Flow pattern Sensor Figure 1-1 Typical Pro20 Installation (2 of 4 profiles shown) The ADFM divides the return signal into discrete regular intervals that correspond to different depths in the flow. Velocity is calculated from the frequency shift measured in each interval. The result is a profile, or linear distribution of velocities, along the direction of the beam. Each of the small black circles in Figure 1-1 represent an individual velocity measurement in a small volume known as a velocity bin. The directions of the velocity profiles are based on the geometry of the ADFM’s transducer assembly. Figure 1-2 shows a side view of the transducer assembly. The profiles shown in Figure 1-1 are generated from velocity data measured by an upstream and downstream beam pair. The data from one beam pair are averaged to generate Profile #1, and a beam pair on the opposite side of the transducer assembly generates Profile #2. Since Doppler measurements are directional, only the component of velocity along the direction of transmit and receive is measured. Narrow acoustic beams are required to accurately determine the horizontal velocity from the measured component. The narrow acoustic beams of the ADFM ensure that this measurement is accurate. Also, the range-gate times are short and the velocity bins occupy a small volume - cylinders approximately 5 centimeters (2 inches) long and 5 centimeters (2 inches) in diameter. This ensures that the velocity measurements are truly representative of that portion of the flow, avoiding potential bias 1-5 ADFM® Flow Meter Section 1 Introduction in the return energy spectrum due to range dependent variables. The result is a very precise measurement of the vertical and transverse distribution of flow velocities. Beam Angles: 20° front-back; 30° to side Beam Angles: 10° front-back; 20° to side 1 FLOW Top and Front View 2 5 4 Beam Angles: 20° front-back; 30° to side Figure 1-2 ADFM Pro20 dimensions and beam geometry 1-6 3 Beam Angles: 10° front-back; 20° to side ADFM® Flow Meter Section 1 Introduction The velocity data from the two profiles are entered into an algorithm to determine a mathematical description of the flow velocities throughout the entire cross-section of the flow. The algorithm fits the basic functions of a parametric model to the actual data. The result predicts flow velocities at all points throughout the flow. These results are integrated over the cross-sectional area to determine the discharge. The key benefit to this approach is that the system will operate accurately under different hydraulic conditions. As hydraulic conditions change, the change will manifest itself in the distribution of velocity throughout the depth of flow. As the ADFM is measuring the velocity distribution directly, it will adapt to the changes in hydraulics, and generate a flow pattern that is representative of the new hydraulic conditions, insuring an accurate estimate of flow rate. Figure 1-3 shows a typical Hot Tap installation in a closed-pipe application. The operation of the Hot Tap Insertion velocity profiler works in the same manner as the Pro20, but for full and pressurized pipes. Mounted nearly flush with the inner pipe wall, the Hot Tap sensor is comprised of four ceramics that transmit and receive the acoustic signals. Beam Angles: 20° front-back; 30° to side Beam Angles: 10° front-back; 20° to side 3 1 4 2 Beam Angles: 10° front-back; 20° to side Beam Angles: 20° front-back; 30° to side Figure 1-3 ADFM Hot Tap beam geometry Note For Hot Tap dimensions, refer to Section 2.7. 1-7 ADFM® Flow Meter Section 1 Introduction 1.5 Communication and Data Interfacing The basic connection for initial configuration of the ADFM is a serial connection with a computer (RS-232 or RS-422), or with a modem. The ADFM controller may optionally have a factory-installed 28800 bps modem with data compression and error correction capabilities. The AD FM is config ured and programmed using Isco’s WinADFM software. WinADFM also retrieves the flow data, providing analysis, editing, and reporting. Isco’s Flowlink® 5.1 software may be purchased optionally. The ADFM can be configured and programmed using Flowlink. In addition to data retrieval, analysis, editing, and reporting, Flowlink 5.1 is compatible with most other Isco environmental instruments, providing a wide variety of networking and interfacing possibilities. The added capabilities of Flowlink Pro client software include support for an enterprise database, Web UI, and pushing data to a server. 1.5.1 Optional Interfacing Tools Isco offers additional tools to expand the ADFM’s communication capabilities. For detailed information about these instruments, visit our web site at www.isco.com. accQcomm Interface Module – T h e a c c Q c o m m a c c e p t s RS232/RS422 serial data from up to three ADFM flow meters and converts the data to industry standard MODBUS protocol, or a 4-20 mA analog current loop. The module also provides programmable alarm outputs and data viewing on the Web. While the ADFM controller has no data display (the box controller’s internal display is only for test information), the accQcomm’s front panel LCD is capable of displaying data output for each connected flow meter (flow, totalized flow, velocity, level and temperature), as well as 4-20 mA outputs. For additional information, see the accQcomm user manual on the Isco web site. Figure 1-4 Optional accQcomm Interface Module 1-8 ADFM® Flow Meter Section 1 Introduction 2105 Interface Module – The 2105 stores data from the ADFM and other Isco instruments. It also provides Modbus input, sampler interfacing, rain gauge and SDI-12 input, and cellular phone communication. For additional information, see the 2105 user manual on the Isco web site. Figure 1-5 Optional 2105 Interface Module Other options available Wireless radio and other communication protocols are available. Contact the factory for more information about these options. 1-9 ADFM® Flow Meter Section 1 Introduction 1-10 ADFM® Flow Meter Section 2 Setup and Installation This section of the manual contains information and instructions for configuration, testing, installation, and deployment of the ADFM Velocity Profiler. Included in this section are: • Software • Power options • Final preparations for use • Connecting the components • Installation and deployment • Built-in tests (BITs) Use this guide to plan your installation layout. Teledyne Isco recommends distributing this information to your organization’s planners and installation engineers. 2.1 Software For accurate flow measurement, you will use either Flowlink® software (optional) or WinADFM software (standard) to program the ADFM with site-specific parameters for the pipe or channel in which it is installed. While both software programs are capable of basic site setup and data retrieval, Flowlink software has expanded capabilities and features. Contact the factory for more information. If you have purchased Flowlink software, refer to Section 2.2 for basic setup and Section 2.13 for basic data retrieval and viewing. If you are using WinADFM software, refer to Section 2.3 for basic setup and Section 2.14 for basic data retrieval and viewing. 2.2 Flowlink Software For complete information about setup and operation of Flowlink software, refer to the Flowlink user manual and Help files. 1. Connect the computer to the ADFM flow meter with the communication interface cable. 2. Click the Quick Connect button on the Flowlink toolbar, or press F11 on the keyboard. Flowlink opens the Quick Connect window. 3. Select the Type of connection (Direct for initial setup). 4. Check the Create new site check box and then click on the large button for pulse doppler instruments. 5. The Pulse Doppler Connect window will appear. 2-1 ADFM® Flow Meter Section 2 Setup and Installation 6. Enter a site name and a device name, and select the radio button for ADFM. Click OK, and Flowlink creates a site window (Figure 2-1). Site Info Figure 2-1 Flowlink Site Info tab 2-2 The Site Info tab allows you to view and change the site name and date/time. Click the Connect button, and Flowlink starts communication with the ADFM. ADFM® Flow Meter Section 2 Setup and Installation Devices The Devices tab displays general information about the instrument, secondary depth sensor, and battery (if applicable), as well as connection information (which can be modified when offline). Figure 2-2 Flowlink Devices tab 2-3 ADFM® Flow Meter Section 2 Setup and Installation Measurements While connected, Flowlink continually polls the site for real-time readings. The Measurements tab displays the real-time readings, as well as test data, in the Output window. Diagnostic tests are selectable from the buttons to the left of the screen. The results of each test are displayed and recorded in the station’s Log File. Note The "Bench Test" function is for diagnostic purposes and is not required for routine operation. If for any reason the Bench Test is performed, regardless of the time interval between tests, Retrieve and save all recorded data before it is performed again. Prior to redeployment, select "Erase Recorder" and then "Restart." Figure 2-3 Flowlink Measurements tab 2-4 ADFM® Flow Meter Section 2 Setup and Installation Flow Rate Use the Flow Rate tab to specify the appropriate channel geometry (for detailed information about determining this data, refer to Section 2.6.1), dimensions, and sensor mounting information. Figure 2-4 Flowlink Flow Rate tab: Rectangular channel 2-5 ADFM® Flow Meter Section 2 Setup and Installation Flow rate tab: Multi-point channels For multi-point (irregular) channel shapes, measure and record the channel width divided by 2 for 10 different depths: Width/2 = X Depth = Y Figure 2-5 Flowlink Flow Rate tab: Multi-point channels 2-6 ADFM® Flow Meter Section 2 Setup and Installation Data The rate of data storage and adjustment of the number of velocity readings within a data storage interval can be set in the Data storage box. For the most possible velocity readings within an interval, check the box next to "Use Mode 12 Sampling." Manage the data type(s), form of output, and amount of data stored in the Data Format box. Figure 2-6 Flowlink Data tab Note For complete information on programming and data retrieval, refer to the Flowlink software manual and Help files. 2-7 ADFM® Flow Meter Section 2 Setup and Installation 2.3 WinADFM Software 2.3.1 Setup For complete information about setup and operation of WinADFM software, refer to the WinADFM user manual. The following section contains the basic steps for setting up a site file and programming the ADFM. Basic data retrieval steps can be found in Section 2.12. For complete programming and data retrieval instructions, see the WinADFM software manual. To begin setup and programming: 1. Start the WinADFM software. Create a Station file (application programming file) by selecting File > New. Select ADFM Station. Figure 2-7 Creating a new Station file 2. Enter a Site ID with a maximum of 8 alphanumeric characters, with no spaces or symbols, and save. 3. Select ADFM > Setup. There are four tabs at the top of the window. Select each tab and enter the programming information in each tab window. 2-8 ADFM® Flow Meter Section 2 Setup and Installation Site tab 4. Site Tab (Figure 2-8) Enter comments if desired. Select the units of measure from the dropdown list. Figure 2-8 Site Tab window 2-9 ADFM® Flow Meter Section 2 Setup and Installation Channel tab 5. Channel Tab Select the application geometry and enter the appropriate dimensions. For detailed information about determining channel geometry, see Section 2.6.1 Pro20: Channel Geometry. a. Bed Level is the level of permanent silt/debris in the bottom of the channel. b. Zero Offset is the distance from the bottom of the ADFM sensor to the bottom of the channel. If you are using the Flow Conditioning Platform (FCP), this value is typically 0.24 inches (6.1 mm). c. FCP Height is the height or thickness of the Flow Conditioning Platform. It is typically 0.88 inches (22.5 mm). If the channel type is not irregular, skip to step 9. Figure 2-9 Channel Tab window 2-10 ADFM® Flow Meter Section 2 Setup and Installation Irregular channels (multi-point) 6. Irregular Channel Type For irregular shapes, select Irregular > Configure Points (Figure 2-10). Figure 2-10 Irregular Channel Configure window 7. Enter the Width/2 (half the width) and its corresponding Height for ten different points (Heights) in the channel. Point 1 represents the lowest point in the channel. As you enter the widths/2 and their corresponding heights, click Update Display to see them represented graphically (Figure 2-10). 8. When you are finished entering the points, the picture should be an approximate representation of the channel’s geometry. Make any necessary corrections and click OK. 2-11 ADFM® Flow Meter Section 2 Setup and Installation Communication tab Figure 2-11 Communication tab 2-12 9. Communication Tab (Figure 2-11) Unless there is an external modem and phone line used, select Serial, the communication port of the laptop or computer used to program the ADFM, baud rate of 115200, Stop Bits 1, Data Bits 8, and Parity None. ADFM® Flow Meter Section 2 Setup and Installation Profiling tab Burst sampling 10. Profiling Tab (Figure 2-12) Select the Data Interval (recording interval) in minutes from the dropdown list. 11. Select the Samples per Interval (measurement interval). From the drop-down list, select the desired number of measurements per Data Interval. A larger number will reduce battery life but improve measurement precision. Teledyne Isco recommends using no more than 5 Samples per Interval in most applications. 12. Burst Sampling Burst sampling (reading interval) is a secondary data interval automatically triggered by a programmed threshold condition, such as a rain event or overflow. Figure 2-12 Profiling tab 13. To enable Burst Sampling, check the box next to Burst Sampling (Figure 2-12), then select Configure. a. In the Configure window that appears, select the data interval in minutes, and the number of samples (readings) to be taken when the specified trigger conditions are met. 2-13 ADFM® Flow Meter Section 2 Setup and Installation b. In the Enter Level fields, enter the value of Flow (Q), Velocity (V), and Depth (D) that will trigger the Burst Sampling rate. c. Enter the Exit Levels in the exit fields. When Q,V, or D drops below its Exit value, the ADFM will switch back to the normal operating sample interval, conserving battery power and data storage space. Data Recording 14. Under Included Data Types, select all boxes. Select the appropriate output (Serial, unless a modem is used). 15. To activate recording and storage of flow information, check the Record Internally box, and select Slate or Wrap mode. In Slate mode, the recorder will stop recording when full. In Wrap mode, the recorder will continue recording when full, overwriting the oldest data readings with the newest. 16. If using the Record Internally function, select the maximum number of intervals from the dropdown list. If the ADFM serial data is output to an Isco 4-20 mA Analog Module, select the same number, or 1 less, than the Data Interval. 17. Under Data Format, select Reduced. 18. The reading interval for Record Raw Data (Figure 2-12, below Data Format) is based on the sampling (reading) interval. Recording raw data for a single reading includes additional diagnostic information embedded within the Q, V, and D reading. The additional raw data creates a larger file. The recommended raw data interval is 10 minutes, i.e., if the sample interval = 1, the raw data interval would be every 10 readings; if the sample interval = 10, the raw data interval would be every 1 reading, etc. 19. Click OK to save the programming information. 2-14 ADFM® Flow Meter Section 2 Setup and Installation 2.3.2 Connecting to the ADFM To begin operating the ADFM through direct-connection: 1. Connect the computer to the ADFM flow meter with the communication interface cable. 2. Start WinADFM software. 3. Select ADFM > Operate. Figure 2-13 Connect screen 4. When the Connect screen appears, select Connect. 2-15 ADFM® Flow Meter Section 2 Setup and Installation Figure 2-14 Connected screen (status window) Testing the ADFM Diagnostic tests are selectable from the buttons to the right of the screen. The results of each test are displayed and recorded in the station’s Log File. The Field Test should be performed in the field with the sensor installed and underwater. The test performs internal ADFM system checks. Click Field Test to perform the test. Note The Bench Test function is for diagnostic purposes and is not required for routine operation. If for any reason the Bench Test is performed, regardless of the time interval between tests, first retrieve and save all recorded data before it is performed again. Prior to redeployment, select "Erase Recorder" and then "Restart." 5. When a connection is established, a status message will appear in the window; when the status message appears, select PROGRAM AND GO. This programs the ADFM with the information and operational parameters you saved in the Station file, and activates flow monitoring operation 2-16 ADFM® Flow Meter Section 2 Setup and Installation Note If error messages appear when you select Quick Data or Program and Go, typical causes are a disconnected sensor cable and/or invalid station file settings. Ensure that the sensor is properly connected and that Channel Properties, as well as all other station file settings, are valid, and retry. Figure 2-15 Real-time Data screen 6. When the Real-time Data screen appears (Figure 2-15), click Exit. Disconnect the interface cable and exit the Operate screen. Exit the WinADFM software program. For an overview of data retrieval, turn to Section 2.14. Note For complete information on programming and data retrieval, refer to the WinADFM software manual. 2-17 ADFM® Flow Meter Section 2 Setup and Installation 2.4 Preparing for Installation 2.4.1 Installation Checklist Before deployment, your system configuration and site characteristics must be determined. This section will help you to prepare the ADFM for deployment. The general sequence of steps in the installation and deployment of the ADFM are as follows: 1. Determine the installation site and sensor mounting location according to site requirements. 2. Measure and record all channel dimensions and determine geometry. 3. Prepare your laptop PC with Isco WinADFM software, to take to the installation site. 4. Perform pre-installation equipment and operational checks. 5. Install and secure the ADFM controller, and connect the sensor. 6. Connect power and conduct final tests. 7. Program the desired data logging parameters into the ADFM. 2-18 ADFM® Flow Meter Section 2 Setup and Installation 2.4.2 Basic Configuration Basic ADFM system configurations are shown in Figures 2-16 and 2-17. Other configurations may include an environmental enclosure and optional interfacing device and/or heater. Box Controller (front view) Computer Pro20 sensor Serial cable EXT. MODEM/ MAINS DC RS232 (Internal AC connection is no longer required.) SECONDARY DEPTH SENSOR Pro20 SENSOR Velocity sensor Secondary depth sensor Modem/RS232 External DC Mains (no longer used) or Hot Tap sensor Figure 2-16 ADFM System configuration with box controller 2-19 ADFM® Flow Meter Section 2 Setup and Installation Canister Controller Secondary depth sensor Modem/RS232 Computer Serial Cable Pro20 Sensor Velocity sensor External DC or Hot Tap Sensor Figure 2-17 ADFM System configuration with canister controller 2-20 ADFM® Flow Meter Section 2 Setup and Installation 2.4.3 Power Selection The ADFM is designed to operate from one of two independent power sources: internal batteries or external DC power supply. All sources may be used concurrently; the source that supplies the highest voltage will automatically supply power to the system. Internal Batteries The battery configuration consists of four 6-volt alkaline lantern batteries with spring terminals. Recommended alkaline batteries are the Eveready Energizer, Model EN529. These alkaline batteries have approximately 2.5 times the power/life of the lead-acid type. A supply voltage of 24 to 36 VDC is recommended to allow operation from the internal batteries when the external power supply is interrupted. External DC Power The 24VDC power supply plugs directly into a standard AC outlet and terminates in a connector compatible with the DC connector on the box or canister controller, or with unterminated wires if the system includes an accQcomm Interface Module. This power supply is included with the ADFM system. DC Power Supply Cable This two-conductor pigtail cable provides no grounding. It mates with the DC connector on the controller. Wire colors for the power cable are designated as follows: Pin Color Function (+)1 Red + DC (-)4 Black - DC This cable is installed at the factory as part of ADFM systems that are mounted inside an enclosure with a 24V DIN rail (example: Figure 2-20). 60-7004-041 For current model canister controller with metal Crown connectors. 60-7004-062 For box controller and older style canister controller with Amp connectors Figure 2-18 Pigtail DC power cable 2-21 ADFM® Flow Meter Section 2 Setup and Installation External AC Power Systems ordered with the environmental console enclosure (described on page 2-23) come with all components factory installed inside the enclosure and pre-wired to a 24V DIN rail. User-supplied AC power is connected at the installation site. 2.4.4 Site Requirements The installation site must allow for proper securing of all electronics, cables, sensors, and hardware. Whenever possible, the sensor’s mounting location should allow for easy removal and reinstallation in the event that cleaning, testing, or replacement is required. 24 VDC at 3W is required. Depending on the configuration, some installations require AC voltage for heaters and other options. 2.4.5 Installing the Electronics Controller Wall Mounting The ADFM electronics controller housing and options are selected according to your application needs. The electronics are housed in either a box, which can be mounted on a wall or in an environmental console enclosure, or in a cylindrical canister for suspension within a manhole. Either housing can be ordered with or without an internal modem; contact Teledyne Isco for more information. The ADFM NEMA 4X electronics box may be used indoors or outdoors. However, some other system components, such as the accQcomm Interface Module (see Section 1.5.1), must be installed in a dry, dust-free, climate-controlled environment, or in a console enclosure (see next section). Figure 2-19 ADFM controller: wall mounting 2-22 ADFM® Flow Meter Section 2 Setup and Installation Console Enclosure Mounting Stainless steel environmental console enclosures are available from Teledyne Isco for outdoor or indoor installations without climate control, and where dust or moisture is present. The electronics box and all other electronics must be mounted within the enclosure. The environmental console enclosure can be ordered with or without a 400- or 800-watt heater; contact Teledyne Isco for more information. Where a console enclosure will be used, a user-supplied concrete pad and steel stand, or other secure method, as well as cable conduit with minimum 2" ID, are recommended. Note Environmental enclosures are not shipped with access holes for conduit connection. All cable entries must have appropriate ID, user-supplied conduit connections or cord-grip fittings to retain the NEMA 4X rating. Conduit and wires must be sealed to prevent harmful gases and moisture from entering the enclosure. Failure to seal conduit could reduce equipment life. Figure 2-20 ADFM controller: environmental console enclosure 2-23 ADFM® Flow Meter Section 2 Setup and Installation Cylindrical Canister The cylindrical canister houses all electronics, and usually the batteries, and is designed for suspension within a manhole or other wet environment. Figure 2-21 ADFM controller: cylindrical canister suspended in manhole Note The current canister controller has four connector ports. Earlier models included a fifth Auxiliary port for the connection of an external modem. A fifth port is sometimes still added to current models as a special power switch controlled by a sampler enable signal input. Early version Current Figure 2-22 Connector port changes in the canister controller 2-24 ADFM® Flow Meter Section 2 Setup and Installation 2.5 Sensor Installation The Pro20 and Hot Tap sensors are connected to the control box in the same manner, as described below. Following this are sections dedicated to the physical installation of both the Pro20 and the Hot Tap. Technical support For additional assistance with installing the sensor, contact our Environmental Product Specialists at: Teledyne Isco 4700 Superior St. Lincoln NE 68504 Phone: (866) 298-6174 or (402) 464-0231 Fax: (402) 465-3022 E-mail: [email protected] 2.5.1 General Cabling and Connection The sensor cable is a multi-pair, multi-shielded cable designed specifically for use with the ADFM. The standard cable length is 49.2 feet (15 meters), but other lengths are available upon request. CAUTION Never allow the connectors to be exposed to moisture, foreign matter, or physical shock. Failure to do so can result in permanent damage to the system and may render it inoperable. To connect the sensor cable, remove the blank cap from the sensor port on the controller (see Figure 2-16, above). Insert the cable connector into the port, rotating it until it stops with the keyed portions aligned. Thread the cable’s coupling ring onto the port threads. User-supplied cable conduit, if required, must have a minimum inner diameter of 2 inches (to accommodate the cable connector). If routing requires bending the cable, it must have a minimum bend radius of 6 inches. The sensor cable should not be spliced, and should remain intact from the sensor to the control box. 2.6 Pro20 Sensor Installation 2.6.1 Pro20: Channel Geometry Information about the sensor installation site, and pipe or channel cross-sectional geometry must be measured and recorded. You will need this information in order to select the proper hardware and accessories, and to program the ADFM. Accurate flow measurement is dependent upon exact dimensional data. After you have recorded all of the information about the installation site, enter it at the Channel screen of the software you will use to program the ADFM. The Isco software programs available for this are Flowlink and WinADFM. For basic software information, refer to Sections 2.1 Software, 2.2 Flowlink Software, and 2.3 WinADFM Software in this manual. For more complete information, refer to the software user manual and Help files. 2-25 ADFM® Flow Meter Section 2 Setup and Installation Measure and record the distance from the bottom of the channel to the top of permanent silt, if any. This is the Bed Level entered into your software, and is used to calculate required sensor elev a t i o n , i f a n y ( s e e A p p l i c a t i o n s Wi t h Pe r m a n e n t S i l t Section 2.6.7). Measure and record the distance from the invert (bottom) of the pipe or channel to the bottom of the sensor. This is the Zero Offset entered into your software. Common Channel Shapes For common geometries with the standard measurements described below, the channel shape must be symmetrical about the vertical center line. These common geometries include: Circular, Rectangular, Trapezoidal, and Elliptical (Figure 2-23). Rectangular Circular Trapezoidal Elliptical Figure 2-23 Common pipe and channel shapes Geometry and Parameters Circular D = Diameter Rectangular & Trapezoidal W = Width H = Height H1 = 0 Elliptical R = Radii E = Angles Irregular (Multi-Point) Channel Shapes For irregular-shaped channels, measure and record the channel width divided by 2 for 10 different depths: Width/2 = X Depth = Y 2-26 ADFM® Flow Meter Section 2 Setup and Installation 2.6.2 Sensor Positioning Place the sensor in the straightest possible run, typically at a minimum of 5 channel diameters downstream from a bend and 2 channel diameters upstream from a bend. The sensor should be securely positioned, with minimal potential for fouling or damage from sediment or debris. In installations where high velocity/debris will be present, you may consider protecting the entire cable length (i.e., with user-supplied rigid conduit or metal framing). FLOW > 5 Channel = > 2 Channel = Figure 2-24 Sensor positioning In all installations, the sensor mounting must be firmly anchored flat against the invert (center) of the channel (zero pitch, zero roll). NO NO YES Figure 2-25 Mount sensor flat on channel floor Note If debris and/or silt are expected, the sensor must be elevated with the proper fairing/spacer combination to ensure proper operation, as described in Section 2.6.7. 2-27 ADFM® Flow Meter Section 2 Setup and Installation The long side of the sensor must be parallel with the longitudinal axis of the channel. Flow Flow YES NO Figure 2-26 Sensor alignment with channel wall Sites where a large amount of aeration or turbulence will be present often require the use of a secondary pressure transducer. In these cases, the mounting of the secondary sensor, including elevation and orientation, must also be considered. 2.6.3 Pro20: Cabling Be careful to route the cable away from the side of the sensor where it is attached. Improper cable routing increases the possibility of debris fouling. YES NO Minimum bend radius 6” Flow Flow Figure 2-27 Sensor cable direction During installation, ensure that the cable connector end is sealed for protection in case it comes into contact with water. If a mounting apparatus (such as a ring or rectangular frame) is used, cables should be fastened to its downstream side. All permanent installations require the cables to be secured to the channel wall and mounting apparatus with rubber-cushioned stainless steel loop straps at 6" (nominal) intervals. 2-28 ADFM® Flow Meter Section 2 Setup and Installation Cable mounting kit, Pro20 only: part #60-7709-003 Cable mounting kit, Pro20 + pressure sensor: part #60-7709-002 Lock nut Flat washer B CA LE (S) Flathead screw Isco mounting ring Figure 2-28 Securing the cable(s) with SST straps Note Always secure the sensor cable to the mounting apparatus and channel wall. Permanent installations require the use of bolted stainless steel straps. Plastic cable ties alone are not recommended for any installation, but if used, should have minimum 50 lb loop strength. 2.6.4 Circular Channels For large ID pipes and manhole inverts, Isco’s adjustable Scissors Ring (also known as the Universal Mounting Ring) is available in sets consisting of a base section, a scissors mechanism for adjustment, and one or more pairs of extensions to fit the specific channel size. The base section is equipped with holes and tabs for mounting other Isco sensors. Note Complete information about the Scissors Ring is beyond the scope of these instructions. See the Isco Mounting Rings Installation and Operation Guide (available at www.isco.com) or call the factory for details about choosing and installing your configuration. 2-29 ADFM® Flow Meter Section 2 Setup and Installation WARNING Use gloves and eye protection when assembling and installing the Isco Mounting Rings. Bolt holes Scissors mechanism Slots for bolting to channel wall Extensions Sensor mounting location Holes for securing cable Flow Sensor Mounting Hardware Kit: Part #60-3004-178 Secondary Sensor Hardware Kit: Part #60-7709-001 Figure 2-29 Scissors Ring Scissors ring assembly: 1. In order for the Pro20 sensor (or fairing/spacer) to be mounted flush against the bottom of the scissors ring, and to avoid accumulation of debris, the six tabs in the center of the base section must be flattened. This can be accomplished by hammering and bending the tabs (Figure 2-30). 2-30 ADFM® Flow Meter Section 2 Setup and Installation Figure 2-30 Flatten six center tabs on base section 2. Assemble the Scissors Ring, attach the sensor, and secure the cables above ground. 3. Assemble the ring, making sure the tongue sections are fully inserted into the slotted sections and over the securing buttons. 4. Bolt the sections together to increase safety and prevent the assembly from being dislodged or separated by the flow stream. Bolt holes Pro20 sensor with debris fairing Figure 2-31 Assembling the ring and mounting the sensor 2-31 ADFM® Flow Meter Section 2 Setup and Installation Scissors mechanism Figure 2-32 Ring assembled, ready for installation 5. Lower the assembly into the pipe with the sensor directly on the bottom center, parallel with the channel wall, facing into the flow. Tighten the scissors assembly to expand the ring outward so that it is pressed entirely flat against the pipe wall (Figure 2-33). a. For additional reinforcement, anchor the ring to the pipe wall using the slots provided and user-supplied 1 /4" x 21/4" SST concrete wedge anchors. Note Wedges are for reinforced concrete only. For pipes made of other materials, such as composite fiber, contact the manufacturer or Teledyne Isco for attachment recommendations. For pipe IDs of 60" or smaller, the full scissors ring is recommended. b. For manhole invert installations, the scissors mechanism may be omitted. Anchor the base section and any extensions to the pipe wall. Note Be very careful to position the sensor flat against the channel floor, facing into the flow. 6. Secure the cable along the top or side of the pipe to prevent damage, dislodging, and collection of debris. 2-32 ADFM® Flow Meter Section 2 Setup and Installation Scissors mech. Expand by tightening scissors mechanism. Figure 2-33 Expand and secure the ring against the channel wall 2.6.5 Large Flows and Moving Debris Under high velocity conditions (greater than five feet per second or 1.5 meters per second) and/or moving debris, the ring may require anchoring to keep it tight against the pipe. The flow could lift the ring off the bottom of the pipe, or even carry it downstream. This problem is more prevalent in larger diameter pipes, and in pipes with a smooth inside surface (plastic, for example). If any of these conditions are present, or if movement of the spring ring is suspected, anchoring the ring is highly recommended. This is usually accomplished using threaded fasteners anchored or driven into the wall of the channel, typically wedge anchors set in a pre-drilled hole, or with a power actuated stud gun. Please contact the factory for recommendations on installation in manhole inverts, or in pipes larger than 80 inches in diameter. 2.6.6 Rectangular Channels In rectangular channels, the Pro20 sensor is commonly installed using a flat mounting plate anchored to the channel floor, and/or a removable rectangular frame inserted into guide slots in the channel walls. In some cases, particularly when the Pro20 sensor will be installed using a diver or other special methods, the sensor will be mounted on a rectangular plate, which is then anchored directly to the channel floor. 2-33 ADFM® Flow Meter Section 2 Setup and Installation Flow Plate: Part #60-7613-003 FLH M6 X 10mm SST Screws: Part #231-8116-10 Figure 2-34 Attaching the sensor to a mounting plate Secondary level sensor ADFM Pro20 sensor FLOW Figure 2-35 Rectangular frame mounting Where a rectangular frame is used, verify the exact channel width at different depths and ensure that no obstructions will hinder insertion and removal of the frame. When designing mounting methods and accessories, avoid conditions where accumulation of solids on or against the frame is likely. Ensure that the installation allows access for servicing, clearing of debris, and removal/replacement of the frame. 2-34 ADFM® Flow Meter Section 2 Setup and Installation Cable Conduit (min. 2” dia.) Minimum bend radius 6” Cable in this area MUST be secured and protected. Sensor mounting plate Align sensor(s) parallel w/ the channel walls and flat on the channel bottom. Figure 2-36 Installation example 2.6.7 Applications With Permanent Silt For pipes or channels where sediment or debris will be present, Teledyne Isco offers mounting accessories for elevating the sensor. The debris fairing attaches directly to the mounting plate or ring, and the sensor is mounted in the top of the fairing for a lift of 3 inches. Fairing spacers add 1, 2, and 4 inches each, and may be combined for additional lift. The sensor, fairing, and spacer(s) are attached to the mounting plate with three threaded couplers and mounting screws. 2-35 ADFM® Flow Meter Section 2 Setup and Installation Fairing: part # 60-7004-042 4" lift: part # 60-7004-045 2" lift: part # 60-7004-044 1" lift: part # 60-7004-043 Figure 2-37 Fairing and spacers for added lift 1. Insert the threaded couplers into the fairing or bottom spacer. Additional couplers may be connected if extra spacers are required. Figure 2-38 Inserting the threaded couplers 2. Position the mounting plate over the couplers with the countersunk holes facing out. Attach with the mounting screws. 2-36 ADFM® Flow Meter Section 2 Setup and Installation Figure 2-39 Attaching the mounting plate Fairing Spacer Figure 2-40 Sensor with fairing and fairing spacer 2-37 ADFM® Flow Meter Section 2 Setup and Installation 3. Break off any excess length from the threaded couplers (Figure 2-41) such that the remaining threads attach the sensor snugly into the fairing. Figure 2-41 Threaded couplers: break off at joint 2.6.8 Pro20 Sensor Mounting Hardware 2-38 Table 2-1 List of Pro20 Sensor Mounting Accessories Cable mounting kit - Pro20 sensor only 60-7709-003 Cable mounting kit - Pro20 & pressure sensor 60-7709-002 Single SST Loop - Pro20 sensor only 489-0016-23 Single SST Loop - Pro20 & pressure sensor 489-0016-25 Scissors Ring standard sensor mounting hardware kit 60-3004-178 Scissors Ring secondary sensor mounting hardware kit 60-7709-001 Sensor mounting plate 60-7613-003 Sensor mounting screws 231-8116-10 Debris fairing 60-7004-042 Spacer, 1 inch lift 60-7004-043 Spacer, 2 inch lift 60-7004-044 Spacer, 4 inch lift 60-7004-045 Threaded coupler 60-7614-001 Replacement hardware kit for fairing/spacer 60-7619-001 ADFM® Flow Meter Section 2 Setup and Installation 2.7 Hot Tap Sensor Installation Recent changes have been made to the design of the Hot Tap Insertion (HTI) sensor. The two versions have slightly different dimensions and hardware. Operation is exactly the same for both. The two versions are most distinguishable from one another by the appearance of the box at the head of the shaft. See Figure 2-42, below. If your sensor has the smaller, metal box on the left, follow the instructions in Section 2.8 Insertion: Early Version HTI. If your sensor has the larger, molded box on the right, follow the instructions in Section 2.9 Insertion: Current HTI. Early HTI Current HTI Figure 2-42 Early and current versions of the HTI sensor WARNING Never loosen any hardware on the Hot Tap sensor when the pipe is pressurized. Pressure within the pipe can force the shaft to come out of the pipe, causing grave injury to anyone nearby. WARNING 2-39 ADFM® Flow Meter Section 2 Setup and Installation 2.7.1 Forced Depth and Scaling Constant (Hot Tap only) During Hot Ta p site setup (F lowlink) or statio n setup (WinADFM), you must open the Advanced Commands field and enter the following information: Forced Depth (QF) – The value of QF is the pipe’s inside diameter (ID) in millimeters. Example: For an ID of 22.5 inches, enter QF572 (22.5 x 25.4 mm/in, rounded up). Scaling Constant (QS) – This is the number printed on the serial tag of every Hot Tap sensor. Enter as QS### or QS####, depending on how many numbers are given. Example: Figure 2-43 shows the location of this value on old (QS1005) and new (QS982)sensors. Early version HTI Current HTI Figure 2-43 Location of the QS value on Hot Tap label 2-40 ADFM® Flow Meter Section 2 Setup and Installation 2.8 Insertion: Early Version HTI These instructions refer to Figure 2-44 on the following page. The preferred locations for sensor installation in a horizontal pipe are between the clock positions 1 and 5, and 7 and 11, as shown in Figure 2-44. Installation at the top and bottom of the pipe should be avoided due to the possibility of trapped air or sedimentation. The sensor may be installed at any position in a vertical pipe, provided the stream is flowing upward. For all other variations in position or flow, contact Teledyne Isco for assistance. Tools and supplies Installation of the Hot Tap requires the following user-provided tools and supplies: • Tapping saddle, thread-o-let, or spool piece • 2" NPT Corporation stop or ball valve • 9/64" hex screwdriver • Pipe wrench • PTFE pipe thread tape • Optional cable conduit (min. 2" dia.) The standard length of the Hot Tap sensor cable is 50 ft (15m). A custom-length cable can be up to 100 ft (30m). If conduit is used, a minimum diameter of 2 in. is required. Minimum bend radius for the cable is 6 in. Dimensional requirements When determining the installation location, consider the minimum clearance required for installation and removal of the sensor from the pipe. The minimum clearance required is found by calculating the dimension C. For the standard length sensor, the distance from the top of the valve to the inner pipe wall (D) must not exceed 15" in order to have an insertion depth of up to 11/2" past the inner pipe wall. Note Typical insertion depth is usually between 1/4 in. and 1/2 in. However, installations in pipes where buildup of grease or debris is expected, deeper insertion will ensure unimpaired flow readings. I f D e x c e e d s 1 5 i n c h e s, a c u s t o m l e n g t h s e n s o r s h a f t (part #60-5314-677) must be ordered. Contact Teledyne Isco for assistance with custom length selection. 2-41 ADFM® Flow Meter Section 2 Setup and Installation I D E pi (ty V Nipple T P Saddle Tap Pip eW all Valve L Sensor length (printed on box; standard 28" nom.) P Pipe wall thickness E Extended length (L + 2.25") C Minimum clearance for sensor removal (E + V + T) V Valve (user-supplied) D Distance from top of valve to inner wall (V + T + P) T Tapping saddle, thread-o-let, or spool piece (user-supplied) I Insertion depth (L - (S+P)) S Sensor tip insertion depth (1/4" to 1/2") L 2.25” Measured sensor length (L) E Figure 2-44 Early HTI: Component measurements and sensor positioning 2-42 1-5 7-11 Sensor c Se S Pi S = al in nso pe s r wa 1/4” ertio tip to n ll 1 d /2 ep ” ) th C ADFM® Flow Meter Section 2 Setup and Installation Before installation, fully extend the Hot Tap by loosening the clamping collar (lock ring) screw (Figure 2-45) and pulling the sensor all the way back inside the nipple, as shown at the bottom left of Figure 2-44. Collar screw Figure 2-45 Early HTI Hardware The sensor’s extended length E is 2.25 inches greater than the sensor length L. Use Figure 2-44 as a guide when calculating distances C and D. Installation 1. With the sensor fully extended, apply pipe thread tape to the nipple threads. 2. Screw the nipple into the valve. 3. Open the valve and push the sensor into the pipe to Dimension I. 4. Align the arrow printed on the sensor head box (bottom right, Figure 2-44) with the direction of flow (downstream). (The cable is also attached on the downstream side of the box.) Note For highest accuracy, the box must be aligned exactly parallel to the flow in the pipe, with the cable end facing downstream. When adjusting this alignment, ROTATE THE SHAFT, not the box itself. Flow Figure 2-46 Align the edges of the box parallel to flow 2-43 ADFM® Flow Meter Section 2 Setup and Installation 5. Lock the sensor shaft in place by tightening the collar screw. Note that there are two screws; the screw to be tightened is on the side of the collar, not the top. WARNING Never loosen any hardware on the Hot Tap sensor when the pipe is pressurized. Pressure within the pipe can force the shaft to come out of the pipe, causing grave injury to anyone nearby. WARNING Early version HTI: safety reinforcement A secondary clamping collar (kit 69-7303-012) is included with the early version Hot Tap sensor. Should the secondary collar become necessary, install it on the shaft directly behind the first collar. 1. Remove the Allen screw from the top of the first collar. 2. Place one half of the new collar on top of the old one, aligning the holes. Insert the long Allen screw, with spring lock washer, through the new collar clamp and down into the threaded hole of the old collar, and tighten down firmly. Hex screws Spacers (4) Allen screw Flat washers (4) Spring washer Hex nuts Lock washers Figure 2-47 Secondary collar installation 2-44 ADFM® Flow Meter Section 2 Setup and Installation 3. Place the other half of the new collar on top of the old one to form the new collar. 4. Insert the two long screws, including washers, spacers, and nuts, as shown above. Tighten the screws until the collar is snug against the shaft and cannot rotate. Figure 2-48 Early version Hot Tap with secondary collar installed WARNING Never loosen any hardware on the Hot Tap sensor when the pipe is pressurized. Pressure within the pipe can force the shaft to come out of the pipe, causing grave injury to anyone nearby. WARNING 2-45 ADFM® Flow Meter Section 2 Setup and Installation 2.9 Insertion: Current HTI These instructions refer to Figure 2-49 on the following page. The preferred locations for sensor installation in a horizontal pipe are between the clock positions 1 and 5, and 7 and 11, as shown in Figure 2-49. Installation at the top and bottom of the pipe should be avoided due to the possibility of trapped air or sedimentation. The sensor may be installed at any position in a vertical pipe, provided the stream is flowing upward. For all other variations in position or flow, contact Teledyne Isco for assistance. Tools and supplies Installation of the Hot Tap requires the following user-provided tools and supplies: • Tapping saddle, thread-o-let, or spool piece • 2" NPT Corporation stop or ball valve • 3/16" hex screwdriver • Pipe wrench • PTFE pipe thread tape • Optional cable conduit (min. 2" dia.) The standard length of the Hot Tap sensor cable is 50 ft (15m). A custom-length cable can be up to 100 ft (30m). If conduit is used, a minimum ID of 2 in. is required. Minimum bend radius for the cable is 6 in. Dimensional requirements When determining the installation location, consider the minimum clearance required for installation and removal of the sensor from the pipe. The minimum clearance required is found by calculating the dimension C. For the standard length sensor, the distance from the top of the valve to the inner pipe wall (D) must not exceed 15" in order to have an insertion depth of up to 11/2" past the inner pipe wall. Note Typical insertion depth is usually between 1/4 in. and 1 /2 in. However, installations in pipes where buildup of grease or debris is expected, deeper insertion will ensure unimpaired flow readings. I f D e x c e e d s 1 5 i n c h e s, a c u s t o m l e n g t h s e n s o r s h a f t (part #60-5314-677) must be ordered. Contact Teledyne Isco for assistance with custom length selection. 2-46 ADFM® Flow Meter Section 2 Setup and Installation I D 31 C .78 5” e ”) pth 5” 28 pi (ty V 1-5 7-11 Sensor c Se /2 S S al ns Pi pe = 1 inse or t wa /4” rtio ip to n ll 1 d .03 Nipple T P Saddle Tap Pip eW all Valve Sensor length: 28.785 in. (73.114 cm) P Pipe wall thickness Extended length: 31.035 in. (78.829 cm) C Minimum clearance for sensor removal (31.035" + V + T) V Valve (user-supplied) D Distance from top of valve to inner wall (V + T + P) T Tapping saddle, thread-o-let, or spool piece (user-supplied) I Insertion depth (28.785" - (S+P)) S Sensor tip insertion depth (1/4" to 1/2") 28.785” 2.25” 31.035” Figure 2-49 Current HTI: Component measurements and sensor positioning 2-47 ADFM® Flow Meter Section 2 Setup and Installation Before installation, fully extend the Hot Tap by loosening the clamping collar screws (Figure 2-50) and pulling the sensor all the way back inside the nipple, as shown at the bottom left of Figure 2-49. WARNING Never loosen any hardware on the Hot Tap sensor when the pipe is pressurized. Pressure within the pipe can force the shaft to come out of the pipe, causing grave injury to anyone nearby. WARNING Tighten hex screws Phillips screws Collar Figure 2-50 Current HTI Hardware The sensor’s extended length, 31.035 inches, is 2.25 inches greater than the sensor length (28.785 in.). Use Figure 2-49 as a guide when calculating distances C and D. Installation 1. With the sensor fully extended, apply pipe thread tape to the nipple threads. 2. Screw the nipple into the valve (Figure 2-44). 3. Open the valve and push the sensor into the pipe to Dimension I. 4. Align the arrows printed on the Hot Tap’s electronics box with the direction of flow (downstream). (The cable is also attached on the downstream side of the box.) Note For highest accuracy, the box must be aligned exactly parallel to the flow in the pipe, with the cable end facing downstream. When adjusting this alignment, ROTATE THE SHAFT, not the box itself. 2-48 ADFM® Flow Meter Section 2 Setup and Installation Flow Figure 2-51 Align the edges of the box parallel to flow 5. Loosen the two Phillips screws on the back of the two-piece clamping collar. WARNING Never loosen any hardware on the Hot Tap sensor when the pipe is pressurized. Pressure within the pipe can force the shaft to come out of the pipe, causing grave injury to anyone nearby. 6. Lock the sensor shaft in place by evenly tightening the two hex socket screws in the sides of the two-piece clamping collar, and then re-tighten the two Phillips screws. WARNING Safety reinforcement The sensor assembly includes a tethering chain as a precautionary measure in the event that the clamping collar is inadvertently loosened. Attach the quick disconnect links through holes in each of the two flanges on the sensor shaft, adjusting the chain to proper length. Figure 2-52 Attaching the tether chain 2-49 ADFM® Flow Meter Section 2 Setup and Installation Figure 2-53 Adjust chain to proper length Additional Safety Equipment Figure 2-54 Safety Installation Kit 2-50 For installation of the sensor in pipes with pressures above 100psi, Teledyne Isco recommends the Safety Installation Kit, part #60-7007-030 as an additional safety measure. ADFM® Flow Meter Section 2 Setup and Installation 2.10 Applying Power 2.10.1 Box Controller Batteries Connect the appropriate power supply to the ADFM and the power source, and/or ensure that the batteries are securely mounted inside the control box. To install the four lantern batteries: 1. Remove the top cover by loosening the four large screws holding it in place. 2. Remove the two small, flathead screws holding the inner front panel closed. The screws are not attached. Take care not to lose the plastic washers. 3. Remove the battery housing lid by loosening the four large screws holding it in place. The screws remain attached to the lid. Loosen screws (4) Figure 2-55 Box controller: remove the battery compartment 2-51 ADFM® Flow Meter Section 2 Setup and Installation 4. Place the four batteries inside the compartment with the terminals facing downward. Figure 2-56 Box: Battery compartment 5. Replace the housing lid, installing it so that the metal screw tab in the chassis is over the cutout in the upper right corner of the lid, as before. Cutout in lid Screw tab Figure 2-57 Reinstalling the battery compartment lid 2-52 ADFM® Flow Meter Section 2 Setup and Installation 2.10.2 Box Controller On and Reset Switches In the box controller, the On switch is a key switch located on the left side of the inner front panel (Figure 2-58), inside the area labeled Power. Note that there are two switches, labeled Battery and Mains. Only the switch labeled Battery is functional. This switch controls all DC power, including batteries and external power. The Mains switch is not connected or functional, since current ADFM units do not use line voltage. To power up the ADFM, use the switch-key provided to turn the "Battery" switch to the On position, indicated by the number 1 (one). Power switch (both battery and external DC) Not functional; do not use Figure 2-58 Control box power switches To reset the ADFM, turn the spring-loaded Reset switch to the 1 (one) position and release it. 2-53 ADFM® Flow Meter Section 2 Setup and Installation 2.10.3 Canister Controller Batteries To install the four lantern batteries: 1. Unscrew the four eye bolts on the canister’s suspension end, taking care not to lose the washers and the black o-ring seal around the base of the lid. Unscrew suspension bolts (4) Figure 2-59 Canister: remove battery compartment lid 2. Remove the butterfly screw and battery retaining cover. Butterfly screw Retaining cover Figure 2-60 Remove battery retaining cover and screw 2-54 ADFM® Flow Meter Section 2 Setup and Installation 3. Place the four batteries inside the compartment with the terminals facing downward. Figure 2-61 Canister: Battery compartment 4. Reinstall hold-down and outer covers. 2.10.4 Resetting the ADFM Canister To reset the ADFM canister, disconnect and reconnect power cable and/or battery power (by removing and replacing the batteries). 2-55 ADFM® Flow Meter Section 2 Setup and Installation 2.11 Built In Tests (BITs) (Box Controller Only) When power is first applied to the ADFM box controller, an internal self-test will automatically be performed. On the control box, result messages will scroll on the LCD display, finishing with a display showing the ADFM firmware version number on the first line and a hexadecimal-coded event/error map on the second line. 2.11.1 Testing Interval Routine execution of the built-in tests is not required during normal system operation. Execution of selected built-in tests from software is recommended quarterly or at each battery change, whichever is more frequent. The built-in tests should also be performed whenever a hardware problem with the ADFM is suspected. 2.11.2 Test Record By default, the software will create a log containing details of all ADFM operations, including the status of the error code map and the results of all built-in tests. No further test record is required unless specifically requested by Isco Service personnel. 2.11.3 Power-up BIT Procedure/Sequence Switch off the power to the ADFM. After an interval of at least ten minutes, switch the power on again. The ADFM’s LCD display should show the firmware version and error code map followed by the wakeup message: RD Instruments: ------------------Acoustic Doppler Flow Meter The ADFM should begin displaying the results of the power-up BIT. The power-up BITs will last approximately one to two minutes, after which the LCD will show the firmware version on the first line and BIT error and event code on the second line: ADFM Ver. V6.xx 09000080 For code definitions, refer to Table 2-2 on the following page. Note If no events or errors occurred, the second line will show only zeros (00000000). To repeat the power-up BIT tests, turn and release the spring-loaded Reset key switch located on the front panel. 2-56 ADFM® Flow Meter Section 2 Setup and Installation Table 2-2 BIT Hexadecimal Code Definitions Code Definition Explanation 01nnnnnn Autostart: Unit has been restarted or restarted itself. 80nnnnnn Modem dial failure 40nnnnnn Modem listen failure 20nnnnnn Recorder failure 10nnnnnn Recorder full 08nnnnnn Transducer communication failure 04nnnnnn Power time fail: 02nnnnnn Fifo fail: 008nnnnn DeMod LCA fail: 00000040 00000020 Intrup Err: Motherboard failure 00000010 00000008 Divo Err: 00000004 Inst Err: 00000002 Addr Err: 00000001 Bus Err: 004nnnnn Comm Timeout: Communication times out in the ADFM after several minutes of no activity. To reestablish communication, disconnect the ADFM from the computer and then reconnect. 002nnnnn Pressure fail: Failure of secondary depth sensor if it is a pressure type sensor; no code for other sensor types. 00000080 Cold WU (wakeup): Manual restart occurred while ADFM was connected to computer. Possible motherboard failure, but may correct itself upon restart. Note Each code indicates one error or event type. However, if two or more events are present, the code will appear as the sum of the most significant digits of their corresponding codes. Example: If the ADFM has been restarted and also experienced a transducer communication failure, the code displayed would be: 09nnnnnn. 2-57 ADFM® Flow Meter Section 2 Setup and Installation 2.12 Data Retrieval This section offers a brief overview of collecting data from your ADFM system with Teledyne Isco’s software programs. For full details of site setup and data management, refer to the software instruction manual. Note The flow meter’s recorder must be cleared following data retrieval. Save all downloaded data and, prior to redeployment, erase the recorder and restart the ADFM. This applies to both Flowlink and WinADFM software programs. 2.13 Flowlink To begin downloading data from the ADFM through direct connection: 1. Connect the computer to the ADFM flow meter with the communication interface cable. 2. Start Flowlink software. 3. In the workspace on the left, open the desired site file. The site window opens. Figure 2-62 Site Info tab: Connect and Retrieve Data buttons 4. On the Site Info tab, click the Connect button. 5. Once the site is online, the Retrieve Data button becomes active. Click the Retrieve Data button to download data from the site. A progress bar will indicate the download status. 2-58 ADFM® Flow Meter Section 2 Setup and Installation Note To retrieve only the data collected since the last interrogation, press Shift + F8 to open the Retrieve Options window. Figure 2-63 Flowlink: Data download 6. Upon completion, click Erase Data to erase the recorder. The software will remind you to back up your data first: Figure 2-64 Erasure warning - Flowlink 7. Click Yes to continue. The data window will say: PLEASE WAIT, ERASING RECORDER... RECORDER WAS ERASED. 8. Restart the ADFM by doing one of the following: a. To save new program settings, click Program and Restart. The timeout warning will appear: Figure 2-65 Timeout warning - Flowlink Click Yes to continue. 2-59 ADFM® Flow Meter Section 2 Setup and Installation b. To keep current program settings, click Restart. Figure 2-66 Restart warning - Flowlink 2.13.1 Viewing the Data In the workspace on the left, expand the site file tree to display devices in the site and the ADFM’s measured parameters. To quickly graph data, double-click on any parameter (Figure 2-67). Figure 2-67 Flowlink: Graphing data (velocity shown) 2-60 ADFM® Flow Meter Section 2 Setup and Installation To view multiple parameters on the graph, simply drag and drop them into the graph. Figure 2-68 Flowlink: Drag & drop data parameters on graph (velocity and flow shown) Flowlink’s Pulsed Doppler graphing properties include many editing and formatting capabilities, and other features such as Scatter plots, Flow Profile, and data quality indicators of amplitude and correlation. For detailed information, refer to the Flowlink user manual and Help files. Note Real-time data viewing requires pushed data capability, available with Flowlink Pro. Contact the factory for more information. 2-61 ADFM® Flow Meter Section 2 Setup and Installation 2.14 WinADFM To begin downloading data from the ADFM through direct-connection: 1. Connect the computer to the ADFM flow meter with the communication interface cable. 2. Start WinADFM software. 3. Select File > Open. 4. Select the appropriate Station file (.stn file). 5. Select ADFM > Operate. 6. Click Connect (Figure 2-69). Figure 2-69 Connect Screen 7. Select Collect Data. 2-62 ADFM® Flow Meter Section 2 Setup and Installation Figure 2-70 Collect/Erase Data The Collect window shows the name of the data file being collected and the number of bytes transferred, as well as the size of the data file. Figure 2-71 Data transfer indicator 2-63 ADFM® Flow Meter Section 2 Setup and Installation When the download is finished, erase the recorder by clicking Erase Data. 8. When finished, restart the ADFM by doing one of the following: a. Click Restart to keep current program settings. b. Click Program & Go to save new program settings. When the Program & Go screen appears, click Exit. 9. Disconnect the communication interface cable from the ADFM, exit the Operate screen, and quit the WinADFM software program. 2.14.1 Viewing the Data To view the downloaded data, start WinADFM and open the desired Station file. Select Display, then Data. Figure 2-72 ADFM Data window The data files available for viewing will appear in the Data window (Figure 2-72). Click the data file to view and select the viewing mode from the column of buttons on the right. For example, selecting Expert View would result in a view similar to Figure 2-73. Exit WinADFM when finished. 2-64 ADFM® Flow Meter Section 2 Setup and Installation Figure 2-73 Viewing data in Expert View 2-65 ADFM® Flow Meter Section 2 Setup and Installation 2-66 ADFM® Flow Meter Section 3 Maintenance and Troubleshooting This section explains the maintenance requirements of the ADFM Velocity Profiling System. The ADFM is designed to perform reliably in adverse conditions with a minimal amount of routine service requirements. To keep your system working properly, inspect the battery voltage and the condition of the internal desiccant regularly. Maintenance intervals are affected by many variables. The Data Storage Rate will affect the battery life. Humidity levels obviously affect the service life of the desiccant, and the amount of debris in the stream can drastically alter the channel conditions. 3.1 How to Obtain Service Teledyne Isco Technical Service Dept. P.O. Box 82531 Lincoln, NE 68501 USA Phone: (866) 298-6174 (402) 464-0231 FAX: (402) 465-3085 E-mail: [email protected] If you think your equipment requires repair, contact Teledyne Isco’s Technical Service Department. The cable connections and electronic components of the sensor are encapsulated in plastic resin and are not user-serviceable. Corresponding with a Teledyne Isco Technical Service Representative can often resolve the problem without the need to return the item. If the difficulty cannot be resolved you will be issued a Return Authorization Number (RAN) and information for returning it to the factory. Before packaging and shipment, clean and dry the flow meter and sensor, and include important information as described in the following sections. 3.1.1 Cleaning The electronics case, cables, and sensor may be cleaned with mild detergent and warm water. Before cleaning, ensure that all protective connector caps are in place. Do not use abrasive agents or solvents; they will damage the surfaces of the equipment. Mild chlorine bleach solutions may be used for disinfection and elimination of odors. 3.1.2 Packaging Attach documentation to the equipment identifying the owner and owner address, complete instrument model and serial number, and a description of the problems observed with the equipment. Whenever possible, the original factory packaging material should be retained for reuse. For repackaging with commercial materials, follow these instructions: • Wrap the flow meter and sensor assemblies separately in bubble wrap or other cushioning material. • Use a strong shipping container suitable for the weight of the ADFM. Shipping containers made of wood or 3-1 ADFM® Flow Meter Section 3 Maintenance and Troubleshooting plastic are preferable; however, corrugated shipping boxes of at least 200-lb test may also be used. • Use a layer of shock absorbing material at least one inch thick around all sides of the flow meter and transducer assemblies to firmly cushion and prevent movement within the container. Special care must be taken to protect the transducer ceramics on the upper face of the transducer assembly from damage. • Seal the shipping container securely. • Mark the container FRAGILE to ensure careful handling. • In any correspondence, refer to the system by model number and serial number. 3.2 Desiccant The ADFM flow meter uses desiccant to protect the internal components from moisture damage. When the desiccant becomes saturated, it must be replaced or reactivated. If the controller is unable to connect, this could be an indication of humidity within the controller. CAUTION Do not allow the flow meter to operate with saturated desiccant. In many flow environments, gases are present in the atmosphere that can combine with available water vapor to form acids. The acids formed this way can corrode the internal components of the flow meter, ruining them. An active desiccant canister inhibits the formation of these acids by absorbing water vapor. Keep the lid closed whenever possible. Inspect and regenerate the canister when necessary. 3.2.1 Box Controller Desiccant Part #099-0012-00 3-2 Only open the controller case in a clean, dry environment. As shown in Figure 3-1, the box controller is equipped with a reusable desiccating canister attached to the inside of the case. This canister contains silica gel that attracts moisture trapped inside the flow meter's case when it is closed. This keeps the inside of the case completely dry during shipment, storage, and use. If you leave the case open, the desiccant will attract moisture from the surrounding air. Eventually, its absorption capacity will be reached, and it will no longer be able to protect the internal components of the flow meter. ADFM® Flow Meter Section 3 Maintenance and Troubleshooting Desiccant canister Window Figure 3-1 Internal desiccant canister Inspect the desiccant canister each time the case is opened. The desiccant canister has a window on its side that looks blue or yellow when the desiccant is dry. As the desiccant absorbs moisture, the pebbles in the window will turn from blue to pink, or from yellow to green. When the pebbles turn pink or green, the desiccant needs to be regenerated, or replaced with the spare canister provided in the flow meter's accessory package. Remove the canister from the flow meter and heat it in a vented oven at 300°F (150°C) for about three hours, or until the blue or yellow color returns. After cooling, put the canister back in the flow meter; make sure the window on the side of the canister remains visible. CAUTION Desiccant may produce irritating fumes when heated. Leave the room while the desiccant is being recharged. Important Guidelines to Follow: • Always use a vented, circulating forced air, convection oven in a well-ventilated room. • DO NOT use a microwave oven to recharge the desiccant cartridge. • Always use the recommended temperature. Never heat the desiccant at higher than recommended temperatures. • Avoid heating the desiccant longer than necessary. 3-3 ADFM® Flow Meter Section 3 Maintenance and Troubleshooting 3.2.2 Canister Controller Desiccant The canister controller desiccant is in a bag that cannot be regenerated and must be replaced. Part #099-0002-01 CAUTION Opening the electronics cover on the canister will void the NEMA/IP rating. To preserve the NEMA/IP rating, send the canister controller to the factory for service and inspection of the desiccant. If you choose to void the NEMA/IP rating, only open the case in a clean, dry environment. You can access the desiccant bag for replacement and inspect the controller interior for humidity by performing the following steps: 1. Remove the four 3/16" Allen screws holding the electronics cover in place. Allen screws (4) Figure 3-2 Canister controller: opening the electronics lid 2. The interior electronics are attached to the lid. Laying the controller on its side, very carefully ease the lid a few inches away from the case (Figure 3-3). Wiring from the battery compartment is connected to the electronics. Do not attempt to pull the electronics all the way out of the case. 3. A humidity indicator card is located inside the case along with the desiccant bag. The indicator turns pink or white when the humidity level exceeds the printed value. Ideally, all three sections of the indicator should be blue. If the 20% and 30% sections are pink or white, replace the desiccant. (The card may be square or round.) 3-4 ADFM® Flow Meter Section 3 Maintenance and Troubleshooting Desiccant bag 30 20 40 Figure 3-3 Canister case desiccant and humidity indicator card 3.3 Real Time Clock Backup Battery The real time clock is designed to keep the time updated when the flow meter’s power is removed. In the box controller, the backup battery is a single, 3-volt, 250 mAh lithium coin cell, located near the bottom left corner of the ADFM motherboard. The lithium battery life is approximately ten years. To replace the battery in a box controller, refer to the following steps. The canister controller must be returned to the factory to have the battery replaced. CAUTION Never open the flow meter housing in a damp or corrosive atmosphere. Only perform maintenance work inside the case in a clean, dry location. 1. Turn the “Battery” switch to the OFF (0) position to remove power. 2. Remove the front cover and open the interior panel. 3. With a small-blade, non-conductive screwdriver, gently lift and slip out the coin cell. 4. Install a new coin cell (Panasonic PR2330 or equivalent). 5. Reapply power to the instrument. 6. Test the system for proper operation. 3-5 ADFM® Flow Meter Section 3 Maintenance and Troubleshooting 3.4 Troubleshooting the ADFM 3.4.1 Troubleshooting Tables The following sections provide assistance in locating and isolating faults in the system. Troubleshooting information for system power-up is provided in Table 3-1, and for system operation in Table 3-2. Possible problems and actions are listed in order of likelihood. Note Call the factory for assistance before replacing the motherboard. Table 3-1 Troubleshooting on Power-Up Symptom Possible Problem(s) Action(s) No wakeup message on LCD or computer screen Power Verify battery voltage and connections. Verify connection to external DC supply. Motherboard Contact the factory. No wakeup message on LCD, but com- LCD Replace LCD puter displays wakeup message when a Front panel interface board Replace front panel interface board manual reset is performed. Cable connection between LCD and Replace ADFM Motherboard. front panel Cable connection between front panel interface board and motherboard. Motherboard No wakeup message on computer RS-232 connection screen, but LCD displays wakeup mesIncorrect port settings on computer sage and completes Built-In-Tests (BIT). Front panel interface board Motherboard Troubleshoot cabling Adjust communication port settings on computer Replace front panel interface board Replace motherboard. 3-6 ADFM® Flow Meter Section 3 Maintenance and Troubleshooting Table 3-2 Troubleshooting During Operation Symptom Possible Problem(s) Action Message: “Transducer not found” Sensor cable connector Refer to Section 3.4.4. Cabling between Motherboard and sensor connector of flow meter Sensor or sensor cable Message: “Recorder not found” Recorder cable assembly Recorder Assembly Motherboard Check recorder ribbon cable connection to motherboard. Replace recorder assembly. Replace motherboard. Message “No Command Prompt Found” Incorrect port settings on computer Adjust communication port settings on computer Message “Cannot Open Port” Ancillary Data VXDR, VDD1, and Batteries or power supply VDC are outside the range listed in Motherboard section “Maintenance and Troubleshooting.” Transmit Test Failure Replace batteries. Check power supply. Replace motherboard. Cabling between the sensor interface board Verify all connections. and the ADFM rear panel sensor connecReplace motherboard. tor. Connection between motherboard and sensor interface board Transducer cable or connectors Motherboard Message: “Loop Test Failure.” An occasional loop test failure may be normal since this is a statistical test. The percentage of loop test failures should typically be less than 10%. Transducer improperly connected, or dam- Eliminate interference sourcea, or shield transducer environment. aged High interference source Motherboard. Perform Field Test in WinADFM (refer to WinADFM software manual). The Correlation Magnitude at Lag 0 should be 255; at Lag 7 it should be typically < 20. Also, the High Gain RSSI should be typically < 65. Otherwise it may indicate a high source of interference. Call the factory. Any RAM Test failure Motherboard Replace motherboard Message: “Clock Interrupt failed” a. It is recommended to record the values for Correlation Magnitude, High Gain RSSI, and the results of the transmit test for later reference. 3.4.2 Troubleshooting Steps The following procedures are intended to assist fault isolation in cases where the Built-in-Test (BIT) cannot be executed (no ADFM wakeup for example), or the BIT determines a problem with the sensor. 3-7 ADFM® Flow Meter Section 3 Maintenance and Troubleshooting It is not necessary to follow these procedures for routine maintenance. However, the Built-In Tests may be executed on a routine basis. For the following procedure, the top cover of the ADFM controller must be removed from the chassis. This exposes the controller’s circuitry, which contains electro-static sensitive devices. To prevent electro-static discharge (ESD) to these components, you must ground the controller as well as yourself. Use an ESD wrist strap (or other accepted means) to ground yourself. Please keep in mind that even if an ESD has occurred, the ADFM may still work, but its reliability may be seriously impaired. 3.4.3 BIT Not Executing (Box Controller Only) Communication If the built-in test (BIT) cannot be executed, it is likely caused by either faulty communication, or power loss or a faulty ADFM power supply. If communication cannot be established, the following procedure may help you to isolate the problem: 1. Verify that the internal or external power sources are properly connected to the ADFM, and sufficient to supply it. 2. Verify that the computer’s serial port is functioning normally. In Windows, go to Start, Settings, Control Panel. Select System, go to the Hardware tab, and click Device Manager and Ports to determine if the computer’s serial port is properly operating. Verify line continuity on the RS-232 Serial Communications Cable. 3. If remote communications still cannot be established, perform a manual reset by turning and releasing the keyed RESET switch on the ADFM box’s inner front panel, or by disconnecting and reconnecting power from the ADFM canister. This should start the built-in test. If you are using the box enclosure, the wake-up message, and a series of built-in test results, should appear on the ADFM’s display. 4. If these steps are not successful, the motherboard may have to be replaced. 5. If all tests are successful (i.e., the computer screen produces normal, legible results), yet the ADFM box display is blank or scrambled, the display or front panel interface may need to be replaced. 6. It is also possible that there is a problem with the power supply, as discussed in the following section. Power If the Built-In Tests cannot be executed locally or remotely, or if communication cannot be established, perform the following steps to isolate the problem: 1. If you tried to use internal batteries to power the ADFM, you may alternatively try DC power if possible. If you are successful, the problem is likely to be a faulty battery switch, or its wiring. Also check the internal batteries’ wir- 3-8 ADFM® Flow Meter Section 3 Maintenance and Troubleshooting ing harness for good connection at the battery terminals, and the motherboard battery connector. 2. If you are using an external DC power supply, ensure that it is supplying proper voltage to the ADFM controller (12 to 26 VDC). On the electronics box, ensure that the Battery switch at the front panel is in the On (“1”) position. 3. Perform a manual reset by turning and releasing the keyed RESET switch on the ADFM box’s inner front panel, or by disconnecting and reconnecting power from the ADFM canister. If the above procedures are not successful in establishing communications with the ADFM, the problem may be internal. Contact the factory. The BIT should display the following voltages for the ADFM: VMVDC 3.4.4 BIT Determines a Problem Associated with the Sensor Interior and/or Exterior exterior power supply 12 - 36 VDC VMVDD1 Main supply of electronics 5.0 VDC ± 0.2 VMVXDR Recorder 10.7 VDC ± 0.2V The built-in test (BIT) is not able to isolate the exact problem in all cases. If, with help of BIT, you determined the fault to be within the transducer or the Transmit Test failed, the problem may be associated with the following items: Any connection between the ADFM motherboard and the transducer cable A malfunctioning or damaged sensor Check the pins on the sensor cable connection. There should be a total of 11 pins, and the pins should be free of moisture and corrosion. Note It is very important to keep all unused connectors capped. Moisture penetration and corrosion can cause permanent damage to the ADFM and/or the sensor. With the exception of the sensor cable, the ADFM box controller must be opened to check any other sensor related connection. Ensure that the connections between the sensor interface board and the motherboard are properly seated. There are two connections: a ribbon cable for VCC and grounding connections, and a coaxial cable for transmission of the sensor’s analog signal. Do not alter the connections made on the motherboard for any reason other than to re-establish proper connection. 3-9 ADFM® Flow Meter Section 3 Maintenance and Troubleshooting Ribbon cable Coaxial cable Figure 3-4 Box controller sensor interface board connections 3.4.5 Sensor Malfunction With Canister Controller Check the pins on the sensor cable connection. There should be a total of 11 pins, and the pins should be free of moisture and corrosion. Note It is very important to keep all unused connectors capped. Moisture penetration and corrosion can cause permanent damage to the ADFM and/or the sensor. CAUTION The canister controller contains electronics similar to those in the box; however, opening the canister in the field will void the NEMA/IP rating. To preserve the NEMA/IP rating, send the canister controller to the factory for service and inspection of the desiccant. If you choose to void the NEMA/IP rating, only open the case in a clean, dry environment. You can access the circuit boards by performing the following steps: 1. Remove the four 3/16" Allen screws holding the electronics cover in place (Figure 3-5). 3-10 ADFM® Flow Meter Section 3 Maintenance and Troubleshooting Allen screws (4) Figure 3-5 Canister controller: opening the electronics lid 2. The interior electronics are attached to the lid. Laying the controller on its side, very carefully ease the lid a few inches away from the case (Figure 3-6). Wiring from the battery compartment is connected to the electronics. Do not attempt to pull the electronics all the way out of the case. Ensure that the connections between the sensor interface board and the motherboard are properly seated. There are two connections: a ribbon cable for VCC and grounding connections, and a coaxial cable for transmission of the sensor’s analog signal. Ribbon cable Coaxial cable Figure 3-6 Canister controller sensor interface board connections Do not alter the connections made on the motherboard for any reason other than to re-establish proper connection. 3-11 ADFM® Flow Meter Section 3 Maintenance and Troubleshooting 3-12 ADFM® Flow Meter Appendix A Parts and Accessories Parts and Accessories can be purchased by contacting Teledyne Isco’s Customer Service Department. Teledyne Isco Customer Service Department P.O. Box 82531 Lincoln, NE 68501 USA Phone: (800) 228-4373 (402) 464-0231 FAX:(402) 465-3022 E-mail:[email protected] A.1 General Spare Parts and Accessories ADFM control box . . . . . . . . . . . . . . . . . . . . . . . . . . . . 62-7100-005 ADFM canister controller . . . . . . . . . . . . . . . . . . . . . . 62-7110-005 ADFM IS control box . . . . . . . . . . . . . . . . . . . . . . . . . . 62-7100-105 ADFM IS canister controller . . . . . . . . . . . . . . . . . . . . 62-7110-105 Internal modem (for both box and canister). . . . . . . . 60-7004-015 RS232 Communication cable, 3 m (10 ft). Connects PC with 9-pin serial port with ADFM box, or ADFM canister with Amp connectors . . . . . . . . . . . . . . . . . . . . . . . . . . . . . . 60-7004-057 RS232 Communication cable, 3 m (10 ft). Connects PC with 9-pin serial port with ADFM canister with Crown connector . . . . . . . . . . . . . . . . . . . . . . . . . . . . . 60-7004-027 DC power cable pigtail for ADFM box, and ADFM canister with Amp connectors . . . . . . . . . 60-7004-062 DC power cable pigtail for ADFM canister with Crown connectors . . . . . . . . . . . . . . . . . . . . . . . . 60-7004-041 Flow meter suspension harness kit60-7109-002 Pro20 sensor with 15 m (49 ft) cable. . . . . . . . . . . . . . 60-7004-004 Pro20 sensor with 30 m (98 ft) cable. . . . . . . . . . . . . . 60-7004-005 Pro20 sensor with 45 m (147 ft) cable. . . . . . . . . . . . . 60-7004-006 Extension cable for Pro20 sensor, 15 m (49 ft) . . . . . . 60-7004-061 (Total cable length should not exceed 150 ft without prior factory approval.) Extension cable for Pro20 sensor, 30 m (98) ft . . . . . . 60-7004-013 (Total cable length should not exceed 150 ft without prior factory approval.) A-1 ADFM® Flow Meter Appendix A Parts and Accessories Pro20 IS sensor with 15 m (49 ft) cable . . . . . . . . . . . 60-7004-028 Pro20 IS sensor with 30 m (98 ft) cable . . . . . . . . . . . 60-7004-029 Pro20 IS sensor with 45 m (147 ft) cable . . . . . . . . . . 60-7004-030 Hot Tap insertion sensor with 15 m (49 ft) cable . . . . 62-7004-012 Hot Tap insertion sensor with 30 m (98 ft) cable . . . . 62-7004-016 Hot Tap safety installation kit . . . . . . . . . . . . . . . . . . 60-7007-030 A.2 Standard Pro20 Mounting Rings Standard Scissors Rings (Each scissors ring includes a base section, scissors mechanism, extensions, plastic ties, and a manual) 16-24" Pipe . . . . . . . . . . . . . . . . . . . . . . . . . . . . . . . . . . 68-3000-042 26-38" Pipe . . . . . . . . . . . . . . . . . . . . . . . . . . . . . . . . . . 68-3000-043 38-44" Pipe . . . . . . . . . . . . . . . . . . . . . . . . . . . . . . . . . . 68-3000-044 44-48" Pipe . . . . . . . . . . . . . . . . . . . . . . . . . . . . . . . . . . 68-3000-045 60" Pipe. . . . . . . . . . . . . . . . . . . . . . . . . . . . . . . . . . . . . 68-3000-046 72" Pipe. . . . . . . . . . . . . . . . . . . . . . . . . . . . . . . . . . . . . 68-3000-047 16-80" Pipe . . . . . . . . . . . . . . . . . . . . . . . . . . . . . . . . . . 68-3000-048 Base Section . . . . . . . . . . . . . . . . . . . . . . . . . . . . . . . . . 60-3004-169 (with plastic ties and manual) A.3 Pro20 Debris Fairing Kits Debris fairing kit, 3-inch lift . . . . . . . . . . . . . . . . . . . . 60-7004-042 Fairing spacer, 1-inch lift. . . . . . . . . . . . . . . . . . . . . . . 60-7004-043 Fairing spacer, 2-inch lift. . . . . . . . . . . . . . . . . . . . . . . 60-7004-044 Fairing spacer, 4-inch lift. . . . . . . . . . . . . . . . . . . . . . . 60-7004-045 Fairing/spacer hardware kit . . . . . . . . . . . . . . . . . . . . 60-7619-001 (Includes all mounting hardware. Accommodates up to 8 inches total height. For greater heights, use multiple kits.) A.4 Secondary Depth Sensors Custom-length pressure sensor. . . . . . . . . . . . . . . . . . 60-5314-730 Specify maximum pressure rating (2.5 to 30 psi) and cable length up to 250 ft (76.2 m) Custom-length pressure sensor for Intrinsically Safe ADFM system. . . . . . . . . . . . . . . . . 60-5314-762 Specify maximum pressure rating (2.5 to 30 psi) and cable length up to 250 ft (76.2 m) Custom-length ultrasonic sensor . . . . . . . . . . . . . . . . 68-5304-008 A-2 ADFM® Flow Meter Appendix B Material Safety Data Sheets This appendix provides Material Safety Data Sheets (MSDS) for the internal desiccant used inside the ADFM electronics housing. Specific questions regarding the use and handling of this product should be directed to the manufacturer listed in the MSDS. B-1 ADFM® Flow Meter Appendix B Material Safety Data Sheets Page 1 of 5 0$7(5,$/6$)(7<'$7$6+((7 'DWH,VVXHG 06'61R 'DWH5HYLVHG 5HYLVLRQ1R 'HVL3DN 352'8&7$1'&203$1<,'(17,),&$7,21 352'8&71$0('HVL3DN *(1(5$/86('HVLFFDQW 0$18)$&785(5 6G&KHPLH3HUIRUPDQFH3DFNDJLQJ &KULVWLQH'ULYH 5LR*UDQGH,QGXVWULDO3DUN %HOHQ10 &XVWRPHU6HUYLFH +5(0(5*(1&<7(/(3+21(180%(56 &+(075(& 2XWVLGHWKH86&DOO&ROOHFW +$=$5'6,'(17,),&$7,21 (0(5*(1&<29(59,(: 3+<6,&$/$33($5$1&(3HUIRUPDQFHSDFNDJLQJSURGXFWVL]HDQGW\SHYDU\ ,00(',$7(&21&(5163RVHVOLWWOHRUQRLPPHGLDWHKD]DUG 327(17,$/+($/7+())(&76 (<(65RXWHRIH[SRVXUHXQOLNHO\'XVWPD\FDXVHDPHFKDQLFDOLUULWDWLRQZKLFKFDQVFUDWFKWKHH\H 6.,11RDGYHUVHHIIHFWVH[SHFWHG ,1*(67,211RQWR[LFE\LQJHVWLRQ3DFNHWVRUFDQLVWHUVPD\SRVHDFKRNLQJKD]DUG.HHSDZD\IURPFKLOGUHQDQG SHWV ,1+$/$7,215RXWHRIH[SRVXUHXQOLNHO\7KLVPDWHULDOLVQRUPDOO\SDFNDJHGDQGFRQWDLQHGLQDSRXFKEDJRU FDQLVWHU,IWKHFRQWDLQHULVRSHQHGSURORQJHGRUUHSHDWHGLQKDODWLRQRIKLJKGXVWFRQFHQWUDWLRQVPD\FDXVHOXQJ GDPDJH &20326,7,21,1)250$7,2121,1*5(',(176 ,1*5(',(176 3RXFK%DJ&DQLVWHU6WRSSHURU&DS &OD\ 6LOLFDTXDUW] &$6 :W 6HH6HFWLRQIRU([SRVXUH/LPLWV ),567$,'0($685(6 (<(6'RQRWUXEH\HV)OXVKZLWKOXNHZDUPJHQWO\IORZLQJZDWHUIRUPLQXWHVRUXQWLOWKHSDUWLFOHGXVWLVUHPRYHGZKLOH KROGLQJWKHH\HOLGVRSHQ2EWDLQPHGLFDODWWHQWLRQ 6.,1:DVKZLWKVRDSDQGZDWHU B-2 ADFM® Flow Meter Appendix B Material Safety Data Sheets Page 2 of 5 'HVL3DN ,1*(67,211RUPDOO\QRWQHHGHG,IODUJHTXDQWLWLHVDUHLQJHVWHGFDOO\RXUORFDO3RLVRQ&RQWURO&HQWHU LQWKH86 ,1+$/$7,211RUPDOO\QRWQHHGHG,IH[SRVHGWRH[FHVVLYHOHYHOVRIGXVWRUIXPHVUHPRYHWRIUHVKDLUDQGVHHNPHGLFDO DWWHQWLRQRIFRXJKRURWKHUV\PSWRPVGHYHORSRUSHUVLVW ),5(),*+7,1*0($685(6 )/$6+32,17$1'0(7+2'0DWHULDOLVQRWIODPPDEOH (;7,1*8,6+,1*0(',$8VHH[WLQJXLVKLQJDJHQWDSSOLFDEOHWRVXUURXQGLQJILUH ),5(),*+7,1*352&('85(6$VLQDQ\ILUHZHDUVHOIFRQWDLQHGEUHDWKLQJDSSDUDWXVRSHUDWHGLQSUHVVXUHGHPDQG PRGH1,26+DSSURYHGRUHTXLYDOHQWDQGIXOOSURWHFWLYHJHDU $&&,'(17$/5(/($6(0($685(6 60$//63,//1RVSHFLDOSUHFDXWLRQVUHTXLUHG /$5*(63,//:LWKVKRYHORUVFRRSSODFHPDWHULDOLQWRDSSURSULDWHFRQWDLQHU +$1'/,1*$1'6725$*( +$1'/,1*8VHRISURSHUK\JLHQHSUDFWLFHVLQWKHZRUNSODFHLVUHFRPPHQGHG 6725$*(6WRUHLQDGU\DUHD (;32685(&21752/63(5621$/3527(&7,21 (;32685(*8,'(/,1(6 +$=$5'286&20321(176 (;32685(/,0,76 26+$3(/ &KHPLFDO1DPH $&*,+7/9 SSP PJP SSP PJP >@ >@ >@ >@ >@ >@ &OD\ 7:$ >@ 6LOLFDTXDUW] 7:$ >@ 26+$7$%/(&200(176 ([SRVXUHOLPLWVQRWHVWDEOLVKHG 7RWDO'XVW PJP6L2 5HVSLUDEOH (1*,1((5,1*&21752/6,IXVHURSHUDWLRQVJHQHUDWHGXVWIXPHRUPLVWXVHYHQWLODWLRQWRNHHSH[SRVXUHWRDLUERUQH FRQWDPLQDQWVEHORZWKHH[SRVXUHOLPLW 3(5621$/3527(&7,9((48,30(17 (<(6$1')$&()ROORZIDFLOLW\JXLGHOLQHV 6.,18VHRISURSHUK\JLHQHSUDFWLFHVLQWKHZRUNSODFHLVUHFRPPHQGHG 5(63,5$725<8VHORFDOH[KDXVWLIGXVWLQJRFFXUV*RRGJHQHUDOYHQWLODWLRQLVDGHTXDWHLQWKHDEVHQFHRIGXVWV &200(176$OOLQHUWRUQXLVDQFHGXVWVZKHWKHUPLQHUDOLQRUJDQLFRURUJDQLFQRWOLVWHGVSHFLILFDOO\E\VXEVWDQFHQDPH DUHFRYHUHGE\WKH3DUWLFXODWHV1RW2WKHUZLVH5HJXODWHG3125OLPLWZKLFKLVPJPIRUUHVSLUDEOHIUDFWLRQDQG PJPIRUWRWDOGXVW$&*,+H[SRVXUHJXLGHOLQHVRIOHVVWKDQPJPUHVSLUDEOHDQGPJPLQKDODEOHKDYHEHHQ HVWDEOLVKHGIRUSDUWLFOHVLQVROXEOHSRRUO\VROXEOHQRWRWKHUZLVHVSHFLILHG3126 B-3 ADFM® Flow Meter Appendix B Material Safety Data Sheets Page 3 of 5 'HVL3DN 3+<6,&$/$1'&+(0,&$/3523(57,(6 3+<6,&$/67$7(6ROLG 2'251RQH S+1RW'HWHUPLQHG 3(5&(1792/$7,/(1RQH 9$32535(6685(1RW$SSOLFDEOH 9$325'(16,7<1RWDSSOLFDEOH (9$325$7,215$7(1RW$SSOLFDEOH 9,6&26,7<1RW$SSOLFDEOH 2;,',=,1*3523(57,(61RQH 67$%,/,7<$1'5($&7,9,7< 67$%/(<HV +$=$5'28632/<0(5,=$7,211R 72;,&2/2*,&$/,1)250$7,21 $&87( &KHPLFDO1DPH 25$//' UDW '(50$//' UDEELW ,1+$/$7,21 /& UDW &OD\ ! JPNJEZ !PJ/+ 6LOLFDTXDUW] JPNJEZ 1R'DWD $YDLODEOH 1R'DWD $YDLODEOH &$5&,12*(1,&,7< &KHPLFDO1DPH 173 6WDWXV &OD\ 1RWOLVWHG 6LOLFDTXDUW] .QRZQ &DUFLQRJHQ ,$5& 6WDWXV 26+$ 6WDWXV 1RWOLVWHG 1RWOLVWHG *URXS, 1RWOLVWHG 6(16,7,=$7,211RWVHQVLWL]LQJ *(1(5$/&200(176&U\VWDOOLQHVLOLFDSUHVHQWLVFRQWDLQHGZLWKLQDSRXFKFDQLVWHURUEDJ1RH[SRVXUHWRDLUERUQH SDUWLFOHVRIUHVSLUDEOHVL]HLVH[SHFWHGXQGHUQRUPDOFRQGLWLRQVRIXVH (&2/2*,&$/,1)250$7,21 (19,5210(17$/'$7$/RZKD]DUGIRUXVXDOLQGXVWULDORUFRPPHUFLDOKDQGOLQJ &+(0,&$/)$7(,1)250$7,217KLVPDWHULDOLVRIPLQHUDORULJLQ,WLVQRWELRGHJUDGDEOH ',6326$/&216,'(5$7,216 ',6326$/0(7+2'7KLVSURGXFWLIGLVFDUGHGDVVROGLVQRWD)HGHUDO5&5$KD]DUGRXVZDVWH3URFHVVLQJXVHRU B-4 ADFM® Flow Meter Appendix B Material Safety Data Sheets Page 4 of 5 'HVL3DN FRQWDPLQDWLRQRIWKLVSURGXFWPD\FKDQJHWKHZDVWHPDQDJHPHQWRSWLRQV6WDWHDQGORFDOGLVSRVDOUHJXODWLRQVPD\GLIIHU IURPIHGHUDOGLVSRVDOUHJXODWLRQV 75$163257,1)250$7,21 '27'(3$570(172)75$163257$7,21 3523(56+,33,1*1$0(1RWUHJXODWHG 52$'$1'5$,/$'55,' 3523(56+,33,1*1$0(1RWUHJXODWHG $,5,&$2,$7$ 6+,33,1*1$0(1RWUHJXODWHG 9(66(/,02,0'* 6+,33,1*1$0(1RWUHJXODWHG &$1$'$75$1632572)'$1*(5286*22'6 6+,33,1*1$0(1RWUHJXODWHG 5(*8/$725<,1)250$7,21 81,7('67$7(6 6$5$7,7/(,,,683(5)81'$0(1'0(176$1'5($87+25,=$7,21$&7 ),5(1R35(6685(*(1(5$7,1*1R5($&7,9,7<1R$&87(1R&+521,&<HV 5(3257$%/(,1*5(',(1761RWOLVWHG &(5&/$&2035(+(16,9(5(63216(&203(16$7,21$1'/,$%,/,7<$&7 &(5&/$5(*8/$725<1RWOLVWHG 76&$72;,&68%67$1&(&21752/$&7 76&$67$786$OOFRPSRQHQWVDUHOLVWHGRQWKH76&$,QYHQWRU\RUDUHH[FOXGHGRUH[HPSW 5(*8/$7,216 67$7(5(*8/$7,216&DOLIRUQLD &$/,)251,$352326,7,217KLVSURGXFWGRHVQRWFRQWDLQFKHPLFDOVNQRZQWRWKHVWDWHRI&DOLIRUQLDWRFDXVH FDQFHUELUWKGHIHFWVRUUHSURGXFWLYHKDUP &U\VWDOOLQHVLOLFDSUHVHQWLVFRQWDLQHGZLWKLQDSRXFKFDQLVWHURUEDJ7KHUHLVQRH[SRVXUHWRDLUERUQHSDUWLFOHVRI UHVSLUDEOHVL]HXQGHUQRUPDOFRQGLWLRQVRIXVH &KHPLFDO1DPH 6LOLFDTXDUW] :W /LVWHG &DQFHU 5&5$67$7867KLVSURGXFWLIGLVFDUGHGDVVROGLVQRWD)HGHUDO5&5$KD]DUGRXVZDVWH3URFHVVLQJXVHRU FRQWDPLQDWLRQRIWKLVSURGXFWPD\FKDQJHWKHZDVWHPDQDJHPHQWRSWLRQV6WDWHDQGORFDOGLVSRVDOUHJXODWLRQVPD\ GLIIHUIURPIHGHUDOGLVSRVDOUHJXODWLRQV &$1$'$ :+0,6+$=$5'6<0%2/$1'&/$66,),&$7,21 'RHVQRWPHHWFODVVLILFDWLRQFULWHULDSXUVXDQWWRWKH&DQDGLDQ+D]DUGRXV3URGXFWV$FW :+0,6:25.3/$&(+$=$5'2860$7(5,$/6,1)250$7,216<67(07KLV06'6KDVEHHQSUHSDUHG DFFRUGLQJWRWKHKD]DUGFULWHULDRIWKH&RQWUROOHG3URGXFWV5HJXODWLRQV&35DQGWKH06'6FRQWDLQVDOORIWKH LQIRUPDWLRQUHTXLUHGE\WKH&35 &$1$'$,1*5(',(17',6&/2685(/,67&RQWDLQVFRPSRQHQWVOLVWHGRQWKH&DQDGLDQ+D]DUGRXV3URGXFWV$FW ,QJUHGLHQW'LVFORVXUH/LVW &$1$',$1(19,5210(17$/3527(&7,21$&7$OOLQJUHGLHQWVDUHOLVWHGRQWKH&DQDGLDQ'RPHVWLF6XEVWDQFHV /LVWLQYHQWRU\ B-5 ADFM® Flow Meter Appendix B Material Safety Data Sheets Page 5 of 5 'HVL3DN (8523($1&20081,7< ((&/$%(/6<0%2/$1'&/$66,),&$7,21 1RWFODVVLILHGDVGDQJHURXV 27+(5,1)250$7,21 $33529('%<3UHSDUHGDQGDSSURYHGE\6+('HSW6XG&KHPLH,QF ,1)250$7,21&217$&7(PDLO06'6B86#VXGFKHPLHFRP 5(9,6,216800$5<7KLV06'6UHSODFHVWKH06'65HYLVHG6HFWLRQ,1)250$7,21 &217$&76HFWLRQ+0,65$7,1*+($/7+3+<6,&$/+$=$5'+0,65$7,1*6127(6&+521,& 1)3$&2'(6 +0,65$7,1* +($/7+ * 1 )/$00$%,/,7< 0 3+<6,&$/+$=$5' 0 3(5621$/3527(&7,21 +0,65$7,1*6127(63HUVRQDO3URWHFWLRQVKRXOGEHGHWHUPLQHGEDVHGRQZRUNSODFHFRQGLWLRQV 0$18)$&785(5',6&/$,0(57KHLQIRUPDWLRQSUHVHQWHGKHUHLQLVEHOLHYHGWREHDFFXUDWHEXWLVQRWZDUUDQWHG 5HFLSLHQWVDUHDGYLVHGWRFRQILUPLQDGYDQFHWKDWWKHLQIRUPDWLRQLVFXUUHQWDSSOLFDEOHDQGVXLWDEOHWRWKHLU FLUFXPVWDQFHV B-6 ADFM® Flow Meter Appendix B Material Safety Data Sheets Multisorb Technologies, Inc. Drican® (Indicating Silica Gel – Al Case ) July 21, 2008 Page 1 of 4 MATERIAL SAFETY DATA SHEET July 21, 2008 M119 Effective Date MSDS Number Section 1 – Product and Company Information Product Name: Drican® (Indicating Silica gel, Aluminum case) Product Use: Grades: Synonyms: Desiccant, absorbent Silica gel, indicating Amorphous silica gel, SiO2, silicon dioxide (amorphous) Company; Street Address: City, State, Zip, Country: Telephone Number: Fax Number: Website / E-Mail : Multisorb Technologies, Inc. 325 Harlem Road Buffalo, NY 14224-1893 USA (716) 824 8900 [USA] Monday - Friday (8:00 - 5:00 EDT) (716) 824 4091 [USA] multisorb.com Section 2 – Hazard Identification Emergency Overview: An aluminum case containing a clear blue granular material that poses little or no immediate hazard. The case and the contents of the case are not combustible. Potential Health Effects: None Eyes: Skin: None Ingestion: Ingestion is very unlikely but if ingested get medical attention. Inhalation: None Medical Effects Generally Aggravated by Exposure: Chronic Effects/Carcinogenity: None None Section 3 – Composition / Information on Ingredients Component Name Synthetic amorphous silica gel (SiO2) CAS Number % by Weight 112926-00-8 80 - 90 Cobalt chloride 7646-79-9 .5 Aluminum 7429-90-5 10 - 20 While this material is not classified as hazardous under OSHA regulations, this MSDS contains valuable information critical to the safe handling and proper use of this product. This MSDS should be retained and available for employees and other users of this product. Section 4 – First Aid Measures Eyes: Rinse the eyes well with water while lifting the eye lids. If irritation persists, consult a physician. Skin: Wash affected area with soap and water. Ingestion: Ingestion is unlikely but if ingested get medical attention. Inhalation: Remove the affected person to fresh air and get medical attention if necessary. Notes to Physician: Not applicable B-7 ADFM® Flow Meter Appendix B Material Safety Data Sheets Multisorb Technologies, Inc. Drican® (Indicating Silica Gel – Al Case ) July 21, 2008 Page 2 of 4 Section 5 – Fire Fighting Measures Flammable Properties: Not flammable Flash Point: Not applicable Flammable Limits: Method: Not applicable Not flammable Lower Flammability Limit: Not applicable Upper Flammability Limit: Autoignition Temperature: Hazardous Combustion Products: Extinguishing Media: Not applicable Not applicable Not applicable Use extinguishing media that is appropriate for the surrounding fire. The silica gel and the aluminum case are not combustible. Fire Fighting Instructions: The silica gel and the aluminum case are not combustible. Unusual Fire and Explosion Hazards: None Section 6 – Accidental Release Measures Spill: Sweep or vacuum up and place the spilled material in a waste disposal container. Avoid raising dust. Wash with soap and water after handling. Section 7 – Handling and Storage Handling: Avoid raising dust and minimize the contact between worker and the material. Practice good hygienic work practices. Storage: Store in a cool, dry location. Keep in sealed containers away from moisture. The silica gel will readily adsorb moisture. Section 8 – Exposure Controls/Personal Protection Engineering Controls: Not required. Respiratory Protection: Not required. Skin Protection: Not required. Eye Protection: Not required. Component Name OSHA PEL TWA 20 mppcf (80 mg / m3 % SiO2) ACGIH TLV Not applicable .1 mg / m3 (cobalt metal dust & fume) TWA .02 mg / m3 (as cobalt) Exposure Limits Silica gel Cobalt chloride Aluminum B-8 3 TWA 15 mg / m (total dust) TWA 5 mg / m3 (respirable fraction) 1 mg / m3 (respirable fraction of aerosol) Other Recommended Limits NIOSH REL TWA 6 mg / m3 IDLH 3000 mg / m3 NIOSH REL TWA .05 mg / m3 (Cobalt metal dust & fume as cobalt) IDLH 20 mg / m3 (as metal dust & fume as cobalt) NIOSH REL TWA 10 mg / m3 (total dust) TWA 5 mg / m3 (respirable fraction) ADFM® Flow Meter Appendix B Material Safety Data Sheets Multisorb Technologies, Inc. Drican® (Indicating Silica Gel – Al Case ) July 21, 2008 Page 3 of 4 Section 9 – Physical and Chemical Properties Appearance: Silver metal canister Vapor Density: Not applicable Odor: None Boiling Point: 4046q F (2230q C) (Silica Gel) Physical State: Silver metal canister Melting Point: 3110q F (1710q C) (Silica Gel) PH: Not applicable Solubility: Insoluble in water Vapor Pressure: Not applicable Specific Gravity: 2.1 Section 10 – Stability and Reactivity Stability: Stable Moisture and high humidity environments. Conditions to avoid: Incompatibility: Water, fluorine, oxygen difluoride, chlorine trifluoride Hazardous Decomposition Products: Hazardous Polymerization: None Will not occur Section 11 – Toxicological Information This product and its components are not listed on the NTP or OSHA Carcinogen lists. Animal Toxicology Tests for DOT Hazard classification ( Tests Conducted on finely ground silica gel) 1 - hour LC50 (rat) > 2 mg / l 48 - hour oral LD50 (rat) est. > 31,600 mg / kg 48 - hour dermal LD50 (rabbit) est. > 2,000 mg / kg Considered an ocular irritant IARC Amorphous silica gel IARC - 3 (Unclassifiable as to Carcinogenicity in Humans) ACGIH Cobalt and inorganic compounds, as Co are rated as A3 (confirmed animal carcinogen and unknown relevance to humans). IARC Cobalt and cobalt compounds are rated as Group 2B (possible carcinogens to humans). Human Toxicology Silica gel is a synthetic amorphous silica not to be confused with crystalline silica. Epidemiological studies indicate low potential for adverse health effects. In the activated form, silica gel acts as a desiccant and can cause a drying irritation of the mucous membranes and skin in cases of severe exposure. Multisorb Technologies Inc. knows of no medical conditions that are abnormally aggravated by exposure to silica gel. The primary route of entry is inhalation of dust. Section 12 – Ecological Information Not known to have any adverse effect on the aquatic environment. Silica gel is insoluble and non-toxic. Section 13 – Disposal Information Disposal Information If this product as supplied becomes a waste, it does not meet the criteria of a hazardous waste as defined under the Resource Conservation and Recovery Act (RCRA) 40 CFR 261. Materials of a hazardous nature that contact the product during normal use may be retained on the product. The user of the product must identify the hazards associated with the retained material in order to assess the waste disposal options. Dispose according to federal, state and local regulations. B-9 ADFM® Flow Meter Appendix B Material Safety Data Sheets Multisorb Technologies, Inc. Drican® (Indicating Silica Gel – Al Case ) July 21, 2008 Page 4 of 4 Section 14 – Transportation Information U.S. Department of Transportation Shipping Name: Not classified as a hazardous material. Not regulated. Section 15 – Regulatory Information (Not meant to be all inclusive - selected regulations represented) TSCA Listed: Yes (Ingredients) DSL/NDSL (Canadian) Listed: Yes (Ingredients) OSHA: See section 8 above. NIOSH: See section 8 above. Animal tests conducted in 1976 - 1978. 18 month exposure at 15 mg / m3 showed silica deposition in respiratory macrophages and lymph nodes, minimum lung impairment, no silicosis. ACGIH: See section 8 above. DOT: Not classified as a hazardous material. Section 16 – Other Information HMIS – Hazardous Materials Identification System HMIS Rating Health 1 Flammability 0 Physical 0 The HMIS rating information is intended solely for the use of individuals trained in the use of the HMIS rating system. The NPCA specifically recommends that prepares of MSDSs should not place HMIS PPE designation codes on the MSDSs or labels that leave the facility as it is not known the conditions under which the customer will use this product. This MSDS was prepared by: George E. Mckedy Senior Applications Development Specialist Multisorb Technologies, Inc. This data and recommendations presented in this data sheet concerning the use of our product and the materials contained therein are believed to be correct but does not purport to be all inclusive and shall be used only as a guide. However, the customer should determine the suitability of such materials for his purpose before adopting them on a commercial scale. Since the use of our products is beyond our control, no guarantee, expressed or implied, is made and no responsibility assumed for the use of this material or the results to be obtained therefrom. Information on this form is furnished for the purpose of compliance with Government Health and Safety Regulations and shall not be used for any other purposes. Moreover, the recommendations contained in this data sheet are not to be construed as a license to operate under, or a recommendation to infringe, any existing patents, nor should they be confused with state, municipal or insurance requirements, or with national safety codes. B-10 ADFM® Flow Meter Index Numerics F 2105, 1-8 fairing, 2-35 Flowlink software, 1-8, 2-1, 2-58 A accQcomm, 1-8 advanced settings Hot Tap, 2-40 G geometry, 2-25 H B basic setup, 2-19 batteries box controller, 2-51 canister, 2-54 battery, lithium, 3-5 battery, real-time clock, 3-5 BIT codes, 2-57 BITs, 2-56 box controller inside panel, 2-53 box controller switches, 2-53 built-in tests, 2-56 C canister, 2-24 early and current versions, 2-24 electronics compartment, 3-4 NEMA/IP rating, 3-4, 3-10 circular channels, 2-29 cleaning, 3-1 communication, 1-8 optional equipment, 1-8 connecting to the accQmin, 2-15 console enclosure, 2-23 contact, 1-2, 3-1, A-1 D data, 1-8 real-time - WinADFM, 2-17 retrieval with Flowlink, 2-58 retrieval with WinADFM, 2-62 viewing with Flowlink, 2-60 viewing with WinADFM, 2-64 desiccant, 3-2 box, 3-2 canister, 3-4 E error messages, 2-17 Hot Tap advanced settings, 2-40 current version, 2-46 dimensions, 2-41 forced depth, 2-40 installation, 2-39 overview, 1-1 previous version, 2-41 scaling constant, 2-40 specifications, 1-4 I inspection, 1-2 installation basic configuration, 2-19 checklist, 2-18 console enclosure, 2-23 controller, 2-22 current Hot Tap, 2-46 early Hot Tap, 2-41 Hot Tap, 2-39 Pro20 sensor, 2-25 requirements, 2-22 sensor, 2-25 suspension, 2-24 wall mount, 2-22 interfacing, 1-8 M mounting rings, 2-29 O operation, 1-5 P packaging, 3-1 parts and accessories, A-1 power, 2-21, 2-51 batteries, 2-51, 2-54 Index-1 ADFM® Flow Meter Index troubleshooting, 3-8 power-up sequence, 2-56 Pro20 cabling, 2-28 channel geometry, 2-25 circular channels, 2-29 elevating the sensor, 2-35 installation, 2-25 intrinsically safe system, 1-1 mounting hardware, 2-38 overview, 1-1 positioning, 2-27 rectangular channels, 2-33 specifications, 1-4 programming connecting to the accQmin, 2-15 Flowlink, 2-1 WinADFM, 2-8 R rectangular channels, 2-33 repairs, 3-1 reset box, 2-53 canister, 2-55 S sensor cabling, 2-25 Pro20, 2-28 service, 3-1 silt, 2-35 site requirements, 2-22, 2-41 software, 2-1 Flowlink, 2-1 Flowlink 5.1, 1-8 WinADFM, 1-8, 2-8 specifications controller, 1-2 Hot Tap, 1-4 Pro20, 1-4 T troubleshooting, 3-6 BIT not executing, 3-8 fault isolation, 3-7 sensor, 3-9, 3-10 troubleshooting tables, 3-6 W WinADFM software, 1-8, 2-8, 2-62 Index-2 Compliance Statements DECLARATION OF CONFORMITY Application of Council Directive: Manufacturer's Name: Manufacturer's Address: Equipment Type/Environment: Trade Name/Model No: Year of Issue: Standards to which Conformity is Declared: Teledyne Isco, Inc. 4700 Superior, Lincoln, Nebraska 68504 USA Mailing Address: P.O. Box 82531, Lincoln, NE 68501 Laboratory Equipment for Light Industrial/Commercial Environments Pro20 and Hot Tap Sensor 2007 EN 61326:1998 EMC Requirements for Electrical Equipment for Measurement, Control, and Laboratory Use Description Severity Applied Performance Criteria Electrostatic Discharge Level 2 - 4kV contact discharge Level 3 - 8kV air discharge C* EN61000-4-3 Radiated RF Immunity 80 MHz to 1000MHz 80% AM at 1kHz Level 1 – 10V/m B** EN61000-4-4 Electrical Fast Transient Level 2 – 2kV on AC lines C*** EN61000-4-5 Surge on AC Lines 2kV L-Gnd, 1KV L-L C*** EN61000-4-6 Conducted RF on AC lines 150 kHz to 80 MHz, 3V rms, 80% modulated B** EN61000-4-11 AC Dips and Short Interruptions 0.5 Cycle, each polarity/100% CISPR11/ EN 55011 RF Emissions Group 1, Class A Industrial, Scientific, and Medical Equipment EN61000-3-2, 3-3 Harmonic, Flicker C E D ec la ra ti o n m ity EN61000-4-2 of C on fo r Standard 2004/108/EC -The EMC Directive A Passes Passes *Unit is susceptible to ESD. In dry environments (<40% humidity), user must discharge themselves to earth before touching front panel to prevent program lock-up. **Unit’s flow sensor/cable is susceptible to RF. Unit must not be located near an RF source (radio/TV tower) to prevent erroneous flow/depth measurements. ***Unit is susceptible to AC line transients and/or surges. If program lock-up occurs, unit’s wall mount power supply must be connected to an AC power conditioner or operated on its internal batteries. We, the undersigned, hereby declare that the design of the equipment specified above conforms to the above Directive(s) and Standards as of July 5, 2007 William Foster USA Representative William Foster Director of Engineering Teledyne Isco, Inc. 4700 Superior Street Lincoln, Nebraska 68504 Phone: (402) 464-0231 Fax: (402) 464-4543 60-7102-003 Rev. A Warranty Teledyne Isco One Year Limited Factory Service Warranty* This warranty exclusively covers Teledyne Isco instruments, providing a one-year limited warranty covering parts and labor. Any instrument that fails during the warranty period due to faulty parts or workmanship will be repaired at the factory at no charge to the customer. Teledyne Isco’s exclusive liability is limited to repair or replacement of defective instruments. Teledyne Isco is not liable for consequential damages. Teledyne Isco will pay surface transportation charges both ways within the 48 contiguous United States if the instrument proves to be defective within 30 days of shipment. Throughout the remainder of the warranty period, the customer will pay to return the instrument to Teledyne Isco, and Teledyne Isco will pay surface transportation to return the repaired instrument to the customer. Teledyne Isco will not pay air freight or customer’s packing and crating charges. This warranty does not cover loss, damage, or defects resulting from transportation between the customer’s facility and the repair facility. The warranty for any instrument is the one in effect on date of shipment. The warranty period begins on the shipping date, unless Teledyne Isco agrees in writing to a different date. Excluded from this warranty are normal wear; expendable items such as charts, ribbon, lamps, tubing, and glassware; fittings and wetted parts of valves; and damage due to corrosion, misuse, accident, or lack of proper maintenance. This warranty does not cover products not sold under the Teledyne Isco trademark or for which any other warranty is specifically stated. No item may be returned for warranty service without a return authorization number issued by Teledyne Isco. This warranty is expressly in lieu of all other warranties and obligations and Teledyne Isco specifically disclaims any warranty of merchantability or fitness for a particular purpose. The warrantor is Teledyne Isco, 4700 Superior, Lincoln, NE 68504, U.S.A. * This warranty applies to the USA and countries where Teledyne Isco does not have an authorized dealer. Customers in countries outside the USA, where Teledyne Isco has an authorized dealer, should contact their Teledyne Isco dealer for warranty service. Before returning any instrument for repair, please call, fax, or e-mail the Teledyne Isco Service Department for instructions. Many problems can often be diagnosed and corrected over the phone, or by e-mail, without returning the instrument to the factory. Instruments needing factory repair should be packed carefully, and shipped to the attention of the service department. Small, non-fragile items can be sent by insured parcel post. PLEASE BE SURE TO ENCLOSE A NOTE EXPLAINING THE PROBLEM. Shipping Address: Mailing Address: Phone: Fax: Email: Teledyne Isco - Attention Repair Service 4700 Superior Street Lincoln, NE 68504 USA Teledyne Isco PO Box 82531 Lincoln, NE 68501 USA Repair service: (800) 775-2965 (lab instruments) (866) 298-6174 (samplers & flow meters) Sales & General Information: (800) 228-4373 (USA & Canada) (402) 465-3001 [email protected] February 28, 2012 P/N 60-1002-040 Rev G