1
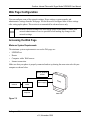
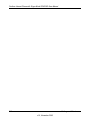
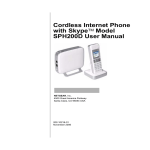
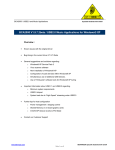
Chapter 7
Settings and Maintenance
Settings
Use the Settings menu to change call settings and settings for the handset.
Figure 7-1
Country Code
The country code is the international calling code for a country (for example, ‘1’ for Canada).
When you first set up the handset, you entered a country code.
To change the country code:
1. Press Menu>Settings>Call Settings>Country Code.
2. Edit the country code. Press Clear to make corrections.
3. Press OK when finished. The new setting is saved.
Note: After you set up your country code, your handset’s power switches off. It will
switch back on in a few seconds after updating the country settings.
7-1
v1.0, November 2006
Cordless Internet Phone with Skype Model SPH200D User Manual
Area Code
The area code feature automatically adds or removes the area code of an outgoing call based on the
country setting for the handset. You can define an area code up to five digits.
Note: The country code must be correct for the area code feature to work properly. See
“Setting up the Handset” in Chapter 2.
To set the area code follow these steps:
1. Press Menu>Settings>Call Settings>Area Code.
2. Enter your area code, or press Clear to erase it.
3. Press OK when finished.
The new setting is saved.
Time and Date
Set the time zone before initial use of the phone. Once you have connected to the Internet, your
phone updates the clock automatically according to your time zone setting. After resetting the
phone, you may have to set the time zone again.
Note: If you use this menu to set the time or date manually, your phone will use this new
setting. It will stop automatic update until your base power is reset.
To set the time and date, follow these steps:
1. Press Menu>Settings>Time & Date.
You can adjust these settings:
•
Time. You do not need to set the time. If you set the Time Zone, then the phone will
automatically find the time on the Internet.
•
Time Zone. GMT (Greenwich Mean Time), or the number of hours + or - for GMT.
•
Daylight Time. Choose Standard or Daylight Time (Daylight Savings Time).
•
Time Format. Choose 12 hour or 24 hour.
•
Time Separator. The time separator is a symbol such as a colon that separates the hour
and minute (i.e. 18:30). Your phone supports two styles: colon and period (: .).
7-2
Settings and Maintenance
v1.0, November 2006
Cordless Internet Phone with Skype Model SPH200D User Manual
•
Date Format (Month/Day/Year). The default is MM/DD/YYYY.
•
Date Separator. The date separator is a symbol such as a slash that separates the month,
day and year (for example, 08/25/2006). Your phone supports three styles: slash, colon,
and period (/ : .).
2. Press OK when finished.
The new setting is saved.
Note: Automatic Update. Once you have connected to the Internet, your phone updates
the clock automatically according to your time zone setting.
Changing the System PIN
The system PIN is used for registering, deleting handsets, and protecting the access rights to some
of the other menus. The default system PIN is 0000. You can personalize the PIN for greater
security.
1. Press Menu>Settings>Handset>Change PIN.
2. Enter the system PIN. Press Enter to confirm. Press Clear to make corrections.
3. Enter the new system PIN. Press Enter.
4. Re-enter the new system PIN again for verification.
5. Press Enter. The new setting is saved.
Note: Write down your PIN and save it for future use. If you have forgotten the PIN, call
your manufacturer for assistance.
Resetting to Default Settings
The default settings are the original factory settings of your phone. You can reset your phone
settings to factory default. These settings are shown in “Default Factory Settings” in Appendix A.
You can reset all the settings, but keep the network settings.
1. Press Menu>Settings>Advanced>Reset Device.
2. Scroll and select either Reset All or Keep Network.
Settings and Maintenance
7-3
v1.0, November 2006
Cordless Internet Phone with Skype Model SPH200D User Manual
•
Reset All. Reset all the settings including the network settings.
•
Keep Network. Reset all the settings except the network settings.
3. Enter the system PIN. Press Clear to make corrections.
4. Press Yes to confirm.
5. The settings will reset. Your handset’s power switches off. It will switch back on in a few
seconds after updating all the settings.
Registering Your Handset
Registration lets your base unit and handsets communicate. Your handset must be linked to the
base in order to make calls and to use many of features on the phone.
Your handset is already registered unless you have bought an extra handset individually, or you
have de-registered a handset. For additional handsets, see “Registering Your Handset(s) with an
Additional Base” on page 7-5. If the handset is not registered, it displays “Unregistered.”
Note: Your base unit can register up to four handsets. After registering four handsets,
your base unit registration memory is full. If you try to register an additional
handset, the registration process will not complete.
Follow the steps below to register your handset.
1. Press Menu>Settings>Handset>Register.
2. Enter the system PIN (Default: 0000). Press Clear to make corrections.
3. Press Enter to confirm. Your handset starts searching for the base.
4. Press
on the base unit until the LED starts flashing.
5. The handset registers to the particular base unit, and shows the signal icon
7-4
.
Settings and Maintenance
v1.0, November 2006
Cordless Internet Phone with Skype Model SPH200D User Manual
Registering Your Handset(s) with an Additional Base
Note: Make sure that you have configured the language, country code, and area code of
you phone before registering extra handsets.
This section shows you how to register your handset to additional base units. If your handset
displays Unregistered, see to “Registering Your Handset” on page 7-4.
1. Press Menu>Settings>Handset>Register.
2. Enter the system PIN (Default: 0000). Press Clear to make corrections.
3. Press Enter to confirm. Your handset starts searching for the base.
4. Press
on the base unit until the LED starts flashing.
Selecting a Base Unit
You can switch your handset between different base units if your handset has registered to these
base units. You can set up the handset to automatically connect to the closest base unit. You can
also set up the handset to only connect to a fixed base unit you have specified.
Note: Your handset must be registered to a base unit before you can select that base unit.
1. Press Menu>Settings>Handset>Base.
2. Scroll to the base unit that you want, or select Auto if you want your handset to automatically
connect to the closet base unit.
3. Press Select.
The new setting is saved.
Deleting a Handset
Use one handset to delete (de-register) another handset that shares the same base unit.
1. Press Menu>Settings>Handset>De-register.
Settings and Maintenance
7-5
v1.0, November 2006
Cordless Internet Phone with Skype Model SPH200D User Manual
2. Scroll to the handset (number) that you want to delete. Press Enter.
Tip: The handset number displays beside the word “Skype” during standby. For
example, Skype (1)
3. Enter the system PIN. Press Clear to make corrections.
4. Press Enter.
The handset is deleted.
Advanced Landline Calling Features
This section describes the call-related features that apply to the landline only.
Dial Mode
Dial mode is the telephone signal used in your country. Your phone supports tone (DTMF) and
pulse (rotary) dialing. During installation, you set up your phone for use in your country. For
details, consult your service provider.
To go to dial mode, follow these steps:
1. Press Menu>Settings>Advanced> Landline>Dial Mode.
2. Scroll to the new setting.
3. Press OK.
The new setting is saved.
Tip: If your phone is set to pulse dialing, press and hold
during a call for temporary
tone mode. The display shows d. Digits entered after the d are sent out as tone
signals (on this call only).
Recall Selection
Recall is a signal that is sent when using some of the calling features such as making or answering
a second call. Your phone supports different recall signals. You can make changes depending on
the requirements. Your phone is already set up for use in your country. For details, consult your
service provider.
7-6
Settings and Maintenance
v1.0, November 2006
Cordless Internet Phone with Skype Model SPH200D User Manual
To select recall duration, follow these steps:
1. Press Menu>Settings>Advanced>Landline>Recall.
2. Scroll to the new setting and press OK.
The new setting is saved.
Setting a Pause
A pause is a break you can enter when making a call. A pause is used for calls such as PABX and
operator services. Your phone supports different pause durations. For details, consult your service
provider.
To set the pause, follow these steps:
1. Press Menu>Settings>Advanced>Landline>Pause.
2. Scroll to the new setting.
3. Press OK.
The new setting is saved.
Category Number
This section only applies to models with Category number support. Some telephone providers
send a category number along with the CallerID. Consult your service provider on category
number handling.
To call back from the history properly, change setting to Yes if your telephone service provider
sends out a category number, or change setting to No if the category number is not sent.
To set the category number, follow these steps:
1. Press Menu>Settings>Advanced>Landline>Cat. Number.
2. Scroll to the new setting and press OK.
The new setting is saved.
Settings and Maintenance
7-7
v1.0, November 2006
Cordless Internet Phone with Skype Model SPH200D User Manual
Network Settings
This section describes the information on viewing and changing the Internet network settings of
your phone. You do not need to configure the network after setting up the phone. This section is
recommended for advanced users who want to configure the network with their static IP (Internet
Protocol) address.
Note: Incorrect network settings will affect Skype usage on this phone. Consult your
network administrator or service provider before making any changes to the
network settings.
Viewing Network Settings
To view the network settings, follow these steps:
1. Press Menu>Settings>Information.
2. Scroll to view the information.
Changing Network Settings
To change the network settings, follow these steps:
1. Press Menu>Settings>Network.
2. Scroll and select the setting that you want, and follow the onscreen instructions.
•
DHCP. The Cordless Internet Phone uses Dynamic Host Configuration Protocol (DHCP)
by default, which is correct for most customers. If you configure a static IP, this disables
DHCP. Press Back when finished.
•
PPPoE. If your Internet service provider requires you to use Point-to-Point Protocol over
Ethernet (PPPoE), you can configure your user name and password for the PPPoE
connection.
•
Static IP. You can configure the network to use a static IP.
•
Reset Network. This resets the network with the changes that you made.
7-8
Settings and Maintenance
v1.0, November 2006
Cordless Internet Phone with Skype Model SPH200D User Manual
Web Page Configuration
You can configure some of the network settings, Skype settings, system upgrade, and
administrative settings from the Web page. You do not need to configure most of these settings
after setting up the phone. This section is recommended for advanced users only.
Note: Incorrect network settings will affect Skype usage on this phone. Consult your
network administrator or service provider before making any changes to the
network settings.
Accessing the Web Page
Minimum System Requirements
The minimum system requirements to access the Web page are:
• SPH200D set
• Router
• Computer with a Web browser
• Internet connection
Make sure that your phone is properly connected and set up sharing the same network with your
computer as shown below.
phone (landline)
socket
power supply
Internet
router
computer
base unit
Figure 7-2
Settings and Maintenance
7-9
v1.0, November 2006
Cordless Internet Phone with Skype Model SPH200D User Manual
Accessing the Web Page
To access the Web page, follow these steps:
1. Open a Web browser.
2. Enter your phone’s IP address at the address bar. An authentication window pops up.
Tip: To find your phone’s IP address, see “Viewing Network Settings” on page 7-8.
3. Enter the user name and password. The default user name is admin and the default password
is password.
After verifying your user name and password, you will see the configuration home page.
•
Home page. The home page shows your current system and network settings.
•
Network page. The network page shows your current Internet connection type and Ethernet
speed. You can make changes to these settings on this page.
•
Skype page. The Skype page shows your current Skype status. You can create a new Skype
account or sign in to Skype from this page.
•
System page. You can upgrade your phone’s operating system from this page. You will first
need to download the latest software from the NETGEAR Web page, at www.netgear.com.
•
Administration page. You can change the Web page access password on this page. You can
also reset your phone to factory default feature and network settings.
Troubleshooting
Table 7-1. Troubleshooting Tips
Problem
Tip
No dial tone on landline.
• Check the phone and power connections.
• The handset may be out of range. Move closer.
• The battery capacity may be low. Charge battery.
Signal icon flashing.
• The handset may be out of range. Move closer.
• If the handset displays Unregistered, it is not registered. Register the
handset. See “Registering Your Handset” on page 7-4.
7-10
Settings and Maintenance
v1.0, November 2006
Cordless Internet Phone with Skype Model SPH200D User Manual
Table 7-1. Troubleshooting Tips (continued)
No parking tone.
•
•
•
•
Check the power connections of the charger.
The handset may not be placed properly. Try again.
Charging contacts may be dirty. Clean contacts with a damp cloth.
Turn on the handset tone. See “Personalizing Your Handset Display”
in Chapter 6.
• Switch on the handset’s power. See “Powering Your Handset On and
Off” in Chapter 1.
Handset on the charger does not
charge.
• The battery may be defective. Purchase new batteries from your
dealer.
• Check that the batteries are inserted correctly.
• Make sure that the handset is placed properly on the charger. The
battery icon is animated while charging.
No display.
• Check that the battery is charged.
• Check the connections.
Bad audio (crackles, echo).
• The handset may be nearly out of range. Move closer.
• The phone may be interfered by nearby electrical appliance. Move
the base unit to a different location.
• The phone may be at a location with thick walls. Move the base unit
to a different location.
Handset does not ring.
Check that the handset ringer is turned on. See “Personalizing Your
Handset Display” in Chapter 6.
Caller ID does not display.
• Caller ID service may not be activated. Check with your service
provider.
• The caller’s information may be withheld or unavailable.
Cannot make or answer a second
call.
• Second call service may not be activated. Check with your service
provider.
• For landline calling, check that the recall selection is correct. See
“Recall Selection” on page 7-6.
Settings and Maintenance
7-11
v1.0, November 2006
Cordless Internet Phone with Skype Model SPH200D User Manual
7-12
Settings and Maintenance
v1.0, November 2006