1
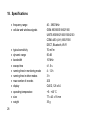
RAKSA iDet SELECTIVE RF DETECTOR USER MANUAL All information contained within this manual is subject to change without notice. Additional information: http://www.ts-market.com Technical support: [email protected] © Copyright TS-Market, 2015. All right reserved. Table of Contents 1. 2. 3. 4. 5. 6. 7. Introduction Operating Principle Operation Instructions Battery Charging ON/OFF and Operation The Main Menu Monitoring Mode 7.1 Monitoring Mode, when to use 7.2 Monitoring Mode, how to operate 7.3 Threat Signal Monitoring 7.4 Log Review from the Monitoring Mode 7.5 Monitoring Mode Settings 8. Sweep Mode 9. Search Mode 9.1 Search Mode, how and when to use 9.2 Light and Sound Indication 6 7 8 9 11 12 13 13 13 15 15 15 16 17 17 17 3 10. Difference Search Mode 10.1 Difference Search Mode, when to use 10.2 Difference Search Mode, how to operate 11. Monitoring of Digital Signals 12. Audio monitoring 13. Alarm Events Log 14. Settings 14.1 Types of Detected Signals 14.2 Threshold Levels of Signals 14.3 Interface Language 14.4 Sound Volume 14.5 Alarm Volume 14.6 Running Time in Monitoring Mode 14.7 Alarm Delay 14.8 Rate of Adaptation to Background Noise 14.9 Frequency bands of cellular networks 14.10 Current Time Setting 14.11 Settings Reset 4 18 18 19 19 20 21 22 22 23 23 23 24 24 24 25 26 26 26 15. 16. 17. 18. About device Package Contents Warranty Specifications 27 27 27 28 5 1. Introduction RAKSA iDet Selective RF Detector can be used to detect and locate in near field a wide variety of surveillance devices, including cell phones of GSM 850 / 900E / 1800 / 1900, UMTS 850 / 900 / 1800 / 1900 / 2100, CDMA 450 (A-H) / 800 / 1900 standards, cordless DECT telephones, Bluetooth and Wi-Fi devices. Special Features: signal detection against the background interference high speed of scanning and analyzing detection of digital, analog and wideband signals adaptation to the background noise in Monitoring Mode difference search mode audio monitoring through the built-in speaker signals frequency and level measurement alarm events log silent alert signal (vibration mode) no need for external antenna interface languages: Deutsch, English, Español, Français, Italiano, Русский 6 2. Operation Principle RAKSA iDet Selective RF Detector is a superheterodyne receiver with low IF and frequency synthesizer. It provides continuous scanning of frequency range and analysis of spectrogram peaks. The standard digital signals are identified by their amplitude-time characteristic. Scanning and analyzing cycle period is 1.0-1.5 sec. Filtration of short-term noise requires at least two scanning cycles, so the signal is detected in 2-3 seconds. Any continuous radio signal with the amplitude modulation index ≤0.5 without frequency hopping is treated as an analog signal. Such are the analog signals of AM, FM, PM modulation and digital signals of FSK, PSK and the like modulations. RAKSA iDet Selective RF Detector can operate within monitoring, sweep, search, difference search modes and monitoring of digital signals. 7 3. Operation Instructions Radio transmitter detection requires two complimentary steps – search and monitoring. Search Mode enables to detect and locate the transmitters activated to the moment. Monitoring Mode provides continuous monitoring of the radio signals thus the transmitters are detected at the moment of their activation. Before searching the target area all the radio signal sources should be switched off (mobile and cordless telephones, Bluetooth, Wi-Fi, microwave ovens). To activate the transmitters with voice control use any sound source. Place the RF detector in the center of the room and switch on Search mode. Gradually approach the probable transmitter locations and watch the possible change of the signal level. Both light and sound indication can be used – the closer to the source of signal – the higher is the frequency of flashes. The high flash increase might indicate a hidden surveillance device. After verification of the clean area change the mode to Monitoring and place RF Detector at your convenience. The RF Detector should stay stable to avoid false alarms. The alarm signal is generated when detection a threat radio signal. The efficiency of radio signal detection in Monitoring Mode depends on correct setting of threshold levels. The mobile phones for instance are characterized by 8 wide range of signal magnitude. Use the Digital Signals Monitoring Mode to define the signal levels of mobile and cordless phones, Bluetooth and the like and adjust the threshold level if necessary. The higher is the threshold level the less probable is false alarm but distance of detection will lessen as well. 4. Battery Charging The RF Detector power supply is provided by the built-in Li-Pol battery. If the unit is used and stored as required the battery resource will provide as much as 500 recharging cycles. The battery level is shown in the right upper corner of the display. When the battery is fully discharged Low Battery warning will appear and the device will automatically shut down. In such a case the battery should be recharged. Before charging the battery switch off the RF Detector and plug it into the charging unit. The process of charging of fully discharged battery will take 4-5 hours. The light signal will be on during the process of recharging and will be off as soon as the charging process is completed. The charging state will also be indicated on the display after pressing any button. After the charging is completed unplug the charging unit. 9 Simultaneous operation and charging is possible but the recharging period will increase. The continual plug-in charging unit might shorten the life cycle of the battery. If you don't plan to use the RF Detector for a considerable period of time, please recharge the battery fully and then repeat recharging it each six months. To avoid any damage of the RF Detector do not use alien charging units! 10 5. ON/OFF and Operation To switch the Detector on or off press and hold the button [C/PWR] for more than one second until you hear the sound signal. After the activation the display shows the main menu. The buttons ▲ («up») and ▼ («down») are there to navigate the menu, the list of signals or to change the selected figures. With the [OK] button you can call the pulldown menu and select a menu item as well as verify the choice. Pressing [C] button you will return to the previous menu or deny the change of the selected value. In some cases the menu will require verification. To verify the choice use ▲ or ▼ buttons, select «Yes» and press [OK]. To deny choose «No» and press [OK], or press [C] button instead. 11 6. The Main Menu The main menu is used for selecting the required mode of operating or its settings. The menu contains the following functions: 12 Monitoring – Monitoring Mode Sweep – Sweep Mode Search – Search Mode Diff. search – Difference Search Mode Digital signals – Digital Signals Monitoring Log – Alarm Events Log Settings – Reviewing and changing of the settings About device – Information about the device 7. Monitoring Mode 7.1 Monitoring Mode, when to use Monitoring Mode provides continuous monitoring of detected analog and digital radio signals in automatic mode and setting alarm in case of threat radio signal (signal exceeding the preset threshold level) detection. Monitoring Mode is used in cases when the primary signal source has not been activated. The information about the alarm events is recorded in the Alarm Events Log. Monitoring Mode enables the background noise deduction for analog signals thus reducing the influence of regular background noise. Slow fluctuations of its level are ignored thanks to the adaptation algorithm. 7.2 Monitoring Mode, how to operate If the current time has not been preset the time setting request will appear on the display (see Time Setting). If you don't set the current time the device starts time counting from zero. The Monitoring Mode starts from 2-3 min accumulation of the background noise. The display indicates the progress of accumulation. If the analog signals have not 13 been selected this stage is omitted. Any analog signal registered at the time of background accumulation will not be classified later as threat. After the accumulation the Monitoring Mode is launched automatically. If the RF Detector does not detect any threat signals the display indicates “OK”. If any threat signal is detect the display indicates “ALARM”, specifying the type of the signal; the alarm sound is produced as well as vibration. The next alarm sound will occur only after five minutes and only for a new threat signal. The alarm vibration will repeat every five minutes. The current state can also be identified by the frequency of light blinking: frequent blinking means alarm. In the Monitoring Mode the display will go to sleep automatically in two minutes, to activate it please press any button. 14 7.3 Threat Signal Monitoring Monitoring of any threat signal could be done by pressing [OK] button. To return to Monitoring Mode press [OK] or [C] button. Monitoring of threat signal does not interrupt Monitoring Mode. 7.4 Log Review from the Monitoring Mode To review the Alarm Events Log from the Monitoring Mode please press ▲ or ▼. If the Log is not empty the display will indicate the last event (see Alarm Events Log). Reviewing the Log does not interrupt the Monitoring Mode. 7.5 Monitoring Mode Setting The Settings used in Monitoring Mode are described in detail in “Types of Detected Signals”, “Threshold Levels of Signals”, “Alarm Volume”, “Running Time in Monitoring Mode”, and “Alarm Delay and Rate of Adaptation to Background Noise”. 15 8. Sweep Mode Sweep Mode is used for detection of analog and digital radio signals of all types. This mode allows the review of all detected signals regardless their level. The display shows the list of current detected signals classified according to frequency or type of signal. The list starts from the analog signals with the defined frequency. It is followed by the one maximal signal whit undefined frequency. The digital signals are at the bottom of the list. When the signal disappears it is deleted from the list after 10 sec, the display shows the last significant level of the signal. To browse the list use ▲ or ▼ buttons. To monitor one selected signal press [OK]. The audio monitoring in Sweep Mode could be done for analog signals only (see Audio Monitoring). To return to the list press [OK] or [C]. 16 9. Search Mode 9.1 Search Mode, how and when to use The Search Mode is used for detection and location of analog and digital transmitters. This mode is used when you can move the RF Detector around searching for a radio transmitter. The types of signals detected are similar to the ones detected in Monitoring Mode. The selection of detected signals is done through the menu «Settings -> Signals». The display indicates the signal that has maximal strength level. To monitor the current signal press [OK]. The audio monitoring in Search Mode could be done for analog signals only (see Audio Monitoring). 9.2 Light and Sound Indication Search Mode for analog signals utilizes both light and sound indication of the signal strength: the higher is the frequency of flash the closer is the transmitter. The search mode for digital signals does not use light signals due to probable fluctuations of radiation power. 17 Relative level means the difference of current and reference levels. Initially the reference level is set as equal to the current one and the LED does not produce any flash. When the RF Detector is moved around the frequency of flashing grows with the growth of relative level. You can set the reference level equal to current one by pressing ▲ or ▼ buttons. 10. Difference Search Mode 10.1 Difference Search Mode, when to use Difference Search Mode is used for detection and localization of analog transmitters. This mode has its advantage in case the transmitter is located in the same room. In this Mode the device defines the relative level of the signal — its difference with the reference spectrum that was fixed at the beginning of operation in this Mode. The closer to the source of radio signal located in the room the higher is its signal level in comparison with the outside radio transmitter. The RF Detector selectively reacts to the change of level thus enabling to locate the radio transmitter at a higher rate. 18 10.2 Difference Search Mode, how to operate Difference Search Mode starts from 5 sec reference spectrum signal accumulation. The display indicates the progress of accumulation. When the accumulation is complete the display indicates the analog signal of maximal relative level. To audio monitor the current signal press [OK] (see Audio Monitoring). Differential Search Mode utilizes both light and sound indication of the relative signal level – the higher is the frequency of light flashing the closer is the radio transmitter. 11. Monitoring of Digital Signals Monitoring of Digital Signals is intended for detection of mobile phone signals (GSM, UMTS (3G), CDMA types), cordless telephones (DECT standard), Bluetooth, Wi-Fi and other impulse signals in 2.4 GHz. Besides this mode can be used for adjustment of threshold levels for Monitoring Mode. 19 In Monitoring of Digital Signals the display shows the list of all digital signals and their strength levels. To browse the list use ▲ or ▼ buttons. To monitor one selected signal press [OK]. To return to the list press [OK] or [C]. 12. Audio Monitoring Audio Monitoring is available only for analog signals in Sweep, Search and Difference Search Modes through the built-in speaker. The audio monitoring facilitates signal identification and allows using the acoustic feedback. The scanning is interrupted as the Audio Monitoring requires the fixed tuning for a signal. The display indicates the frequency (or the type) and the current signal strength. The volume is regulated by ▲ and ▼ buttons. To return from audio monitoring press [OK] or [C]. 20 13. Alarm Events Log Alarm Events Log accumulates the information about the threat signals detected in the Monitoring Mode. The max number of records – 200. Before initiating the Monitoring Mode all records are deleted. When the mode is reiterated you can continue the records or wipe them off. The records are saved regardless any switch/off-on manipulations. To reduce the number of records short signals fallouts (less than 1 min) are ignored. The frequencies of the analog signals are also ignored as the spectrum of transmitter might contain several harmonic components. If the detected threat signals are of different types the Log will record all of them. You can review the Log either from the Main Menu or from Monitoring Mode. The display shows: – the index number of current record and the total number of records – the moment of detection and the moment of the signal extinction – the type and the max level of the signal 21 To review the records use ▲ or ▼buttons. To escape press [OK] or [C]. 14. Settings To choose the settings press [OK], make changes, pressing ▲ or ▼, to save the new parameter press [OK], to return to the previous parameter press [C]. 14.1 Types of Detected Signals Selection of signal types in Monitoring and Search Modes. The types of signals selected are marked by «√». “Menu -> Settings -> Signals” Analog – analog signal GSM – GSM signal UMTS – UMTS (3G) signal CDMA – CDMA signal DECT – DECT signal Bluetooth – Bluetooth signal Wi-Fi – Wi-Fi signal 2.4 GHz – other impulse signals of 2.4 GHz range 22 14.2 Threshold Levels of Signals How to set: “Menu -> Settings -> Thresholds” Threshold level is a level exceeding which the signal is treated as dangerous. The values for threshold levels by default are for reference only and could be adjusted if necessary. 14.3 Interface Language How to choose the language (Deutsch, English, Español, Français, Italiano, Русский): “Menu -> Settings -> Options -> Language” 14.4 Sound Volume How to set the sound volume when indicating the relative level in Search Mode, as well as when RF Detector switching on or off. “Menu -> Settings -> Options -> Sound volume” 23 14.5 Alarm Volume How to set the alarm volume in Monitoring Mode: “Menu -> Settings -> Options -> Alarm volume” 14.6 Running Time in Monitoring Mode How to set the running time in Monitoring Mode: “Menu -> Settings -> Options -> Duration” 4 hrs 8 hrs 12 hrs The max battery capacity is enough for 4 hours of continuous monitoring. In other cases the intermittent mode is used when the monitoring is done only half or one/third of the minute. In such cases the time of reaction might increase up to 50 sec. 14.7 Alarm Delay How to set the Alarm Delay in Monitoring Mode: “Menu -> Settings -> Options -> Delay” 24 MIN – minimal NOM – nominal MAX – maximal The alarm delay sets the minimal duration of threat signal and the short-time signals and noise are ignored. Nominal delay – 5 sec is enough in the majority of cases. 14.8 Rate of Adaptation to Background Noise How to set Rate of Adaptation to Background Noise in Monitoring Mode: “Menu -> Settings -> Options -> Adaptation” SLOW NORM FAST The rate of adaptation defines how quickly the deducted background spectrum traces the changes of current signals. The algorithm of adaptation used in the device ignores the constant signals and noise. The normal rate of adaptation equals 2-3 min which is enough in the majority of cases. 25 14.9 Frequency Bands of Cellular Networks Selection of frequency bands cell phones signals. The selected frequency bands are marked by ”√”, the selected CDMA 450 frequency band is marked by “A” – “H”. “Menu -> Settings -> Options -> Cell networks” You have to limit frequency bands of cellular networks to really existing in a particular location, otherwise the time of signal detection might increase. 14.10 Current Time Setting The current time can be set at the very beginning using Monitoring Mode or Menu. “Menu -> Settings -> Time” The sequence of setting is the following: hours (▲ or ▼), [OK], minutes (▲or ▼), [OK] Current time is used only in Monitoring Mode; it will be recorded in Log. You have to reset the time every time you switch on the Detector. 14.11 Settings Reset Settings reset: choose all types of traced signals, set the thresholds and options by default, the language interface and the time will be preserved as set initially. “Menu -> Settings -> Reset” 26 15. About Information about the RF Detector: Model, Software Version, Serial Number. 16. Package Contents RAKSA iDet Selective RF Detector Charging Device Owner’s Manual 1 1 1 17. Warranty The producer provides 24 months warranty on the following conditions: Filled-in warranty card No traces of mechanical damage and seal breaking Compliance with operating rules, storage and transporting requirements. 27 18. Specifications frequency range cellular and wireless signals 28 typical sensitivity dynamic range bandwidth sweep time running time in monitoring mode running time in other modes max number of records display operating temperature size weight 40 - 3800 МHz GSM 850/900E/1800/1900 UMTS 850/900/1800/1900/2100 CDMA 450 (A-H) /800/1900 DECT, Bluetooth, Wi-Fi 70 mV/m 50 dB 10 МHz ≤ 1.5 s 4 - 12 h 3h 200 OLED, 128 x 64 +5 - +40 °C 77 х 43 х 18 mm 35 g WARRANTY CARD Date of Purchase Dealer Name & Stamp 29