1
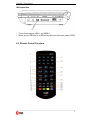
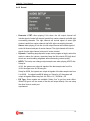
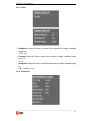
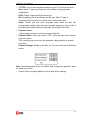
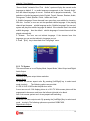
Portable DVD player / DVB-T MPEG4-2 Receiver
VideoPal 7
U s e r M a n u a l
Version 1.0
VideoPal 7 User Manual
1 Table of Contents
1
Table of Contents ..............................................................................................................1
2
Safety Precautions............................................................................................................2
3
Package Contents.............................................................................................................2
4
DVD MODE ........................................................................................................................3
4.1
Basic Operations and Connections.........................................................................3
4.2
Remote Control Functions .......................................................................................5
4.3
Basic operations.......................................................................................................6
4.4
Main Setup Menu ......................................................................................................8
4.4.1 General ..................................................................................................................9
4.4.2 Sound ..................................................................................................................10
4.4.3 Video.................................................................................................................... 11
4.4.4 Preference ........................................................................................................... 11
5
DIGITAL TV (DVB-T) MODE.............................................................................................13
5.1
Welcome Srceen .....................................................................................................13
5.2
Installation ..............................................................................................................13
5.2.1 Channel Auto Scan...............................................................................................13
5.2.2 Channel Scan.......................................................................................................14
5.2.3 LCN......................................................................................................................14
5.3
OPERATION ............................................................................................................14
5.3.1 Changing Channels ..............................................................................................14
5.3.2 Accessing the Electronic Program Guide (EPG)....................................................15
5.4
EDIT CHANNEL.......................................................................................................15
5.4.1 Edit Channel menu...............................................................................................15
5.4.2 TV Channel list .....................................................................................................16
5.4.3 Radio Channel list ................................................................................................16
5.4.4 Delete All..............................................................................................................16
5.5
SYSTEM SETUP......................................................................................................17
5.5.1 System setup menu..............................................................................................17
5.5.2 Language .............................................................................................................17
5.5.3 TV System ...........................................................................................................18
5.5.4 Local Time Setting................................................................................................19
5.5.5 Timer Setting........................................................................................................19
5.5.6 Parental Lock .......................................................................................................20
5.5.7 OSD Setting .........................................................................................................20
5.5.8 Favorite................................................................................................................21
5.6
TOOLS.....................................................................................................................21
5.6.1 Tools main menu ..................................................................................................21
5.6.2 Receiver Information ............................................................................................22
5.6.3 Load Factory Default ............................................................................................22
5.6.4 Software Upgrade.................................................................................................22
5.6.5 USB Device..........................................................................................................23
5.6.6 Remove USB device safely ..................................................................................23
5.7
GAME ......................................................................................................................24
5.7.1 Game ...................................................................................................................24
5.8
REC & MEDIA..........................................................................................................24
5.8.1 REC & Media main menu .....................................................................................24
5.8.2 Record Manager...................................................................................................25
5.8.3 DVR HDD Information ..........................................................................................25
5.8.4 HDD Format .........................................................................................................26
5.8.5 DVR Configuration................................................................................................26
5.9
TIMESHIFT/ RECORD .............................................................................................27
5.9.1 Time shift..............................................................................................................27
5.9.2 Personal Video Recording (PVR)..........................................................................29
6
Technical support ...........................................................................................................31
7
Technical Specifications.................................................................................................31
________________________________________________________________________
1
VideoPal 7 User Manual
2 Safety Precautions
1. Do not put the player in the condition of high temperature (over 40 oC),
humidity or dust.
2. Do not knock or hit the player, especially do not shake TFT screen in order to
avoid TFT being seriously damaged.
3. To prevent electric shock or fire hazard do not expose the unit to rain or
moisture.
4. To avoid electric shock or fire hazard, do not open the cabinet. This must be
done from qualified persons only.
5. Do not use alcohol or petrol to clean the surface of the player.
This symbol is intended to alert the user to the presence of voltage»
within the product’s enclosure that may be of sufficient constitutes a
risk of electric shock to persons.
CLASS 1 LASER PRODUCT:
This marking indicates the presence of laser beams used in this unit, and CLASS 1
the weaker class. There is no danger of hazardous radiation outside this unit
3 Package Contents
1. VideoPal 7 Player
2. Remote Control (with battery)
3. Portable Antenna
4.
5.
6.
7.
Power adapter
USB cable
Av cable
User’s Manual / warranty card
________________________________________________________________________
2
VideoPal 7 User Manual
4 DVD MODE
4.1 Basic Operations and Connections
Main Body Buttons
________________________________________________________________________
3
VideoPal 7 User Manual
Side Views
Connection Diagram
Notice: Please turn off all devices before connection.
As the picture above, use the A/V cable to connect the portable DVD player to a
TV, LCD or other devices.
Turn on the portable DVD player and the other unit to which connection has been
made.
Press the DVD/DVBT/AV button on the portable DVD player or on the remote
control to enter in A/V mode.
Note: The audio output only supports analogue output.
________________________________________________________________________
4
VideoPal 7 User Manual
USB connection
·
This unit can support USB1.1 and USB2.0
·
When using a USB stick or a HDD drive,make sure the format used is FAT32.
4.2 Remote Control Functions
________________________________________________________________________
5
VideoPal 7 User Manual
1. Switch DVD/TV/AV Button
15. Fast Backward/RED Button
2.“Number Keys”.
3. “SETUP”.
4. Channel Up(DVB-T)/UP(DVD)
16. Fast Forward/GREEN Button
17. Switch Sound/Soundless Button
18. Repeat Play The Current Chapter
5. Volume DOWN/Left(DVD)
6. OK(DVD MODE) Channel
(DVD),RECALL(DVB-T)
List 19. Exit
(DVB-T MODE)
7. Page UP (DVB-T Mode)
8. Page UP (DVB-T Mode)
20. Volume UP/Right(DVD)
21. Page DOWN (DVB-T Mode)
22. Goto(DVD)/FAV (DVBT)
9. USB/CARD.(DVD) TV/Radio(DVB-T) 23. Menu(DVD)/EPG (DVBT)
10. Info
11. AUDIO
12. Subtitle Function
13. LCD Setup
24. Zoom (DVD)/TTX (DVBT)
25. REC(DVB)COPY DELETE(DVD-USB)
26. STOP
27. Skip Forward/BLUE Button
14. PLAY/PAUSE
28. Skip Backward/YELLOW Button
4.3 Basic operations
·
ON/OFF: After connecting the AC adaptor, press the on/off button and the unit
·
will turn into working status.
STOP: When playing DVD, SVCD/CVD,VCD and CD disc, press the button
·
once and the unit will memorize the current position. Press play/pause button
and the unit will start from where you stop. Press stop button twice and the unit
will stop and will lose the last memory.
PLAY/PAUSE: When playing a disc press the button once to pause the
current playback Press once more to resume playback.
·
SKIP: When playing a disc, press
When playing a disc press
·
to play previous chapter or title.
to play next chapter or title.
FAST FORWARD/BACKWARD: When playing a disc, press the button to fast
play forward or backward.
________________________________________________________________________
6
VideoPal 7 User Manual
Press
Press
·
,playback speed will be
playback speed will be
Under fast forward, pressing [play/pause] will resume to normal playback.
REPEAT: This function activates “repeat one title only, one chapter, one track,
or the whole disc”.
When playing a DVD, press the repeat button and the following display will
appear:
When playing a CD, VCD 1.1,SVCD or VCD 2.0 in pbc mode, if the repeat
button is pressed, the following display will appear
·
MUTE: Press MUTE once, the sound will be turned off and the LCD monitor
·
will show the volume
Press once more the volume will return. You can also resume the volume by
volume button + -.
VOLUME: The volume can be adjusted by volume button + -.
NUMBER BUTTONS: When playing CD,DVD,SVCD,VCD discs, number
·
buttons will be unavailable when PBC is on
AUDIO: When playing a multi channel SVCD, VCD, CD disc, press the
·
"audio" key to choose a different audio output.
Stereo---Left channel---Right channel
When playing a multi-language DVD, SVCDdisc, press the "audio" key to
·
choose the desire language.
SUBTITLE: When playing a Multi-Language disc, press the "SUBTITLE” key
·
to choose a subtitle.
MENU: When playing a SVCD, VCD2.0 disc, press the "MENU"BUTTON to
·
activate/deactivate the PBC function.
COPY/DELETE: When playing from USB/CARD device, press “copy delete”
button to copy items from USB to card or card to USB, or delete items from
________________________________________________________________________
7
VideoPal 7 User Manual
·
USB/card. It can also copy mp3,mpeg4,jpeg items from disc to USB/CARD.
BASIC PLAYBACK: When playing back a DVD disc, press the "GOTO”key. A
·
menu will pop up showing information about the play backed title
USB FUNCTION: In order to use the USB or the card reader, the unit should
be in “Stop” or “No disc” mode. Press the USB button on the DVD player. The
loading time of the files and the content will depend on the size of these, and
the amount of the files. After having loaded the file, use the Key arrow buttons
to select the files and press the “Enter” button to confirm, If you want to stop
the playback, press the USB button.
4.4
Main Setup Menu
Choose the desired function using the direction keys and press "OK” to confirm.
Return to the setup menu by using the direction keys Press setup to edit the
menu.
By moving the cursor to the selected item, a display will appear at the bottom
displaying the information
The unit will memorize the setup configuration once it is powered off.
The unit can only enter in setup mode if it is in”stop”mode or tray is opened.
________________________________________________________________________
8
VideoPal 7 User Manual
4.4.1 General
·
Tv Display: Select the desired LCD display from the following:
4:3 Panscan
4:3 Letterbox
16:9 Wide
·
OSD language: choose the desired language.
Captions: When playing back a disc, turn on or off the caption function
·
This function will show or hide subtitle information on the screen. This
function is used for persons with hearing problems.
Note: The caption function will only work if the DVD disc contains this
information.
Screen Saver: If the screen saver is on, when your player is in stop, open or
·
no disc state, or there is a frame frozen for several minutes, the screen saver
will be activated. This feature can protect the screen from burn-in damage.
ON: Choose this setting to activate the screen saver.
·
OFF: Choose this setting to cancel the screen saver.
Last memory: This function memorizes the end of the last playback and will
·
resume from that point if the function is enabled.
MP3 Lyric: When playing mp3 in usb/card/disc device,if the mp3 lyric in the
same dir of the device,the lyric will display in the button of the screen.
________________________________________________________________________
9
VideoPal 7 User Manual
4.4.2 Sound
·
Downmix: LT/RT: when playing 5.1ch discs, the left output channel will
include signal of entire left channel, partial from center channel and left& right
surrounding channels. The right channel will include signal of entire right
channel, partial from center channel and left & right surrounding channels.
Stereo: when playing 5.1ch disc, the left output channel will include signal of
·
entire left channel and part of center channel. The right channel will include
signal of entire right channel, and part of center channel.
Dynamic: If watching large dynamic scope movie program at night, select this
·
mode to reduce the volume, meantime keep the little minutia EQ high level,
thus it can avoid troubling neighbors without detracting volume quality.
HDCD: This setup can change output sample rate when playing HDCD disc.
·
Setup for
44.1K, the system can output all signals of the disc sample rate from 0 to
44.1K the signal over 44.1K being cut.
Setup for 88.2K, the system can output all signals of the disc sample rate from
0 to 88.2K, the signal over88.2K being cut. Setup for off, the system will
output all signals without any limit. 44.1KHz = 1X ; 88.2KHz = 2X
EQ Type: Seven modes are available. Select “live” to get live music effect.
When EQ type is off, the sound of the disc will output directly. You can setup
the other items to reach your
requirement.
________________________________________________________________________
10
VideoPal 7 User Manual
4.4.3 Video
·
Brightness: Setup this item to control the brightness of image, available
·
range from
–20 to +20.
Contrast: Setup this item to control the contrast of image, available range
·
from –16
to +16.
Sharpness: Setup this item to control the sharpness of image, available range
as
high – medium – low.
4.4.4 Preference
________________________________________________________________________
11
VideoPal 7 User Manual
·
TV TYPE: The unit can correspond with every type of TV all over the world
Auto: Select TV type according to the color system of the playing disc
automatically.
NTSC: Taiwan, Japan and USA use this type.
PAL: HongKong, China and Europe use this type, When TV type is
·
inconsistent with this setup, the screen will be in black strip state.
Audio: Subtitle and disc menu language setup: when the disc has
·
correspondent subtitle, audio and menu language supporting, menu is valid, if
the playing disc defaults preferred language, this setup will be invalid.
Parental control:
·
Adjust parental control to control the playing rated disc.
Password Mode: When the mode is "OFF", setup the age control directly;
when the mode is
"ON", setup the age control only with password, using password to operate
every time.
Password Change: Setting up this item, the TV screen will show as following
picture:
Note: The initial password of the unit is 8806. After changing the password, press
the select key to finish.
·
Default: Return the player defaults to the original factory settings.
________________________________________________________________________
12
VideoPal 7 User Manual
5 DIGITAL TV (DVB-T) MODE
5.1
Welcome Srceen
If you use the device for the first time, the "Welcome" menu appears.
Press cursor button to setup the Region, Language, Display Mode and Aspect
Mode.
Highlight "OK" and press the "OK" button to start channel search.
5.2
Installation
1. Press the "Setup" button to enter main menu.
2. Press "UP"or " DOWN " button to highlight "Installation", press "RIGHT" button
to enter to the Installation menu.
3. Press "UP" or "DOWN" cursor button to highlight the desired item and press
"OK" button to enter the sub-menu .
4. Press "EXIT" button to exit.
5.2.1 Channel Auto Scan
1. Select the "Auto Scan", press "OK" button to enter the Auto Scan menu.
2. Press the cursor button to set "FTA Only",(select NO for free to air and pay per
view channels and YES for all free to air channels only ), then press "Search"
and press the "OK" button to start auto scan.
________________________________________________________________________
13
VideoPal 7 User Manual
5.2.2 Channel Scan
1. Select "Channel Scan", press the "OK" button to enter the Channel Scan menu.
2. When entering to “Channel Scan” menu, a channel scan menu will be shown as
below. There are two choices of “Scan Mode.”
You can scan channel by channel or by frequency. If you scan by channel, “Scan
Band” and “Ch No” are available to adjust. If you scan by frequency,
“Frequency” and “Bandwidth” are available to adjust.
There are two choices of “Scan Band.” You can choose “UHF” or “VHF.”
There are 56 choices of “CH No” ranging from “CH05(177500Hz) ” to
“CH69(858000Hz).”
There are three choices of “Bandwidth”, 6, 7, and 8 MHz.
When you complete your modification, move highlight to “Search” and press [OK] ,
then the device will begin to scan.
5.2.3 LCN
If LCN(Logical Channel Number) Select function is activated, you can't change
the original number of TV channels by scanning .
You can activate/deactivate the LCN function by setting the "LCN Mode" to on/off.
5.3
OPERATION
5.3.1 Changing Channels
There are three ways of channel selection - stepping through the channel list,
selection by number and from the on-screen channel list.
________________________________________________________________________
14
VideoPal 7 User Manual
1. Stepping through the channel list:
To move through the channel list, press the upward arrow or downward arrow key
on the remote control.
2. Selected by number:
Enter the channel number directly by pressing numeric buttons, and press the
"OK" button to select desired channel.
3. Selected by on-screen channels list:
You can also select the required channel directly from on-screen channel list. This
is displayed using the device main menu. See "Edit Channel" in this manual for
operation details.
5.3.2 Accessing the Electronic Program Guide (EPG)
With the DVB-T you can have access to program information any time you want.
This feature is displayed on-screen with functions allowing a viewer to navigate,
select, and see content by time, title, channel etc. Also you can have access to TV
guide of any digital channel. To use this function simply follow the following:
1. Press "EPG" button to enter EPG menu.
2. Press cursor button to switch between channel list, events schedule of the
selected channel and now/next events.
3. Press "Green" button to start Timer settings.
With this option you can set the device to open or close whenever you want, set a
channel as wake up channel and schedule to record any future broadcast.
4. Press "Red" button to enter the "Step time" menu.
With this option you can find information about a program of each channel, based
on hours or days. Eg you can see the program guide of a channel for 2 or 3 days
later, etc.
5. If you want to go back on viewing the channel press the "EPG" button again.
5.4
EDIT CHANNEL
5.4.1 Edit Channel menu
1. Press the " Setup " button to enter main menu.
2. Press "UP" or "DOWN " button to highlight "Edit Channel", press "RIGHT"
button to enter the Edit Channel menu.
3. Press "UP" or "DOWN" cursor button to highlight the desired item and press
________________________________________________________________________
15
VideoPal 7 User Manual
"OK" button to enter the sub-menu .
4. Press "EXIT" button to exit.
5.4.2 TV Channel list
1. In the Edit Channel menu, select "TV Channel List", press "OK" button to enter
TV channel list menu.
2. Move the highlight by pressing [Channel Up/Channel Down] button. Then press
[OK] to preview the current highlighted program in the preview window.
3. By pressing [Page Up/Page Down] you can execute the PageUp/Pagedown
function.
4. By pressing [Volume Up/Volume Down] you can switch to different Program
Group.
5. By pressing [Setup] or [Exit] you can go back to the “Edit Channel” menu.
5.4.3 Radio Channel list
1. In the Edit Channel menu, select "Radio Channel List", press "OK" button to
enter the Radio Channel list menu.
2. Press "UP" or "DOWN" button to highlight channel press the "OK" button to
listen the desired TV channel.
NOTE: Basically, the operation of "Radio Channel List" is the same as "TV
Channel List", but there is one point different: In "Radio Channel List" mode, there
is no video information, so it will always display Radio's logo in the right side
preview window.
5.4.4 Delete All
1. In the Edit Channel menu, select "Delete All", press "OK" button.
________________________________________________________________________
16
VideoPal 7 User Manual
2. A warning window appears.
Select "Yes", press "OK" button to delete all channels.
Select "No", Press "OK" button to cancel deleting.
5.5
SYSTEM SETUP
5.5.1 System setup menu
System setup menu allows us to set Language, TV System, Local Time Setting,
Timer Setting, Parental Lock, OSD Setting and Favorite.
1. Press the " Setup " button to enter main menu.
2. Press "UP" or "DOWN" button to highlight "System Setup", press "RIGHT"
button to enter the System Setup menu.
3. Press "UP" or "DOWN" cursor button to highlight the desired item and press
"OK" button to enter the sub-menu.
4. Press "EXIT" button to exit
5.5.2 Language
This menu allows you to set Language.
1. Language: press [Volume Up/ Volume Down] key to select menu languages,
the selections of languages include: English, Greek.
2. First Audio: Some channels have more than one available audio language.
With this function, a user can set the first audio for this channel. If the playing
channel has the same audio as the “First Audio” you set, system will play this
audio language as default. If the channel hasn’t the suited audio language, then
the system will compare automatically with the second audio language. The
selections of audio languages include: English, French, German, Russian, Arabic,
Portuguese, Turkish, Spanish, Polish , Italian and Greek.
3. Second Audio: If the channel contains the audio track corresponding to the
________________________________________________________________________
17
VideoPal 7 User Manual
“Second Audio” instead of the “First
Audio”, system will play the second audio
language as default. If no audio language corresponds to the “Second Audio”,
then the default language of current channel will be played automatically. The
selections of audio languages include: English, French, German, Russian, Arabic,
Portuguese, Turkish, Spanish, Polish , Italian and Greek.
4. Subtitle Language: Some channels have more than one subtitle for choosing.
With this function, a user can set the specified subtitle language. If the playing
channel has the same subtitle language as the “Subtitle Language” the user set,
system will play this subtitle language as default. If the channel hasn’t the suited
subtitle language, then the default subtitle language of current channel will be
played automatically.
5. Teletext: The user can set teletext language. If the streams have this
language you can see the teletext in language you set.
6. Press
[Exit]
key to draw back from “Language” menu.
5.5.3 TV System
This menu allows us to set Display Mode, Aspect Mode, Video Output and Digital
Audio Output.
Display Mode:
To switch the system output video resolution.
Aspect Mode:
To switch the screen aspect ratio. By pressing [Left/Right] key to select each
mode circularly.
The following options are provided:
4:3 PS /4:3 LB /16:9/Provide the pillar box mode.
A user can see a 4:3 full display picture in a 16:9 TV. Wide screen picture will be
suppressed to be narrow, and leave the left and right side to be black.
Auto. Auto means system won’t do any aspect ratio switching.
Video Output::
To set the TV video output mode. By pressing the [Left/Right] Key to select each
mode circularly. The following options are provided: RGB/CVBS.
Digital Audio Output::
________________________________________________________________________
18
VideoPal 7 User Manual
By pressing [Left/Right] Key to set the audio output mode to be:LPCM Out ,
System will decode AC3 and/or PCM audio track data to be LPCM.
BS Out. System simply outputs RAW audio data to SPDIF interface without
decoding.
5.5.4 Local Time Setting
This menu allows you to set the region and time.
Region:
This menu is used for changing the region setting.
GMT Usage:
This menu is used for opening the usage of GMT. The options are:
Off / On
GMT Offset: This menu is valid only when selected "Uesr Define" in GMT Usage
menu.
The GMT offset range is "-11:30 ~ +12:00", increasing half hour progressively.
Date: "Date" and "Time" menus are valid only when selected "Off" in GMT
Usage menu.
Time: Press "OK" then numeric button to input the time.
5.5.5 Timer Setting
1. Program Timer: This menu allows us to set the program timer for a scheduled
recording or channel setting.
Timer Mode:
Timer Service:
Off/Once/Daily
Channel/Record (schedule a video recording)
Wakeup Channel: You can select a desired channel as the wakeup channel.
Wakeup Date:
Press "OK" then numeric button to input date.
Wakeup Time:
Press "OK" then numeric button to input the time.
Duration:
Press "OK" then press numeric button to input the duration time.
________________________________________________________________________
19
VideoPal 7 User Manual
5.5.6 Parental Lock
This menu allows you to protect the installation menu and channel, and change
the Password.
1. In "System Setup" menu, select "Parental Lock" and press "OK" button, you are
asked to input a password (the default password is"0000").
2. After the input of the correct password by pressing numeric buttons, the
parental lock menu appears.
Menu Lock:
To lock the installation menu and Edit menu. When you want to
enter Auto Scan/Channel Scan menu, you must input the password. You can set
menu lock to on/off.
Channel Lock:
Off/ Manual/ AGE 10/AGE 12/AGE 16/AGE 18
New Password:
To change the password.
Confirm Password:
To confirm the new password.
5.5.7 OSD Setting
This menu allows you to set OSD Timeout, OSD Transparency and load default
OSD setting.
OSD Timeout: 1-10
To set the duration of showing up for the
program banner which contains
some information about
the channel and shows up once the
channel is changed.
By pressing [Left/Right] key to set the duration,
ranging
from “1 second ~ 10 seconds”.
OSD Transparency:
To set the transparency of OSD.
By pressing
select the values. There
are 5 levels
30%, 40%,
and “Off” (Opaque of the OSD).
of
[Left/Right]
transparency,
key
10%,
to
20%,
________________________________________________________________________
20
VideoPal 7 User Manual
Load Default OSD Setting:
To clear all OSD setting and reset parameters as default value.
5.5.8 Favorite
This menu allows you to rename the favorite group.
1. In Channel menu, select "Favorite", press "OK" button to enter Favorite menu.
2. Select desired group, press "OK" button to open the screen keypad. Input a
letter and a number one by one by pressing the cursor button and press "OK"
button to confirm. After finishing, highlight "OK" on screen keypad to confirm, then
you have you change Favorite group name successfully.
3. Press "EXIT" button to quit the group rename menu.
5.6
TOOLS
5.6.1 Tools main menu
1. Press the " Setup " button to enter main menu.
2. Press " UP" or " DOWN " button to highlight "Tools", press "RIGHT" button to
enter the Tools menu.
3. Press "UP" or "DOWN" cursor button to highlight the desired item and press
"OK" button to enter the sub-menu.
4. Press "EXIT" button to exit.
If
Menu Lock is “On”, it will display a dialogue for user
password. The default Password is “0000”.
to
key in
________________________________________________________________________
21
VideoPal 7 User Manual
5.6.2 Receiver Information
This menu can display some parameters of bootloader, maincode, radioback,
countryband and userdb information.
1. In "Tools" menu, select "Receiver Information", press "OK" button to open
receiver information window.
2. Press "EXIT" button to exit.
5.6.3 Load Factory Default
This menu allows you to re-set the device back to factory settings and clear all
existed channels.
1. In the "Tools" menu, select "Load Factory Default" and press "OK" button.
2. A confirmation window will be displayed. Select "Yes" to activate a reset back to
the factory settings and clear all channels.
3. Select "No" to cancel. Press "EXIT" button to exit.
5.6.4 Software Upgrade
We offer the functions for user to upgrade software version by OTA or by USB.
1. Enter "Tools" menu, select "S/W Upgrade by OTA" or "Upgrade by USB", press
"OK" button and the Software Upgrade menu will be shown.
2. Press cursor button to select the desired item, then highlight "Start" and press
"OK" button to start the upgrade.
3. Press "EXIT" button to exit.
________________________________________________________________________
22
VideoPal 7 User Manual
5.6.5 USB Device
This function allows you to play files from USB port.
1. In "Tools" menu, select "Media+", press "OK" button to enter Media Player
menu.
2. Press "UP" or "DOWN" cursor button to select a desired item, and press "OK"
button to play the desired files.
3. Press "EXIT" button to exit.
Music play operation
Red Key: Play the file list from the 1st music file.
Yellow Key: Delete the file highlighted by Yellow key.
Blue Key: Delete all files by blue Key, with a remind “Are you sure to save?”
Image view operation
Red Key: Start to browse image if press RED key
Yellow Key: Delete selected image if press Yellow Key.
Blue Key: Press Blue Key, will delete all image files in play list, but system will
remind you “are you sure to save?” before practical operation. If you select Yes,
all file will be deleted and Play list window will be closed.
Menu Operation: Press [Info] key to enter the Setup menu.
5.6.6 Remove USB device safely
In "Tools" menu, select "Remove USB device safely", Press "OK" button to
confirm. Then a window is displayed. Press "OK" button again.
________________________________________________________________________
23
VideoPal 7 User Manual
5.7
GAME
5.7.1 Game
This menu allows you to play games.
1. Press the " Setup " button to enter main menu.
2. Press "UP" or "DOWN" button to highlight "Game", press "RIGHT" button to
enter the Game menu.
3. Press "UP" or "DOWN" cursor button to highlight the desired item and press
"OK" button to enter the game.
4. Press "EXIT" button to exit.
5.8
REC & MEDIA
5.8.1 REC & Media main menu
1. Press the " Setup " button to enter main menu.
2. Press "UP" or "DOWN" button to highlight "REC & Media", press "RIGHT"
button to enter the REC & Media menu.
3. Press "UP" or "DOWN" cursor button to highlight the desired item and press
"OK" button to enter the sub-menu.
4. Press "EXIT" button to exit.
________________________________________________________________________
24
VideoPal 7 User Manual
5.8.2 Record Manager
This menu allows you to play the recorded files.
1. In "REC&MEDIA" menu, select "Record Manager" and press "OK" button to
enter Record Manage menu.
2. Press "UP" or "DOWN" cursor button to select a desired item, and press "OK"
button to play the desired files.
3. Press "EXIT" button to exit.
Lock
Press [Green] key to lock a program . If you want to cancel the lock mark for a
program, press [Green] key again.
Delete
Press [Blue] key to make a delete mark on the highlight program. If you want to
cancel the delete operation, press [Blue] key again to cancel the delete mark.
When exit the “Record Manager” menu, all the delete mark channel will be
deleted directly.
Rename
Press [Red] key to rename the highlight program. It will show the “Rename”
window.
You can press [Red] key to switch capital and lowercase. Press [Green] key to
delete the char on the cursor. Press [Yellow] key to save the modification. Press
[Blue] key to cancel the modification
5.8.3 DVR HDD Information
This menu can display some parameters of the Removable Disk.
1. In "REC" menu, select "DVR HDD Information", press "OK" button to open DVR
________________________________________________________________________
25
VideoPal 7 User Manual
HDD information window.
2. Press "EXIT" button to exit.
5.8.4 HDD Format
This menu allows you to format the removable disk.
1. In "REC" menu, select "HDD Format", press "OK" button to open HDD Format
menu.
2. Highlight "Storage Partition", press "LEFT" or "RIGHT" cursor button to change
Partition.
3. Highlight "Format", press "OK" button, a window appears.
Select FAT/NTFS, press "OK" button to format.
Select "Cancel", Press "OK" button to cancel.
Note: Be careful the format option will erase all data from you disk.
5.8.5 DVR Configuration
This menu allows us to set the DVR Configuration.
Press "UP" or "DOWN" cursor button to select desired item, press "LEFT" or
"RIGHT" cursor button to change the setting.
TimeShift time(min):
Record Type:
On/Off
TS/PS
TS: Transportation stream which includes information like teletext, subtitle, etc.
PS: Program stream which will be packeted with the file format of *.mpg and be
also playbacked by PC or other devices. (PS function works only with MPEG2
channels)
Record Selection:
You can press "LEFT"or "RIGHT" cursor button to change
________________________________________________________________________
26
VideoPal 7 User Manual
Selection.
5.9
TIMESHIFT/ RECORD
Plugging an external Mass Storage Device on the USB port gives you access to
activate Time Shift and Record a broadcast program.
- Pause a broadcast program and continue watching it later (Time Shift )
- Record a broadcast program.
- When the the available free space on the Mass Storage Device runs out,
recording operation of the broadcast will be stoped.
NOTE: For proper operation of TIME SHIFT and PVR record it is recommend
using a storage device that supports USB 2.0 and has high speed read /write.
Also if it is possible is is recommended to use a USB stick or HDD with high
storage space. The product can support up to 2TB disks
5.9.1 Time shift
The digital receiver of VideoPal 7 gives you the ability to record and watch one
program interfacing with the viewing time. All you have to do is to connect an
external hard drive or a USB stick in the usb port of the device.
With this function you can:
Pause the program and continue to see if another time.
NOTE: For proper operation of TIME SHIFT it is recommend using a storage
device that supports USB 2.0 and has high speed read /write. Also if it is possible
it is recommended to use a USB stick or HDD with high storage space.
The TIME SHIFT is a feature where you can simultaneously track, pause or to go
back and forth when you are watching a program. For example, while watching
your favorite show someone rings the door bell. No problem. Just press “Pause”
button freeze the image. when you return you can resume viewing from where
you left by pressing “Play” button
________________________________________________________________________
27
VideoPal 7 User Manual
• Enable TIME SHIFT
- To use TIME SHIFT press <PAUSE> and a bar with the time when the recording
is started (right) will appear. From this moment and forth the channel program will
be recorded.
Each time you wish to pause or rewind the program a new bar will appear.
Notice that now the bar has 2 times. The right is the normal time showing the on
going time from the beginning when started Time Shift and the left is the play
backed time according to the time you choose to watch of the recorded program.
During TIME SHIFT, it is possible to do the following.
- Press "PAUSE" to pause the program and <PLAY> to continue watching later.
- Press "STEP FORWARD" or "FORWARD" to fast forward the recorded program
at specified time steps according to “Jump” settings(30 Mon - 30 minutes) or at
2χ, 4x, speed etc respectively.
- Press "STEP BACKWARD" or "BACKWARD" to quickly rewind the recording at
specified time steps according to “Jump” settings (30 Mon - 30 minutes) or at 2χ,
4X, speed etc, respectively.
This choices affect only the recorded program, and not the function of TIME
SHIFT.
To return to the normal playing time press the "STOP" and then the <EXIT>. The
TIME SHIFT will continue to record but you will watch the normal time of the
program
• Stop TIME SHIFT
The TIME SHIFT is switch off when you change the channel or if you enter the
main menu
NOTE:
• The TIME SHIFT is disabled when you activate it for a specific channel and
you have scheduled a recording (PVR) to another channel. When that recording
starts the device will take you to that channel automatically and it will deactivate
Time Shift to the other
• The TIME SHIFT can be activated while recording a program, but only for that
channel you are recording
________________________________________________________________________
28
VideoPal 7 User Manual
5.9.2 Personal Video Recording (PVR)
· Instant Recording
With this feature, with a touch of a button you can write a program you are
watching.
- Press <RECORD> button on your remote
to immediately start recording the
program you are watching
- Pressing the button again <RECORD>, you can adjust the duration of the
recording.
- Press <STOP> button to stop recording. A window will appear.
- Select YES to stop recording. Select NO to resume recording.
·
Scheduled Recording
Apart from the operation of direct recording, the device can be scheduled to write
a program in the future.
-Press and the < Setup > button and select <settings>, <Timer Settings>
This menu lets you set the timer for a recording.
Time Mode:
Off/Once/Daily
Time service:
Record
Wakeup Channel: Set the channel you want to record.
Wakeup Date:
Press OK and then the numbers to enter the date of recording.
Wakeup Time:
Press OK and then the numbers to enter time you want the
device to
start writing.
Duration:
Press OK and then the numbers to enter the duration of the
recording
To see all the programs you have recorded press :
1. Menu <Rec&Media> select “Record Manager” press OK or press “PVR” button
2. Press the Up and Down arrow keys to select the desired entry and press the
OK to play the file.
3. Press <EXIT> on the remote to exit the menu.
________________________________________________________________________
29
VideoPal 7 User Manual
Note :
·
When you write a program in a particular channel you can watch another of
the same group of four digital channels, at the same time you make the
record.
·
When you have programmed a recording for a channel and you are
watching another with the time shift activated when the recording will start
the device automatically deactivate Time Shift and takes you to the channel
that is programmed to be recorded.
·
During the time that a recording takes place the Time Shift function can be
activated in parallel with the recording only for that specific channel and
not for anyone else.
________________________________________________________________________
30
VideoPal 7 User Manual
6 Technical support
For technical information and support please contact us:
Web Site: www.crypto.gr
E-mail: [email protected]
7 Technical Specifications
Power Voltage
DC 9V / 1A
Screen
7' TFT LCD
Screen Resolution
1440*234
Built –in 7.4V/1500mAh(The Battery can play 2 to 2.5 hours
Battery
Fast charge (Power OFF)
2.5-4 Hours
Slow charge (Power ON)
6-8 Hours
MPEG-1 / MPEG-2 MP@ML /
Video decoder
MPEG-4 AVC / H.264 MP @L3
ISO/IEC 13818-2 MAIN PROFILE@ MAIN LEVEL
ISO/IEC 14496-10 MAIN PROFILE@ L3.0
Audio decoder
MPEG-1 Layer 1,2
32/ 44.1 / 48 KHz
Video output ratio
4:3 / 16:9 / auto
Recording Format
Video: dvr (MPEG2/MPEG4), mpg (MPEG2)
________________________________________________________________________
31
VideoPal 7 User Manual
Disc Formats
DVD / DVD+RW / DVD+R / DVD-RW / DVD-R / CD / CD-R / CD-RW
Media Player Format
Video:
Audio:
MPEG-1(VCD)
MPEG1
MPEG-2(SVCD,DVD)
AC3 DECODE
MPEG-4 SP/ASP
MP3
DIVX
MP3-PRO
XVID
WMA
FLV
LC-AAC
Picture CD
HDCD
MPE/ MPG/ ASF(MPEG-1 ENCODE)
CD-G
OSD Menu
Multi Language (Supports Greek)
Teletext /EPG
Greek
Tuner
RF Input Connector
IEC FEMALE
Receiving Channel Range
174~230MHz, 470~862MHz
Modulation
QPSK/16QAM/64QAM
Band Width
6MHz, 7MHz, 8MHz
1x mini USB 2.0 socket
1x IEC FEMALE antenna
1x SD/ MMC/ MS card reader
1x 3.5 mm DC-IN Jack
1x 3.5 mm AV IN/OUT jack
1x 3.5 mm stereo earphone jack
Inputs / Outputs
Dimensions
WxD xH
Weight
770 gr
198 x 161 x 40mm
Technical Specifications are subject to change without prior notice.
Disposal of old electrical and electronic equipment
If you see this symbol on the product or on its packaging, you should hand the product
over to the applicable collection point for the recycling of electrical and electronic
equipment. Do not throw it away with household wastes.
The improper disposal of these products may have negative consequences for the
environment and human health.
For more information about the recycling of this product, please contact your local city
office, your household waste disposal service or the shop where you purchased it.
________________________________________________________________________
32