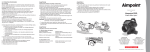
1
P.O.Box 2108, Salisbury, SP2 2BX, UK
Tel: +44 8700 422260 Fax: +44 8700 422261
Email: [email protected]
User's Manual
LORIS
Monocular Night Vision System
667/TME/UM
Ring Sights™
Revision : 0
P.O.Box 2108, Salisbury, SP2 2BX, UK
Tel: +44 8700 422260
Fax: +44 8700 422261
Email: [email protected]
Page i
Date : February 15th 2007
PREFACE
♦ CORRECT OPERATION
♦ RELIABILITY
♦ LONG LIFE
Can be achieved, provided the user has a thorough
knowledge of the equipment.
Technical inspection and maintenance at regular
intervals will save costly repairs.
Please read and follow the safety measures carefully.
SAFETY MEASURES
LORIS
Monocular Night Vision System
User’s Manual
Ref : 667/TME/UM
All information contained in this document is Ring Sights™ property; it may in no case be reproduced, even partly, or communicated to a third party or used for any possible purpose
without Ring Sights™ expressly written permission.
Ring Sights™
Revision : 0
P.O.Box 2108, Salisbury, SP2 2BX, UK
Tel: +44 8700 422260
Fax: +44 8700 422261
Email: [email protected]
Page ii
Date : February 15th 2007
In order to avoid damage to the instrument, in particular to the intensifier tube, the instrument
must be cared for as described below:
WARNING
Always keep the front lens covered except in twilight or in darkness, even when
the instrument is switched OFF.
If the original front lens cover is missing, use another convenient object to cover
the lens.
Never point the instrument towards a bright light source such as the sun, a
searchlight, or any brightly reflecting surface, even when the front lens is
covered with the protection cap.
Always remove the battery after use and before repackaging the instrument.
Keep the inside of the carrier bag dry. Keep the carrier bag closed.
Remove salt residues as quickly as possible
Dry the instrument if it was used in rain, mist or fog, before placing the
instrument in the carrier bag.
Place dust caps on open modules during transport or storage.
Protect the system against heat sources (over 70°C) and extreme humidity
(higher than 95°)
When the sight is open or broken, it is necessary for personal safety to observe the following
safety precautions:
Broken glass should only be handled while wearing protective rubber gloves
Even after the image intensifier tube is disconnected from the power source it
remains charged with a few thousand Volts for several hours. The tube should
not be touched during this period
The photocathode and the phosphor screen of the image intensifier tube are
toxic. When the image intensifier tube is damaged be careful not to touch these
parts or to inhale gases. The image intensifier tube should not be destroyed by
incineration because of the danger of toxic fumes
LORIS
Monocular Night Vision System
User’s Manual
Ref : 667/TME/UM
All information contained in this document is Ring Sights™ property; it may in no case be reproduced, even partly, or communicated to a third party or used for any possible purpose
without Ring Sights™ expressly written permission.
Ring Sights™
P.O.Box 2108, Salisbury, SP2 2BX, UK
Tel: +44 8700 422260
Fax: +44 8700 422261
Email: [email protected]
Revision : 0
Page iii
Date : February 15th 2007
Records of revisions
Revision
0
Issue Date
February 15th 2007
LORIS
Monocular Night Vision System
Date Inserted
By (name & paragraph)
User’s Manual
Ref : 667/TME/UM
All information contained in this document is Ring Sights™ property; it may in no case be reproduced, even partly, or communicated to a third party or used for any possible purpose
without Ring Sights™ expressly written permission.
Ring Sights™
Revision : 0
P.O.Box 2108, Salisbury, SP2 2BX, UK
Tel: +44 8700 422260
Fax: +44 8700 422261
Email: [email protected]
Page iv
Date : February 15th 2007
Table of contents
1.
GENERAL .......................................................................................................................................................... 3
1.1
SCOPE........................................................................................................................................................... 3
1.2
DESCRIPTION ................................................................................................................................................ 3
1.3
SPECIFICATIONS ........................................................................................................................................... 4
1.3.1 Optical data............................................................................................................................................. 4
1.3.2 Mass and Dimensions LORIS sight ......................................................................................................... 4
1.3.3 Power ...................................................................................................................................................... 4
1.3.4 Face mask ............................................................................................................................................... 4
1.3.5 Helmet Mount .......................................................................................................................................... 4
1.3.6 Environmental ......................................................................................................................................... 5
1.4
DELIVERY CONSIGNMENT ............................................................................................................................. 5
1.5
TROUBLESHOOTING ...................................................................................................................................... 6
1.6
STORAGE AND TRANSPORTATION ................................................................................................................. 8
1.7
MAINTENANCE AND REPAIR TASKS............................................................................................................... 8
2.
OPERATION...................................................................................................................................................... 9
2.1
DESCRIPTION ................................................................................................................................................ 9
2.1.1 General ................................................................................................................................................... 9
2.1.2 Adjustments and switches ........................................................................................................................ 9
2.1.3 LORIS .................................................................................................................................................... 10
2.1.4 Face mask ............................................................................................................................................. 11
2.1.5 Helmet Mount ........................................................................................................................................ 12
2.1.6 Extended Range Objective 3x................................................................................................................ 13
2.1.7 Weapon Interface .................................................................................................................................. 13
2.1.8 Filters .................................................................................................................................................... 13
2.1.9 Binocular coupling ................................................................................................................................ 13
2.1.10
Carrier bag ....................................................................................................................................... 13
2.1.11
Storage case ...................................................................................................................................... 13
2.2
FIRST TIME USE........................................................................................................................................... 13
2.3
FUNCTIONAL CHECK ................................................................................................................................... 14
2.3.1 The LORIS sight .................................................................................................................................... 14
2.3.2 The face mask ........................................................................................................................................ 14
2.3.3 The helmet mount .................................................................................................................................. 15
2.3.4 The sacrificial window .......................................................................................................................... 15
2.4
SPECIAL CONDITIONS.................................................................................................................................. 15
2.5
OPERATION ................................................................................................................................................ 16
2.5.1 LORIS stand alone ................................................................................................................................ 16
2.5.2 LORIS on face mask .............................................................................................................................. 16
2.5.3 LORIS on helmet mount ........................................................................................................................ 17
2.5.4 LORIS on weapon interface .................................................................................................................. 18
2.5.5 Fitting the filters .................................................................................................................................... 18
2.5.6 Inserting the battery .............................................................................................................................. 18
3.
MAINTENANCE ............................................................................................................................................. 20
3.1
MAINTENANCE AFTER USE ......................................................................................................................... 20
3.1.1 The optical surfaces .............................................................................................................................. 20
3.1.2 The LORIS sight .................................................................................................................................... 20
3.1.3 Face mask, helmet mount, weapon interface, binocular coupling ........................................................ 21
3.2
MAINTENANCE DURING LONG TERM STORAGE ........................................................................................... 21
LORIS
Monocular Night Vision System
User’s Manual
Ref : 667/TME/UM
All information contained in this document is Ring Sights™ property; it may in no case be reproduced, even partly, or communicated to a third party or used for any possible purpose
without Ring Sights™ expressly written permission.
Ring Sights™
P.O.Box 2108, Salisbury, SP2 2BX, UK
Tel: +44 8700 422260
Fax: +44 8700 422261
Email: [email protected]
4.
Revision : 0
Page v
Date : February 15th 2007
REPAIR ............................................................................................................................................................ 22
4.1
4.2
4.3
4.4
4.5
PROTECTION CAP ........................................................................................................................................ 22
EYE CUP ..................................................................................................................................................... 22
FACE MASK ................................................................................................................................................ 23
HELMET MOUNT ......................................................................................................................................... 23
CARRIER BAG SHOULDER BELT ................................................................................................................... 23
List of figures
Figure 1 - Delivery consignment ....................................................................................24
Figure 2 - LORIS sight ...................................................................................................25
Figure 3 - LORIS Face Mask Single ..............................................................................26
Figure 4 - LORIS Face Mask Twin ................................................................................27
Figure 5 - LORIS Helmet Mount Single .........................................................................29
Figure 6 - LORIS Helmet Mount Twin ...........................................................................30
Figure 7 - Binocular Coupling mechanism ....................................................................31
LORIS
Monocular Night Vision System
User’s Manual
Ref : 667/TME/UM
All information contained in this document is Ring Sights™ property; it may in no case be reproduced, even partly, or communicated to a third party or used for any possible purpose
without Ring Sights™ expressly written permission.
Ring Sights™
Revision : 0
Page 1 of 28
P.O.Box 2108, Salisbury, SP2 2BX, UK
Tel: +44 8700 422260
Fax: +44 8700 422261
Email: [email protected]
Date : February 15th 2007
Abbreviations and symbols
C
cm
D
FM
g
HM
IIT
IPD
IR
K
LED
lp/mrad
m
mlux
mm
NiCd
NiMH
nm
NSN
S/N
USAF
VDC
Celsius
centimeter
Dioptre
Face Mask
gram
Helmet Mount
Image Intensifier Tube
InterPupillary Distance
InfraRed
Kelvin
Light Emitting Diode
linepairs per milliradians
meter
milliLux
millimeter
NickleCadmium
Nickle Metal Hydride
nanometer
Nato Stock Number
Serial Number
United States Air Force
Volt Direct Current
Warning sign: can be hazardous to equipment or personnel
LORIS
Monocular Night Vision System
User’s Manual
Ref : 667/TME/UM
All information contained in this document is Ring Sights™ property; it may in no case be reproduced, even partly, or communicated to a third party or used for any possible purpose
without Ring Sights™ expressly written permission.
Ring Sights™
Revision : 0
Page 2 of 28
P.O.Box 2108, Salisbury, SP2 2BX, UK
Tel: +44 8700 422260
Fax: +44 8700 422261
Email: [email protected]
Date : February 15th 2007
List of consumable materials
Alcohol
Benzine
Ether
Lens cleaning tissue
Methanol
Silicagel
LORIS
Monocular Night Vision System
User’s Manual
Ref : 667/TME/UM
All information contained in this document is Ring Sights™ property; it may in no case be reproduced, even partly, or communicated to a third party or used for any possible purpose
without Ring Sights™ expressly written permission.
Ring Sights™
Revision : 0
Page 3 of 28
P.O.Box 2108, Salisbury, SP2 2BX, UK
Tel: +44 8700 422260
Fax: +44 8700 422261
Email: [email protected]
Date : February 15th 2007
1.
General
1.1
Scope
This User’s manual provides the operating and user maintenance instructions of the
OIP Sensor Systems LORIS Monocular Night Vision System. The instructions given in
this manual are limited to the user level. The procedures indicated should be followed
upon receipt of a new equipment and repeated periodically to ensure proper operation.
Details on drawings are indicated in the text by two numbers, meaning figure number
and mark number.
1.2
Description
LORIS is a passive image intensifying device. It uses an image intensifier tube to
amplify the light present at night.
The LORIS Monocular Night Vision System consists of a LORIS 1x observation sight
with integrated battery compartment and a face mask or a helmet mount. The
monocular night vision system can be used by foot soldiers. LORIS will make it
possible to see the terrain at night and recognise a standing man at distances up to
more than 200 m. With LORIS, near infrared light, invisible to the naked eye, for
instance from laser pointers, can be detected.
The sight can be used stand alone, with face mask or helmet mount, or mounted on a
weapon with an optional weapon adapter.
An infrared illuminator (invisible for the naked human eye) built into the sight improves
close distance operations such as map reading or delicate manual work while ambient
light is very low or even not present. A visible red warning light in the eyepiece of the
sight indicates that the infrared illuminator is switched on, to warn that the emitted
infrared light can be detected (e.g. by enemies) with other night vision equipment.
An integrated light sensor switches off the system automatically if submitted to high
light levels. When the light returns to acceptable light levels, the sight will switch on
again automatically. The automatic switch-off feature by the light sensor can be deactivated by turning the switch ring to position II.
A sacrificial window can be fitted in front of the objective. The window can be installed
and removed without special tools.
A protection cap can be placed over the objective for protection. A small hole in the
protection cap allows for use of the LORIS daylight. This is useful for training purposes.
For daylight use, the light sensor has to be de-activated (turn switch ring to position II)
LORIS
Monocular Night Vision System
User’s Manual
Ref : 667/TME/UM
All information contained in this document is Ring Sights™ property; it may in no case be reproduced, even partly, or communicated to a third party or used for any possible purpose
without Ring Sights™ expressly written permission.
Ring Sights™
Revision : 0
Page 4 of 28
P.O.Box 2108, Salisbury, SP2 2BX, UK
Tel: +44 8700 422260
Fax: +44 8700 422261
Email: [email protected]
Date : February 15th 2007
1.3
Specifications
1.3.1
Optical data
Magnification
Focal length objective/eyepiece
F-number objective
T-number objective
Field of view
Focus setting range
Dioptre setting
Exit pupil size
Eyerelief
Infrared illuminator
: 1x ± 3%
: 27.3 mm
: ≤ 1.12
: ≤ 1.3
: 40° ± 2%
: 25 cm to infinity
: adjustable from -6 to +2 dioptre
: 10 mm
: 26 mm
: peak wavelength 880 nm
1.3.2
Mass and Dimensions LORIS sight
Mass
: 323 g
Dimensions
- length without eye cup
: 112 mm
(focused at infinity, dioptre setting at 0D)
- width
: 51 mm
- height
: 72 mm
1.3.3
Power
Battery AA-size
: 1x 1.5 VDC Alkaline
1x 1.24 VDC NiCd
1x 1.24 VDC NiMH
Battery life (at +20°C, Alkaline, IR OFF) : ≥ 48 hours
Polarisation protected
Battery-low indicator in eyepiece
1.3.4
Face mask
Adjustable head, side and chin straps
Sight adjustments
: - height
- elevation
- eyerelief
- left or right eye
Sight can be folded up, out of the visual field. In this position the sight automatically
switches off (flip-up/switch off feature)
1.3.5
Helmet Mount
Adjustable helmet strap
Sight adjustments
: - height
- elevation
- eyerelief
- left or right eye
Sight can be folded up, out of the visual field. In this position the sight automatically
switches off (flip-up/switch off feature)
LORIS
Monocular Night Vision System
User’s Manual
Ref : 667/TME/UM
All information contained in this document is Ring Sights™ property; it may in no case be reproduced, even partly, or communicated to a third party or used for any possible purpose
without Ring Sights™ expressly written permission.
Ring Sights™
Revision : 0
Page 5 of 28
P.O.Box 2108, Salisbury, SP2 2BX, UK
Tel: +44 8700 422260
Fax: +44 8700 422261
Email: [email protected]
Date : February 15th 2007
1.3.6
1.4
Environmental
Operating temperature
Storage temperature
Humidity
Free fall
Immersion
: -32 to +55°C
: -40 to +70°C
: withstands a relative humidity of 95%
: 1 m on a wooden floor
: 20 m water for 1 hour
Delivery consignment
see figure 1: delivery consignment
#
Description
fig. 1
Standard delivery
1
1
1
1
2
1
LORIS
Sacrificial window
User's manual
Lens cleaning cloth
Batteries
Carrier bag
1-1
1-2
1-3
1-4
1-5
1-6
Optionals
Extended range objective 3x
Face mask Single
Face mask Twin
Helmet mount Single
Helmet mount Twin
Weapon interface
Neck lanyard
Laser filter
Minus-blue filter
Binocular coupling
Storage case
LORIS
Monocular Night Vision System
1-7
1-8
1-9
1-10
1-11
User’s Manual
Ref : 667/TME/UM
All information contained in this document is Ring Sights™ property; it may in no case be reproduced, even partly, or communicated to a third party or used for any possible purpose
without Ring Sights™ expressly written permission.
Ring Sights™
Revision : 0
Page 6 of 28
P.O.Box 2108, Salisbury, SP2 2BX, UK
Tel: +44 8700 422260
Fax: +44 8700 422261
Email: [email protected]
Date : February 15th 2007
1.5
Troubleshooting
Failure
Possible cause
Corrective action
Warning LED in eyepiece
is blinking
* Battery empty
* Replace battery
* Defective electronics
* Battery empty
* Too much ambient light
* Send out for repair
* Replace battery
* Use the system in an
environment with less
ambient light
* Send out for repair
No night vision image
Night image not sharply
focused
No infrared light (IR-LED)
Warning LED not active
when IR-LED is switched
on
Battery compartment does
not close
Protection cap damaged or
does not fit
Identification plate missing
or illegible
Face mask cannot be fixed
on the head
Face mask front pad
damaged
Helmet mount cannot be
fixed on the helmet
External or internal
physical damage
LORIS
Monocular Night Vision System
* Image intensifier tube
defective
* Defective electronics
* Objective not focused
* Eyepiece not correctly
adjusted
* Grease, dirt or
condensation on
external lens surfaces
* Condensation on
internal surfaces
* Defective or
misadjusted optics
* Object too far away
* Defective electronics
* Defective electronics
* Cap defective or
missing
* Battery compartment
defective
* Send out for repair
* Focus the objective
* Adjust dioptre setting of
the eyepiece
* Clean external lens
surfaces
* Send out for repair
* Send out for repair
* Work at a closer
distance
* Send out for repair
* Send out for repair
* Send out for repair
* Send out for repair
* Replace protection cap
* Send out for repair
* Defective straps
* Defective headband
* Replace straps
* Send out for repair
* Replace front pad
* Defective strap
* Defective strainer
* Send out for repair
* Send out for repair
* Send out for repair
User’s Manual
Ref : 667/TME/UM
All information contained in this document is Ring Sights™ property; it may in no case be reproduced, even partly, or communicated to a third party or used for any possible purpose
without Ring Sights™ expressly written permission.
Ring Sights™
Revision : 0
Page 7 of 28
P.O.Box 2108, Salisbury, SP2 2BX, UK
Tel: +44 8700 422260
Fax: +44 8700 422261
Email: [email protected]
Date : February 15th 2007
LORIS
Monocular Night Vision System
User’s Manual
Ref : 667/TME/UM
All information contained in this document is Ring Sights™ property; it may in no case be reproduced, even partly, or communicated to a third party or used for any possible purpose
without Ring Sights™ expressly written permission.
Ring Sights™
Revision : 0
Page 8 of 28
P.O.Box 2108, Salisbury, SP2 2BX, UK
Tel: +44 8700 422260
Fax: +44 8700 422261
Email: [email protected]
Date : February 15th 2007
1.6
Storage and transportation
The instrument can be stored in the carrier bag, when the instrument is in regular use.
The battery must be removed from the instrument during storage and can be placed in
the intended compartment in the carrier bag.
When the instrument is stored unused for a longer period (more than 1month) put
silicagel (NSN 6850.12.130.3339) in the carrier bag. Check the silicagel at least every
6 months and replace when necessary.
Minimum and maximum storage temperatures are specified in par. 1.3.6 of this
manual. However, it is recommended to store the equipment at room temperature.
For storage over a period longer than 2 years, refer to the logistic unit.
LORIS should be transported in the carrier bag. This bag protects the device against
normal shocks and vibrations.
When the system is transported by vehicle, it is advisable to store it in a storage case
(optional) to protect the system against excessive shocks and vibrations.
1.7
Maintenance and repair tasks
Task
Duration
(man hours)
Type
Par.
Cleaning of optical surfaces
Cleaning of the LORIS sight
Cleaning of face mask
Cleaning of helmet mount
Cleaning of weapon interface
Cleaning of binocular coupling
Maintenance during long term storage
Replacing the protection cap
Replacing the eye cup
Replacing the face mask head strap
Replacing the face mask chin strap
Replacing the face mask front pad
Replacing the helmet mount helmet strap
Replacing the carrier bag shoulder belt
10 minutes
5 minutes
5 minutes
5 minutes
1 minute
1 minute
30 minutes
1 minute
1 minute
2 minutes
2 minutes
1 minute
2 minutes
1 minute
maintenance
maintenance
maintenance
maintenance
maintenance
maintenance
maintenance
repair
repair
repair
repair
repair
repair
repair
3.1.1
3.1.2
3.1.3
3.1.3
3.1.3
3.1.3
3.2
4.1
4.2
4.3
4.3
4.3
4.4
4.5
LORIS
Monocular Night Vision System
User’s Manual
Ref : 667/TME/UM
All information contained in this document is Ring Sights™ property; it may in no case be reproduced, even partly, or communicated to a third party or used for any possible purpose
without Ring Sights™ expressly written permission.
Ring Sights™
Revision : 0
Page 9 of 28
P.O.Box 2108, Salisbury, SP2 2BX, UK
Tel: +44 8700 422260
Fax: +44 8700 422261
Email: [email protected]
Date : February 15th 2007
2.
Operation
2.1
Description
2.1.1
General
The LORIS Monocular Night Vision System, in its standard configuration, consists of
the following major parts :
- 1 LORIS
- 1 set of accessories (sacrificial window, cleaning cloth, user’s manual, batteries)
- 1 carrier bag
2.1.2
Adjustments and switches
The following adjustments and switches are present on the LORIS Monocular Night
Vision System (see figure 1):
Action
• Night vision ON & light sensor
active
• Night vision + IR-LED ON
• Focusing
• Dioptre adjustment
• Adjusting the height
- on face mask
- on helmet mount
• Adjusting the eye relief
- on face mask
- on helmet mount
• Adjusting the elevation
(on face mask or helmet mount)
• Select left or right eye
(on face mask or helmet mount)
LORIS
Monocular Night Vision System
Done with
Turn witch ring on sight to position I
Fig.
2-4
Turn switch ring on sight to position
II and simultaneously push the stop
button (note : this position deactivates the light sensor)
Turn the focus ring on the objective
Turn the dioptre setting ring on the
eyepiece
2-4
2-6
2-2
- adjust the length of the side straps
and head strap
- slide the height regulator
3-1/4-1
3-8/4-8
5-3/6-3
- slide the depth regulator,
simultaneously pushing the button
- adjust the friction coupling
Adjust the friction coupling
3-4/4-4
Turn the friction coupling
5-4/6-4
3-5/4-5
5-4/6-4
3-5/4-5
5-4/6-4
User’s Manual
Ref : 667/TME/UM
All information contained in this document is Ring Sights™ property; it may in no case be reproduced, even partly, or communicated to a third party or used for any possible purpose
without Ring Sights™ expressly written permission.
Ring Sights™
Revision : 0
Page 10 of 28
P.O.Box 2108, Salisbury, SP2 2BX, UK
Tel: +44 8700 422260
Fax: +44 8700 422261
Email: [email protected]
Date : February 15th 2007
2.1.3
LORIS
The LORIS consists of four parts (see figure 2):
- Objective
- Body with image intensifier tube and interface connection
- Eyepiece
- Integrated battery compartment with IR-LED and light sensor
The objective forms an image of the scene on the image intensifier tube. The image
intensifier tube forms an amplified image on its phosphor screen. This amplified image
is viewed through the eyepiece.
An infrared illuminator (IR-LED) is built into the sight. Its light is invisible to the naked
eye. The illuminator facilitates close distance operations such as map reading or
delicate manual work while ambient light is very low or even not present.
An integrated light sensor switches off the system automatically if submitted to high
light levels. When the light returns to acceptable light levels, the sight will switch on
again automatically. The automatic switch-off feature of the light sensor can be deactivated by turning the switch ring to position II.
2.1.3.1 Objective
The objective can be focused on objects at distances between 25 cm and infinity.
Focusing is done by turning the focus ring.
A protection cap can be placed over the objective to protect the optics when the system
is not in use. The protection cap has a small hole allowing the sight to be used in
daylight. This is useful for training purposes.
A sacrificial window can be fitted in front of the objective to protect the front lens.
2.1.3.2 Eyepiece
The eyepiece can be adjusted for the individual user's eye by turning the dioptre setting
ring. The eyepiece can be set from -5 to +2 dioptres.
The eyepiece is fitted with an eye cup. This eye cup prevents light leakage, that would
make the user visible for the enemy. The eye cup can be easily removed.
When the IR-LED is switched on, a warning LED will light up in the eyepiece. This
alerts the user to the fact that he or she can be detected with night vision equipment.
When the batteries need replacing, the warning LED in the eyepiece will start to blink.
LORIS
Monocular Night Vision System
User’s Manual
Ref : 667/TME/UM
All information contained in this document is Ring Sights™ property; it may in no case be reproduced, even partly, or communicated to a third party or used for any possible purpose
without Ring Sights™ expressly written permission.
Ring Sights™
Revision : 0
Page 11 of 28
P.O.Box 2108, Salisbury, SP2 2BX, UK
Tel: +44 8700 422260
Fax: +44 8700 422261
Email: [email protected]
Date : February 15th 2007
2.1.3.3 Switch ring
The switch ring has three positions :
0 OFF
l
Image intensifier tube ON & light sensor active
II Image intensifier tube ON, infrared illuminator ON & light sensor de-activated
To set the switch ring in position II, the stop button has to be pushed simultaneously
while turning the ring.
2.1.3.4 Light Sensor
An integrated light sensor switches off the system automatically if submitted to high
light levels. When the light returns to acceptable light levels, the sight will switch on
again automatically.
The automatic switch-off feature can be de-activated by turning the switch ring to
position II, for example for day training purposes (with protection cap
placed on objective).
WARNING : in position II, be careful to protect the system for high light levels as
the light sensor function which protects the systems is not active.
2.1.3.5 Flip-up/Switch-off feature
LORIS is equipped with a flip-up/switch-off feature. When LORIS, attached to a
facemask or helmet mount, is flipped up out of the field of view, it automatically
switches off.
When the sight is placed back in front of the eye, it needs to be switched on again with
the rotary switch. Just turn the rotary switch to OFF position (position O) and back to
the ON position (position I).
2.1.3.6 Battery compartment
The battery compartment can hold one AA size battery. The system is protected
against inserting the battery with incorrect polarisation.
2.1.4
Face mask
The face mask allows for wearing LORIS on the head. Removable pads, attached with
velcro, ensure a comfortable fit. The face mask can be adjusted to the head by means
of adjustable head, side and chin straps.
The sight clicks into the mounting bracket of the friction coupling on the front of the
face mask.
LORIS
Monocular Night Vision System
User’s Manual
Ref : 667/TME/UM
All information contained in this document is Ring Sights™ property; it may in no case be reproduced, even partly, or communicated to a third party or used for any possible purpose
without Ring Sights™ expressly written permission.
Ring Sights™
Revision : 0
Page 12 of 28
P.O.Box 2108, Salisbury, SP2 2BX, UK
Tel: +44 8700 422260
Fax: +44 8700 422261
Email: [email protected]
Date : February 15th 2007
Following adjustments to the position of the sight with respect to the head can be made
with the head strap, friction coupling and depth regulator:
• eyerelief
• height
• elevation
• left or right eye
The sight can be folded up, out of the visual range. It can easily be folded back in front
of the eyes without the need for readjustment of its position.
The face mask has a flip-up/switch-off feature : when folded up out of the field of view,
the LORIS switches off automatically. To switch on the LORIS again, turn the switch
ring to position O and again to position I.
The face mask exists in 2 configurations :
•
•
2.1.5
Face mask single : for coupling one LORIS monocular
Face mask twin : for coupling two LORIS monoculars and use the system as a
binocular night vision system.
Helmet Mount
The helmet mount allows for wearing LORIS on a helmet.
The helmet mount can be adjusted to the helmet by means of the helmet strap and
strainer.
The sight clicks into the mounting bracket of the friction coupling on the front of the
helmet mount.
Following adjustments to the position of the sight with respect to the head can be made
with the friction coupling:
• eyerelief
• height
• elevation
• left or right eye
The sight can be folded up, out of the visual range. It can easily be folded back in front
of the eyes without the need for readjustment of its position.
The helmet mount has a flip-up/switch-off feature : when folded up out of the field of
view, the LORIS switches off automatically. To switch on the LORIS again, turn the
switch ring to position O and back to position I.
The helmet mount exists in 2 configurations :
•
•
Helmet mount single : for coupling one LORIS monocular
Helmet mount twin : for coupling two LORIS monoculars and use the system as a
binocular night vision system.
LORIS
Monocular Night Vision System
User’s Manual
Ref : 667/TME/UM
All information contained in this document is Ring Sights™ property; it may in no case be reproduced, even partly, or communicated to a third party or used for any possible purpose
without Ring Sights™ expressly written permission.
Ring Sights™
Revision : 0
Page 13 of 28
P.O.Box 2108, Salisbury, SP2 2BX, UK
Tel: +44 8700 422260
Fax: +44 8700 422261
Email: [email protected]
Date : February 15th 2007
2.1.6
Extended Range Objective 3x
An extended range objective with 3x magnification can be placed on the LORIS
objective, to increase the magnification and range of the night vision monocular. The
Extended range objective screws onto the LORIS objective.
2.1.7
Weapon Interface
The LORIS monocular can be mounted on a weapon by means of a specially designed
weapon interface for Picatinney Rail. The weapon interface is mounted on the LORIS
monocular interface connection.
2.1.8
Filters
Following filters can be delivered :
- Sacrificial window (standard deliverable)
- Laser filter STANAG 4401 (option)
- Minus-blue filter : according to MIL-L-85762A, class B (option)
2.1.9
Binocular coupling
A coupling mechanism, permitting to couple 2 LORIS monoculars to obtain a stereo
handheld binocular can be delivered as an option.
2.1.10
Carrier bag
The carrier bag is a soft case in which the complete system and its accessories (see
par. 1.6.) can be safely put away for storage and/or transportation.
The carrier bag has an adjustable and removable shoulder strap.
2.1.11
Storage case
The storage case (optional) is a hard case in which the complete system, its
accessories and the carrier bag can be safely put away for storage and/or
transportation.
2.2
First time use
a.
b.
c.
d.
e.
f.
g.
Verify that the shipment is complete (see par. 1.4) and undamaged.
Study the operating procedure (par 2.5) and safety measures (page ii).
Insert the battery into the battery compartment conform to the polarity indications
(see par 2.5.6)
Perform the functional check (par.2.3)
After use : switch off the sight and remove the battery.
If necessary clean and/or dry the equipment (par. 3.1)
Store the equipment in the carrier bag.
LORIS
Monocular Night Vision System
User’s Manual
Ref : 667/TME/UM
All information contained in this document is Ring Sights™ property; it may in no case be reproduced, even partly, or communicated to a third party or used for any possible purpose
without Ring Sights™ expressly written permission.
Ring Sights™
Revision : 0
Page 14 of 28
P.O.Box 2108, Salisbury, SP2 2BX, UK
Tel: +44 8700 422260
Fax: +44 8700 422261
Email: [email protected]
Date : February 15th 2007
2.3
Functional check
2.3.1
The LORIS sight
Remove the protection cap only in subdued light.
Never point the instrument towards a bright light source such as the
sun, a searchlight, or any brightly reflecting surface, even when the
protection cap is fitted.
a.
b.
c.
d.
e.
f.
g.
h.
2.3.2
Insert the battery into the battery compartment conform to the polarity indications
(see par 2.5.6.)
Check that the eyepiece dioptre setting ring (2-2) of the sight rotates smoothly.
Check that the objective focus ring (2-6) of the sight rotates smoothly.
Check that the image intensifier tube lights up and that the warning LED in the
eyepiece is not blinking when the switch ring (2-4) is set in position I.
Look through the eyepiece and check that the eyepiece can be focused (2-6) on
the grain of the screen of the image intensifier tube.
Aim the sight to a suitable object (approx. 50 m) and observe the image. With the
dioptre and focus controls adjusted to maximum resolution, the image must be
sharp and may not show unacceptable disturbing dark or light spots in the central
part of the image
Check that the IR-LED and the warning LED light up when the switch ring is set in
position II. Simultaneously push the stop button (2-5) while rotating the switch ring.
Light from the IR-LED can not be seen with the naked eye. Focus at a nearby
object (less than 1 m) and look through the sight to check if the IR-LED is switched
on.
Cover the objective with its protection cap and check that the system switches off
automatically if submitted to a sudden high light level and it switches on again
automatically when the light level is reduced.
The face mask
a. Check that it is possible to adjust the lengths of head strap (3-1/4-1), side straps
(3-8/4-8) and chin strap (3-7/4-7).
b. Fit the sight on the face mask (par. 2.5.2).
c. Check that the depth regulator (3-4/4-4) can be adjusted.
d. Check that the sight can be adjusted in height and elevation and that it can be
placed in front of either eye.
e. Put the sight in the normal viewing position and check that the image intensifier
lights up when the sight is switched on.
f. Fold the sight upwards out of the field of view and check that the sight switches off
automatically.
LORIS
Monocular Night Vision System
User’s Manual
Ref : 667/TME/UM
All information contained in this document is Ring Sights™ property; it may in no case be reproduced, even partly, or communicated to a third party or used for any possible purpose
without Ring Sights™ expressly written permission.
Ring Sights™
Revision : 0
Page 15 of 28
P.O.Box 2108, Salisbury, SP2 2BX, UK
Tel: +44 8700 422260
Fax: +44 8700 422261
Email: [email protected]
Date : February 15th 2007
2.3.3
The helmet mount
g. Check that it is possible to adjust the length of the helmet strap (5-2/6-2) and to
tighten the strainer (5-1/6-1).
h. Fit the sight on the helmet mount (par. 2.5.3).
i. Check that the sight can be adjusted in height and elevation and that it can be
placed in front of either eye.
j. Put the sight in the normal viewing position and check that the image intensifier
lights up when the sight is switched on.
k. Fold the sight upwards out of the field of view and check that the sight switches off
automatically.
2.3.4
The sacrificial window
a. Check that the sacrificial window (1-2) can be fit in front of the objective.
b. Check that sight still functions normally with the sacrificial window installed (par.
2.3.1, steps e through h).
2.4
Special conditions
Fit the sacrificial window when damage to the front lens can be expected, for example
due to:
• dust or sand in the air
• branches
LORIS
Monocular Night Vision System
User’s Manual
Ref : 667/TME/UM
All information contained in this document is Ring Sights™ property; it may in no case be reproduced, even partly, or communicated to a third party or used for any possible purpose
without Ring Sights™ expressly written permission.
Ring Sights™
Revision : 0
Page 16 of 28
P.O.Box 2108, Salisbury, SP2 2BX, UK
Tel: +44 8700 422260
Fax: +44 8700 422261
Email: [email protected]
Date : February 15th 2007
2.5
Operation
Remove the protection cap only in subdued light
Never point the instrument towards a bright light source such as: the
sun, a searchlight, or any brightly reflecting surface, even when the
front lens cover is on.
2.5.1
LORIS stand alone
a. Fit the sacrificial window (1-2) in front of the objective of the sight, if required
b. Check that the protection cap (2-7) is placed over the 1x objective of the sight
c. Insert the battery into the battery compartment (2-8) conform to the polarity
indications (see par 2.5.6)
d. Switch on the LORIS by setting the switch ring (2-4) to position I.
e. Check that the battery-low indicator in the eyepiece of the sight does not blink
f. Look through the eyepiece and adjust the dioptre setting ring (2-2) so that the
grain of the screen of the image intensifier is seen perfectly sharp.
g. Remove the protection cap (only in darkness or subdued light).
h. Switch on the infrared illuminator if required by setting the switch ring to position II
while pushing the stop button (2-5).
i. Look at the scene to be observed and turn the focus ring (2-6) on the objective
until the scene is sharply focused.
After use:
a. Switch off the equipment by setting the switch ring to position 0
b. Replace the protection cap
c. Remove the battery
d. Clean and dry the equipment, if necessary (par 3.1)
e. Repack the equipment into the carrier bag
2.5.2
LORIS on face mask
Adjusting the face mask. This only needs to be done the first time the face mask is
used.
a. Before donning the face mask check that all the straps are straight and not twisted.
b. Check that the front pad (3-3/4-3) is secured to the face mask with velcro.
c. Adjust all the straps to their maximum length.
d. Unlock the chin buckle (3-6/4-6) of the chin strap (3-7/4-7).
e. Put the facemask on the head, adjust the length of the head strap (3-1/4-1) until it
fits precisely on the head.
f. Fasten the chin strap.
g. Adjust the length of side straps (3-8/4-8) and the chin strap until the facemask fits
tightly and rests securely on the head. Keep the straps on both sides of the head
of equal length. Make sure that the ears remain free.
h. To remove the facemask, just unfasten the chin buckle (3-6/4-6). Do not adjust the
length of any of the straps.
LORIS
Monocular Night Vision System
User’s Manual
Ref : 667/TME/UM
All information contained in this document is Ring Sights™ property; it may in no case be reproduced, even partly, or communicated to a third party or used for any possible purpose
without Ring Sights™ expressly written permission.
Ring Sights™
Revision : 0
Page 17 of 28
P.O.Box 2108, Salisbury, SP2 2BX, UK
Tel: +44 8700 422260
Fax: +44 8700 422261
Email: [email protected]
Date : February 15th 2007
Adjusting the LORIS on the face mask :
a.
b.
c.
Fit the sacrificial window (1-2) in front of the objective of the sight, if required
Check that the protection cap (2-7) is placed over the 1x objective of the sight
Insert the battery into the battery compartment conform to the polarity indications
(see par 2.5.6)
d. Slide the sight on the mounting bracket of the friction coupling (3-9/4-9) of the face
mask.
e. Place the face mask on the head.
f. Position the instrument in front of the right or left eye and adjust its elevation with
the friction coupling. The sight should be at the correct height. If not, the head
strap has to be adjusted.
g. Slide the instrument towards the face while pushing both push buttons on the
depth regulator (3-4/4-4), until the eye cups fit comfortably without exerting too
much pressure.
NOTE: It is very important that the sight is positioned centrally in front of the eye
to prevent fatigue when using LORIS continuously for several hours.
h. Switch on the LORIS by setting the switch ring (2-4) to position I.
i. Check that the battery-low indicator in the eyepiece of the sight does not blink,
otherwise replace the batteries.
j. Look through the eyepiece and adjust the dioptre setting ring (2-2) so that the
grain of the screen of the image intensifier is seen perfectly sharp.
k. Remove the protection cap (only in darkness or subdued light).
l. Switch on the infrared illuminator if required by setting the switch ring (2-4) to
position II while pushing the stop button (2-5).
m. Look at the scene to be observed and turn the focus ring (2-6) on the objective
until the scene is sharply focused.
n. The friction coupling allows for the LORIS to be folded up out of the field of view.
Check that in this position the sight switches off automatically (flip-up/switch-off
feature). The sight can easily be folded back in front of the eye without the need
for readjustment of its position. To switch on the sight again after the automatic
flip-up/switch-off : turn the switch ring to position O and then to position I.
After use:
a. Switch off the equipment by setting the switch ring to position 0
b. Replace the protection cap
c. Remove the battery
d. Press the release catch (3-10/4-10) to detach the LORIS.
e. Clean and dry the equipment, if necessary (par 3.1)
f. Repack the equipment into the carrier bag
2.5.3
LORIS on helmet mount
a. Before mounting the helmet mount check that the helmet strap (5-2/6-2) is straight
and not twisted.
b. Loosen the strainer (5-1/6-1) and adjust the strap to its maximum length.
c. Fit the clamps of the helmet mount over the rim of the helmet; make sure that the
clamps are well centred on the helmet.
d. Pull the strap tight and then close the strainer.
LORIS
Monocular Night Vision System
User’s Manual
Ref : 667/TME/UM
All information contained in this document is Ring Sights™ property; it may in no case be reproduced, even partly, or communicated to a third party or used for any possible purpose
without Ring Sights™ expressly written permission.
Ring Sights™
Revision : 0
Page 18 of 28
P.O.Box 2108, Salisbury, SP2 2BX, UK
Tel: +44 8700 422260
Fax: +44 8700 422261
Email: [email protected]
Date : February 15th 2007
Adjusting the LORIS on the helmet mount :
a.
b.
c.
Fit the sacrificial window (1-2) in front of the objective of the sight, if required
Check that the protection cap (2-7) is placed over the 1x objective of the sight
Insert the battery into the battery compartment conform to the polarity indications
(see par 2.5.6)
d. Slide the sight on the mounting bracket of the friction coupling (5-4/6-4) of the
helmet mount.
e. Place the helmet on the head.
f. Position the instrument in front of the right or left eye and adjust its elevation,
height and eye relief with the friction coupling.
NOTE: It is very important that the sight is positioned centrally in front of the eye
to prevent fatigue when using LORIS continuously for several hours.
g. Switch on the LORIS by setting the switch ring (2-4) to position I.
h. Check that the battery-low indicator in the eyepiece of the sight does not blink,
otherwise replace the batteries.
i. Look through the eyepiece and adjust the dioptre setting ring (2-2) so that the
grain of the screen of the image intensifier is seen perfectly sharp.
j. Remove the protection cap (only in darkness or subdued light).
k. Switch on the infrared illuminator if required by setting the switch ring (2-4) to
position II while pushing the stop button (2-5).
l. Look at the scene to be observed and turn the focus ring (2-6) on the objective
until the scene is sharply focused.
m. The friction coupling allows for the LORIS to be folded up out of the field of view.
Check that in this position the sight switches off automatically (flip-up/switch-off
feature). The sight can easily be folded back in front of the eye without the need
for readjustment of its position. To switch on the sight again after the automatic
flip-up/switch-off : turn the switch ring to position O and then to position I.
After use:
a. Switch off the equipment by setting the switch ring to position 0
b. Replace the protection cap
c. Remove the battery
d. Press the release catch (5-6/6-6) to detach the LORIS.
e. Clean and dry the equipment, if necessary (par 3.1)
f. Repack the equipment into the carrier bag
2.5.4
LORIS on weapon interface
The standard weapon interface is designed for mounting LORIS on a weapon equipped
with a Picatinney rail.
2.5.5
Fitting the filters
The sacrificial window (1-2), laser filter or minus-blue filter is screwed into the objective
housing in front of the objective.
2.5.6
Inserting the battery
a. Unscrew the cap from the battery compartment (2-8).
b. Check that the inside of the battery compartment is clean and dry.
LORIS
Monocular Night Vision System
User’s Manual
Ref : 667/TME/UM
All information contained in this document is Ring Sights™ property; it may in no case be reproduced, even partly, or communicated to a third party or used for any possible purpose
without Ring Sights™ expressly written permission.
Ring Sights™
Revision : 0
Page 19 of 28
P.O.Box 2108, Salisbury, SP2 2BX, UK
Tel: +44 8700 422260
Fax: +44 8700 422261
Email: [email protected]
Date : February 15th 2007
c.
d.
Insert the battery in the compartment according to the drawing on the side of the
compartment.
Firmly screw the cap back on.
LORIS
Monocular Night Vision System
User’s Manual
Ref : 667/TME/UM
All information contained in this document is Ring Sights™ property; it may in no case be reproduced, even partly, or communicated to a third party or used for any possible purpose
without Ring Sights™ expressly written permission.
Ring Sights™
Revision : 0
Page 20 of 28
P.O.Box 2108, Salisbury, SP2 2BX, UK
Tel: +44 8700 422260
Fax: +44 8700 422261
Email: [email protected]
Date : February 15th 2007
3.
Maintenance
3.1
Maintenance after use
After use, the battery should be removed and the equipment should be thoroughly
cleaned and dried before repackaging it in its carrier bag.
3.1.1
The optical surfaces
Do not clean any optical surfaces if not necessary
1. Remove loose dirt, sand and dust particles from the glass surface by blowing or with
a lens brush.
2. If contamination is severe, rinse the glass surface in demineralised water; do not rub
the surface when there are dirt particles adhering to it because this will cause
damage to the surface.
3. Remove grease stains by means of a suitable lens cleaning liquid like a
methanol/ether mixture and lens cleaning paper or a lens cleaning cloth like the one
provided (1-4). If using lens cleaning paper, make a wad from several sheets of
paper. Apply a drop of cleaning liquid to the cleaning cloth and gently rub the lens
surface with the moistened part.
4. Gently wipe the glass surface dry with a dry part of the cloth or a fresh dry lens
cleaning paper.
3.1.2
The LORIS sight
Do not touch any optical surfaces while cleaning the sight.
1. Remove loose dirt, sand particles, etc.
2. If contamination is severe, fit the sacrificial window, close the battery compartment
and rinse the instrument under a jet of cold tap water (10 to 30°C).
3. Wipe the instrument clean with a clean, soft, damp cloth. Do not use the lens
cleaning cloth!
4. Wipe the instrument dry with a clean, soft, dry cloth. Do not use the lens cleaning
cloth!
LORIS
Monocular Night Vision System
User’s Manual
Ref : 667/TME/UM
All information contained in this document is Ring Sights™ property; it may in no case be reproduced, even partly, or communicated to a third party or used for any possible purpose
without Ring Sights™ expressly written permission.
Ring Sights™
Revision : 0
Page 21 of 28
P.O.Box 2108, Salisbury, SP2 2BX, UK
Tel: +44 8700 422260
Fax: +44 8700 422261
Email: [email protected]
Date : February 15th 2007
3.1.3
Face mask, helmet mount, weapon interface, binocular coupling
1. Remove loose dirt, sand particles, etc.
2. If contamination is severe, remove the front pad and rinse the parts under a jet of
cold tap water (10 to 30°C).
3. Wipe the parts clean with a clean, soft, damp cloth. Do not use the lens cleaning
cloth!
4. Wipe the parts dry with a clean, soft, dry cloth. Do not use the lens cleaning cloth!
5. Replace the front pad of the face mask if necessary.
3.2
Maintenance during long term storage
It is recommended to take the instrument out of the storage case every two years to
perform the following procedure :
-
Reflush the instrument with dry nitrogen ; this is to be performed by skilled
technicians or by the manufacturer.
Perform a visual and functional check (par. 2.3)
Repack the instrument (without batteries).
LORIS
Monocular Night Vision System
User’s Manual
Ref : 667/TME/UM
All information contained in this document is Ring Sights™ property; it may in no case be reproduced, even partly, or communicated to a third party or used for any possible purpose
without Ring Sights™ expressly written permission.
Ring Sights™
Revision : 0
Page 22 of 28
P.O.Box 2108, Salisbury, SP2 2BX, UK
Tel: +44 8700 422260
Fax: +44 8700 422261
Email: [email protected]
Date : February 15th 2007
4.
Repair
Under no circumstances it is allowed to open the instrument, except to replace the
battery. Either repairs must be done at depot level by skilled technicians or the
instrument must be returned to the manufacturer or his representatives.
Any part removed from the carrier bag/transport case should be replaced as soon as
possible so that a complete set is always available.
No special tools are needed for any of the following repairs :
4.1
Protection cap
The protection cap is
secured to the objective with
a rubber ring that fits in a
groove in the focus ring. The
protection cap can easily be
removed and replaced
without special tools.
4.2
Eye cup
The eye cup assy clicks in the
eyepiece of the sight. Pull to remove
it.
LORIS
Monocular Night Vision System
User’s Manual
Ref : 667/TME/UM
All information contained in this document is Ring Sights™ property; it may in no case be reproduced, even partly, or communicated to a third party or used for any possible purpose
without Ring Sights™ expressly written permission.
Ring Sights™
Revision : 0
Page 23 of 28
P.O.Box 2108, Salisbury, SP2 2BX, UK
Tel: +44 8700 422260
Fax: +44 8700 422261
Email: [email protected]
Date : February 15th 2007
4.3
Face mask
Head strap and chin strap
The head and chin strap is removed
by loosening the velcro and detaching
the side straps.
Front Pad
The front pad is attached to the face
mask with velcro and can easily be
replaced.
4.4
Helmet mount
Helmet strap
The helmet strap of the helmet mount can
easily be removed and replaced without
special tools.
4.5
Carrier bag shoulder belt
The shoulder belt of the carrier bag is removed by
unhooking the belt.
LORIS
Monocular Night Vision System
User’s Manual
Ref : 667/TME/UM
All information contained in this document is Ring Sights™ property; it may in no case be reproduced, even partly, or communicated to a third party or used for any possible purpose
without Ring Sights™ expressly written permission.
Ring Sights™
Revision : 0
Page 24 of 28
P.O.Box 2108, Salisbury, SP2 2BX, UK
Tel: +44 8700 422260
Fax: +44 8700 422261
Email: [email protected]
Date : February 15th 2007
Figure 1 - Delivery consignment
1
Standard delivery
LORIS MONOCULAR
7
EXTENDED RANGE OBJECTIVE 3X
2
SACRIFICIAL WINDOW
8
FACE MASK SINGLE
3
USER’S MANUAL
9
FACE MASK TWIN
4
LENS CLEANING CLOTH
10
HELMET MOUNT SINGLE
5
BATTERIES
11
HELMET MOUNT TWIN
6
CARRIER BAG
LORIS
Monocular Night Vision System
Optionals
*
NECK LANYARD
*
LASER FILTER
*
MINUS-BLUE FILTER
*
BINOCULAR COUPLING
*
STORAGE CASE
*
WEAPON INTERFACE
User’s Manual
Ref : 667/TME/UM
All information contained in this document is Ring Sights™ property; it may in no case be reproduced, even partly, or communicated to a third party or used for any possible purpose
without Ring Sights™ expressly written permission.
Ring Sights™
Revision : 0
Page 25 of 28
P.O.Box 2108, Salisbury, SP2 2BX, UK
Tel: +44 8700 422260
Fax: +44 8700 422261
Email: [email protected]
Date : February 15th 2007
* Not Illustrated
Figure 2 - LORIS sight
1
EYECUP
6
FOCUS RING
2
DIOPTRE RING
7
PROTECTION CAP
3
INTERFACE CONNECTION
8
BATTERY COMPARTMENT
4
SWITCH RING
9
IR LIGHT SOURCE
5
STOP BUTTON
10
LIGHT SENSOR
LORIS
Monocular Night Vision System
User’s Manual
Ref : 667/TME/UM
All information contained in this document is Ring Sights™ property; it may in no case be reproduced, even partly, or communicated to a third party or used for any possible purpose
without Ring Sights™ expressly written permission.
Ring Sights™
Revision : 0
Page 26 of 28
P.O.Box 2108, Salisbury, SP2 2BX, UK
Tel: +44 8700 422260
Fax: +44 8700 422261
Email: [email protected]
Date : February 15th 2007
Figure 3 - LORIS Face Mask Single
1
HEAD STRAP
6
CHIN BUCKLE
2
HEAD BAND
7
CHINSTRAP
3
FRONT PAD
8
SIDE STRAP
LORIS
Monocular Night Vision System
User’s Manual
Ref : 667/TME/UM
All information contained in this document is Ring Sights™ property; it may in no case be reproduced, even partly, or communicated to a third party or used for any possible purpose
without Ring Sights™ expressly written permission.
Ring Sights™
Revision : 0
Page 27 of 28
P.O.Box 2108, Salisbury, SP2 2BX, UK
Tel: +44 8700 422260
Fax: +44 8700 422261
Email: [email protected]
Date : February 15th 2007
4
DEPTH REGULATOR
9
MOUNTING BRACKET
5
FRICTION COUPLING
10
RELEASE CATCH
Figure 4 - LORIS Face Mask Twin
1
HEAD STRAP
6
CHIN BUCKLE
2
HEAD BAND
7
CHINSTRAP
LORIS
Monocular Night Vision System
User’s Manual
Ref : 667/TME/UM
All information contained in this document is Ring Sights™ property; it may in no case be reproduced, even partly, or communicated to a third party or used for any possible purpose
without Ring Sights™ expressly written permission.
Ring Sights™
Revision : 0
Page 28 of 28
P.O.Box 2108, Salisbury, SP2 2BX, UK
Tel: +44 8700 422260
Fax: +44 8700 422261
Email: [email protected]
Date : February 15th 2007
3
FRONT PAD
8
SIDE STRAP
4
DEPTH REGULATOR
9
MOUNTING BRACKET
5
FRICTION COUPLING
10
RELEASE CATCH
LORIS
Monocular Night Vision System
User’s Manual
Ref : 667/TME/UM
All information contained in this document is Ring Sights™ property; it may in no case be reproduced, even partly, or communicated to a third party or used for any possible purpose
without Ring Sights™ expressly written permission.
Ring Sights™
Revision : 0
Page 29 of 28
P.O.Box 2108, Salisbury, SP2 2BX, UK
Tel: +44 8700 422260
Fax: +44 8700 422261
Email: [email protected]
Date : February 15th 2007
Figure 5 - LORIS Helmet Mount Single
1
STRAINER
4
FRICTION COUPLING
2
HELMET STRAP
5
MOUNTING BRACKET
3
HEIGHT REGULATOR
6
RELEASE CATCH
LORIS
Monocular Night Vision System
User’s Manual
Ref : 667/TME/UM
All information contained in this document is Ring Sights™ property; it may in no case be reproduced, even partly, or communicated to a third party or used for any possible purpose
without Ring Sights™ expressly written permission.
Ring Sights™
Revision : 0
Page 30 of 28
P.O.Box 2108, Salisbury, SP2 2BX, UK
Tel: +44 8700 422260
Fax: +44 8700 422261
Email: [email protected]
Date : February 15th 2007
Figure 6 - LORIS Helmet Mount Twin
1
STRAINER
4
FRICTION COUPLING
2
HELMET STRAP
5
MOUNTING BRACKET
3
HEIGHT REGULATOR
6
RELEASE CATCH
LORIS
Monocular Night Vision System
User’s Manual
Ref : 667/TME/UM
All information contained in this document is Ring Sights™ property; it may in no case be reproduced, even partly, or communicated to a third party or used for any possible purpose
without Ring Sights™ expressly written permission.
Ring Sights™
Revision : 0
Page 31 of 28
P.O.Box 2108, Salisbury, SP2 2BX, UK
Tel: +44 8700 422260
Fax: +44 8700 422261
Email: [email protected]
Date : February 15th 2007
Figure 7 - Binocular Coupling mechanism
1
MOUNTING BRACKET
2
RELEASE CATCH
LORIS
Monocular Night Vision System
User’s Manual
Ref : 667/TME/UM
All information contained in this document is Ring Sights™ property; it may in no case be reproduced, even partly, or communicated to a third party or used for any possible purpose
without Ring Sights™ expressly written permission.