1
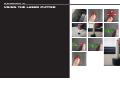
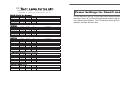
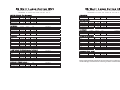
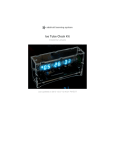
Laser Cutter
User Manual
frequently asked questions...
“the laser is cutting weird! it’s cutting a thick line or not cutting through at all!”
Table Of Contents
1. the z height is set incorrectly.
and/or
Section 1: Materials Guide
1.1 Can I Cut this? Acceptable and Prohibited Materials
Acceptable Materials and range of thickness for 35w and 60w
List of Prohibited Materials
Section 2: Using the Laser Cutter
2.1 Before your appointment
Scale
Cutsheets
Cutting/etching order
No editing on laser room computers
35 Watt and 60 Watt Cutting Settings
Cutting material to the correct size
2.2 Once Your Cutting Time has Started
Turning on the Machine
Setting the Z Height
Loading in your file using True View
Material Cutting Settings
How to Print Your File
Using Recommended Settings
Test Cuts
2.3 Send, Wait, Remove
Importance of watching laser cutter for flare ups
Removing all work and cleaning up after yourself
2. you may have set up your layers incorrectly. you can avoid this by using the laser cutter template, found online at
http://architecture.cua.edu/resources/lasercutting.cfm
and/or
3. you have double lines in your autoCAD file. you can correct this problem by running the “overkill” command on your
computer before you print it to the laser cutter.
“the laser isn’t cutting, and all I see is a flashing red light on the front of the machine!”
1. the machine door isn’t shut all the way. check both the top door (with the see through glass) as well
as the front door (where the laser bed is located).
“the computer is displaying a message, ‘continuous plot log could not be opened for write.’ what
does that mean?”
1. this happens when you are trying to print directly from your flash drive. although nothing happens, it is always a
good idea to print from the computer’s hard drive. just drag and drop your file onto the desktop and then open your
file for printing.
Section 3: Trouble Shooting Guide
3.1 Laser Cutter Won’t Print My File
3.2 The Laser Cutter is a Little Red Dot, and it Won’t Cut!
3.3 The Laser Cutter Head is not Moving
3.4 Help! The Laser Cutter is On Fire!!
if you are still experiencing problems, contact the TA via email
SECTION 3
TROUBLE SHOOTING GUIDE
acceptable materials
Chipboard
Cardboard
Matboard
Acrylic*
Paper
Acetate
Material Cutting Settings:
The Art of Test Cutting
If quality of cut truly matters (i.e. you are building a final model for studio)
you will want to perform several test cuts to find the correct settings for your
material. The best way to do that is to plan ahead for this. When setting up
your cut sheets, be sure to leave space for test cutting to occur. Cut a variety
of shapes. Don’t cut just straight lines, because sometimes the lasers can
burn a material differently on different types of cuts.
Some ideas for shapes to cut:
1. Rectangles within rectangles (for windows)
2. Trees, or something with complex edges
3. Circles, People, etc.
* Utrecht does not typically carry Acrylic sheets. Do not buy just any plastic sheet. You must check
the label: if it doesn’t say “Acrylic”, then it’s not acceptable. You can purchase Acrylic online through
McMaster-Carr (they ship within 24 hours), or you can purchase in person through Miles Glass or
Piedmont Plastics and pick it up the same day. Remember, unless it specifically says Acrylic on the
label, you CANNOT CUT it on the laser cutter.
The more testing you do, the better you can ensure you have the correct
settings, and the happier you will be with the final product.
laser appointment
Material Cutting Settings:
Using Recommended Settings
Before you print your file, you need to set the appropriate laser settings for
your material. You can find these settings next to the laser cutter you are
using, posted against the wall. Be sure to use the correct settings for the
correct laser. DO NOT use the 35 watt laser settings for the 60 watt laser, and
vice versa.
The settings on the wall are not absolute. They are only recommendations. It
is always a good idea to perform a test cut on your material first to make sure
that the settings you chose were correct. It is a good idea to remember the
settings that work for you best.
prohibited materials
Lexan
Glass
Metals
Foamcore
Foam
Styrene
Polystyrene
PVC (polyvinyl carbonate)
Vinyl
Polycarbonate
If you are caught cutting with these materials you will LOSE your laser cutting priviledges! Prohibited
materials could melt on the laser bed or release toxic gases; all of which can cause damage to both
the user and machine. Any damage that occurred to the laser cutter because you did not follow the
rules will come out of your pocket!
SECTION 2
USING THE LASER CUTTER
1
2
3
notch!
4
6
9
5
7
correct distance of laser cartridge to material
laser appointment
Setting Z Height
1. Grab the Z tool that is in the laser bed off to the left side.
2. Press the “Z” button
3. Move the red laser cartridge in the x and y axis until it is positioned on your
material. It should automatically go to a good position. Be careful not to hit the
x-y button.
4. Place the Z tool, black side down on the material near the red laser cartridge.
Line up the notch with bottom right edge of the red laser cartridge and make sure
it sits flat.
5. Start with the laser bed too low and press the up arrow until the notch bumps
the focus tool off the face of the laser cartridge. Go down one increment.
6. Press the select button
7. Press the up arrow again, the bed will be moving more slowly. Go up until the
notch bumps off again.
8. Press the down arrow once. This is your correct setting.
9. Press the Z button again, and the red cartridge will move back to the 0,0
position.
before your appointment
How to Scale in AutoCAD
Option 1:
Select everything you wish to cut, then type “SCALE” into the command bar, or
press the scale button
Specify the “base point”
Enter the model scale you are working with (remember that 1/8inch = 1 foot
scale is the numerical equivalent to 1/8 inch = 12 inches which is equal to
1:96 scale so you would enter 1/96)
Option 2:
Draw a line that is 1 foot long off to the side, then draw another line that begins
at the same point that is perpendicular and is the length of your scale, 1/8 inch
for instance. Be certain “ortho” is on and you can snap to endpoints.
Select everything you wish to cut, then type “SCALE” into the command bar, or
press the scale button
Specify the “base point” and choose the point where your two reference lines
touch
Type “R” for reference and choose the point where your two reference lines
touch
Snap to the end of the 1 foot line then snap to the end of your 1/8 inch line.
before your appointment
How to Setup Your Cutsheet
Always design and draw in 1:1. Once your drawing is complete, select the
shapes you need to cut and copy them to the clipboard (Ctrl “C” or Edit =>
Copy).
Save the “Laser Cutting Template” which can be downloaded from the Architecture web page at the following address http://architecture.cua.edu/resources/lasercutting.cfm, to your hard drive. Open this file then save as “YourFileName_LaserTemplate.” Tip: Keep all your files for each project in one folder
and keep the first version of the template (the one you downloaded) empty and
saved in a different location on your hard drive for future use.
Paste (Ctrl “V” or Edit => Paste) the shapes from the clipboard to this new
file “YourFileName_LaserTemplate”.
Loading in Your File with True View
1. Log onto your student account
2. Drag your file from your jumpdrive, email, M:Drive (under network drivers in
“my computer”) etc. and load it onto the computer desktop.
3. Run the “True View” application on the desktop.
4. Open your file.
5. Check for errors
6. Print
laser appointment
Turning On The Machine
1. Flick the light switch next to the machine you are using. This will turn on
the laser machine and the exhaust system.
2. Wait for the laser to initialize and warm up. It’s ready to go with the green
light is on.
3. Log on to the computer using your CUA logon I.D. and password
4. Open up true view
before your appointment
Proper Cutting and Etching Order
The laser cutter reads the following colors in this order:
1. Black (white)
2. Red
3. Green
4. Yellow
5. Blue
6. Magenta
7. Cyan
8. Orange
The numbered layers in the template file are in the order that the laser
cutter will cut. You now can select your scaled shapes and then select the
appropriate layer. Remember you want to etch first then cut. If you are cutting
two different things (for example cutting a screen of circles) cut the interior
openings first then the exterior.
There is a layer called “0 Layout.” Measure your material and draw that into
the template in the bottom left corner of the laser cutter bed (represented by
the large rectangle in the template file).
Move “M” and rotate “rotate” your shapes to nest them closely inside your
material rectangle. If two shapes share a line you need to delete the line. The
“overkill” command will do this nicely but is not standard on newer versions of
AutoCAD.
before your appointment
Cutting Your Material to Laser Bed Size
The laser bed size is 18” in width by 32” in length. You MUST cut your material to the correct size to fit into the laser bed. If your material is thin, you can
easily cut it to size using the laser room shear.
1. Measure out your material with a ruler: make an 177/8 by 317/8 rectangle
2. Line up the crosshairs and the lines of the rectangle you drew, then press
down the foot lever. Watch your fingers and toes!
3. Retrieve your scrap and save it or throw it away! Do not leave it behind the
machine!
If you are laser cutting wood or acrylic sheet, you may have to cut it down to
the correct size using woodshop tools. Talk to one of the shop monitors if you
need help!
before your appointment
9
9CVV.CUGT%WVVGT
Edit Your File Before You Cut
You are unable to edit your files in the laser room. All of your files should be
edited and ready to go before your laser appointment starts! Here’s a checklist
to run through to guarantee that you are ready (and hopefully catch any mistakes!)
1. Make sure your file is nested properly. Nesting is putting all the objects as
close as possible (sometimes sharing lines, if possible). Doing this saves time
and material, allowing you to cut more in less time with less waste!
2. Run the overkill command. Doing this will delete any extra lines, and
reduces time on the laser machine and the likelihood of burnt edges!
3. Double check the scale of your drawing.
and you’re ready to go!
#RRTQZKOCVG5GVVKPIUÄÄ-GGR[QWTQYPTGEQTFÄÄ
4GOGODGTVQHQEWUVJGNGPUGQTUGVVJG<
8'%614'6%*+0)
#NN/CVGTKCNU
3WCNKV[
2QYGT 5RGGF
22+
'ZVTC.KIJV
.KIJV
/GFKWO
*GCX[
'ZVTC*GCX[
%*+2$1#4&
6JKEMPGUU
2QYGT 5RGGF
22+
Ä
Ä
Ä
Ä
Ä
8GEVQT'VEJ
$#55911&
6JKEMPGUU
2QYGT 5RGGF
22+
Ä
Ä
Ä
Ä
Ä
Ä
Ä
8GEVQT'VEJ
(.+)*6)4#&'2.;911&
UQNFCV7VTGEJV
6JKEMPGUU
2QYGT 5RGGF
22+
Ä Ä
Ä
Ä
Ä
Ä
8GEVQT'VEJ
4')7.#42.;911&
.WCP
6JKEMPGUU
2QYGT 5RGGF
22+
Ä
8GEVQT'VEJ
%QOOGPVU
%QOOGPVU
%QOOGPVU
%QOOGPVU
%QOOGPVU
9
9CVV.CUGT%WVVGT
#RRTQZKOCVG5GVVKPIUÄÄ-GGR[QWTQYPTGEQTFÄÄ
4GOGODGTVQHQEWUVJGNGPUGQTUGVVJG<
8'%614'6%*+0)
#NN/CVGTKCNU
3WCNKV[
2QYGT 5RGGF
22+
'ZVTC.KIJV
.KIJV
/GFKWO
*GCX[
'ZVTC*GCX[
%*+2$1#4&
6JKEMPGUU
2QYGT 5RGGF
22+
Ä
Ä
Ä
Ä
Ä
8GEVQT'VEJ
$#55911&
6JKEMPGUU
2QYGT 5RGGF
22+
Ä
Ä
Ä
Ä
Ä
Ä
Ä
8GEVQT'VEJ
(.+)*6)4#&'2.;911&
UQNFCV7VTGEJV
6JKEMPGUU
2QYGT 5RGGF
22+
Ä Ä
Ä
Ä
Ä
Ä
8GEVQT'VEJ
4')7.#42.;911&
.WCP
6JKEMPGUU
2QYGT 5RGGF
22+
Ä
8GEVQT'VEJ
%QOOGPVU
%QOOGPVU
%QOOGPVU
%QOOGPVU
%QOOGPVU
Power Settings for 35watt and 60watt
The 60 watt laser and the 35 watt laser have different power settings. The 60
watt laser (laser #1) will cut through thicker material (up to 1/4”) and is the
one farthest from the door. The 35 watt laser (laser #2) is better for thinner
material, and also will burn less.
9CVV.CUGT%WVVGT
#RRTQZKOCVG5GVVKPIUÄÄ-GGR[QWTQYPTGEQTFÄÄ
4GOGODGTVQHQEWUVJGNGPUGQTUGVVJG<
8'%614'6%*+0)
#NN/CVGTKCNU
3WCNKV[
2QYGT 5RGGF
22+
'ZVTC.KIJV
.KIJV
/GFKWO
*GCX[
'ZVTC*GCX[
%*+2$1#4&
6JKEMPGUU
2QYGT 5RGGF
22+
Ä
Ä
Ä
Ä
8GEVQT'VEJ $#55911&
6JKEMPGUU
2QYGT 5RGGF
22+
Ä
Ä
Ä
Ä
Ä
Ä
8GEVQT'VEJ
(.+)*6)4#&'2.;911&
UQNFCV7VTGEJV
6JKEMPGUU
2QYGT 5RGGF
22+
Ä
Ä
Ä
Ä
Ä
8GEVQT'VEJ
4')7.#42.;911&
.WCP
6JKEMPGUU
2QYGT 5RGGF
22+
Ä
8GEVQT'VEJ
%QOOGPVU
%QOOGPVU
%QOOGPVU
%QOOGPVU
%QOOGPVU
9CVV.CUGT%WVVGT
#RRTQZKOCVG5GVVKPIUÄÄ-GGR[QWTQYPTGEQTFÄÄ
4GOGODGTVQHQEWUVJGNGPUGQTUGVVJG<
%#4&$1#4&
6JKEMPGUU
2QYGT 5RGGF
22+
%QOOGPVU
Ä
/75'#/$1#4&
6JKEMPGUU
2QYGT 5RGGF
22+
%QOOGPVU
5KPING2N[
Ä
&QWDNG2N[
Ä
3WCF2N[
Ä
8GEVQT'VEJ
/#6$1#4&
6JKEMPGUU
2QYGT 5RGGF
22+
%QOOGPVU
RN[
Ä
8GEVQT'VEJ
2.':+).#5
'ZVTWFGF
6JKEMPGUU
2QYGT 5RGGF
22+
%QOOGPVU
8GEVQT'VEJ
2.':+).#5
%GNN%CUV
6JKEMPGUU
2QYGT 5RGGF
22+
%QOOGPVU
8GEVQT'VEJ
Rasteretchingshouldbeavoidedforthetwoweekspriortomidtermsandthetree
weeksleadinguptofinalsbecauseofthelongcuttimesassociatedwiththatprocess.