1
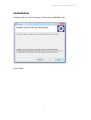
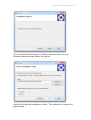
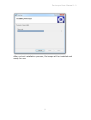
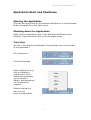
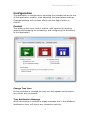
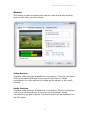
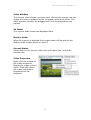
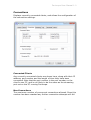
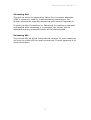
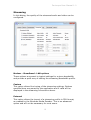
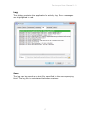
Perixcope
User Manual
© 2012 Unflustered Software
Perixcope User Manual 1.0
Table of Contents
Table of Contents .....................................................................2
Introduction.............................................................................3
Operation ................................................................................4
Quick Start Guide .....................................................................5
Installation ..............................................................................6
Application Start and Shutdown .................................................9
Starting the Application ..........................................................9
Shutting down the Application .................................................9
Tray Icon..............................................................................9
Configuration ......................................................................... 10
Control............................................................................... 10
Source ............................................................................... 12
Connections ........................................................................ 14
Streaming .......................................................................... 16
Log .................................................................................... 17
Advanced ........................................................................... 18
Registration ........................................................................... 20
Appendix A: URLs and ports .................................................... 21
Appendix B: Viewing the remote stream.................................... 21
Appendix C: Firewall unblocking ............................................... 22
2
Perixcope User Manual 1.0
Introduction
Perixcope is a Windows application which connects to a video and/or
audio device and streams the data across a network so it can be
viewed remotely.
The streamed video or audio can be configured to suit a connection
of any bandwidth, from low speed modem connections to high
speed LAN connections.
The application works on all versions of Microsoft Windows from
Windows XP onwards.
3
Perixcope User Manual 1.0
Operation
In order for the application to operate, a suitable source must be
selected. The source may be either a USB video device or an audio
device, or both.
The main Control page of the application is used to start, stop or
pause streaming, and configure the behaviour of the application.
Application operation can be summarised as:
Select sources on the Source page.
Set the streaming port on the Connections page.
Apply the settings.
Click the Start button on the Control page to start streaming.
Start and Stop streaming
When the start button is clicked, the application will listen for
incoming connections, and stream the data accordingly.
When the stop button is clicked, the application will close the
listening port and terminate any existing streaming connections.
Applying settings
Any changes to settings will not take effect until the Apply button is
clicked. If the Cancel button is pressed any unapplied settings will
be discarded.
Showing and Hiding the application
Clicking the OK or Cancel button, or the close button at the top
right of the application window will minimise the application to the
Windows Notification Area, where it will continue to run. To exit the
application right-click on the icon in the Notification Area and select
the Exit option.
4
Perixcope User Manual 1.0
Quick Start Guide
To stream video or audio data
Start the application.
On the Source tab:
Select the desired video device in the list.
Select the desired audio device in the list.
On the Connections tab:
Enter the desired streaming port. The default of 8080 will usually be
appropriate.
Ensure the ‘Max Connections’ setting is set to 1 or greater.
On the Streaming tab:
Select the desired bandwidth for the stream to use. If unsure,
250Kbps Broadband is a suitable default.
On the Control tab:
Click Apply.
Click Start.
The application will begin listening for incoming connections on the
specified port. The current status is reported on the Control tab.
The stream can be viewed by a remote client using a standard
media playing application. Consult Appendix B for more information.
5
Perixcope User Manual 1.0
Installation
Double click on the Perixcope_Setup.msi installation file.
Click ‘Next’.
6
Perixcope User Manual 1.0
If you would like Perixcope to install a shortcut Icon on your
Windows desktop then select the option.
Specify the desired installation folder. The default will usually be
appropriate.
7
Perixcope User Manual 1.0
After a short installation process, Perixcope will be installed and
ready for use.
8
Perixcope User Manual 1.0
Application Start and Shutdown
Starting the Application
Click the Perixcope icon on the Windows Desktop or in the Perixcope
folder accessible from the Start menu.
Shutting down the Application
Right click the application icon in the Windows Notification Area
(System Tray) and select ‘Exit’ from the popup menu.
Tray Icon
An icon in the Windows Notification Area displays the current state
of the application:
No Connections
Clients Connected
Right-clicking the tray
icon will display a
popup menu, from
where the application
can be shown or
hidden, and streaming
can be started or
stopped.
Double clicking the
tray icon will
show the application.
9
Perixcope User Manual 1.0
Configuration
The application is configured by selecting the relevant tab at the top
of the application window, then adjusting the appropriate settings.
Changed settings will not take effect until the Apply button is
clicked.
Control
This dialog is the main control section, with buttons for starting,
pausing and stopping the streaming, and configuring the behaviour
of the application.
Change Tray Icon
If this checkbox is checked the tray icon will appear red whenever
any clients are connected.
Tray Notification Message
When this setting is enabled a popup message box in the Windows
Notification Area, will report any connection activity.
10
Perixcope User Manual 1.0
Start On Load
When this setting is enabled the application will start streaming as
soon as it loads, provided the last connected video or audio device
is available.
Start Minimised
When this setting is enabled the application will start minimised to
the Windows Notification Area.
Current Status
Displays information about the current status of the application.
Start, Stop & Pause
Starts, stops or pauses streaming.
Start and Stop can also be accessed by right-clicking the application
icon in the Windows notification area.
When streaming is stopped the video device image will still be
viewable in the Source tab, and the audio device levels will still be
shown, but no external connections will be accepted by the
application.
11
Perixcope User Manual 1.0
Source
This dialog is used to specify the source video and audio devices,
and monitor their current output.
Video Devices
Displays video devices available for connection. Click the checkbox
next to the desired device to connect to that device. When
connected to a video device the video will be shown in the video
window.
Audio Devices
Displays audio devices available for connection. Click the checkbox
next to the desired device to connect to that device. When
connected to an audio device the sound levels will be displayed on
the VU meter.
12
Perixcope User Manual 1.0
Video Window
The current video stream is shown here. Moving the mouse over the
image will cause a window border to appear around the video. The
video window can then be dragged out from the application and
resized.
VU Meter
The current audio levels are displayed here.
Monitor Audio
When this option is selected the current audio will be sent to the
default audio output device on the PC.
Current Status
Shows the current stream video size and frame rate, and audio
sample rate.
Video Properties
Right click the mouse on
the video window to
display the video context
menu. From this menu
the video and stream
properties can be
adjusted.
13
Perixcope User Manual 1.0
Connections
Displays currently connected clients, and allows the configuration of
the connection settings.
Connected Clients
Any currently connected clients are shown here, along with their IP
address, port number and the length of time they have been
connected. Note that the port number is the port number on the
client’s own PC, and is not likely to be the same as the streaming
port set on the PC running Perixcope.
Max Connections
The maximum number of concurrent connections allowed. Once this
number has been reached any further connection attempts will fail.
14
Perixcope User Manual 1.0
Streaming Port
The port on which the application listens for connection attempts.
8080 is commonly used for media streaming connections. For
further information regarding streaming ports consult Appendix A.
If either the Max Connections or Streaming Port setting is changed
and applied while streaming is in progress, the stream will be
restarted and any connected clients will be disconnected.
Streaming URL
The current URL on which clients should connect. In most cases this
will only be a valid URL for local connections. Consult Appendix A for
more information.
15
Perixcope User Manual 1.0
Streaming
In this dialog, the quality of the streamed audio and video can be
configured.
Modem – Broadband - LAN options
These options are preset to typical settings for a given bandwidth,
and provide a quick way of setting the streaming bandwidth profile.
Custom
This option allows fine tuning of the streaming settings. Options
specified here are parsed by the application and if valid will be
displayed in the streaming info section above.
External
This option allows the import of a streaming profile in PRX format,
as created by the Windows Media Encoder. This is an advanced
option and will not be necessary for most users.
16
Perixcope User Manual 1.0
Log
This dialog contains the application’s activity log. Error messages
are highlighted in red.
Save
The log can be saved as a text file, specified in the accompanying
field. The log file is maintained between sessions.
17
Perixcope User Manual 1.0
Advanced
This dialog contains the settings for advanced users, and statistics
concerning application operation.
Statistics
The Total Connection Time is the total time that remote clients have
been connected to the application. If two clients are connected at
the same time then the total time will increase at double the rate of
a single client. It is this time that is used to determine the
unregistered timeout limit.
Buffer – Keyframe – Video Smoothness
These are settings specific to the Windows Media Audio & Video
codecs. The buffer size is the amount of latency on the application
side of the connection. A lower value will provide lower latency but
may result in a stream that stalls intermittently, depending on the
quality of the network connection to the remote client.
18
Perixcope User Manual 1.0
Save Video mode
If this is enabled, the resolution of the connected video device will
be saved between sessions, otherwise the video device will revert to
its default resolution each time it is connected.
19
Perixcope User Manual 1.0
Registration
The About dialog contains information about the application version,
and allows the registration of the application.
To enter a registration key, double-click the Perixcope banner or
press Ctrl-R on the keyboard. A Dialog will appear requesting the
location of the registration key. Locate the key and click Open.
Alternatively the key file can be dragged to the Perixcope banner
using the standard drag & drop methods used within Windows
Explorer.
If the application is unregistered, the total connection time (shown
in the Advanced tab) is limited to 1 hour. After this time, streaming
will stop and if further streaming is required the application will
need to be restarted.
20
Perixcope User Manual 1.0
Appendix A: URLs and ports
The application, when streaming is enabled, listens for client
connections on the URL shown on the Streaming tab.
This URL will typically be valid only for the local network. If it is
desired to stream to clients across the Internet the IP address part
of the URL will change. It will be necessary to discover the IP
address of your system as seen by the Internet. Websites such as
http://www.whatsmyip.org/ or http://www.whatismyip.com/ will
show this information. It is not possible for the application to
determine this address by itself.
If your PC is connected to the Internet via a router, it will be
necessary to tell the router to pass through any connection
attempts on the streaming port. Consult your router documentation
for details.
Appendix B: Viewing the remote stream
The stream can be viewed in any media playing application that
plays network streams, such as Windows Media Player or VLC Media
Player.
To view in Windows Media Player, select ‘Open URL’ from the File
menu, or press Ctrl-U. Then enter the streaming URL.
To view in VLC Media Player, select ‘Open Network Stream’ from the
File menu, then select ‘http’ and enter the streaming URL.
21
Perixcope User Manual 1.0
Appendix C: Firewall unblocking
The first time Streaming is enabled when video or audio devices are
connected, Windows will ask your permission to allow Perixcope to
communicate over the network. Select the appropriate setting
depending on whether you intend to stream over a local network or
over the Internet.
22