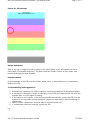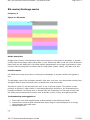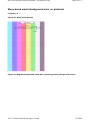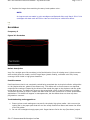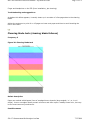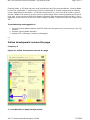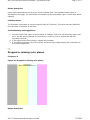
1
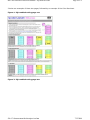
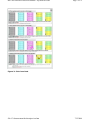
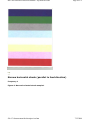
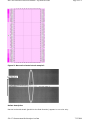
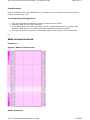
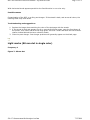
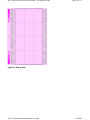
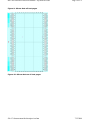
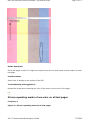
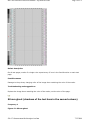
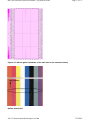
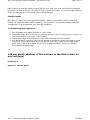
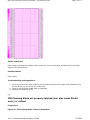
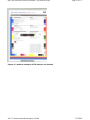
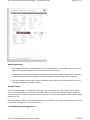
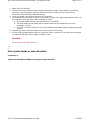
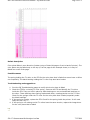
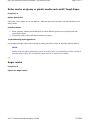
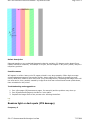
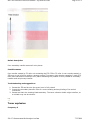
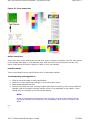
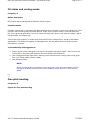
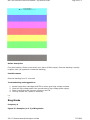
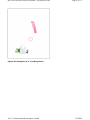
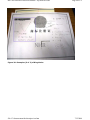
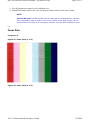
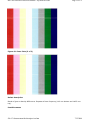
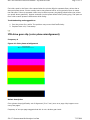
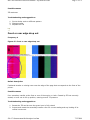
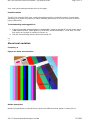
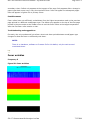
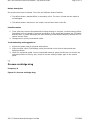
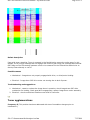
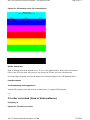
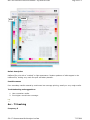
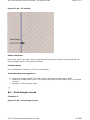
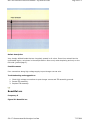
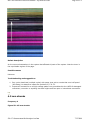
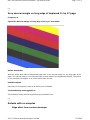
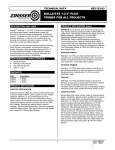
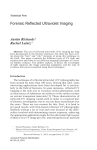
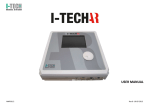
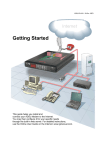
HP Color LaserJet 9500 Series Printers - PQ Defects Guide
Page 1 of 72
HP Color LaserJet 9500 Series Printers - PQ
Defects Guide
Description of PQ Direction - Scan versus Feed (also called Process) direction
Repetitive defect distances
Frequency of print defects
Image formation troubleshooting
Narrow horizontal streak (parallel to feed direction)
Wide horizontal streak
Light marks (98 mm dot in single color)
98 mm repeating marks of one color on all test pages
45 mm repeating marks of one color on all test pages
98 mm ghost (shadows of the test bars in the second column)
140 mm ghost (shadows of the test bars in the third column on any test page)
ITB Cleaning blade not properly latched (can also cause 59.AO error) or nicked
Color plane fades in scan direction
Roller marks on glossy or plastic media such as HP Tough Paper
Auger marks
Random light or dark spots (ITB damage)
Rib marks/discharge marks
Wavy brush marks/background color on printouts
Scratches
Hand print on ITB
Cleaning blade tuck (cleaning blade failures)
Yellow development accross the page
Dropped or missing color planes
Completely missing color plane
Cleaning Blade ghost (cleaning blade failure)
Washed out or missing color, toner on edges of paper due to cleaning blade failure
Discharge marks
T2 not in contact
Toner explosion
Oil stains and cooling marks
Fine pitch banding
Ring Marks
OPC surface contamination
Fuser flats
ITB drive gear slip (color plane misalignment)
Dunes
Belt wave
Front or rear edge drop out
Yellow dots - 47 mm bands
Gloss level variation
Fuser wrinkles
Process cartridge drag
Toner agglomerations
ITB backing roller T2 contamination
T2 roller not raised (flock of birds patterns)
Mottled halftones
Arc - T2 bushing
Arc - Post charger corona
Beautiful arc
4.5 mm streaks
file://C:\documentum\checkout\preview.htm
7/12/2004
HP Color LaserJet 9500 Series Printers - PQ Defects Guide
Page 2 of 72
Very narrow margin on long edge of duplexed 11 by 17 page
Defects with no samples
Introduction
Welcome to the HP Color LaserJet 9500 Series Printers PQ Defects Guide. This guide will be
updated as needed to reflect new information. This is version 1.2.
Last Updated: 12-July-2004
WARNING:
The information contained in this guide is HP Confidential.
New issues
New issues will be reviewed thoroughly. Please send any suggestions to [email protected]
Description of PQ Direction - Scan versus Feed (also called
Process) direction
When troubleshooting PQ defects it is important to understand the difference between two terms
commonly used to describe the orientation and direction the defects have on printouts, scan
direction and feed direction. Note the information in the PQ Defect descriptions that refer to this, it
is very important when troubleshooting PQ Defects.
During image formation, the Laser Scanner beam moves back and forth in what is called the SCAN
direction as the paper passes through the printer.
Paper is fed or processed through the printer in this direction, this is referred to the FEED or
PROCESS direction.
top
Repetitive defect distances
Consumable
Distance (in millimeters)
Black Developer Roller
27 mm
CMY Developer Roller
30 mm
Charge Roller
45 mm
T1 Backing Roller (four, on ITB)
52 mm
T2 Roller
71 mm
T2 Backing Roller (on ITB)
73 mm
OPC (four)
98 mm
file://C:\documentum\checkout\preview.htm
7/12/2004
HP Color LaserJet 9500 Series Printers - PQ Defects Guide
ITB Drive Roller
100 mm
Cleaning Backing Roller
100 mm
Space between T1 rollers
100 mm
Fuser Bottom Roller
140 mm
Fuser Top Roller
148.5 mm
Page 3 of 72
top
Frequency of print defects
One of our goals is to capture and preserve PQ defect corner cases: these are isolated cases for
specific print quality defects.
The following are PQ defects that have been grouped according to frequency, One being the Most
Common and Five being the Least. PQ defects that have a frequency of Five should be
considered corner cases.
1. Most Common
z
Narrow Horizontal Streak
z
Wide Horizontal Streak
z
Light Marks
z
98 mm Repeating Marks
z
ITB Cleaning Blade not Latched
z
45 mm Repeating Marks
z
140 mm Ghost
z
Roller Marks
2. Commonly seen
z
Auger Marks
z
Random Light or dark Spots (ITB damage)
z
Rib Marks/Discharge Marks
z
Scratches
z
Hand Print on ITB
file://C:\documentum\checkout\preview.htm
7/12/2004
HP Color LaserJet 9500 Series Printers - PQ Defects Guide
Page 4 of 72
3. Occasionally seen
z
Cleaning Blade Tuck
z
Dropped or missing Color Planes
z
Completely Missing Color Plane
z
Cleaning Blade Ghost (cleaning failure)
z
Washed Out or Missing Color Cleaning Blade Failure
z
Discharge marks
z
T2 Not in Contact
z
Toner Explosion
z
Oil Stains and Cooling Marks
4. Seldom seen
z
Fine Pitch Banding
z
OPC Surface Contamination
z
Fuser Flats
z
ITB Drive Gear Slip
z
Dunes
z
Belt Wave
z
Wavy Brush Pattern
z
Front or Rear Edge Drop Out
z
Thin White Line in Black
z
Yellow Dots
z
Fuser Offset
5. Seldom, if ever seen
z
Fuser Wrinkles
z
Process Cartridge Drag
file://C:\documentum\checkout\preview.htm
7/12/2004
HP Color LaserJet 9500 Series Printers - PQ Defects Guide
z
Toner Agglomeration
z
T2 Backing Roller Contamination
z
T2 Not raised (flock of birds)
z
Arc - T2 Bushing
z
Mottled Halftones
z
Arc - Post Charger Corona
z
Beautiful Arc
z
4.5 mm Streaks
z
Other defects with no samples
Page 5 of 72
top
Image formation troubleshooting
The image formation system is the central hub of the printer. During image formation, an image of
colored toner is formed and then fused onto the paper. The image formation system consists of the
following physical components:
z
Four Laser Scanners
z
Four Print Cartridges
z
Four Imaging Drums
z
Image Transfer Belt
z
Cleaning Blade
z
Fuser
NOTE:
The ITB cleaner should be removed, then reinstalled and properly latched into the position as
part of any print quality troubleshooting. It is not real intituitive when the ITB cleaner is
latched properly, it can appear to be latched properly when in fact it is not.
Collecting Print samples from customers: If the customer is experiencing any print quality
issue, print samples before dispatching service or POP/CREWING any consumables. Have the
customer print the PQ Assessment Pages and Color Band Test from the control panel of the
printer and send them in for analysis. These selections are located under the Diagnostics Menu
option. Select PQ Troubleshooting or Color Band Test from the Diagnostics Menu to print the
Diagnostic pages and Color Band test. Follow the instructions on pages one and two, Figures 1 and
file://C:\documentum\checkout\preview.htm
7/12/2004
HP Color LaserJet 9500 Series Printers - PQ Defects Guide
Page 6 of 72
2 below are examples of these two pages, followed by an example of the Color Band test.
Figure 1: PQ troubleshooting page one
Figure 2: PQ troubleshooting page two
file://C:\documentum\checkout\preview.htm
7/12/2004
HP Color LaserJet 9500 Series Printers - PQ Defects Guide
Page 7 of 72
Figure 3: Color band test
file://C:\documentum\checkout\preview.htm
7/12/2004
HP Color LaserJet 9500 Series Printers - PQ Defects Guide
Page 8 of 72
top
Narrow horizontal streak (parallel to feed direction)
Frequency 1
Figure 4: Narrow horizontal streak sample 1
file://C:\documentum\checkout\preview.htm
7/12/2004
HP Color LaserJet 9500 Series Printers - PQ Defects Guide
Page 9 of 72
Figure 5: Narrow horizontal streak sample 2
Defect description
Narrow horizontal streak (parallel to the feed direction) appears in one color only.
file://C:\documentum\checkout\preview.htm
7/12/2004
HP Color LaserJet 9500 Series Printers - PQ Defects Guide
Page 10 of 72
Possible causes
Scratch around the OPC of the affected color. If appears on all color planes, the cause may be a
scratch around a fuser roller.
Troubleshooting and suggestions
1. Run the PQ Assessment Pages to isolate to a particular color plane.
2. Replace Image Drum of Color Indicated
3. If the defect shows up in all color planes, look for physical obstructions in the paper path
anywhere after the four T1 stations and inspect the fuser rollers for scratches.
4. See also, rib marks, scratches, and discharge marks in this guide for further assistance.
top
Wide horizontal streak
Frequency 1
Figure 6: Wide horizontal streak
Defect description
file://C:\documentum\checkout\preview.htm
7/12/2004
HP Color LaserJet 9500 Series Printers - PQ Defects Guide
Page 11 of 72
Wide horizontal streak appears parallel to the feed direction in one color only.
Possible causes
Contamination of the OPC, or a dirty post charger. If the streak is dark, and across all colors, the
cleaning blade may have failed.
Troubleshooting and suggestions
1. Replace the image drum matching the color of the test page with the streak.
2. If the streak is dark and appears on all or several of the test pages, open the front doors of
the printer, then lower and raise the large green ITB lever. Lower and raise the blue transfer
cleaner located behind the toner collection bottle.
3. Clean the post charger. Post charger problems will generally appear on the black page.
top
Light marks (98 mm dot in single color)
Frequency 1
Figure 7: 98 mm dot
file://C:\documentum\checkout\preview.htm
7/12/2004
HP Color LaserJet 9500 Series Printers - PQ Defects Guide
Page 12 of 72
Figure 8: 98 mm dots
file://C:\documentum\checkout\preview.htm
7/12/2004
HP Color LaserJet 9500 Series Printers - PQ Defects Guide
Page 13 of 72
Defect description
Two or three light marks repeat every 98 mm in the feed direction on one color plane only.
Possible causes
Foreign substance stuck to the surface of the OPC.
Troubleshooting and suggestions
1. Run PQ assessment pages to isolate to a color plane.
2. Replace the image drum matching the color of the test page with the mark.
3. If the mark does not repeat regularly on the same page, there may be contamination on the
ITB.
top
98 mm repeating marks of one color on all test pages
Frequency 1
file://C:\documentum\checkout\preview.htm
7/12/2004
HP Color LaserJet 9500 Series Printers - PQ Defects Guide
Page 14 of 72
Figure 9: 98 mm dots all test pages
Figure 10: 98 mm dots on all test pages
file://C:\documentum\checkout\preview.htm
7/12/2004
HP Color LaserJet 9500 Series Printers - PQ Defects Guide
Page 15 of 72
Defect description
On all test pages, marks of a single color repeat every 98 mm at the same vertical location on each
test page.
Possible causes
Small point of damage to the surface of the OPC.
Troubleshooting and suggestions
Replace the image drum matching the color of the marks, not the color of the page.
top
45 mm repeating marks of one color on all test pages
Frequency 1
Figure 11: 45 mm repeating marks on all test pages
file://C:\documentum\checkout\preview.htm
7/12/2004
HP Color LaserJet 9500 Series Printers - PQ Defects Guide
Page 16 of 72
Defect description
On all test pages, marks of a single color repeat every 45 mm in the feed direction on each test
page.
Possible causes
Damage to the primary charging roller of the image drum matching the color of the marks.
Troubleshooting and suggestions
Replace the image drum matching the color of the marks, not the color of the page.
top
98 mm ghost (shadows of the test bars in the second column)
Frequency 1
Figure 12: 98 mm ghost
file://C:\documentum\checkout\preview.htm
7/12/2004
HP Color LaserJet 9500 Series Printers - PQ Defects Guide
Page 17 of 72
Figure 13: 98 mm ghost (shadows of the test bars in the second column)
Defect description
file://C:\documentum\checkout\preview.htm
7/12/2004
HP Color LaserJet 9500 Series Printers - PQ Defects Guide
Page 18 of 72
Dark image is ghosted into lighter areas at 98 mm. Also may occur that light solid fills may ghost
into darker fill areas at 98 mm. May also be seen in single color planes. On one test page, shadows
of the test bars appear in the second column (about 98 mm).
Possible causes
OPC ghost. Primarily seen with cyan and magenta, caused by incomplete cleaning of the OPC.
Images are ghosted at 98mm (OPC frequency). This problem is very environmentally dependent
and appears in high temperature, high humidity conditions.
Troubleshooting and suggestions
1. Run PQ Assessment pages to isolate to a color plane.
2. Reseat the image drum of the color(s) showing the fail, in the event that poor HV contacts to
cleaning brushes are the cause of the problem.
3. Replace the image drum matching the color of the test page with the shadows.
4. As a workaround, customers may also be advised to change the layout of the page to place
solid fills in an area where they will not ghost into light areas, reducing the chance of this
ghost. Also, Letter and A4 paper can be fed in a rotated direction, which may reduce or
eliminate the ghosted image.
top
140 mm ghost (shadows of the test bars in the third column on
any test page)
Frequency 1
Figure 14: 140 mm ghost
file://C:\documentum\checkout\preview.htm
7/12/2004
HP Color LaserJet 9500 Series Printers - PQ Defects Guide
Page 19 of 72
Defect description
Dark image is ghosted into lighter areas at 140 mm. On any test page, shadows of the test bars
appear in the third column.
Possible causes
Fuser ghost
Troubleshooting and suggestions
1. Check to see that the print mode set on the control panel and the paper type selected in the
printer driver are correct for the media type.
2. Check to see that the media used is supported.
3. Replace the image fuser kit.
top
ITB Cleaning blade not properly latched (can also cause 59.AO
error) or nicked
Frequency 1
Figure 15: ITB Cleaning blade nicked or unlatched
file://C:\documentum\checkout\preview.htm
7/12/2004
HP Color LaserJet 9500 Series Printers - PQ Defects Guide
Page 20 of 72
Figure 16: ITB Cleaning blade not properly latched
file://C:\documentum\checkout\preview.htm
7/12/2004
HP Color LaserJet 9500 Series Printers - PQ Defects Guide
Page 21 of 72
Figure 17: Another example of ITB cleaner not latched
file://C:\documentum\checkout\preview.htm
7/12/2004
HP Color LaserJet 9500 Series Printers - PQ Defects Guide
Page 22 of 72
Defect description
z
z
z
Can appear as brown or dark streaks of toner in feed direction. May repeat, but not on every
page (ITB variable frequency). Sometimes worse at start of job.
Can appear as a faint ghost image or streaks across the whole page. If the printer calibrates,
the calibration patches are apparent on printed pages as shown in the above examples.
The two examples shown above have calibration marks that were not cleaned off due to the
ITB cleaner not being latched properly.
Possible cause
The ITB cleaning blade is not latched completely. During installation of the printer, the customer
may not understand how to fully latch the blade. Often customers will hold the blade's handle up
and slide the toner collection bottle around it. This does not allow for complete latching of the blade
against the ITB.
If the ITB cleaning blade is not latched properly it is possible for it to cause enough drag on the ITB
to generate a 59.AO error (ITB motor error).
Troubleshooting and suggestions
file://C:\documentum\checkout\preview.htm
7/12/2004
HP Color LaserJet 9500 Series Printers - PQ Defects Guide
Page 23 of 72
1. Open the front left door.
2. Remove the toner collection bottle without moving the handle. If the blade is not latched
correctly, it will fall slightly when the bottle is removed. Check for this movement to
determine if the blade was latched correctly.
3. Lower the blade, remove and reinstall it in the printer.
4. To correctly latch the blade in place, lift the blade up with your right hand and then push it to
the right with your left hand. When installed correctly:
a. The blade should make a click sound when it is installed
b. The blue handle on the blade will be parallel with the blue handles for the print
cartridges (t-carts).
c. The toner collection bottle will fit over the blade's blue handle without holding the blade
in place.
5. Reinstall the toner collection bottle and shut the printer's front door.
6. Print the PQ Troubleshooting pages to verify the issue is resolved. It may take several pages
to clean the ITB before the images printed are clear.
CAUTION:
Do Not replace the ITB assembly.
top
Color plane fades in scan direction
Frequency 1
Figure 18: Example of faded color plane in scan direction
file://C:\documentum\checkout\preview.htm
7/12/2004
HP Color LaserJet 9500 Series Printers - PQ Defects Guide
Page 24 of 72
Defect description
Color plane fades in scan direction (bottom to top of letter/A4 page or front to back of printer). The
color plane may be faded only on the top 1/3 of the page as the example shows, or it may be
faded over most of the page.
Possible causes
The spring holding the T1 roller on the ITB for the color plane that is faded has come loose or fallen
out completely. The black bushing holding the T1 roller may also have broken.
Troubleshooting and suggestions
1. Print the PQ Troubleshooting pages to verify which color plane is faded
2. Check the ITB for a missing T1 roller spring - Remove the ITB and identify the T1 rollers
inside the ITB. They are held in place by white bushings on one end and black bushings on
the other. These bushings have springs underneath them, creating tension on the T1 roller.
Check for the springs under the T1 roller for the color plane that is faded, especially under
the black bushings.
3. If the spring is missing, replace the ITB. Check for the spring inside the printer. It will most
likely fall into Tray 2.
4. If the spring is not missing and all T1 rollers have the same tension, replace the image drum
for the color plane that is faded.
top
file://C:\documentum\checkout\preview.htm
7/12/2004
HP Color LaserJet 9500 Series Printers - PQ Defects Guide
Page 25 of 72
Roller marks on glossy or plastic media such as HP Tough Paper
Frequency 1
Defect description
Post-fuser rollers cause one of two defects - different gloss level stripes in the feed direction and
wavy media.
Possible causes
1. Roller pressure causes post-fused toner to show different gloss levels (mostly fixed with
continuous rollers).
2. Continuous rollers cause still-warm media to be wavy.
Troubleshooting and suggestions
Use straight-through paper path to avoid as many post-fuser rollers as possible. Manual duplex.
NOTE:
Onsite visits and parts replacement (such as printer parts or consumables) will do nothing to
alleviate roller marks. Do not dispatch onsite service or parts for this defect.
top
Auger marks
Frequency 2
Figure 19: Auger marks
file://C:\documentum\checkout\preview.htm
7/12/2004
HP Color LaserJet 9500 Series Printers - PQ Defects Guide
Page 26 of 72
Defect description
Diagonal banding or an angled plaid-appearing density variation (50 degree angle, about 15mm
repeat, difficult to measure). This sample is in cyan, but can happen in any color (CMYK). May be a
temporary problem.
Possible causes
Will appear in solid or heavy color fill pages printed in very large quantity. Often high coverage
causes subsequent pages to have auger marks. Auger marks are a failure to charge the toner
evenly. Often this is due to worn-out carrier (very old image drum). Replacing the Image Drum will
use new carrier. Also, possibly caused by image drum that was removed and turned upside down,
then reinstalled in the printer.
Troubleshooting and suggestions
1. Run a few pages (PQ Assessment pages, for example) and the problem may clear up.
2. Run PQ assessment pages to isolate to a color plane.
3. Replace the image drum of the process color showing the defect.
top
Random light or dark spots (ITB damage)
Frequency 2
file://C:\documentum\checkout\preview.htm
7/12/2004
HP Color LaserJet 9500 Series Printers - PQ Defects Guide
Page 27 of 72
Figure 20: ITB damage
Defect description
Spot of any size or shape of missing (white) or too much (dark) toner. Will repeat, but not on
every page (ITB variable frequency). The defect itself will repeat in terms of size, shape, and
location with regard to feed direction.
Possible causes
Physical damage to the ITB (such as creases, dents, holes, or deep scratches) or contaminant
stuck to the ITB.
Troubleshooting and suggestions
1. Eliminate the possibility of a higher frequency repeat by printing the PQ assessment pages.
2. If the defect is caused by a finger or hand print on the ITB, the cleaning blade will solve the
problem after 10 to 50 pages of printing.
3. If the repeat is still irregular, lower the green handle and partially remove the ITB, turn the
flywheel on the right side of the assembly to inspect the entire belt for physical damage or
contaminant.
4. Gently remove contaminant using the edge of a smooth-sided coin.
5. If contaminant cannot be removed, replace the ITB.
top
file://C:\documentum\checkout\preview.htm
7/12/2004
HP Color LaserJet 9500 Series Printers - PQ Defects Guide
Page 28 of 72
Rib marks/discharge marks
Frequency 2
Figure 21: Rib marks
Defect description
Straight lines of toner in feed direction that are moved prior to fusing due to discharge or physical
collision with sensor flags, paper path guides, or ribs. Defect may fade in and out in the direction of
paper feed, but will always be in the same position perpendicular to the paper feed direction. Most
common with smooth gloss film media, and HP Tough Paper (plastic media), solid dark color fills.
Possible causes
Pre-fused toner being moved prior to fusing due to discharge or physical collision with guides or
ribs.
The discharge comb of the secondary transfer roller area, over time, may accumulate enough toner
and paper dust to cause horizontal lines, smeared toner, and white areas.
This failure is post T1, and therefore can occur in one or all color planes. The problem is seen
primarily on glossy or rough media, in high temperature/high humidity or low temperature/low
humidity conditions. Commonly seen on second side, but occasionally on first side, and will look
like white process feed direction marks, such as streaks, worms, circles, and lightning strikes.
Troubleshooting and suggestions
1. Clean fuser inlet with supplied brush as documented in User Reference Guide.
2. Inspect fuser entrance guide ribs and fuser sensor flag, for accumulated toner or foreign
object hanging onto paper path.
3. Replace fuser unit.
top
file://C:\documentum\checkout\preview.htm
7/12/2004
HP Color LaserJet 9500 Series Printers - PQ Defects Guide
Page 29 of 72
Wavy brush marks/background color on printouts
Frequency 2
Figure 22: Wavy brush pattern
Figure 23: Magenta background along with repeating primary charge roller dunes
file://C:\documentum\checkout\preview.htm
7/12/2004
HP Color LaserJet 9500 Series Printers - PQ Defects Guide
Page 30 of 72
Figure 24: Magenta background
file://C:\documentum\checkout\preview.htm
7/12/2004
HP Color LaserJet 9500 Series Printers - PQ Defects Guide
Page 31 of 72
Figure 25: Magenta background and brush marks (wavy lines)
file://C:\documentum\checkout\preview.htm
7/12/2004
HP Color LaserJet 9500 Series Printers - PQ Defects Guide
Page 32 of 72
Defect description
Wavy brush patterns of a single primary color covering the whole page, including the unprintable
region. This may also be seen as a background haze in one primary color as the wavy pattern may
not be apparent.
Possible causes
Image drum cleaning brush failure due to bad connection or toner overload. This is more likely to
occur when the customer prints intermittent heavy coverage, followed by low coverage documents.
Troubleshooting and suggestions
1. Print a PQ Assessment set to isolate to a particular color plane - in this case, magenta.
2. Reseat the image drum matching the wavy brush pattern color.
3. Check high voltage supply and connections to the image drum.
file://C:\documentum\checkout\preview.htm
7/12/2004
HP Color LaserJet 9500 Series Printers - PQ Defects Guide
Page 33 of 72
4. Replace the image drum matching the wavy brush pattern color.
NOTE:
An improvment was made in print cartridges manifactured after early March 2004. Print
cartridges with date code 4C03XX or later are less likely to exhibit this defect.
top
Scratches
Frequency 2
Figure 26: Scratches
Defect description
Very fine, straight razor-like scratches in the feed direction (lines of missing toner). Most common
with smooth gloss film media, and HP Tough Paper (plastic media), solid dark color fills, heavy
coverage. Most visible in high gloss situations.
Possible causes
Post-fused toner that is not completely cooled being scratched due to physical collision with guides
or ribs (duplex diverter, guide to face down tray). This defect will be most common on duplexed
output as the marks are caused by the diverter that sends the page to the duplexer and the guide
to the face-up tray. The defect will show on the second side, which is the first side to be printed.
This defect will show up most in output with dark solid fills from PowerPoint or similar presentation
applications. This defect will appear on transparencies, but the defect does not show up when
projected on a screen.
Troubleshooting and suggestions
1. Ensure printer mode settings are correct for the plastic high gloss media - this turns on the
cooling fan in the paper path that will cool the newly fused toner faster and lessen the effect
of the rib guides.
2. Do not use a straight-through paper path. Pages that are fed to the top (face down) output
file://C:\documentum\checkout\preview.htm
7/12/2004
HP Color LaserJet 9500 Series Printers - PQ Defects Guide
Page 34 of 72
tray avoid the ribs of the diverter.
3. Do not duplex if possible. Manual duplex is an option.
4. Use different media.
NOTE:
Onsite visits and parts replacement (such as printer parts or consumables) will do nothing to
alleviate scratches. Do not dispatch onsite service or parts for this defect.
top
Hand print on ITB
Frequency 2
Figure 27: ITB hand print
Defect description
Very clear finger and handprints appear on the printed page.
Possible causes
file://C:\documentum\checkout\preview.htm
7/12/2004
HP Color LaserJet 9500 Series Printers - PQ Defects Guide
Page 35 of 72
Finger and handprints on the ITB (from installation, jam clearing).
Troubleshooting and suggestions
As bad as this defect appears, it usually clears up in a matter of a few pages due to the cleaning
blade.
Advise the customer to print 10 to 15 pages on lower-cost paper and then to avoid touching the
belt in the future.
top
Cleaning blade tuck (cleaning blade failures)
Frequency 3
Figure 28: Cleaning blade tuck
Defect description
Pages are marked with diagonal lines of smudged toner deposits (large angled / or \ or in a Vshape). Lines or smudges usually contain all toners and show up as a muddy brown color, but may
be the most commonly used toners.
Possible causes
file://C:\documentum\checkout\preview.htm
7/12/2004
HP Color LaserJet 9500 Series Printers - PQ Defects Guide
Page 36 of 72
Cleaning blade- or ITB that has been used considerably past life recommendations. Cleaning Blade
is bent into a backward "J" shape as the ITB runs underneath it. Creates enough drag to possibly
cause a Registration Roller Motor, or ITB Motor Abnormal Error. (Also, see 59.A0 notes in service
manual.) Blade tucks seem to be more common when image drums, cleaning blade and ITB are all
new. Also, more common at 30C/80% Relative Humidity (high temperature/high humidity). Some
blade tuck events cause a 59.A0 error before a page is printed. In this case check the image on the
ITB.
Troubleshooting and suggestions
1. Re-seat cleaning blade assembly and ITB. Make sure the green level is all the way in the "up"
position.
2. Replace cleaning blade assembly.
3. Replace ITB if necessary (usually not damaged).
top
Yellow development accross the page
Frequency 3
Figure 29: Yellow development accross the page
1 - Feed direction of paper thriogh printer
file://C:\documentum\checkout\preview.htm
7/12/2004
HP Color LaserJet 9500 Series Printers - PQ Defects Guide
Page 37 of 72
Defect description
Heavy yellow development covering the entire printable area. The intended image is also on
developed on the page. The yellow does not extend into the unprintable region, unlike Wavy Brush
Patterns.
Possible causes
The formatter is providing an incorrect signal to the DC Controller. This issue has been identified,
but root cause is unknown at this time.
Troubleshooting and suggestions
1. Print an Engine Test. Note: If the formatter is installed, a 49 error will follow the engine test
print. See the Service Manual for instructions in order to print an engine test with the
formatter removed.
2. If the engine test prints correctly, replace the formatter.
3. If the engine test does not print correctly, check the high voltage supply and connections to
the yellow image drum.
top
Dropped or missing color planes
Frequency 3
Figure 30: Dropped or missing color planes
Defect description
file://C:\documentum\checkout\preview.htm
7/12/2004
HP Color LaserJet 9500 Series Printers - PQ Defects Guide
Page 38 of 72
One or more color planes drop out or fade out. In the scan direction, the color plane should be
consistent (either missing or present). In the feed direction, the color planes are intermittent or
missing.
Possible causes
Typically, not the process cartridge, but rather a stall of the developer motor on OPC due to
electrical noise in the system. Connector problems to the motor (post charger, ribbon cable, HV
contacts, DC controller)
Troubleshooting and suggestions
1. Reseat image drum cartridges, and image transfer belt to ensure HV connections.
2. Inspect ITB for good HV connections to the T1 rollers. Check HV paths and motor
control/drive paths from image drum drive assembly and ITB to HV-PS and to DC controller.
3. Replace image drum for missing color.
4. Replace ITB.
5. Check/replace laser scanner for missing color.
6. Check/replace HV power supply, DC controller.
NOTE:
Do not forget to force Calibrate Now (Configure Device Print Quality Calibrate Now) in case
calibration data has been saved under the broken condition.
top
Completely missing color plane
Frequency 3
Defect description
The printer prints with one color plane completely missing (for example, Cyan).
Possible causes
z
z
z
z
Find out if either of the print cartridge or image drum of the color plane in question have
recently been replaced.
If so, check, and reseat those parts.
Then, make sure toner is feeding from the print cartridge to the image drum (look for visible
signs of toner moving between the two, and see that the shutter doors are functioning
correctly).
Check to see that the toner dam and all shipping protection have been successfully removed
from both the print cartridge and the image drum.
Troubleshooting and suggestions
file://C:\documentum\checkout\preview.htm
7/12/2004
HP Color LaserJet 9500 Series Printers - PQ Defects Guide
Page 39 of 72
Inspect and test these areas. Replace parts as necessary.
1. ITB parts for the color plane in question (copper contacts for primary transfer bias, springs
that position primary transfer roller, etc.). Trace these leads backward to the HV power
supply.
2. High voltage paths and connectors to print cartridge for opens (intermittent or poor
connections usually don't result in a complete dropout). Trace backward to the HV power
supply.
3. High voltage paths and connectors to ITB (primary transfer) for opens (intermittent or poor
connections usually do not result in a complete dropout).
4. Print cartridge and image drum (such as connectors and doors)
5. DC controller
6. HV power supply
top
Cleaning Blade ghost (cleaning blade failure)
Frequency 3
Figure 31: Cleaning blade failure
Defect description
Ghost of previous image (K toner over color bands) may be all colors, or predominant color
printed.
file://C:\documentum\checkout\preview.htm
7/12/2004
HP Color LaserJet 9500 Series Printers - PQ Defects Guide
Page 40 of 72
Possible causes
Cleaning blade not latched
Troubleshooting and suggestions
Reseat and latch the cleaning blade assembly. Note: The toner collection bottle may interfere, so
that a mislatch may not be obvious. Remember to execute a Calibrate Now from the control panel
as bad calibrations may have occurred while the cleaning blade was not functional, causing the
printer to be working with bad calibration data. This would cause light output.
NOTE:
Severe cleaning blade failures (extensive, and left to run in bad condition for many pages)
can cause damage to the OPCs of the image drum cartridges, particularly yellow. In cases of
severe cleaning blade failure, the image drums should also be checked for damage once the
blade fail is corrected. Replace damaged image drum(s).
top
Washed out or missing color, toner on edges of paper due to
cleaning blade failure
Frequency 3
Figure 32: Cleaning blade failure
Defect description
Pages print with washed-out or missing halftones. Some pages may have toner streaking across
the pages.
Possible causes
A density calibration has taken place while the printer was experiencing a cleaning blade failure.
Troubleshooting and suggestions
1. Correct the cleaning blade failure, by reseating or replacing the cleaning blade.
file://C:\documentum\checkout\preview.htm
7/12/2004
HP Color LaserJet 9500 Series Printers - PQ Defects Guide
Page 41 of 72
NOTE:
The toner collection bottle may interfere, so that a mislatch may not be obvious.
2. After the cleaning blade failure is corrected, execute a "calibrate now" from the control panel
to correct the light output caused by miscalibration.
NOTE:
Countermeasures were implemented prior to introduction that greatly reduce the
possibility of the cleaning blade becoming unlatched.
top
Discharge marks
Frequency 3
Figure 33: Discharge marks
Defect description
White marks generally in the feed direction, or on the leading/trailing edges of the paper that can
be straight lines, circles, worm shaped, or look like lightning strikes.
Possible causes
file://C:\documentum\checkout\preview.htm
7/12/2004
HP Color LaserJet 9500 Series Printers - PQ Defects Guide
Page 42 of 72
Toner and paper dust build up on discharge comb near T2, which causes the charge on the paper
to be dissipated unevenly. Usually only seen late in printer life after much use.
Most common with thin rough medias. Some coated medias are very resistive and can cause this
defect also.
Troubleshooting and suggestions
1. Use the cleaning brush (attach brush to tongs) to knock the toner and dust off the comb.
Customers may lose or misplace the brush. In this case, they can use a toothbrush or
anything similar that may be available. See User Reference Guide about how to clean the
comb with the included cleaning brush.
2. Also, make sure customers are using recommended media and using the appropriate TYPE
setting on the control panel to match the media. This implements the best secondary transfer
settings that will avoid these discharge marks. If a glossy media is being used, try using HP
High Gloss Paper.
3. Leave media wrapped until it is used. Do not store media in printer tray for long periods of
time.
4. Use a different media.
top
T2 not in contact
Frequency 3
Figure 34: T2 not in contact
file://C:\documentum\checkout\preview.htm
7/12/2004
HP Color LaserJet 9500 Series Printers - PQ Defects Guide
Page 43 of 72
Defect description
Poor secondary transfer across all color planes.
Possible causes
Poor transfer caused by T2 roller not contacting the ITB. ITB or T2 roller is not correctly seated, or
ITB lever is not in full up position, causing uneven T2 pressure. May also be caused by a lack of T2
bias. Note that defect crosses all color planes indicating the problem is likely related to secondary
transfer and not primary transfer.
Troubleshooting and suggestions
1. Reseat the ITB and be sure the green lever is fully raised.
2. Inspect the secondary transfer roller for correct seating and any binding of its vertical
movement.
3. Reseat and latch the cleaning blade assembly. The toner collection bottle might interfere, so
a mislatch may not be obvious.
top
Toner explosion
Frequency 3
file://C:\documentum\checkout\preview.htm
7/12/2004
HP Color LaserJet 9500 Series Printers - PQ Defects Guide
Page 44 of 72
Figure 35: Toner explosions
Defect description
Toner halos form in the white areas around solid, heavy coverage, secondary color fills. May appear
on the second side (page 1) of a duplexed page. Note the areas in the sample around the red,
green, and process blue boxes. Usually in cases of very low humidity.
Possible causes
Toner moves away from the solid fill at the time of secondary transfer.
Troubleshooting and suggestions
1.
2.
3.
4.
Check to see that media is within specification.
Check for correct media type settings on the control panel menu.
Keep media wrapped until use.
Choose colors that are lower coverage (lighter and closer to primary). User may try different
settings under print quality optimize transfer (down or up depending on the media). Some
testing may be necessary to find the optimal setting.
NOTE:
Onsite visits and parts replacement (such as printer parts and consumables) will do
nothing to alleviate toner explosions. Do not dispatch onsite service or parts for this
defect.
top
file://C:\documentum\checkout\preview.htm
7/12/2004
HP Color LaserJet 9500 Series Printers - PQ Defects Guide
Page 45 of 72
Oil stains and cooling marks
Frequency 3
Defect description
Oily looking stains that appear as different levels of gloss.
Possible causes
Caused by variations in cooling as the page proceeds from the fuser up to the top output tray. Most
common with smooth gloss film media and HP Tough Paper (plastic media), and solid dark color
fills. The higher the gloss level, the more visible this becomes. Occurs only when the page is fed to
the face down, top output tray.
This will be most common in output with dark solid fills from PowerPoint or similar presentation
applications. This defect will appear on transparencies, but the defect does not show up when
projected on a screen.
Troubleshooting and suggestions
1. Ensure printer mode settings are correct for the plastic high gloss media - this turns on the
cooling fan in the paper path between the fuser and the top output bin.
2. Use a straight-through paper path, allowing more rapid and even cooling when using gloss
film or HP Tough Paper (plastic media).
3. Use different media.
NOTE:
Onsite visits and parts replacement (such as printer parts and consumables) will do
nothing to alleviate cooling marks. Do not dispatch onsite service or parts for this
defect.
top
Fine pitch banding
Frequency 4
Figure 36: Fine pitch banding
file://C:\documentum\checkout\preview.htm
7/12/2004
HP Color LaserJet 9500 Series Printers - PQ Defects Guide
Page 46 of 72
Defect description
Fine pitch banding. Shows up across all color planes (CMYK output). Electrical banding is usually
irregular pitch (as opposed to mechanical banding).
Possible causes
Electrical banding from T1 cross-talk
Troubleshooting and suggestions
1.
2.
3.
4.
Reseat image drum cartridges and ITB to ensure good high-voltage contacts.
Check all high-voltage paths from ground back to high voltage power supply.
Check connections and common ground on the ITB.
ITB may be past life; replace if necessary.
top
Ring Marks
Frequency 4
Figure 37: Examples (1 of 3) of Ring Marks
file://C:\documentum\checkout\preview.htm
7/12/2004
HP Color LaserJet 9500 Series Printers - PQ Defects Guide
Page 47 of 72
Figure 38: Examples (2 of 3) of Ring Marks
file://C:\documentum\checkout\preview.htm
7/12/2004
HP Color LaserJet 9500 Series Printers - PQ Defects Guide
Page 48 of 72
Figure 39: Examples (3 of 3) of Ring Marks
file://C:\documentum\checkout\preview.htm
7/12/2004
HP Color LaserJet 9500 Series Printers - PQ Defects Guide
Page 49 of 72
Defect description
Small, random circles on the page. May be only one ring mark on the page, or multiple
Possible Cause
Foreign particle residing in the image drum. An occasional ring mark occurring from time to time is
normal. Frequent ring marks may occur if the engine is opened up frequently.
Troubleshooting and suggestions
Occasional ring marks are to be expected. Only if the ring marks occur frequently in one color,
replace the image drum.
top
OPC surface contamination
Frequency 4
Figure 40: OPC surface contamination
file://C:\documentum\checkout\preview.htm
7/12/2004
HP Color LaserJet 9500 Series Printers - PQ Defects Guide
Page 50 of 72
Defect description
Wide fade or light area image defects that run in the feed direction or a mottled density loss in a
single color.
Possible causes
Silicate or carrier contamination on the surface of the OPC causes poor laser discharge and
subsequent poor toner transfer. Tends to occur in environments with high temperature, high
humidity, and low coverage at the end of image drum life. Usually happens with high volumes of
solid fills followed by a halftone fill.
Troubleshooting and suggestions
file://C:\documentum\checkout\preview.htm
7/12/2004
HP Color LaserJet 9500 Series Printers - PQ Defects Guide
Page 51 of 72
1. Run PQ Assessment pages to verify affected color.
2. Replace the image drum of the color showing the defect, which in this case is black.
NOTE:
Internal HP note: The OPC surface may be inspected for contamination or damage.
The contamination may be visible or felt on the surface of the OPC. An OPC can be
cleaned with a soft tissue in an emergency situation only (the OPC is difficult to turn).
top
Fuser flats
Frequency 4
Figure 41: Fuser Flats (1 of 3)
Figure 42: Fuser Flats (2 of 3)
file://C:\documentum\checkout\preview.htm
7/12/2004
HP Color LaserJet 9500 Series Printers - PQ Defects Guide
Page 52 of 72
Figure 43: Fuser Flats (3 of 3)
Defect description
Bands of gloss or density differences. Repeats at fuser frequency (140 mm bottom and 148.5 mm
top).
Possible causes
file://C:\documentum\checkout\preview.htm
7/12/2004
HP Color LaserJet 9500 Series Printers - PQ Defects Guide
Page 53 of 72
Flat roller spots in the fuser roller caused when the printer failed to separate fuser rollers due to
abnormal power down. Printer usually has to stay powered off for a long period of time to cause
the flat spots. Failure to separate rollers may be due to power plug being pulled before the printer
can power down gracefully. Instruct customer to shut power down before pulling plug. Flat spots on
fuser rollers cause pressure differences while fusing.
Troubleshooting and suggestions
1. Run the printer for a while. The problem may correct itself sufficiently.
2. Replace fuser unit, if necessary.
top
ITB drive gear slip (color plane misalignment)
Frequency 4
Figure 44: Color plane misalignment
Defect description
Color planes drop significantly out of alignment (2 to 5 mm) once on a page. May happen once
every few pages.
Frequency of one per page suggests that this is not a broken gear tooth.
file://C:\documentum\checkout\preview.htm
7/12/2004
HP Color LaserJet 9500 Series Printers - PQ Defects Guide
Page 54 of 72
Possible causes
Interfacing gears between ITB assembly and drive mechanism slipped once, then interfaced
correctly.
Troubleshooting and suggestions
1. Inspect interfacing gears between the ITB assembly and the ITB drive mechanism.
2. Verify the ITB is seated and latched correctly.
3. Replace ITB assembly or ITB drive mechanism if either is damaged.
top
Dunes
Frequency 4
Figure 45: Dunes
Defect description
Wavy patterns that look like sand dunes in a single color. Note that the pattern is black and is
reversed in black and carries over onto other colors. Note repetitive at about 45 mm (but if charge
roller skids, it could stretch to about 50 mm).
file://C:\documentum\checkout\preview.htm
7/12/2004
HP Color LaserJet 9500 Series Printers - PQ Defects Guide
Page 55 of 72
Possible causes
Image Drum charge roller contamination - in this case, black.
Troubleshooting and suggestions
1. Run PQ assessment pages to isolate to a single color plane - in this case black.
2. Reseat or replace process cartridge matching the pattern color.
top
Belt wave
Frequency 4
Figure 46: Belt wave
file://C:\documentum\checkout\preview.htm
7/12/2004
HP Color LaserJet 9500 Series Printers - PQ Defects Guide
Page 56 of 72
Defect description
Alternating light and dark streaks running parallel to the feed direction. Streaks appear
approximately 30 mm apart and are more noticeable on 11x17/A3 size media. The sample shows
the waves extending the entire length of the paper. Often, the waves appear more on the leading
or trailing edge of the paper, rather than the entire length of the paper.
file://C:\documentum\checkout\preview.htm
7/12/2004
HP Color LaserJet 9500 Series Printers - PQ Defects Guide
Page 57 of 72
Possible causes
ITB waviness.
Troubleshooting and suggestions
1. Print a darker scale or different pattern.
2. Change media.
3. Replace the ITB
top
Front or rear edge drop out
Frequency 4
Figure 47: Front or rear edge drop out
Defect description
Feathered streaks or missing toner near the edge of the page that corresponds to the front of the
printer.
Possible causes
Poor secondary transfer at the front or rear of the engine, or both. Caused by ITB not correctly
seated, or lever not in full up position, causing uneven T2 pressure.
Troubleshooting and suggestions
1. Reseat the ITB and be sure the green lever is fully raised.
2. Inspect and reseat the secondary transfer roller for correct seating and any binding of its
vertical movement.
file://C:\documentum\checkout\preview.htm
7/12/2004
HP Color LaserJet 9500 Series Printers - PQ Defects Guide
Page 58 of 72
3. Reseat and latch the cleaning blade assembly in case the cleaning blade is interfering with
the correct lift and positioning of the ITB.
NOTE:
The toner collection bottle may interfere, so a cleaning blade mislatch may not be
obvious.
top
Yellow dots - 47 mm bands
Frequency 4
Figure 48: Yellow dots - 47 mm bands
Defect description
NOTE:
The counterfeit tracking pattern is magnified. The lighter pattern helps to reduce 47 mm
banding.
file://C:\documentum\checkout\preview.htm
7/12/2004
HP Color LaserJet 9500 Series Printers - PQ Defects Guide
Page 59 of 72
Very small yellow background dots all over the page.
Possible causes
The HP Color LaserJet 9500 uses a yellow dot background for counterfeit tracking. It also takes
advantage of a yellow dot pattern to reduce banding (particularly at 47 mm from start of solid or
heavy halftone fill).
Troubleshooting and suggestions
1. If the 47 mm band countermeasure is undesirable, it may be turned off via the control panel
(CONFIGURE DEVICE, PRINT QUALITY, OPTIMIZE, HIGH COVERAGE 1, set to ON). The user
may notice an increase in banding if they do so.
2. The anti-counterfeiting pattern cannot be turned off.
top
Gloss level variation
Frequency 4
Figure 49: Gloss level variation
Defect description
Banded (perpendicular to feed direction) gloss level differences that appear in heavy fills of
file://C:\documentum\checkout\preview.htm
7/12/2004
HP Color LaserJet 9500 Series Printers - PQ Defects Guide
Page 60 of 72
secondary colors. Defect only appears at the top part of the page. Only appears after a change in
paper types that occurs over a very short period of time. Does not appear on subsequent pages.
Does not appear in lighter fills or primary colors.
Possible causes
Fuser rollers have not sufficiently cooled down from the higher temperature used on the previous
page printed in a different mode/paper type. The defect only appears on the top of the first page
printed in the new mode as the media serves to cool the fuser rollers to the target temperature
after the first fuser roller rotation or two.
Troubleshooting and suggestions
Currently, the only workaround is to allow a short cool down period between mode/paper type
changes to allow the fuser to sufficiently cool down.
NOTE:
There is no hardware, software or firmware fix for this defect, only the work around
mentioned above.
top
Fuser wrinkles
Frequency 5
Figure 50: Fuser wrinkles
file://C:\documentum\checkout\preview.htm
7/12/2004
HP Color LaserJet 9500 Series Printers - PQ Defects Guide
Page 61 of 72
Defect description
See process blue band of sample. There are two different kinds of defects.
z
z
The defect shows a banded effect in secondary colors. The toner is fused and the media is
not damaged.
The defect shows a waviness in the media, but the fused toner looks OK.
Possible causes
1. Toner piles may become disrupted before fusing causing an irregular, wrinkled looking effect.
Disruptions may be caused by physical interference in the paper path between the T2 station
and the fuser, or static discharge (see also discharge marks defect samples) between the T2
station and the fuser.
2. Unsupported or poorly constructed media.
Troubleshooting and suggestions
1. Inspect the paper path for physical obstructions.
2. Clean the fuser input (T2 discharge comb) as outlined in the Service Manual and User
Reference Guide.
3. Check for supported media. Poorly constructed coated or glossy media may not survive the
heat and pressure of fusing. Also, check for correct setting of paper type on the control
panel.
top
Process cartridge drag
Frequency 5
Figure 51: Process cartridge drag
file://C:\documentum\checkout\preview.htm
7/12/2004
HP Color LaserJet 9500 Series Printers - PQ Defects Guide
Page 62 of 72
Defect description
Page-wide toner streaking. Toner is smeared in the feed direction across the entire page. In this
sample, the K process cartridge did not engage with its drive gear when the cartridge was inserted.
OPC drags on the ITB causing upstream colors to be smeared on the ITB and the stalled color to
develop intermittently or not all.
Possible causes
z
Mechanical - Image drum not properly engaged with drive, or drive/motor binding.
z
Electrical - Image drum OPC drive motor not turning due to lack of power.
Troubleshooting and suggestions
1. Mechanical - reseat or replace the image drum in question, check image drum OPC drive
mechanism for binding, check gear/drive engagement, replace image drum motor assembly.
2. Electrical - check connections between motor and DC controller.
top
Toner agglomerations
Frequency 5 (This problem has been addressed with toner formulation changes prior to
introduction.)
file://C:\documentum\checkout\preview.htm
7/12/2004
HP Color LaserJet 9500 Series Printers - PQ Defects Guide
Page 63 of 72
Figure 52: Toner agglomerations
Defect description
Toner gets a mottled look with random variations in density, particularly in greens.
Possible causes
Related to low coverage and toner particle size.
Troubleshooting and suggestions
1. Run a PQ Troubleshooting set to isolate to a particular primary color.
2. As a workaround, shake the image drum and print cartridge of the particular primarily color
suspected.
3. Replace image drum and/or print cartridge of the color suspected.
top
ITB backing roller T2 contamination
Frequency 5 (Pre-intro counter-measured ITBs keep almost all contamination out)
file://C:\documentum\checkout\preview.htm
7/12/2004
HP Color LaserJet 9500 Series Printers - PQ Defects Guide
Page 64 of 72
Figure 53: ITB backing roller T2 contamination
Defect description
Spot of missing toner that repeats every 72 mm in the feed direction. Note, this is the bottom
roller of the ITB, the other two rollers in top corners of ITB are 100 mm circumference.
A foreign object dropped onto the backside of the ITB and lodged on the ITB Backing Roller.
Possible causes
Troubleshooting and suggestions
Inspect ITB backing roller and remove contamination, or replace ITB assembly.
top
T2 roller not raised (flock of birds patterns)
Frequency 5
Figure 54: T2 roller not raised
file://C:\documentum\checkout\preview.htm
7/12/2004
HP Color LaserJet 9500 Series Printers - PQ Defects Guide
Page 65 of 72
Defect description
Strange flock of birds discharge pattern independent of color plane.
Possible causes
Electrical transfer without physical contact transfer. Poor contact at T2 between paper and ITB,
caused by clutch failure in T2 roller assembly, causing the T2 roller to not travel all the way into
the up position.
Troubleshooting and suggestions
1. Visually, inspect the T2 roller (consumable) and T2 roller assembly (FRU) for correct
installation and travel.
2. Check electrical connections to the secondary transfer assembly.
3. Replace the T2 roller, then replace the secondary transfer assembly.
4. If a high-voltage bias problem is suspected (generally not the problem with above sample),
check HV paths for bent contacts from roller back to HVPS.
top
Mottled halftones
Frequency 5
Figure 55: Mottled halftones
file://C:\documentum\checkout\preview.htm
7/12/2004
HP Color LaserJet 9500 Series Printers - PQ Defects Guide
Page 66 of 72
Defect description
Halftone fills print with a "mottled" or light appearance. Random patterns of white appear in the
halftone fills, looking very much like poor secondary transfer.
Possible causes
Poor secondary transfer caused by continuous low-coverage printing, usually on very rough media.
Troubleshooting and suggestions
1. Use a smoother media.
2. Print higher overall toner coverage.
top
Arc - T2 bushing
Frequency 5
file://C:\documentum\checkout\preview.htm
7/12/2004
HP Color LaserJet 9500 Series Printers - PQ Defects Guide
Page 67 of 72
Figure 56: Arc - T2 bushing
Defect description
Hazy stripe, cyan in this case. Stripe is perpendicular to direction of paper feed and extends into
the unprintable region of the page (not shown).
Possible causes
Poor contact shaft to bushing in T2 roller (consumable).
Troubleshooting and suggestions
1. Replace the image transfer (T2) roller, which is where the contact bushing failed.
2. Check high voltage paths from T2 roller back to the HVPS for intermittent, bent, or corroded
contacts.
3. Replace T2 roller assembly (FRU).
top
Arc - Post charger corona
Frequency 5
Figure 57: Arc - Post charger corona
file://C:\documentum\checkout\preview.htm
7/12/2004
HP Color LaserJet 9500 Series Printers - PQ Defects Guide
Page 68 of 72
Defect description
Very sharply defined bands that are irregularly spaced in all colors. Some lines extend into the
unprintable region, not shown in the sample above. Occurs only when duplexing and only on the
first side (printed page 2).
Possible causes
Poor connections along high voltage supply to post charger corona wire.
Troubleshooting and suggestions
1. Check high voltage connections to post charger corona and ITB assembly grounds.
2. Reseat ITB assembly.
3. Replace ITB assembly.
top
Beautiful arc
Frequency 5
Figure 58: Beautiful arc
file://C:\documentum\checkout\preview.htm
7/12/2004
HP Color LaserJet 9500 Series Printers - PQ Defects Guide
Page 69 of 72
Defect description
An Arc occurred somewhere in the system that affected all parts of the system. Note the toner in
the unprintable regions of the page.
Possible causes
Unknown
Troubleshooting and suggestions
1. Run a color band test (multiple copies) with paper type set to a mode that runs half speed
(HP Glossy) to attempt to isolate the problem to T1 or T2.
2. Inspect all connections on all high-voltage paths from ground back to the HVPS for damaged
connectors, corrosion or anything else that might cause an open or intermittent connection.
top
4.5 mm streaks
Frequency 4
Figure 59: 4.5 mm streaks
file://C:\documentum\checkout\preview.htm
7/12/2004
HP Color LaserJet 9500 Series Printers - PQ Defects Guide
Page 70 of 72
Defect description
4.5 mm bands running parallel to the feed direction.
Possible causes
Contaminated cleaning brushes in an Image Drum. The brushes move back and forth on the OPC
at a 4.5 mm amplitude. The contamination on the brushes causes the OPC to be more effectively
cleaned in the area of contamination, which affects the final image in lighter or darker areas. The
contamination may be caused by a loss or partial loss of high voltage to the brushes.
Troubleshooting and suggestions
1. Run a set of PQ Troubleshooting pages to isolate the defect to a specific color plane.
2. Remove the indicated image drum and inspect the high voltage contacts on the drum and in
the print engine for damage. Check the high voltage connections for continuity back to the
HV power supply.
3. Replace the indicated image drum.
4. Replace the HV power supply.
file://C:\documentum\checkout\preview.htm
7/12/2004
HP Color LaserJet 9500 Series Printers - PQ Defects Guide
Page 71 of 72
top
Very narrow margin on long edge of duplexed 11 by 17 page
Frequency 4
Figure 60: Narrow margin on long edge of 11 by 17 size media
Defect description
With this defect both sides of a duplexed page have a very narrow margin on one long edge of the
page. This narrow margin is on the same edge on both sides of the duplexed printouts. The yellow
on the samples also appear to be much denser than normal.
Possible causes
Data may be corrupted or need to be flushed out of NVRAM.
Troubleshooting and suggestions
This ended up being resolved by performing an NVRAM reset.
top
Defects with no samples
Edge effect from contact developer
file://C:\documentum\checkout\preview.htm
7/12/2004
HP Color LaserJet 9500 Series Printers - PQ Defects Guide
Page 72 of 72
Frequency 5
Defect description
Dark/Light areas in fill areas around text characters.
Possible causes
Occurs at mid to latter part of developer life.
Troubleshooting and suggestions
1. Decrease fill percentage and problem goes away
2. Manual edge control setting in software?
NOTE:
Onsite visits and parts replacement (such as printer parts or consumables) will do
nothing to alleviate edge effect. Do not dispatch onsite service or parts for this
defect.
top
file://C:\documentum\checkout\preview.htm
7/12/2004