1
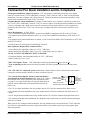
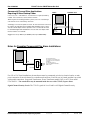
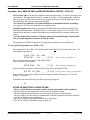
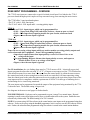
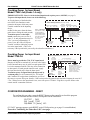
AES•7750-F
Including 7750-F-4x4 and 7750-F-8
RF Subscriber Unit Version 2
INSTALLATION & OPERATION MANUAL
1 1
1 0
0 3
AES Corporation
285 Newbury Street • Peabody, Massachusetts 01960-1315 USA
Tel 978-535-7310 • Fax 978-535-7313
Copyright 2000 All Rights Reserved
40-0590 Document Rev B1 Issued 4/01
Updated 11/03
Doc # 40-0590
7750-F -Series SMART Subscriber Unit
pg 2
Table of Contents
Wiring and Parts Location Diagrams .....................3
Initializing the Unit ................................................ 20
Commercial Fire Alarm Installation
and UL Compliance .....................................4
General Requirements ...................................4
UL Burglary ...................................................5
Compliance Chart ...................................... 6,7
Fire Application; Canadian Installations ......8
Status Check ........................................................... 21
Physical Installation ..................................................9
Other Functions ...................................................... 22
Default Reset
Monitoring Modes
Key Transmitter
Sending/Receiver ASCII Text Messages
Enable/Disable Repeating
Time-to-Live Programming
Power Up, Initial Programming ........................... 10
Programming the Subscriber from a PC ............. 26
Error Messages, Troubleshooting ........................ 11
Antenna Cut / Acknowledge Delay Output ......... 26
Status Indicators ..................................................... 11
7750-F Specifications, FCC Compliance ............. 27
Programming the Unit ...........................................
Overview .........................................................
Setup Unit .......................................................
ID #; Dealer Code; Enable Repeating
Set Check-In Time .........................................
Zone Trigger Programming .........................
Zone Trigger Wiring Diagrams....................
Supervised / Fire - EOL; Reversing Polarity
12
12
13
Warranty / Service Procedures ............................. 28
Quick Programming Guide ................................... 29
14
15
18
Copyright 2000, 2001, 2003 • AES Corporation • All Rights Reserved
AES•IntelliNet is a Registered Trademark of AES Corporation
Model Number 7750-F-8 Series Subscriber Unit
Electrical Rating: 12VDC nominal
Current Draw:
Standby
Transmit
Subscriber Unit Only
584ma
1.55A
Subscriber Unit & 7068 'Tap 660ma
2.00A
Onboard Fuse: Self Resetting / Not User Serviceable
In-Line Battery Fuse: 3 Ampere
12V Rechargeable Battery*: 7AH (24 Hr); 14AH (60 Hr)
*If battery(s) are housed in separate enclosure see page 8.
Low battery condition is reported to the central station.
All Circuits Power Limited.
Model Number 7750-F-4X4 Series Subscriber Unit
Electrical Rating: 12VDC nominal
Current Draw:
Standby
Transmit
Subscriber Unit Only
230ma
1.2A
Subscriber Unit & 7068 'Tap 295ma
1.3A
Onboard Fuse: Self Resetting / Not User Serviceable
In-Line Battery Fuse: 3 Ampere
12V Rechargeable Battery*: 7AH (24 Hr); 14AH (60 Hr)
*If battery(s) are housed in separate enclosure see page 8.
Low battery condition is reported to the central station.
All Circuits Power Limited.
AES•IntelliNet Central Alarm Reporting System
40-0590b1.p65
revised 11/03 zd03C
Rev B1 11/03
Doc # 40-0590
7750-F -Series SMART Subscriber Unit
pg 3
Wiring and Parts Location Diagram
WARNING: For Continued Protection
Against Fire, Replace Only With Same
Type and Rating of Fuse
J1 Accessory Port & Programmer
Connector
DO NOT Connect to Telephone Line!
Transceiver
TX Transmit
STATUS
INDICATORS:
RX Receive
See page 11
WA Waiting
Reset Switch
Antenna Cut / Ack Delay Output- J4:
+12V Open Collector; 12V present when
problem condition is detected. Connect to
relay, sounder or other device - max load
200 ma.
Mating connector #12-0388-J4
Output +
J4
Observe
Polarity!
red
black
J3
_
Battery*
EARTH GROUND - Green Nut
- Use a ring lug connector
and 18 gauge (min) wire to
connect to a suitable earth
ground, such as a metal
cold water pipe.
Power In: 16VAC, 30VA,
Class 2 (dry) source only.
UL/NFPA72 installations use
Amseco #XP1640 or XT1640.
ULC and cUL installations use
listed power source
Foster Trans p/n 15952, or
ATC-Frost p/n FTA7518ULC
Power
Input
Connector To Zone Input Board
See Input Detail Below
7750-F4x4
Zone Inputs
7750-F4x4 Input Module
Input Board (#7760) - Opto-Isolated
Zones 1 - 4, Input Triggers
Z1
Z2
Z3
Z4
Typical Input: Dry Contact
EOL Programmable Options:
Supervised, Fire, Bypass; Restorals
Zones 5 - 8, Reversing-Voltage Input Triggers
Z5
Z6
Z7
Z8
+
EOL resistor must be located
inside the control unit
Shown Wired for Fire / EOL:
1K resistor = Normal / Close = Alarm / Open=Trouble.1K
Max Line Impedance = 100 ohms plus EOL resistor.
_
_
+
+
_
3
Amp
Fuse
Power for Zones 1-4
12VDC nominal
Power must be provided to input board for Zones 1 - 4.
(accepts 8-28 VDC)
Requires 8-28VDC to terminals (J4) at center of input board.
See Notes
Internal battery may be used, but earth ground will be tied to common
terminals. This may affect connection to other panels. If earth ground
cannot be used, supply the input board with power from the alarm panel.
Zones 1-4, To monitor power on Input Board when powered by an
alarm panel: For all Commercial Fire, UL burglar and Canadian UL
burglar alarm installations, use one of the Z5-Z8 as a power fail report.
Bridge power to one of the Z5-Z8 inputs. Program the zone for "F". If
power fails, the zone reports "Trouble". Flag this at the central station in
automation software as a power fail.
+
_
+
_
+
_
7750-F-4x4, Zones 5 - 8,
Reversing-Voltage Input from Fire Panel,
• Input Range: 10 to 30VDC filtered;
+/_ Voltage as Shown = Normal
_/+ Reversed Voltage = Alarm
Low / No Voltage = Trouble
• Intended for Connection to a Polarity Reversal Circuit of a
Control Unit having Compatible Ratings (example on zone 7).
• Also used to monitor power when a remote source is used
to power isolated zones 1-4 (example on zone 5).
• Current Draw for Zones 5-8, at 10V=2.5 ma; at 30V=10 ma.
• The Reversing Voltage inputs are self powered.
• Program unused inputs for BYPASS, otherwise unused inputs
report as "trouble".
7750-F8 Input Module
7750-F8
Zone Inputs
Input Board (#7761) - Opto-Isolated
Zones 1 - 8 Input Triggers
_ +
8-28VDC
Power must be provided to 7761 "F-8"
input board. Requires 8-28VDC to
terminals (J3) at lower left of input board.
Internal battery may be used, but earth
ground will be tied to common terminals.
This may affect connection to other
panels. If earth ground cannot be used,
supply the input board with power from
the alarm panel.
3
Amp
Fuse
GND
Main Circuit Board
See AES-IntelliTAP
Installation Guide,
#7068 Optional
Document # 40-0571
AES-IntelliTAP
Dialer Data Rcvr
7750-F4x4 Zones 1 - 4
+ Rechargeable
ALM Status
BATT
- +
ENTER MSG:
Antenna
7041 Programmer
WARNING!ConnectAntenna
BeforeConnectingPower!
AES 7750-F Series Radio Subscriber Unit
J3
3
Amp
Fuse
_
EOL resistor must be located
inside the control unit
Zones 1 - 8 Input Triggers
+
Power: 12VDC
Nominal
3.01 K
(accepts 8-28 VDC)
See Notes
To monitor power on Input Board when powered by an alarm panel: For all Commercial Fire, UL burglar
and Canadian UL burglar alarm installations, use one of the zones as a power fail report. Install a 3.01K
resistor on the designated zone terminals. Program the zone for F / Fire. When power to the input board is
lost, zone will report a "Trouble". Flag this as a power failure at the central station / automation software.
AES•IntelliNet Central Alarm Reporting System
(C=Common)
1 C 2 3 C 4 5 C 6 7 C 8
40-0590b1.p65
Typical Input: Dry Contact
Programmable Options:
EOL Supervised, Fire, Bypass; Restorals
Shown Wired for Fire / EOL:
3.01K resistor = Normal / Close = Alarm / Open=Trouble.
Max Line Impedance = 300 ohms plus EOL resistor.
revised 11/03 zd03C
Rev B1 11/03
Doc # 40-0590
7750-F -Series SMART Subscriber Unit
pg 4
Commercial Fire Alarm Installation and UL Compliance
UL Burglar Installations Tamper Protection: A UL Listed tamper switch that protects the cover against
removal is required on the 7750-F Additionally, when the 7750-F is used on a Safe or Vault UL burglar alarm
installation, a rear pry-off tamper and a shock sensor UL Listed for protection of sheet metal enclosures is also
required to be mounted on the inside of the 7750-F unit.
Canadian Burglar Alarm Installations: A tamper switch listed for use in Canada is required for protection of
the 7750-F's cover. Additionally, when the 7750-F is used on a Safe or Vault burglar alarm installation in Canada,
a rear pry-off tamper and a shock sensor Listed for protection of sheet metal enclosures is also required to be
mounted on the inside of the 7750-F unit. The rear pry-off tamper and shock sensor must be Listed for use in
Canada.
Power Requirements: 16 VAC, 30VA;
• For UL certificated burglar installations, use the Listed AMSECO transformer p/n XP-1640 or XT-1640,
• For commercial fire alarm installations in the U.S., use the Listed AMSECO transformer p/n XP-1640 or XT1640.
• For commercial fire alarm installations in Canada, use the Listed Foster Model 15952 transformer or ATC-Frost
model FTA7518ULC.
• Do Not Connect To A Receptacle Controlled By A Switch
Back Up Battery Requirement, Commercial Fire
• Central Station Fire Signalling (24hr): use a 12V, 7 AH battery
• Remote Station Fire Signalling (60hr): use a 12V, 14 AH battery pack (see page 8)
UL 681, CAN/ULC-304-M88 and CAN/ULC-S303-M91:
• Commercial Burglar Alarm Installation (4hr) use 12V, 7 AH battery
• Replace battery(s) every 3 years
7750-F EOL Inputs / Zones: EOL Alarm Inputs must be programmed for Supervised or Fire.
• Type of signaling service; manual fire alarm, automatic fire alarm, sprinkler supervisory and water flow
alarm.
• For a UL and ULC certificated system, maintenance contracts must be in force between the central station
issuing the certificate and the subscriber with the certificated system.
• For Central Station Burglar Alarm Systems that Require
Two Methods of Signal Transmission (see chart pg 6) - connect
the J4 output of the 7750-F Subscriber Unit main circuit board
(see page 3) to a relay module that will cause the alarm panel to
generate a local audible and visual annunciation when the antenna is cut.
Antenna Cut /
Comm Trouble
Output
+
J4
Mount relay inside
the Subscriber enclosure
Supervised
Loop from
Alarm Panel
NC
Relay
• For U.S. fire alarm installations, the relay module must be UL Listed for commercial fire alarm service.
• For Canadian fire alarm installations, the relay module must be Listed for commercial fire alarm service in
Canada.
• For UL burglar alarm installations the relay module must be UL Listed for commercial burglar alarm service.
• For commercial burglar alarm installations in Canada the relay module must be Listed for commercial burglar
alarm use in Canada.
When used for fire or burglar alarm installations, the relay module must be located inside the 7750-F subscriber
unit. The wire connections between the control panel and the relay module must be supervised against opens,
shorts and grounds.
AES•IntelliNet Central Alarm Reporting System
40-0590b1.p65
revised 11/03 zd03C
Rev B1 11/03
Doc # 40-0590
7750-F -Series SMART Subscriber Unit
pg 5
• For UL Grade A and AA Central Station Burglar Alarm Installations, the 7750-F subscriber unit shall be connected to
a UL Listed central station control panel such that:
a) Opening and closings signals are provided.
b) A means is provided for the central station operator to signal the subscriber that a normal closing signal has been received
(i.e. a ringback signal).
c) The control panel and the AES radio Subscriber Unit must monitor each other's method of signal transmission. The
operable method of signal transmission shall send a signal to the central station if the other method of signal transmission is
unable to transmit. The signal shall identify the condition.
d) The time lapse between the occurrence of the above, such as the removal of the antenna, that can prevent the receipt of
signals from the protection system and the annunciation and recording of that condition at the central station shall not
exceed 200 seconds.
e) The time lapse between the occurrence of a status change in a protection system and the annunciation and recording of
that change at the central station shall not exceed 90 seconds.
f) The cover to the 7750-F is protected with a UL Listed tamper switch.
• For UL Grade B and BB Central Station Burglar Alarm Installations, the 7750-F subscriber unit shall be connected to
a UL Listed central station control panel such that:
a) Opening and closings signals are provided.
c) The control panel and the AES radio Subscriber Unit must monitor each other's method of signal transmission. The
operable method of signal transmission shall send a signal to the central station if the other method of signal transmission is
unable to transmit. The signal shall identify the condition.
d) The time lapse between the occurrence of the above, such as the removal of the antenna, that can prevent the receipt of
signals from the protection system and the annunciation and recording of that condition at the central station shall not
exceed 200 seconds.
e) The time lapse between the occurrence of a status change in a protection system and the annunciation and recording of
that change at the central station shall not exceed 90 seconds.
f) The cover to the 7750-F is protected with a UL Listed tamper switch.
• For UL Grade A and AA Police Station Connected Burglar Alarm Installations, the 7750-F subscriber unit shall be
connected to a UL Listed central station control panel such that:
a) The time lapse between the occurrence of a status change in a protection system and the annunciation and recording of
that change at the central station shall not exceed 90 seconds.
b) The control panel is connected in conduit to a UL Listed burglar alarm sounding device. Depending upon the particular
installation an alarm sounding device housing may also be required.
c) A bell test on arming is also provided.
• For UL Grade C and CC Central Station Burglar Alarm Installations, the 7750-F subscriber unit shall be connected to
a UL Listed central station control panel such that:
a) The control panel and the AES radio Subscriber Unit must monitor each other's method of signal transmission. The
operable method of signal transmission shall send a signal to the central station if the other method of signal transmission is
unable to transmit. The signal shall identify the condition.
b) The time lapse between the occurrence of the above, such as the removal of the antenna, that can prevent the receipt of
signals from the protection system and the annunciation and recording of that condition at the central station shall not
exceed 200 seconds.
c) The time lapse between the occurrence of a status change in a protection system and the annunciation and recording of
that change at the central station shall not exceed 90 seconds.
For Safe and Vault Burglar Alarm Installations for any Grade, the 7750-F must also be protected with a UL Listed rear
pry-off tamper and a shock sensor Listed for the protection of sheet metal enclosures.
AES•IntelliNet Central Alarm Reporting System
40-0590b1.p65
revised 11/03 zd03C
Rev B1 11/03
Doc # 40-0590
7750-F -Series SMART Subscriber Unit
pg 6
Compliance Chart - AES 7750-F SUBSCRIBER UNIT
Tamper Protection - Case
Supervision -Inputs
Shock Sensor Required
Rear Pry Off Sensor Required
More Than One Method of Signal
Transmission Req
(ie DACT, Der Ch, Mpx Line)
24
No
No
Yes
T6-2 24 hr
T7-2 24 hr
No
No
No
B) Central Station Fire
(UL 864 / NFPA72, UOJZ, UOJZ7, IPXX7)
24
No
No
Yes
T6-2 24 hr
T7-2 24 hr
No
No
No
C) Remote Station Fire
UOJZ, UOJZ7, UOXX, UOXX7)
60
Yes
No
Yes
T6-2 24 hr
T7-2 24 hr
No
No
No
Central Station Burglar Alarm
(UL 1610, CAN/ULC-S304-M88, AMCX, AMCX7
4
No
(opt)
Yes
Yes
1
AA-(1,2)
On
A(2,3) B(3) S+V
BB (1)
only
C (3)
(5)
CC (1)
On
S+V
only
(5)
Yes
No, No
Yes
No
Yes
Police Station Connected Burglar Alarm
(UL 365, CAN/ULC-S303-M91, CAN/ULC-S301-M88
4
No
(opt)
Yes
Yes
1
AA (1)
A (3,5)
On
S+V
(5)
On
S+V
(5)
Yes
No
Local Burglar Alarm - when remote monitoring is
required (UL609, CAN/ULS-S303-M91, AOTX, AOTX7)
4
No
(opt)
Yes
Yes
1
A (4,5)
A(4)
A(4)
Opt
Type 6 Fire
24
or 60
Yes
for 60
No
Yes
2
24 hr
NA
NA
No
Type 7 Fire
24
or 60
Yes
for 60
No
Yes
2
24 hr
NA
NA
No
Check-In Interval (#/See Notes)
Accessory Battery Case Req.
A) Proprietary Fire
(UL 864 / NFPA72, UOJZ, UOJZ7, IPXX7)
Req'd # Paths to Central
Battery Requirement 4/24/60
For All Commercial Fire Alarm Installations (NFPA72), UL Commercial Burglar Alarm Installations (UL 681 * 827), and Commercial Burglar Alarm installations in Canada CAN/ULC-S304M88 & CAN/ULC-S303-M91.
UL 864 / NFPA-72 Standard for Control Units for Fire Protective Signaling Systems (UOJZ and
UOXX, UOJZ when installed as part of the AES-IntelliNet Receiving System and UOXX when used as
an accessory unit with other Listed Receiving System equipment. Includes 4, 5, 6 and 7.
UL 1610, Standard for Central Station Burglar Alarm Units (AMCX).
UL 365, Standard for Police Station connected Burglar Alarm Units and Systems (APAW).
UL 609, Standard for Local Burglar Alarm Units (AOTX) when remote signaling is required.
UL 1076, Standard for Proprietary Burglar Alarm Units and Systems
Type 4, 5 Fire Available; Contact AES for details
See Notes, next page
AES•IntelliNet Central Alarm Reporting System
40-0590b1.p65
revised 11/03 zd03C
Rev B1 11/03
Doc # 40-0590
7750-F -Series SMART Subscriber Unit
pg 7
FOOTNOTES for Compliance Chart on page 6:
1. Since opening/closing and ringback signals are provided by a second communications method
(DACT), the minimum check in time for Grade AA, BB, or CC Central Station Burglar Alarm installation is a least once every 6 minutes.
2. Check-in signals do not apply to Grade A.
3. Grade B and C central station and Police Station Connected Burglar alarm installations require a 24
hour check in.
4. Grade A Local Burglar Alarm installation only refers to equipment of the protected premise. When
remote alarm monitoring is required, the 7750 or 7750-F is suitable.
5. For Safe and Vault (S&V) installations, a rear pry-off tamper switch and a shock sensor, Listed for
protection of sheet metal enclosures, is required on the subscriber unit, in addition to a cover tamper
switch. (This also applies to any burglar alarm installation where the subscriber unit has to be mounted
outside the protected area.)
6. UL Local Burglar- and Police Station Connected- burglar alarm installations are roughly the same as
ULC's Local Burglar Alarm installation except there is no recognition for line security. Thus, Canada's
Local Burglar Alarm installation would be Grade A with or without the connection of remote monitoring.
7. Grade A is a rough equivalent to Level I line security in Canada. Grade AA is roughly equivalent to
Level II line security in Canada.
For UL installations, the wire linking alarm panel to 7750-F must use electrically supervised inputs
(program the subscriber unit for Supervised or Fire Supervised accordingly). If inputs are not supervised,
the 7750-F Subscriber Unit must be mounted a) no more than 3 feet away from the control panel, b)
within the same room as the control panel with no intervening barriers between the two units and c) all
interconnecting wiring from the control panel to the subscriber unit must be run in conduit or the equivalent. Supervision of the zone inputs must be in compliance with the requirements of NFPA 72 for the
type of initiating device and initiating device circuit being monitored.
AES•IntelliNet Central Alarm Reporting System
40-0590b1.p65
revised 11/03 zd03C
Rev B1 11/03
Doc # 40-0590
7750-F -Series SMART Subscriber Unit
Commercial Fire and Other Applications
Requiring 60 Hour Backup Power
pg 8
7750-F
#30-0022 Case
Use two (2) 12V / 7AH batteries. A second case is required, linked by
conduit. Use a listed case, such as AES # 30-0022.
*If battery(s) are housed in separate enclosure, the enclosure must be connected
by conduit to the subscriber unit. For burglar alarm installations in the U. S. the
enclosure and the tamper switch for protection of the cover must be UL Listed.
For Canadian burglar alarm installation the enclosure and cover tamper switch
must be Listed for use in Canada.
Conduit
When required for UL Burglar alarm systems, use a UL Listed tamper
switch on the cover of the battery enclosure.
Neg Pos
Neg Pos
Battery
12V, 7AH
Battery
12V, 7AH
Suggested accessory: AES box p/n 30-0022 (red box p/n 30-0022-RED).
Notes for Canadian Commercial Fire Alarm Installations
7750-F
Conduit
16.5VAC
30VA
Primary
16V, 30VA Transformer
ULC requires a Listed transformer
in a metal enclosure for hardwired
installation.
• Foster Model 15952 or
• ATC Frost Model FTA7518ULC,
18VAC, 75VA
Secondary
For cUL or ULC listed installations, the transformer must be permanently wired to its electrical outlet, or main
power connection. It must be housed in a suitable metal enclosure, Listed for use in Canada, and that is provided
with conduit connections. Suggested Transformers: Foster Transformer model 15952, or ATC Frost model
FTA7518ULC. The transformer may be mounted inside the case of the 7750-F, if space allows.
Signal Channel Security Levels: The 7750-F is good for Level I and Level II Signal Channel Security.
AES•IntelliNet Central Alarm Reporting System
40-0590b1.p65
revised 11/03 zd03C
Rev B1 11/03
Doc # 40-0590
7750-F -Series SMART Subscriber Unit
pg 9
PHYSICAL INSTALLATION
SUBSCRIBER UNIT
Choose a secure, dry location for the subscriber unit.
The unit must be in a climate controlled area, avoiding
extremes of heat or cold. Attach to a suitable, strong
surface using proper fasteners. Pre-cut “knockout” holes
are provided on the back and sides of the case for wiring
access - After the subscriber unit is mounted, install the
radio transceiver. For burglar applications, the unit should
be located away from the alarm control panel - hidden if
possible - and must be within the protected area. If an
intruder attacks the control panel, the transceiver will still
be able to send a signal.
ANTENNA
The antenna should be mounted in a location near the
transceiver to minimize signal loss due to cable length.
Also, it should be located as high as possible, on or in the
structure, with attics and rooftops locations preferred
(Subscriber Unit must not be located in the attic as
extremes of temperature can affect performance.) The
antenna must be grounded properly to prevent lightning
damage in accordance with building codes. To protect
against attack for burglary applications, the antenna and
cable must be within the secured area.
Antenna Location is Important - In many cases, the
2.5db case-mounted antenna (#7210-3-UR/C, below) is
adequate. Otherwise, use a separate antenna positioned as
high as possible and away from metal: some structures are
insulated or sided with metal foil-backed materials, or
may contain a lot of metal reinforcement inside the walls.
This causes significant radio signal loss. In such cases,
choose a location outdoors (inaccessible to intruders for
burglary uses), in the attic (assuming that the roof has no
foil) or near a window. Position the antenna away from
metallic surfaces of any kind. Antenna must be mounted
in a vertical position for best performance.
ANTENNA OPTIONS (460-470 MHz)
• 2.5 db Antenna & Cable - mounts on Subscriber Unit case, order p/n 7210-3-UR/C
• 3 db Stealth Antenna & Cable - mounts in
attics, vents, walls, behind drapes order p/n
7211
• 5 db Antenna* - steel mast, in/outdoor, with
mount, 3 ft, p/n 7210-5-UM
• 6 db High Gain* - fiberglass mast, in/outdoor,
with mount, 4.5 ft, p/n 7210-6-UC
• 7 db High Gain* - fiberglass mast, in/outdoor,
with mount, 6 ft, p/n 7210-7-US
AES•IntelliNet Central Alarm Reporting System
Antenna
See options below
Cable (transceiver-to-antenna)
See options below
Subscriber Unit
# 7750-F
Transceiver
Smart Controller Board
Zone Input Board Options
• F4x4, 4 Rev Pol Inputs + 4 EOL
• F8, 8 EOL
Options
• AES-IntelliTAP Local Dialer Data Receiver
"Taps" the data from the alarm
panel dialer output.
12345678901234
12345678901234
12345678901234
12345678901234
12345678901234
12345678901234
12345678901234
12345678901234
12345678901234
12345678901234
• FDX Full Data Transfer Alarm Panel to Radio Link
Backup Battery
• Wire linking alarm panel to
7750-F, use "supervision" or
"fire supervision" options for
zone inputs.
Alarm Control Panel
The 7750-F links to any listed fire
or burglary control panel.
• 9 db High Gain* - fiberglass mast, in/outdoor,
with mount, 8 ft, p/n 7210-9-UC
*=requires cable, see below:
CABLES, BNC/N, for all AES Subscriber Units,
hi performance, low loss for -UM, -UC and -US
antennas. Cables and connectors are pre-assembled and tested.
• 10 Ft Cable, p/n 7220-10-N
• 25 Ft Cable, p/n 7220-25-N
40-0590b1.p65
revised 11/03 zd03C
Rev B1 11/03
Doc # 40-0590
7750-F -Series SMART Subscriber Unit
pg 10
Power Up, Initial Programming
NOTE: When a subscriber unit is powered up, it immediately enrolls itself on the network, generating
signals to the central station. Central station operators must be forewarned of activity on this account to
avoid the chance of false alarm.
Connect handheld programmer to the controller board (see diagram, page 3). Note that all AES subscriber units use the same programmer, but there are two types of connector/cable assemblies. The
7750-F uses the type with the 6 pin modular telephone type plug at both ends (available from AES).
Connect power to the unit: 12V, 7AH (or larger) battery to battery terminals. Then, with the transformer
NOT plugged in, connect the output of a 16-18VAC, 30-40 VA class II transformer to the power input
terminals. Plug in power to the power input (see page 3). Be certain that the transformer is connected to
an outlet that is NOT controlled by a switch. (See also UL and cUL Compliance notes on pages 4-8.)
After power is connected, push Reset Button for a fresh reset.
The controller runs a “self test”. After a few seconds, a message will appear on the handheld
programmer:
SELFTEST-PASS
SUB [rev#] 7750F
ID#: [4 digit ID number] (C)[YEAR] AES
If the message reads SELFTEST - PASS, you may proceed to the "Programming the Subscriber
Unit" section. Note that the current ID# for this unit is displayed, as well as the software version
and date.
If the messages reads SELFTEST - FAIL [Error Code], retry the procedure by pushing the controller RESET button (see diagram). Errors reported during the self test may be the result of
transient conditions caused during a cold power up or by power interruptions during a programming procedure. Pushing the RESET button clears many of these problems.
If the Fail message persists, see the list of error messages on following page.
Repeat the procedure several times if necessary. If the unit consistently fails the self test, it must
be serviced.
AES•IntelliNet Central Alarm Reporting System
40-0590b1.p65
revised 11/03 zd03C
Rev B1 11/03
Doc # 40-0590
7750-F -Series SMART Subscriber Unit
pg 11
SELF TEST ERROR MESSAGES: An [Error Code] is listed when the unit fails the self test.
Some may be correctable on site. Check that all IC's are seated properly in their
sockets - on rare occasions chips may come loose in shipment.
Message:
Procedure:
01
Battery / power input is low.
Push RESET button, see if unit will pass self test; If the unit fails
and reports the same message, replace battery and/or check main power voltage.
Message:
Procedure:
02
Random Access Memory (RAM) Checksum failure; may be caused by
initial power up, or by power interruption during a programming procedure.
Push RESET button, check if unit will pass self test; If unit passes,
please note that it must now be reprogrammed (see next section). If unit
fails, memory may be damaged and require service.
Message:
Procedure:
03
Self test detects both problems 01 and 02 above.
Follow procedures described in 01 and 02 above.
Message:
Procedure:
04 or 06, EEPROM Failure
Push RESET button. If the unit fails and reports the same message, EEPROM
chip may be bad. Push RESET button: if unit passes, please note that it must now
be reprogrammed (see next section). If unit fails, memory may be damaged and
require service.
Message:
Procedure:
08, Analog Digital Converter / ADC Failure
Same as 04 / 06 failure, see above
Message:
Procedure:
80
Loopback Test Failure, common on initial power up
Push RESET button, unit will likely pass self test; If the unit fails repeatedly and
consistently reports the same message, contact factory for service.
Message:
Procedure:
100
AC Not Present
Check AC power input, transformer
Other Messages:
Unit requires AES authorized servicing. Report error code to AES service rep.
ALM WA RX TX
IMPORTANT! STATUS INDICATORS - A Key Source of Information
STATUS
INDICATORS:
LED's on
upper right
edge of the
board
TX - indicates radio transmit
RX - indicates radio receive (includes any radio on activity on this frequency)
WA - Steady On = Waiting for acknowledgment of last transmission;
- Steady Blinking = Not on Network;
- Off = Normal
AL - Alert / troubleshooting indicator, “blink” codes as follows:
"·" = short, " — " = long
·
·
·
steady blink - system OK;
··
··
··
short-short blink - low battery;
·—
·—
·—
short-long blink - an input zone is in alarm or trouble;
··—
·· —
· · — short-short-long blink, low batt & zone in alarm/trouble;
· ··
· ··
· · · short-pause-short-short, AC Fault
·· ·· ·· ··
· · · · short-short-pause-short-short, AC fault & low batt
————————————————— steady / no blink - Selftest failure (excl low batt)
AES•IntelliNet Central Alarm Reporting System
40-0590b1.p65
revised 11/03 zd03C
Rev B1 11/03
Doc # 40-0590
7750-F -Series SMART Subscriber Unit
pg 12
PROGRAMMING THE SUBSCRIBER UNIT
Having passed the SELFTEST procedure, you are now ready to program the subscriber unit. Previously
programmed information is stored in nonvolatile memory, so the settings are not lost during a power
down or failure condition.
Overview of Programming Items:
• THE ID NUMBER selected for this subscriber unit must be unique, different from all other ID numbers in the system.
• THE CIPHER must be the same for all subscriber units and the central station on the network. The
cipher serves as a password for units monitored by a specific central station. Thus if more than one
AES-IntelliNet network is operating on the same radio frequency, the networks are kept separate by this
code.
• ENABLE REPEATING function is used to enable or disable the subscriber units ability to relay
messages. In general, enter Y/yes for all standard subscriber unit installations. However, mobile units
must never use repeating - enter N/no for these applications.
• CHECK-IN TIME*: is the interval between supervisory signals to the central station. The allowable
range is 1 minute to 24 hours. Use short check-in times ONLY for those installations that require it.
Short check-in times create traffic that may slow the network speed.
• THE REPORT DELAY*: defines how often a unit can report an additional alarm. This allows the
subscriber unit to accumulate multiple alarm events for each report, and assures the orderly flow of
information through the network. The range is 0-330 seconds, the default is 10 seconds.
• ZONE PROGRAMMING*: The 7750F offers 2 zone input board options:
• The "F-8", with 8 - EOL zone inputs,
• The "F-4x4" with 4 - EOL inputs and 4 - reversing polarity inputs.
Zones can be individually programmed. For the EOL inputs, choose from Supervised, Fire Supervised or
Bypass. Other options include reporting of zone input Trouble** and Restoral. Use Restorals ONLY for
those installations that require it. Restorals create traffic that may slow the network speed.
• ESCAPE/ ABORT FEATURE: press the ESC escape key on the programmer to abort an operation at
any time. NOTE: If you started to enter data and then press Escape, you may lose the data that was stored
there. In this event, repeat the programming procedure.
• TIMEOUT/SAFEGUARD FEATURE: During programming, you have one minute to complete a
function procedure. After one minute passes, the procedure is aborted. The message appears: TIMEOUT.
*NOTE: Functions noted by a * may be programmed using either the handheld programmer or the
AES Net software supplied with the AES 7100/7700 Central Station Controller. It is much easier to
use the Net software to program the subscriber units. If the AES Net7K or Net77 software is used
in the system, it is recommended that these functions be programmed using the Net software
to enable it's powerful, centralized database capability.
**NOTE: Reporting of "Trouble" packets messages requires a version 1.70 or newer receiver.
PRE-VERSION 1.70 RECEIVERS WILL NOT RECEIVE TROUBLE MESSAGES.
Check with the central station manager. If the receiver is pre-1.70, it should be upgraded to the
current version. Contact AES Corporation or details.
AES•IntelliNet Central Alarm Reporting System
40-0590b1.p65
revised 11/03 zd03C
Rev B1 11/03
Doc # 40-0590
7750-F -Series SMART Subscriber Unit
pg 13
Procedure: SETUP UNIT - CTRL+F1
The initial unit setup must be done with the handheld programmer.
NOTE: Entering new data with this function will overwrite (erase) any previously stored
information on ID# and the Cipher Code. Pushing the ENTER key without entering new
data saves the previously stored information. The programmer should be connected and
the power should be on (as in self test).
To start, push Programmer keys (CTRL)+F1 (hold down the Control key and then the F1 key).
The following message appears:
SETUP UNIT -OLD: NEW
ENTER ID#- 1234: ____
Previously stored "old" data;
Enter new data here
To keep previously stored ID#, simply push ENTER. To change the ID#, enter the 4 digit identification number for this unit using any of the 16 hex numerals, and then push ENTER. The ID
number must be unique, different from all other ID numbers in your system.
After entering the ID number, the following message appears:
For security, stored data not shown;
CPHR CODE-- XXXX: ____
Enter the correct code here
Unit must be programmed with the cipher code chosen for your network. Enter the 4 digit dealer
code as assigned by the system administrator, then push enter.
NOTE: The code must match that of the central station - If the wrong code is used, the unit
cannot log on and will not work.
NOTE: DO NOT USE ZERO (0) AS A Cipher CODE. Zero is used at the factory for test and
burn in purposes and should not be used in a live installation.
After entering the dealer code, the following message appears:
OK
NOTE: The "SETUP UNIT" functions - Unit ID and Cipher - are the only functions that must be
performed using the handheld programmer. You may complete the programming with the handheld programmer, but it is recommended that you program the remaining functions (timing, zone
programming) using the AES Net software. Refer to the Net77/7K manual to complete the programming procedures.
AES•IntelliNet Central Alarm Reporting System
40-0590b1.p65
revised 11/03 zd03C
Rev B1 11/03
F
Doc # 40-0590
7750-F -Series SMART Subscriber Unit
pg 14
Procedure: Set CHECK-IN TIME and REPORTING DELAY PERIOD - CTRL+F2
The Check-In Time is the interval at which the subscriber unit sends it’s “Check-in” messages to the
central station. The range for this feature is 1 minute to 24 hours. For most applications, a check-in
interval between 12 and 24 hours is used. More frequent check-ins are used for high security users.
Note that shorter intervals create more network traffic.
• Set Check in as required for UL Listed installations; set automation software accordingly.
• See pages 4-8 for UL and Commercial Fire compliance notes.
The Reporting Interval is the time period after the initial alarm (which transmits instantly) and
before the next transmission. The default value is 10 seconds, the range is 0 to 330 seconds. This
function allows the unit accumulate alarm data between transmissions for optimum system performance.
• For all Commercial Fire Alarm, UL Burglar Alarm, and Canadian Burglar Alarm installations, the Reporting Interval must not exceed 10 seconds.
The programmer should be connected to J1 programmer port and the power should be on.
To start, push Programmer keys (CTRL)+(F2)
Press programmer keys CTRL + F2 (hold down the Control and the F2 keys at the same time). The
following message appears:
CHKIN TIME--OLD: NEW
ENTER HRS----HH: __
[0-24]
Enter a number between 0 and 24, and push ENTER.
Next, the minutes field appears
(HH = Previously programmed hours)
ENTER MINS---MM: __
[1-59] (MM = Previously programmed hours)
Enter the number of minutes, a number between 0 and 59, and push ENTER.
NTR RPT DLY-NNN: ___ [0-330] [seconds] (NNN= previously programmed delay)
Enter a number of seconds to allow between reporting of alarms; the range is 0 to 330; the
default is 10 seconds.
If data has been entered correctly, the following message appears:
OK
NOTES ON SELECTING A CHECK IN TIME:
• Choose a check-in time in accordance with the security requirements of the installation
• Except for high security applications, a check in time of 24 hours is typical.
The more frequent the check in times are set, the more traffic there is on the network.
Excessive traffic can cause delays in communications, and thus frequent check in times should be
used only for highest security applications.
• Do not use a check in time of greater than 24 hours, 00 minutes.
• Also see UL and Fire Compliance section on pages 4-8.
AES•IntelliNet Central Alarm Reporting System
40-0590b1.p65
revised 11/03 zd03C
Rev B1 11/03
Doc # 40-0590
7750-F -Series SMART Subscriber Unit
pg 15
ZONE INPUT PROGRAMMING - OVERVIEW
The 7750-F zone inputs are connected to a special isolated circuit board. It is linked to the 7750-F
processor board through optical couplers to keep unwanted energy from entering the main circuits.
The 7750F offers 2 zone input board options:
• The "F-8", with 8 - EOL zone inputs,
• The "F-4x4" with 4 - EOL inputs and 4 - reversing polarity inputs.
7750F-8
Zones 1-8 are E.O.L. input triggers which can be programmed for:
• E.O.L. / Supervised, using 3.01K end-of-line resistors , alarm on open or closed
• E.O.L. / Fire Supervised, reporting trouble for open circuits, alarm on closed
• Bypass, where the zone input is ignored.
7750F-4x4
Zones 1-4 are E.O.L. input triggers which can be programmed for:
• E.O.L. / Supervised, using 1K end-of-line resistors , alarm on open or closed
• E.O.L. / Fire Supervised, reporting trouble for open circuits, alarm on closed
• Bypass, where the zone input is ignored.
Zones 5-8 are reversing voltage inputs which are used to monitor reversing polarity output used
on fire alarm and other equipment. , Zones 5-8 Programming Options:
• Supervised, reports alarm when input polarity reverses or if there is low or no
voltage on the input
• Fire programming, Reports Alarms when input polarity reverses, and reports a
Trouble if there is low or no voltage on the input.
• Bypass, where the zone input is ignored.
For UL installations, the wire linking alarm panel to 7750-F must use EOL / electrically supervised
inputs (program the subscriber unit with "S" or "F"). If inputs are not supervised, the 7750-F Subscriber
Unit must be mounted a) no more than 3 feet away from the control panel, b) within the same room as
the control panel with no intervening barriers between the two units and c) all interconnecting wiring
from the control panel to the subscriber unit must be run in conduit or the equivalent. Supervision of the
zone inputs must be in compliance with the requirements of NFPA 72 for the type of initiating device
and initiating device circuit being monitored.
The zone inputs can be programmed to match the output of the equipment being monitored by the 7750F subscriber unit. The default setting is Supervised.
See diagrams in the next several pages for further details.
ZONE RESTORALS: Each zone can be programmed to report “restoral” to a normal status. Restoral
reporting is usually reserved for higher security users, as it adds radio traffic to the system. Enable the zone
restorals only when needed. The default setting is for "No" restorals.
NOTE: For systems using AES Net software in the central station, zone inputs can be programmed using that
software. Zones can be set up using the handheld programmer, but it is easier to use the AES software for this
task. Further, the subscriber data programmed using Net software is stored in the central station database.
AES•IntelliNet Central Alarm Reporting System
40-0590b1.p65
revised 11/03 zd03C
Rev B1 11/03
Doc # 40-0590
7750-F -Series SMART Subscriber Unit
pg 16
Bypass
Supervised
Fire*
B
S
F
7750-F-8
Zones 1-8
Open
Resistor - 3.01K
Closed/Short
B
B
B
A
N
A
T*
N
A
7750-F-4x4
Zones 1 -4
Zone Program:
Zone Reporting Chart
Open
Resistor - 1K
Closed/Short
B
B
B
A
N
A
T*
N
A
Normal Polarity
B
N
N
Reverse Polarity
Low/No Voltage
B
B
A
A
A
T*
7750-F-4x4
Zones 5 - 8
Zone Electrical State:
Zone Report:
N=Normal
A=Alarm
T=Trouble*
B=Bypassed zone - no reports
Programming for 7750F-8, Zones 1-8(E.O.L.):
S = Supervised - 3.01K-EOL Resistor; 3.01K ohm = Normal / Open = Alarm / Short = Alarm
F = Fire - 3.01K-EOL Resistor; 3.01K ohm = Normal / Open = Trouble / Short = Alarm
B = Bypass - No Report
Programming for 7750F-4x4, Zones 1-4 (E.O.L.):
S = Supervised - 1K-EOL Resistor; 1K ohm = Normal / Open = Alarm / Short = Alarm
F = Fire - 1K-EOL Resistor; 1K ohm = Normal / Open = Trouble / Short = Alarm
B = Bypass - No Report
Programming for 7750F-4x4, Zones 5-8 (Reversing Polarity):
S = Supervised - Normal Polarity = Normal / Reverse Polarity = Alarm / Low-or-No Voltage = Alarm
F = Fire - Normal Polarity = Normal / Reverse Polarity = Alarm / Low-or-No Voltage = Trouble
B = Bypass - No Report
*NOTE: Reporting of "Trouble" packets messages requires a version 1.70 or newer receiver.
PRE-VERSION 1.70 RECEIVERS WILL NOT RECEIVE TROUBLE MESSAGES.
Check with the central station manager. If the receiver is pre-1.70, it should be upgraded to the current
version. Contact AES Corporation or details.
AES•IntelliNet Central Alarm Reporting System
40-0590b1.p65
revised 11/03 zd03C
Rev B1 11/03
Doc # 40-0590
7750-F -Series SMART Subscriber Unit
pg 17
Procedure: Zone Programming using the handheld programmer - CTRL+F3
Press programmer keys CTRL + F3 (hold down the Control and the F3 keys at the same time). The following
message appears:
FIRE/ ----OLD: NEW
TROUBLE PKT- Y: .
The programming sequence first asks if any "Fire" inputs are to be used. Answer Y/yes if you wish to
have the unit report "Trouble"* conditions. Otherwise answer N/no (refer to chart on preceding page).
The current programming is shown under the "OLD:" If you wish to change the setting, press Y or N,
and push ENTER. To leave unchanged, simply push ENTER. Next appears:
ZONE BANK 0
SET ZONE (BSF) BO
OLD SSSSSSSS LOW>HI
NEW ........
Individual zones can now be programmed. The valid programming options are shown in parentheses.
The options that appear are determined by your input to the Fire/Trouble question above. The current
programming is shown next to the word OLD, Zones 1-8 in order left to right. Your new entries will
appear directly below, next to the word NEW. You must enter a valid letter for each of the 8 zones.
EOL Zone Inputs (Triggers) can be set for:
B - Bypass - No signals sent - all alarm, trouble conditions ignored;
S - Supervised/E.O.L. (alarm on open or short);
F - Fire Supervised E.O.L. (alarm on short; trouble* on open)
Zones 5-8 Reversing Voltage (7750-F-4x4 ONLY) inputs can be set for:
B - Bypass - No signals sent - all alarm, trouble conditions ignored;
S - Supervised (alarm on reverse polarity of input; alarm on loss of voltage);
F - Fire (alarm on reverse polarity; trouble* on loss of voltage)
Press ENTER after entering selections. Next appears:
SET RESTORAL (XR) B0
OLD XXXXXXXX LOW>HI
NEW ........
You can program individual zones to report restorals - ie return to normal status. X= Restorals Not
Reported; R=Restorals Reported. The existing or OLD programming is shown for each zone. Your new
entries will appear directly below, next to the word NEW. You must enter a valid letter X or R for each
zone. Press ENTER after entering selections. When all is complete, the OK message appears.
OK
*Important Note: Reporting of "Trouble" packets messages requires a version 1.70 or newer receiver.
PRE-VERSION 1.70 RECEIVERS WILL NOT RECEIVE TROUBLE MESSAGES.
Check with the central station manager. If the receiver is pre-1.70, it should be upgraded to the current
version. Contact AES Corporation or details.
AES•IntelliNet Central Alarm Reporting System
40-0590b1.p65
revised 11/03 zd03C
Rev B1 11/03
Doc # 40-0590
7750-F -Series SMART Subscriber Unit
pg 18
Wiring EOL Zone Input Triggers for Subscriber Unit
Each zone trigger in the 7750-F area used with an E.O.L. resistive loop, using an end-of-line resistor. See preceding
pages for zone programming.
Unused zones may be bypassed.
IMPORTANT NOTE: Isolated input board requires power, 8-28VDC. Refer to section below.
E.O.L. INPUT TYPE: SUPERVISED or FIRE (also, see chart on page 16)
7750-F Subscriber Unit
Program for Fire
EOL resistor - use at END of line
Normally Open
Dry Contact Closes on Alarm
EOL Zone Input
Program for Supervised
Normally Closed
Dry Contact Opens on Alarm
7750-F Subscriber Unit
1K ohm resistor - use at END of line
EOL Zone Input
7750-F-4x4 NOTE: Maximum resistance of E.O.L. input, including wire and EOL resistor, is 1100
ohms. Thus, when using the 1K ohm resistor supplied, wire resistance must not exceed 100 ohms.
7750-F-8 NOTE: Maximum resistance of E.O.L. input, including wire and EOL resistor, is 3301 ohms.
Thus, when using the 3.01K ohm resistor supplied, wire resistance must not exceed 300 ohms.
7750-F-4x4 only:
Wiring Reversing Polarity Inputs, Zones 5-8
INPUT TYPE: REVERSING POLARITY - Alarm occurs input voltage when polarity is reversed.
• Input Voltage range is 10-30V
• These inputs are self powered
• Program 7750-F zone for Fire (see section on Zone Programming)
7750-F Subscriber Unit
Reversing
(+)
Polarity
Output from FACP (---)
AES•IntelliNet Central Alarm Reporting System
Zone Input 5-8 (+)
(---)
40-0590b1.p65
revised 11/03 zd03C
Rev B1 11/03
Doc # 40-0590
7750-F -Series SMART Subscriber Unit
pg 19
Providing Power for Input Board
Model 7750-F-4x4 (Zones 1-4 only)
3 Amp
Fuse
IMPORTANT NOTE: Zone 1-4 of the isolated input board requires power, 8-28VDC (see page 3).
To power this input board, choose one of the following:
A: Use the battery of the Subscriber
unit. NOTE: this introduces earth
7750-F-4x4 Input Board (7760) - Opto-Isolated
ground to the inputs, which may cause
Zones 5 - 8,
Isolated
Zones 1 - 4, Input Triggers
Power Input Reversing Polarity Inputs
a trouble condition on the inputting
Z1
Z2
Z3
Z4
Z5
Z6
Z7
Z8
for Z1-Z4
device.
Zones 1 - 4, Input Triggers
When using remote power for
or, B: Use the power from the alarm
Typical Input: Dry Contact
input board, monitor for power failure
using one of Zones 5 - 8 (shown:
panel (thus avoiding the earth ground). Programmable Options:
power monitored on Zone 5).
Supervised EOL; Fire EOL;
Program for "Fire"; a no-voltage
To monitor power on the input
Restorals; Trouble; Bypass
condition is reported as a
Shown:
Wired
for
Fire/EOL:
Trouble to the central station.
board, connect the power to one of
1K resistor = Normal
Remote
zones 5 - 8, and program that zone for
Close = Alarm
Open = Trouble
Alarm Panel
"Fire" (see zone programming). If
EOL resistor must
Power from
be located inside
power is lost, this zone will report a
remote alarm
the control unit
panel
"trouble" condition, indicating a power
loss at the input board. (This is not
necessary if the input board is powered by the subscriber unit battery.)
Providing Power for Input Board
Model 7750-F-8
7750-F-8 Input Board (7761) - Opto-Isolated
Isolated
Power Input
1
C
2
Zones / Input Triggers
3 C 4 5 C 6 7
3 Amp
Fuse
Power must be provided to 7761 "F-8" input board.
Requires 8-28VDC to terminals (J3) at lower left of input
board. Internal battery may be used, but earth ground will
be tied to common terminals. This may affect connection
to other panels. If earth ground cannot be used, supply
the input board with power from the alarm panel.
for Zone Inputs
Power from
remote alarm
panel
3.01K EOL resistor
must be located
inside the
control unit.
Shown wired for
Fire/EOL
C
8
3.01K
When using remote power for
input board, monitor for power failure
using one of Zones 1 - 8 (shown:
power monitored on Zone 8).
Program for "Fire"; a no-voltage
condition is reported as a
Trouble to the central station.
To monitor power on Input Board when powered by
Remote
Alarm Panel
an alarm panel: For all Commercial Fire, UL burglar
and Canadian UL burglar alarm installations, use one of
the zones as a power fail report. Install a 3.01K resistor on the designated zone terminals. Program the zone for F
/ Fire. When power to the input board is lost, zone will report a "Trouble". Flag this as a power failure at the
central station / automation software.
CONFIRM PROGRAMMING - RESET
To confirm this procedure, press the RESET button on the controller to check the program.
The reset function runs the Selftest, which prints out the ID number:
SELFTEST - PASS
SUB [rev#] 7750F
ID#:NNNN (C)[date] AES
(If “FAIL” messages appears, push RESET again; If Fail persists, go to page 11 to troubleshoot.)
Proceed to "Initializing the Subscriber Unit", next page.
AES•IntelliNet Central Alarm Reporting System
40-0590b1.p65
revised 11/03 zd03C
Rev B1 11/03
Doc # 40-0590
7750-F -Series SMART Subscriber Unit
pg 20
INITIALIZING THE SUBSCRIBER UNIT
Having passed the self test and programmed the unit, you are now ready to introduce it to the radio network.
It is assumed that an AES•IntelliNet central station is actively monitoring the network and can respond to the
new subscriber unit as it comes on line.
Power down the subscriber unit by disconnecting both the battery and power input. Connect programmer to
subscriber unit (if you have not already done so).
Connect the antenna to the transceiver (if you have not already done so). Do not operate transceiver without
the antenna connected!
Connect the controller-to-transceiver cable with 9 pin connector to the radio transceiver.
Connect the battery first, and then the AC primary power. The controller power indicator should be on. The
Programmer should be connected as described earlier.
Push the Reset button on the controller board (see diagram page 3).
At this point, the message on the programmer should read:
SELFTEST - PASS
SUB [rev#]
7750F
ID#:NNNN (C)[date] AES
(If an "Fail" error message is displayed, push the reset button. If an error message continues to appear, see
page 11 for possible solutions.)
When the reset button is pushed, the subscriber unit goes on the air to query the other subscriber units to set
up the best route(s) to link with the central station. The status lights indicate the process:
• RX, TX and WA lights will all come on briefly, testing the LED's.
• RX comes on during loop back test (a self test);
• TX comes on sending a "Receiver Not in Service" message - a standard power up event;
• AL + WA will blink at different but steady rates
• TX comes on again as unit transmits a "Request for Reply" from other subscriber units
• WA stops flashing after about 30 seconds IF one or more other subscriber units reply to the "Request",
(otherwise the WA continues to flash, indicating the unit is not on the network);
• TX comes on again (if WA stops flashing) to send first "Check-In";
• AL blinks at a steady rate, indicating a normal condition.
When the unit receives a valid acknowledgment, the WA light will turn off. This indicates that the subscriber
unit is now connected to the network.
IMPORTANT NOTE: A flashing WA light (blinking at a steady rate) indicates that the subscriber has NOT
linked itself into the network. Check antenna and all cables; be sure that correct system cipher has been
programmed in to the unit.
The next step is to perform a status check.
AES•IntelliNet Central Alarm Reporting System
40-0590b1.p65
revised 11/03 zd03C
Rev B1 11/03
Doc # 40-0590
7750-F -Series SMART Subscriber Unit
pg 21
Procedure: STATUS CHECK - SHIFT +F4
Performs a quick diagnostic check at any time.
Connect the programmer to J1 programmer port. Be sure that radio and antenna are connected,
and power is on.
Press programmer keys SHIFT+F4 (hold down the Shift key and then press the F4 key). The
following message appears:
SUB [rev#]
7750F
ID#:[NNNN] (C)YYYY AES
RT1:NNNN LEVEL: NNN
STAT:NNN NETCON: N
EXPLANATION OF STATUS CHECK TERMS
ID#: 4 digit ID number programmed into this unit.
LEVEL: refers to the subscriber unit “level" or "link layer”, which tells you how many “hops” the message
packet must make to get to the central station. In general, if the number is 1, then this unit is communicating
directly with the central station. If the number is 2, the unit relays its message through one other subscriber
unit to reach the central station. If the number is 3, the message goes through 2 other subscribers ... and so on.
Also, the level number of subscriber with a weak signal to the unit on the top of its routing list will be
incremented. by 1. A unit level = 255 indicates that unit is not on network.
RT1: refers to the “first route” or primary route in the routing table. The 4 digit number is the subscriber unit
ID of the next hop to the central station. If the unit is communicating directly with the central station , the 1ST
RT is 0000 - the central station ID number. If the subscriber is using intermediate units to communicate, the
RT1 number is the ID number of first subscriber on the message route. If XXXX appears, the unit is not on
the network.
Dynamic Routing Table: Each subscriber unit maintains a list of up to 7 alternate routes. Routes are prioritized according to signal strength and NETCON ratings. This function is dynamic, and is updated constantly.
STAT: Status - shows self-test results (see page 11 for codes).
NETCON: “NETwork CONnectivity”. This is an internal rating function used by the subscriber units to
align themselves in the network. The scale is 0 to 7, 0 being best. Readings of 5 or 6 are common. Units at the
end of the path may show a 7.
Minimum criteria for a "good" repeater are as follows:
1. RF signal exceeds marginal threshold
2. No faults indicated in status (such as low battery)
3. Level/Link Layer of repeater is less than or equal to this unit’s
4. Signal received from unit a least once every 6 hours
5. NETCON of repeater is less than 7
continued...
AES•IntelliNet Central Alarm Reporting System
40-0590b1.p65
revised 11/03 zd03C
Rev B1 11/03
Doc # 40-0590
7750-F -Series SMART Subscriber Unit
pg 22
OTHER PROGRAMMING FUNCTIONS
DEFAULT RESET
CTRL+F5
The Default (Master) Reset function can be used to reset programmed values to their default
settings. The ID# and Cipher are not changed. Use this function only if you wish to reset
all parameters. Power must be on. Connect the programmer to J1 / programmer port.
Press programmer keys CTRL+F5 (hold down the Control key and then press F5 key).
The following message appears:
RESET RAM?
<Your Response:>
(Y) (Enter) for YES, or
(N) (Enter) for NO
If you answer (Y) Yes, all program parameters will be restored to their default values. The
subscriber then goes through its normal “reset” routine. The following message appears:
SELFTEST - PASS
SUB [rev#] 7750F
ID# : [4 digit ID number] (C)[date] AES
The default reset restores program parameters to their default values:
CHECK IN TIME:
ZONE INPUT PROGRAMMING:
24 Hours 00 Minutes
Supervised, All Zones;
NO Restorals Reported, All Zones;
REPORT INTERVAL (DELAY):
10 Seconds
UNIT ID #:
CIPHER
NOT Changed by Default Reset
NOT Changed by Default Reset
REPEATING
Enabled
TIME TO LIVE (TTL)
Enabled for Check-Ins only, 30 minutes
(All other packets - TTL disabled)
AES•IntelliNet Central Alarm Reporting System
40-0590b1.p65
revised 11/03 zd03C
Rev B1 11/03
Doc # 40-0590
7750-F -Series SMART Subscriber Unit
pg 23
OTHER FUNCTIONS, continued
MONITORING Using the Handheld Programmer
Installers can view network data “traffic” on the handheld programmer at a remote site. It is not a practical
way to “read” data (it scrolls off the screen quickly), but it can be useful to see that data is being sent or
received. Three monitor functions can be enabled:
RECEIVE MONITOR ON/OFF
PROCEDURE:
Push programmer keys (SHFT)+(F1)
MESSAGE: RX MONITOR ON (OFF)
Hold down the Shift key and then press the F1 key to enable or disable (toggle) the display of
data addressed to this unit.
TRANSMIT MONITOR ON/OFF
PROCEDURE:
Push programmer keys (SHFT)+(F2)
MESSAGE: TX MONITOR ON (OFF)
Hold down the Shift key and then press the F2 key to enable or disable (toggle) the display of
messages transmitted by this unit.
MONITOR ALL ON/OFF
NOTE: Requires that Receive Monitor must be on - Enter (SHFT)+(F1)
PROCEDURE: Push programmer keys (SHFT)+(F3)
MESSAGE: MONITOR ALL ON (OFF)
Hold down the Shift key and then press the F3 key to enable or disable (toggle) the display of
all network messages within range of this unit.
The monitor functions should be disabled when installation and testing is complete.
NOTE: Text messages cannot be received when any of the monitoring functions are in use. Use these
functions only for test purposes. Toggle the functions OFF when testing is complete, or press Reset
Switch (see page 3).
AES•IntelliNet Central Alarm Reporting System
40-0590b1.p65
revised 11/03 zd03C
Rev B1 11/03
Doc # 40-0590
7750-F -Series SMART Subscriber Unit
pg 24
KEY TRANSMITTER - SHFT+F5
This function activates the transmitter for 6 seconds. This allows the installer to use external test equipment
(SWR, power meter, etc.) to test the radio power, cables connections, antenna tuning and other radio parameters. It is assumed that the programmer is connected to the subscriber, the transceiver is connected to the
subscriber circuit board, power is on and the antenna is connected.
PROCEDURE:
MESSAGE:
Push programmer keys (SHFT)+(F5)
KEYING TX..
Activating this function causes the transmitter to go on the air for 6 seconds, and then shut off automatically.
Press the ENTER key to cancel the transmit test.
SENDING ASCII TEXT MESSAGE (F5)
Text messages can be sent from the subscriber unit to the central station.
PROCEDURE:
MESSAGE:
Push programmer key (F5)
ENTER MSG:
_
[Enter your text message, up to 200 characters. Push ENTER to send.]
If not data is entered within approximately 60 seconds, the unit will exit the text message mode.
Note that the unit is unable to transmit or receive while in this mode
RECEIVING ASCII TEXT MESSAGES
Messages can be sent from the central station to any subscriber unit. If the handheld programmer is
connected to the unit, the message will be displayed on the screen and a beep will sound. This is a
handy feature for communications between installers and central stations.
NOTE: Text messages cannot be received when a monitor function is in use.
ENABLE REPEATING - CTRL+F4
To start, push Programmer keys (CTRL)+F4 (hold down the Control key and then the F4 key. The
following message appears:
previously stored data
ENABLE RPTNG-Y:
_
enter new data (Y/N) here
For most installations, enter a “Y” for YES, and then push ENTER.
NOTE: This enables the repeating function which is critical to the proper operation of the
AES network. In general, repeating is disabled only for mobile units.
To disable this unit from forwarding messages, enter “N” for NO, and then push ENTER. Mobile units such as the 7050MMP or the 7550VLS must not be used for repeater functions.
OK
AES•IntelliNet Central Alarm Reporting System
40-0590b1.p65
revised 11/03 zd03C
Rev B1 11/03
Doc # 40-0590
7750-F -Series SMART Subscriber Unit
pg 25
PACKET TIME-TO-LIVE PROGRAMMING - F2
7750-F Ver 2 subscribers include the new “Time-To-Live” or “TTL” function. The TTL function ensures a smooth, continuous flow of data through the AES-IntelliNet system.
Like the Internet, AES-Intellinet is a packet-based technology. The Time-to-Live concept in the Internet
is based on the fact that all data has a useful life. This is also true in the security industry. Statistics
show that 95+% of all data sent through the AES-Intellinet system are check-in/test timer packets. These
messages can be burdensome to both the network and the alarm automation software attached.
The benefits of TTL are best exhibited when the central station goes off line due to a lightning hit or
some other unlikely, catastrophic event. While the receiver is off line, messages traveling through the
system are stored in the individual subscriber units for later delivery. Under the default TTL settings,
unimportant test timer messages are deleted from the subscriber unit memory after 30 minutes of being
delayed in the network. Thus, the system will not have to handle the message when the central receiver
comes back on line. All other messages, such as alarms, etc. speed there way to the central station as
they normally do.
NOTES:
· Even when a check-in packet is deleted due to a delay, the objective of that message has already
served: the late or missing signal has been flagged at the central station.
· Under the default (factory) settings, only test timer messages are subject to the TTL function. If you
want TTL for other message types, YOU must activate it when you program the subscriber unit (F4 on
the handheld programmer).
· The TTL feature works best when the majority of subscribers, or the subscribers that are most heavily
used, have the feature in the firmware. Call your AES representative for upgrade information.
To start, push Programmer key F2. The following message appears:
PACKET TIME TO LIVE
CHECK IN----OLD:NEW
Previously stored data
ENTER HRS----00:..
Enter new data here
Enter new data Hours 0-24, or push ENTER to accept old data. Next appears:
ENTER MINS---30:..
Enter new data Minutes 0-59, or push ENTER to accept old data.
Default time for Check-In Packets is 00 hours, 30 minutes. DO NOT enter a greater than 24 hrs 00 mins.
Entering a time of 00 hours and 00 minutes deactivates the time-to-live function for that packet type.
The shortest allowed TTL time is 00 hours, 10 minutes.
Next appears
STATUS------OLD:NEW
The sequence repeats for
ENTER HRS----00:..
other packet types
The sequence now repeats for:
• Status Packets
• Alarm Packets
• Trouble / Trouble-Restoral Packets
• Zone Restoral Packets
• AES-IntelliTAP Packets • Special Packets (Vending, etc.)
The default time for the 6 packet types above is 00, i.e. the time-to-live function is deactivated for these
packets. Entering anything greater than 00 HRS and 10 MINS will enable the Time-to-Live function.
Press ENTER to accept existing "old" data.
AES•IntelliNet Central Alarm Reporting System
40-0590b1.p65
revised 11/03 zd03C
Rev B1 11/03
Doc # 40-0590
7750-F -Series SMART Subscriber Unit
pg 26
PROGRAMMING THE SUBSCRIBER UNIT FROM A PC
In place of a handheld terminal
An cable adapter kit #7043 may be ordered from AES to link the 7750-F to your computer serial port.
Communications Parameters: 4800 baud, NO parity, 8 data bits, 1 stop bit,
RTS/CTS Flow control OFF
Handheld (HH) Programmer Key equivalents to PC Keyboard:
HH
PC
HH
PC
F1 = CTRL-Q
SHIFT F1 = a
F2 = CTRL-R
SHIFT F2 = b
F3 = CTRL-S
SHIFT F3 = c
F4 = CTRL-T
SHIFT F4 = d
F5 = CTRL-U
SHIFT F5 = e
HH___ __PC
CTRL-F1 = f
CTRL-F2 = g
CTRL-F3 = h
CTRL-F4 = i
CTRL-F5 = j
REMARKS:
• When entering Hex numbers, use uppercase, i.e.. "9A" not "9a"
• If possible, set terminal program for "destructive backspace" so that backspace will erase the
deleted character from the screen.
• If nothing is sent or received by the 7750-F, make sure the program is set to the correct COM port.
• If characters are received by the 7750-F, but nothing can be sent, make sure the CTS/RTS flow
control is OFF, and that the cable is OK.
Antenna Disconnect / Acknowledgment Delay Output (Terminal J4)
The 7750-F monitors radio traffic on its frequency. If the channel is "quiet" for more than 4 minutes (as
would be the case if the antenna was disconnected) the 7750-F subscriber tests the channel by sending a
test message to a unit within its routing table. If that message is not acknowledged within the programmed acknowledgment delay period (default is 2 minutes*), a fault condition exists. This fault is
annunciated by a voltage (12V) at the pins on J4 (see diagram, page 3). The voltage can be used to drive
a relay, sounder or other device to notify someone of the condition. Maximum load is 200 ma.
Mating Output Connectors: Order part number 12-0388-J4 for a package of 10 mating connectors for
the J4 output pins.
*programmed through Net7K or Net77 Central Station Controller Software
AES•IntelliNet Central Alarm Reporting System
40-0590b1.p65
revised 11/03 zd03C
Rev B1 11/03
Doc # 40-0590
7750-F -Series SMART Subscriber Unit
pg 27
7750-F-Series SUBSCRIBER UNIT SPECIFICATIONS
SIZE:
13.25"h x 8.5"w x 4.3"d
34 cm x 21.5 cm x 11 cm
WEIGHT:
6.4 pounds (2.9 kilograms) (exc battery)
RADIO:
Standard Frequency Ranges (others available) 450-470 MHz.
Standard Radio Output Power: 2 Watts (others available) All radio systems require FCC licensing;
POWER INPUT: 16VAC, 30VA
ZONE BOARD POWER INPUT: 8-28VDC (not required for Reverse Polarity inputs)
VOLTAGE:
12VDC nominal
7750-F-4X4
7750-F-8
CURRENT:
Standby
Transmit
Standby
Transmit
Subscriber Unit Only
230ma
1.2A
584ma
1.55A
Subscriber Unit & 7068 'Tap
295ma
1.3A
660ma
2.00A
INPUTS:
7750-F-4x4
8 zones: 4 zone triggers - EOL (1K); 4 Reversing Polarity inputs
7750-F-8
8 zones, zone triggers, EOL (3.01K)
Input Option: AES 7068 IntelliTap Dialer Output / Radio Interface
OPERATING TEMPERATURE RANGE: 0° to 50° C (32° to 122°F)
STORAGE TEMPERATURE RANGE: -10° to 60° C (14° to 140°F)
RELATIVE HUMIDITY RANGE: 0 to 85% RHC, Non Condensing
BACK-UP BATTERY: 12V, 7 AH (min), lead acid gel type; required for all installations
LOW BATTERY REPORTING:
22.5 Minute Test Cycle (approx)
AC FAILURE REPORTING: Reports to central station after approximately 4 minutes without AC power; reports AC
power restoral after approximately 4 minutes of restored power.
ANTENNA DISCONNECT/ LOCAL REPORTING: Fault is annunciated by a ground (+12V open collector) at pins on J4
on the main circuit board; 200ma max load.
• FCC COMPLIANCE
NOTE: This equipment has been tested and found to comply with the limits for a Class B digital device, pursuant to Part 15 of the
FCC Rules. These limits are designed to provide reasonable protection against harmful interference in a residential installation.
This equipment generates, uses and can radiate radio frequency energy and, if not installed and used in accordance with the
instructions, may cause harmful interference to radio communications. However, there is no guarantee that interference will not
occur in a particular installation. If this equipment does cause harmful interference to radio or television reception, which can be
determined by turning the equipment off and on, the user is encouraged to try to correct the interference by one or more of the
following measures:
Reorient or relocate the receiving antenna;
Increase the separation between the equipment and the receiver;
Connect the equipment into an outlet on a circuit different from that to which the receiver is connected;
Consult the dealer or an experienced radio/TV technician for help.
CAUTION: Changes or modifications to this equipment not expressly approved by the party responsible for compliance could
void the user’s authority to operate the equipment.
• CANADIAN COMPLIANCE
This digital apparatus does not exceed the Class B limits for radio noise emissions from digital apparatus as set out in the interference-causing equipment standard entitled "Digital Apparatus", ICES-003 of Industry Canada.
Cet appareil numérique respects les limites de bruits radio électriques applicables aux appareils numériques de Classe B prescrites
dans la norme sur le matériel brouilleur: "Appareils Numeriques", NMB-003 édictés par l'Industrie Canada.
WARNING:
• It is unlawful to operate this equipment without a valid FCC radio station license.
• If the antenna or cables connected to this equipment come in contact with electrical power lines, DEATH or SERIOUS INJURY
may result.
• Never install the antenna where people may come in contact with it as SERIOUS INJURY may result.
• Test this system periodically for proper operation. AES assumes no responsibility for this equipment's failure to operate. AES's
sole responsibility is to repair or replace any AES device found to be defective during the warranty period.
AES•IntelliNet Central Alarm Reporting System
40-0590b1.p65
revised 11/03 zd03C
Rev B1 11/03
Doc # 40-0590
7750-F -Series SMART Subscriber Unit
pg 28
AES THREE YEAR OWNER WARRANTY
We warrant AES products to be free from defects in material
and workmanship for three (3) full years from date of purchase.
At no cost to the original purchaser for parts or labor, AES will repair or replace any part or parts
which are judged defective under the terms of this Warranty.
Defective products must be returned to AES directly, provided they are properly packed, postage
prepaid. Or exchange may be made through any authorized direct factory representative for any
products which are judged defective under the terms of this Warranty.
This Warranty is in lieu of all other Warranties expressed or implied and of all other obligations
or liabilities on the part of AES. This Warranty does not apply to any product or any part thereof
which has been repaired or altered outside our factory in any way to affect its stability or
reliability, or which has been subjected to misuse, negligence or accident, or which has had the
serial number effaced or removed. Neither shall this Warranty apply to any product which has
not been installed, applied or used in strict accordance with our instructions.
AES Corporation cannot be aware of, or responsible, for the differing values of property to be
protected by its alarm reporting systems. The above Warranty is given in lieu of all other
Warranties, either expressed or implied, including a Warranty of fitness for a particular purpose,
and manufacturer shall not be liable for any defect, incidental or consequential, loss or damage
arising out of the failure of the product to operate.
Some states do not allow the exclusion or limitation of incidental or consequential damages, so
the above limitation or exclusion may not apply to you.
This warranty gives you specific legal rights and you may also have other rights which vary from
state to state.
SERVICE PROCEDURE: Authorized repair service is furnished only by AES Corporation.
Contact AES Corporation at 978-535-7310 (fax 978-535-7313) to receive a Return Authorization Number. Have the
AES part number and serial number ready. Repack equipment in original or equivalent packaging. Inside the box,
please include a contact name, telephone number, address and a brief description of the reason for return.
Ship items freight-prepaid to:
Repair Services, RA# __________
AES Corporation
285 Newbury St
Peabody, MA 01960 USA
(call for Return Authorization number)
AES•IntelliNet Central Alarm Reporting System
40-0590b1.p65
revised 11/03 zd03C
Rev B1 11/03
Doc # 40-0590
7750-F -Series SMART Subscriber Unit
pg 29
Quick Programming Guide for 7750-F Ver. 2 Subscriber
Complete details of these procedures are provided in the manual. This page provides a handy reference sheet for technicians familiar with the AES•IntelliNet system who are using a handheld programmer to install or update the parameters of a subscriber unit.
NOTE: With the exception of the initial "Setup Unit" section, programming can be done from the AES
Net central station software.
FUNCTION
SETUP UNIT
(CTRL)+(F1)
CHECK IN TIME
(CTRL)+(F2)
REPORT DELAY
ZONE SETUP
(CTRL)+(F3)
PROGRAMMER SCREEN
NOTES
SETUP UNIT -OLD: NEW
ENTER ID#- 1234: ____
CIPHER CODE XXXX: ____
CHKIN TIME--OLD:
ENTER HRS----HH:
ENTER MINS---MM:
NTR RPT DLY-NNN:
FIRE/ ----OLD:
TROUBLE PKT Y:
NEW
__
__
___
NEW
.
Shows existing "old" ID#, but hides Cipher (Dealer) Code
Enter new data, or push enter to keep old data;
Caution: Cipher must match for all subscribers and central receiver
(Legal characters are hex numerals 0123456789ABCDEF)
Range = 00 Hrs, 01 Min to 24 Hrs, 00Mins
[0-24] (minutes field appears if digits are entered in hours field)
[1-59]
[0-330] [seconds, default is 10]
Programming Zones:
1. Answer Y/yes if you are using Fire inputs. This enables the unit to
[Y/N] generate "Trouble" packets* (messages) for Fire type inputs. Otherwise,
answer N/no. See definition below.
SET ZONE (BSF) B0
2. "Set Zone" sets individual zone programming. The options [BSF] or
[BS] are displayed in brackets; these vary according to your answers Y/N
to zones part 1. above.
OLD SSSSSSSS LOW>HI
NEW ________
There are 8 spaces, each representing one of the 8 zones, numbered
Low>Hi, or 1 to 8, left to right.
ZONE BANK 0
B=Bypass
S=Supervised EOL, 2 Level Supervision
No trouble signals are sent
Zones 1-4, Supervised means: Alarm=Short, Normal=1K resistor,
Alarm=Open
Zones 5-8, Fire means: Alarm=Reverse Polarity, Normal=Normal
Polarity, Alarm=No/Low Voltage
SET RESTORALS (XR) B0
OLD XXXXXXXX LOW>HI
NEW _______
F=Fire Supervised EOL, 3 Level Supervision, see above
Zones 1-4, Fire means: Alarm=Short, Normal=1K resistor,
Trouble=Open
Zones 5-8, Fire means: Alarm=Reverse Polarity, Normal=Normal
Polarity, Trouble=No/Low Voltage
3. Restorals - All zones can be programmed to report restorals, i.e. when
the zone returns to its normal state after an alarm condition
There are 8 spaces, each representing one of the 8 zones, numbered
Low>Hi, or 1 to 8, left to right.
Enter "R" for Restoral, Enter "X" for no restoral
*Important Note: Reporting of "Trouble" packets messages requires a version 1.70 or newer receiver.
PRE-VERSION 1.70 RECEIVERS WILL NOT RECEIVE TROUBLE MESSAGES.
Check with the central station manager. If the receiver is pre-1.70, it should be upgraded to the current version.
Contact AES Corporation or details
AES•IntelliNet Central Alarm Reporting System
40-0590b1.p65
revised 11/03 zd03C
Rev B1 11/03
Doc # 40-0590
7750-F -Series SMART Subscriber Unit
pg 30
Programming Codes - Quick Reference, continued
ENABLE REPEATING
(CTRL)+(F4)
ENABLE RPTNG-Y:
MASTER RESET
(CTRL)+(F5)
DISPLAY STATUS
(SHIFT)+(F4)
KEY TRANSMITTER
(SHIFT)+(F5)
_
RESET RAM?
SUB N.NN
ID#:NNNN
RT1:NNNN
STAT:NNN
Enter Y to enable repeating capability (page 26)
[Y/N]
7750F
(C)YYYY AES
LEVEL: NNN
NETCON: N
KEYING TX..
SEND TEXT MESSAGE
(F5)
ENTER MSG:
Version Number and Subscriber Type
ID # and Copyright
ID of #1 in 1st Route; Link Layer Number
Status/Error Message (if any); Netcon Rating
(6 second test)
Sends text message to central receiver
(SHIFT)+(F1)
(SHIFT)+(F2)
(SHIFT)+(F3)
RECEIVE MONITOR ON/OFF
TRANSMIT MONITOR ON/OFF
MONITOR ALL ON/OFF
(toggle)
(toggle)
(toggle)
F2
PACKET TIME TO LIVE
CHECKIN-----OLD:NEW
ENTER HRS----00:..
ENTER MINS---30:..
[continues]
See page 25
AES•IntelliNet Central Alarm Reporting System
40-0590b1.p65
revised 11/03 zd03C
Rev B1 11/03