1
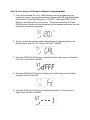
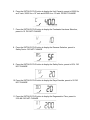
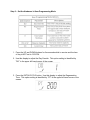
INSTALLATION
PROGRAMMING
MANUAL
PURONICS®
WATER CONDITIONER
Model Terminator® MP
With SilverShield® HYgene®
Bacteriostatic Protection
Manufactured by:
Puronics Water Systems, Inc.
5775 Las Positas Road
Livermore, CA 94551
(800) 339-8780
www.puronics.com
Service Call
The Model MP control valve features an automatic Service Call Reminder. The valve
measures water volume usage and based on the life expectancy of the SilverShield®
HYgene® bacteriostatic media for the unit, will flash a screen message of CALL TECH
and phone number.
Timer Features
•
•
•
•
•
•
Power backup continues to keep time and the passage of days for a minimum of
48 hours in the event of power failure. During a power outage, the control goes
into power-saving mode. It does not monitor water usage during a power failure,
but it does store the volume remaining at the time of power failure.
While in service, the display alternates between time of day and volume
remaining until next regeneration.
The Flow Indicator flashes when outlet flow is detected.
The Service Icon flashes if a regeneration cycle has been queued.
A Regeneration can be triggered immediately by pressing the EXTRA CYCLE
button for five seconds.
The Parameter Display displays the current Cycle Step (BW, BF, RR, etc.) during
regeneration, and the date display counts down the time remaining for that step.
While the valve is transferring to a new cycle step, the display will flash. The
parameter display will identify the destination cycle step (BW, BF, RR, etc.) and
the data display will read “----“. Once the valve reaches the cycle step, the
display will stop flashing and the data display will change to the time remaining.
During regeneration, the user can force the control to advance to the next cycle
step immediately by pressing the EXTRA CYCLE button.
Step 1-Set the Service Call Number in Master Programming Mode
1. Press and hold either the UP or DOWN buttons until the programming icon
replaces the service icon and the parameter display reads DO. Adjust the display
time with the UP and DOWN buttons to 12:01PM. Press the EXTRA CYCLE
Button (to exit Setting Time of Day mode). Then press and hold the UP and
DOWN buttons together until the programming icon replaces the service icon and
the Display Format screen appears.
2. The first screen that appears when entering Master Programing Mode is the
Display format, preset to U.S. Gallons. DO NOT CHANGE
3. Press the EXTRA CYCLE Button to display the Valve Type, preset to Downflow
Flow Fill First. DO NOT CHANGE
4. Press the EXTRA CYCLE button to display the Control Type, preset to Meter
Delayed. DO NOT CHANGE
5. Press the EXTRA CYCLE button to display the Number of Tanks, preset to
Single Tank. DO NOT CHANGE
.
6. Press the EXTRA CYCLE button to display the Unit Capacity, preset to 20000 for
an 8” tank, 30000 for a 10” tank and 40000 for a 12’ tank. DO NOT CHANGE
7. Press the EXTRA CYCLE button to display the Feedwater Hardness Selection,
preset to 10. DO NOT CHANGE
8. Press the EXTRA CYCLE button to display the Reserve Selection, preset to
Safety Factor. DO NOT CHANGE
9. Press the EXTRA CYCLE button to display the Safety Factor, preset to 20%. DO
NOT CHANGE
10. Press the EXTRA CYCLE button to display the Days Override, preset to 20. DO
NOT CHANGE
11. Press the EXTRA CYCLE button to display the Regeneration Time, preset to
2:00 AM. DO NOT CHANGE
12. Press the EXTRA CYCLE button to display the Brine Fill Time, preset to 12
minutes for 8” tank, 14 minutes for 10” tank and 16 minutes for 12” tank. DO NOT
CHANGE
13. Press the EXTRA CYCLE button to display the Service (Brine Soak) Time, preset
to 58 minutes for 8” tank, 56 minutes for 10” tank and 54 minutes for 12” tank.
DO NOT CHANGE
14. Press the EXTRA CYCLE button to display the Backwash Time, preset to 10
minutes. DO NOT CHANGE
15. Press the EXTRA CYCLE button to display the Brine Draw Time, preset to 58
minutes. DO NOT CHANGE
16. Press the EXTRA CYCLE button to display the Rapid Rinse Time, preset to 12
minutes. DO NOT CHANGE
17. Press the EXTRA CYCLE button to display the Flow Meter Type, preset to ¾”
Paddle Wheel Meter. DO NOT CHANGE
18. Press the EXTRA CYCLE button to display the Service Call Area Code, preset to
800. Press the UP and DOWN arrows to enter new Area Code.
19. Press the EXTRA CYCLE button to display the Service Call Prefix, preset to 339.
Press the UP and DOWN arrows to enter new Prefix.
20. Press the EXTRA CYCLE button to display the Service Call Suffix, preset to
8780. Press the UP and DOWN arrows to enter new Suffix.
21. Press the EXTRA CYCLE button to save all settings and exit Master
Programming Mode.
Step 2 – Set the Hardness In User Programming Mode
1. Press the UP and DOWN buttons for five seconds while in service and the time
of day is NOT set to 12:01PM.
2. Use this display to adjust the Day Overide. This option setting is identified by
”DO” in the upper left hand corner of the screen.
3. Press the EXTRA CYCLE button. Use this display to adjust the Regeneration
Time. This option setting is identified by “RT” in the upper left hand corner of the
screen.
4. Press the EXTRA CYCLE button. Use this display to adjust the Feed Water
Hardness. This option setting is identified by “H” in the upper left hand corner of
the screen.
Range 1-199 hardness
5. Press the EXTRA CYCLE button. Use this display to adjust the Safety Factor.
This option is identified by “SF” in the upper left hand corner of the screen.
6. Press the EXTRA CYCLE button to end User Programming Mode.
Step 3 – Set Time of Day
If you should have a power failure or want to adjust for Daylight Saving Time, follow
these Instructions.
Press and hold either the UP or DOWN buttons until the programming icon replaces the
service icon and the parameter display reads DO.
Adjust the display time with the UP and DOWN buttons.
When the desired time is set, press the EXTRA CYCLE
button to resume normal operation. The unit will also
return to normal operation after 5 seconds if no buttons are pressed.
During a power outage, the control goes into a power saving mode. It does not monitor
water usage during a power outage, but it does store the volume remaining at the time
of power failure. It will continue to keep time and the passage of days for a minimum of
48 hours in the event of power failure. The Time of Day flashes when there has been a
power failure. Press any button to stop the time of Day from flashing.
If power fails while the unit is in regeneration, the control will save the current valve
position before it shuts down. When power is restored, the control will resume the
regeneration cycle from the point where power failed.
Step 4 – Set to Regenerate Today
To initiate a manual regeneration at the preset delayed regeneration time, press the
EXTRA CYCLE button. The service icon will flash to indicate that a regeneration is
queued. If you pressed the EXTRA CYCLE button in error, pressing the button again
will cancel the request
To Initiate a manual regeneration immediately, press and hold the EXTRA CYCLE
button for five seconds. The system will begin to regenerate immediately.
Note: If the brine tanks does not contain salt, fill with salt before initiating a manual
regeneration
How to Demonstrate the Service Call Screen
1. Enter Diagnostics Mode by pressing the UP and EXTRA CYCLE buttons
simultaneously.
2. Press the DOWN button once or the UP button seven times to reach Call Flow
Remaining.
3. Press and hold the EXTRA CYCLE button for 5 seconds and the Service Call
Screens will be activated.
4. This same method can be used to deactivate the Service Call Screens without
resetting the Call Flow Remaining if it was activated this way.
How to Turn Off Service Call Alert and Reset Total Flow and Call Flow
Remaining
Turn off the Service Call Alert and to reset the Call Flow to full volume, enter and
complete Master Programming Mode. No values need to be changed, but it must be
exited normally by completing all parameters
DIAGNOSTIC PROGRAMMING MODE
Diagnostic Programming Mode Options
Abbreviation
Parameter
Description
FR
Flow Rate
Displays the current outlet
flow rate
PF
Peak Flow Rate
Displays the highest flow
rate measured since the
last regeneration
HR
Hours in Service
Displays the total hours that
the unit has been in service
VU
Volume Used
Displays the total volume of
water treated by the unit
RC
Reserve Capacity
Displays the system’s
reserve capacity calculated
from the system capacity,
feedwater hardness, and
safety factor
SV
Software Version
Displays the software
version installed on the
controller
TF
Total Flow
Displays the total volume of
water treated since reset.
CF
Call Flow Remaining
Displays the remaining
volume of water until next
Service Call
1. Press the UP and EXTRA CYCLE buttons for five seconds while in service. The
timer will exit Diagnostic Mode after 60 seconds if no buttons are pressed. Press
the EXTRA CYCLE button to exit Diagnostic Mode at any time.
2. Use this display to view the current Flow Rate.
3. Press the UP button. Use this display to view the Peak Flow Rate since the last
regeneration cycle.
4. Press the UP button. Use this display to view the Hours in Service since the last
regeneration cycle.
5. Press the UP button. Use this display to view the Volume Used since the last
regeneration.
6. Press the UP button. Use this display to view the Reserve Capacity.
7. Press the UP button. Use this display to view the Software Version.
8. Press the UP button. Use this display to view the Total Flow.
9. Press the UP button. Use this display to view the Call Flow Remaining.