1
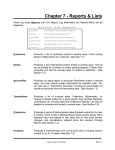
Estimating Information General Information ASSEMBLY ILLUSTRATIONS: The illustrations are typical. All illustrations may show more or fewer parts than you actually receive when you order the used part or assembly. Check included items with your supplier. Reader Reply Card/Toll-Free Number Your comments and suggestions are appreciated and valuable to us. A reader reply card is provided in each issue for your use to correspond with Mitchell concerning the information in this Guide. Just fill out the card and send it to us, or call us toll free at 800-854-7030, Extension 8220. In the 858 area call 578-6550. You will receive a response to each inquiry. Symbols SYMBOLS: The following symbols are used throughout this Guide and are explained in detail in each section. P1 by shifting the part or assembly and sealing the welded or bolted-on seams where necessary. FRAME SETUP: This procedure includes the following: Disconnect battery or remove as necessary. Lift or jack up vehicle. Remove wheels as needed. Attach mounting brackets includes detaching or moving necessary lines, brackets or bolted on parts/assemblies for access. Lower vehicle onto machine as per manufacturer's direction. Remove vehicle from machine. Special Cautions STRUCTURAL GLASS: Windshields, back windows, quarter and side glass that was originally installed by the vehicle manufacturer utilizing urethane, should be reinstalled with urethane. The urethane bonds the glass to the vehicle and makes the glass part of the vehicle structure. Ensure that the vehicle manufacturer and/or I-CAR recommended installation is followed, and that the urethane is properly cured before returning the vehicle to service. # – LABOR FOOTNOTE: Special labor situations or requirements are denoted with a footnote symbol. The explanation follows as closely as possible to the time referenced. SUPPLEMENTAL RESTRAINT SYSTEMS: Vehicle manufacturer's recommended service and repair procedures must be followed when servicing an Air Bag System. Certain safety precautions and disabling procedures must be observed when performing repairs. m – A designation that appears in a separate text column to the left of the labor time column to identify components for which R&I or R&R is commonly considered to be a mechanical operation when performed in a collision repair environment. See Mitchell's Air Bag Service & Repair Manual for system description and operation checks, precautions, disabling and activating procedures, component removal and installation procedures, and diagnosis and testing information. s – A designation that appears in a separate text column to the left of the labor time column to identify unibody structural components—those which support the weight of the vehicle and absorb the energy of the impact as well as road shock. Definitions DISCONNECT & CONNECT: Disconnect a part or assembly by unbolting and/or unplug, and set it aside without physically removing it from the vehicle to gain access or removal of an adjacent part. The disconnected part or assembly is then reconnected during the assembly process. REMOVE AND INSTALL (R&I): Remove a part or assembly, set it aside and reinstall it later. The time shown includes the alignment that can be done by shifting the part or assembly. REMOVE AND REPLACE (R&R): Remove a damaged part or assembly identified as included within the Procedure Explanation and replace it with an undamaged salvaged part or assembly. Replacement includes the alignment that can be done Caution: Never install used/salvaged Air Bag system components from another vehicle or a new part different from that specified by the manufacturer. Refer to manufacturer’s recommended service procedures. MAIN COMPUTER MODULE: When working with vehicles equipped with on-board computers, manufacturers recommend removal if the temperature is likely to exceed 80°C or 176°F. Do not apply heat from a torch or weld in the immediate vicinity of computers without protecting them. Remove if necessary. Never connect or disconnect these units with the ignition switched on, or when charging the battery with negative battery cable connected. Before servicing, ground yourself and ground the work area to discharge stored static electricity. SEAT BELTS: Many vehicle manufacturers advise replacement of seat belts when stressed by occupants in a collision. Refer to vehicle manufacturer or service manual for clarification. P2 Estimating Information Special Cautions (Continued) SAFETY NOTE: Assemblies or parts should be thoroughly checked for safety, as well as for excessive wear before installation. Appearance of such items in this Guide does not imply any endorsement or recommendation for their use. Mitchell International assumes no responsibility for the condition of, or use of salvaged parts. Procedure Explanations LABOR TIMES: THE LABOR TIMES SHOWN IN THIS PUBLICATION ARE IN HOURS AND TENTHS OF AN HOUR (6 MINUTES) AND ARE FOR REPLACEMENT WITH UNDAMAGED USED PARTS. Labor times listed in this Guide are to be used to estimate time needed to replace parts or assemblies with undamaged used parts or assemblies of like kind and quality. These suggested times may vary depending on vehicle condition, labor technician’s experience, shop equipment, etc. LABOR CATEGORIES: The labor times shown in the Guide fall into various categories (for example: body, frame, mechanical) as determined by the repair facility's operating procedures. As a guide, components for which R&I or R&R is commonly considered to be a mechanical operation when performed in a collision repair environment are designated with the letter "m" in the text. These designations are only a guide. They are not necessarily all inclusive, nor do they suggest the application of a labor rate. WELDED PANELS: Replacement labor times for panels that are joined by welding include the necessary use of inserts and accepted sectioning guidelines developed by OEMs, I-CAR, and TECH-COR. The labor times for welded panels include grinding, filling and final sanding with up to 150 grit sandpaper to match the original panel contour. Labor times do Not-Include the Feather, Prime and Block refinish operation. See Procedure Explanation page P37, for information on Feather, Prime and Block. SHOP MATERIAL: The labor times shown in this publication do not take into account the cost of any materials or the cost of hazardous materials recycling or disposal. DISABLE AND ENABLE AIR BAG SYSTEM: The labor times shown in the guide represent the procedures necessary to disable and enable the air bag system in order to replace air bag system components and/or to perform repairs not related to the air bag system; e.g., welding. This procedure includes visually monitoring the air bag warning light to verify proper system functionality. The allowance does not include troubleshooting of the system if proper system functionality is not present. DIAGNOSE AIR BAG SYSTEM: The labor times shown in the guide to diagnose air bag systems include system disable and enable, removal and installation of air bag module(s) (where required), installation of appropriate simulators, and retrieving and clearing of trouble codes. Time for specific troubleshooting of Diagnostic Trouble Codes (DTCs) is not included. PROCEDURE REFERENCE: Throughout each vehicle "service'' there are Procedure Explanation reference notes located immediately following the main section headings. Example: FRONT INNER STRUCTURE is followed by, "Use Procedure Explanations 2 and 32 with the following text.'' This indicates that the text portion and the Procedure Explanations for FRONT INNER STRUCTURE and Refinish should be used in conjunction with one another when writing a damage report. LABOR RELATED NOTES IN THE TEXT PORTION OVERRIDE THE PROCEDURE EXPLANATION PAGES. PROCEDURES: The Procedure Explanations on the following pages outline the operations which are or are not included in the labor time listed in each vehicle "service.'' You are encouraged to become familiar with these procedure pages to be sure you have a thorough understanding of the Mitchell approach to collision estimating. The left Included Operations column means that the labor time shown in the Mitchell Replacement Assemblies Estimating Guide text includes that particular operation or operations. The right Not Included Operations column means that the labor time in the text does not include that particular operation or operations. Performance of one or more of these operations may or may not be necessary as determined by the individual job requirements. If an add-on time has been established for any of these operations, it will be shown in the text. If a time has not been established or if the add-on time is dependent on conditions that vary due to collision damage (example: access time, free up parts), the additional time should be recorded on the damage report. Labor times relating to the repair of a damaged panel would come under this category. Additions to Labor Times Due to the wide range of collision damage and vehicle conditions, labor times for the following operations are not included in the Guide. • ACCESS TIME: Remove damaged parts by cutting, pushing, pulling, etc. • AIR CONDITIONING: Evacuate and recharge system. • ANTI-CORROSION RUST RESISTANT MATERIAL: Remove and/or apply weldable zinc primers, wax, petroleum based coatings, undercoating or any type of added conditioning. • PAINT AND SHOP MATERIALS: Additional costs. • BROKEN GLASS CLEAN UP • DETAIL: Clean vehicle to pre-accident condition. • DRAIN & REFILL: Fuel (see fuel tank) • DRILL OR FILL TIME: For attachment parts. • ELECTRONIC COMPONENTS: • Time to remove and install as necessary; includes wiring and/or wiring harness and computer module. • Time to reset memory code function (example: seat position, radio presets) when battery has been disconnected to perform repairs. • Time to complete computer relearn procedures for proper operation of vehicle systems (example: power sunroof, power window) when battery has been disconnected to perform repairs. • FABRICATION: Fabrication of reinforcements or inserts (new component not cut or manufactured from existing or salvaged part, but from raw stock). • FRAME SETUP: See Definitions Section page P1. • FREE UP PARTS: Time necessary to free up parts frozen by rust or corrosion on vehicle or replacement part. • MEASURE AND IDENTIFY: Structural damage to unibody vehicles. Estimating Information Additions to Labor Times (Continued) • METAL TRIMMING: Trimming of welded assemblies to be installed. • MOULDING OR NAMEPLATES: Time to remove and replace, install, or clean and retape. • REPAIR OR ALIGN: Parts adjacent to parts or assemblies being replaced. • REWORK PARTS: To fit a particular year or model (example: cutting holes for lamps, modifying a radiator support). • STRIPES, DECALS, LABELS, WARNINGS, OR OVERLAYS: Time to remove or install these items. • TAR AND GREASE: Removal of these or any other materials that would interfere with operation. • TRANSFER TIME: To remove a damaged part from salvage assembly, remove undamaged part from damaged assembly and reinstall that part on the salvage assembly (R&R&R). Example: lights, trim, mirror. P3 Unibody Structural Components Unibody structural components are parts which support the weight of the vehicle and absorb the energy of the impact as well as road shock. These components are designated with the letter "s" in the text. The components are the radiator support, front and rear unirails, apron and wheelhouse (strut type) assemblies, rocker panel assemblies and suspension crossmembers. Body pillars, while not primary load-bearing structures, also require special treatment and are considered structural components. Not all unibody vehicles have rear strut wheelhouse assemblies. An illustrated listing of these components appears below. Certain body styles may have components in addition to those listed below that the vehicle manufacturer has identified as structural. These are noted in the text. To ensure the integrity of the repaired vehicle, particular care should be taken in the replacement of any structural component. • WIRING AND WIRING HARNESS: Time to remove and install or replace, unless otherwise noted. Component identification and illustration courtesy of TECH-COR, Inc. Rev. 01-07 Procedure Explanation P4 1 . Front Bumper/ Sheet Metal Bumper Assembly R&R Included Operations • Remove assembly from frame, impact absorbers or mounting arms • Replace as an assembly • Remove and replace impact absorbers • Adjust alignment to vehicle Not Included Operations • Refinish bumper • Remove and install or replace: Mouldings, nameplates, lamps, etc. • Optional accessories (example: auxiliary lamps, brush guard, fog lamps,headlamp washer systems, laser/radar cruise control sensors, parking aid sensors, spoilers) Bumper/Grille Assembly R&R Included Operations Not Included Operations • Remove assembly from frame, impact absorbers or mounting arms • Refinish cover • Replace as an assembly • Remove and install or replace: • Remove and replace impact absorbers • Adjust alignment to vehicle • Aim lamps Mouldings, nameplates, lamps, etc. • Optional accessories (example: auxiliary lamps, brush guard, fog lamps,headlamp washer systems, laser/radar cruise control sensors, parking aid sensors, spoilers) Front Panel R&R Included Operations Not Included Operations • Remove and replace as an assembly • Refinish front panel • Align to adjacent parts • Aim lamps • Remove and install or replace: Bumper assembly Lamps attached to panel Grille assembly Mouldings, nameplates, etc. Procedure Explanation Front Bumper/ Sheet Metal P5 1 (continued) Front Sheet Metal R&R (Bolt-On) Frame Type Included Operations • Remove and replace as an assembly: Not Included Operations • Refinish sheet metal Radiator • Aim lamps Radiator support • Remove and install or replace: Impact absorbers or brackets Battery Fenders Mouldings, nameplates, etc. Bumper assembly Bolted on parts that are included in the salvaged assembly (example: radiator, fenders, headlamp assemblies, etc.) Front panel Wiring and/or wire harness Hood Wheel Grille assembly Headlamp assemblies Front Sheet Metal R&R (Bolt-On) Unibody Included Operations • Remove and replace: Not Included Operations • Refinish assembly Bumper assembly • Aim lamps Impact absorbers or brackets • Remove and replace or install: Fenders Battery Hood Mouldings, nameplates, etc. Front panel Rocker moulding Grille assembly Bolted on parts that are included in the salvaged assembly (example: fenders, grille assembly, headlamp assemblies, etc.) Headlamp assemblies Wheel Procedure Explanation P6 2 Front Inner Structure Front Assembly R&R Included Operations Not Included Operations • Remove and replace radiator support and both apron/rails • Refinish front assembly • Remove and install: • Aim lamps Cowl trim if necessary • Remove and install or replace: Shroud and radiator assembly Impact absorbers or mounting arms if necessary to perform operation • Loosen and pull back carpet and insulation as required and if necessary • Remove and replace caulking for standard factory application IMPORTANT REMINDER: Labor times for inner panels, rails or reinforcements are with outer panels removed. IMPORTANT REMINDER: Sectioning of a panel may or may not be recommended by vehicle manufacturer. This procedure should only be performed when a qualified and knowledgeable technician has determined that the operation does not jeopardize the integrity of the vehicle. • Remove and/or apply: Anti-corrosion rust resistant materials • Remove and install: Bumper assembly Hood panel Front panel Front fenders Engine Wiring and/or wiring harness Hard shell cowl panel insulation • Remove and replace: Radiator hoses Fan, pulley, fan clutch or belts Decals (example: EPA, body identification, caution/danger) • Remove and install or replace: Suspension assemblies Bolted parts and assemblies (example: fluid reservoirs and coolers, vapor canister, cruise control, air conditioning components) Instrument panel and center console Seat assemblies Windshield and mouldings Air safety bag Upper reinforcements • Wheel alignment • Frame set up (see Definitions page P1, estimate time required) • Trimming of welded assembly to be installed Procedure Explanation Front Inner Structure P7 2 (continued) Partial Front Assembly R&R Included Operations Not Included Operations • Remove and replace radiator support and one apron/rail • Refinish partial front assembly • Remove and install: • Aim lamps Cowl trim • Remove and install or replace: Shroud and radiator assembly Impact absorbers or mounting arms if necessary to perform operation • Loosen and pull back carpet and insulation as required • Remove and replace caulking for standard factory application IMPORTANT REMINDER: Labor times for inner panels, rails or reinforcements are with outer panels removed. • Remove and/or apply: Anti-corrosion rust resistant materials • Remove and install: Bumper assembly Hood panel Front panel Front fenders Engine Wiring and/or wiring harness Hard shell cowl panel insulation • Remove and replace: Radiator hoses Fan, pulley, fan clutch or belts Decals (example: EPA, body identification, caution/danger) • Remove and install or replace: Suspension assemblies Bolted parts and assemblies (example: fluid reservoirs and coolers, vapor canister, cruise control, air conditioning components) Instrument panel and center console Seat assemblies Windshield and mouldings Air safety bag Upper reinforcements • Wheel alignment • Frame set up (see Definitions page P1, estimate time required) • Trimming of welded assembly to be installed Procedure Explanation P8 2 Front Inner Structure (continued) Short Front Assembly R&R Included Operations Not Included Operations • Remove and replace radiator support and both aprons forward of the shock towers • Refinish short front assembly • Remove and install or replace: • Remove and/or apply: Shroud and radiator assembly Impact absorbers or mounting arms if necessary to perform operation • Remove and replace caulking for standard factory application • Aim lamps Anti-corrosion rust resistant materials • Remove and install: Bumper assembly Hood panel Front panel Front fenders Engine Wiring and/or wiring harness • Remove and replace: IMPORTANT REMINDER: Labor times for inner panels, rails or reinforcements are with outer panels removed. Frame rails IMPORTANT REMINDER: Sectioning of a panel may or may not be recommended by vehicle manufacturer. This procedure should only be performed when a qualified and knowledgeable technician has determined that the operation does not jeopardize the integrity of the vehicle. Fan, pulley, fan clutch or belts Radiator hoses Decals (example: EPA, body identification, caution/danger) • Remove and install or replace: Suspension assemblies Bolted parts and assemblies (example: fluid reservoirs and coolers, vapor canister, cruise control, air conditioning components) Air safety bag Upper reinforcements • Frame set up (see Definitions page P1, estimate time required) • Trimming of welded assembly to be installed Procedure Explanation Hood P9 3 Hood Panel R&R Included Operations Not Included Operations • Remove and replace as an assembly • Refinish hood • Align to adjacent parts • Remove and install or replace: Hinges Gas prop rod Insulator Lamps Decals, labels Mouldings, nameplates, etc. Grille Washer nozzles Front or Rear Fender Front Fender, Rear Fender or Fender/Wheelhouse R&R Included Operations Not Included Operations • Remove and replace as an assembly • Refinish fender • Align to adjacent parts • Aim lamps • Remove and install or replace: Bumper assembly Lamps attached to fender Front panel Wheel Mouldings, nameplates, etc. 4 Procedure Explanation P10 5 Front Fender & Radiator Support Front Fender & Radiator Support R&R (Non-Welded) Included Operations Not Included Operations • Remove and replace as an assembly • Refinish fender radiator support • Align to adjacent parts • Aim lamps • Remove and replace or install: • Remove and replace or install: Radiator Bumper assembly Lamps attached to fender Front panel Grille Valance panel Filler panels Battery A/C condenser or receiver/drier Hood Parts and assemblies attached to wheelhouse Hoses Wheel Mouldings, nameplates, etc. • Transfer or replace labels, decals, or warnings 6 . Frame Frame Assembly R&R Included Operations • Remove and install: Front and rear bumpers Front sheet metal as an assembly Body assembly Pickup bed Mechanical assemblies (example: engine, transmission, suspension, fuel tank, differential and components) • Remove and install or replace: Engine mounts/absorbers Wiring and/or wiring harness if necessary NOTE: It may be necessary to transfer parts from the damaged frame to the used frame assembly. This cannot be determined until you see the used frame assembly. The additional time needed for this operation must be estimated. Not Included Operations • Overhaul assemblies or replace parts of assemblies that are transferred • Remove and install or replace: Welded or riveted assemblies of the frame (see Note) Optional accessories (example: auxiliary lamps and fuel tanks, brush guard, lift kit, bed liner, trailer hitch, trailer connector) • Wheel alignment • Adjust control linkage • Bleed brakes if necessary • Evacuate and recharge Air Conditioning if so equipped and necessary • Refrigerant recovery if necessary Procedure Explanation P11 6 Frame (continued) Frame Section—Front or Rear R&R Included Operations Not Included Operations • Replace used frame section with necessary components intact • Adjust transmission linkage • Cut and remove damaged frame section • Wheel alignment • Remove and replace frame mounted steering gear NOTE: Sectioning of a panel may or may not be recommended by vehicle manufacturer. This procedure should only be performed when a qualified and knowledgeable technician has determined that the operation does not jeopardize the integrity of the vehicle. • Bleed brakes if necessary • Remove and install or replace: Sheet metal Bumper assembly Suspension Engine Fuel tank Fluid lines • Evacuate and recharge Air Conditioning if so equipped and necessary • Refrigerant recovery if necessary Wheel Alignment 7 Adjust Front Alignment Included Operations Not Included Operations • Position vehicle on alignment rack and check/adjust tire pressure • Diagnostic road test to determine if alignment operations are necessary • Check ride height and adjust to vehicle manufacturer specifications • Straighten or replace suspension parts and/or structural components • Set-up gauges on all 4 wheels and check wheel run out and front suspension for wear • Shift or align engine subframe/crossmember and/or axle housing • Determine vehicle tracking by checking thrust angle to vehicle center line • R&I steering wheel • Center steering wheel • Adjust wheel bearings • Adjust front caster, camber and toe-in where applicable • Perform vehicle manufacturer recommended shimming procedures if necessary • Remove vehicle from alignment equipment • Verify alignment by road test • Non-vehicle manufacturer shimming • Adjust rear wheel alignment NOTE: Labor times for Wheel Alignment are based on the use of Four Wheel Alignment equipment to ensure that a minimum Thrust Angle Alignment is provided in all instances where a Four Wheel Alignment cannot be performed. If other than Four Wheel Alignment equipment is used, some adjustments in labor times may be appropriate. Procedure Explanation P12 7 Wheel Alignment (continued) Adjust Four-Wheel Alignment Included Operations Not Included Operations • Position vehicle on alignment rack and check/adjust tire pressure • Diagnostic road test to determine if alignment operations are necessary • Check ride height and adjust to vehicle manufacturer specifications • Straighten or replace suspension parts and/or structural components • Set-up gauges on all 4 wheels and check wheel run out and suspension for wear • Shift or align engine subframe/crossmember and/or axle housing • Determine vehicle tracking by checking thrust angle to vehicle center line • Shift or align rear suspension axle assembly, carrier and/or housing • Center steering wheel • R&I steering wheel • Adjust front and rear caster, camber and toe-in where applicable • Non-vehicle manufacturer shimming • Perform vehicle manufacturer recommended shimming procedures if necessary • Adjust wheel bearings • Remove vehicle from alignment equipment • Verify alignment by road test Adjust Rear Alignment Included Operations Not Included Operations • Position vehicle on alignment rack and check/adjust tire pressure • Diagnostic road test to determine if alignment operations are necessary • Check ride height and adjust to vehicle manufacturer specifications • Straighten or replace suspension parts and/or structural components • Set-up gauges on all 4 wheels and check wheel run out and rear suspension for wear • Shift or align rear suspension axle assembly carrier and/or housing • Determine vehicle tracking by checking thrust angle to vehicle center line • R&I or center steering wheel • Adjust rear caster, camber and toe-in where applicable • Adjust wheel bearings • Perform vehicle manufacturer recommended shimming procedures if necessary • Non-vehicle manufacturer shimming • Adjust front wheel alignment • Remove vehicle from alignment equipment NOTE: If Front Wheel Adjustment is necessary, cancel • Verify alignment by road test Adjust Rear Alignment procedure and use Adjust Four Wheel Alignment procedure. Procedure Explanation P13 8 Front or Rear Suspension Suspension R&R Included Operations Not Included Operations • Remove and replace as an assembly • Wheel alignment • Remove and install wheel • Bleed brakes if necessary CAUTION: Check state laws regarding the use of used suspension and/or brake components IMPORTANT REMINDER: Due to the design of suspension on unibody vehicles, it may be necessary to perform four wheel alignment. Engine 9 Engine & Transmission R&I Included Operations • Disconnect and connect: Necessary components to remove and install engine/ transmission as an assembly • Remove and install hood assembly NOTE: Labor times shown in the text are only to remove and install the engine and/or transmission assembly to facilitate other work and are not for engine or transmission replacement. Not Included Operations • Remove and install: Radiator if necessary Any parts on engine if necessary • Adjust linkage if adjustable type • Evacuate and recharge air conditioning if so equipped and necessary • Refrigerant recovery if necessary Procedure Explanation P14 10 Steering Gear and Column Steering Gear & Column R&R Included Operations Not Included Operations • Each operation identified is considered to be a stand alone operation • Refinish column • Column assembly is with steering wheel intact • Recode lock cylinder • Remove and install or replace: • Wheel alignment • Remove from salvaged assembly: Lock cylinder Lock cylinder Air bag module NOTE: Refer to “Safety Note” in Special Cautions on Estimating Information page P1. 11 Glass and Interior Instrument Panel R&R Included Operations • Disconnect and connect: Necessary wiring, hoses and cables Not Included Operations • Refinish instrument panel or crash pad • Remove and install: • Remove and replace as an assembly Front seats • Loosen steering column for access Steering column • Test all necessary functions of electrical components for correct operation and reset as required Main wiring harness • Remove and install or replace: Control cables (example: hood release, remote mirrors) Optional equipment (example: electronic components, center console, cruise control) Remote mirrors Air bag module • Repair/Rework parts (example: cut holes for modification) • Drill holes for installing trim • Transfer instruments Procedure Explanation Glass and Interior P15 11 (continued) Windshield/Back Window R&R Included Operations Not Included Operations • Remove and replace: • Remove and install or replace: Reveal mouldings High mount stop lamp Garnish mouldings • Remove and replace: Wiper arms Aftermarket window tint Rear view mirror • Broken glass clean up • Replace weatherstrip IMPORTANT REMINDER: No windshield or flush • Clean up old adhesive as necessary mounted reveal moulding can be removed without the possibility of breakage. Unintentional damage to glass that is considered a structural member by the vehicle manufacturer may occur when attempting alignment pulls to correct unibody collision damage. Agree beforehand who will incur the charge for damage occurring during normal R&R or R&I, and whether additional labor time will be required to perform R&I operations on glass secured by urethane. • Test for leaks Cowl Side and Door Post 12 Cowl Side & Door Post R&R Included Operations Not Included Operations • Remove and replace as an assembly • Refinish cowl side and door post • Cut in windshield opening and at base of door post • Remove and/or apply: • Remove and install or replace: Front Door Anti-corrosion rust resistant materials • Remove and install or replace: Cowl side trim Front fender Weathercords Windshield, seals or mouldings Weatherstrips Restraint systems Sill plates • Loosen and pull back carpet and insulation as required • Remove and replace caulking for standard factory application IMPORTANT REMINDER: Sectioning of a panel may or may not be recommended by vehicle manufacturer. This procedure should only be performed when a qualified and knowledgeable technician has determined that the operation does not jeopardize the integrity of the vehicle. Instrument panel, instruments, etc. • Trimming of welded assembly to be installed IMPORTANT REMINDER: No windshield or flush mounted reveal moulding can be removed without the possibility of breakage. Unintentional damage to glass that is considered a structural member by the vehicle manufacturer may occur when attempting alignment pulls to correct unibody collision damage. Agree beforehand who will incur the charge for damage occurring during normal R&R or R&I, and whether additional labor time will be required to perform R&I operations on glass secured by urethane. Procedure Explanation P16 13 Rocker Panel Rocker Panel R&R Included Operations Not Included Operations • Remove and replace inner and outer panels • Refinish rocker panel • Cut at door posts, center pillar, lock pillar or dog leg • Remove and/or apply: • Remove and install or replace: Anti-corrosion rust resistant materials Cowl side trim • Remove and install or replace: Center pillar trim Front and rear doors Quarter trim at sill Rocker moulding Sill plates Control cables (latch release, etc.) Seats Fluid lines • Loosen and pull back carpet and insulation as required • Remove and replace caulking for standard factory application IMPORTANT REMINDER: Sectioning of a panel may or may not e recommended by vehicle manufacturer. This procedure should only be performed when a qualified and knowledgeable technician has determined that the operation does not jeopardize the integrity of the vehicle. 14 Restraint systems • Remove and replace or loosen rear edge of front fender • Trimming of welded assembly to be installed Rocker Panel and Center Pillar Rocker Panel & Center Pillar R&R Included Operations • Remove and replace inner and outer rocker panel and center pillar • Cut center pillar below roof and rocker panel at base of door post and dog leg • Remove and install or replace Rear Door Cowl side trim Center pillar trim Sill plates Seats Quarter trim at sill • Loosen and pull back carpet and insulation as required • Remove and replace caulking for standard factory application IMPORTANT REMINDER: Sectioning of a panel may or may not be recommended by vehicle manufacturer. This procedure should only be performed when a qualified and knowledgeable technician has determined that the operation does not jeopardize the integrity of the vehicle. Not Included Operations • Refinish rocker and center pillar • Remove and/or apply: Anti-corrosion rust resistant materials • Remove and install or replace: Front door Rocker panel moulding Control cables (latch release, etc.) Restraint systems Fluid lines Headliner • Remove and replace or loosen rear edge of front fender • Trimming of welded assembly to be installed Procedure Explanation P17 15 Front/Rear/Side Cargo or Back Door Door Assembly R&R Included Operations Not Included Operations • Remove and replace as an assembly • Refinish door • Remove and install or replace: • Remove and replace: Trim panel Outside mirrors Lock cylinder Aftermarket window tint Water/dust barrier IMPORTANT REMINDER: No side or back glass (nonremovable) or flush mounted reveal moulding can be removed without the possibility of breakage. Agree beforehand who will incur the charge for damage occurring during normal removal and installation. • Remove and install or replace: Restraint systems • Replace or transfer parts attached to door (example: outside handle, glass, run channels, regulator, vent assembly, weatherstrip) • Recode lock cylinder • Remove from salvaged assembly: Interior trim panel Lock cylinder Door Glass R&R Included Operations • Remove and install: Trim panel Garnish mouldings • Remove and install or replace: Belt moulding if necessary Outside rear view mirror if necessary Parts attached to glass Water/dust barrier • Replace weatherstrip if so attached • Replace necessary adhesive/urethane • Clean up old adhesive in opening area • Align glass • Test for leaks Not Included Operations • Remove and install or replace: Glass regulator and motor • Remove and replace: Aftermarket window tint • Broken glass clean up Procedure Explanation P18 16 Doors and Center Pillar Doors & Center Panel R&R Included Operations Not Included Operations • Cut center pillar below roof and at base • Refinish doors and center pillar • Remove and install or replace: • Remove and/or apply: Center pillar trim Door trim panels Anti-corrosion rust resistant materials • Remove and install or replace: Lock cylinder Control cables (latch release, etc.) Sill plates Restraint systems Front and rear doors Fluid lines Water/dust barrier Mouldings, nameplates, etc. • Loosen and pull back carpet and insulation as required Outside mirror • Remove and replace caulking for standard factory application Headliner IMPORTANT REMINDER: Sectioning of a panel may or may not be recommended by vehicle manufacturer. This procedure should only be performed when a qualified and knowledgeable technician has determined that the operation does not jeopardize the integrity of the vehicle • Replace or transfer parts attached to door (example: outside handle, glass, run channels, regulator, vent assembly, weatherstrip) • Remove and replace or loosen rear edge of front fender • Recode lock cylinder • Remove from salvaged assembly: Interior trim panels Lock cylinder • Trimming of welded assembly to be installed Procedure Explanation Doors/Center Pillar and Rocker P19 17 Doors/Center Pillar & Rocker R&R Included Operations • Remove and replace inner and outer rocker panels and center pillar • Cut center pillar below roof and rocker panel at base of door posts and dog leg • Remove and install or replace: Front and rear doors Cowl side trim Center pillar trim Quarter trim at sill Door trim panels Lock cylinder Not Included Operations • Refinish doors, center pillar and rocker panel • Remove and/or apply: Anti-corrosion rust resistant materials • Remove and install or replace: Mouldings, nameplates, etc. Control cables (latch release, etc.) Restraint systems Fluid lines Outside mirror Headliner Seats • Replace or transfer parts attached to door (example: outside handle, glass, run channels, regulator, vent assembly, weatherstrip) Water/dust barrier • Remove and replace or loosen rear edge of front fender Sill plates • Loosen and pull back carpet and insulation as required • Recode lock cylinder • Remove and replace caulking for standard factory application • Remove from salvaged assembly: IMPORTANT REMINDER: Sectioning of a panel may or may not be recommended by vehicle manufacturer. This procedure should only be performed when a qualified and knowledgeable technician has determined that the operation does not jeopardize the integrity of the vehicle. Interior trim panels Lock cylinder • Trimming of welded assembly to be installed Procedure Explanation P20 18 Doors/Center Pillar/ Rocker and Quarter Doors/Center Pillar/Rocker & Quarter R&R Included Operations • Remove and replace center pillar, rocker and quarter as an assembly • Cut through window opening and at base of front door post, includes wheelhouse • Remove and install: Luggage compartment trim Cowl side trim Center pillar trim Quarter trim Plastic wheelhouse liner Door trim panels Lock cylinder Sill plates Seats Tail lamp Rear bumper Not Included Operations • Refinish doors, center pillar, rocker and quarter panel • Remove and/or apply: Anti-corrosion rust resistant materials • Remove and install: Headliner (all types) Restraint systems • Remove and install or replace: Fuel tank Antenna Control cables (latch release, etc.) Fluid lines Mouldings, nameplates, etc. Suspension assembly Luggage lid Outside mirror Stone deflector • Replace or transfer parts attached to door (example: outside handle, glass, run channels, regulator, vent assembly, weatherstrip) Lower valance • Recode lock cylinder Parcel shelf trim • Remove or replace or loosen rear edge of fender Filler panel • Remove and install or replace: • Remove from salvaged assembly: Side and back glass, seals or mouldings Interior trim panels Front and rear doors Lock cylinder Water/dust barriers • Loosen and pull back cloth type headliner, carpet and insulation as required • Remove and replace caulking for standard factory application IMPORTANT REMINDER: Sectioning of a panel may or may not be recommended by vehicle manufacturer. This procedure should only be performed when a qualified and knowledgeable technician has determined that the operation does not jeopardize the integrity of the vehicle. • Trimming of welded assembly to be installed Procedure Explanation Roof P21 19 Roof Section R&R Included Operations Not Included Operations • Cut in windshield and back glass openings • Refinish roof section • Remove and install or replace: • Remove and/or apply: Windshield, seals or mouldings Side and back glass, seals or mouldings Anti-corrosion rust resistant materials • Remove and install or replace: Headliner (All types) Restraint systems Sunvisors or grip handles Luggage rack Front and rear seats (Passenger/Pickup vehicles) Roof cap and/or vinyl cover Front seats (Van/Utility vehicles) Adhesive exterior trim Lift gate Stripes, decals, transfers or overlays Quarter trim Drip mouldings Weathercords Windshield pillar trim Center pillar trim • Remove and replace caulking for standard factory application IMPORTANT REMINDER: Sectioning of a panel may or may not be recommended by vehicle manufacturer. This procedure should only be performed when a qualified and knowledgeable technician has determined that the operation does not jeopardize the integrity of the vehicle. Sound deadener • Trimming of welded assembly to be installed IMPORTANT REMINDER: No windshield, back or quarter glass (if applicable), or flush mounted reveal mouldings can be removed without the possibility of breakage. Unintentional damage to glass that is considered a structural member by the vehicle manufacturer may occur when attempting alignment pulls to correct unibody collision damage. Agree beforehand who will incur the charge for damage occurring during normal R&R or R&I, and whether additional labor time will be required to perform R&I operations on glass secured by urethane. Procedure Explanation P22 20 Roof and Back Panel Roof & Back Panel R&R Included Operations Not Included Operations • Cut in windshield opening and at base of lock pillars • Refinish roof and back panel • Remove and install: • Remove and/or apply: Windshield, seals or mouldings Seats Anti-corrosion rust resistant materials • Remove and install: Headliner (All types) Back glass and mouldings Interior trim (base model only) Quarter glass and mouldings Sill plates Pickup bed assembly Lock strikers Restraint systems • Remove and replace caulking for standard factory application IMPORTANT REMINDER: Sectioning of a panel may or may not be recommended by vehicle manufacturer. This procedure should only be performed when a qualified and knowledgeable technician has determined that the operation does not jeopardize the integrity of the vehicle. Fuel tank • Remove from salvaged assembly: Interior trim panels • Trimming of welded assembly to be installed IMPORTANT REMINDER: No windshield, back or quarter glass can be removed without the possibility of breakage. Agree beforehand who will incur the charge for damage occurring during normal R&R or R&I and whether additional labor time will be required to perform R&I operations on glass secured by urethane. Procedure Explanation Back Panel P23 21 Back Panel R&R Included Operations Not Included Operations • Cut in window opening, corner panel seams and base of lock pillar • Remove and install: Seats Trim (base model only) Back or quarter glass, seals or mouldings • Loosen and pull back cloth type headliner, carpet and insulation as required • Remove and replace caulking for standard factory application IMPORTANT REMINDER: Sectioning of a panel may or may not be recommended by vehicle manufacturer. This procedure should only be performed when a qualified and knowledgeable technician has determined that the operation does not jeopardize the integrity of the vehicle. • Refinish back panel • Remove and/or apply: Anti-corrosion rust resistant materials • Remove and install: Pickup bed assembly Headliner (All types) Restraint systems Fuel tank • Remove from salvaged assembly: Interior trim panels • Trimming of welded assembly to be installed IMPORTANT REMINDER: No back glass or flush mounted reveal mouldings can be removed without the possibility of breakage. Agree beforehand who will incur the charge for damage occurring during normal R&R or R&I and whether additional labor time will be required to perform R&I operations on glass secured by urethane. Back and CornerSide Panel 22 Back & Corner Side-Panels R&R Included Operations • Cut in window opening, seam of back panel and base of lock pillar • Remove and install: Seats Interior trim (base model only) Sill plates Lock strikers Quarter glass, seals or mouldings • Remove and replace: Back glass, seals or mouldings • Loosen and pull back cloth type headliner, carpet and insulation as required • Remove and replace caulking for standard factory application IMPORTANT REMINDER: Sectioning of a panel may or may not be recommended by vehicle manufacturer. This procedure should only be performed when a qualified and knowledgeable technician has determined that the operation does not jeopardize the integrity of the vehicle. Not Included Operations • Refinish back and corner panel • Remove and/or apply: Anti-corrosion rust resistant materials • Remove and install or replace: Pickup bed assembly Headliner (All types) Restraint systems Fuel tank • Remove from salvaged assembly: Interior trim panels • Trimming of welded assembly to be installed IMPORTANT REMINDER: No back or quarter glass (if applicable) or flush mounted reveal mouldings can be removed without the possibility of breakage. Agree beforehand who will incur the charge for damage occurring during normal R&R or R&I and whether additional labor time will be required to perform R&I operations on glass secured by urethane. Procedure Explanation P24 23 Cab Assembly Cab Assembly R&R Included Operations • Remove and install: Cab as an assembly Headliner (All types) Interior trim (base model only) Not Included Operations • Refinish cab assembly • Remove and/or apply: Anti-corrosion rust resistant materials • Remove and install or replace: Seats Front sheet metal Lock cylinders Windshield, seals or mouldings IMPORTANT REMINDER: No windshield, back or quarter glass (if applicable) or flush mounted reveal mouldings can be removed without the possibility of breakage. Agree beforehand who will incur the charge for damage occurring during normal R&R or R&I and whether additional labor time will be required to perform R&I operations on glass secured by urethane. IMPORTANT REMINDER: Sectioning of a panel may or may not be recommended by vehicle manufacturer. This procedure should only be performed when a qualified and knowledgeable technician has determined that the operation does not jeopardize the integrity of the vehicle. Quarter glass, seals or mouldings Back glass, seals or mouldings Pickup bed assembly Mouldings, nameplates, etc. Instrument panel Steering column Fuel tank Outside mirrors Restraint systems • Remove from salvaged assembly: Interior trim panels Lock cylinders Procedure Explanation Rear Section Rear Section R&R Included Operations Not Included Operations • Cut at base of roof line and at base of lock pillar or dog legs • Refinish rear section • Remove and install or replace: • Remove and/or apply: Quarter trim Plastic wheelhouse liners Anti-corrosion rust resistant materials • Remove and install or replace: Side and back glass, seals or mouldings Headliner (All types) Rear seat Mouldings, nameplates, etc. Sill plates Restraint systems Bumper assembly Suspension assembly Luggage compartment trim Antenna Lock cylinder Fuel tank Lock strikers Control cables (latch release, etc.) Water/dust barriers Fluid lines • Loosen and pull back cloth type headliner, carpet or insulation as required Convertible top • Remove and replace caulking for standard factory application Exhaust system IMPORTANT REMINDER: No back glass or flush mounted reveal mouldings can be removed without the possibility of breakage. Unintentional damage to glass that is considered a structural member by the vehicle manufacturer may occur when attempting alignment pulls to correct unibody collision damage. Agree beforehand who will incur the charge for damage occurring during normal R&R or R&I, and whether additional labor time will be required to perform R&I operations on glass secured by urethane. Removable hard top Lift gate Lamp assemblies Center console • Recode lock cylinder • Remove from salvaged assembly: Interior trim panels Lock cylinder IMPORTANT REMINDER: Sectioning of a panel may or may not be recommended by vehicle manufacturer. This procedure should only be performed when a qualified and knowledgeable technician has determined that the operation does not jeopardize the integrity of the vehicle. • Trimming of welded assembly to be installed P25 24 Procedure Explanation P26 25 Rear Section and Roof Rear Section & Roof R&R Included Operations Not Included Operations • Cut in windshield openings and front door openings • Refinish rear section • Remove and install or replace: • Remove and/or apply: Quarter trim Plastic wheelhouse liners Anti-corrosion rust resistant materials • Remove and install or replace: Windshield, seals or mouldings Headliner (All types) Rear seat Restraint systems Front seats Suspension assembly Center pillar trim Back glass, seals or mouldings Sill plates Antenna Bumper assembly Fuel tank Luggage compartment trim Mouldings, nameplates, etc. Lock cylinder Control cables (latch release, etc.) Lock strikers Fluid lines Water/dust barriers Front and rear doors • R&I carpet and insulation as required Exhaust system • Remove and replace caulking for standard factory application Lamp assemblies IMPORTANT REMINDER: No windshield, back or quarter glass (if applicable) or flush mounted reveal mouldings can be removed without the possibility of breakage. Agree beforehand who will incur the charge for damage occurring during normal R&R or R&I and whether additional labor time will be required to perform R&I operations on glass secured by urethane. IMPORTANT REMINDER: Sectioning of a panel may or may not be recommended by vehicle manufacturer. This procedure should only be performed when a qualified and knowledgeable technician has determined that the operation does not jeopardize the integrity of the vehicle. Center console • Recode lock cylinder • Remove from salvaged assembly: Interior trim panels Lock cylinder • Trimming of welded assembly to be installed Procedure Explanation Quarter and Back Panel Quarter & Back Panel R&R Included Operations • Cut in window openings at base or door post or dog legs, includes wheelhouse • Remove and install or replace: Side and back glass, seals or mouldings Quarter glass, seals or mouldings Rear seat Sill plates Parcel shelf trim Quarter trim Plastic wheelhouse liner Tail lamps Bumper assembly Luggage compartment trim Lock cylinder Lock strikers Filler panel, stone deflector or rear lower valance Water/dust barrier • Remove and replace caulking for standard factory application • Loosen or pull back cloth type headliner, carpet and insulation as required • Loosen convertible top IMPORTANT REMINDER: No back or quarter glass (nonmovable) or flush mounted reveal mouldings can be removed without the possibility of breakage. Agree beforehand who will incur the charge for damage occurring during normal R&R or R&I and whether additional labor time will be required to perform R&I operations on glass secured by urethane. IMPORTANT REMINDER: Sectioning of a panel may or may not be recommended by vehicle manufacturer. This procedure should only be performed when a qualified and knowledgeable technician has determined that the operation does not jeopardize the integrity of the vehicle. Not Included Operations • Refinish quarter and back panel • Remove and/or apply: Anti-corrosion rust resistant materials • Remove and install or replace: Headliner (All types) Restraint systems Suspension assembly Antenna Fuel tank Control cables (latch release, etc.) Fluid lines Luggage lid Liftgate Wheel • Recode lock cylinder • Remove from salvaged assembly: Interior trim panels Lock cylinder • Remove and replace: Floor pan • Trimming of welded assembly to be installed P27 26 Procedure Explanation P28 27 Quarter and Rocker Panel Quarter & Rocker Panel R&R Included Operations • Cut in window openings and rocker panel as necessary, includes wheelhouse • Remove and install or replace: Quarter trim Plastic wheelhouse liner Side and back glass, seals or mouldings Seats Parcel shelf trim Cowl side trim Filler panels, stone deflector, or lower valance panel Sill plates Bumper assembly Lock strikers Tail lamp Luggage compartment trim Water/dust barrier • Loosen or pull back cloth type headliner, carpet and insulation as required • Remove and replace caulking for standard factory application • Loosen convertible top at quarter IMPORTANT REMINDER: Sectioning of a panel may or may not be recommended by vehicle manufacturer. This procedure should only be performed when a qualified and knowledgeable technician has determined that the operation does not jeopardize the integrity of the vehicle. Not Included Operations • Refinish quarter and rocker panel • Remove and/or apply: Anti-corrosion rust resistant materials • Remove and install or replace: Headliner (All types) Restraint systems Suspension assembly Luggage lid Antenna Liftgate Fuel tank Control cables (latch releases, etc.) Fluid lines Mouldings, nameplates, etc. Wheel • Remove from salvaged assembly: Interior trim panels • Trimming of welded assembly to be installed IMPORTANT REMINDER: No back or quarter glass (nonmovable) or flush mounted reveal mouldings can be removed without the possibility of breakage. Agree beforehand who will incur the charge for damage occurring during normal R&R or R&I and whether additional labor time will be required to perform R&I operations on glass secured by urethane. Procedure Explanation Quarter Panel Assy P29 28 Quarter Panel R&R Included Operations • Cut in window openings and at base of door post or dog legs, includes wheelhouse • Remove and install or replace: Side and back glass, seals or mouldings Water/dust barrier Quarter glass, seals or mouldings Rear seat Sill plates Parcel shelf trim Quarter trim Plastic wheelhouse liner Lock striker Tail lamp Bumper assembly Luggage compartment trim Filler panel, stone deflector or lower valance • Loosen and pull back cloth type headliner, carpet and insulation as necessary • Loosen convertible top at quarter Not Included Operations • Refinish quarter panel • Remove and/or apply: Anti-corrosion rust resistant materials • Remove and install or replace: Headliner (All types) Restraint systems Suspension assembly Luggage lid Antenna Liftgate Wheel Fuel tank Control cables (latch release, etc.) Fluid lines Mouldings, nameplates, etc. • Remove from salvaged assembly: Interior trim panels • Trimming of welded assembly to be installed • Remove and replace caulking for standard factory application IMPORTANT REMINDER: Sectioning of a panel may or may not be recommended by vehicle manufacturer. This procedure should only be performed when a qualified and knowledgeable technician has determined that the operation does not jeopardize the integrity of the vehicle. IMPORTANT REMINDER: No back, quarter glass (non-movable) or flush mounted reveal mouldings can be removed without the possibility of breakage. Unintentional damage to glass that is considered a structural member by the vehicle manufacturer may occur when attempting alignment pulls to correct unibody collision damage. Agree beforehand who will incur the charge for damage occurring during normal R&R or R&I, and whether additional labor time will be required to perform R&I operations on glass secured by urethane. IMPORTANT REMINDER: Quarter panel R&R is intended to be performed as an assembly including the wheelhouse, and not the outer skin sheet metal by itself. However, due to a variety of unforeseen reasons (e.g. the unavailability of a new quarter panel outer skin for an older model vehicle) utilizing a salvaged quarter panel outer skin may be the only repair option available. In these situations, all additional time for metal trimming to separate the outer skin from the assembly will need to be added to the assembly R&R allowance. Procedure Explanation P30 29 Pickup Bed Assembly/ Side Panel Pickup Bed Assembly/Side Panel R&R Included Operations Not Included Operations • Remove and install as an assembly, including tail gate • Refinish bed or side assembly • Remove and install: • Remove and/or apply: Bumper assembly Plastic wheelhouse liners Anti-corrosion rust resistant materials • Remove and install or replace: Fuel filler pipe Bed liner Tailgate Camper shell Bed assembly Fuel tank • Remove and replace caulking for standard factory application IMPORTANT REMINDER: Sectioning of a panel may or may not be recommended by vehicle manufacturer. This procedure should only be performed when a qualified and knowledgeable technician has determined that the operation does not jeopardize the integrity of the vehicle. Fluid lines Optional accessories Rear fenders Mouldings, nameplates, etc. Stripes or decals Wheel Lamps • Trimming of welded assembly to be installed Procedure Explanation Van Side Panel Van Side Panel R&R Included Operations • Cut in window openings and at base of door posts, includes wheelhouse • Remove and install: Quarter glass, seals, or mouldings Plastic wheelhouse liner Side and rear doors Sill plates Lock striker Bumper assembly Tail lamp Water/dust barrier • Loosen and pull back cloth type headliner, carpet and insulation as necessary • Remove and replace caulking for standard factory application IMPORTANT REMINDER: No quarter glass (nonmovable) or flush mounted reveal mouldings can be removed without the possibility of breakage. Agree beforehand who will incur the charge for damage occurring during normal R&R or R&I and whether additional labor time will be required to perform R&I operations on glass secured by urethane. IMPORTANT REMINDER: Sectioning of a panel may or may not be recommended by vehicle manufacturer. This procedure should only be performed when a qualified and knowledgeable technician has determined that the operation does not jeopardize the integrity of the vehicle. Not Included Operations • Refinish side panel • Remove and/or apply: Anti-corrosion rust resistant materials • Remove and install or replace: Headliner (All trypes) Interior trim panels Restraint systems Suspension Fuel tank Fluid lines A/C or heater components Seats Mouldings, nameplates, etc. Stripes or decals Wheel • Trimming of welded assembly to be installed P31 30 Procedure Explanation P32 31 Luggage Lid/Lift Gate/ Bumper/Rear Lamps Luggage Lid R&R Included Operations Not Included Operations • Remove and install as an assembly • Refinish luggage lid • Remove and install or replace: • Remove and install: Lock cylinder Latch or controls Trim panel Mouldings, nameplates, etc. IMPORTANT REMINDER: No back glass or flush mounted reveal moulding can be removed without the possibility of breakage. Agree beforehand who will incur the charge for damage occurring during normal R&R or R&I and whether additional labor will be required to perform R&I operations on glass secured by urethane. Hinges Gas prop rod Spoiler Stripes or decals Lamps • Recode lock cylinder • Remove from salvaged assembly: Interior trim panel Lock cylinder Procedure Explanation Luggage Lid/Lift Gate/ Bumper/Rear Lamps P33 31 (continued) Rear Gate/Liftgate R&R Included Operations Not Included Operations • Remove and install as an assembly • Refinish rear gate/liftgate • Remove and install or replace: • Remove and install or replace: Lock cylinder Hinges or links Interior trim panels Gas prop rod Water/dust barrier Latch or controls Wiper and washer Handle Spoiler Mouldings, nameplates, etc. Stripes or decals Rear glass, seals or mouldings Lamps • Recode lock cylinder • Remove from salvaged assembly: Interior trim panels Lock cylinder Bumper Assembly R&R Included Operations • Remove assembly from frame, impact absorbers or mounting arms • Replace as an assembly • Adjust alignment to vehicle • Remove and replace impact absorbers Not Included Operations • Refinish bumper • Remove and install optional accessories (example: parking aid sensors, spoilers, trailer hitch, trailer connector) Procedure Explanation P34 32 Refinish Procedure Major Panels or Assemblies Major panels or assemblies are those listed below: FRONT PANEL BACK AND CORNER-SIDE PANELS FRONT SHEET METAL CAB ASSEMBLY FENDER REAR SECTION FENDER AND RADIATOR SUPPORT REAR SECTION AND ROOF HOOD QUARTER AND BACK PANEL ROCKER QUARTER AND ROCKER PANEL ROCKER AND CENTER PILLAR QUARTER PANEL DOOR PICKUP BED DOORS AND CENTER PILLAR PICKUP BED SIDE DOORS/CENTER PILLAR AND ROCKER VAN SIDE PANEL DOORS/CENTER PILLAR/ROCKER AND QUARTER LUGGAGE LID ROOF ROOF AND BACK PANEL LIFTGATE TAILGATE BACK PANEL Overlap Deduct .4 hour from refinish time for each ADJACENT MAJOR PANEL or ASSEMBLY and deduct .2 hour from time for each NON-ADJACENT MAJOR PANEL or ASSEMBLY. There is no overlap deduction taken for the first major panel or assembly. Adjacent major panel or assembly example: Front sheet metal 8.5 hours (full time) and right front door 2.5 hours minus .4 hour overlap for a total of 10.6 hours. Non-adjacent major panel or assembly example: Front sheet metal 8.5 hours (full time) and right rear door 2.5 hours minus .2 hour overlap for a total of 10.8 hours. No overlap deductions for valance panel, pillars, inner panels, filler panels, soft bumper covers or bolt-on finish panels. NOTE: Refinish overlap within assemblies has been factored. Do not take any additional overlap for panels within assemblies Procedure Explanation Refinish Procedure P35 32 (continued) Included Operations Not Included Operations • Detergent/solvent wash • Applying anti-corrosion rust resistant materials • Scuff panel and clean • Blending into adjacent panel and/or panels, or nearest breaking point • Mask adjacent panels up to 36 inches or substitute with cover vehicle (bag) complete • Clear coat • Prime or seal as required • Color match or tinting • Final sanding and clean • Finish sand and buff • Mix materials • Subsequent vehicle bagging when required: add .2 hour for each application & removal • Adjust spray equipment • Apply color • Clean equipment NOTE: The included operation of mask adjacent panels is inclusive of any necessary back tape masking to prevent overspray. • Mask interior to prevent overspray damage • Featheredge rock chips, scratches or other imperfections, or the application of primer surfacer and block sanding of the same • Gravel guard refinish; add .5 hour for the first major panel and .3 hour for each additional panel IMPORTANT REMINDER: Refinish times are for UNDAMAGED SALVAGED PARTS AND/OR ASSEMBLIES. • Paint removal if necessary NOTE: Refinish times are for outside surfaces only • Remove and install or mask: unless stated otherwise in text (example: add for underside, add to edge). IMPORTANT REMINDER: Remove and install or masking of glass, outside handles or exterior trim, feathedge-fill-sand and block, and masking for surface fill application are not included in refinish time. Refinish times may vary depending on individual procedures, product and/or weather conditions. A small percentage of colors are identified by the paint manufacturers as highly transparent. These colors may require additional application coats to achieve visual hiding. In instances where four or more color coats are necessary to achieve adequate hiding, some adjustment in refinish times may be appropriate. The cost of paint and materials is not included in refinish time. • Removal of protective coatings Bolted parts and assemblies (example: reservoirs, canisters, door handles, moldings, mirrors, name plates, cruise control, air conditioning and heater components, etc.) Glass and trim Decals (example: EPA, body identification, etc.) Wiring and/or wiring harness for access to refinish • Special coating of luggage compartment • Steam cleaning of replacement panels to remove contaminates or other materials that would interfere with refinish operation • Two tone refinish NOTE: Gravel Guard application and appropriate refinish may be necessary beyond the actual replacement area to achieve a “texture” match. It may be necessary to tint or otherwise modify non-exterior colors applied to undersides, edges and/or jambs for which there is no paint color formula to acheive a color match. When necessary, reference “color match or tinting” listed in Not Included Operations. P36 32 Procedure Explanation Refinish Procedure (continued) Clear Coat/Two Stage Refinish First major panel, assembly or soft bumper/fascia cover: Add .4 per refinish hour (40%), then add .4 per refinish hour for jamb, jamb and interior, edge panel, and/or underside (when necessary). Included Operations Additional panel(s), assembly(s) and/or other refinish area(s): Deduct overlap (if applicable); add .2 per refinish hour (20%), then add .2 per refinish hour for jamb, jamb and interior, edge panel, and/or underside (when necessary). Included Operations • Mix material • Clean and tack surface • Clean and tack surface • Apply material • Apply material • Clean equipment NOTE: Some OEMs now utilize a matte clear coat on nonexterior colors applied to undersides, edges,and/or jambs. Three Stage Refinish First major panel, assembly or soft bumper/fascia cover: Add .7 per refinish hour (70%), after time has been added for jamb, jamb and interior, edge panel, and/or underside (when necessary). Included Operations Additional panel(s), assembly(s) and/or other refinish area(s): Deduct overlap (if applicable); add .4 per refinish hour (40%), after time has been added for jamb, jamb and interior, edge panel, and/or underside (when necessary). Included Operations • Mix pearl/mica toner • Apply pearl/mica toner • Apply toner to test panel • Clean and tack surface • Mix clear • Apply clear • Clean and tack surface • Apply clear to test panel • Repeat application to surface being refinished • Clean equipment NOTE: With three stage paints, it may be necessary to blend into larger areas of adjacent panels or complete sides of vehicles, otherwise known as zone painting. NOTE: Some OEMs now utilize a matte clear coat on nonexterior colors applied to undersides, edges, and/or jambs. Two Tone Refinish First major panel: Additional panel(s) and/or other refinish area(s): Add .5 per refinish hour (50%). Deduct overlap (if applicable); add .3 per refinish hour (30%). Included Operations Included Operations • Mask panel • Mask panel • Scuff panel • Scuff panel • Mix material • Apply material • Apply material • Clean equipment Procedure Explanation Refinish Procedure P37 32 (continued) Finish Sand & Buff A labor time formula is provided should it be necessary to perform this operation. This procedure includes the removal of orange peel and any blemishes that affect paint texture in order to produce a smooth finish to the entire panel surface. This process is not limited to “nib sanding” or “finessing” which is the removal of isolated dirt/dust particles only. The performance of this operation is NOT INCLUDED in the Mitchell refinish labor time. The finish sand and buff formula is intended to be calculated as a percentage of the base refinish hours excluding overlap and clear coat. It DOES NOT APPLY to edges, jambs, and undersides. For blended panels, the formula should be applied to the full panel refinish time. No deduction for refinish overlap should be taken. Mask Vehicle to Prevent Overspray Damage The following refinish information is provided should it be necessary to perform these operations as determined by individual job requirements: MASK INTERIOR ENTRYWAYS, ENGINE COMPARTMENT AND TRUNK OPENINGS Interior masking may be necessary when refinishing exterior surfaces to stop overspray damage that is not prevented by adjacent panel perimeter masking which includes back taping or application of foam tape. Interior masking may also be used when exterior panels (door, hood, etc.) are removed while applying refinish material. The performance of this operation is NOT INCLUDED in the Mitchell refinish labor time. Finish sand and buff outside surface area(s): Allow .3 per refinish hour (30%) to finish sand and buff each surface area(s). MASK INTERIOR OPENINGS, JAMBS Feather, Prime & Block Is the Not-Included refinish operation that completes bodywork repair from 150 grit smoothness to the condidtion of a new undamaged panel, and the point at which refinish labor time begins. The labor and materials associated with feather, prime and block may vary depending upon the size of the repair area, and should be evaluated when determining the work to be performed. See Estimating Information page P-2 for information on Welded Panels. NOTE: The times shown in the illustration are for interior masking of that panel and/or opening. Labor time includes all pillars, jambs, weatherstrips, edges, entryways and openings as necessary. Deduct .1 hour overlap for each interior masked adjacent panel and/or opening. The Mitchell REFINISHING MATERIALS GUIDE, with the Latest Available Costs for Materials Used in Single and Multi-Stage Refinishing, is an Accurate Source for Determining Costs. Information on the REFINISHING MATERIALS GUIDE and Other Collision Estimating and Repair Publications is Provided at the Front of this Guide. Procedure Explanation P38 33 Plastic Identification (continued) Plastic Markings Handling Precautions For Plastics Vehicle manufacturers generally mark major plastic parts to identify the type of plastic material used in the item’s production. These are in the form of letter-coded groups molded on the backs of parts as identified below. Wherever possible, these parts are identified in the text. Abbrev. Material Name Heat Resisting Temp °F (°C) AAS Acrylonitrile acrylic rubber styrene ABS When repairing and painting metal body parts adjacent to plastic parts, consider their characteristics (i.e., influence of heat and solvent) and remove them if necessary, or take suitable measures to protect them. Plastic parts should be repaired and painted using methods suiting the materials. Depending on the severity of damage, the repair cost should not exceed the cost of replacing the part. Location Notes 176 (80) Trim panel, side marker lamp, door, outside mirror Avoid gas and solvents. Acrylonitrile butadiene styrene 176 (80) Grille, garnish moulding, speaker grill, vent louver, trim panel, safety pad, outside mirror Avoid gas and solvents. AES Acrylonitrile ethylene styrene 176 (80) Grille Avoid gas and solvents. EDPM Ethylene propylene rubber 212 (100) Bumper impact strip Gas and most solvents are harmless (wipe quickly). FRP Fibre reinforced plastics 338 (170) Headlamp cover Gas and most solvents are harmless. PA Polyamide (nylon) 176 (80) Exterior finish panel Gas and most solvents are harmless. PC Polycarbonate 248 (120) Instrument panel, lens, grille Avoid gas and solvents. PE Polyethylene 176 (80) Fender skirt, interior trim, headliner, valance, spoiler, sill cover Gas and most solvents are harmless. Flammable. PMMA Polymethyl methacrylate 176 (80) Lens Avoid gas and solvents. PP Polypropylene 176 (80) Instrument panel, interior trim, grille, center console, scuff plate, exterior trim, fender, skirt, heater/evaporator case, coolant tank Gas and most solvents are harmless. Flammable. PPC Polypropylene composite 239 (115) Center console box Gas and most solvents are harmless. Flammable. PPO Polypropylene oxide 212 (100) Grille, headlamp, door, bezel, ornament (chrome) Avoid gas and solvents. PUR Polyurethane 176 (80) Bumper cover Gas and most solvents are harmless (wipe quickly). PVC Polyvinyl chloride 176 (80) Headliner, interior trim, side protect moulding, safety pad Gas and most solvents are harmless (wipe quickly). Poison gas emitted when burned. SAN Styrene acrylonitrile resin 176 (80) Instrument panel gauge lens Avoid gas and solvents. TPO Thermoplastic olefin 176 (80) Mudguard Gas and most solvents are harmless (wipe quickly). TPR Thermoplastic rubber 176 (80) Valance panel, filler panel, mudguard Avoid gas and solvents. TPU Thermoplastic polyurethane 176 (80) Bumper cover, gravel deflector, soft filler panel Avoid gas and solvents. Rev. 01-07