1
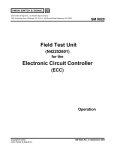
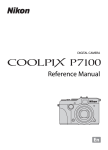
Page 1 of 19
Fuel Injection Pumps, In-Line
(005-012)
Table of Contents
Summary
General Information
Preparatory Steps
Remove
Install
Finishing Steps
Prime
Summary
Stepblock
Disconnect batteries
Stepblock
Clean any debris from fuel injection
pump.
Stepblock
Remove fuel supply lines (Procedure
006-024, and injector supply lines to
pump (Procedure 006-051).
Stepblock
Remove control linkage (see OEM
service manual), and fuel shutoff valve
(Procedure 005-043).
Stepblock
Remove air fuel control air tube
(Procedure 006-001), and disconnect
wastegate turbocharger control line (if
applicable).
Stepblock
Connect batteries, operate engine and
check for leaks.
Stepblock
Disconnect external oil fed lines.
Stepblock
Locate cylinder Number 1 top dead
center.
Stepblock
Disengage timing pin.
Stepblock
Remove fuel pump mounting bracket.
Stepblock
Remove gear cover access cap, and nut
and washer from fuel pump shaft.
Pull the fuel injection pump drive gear
Part Number 3163381 or Part Number
file://C:\DOCUME~1\au172\LOCALS~1\Temp\554KYC8C.htm
10/31/2008
Page 2 of 19
Stepblock
loose from shaft.
Stepblock
Remove four mounting nuts and fuel
pump.
Stepblock
Remove fuel injection pump.
Stepblock
Verify cylinder Number 1 at top dead
center.
Stepblock
Stepblock
Remove fuel pump access plug and
timing pin.
Stepblock
If timing tooth not aligned with hole,
rotate fuel injection pump shaft until tooth
aligned.
Stepblock
Reverse position of pin.
Stepblock
Install and secure timing pin with access
plug.
Stepblock
Stepblock
Lubricate gear cover housing and
pump mounting flange.
Stepblock
Install new pilot o-ring.
Stepblock
Slide pump shaft through drive gear.
Stepblock
Stepblock
3824469 with M8-1.25 x 50, grade 8.8 or
equivalent.
Use 50/50 mixture of clean engine oil
and STP or equivalent.
Push pump until flange and o-ring
properly fit into housing bore.
Stepblock
Install mounting nuts.
Torque: 43 N•m [32 ft-lb].
Stepblock
Install retaining nut and washer.
Torque: 10 to 15 N•m [7 to 11 ft-lb].
Stepblock
Disengage engine timing pin.
Stepblock
Remove access plug and add lubricating
engine oil.
Stepblock
Remove fuel pump timing pin plug and
reverse pin position.
Stepblock
Install pin, plug, and sealing washer.
Stepblock
Tighten fuel pump drive nut.
“A” Pump: 85 N•m [63 ft-lb], In-line
Pumps P3000 and P7100: 195 N•m [144
ft-lb], and Nippondenso Pump: 123 N•m
[91 ft-lb].
Stepblock
Install gear cover access cap.
Hand-tighten.
Stepblock
Install fuel injection pump mounting
bracket capscrews.
Stepblock
Tighten capscrews by hand.
Torque: 24 N•m [18 ft-lb].
file://C:\DOCUME~1\au172\LOCALS~1\Temp\554KYC8C.htm
10/31/2008
Page 3 of 19
Stepblock
Connect external oil fed lines.
Stepblock
Connect wastegate turbocharger control
line (if applicable), and install air fuel
control air tube (Procedure 006-001).
Stepblock
Install fuel shutoff valve (Procedure 005043), and control linkage (see OEM
service manual).
Stepblock
Install injector supply lines to pump
(Procedure 006-051), and fuel supply
lines (Procedure 006-024).
Stepblock
Injection Pumps - Venting
Stepblock
Vent air and fuel from Nippondenso EP-9
and Lucas CAV fuel injection pumps.
Stepblock
Loosen vent screw and operate priming
lever until injection pump primed.
Stepblock
Tighten vent screw.
Stepblock
Vent air through fuel drain manifold line.
Energize fuel solenoid valve on Lucas
CAV pump before venting.
Torque: 9 N•m [80 in-lb].
General Information
TOC
The Bosch® P7100 in-line fuel injection pump can be found
on the following engine application:
1991 high-horsepower automotive ratings
1994 automotive, all 6B ratings
1996 emissionized high-horsepower industrial ratings.
SMALL | MEDIUM | LARGE
Next
The Nippondenso EP-9 in-line fuel injection pump with the
RSV governor can be found on the following engine
application:
Higher horsepower marine rating.
SMALL | MEDIUM | LARGE
file://C:\DOCUME~1\au172\LOCALS~1\Temp\554KYC8C.htm
10/31/2008
Page 4 of 19
Previous
Next
The Bosch® A-RSV in-line fuel injection pump can be found
on the following engine application:
Pre-1996 noncommissioned industrial ratings
1996 industrial emission ratings
Marine
Gensets.
SMALL | MEDIUM | LARGE
Previous
Next
The Bosch® MW/RSV and MW/RQV in-line fuel injection
pump can be found on the following engine application:
1996 and higher industrial emission ratings.
SMALL | MEDIUM | LARGE
Previous
Next
The Bosch® P3000/RQVK and P3000/RQV in-line fuel
injection pump can be found on the following engine
application:
1996 and higher high-horsepower industrial emission
rating.
SMALL | MEDIUM | LARGE
Previous
Next
file://C:\DOCUME~1\au172\LOCALS~1\Temp\554KYC8C.htm
10/31/2008
Page 5 of 19
The Bosch® P3000/RSV In-line fuel injection pump can be
found on the following engine application:
1996 and higher high-horsepower industrial emission
ratings
Marine.
SMALL | MEDIUM | LARGE
Previous
Next
The pressure relief valve arrangement on the Bosch®
P7100 fuel injection pump in the supply side of the fuel
circuit creates a self-bleeding system for air introduced
during replacement of the supply-side components.
Small amounts of air can be bled from the pump by
operating the hand primer on the fuel transfer pump or by
cranking the engine.
SMALL | MEDIUM | LARGE
Previous
Next
The Bosch® P7100 in-line fuel injection pump has a jumpover tube to route return fuel and entrapped air from the
pressure relief valve directly to the supply tank.
SMALL | MEDIUM | LARGE
Previous
Next
The Nippondenso EP-9 in-line fuel injection pumps will
require additional venting prior to initial start-up, pump
replacement, or if engine fuel runs out.
file://C:\DOCUME~1\au172\LOCALS~1\Temp\554KYC8C.htm
10/31/2008
Page 6 of 19
SMALL | MEDIUM | LARGE
Previous
Next
Fuel Injection Pump (In-Line Type)
Beginning in 1991, the B Series engine used the Bosch®
P7100 in-line fuel injection pump on higher horsepower
automotive ratings. In 1994, all automotive 6B Series
engines used the Bosch® P-7100 in-line fuel injection
pump.
B Series industrial ratings and marine (after 1996) engines
use the Bosch® “A” in-line fuel injection pumps.
SMALL | MEDIUM | LARGE
Previous
Next
The B Series engine also uses the Nippondenso EP-9 with
RSV governor on 1996 or earlier engines with a 250 and
300-horsepower marine rating.
Refer to the B Series Marine Operation and Maintenance
Manual, Bulletin 3810466, for additional information.
SMALL | MEDIUM | LARGE
Previous
Next
The fuel injection pump performs the three basic functions
of:
1. Metering the exact amount of fuel for each injection
cycle
2. Producing the high fuel pressure required for injection
file://C:\DOCUME~1\au172\LOCALS~1\Temp\554KYC8C.htm
10/31/2008
Page 7 of 19
3. Delivering the high-pressure metered fuel to each
cylinder at the precise time.
SMALL | MEDIUM | LARGE
Previous
Next
Individual plungers are used in the pumps to develop and
distribute the high pressure required for injection.
A worn or damaged plunger in the pump will affect only one
cylinder.
SMALL | MEDIUM | LARGE
Previous
Next
Preparatory Steps
TOC
WARNING
Batteries can emit explosive gases. To reduce the
possibility of personal injury, always ventilate the
compartment before servicing the batteries. To reduce
the possibility of arcing, remove the negative (-) battery
cable first and attach the negative (-) battery cable last.
Disconnect the batteries.
SMALL | MEDIUM | LARGE
Previous
Summary 1
Next
file://C:\DOCUME~1\au172\LOCALS~1\Temp\554KYC8C.htm
10/31/2008
Page 8 of 19
WARNING
Fuel is flammable. Keep all cigarettes, flames, pilot lights,
arching equipment, and switches out of the work area
and areas sharing ventilation to reduce the possibility of
severe personal injury or death when working on the fuel
system.
SMALL | MEDIUM | LARGE
WARNING
Some state and federal agencies have determined that
used engine oil can be carcinogenic and cause
reproductive toxicity. Avoid inhalation of vapors,
ingestion, and prolonged contact with used engine oil. If
not reused, dispose of in accordance with local
environmental regulations.
Previous
Summary 2
Next
Summary 3
Summary 4
Clean any debris from the fuel injection pump.
Remove the fuel supply lines. Refer to Procedure
006-024.
Remove the injector supply lines to the pump. Refer
to Procedure 006-051.
Remove the control linkage. See the OEM service
manual.
Remove the fuel shutoff valve. Refer to Procedure
005-043.
Remove the air fuel control air tube. Refer to
Procedure 006-001.
Disconnect wastegate turbocharger control line (if
applicable).
Summary 5
Remove
TOC
Disconnect the external oil feed line at the inboard side of
the fuel injection pump (if applicable) and the main oil rifle.
Disconnect the external oil feed line at the rear of the pump
or AFC latchout if applicable.
SMALL | MEDIUM | LARGE
Previous
file://C:\DOCUME~1\au172\LOCALS~1\Temp\554KYC8C.htm
Summary 7
10/31/2008
Page 9 of 19
Next
Locate top dead center for cylinder Number 1. Push the top
dead center pin into the hole in the camshaft gear while
slowly barring the engine.
NOTE: Be certain to disengage the timing pin after
locating top dead center.
SMALL | MEDIUM | LARGE
Previous
Summary 8
Next
Summary 9
Remove the fuel injection pump mounting bracket, if
applicable.
SMALL | MEDIUM | LARGE
Previous
Summary 10
Next
CAUTION
Do not drop the nut and washer. Dropping the nut and
washer will result in the need to remove the front cover.
Remove the gear cover access cap.
Remove the nut and washer from the fuel injection pump
shaft.
SMALL | MEDIUM | LARGE
Previous
Summary 11
Next
file://C:\DOCUME~1\au172\LOCALS~1\Temp\554KYC8C.htm
10/31/2008
Page 10 of 19
Use fuel pump gear puller, Part Number 3163381 or Part
Number 3824469 with M8-1.25 x 50 capscrews, grade 8.8
or equivalent. Pull the fuel injection pump drive gear loose
from the shaft.
SMALL | MEDIUM | LARGE
Previous
Summary 12
Next
Remove the four mounting nuts.
Remove the fuel injection pump.
SMALL | MEDIUM | LARGE
Previous
Summary 13
Next
Summary 14
Install
TOC
Make certain that the engine has cylinder Number 1 at top
dead center.
SMALL | MEDIUM | LARGE
Previous
Summary 15
Next
file://C:\DOCUME~1\au172\LOCALS~1\Temp\554KYC8C.htm
10/31/2008
Page 11 of 19
Remove the access plug.
SMALL | MEDIUM | LARGE
Previous
Next
Remove the timing pin.
SMALL | MEDIUM | LARGE
Previous
Summary 16
Next
If the timing tooth is not aligned with the timing pin hole,
rotate the fuel injection pump shaft until the timing tooth
aligns.
SMALL | MEDIUM | LARGE
Previous
Next
Summary 17
Reverse the position of the timing pin so the slot of the
timing pin will fit over the timing tooth in the pump.
file://C:\DOCUME~1\au172\LOCALS~1\Temp\554KYC8C.htm
10/31/2008
Page 12 of 19
Install and secure the timing pin with the access plug.
SMALL | MEDIUM | LARGE
Previous
Summary 18
Next
Summary 19
Use a 50/50 mixture of clean lubricating engine oil and STP,
or equivalent, to lubricate the gear cover housing to make
certain that the fuel injection pump will slide into the gear
cover housing easily.
SMALL | MEDIUM | LARGE
Previous
Next
WARNING
When using solvents, acids, or alkaline materials for
cleaning, follow the manufacturer's recommendations for
use. Wear goggles and protective clothing to avoid
personal injury.
SMALL | MEDIUM | LARGE
WARNING
Wear appropriate eye and face protection when using
compressed air. Flying debris and dirt can cause bodily
injury.
file://C:\DOCUME~1\au172\LOCALS~1\Temp\554KYC8C.htm
10/31/2008
Page 13 of 19
Previous
CAUTION
Next
Summary 20
The fuel injection pump drive gear inside diameter and
the shaft outside diameter must be clean and dry before
installing the gear. Failure to do so can result in slipped
timing.
NOTE: Before installing the fuel pump drive gear,
clean the injection pump shaft and gear tapers with
residue-free cleaner, Part Number 3824510, by
spraying into the gap between the shaft and the gear.
Dry with compressed air.
NOTE: The in-line fuel injection pump driveshaft has a
provision for a Woodruff key: however, it is not
required. Timing mark alignment is not required for
the in-line drive gear.
NOTE: Make certain that the engine has cylinder
Number 1 at top dead center.
Make certain that the o-ring seals for the fill orifice and
pilot are correctly installed and are not damaged.
Install new pilot o-ring.
SMALL | MEDIUM | LARGE
Previous
Next
Summary 21
Slide the pump shaft through the drive gear and position
the pump flange onto the mounting studs.
Push the pump forward until the mounting flange and oring are properly fitted into the gear housing bore.
SMALL | MEDIUM | LARGE
Previous
Next
file://C:\DOCUME~1\au172\LOCALS~1\Temp\554KYC8C.htm
Summary 22
10/31/2008
Page 14 of 19
CAUTION
Do not attempt to pull the pump flange into the gear
housing with the mounting nuts as damage to housing
can occur.
SMALL | MEDIUM | LARGE
Previous
Next
Summary 23
Install the mounting nuts.
Torque
Value:
43
n.m
[32
lb ]
ft-
Install the support bracket (if equipped).
Torque
Value:
32
n.m
[24
lb ]
ft-
SMALL | MEDIUM | LARGE
Previous
Next
Summary 24
CAUTION
Do not drop the nut and washer. Dropping the nut and
washer will result in the need to remove the front cover.
Install the retaining nut and washer.
Torque
Value:
10 to 15
n.m
SMALL | MEDIUM | LARGE
[89 to 133
in-lb ]
Previous
To prevent damage to the timing pins, do not exceed the
torque value given. This is not the final torque value for
the retaining nut.
Next
Summary 25
Disengage the engine timing pin.
file://C:\DOCUME~1\au172\LOCALS~1\Temp\554KYC8C.htm
10/31/2008
Page 15 of 19
SMALL | MEDIUM | LARGE
Previous
Next
Summary 26
CAUTION
The governor housing must be prelubricated before
engine operation. Failure to do so can result in
premature governor wear.
SMALL | MEDIUM | LARGE
Remove the access plug.
Add the following quantity of clean lubricating engine oil:
Previous
RSV 450 mL [0.48 qt]
RQV 750 mL [0.79 qt]
RQVK 750 mL [0.79 qt]
Next
Summary 27
Remove the fuel injection pump timing pin plug, reverse
the position of the timing pin, and install the timing pin,
plug, and sealing washer.
Torque
Value:
27
n.m
[20
lb ]
ft-
SMALL | MEDIUM | LARGE
Previous
Next
Summary 28
Summary 29
Tighten the fuel injection pump drive nut.
file://C:\DOCUME~1\au172\LOCALS~1\Temp\554KYC8C.htm
10/31/2008
Page 16 of 19
“A” Pump
85
n.m
[63
P3000 and P7100
195
n.m
[144
Nippondenso
123
n.m
[91
ft-lb ]
ft-lb ]
ft-lb ]
Install the gear cover access cap hand-tight.
SMALL | MEDIUM | LARGE
Previous
Next
Summary 30
Summary 31
Install the fuel injection pump mounting bracket
capscrews.
Tighten all capscrews by hand for proper alignment.
Torque
Value:
24
n.m
[18
lb ]
ftSMALL | MEDIUM | LARGE
Previous
Next
Summary 32
Summary 33
Connect the external oil feed line at the inboard side of the
fuel injection pump (if applicable) and the main oil rifle.
Connect the external oil feed line at the rear of the pump or
AFC latchout if applicable.
SMALL | MEDIUM | LARGE
Previous
Next
file://C:\DOCUME~1\au172\LOCALS~1\Temp\554KYC8C.htm
Summary 34
10/31/2008
Page 17 of 19
Finishing Steps
TOC
Connect wastegate turbocharger control line (if
applicable)
Install the air fuel control air tube. Refer to Procedure
006-001
Install the fuel shutoff valve. Refer to Procedure 005043
Install the control linkage. See the OEM service
manual
Install the injector supply lines to the pump. Refer to
Procedure 006-051
Install the fuel supply lines. Refer to Procedure 006024.
SMALL | MEDIUM | LARGE
Previous
Next
Summary 35
Summary 36
Summary 37
WARNING
Batteries can emit explosive gases. To reduce the
possibility of personal injury, always ventilate the
compartment before servicing the batteries. To reduce
the possibility of arcing, remove the negative (-) battery
cable first and attach the negative (-) battery cable last.
Connect the batteries
Operate the engine and check for leaks.
SMALL | MEDIUM | LARGE
Previous
Summary 6
Next
Prime
TOC
Replacing the fuel supply lines, fuel filters, fuel injection
pump, high-pressure fuel lines, and injectors will let air enter
into the fuel system. Follow the specified procedure to bleed
the air from the system.
Refer to Procedure 006-015 Fuel Filter (Spin-On) for proper
venting of the low pressure side of the fuel system.
file://C:\DOCUME~1\au172\LOCALS~1\Temp\554KYC8C.htm
10/31/2008
Page 18 of 19
Refer to Procedure 006-051 Injector Supply Lines (High
Pressure) for venting of the high pressure side of the fuel
system.
SMALL | MEDIUM | LARGE
Previous
Next
The MW, A, and P fuel injection pumps equipped with the
engine-side fuel drain arrangement create a self-bleeding
system for air introduced during replacement of the supplyside components.
For faster air purge, small amounts of air can be bled from
the pump by operating the hand primer on the fuel transfer
pump or by cranking the engine.
SMALL | MEDIUM | LARGE
Previous
Next
Injection Pumps - Venting
After priming the low pressure fuel lines (see Procedure
006-015, Fuel Filter — Spin-On Type), air/fuel can be
vented from the illustrated vent locations on the
Nippondenso EP-9 and the Lucas CAV fuel injection
pumps. The Lucas CAV fuel injection pump requires that
the fuel solenoid valve be energized before venting.
SMALL | MEDIUM | LARGE
Loosen the vent screw, and operate the priming lever on
the fuel transfer pump until the fuel injection pump is
primed.
Previous
Next
Summary 38
Tighten the vent screw.
Summary 39
Torque
Value:
9
n.m
[80
lb ]
inSummary 40
Summary 41
CAUTION
It is necessary to turn the keyswitch to the ON position.
Because the engine can start, be sure to follow all safety
precautions. Use the normal engine starting procedure.
file://C:\DOCUME~1\au172\LOCALS~1\Temp\554KYC8C.htm
10/31/2008
Page 19 of 19
SMALL | MEDIUM | LARGE
CAUTION
When using the starting motor to vent the system, do not
engage it for more than 30 seconds, or starter damage
will occur. Wait 2 minutes before starting the engine
again.
Previous
Summary 42
Air can also be vented through the fuel drain manifold line
by operating the starting motor.
Last Modified: 24-Apr-2006
Feedback / Help
Copyright © 2006 Cummins Inc. All rights reserved
file://C:\DOCUME~1\au172\LOCALS~1\Temp\554KYC8C.htm
10/31/2008