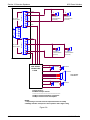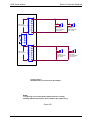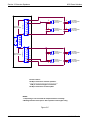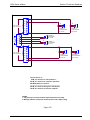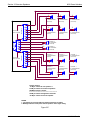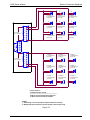
1
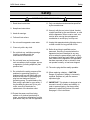
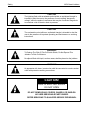
Installation & Owner’s Manual Supplement U.S. and Canada, call toll-free: 1-877-ROC-N-ROL (1-877-762-6765) Outside the U.S. and Canada, call: (616) 243-3633 E-mail: [email protected] www.amientertainment.net 22000620 Rev C Table of Contents Safety ............................................................................................................................................................... 1 Section: 1 Unpacking & System Description .............................................................................................. 1-1 Introduction............................................................................................................................................... 1-1 NGX Grand Jukebox Features................................................................................................................. 1-2 Unpacking Instructions ............................................................................................................................ 1-3 Speaker Setup ........................................................................................................................................... 1-4 Major Components of the NGX Grand...................................................................................................... 1-5 Computer Core........................................................................................................................................ 1-5 Touchscreen 32” Vertical LCD Flatscreen 1920 x 1080 resolution............................................................ 1-5 Power Distribution Assembly ................................................................................................................... 1-5 Volume Control Unit................................................................................................................................. 1-5 Bill Acceptor ............................................................................................................................................ 1-5 Lighting Assembly ................................................................................................................................... 1-6 Deluxe 4-Channel Preamplifier ................................................................................................................ 1-6 500-Watt Audio Digital Power Amplifier.................................................................................................... 1-6 Audio Output Transformers...................................................................................................................... 1-6 NGX Grand Specifications........................................................................................................................ 1-7 Sound System ......................................................................................................................................... 1-7 Circuit Breakers....................................................................................................................................... 1-7 Lighting ................................................................................................................................................... 1-7 Anti-Tip Installation Instructions.............................................................................................................. 1-8 Section: 2 Power Up and Initial Testing....................................................................................................... 2-1 Lighting Assembly Modes ........................................................................................................................ 2-2 Section: 3 Extension Speakers .................................................................................................................... 3-1 Extension Speaker Operation................................................................................................................... 3-1 Selecting Speaker Power.......................................................................................................................... 3-2 Jukebox Speaker Power ........................................................................................................................... 3-8 Amplifier Overload Check ........................................................................................................................ 3-8 Sample Speaker Connections .................................................................................................................. 3-9 Section: 4 Parts Catalog............................................................................................................................... 4-1 Section: 5 Block Diagrams........................................................................................................................... 5-1 NGX Grand Jukebox Safety Safety IMPORTANT SAFETY INFORMATION 1. Read these instructions. 11. Only use attachments/accessories specified by the manufacturer 2. Keep these instructions. 3. Heed all warnings. 4. Follow all instructions. 5. Do not use this apparatus near water. 12. Use only with the cart, stand, tripod, bracket, or table specified by the manufacturer, or sold with the apparatus. When a cart s used, use caution when moving the cart/apparatus combination to avoid injury from tip-over. 13. Unplug this apparatus during lightning storms or when unused for long periods of time. 6. Clean only with a dry cloth. 7. Do not block any ventilation openings. Install in accordance with the manufacturer’s instructions. 8. Do not install near any heat sources such as radiators, heat registers, stoves, or apparatus (including amplifiers) that produce heat. 9. Do not defeat the safety purpose of the polarized or grounding-type plug. A polarized plug has two blades with one wider than the other. A grounding-type plug has two blades and a third grounding prong. The wide blade or the third prong is provided for your safety. If the provided plug does not fit into your outlet, consult an electrician for replacement of the obsolete outlet. 10. Protect the power cord from being walked on or pinched, particularly at plugs, convenience receptacles, and the point where they exit from the apparatus. 14. Refer all servicing to qualified service personnel. Servicing is required when the apparatus has been damaged in any way, such as when the power-supply cord or plug is damaged, liquid has been spilled or objects have fallen into the apparatus, the apparatus has been exposed to rain or moisture, does not operate normally, or has been dropped. 15. The mains plug shall be readily operable. 16. When replacing a battery – CAUTION: Danger of explosion if battery is incorrectly replaced. Replace only with the same or equivalent type. 17. IMPORTANT: This jukebox is designed to be secured to a wall for safety and stability. In order to prevent tipping, use the provided hardware to attach the jukebox to the wall. See page 1-8 for instructions. Safety NGX Grand Jukebox CAUTION! The lightning flash with arrowhead symbol within an equilateral triangle is intended to alert the user to the presence of non-insulated “dangerous voltage” within the product’s enclosure that may be of sufficient magnitude to constitute a risk of electric shock to persons. CAUTION! The exclamation point within an equilateral triangle is intended to alert the user to the presence of important operating and maintenance or servicing instructions. WARNING! To Reduce The Risk Of Fire Or Electric Shock, Do Not Expose This Jukebox To Rain Or Moisture. No objects filled with liquid, such as vases, shall be placed on the jukebox. WARNING! An apparatus with class I construction shall be connected to a mains socket outlet with protective earthing connections. CAUTION! RISK OF ELECTRIC SHOCK DO NOT OPEN DO NOT REMOVE ANY COVERS, GUARDS, OR SHIELDS. NO USER SERVICABLE PARTS INSIDE. REFER SERVICING TO QUALIFIED SERVICE PERSONNEL. NGX Grand Jukebox Section 1: Unpacking & System Description Section: 1 Unpacking & System Description Introduction The NGX Grand jukebox is part of a much larger system – the AMI Entertainment network. This network is a digital platform that delivers music across the Internet to Rowe Jukeboxes anywhere. The NGX Grand jukebox is an Internet-enabled jukebox that allows all the traditional functions of a jukebox backed by the power of the Internet. This Internet connectivity gives patrons more features, such as the ability to download “Music On Demand” songs when their song choice is not already on the jukebox. The NGX Grand is actually a cabinet that houses a slightly modified standard NGX wall mount jukebox. The standard NGX has been modified to allow the locking mechanisms to be accessed by keyed locks in the NGX Grand cabinet. Refer to the NGX Installation and Owner’s Manual 22022617 (included with the NGX Grand) for information regarding system operation, setup and maintenance. Since the NGX is already mounted in the NGX Grand cabinet, you can ignore the section in that manual on how to mount the NGX on a wall. 22022620 Rev C 1-1 Section 1: Unpacking & System Description NGX Grand Jukebox NGX Grand Jukebox Features • • • • • • • • • • • • • • • • • • • Sturdy construction and reliable design Conveniently located customer, operator, and service controls All major components are modular and easy to replace, if needed Computer-controlled digital music A 500-watt ICEpower Class 2 power amplifier manufactured by Bang & Olufsen. Audio output transformer with 70-volt taps Deluxe 4-channel preamplifier Song reject 300 album and cover art capacity Unwanted music categories, artists, albums, and songs can be blocked Quarter coin acceptance Bill acceptance of $1, $5, $10, and $20 700 bill capacity Web-based management Attract mode “Music On Demand” song download Dynamic search capabilities No pause between plays Easy to change pricing Service Features: • • • • • • • • 1-2 Modular component construction for easy replacement No CDs to bother with or cumbersome cover art mechanisms Complete cash and play audit information Password protected Operator Web Site Access anytime and from anywhere Track revenue and usage Download new music and other content Check system status 22022620 Rev C NGX Grand Jukebox Section 1: Unpacking & System Description Unpacking Instructions This section contains information for unpacking the jukebox and installing it at a location. The jukebox is shipped with all major components. 1. Remove the shipping carton with care: Do not use shipping hooks or sharp tools that could damage the jukebox cabinet. 2. Remove the plastic bag that covers the jukebox. 3. Carefully inspect the interior and exterior of the jukebox to ensure that no damage occurred during transit. CAUTION! Do not open the NGX front door until the speakers have been moved from their shipping position (see next page). Failure to reposition the speakers can result in damage to the speakers or the lighting assembly. If damage is detected, the carrier who delivered the jukebox should be contacted immediately to examine it. Regardless of the exterior condition of the shipping cartons, the carrier should be called and notified of damage. Do not destroy packing material or boxes until the carrier’s agent has examined them. Damage claims are your responsibility. Do not return damaged merchandise until after your claim has been established. Once your claim has been established, merchandise may be returned to your Rowe distributor for repair. The invoice amount for repair charges can then be collected from the carrier. Keys Locate the white bag taped to the power inlet on the back of the cabinet. Remove the door keys from the bag and unlock the rear door assembly. Turn the key to the right and press in on the door as you turn the key. Visual Inspection Check to be sure that all electrical plugs are completely seated into their receptacles. Warranty Registration Card A Warranty Registration Card is included in the NGX manual. This card should be filled out and returned to Rowe. 22022620 Rev C 1-3 Section 1: Unpacking & System Description NGX Grand Jukebox Speaker Setup The NGX Grand is packed with the speakers in the shipping position. In this position, the front door of the NGX will not open all the way. Open the back door of the NGX Grand cabinet and loosen the bolts holding the left-hand speaker mounting rails to the cabinet. Slide the left-hand speaker out so the lighting assembly will clear the left-hand speaker when the door is opened. Both speakers can be extended and rotated to any position that suits your location. Be sure to secure the speakers in their final position by tightening the bolts and screws. Figure 1-A Speaker Positioning 1-4 22022620 Rev C NGX Grand Jukebox Section 1: Unpacking & System Description Major Components of the NGX Grand Computer Core The Computer Core Assembly is the heart of the system and has a hard drive and a single board computer. The hard drive is the only storage in the system and contains Windows XP Embedded Operating System software, all application software, all music, and all setup and audit data. The single board computer converts music selections stored on the hard drive into a stereo signal for the system’s audio components. It connects to the Internet, the SVGA touchscreen monitor, and the Rowelink modules. It also includes the interface circuits for the coin switch, router reset, fan circuits, bill acceptor, song reject, infrared remote control detector and amplifier mute. Touchscreen 32” Vertical LCD Flatscreen 1920 x 1080 resolution All machine operations are performed through the touchscreen monitor. These include viewing and making selections, displaying the selection being played, displaying pricing and credits, viewing and changing setup and audit data, and downloading “Music On Demand” selections. Power Distribution Assembly The power distribution assembly contains a relay to switch the jukebox lights, touchscreen monitor, and the bill acceptor ON or OFF. It has an IEC 320 power inlet, and one 15A circuit breaker ON/OFF switch. Volume Control Unit The Volume Control Unit (VCU) mounted on the back of the NGX Grand cabinet is a Rowelink module and can be mounted remotely (behind bar, etc.). A plate is supplied in the Handy Pack to cover the hole if the VCU is removed. Use the VCU screws to secure the plate. The VCU displays and controls the volume of the amplifier channels and microphones. • The POWER button turns the NGX Grand jukebox lights, touchscreen monitor, and bill acceptor ON or OFF. • The REJECT button rejects the selection playing. • The FUTURE button adds credits toward selections (see “Credit Management” in the Operator Setup Screens Manual). • The MODE key toggles between channels and microphones. • The VCU also raises or lowers the volume of the channel(s) or microphone using the UP/DOWN keys. The volume range is 0 to 63. Channel volume is displayed when the mode LED is off, and microphone volume is displayed when the mode LED is on. The CH, MIC, and SINGER LEDs indicate what volume is being displayed when toggled by the Mode Switch. When adjusting channel volume, if more than one LED is on, it means those channels have the same volume. All four channels have the same volume when shipped from the factory (see Section 3 of the included “Network Setup, Jukebox Operation, Operator Setup Screens” manual for other possible configurations). Bill Acceptor The Coinco® Vantage with a 700-bill stacker, or MEI® Series 2000 bill acceptor with a 700bill stacker, operates on 120 VAC input power and sends its pulsed credit signals to the Computer Core. 22022620 Rev C 1-5 Section 1: Unpacking & System Description NGX Grand Jukebox Lighting Assembly The NGX Grand comes with a custom lighting assembly already installed on the jukebox. The LED controller for the lighting assembly is configured to rotate through all available colors and can be programmed for several different modes of operation. To change modes, see page 2-2 for specific instructions. Deluxe 4-Channel Preamplifier This Rowelink module transforms audio signals from the Computer Core Assembly, microphones, and other sound processors/equipment/systems into signals for the Power Amplifier. It contains Automatic Volume Control (AVC) circuits to adjust for varying recording levels, input gain control, 5-band equalizers, and a loudness contour. All adjustments and options are programmable via the touchscreen and are retained on the Computer Core Assembly hard drive (see Section 3 of the included “Network Setup, Jukebox Operation, Operator Setup Screens” manual for setup information). 500-Watt Audio Digital Power Amplifier The 2-channel digital audio power amplifier is rated 500 watts RMS (250 per channel) into a 4-ohm load. The full volume output voltage is 31 volts. The amplifier is protected against overloads and short circuits. Continuous severe overloads or shorts may shut down the amplifier (or a channel) but will not damage it. If the overload is removed, a signal will reset the amplifier when the next selection plays. Audio Output Transformers The Audio Output Transformer Assembly is located in the back of the NGX Grand jukebox cabinet. It is designed to enable the jukebox to connect to a wider variety of speakers and speaker configurations, including 70-volts speakers. The output transformers are used to “step up” the power amplifier’s output voltage for 70volt extension speakers. They also provide screw terminal connections for selecting different power levels for standard extension speakers. As shipped from the factory, the NGX Grand jukebox speakers are connected to the E7 taps on the transformers. In this configuration, the jukebox speaker system will use about 250 watts of the rated 500-watt amplifier. The other 250 watts are available for extension speakers. 1-6 22022620 Rev C NGX Grand Jukebox Section 1: Unpacking & System Description NGX Grand Specifications General Depth...............................................................................................................22-1/2 in. Width ............................................................................................................37 to 45 in. Height ..............................................................................................................79-1/2 in. Power Requirements ............................................................................ 120 VAC 60 Hz. 500 watts 5.25 amps Pricing .................................................................................................See “Credit Pricing” in the “Network Setup and Jukebox Operation Manual” (P/N21822707) Sound System Core Computer Type ................................................................................. 16-bit Stereo Frequency Response........................................................................... 20 to 20,000 Hz. Channel Separation ......................................................................... 90 dB @ 1,000 Hz. Output...................................................... 0.7 VRMS (approx. depending on the album) Preamplifer Deluxe 4-Channel (Two Stereo, Four Mono, many other combinations) Tone Control – 5-band equalizer (+2.5db to -12db Filter/Band) Power Amplifier 500-Watt Stereo (Second 500-watt Stereo Amplifier is Optional) FTC Rating, 4-ohm Loads @ 1% THD................................................... 500 watts RMS FTC Rating, 70V Lines @ 1% THD (125 per channel) ........................... 250 watts RMS Transformer Package 70V line for extension speakers System Frequency Response ...........................................................40 to 20,000 ±4 dB Speakers 15” Dual Voice Coil Woofer, 5” Mid-Bass, 3” Tweeter Selection System Capacity ................................................................................300 Albums Circuit Breakers System Power Supply 120 VAC ........................................... Combination 15 Amp Breaker and Power Switch Lighting LED ................................................................................................................... Custom 22022620 Rev C 1-7 Section 1: Unpacking & System Description NGX Grand Jukebox Anti-Tip Installation Instructions It is VERY IMPORTANT that the jukebox is secured to a wall for safety and stability. Locate the supplied hardware inside the handy pack and follow the instructions below to secure the jukebox to a wall. CONTENTS: QTY 1 1 1 1 1 1 1 1 PART # HW0128-01 HW0081-04 HW1340-03 HW1380 HW3300 HW1360 HW5554-03 HW1370-02 DESCRIPTION SNAP SPRING LANYARD #1/4-20x4.00L EYEBOLT #1/4-20 WINGNUT 1/4-20 HEX NUT LAG EYEBOLT .05Tx.28IDx1.5 WASHER 1/4-20x1 WALL ANCHOR 1. Turn off and unplug the jukebox. 2. Locate a wall stud to mount the jukebox. 3. Measure approximately 76" from the floor on the mounting stud and drill a hole to install the hardware. Installation into a wooden stud requires a 2" deep x 1/4" hole. For masonry walls, drill a 1 1/4" deep x 1/2" hole. For steel stud or hollow walls drill an 11/16" hole. 4. For wooden stud installation, screw the lag eyebolt into the hole (see Figure A). For masonry wall, insert the lag shield into the hole and then insert and tighten the machine eyebolt (see Figure B). For steel stud or hollow walls, insert the toggle bolt into the hole and then insert the machine eyebolt, nut and washer and tighten (see Figure C). 5. Route the lanyard through the eye bolt and attach it to the snap spring as shown in Figure D. Then, attach the snap spring to the U-bolt on the top of the jukebox. A B LAG EYEBOLT C LAG SHIELD MACHINE EYEBOLT D PULL HANDLE SNAP SPRING LANYARD EYEBOLT TOGGLE BOLT NUT/WASHER MACHINE EYEBOLT 1-8 22022620 Rev C NGX Grand Jukebox Section 2: Power Up & Initial Testing Section: 2 Power Up and Initial Testing CAUTION Hard drives are extremely sensitive to physical mishandling. Always keep the hard drives protected from accidental falls, banging, dust, or liquids. To avoid damage, do not remove drive from tray. WARNING Never install or remove a hard drive when the unit is powered on. As an extra precaution, always unplug the CC (Core Computer) from the power source before removing or installing a hard drive. Your NGX Grand is shipped from the factory with a hard drive already installed in the computer core. 1. The power cord is shipped in the spare parts bag. Locate the power cord and insert one end of the cord into the IEC connector located on the back of the jukebox. Insert the other end into a grounded 120-volt 15-amp wall socket. CAUTION Do not open the NGX front door until the speakers have been moved from their shipping position. Failure to reposition the speakers can result in damage to the speakers or the lighting assembly. 2. After moving the speakers from their shipping position, open the front door of the NGX using the upper key lock on the right side of the jukebox. Turn on the red POWER switch located on the left inside of the NGX. There will be a slight delay before the lights and fans turn on. 3. Allow the jukebox to boot up completely. Refer to the “NGX Installation and Service Manual” for further information on testing touchscreen calibration, currency devices, etc. 4. Add credits to the jukebox and make a selection. You should hear the selection play through the jukebox speaker system. Verify that all speakers are working properly. 5. Finally, adjust the speakers for the best sound coverage in your location. 22022620 Rev C 2-1 Section 2: Power Up & Initial Testing NGX Grand Jukebox Lighting Assembly Modes The NGX Grand lighting assembly can be programmed for several different modes of operation. By default, the lighting assembly is set to slowly cycle through six different colors with a slow transition between each color. To change the mode, open the main door of the jukebox. The lighting assembly will swing open with the door. Use a Philips screwdriver and remove the LED controller cover from the back side of the lighting assembly. This exposes the LED controller. There are two blue pots on the board marked BRIGHT and SPEED. These are used to set the brightness of the LEDs and adjust the speed of color changes for the two color cycling modes. The four position DIP switch is used to set the operating mode of the controller. Use the following table to set the mode. SW1 OFF OFF OFF OFF OFF OFF OFF OFF ON 2-2 SW2 OFF ON OFF ON OFF ON OFF ON OFF SW3 OFF OFF ON ON OFF OFF ON ON OFF SW4 OFF OFF OFF OFF ON ON ON ON OFF Mode Cycle – slow transition through colors (default) Blue Cyan Green Cycle – quick transition through colors Yellow Magenta Red White 22022620 Rev C NGX Grand Jukebox Section 3: Extension Speakers Section: 3 Extension Speakers Extension Speaker Operation To avoid poor sound quality, care must be taken when adding extension speakers. The following requirements must be met: Speakers connected to the Output Transformer Assembly must be wired so the power consumed by the extension speakers does not exceed the amplifier power rating of 250 watts per channel. An Output Transformer Assembly has: • Two transformers (one for each channel). • Two 7-position terminal strips for low impedance speakers marked E1 through E7. • One 4-position terminal strip for 70-volt speakers marked Ch1 A1-A2, Ch 2 A1-A2. • Speakers connected across terminals E1 to E7 bypass the transformer and are driven directly by an amplifier channel. • Each transformer provides 70V terminals for driving 70V speakers, and provides taps (E1-E6) for driving extension speakers at a lower volume. The power consumed by speakers driven by a transformer must not exceed the transformer rating of 125 watts per channel. • The power consumed by all connected speakers must not exceed the channel rating of 250 watts. For example, each channel could drive 125 watts directly from the amplifier (E1 to E7), and the remaining 125 watts through the transformer (lower taps and 70V terminals). • Complete the Extension Speaker Worksheet (Tables 1-1 through 1-5) for each channel and verify it does not exceed the 125-watt transformer rating and the 250-watt amplifier channel rating. After wiring the speakers, perform the Amplifier Overload Check immediately following Table 1-5. All speakers must be connected with the correct polarity (see Figure 3-A through 3-F). Channel 1 E1-E7 output is in phase with channel 2 E1-E7 output. The speaker connections for channel 1 speakers are in phase with channel 2 speakers. The 70V phasing is reversed inside the output transformers. See Figure 3-D for correct polarity hookup of extension speakers. If the (+) and (-) terminals are not wired properly, the speakers will be out of phase, causing a reduction in low frequencies (bass). 70-Volt Speakers To avoid prohibitive cable losses on long speaker lines (over 100 feet), use 70V speakers. The power level in the 70V speakers is set at each speaker. For each channel, a maximum of 125 watts are available for 70V speakers by terminal connections on the audio output transformer assembly. 22022620 Rev C 3-1 Section 3: Extension Speakers NGX Grand Jukebox Low Impedance Speakers Low impedance speakers (16, 8, or 4-ohm) can be used when the connecting cable is less than 100 feet. Keep the following two things in mind when wiring your speakers: 1. No more than one 4-ohm speaker should be connected to a speaker line. If several 4-ohm speakers are to be used, each speaker should have its own line. 2. The loss in 100 feet of 18-gauge zip-cord feeding on an 8-ohm speaker is 15%. The loss for two 8-ohm speakers is 30%. Selecting Speaker Power General Instructions This section will lead you through the power and speaker selection process. This process consists of three major steps and several smaller steps. The major steps are: 1. Identify the extension speakers and compute the speaker power for speakers connected: a. directly across the amplifier (E1 to E7) b. to the 70V taps c. to lower power taps on the transformer (E1 through E6). 2. Make the extension speaker connections. 3. Perform an amplifier overload check (see instructions immediately following Table 1-5). Selection Procedures • • • • 3-2 Use a pencil (you may want to revise your figures) to fill in the Extension Speaker Worksheet on the following pages. Extension speakers are available in two general categories: general purpose speakers (16, 8, and 4-ohm), and 70V speakers. The power level in 70V speakers is set at each speaker. Use the Table 1-1 through 1-5 Worksheets to help you calculate the amount of power consumed by the extension speakers. An extension speaker RMS power rating should be at least 10% higher than the power it will consume at maximum jukebox volume. When RMS power to speaker at maximum jukebox volume is: Then recommended RMS power rating of speaker is: 240 watts 120 watts 60 watts 30 watts 300 watts 150 watts 75 watts 40 watts 22022620 Rev C NGX Grand Jukebox Section 3: Extension Speakers Table 1-1 – Extension Speaker Worksheet Sheet 1 Extension Speakers Connected E1 to E7 Place the quantity of speakers in the blank under Qty and multiply the quantity times the power consumption. Place your results in the blank under Total. Qty Two 8-ohm speakers in series: (30 watts to each speaker) Two 4-ohm speakers in series: (60 watts to each speaker) 16-ohm speakers: 8-ohm speakers: 4-ohm speakers: Total CH 1 CH 2 CH 1 CH 2 _____ _____ at 60 watts per series = _____ _____ watts _____ _____ at 120 watts per series = _____ _____ watts _____ _____ _____ _____ at 60 watts each _____ at 120 watts each _____ at 240 watts each _____ _____ _____ _____ watts _____ watts _____ watts _____ _____ watts Sum totals for CH1 and CH2 then transfer totals to Table 1-5. = = = (Continued on the next page.) 22022620 Rev C 3-3 Section 3: Extension Speakers NGX Grand Jukebox Table 1-2 – Extension Speaker Worksheet Sheet 2 4-Ohm Speakers Connected To Transformer Taps E1 through E6 Place the quantity of speakers in the blank under Qty and multiply the quantity times the power consumption. Place your results in the blank under Total. 4-Ohm Speakers Connected to Channel 1 Transformer Taps: Connections Speakers for the 1-watt taps: Speakers for the 4-watt taps: Speakers for the 16-watt taps: Speakers for the 36-watt taps: Speakers for the 49-watt taps: Speakers for the 64-watt taps: Speakers for the 100-watt taps: Speakers for the 121-watt taps: (E1 to E2) (E1 to E3) (E1 to E4) (E3 to E5) (E2 to E5) (E1 to E5) (E3 to E6) (E2 to E6) Qty Total ____ at 1 watt each = ____ at 4 watts each = ____ at 16 watts each = ____ at 36 watts each = ____ at 49 watts each = ____ at 64 watts each = ____ at 100 watts each = ____ at 121 watts each = Sum totals for CH1 then transfer total to Table 1-5. ____watts ____watts ____watts ____watts ____watts ____watts ____watts ____watts ____watts 4-Ohm Speakers Connected to Channel 2 Transformer Taps: Connections Speakers for the 1-watt taps: Speakers for the 4-watt taps: Speakers for the 16-watt taps: Speakers for the 36-watt taps: Speakers for the 49-watt taps: Speakers for the 64-watt taps: Speakers for the 100-watt taps: Speakers for the 121-watt taps: (E1 to E2) (E1 to E3) (E1 to E4) (E3 to E5) (E2 to E5) (E1 to E5) (E3 to E6) (E2 to E6) Qty ____ at 1 watt each ____ at 4 watts each ____ at 16 watts each ____ at 36 watts each ____ at 49 watts each ____ at 64 watts each ____ at 100 watts each ____ at 121 watts each Sum totals for CH2 then transfer total to Table 1-5. Total = = = = = = = = ____watts ____watts ____watts ____watts ____watts ____watts ____watts ____watts ____watts (Continued on the next page.) 3-4 22022620 Rev C NGX Grand Jukebox Section 3: Extension Speakers Table 1-3 – Extension Speaker Worksheet Sheet 3 8-Ohm Speakers Connected To Transformer Taps E1 through E6 Place the quantity of speakers in the blank under Qty and multiply the quantity times the power consumption. Place your results in the blank under Total. 8-Ohm Speakers Connected to Channel 1 Transformer Taps Speakers for the .5-watt taps: Speakers for the 2-watt taps: Speakers for the 8-watt taps: Speakers for the 18-watt taps: Speakers for the 24-watt taps: Speakers for the 32-watt taps: Speakers for the 50-watt taps: Speakers for the 72-watt taps: Speakers for the 95-watt taps: Connections (E1 to E2) (E1 to E3) (E1 to E4) (E3 to E5) (E2 to E5) (E1 to E5) (E3 to E6) (E1 to E6) (E3 to E7) Qty ____ at .5 watt each ____ at 2 watts each ____ at 8 watts each ____ at 18 watts each ____ at 24 watts each ____ at 32 watts each ____ at 50 watts each ____ at 72 watts each ____ at 95 watts each = = = = = = = = = Sum totals for CH1 then transfer total to Table 1-5. Total ____watts ____watts ____watts ____watts ____watts ____watts ____watts ____watts ____watts ____watts 8-Ohm Speakers Connected to Channel 2 Transformer Taps Speakers for the .5-watt taps: Speakers for the 2-watt taps: Speakers for the 8-watt taps: Speakers for the 18-watt taps: Speakers for the 24-watt taps: Speakers for the 32-watt taps: Speakers for the 50-watt taps: Speakers for the 72-watt taps: Speakers for the 95-watt taps: Connections (E1 to E2) (E1 to E3) (E1 to E4) (E3 to E5) (E2 to E5) (E1 to E5) (E3 to E6) (E1 to E6) (E3 to E7) Qty ____ at .5 watt each ____ at 2 watts each ____ at 8 watts each ____ at 18 watts each ____ at 24 watts each ____ at 32 watts each ____ at 50 watts each ____ at 72 watts each ____ at 95 watts each Sum totals for CH2 then transfer total to Table 1-5. = = = = = = = = = Total ____watts ____watts ____watts ____watts ____watts ____watts ____watts ____watts ____watts ____watts (Continued on the next page.) 22022620 Rev C 3-5 Section 3: Extension Speakers NGX Grand Jukebox Table 1-4 – Extension Speaker Worksheet Sheet 4 16-Ohm Speakers Connected To Transformer Taps E1 through E6 Place the quantity of speakers in the blank under Qty and multiply the quantity times the power consumption. Place your results in the blank under Total. 16-Ohm Speakers Connected to Channel 1 Transformer Taps Speakers for the .25-watt taps: Speakers for the 1-watt taps: Speakers for the 4-watt taps: Speakers for the 9-watt taps: Speakers for the 12-watt taps: Speakers for the 16-watt taps: Speakers for the 25-watt taps: Speakers for the 36-watt taps: Speakers for the 47-watt taps: Connections (E1 to E2) (E1 to E3) (E1 to E4) (E3 to E5) (E2 to E5) (E1 to E5) (E3 to E6) (E1 to E6) (E3 to E7) Qty ____ at .25 watt each ____ at 1 watts each ____ at 4 watts each ____ at 9 watts each ____ at 12 watts each ____ at 16 watts each ____ at 25 watts each ____ at 36 watts each ____ at 47 watts each = = = = = = = = = Sum totals for CH1 then transfer total to Table 1-5. Total ____watts ____watts ____watts ____watts ____watts ____watts ____watts ____watts ____watts ____watts 16-Ohm Speakers Connected to Channel 2 Transformer Taps Connections Speakers for the .25-watt taps: (E1 to E2) Speakers for the 1-watt taps: (E1 to E3) Speakers for the 4-watt taps: (E1 to E4) Speakers for the 9-watt taps: (E3 to E5) Speakers for the 12-watt taps: (E2 to E5) Speakers for the 16-watt taps: (E1 to E5) Speakers for the 25-watt taps: (E3 to E6) Speakers for the 36-watt taps: (E1 to E6) Speakers for the 47-watt taps: (E3 to E7) Qty ____ at .25 watt each ____ at 1 watts each ____ at 4 watts each ____ at 9 watts each ____ at 12 watts each ____ at 16 watts each ____ at 25 watts each ____ at 36 watts each ____ at 47 watts each Sum totals for CH2 then transfer total to Table 1-5. = = = = = = = = = Total ____watts ____watts ____watts ____watts ____watts ____watts ____watts ____watts ____watts ____watts (Continued on the next page.) 3-6 22022620 Rev C NGX Grand Jukebox Section 3: Extension Speakers Table 1-5 – Extension Speaker Worksheet Sheet 5 Combine power consumption of all speakers: Channel 1 Channel 2 Connected E1 to E7 Tapped 4-Ohm Tapped 8-Ohm Tapped 16-Ohm 70-Volt A1, A2 Sum of tapped and 70-Volt A1, A2 must NOT exceed 125 watts per channel. Channel 1 Totals: Subtract the Grand Total from 500 and write the results here: Channel 2 + Grand Total = Power available for jukebox: __________ The Grand Total is the amount of power that the jukebox will need to supply to the extension speakers. If the Channel 1 Total or the Channel 2 Total is more than 250 watts, you must reduce the power used by that channel’s extension speakers, and then recalculate that channel’s power consumed. When you subtract the Grand Total from 500, you will get the “Power Available for the Jukebox”. Be sure to write this value down in the blank above because you will not be using it until you have wired all of the extension speakers. NOTE: In any speaker installation, the total RMS speaker load (the sum of all power to all speakers) must not exceed 250 watts per channel. It is strongly recommended that “efficient” extension speakers be used. When you have reached a satisfactory combination of speakers and speaker power consumption, use the “Connections” column as a wiring guide to make the actual connections. Speaker terminal strips on the output transformer are accessed by removing the cover from the rear of the jukebox. 22022620 Rev C 3-7 Section 3: Extension Speakers NGX Grand Jukebox Jukebox Speaker Power Once you determine the total power needed for extension speakers, what is left over can be used by the jukebox speaker system. Use the table below to tap the jukebox speaker in order to “use up” the remaining amplifier power. If there is no power left over after connecting extension speakers and you still want to use the jukebox speakers, you will have to reconfigure your extension speakers to leave some power left over for the jukebox. Select the speaker taps for the jukebox speakers that will use up as much of the “Power available for jukebox” as possible. Jukebox Power Jukebox Speaker Connections .5 Violet to Channel 1 E2, Pink to Channel 2 E2 2 Violet to Channel 1 E3, Pink to Channel 2 E3 8 Violet to Channel 1 E4, Pink to Channel 2 E4 32 Violet to Channel 1 E5, Pink to Channel 2 E5 72 Violet to Channel 1 E6, Pink to Channel 2 E6 120 Violet to Channel 1 E7, Pink to Channel 2 E7 Do not reposition the black/white wires. They should stay on E1. Amplifier Overload Check Check that the amplifier is not overloaded by performing the following steps: 1. Make sure that the extension speakers are connected to the audio output transformer terminals properly (E1 through E7, and A1, A2). 2. Make a selection and set the volume control to maximum. 3. If the red OVERLOAD LED is always lit, the amplifier is overloaded and will shut down. You must perform Step 4. 4. Do this step only if the OVERLOAD LED came on as described in Step 3. • Find the source of the overload (shorted speaker wires, shorted speaker, too many speakers connected, speaker power taps too high). • After you fix the short, disconnect a few speakers or lower the speaker power tap selection to reduce the wattage. Repeat from Step 2. • If no overload is detected, reconnect the disconnected speakers (ensure you do not have too many speakers). Repeat from step 2. 5. If the red OVERLOAD LED does not turn on but the sound through the speakers sounds distorted, the sound system may be over driven. Reduce the input gain setting or equalizer settings using the jukebox Service Mode screens Volume Presets and Equalizer Setup under Hardware Setup until the sound heard from the speakers is clean and clear. 3-8 22022620 Rev C NGX Grand Jukebox Section 3: Extension Speakers Sample Speaker Connections Speaker Synopsis 500 Watts of RMS Power per Amplifier or 250 Watts per Channel. The generic speaker wiring diagrams cover 4 to 18 speakers. The power rating indicated for each speaker is the actual power delivered to each speaker. We recommend using a higher-rated speaker to ensure adequate performance. This is to provide a safety factor and will also provide extended life for the speakers. However, using a speaker with a rating much higher than absolutely necessary will be more expensive and not cost effective. Figure 3-B is a four speaker layout with the NGX speaker system disconnected. If you want this layout with only four speakers, then the speakers must be rated for 150 watts at 8 ohms. These speakers can be expensive, providing a lot of sound in a localized area, which does not always optimize the room sound. The best way to distribute the sound is by adding more speakers. Additionally, by adding more speakers, you can use lower power speakers which will minimize the cost of your extension speaker installation. Using these diagrams as a guide, you will readily see how many different schemes can be achieved. The key things to keep in mind are: • The load on each channel must be less than 250 watts. • The maximum you can connect via the Output Transformers (any connections not across E1 and E7) is 125 Watts per channel. • Pay attention to speaker polarization. Ensure speaker terminals are connected properly. • Remember to include the jukebox speaker system in your configuration and calculations if you expect to use the jukebox speakers. Power Calculations If you are inclined to perform your own power calculations, the formula to use is: P = E2 / R P is power in watts E is the voltage indicated at the transformer tap R is the equivalent impedance of the speaker(s) across the tap Example 1: One 8-ohm speaker across taps E2 (2 volts) to E5 (16 volts) would be: P = (16 – 2) 2 / 8 = 24.5 watts Example 2: Two 4-ohm speakers in series across taps E1 (0 volts) to E6 (24 volts) would be: P = (24 – 0) 2 / (4 + 4) = 72 watts (36 watts per speaker) 22022620 Rev C 3-9 Section 3: Extension Speakers E7 250 WATTS PER CHANNEL CHANNEL 2 E6 E5 E4 E3 E2 70V 70V 70V MONO E1 31 V NGX Grand Jukebox PINK + + 24 V 16 V CHANNEL 2 8 OHM SPEAKER (50 WATTS) CHANNEL 2 8 OHM SPEAKER (50 WATTS) 8V 4V 2V 0V B/W 0V B/W A2 A1 A2 A1 E1 250 WATTS PER CHANNEL CHANNEL 1 E2 E3 E4 E5 E6 E7 2V 4V 8V 16 V 24 V 31 V + V + CHANNEL 1 8 OHM SPEAKER (50 WATT) NGX GRAND CROSSOVER 8 OHM + TWEETER + CHANNEL 1 8 OHM SPEAKER (50 WATTS) MID-BASS WOOFER L+ LRR+ TWEETER + NGX GRAND SPEAKERS MID-BASS + Load as shown is 220 Watts total per channel. ---------------------------------------------------------------100 W per channel through the transformer 120 W per channel across the amplifier NOTES: 1. 70V phasing is reversed inside the output transformer assembly. 2. Wattage indicates actual power. Select speakers with a higher rating. Figure 3-A 3-10 22022620 Rev C NGX Grand Jukebox Section 3: Extension Speakers E7 250 WATTS PER CHANNEL CHANNEL 2 E6 E5 E4 E3 E2 70V 70V 70V MONO E1 31 V 24 V 16 V + + 8V 4V CHANNEL 2 8 OHM SPEAKER (120 WATTS) 2V 0V CHANNEL 2 8 OHM SPEAKER (120 WATTS) A2 A1 A2 A1 E1 250 WATTS PER CHANNEL CHANNEL 1 E2 E3 E4 E5 E6 E7 0V 2V 4V 8V + 16 V CHANNEL 1 8 OHM SPEAKER (120 WATTS) 24 V + CHANNEL 1 8 OHM SPEAKER (120 WATTS) 31 V Load as shown is 240 Watts total per channel across the amplifier. NOTES: 1. 70V phasing is reversed inside the output transformer assembly. 2. Wattage indicates actual power. Select speakers with a higher rating. Figure 3-B 22022620 Rev C 3-11 Section 3: Extension Speakers E7 250 WATTS PER CHANNEL CHANNEL 2 E6 E5 E4 E3 E2 70V 70V 70V MONO E1 31 V NGX Grand Jukebox + 24 V 16 V CHANNEL 2 4 OHM SPEAKER (36 WATTS) + CHANNEL 2 4 OHM SPEAKER (60 WATTS) 8V 4V + 2V CHANNEL 2 4 OHM SPEAKER (36 WATTS) + CHANNEL 2 4 OHM SPEAKER (60 WATTS) 0V A2 A1 A2 A1 E1 250 WATTS PER CHANNEL CHANNEL 1 E2 E3 E4 E5 E6 E7 0V 2V 4V 8V + CHANNEL 1 4 OHM SPEAKER (36 WATTS) + CHANNEL 1 4 OHM SPEAKER (60 WATTS) 16 V 24 V 31 V + CHANNEL 1 4 OHM SPEAKER (36 WATTS) + CHANNEL 1 4 OHM SPEAKER (60 WATTS) Load as shown is 192 W per channel for extension speakers. ---------------------------------------------------------------72 W per channel through the transformer 120 W per channel across the amplifier NOTES: 1. 70V phasing is reversed inside the output transformer assembly. 2. Wattage indicates actual power. Select speakers with a higher rating. Figure 3-C 3-12 22022620 Rev C NGX Grand Jukebox E7 250 WATTS PER CHANNEL CHANNEL 2 E6 E5 E4 E3 E2 70V 70V 70V MONO E1 Section 3: Extension Speakers 31 V 24 V 16 V + 4V CHANNEL 2 8 OHM SPEAKER (72 WATTS) 2V 0V A2 + + A1 A2 A1 E1 250 WATTS PER CHANNEL CHANNEL 1 E2 E3 E4 E5 E6 E7 + 8V CHANNEL 2 8 OHM SPEAKER (120 WATTS) CHANNEL 2 70 SPEAKERS (36 WATTS) CHANNEL 1 70V SPEAKERS (36 WATT) 0V 2V 4V 8V + 16 V CHANNEL 1 8 OHM SPEAKER (72 WATTS) 24 V + CHANNEL 1 8 OHM SPEAKER (120 WATTS) 31 V Load as show n is 36 W per channel for 70V speakers + 192 W per channel for extension speakers. 228 Watts total per channel. ------------------------------------------------------------------108 W per channel through the transformer 120 W per channel accross the amplifier NOTES: 1. 70V phasing is reversed inside the output transformer assembly. 2. Wattage indicates actual power. Select speakers with a higher rating. Figure 3-D 22022620 Rev C 3-13 Section 3: Extension Speakers NGX Grand Jukebox + CHANNEL 2 4 OHM SPEAKERS (16 WATTS) E7 250 WATTS PER CHANNEL CHANNEL 2 E6 E5 E4 E3 E2 70V 70V 70V MONO E1 24 V + 8V CHANNEL 2 4 OHM SPEAKERS (2 WATT) 4V CHANNEL 1 E5 E6 E7 CHANNEL 2 4 OHM SPEAKERS (4 WATTS) CHANNEL 2 8 OHM SPEAKERS (32 WATTS) CHANNEL 1 4 OHM SPEAKERS (4 WATTS) CHANNEL 1 8 OHM SPEAKERS (32 WATTS) CHANNEL 2 70V SPEAKERS (70 WATTS) + + E4 + 0V CHANNEL 1 70V SPEAKERS (70 WATTS) A1 250 WATTS PER CHANNEL + 2V A2 E3 CHANNEL 2 8 OHM SPEAKERS (32 WATTS) 16 V A1 E2 CHANNEL 2 8 OHM SPEAKERS (32 WATTS) + 31 V A2 E1 + 0V 2V CHANNEL 1 4 OHM SPEAKERS (2 WATT) 4V 8V 16 V + 24 V + + 31 V CHANNEL 1 4 OHM SPEAKERS (16 WATTS) + CHANNEL 1 8 OHM SPEAKERS (32 WATTS) + CHANNEL 1 8 OHM SPEAKERS (32 WATTS) + Load as shown is 70 W per channel for 70V speakers + 118 W per channel for extension speakers. 188 Watts total per channel. ---------------------------------------------------------------124 W per channel through the transformer 64 W per channel across the amplifier NOTES: 1. 70V phasing is reversed inside the output transformer assembly. 2. Wattage indicates actual power. Select speakers with a higher rating. Figure 3-E 3-14 22022620 Rev C NGX Grand Jukebox Section 3: Extension Speakers + CHANNEL 2 4 OHM SPEAKER (16 WATTS) + E7 250 WATTS PER CHANNEL CHANNEL 2 E6 E5 E4 E3 E2 70V 70V 70V MONO E1 31 V 24 V 16 V CHANNEL 2 4 OHM SPEAKER (16 WATTS) + + CHANNEL 2 4 OHM SPEAKER (16 WATTS) + CHANNEL 2 4 OHM SPEAKER (16 WATTS) + + CHANNEL 2 4 OHM SPEAKER (27 WATTS) + CHANNEL 2 4 OHM SPEAKER (27 WATTS) + 8V 4V CHANNEL 2 4 OHM SPEAKER (16 WATTS) 2V CHANNEL 2 4 OHM SPEAKER (16 WATTS) CHANNEL 2 4 OHM SPEAKER (27 WATTS) 0V A2 A1 A2 A1 E1 250 WATTS PER CHANNEL CHANNEL 1 E2 E3 E4 E5 E6 E7 0V 2V CHANNEL 1 4 OHM SPEAKER (16 WATT) 4V CHANNEL 1 4 OHM SPEAKER (16 WATT) CHANNEL 1 4 OHM SPEAKER (27 WATTS) 8V 16 V + + + 24 V 31 V CHANNEL 1 4 OHM SPEAKER (16 WATT) + CHANNEL 1 4 OHM SPEAKER (16 WATT) + CHANNEL 1 4 OHM SPEAKER (16 WATT) + CHANNEL 1 4 OHM SPEAKER (16 WATT) + CHANNEL 1 4 OHM SPEAKER (27 WATTS) + CHANNEL 1 4 OHM SPEAKER (27 WATTS) + Load as shown is 177 Watts total per channel. ---------------------------------------------------------------96 W per channel through the transformer 81 W per channel across the amplifier NOTES: 1. 70V phasing is reversed inside the output transformer assembly. 2. Wattage indicates actual power. Select speakers with a higher rating. Figure 3-F 22022620 Rev C 3-15 Section 3: Extension Speakers NGX Grand Jukebox This page intentionally left blank. 3-16 22022620 Rev C NGX Grand Jukebox Section 4: Parts Catalog Section: 4 Parts Catalog Cabinet Assembly for NGX Grand Jukebox – Front 1 2 3 5 4 65 7 Figure 4-A No. 1 2 3 4 5 6 7 22022620 Rev C Part Number 61203801 61203802 61200107 61201001 40992201 41020601 30973001 Description SPEAKER ENCLOSURE–LEFT (MID/TWTR) SPEAKER ENCLOSURE–RIGHT (MID/TWTR) LIGHTING ASSEMBLY CABINET ASSEMBLY PANEL ASSEMBLY–BASS SPEAKER CHAMBER BRACKET – CASTER MOUNTING, FRONT CASTER Qty. 1 1 1 1 1 2 4 4-1 Section 4: Parts Catalog NGX Grand Jukebox Cabinet Assembly for NGX Grand Jukebox – Back 1 2 3 4 Figure 4-B No. 1 2 3 4 4-2 Part Number 61203901 40991901 34107201 22192501 Description DOOR ASSEMBLY – REAR (CABINET) PANEL – SPEAKER CHAMBER (BACK) COVER – OUTPUT TRANSFORMER BRACKET – CASTER SWIVEL LOCK Qty. 1 1 1 2 22022620 Rev C NGX Grand Jukebox Section 4: Parts Catalog Speaker Enclosure Assembly for NGX Grand Jukebox Right Speaker Enclosure – 61203802 Left Speaker Enclosure – 61203801 2 4 7 8 3 5 1 6 Figure 4-C No. 1 2 3 4 5 6 7 8 Part Number 30426708 61203401 34108502 40992101 86662708 86323616 40830901 40830807 34107401 61203402 34054605 22022620 Rev C Description BINDING POST STRIP (3 POS.) ENCLOSURE–LEFT SPEAKER, MID, TWTR COVER–SPEAKER TERMINAL GRILL–SPEAKER (MID/TWTR) SCREW–#6-32 X ½ HEX WRH, TYPE 17 SCREW–#8 X 1" PHILLIPS FLATHEAD (NOT VISIBLE) SPEAKER–TWEETER (3”) SPEAKER–MIDRANGE (5”) Not shown above: PAD–ACOUSTICAL ENCLOSURE–RIGHT SPEAKER, MID, TWTR HARNESS–SPEAKER ENCLOSURE Qty. 1 1 1 1 14 2 1 1 1 1 1 4-3 Section 4: Parts Catalog NGX Grand Jukebox Cabinet Assembly for NGX Grand Jukebox – Inside NOTE: 34108501 (wiring cover) not shown, installed in this position, 4 required 1 7, 8, 9, 10, 11 2 3 12 4 13 5 14 6 15 16 Figure 4-D 4-4 22022620 Rev C NGX Grand Jukebox Section 4: Parts Catalog Cabinet Assembly for NGX Grand Jukebox – Inside Refer to Figure 4-D No. 1 2 3 4 5 6 7 8 9 10 11 12 13 14 15 16 22022620 Rev C Part Number 34106501 22325601 34032901 22326601 40832124 61688 22326103 34108501 80493032 87843000 88903000 34106401 22326001 61052708 34108502 34106701 Description CABLE–LOCK ACTUATOR BRACKET–LOCK ACTUATOR VOLUME CONTROL UNIT BRACKET–LOCK CABLE TRANSFORMER ASSEMBLY–OUTPUT SPEAKER, 15" DVC, PEAVEY BRACKET–SPEAKER PIVOT COVER–WIRING #8-32x2 PPH SEMS SCREW #8-32 KEPS HEX MS NUT #8 EXT LOCK WASHER HINGE–SPEAKER MOUNTING CHANNEL–SPEAKER MOUNTING CBA–CROSSOVER COVER–SPEAKER TERMINAL JUNCTION BOX ASSEMBLY Qty. 2 2 1 4 1 1 4 4 4 4 8 2 4 1 1 1 4-5 Section 4: Parts Catalog NGX Grand Jukebox Lighting Assembly for NGX Grand Jukebox 18 9 5 1 10 6 11 2 12 17 3 13 14 4 15 16 7 8 Figure 4-E 4-6 22022620 Rev C NGX Grand Jukebox Section 4: Parts Catalog Lighting Assembly for NGX Grand Jukebox Refer to Figure 4-E No. 1 2 3 4 5 6 7 8 9 10 11 12 13 14 15 16 17 18 Part Number 34103805 22323503 40990704 34103804 61200215 34103904 61200004 40990705 40990612 61200216 22326301 34103903 40977102 41010601 22327402 40990613 34104906 34100501 Description PLATE–BEZEL (TOP) PLATE–BEZEL (CORNER) PLATE–BEZEL (LH) PLATE–BEZEL (BOTTOM) BRACKET–VERT (LEFT)) LATCH–LH DIFFUSER PLATE–BEZEL (RH) BRACKET–HORIZONTAL (TOP) BRACKET–VERT (RIGHT) LED STRIP ASSEMBLY LATCH–RH COVER–LED CONTROL RGB CBA–LED CONTROL BRACKET–MOUNTING (LOWER) (LED STRIP) BRACKET–HORIZONTAL (BOTTOM) BRACKET–DIFFUSER CLAMP BRACKET–DIFFUSER CLAMP SHORT Qty. 1 2 1 1 1 1 1 1 1 1 1 1 1 1 2 1 2 2 Miscellaneous Parts for NGX Grand Lighting Assembly No. 22022620 Rev C Part Number 22323601 22324101 25156910 22145626 70134152 22145627 22324501 Description BRACKET–CONNECTOR (LIGHT ASSEMBLY) COVER–LIGHT ASSEMBLY CONNECTOR WASHER–SHOULDER HARNESS ASSEMBLY–INTERCONNECT W/RL W/GND SCREW #6-32x3/8 PIN IN TORX BLACK HARNESS ASSEMBLY–LED CONTROL W/RL W/GND WRENCH–LKEY PIN IN TORX Qty. 1 1 2 1 1 1 1 4-7 Section 4: Parts Catalog NGX Grand Jukebox Lock and Cable Installation Figure 4-F 4-8 22022620 Rev C NGX Grand Jukebox Section 5: Block Diagrams Section: 5 Block Diagrams The block diagrams on the following pages are presented to aid in troubleshooting and repair. The wire colors called out on wire harnesses are standard, however, wire colors may be substituted based on availability at the time of manufacture. 22022620 Rev C 5-1 Section 5: Block Diagrams NGX Grand Jukebox 21958306 TRANSMITTER 40846302 IR RECEIVER TO IR REMOTE (Y ELLOW) ON CORE COMPUTER 34037905 CANCEL TO 6 BUTTON REMOTE (RED) ON CORE COMPUTER INT 62009-A-LF EXT MUTE OPTIONAL 70004-1A WIRED REMOTE 61199701 32" FLAT PANEL DISPLAY AND TOUCH SCREEN INCLUDES CABLES MARKED WITH ** TO USB ON CORE COMPUTER **34068706** **22164202** TO VGA ON CORE COMPUTER USB TOUCH CONTROL VGA VIDEO 120 VAC POWER 34032904 ROWELINK VOLUME CONTROL CH1 CH2 CH3 CH4 **21121225** MIC1 MIC2 MIC3 SINGER 34037908 34102007 VOLUME 22322402 TO CORE (GREEN) ROWELINK SPLITTER (GREEN) TO AMP OR LIGHTING ASSY PWR CAN FUT MODE 28280004 4-PORT WIRELESS ROUTER POWER PLUG TO LOCATION INTERNET SOURCE TO RJ45 ETHERNET ON CORE COMPUTER WAN PORT ETHERNET CABLE SUPPLIED WITH ROUTER KIT 1 2 LAN PORTS OPTIONAL 26704801 WIRELESS ROUTER KIT 5-2 3 4 22022620 Rev C NGX Grand Jukebox Section 5: Block Diagrams 34102201 LIGHTING ASSY INTERFACE TO ROWELINK (GREEN) ON CORE COMPUTER SERVICE SW SPARE IN B MUTE OUT LIGHTS ON/OFF +12 V GND GND GND SPECIAL EVENT SPARE OUT B ROUTER POWER SPARE OUT A MONEY METER +12 V 1 2 O 1 2 3 4 5 6 7 8 9 10 11 12 13 14 G 40984201 B R1 10K B BL BL G 1 2 3 4 +5 V 1 2 3 Q3 A56 R B/W To Pin 10 To Pin 11 R B/W To Pin 12 To Pins 7-9 P5 R4 10K TO CURRENCY MODULE 12 PIN CONNECTOR Q4 A06 R7 4.7K +5 V +12 V GND GND +5 V Q2 A06 R3 4.7K R6 10K R5 10K TO JUKEBOX I/O (BROWN) ON CORE COMPUTER TO ATX POWER INPUT ON CORE COMPUTER 1 2 3 Q1 A56 P2 TO ATX POWER OUT ON CORE COMPUTER P4 +5 V R2 10K 1 2 3 4 5 6 7 8 R8 10K Y B 1 B 2 R 3 4 POWER IN P3 6 5 4 3 2 1 P1 P4 40983801 D2 K3 D1 K2 K1 K3 K3 AMPLIFIER POWER P5 N 1 2 3 N.O. L N.O. W G/Y B P2 W B 1 2 3 N DISPLAY POWER N K2 L N.O. L P6 ROUTER POWER N K1 ATX POWER B.A. POWER P1 N.C. L P3 N L N S1 POWER CB1 10A P7 120 VAC INPUT 40984301 POW ER DISTRIBUTION ASSY TO ATX RESET PLUG ON CORE COMPUTER ATX RESET 22121216 POWER CORD 22121225 POWER CORD 34106701 JUNCTION BOX 22022620 Rev C 5-3 Section 5: Block Diagrams NGX Grand Jukebox 34039109 CABINET FAN TO CABINET FANS ON CORE COMPUTER 34052609 1 2 3 4 R B 1 2 1 2 1 2 34039109 CABINET FAN R W/R + _ 34054605 1 2 3 4 5 6 7 8 9 G B/W PK S B S/W L+ LRR+ BASS - 8 ohm 61688 + _ B R ight C h annel 61203802 TWEETER 40830901 1 2 B V BL MID - 8 ohm 40830807 1 2 + _ L eft C hannel 61203801 TWEETER 40830901 1 2 R 40992801 R-2 W/R-2 1 W/R-1 2 3 R-1 4 5 B-2 6 B-1 7 V CH 1 P2 BGM IN POWER BR STATUS P101 RL COMM MAIN IN - STEREO PLUG CH 2 OUT GND GND CH 1 OUT CH2 30934231 CH1 CH4 G 22180824 - AUDIO TRANSFORMER CH1 TO AUDIO OUTPUT ON CORE COMPUTER MUTE THERMAL AUDIO OUT OVR CRNT MIC 2 INPUT SENSE POWER GND SHIELD LEFT GND GND RIGHT MUTE J2 TO ROWELINK (GREEN) ON CORE COMPUTER 1 2 3 4 5 MIC 1 INPUT SIGNAL SENSE POWER GND 22215009 Shld G B W R O/B 1 2 3 4 5 BR 6 7 8 W/BR J7 34104601 CH 1 IN GND GND CH 2 IN THERMAL OVER CURRENT ENABLE BTL SY NC +24VDC GND TO AMPLIFIER POWER ON POWER DISTRIBUTION ASSY 40912013 B 1 2 3 1 2 3 SPEAKER BINDING POSTS P103 R B 1 2 34104701 1 2 3 +24VDC GND AUX PWR OUT 61200701 PREAMP P100 W G INTERFACE J10 POWER ROWELINK P102 8 7 6 5 4 3 2 1 B 34104501 CH3 J3 SIGNAL B/W 1 2 3 4 EXT OUT 1 2 3 4 5 P CH 2 61052708 CROSSOVER 34054605 CH2 BR B/W B W/R + _ P1 E1 E2 E3 E4 E5 E6 E7 MID - 8 ohm 40830807 B R E1 E2 E3 E4 E5 E6 E7 GND GND POWER POWER B W 34104401 40991404 AMPLIFIER ASSY 1 2 3 40983901 ICEpower AMPLIFIER LINE NEUTRAL POWER SINGLE AMPLIFIER CONFIGURATION 5-4 22022620 Rev C NGX Grand Jukebox Section 5: Block Diagrams OPTIONAL DUAL BA INSTALL U.S. 4 7 9 10 20 21 22 24 120V NEU CREDIT PULSE SEL GROUND 120V HOT EARTH OOS ENABLE 22135613 MEI AE2681D7EUS -- OR -22135614 COINCO VL61D47US01 SINGLE BA INSTALL W Y B/W B/W B G/Y BL BR GND +12 V COIN 5 COIN 6 LED ON INHIBIT COIN 1 COIN 2 COIN 3 COIN 4 1 2 3 4 5 6 7 8 9 10 34095702 1 2 3 4 5 6 7 8 9 B/W BR B B/W G Y BL W U.S. 4 7 9 10 20 21 22 24 4 7 9 10 20 21 22 24 120V NEU CREDIT PULSE SEL GROUND 120V HOT EARTH OOS ENABLE 34022350 34022350 1 2 3 4 5 6 7 8 9 B/W B/W 1 O 2 3 4 R 5 B/W 6 W 7 B/W 8 R O W 1 2 3 4 5 6 7 8 4 7 9 10 20 21 22 24 120V NEU CREDIT PULSE SEL GROUND 120V HOT EARTH OOS ENABLE 22135613 MEI AE2681D7EUS -- OR -22135614 COINCO VL61D47US01 4 7 9 10 20 21 22 24 120V NEU CREDIT PULSE SEL GROUND 120V HOT EARTH OOS ENABLE 22135613 MEI AE2681D7EUS -- OR -22135614 COINCO VL61D47US01 22178602 IMONEX COIN ACCEPTOR BR O R B W G CANADIAN $1, $2 $2 B CANADA G $1 W BR O R CANADA TO COINS (BLUE) ON CORE COMPUTER GND +12 V COIN 5 COIN 6 LED ON INHIBIT COIN 1 COIN 2 COIN 3 COIN 4 1 2 3 4 5 6 7 8 9 10 NC 1 NC 2 GND 3 OOS 4 +5 V 5 NC 6 CREDIT 7 ESCROW 8 ENABLE 9 DATA 10 B/W SL U.S. 22178601 IMONEX COIN ACCEPTOR 34022351 Canada Only COM SL B/W BL Y 1 2 3 4 5 6 7 8 9 10 11 12 1 2 3 4 5 6 7 8 9 10 11 12 B/W SL B/W BL Y BR B G/Y W O R B/W BR N.O. 34022347 QUARTER ONLY U.S. SERVICE 1 2 1 2 R B LIGHTED BACK PANEL 22325401 - DIFFUSER PANEL 34105801 - CBA - LED BACKLIGHT TO BILLS (WHITE) ON CORE COMPUTER TO POWER DISTRIBUTION ASSY MOUSE HOLE IN CURRENCY MODULE 22185353 CREDIT CARD READER Supplied with Card Reader TO CORE COMPUTER 22022620 Rev C 5-5