1
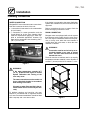
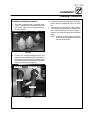
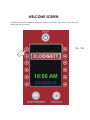
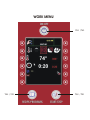
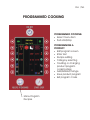
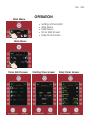
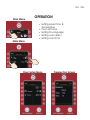
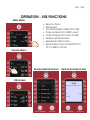
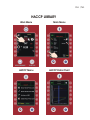
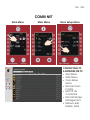
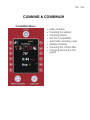
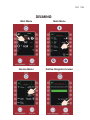
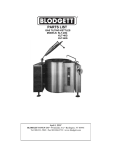
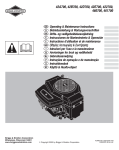
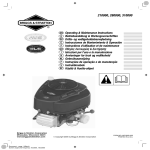
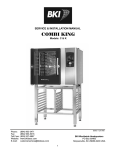
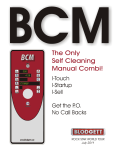
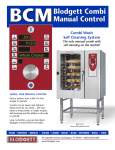
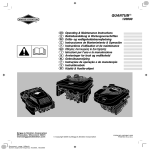
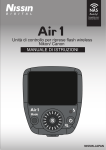
BCP
BCP
ON/OFF
Combi Optima
18°
135
0:02
0:20
RECIPE/PROGRAMS
START/STOP
www.blodgett.com
The Combi that
Does it ALL!
I-Touch
I-Startup
I-Sell
Get the P.O.
No Call Backs
ROCK STAR WORLD TOUR
July 2011
TRAINING LOGISTICS
You will be divided into 5 teams. All teams will have the opportunity to attend each of the
5 different BCP training sessions. The sessions include:
!
Startup & Support Materials
!
BCP Control, Combi Optima
!
BCP Programming
!
BCP Operation and USB Function
!
HACCP, Combi Net & Maintenance
BCP
Startup
TIPS FOR YOUR CUSTOMERS
!
Warnings, shipping damage. DO NOT sign until you are sure there is no damage.
!
Always bring an extra operation manual.
!
Loading dock or lift gate?
!
Will the unit fit through the door?
!
Cross check the utility supply, gas, LP, electric, kW - amp load
!
Always sell the extended warranty
!
Start a file for the customer, include the following:
Oven information from the page in the operations manual
Name of chef or rep that performed the startup
Date of warranty expiration
Yes / No
OVEN INFORMATION - NO CALL BACKS!
The following can be found in the front of the operation manual. Be sure to fill out the
information and include it in your customer file.
Model/Modèl:
Your Service Agency's Address:
Adresse de votre agence de service:
Serial Number/Numéro de série:
Your oven was installed by/
Installateur de votre four:
Your oven's installation was checked by/
Contrôleur de l'installation de votre four:
Yes / No
Installation
Final Check Lists
WARNING!!
Final check list must be performed by a
qualified installer only.
OVEN EXTERIOR
j Check that the oven has not been damaged
in transit (dents, scratches, etc.)
j Check/adjust the height and check that the
oven is placed level (horizontally)
j Check/adjust oven door
CONNECTIONS
j
j
j
j
j
j
j
j
j
j
j
Check for correct water connection
Turn on water supply
Check for leaks
Turn off water supply
Check and clean dirt filter
Turn on water supply again
Check hand shower
Check for correct electrical connection
Check connection to drip tray
Check for correct mounting of drip tray
Check for correct fall of hose from drip tray,
and check for leaks
j Check for correct exhaust and drain connecĆ
tion
j Clean the oven
j Apply steel oil
OVEN INTERIOR
j Check that filter housing is mounted correctly
j Check interior light
j Clean the oven
CONTROL
j Check and adjust, if necessary, each of the
preset values
j Heat up the oven at 480° F (249°C) for approxĆ
imately 5 minutes.
Yes / No
Installation
Plumbing Connections
If the feeder is connected to the water distribution
system with a flexible hose, this hose should be VA
approved.
WATER CONNECTION
Blodgett BCP ovens have two water connections.
Both are located at the back of the unit.
D
D
Before connecting the oven to water, flush the
tubes thoroughly. Connect the oven.
1 connection for raw water for the condensation
jet (cold water).
1 connection for steam generation and the
Combi Wash jet in the oven chamber. Must
meet the requirements applying to water supĆ
plied to household appliances; however, hot
water with a temperature not exceeding 120°F
(49°C) can be used.
Quench
DRAIN CONNECTION
Blodgett ovens are equipped with a drain system
that removes surplus water from the oven chamĆ
ber. This may be condensed water from the prodĆ
ucts, or it may occur when the oven chamber is
cooled down with cold water, or when the oven
chamber is cleaned.
Steam
WARNING!!
Connection must be carried out by an auĆ
thorised plumber, to an open or closed
drain. The drain must never end directly
beneath the oven.
The drain must be of stainless steel or an equally
temperatureĆresistant material, have a diameter of
at least 2" (49 mm) and a fall of at least 3° or 5%.
Figure 3
WARNING!!
If the water temperature exceeds 70°F
(21°C), problems with regard to Combi
Optima calibration and cooling of the
oven may occur.
The water connection must be carried out
by an authorized plumber in accordance
with existing local codes.
Clogged up water filters and dirt in the soĆ
lenoid valves are not covered by the warĆ
ranty.
To facilitate cleaning and servicing, the oven
should be connected with an approved flexible
3/4" hose. Permanent installations should be fitted
with a stopĆtap and a nonĆreturn valve.
Figure 4
8
Yes / No
Installation
Plumbing Connections
3. Insert the blue and red hoses into the proper
bottles. Red is for detergent, blue is for rinse
aid.
4. The last line is for the delimer. This is the tan
colored tube protroding from the bottom of the
oven. Cut the tubing to the proper length, if
needed, and place the tubing into the delime
bottle.
NOTE: If the tube is cut to length, remove the
stainless steel weight from the end of
the tube and reinsert.
CLEANING & DELIMING CHEMICAL
1. The oven is supplied with a chemical bottle
holder. The holder can be affixed to either side
of the oven. Place it on the stand crossmemĆ
ber. See Figure 5.
Figure 5
2. Connect the supplied detergent tubes (red
and blue) to the underside of the oven near the
rear. Connect the blue hose to the fitting with
the blue sticker and the red hose to the fitting
with the red sticker. See Figure 6.
Red Sticker
Blue Sticker
Red Tube
Blue Tube
Figure 6
9
BCP & BCM ERROR CODES & CAUSES
Yes / No
3 - Generator Hot – Generator High Limit Thermostat Open(Opens at 275˚F) (Manual Reset under a cover at the bottom
of the control panel) (Check F1)
4 – Oven Hot - Oven High Limit Thermostat Open (Opens at 662˚F) (Manual Reset under a cover at the bottom of the
control panel) (Check F1)
5 – Fan Hot – Motor Thermal Limit Open (2 Gray Wires) (Opens at 320˚F) Wait 10 minutes and try again. If 5 appears
again, the cooling fans, motor bearings, or thermal switch within the motor failed. (Check F1 or for a 5vDC Short)
6 – Drain Hot – RTD Probe in Drain (100 Ohm Probe) reads over 167˚F for over 5 minutes. (Check Quench Water)
7 – Oven sensor Defect – RTD Probe in Generator (100 Ohm Probe) Shorted/Open
8 – Core Probe Missing – Control has an active Core (Meat) Probe. Deactivate both Core Probes or insert Core Probe in
the probe port on the control side.
9 – Gen Sensor Defect – RTD Probe in Generator (100 Ohm Probe) Shorted/Open
10 – Drain Sensor Defect - RTD Probe in Drain (100 Ohm Probe) Shorted/Open
11 – Water Shortage – Steam Generator could did fill in 5 minutes. (Check fill water or level sensor)
12 – SSR Hot – one of the two SSR Heat Sink Automatic Reset Snap Disks that are wired in series is Open (Open at 248˚F)
(Check F1 and Axial Air Flow)
13 – Generator > 265 – RTD Probe in Generator (100 Ohm Probe)reads over 265˚F.
14 – Fan Slow – Fan Hall Sensor (Brown, Black and Red Wires), Inverter or the Motor has failed or a wiring issue exists.
(Check Axial Air flow, Hall Effect, 5vDC short, Fan Motor, Freq Inverter)
16 – IO Board Hot – The IO Board senses a temperature above 140˚F. (Stops functioning - Check Axial Air flow)
19 –Internal Error–The control has sensed a failed process, restart the control.
20 – IO Com Error- Failure of communication between the CPU and IO Board.
21 – Invalid recipe – Indicates a recipe is programmed for a feature the oven does not have. (Boiler/Boilerless)
22 - Program Terminated – Power interrupted while a program was in progress and enough time elapsed that the
program cannot resume.
24 – Empty Error – Steam Generator water level sensor reads water 25 seconds after running the drain pump to drain
the boiler. (Check Drain Pump or Level Sensor)
25 – CombiOptima not Calibrated – Enter the Service Menu and run the calibration.
26 – CombiOptima Sensor Error – The Pressure sensor gives a reading outside the range of 0.5 - 4.5.
27 – CombiOptima calibr. Fault – Calibration could not be completed, Start calibration when the oven is cold and dry.
(Check Injection Nozzle)
28 – Main Alarm Error –No 24V signal to high limit board (Check High Limit board condition and power supply)
29 – Door Sensor Error – Wrong door sensor signal (5vDC Short [creating a signal < 10])
34 – Water Pressure Low – Water Pressure Switch (located on the larger solenoid assembly) is closed. (Opens at 36 PSI)
36 – No Detergent – Time Based detergent monitoring is disabled. (Disable Detergent Monitoring in menu)
38 – Detergent In Oven – Combi wash interrupted while the detergent was in the oven. Run Combi Wash in Step 0 to
clear detergent prior to inserting product.
39 – Insufficient Memory – The units memory is not sufficient for the current operation. (HAACP full, perform
download)
40 - IO Board Hot- The IO Board senses a temperature above 140°F. (Will keep working, but see 16)
41 – Main Alarm - Boiler Temp Rising without a call for boiler heat.
42 – Error in SW – Software Error.
Yes / No
For Gas Ovens
44-Dammper Error-Failure during initialization of exhaust at oven start-up. (Check for vent damper obstructions)
45-24V Error-24V missing or failure of main contactor output.
50-Switch On-Pressure switch on when gas-air control unit running (timeout 20 sec.)
51-Switch Off-Pressure switch not on when gas-air control unit running (timeout 20 sec.)
52-Gas Valve-Gas valve does not open (automatic gas burner control has failed (timeout 20 sec.))
53-No Fan RPM-Gas-air control unit does not revolve when pressure switch is on.
54-Fan Error-Gas-air control unit does not run at correct RPM just before ignition.
55-Gas Fail-Warning: Ignition failed.
56-Gas Error-Flame fails to occur after 3 attempts.
57-Gas Stop-Warning: Gas failure during operation.
Yes / No
Annual Service Check
Customer:
Address:
By: Postal code:
Serial No of the oven: Model:
1. Connection: Functioning correctly YES NO
Water connection – dirt filter (may need tightening)
Electrical connection (may need tightening)
Drain connection (May need tightening)
Positioning of oven
2. Door:
Closing device (may need adjusting)
Catch (may need adjusting)
Sealing (must be tight at 100°C steam or combi steam)
Hinging (may need adjusting)
Interior glass (hinging, fastening)
3. Inside:
Interior light
Jets (may need cleaning)
Fan (should rotate freely and be tightly fitted)
Heating element (may need tightening)
4. Beneath oven: Drain system (check for leaks and blocks)
Condensation jet and drain sensor
Drip tray
Drip slide on oven door
G.S. BLODGETT CORPORATION 44 Lakeside Avenue, Burlington, Vermont 04501-5474 USA
Telephone: (802) 860-3700 (800) 331-5842 www.blodgett.com
Yes / No
5. Motor room:
Connection to heating elements
Load distribution on phases Wire connection (overloading,
bad connection, and tightening)
Exhaust motor
Fan motor (may need tightening)
Frequency transformer (check regulation)
ClimaOptima
Cooling fan
Filter for intake (may need cleaning)
Check for moisture
6. Steam generator: Functioning correctly YES NO
Heating elements (check for leaks)
Load distribution on phases
Level sensor – to be cleaned
Drain pump
May need descaling
7. Functional test:
Components (use test function)
Core temperature probe
Operation modes
CombiWash
Service engineer: Date and signature
G.S. BLODGETT CORPORATION 44 Lakeside Avenue, Burlington, Vermont 04501-5474 USA
Telephone: (802) 860-3700 (800) 331-5842 www.blodgett.com
Review
Yes / No
Service Manual
For Electric BCP Oven
“Programmable Control”
GB
On CD
w/Operatons
Manual
BCP
Control
WELCOME SCREEN
The Welcome Screen appears when you power up the BCP. Press any of the 6 keys on
either side of the control.
Yes / No
WORK MENU
Yes / No
Yes / No
Yes / No
Yes / No
WORK MENU
Menu
Key
Mode
Temp
Time
Fan &
Vent
Core
Probe
Yes / No
MANUAL COOKING
Choose from the following oven modes
Hot Air
Combi
Steam
Retherm
Proofing
Preheat
Cool
Down
Combi
Wash
Yes / No
CORE PROBE COOKING
Core
Probe
2 Probes
Yes / No
Yes / No
Active
Yes / No
Delta T
Yes / No
Cook & Hold
Yes / No
BCP
Programming
Yes / No
PROGRAM SUBMENU
200 Recipe
Programs
10 Cooking
Stages
15 Categories
Menu Program
Recipes
Yes / No
PROGRAMMED COOKING
PROGRAMMED COOKING
! Select menu item
! Push start/stop
PROGRAMMING A
PRODUCT
! Edit program screen
! Enter text
! Recipe editing
! Category selecting
! Creating or changing
product program
cooking steps
! Add/Delete/Change
! Save product program
! Exit program mode
Menu Program
Recipes
Yes / No
PROGRAMMING A PRODUCT
Edit Program Screen
Edit Step Change Function Screen
Press to select the desired mode
Press to select Add, Delete or Change
Press to select step to be modified
Edit Step Screen
Yellow box indicates
current stage in edit
mode
Press to scroll
the yellow box
to the left
Use these keys
to change
settings
Press to move to
Edit Step Change
Function screen
Press to scroll
the yellow box
to the right
Use these keys
to change
settings
BCP
Operation
& USB
Yes / No
Work Menu
OPERATION
!
!
!
!
!
Setting a timed start
Work Menu
Main Menu
Timer Start Screen
Daily Timer Screen
Main Menu
Timer Start Screen
Starting Time Screen
Daily Timer Screen
Yes / No
Work Menu
OPERATION
!
!
!
!
!
Setting preset time &
temperature
Oven set temp
Setting the language
Setting oven alarm
Setting oven time
Main Menu
Oven Setup Menu
Preselection Screen
Yes / No
OPERATION - USB FUNCTIONS
Main Menu
!
!
!
!
!
!
!
!
Service menu
USB screen
To restore system data from USB
Copy recipes from USB to oven
Copy recipes from oven to USB
Recipe upload screen
Upload accept screen
Send recipe oven to USB to PC to
PC to USB to Combi
Service Menu
Recipe Upload Screen
USB Screen
Upload Accept Screen
BCP
HAACP,
CombiNet
Maintenance
Yes / No
HACCP LIBRARY
Work Menu
Main Menu
HACCP Menu
HACCP Data Chart
Yes / No
COMBI NET
Work Menu
Main Menu
Oven Setup Menu
CONNECTING TO
A NETWORK OR PC
! Work Menu
! Main Menu
! Oven Setup
Menu
! Remote Oven
Control
! HACCP via
Combi Net
! Remote Recipe
Management
! Retrieve, Edit,
Delete, Send
Yes / No
CLEANING & COMBIWASH
CombiWash Menu
!
!
!
!
!
!
!
Daily cleaning
Cleaning the exterior
Cleaning interior
Run the CombiWash
automatic cleaning cycle
Weekly cleaning
Cleaning the control filter
Cleaning behind the fan
guard
Yes / No
DELIMING
Work Menu
Main Menu
Service Menu
Delime Diagnosis Screen