1
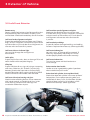
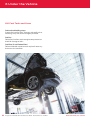
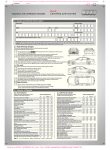
Audi Certified pre-owned Inspection and Certification Checklist Dealer User Guide - Reconditioning Manual Foreword The Foundation of the Audi Certified pre-owned Program The Inspection and Certification checklist stands out as the single most important document in the Audi Certified pre-owned program. From advertising and merchandising to sales and delivery, we promote our industry leading certification process by which we thoroughly inspect and recondition our vehicles. Not to be misunderstood or referred to as “overly comprehensive”, our inspection and certification process is in direct relation to the thoroughness and dedication that goes into the manufacturing of every Audi product. An extension of our philosophy of “Truth in Engineering”, we impose this same inspiration in the care we take to ensure that our Certified pre-owned vehicles will continue to provide the exceptional performance and quality our owners expect. Contents Introduction and Best Practices 4 Introduction 4.1 Engine 4.2 Cooling System Best Practices (Interior and Exterior) 4.3 Transmission Preliminary Work 4.4 Electrical System 1 Dealer and Vehicle Information Engine Compartment 4.5 Brake System 1.1 Audi Achtungs (Stops!) 1.2 Pre-Work 1.3 Predetermination 2 Interior of Vehicle 2.1 Front Interior 2.2 Left Front Interior 2.3 Left Rear Interior 2.4 Right Rear Interior 2.5 Right Front Interior 5 Road Test 5.1 Engine, Drivetrain, and Operation 6 Under the Vehicle 6.1 Undercarriage 6.2 Exhaust System 6.3 Engine Transmission/Differential/Transaxle 6.4 Tires and Wheels 6.5 Brakes 6.6 Fuel Tank and Lines 3 Exterior of Vehicle 3.1 Front Exterior 3.2 Left Front Exterior 3.3 Left Rear Exterior 3.4 Rear Exterior 3.5 Right Rear Exterior 7 Signatures Signatures of Approval Required Appearance Standards for Proper Reconditioning 3.6 Right Front Exterior 3.7 Top Exterior 3 Inspection and Certification Checklist User Guide · Audi of America · 4 / 2012 Audi Certified pre -owned Design, build and care for only those cars we would want to drive today and tomorrow. At Audi we believe in caring for our cars today and tomorrow. Our Certified pre-owned program is an extension of this belief and is paralleled by the process in which we certify our cars. We have developed the most comprehensive and thorough inspection and certification process in the industry. The Inspection and Certification checklist is the accumulation of experience and input by our factory and field technicians who stand behind the cars they keep on the road year after year. Approved signatures back this checklist from the Audi Certified pre-owned Manager, Service Manager and most importantly the authorized Audi technician who inspected and certified the car. This thoroughness and care is provided at authorized Audi dealerships and service facilities such as the Audi Reconditioning Centers using factory tools, genuine Audi approved parts and technical/ diagnostic equipment to maintain and service our vehicles. We stand behind the checklist as a blueprint to the process in which we care for our cars. Upon completion and approval, it is required to include a copy of the checklist with the owner’s kit for peace of mind and product confidence. The checklist cover and original copy must be retained on file at the dealership. Best Practices • Using the CPO 300+ Point Checklist Your checklist arrives in duplicate on three separate pages included in a resourceful cover. The gray cover serves as a backing to assist in the added pressure needed when writing in duplicate as well as providing space for taking notes. There is a vehicle diagram to note exterior damage, the version on the checklist should be left untouched to represent the clean unblemished vehicle for delivery. Please complete the checklist in a legible manner for your customer who receives the bottom copy. • Improved Process Flow The new checklist was designed to keep our thorough inspection and certification process as efficient as possible. This improved process will ensure that the entire vehicle is properly inspected in a timely manner. • Vehicle Pre-inspection Wash the vehicle (including the wheels) prior to the start of the inspection. This helps reveal any body scratches and dents and gives you a clean work surface. • Interior Pre-Cleaning Clean and vacuum interior of the vehicle prior to the interior inspection. Clean surfaces will uncover any potentially missed blemishes prior to detailing. • Vehicle Walk Around Walk around the vehicle in both natural and indoor lighting conditions to inspect and best reveal all painted surfaces and trim. • Note Exterior Damage Damage on body panels is difficult to see from standing eye level; therefore, it is important to check all areas for damage. Record damage on cover diagram. • Exterior Scratch Inspection Use cleaning wax and a micro-fiber cloth to determine scratch depth. This process will help reveal any need for additional paint repair. 4 Inspection and Certification Checklist User Guide · Audi of America · 4 / 2012 Audi Certified pre -owned 1 Dealer and Vehicle Information The following information must be completed in the Inspection and Certification Checklist for the vehicle to be considered into the Audi Certified pre-owned program. Dealer Name: Your Dealership’s name Dealer Number: Your Audi Dealer number Model: Model of car A4, A6, A8, etc. Year: Model year of vehicle Color: Enter properly named vehicle color Mileage: Current mileage on odometer VIN Number: VIN number of vehicle from windshield plate Inspection Date: The current day you are inspecting the vehicle Audi Certified pre-owned Technician Name: Your name Tech Code: Your Audi Technician Code Repair Order Number: Obtained from Service Manager or Warranty Clerk 5 Inspection and Certification Checklist User Guide · Audi of America · 4 / 2012 Audi Certified pre -owned 1 Dealer and Vehicle Information 1.1 Audi Achtungs (Stops!) Performed by CPO/Service Manager Has the vehicle passed the CARFAX® Vehicle History Report? This requirement is 100% mandatory and is confirmed by looking at the CARFAX® Vehicle History Report for the red stop signs and yellow triangles calling out any major concerns. Report all major concern icons immediately to the Service Manager and Audi Certified pre-owned Manager. The following CARFAX® data flags make a vehicle ineligible for Audi CPO: • Salvage Title • Junk Title • Flood Title • Fire Title • Hail Title • Rebuilt Title • Reconstructed Title • Dismantled Title • Lemon Law or Buyback Title • NAM (Not Actual Mileage) Title • Potential Odometer Rollbacks – If a more recent odometer reading is less than an older reading, then the odometer may have been tampered with and “rolled back.” CARFAX® analyzes the mileage history to indicate a potential odometer rollback. • Inconsistent Mileage Reading Flag – If a more recent odometer reading is less than an older reading, then the odometer may have been tampered with and “rolled back.” CARFAX®analyzes the mileage history to indicate a potential odometer rollback or inconsistent mileage reading. Is the vehicle 5 model years old or newer with no more than 60,000 miles? The oldest model year will drop off on September 1st of each year. This requirement is a full stop and must be met. Is the vehicle free from current or past evidence of after market modifications? (VAS Scan Test Required) This includes the following: Chassis, engine performance chip, suspension, exhaust, electrical, wheels and tires, and performance enhancements. Do the tires match the application sticker on the B pillar? Perform a Specification/Actual test with the appropriate VAS tool (tool must have an active internet connection) ensuring all vehicle software is current and no tuning modifications exist. Afterwards, check ElsaWeb for any Warranty Keys indicating aftermarket modifications. Should any exist, stop and notify dealer management immediately as the vehicle is ineligible for certification. Is it certain the vehicle does not have an extensive or unreasonable service history? Review ElsaWeb at your dealership and review what has been done in terms of warranty activity. If the vehicle has had multiple powertrain, electrical, or repeated repairs for the same concern, it is not a candidate for the Audi Certified pre-owned program. Check to ensure the car has not been repaired numerous times for the same item. Do all VINs match with labels and plates intact? Examine the frame, windshield, B-Pillar FMVSS Sticker and Trunk VIN sticker to confirm a match. • Verified Odometer Rollbacks (All original: no alterations) • Frame Damage Reported Is the unit's history free from any manufacturer buyback (lemon law) or cash settlement events? All vehicles under this classification are accompanied by a document packet supplied by the manufacturer. Please check ElsaWeb for any warranty keys indicating lemon law or cash settlement events. Should any exist, vehicle is ineligible for certification. Confirm with your manager that this vehicle meets these classifications. • Taxi Use Flag • Grey Market Vehicle • Auto Recycler Record • Total Loss Vehicle 6 Has the vehicle been in operation for at least 4 months or have a minimum of 4,000 miles? This requirement is a full stop and must be met. Inspection and Certification Checklist User Guide · Audi of America · 4 / 2012 Audi Certified pre -owned 1 Dealer and Vehicle Information 1.2 Pre-Work 1.3 Determination Performed in service bay. Attach exhaust hose and start vehicle engine for power. In your opinion, is this vehicle a good candidate to become Certified? As an authorized Audi technician, determine if this vehicle qualifies to be enrolled into the Audi Certified pre-owned program. If no, stop and notify the Service Manager and Certified pre-owned Manager. If yes, continue with the Inspection and Certification Checklist. Does the paperwork match the VIN and vehicle? Confirm the VIN number on paperwork with the vehicle you are inspecting. Is the model year of the vehicle confirmed? Confirm model year of the vehicle by checking the VIN number. Maintenance record booklet Confirm it is present and stamped accurately. Warranty booklet/owner’s manual Confirm both are present in glove box. Are all services up to date and reflected in the maintenance booklet? Make note of the service and maintenance being performed during the CPO inspection and make sure to stamp the book for all services performed to date. Run diagnostic test with appropriate VAS tester; Correct faults during the inspection. Check for trouble codes. Run battery load test with appropriate tester. Replace battery if it fails the test. Print all diagnostic results and place copy in the vehicle file. This is crucial for dealer standards. 7 Inspection and Certification Checklist User Guide · Audi of America · 4 / 2012 Audi Certified pre -owned 2 Interior of Vehicle 2.1 Front Interior All three keys (two main and one valet) Test all lock/unlock, switchblade, and panic features on remote keys. Valet must be included with main keys. Warning lights & messages (ABS, airbag, 02 sensor, etc.) Cycle vehicle ignition and allow vehicle warning lights to illuminate. Confirm each warning light illuminates. Steering wheel/lock/key/tilt/telescope Review entire wheel for scratches or wear to leather wrap. Note damages for repair/refinish. If equipped with multi-function steering wheel, test the radio, telephone, and sound control. Test heated steering wheel function if equipped. Release column lock and test telescope and tilt features. Re-secure lock and make note of concerns. Onboard computer (check OK MIL cycle) Turn on ignition and confirm vehicle cycle will run properly. Horn (all areas of pad) Depress each area of horn pad and confirm proper operation. Hazard lights switch Activate switch and confirm proper operation. Left/right exterior mirror control and heater Operate both mirrors in every direction and check heater elements to ensure they work. Dash/console switches Activate every switch on dash and console area to confirm proper operation. Power on will be necessary for these checks. Driver’s side airbags Inspect airbag covers and confirm no tampering or deployment has occurred. Speakers Activate sound system and listen to sound quality. Note any cracking, popping, or speakers that do not work. Check fader/balance settings to confirm all speakers are activated. Dash lights/dimmer Turn on interior lamps/headlamps to confirm all dash and console convenience lights function properly. Cup holders Inspect and operate all cup holders (collapsing type) on the dash and in the center console. 8 Rearview mirror/compass (Compass set to local zone?) Ensure that the mirror compass tracks all directions. Dome and front courtesy lights Activate courtesy lamps (front and rear) where applicable and confirm proper operation. Check red courtesy lights around driver and center console area for proper operation. Also, check door sill lights if equipped. Hood release handle Grasp handle and release hood to confirm handle is operable and free from damage. Trunk/tailgate release Depress trunk/deck lid tailgate release button to confirm proper operation. Fuel door release Activate fuel door release button to confirm proper operation (where applicable). Inspection and Certification Checklist User Guide · Audi of America · 4 / 2012 Audi Certified pre -owned 2 Interior of Vehicle 2.1 Front Interior (Cont’d) Accessory power socket, lighter, and ashtray Test power socket with lighter or 12 volt device. Open and close ashtray to confirm it opens and closes properly. AM/FM Radio/Cass/CD chg/SAT radio/ AMI/Jukebox functionality Activate and confirm each function of radio for clear operation and function. Test cassette, CD, CD Changer, Satellite Radio, AMI, and Jukebox function where applicable. Remove any previously stored music in Jukebox. Clock Confirm clock is fully operable and adjusted to proper local time. Windshield wiper controls Test all controls and settings from control stem. Defogger/defroster Activate button to confirm illumination. Test if weather permits for deicing. HVAC/blower/climate controls/vents Test A/C, heater, blower motor operation, center vents, and automatic settings (where applicable). Parking brake Depress button and pull handle to set brake. Feel for proper tension and free play. On applicable models, pull electronic brake lever to ensure mechanism activates and light on dash appears and shuts off when released. Foot pedals/operation and covers Inspect brake, clutch, and accelerator pedals for damage, obstructions, and functionality. Replace worn pedal covers. Warning chimes and bells/alarm/theft deterrent Cycle ignition and listen for chimes to activate. Open and close door to ensure warning bells toll. Ensure theft deterrent system is operable and alarm activates. Test Bluetooth functionality with approved phone Check MMI menus for proper functionality. Also check Audi connect with properly functioning Wi-Fi device. Do the MMI controller buttons function freely? Ensure dials turn and click properly, as well as all buttons operating cleanly. There should be no evidence of contamination or tacky residue. Gear shifter handle/indicator Depress brake and release interlock mechanism. Review handle and knob for proper operation and ensure damage free. 9 Inspection and Certification Checklist User Guide · Audi of America · 4 / 2012 Audi Certified pre -owned 2 Interior of Vehicle 2.2 Left Front Interior Left front interior trim and door handle With the door unlocked, grasp the handle and open door. Confirm that the handle is firmly connected and not damaged in any way. Left front safety belt/height adjuster Review safety belt strap and belt ends for wear or damage. Adjust side height to confirm it slides and locks properly. Left front visor/vanity mirror/light Ensure visor/vanity is free from stains, tears, or damage and that all fasteners are tight. With accessory power on, open vanity and check light for functionality. Make any necessary repairs. Left front seat cushion and cover Visually inspect seat cover for excessive wear. If tears or damage are present, repair or replace. Seat cover must be free from any stains. Sit in seat to confirm cushion is comfortable and not worn out. Left front power window/lock Operate all windows in both auto down and up modes. Confirm that all windows will go partially up and down and that the window lock mechanism activates and disables the other windows. Operate power door lock feature to ensure all doors lock and unlock. Check the pinch protection function. Driver seat, headrest, headrest release, and headliner Inspect each item to verify it is free from damage, operates properly, and present. Left front seat controls/power/memory function Verify seat responds to all directional commands using all seat controls. Lumbar support function should also be verified. Set memory to confirm that seat functions properly. Left front headliner assist handle Confirm handle is secure, pulls properly, and retracts to the rest position. Left front door light/reflector Open door and confirm light is operable and reflector is present (where applicable). Left front seat heater and ventilator Activate seat heater and ventilator and confirm proper operation (where applicable). Left front controls/vents Move directional vents in each direction testing shut-off and direction controls. Left front carpet, floor mat, and footwell Ensure the mat securely fastens to its retainers. Inspect condition of carpet, floor mat, and footwell. Look for burns, tears, holes, curling, or excessive wear noting all needed repairs. Replace damaged and aftermarket mats with OEM mats only. 10 Inspection and Certification Checklist User Guide · Audi of America · 4 / 2012 Audi Certified pre -owned 2 Interior of Vehicle 2.3 Left Rear Interior Left rear interior trim and door handle With door unlocked, grasp the handle and open the door. Confirm that the handle is firmly connected and not damaged in any way. Left rear airbag Inspect cover for damage or deployment (where applicable). Left rear power window Operate window switch and window in full up and down range. Check the pinch protection function. Left rear headliner assist handle Confirm handle is secure, pulls properly, and retracts to rest position. Left rear seat heater and ventilator Activate seat heater and ventilator and confirm proper operation (where applicable). Rear armrest/ski sack Raise and lower armrest to confirm proper operation. Inspect ski sack condition to ensure there are no tears (where applicable). Left rear carpet, floor mat, and footwell Ensure the mat securely fastens to its retainers. Inspect condition of carpet, floor mat, and footwell. Look for burns, tears, holes, curling, or excessive wear noting all needed repairs. Replace damaged and aftermarket mats with OEM mats only. Left rear safety belt Review strap, belt, and buckle ends for damage or excessive wear. Left rear seat cushion and cover Visually inspect seat cover for excessive wear. If tears or damage are present, repair or replace. Seat cover must be free from any stains. Sit in seat to confirm cushion is comfortable and not worn out. Left rear headrest, headrest release and headliner Inspect each item to verify it is free from damage, operates properly, and present. Left rear door lights/reflector Open door and confirm light is operable and reflector is present (where applicable). Rear controls/vents Operate vents and shut-off vents. Check for proper operation. Rear ashtray in center Open and close ashtray. Confirm damage free and clean. Confirm proper operation. Rollers may need lubrication at some points. Rear window sunshade Raise and lower rear sunshade and confirm proper operation (where applicable). First aid kit in center armrest (if applicable) Open drop down door and confirm first aid kit, contents, and that kit has not been used. Note any concerns and order replacement. Center headrest and release Inspect each item to verify it is free from damage, operates properly, and present (where applicable). Left rear window sunshade Raise and lower shade and lock into position. Confirm shade retracts properly (where applicable). 11 Inspection and Certification Checklist User Guide · Audi of America · 4 / 2012 Audi Certified pre -owned 2 Interior of Vehicle 2.4 Right Rear Interior Right rear interior trim and door handle With door unlocked, grasp handle and open the door. Confirm that the handle is firmly connected and not damaged in any way. Right rear power window Operate window switch and window in full up and down range. Check the pinch protection function. Right rear seat heater and ventilator Activate seat heater and ventilator and confirm proper operation (where applicable). Right rear carpet, floor mat, and footwell Ensure the mat securely fastens to its retainers. Inspect condition of carpet, floor mat, and footwell. Look for burns, tears,holes, curling, or excessive wear noting all needed repairs. Replace damaged and aftermarket mats with OEM mats only. Right rear safety belt Review strap, belt, and buckle ends for damage or excessive wear. 12 Right rear seat cushion and cover Visually inspect seat cover for excessive wear. If tears or damage are present, repair or replace. Seat cover must be free from any stains. Sit in seat to confirm the cushion is comfortable and not worn out. Right rear headrest, headrest release, and headliner Inspect each item to verify it is free from damage, operates properly, and present. Right rear door lights/reflector Open door and confirm light is operable and reflector is present (where applicable). Right rear window sunshade Raise and lower shade and lock into position. Confirm shade retracts properly. Right rear airbag Inspect cover for damage or deployment. Right rear headliner assist handle Confirm handle is secure, pulls properly, and retracts to rest position. Inspection and Certification Checklist User Guide · Audi of America · 4 / 2012 Audi Certified pre -owned 2 Interior of Vehicle 2.5 Right Front Interior Right front interior trim and door handle With the door unlocked, grasp the handle and open door. Confirm that the handle is firmly connected and not damaged in any way. Right front vanity mirror/light Ensure visor/vanity is free from stains, tears, or damage and that all fasteners are tight. With accessory power on, open vanity and check that the light is functional. Make any necessary repairs. Right front power window/door lock Operate window switch and window in full up and down range. Operate power door lock feature to ensure all doors lock and ulock. Check the pinch protection function. Right front seat controls/power Verify seat responds to all directional commands using all seat controls. Lumbar support function should also be verified. Right front carpet, floor mat, and footwell Ensure the mat securely fastens to its retainers. Inspect condition of carpet, floor mat, and footwell. Look for burns, tears, holes, curling, or excessive wear, noting all needed repairs. Replace damaged and aftermarket mats with OEM mats only. Right front safety belt/height adjuster Review safety belt strap and belt ends for wear or damage. Adjust side height to confirm it slides and locks properly. Right front seat cover and cushion Visually inspect seat cover for excessive wear. If tears or damage are present, repair or replace. Seat cover must be free from any stains. Sit in seat to confirm cushion is comfortable and not worn out. Right front headrest, headrest release, and headliner Inspect each item to verify it is free from damage, operates properly, and present. Right front controls/vents Move directional vents in each direction testing shut-off and direction controls. Right front door lights/reflector Open door and confirm light is operable and reflector is present (where applicable). Right front seat heater and ventilator Activate seat heater and ventilator to confirm proper operation (where applicable). Right front headliner assist handle Confirm handle is secure, pulls properly, and retracts to the rest position. Right front dash Inspect dash area and review condition of dash, trim, and wood. Look for warping or loose fitting areas. Right front airbags Inspect cover for damage or deployment. Glove box, lock, and light Inspect glove box operation and condition. Confirm that the glove box light illuminates and the door locks/unlocks. 13 Inspection and Certification Checklist User Guide · Audi of America · 4 / 2012 Audi Certified pre -owned 3 Exterior of Vehicle 3.1 Front Exterior Front bumper Check that the bumper is level and not damaged from impact or poor body repair. Also, check fasteners and bumper cover for damage. Scratches, dents, and cracks need to be noted. Parking and hazard lights Ensure each bulb is functional and lens covers are free from damage. With hazard button depressed and activated, confirm that each hazard light bulb is in operating condition and free from damage. License plate bracket and filler panel Ensure bracket is present and fastened properly to the bumper. Check to see if the correct screws are used. If holes are drilled in the bumper, make sure bracket or filler panel is put on the vehicle to cover these holes. Install appropriate item for your state. Fog lights (where applicable) Activate fog lamps with headlights in the “on” position. Confirm that lamps function properly and are free from damage. Park sensors (if equipped) Inspect sensors for damage or cracks. Test operation and functionality. Front headlight lens Inspect headlight lens for damage, wear, or cracks. Headlamps high/low beam Activate headlamps and confirm headlights are functional. Also use headlamp setting and confirm high/low beams function properly. Marker lights and turn signals With headlights in the “on” position, confirm that both side marker lights and lens covers function properly and are free from damage. Activate turn signal stalk for both left and right turn signals. Verify proper function and release of stalk from activated position. 14 Headlamp washer spray heads and covers With headlamps on, depress washer fluid feature to verify washer heads properly function. Check washer head covers to ensure proper fit (where applicable). Audi emblem Audi Rings should be securely attached to grill and free from any visible damage or discoloration. Grill condition Grill should be free from any damage, secure, and retain original luster. Lower right fascia grill Inspect grill to verify that it is present and free from damage. Inspection and Certification Checklist User Guide · Audi of America · 4 / 2012 Audi Certified pre -owned 3 Exterior of Vehicle 3.1 Front Exterior (Cont’d) Front tow eye cover Ensure tow eye cover is present and free from damage. Lower center grille Inspect grill to verify it is present and free from damage. Lower left fascia grille Inspect grill to verify it is present and free from damage. Front hood condition and paint condition Review the condition of the paint and clear coat. If visible dents, dings, or chips are present, utilize PDR and touch up paint where necessary. Front end alignment of panels (gaps) This check is to review the fit of the front fenders and the hood. This check is done by looking for consistency in panel gap, fit, and alignment to the front fascia. Windshield glass For safety reasons, be especially careful to review the entire windshield. If cracks, or chips with cracks are present and spreading, replace the windshield. An Audi approved windshield repair technician can repair up to two small windshield chips outside of driver's line of view. If excessive scratches or sandblasting is present on windshield, replace glass. All driver assist functions must function properly. All glass replacement must use OEM glass and must be installed to Audi Brand Specification. 15 Windshield wipers Review condition and functionality of wiper blades to ensure no damage is present. Also, verify wipers properly clean the entire path of the windshield. Windshield wiper arms Inspect wiper arms for damage or corrosion in the hinges. Ensure springs apply proper tension on arm and that both wiper arm bolt covers are present. Windshield washer spray heads Pull washer feature for windshield to verify proper spray pattern and flow from washer heads. Hood release latch operation Pull hood release handle to verify handle, cable, and latch mechanism function properly. Hood should close without additional force and close from 15”-20”. Hood struts Struts should retain hood in the full open position. Replace worn or non-operative struts. Audi Advanced Key Ensure two keyless remotes are present. If not, order appropriately. Ensure all buttons on both keyless remotes function properly, as well as being able to open and lock doors from any handle with the appropriate actions. Ensure keyless start functions for each keyless remote. Also inspect each remote for damage or wear. Replace remotes where necessary or replace batteries as necessary. Inspection and Certification Checklist User Guide · Audi of America · 4 / 2012 Audi Certified pre -owned 3 Exterior of Vehicle 3.2 Left Front Exterior Remote entry Depress unlock/lock button on key fob to confirm that the remote entry locks and unlocks all doors, trunk, and fuel door. Check both remote keys for this function. Left front fender alignment and paint Inspect the condition of paint and clear coat. If dents, dings, or chips are present, utilize PDR and paint touch up where necessary. Ensure door fit and alignment are accurate and a consistent fit is present. Left front side turn indicator light Lens must be damage free and light must be functional. Left A-pillar Inspect A-pillar for cracks, dents, or damage. Pillar and welds should exhibit complete integrity. VIN plate Inspect VIN plate for any signs of prying or tampering with rivets, adhesives, etc. If there is any foul play detected, check under hood and on frame to verify correct VIN number. Verify against the B-pillar FMVSS Sticker and firewall VIN number under the hood. Left front side mirror housing and glass Check function of folding feature, mirror movement with interior control, and condition of glass inside mirror housing. Confirm mirror housing is not scratched or broken from impact. 16 Left front door panel alignment and paint Check over the condition of paint and clear coat. If visible dents, dings, or chips are present, utilize PDR and paint touch up where necessary. Ensure door fit and alignment are accurate and a consistent fit is present. Left front body moldings Inspect for loose or damaged moldings and molding fasteners. Replace where necessary (where applicable). Left front window glass No cracks, chips, or damage will be accepted. If necessary, replace only with OEM glass. Ensure window properly fitted and functions correctly. Left front window trim Trim must be secure and free from dents or visual damage. Driver exterior door handle Handle must be in good working order. Open door when unlocked and pull handle. Driver door lock cylinder (auto up/down/lock) Check driver door lock cylinder in the auto up/down/ lock position. Ensure proper operating order and unlock/lock all doors, trunk, and fuel door. Cylinder should roll down and roll up all windows as well. Perform with both keys (where applicable). Inspection and Certification Checklist User Guide · Audi of America · 4 / 2012 Audi Certified pre -owned 3 Exterior of Vehicle 3.2 Left Front Exterior (cont’d) Left front door hinge and alignment Open door fully and check function of door hinges and positioners. Ensure that door hinges are not damaged or corroded, and are properly lubricated. 17 Left front door side molding Inspect for loose or damaged moldings and molding fasteners. Replace where necessary (where applicable). Left front door seals Inspect door seal to verify seal is secure, pliable, and in good working order. Left front side rocker panel and trim Inspect rocker panel for dents or damage from road debris. Confirm trim is free from damage and secure (where applicable). Left front door sill plate Ensure door sill plate is secure and free from damage, or excessive scratches. Left B-pillar Inspect B-pillar for cracks, dents, or damage. Pillar and welds should exhibit complete integrity. Inspection and Certification Checklist User Guide · Audi of America · 4 / 2012 Audi Certified pre -owned 3 Exterior of Vehicle 3.3 Left Rear Exterior Left rear door panel alignment and paint Inspect the condition of paint and clear coat. If visible dents, dings, or chips are present, utilize PDR and paint touch up where necessary. Ensure door fit and alignment are accurate and an consistent fit is present. Left rear door side molding Molding must be secure and free from damage (where applicable). Left rear body moldings Inspect for loose or damaged moldings and molding fasteners. Replace where necessary (where applicable). Left rear side rocker panel and trim Inspect rocker panel for dents or damage from road debris. Confirm trim is free from damage and secure (where applicable). Left rear door window trim and moldings Trim must be secure and free from dents or visual damage. Left rear door window glass No cracks, chips, or damage will be accepted. If necessary, replace only with OEM glass. Ensure window is properly fitted and functions correctly. Left rear exterior door handle Handle must be in good working order. Open door when unlocked and handle is pulled. Left rear door seals Inspect door seal to verify seal is secure, pliable, and in good working order. Left rear sill plate Ensure doorsill plate is secure and free from damage, or excessive scratches. Left C-pillar Inspect C-pillar for cracks, dents, or damage. Pillar and welds should exhibit complete integrity. Left rear quarter window glass Inspect glass for scratches, cracks, or damage. If necessary, replace only with OEM glass. Confirm glass has proper fit and seal (where applicable). Left rear back window glass Inspect glass for scratches, cracks, or damage. If necessary, replace only with OEM glass. Confirm glass has proper fit and seal (where applicable). Left rear back window defrost element Element on glass must be reviewed for damage and working properly (where applicable). Left rear body panel alignment and paint Check over the condition of paint and clear coat. If visible dents, dings, or chips are present, utilize PDR and paint touch up and repair where necessary. Left rear child lock Open door and engage child lock. Enter rear seat of vehicle from other side and verify handle is inoperable on the left rear interior. Open and disengage lock after testing. Left rear door hinge and alignment Open door fully and check function of door hinges and positioners. Ensure that door hinges are not damaged or corroded and are properly lubricated. 18 Inspection and Certification Checklist User Guide · Audi of America · 4 / 2012 Audi Certified pre -owned 3 Exterior of Vehicle 3.4 Rear Exterior Rear end and tailgate paint Review rear end and tailgate for dents, scrapes, or damage. Park sensors (if equipped) Inspect sensors for damage or cracks. Test operation and functionality. Rear Audi emblem and tailgate trim Emblem must be secure and free from damage. Confirm trim beneath is also secure and free of damage. Rear parking, reverse, fog, hazard and tail lights Review all functionality of bulbs and lenses for proper working condition. Each must be clean and free from damage. Rear window glass Glass should be free from damage and securely in place. If necessary, replace only with OEM glass. Rear marker lamps and turn signals Review functionality of each bulb and confirm damage free. Rear window defrost element Element on glass must be reviewed for damage and proper functionality. Rear brake lights Check bulb functionality and ensure damage free. Rear camera (if equipped) With engine running, put transmission into reverse and ensure that camera is functioning properly and providing quality image. Tailgate hinges, struts and alignment Decklid must open and close with ease and remain in the open position by the struts (test automatic open/ close function where applicable). Trunk seal Check entire seal for tears or loose fit. Trunk/luggage compartment light Confirm light activates when deck lid is opened. Compartment covers, hold down latches and net Covers must be in place and must operate properly. On vehicles equipped with a trunk cargo net, confirm that the net is in good clean working condition and attached to tie-down points. Roadside kit present (where applicable) Open trunk area and panel containing hazard reflector and roadside emergency items. Confirm all items, including jack and tools are present and the secure panel latch is in the closed position. Removable cargo cover On vehicles equipped with a luggage cover, confirm that the cover is present, in good clean working condition, and securely attached (where applicable). 19 Rear bumper Inspect for damage, alignment, and any evidence of collision damage or improper repairs. Rear exterior trunk release Lever must be in good working order. Open trunk when unlocked and lever is pulled. License plate bracket and light Verify bracket is present, secure, and includes all screws. With headlamps on, verify rear license plate lamp is functional. Rear window wiper Review wiper for proper cleaning path and wear (where applicable). High-center third brake light Check bulb functionality and ensure damage free. Rear window wiper arm Inspect wiper arms for damage or corrosion in the hinges. Ensure spring applies proper tension on arm and that wiper arm bolt cover is present (where applicable). Rear window washer/spray head Activate window sprayer to confirm proper spray pattern and flow of washer solvent (where applicable). Boot cover (Cabriolet/Roadster) Confirm that the Roadster boot cover is present, free from damage and properly stowed. Cabriolet boot cover should operate smoothly and be clean and damage free. Inspection and Certification Checklist User Guide · Audi of America · 4 / 2012 Audi Certified pre -owned 3 Exterior of Vehicle 3.5 Right Rear Exterior Right rear quarter panel alignment and paint Check over the condition of paint and clear coat. If visible dents, dings, or chips are present, utilize PDR and paint touch up where necessary. Ensure door fit and alignment are accurate and a consistent fit is present. Right rear panel trim pieces and moldings Trim must be secure and free from visual damage. Fuel door, rubber stops, and fuel cap Inspect door for proper function. Open and close to ensure that the rubber bumpers are present and functional. Ensure the cap seals properly and clicks when fully tightened. Right rear back window glass Inspect glass for scratches, cracks, or damage. If necessary, replace only with OEM glass. Confirm glass has proper fit and seal (where applicable). Right rear quarter window glass Inspect glass for scratches, cracks, or damage. If necessary, replace only with OEM glass. Confirm glass has proper fit and seal (where applicable). Right rear door paint and gap alignment Review surface areas for scratches, cracks, or damage. Confirm door panel has a consistent fit around other panels. Right rear exterior door handle Handle must be in good working order. Open door when unlocked and handle is pulled. Right rear child lock Open door and engage child lock. Enter rear seat of vehicle from the other side and verify handle is inoperable on the right rear interior. Right rear sill plate Ensure doorsill plate is secure and free from damage or excessive scratches. Right rear door hinge and alignment Open door fully and check function of door hinges and positioners. Ensure that the door hinges are not damaged or corroded and are properly lubricated. Right C-pillar Inspect C-pillar for cracks, dents, or damage. Pillar and welds should exhibit complete integrity. Right rear side rocker panel and trim Inspect rocker panel for dents or damage from road debris. Confirm trim is free from damage and secure (where applicable). Right rear door window trim and moldings Trim must be secure and free from dents or visual damage. Right rear door window glass No cracks, chips, or damage will be accepted. If necessary, replace only with OEM glass. Ensure window is properly fitted and functions correctly. 20 Inspection and Certification Checklist User Guide · Audi of America · 4 / 2012 Audi Certified pre -owned 3 Exterior of Vehicle 3.6 Right Front Exterior Right B-pillar Inspect B-pillar for cracks, dents, or damage. Pillar and welds should exhibit complete integrity. Right front door panel paint and gap alignment Inspect the condition of paint and clear coat. If visible dents, dings, or chips are present, utilize PDR and paint touch up where necessary. Ensure door fit and alignment are accurate and an consistent fit is present. Right front exterior door handle Handle must be in good working order. Open door when unlocked and pull handle. Right front door lock Confirm door-locking mechanisms engage properly preventing doors from opening from the outside. Right front sill plate Ensure doorsill plate is secure and free from damage or excessive scratches. Right front door hinge and alignment Open door fully and check function of door hinges and positioners. Ensure that door hinges are not damaged, corroded, and are properly lubricated. Right front door seals Inspect door seal to verify seal is secure, pliable, and in good working order. Right front side rocker panel and trim Inspect rocker panel for dents or damage from road debris. Confirm trim is free from damage and secure (where applicable). 21 Right front window glass No cracks, chips, or damage will be accepted. If necessary, replace only with OEM glass. Ensure window is properly fitted and functions correctly. Right front window trim and moldings Trim must be secure and free from dents or visual damage. Right side mirror housing and glass Inspect function of folding feature, mirror movement with interior control, and condition of glass inside mirror housing. Confirm mirror housing is not scratched or broken from impact. Right A-pillar Inspect A-pillar for cracks, dents, or damage. Pillar and welds should exhibit complete integrity. Right front marker light Review marker light and lens to ensure both are free from damage and fully operable. Right front trim pieces and moldings Trim must be secure and free from visual damage. Right front fender alignment and paint Inspect the condition of paint and clear coat. If dents, dings, or chips are present, utilize PDR and paint touch up where necessary. Ensure door fit and alignment are accurate and a consistent fit is present. Inspection and Certification Checklist User Guide · Audi of America · 4 / 2012 Audi Certified pre -owned 3 Exterior of Vehicle 3.7 Top Exterior Sunroof glass and seals (test for leaks) Fully open and close roof panel to ensure proper function. Observe top area of vehicle and inspect to ensure sunroof glass is free from damage. Verify the sunroof drains are free from debris and drain properly. Check for leaks during car wash. Roof panel/luggage rack Ensure painted roof surfaces are free from dents, scratches, etc. Inspect rails and tie down areas for any damage. Ensure roof panel under rack and rails are free from any damage (where applicable). Convertible top (Cabriolet and Roadster) Inspect outside fabric for tears, stains, or damage. Inspect outer seals and sill near rear of the top to confirm proper fit and seal. Open and close top to confirm proper operation. Windscreen operation (Cabriolet and Roadster) Verify that the windscreen is present, free from damage, and operates properly. Raise and lower TT windscreen checking for proper operation. Insert A4 Cabriolet Windscreen into slots and ensure it opens locks and functions properly. Roof antenna/SIRIUS®/Nav housing Inspect roof antennas to ensure they are secure and free from damage. Satellite radio antennas will also need to be inspected to confirm they are secure and free from damage (where applicable). 22 Inspection and Certification Checklist User Guide · Audi of America · 4 / 2012 Audi Certified pre -owned 4 Engine Compartment 4.1 Engine Under hood insulation Insulation must fit snug and all fasteners should be holding material firmly to the under side of the hood. Inspect cowel drains for debris and proper operation. Engine compartment labels – EGR/PCV Confirm EGR, PCV, and emission stickers are present. Air filter – Check for oil Open canister and pull filter. If dirty, replace or follow scheduled maintenance guidelines. Check for oil for indication of blow back issue. Aftermarket is not acceptable. Tire pressure and recommended fuel label Stickers are located under the hood and behind the fuel door. Dust and pollen filter (HEPA) Check filter and intake for excess dirt or debris. Remove any debris and inspect filter. Replace as needed or per the scheduled maintenance guidelines. Use only OEM filters. Covers – Engine compartment/cowl cover/emblems Inspect all beauty covers for secure fit and ensure that they are free from damage. Make sure set screws are all locked and that Audi emblem on engine cover is not damaged. Accessory belt Inspect belt for premature cracks or damage to surface area. Some small cracks may be present on backside. Replace if needed and follow scheduled maintenance guidelines. Power steering, engine oil, and washer reservoir caps Check fluid levels and condition. Ensure all caps are firmly closed and not damaged. Timing belt/chain (per maintenance schedule) Inspect timing belt especially on vehicles with more than 50,000 miles. Follow scheduled maintenance guidelines closely. Timing belt should be changed if visible wear is present or if not completed under scheduled maintenance. Check for water in oil (check underside of oil filler cap) Unscrew cap and review the underside forcondensation. Also look for carbon build up. Note any concerns. Fuel injection system, fuel filter/lines Inspect fuel lines to each cylinder from fuel injection pump housing for signs of leaks. Inspect fuel rails for damage or leaks. Throttle linkages/"E-Gas" (or throttle by wire) Inspect all throttle linkage points to ensure cleanliness and proper lubrication at joints. Inspect throttle by wire housing to confirm proper operation. 23 Inspection and Certification Checklist User Guide · Audi of America · 4 / 2012 Audi Certified pre -owned 4 Engine Compartment 4.1 Engine (Cont’d) Power steering pump/hoses Inspect pump housing and bearing housing for leaks. Inspect high pressure hydraulic hose to rack for any evidence of leaking. Power steering fluid level Remove fluid cap to examine for proper level. Add fluid if necessary. Windshield washer fluid level Review reservoir and fluid supply line. If reservoir is low, top off with approved washer solvent. Check all hoses for air and fluid leaks Review the engine compartment for evidence of fluid leaks and note concerns. Identify origin of leaks and proceed with necessary action to repair (check belly pan to find and trace leaks). Check oil on dipstick for level and condition Pull the dipstick and review oil level. It is important to note if the vehicle is running on low oil levels. Also check oil for the presence of contamination. Engine mounts (top area) Inspect top of engine mounts and bolts. Make note to replace damaged or worn mounts. All engine and transmission seals and gaskets Look for leaks that are flowing or beginning to flow. Some seepage may occur on some engine models. Consult your Service Manager when necessary. A/C compressor/lines/condenser Review A/C system for proper function and pressure. Test using appropriate VAS Audi handheld tester. Review all A/C lines for damage or leaks. Confirm compressor operates and engages properly. 24 Inspection and Certification Checklist User Guide · Audi of America · 4 / 2012 Audi Certified pre -owned 4 Engine Compartment 4.2 Cooling System Engine coolant reservoir cap Inspect cap (while car is not hot) to ensure it maintains a proper seal and pressure. Engine coolant level Inspect reservoir level to confirm proper fill level. Add where necessary and inspect. Cooling system pressure test (Check for leaks) Using VAS pressure test tool, conduct pressure test on cooling system. Radiator hoses upper/lower & heater hoses Check upper and lower radiator hoses for bulging, leaks, or damage. Inspect supply and return lines to heater core for leaks or wear. Cooling fan Check electric cooling fans for proper engagement and function. Cooling fan motor Listen to the sound of the electric motor for evidence of shorts or worn bearing. Radiator cap Inspect cap and confirm it properly holds pressure and fluid (where applicable). Radiator/thermostat Check housing for leaks and inspect if car is over heating to confirm worn or corroded thermostat. Upper core support, radiator housing Upper core support should be firmly mounted and attached to radiator bracket. Water pump/belt (noise/leaks) Inspect water pump for leaks at shaft or rear seal at engine block. Accessory belt should operate quietly on the water pump pulley (where applicable). Test coolant for protection temperature Use hydrometer to ensure proper coolant concentration and freezing point. 25 Inspection and Certification Checklist User Guide · Audi of America · 4 / 2012 Audi Certified pre -owned 4 Engine Compartment 4.3 Transmission 4.4 Electrical System 4.5 Brake System 4.3 Transmission system condition Inspect transmission to ensure all mounts, linkages, and lines are free from damage. Transmission fluid auto/manual (leakage check) Perform all routine schedule maintenance, road test, and leakage inspection to ensure proper transmission fluid, condition, and levels. 4.4 Battery condition -location varies by model This will be confirmed by the Midtronics test in terms of battery life. You should also check the battery case and mount to ensure both are in proper working condition. Alternator charging (warning light) The instrument panel will display the battery symbol if the vehicle is not properly charging. Battery will drain requiring recharge. Inspect all harnesses for abnormal wear and tear Check all ties, covers, fasteners, and wiring for proper routing and any abnormal wear or damage. Replace all necessary parts and wiring. 4.5 Brake fluid reservoir cap Inspect cap to ensure it is tight and free from damage. Brake fluid level / condition Confirm fluid is at the full mark and clean. Add only Audi approved fluid. Brake master cylinder and booster Inspect both the master cylinder and booster unit to confirm proper operation and that both are free from leaks. 26 Inspection and Certification Checklist User Guide · Audi of America · 4 / 2012 Audi Certified pre -owned 5 Road Test 5.1 Engine, Drivetrain, and Operation Starter operation/starting (cold/hot) Starter should engage and turn engine over with ease. Fuel pump noise Fuel pump noise is typically heard on Audi vehicles during ignition on as pump builds pressure to system. If there is abnormal or loud noise, further inspection is required. Engine performance idle/noise/vibrations Engine should run smoothly without clunking, or sputtering. Vibrations should be noted and corrected. Smooth acceleration/deceleration Conduct stop and go test at different speed intervals. Vehicle must accelerate smoothly with no hesitation or sputtering. Transmission and shift points Transmission, manual or automatic, should shift smoothly without difficulty. Automatic shift points should be concise and without gear searching, etc. Test shift paddle operation if equipped. Transmission/transaxle noise (cold/hot) Engage transmission into gear and listen for concise shift points and reaction times. Transmission and transaxle should operate without hesitation or gear searching. No excessive noise should come from either component. Grinding, clunking, and audible whining should not be heard. Check operation for both components in both cold and hot operational temperatures. Shift interlock Interlock should release with the brake depressed. Clutch operation Clutch pedal should have about 1” of free play and allow transmission to be shifted into gear with ease. Pedals that require full floor depressing should be adjusted or repaired to specification. Brakes (operation/noise/pulling/pulsating) Brakes should be tested on a smooth level road only. Listen for squealing, grinding, or clunking. Brakes should not pull or pulsate. ABS function On safe level surface, do a hard stop to ensure ABS system activates and controls vehicle direction. Steering wheel should maintain a straight course. Steering/tracking/pulling/play in the wheel On level road, examine vehicle steering qualities. Ensure vehicle steering tracks a straight line and will hold fast. The car should not pull or have play in the steering. Suspension noise/performance While driving, the suspension should not make noises or exhibit noise from worn front-end parts. Car should stay level and be free from excessive nose-diving or wheel hop. Vehicle ride, vibration, and overall drivability Confirm that the vehicle or steering wheel does not vibrate or shake. Check for vibrations from worn parts, dirt in wheels, etc. Speedometer, odometer, trip meter function Confirm that each instrument clocks accurately and tracks mileage properly. Navigation system DVDs/CDs present and function Set destination on navigation system and test each independent feature. Clear history of all previously set destinations. Ride, wind, door noise, rattles, etc. With the radio off and windows up, listen for any noises that would compromise the ownership experience. Test all driver assist features This includes but is not limited to LDW, ACC, Side Assist, Head-up Display, Rear camera, Park assist. Exhaust noises/odors Listen for exhaust leaks from manifold, down pipes, and straight pipes. With the vehicle stopped, roll window down to smell for odors from the exhaust system. Sulfur odors usually reveal converter problems or bad fuel. 27 Inspection and Certification Checklist User Guide · Audi of America · 4 / 2012 Audi Certified pre -owned 6 Under the Vehicle 6.1 Undercarriage Bumper flanges and brackets Inspect bumper flanges and mounting bracket for evidence of collision damage that has not been properly repaired. Brackets and flanges should be secure, in place, and free from impact damage. Brake lines Follow the full length of the brake lines along the under belly. Inspect to make sure brake lines are not dented, smashed, or leaking throughout the entire under carriage. Frame spot welds and seams (cracked or stressed) Remember that a vehicle is not eligible for certification if it has any evidence of frame damage OR repair. Review Audi Space Frame or uni-body sections of the undercarriage for evidence of cutting from collision repair, dents, cracks, etc. that may indicate vehicle abuse or frame damage. Spot welds will be uniform in appearance and will not be separated. If spot welds are separated, there is a chance of collision or severe damage to the vehicle. Report damage to manager for further determination. Inspect seams for cracks or stresses. Ensure seam sealer from the factory is consistent in application. Wavy smears in seam sealer is a good way to catch prior collision damage. Seams can be damaged from collision or poor repair. Check seems for stress breaks as well. Bottom of front and rear bumpers (visual damage) Inspect for damage from parking blocks, road hazards, or off-road driving. Covers, fasteners, and splash shield should all be secure and free from damage. Sheet metal (deformities) Undercarriage sheet metal at rear and mid-section of body will be smooth and free from any buckles or wrinkling. Water damage evidence Inspect undercarriage. If any water lines or sediment are found in sub-frame or uni-body rails, the vehicle could have been in a flood zone. Checking the seat tracks is also a good indication of flood damage. Notify your Service Director. Front sub-frames Inspect sub-frames for damage of any kind (cradle). Front side aprons The area under and around the front fender wells must be inspected for damage. Center support bearing Inspect the quattro drive shaft support bearing: Grasp shaft and check for wear at bearing (quattro® driveshaft). 28 Lower splash shield Use the splash shield to find leaks. Drop the shield and look for oil, coolant, brake, or transmission fluid. Shield should not be damaged and should be held in place by all of the fasteners. Lower engine mounts Engine mounts must be sound and have no free play. Inspect for cracks, leaks, or worn bolts and replace as needed. Lower radiator hoses Inspect hoses for bulging, leaks, or wear at clamp ends. Ensure clamps are tight. Suspension arms and CV joints Check all suspension arms for free play. Joints on suspension arms should have bushings that do not squeak or allow play in the suspension. Sway bars/links/bushings Check all sway bars, links, and bushings for wear or free play. Struts, shocks, and springs Check struts for leaking. Springs should be mounted inside of strut towers and provide proper lift to vehicle. Control arms, and steering rack Control arms should not have free play or wear in joints. Steering rack should be free from leaks and damage. Inspection and Certification Checklist User Guide · Audi of America · 4 / 2012 Audi Certified pre -owned 6 Under the Vehicle 6.2 Exhaust System 6.3 Transmission/Differential/ Transaxle 6.2 Hangers and clamps Rubber hangers and sectional clamps should be solid and be free from excessive corrosion, tears, or separation. Exhaust pipes, catalytic converter, and heat shield Pipes should be free from rust or excessive corrosion. Catalytic converter should be mounted securely and free from corrosion. Heat shields must be mounted securely and free from damage. Check for leaks With car up and running, check entire system for leaks. 6.3 Rear axle fluid level Top off where applicable. Engine/Transmission/Differentials/Transaxle seals and gaskets Confirm no leaks and fully operable. Transmission lines Lines must be free from damage or leaks. Axle housing/final drive Check the unit housing over for leaks or damage. Final drive seals should be inspected for leaks. Transmission/mounts/control linkages Inspect mounts for wear or damage. Control linkages and control module wiring harnesses should be inspected carefully. Differential/Torsen®/quattro® Inspect mounts and components for excessive wear, damage, and play. Inspect transmission fluid level and condition Note condition of fluid and perform transmission service if appropriate. Ensure fluid level is to specification. 29 Inspection and Certification Checklist User Guide · Audi of America · 4 / 2012 Audi Certified pre -owned 6 Under the Vehicle 6.4 Tires and Wheels As important as it is in providing premium performance in every one of our Audi Certified pre-owned vehicles, it is equally as important to provide premium performing replacement parts when completing the Audi Certification Process. Ride quality and driving performance are paramount Audi brand attributes and should never be compromised when equipping our vehicles with replacement tires and wheels. When completing the Audi Certification and Inspection Checklist, it is important to note that Audi of America does not recommend nor stand behind the application of sub-par or secondary tires and wheels in its certification process. Only OEM/OEA tires and wheels are acceptable in the Audi Certification Process. Applying non-OEM/OEA spec tires and wheels not only puts the vehicle outside of the certification qualifications, but also jeopardizes the customer experience. To ensure proper application of OEM/OEA replacement tires and wheels, the Audi Tire Center should be utilized in all aspects of tire and wheel installation for the purpose of Audi Certified pre-owned vehicles. Providing a premium experience in itself, the Audi Tire Center provides dealers with many benefits outside of OEM/ OEA equipment including dealer resources, warranty assistance, and rebate programs. The Audi Tire Center website can be found on AccessAudi under the Parts tab, or at the address below: http://www.auditire.com/DealerTire/index cfm?event=alliance:home 6.4 Chart Inner Middle Wheels: Approved size*/match/finish/free of damage Check for excessive run out, and curb damage. Inspect wheels for drive flat damage, finish damage from acid wheel cleaners, and ensure that all four match correctly. Only OEM/OEA Audi wheels are acceptable. Wheel specifications must match tire placard located on vehicle. Tires: Approved size & spec*/matching brand (4)/free of damage A Presently Fitted – Only OEM/OEA tires meeting the approved size and spec*/with matching brand (4) and free of damage as described by the tire placard on the A or B pillars are acceptable. Vehicles fitted with nonmajor brands or sub-performing tires not carried by the Audi Tire Center regardless of tire measurement will not be permitted for use in the certification of any Audi vehicle. B Replacement – Audi of America recommends that vehicles requiring tires for the Audi Certification Process be sourced from the Audi Tire Center. C Snow Tires (WIN) and Secondary Requirement (SEC) tires are not permitted in the Audi Certified pre-owned process. Should you require additional assistance into the specification or qualification of a tire or wheel, please contact your local Area Team or your Regional CPO Manager. Record: Tread depth (5/32 or better)/pressure/size, speed & load rating/DOT # Fill in all fields Outer Pressure Size Load/ Speed DOT# LF LR RF RR Spare 30 Inspection and Certification Checklist User Guide · Audi of America · 4 / 2012 Audi Certified pre -owned 6.5 Brakes Parking brake cable and connection tension Parking brake cable must be mounted securely under the vehicle and free of damage from lifts, road hazards, and corrosion. Tension should be adjusted where necessary. Brake calipers and hoses Inspect calipers for seizing, damage, and confirm that they are mounted securely. Supply hoses should be checked to ensure they are set tight and free from damage. 6.5 Chart 31 Record: Brake pad and rotor requirements Must have 50 percent of friction material remaining. Please refer to Service Manual on ElsaWeb for pad and rotor measurements as well as the minimum allowed wear and replacement specifications. Record measurement results for brake pads and rotors. Check electric parking brake (EPB) for proper operation Ensure wires to caliper are properly secured and undamaged. Inspect caliper to ensure undamaged and no foreign matter is present. Front left mm Rear left mm Rear right mm Front right mm Pad thickness (50% Min) Rotor thickness (ELSAWeb) Inspection and Certification Checklist User Guide · Audi of America · 4 / 2012 Audi Certified pre -owned 6 Under the Vehicle 6.6 Fuel Tank and Lines Fuel tank and holding straps Inspect fuel tank for leaks, damage, and confirm that mounting straps are sound and tightly fastened. Fuel line Follow fuel line from tank to engine compartment to check for damage or leaks. Fuel filter (if not lifetime filter) Follow scheduled maintenance or replace if necessary due to no-start condition. 32 Inspection and Certification Checklist User Guide · Audi of America · 4 / 2012 Audi Certified pre -owned 7 Signatures (Required) All items check "Repaired" have been thoroughly inspected and repaired by a registered Audi Certified Technician with genuine Audi approved parts. The undersigned Audi Certified Technician also confirms that all diagnostic trouble codes are remedied, cleared and that the maintenance booklet is up to date. All warning lights are off and service books are up to date. The signing technician also attests to the fact that all warning lights are off, no open fault codes exist AND all service books are, or have been brought up to date. Signatures of approval required The Inspection & Certification Checklist must be signed and dated. Approval signatures are required of the Audi Certified Technician, Audi Service Manager, and Audi Certified pre-owned Manager to ensure that all items checked “Repaired” have been thoroughly inspected and repaired by a registered Audi technician with genuine Audi approved parts. Important: The above approval signatures must be completed for a vehicle to be entered into the Audi Certified pre-owned program. 33 Inspection and Certification Checklist User Guide · Audi of America · 4 / 2012 Audi Certified pre -owned Appearance Standards for Proper Reconditioning Exterior The exterior of the vehicle must be free from dents, dings, or scratches in all surface areas of the vehicle. Repair all paint chips penetrating the base paint or that exceed ¼”. Paintless Dent Repair Determine if minor body and door dings can be repaired using the paintless dent removal process (aluminum body panels not applicable to this process). Scratches Scratches that are through the clearcoat and basecoat should be repaired. Light scratches that do not penetrate the basecoat can be wet sanded. Scratches that are more than one inch or scratches that have a penetrated clear coat and base coat should be repaired. Interior Damaged interior components such as center consoles, gloveboxes, ashtrays, etc. should be repaired if not in proper working order. Burns, tears, and stains should also be repaired by a qualified repair technician. Paint and Body Paint should be consistent in texture and color. Orange peel and fish eyes from paint repair must be addressed. Remove and buff all paint transfer. Body must be free from frame damage or excessive collision damage. Excessive Collision Damage Providing vehicles that deliver exceptional performance and high quality are paramount to the Audi Certified pre-owned program. Metal panels that are misaligned or have a wave like appearance, mismatched paint or having finish inconsistencies, damaged flanges, broken spot welds, deformities in sheet metal, structural damage are all signs of excessive collision damage and/or sub-standard repairs. As an authorized Audi technician it is your responsibility to maintain the level of integrity in potential CPO vehicles by inspecting and ensuring against evidence of excessive collision damage and/ or sub-standard repairs. Should a vehicle exhibit evidence of excessive collision damage and/or substandard repairs (regardless of the current Vehicle History Report) stop and notify dealer management immediately as the vehicle is ineligible for certification. Should you require additional assistance, please contact your local Area Team or your Regional CPO Manager. General Repairs Vinyl, leather, glass, and carpeting that reflect visible damage or compromise the aesthetics of the vehicle must be repaired. Glass A maximum of two windshield chip repairs are permitted if not in driver's line of sight. Cracks, scratches, or chips in excess of ¼” warrant replacement. All glass replacement must be performed with OEM glass. Final Detail Use a detail brush to remove any residual waxes or compounds from any and all crevices, door jambs, and crevices. Inspect mouldings and chrome for any spotting. 34 Inspection and Certification Checklist User Guide · Audi of America · 4 / 2012 Audi Certified pre -owned