1
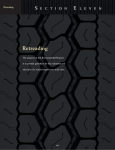
Installation
Guide
L30040 5/08
Rev. 5
HALDEX TRS
(Trailer Roll Stability )
Installation / Service Manual
for 4S/2M and 2S/2M Systems
$ 7.00
Technical Service
and
Engineering Support
In the U.S. please call:
1-800-643-2374 (press 2)
In Canada, please call:
1-800-267-9247
(www.hbsna.com)
IMPORTANT NOTICE
The data listed herein is correct to the best of Haldex’s knowledge and belief, having been
compiled from reliable and official sources of information. However, HALDEX CAN NOT
ASSUME ANY RESPONSIBILITY for possible error or misapplication of the product. Final
determination of the suitability of the products for the use contemplated by the Buyer is the
sole responsibility of the Buyer. Haldex shall have no responsibility in connection with this
suitability.
IMPORTANT NOTICE
The description and specifications contained in this Installation Manual are current at the
time of printing. Haldex Brake Products Corp. reserves the right to discontinue or modify
its models and/or procedure and to change specifications at any time without notice.
Page 1 Rev. 5
Table of Contents
Section
Page
General Operation............................................................
System Components........................................................
System Overview..............................................................
Plumbing Schematic.........................................................
Mounting of ECU/Modulator and PLC Power Adapter.....
Plumbing of Modulator Air Valve.......................................
Electrical Wiring Overview................................................
Electrical Connections of ECU/Modulator Assembly........
Wheel End Speed Sensors and Cables...........................
Paint Preparation..............................................................
Service..............................................................................
Diagnostic Tools................................................................
Test after Installation.........................................................
ABS Light Faults...............................................................
Diagnostic Trouble Code List............................................
Odometer Setting..............................................................
Wheel Scale Chart............................................................
Mounting Pattern Template...............................................
3
4
5
6
7-9
9-11
12
13 - 15
16 - 18
19
19
20 - 22
23
24
25 - 27
27
28
29
This installation manual describes the correct installation procedures for the Haldex TRS
(Trailer Roll Stability) for trailers.
Safety First !
Please follow your company’s safety procedures when you install this equipment. Be sure
that you understand all instructions before you begin.
Note: Remove all air pressure and electrical power from the brake system before beginning
work.
Page 2 Rev. 5
General Operation
Haldex TRS is the latest offering in a full line of Haldex trailer ABS systems. Haldex TRS
provides a further enhancement in safety by detecting the potential of trailer rollover. Haldex
TRS continually monitors the trailers vehicle speed, air suspension pressure, and lateral
acceleration along the vehicle’s roll axis. If the Haldex TRS determines that a rollover
threshold is reached a series of light brake applications are applied to the side of the vehicle
lifting off the ground. If the wheel slip on the unloading side exceeds a threshold the system
automatically applies a heavy brake application on the opposite side. Vehicle stability is
achieved by reducing the vehicle speed to a “Safe Harbor” range.
The Haldex TRS product is compatible with all towing vehicles and is compliant with
FMVSS121 providing the ABS functionality through either permanent or stoplight power;
permanent power is required for the roll stability feature. In the event of power failure, as with
other ABS systems, Haldex TRS defaults to a standard service brake system.
A Haldex TRS system may be used on most air suspension equipped semi-trailer
configurations with 1 to 3 axles, and may be used in either 4 sensor 2 modulator (4S/2M)
or 2 sensor 2 modulator (2S/2M) applications plumbed in a side-by-side configuration only,
using either disc or drum brakes. For other vehicle configurations contact Haldex
Engineering Support. TRS may be used on B-trains, full trailers pulled by tractors or straight
trucks. Not on doubles or triples using A-frame dollies.
The Haldex TRS product MUST NOT be installed on center-axle trailers, full trailers, or
semi-trailers and dollies equipped with mechanical spring suspension. For vehicles with
axle spreads greater then 72” inches contact Haldex Engineering Support.
VEHICLE REQUIREMENTS:
- Constant (permanent) power # 7 Pin Blue wire on J560 connector.
- LED stop lamps (because the stop lamps are illuminated during a rollover event)
- Air Suspension
Warning:
The Haldex TRS product can help reduce the potential risk of rollover in conjunction with
good driving practices. Driving too fast for conditions may still result in a rollover even with a
Haldex TRS equipped trailer. Safe driving remains the most important element in accident
prevention. Failure to drive safely can result in serious personal injury and/or damage to
property.
Page 3 Rev. 5
System Components
“See Haldex Trailer ABS Service Components Catalog L20243
for additional information on Haldex ABS Products”
Haldex Supplied Items
Required / Optional Supplier Section
90° Sensor
ECU/Modulator
Assembly
Trailer Brake
Control Valve
TRS Power
Cord w/Stop
Light Activation
LED Stop Light
Speed Sensor
Cable Extensions
Diagnostic Cable
Sensor Clip
ABS Lamp
Optional Installation Aids
Diagnostic Tools
Software
PC Cable
PC Diagnostics Kit
(PC not included)
7-Way
Diagnostic Connector
3-Way Clip
Hose Clip
Basic TRS Power Cord
INFO CENTER
TRS
HALDEX
TRS Info Center
Tie Strap
Sensor Clip
Page 4 Rev. 5
System Overview
Haldex TRS
Front of Vehicle
Key Installation Points for the Haldex TRS unit:
1.
2.
3.
4.
5.
6.
7.
8.
9.
TRS Valve and ECU preferred location is: centered between axles, centered
between frame rails and as close to the trailer floor as possible
ECU must face toward the “roadside” of the vehicle
Side-by-Side plumbing - Delivery Ports on Valve 21 used for “RoadSide”, Delivery
Ports on Valve 22 used for “CurbSide”
Plumbing is similar to an ABS relay valve except Port 41 is added, which
connects to the air bag circuit
Plug unused pneumatic delivery ports on the modulator
Plug unused electrical ports on the ECU
Make sure sensor and connectors lock into the side holes of the ECU
Make sure ECU Slidelock Lever is closed and in the locked position
Leave some slack in sensor cables to accommodate movement between
components and trailer suspension
Page 5 Rev. 5
Haldex TRS Unit Overview
All dimensions in inches
Overall Height = 6.5
5.9
Ground lug
washer
6.36
5/16” Dia. Holes (4)
7.25
10.5
5. Drill the ECU/Modulator 4 hole mounting pattern into the crossmember. Use 3/8 drill bit.
See page 29 for a mounting pattern template.
6. Mount the unit to the crossmember with rust resistant 5/16” x 2 1/4” long bolts, SAE Grade
5 or better, with washers and locking nuts. Torque the mounting bolts to 15 ft-lbs
maximum. Washers to be used on the modulator and crossmember.
3/8” NPT Control Port 4
with serviceable metal
screen filter
Weight = 11.5 lbs
2 modulators (21, 22)
Detachable ECU
3/8” NPT Suspension Port 41
air bag symbol near port
3/8” NPT Delivery
Ports 22 for
“Curbside” service
chambers
3/8” NPT Delivery
Port 21 for
“Roadside” service
chambers
Note:
Plug all un-used “Delivery Ports”
3/8” NPT Delivery Ports
21 for “Roadside” service
chambers
1/2 NPT Reservoir Port 1
Page 6 Rev. 5
Mounting the ECU/Modulator Assembly
3 Axle Trailer
2 Axle Trailer
3 ft
1 Axle Trailer
3 ft
ECU/Modulator Assembly
1. Locate unit inside frame rails, it can be offset to the side if necessary
2. Tandems - locate unit within +/- 3 ft of the center of the axle spread
3. Tridems - locate unit close to center axle for brake balance
4. Locate unit as high up to the trailer floor as possible
Back of Trailer
Haldex ECU/Modulator Assembly
should be mounted vertically.
This angle shown
must not exceed
± 3°
3°
up
3°
ECU must face
roadside
Roadside
5°
Bottom View - Looking up
The angle shown must not exceed: ± 5°
Page 7 Rev. 5
5°
Mounting the ECU/Modulator Assembly
(Bottom View Shown)
The ECU/Modulator assembly must be frame mounted on a rigid structural member as high
in the chassis as possible to protect the unit from direct spray and other road debris. The
exhaust ports should be down and ECU facing the “roadside” of the vehicle. This unit should
“NOT” be in the direct spray of high pressure washing.
Exhaust Ports
ECU/Modulator Assembly
Ground Lug Located on this Side
ECU faces “RoadSide”
TRS Power Cord
w/Stop Light Activation
1. Determine the center of the axle(s) spread where the ECU/Valve Assembly will be
installed as shown on page 7.
2. Look for a rigid cross member within ± 3 feet of this center to mount the ECU/Modulator
Assembly. It may be necessary to straddle two cross members with a metal mounting
bracket, 3/16” minimum thickness. If bracket is to be painted, mask off the area on the
bracket where the modulator ground lug washer is located.
3. The side-to-side (roadside to curbside) position should be within the frame rails as shown
on page 7. It is permissible to offset the unit to one side as long as sufficient clearances
exist for airline and electrical cabling connections.
4. The ECU must face the roadside of the vehicle and be level as shown on page 7.
5. If the Power Cord with Stop Light Activation is selected, secure the electronic module
by fastening it to the trailer frame with P-clamps, tie-straps, etc.
Page 8 Rev. 5
TRS Plumbing Schematic
Note:
Delivery Hose shown in
“Blue” shall be attached
to Modulator 21 ports to
“Roadside” chambers
and Modulator 22 ports to
“Curbside” chambers.
Port #1 from valve
to air tank should
be 3/4” tubing.
ECU/Modulator
Assembly
Trailer Brake
Control Valve
Plumbing Schematic (4S/2M)
Sensor S2B
(Curbside)
Sensor S1B
(Curbside)
Front of Trailer
Port 1
Service/Control
Port 22
Port 22
Port 41
Emergency/Supply
Port 21
Port 21
Trailer Brake Control Valve
Haldex TRS
Electronic
Control Unit
(ECU)
Sensor S1A
(Roadside)
Legend:
Service/Control Line
Emergency/Supply Line
Air Bag Line
Sensor S2A
(Roadside)
Note:
Haldex TRS with ECU facing “RoadSide”
AIR BRAKE COMPONENTS AND SYSTEM SCHEMATIC ARE DESIGNED TO ALLOW COMPLIANCE
WITH FMVSS121.
THIS SCHEMATIC IS FOR INFORMATION PURPOSES ONLY. IT IS THE VEHICLE
MANUFACTURERS ULTIMATE RESPONSIBILITY TO CERTIFY THEIR SYSTEM MEETS ALL
APPLICABLE REGULATIONS.
PIPE NIPPLES USED TO MOUNT BRAKE VALVES MUST BE HEAVY WALL TYPE PER SAE J514.
Page 9 Rev. 5
Plumbing the Modulator Air Valve
viewed from bottom
Reservoir Tank
Curbside
1. Reservoir port plumbing shown in red:
plumb 3/4” O.D. tubing between the
reservoir tank and the modulator reservoir
port 1.
2. Delivery ports plumbing shown in blue:
attach delivery hoses from modulator 21
ports to “roadside” chambers. Attach delivery
hoses from modulator 22 ports to “curbside”
chambers. Plug unused delivery ports. Use
thread sealant sparingly on all fittings.
(Loctite ST565 or similar). DO NOT use
teflon tape on fittings, it can break and
contaminate the air system.
Front
of
Trailer
Roadside
3. Control port plumbing shown in blue: From the gladhand connect the modulator control
Port 4 to the Trailer Brake Control Valve port as shown by installing a tee fitting into the
TRS modulator.
Gladhand
Haldex TRS
Trailer Brake Control Valve
Control Port 4
Tee
Control Port
Service/Control Line
Page 10 Rev. 5
Plumbing the Modulator Air Valve
Suspension (Air Bags)
4. Suspension port plumbing: connect the modulator suspension port 41 to the delivery side
of the leveling valve. This connection can be made by adding a tee to the delivery port of
the leveling valve or the connection can be made by cutting the synflex tubing of the air
bag circuit and adding a tee.
Air Bag Symbol
Port 41
Page 11 Rev. 5
Electrical Wiring Overview
(Basic Power Cord)
Trailer
ABS Power
Connector
Note: All electrical
plugs are keyed and
have a locking tab to
remove
Always install dummy
plugs in ECU sockets
not used.
Diagnostic Connector
(Mounted to the side of Trailer)
Diagnostic Connector
Basic TRS Power Cord
Push in Slidelock to
Lock Connectors
(Curbside)
(Roadside)
Sensor
S1A
Sensor
S2A
Sensor
S1B
Plug
Plug
*
*
Sensor
S2B
*
Not used for
2S/2M applications
Plugs (2)
Page 12 Rev. 5
Electrical Wiring Overview
(Stop Light Activation Power Cord)
The Stop Light Activation Power Cord illuminates trailer brake
lights during “roll event”.
Trailer
ABS Power
Connector
Diagnostic Connector
(Mounted to the side of Trailer)
Stop Light Activation
Power Cord
Diagnostic Cord
(Curbside)
(Roadside)
Sensor
S1A
Sensor
S2A
Plug
Plug
*
*
*
Not used for
2S/2M applications
Plugs (2)
Page 13 Rev. 5
Sensor
S1B
Sensor
S2B
Electrical Connections to the
ECU/Modulator Assembly
Power and Diagnostic Connections: Move lever on the ECU to the unlocked position. Insert
grey “stop light activation power cord” and “diagnostic cord” into ECU ports with molded
labels facing upward. Press connectors into the ports until they bottom out. Ensure the “red
seal” remains seated on the locking lever. Move lever to the lock position. If the unit remains
unlocked, vibration will loosen the cords, causing them to fall out. Disabling the Haldex TRS
and ABS functions of the system.
1. Pull out locking lever.
4. Push Locking Lever in.
2. Position Connectors.
3. Insert Connectors.
Molded Label
Red Seal
Ensure that the moded label
faces upward before inserting
into the Haldex TRS ECU
Locking Tab
Lock holes for Sensors and
Plugs
Position Sensors and Plugs
into correct locations
Push firmly into correct
holes and listen for click.
Page 14 Rev. 5
Electrical Connections to the
ECU/Modulator Assembly
Sensor extensions: connect sensor extensions to speed sensors and ECU as shown.
Connectors must be pushed fully into the sensor cable sockets and ECU ports until they
click into place to prevent falling out due to vibration. Ensure contact pins are clean.
Ensure o-rings are present and clean on both sides of the sensor extensions.
Front
Axle
Front
Axle
(Roadside)
(Curbside)
Sensor
S1A
Plug
Plug
Sensor
S1B
Sensor
S2B
Sensor
S2A
Rear
Axle
Rear
Axle
Plugs (2)
Sensor extension identification is used for traceability from
the wheel end to the ECU. This is easily accomplished by
removing identification tabs for each sensor extension as
shown below.
ECU
Iden.
Example: S1B
Front Axle, Curbside
Tab Removed
Component
1
2
3
4
S1A
cut
cut
cut
S1B
cut
cut
cut
S2A
cut
cut
cut
S2B
cut
cut
cut
A
B
P
5
cut
cut
cut
S1A
cut
cut
S1B
cut
cut
*S2A
cut
cut
*S2B
cut
cut
cut
(DO NOT cut items in the grey boxes)
* Not used for 2S/2M applications
Page 15 Rev. 5
Cut Tab with Scissor
Wheel End Speed Sensor and Cable
Correct location and mounting of “speed sensors” at the wheel ends is critical for proper TRS
system operation. The Haldex TRS system will adjust the braking air pressure in response to
input from the speed sensors. Incorrect installation or location of speed sensors and exciter
rings will result in poor or no Haldex TRS system performance.
In the figure below the speed sensors are cabled to specific socket locations on the ECU.
Sensor S1B (Curbside)
Sensor S2B (Curbside)
Haldex TRS ECU
(Electronic Control Unit)
(Must face Roadside)
Front of Trailer
Sensor S1A (Roadside)
Legend:
Sensor Line
Sensor S2A (Roadside)
Sensor Requirement:
4S/2M Application - S1A, S2A, S1B and S2B
2S/2M Application - S1A and S1B (Sensors
shall be placed on rear most axle).
Page 16 Rev. 5
Wheel End Speed Sensor and Cable
This manual depicts speed sensor cable routing along the vehicle axles. This was shown for
clarity. Although it is possible to route cables this way, the preferred approach is to route the
speed sensor cables along the air hoses between the TRS valve and the brake actuators.
Tie straps may be used to secure sensor cable to the axle. Although tie straps may be used,
a more reliable installation results if single clips are used to secure speed sensor cables to air
hoses.
Leave some slack in cables to accommodate movement between chassis components.
Excess cable must not be allowed to hang free, it must be bundled and attached to the
chassis or air lines to prevent damage due to vibration and abrasion.
A sensor clip is placed
on the hose and sensor
wire.
Single Sensor Hose Clip
Excess cable length may be taken up in either a “short bone” or a “long bone” arrangement
and secured with tie straps. Do not coil the cable into a loop smaller then 4 inches in
diameter. Do not over tighten the tie straps when the cable is coiled, as this could cause a
cable failure.
Push up and attach tie straps.
Short Cable (short bone)
Long Cable (long bone)
Page 17 Rev. 5
Wheel End Speed Sensor and Cable
4. Disc brakes may have their exciter rings machined into the disc or hub. Speed sensor
mounting holes may be found on the torque plate or the caliper assembly. First determine
the location of the exciter ring in the disc brake. Next locate the speed sensor mounting
holes. Insert the speed sensor clip into the sensor mounting hole. Lightly grease the
speed sensor with a lithium based grease (use Dow Corning Molycoat CU7439 or
equivalent) and insert into the sensor clip. Ensure the sensor cable is not under any
tension, is not touching the disc brake and is clear from moving parts.
Drum Brake Installation
Disc Brake Installation
Sensor
Sensor Clip
Sensor Clip
Sensor
Block
Sensor
Torque
Plate
Exciter
Ring
Page 18 Rev. 5
Paint Preparation
1. Prior to Painting or Undercoating, the ECU/Modulator Assembly
MUST BE PROTECTED. All unused electrical connections are
to have sealed plugs installed. All unused pneumatic ports are
to have pipe plugs installed.
Mask off bottom side exhaust ports as shown.
Painting recommendations: Water based, baking for
1 hour @ 212° F.
Service of ECU/Modulator
ECU
Shoulder Bolt
Modulators
1. The ECU and Modulator can be separated if required. There are 4 bolts that hold the
ECU to the modulator and a 26 pin electrical connector. When removing and
reinstalling the ECU, be careful not to damage the electrical pins.
2. Begin by removing the 4 bolts on the face of the ECU using a T20 torx tool. Pull the
ECU back from the modulator, which disconnects the electrical connector.
3. To reinstall the ECU, securely fasten the ECU to the modulator with 4 bolts.
4. Control port metal screen filter. The filter should be serviced as deemed necessary
based on the application and environment. The filter should also be checked when
service brakes are slow to apply. Disconnect air line fitting and back the filter out of the
port using needle nose pliers or a straight blade screwdriver.
Page 19 Rev. 5
Diagnostic Tools
There are two tools available to troubleshoot the TRS system faults: the Info Center and a PC
based software tool, DIAG+. Both tools need to be connected to the diagnostic port of the
ECU and the vehicle powered with 12 volts DC. Do Not use a battery charger, AC voltages,
or unregulated shop air when servicing the vehicle.
INFO CENTER
TRS
HALDEX
Info Center
This hand held, dedicated tool is used for display of odometer and diagnostic fault codes,
plus other information stored in the ECU. It consists of a LCD (Liquid Crystal Display) and
two buttons marked with an up/down and right pointing arrows. The left hand button
(showing a right pointing arrow) means "select". The right hand button (showing an up/down
arrow) means "change" or "next" to allow movement between the different menus and
options. An internal battery allows the tool to "remember" the settings and faults of the last
powered up ECU it was connected to. ABS PLC Info Center will also read and clear
diagnostic trouble codes.
DIAG+
This PC based software tool provides the most features and functionality of the diagnostic
tools. The vehicle parameter data is stored inside the Haldex TRS ECU. The DIAG+
software can be loaded on a PC with the following requirements:
-
486 Processor or above
8 Megabyte RAM (16 recommended)
20 Megabyte Hard Drive
CD ROM Drive
640 x 480 VGA Monitor
9 pin RS232 serial Com Port (if unavailable, a USB to
RS232 converter is required, but not included in the kit.
Compatible with MS Windows 98, ME, XP, NT or 2000
Page 20 Rev. 5
Diagnostic Tools - Info Center
The TRS Info Center can be used to provide the functions listed here. Connect as shown
below and apply 12 volt DC power through the 7-way. The Haldex ABS PLC Info Center may
be used with the TRS system to read and clear DTC’s.
Haldex TRS Info Center
INFO CENTER
TRS
HALDEX
Diagnostic cable typically located
on the side of the vehicle
AVAILABLE FUNCTIONS:
1. View Odometer readout
2. View % Loaded readout
3. Read & Delete Diagnostic Trouble Codes
4. View Number of Sensors and Modulators
5. View Orientation of Sensors and Modulators
6. View Sensed Wheel Output
7. View Auxiliary Configuration
8. View ECU Software Version, Serial Number
9. View Info Center Software Version
10.View Trailer Manufacturer, VIN
11. Monitor trip distance
12. View and change wheel scale factor
See TRS Info Center User Guide for more information.
Page 21 Rev. 5
Diagnostic Tools - PC DIAG+
Diagnostic port typically located
on the side of the vehicle
PC interface hardware
included in kit
Available Functions:
1.
2.
3.
4.
End of Line Test (EOLT)
Read/Delete Diagnostic Trouble Codes
Odometer readout
Set tire scale factor
See DIAG+ User Guide for more information.
Page 22 Rev. 5
Testing After Installation
After installing the TRS system and completing pneumatic
brake system checks, the TRS system should be tested for
additional functionality using the following equipment.
-
Info Center or DIAG+
12 volt DC power supply, 3-5 amp minimum (not a battery charger)
100 to 120 psi air pressure on the emergency gladhand
20 to 40 psi air pressure on the service gladhand
Connect the power supply to the 7-way J560 at the nose of the trailer or 5-way ABS drop
out connector at the chassis of the trailer.
- Brakes need to be manually adjusted.
1. Secure the vehicle against movement.
2. Connect the Info Center or DIAG+ to the ECU diagnostic port.
3. Charge the service (20-40 psi) and emergency (100-120 psi) air system.
4. Connect the power source to the Trailer 7-way or ABS 5-way connectors.
5. Switch the stop light power source ON.
A. Each valve should “blow-down” a brief shot of exhaust air.
B. ABS light should flash “ON” for about 2 seconds then go “OFF”.
6. Remove stop light power. Switch the permanent power source ON.
A. Each valve should “blow-down” a brief shot of exhaust air.
B. ABS light should flash “ON” for about 2 seconds then go “OFF”.
7. Read Odometer display for a mileage value.
8. Read Diagnostic Trouble Codes (DTC). It should display “Clear”.
9. If a problem exists, a DTC will be displayed. Power down the system, remove service and
emergency air source, park the vehicle, and correct the problem. Clear the DTC.
10. Remove the service air pressure and rotate each wheel at 1 rev / 2 sec.
A. Front, roadside wheel should display S1A on the diagnostic tool.
B. Front, curbside wheel should display S1B on the diagnostic tool.
C. Rear, roadside wheel should display S2A on the diagnostic tool.
D. Rear, curbside wheel should display S2B on the diagnostic tool.
11. To perform a road test with a tractor, turn on the ignition key and charge air system.
Again, make sure ABS warning light comes on briefly, then goes out. Pull the trailer at a
speed above 6 mph and make a brake application until the tractor-trailer has come to a
complete stop. Verify that the ABS light has remained OFF. If the light remains OFF, the
system is functioning properly. If the TRS system detects an error during the stop, the
warning light will be ON.
Page 23 Rev. 5
ABS Light Faults
ABS light doesn’t flash “ON” when ignition
power supplied to the trailer.
1. Ensure all power cables are connected
properly (7-way, 5-way, ECU permanent
power.
2. Check for burned out bulb.
3. Check for open or short circuit in lamp.
4. Check power at 5-way and ECU. If power
is available at the 5-way, but not at the
TRS unit, replace power adapter cable.
TRS doesn’t power up
Reference page 13 of this manual for pin
identifications. Perform the following checks:
1. Make sure the power adapter cable is
plugged into the ECU properly.
2. Make sure 12 volts at the 5-way plug.
3. Disconnect Grey Permanent Power cable
at the ECU and check for +/- 12 volts
between sockets B- and B+ ignition.
4. Apply stop light power and check for 12
volts between socket B- and socket B+
stoplight.
Note. Most ABS or TRS problems are related to: A) Cut, Corroded, or Abraded Wires. B)
Corroded Connectors and Terminals. C) Connector Terminal not latched or seated
correctly to mating assemblies. D) Excessive sensor air gap, Sensor clip retention,
or E) Wheel bearing end play.
Page 24 Rev. 5
Diagnostic Trouble Code List
There are 6 failure modes with this system. The fault codes are
grouped in this manner.
1. Power Supply
4. ECU
2. Sensors
3. Modulators
5. Lateral Accelerometer 6. Auxiliaries
Group 1. Power Supply Fault Code List
ECU TIME OUT or NO LINK No supply on ignition switched line. Check truck fuses, 7-way
connection, 5-way ABS connection, power cable
connections. Check diagnostic cable for corrosion.
PWR ISO7638 FAIL
Intermittent power loss. Check all electrical connections as
mentioned above.
PWR LO VOLT
Supply voltage < 8 volts. Check voltage regulator on tractor,
loose connections, and corrosion.
PWR HI VOLT
Supply voltage > 17 volts. Same as above.
Group 2. Sensor / Sensor Extension Fault Code List
Note. The fault code identified which sensor/wheel end needs
to be checked.
S1A CONT
S1B CONT
S2A CONT
S2B CONT
Open or Short Circuit. 1. Disconnect the sensor extension
cable from sensor and measure electrical resistance between
the two pins in the sensor housing, it should be between 9802350 ohms. 2. Disconnect sensor extension from ECU and
measure continuity.
S1A SIGNAL
S1B SIGNAL
S2A SIGNAL
S2B SIGNAL
Intermittent low sensor output occurs when vehicle is moving.
Check for broken sensor retaining clip, damaged or misaligned
exciter ring, excessive wheel bearing end play, loose/
damaged/corroded sensor connections or a break inside the
sensor cabling.
S1A OUTPUT
S1B OUTPUT
S2A OUTPUT
S2B OUTPUT
Low sensor output. 1. Rotate the wheel at 1 rev / 2 sec and
measure AC voltage at the sensor plug, it should be > 200
millivolts. 2. Make sure sensors are pushed up against exciter
rings.
Page 25 Rev. 5
Diagnostic Trouble Code List
Group 3. Modulators Fault Code List
BRK APPLY SC
BRK APPLY OC
BRK APPLY SC DRIVE
BRK APPLY UNSPEC
Internal fault with the brake apply solenoid. Detach ECU and
replace modulator.
EPRV
EPRV
EPRV
EPRV
EPRV
EPRV
EPRV
EPRV
21
21
21
21
21
21
21
21
HOLD SC
DUMP SC
HOLD OC
DUMP OC
HOLD SC DRIVE
DUMP SC DRIVE
HOLD UNSPEC
DUMP UNSPEC
Internal fault with the hold or dump solenoids of modulator 21.
Detach ECU and replace modulator.
EPRV
EPRV
EPRV
EPRV
EPRV
EPRV
EPRV
EPRV
22
22
22
22
22
22
22
22
HOLD SC
DUMP SC
HOLD OC
DUMP OC
HOLD SC DRIVE
DUMP SC DRIVE
HOLD UNSPEC
DUMP UNSPEC
Internal fault with the hold or dump solenoids of modulator 22.
Detach ECU and replace modulator.
DEMAND SC
DEMAND OC
Internal fault with the service/control line pressure transducer.
Detach ECU and replace modulator.
EPRV
EPRV
EPRV
EPRV
Internal fault with the delivery pressure transducer. Detach
ECU and replace modulator.
21
21
22
22
DEL SC
DEL OC
DEL SC
DEL OC
EPRV 21 SLOW REC
EPRV 22 SLOW REC
Wheels are slow to recover after brakes are released. Make
sure foundation brakes are operating properly, delivery hoses
not pinched, speed sensors not crossed with modulator,
correct side-by-side plumbing.
RESR SC
RESR OC
Internal fault with the reservoir pressure transducer. Detach
ECU and replace modulator.
SUSP SC
SUSP OC
SUSP OUT OF RANGE
1. Check for air leaks on suspension lines 2. Make sure
leveling valve is plumbed correctly 3. Internal fault with the
suspension pressure transducer. Detach ECU and replace
modulator.
Page 26 Rev. 5
Diagnostic Trouble Code List
Group 4. ECU Fault Code List
REV
REV
REV
REV
SWITCH
SWITCH
SWITCH
SWITCH
SC
OC
PNEUMATIC
SIGNAL
1. ECU configured incorrectly, contact Haldex Engineering
2. Internal fault with relay emergency valve pressure
switch. Detach ECU and replace.
PNEUMATIC DEMAND LOSS
No corresponding pneumatic demand pressure. Detach
ECU and replace.
TOWED CAN DEMAND LOSS
TOWED CAN CONTROL LOSS
CAN communication fault. Detach ECU and replace.
CAN communication data fault. Detach ECU and replace.
ECU EE ERR
ECU PARAM ERR
ECU EE UNSPEC
Internal ECU fault. Detach ECU and replace.
Internal ECU fault. Detach ECU and replace.
Internal ECU fault. Detach ECU and replace.
Group 5. Lateral Accelerometer Fault Code List
LAT ACC OC
LAT ACC SC
LAT ACC SIGNAL
Ensure proper positioning, ECU connection, and no
damage to the lateral accelerometer cable. Replace
external lateral accelerometer. Otherwise, replace ECU.
Group 6. Auxiliaries Fault Code List
AUX1
AUX2
AUX3
AUX4
AUX5
Auxiliary
Auxiliary
Auxiliary
Auxiliary
Auxiliary
Channel
Channel
Channel
Channel
Channel
1
2 (stop lamp circuit)
3 (trailer fault lamp circuit)
4
5
Open or short circuit; check auxiliary channel wiring,
connections, misaligned connector. Detach and replace
Odometer Setting
The TRS system requires a wheel scale setting to ensure accuracy of the odometer. The
default value is 508 millimeter rolling radius or 502 revs/mile. This value may change
depending on the tire size. Consult tire manufacturer for rolling or loaded radius and tire
scale factor on the next page.
To change the tire scale factor, consult the PC DIAG+ operating manual.
Page 27 Rev. 5
Wheel Scale Factor Chart
Use DIAG+ to set wheel scale factor using Rolling
Radius (mm) found in columns below
Trailer
Tire
80T Smallest Tire
215/75R17.5
8R17.5
275/65R17.5HC
8.5R17.5
245/70R17.5
235/75R17.5
225/70R19.5
8.25R15
9R17.5HC
10R17.5
265/70R19.5
285/70R19.5
100T Smallest Tire
305/70R19.5
11R17.5HC
10.00R15TR
255/70R22.5
275/70R22.5
445/50R22.5
10R22.5
9.00R20
295/75R22.5
285/75R24.5
295/80R22.5
11R22.5
10.00R20
315/80R22.5
80T Largest Tire
11.00R20
305/75R24.5
11R24.5
10.00R22
12.00R20
425/65R22.5
11.00R22
100T Largest Tire
Rolling Radius
Rdyn (mm)
100T
442
446
451
452
452
469
483
493
493
494
508
508
508*
510
522
Rolling Radius
Rdyn (mm)
80T
442
471
477
485
488
490
490
491
517
517
524
531
543
557
563
565
565
588
604
615
617
617
634
637
637
640
653
655
525
525
536
536
541
543
549
655
Rev/Mile
100T
Rev/Mile
80T
579
543
538
527
524
523
523
521
495
495
490
483
470
580
574
568
566
566
545
527
520
519
518
504
503
502*
501
491
459
454
453
453
436
422
416
415
414
403
402
402
401
393
391
488
488
478
478
472
471
466
391
*Factory Tire Scale Set At 508 mm rolling radius or 502 Rev/Mile
Wheel Scale Factor for other tire sizes: SF = (1000/Rc) x (T/100) or SF = N x (T/100)
Rdyn = rolling radius (mm)
Rc = Rolling Circumference (m) = 2(3.14) x Rdyn/1000
N = Revolution/Mile
T = Exciter Ring Teeth
Page 28 Rev. 5
Mounting Pattern Template
V = Valve Mounting Pattern
ECU
V
When using valve template holes,
these holes are on the ECU Side or
“Roadside”
When using valve template holes,
these holes face REARWARD on the
vehicle
V
Page 29 Rev. 5
V
THIS PAGE INTENTIONALLY LEFT BLANK
Notes:
Page 31 Rev. 5
Notes:
Page 32 Rev. 5
Haldex offers proprietary vehicle technology solutions to the global vehicle industry within specific niches. We focus on products to improve
safety, the environment and vehicle dynamics.
We are enhancing our competitive capabilities
and building long-term customer relationships
through high performance, low total costs to the
customer through the product’s service life, ethical business practices and commitment to
long-term partnerships. Haldex operations are
divided into four business areas: Commercial
Vehicle Systems, Hydraulic Systems, Garphyttan
Wire and Traction Systems.
Austria
Haldex Italia SRL
Biassono (Milan)
Tel.: +39 039 471 702
Fax: +39 039 27 54 309
E-Mail: [email protected]
Belgium
Poland
Haldex N.V./S.A.
Balegem (Ghent)
Tel.: +32 9 363 90 00
Fax: +32 9 363 90 09
E-Mail: [email protected]
Haldex Sp. z.o.o.
Praszka
Tel.: +48 34 350 11 00
Fax: +48 34 350 11 11
E-Mail: [email protected]
Brazil
Russia
Haldex do Brasil Ind. e Com, Ltda.
São Paulo
Tel.: +55 11 213 55 000
Fax: +55 11 503 49 515
E-Mail: [email protected]
OOO Haldex RUS
Moscow
Tel.: + 7 495 747 59 56
Fax: +7 495 786 39 70
E-Mail: [email protected]
Canada
South Korea
Haldex Ltd
Guelph, Ontario
Tel.: +1 519 826 7723
Fax :+1 519 826 9497
E-Mail: [email protected]
Haldex Korea Ltd.
Seoul
Tel.: +82 2 2636 7545
Fax: +82 2 2636 7548
E-Mail: [email protected]
China
Spain
Haldex International Trading Co. Ltd.
Shanghai
Tel.: +86 21 5240 0338
Fax: +86 21 5240 0177
E-Mail: [email protected]
Haldex España S.A.
Parets del Valles (Barcelona)
Tel.: +34 93 573 10 30
Fax: +34 93 573 07 28
E-Mail: [email protected]
France
Sweden
Haldex Europe SAS
Weyersheim (Strasbourg)
Tel.: +33 3 88 68 22 00
Fax: +33 3 88 68 22 09
E-Mail: [email protected]
Haldex Brake Products AB
Landskrona
Tel.: +46 418 47 60 00
Fax: +46 418 47 60 01
E-Mail: [email protected]
Germany
United Kingdom
Haldex Brake Products GmbH
Heidelberg
Tel.: +49 6221 7030
Fax: +49 6221 703400
E-Mail: [email protected]
Haldex Ltd.
Newton Aycliffe
Tel.: +44 1325 310 110
Fax: +44 1325 311 834
E-Mail: [email protected]
Hungary
Haldex Brake Products Ltd.
Redditch
Tel.: +44 1527 499 499
Fax: +44 1527 499 500
E-Mail: [email protected]
Haldex Hungary Kft.
Szentlörinckáta
Tel.: +36 29 631 300
Fax: +36 29 631 301
E-Mail: [email protected]
©2007, This material may contain Haldex
trademarks and third party trademarks, trade
names, corporate logos, graphics and emblems
which are the property of their respective companies. The contents of this document may not
be copied, distributed, adapted or displayed
for commercial purposes or otherwise without
prior written consent from Haldex.
Italy
Haldex Wien Ges.m.b.H.
Vienna
Tel:: +43 1 8 65 16 40
Fax: +43 1 8 65 16 40 27
E-Mail: [email protected]
India
Haldex India Limited
Nasik
Tel.: +91 253 2380094
Fax +91 253 2380729
E-Mail: [email protected]
Commercial Vehicle Systems
L30040 US Rev. 5/08 5M CM
USA
Haldex Brake Products Corp.
Kansas City, MO
Tel.: +1 816 891 2470
Fax: +1 816 891 9447
E-Mail: [email protected]
www.haldex.com
www.hbsna.com