1
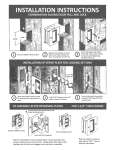
OBSOLETE DOORS SLIDING DOORS--TRIMLINE PATIO DOOR
DUAL POINT MORTISE LOCK UPGRADE
STANDARD PARTS SHIPPED
Dual point mortise lock with screws
Dual point keeper with screws
Keeper marking template
Mortise routing guide
Router collar guide
1/2I straight router bit
5.
Set up router to remove 1 1/8I -- 1/64I of wood from the
stile. Route mortise to dimension of guide.
6.
Remove guide and clean all wood shavings from
mortise area. Remove reference marks from interior
and exterior of stile.
Install mortise lock
assembly into edge
of the stile. Check
Multi--point
mortise clearances
mortise lock
and lock alignment
with handle holes in
stile, modify mortise
if needed. Attach
with
screws
Strike
screws (2)
supplied.
See illustration 3.
7.
YOU WILL NEED TO SUPPLY
Safety glasses
Hearing protection
Phillips screwdriver
Standard screwdriver
Plunge router (preferred) or standard base router*
Drill/Driver with Phillips bit
* Use extreme caution and observe all safety precautions
and guidelines.
Update Procedures
3
1.
Unlock the mortise lock. Remove Phillips head machine
screws from interior handle assembly. Remove interior
and exterior handles from stile. See illustration 1.
2.
Remove lock turn lever from interior of door panel.
See illustration 1.
3.
Slide the door
panel
open.
From edge of
panel locking
stile,
remove
screws at top
and bottom of
the lock. Pull
mortise lock out
of the stile. See
illustration 1.
Replace the lock turn lever on interior as shown in
illustration 4.
9.
Position exterior handle on the stile, if equipped, line up
and insert keyed cylinder actuator pin into mortise lock,
hold handle in place.
10.
Thumb
turn (1)
Exterior
handle (1)
Screws
(2)
1
4.
8.
Interior handle (1)
2” machine screws
(2)
Multi--point
mortise lock (1)
Reposition
interior
handle on the
stile
and
install
machine
screws
through
interior
handle and
secure. See
illustration 4.
Foam
gasket
Thumb turn (1)
Foam gasket
Multi--point
mortise lock (1)
4
Measure existing mortise to find horizontal center line.
With a pencil (or tape) transfer this line to interior and
exterior face of stile near the edge. Position routing jig on
stile as shown and align center mark on guide with marks
on stile. Fasten jig with #8 x 1 3/4I flat head wood screws
supplied, check alignment. See illustration 2.
Interior handle (1)
2” machine screws (2)
11.
Check lock operation with panel open, the turn lever
should operate freely with minimal resistance.
12.
IMPORTANT: If replacement keeper screws are
longer than original screws AND you are attaching
keeper to a stationary panel stile. You MUST use
screws that are the same length as existing screws.
Failure to do this may result in severe damage to the
stationary panel insulating glass unit.
Unlock mortise lock, insert 2 keeper mounting screws
through template provided as indicated. Lock template
(with screws) into mortise lock. Close panel against
locking jamb/panel to mark keeper location. Remove
template from lock. Remove keeper screws from
template, position keeper on jamb/panel attach with
screws. Place shims between the jamb and rough
opening at top and bottom of keeper when applying to
a locking jamb. See illustration 5.
13.
Check vertical alignment of strike to latch hooks. Adjust
as needed by loosening screws and sliding strike up or
down.
Mortise routing jig
Center mark of
existing mortise
#8 x 1 3/4”
screws (2)
Exterior
handle
2
19913260
2/2005
10.2.6
Marvin Service Manual
11708609
OBSOLETE DOORS SLIDING DOORS--TRIMLINE PATIO DOOR
DUAL POINT MORTISE LOCK UPGRADE
14.
After latch and strike are aligned, adjust latch hooks by
rotating adjustment screws above/below hooks with a
standard screwdriver. Before final adjustments are
made (with operating panel fully closed) check to see if
any resistance is felt when operating the turn lever,
extend latch hooks as needed until lever operates freely.
Then adjust one latch hook at a time, rotate adjustment
screw to draw latch hook into the lock in small
increments, close the panel and check lever operation.
Adjust hook until slight resistance is felt at the end of turn
lever travel and panel is drawn snug against locking
jamb. Repeat final adjustment procedures for remaining
latch hook. See illustration 5.
Operator locking stile
Strike screws (2)
Strike placement
template
Lock template
in place
Interior handle
Multi--point
mortise lock
Exterior sheathing
Nailing fin
Operator side jamb
Studwall
Shims
Screws
Strike
5
2/2005
10.2.7
Marvin Service Manual
11708609