1
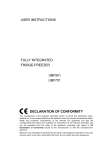
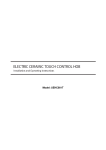
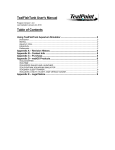
Built in Fanned Oven Stainless Steel
Instructions for Installation
and Use
Models:
UEFN602SS
UEFM601SS
UEFP601SS
Your 1 Year Guarantee
Your appliance carries a 1 year parts and labour warranty. To fulfill the conditions of your guarantee, the appliance must be
correctly installed, operated in accordance with the instructions, and only be used for normal domestic purposes.
Please note that the guarantee and service availability only apply to the United Kingdom.
Customer Service
In case of difficulty please call the Customer Service Helpline number.
0844 800 7848
•
When calling customer service, please ensure you have the model and serial number to hand.
• Please keep your receipt or invoice in a safe place as they will be required as proof of date of purchase.
Appliance 365 Limited, 730 Mandarin Court, Centre Park, Warrington, WA1 1GG
Important Safeguards
When using electrical appliances, in order to reduce the risk of fire, basic safety precautions should always be followed,
including:
For Your Safety
Read all instructions carefully, even if you feel that you are familiar with this appliance.
•
To avoid any possible hazard, this appliance must be installed and maintained by qualified personnel only.
•
Any repairs by unqualified persons could result in electric shock or short circuit.
•
This appliance is intended for use by adults.
•
This appliance is not a toy and is not intended for use by children.
•
This appliance is not intended for use by persons (including children) with reduced physical, sensory and mental
capabilities, or lack of experience and knowledge, unless they have been given supervision or instruction concerning use
of the appliance by a person responsible for their safety.
•
When using this appliance the oven will become hot and remain hot for some time after switching off.
•
Oven and cooking accessories may become very hot during operation. To avoid the risk of burns, use oven gloves when
handling pots or utensils.
•
Take extra care when grilling to avoid risk of fire.
•
Perforated roasts (e.g. sausages) may produce spurting of hot grease. Use long tongs to prevent skin burns and protect
your eyes.
•
Do not place any utensils weighing more than 15kg on the opened oven door.
•
Mains leads of adjacent appliances could be damaged by heat therefore keep them at a safe distance from the appliance.
•
Please remove all packaging prior to use and dispose of or recycle accordingly.
•
Packaging materials (e.g.; polystyrene and plastic items) must be kept out of reach of babies and young children at all
times due to risk of suffocation.
•
The manufacturer accepts no liability for damage or injury to property or persons caused by incorrect or unsuitable
installation.
•
The manufacturer reserves the right to apply such modifications to the appliance as are deemed appropriate, without any
obligation to notify customers in advance.
The manufacturer cannot be held liable for any damage caused due to non-compliance with these important safeguards.
Please keep these instructions in a safe place for future reference
Disposal Of Your Old Appliance
Before discarding your old appliance:
• Switch off and disconnect it from the power supply.
• Cut off the plug.
• Cut off the cable directly behind the appliance to prevent mis-use.
These steps should be carried out by a suitably qualified and competent person.
This appliance is marked according to the European directive 2002/96/EC on Waste Electrical and Electronic Equipment (WEEE).
By ensuring this product is disposed of correctly, you will help prevent potential negative consequences for the environment and
human health, which could otherwise be caused by inappropriate waste handling of this product.
The symbol on the product indicates that this product may not be treated as household waste. Instead it shall be handed over to
the applicable collection point for the recycling of electrical and electronic equipment.
Disposal must be carried out in accordance with local environmental regulations for waste disposal.
For more detailed information about treatment, recovery and recycling of this product, please contact your local council or the shop
where you purchased the product.
Unpacking Your Appliance
Protective packaging has been used to safeguard your appliance against damage during transportation.
After un-packing, please dispose of packaging in a way that will not cause damage to the environment. All materials used for
packaging this appliance are environmentally friendly and can be recycled accordingly.
Your oven explained
UEFN602SS Oven Fascia
C
A
B
UEFM601SS Oven Fascia
E
C
A
B
D
UEFP601SS Oven Fascia
C
A
B
F
A
Oven Temperature Selector (°C)
B
Oven Function Selector – clockwise:
- Defrost
E Manual op eration
F Programmable timer:
Timer
- Fanned cooking
Cooking start timer
- Full grill
Cooking end timer
- Half grill
Manual setting
C
Off position
+ Plus time
D
Mechanical Minute Minder
- Minus time
Before using the oven
Warning: Before using the oven for the first time, clean the oven thoroughly with soapy water and rinse well.
Operate the oven for about 30 minutes at maximum temperature to burn off any manufacturing residue which
might otherwise create unpleasant smells. The odour that is often detected during this initial use is due to the
evaporation of substances used to protect the oven during manufacture and storage. We strongly suggest that
the room should be well ventilated during this time by opening windows and external doors.
Warning: This oven may become hot during use and remain hot for a period of time afterwards. It is therefore
important that children must not be allowed to play with the oven and should be supervised at all times to
prevent possible injury.
Important: As a safety precaution, before cleaning the oven, always disconnect the plug from the power
socket. Do not use acid or alkaline substances to clean the oven (lemon juice, vinegar, salt etc). Do not
use chlorine based products, acids or abrasive products to clean the painted surfaces of the oven.
Warning: Never place the bottom shelf or any utensils on the floor of the oven when it is in operation because
this could damage the enamel. Always place your cookware (dishes, aluminum foil, etc.) on the shelves
provided.
Important note for ovens fitted with a mechanical minute minder:
If you wish to use the oven without the minute minder, the mechanical timer control must
be turned in an anti-clockwise direction so that it is aligned with the symbol
on the
control panel. The oven will not operate unless the control knob is located in this position.
Fanned Oven Functions
Economy Grill (variable) (1100w)
Use the economy grill to grill or brown small amounts of food.
Locate the grill pan in the 4th or 5th shelf position.
Pre-heat the grill for 5 minutes before use.
Temperature is variable between 50° C and 200° C.
The grill should be used with the oven door closed.
Full Grill (variable) (1950w)
Use the full grill to grill or brown larger amounts of food.
Locate the grill pan in the 4th or 5th shelf position.
Pre-heat the grill for 5 minutes before use.
Temperature is variable between 50° C and 200° C.
The grill should be used with the oven door closed.
Fanned Cooking Mode (2000w)
In fanned cooking mode, the rear heating element and the fan are active allowing a uniform distribution of heat
throughout the oven. As a result, fanned cooking is more rapid than conventional cooking.
The temperature is variable between 50° C and 200° C.
This mode is ideal for baking and cooking delicate foods - especially cakes that need to rise.
Defrost Mode
The fan located at the rear of the oven allows cool air to circulate inside the oven. In this way, frozen food can
be more rapidly defrosted. By using the fan, the defrosting time is approximately halved.
To defrost frozen foods, turn the oven function control to the defrost position, ensuring the thermostat button is
set to 0° C. Place the food in the centre of the ov en and close the door.
For your safety
•
•
•
Do not defrost stuffed poultry using this method
Do not defrost larger joints of meat and poultry over 2kg.
Never place un-cooked food for defrosting next to cooked food which is to be cooled as this
can lead to cross-contamination
Defrosting meat, poultry and fish can be accelerated using this method but please ensure they are completely
thawed before cooking. Place meat and poultry on a trivet in a meat tin for defrosting.
Cooling ventilation
In order to cool down the exterior of the appliance, this model is equipped with a cooling fan which comes on
automatically when the oven is hot. When the fan is on, a circle of cool air flows between the oven door and the
control panel.
Note: When cooking is complete, the fan will switch off. This is quite normal but some increase in
temperature should be expected on the door and fascia. Keep children away from the appliance until it
has cooled down completely.
Using the mechanical minute minder with auto cut off timer
If your model is equipped with a mechanical minute minder, the oven can be set to switch off after a given
period of time. To use the oven in this mode, set the mechanical timer knob to the required cooking time
(between 10 and 120 minutes). At the end of the programmed length of time, the timer will sound and the oven
will automatically turn off.
Please note, if you do not wish to use the timer facility, the mechanical timer control knob must be
positioned in the location marked with the
symbol otherwise the oven will not operate.
Using the electronic programmer
If your appliance is equipped with an electronic programmer, when first connected to the mains supply, or in
the event of a power cut, the display will flash “0.00” and “Auto”.
To set the time
•
Press the manual button
once or the cooking time button
and the end cooking time button
together
•
. The display appears as below.
Within 5 seconds of above, set the time using the ‘ + ‘ and ‘ – ‘ buttons. The set time will be saved
within 5 seconds. If the time is not set within 5 seconds of completing stage 1, it will be necessary to
repeat stage 1 otherwise the time cannot be changed.
Using the electronic minute minder
The maximum setting for the minute minder is 23 hours and 59 minutes. To set the minute minder:
•
Press the timer button
•
Press the ‘ + ‘ and ‘ – ‘ buttons until you reach the required time. 5 seconds after this is programmed,
the data will be saved.
•
Once the data is saved, the display will revert to showing the current time and the timer button
once and the display will show “0:00” and the timer button will flash
.
will
cease to flash.
•
Press the timer button
•
To amend the time at any stage, press the timer button
once at any stage to review the time remaining.
once and amend the time using the ‘ + ‘ and
‘ – ‘ buttons.
•
Once the set time has elapsed, the timer button
•
•
To switch the alarm off, simply press any button.
If the alarm is not switched off manually, it will turn off automatically after 7 minutes.
will start to flash and an alarm will sound.
NOTE: The oven does not switch off automatically when using the minute minder function.
Semi-automatic operation
When using the semi-automatic setting, there are 2 options to select from; setting the duration of cooking or
setting the cooking end time.
To set the cooking duration:
•
Press the manual button
•
Select the required cooking function and temperature setting. The oven will switch on.
•
Press the cooking time button
•
•
•
•
Set the cooking duration using the ‘ + ‘ and ‘ – ‘ buttons (maximum 10 hours).
After 5 seconds the programmed cooking duration will be saved and the clock will start to count down.
The display will revert to the current time and the Auto symbol will cease to flash.
Once the cooking duration is complete, the oven will switch off automatically and the alarm will be
heard. The cooking symbol
and the cooking symbol
will appear in the display.
once, the Auto symbol will flash.
will disappear and the Auto symbol will start to flash again.
•
To stop the alarm, press any of the following buttons
•
•
If the alarm is not switched off manually, it will turn off automatically after 7 minutes.
Return the oven function selector and the temperature regulator to the OFF position.
,
,
,
.
To set the cooking end time:
•
Press the manual button
•
Select the required cooking function and temperature setting. The oven will switch on.
•
Press the cooking end time button
symbol will flash.
and the cooking symbol
will appear in the display.
once. The display will show the current time and the Auto
•
Set the cooking end time using the ‘ + ‘ and ‘ – ‘ buttons (maximum 10 hours ahead).
•
•
•
After 5 seconds the programmed cooking end time will be saved.
The display will revert to the current time and the Auto symbol will cease to flash.
Once the cooking end time is reached, the oven will switch off automatically and the alarm will be
heard. The cooking symbol
will disappear and the Auto symbol will start to flash again.
•
To stop the alarm, press any of the following buttons
•
•
If the alarm is not switched off manually, it will turn off automatically after 7 minutes.
Return the oven function selector and the temperature regulator to the OFF position.
,
,
,
.
To cancel the above at any stage simply re-set the cooking duration to zero or adjust the end time to the
current time.
Fully automatic operation
To set the oven with a start and end cooking time, proceed as follows:
•
Press the manual button
•
Select the required cooking function and temperature setting. The oven will switch on.
•
Press the cooking time button
•
Set the cooking duration using the ‘ + ‘ and ‘ – ‘ buttons (maximum 10 hours).
•
Press the cooking end time button
•
Set the cooking end time using the ‘ + ‘ and ‘ – ‘ buttons (maximum 10 hours ahead).
•
The cooking symbol
•
After 5 seconds the programmed cooking end time will be saved, the display will revert to the current
and the cooking symbol
will appear in the display.
once, the Auto symbol will flash.
once.
will disappear.
time and the Auto symbol will cease to flash.
•
When cooking is due to start, the oven will switch on automatically and the cooking symbol
will
appear.
•
Once the end cooking time is reached, the oven will switch off automatically, the alarm will sound, the
cooking symbol
will disappear and the Auto symbol will start to flash again.
•
To stop the alarm, press any one of the following buttons
•
•
If the alarm is not switched off manually, it will turn off automatically after 7 minutes.
Return the oven function selector and the temperature regulator to the OFF position.
To cancel the above at any stage simply press buttons
and
,
,
,
.
together, or button
. The Auto
symbol will disappear.
Audible alarm – there are 3 different tones for the audible alarm. To select an alternative tone, press the
‘ – ‘ button repeatedly when the display shows the current time to hear the options available.
Cleaning and Maintenance
Before cleaning your oven, or performing any maintenance work, always disconnect it from the power supply
and ensure that it has cooled down completely after use.
To extend the life of your oven, it should be cleaned frequently, bearing in mind that:
• Enamelled or stainless steel components should be cleaned with a mild detergent in lukewarm water.
Never use abrasive cleaners or solvents as these could damage the surfaces. After cleaning, it is
advisable to rinse and dry thoroughly.
•
The inside of the oven should be cleaned as soon as possible after use, whilst ensuring the cavity has
cooled sufficiently to avoid the risk of burns. Clean the interior with hot soapy water then rinse and dry
thoroughly. Avoid using abrasive sponges or detergents and acids (such as lime scale–remover) as
these could damage the enamel. If the grease spots and dirt are particularly tough to remove, use a
special product for oven cleaning, following the instructions provided on the packet. Never use a steam
cleaner to clean the inside of an oven.
•
If the oven is used over an extended period of time, condensation may form. This should be dried using
a soft cloth.
•
Your oven door is fitted with a rubber seal which guarantees the performance of the oven. Check the
condition of this seal on a regular basis. If necessary, clean it using warm soapy water and a soft cloth.
Avoid using abrasive products or objects to do so. In the event that the seal is damaged, please
contact your After-sales Service Centre. We recommend you avoid using the oven until it has been
repaired.
•
Never line the oven bottom with aluminum foil, as the consequent accumulation of heat could
compromise cooking and even damage the enamel.
•
Clean the glass door using non-abrasive products or sponges and dry it with a soft cloth.
Replacing the Oven Lamp
Disconnect the oven from the power supply by means of the omnipolar switch used to connect the appliance to
the electrical mains or by unplugging the appliance from the mains socket. Once the oven cavity is cool:
•
•
Remove the cover of the lamp-holder, wash and wipe it dry
Remove the lamp and replace it with a lamp which is resistant to high temperatures (300° C) and with
the following characteristics:
•
•
•
Voltage: 230-240V
Wattage: 25W
Type: E 14
•
Replace the cover and reconnect the oven to the mains power supply.
Practical Cooking Advice
The shelf can be positioned in 5 locations within the oven cavity as detailed below:
Baking Cakes
When baking cakes, always place them in a preheated oven. Make sure you wait until the oven has been
preheated thoroughly (oven indicator light will turn off). Do not open the oven door during baking to prevent the
cake from dropping.
Pastry is too dry
Increase the temperature by 10° C and reduce the co oking time.
Pastry dropped
Use less liquid or lower the temperature by 10° C.
The Pastry sticks to the pan
Grease the pan well and sprinkle it with a dusting of flour or use greaseproof paper.
Cooking Fish and Meat
When cooking white meat, fowl and fish, use a temperature setting from 180° C to 200° C.
For red meat, which should be well done on the outside whilst tender and juicy in the middle, it is a good idea
to start with a high temperature setting (200° C - 220° C) for a short time, then turn the oven down a fterwards.
Ensure the shelf is positioned in the centre of the oven.
For savory roasts (especially duck and wild game), dress the meat with lard or bacon on top.
Never leave a roast to cool inside the oven as it might produce condensation and corrosion of the oven.
Grilling
Take extra care when grilling.
•
•
Use protective gloves at all times
Perforated roasts may produce spurting of hot grease, use long handled tools to prevent burns
and to protect eyes.
•
•
•
•
•
Supervise the grill at all times to prevent the risk of fire
Do not let children in the vicinity of the grill when in use
Grilling should be conducted with the oven door closed
The grill should be pre-heated for approximately 5 minutes before use
Turn food during cooking to ensure an even cooking result
Important Information
To maintain the efficiency and safety of this appliance:
•
•
•
Only call the Service Centres authorised by the manufacturer
Always use original spare parts
In case of damage to the power cord, a special purpose cord or component bought from the
manufacturer must be used for replacement. Do not operate the oven if the power cord is damaged.
•
When handling the appliance, always use the purpose provided handle recesses in the sides of the
oven to prevent harming people or damaging the appliance itself.
•
•
This appliance is designed for non-professional, household use and its functions must not be changed.
The electrical system of this appliance can only be used safely when it is correctly connected to an
efficient earthing system in compliance with current safety standards.
•
When the appliance is in use, the heating elements and some parts of the oven door may become
extremely hot. Make sure you don’t touch them and keep children well away.
Avoid the following:
- Touching the appliance with wet parts of the body;
- Using the appliance when barefoot;
- Pulling on the supply cable to unplug it from the electrical outlet;
- Improper or dangerous operations;
- Obstructing the ventilation or heat dissipation slots;
- Allowing power supply cables of small appliances to come into contact with the hot parts of the appliance;
- Exposing the appliance to atmospheric agents such as rain, or sunlight;
- Using the oven for storage purposes;
- Using flammable liquids near the appliance;
- Using adapters, multiple sockets and/or extension leads;
- Attempting to install or repair the appliance without the assistance of qualified personnel.
Qualified personnel must be contacted in the following cases:
- Installation (following the manufacturer’s instructions);
- When in doubt about operating the appliance;
- Replacing the electrical socket when it is not compatible with the appliance plug.
Service Centres authorised by the manufacturer must be contacted in the following cases:
- If in doubt about the soundness of the appliance after removing it from its packaging;
- If the power supply cable has been damaged or needs to be replaced;
- If the appliance breaks down or functions incorrectly.
Please note:
- A steam cleaner should not be used to clean the oven;
- Only use the appliance to cook food and nothing else;
- Check the soundness of the appliance after it has been unpacked;
- Disconnect the appliance from the electrical mains if it is not functioning properly and before cleaning or
maintenance;
- When left unused, unplug the appliance from the electricity mains;
- Use oven gloves to place cookware in the oven or when removing it;
- Always grip the oven door handle in the centre as the extremities of the handle may be hot due to any hot
air evacuation
-
Make sure the knobs are returned to the off position when the appliance is not in use;
Before discarding this product, cut off the power supply cable directly behind the appliance after
disconnecting it from the mains.
The manufacturer may not be held responsible for any damage due to incorrect installation and improper,
incorrect or irrational use.
Installation
This appliance should only be installed by a qualified and competent engineer in compliance with the
instructions provided. The manufacturer declines all responsibility for improper installation, which may harm
persons or animals and damage property.
Important:
• The power supply to the appliance must be disconnected before any adjustments or maintenance work
is carried out
•
•
The oven should only be connected to the mains supply once it is in position.
The mains lead of the appliance must be located in such a manner as to avoid touching the back panel
of the oven when in situ.
•
The kitchen should be dry and airy and have effective ventilation according to the existing technical
provisions
Installation of Built-in Ovens
In order for this appliance to function correctly, the housing unit used for installation must be fit for this purpose
and able to withstand temperatures up to 100 degrees Celsius. The diagrams below give the dimensions of the
cut-out for installation in a tall housing unit or under the counter.
554mm
595mm
560mm
600mm
595mm
40mm
560mm
522mm
600mm
542mm
21.5mm
600mm
554mm
40mm
595mm
595mm
560mm
600mm
522mm
600mm
542mm
21.5mm
In order to ensure adequate ventilation, the back panel of the housing unit must be removed. The preferred
method of installation is by means of two strips of wood on which the oven will sit (see fig A). If the oven rests
on a continuous, flat surface (fig B), there must be a ventilation gap at the rear of at least D40×W560mm.
560mm
Fig A
40mm
Fig B
The panels of any adjacent cabinets must be made of heat-resistant material. In particular, cabinets with a
veneer exterior must be assembled with glues that can withstand temperatures up to 100°C.
In compliance with current safety standards, it must not be possible to make contact with the electrical parts of
the oven once it has been installed.
All parts, which ensure the safe operation of the appliance, must be removable only with the aid of a tool.
To fasten the oven to the cabinet, open the door of the oven and attach it by inserting 4 wood screws into the
holes located on the perimeter of the door frame.
Electrical Connection
All electrical work should be carried out by a suitably qualified engineer.
Before connecting the oven to the mains supply, ensure that:
•
•
The supply voltage corresponds to the specifications on the data plate on the front of the oven.
The mains lead should be a minimum of 1.5m long to ensure there is adequate length to connect to the
electrical supply once the oven is in place.
•
The mains supply has an efficient earth (ground) connection complying with all applicable laws and
regulations. Correct earthing (grounding) is a legal requirement. The power cable should never reach a
temperature of 50° C above ambient temperature at a ny point along its length.
•
If the appliance is to be connected directly to a mains terminal, fit a switch with minimum aperture of
3mm between the contacts making sure that the switch is of sufficient capacity for the power specified
on the appliance’s dataplate, and compliant with applicable regulations. The switch must not break the
yellow / green earth wire. The socket or switch must be easily accessible with the oven fully installed.
•
If the appliance is to be wired using a standard plug, please ensure it corresponds to the load indicated
on the data plate.
•
The use of adapters, multiple sockets and / or extensions, is not recommended.
Connection:
• A cable of the correct size and rating must be used: Type HO5RR-F 3 x 1.5mm².
• Using a screwdriver, open the connector cover at the rear of the appliance.
• To open, release the two locks located on either side of the connector box as shown in Fig 1.
• Feed the mains cable through the cable clamp to protect the mains lead cable from disconnection.
• Connect the wires in accordance with the diagram shown below (Fig 1).
• Tighten the cable clamp and close the connector cover.
Fig. 1 – Connection to the appliance
Connection to 13A plug
Colour coding:
• The GREEN/YELLOW wire is the EARTH and must be connected to the terminal which is marked with the
letter ‘E’ or ‘PE’, by the earth symbol or coloured GREEN or GREEN/YELLOW.
• The BLUE wire is the NEUTRAL and must be connected to the terminal which is marked with the letter ‘N’ or
coloured BLACK.
• The BROWN wire is the LIVE wire and must be connected to the terminal which is marked with the letter ‘L’
or coloured RED.
Technical Specifications
Inner Volume of the oven: 55 litres
Voltage and Frequency of Power Supply: 220-240V ~ 50Hz
Maximum rating: 2kw
Appliance365 End User Warranty Conditions
The conditions below outline the prerequisites and scope of the warranty offered by Appliance 365
Limited (“we / us”) to consumer end users of appliances supplied by or through us. Please note that these
conditions do not affect your statutory rights or the obligations of your retailer and your contract with
them.
We provide warranty cover for appliances supplied by or through us for a period of 12 months from the
date of delivery of the appliance to the initial end user subject always to the following conditions:
1. The appliance must be correctly installed and operated in accordance with its instructions and only
be used for normal domestic purposes.
Warranty cover is available only to consumer end users of the
appliance; professional or commercial use of the appliance is not covered by this warranty.
2. For the warranty to be valid you must register the warranty together with your details within 28 days of
delivery of the appliance to the initial end user. To register the warranty, please follow the instructions
on the form included in the document package accompanying your appliance.
3. In accordance with the conditions below (items 4 - 8), defects affecting the appliance which are
clearly attributable to material and/or manufacturing faults will be rectified, provided they are
reported immediately after being identified and within 12 months of delivery of the appliance to the
initial end user.
4. To make a claim under this warranty please contact our customer service department using the
number provided in the appliance’s service manual, giving full details of the appliance concerned
(such as make, model and serial number) and the defect in respect of which the claim is being made.
We reserve the right to inspect the appliance following notification of the alleged defect to verify
whether a warranty claim is valid in accordance with the terms and conditions of this warranty. You
must (wherever possible) retain the appliance in the condition as when the defect was reported until
inspection has been carried out. If no defect is identified in the appliance upon inspection a
reasonable call out charge may be applied.
5. The warranty does not cover fragile items such as glass or cosmetic parts or consumable items such as
light-bulbs. Warranty liability will not be triggered by minor variances from nominal features which are
of no significance to the appliance's value or fitness for purpose, or damage caused by the chemical
or electrochemical effects of water and generally by exceptional environmental conditions,
inappropriate operating conditions, or the appliance having come into contact with unsuitable
materials. Likewise, no warranty liability will be accepted if the defects stem from transport damage
for which we are not responsible, improper installation and assembly, improper use, poor
maintenance or failure to follow operating or assembly instructions or any other instructions or
guidance in respect of the storage, use or operation of the appliance.
Furthermore, warranty does
not apply to any defect arising from fair wear and tear, willful damage, accident or negligence by the
end user or any third party.
This warranty will not apply: -
a)
If repairs or other interventions are carried out by persons not authorised by us to take such
action, or if our appliances are fitted with non-original spare parts, extras or accessories; and / or
b)
In the event of physical or verbal abuse towards any member of our staff.
6. In the event that a warranty claim is verified as valid, warranty provision will be free of charge and we
will decide (at our discretion) whether this will take the form of a repair or the replacement of the
appliance. All repairs to appliances will be carried out on the premises at which they are installed.
Once repair / replacement has taken place, our responsibility under this warranty in respect of that
reported defect will be complete. A purchase receipt with date of purchase or delivery must be
presented prior to commencement of any repair or replacement. Replaced parts pass into our
ownership.
7. Service may not be available in all of the islands around the UK and Ireland. Please check with your
retailer or contact our customer service department.
8. The provision of services under warranty neither extends the 12 month term of the warranty nor sets in
motion any new warranty period. The warranty period for spare parts fitted ends with the expiry of the
12 month warranty on the appliance as a whole.
9. Nothing in this warranty shall exclude or limit our liability for matters which cannot be excluded or
limited by law (for example, but without limitation, death or personal injury arising from our negligence
or our fraudulent actions or statements).
10. Subject to item 9 above, we shall not have any liability in respect of any special, indirect or
consequential losses (including for example, loss of salaries or profit, loss of business, loss of income or
revenue, loss of goodwill or reputation, loss of anticipated savings or loss of opportunity) except where
loss of or damage to your physical property was a foreseeable consequence of our failure to comply
with the terms of any contract between us.
11. This warranty is offered only to the initial end user of the appliance and is not transferable to any other
person unless we have agreed to this in writing.
12. If any court or competent authority decides that any of the provisions (or any part of a provision) of
these warranty conditions are invalid, unlawful or unenforceable to any extent, the term (or part
thereof) will, to that extent only, be severed from the remaining terms, which will continue to be valid
to the fullest extent permitted by law.
13. These warranty conditions are governed by English law and the courts of England will have jurisdiction
in relation to any dispute arising out of them.
14. These warranty conditions only apply to appliances purchased in the United Kingdom.
Note: Consistent with our continuing product
development policy, improvements may have
been made which render the contents of
this package slightly different to that shown.
Model No. UEFN602SS / UEFM601SS / UEFP601SS
November 2009
Appliance 365 Limited
Cranage House
730 Mandarin Court
Centre Park
Warrington
United Kingdom
WA1 1GG
www.appliance365.co.uk