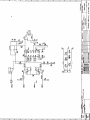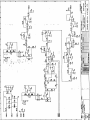
1
FETATRACK 210 / 260 Service Manual
FETATRACK 210 & 260 SERIES FETAL MONITORING
SYSTEMS SERVICE MANUAL
File - Q:ethel.serve\qualsys\servman\210260.doc
Page 1
FETATRACK 210 / 260 Service Manual
CONTENTS
Section
Section 1.
1.0
1.1
1.2
2.1
2.2
2.3
2.4
2.5
2.6
4.1
4.2
4.3
4.4
4.5
4.6
5.1
5.2
5.3
10
12
12
14
15
15
18
29
19
20
Test and Calibration
Introduction
Performance Checks
Setting up the Monitor (software options)
Test Procedures
Ultrasound Calibration
Toco Transducer Calibration
Section 5.
6
7
8
9
10
Circuit Descriptions
Introduction
Power Supply
Ultrasound Circuit
Toco Circuit
Microprocessor Circuit
Printer Interface
Display and Keyboard Circuit FETATRACK 210
Display and Keyboard Circuit FETATRACK 260
ECG and IUP Circuit
Section 4.
4
4
5
Description of the Instrument
Front Panel FETATRACK 210
Rear Panel FETATRACK 210
Front Panel FETATRACK 260
Rear Panel FETATRACK 260
Internal Layout
Dismantling Instructions
Section 3.
3.1
3.2
3.3
3.4
3.5
3.6
3.7
3.8
3.9
General Introduction
Introduction
Unpacking
Safety
Section 2.
Page No.
21
21
23
30
33
33
Safety Tests
Test Equipment Requirements
Setting Up
Operation
File - Q:ethel.serve\qualsys\servman\210260.doc
34
34
34
Page 2
FETATRACK 210 / 260 Service Manual
Section 6.
6.1
6.2
6.3
6.4
6.5
Digital Display Problems
Chart Recorder Problems
Ultrasound Problems
Uterine Activity Problems
ECG Problems
Section 7
7.1
Fault Finding
Recommended Spares
FETATRACK 210 & 260
Section 8
Parts Lists
Section 9
Service Information
9.1
9.2
FETATRACK 210
FETATRACK 260
Section 10.
37
37
38
39
39
Drawings
File - Q:ethel.serve\qualsys\servman\210260.doc
40
41
66
66
67
Page 3
FETATRACK 210 / 260 Service Manual
SECTION 1
GENERAL INTRODUCTION
1.0
INTRODUCTION
This service manual is written to aid in the maintenance and repair of the FETATRACK 210
and FETATRACK 260 series Fetal Monitors. Servicing of this equipment should be
performed only by a qualified technician after carefully studying this manual.
Section 7 of this manual describes safety checks for this instrument. All monitors are
thoroughly checked according to these instructions prior to shipment, but routine scheduled
safety checks are strongly encouraged to ensure the equipment continues to meet the
specifications for safety.
The drawings and circuit descriptions in this manual are correct as of the date it was
assembled, but the manufacturer reserves the right to make changes to improve the operation
of the instrument. If your instrument does not exactly match the manual, contact the
manufacturer for revision information.
1.1
UNPACKING
Inspect the instrument upon receipt for damage, dents, or scratches. If damage is found notify
SEWARD LTD promptly at the following address:Seward Ltd
98 Great North Road
London
N2 0GN
United Kingdom
Telephone
+44 (0) 181 365 4115
FAX
+44 (0) 181 365 3999
Retain the packing material for possible future use.
The instrument is set to operate at a nominal voltage of 240 VAC or 110 VAC 50/60 Hz
according to the destination.
If you have any doubt as to the voltage setting of your unit consult Seward immediately for
advice. Be prepared with the unit serial number.
In the event that the instrument must be returned to Seward for service, or any other reason,
use the same packing material in which the instrument was delivered. If this is no longer
available, the instrument should be packaged in a strong box of suitable size and with
adequate protective padding.
File - Q:ethel.serve\qualsys\servman\210260.doc
Page 4
FETATRACK 210 / 260 Service Manual
1.2
SAFETY
This monitor conforms to ISO 9001 and carries the CE mark. The following procedures are
recommended to ensure continued maximum safety for the patient and operator.
Do not service the monitor or its accessories while it is being used on a patient.
Always inspect transducers, cables, and power cord before using the monitor. If the power
cord or plug becomes cracked, frayed, broken, or otherwise damaged, it should be replaced
immediately by a qualified technician.
The monitor should only be plugged into a three-wire grounded receptacle. The monitor is
designed for operation from a single-phase power source with its neutral at or near ground
potential and with a separate safety-ground conductor. The receptacle should be wired in
accordance with the National Electrical Code.
Dangerous voltages exist within the monitor. Covers and panels MUST be in place while the
monitor is in use and MUST ONLY be removed by a qualified technician.
The units are not explosion proof and MUST NOT be used in the presence of flammable
anaesthetics.
The Rear Panel Accessory connector is provided to interface with specially designed
accessory instruments. Total leakage current, including approved accessories shall not exceed
the requirements of BS5724 part1 (IEC601 part1).
If in doubt about the correct operation of the units, foetal condition MUST be checked
immediately by an alternative method.
File - Q:ethel.serve\qualsys\servman\210260.doc
Page 5
FETATRACK 210 / 260 Service Manual
SECTION 2
DESCRIPTION OF THE INSTRUMENT
2.1
FRONT PANEL - FETATRACK 210
The Front Panel supports various facilities to control the general functioning of the
monitor.These are all membrane activated switches which are operated by pressing for
approximately 1 second. Their functions are as follows:ON/OFF
- This turns the monitor on. If the mains supply is not connected or
not switched on, power is supplied by the internal rechargeable batteries.
PRINTER ON/OFF
- This controls the action of the thermal printer. Pressing once turns
the printer on at the preset speed, pressing again changes the speed, whilst pressing and
holding turns the printer off and fast feeds blank paper.
VOLUME ∆ and ∇
- These two switches increase or decrease the volume setting of the
audio signal from the loudspeaker. The current setting is saved when the unit is turned off
and is recalled the next time it is turned on.
UA ZERO
- This reads the current output of the Toco Transducer and uses this
value as the new Toco zero reference.
POWER ON
- Indicates that the mains supply is switched ON.
BATTERY LOW
is necessary.
- Indicates when the batteries have reached a point when recharging
STORE FULL
- When flashing, shows internal memory activity during paper-out or
Homecare recording,. When on continously it warns of the internal memory reaching 90% of
its FULL capacity.
FHR
- This is a three digit display of Fetal Heart Rate in beats per minute.
During the transmission of data in Homecare mode, this is also used to indicate the current
block number and error messages.
♥ ( FETAL PULSE ) - The heart shaped window to the right of the FHR display flashes at
the fetal heart rate after each computation of fetal heartbeats.
PRINTER cm/min
- This single digit display indicates the current print speed when the
printer is running. Additionally, in Homecare mode, it shows ‘ d ‘ to indicate that Homecare
mode has been selected and ‘ t ‘ to indicate that data has been stored and is ready to be
transmitted.
The printer records fetal heart rate ( FHR ), uterine activity ( UA ) and fetal movement (
Event Mark ), together with date, time and recorder speed on thermosensitive z-fold paper.
CARDIO (Blue)
UA (Yellow)
- This is the input socket for the FHR Ultrasound Transducer.
- This is the input socket for the UA Toco Transducer.
File - Q:ethel.serve\qualsys\servman\210260.doc
Page 6
FETATRACK 210 / 260 Service Manual
2.2
REAR PANEL - FETATRACK 210
Facilities and controls supported by the Rear Panel are detailed below :AC LINE INPUT
- This is a 3-pin IEC receptacle for connection to the mains supply
via an AC power line cord.
FUSES F1 and F2
- These are incorporated in the AC Line Input receptacle.
For 240VAC operation the rating of the fuses is T 200mA ( Time Delay ) 250V.
For 110VAC operation the rating of the fuses is T 500mA ( Time Delay ) 250V.
POWER
- This rocker switch applies mains to the unit for
battery charging and for normal operation.
ACCESSORY
- This is a 25-way ‘D’-type socket which enables the monitor to mate
with a specified central computer or other accessories.
EXTERNAL MARK - This is a jack socket which accepts the hand held, patient operated
push switch which is used to indicate fetal movement. Pressing the button prints an arrow (↑)
Event Mark, on the chart paper.
File - Q:ethel.serve\qualsys\servman\210260.doc
Page 7
FETATRACK 210 / 260 Service Manual
2.3
FRONT PANEL - FETATRACK 260
The Front Panel supports various facilities to control the general functioning of the monitor.
VOLUME ∆ and ∇
- These two switches increase or decrease the volume setting of the
audio signal from the loudspeaker. The current setting is saved when the unit is turned off
and is recalled the next time it is turned on.
PRINTER ON/OFF
- This controls the action of the thermal printer. Pressing once turns
the printer on at the preset speed, pressing again changes the speed, whilst pressing and
holding turns the printer off and fast feeds blank paper.
UA ZERO
- This reads the current output of the Toco Transducer and uses this value as
the new toco zero reference.
POWER ON
- Indicates that the mains supply is switched ON.
FHR
beats per minute.
- This is a green three digit display indicating Fetal Heart Rate in
♥ (FETAL PULSE) - The heart shaped window to the right of the FHR display contains a
multicolour LED which flashes at the fetal heart rate. The colour displayed is an indicator of
signal quality: green for a good quality signal, amber for signal quality below optimum, and
red for a poor or invalid signal
PRINTER cm/min
printer is running.
- This single digit display indicates the current print speed when the
UA
- This is a yellow three digit display showing the relative
contractions strength if a Toco Transducer is connected, or the Intra-Uterine Pressure if an
IUP Transducer is connected.
The printer records fetal heart rate ( FHR ), uterine activity ( UA ) and fetal movement (
Event Mark ), together with date, time and recorder speed, on thermosensitive z-fold paper.
CARDIO (Blue)Leg Electrode.
This is the input socket for the FHR Ultrasound Transducer or ECG
UA (Yellow)Transducer.
This is the input socket for the UA Toco Transducer or IUP
File - Q:ethel.serve\qualsys\servman\210260.doc
Page 8
FETATRACK 210 / 260 Service Manual
2.4
REAR PANEL - FETATRACK 260
Facilities and controls supported by the Rear Panel are detailed below.
AC LINE INPUT
- This is a 3-pin IEC receptacle for connection to the mains supply
via an AC power line cord.
FUSES F1 and F2
- These are incorporated in the AC Line Input receptacle.
For 240VAC operation the rating of the fuses is T 200mA ( Time Delay ) 250V.
For 110VAC operation the rating of the fuses is T 500mA ( Time Delay ) 250V.
POWER
- This rocker switch applies mains to the unit for normal operation.
ACCESSORY
- This is a 25-way ‘D’-type socket which enables the monitor to mate
with a specified central computer or other accessories.
EXTERNAL MARK - This is a jack socket which accepts the hand held, patient operated
push switch which is used to indicate fetal movement. Pressing the button prints an arrow
(↑), or Event Mark, on the chart paper.
File - Q:ethel.serve\qualsys\servman\210260.doc
Page 9
FETATRACK 210 / 260 Service Manual
2.5
INTERNAL LAYOUT
With the top cover removed and the front panel facing you, there is one large printed circuit
board ( the Main PCB Assembly ) fixed to the base of the monitor. This contains the power
supply circuits, microprocessor circuits, printer drive circuits and the external toco and
ultrasound circuits. In the FETATRACK 210 it also includes the battery backup circuits. In
addition, there is the Display Board Assembly mounted on the rear of the Front Panel, which
contains all the displays and keyswitches.
The FETATRACK 260 also has the option of a plug-in ECG / IUP card which is mounted
vertically on the 64 way indirect edge connector on the right hand side of the Main board.
2.6
DISMANTLING INSTRUCTIONS
Note: Before dismantling the unit, ensure that the power cord, and all other leads including
the transducers are disconnected from the instrument.
The top cover has to be removed to allow access to all of the sub-assemblies within the unit.
This is carried out by inverting the unit and resting it on its cover on a clean surface. The four
M4 screws around the periphery of the unit, holding the cover in place, are now accessible
and can be removed. If the unit is carefully turned back on to its feet the cover can now be
removed by lifting it upwards away from the Base, taking care to disconnect the earth
bonding cable connecting the Cover to the grounding post on the Rear Panel. This is done by
carefully pulling or levering the spade connector away from the grounding post.
WARNING : IF WORKING ON A FETATRACK 210, BEFORE PROCEEDING, FUSE
F1 SHOULD BE REMOVED FROM THE MAIN BOARD TO ISOLATE THE
RECHARGEABLE BATTERIES.
Should access to the underside of the Main Board be required, this can only be accomplished
by removal of the board. This is done by removing the six screws holding the PCB to the
Base together with the two transformer fixing screws. Additionally, the four M3 screws
holding the Rear Panel on to the Base are removed. These are situated on the Base directly
under the Rear Panel. The the two remaining green/yellow earth bonding cables should be
removed from the Rear Panel by carefully pulling or levering, the spade connectors away
from the grounding terminals. The printhead ribbon cable ( from PL1 ), the motor drive cable
( from PL2 ), the Display Board ribbon cable ( from PL4 ), and the Front Panel input
connectors cable ( from PL6 ) should now be unplugged from the Main Board, allowing the
Main Board and Rear Panel assembly together to be removed from the unit.
The Main Board is fully functional when removed from the unit provided the Display Board
is re-connected.
File - Q:ethel.serve\qualsys\servman\210260.doc
Page 10
FETATRACK 210 / 260 Service Manual
The Rear Panel does not usually have to be removed from the Main Board, but if it does
become necessary, then it can be done as follows.
The brown and blue wires from the mains transformer to the mains input switch should be
disconnected by carefully pulling or levering the spade connectors away from the switch
contacts. Similarly, the black ground reference wire from the Main Board should be removed
from the remaining ground terminal on the Rear Panel. The loudspeaker wires should also be
disconnected. After removal of the nut on the External Mark jack socket, the Rear Panel
assembly and the Main PCB assembly can be separated.
The Front Panel assembly can be separately removed from the Base if desired.
The Display Board ribbon cable ( from PL4 ), and the input connectors cable ( from PL6 )
should first be unplugged from the Main Board. The monitor is then inverted to access the
Base allowing the four M3 screws holding the Front Panel assembly to the Base to be
removed. Whilst supporting the Front Panel assembly, the monitor is carefully returned to its
feet. The Front Panel bracket ( connecting the Front Panel to the right hand side of the Printer
) is disconnected by unscrewing the M3 nut holding the bracket to the corner of the Display
Board. This allows the entire Front Panel Assembly to be removed, taking care to disconnect
the green/yellow earth continuity cable, situated below the UA input socket, by carefully
pulling the spade connector away from the earth post.
The Display Board may be removed from the Front Panel Assembly, if required, by removal
of the three remaining M3 nuts situated at the corners of the Display Board.
To remove the ECG / IUP card from an FETATRACK 260 it is necessary to disconnect the
input connector cable assembly from ( PL1 ) and to slacken, or remove, the M3 x 12 clamp
screw at the rear of the pcb. The card may then be gently eased vertically away from the edge
connector.
File - Q:ethel.serve\qualsys\servman\210260.doc
Page 11
FETATRACK 210 / 260 Service Manual
SECTION 3
CIRCUIT DESCRIPTIONS
3.1
INTRODUCTION
The Main Board is common to both the FETATRACK 210 and the FETATRACK 260. The
circuitry has been divided into functional blocks, each block being described separately.
Where there are detail differences between the FETATRACK 210 and the FETATRACK
260 they are oulined in the relevant section. The blocks are as follows :Power Supplies
Ultrasound Circuit
Toco Circuit
Microprocessor Circuit
Printer Interface
Display and Keyboard circuit FETATRACK 210
Display and Keyboard circuit FETATRACK 260
ECG and IUP Circuit
3.2
POWER SUPPLY CIRCUITS
The 240/110 VAC supply enters the FETATRACK 210, and FETATRACK 260, through a
double fused mains inlet, and is fed via a double pole switch to a low voltage mains
transformer. For greater isolation and safety this is of split bobbin construction, which
physically separates the primary and secondary windings.A thermal fuse (non resetting) is
contained in the primary side.
The input supply voltage is stepped down via the secondary to a nominal 30 VAC. This is
full wave rectified by bridge rectifier BR1, and smoothed by capacitor C1, to give a nominal
raw DC voltage of 42V.
From this point the circuit differs between the FETATRACK 210 and the FETATRACK
260, the FETATRACK 260 being a mains only device, whilst the FETATRACK 210
additionally contains re-chargeable batteries for short term remote use.
3.2.1
FETATRACK 210 BATTERY CIRCUIT
The raw +42V DC feeds a linear regulator IC1 connected as a 26mA constant current source
which is used to trickle charge the re-chargeable battery packs BP1,2 and 3 whenever the
mains is switched on. These battery packs are connected in series and provide a nominal
voltage of +29V to power the monitor whilst being used away from a mains source, or in the
event of a mains failure.
The raw +42V and the battery voltage are routed to the rest of the circuitry as Vunreg through
blocking diodes D1 and D2.With the mains switched on, the raw +42V is automatically used
as the source via D1, if the mains is off, the battery voltage becomes the source via D2.
File - Q:ethel.serve\qualsys\servman\210260.doc
Page 12
FETATRACK 210 / 260 Service Manual
In the FETATRACK 210 the unit is switched ON by the Front Panel ON/OFF switch. This
momentarily grounds the CLK input of IC2A causing the Q output to change state to a ‘high’.
This turns on TR1, which in turn turns on the FET switch TR2, thus switching Vunreg to the
rest of the circuit. The monitor is switched OFF by pressing the Front Panel ON/OFF switch
again, which clocks IC2A , this time changing the Q output to a ‘low’. This causes the FET
switch TR2 to turn off ( via TR1 ) thus removing power to the rest of the circuit.
The potential divider R5/R6 on the battery output, provides a voltage Vstandby of
approximately +11.6V to supply IC2 continuously. This enables the monitor to be turned on
at any time, provided the batteries are charged. Switchbounce on the ON/OFF switch is
removed by a time delay applied to IC2 by R79 and C16.
In the FETATRACK 260, the raw +42V DC is routed directly to the rest of the circuitry
without the interposing FET switch, the monitor turns on as soon as the mains is switched on.
The FETATRACK 260 has additional smoothing of the raw DC (provided by Cx) to cater for
the additional current demands.
3.2.2
FETATRACK 210 & 260 STABILISED SUPPLIES
The rest of the power supply circuit is common to both the FETATRACK 210 and the
FETATRACK 260.
Vunreg feeds two switching regulators, IC3 and IC5. These regulators are synchronised, the
switching frequency being set to approximately 120khz by the high stability capacitor C6.
IC3 is configured as a step-down regulator to provide a regulated +5V logic supply.
IC5 is configured as a step-down regulator to provide a regulated +15V supply for the
analogue circuits. A -15V unregulated supply for the analogue circuits is also provided by a
second winding on the inductor T3.
3.2.3
PRINTER SUPPLY
The printhead and printer motor are supplied from a circuit based around the linear regulator
IC4 whose output is variable from +18V to +24V, and is set by VR1. This adjustment is
factory set.
The printhead demands high current pulses (up to 10A) of short duration. As the regulator
alone cannot deliver greater than 1.5A, this is accommodated by the addition of a by-pass
transistor TR3, around IC4. When the current demanded exceeds 0.5A TR3 turns on
supplying the excess current required, voltage stability still being maintained by IC4.
To avoid excessive fluctuations on Vunreg, a large resevoir capacitor C8 is provided from
which the required current is drawn during peak demands.
The printer supply is not present continuously, but is turned on only when the printer is
operated. Operation of the Printer ON/OFF switch on the Front Panel initiates a signal
‘Printer Off’, which turns on FET switch TR9, thus routing Vunreg to the regulator circuit
IC4. When printing is terminated, TR9 is turned off and hence the printer supply. This
conserves power, which is particularly relevant in the case of the FETATRACK 210 when
running on its internal batteries.
File - Q:ethel.serve\qualsys\servman\210260.doc
Page 13
FETATRACK 210 / 260 Service Manual
3.3
ULTRASOUND CIRCUIT
The ultrasound circuit is built up of four discrete sections. These are :Oscillator and Transmitter amplifier
Receiver and Detector
Audio amplifier
Signal pre-processing.
These operate to produce a continuous wave of 2.1MHz ultrasound which is passed to the
transmitter crystal in the transducer.The signal is reflected from moving interfaces within the
body to the receiver crystal in the transducer. It is then amplified, and then detected so the
Doppler shift resulting from the moving interface can be heard and passed via signal preprocessing circuitry to the A/D converter for rate calculation.
3.3.1
OSCILLATOR & TRANSMITTER AMPLIFIER
Field effect transistor TR4, together with L1, C45, C46 and associated components, form a
Colpitts oscillator. This runs at a frequency of 2.1MHz, producing a sinewave at the drain of
TR4 of 22V amplitude.
This signal is then fed to the output stage TR5, which has a tuned circuit ( L2/C48 ) as its
collector load. The output transformer L2 has a secondary winding which matches the
impedance of the transmitter crystal, to which it is connected directly.
The output power is varied by adjustment of VR2 during test.
3.3.2
RECEIVER & DETECTOR
The reflected signal of modulated 2.1MHz ultrasound is fed via a resonant transformer circuit
L3/C52 to the gate of TR6. TR6 and TR7 form a cascode amplifier whose drain load
comprises the resonant circuit L4/C51. From the drain of TR7 the amplitude complex of the
received signal is detected by passing the signal through diode D16, the high frequency
component being filtered by C53/R54, the frequency breakpoint being at 1KHz. The raw low
frequency heart complex is then amplified and filtered by IC29 and its associated
components, which form a bandpass filter amplifier with a bandwidth of 150Hz to 1KHz.
This signal is passed to the audio amplifier and signal pre-processing sections.
3.3.3
AUDIO AMPLIFIER
The audio signal passes to the analogue switch IC28 where the microprocessor routes the
signal to a digital attenuator comprising IC23 and buffer amplifier IC32, where the volume
setting is determined by the microprocessor, according to the user operation of the Volume
switches on the Front Panel. From here the gain controlled signal is fed via R35 to the input
of a monolithic power amplifier IC31 which drives the loudspeaker on the Rear Panel.
The analogue switch IC28 also routes the Tape In/Out and ECG beep signals as appropriate.
3.3.4
SIGNAL PRE-PROCESSING
File - Q:ethel.serve\qualsys\servman\210260.doc
Page 14
FETATRACK 210 / 260 Service Manual
The detected audio complex from IC29 is also fed via the analogue switch to a bandpass
amplifier arranged around IC29B, the filter characteristics being arranged to reject signals
below 150Hz and above 1KHz. This output is taken via C40 to an AGC circuit formed
around a VOGAD, IC25.
The amplitude stablised signal is then amplified by IC26A and full wave rectified by the
combination IC26B and D15. The rectified signal is then buffered by IC27A and smoothed
by the active filter IC27B. The smoothing is achieved by the low pass active filter having a 3db response at 5Hz, hence giving the average value of the audio complex. This signal is then
passed to the A/D converter, IC22, for further processing by the microprocessor.
3.4
TOCO CIRCUIT
A stable voltage of +5.1V is obtained from zener diode ZD3, which is buffered by the noninverting buffer IC30A to provide a positive excitation voltage for the Toco Transducer. It is
then inverted by IC30B to provide a negative excitation voltage for the Toco Transducer.
This is also used to pull the Toco input negative, via R62, when no transducer is connected.
The Toco input is fed to a non-inverting amplifier IC24, which has an H.F. bandwidth of 1
KHz, and whose output is fed directly to IC22, the A/D converter.
3.5
MICROPROCESSOR CIRCUIT
The microprocessor circuit is arranged around IC10, an HD63B09 - a fast, second generation
8/16 bit central processing unit (CPU).
When power is applied to the circuit, a microprocessor supervisory circuit IC33 waits for the
power rail to become stable, and then 100 ms later releases the reset on IC9, IC10 and IC21
by going high (logic 1) to +5V. This starts the CPU working, which reads from the EPROM
IC11, the bytes at the very top of its memory map. This points the CPU to the start position
from which to start executing. This sets up all the peripheral devices, and in the case of the
PIA IC9, ( which has an interrupt timer ), starts the system clock, which consists of interrupts
from IC9 pin 21 to the CPU, IC10 pin 3, at a rate of 1 every 0.5 ms. As all functions are time
dependant nothing starts without this clock. The CPU now reads all the preset variables from
IC12, the battery protected RAM.
The supervisory circuit, IC33, controls the chip enable (E1) and the power rail, Vcc, of IC12,
forcing the device into a low power mode when the +5V logic supply falls below a preset
threshold.
The battery source, BP4, for the RAM backup, is a 3V lithium cell with a nominal life of 10
years.
After the CPU has loaded the variables, it checks three checksums to validate the information
it has read. If an error is detected it will display 'Err' on the display and reload the RAM with
data from EPROM so the system can continue to operate.
Selection of the individual devices is controlled by the chip select circuits IC18, IC19 and
IC15.
File - Q:ethel.serve\qualsys\servman\210260.doc
Page 15
FETATRACK 210 / 260 Service Manual
The RAM IC12 uses all the bottom half of the systems memory map, and is therefore
selected when A15, the most significant address bit, is low. The rest of the devices are
selected according to A15 being high and the combination of A12, 13 and 14 as decoded by
IC18 ( a 3 to 8 line decoder ).
The table following this section shows the memory locations of each device. IC11 takes the
top quarter of the memory map with the outputs Y7, Y6, Y5, & Y4 of IC18 being gated via
IC19 so that with any one of the outputs low, IC11 is selected.
IC13 is a battery backed Real Time Clock which derives its clock reference from its own
32.768 KHz crystal, XTL2. The battery source here, BP5, is also a 3V lithium
cell. The clock is read on demand from the CPU, and set via the user setup program. In the
event of a power rail failure, the device automatically switches to its battery BP5 for its
power source.
IC17 and IC19 form an RS232 communications system. IC17 is an asynchronous
communications interface adaptor ( ACIA ) and is controlled by the CPU, whilst IC19 is a
line driver/receiver.
Timing is derived from XTL3, a 1.843 MHz crystal, whilst communication speed is
controlled by the system software option selected in the setup.
IC20 supplies a -5V reference to IC19, the RS232C line driver, allowing the signal swing to
be +/- 5V.
RS 232 CONNECTIONS
Accessory Port Pin Number
25 Way D Type (Male)
2
TXD
3
RXD
5
CTS
7
GND
Computer
25 Way D Type (female)
3
RXD
2
TXD
20
DTR
7
GND
Most analogue signals eventually require digital signal processing for display, chart recording
or digital transmission. The signals are presented to IC22, a 10 bit A/D converter with an
8 way multiplexed input. The converter accepts unipolar signals of 0 - +5V. In order to obtain
digitisation of bipolar signals, a voltage pedestal is applied to the requisite analogue input.
PIA, IC21, interfaces the CPU with the display and keyboard circuit, as well as detecting the
selection of Ultrasound or ECG ( pin 16 ), and the presence of an Event keypress ( pin 17 ).
Pin 18 of IC21 detects the end of conversion pulse from the A/D converter, IC22, passing its
information on request to the CPU. The controlling program breaks down the displayable
characters into segments and strobe information, which is passed via IC21 pins 2-8 and pins
10- 13, to a 20way connector PL4 and thence to the Display Board.
VIA, IC9, is split between audio volume control and printer interface.
File - Q:ethel.serve\qualsys\servman\210260.doc
Page 16
FETATRACK 210 / 260 Service Manual
PA0-5 ( pins 2-7 ) interface with IC23, the digital attenuator ( volume control ). The program
reads the last recorded 6 bit word from RAM IC12 and passes this to IC23, which sets a
precise amount of attenuation of the audio signal.
Pressing Volume UP or DOWN on the Front Panel will cause the program to increase or
decrease the 6 bit word to IC23. Pressing and holding causes the word to increase in jumps.
Pin 9 of IC9 ( PA7 ) outputs pulses in time with each detected ECG complex in the
FETATRACK 260, this pulse being passed to IC28 where it gates a tone burst to the audio
circuit to beep on each ECG complex.
The last output from side A of IC9 is PA6 ( pin 8 ), which indicates bradycardia alarm status.
This pulses low when a bradycardia is detected and pulls pin 8 of IC28 low, passing a tone
directly into the audio amplifier.
Memory Map
FFFF
:
:
:
C000
3.6
EPROM, IC11
B000
NOT YET ASSIGNED
A000
A/D CONVERTER, IC22
9000
REAL TIME CLOCK, IC13
8400
PIA, IC21
8200
RS232, IC17
8100
VIA, IC9
7FFF
:
:
:
0000
RAM, IC12
PRINTER INTERFACE
File - Q:ethel.serve\qualsys\servman\210260.doc
Page 17
FETATRACK 210 / 260 Service Manual
IC9 contains timers, serial drivers and peripheral drivers, and is therefore also used for
printer interface and control. The principle of operation of the printhead and motor drive
circuit is as follows:
Data to be printed is decoded by the software into bit positions within the allowable area of
the printhead ( 256 for the FETATRACK 210, 1024 for the FETATRACK 260 ). This data is
then passed in parallel to the serial converter on IC9 and output as serial data ( Print Data )
from IC9 pin 19 to the printhead. IC9 also provides a serial clock ( Print Data Clock ) to the
printhead from pin 18.
The data is latched onto the printhead by a pulse from IC9 pin 39, which is first inverted by
buffer IC7A (Print Data Latch). The Print Data Strobes ( 1-4 ) to the printhead cause the
appropriate print elements to be energised and ‘burn’ the paper.
When the printer is strobed to burn the data, a timer is set in IC9 which will interrupt the
CPU when the paper is burned. At this point the strobe is removed. If this should not happen,
a monitor circuit IC6 which is connected via diodes D7-10 to the strobe lines, will time out,
this then turns off the output of IC8 pin 10 removing the printhead supply, hence preventing
printhead burn-out.
Under normal conditions, with the Printer OFF, there is no supply connected to the printhead.
Only when printing is requested does IC21 pin 19 go low, in turn causing IC8 pin 10 to go
low if all print strobes are in a high condition.
The Printer motor is a synchronous stepper motor controlled by the CPU via IC9. IC9 pins
14-17 generate motor drive signals, which are buffered by the high voltage drivers in IC8.
These ground the motor windings in turn, hence stepping the motor. Diodes D13-17 catch
any overshoot spikes.
To further protect the printhead, the system will only print if there is paper loaded into the
recorder. This is detected by an IR proximity detector ( the Paper Out Sensor ) mounted
beneath the paper pack in the paper tray. This is monitored by the A/D converter, IC22 ( pin
28 ), simply registering a’low’ for paper present, or a ‘high’ for paper out.
PRINTHEAD SCHEMATIC INFORMATION
Section Number
File - Q:ethel.serve\qualsys\servman\210260.doc
Page 18
FETATRACK 210 / 260 Service Manual
FHR
4
3
2
1
UA Channel
Resistive Elements
Strobe 4
Strobe 3
Strobe 2
Strobe 1
Latch
Clock Pulses
Latch
Shift Register
DATA In
3.7
Data Out
FETATRACK 210 DISPLAY and KEYBOARD CIRCUIT
A 20way ribbon cable connects PL1 on the Display Board to PL4 on the Main Board. Data is
presented to IC1 and IC2 on the Display Board from the PIA IC21 on the Main Board. IC1 is
a high current Darlington array and passes the the segment information to the 7-segment
displays LED5-LED8. Strobe data is presented to IC2, the outputs of which pull the bases of
TR1-4 low, turning them on, and thus connecting the displays to the +5V power rail. LED1LED3 are similarly connected to the +5V rail by these strobe lines, but these are caused to
turn on by the signal ‘Energise LED’.
Switches SW1-4 are also connected to the strobe lines, through blocking diodes D1-4. When
a switch is pressed the strobe pulse is passed back as ‘Switch Sense’, to pin 9 of IC21 on the
Main PCB.
3.8
FETATRACK 260 DISPLAY and KEYBOARD CIRCUIT
A 20way ribbon cable connects PL1 on the Display Board to PL4 on the Main Board. Data is
presented to IC1, IC3 and IC4 on the Display Board by IC21 on the Main circuit card. IC1 is
a high current Darlington array and passes the the segment information to the 7-segment
displays LED2-LED5 and LED9 - LED11.
Individual display strobe lines are decoded from signals Strobe D1-D3 by a 4 to 8 line
decoder IC3. The decoded output is then passed to IC2, another high current Darlington
array, the outputs of which pull the bases of TR1-7 low, connecting the 7-segment displays to
File - Q:ethel.serve\qualsys\servman\210260.doc
Page 19
FETATRACK 210 / 260 Service Manual
the +5V power rail. The ‘Strobe D4’ and ‘Energise LED’ signals are passed to a high current
bi-phase driver IC4 which drives the tri-colour LED - LED12.
The state of the input signals to IC4 determines the output phase from IC4 which will
appropriately energise the LED’s within LED12 to show the required colour ( green, amber
or red ).
Switches SW1-4 are also connected to the display strobes for LED2-LED5, through blocking
diodes D1-4. When pressed, the strobe pulse is passed back to pin 9 of IC21 on the Main
PCB as ‘Switch Sense’.
3.9
ECG and IUP CIRCUIT (FETATRACK 260 Intrapartum only)
ECG signals enter the isolated section of the circuit board via PL1 from the CARDIO socket
on the Front Panel. The signals are buffered by U14 and U15 before being amplified by the
instrumentation amplifier U11. DC offsets introduced by certain ECG electrodes are
eliminated by means of the dc servo circuit ( IC10 and associated components ) around U11.
The amplified signal is transferred to the non-isolated circuitry via a linear isolation amplifier
comprising U9, OP1, U6A, OP2 and U6B.
The signal now passes through an active twin-T notch filter (IC5 and associated components)
centered on 50Hz to remove any mains pick-up on the signal.
This is followed by a digitally controlled potentiometer ( U1 ) which, with the following
amplifier,U2A, is used to provide an AGC function under the control by the microprocessor.
Subsequent stages provide filtering of the signal to remove unwanted noise and out-of-band
signal content.
Finally the signal is rectified and buffered ( U4 ) before leaving the board to be routed to the
A/D Converter on the Main Board.
IUP signals also enter the isolated section of the circuit board via PL1 but this time from the
UA socket on the Front Panel. These signals are amplified by the instrumentation amplifier
U16 and are then transferred to the non-isolated circuitry via another linear isolation
amplifier, comprising U13, OP3, U7A, OP4 and U7B.
The signal is now amplified ( U8A ) and filtered ( U8B ), offset control being provided by
VR3 and gain control ( span ) by VR4, before leaving the board to be routed to the A/D
Converter on the Main Board.
Energisation for the IUP transducer is provided by the +5V high stability regulator, RV1.
The power rails required by the isolated circuits are supplied by a multi-output dc-dc
Converter ( PSU ).
SECTION 4
TEST AND CALIBRATION
4.1
INTRODUCTION
File - Q:ethel.serve\qualsys\servman\210260.doc
Page 20
FETATRACK 210 / 260 Service Manual
The following sections detail tests to ensure that the FETATRACK 210 or FETATRACK
260 is operating within specification. These tests may be performed in whole or part.
However, if any repairs are carried out to the power supply circuits then it is recommended
that the whole test/calibration procedure is undertaken.
The test procedures may be performed without removal of the circuit board from the unit.
4.2
PERFORMANCE CHECKS
The following procedure is intended to provide a means of determining the functional status
of the unit. It should be included as part of a preventative maintenance plan and should be
performed on a regular basis.
Plug the monitor line cord into a grounded mains outlet of suitable line voltage and
frequency, as indicated on the Rear Panel of the FETATRACK 210 or FETATRACK 260.
Switch ON the mains using the POWER switch on the Rear Panel. The green Front Panel ON
LED will illuminate.
NOTE: The FETATRACK 260 is now switched ON: the FETATRACK 210 additionally
requires the Front Panel ON/OFF switch to be pressed before proceeding further.
The FHR display will first show the system selftest “888”, followed by the software revision,
and finally "---". This indicates that the instrument is switched on and awaiting inputs.
Load chart paper to the Printer (for assistance see operating instructions) and ensure the
paper is correctly aligned.
Press the PRINTER ON/OFF switch on the Front Panel to turn on the Printer which will
proceed to run at either 1, 2 or 3 cm/min dependent on the preset value. This is indicated on
the Printer speed display.
4.2.1
ULTRASOUND
Plug the Ultrasound Transducer into the blue CARDIO socket on the Front Panel and set the
audio volume to maximum by pressing the VOLUME ∆ switch.
Place the transducer in the palm of your hand and gently stroke the back of the hand at a
constant rate of about 2 times a second.
Check that a corresponding audio signal is output from the loudspeaker on the Rear Panel.
Observe that the FHR display shows the simulated rate ( approx 120 ) and the heart shaped
foetal pulse LED flashes in time with the audible signal ( on an FETATRACK 260 the colour
of this LED will also vary according to the quality of the signal ). The ultrasound trace on the
chart paper should also correspond to the FHR information being displayed.
File - Q:ethel.serve\qualsys\servman\210260.doc
Page 21
FETATRACK 210 / 260 Service Manual
4.2.2
UA/TOCO/CONTRACTIONS
Plug the Toco Transducer into the yellow UA socket on the Front Panel and place the
Transducer head face up on the table. Allow to settle for a short while ( 1-2 minutes ) and
then press UA ZERO to set the no load trace to the baseline on the printout ( the baseline will
be a preset value between 0 and 20, but typically 0, 5, or 10, as selected in the set-up
procedure).
Place a 100gm weight on to the centre of the Transducer and check that the Toco trace on the
chart recording increases by 20 units+/- 10%.
Remove the weight and the trace should return to the baseline.
Note: The FETATRACK 260 will also display the Toco value in the UA window on the
Front Panel.
4.2.3
EVENT MARKER
Plug the hand held remote Event Marker into the ‘External Mark’ socket on the Rear Panel.
Press the Event Marker button once and note that a half arrow is printed at the bottom of the
FHR graticule on the chart paper. The arrow is printed each time the Event Marker button is
pressed.
4.2.4
PRINTER
Turn off the printer by pressing and holding the PRINTER ON/OFF switch until the print
speed indicator ( cm/min ) extinguishes. The Printer will stop printing and feed approx. 5cm
of paper before stopping automatically
Press and hold the UA ZERO switch and then press and hold the PRINTER ON/OFF switch
at the same time. The instrument will now perform a printhead calibration check.
The FHR Display will read ‘tst’ (TEST), approximately 3 seconds later the recorder will run
at high speed printing a calibration pattern. This consists of two longitudinal lines, one at 150
on the FHR scale and one at 50 on the UA scale. These calibration lines are followed by a
zig-zag then a chequerboard pattern.This process is repeated for 5 cycles after which the
Printer will automatically turn off.
The trace should be inspected to ensure that the lateral alignment is correct ( i.e. the printed
150 and 50 lines align with those on the chart paper, +/- 0.6mm ) and that the density of the
trace is even along the complete length and width of the trace.
In the event that the lateral alignment requires adjustment, this can be corrected by loosening
the two M4 screws at the rear of the recorder assembly at the point where the glass fibre
head-spring is attached to the pivot bar just in front of the motor.This allows lateral
movement of the head assembly which may be moved to align the printhead with the chart
paper. Small adjustments only should be made, each time running the test trace to check the
File - Q:ethel.serve\qualsys\servman\210260.doc
Page 22
FETATRACK 210 / 260 Service Manual
new alignment. Care should be taken also to ensure that the pivot blocks, into which the M4
screws fit, are abutted close to the side walls on both sides of the printer chassis.
Uneven print density will generally be caused by a build of dirt ( ink and paper dust ) on the
print elements on the printhead and can be overcome by cleaning.
4.2.5
ECG ( FETATRACK 260 Option only )
Connect an ECG simulator to the leg electrode. Set the output to 100 uV pk and the rate to
approximately 150BPM.
Connect the leg electrode to the blue CARDIO socket on the Front Panel and allow the ECG
circuit to stabilize (this takes approximately 10-15 seconds). The FHR display will show the
rate, synchronised with an audible bleep. This rate will also be printed on the chart recording.
Decrease the rate on the simulator and the monitor should follow this change; increase the
rate and the monitor should again follow the change. Check also that the heart shaped fetal
pulse indicator flashes at the same rate and is green (good signal).
4.3
SETTING UP THE MONITOR
Both the FETATRACK 210 & 260 can be configured to suit various applications. The mode
of operation of the monitor is programmable through the Front Panel to give a certain amount
of customisation. This facility is controlled by the system software. The options may be
differ from the list below as new software releases are made available. If this is the case, call
your supplier or Seward Medical Systems service department for the upgrade information.
4.3.1
SETTING UP THE FETATRACK 260 (V 1.01 System Software)
The programming mode is entered by pressing and holding UA ZERO whilst turning the
monitor ON. The displays will show :888
888
and then
101
888
and then
A01
000
Release the UA ZERO button and select the desired options from the sequence below.
The following table gives a description of the individual fields and their options. To change
the value of the option, press VOLUME!, In some fields VOLUME " will also change the
value.
Pressing UA ZERO saves the selected value and moves on to the next field. At any time,
pressing and holding PRINTER ON/OFF will exit the setup program.
REAL TIME CLOCK
File - Q:ethel.serve\qualsys\servman\210260.doc
Page 23
Field
A
b
c
d
E
Value
1 - 24
0 - 60
1 - 12
1 - 31
0 - 99
FETATRACK 210 / 260 Service Manual
Description
Sets the real time clock Hour Mode
Sets the real time clock Minute Mode
Sets the month
Sets the day
Sets the year
ALARM SETTINGS
ALO
OFF
ON
60 - 120
AHI
OFF
ON
160 - 200
Sets Low Heart Rate alarm to OFF irrespective of MASTER
ON/OFF state.
Sets Low Heart Rate alarm to ON. This option is also controlled by
the Master ON/OFF setting (pressing Volume up and down
simultaneously).
Incrementing in 5's: Sets the alarm threshold at which LOW alarm
computing starts
Sets the High Heart Rate alarm to OFF irrespective of MASTER
ON/OFF state.
Sets the High Heart Rate alarm to ON. This option is also controlled
by Master ON/OFF setting (pressing Volume up and down
simultaneously).
Incrementing in 5's: Sets the alarm threshold at which the HIGH
alarm computing starts.
At this point on the FETATRACK 260 display will return to - - Press and hold UA ZERO: the display will read EnG and then move on to the following
functions :Field
F
Value
E
A
Description
Sets the printed date to European format of dd/mm/yy
Sets the printed date to American format of mm/dd/yy and locks the
print speed to 3 cm/min.
g
1-3
Sets the recorder printer chart speed to 1, 2, or 3 cm/min
H
20
30
Sets the chart scaling factor to 20 beats / cm.
Sets the chart scaling factor to 30 beats / cm.
I
bb
Beat-to-beat mode. Removes averaging and beat editing from the rate
processing.
Beat edit mode. Removes out of limit FHR and introduces a 3 beat
average.
bE
I
01 - 04
Selects the number of beats befor a pen lift (when US format is 03
selected)
J
0 - 20
Sets the Toco baseline to a value between 0 and 20 units on chart
printout.
L
S
S - Single filter coefficient for UA signal processing.
File - Q:ethel.serve\qualsys\servman\210260.doc
Page 24
d
n
o
01
02
03
04
05
A
r
P
FETATRACK 210 / 260 Service Manual
d - Double filter coefficient for UA signal processing.
Sets the Toco Transducer scale factor.
100 gm pressure prints as 20 units.
100 gm pressure prints as 40 units.
100 gm pressure prints as 60 units.
100 gm pressure prints as 80 units.
100 gm pressure prints as 100 units.
Antenatal mode. Selects antenatal mode to operate as normal fetal
monitor.
Remote mode. Selects remote mode for connection to a central
station computer system.
96
03
06
12
24
48
Baud rate.
selects 9600 baud.
selects 300 baud.
selects 600 baud.
selects 1200 baud.
selects 2400 baud.
selects 4800 baud.
Ptc
PtL
Selects modem type.
Selects Accoustic modem.
Selects Line modem
PFc
PFb
Selects communications interface.
CCITT format.
Bell Format.
r
01 - 99
Unit ID number:
tc0
-
Pt
PF
Records Toco Transducer ‘no load’ value.
Plug in Toco Transducer and wait 30 seconds. Press UA ZERO.
The display will then read :888
888
followed by
101
000
and then
-----
File - Q:ethel.serve\qualsys\servman\210260.doc
Page 25
FETATRACK 210 / 260 Service Manual
4.3.2
SETTING UP THE FETATRACK 210 (V1.01 SYSTEM SOFTWARE)
The FETATRACK 210 fitted with V1.01 System software can be configured for two
specific applications - Standard Antenatal Mode (a) or Remote Mode (r) for
connection to a central station.
Connect the unit to the mains supply and switch the rear ON/OFF switch to the ON
position. Observe the green power on LED on the front panel illuminates. Whilst
depressing the front panel ON/OFF switch, press and hold the UA ZERO button to
enter the programming mode. The display will read :888
A01
When the A 0 1 message is displayed release the UA ZERO button.
The following table is an explanation of the options available. To change the setting
press VOLUME UP ⇑. In some options pressing VOLUME DOWN ⇓ will also
change the setting. Having selected the relevant option press UA ZERO to accept the
setting.
Field
A
b
c
d
E
Option
1 - 24
0 - 60
1 - 12
1 - 31
0 - 99
Description
Sets the hours for the real time clock.
Sets the minutes.
Sets the month.
Sets the day.
Sets the year.
At this point the display will momentarily return to - - -, press and hold the UA
ZERO, the display will change to ENG which indicates it has selected the engineering
set up mode. Select the options from the table below :Field
F
Option
E
A
Description
Selects European format for the time and date.
Selects American format for the time and date.
* see below.
g
1,2,3
Selects the printer chart speed 1, 2 or 3 cm/min.
* In American format speed cannot be changed
when unit is operating.
H
30
20
Selects 30 b/cm chart paper scale.
Selects 20 b/cm chart paper scale. (For Homecare
applications ONLY)
File - Q:ethel.serve\qualsys\servman\210260.doc
Page 26
FETATRACK 210 / 260 Service Manual
I
bE
I
bb
02,03,04
J
00 - 20
Sets the Toco baseline.
L
S
d
Smoothing of toco trace. (single coefficient)
Smoothing of toco trace. (double coefficient)
n
05
01
02
03
04
05
Sets the Toco Transducer scale factor.
100 gm pressure prints as 20 units.
100 gm pressure prints as 40 units.
100 gm pressure prints as 60 units.
100 gm pressure prints as 80 units.
100 gm pressure prints as 100 units.
* set to 01.
O
A
r
Sets the unit to standard Antenatal mode.
Sets the unit to Remote mode- for connection to a
central station monitoring system.
P
Removes out of limit FHR and introduces a 3 beat
average.
Removes the averaging routine from the rate process.
* In American format, option I offers the user to select
the number of beats before a pen lift.
03
06
12
24
48
96
Sets the baud rate for data transmission.
Selects 300 baud.
Selects 600 baud.
Selects 1200 baud.
Selects 2400 baud.
Selects 1200 baud .
Selects 9600 baud.
Pt
c
L
Selects Acoustic coupler modem interface.
Selects Line modem interface.
PF
c
b
Selects CCITT format for data transmission.
Selects BELL format for data transmission.
r
01 - 99
Sets the unit ID number.
tcO
Sets and records the TOCO no load value. Plug in
the TOCO transducer and wait 30 seconds.
Press UA zero. Set up is now complete.
The display will then read
8 8 8 (system calibration)
1 0 1 (software revision)
and then reset the display to - - - .
File - Q:ethel.serve\qualsys\servman\210260.doc
Page 27
FETATRACK 210 / 260 Service Manual
4.3.3
SETTING UP THE FETATRACK 210 (V 2.01 SYSTEM SOFTWARE)
The FETATRACK 210 fitted with V2.01 System software can be configured for two
specific applications - Standard Antenatal Mode (a) or Domiciliary Mode (d) for
monitoring the patient at home.
The FETATRACK 210 can be configured for specific applications by programming the unit
through a series of key presses through the front panel switches. This version of software
offers the user the choice of two modes of operation. - Ante natal mode (A) or Domicilliary
Mode (d).
Connect the unit to the mains supply and switch the rear ON/OFF switch to the ON position.
Observe the green power on LED on the front panel illuminates. Whilst depressing the front
panel ON/OFF switch, press and hold the UA ZERO button to enter the programming mode.
The display will read :888
A01
When the A 0 1 message is displayed release the UA ZERO button.
The following table is an explanation of the options available. To change the setting press
VOLUME UP ⇑. In some options pressing VOLUME DOWN ⇓ will also change the setting.
Having selected the relevant option press UA ZERO to accept the setting.
Field
Option
A
b
c
d
E
1 - 24
0 - 60
1 - 12
1 - 31
0 - 99
Description
Sets the hours for the real time clock.
Sets the minutes.
Sets the month.
Sets the day.
Sets the year.
At this point the display will momentarily return to - - -, press and hold the UA ZERO, the
display will change to ENG which indicates it has selected the engineering set up mode.
Select the options from the table below :Field
Option
Description
F
E
A
Selects European format for the time and date.
Selects American format for the time and date.
* see below.
g
1,2,3
Selects the printer chart speed 1, 2 or 3 cm/min.
* In American format speed cannot be changed
when unit is operating.
H
30
20
Selects 30 b/cm chart paper scale.
Selects 20 b/cm chart paper scale. (For Homecare
applications ONLY)
File - Q:ethel.serve\qualsys\servman\210260.doc
Page 28
FETATRACK 210 / 260 Service Manual
I
bE
I
bb
02,03,04
J
00 - 20
Sets the Toco baseline.
L
S
d
Smoothing of toco trace. (single coefficient)
Smoothing of toco trace. (double coefficient)
n
05
01
02
03
04
05
Sets the Toco Transducer scale factor.
100 gm pressure prints as 20 units.
100 gm pressure prints as 40 units.
100 gm pressure prints as 60 units.
100 gm pressure prints as 80 units.
100 gm pressure prints as 100 units.
O
A
d
Sets the unit to Antenatal mode.
Sets the unit to Domiciliary mode.
P
12
03
12
96
Sets the baud rate for data transmission.
Selects 300 baud rate.
Selects 1200 baud rate.
Selects 9600 baud rate.
Pt
c
L
Selects Acoustic coupler modem interface.
Selects Line modem interface.
PF
c
b
Selects CCITT format for data transmission.
Selects BELL format for data transmission.
r
01 - 99
Sets the unit ID number.
tcO
Removes out of limit FHR and introduces a 3 beat
average.
Removes the averaging routine from the rate process.
* In American format, option I offers the user to select
the number of beats before a pen lift.
Sets and records the TOCO no load value. Plug in
the TOCO transducer and wait 30 seconds.
Press UA zero.
Set up is now complete
The display will then read
8 8 8 (system calibration)
2 0 1 (software revision)
and then reset the display to - - - .
File - Q:ethel.serve\qualsys\servman\210260.doc
Page 29
FETATRACK 210 / 260 Service Manual
4.4
TEST PROCEDURES
EQUIPMENT
Oscilloscope:
Digital Multimeter:
Frequency Counter:
Signal Generator:
ECG Simulator
2 channel 50MHz bandwidth, minimum resolution 5mV/cm
4 Digit DVM measuring 1mV, 1mA, 0.1ohm
0 - 10MHz, resolution 1kHz at 2MHz
10Hz to 10MHz, 1mV to 10V sine-wave
30 to 240 BPM, 100uV output
POWER SUPPLY
Plug the monitor line cord into a grounded mains outlet of suitable line voltage and
frequency, as indicated on the Rear Panel of the FETATRACK 210 or FETATRACK 260.
Turn the monitor on at the Rear Panel switch. The green Front Panel LED will illuminate.
NOTE: The FETATRACK 210 requires the Front Panel ON/OFF switch to be pressed before
proceeding further.
The display will first show the system selftest ( 888 ) followed by
the software revision number, and finally "---". Connect the negative probe of the DVM to
0V (chassis) and check the voltages at the following points :Test Point
Voltage
P1 (D12 anode)
RHS of F1 (FETATRACK 210 only)
Lk1
Lk2
Lk3
+42V +/- 10V dc
+32V Nominal *see Note 1
+5V +/- 0.2V dc
-15V +/- 1V dc
+15V +/- 1V dc
Check the battery charging current by removing F1 and measuring across F1 contacts with
the DVM on current range. This should be 26mA nominal. *see Note 1
* Note 1 -
These values will vary depending on battery condition.
Check the Printhead voltage by pressing the PRINTER ON/OFF switch on the Front Panel
and checking the voltage at P10 with the DVM. This should be +18Vdc on the FETATRACK
210 and +20Vdc on the FETATRACK 260. This can be adjusted if necessary by VR1
File - Q:ethel.serve\qualsys\servman\210260.doc
Page 30
FETATRACK 210 / 260 Service Manual
ULTRASOUND CIRCUIT
Plug the Ultrasound Transducer into the CARDIO socket (blue) on the Front Panel.
Check the voltage at P25. This should be +11.4 +/- 0.5Vdc.
Connect the oscilloscope to PL6 pin1. The signal should be a clean sine wave whose
frequency is between 1.95 and 2.05Mhz and amplitude is 6Vpk-pk.
Connect the oscilloscope to D16 cathode ( marked with a stripe ). This should be a dc voltage
of >+8V.
Connect the oscilloscope to P26 and gently stroke the transducer faceplate. This should be a
low frequency audio signal centred on 0V varying as the faceplate is stroked.
This should also be heard as an audible signal from the loudspeaker ( unless the volume
setting is too low ).
AUDIO CIRCUIT
This may be checked by injecting a signal into the Tape Input on the ‘D’ type Accessory
connector on the Rear Panel.
Connect the output from the signal generator to pin 10 ( Tape In/Out ) of the ‘D’ connector,
using pin 7 as the GND reference. Pin 9 ( Tape In Select ) should also be connected to pin 7.
Set the signal generator output to give a 1kHz sinewave.
Set the volume to maximum (verified by checking that pins 2-7 of 1C23 are all low).
Using the oscilloscope, check the output measured across the loudspeaker for the following
inputs:Input
Output across the loudspeaker
500mV pk-pk
2V pk-pk
6V pk-pk
240-360mV pk-pk
0.96-1.44V pk-pk
3.2-4.4V pk-pk
All the signals must be clean sine-waves with no visible distortion.
File - Q:ethel.serve\qualsys\servman\210260.doc
Page 31
FETATRACK 210 / 260 Service Manual
AGC NETWORK
With the signal generator connected as above, set the output to 400Hz.
Set the input voltage to 3V pk-pk, and connect the oscilloscope to ZD8 cathode (marked with
a stripe). This should be a dc level of approximately +2.1V.
Rapidly decrease the input voltage to 1.0V pk-pk and the dc level at ZD8 should recover to
2.1V within 1 second.
Rapidly decrease the input voltage to 300mV pk-pk and the dc level at ZD8 should recover to
2.1V within 4 seconds.
Increase the input voltage to 3V pk-pk, the dc level at ZD8 should recover to 2.1V within 1
second.
TOCO CIRCUIT
Plug the Toco Transducer into the UA socket ( yellow ) on the Front Panel. Place the
Transducer face up and flat on the bench and check the following signals with the DVM:
Toco Positive Excitation
Toco Negative Excitation
Toco Input
PL6 pin 5
PL6 pin 6
PL6 pin 7
+5V +/- 0.2Vdc
-5V +/- 0.2Vdc
+50 to +150mV
Place a 250gm weight on to the centre of the transducer and check the
voltage at Pin 6 of IC24. This should be +0.93 to +1.73Vdc.
DIGITAL CIRCUITS
There are no specific tests applicable to the Digital Circuits. Due to the complexity of the
digital computer circuit, checking is restricted to confirming that each device has the correct
supply presented to it. However, below are a selection of key signals which, if not present
will prevent the system from starting and operating.
IC33 - Max 691 Microprocessor Supervisor IC
Pin 1 VBat
Pin 9 PFI ( input )
Pin 4 0V
Pin 3 Vcc
Pin 2 Vout ( RAM supply )
Pin 12 CEO ( output to RAM )
Pin 13 CEI ( input from decode logic )
4.5
ULTRASOUND TRANSDUCER CALIBRATION
File - Q:ethel.serve\qualsys\servman\210260.doc
Page 32
FETATRACK 210 / 260 Service Manual
This procedure should be performed in the event of fitting a replacement Ultrasound
transducer. It ensures that the transducer is optimised with the drive circuits on board. The
following is performed with the instrument switched on and the Ultrasound Transducer
plugged into the CARDIO socket on the Front Panel.
SETTING THE TRANSMITTER
Connect the oscilloscope to the junction of C52 and TR5/gate ( D19 cathode or D20 anode ).
This should be a low level signal at approximately 2.1MHz.
Carefully adjust L1 so that the signal displayed on the oscilloscope is maximised. The
amplitude should be greater than 100mV pk-pk
Check the frequency of the signal as at PL6 pin 1 with the frequency counter, this must be
between 2.050 and 2.150 MHz ). Connect the oscilloscope to PL6 pin 1 and adjust L2 to
maximise the observed signal. Adjust VR2 to set the amplitude of the signal to 6V pk-pk.
ADJUSTING THE RECEIVER
Connect the oscilloscope to the cathode of D16 and adjust L3 and L4 so that the dc level
displayed is peaked. This dc level must be greater than 12Vdc.
Note: It may be necessary to repeat the adjustments of L3/L4 as they are interactive.
4.6
TOCO TRANSDUCER CALIBRATION
The Toco Transducer requires no calibration. However in the event that the transducer
requires replacing, then it will be necessary to register the residual offset of the transducer
(tco) by following the set-up programme which is detailed earlier in this section.
File - Q:ethel.serve\qualsys\servman\210260.doc
Page 33
FETATRACK 210 / 260 Service Manual
SECTION 5
SAFETY TESTS
This section details the safety tests which should be performed on each instrument at regular
intervals and after any repair which could affect the safety aspect of the unit.
5.1
TEST EQUIPMENT REQUIREMENTS
Rigel Safety Tester Model 233
5.2
SETTING UP
The electrical safety tester must be plugged into a standard power socket with a known good
earth.
The unit to be tested is plugged into the IUT ( Insrument Under Test ) power
outlet on the tester.
The applied parts - transducers type B, and transducers or scalp electrodes type BF, must be
plugged into the applied part sockets at the top right hand corner of the tester via the 4mm
plug to crocodile clip adaptors.
The probe/clip must be connected to the probe terminal on the tester and its use will be
described in the appropriate sections.
5.3
OPERATION
The programme switch located at the bottom right corner of the tester should be set to the
Class and Type of instrument to be tested.
All units are Class 1.
FETATRACK 210 and FETATRACK 260 Antepartum are Type B units.
FETATRACK 260 Intrapartum (ECG / IUP) is a Type BF unit.
Switch ON the Instrument Under Test via the Rear Panel POWER switch (and also the Front
Panel switch on the FETATRACK 210).
All tests are carried out with the POWER switch on the Instrument Under Test ON.
Switch ON the Safety Tester.
Turn the test selector to 1 - TEST
All lamps on the Safety Tester must be lit and the meter needle must indicate within the test
arc on the meter scale.
Turn the test selector to 2 - SUPPLY.
The 'MAINS' LED next to the meter is lit to indicate the scale to be read: the value must be in
the range 200 to 260V.
File - Q:ethel.serve\qualsys\servman\210260.doc
Page 34
FETATRACK 210 / 260 Service Manual
Turn the test selector to 3 - MAINS PART
The Mohm scale is used for this test as indicated by the Ins Mohm LED adjacent to the
meter, and the illuminated TEST button must be pressed to perform the test. The value must
be greater than 1Mohm.
Turn the test selector to 4 - APPLIED PART ( Type BF units only )
The Mohm meter scale is used for this test as indicated by the Ins Mohm LED, and the
illuminated TEST button must be pressed to perform the test. The value must be greater than
10Mohm.
Turn the test selector to 5 - PROTECTIVE EARTH
Using the Clip/Probe, attach to ( or hold firmly against ) all parts listed below and press the
TEST button.
As indicated by the adjacent LED, the RES. scale is in use. All values measured must be less
than 0.2 ohms.
All case screws ( front panel, rear panel, cover ).
Front panel recorder aperture.
Recorder door earth stud.
Turn the test selector to 6 - EARTH LEAKAGE
The illuminated AP/GND switch must be pressed. The value must be less than 500uA.
Turn the test selector to 7 - EARTH LEAKAGE
The NORMAL/REVERSE switch must be used to interrupt each supply lead in turn. The
illuminated AP/GND switch must be pressed in both NORMAL and REVERSE positions.
The value must be less than 1000uA.
Turn the test selector to 8 - ENCLOSURE LEAKAGE
Using the Clip/Probe lead connect in turn to each of the exposed metal parts listed below.
The value must be less than 100 uA.
All case screws ( front panel, rear panel, cover ).
Front Panel recorder aperture.
Recorder door earth stud.
Turn the test selector to 9 - ENCLOSURE LEAKAGE
Using the Clip/Probe lead, connect in turn to each of the exposed metal parts listed below.
The value must be less than 500 uA.
All case screws ( front panel, rear panel, cover ).
Front Panel recorder aperture.
Recorder door earth stud.
Turn the test selector to 10 - ENCLOSURE LEAKAGE
File - Q:ethel.serve\qualsys\servman\210260.doc
Page 35
FETATRACK 210 / 260 Service Manual
Using the Clip/Probe lead connect in turn to each of the exposed metal parts listed below.
Operate the NORMAL/REVERSE switch each time. The value obtained must be less than
500 uA.
All case screws ( front panel, rear panel, cover ).
Front Panel recorder aperture.
Recorder door earth stud.
Turn the test selector to 11 - PATIENT LEAKAGE
The value obtained must be less than 100uA.
Turn the test selector to 12 - PATIENT LEAKAGE
Operate the NORMAL/REVERSE switch. The values obtained must be less than 500uA.
Turn the test selector to 13 - PATIENT LEAKAGE
Operate the NORMAL/REVERSE switch. The values obtained must be less than 500uA.
Turn test selector to 14 - PATIENT AUXILIARY CURRENT
The value must be less than 10uA.
Turn the test selector to 15 - PATIENT AUXILIARY CURRENT
Operating the NORMAL/REVERSE switch. The values obtained must be less than 500uA.
Turn the test selector to 16 - PATIENT AUXILIARY CURRENT
Operate the NORMAL/REVERSE switch together with the lead selector switch. The value
obtained must be less than 500uA
Turn the test selector to 17 - MAINS ON APPLIED PART ( Type BF units only )
Operate the NORMAL/REVERSE switch and press TEST in each case. The value obtained
must be less than 5000uA.
Turn the test selector to 18 - MAINS ON APPLIED PART ( Type BF units only )
Operate the NORMAL/REVERSE switch and press TEST in each case. The value obtained
must be less than 5000uA.
TESTS COMPLETE - TURN TEST SELECTOR TO 1 AND TURN SAFETY TESTER
AND MONITOR OFF.
File - Q:ethel.serve\qualsys\servman\210260.doc
Page 36
FETATRACK 210 / 260 Service Manual
SECTION 6
FAULT FINDING
This section is an aid to trouble shooting and should be used in conjunction with the relevant
circuit diagrams found at the rear of this manual (Section 10). In each case recalibration and
safety checks must be carried out after any repair.
The following tables list some of the symptoms and the relevant circuit areas.
NOTE:
6.1
DO NOT, UNDER ANY CIRCUMSTANCES ATTEMPT TO REPAIR
THE INSRUMENT WHILST IT IS CONNECTED TO A PATIENT.
DIGITAL DISPLAY PROBLEMS
Symptom
Suspect Circuit or Section
Check
Power on but no displays
illuminate.
Ribbon cable interface from
Main PCB to Display PCB.
Connections at PL4.
POWER ON LED is
illuminated but no digital
displays.
FETATRACK 210 only
IC21 (PIA)
Signals (pulses) present at
IC21pins 2-8 & 10-14.
Pressing Front Panel
ON/OFF switch does not
turn unit ON.
Unit on/off control - IC2A
Pin 3 goes low when switch
pressed ; pin 1 changes state.
TR1 and TR2
TR1 and TR2 turn on when
IC2A pin 1 goes high.
6.2
CHART RECORDER PROBLEMS
Symptom
Suspect Circuit Area
Check
Speed display flashes
Paper out sensor detected
end of paper.
Recorder does not feed paper
but speed display
illuminates.
Cables
Paper out sense:
IC22pin28=low for no paper,
high when paper pack
present.
Connections on interface
cables PL1 and PL2
Recorder feeds paper but
does not print.
Printer power supply
- TR9, IC4, TR3
Printhead voltage at P10
Motor control - IC9, IC8
Motor strobe signals at IC8
pins 13 - 16.
Data and strobe pulses on
IC7 pins 2, 4, 6, 10, 12.
Printhead interface
- IC9, IC7
File - Q:ethel.serve\qualsys\servman\210260.doc
Page 37
FETATRACK 210 / 260 Service Manual
Printhead fixing screws - if
Printhead alignment.
loose printhead will
misalign.
Realign using printer test
trace; ensure screws are
tight.
Printhead pressure.
Misalignment of trace on
chart paper.
6.3
Printhead lateral alignment.
Loose fixing screws in spring
mounting bars, broken
spring.
Releasing the two M4 screws
at rear of printhead mounting
bracket allows lateral
movement; re-tighten screws
after adjustment.
ULTRASOUND
Symptom
Suspect Circuit Area
Check
Ultrasound does not
function.
Transducer
Try another transducer.
Mode detect circuit
IC28 pin 1 (P28) high, IC28
pin 16 (P31) high when
transducer plugged in.
Ultrasound transmitter/
receiver
Transmitter signal to
transducer - PL6/1.
Received signal after
detection -IC29A pin 1
(P26): observable audio
signal when transducer
faceplate stroked.
Check wires have not
become detatched from
loudspeaker terminals.
Ultrasound signals OK but
no audio.
Loudspeaker connections
Mode selector - IC28
Audio signal is present at
IC28 pins 3, 2, 15, 14, 11.
Digital volume control IC23, IC32
With volume at maximum,
IC23 pins 2-7 should be low;
audio signal should be
present at IC32 pin 6.
Audio amplifier IC31
Input signal at IC31 pin 3
(P21). Ouput signal at IC31
pin 5.
File - Q:ethel.serve\qualsys\servman\210260.doc
Page 38
FETATRACK 210 / 260 Service Manual
6.4
UTERINE ACTIVITY (TOCO)
Symptom
Suspect Circuit or section
Check
UA pressure does not
register on chart printout.
Toco Transducer
Replace transducer.
Transducer excitation
+5Vdc at IC30 pin 1 (P41)
and PL6 pin 5
-5Vdc at IC30 pin 7 (P42)
and PL6 pin 6.
Transducer output
PL6 pin 7 - should be
+100mV +/- 50mV unloaded,
increasing by 40mV/100gm
load on transducer button.
IC24 pin 6 - dc readings
should be 4.9 x transducer
output for FETATRACK
210, and
7.5 x transducer output for
FETATRACK 260.
FETATRACK 260 only
The UA digital display will display the pressure provided that the analogue circuit is
functioning correctly as above. The UA digital display is controlled by the system software
and is dependant on the analogue input.
6.5
ECG (FETATRACK 260 only)
Symptom
Suspect Circuit or Section
Check
ECG does not function.
Leg clip connections
ECG Electrode connections
to Leg clip.
Continuity of leg clip
terminals to plug contacts.
ECG Enable - IC28
IC28 pin 1 is +5V.
ECG PCB Assembly
Check overall functioning
with ECG Simulator.
Connect ECG Simulator to
CARDIO input on monitor.
Set output to 120BPM.
Check ECG rate is displayed,
File - Q:ethel.serve\qualsys\servman\210260.doc
Page 39
FETATRACK 210 / 260 Service Manual
output from loudspeaker and
also printed correctly.
File - Q:ethel.serve\qualsys\servman\210260.doc
Page 40
FETATRACK 210 / 260 Service Manual
SECTION 7
RECOMMENDED SPARES
7.1
Recommended Spares
The following list is a list of recommended spares for the FETATRACK 210 and 260 series
fetal monitors :Description
Ultrasound Transducer
TOCO Transducer
Leg Plate
Event Marker
Ultrasound Head assy.
TOCO Head assy.
Ultrasound Cable assy.
TOCO Cable assy.
Rechargeable Battery
Lithium Battery
Main PCB assy
Display PCB assy.
ECG PCB assy
Transformer (mains) 220V
Transformer (mains) 110V
Fuses T200mA
Fuses T500mA
Fuses F2A
Paper Out Sensor assy.
Drive Belts short
Drive Belts long
Thermal Printhead
Motor / Gearbox assy.
File - Q:ethel.serve\qualsys\servman\210260.doc
FETATRACK 210
0215-0003
0211-0003
0211-0004
0211-7001
0211-7002
0215-8401
0211-8405
0200-1067
9020-4220
0211-8201
0211-8202
0211-3001
0211-3002
6410-0200
6410-0500
6420-2000
0211-8205
0211-1017
0211-1018
6200-0803
0211-7006
FETATRACK 260
0215-0003
0211-0003
0261-0005
0211-0004
0211-7001
0211-7002
0215-8401
0211-8405
9020-4220
0260-8201
0260-8202
0260-8203
0211-3001
0211-3002
6410-0200
6410-0500
0211-8205
0211-1017
0211-1018
6200-2005
0211-7006
Page 41
FETATRACK 210 / 260 Service Manual
SECTION 8
PARTS LISTS
The following parts lists are included in this section :FETATRACK 210
Assembly Number
0215-8101
0215-8103
0215-8104
0215-8107
0215-8105
0215-8106
0211-8201
0211-8202
0211-8205
0211-0003
0215-0003
Description
FETATRACK 210 Front Panel Assemby
Cover Assembly
Recorder Assembly
Rear Panel Assembly
Chassis Assembly
Final Assembly
Main PCB Assembly
Display PCB Assembly
Paper Out Sensor Assembly
External TOCO Transducer
FETATRACK 210/260 Ultrasound Transducer
FETATRACK 260
Assembly Number
0261-8101
0261-8102
0261-8103
0261-8104
0261-8105
0261-8107
0261-8109
0211-0003
0215-0003
0261-0005
0260-8201
0260-8202
0260-8203
Description
FETATRACK 260 Front Panel Assembly
Rear Panel Assembly
Cover Assembly
Recorder Assembly
Chassis Assembly
Antenatal Final Assembly
Intrapartum Final Assembly
External TOCO Transducer
FETATRACK 210/260 Ultrasound Transducer
FETATRACK 260 Leg Plate
Main PCB Assembly
Display PCB Assembly
ECG PCB Assembly
File - Q:ethel.serve\qualsys\servman\210260.doc
Page 42
FETATRACK 210 / 260 Service Manual
0215-8101
FETATRACK 210 FRONT PANEL ASSEMBLY
0211-1001
FETATRACK 210 Front Panel
0211-1508
FETATRACK 210 Front Panel Overlay (Embossed)
0211-8202
FETATRACK 210 Display PCB Assy
5212-1010
Harwin Housing 10 Way
5250-1000
Harwin Crimps
5621-4012
Nicolay socket 12 way Yellow 202 290
5621-6012
Nicolay Socket 12 way Blue 108 510.16
5631-5012
Nicolay Contact Female (Skt) 320604
5640-0250
Spade Terminal Post
5650-0250
Spade Crimp size 250
7000-0100
Wire 7/0.2 Single White
7000-1000
Wire 7/0.2 Single Black
7000-5000
Wire 7/0.2 Single Yellow
7000-7000
Wire 7/0.2 Single Blue
7020-0300
Wire 16/30 Single Y/Gn UL1007
7064-0174
Wire Coaxial RG174
7072-0032
Heatshrink Tube 3.2mm diam.
7124-1300
Nut Stainless Full M3
7126-1300
Washer Stainless Plain M3
7157-1300
M3 Shakeproof Washer
7159-6032
M3 Nylon Washer
7213-0030
M3x6 Spacer Brass
255
85
85
620
170
100
13
12
13
1
4
0215-8103
FETATRACK 210 COVER ASSEMBLY
0210-1400
FM210 Handle Set
0215-1002
FETATRACK 210 Cover
5650-0250
Spade Crimp size 250
5670-0004
Eyelets Insulated Crimp M4
7020-0300
Wire 16/30 Single Y/Gn UL1007
7124-1500
Nut Stainless Full M4
7153-1512
Screw Stainless CSK M4x12mm
7157-1500
M4 Shakeproof Washer
1
1
1
1
200
1
2
1
0215-8104
FETATRACK 210 RECORDER ASSEMBLY
0215-1003
FETATRACK 210 Printer Door
0211-1008
FETATRACK 210 Papertray
0211-1010
FETATRACK 210 Printhead Spring
0211-1015
AFM 210 Recorder Roller
0211-1016
AFM 210 Gearbox Drive Gear
0211-1017
Recorder Drive Belt (short)
0211-1018
Recorder Drive Belt (long)
0211-1019
Pivot Pin
0211-1021
AFM 210 Printer Door Pivot Spindle
0211-1022
AFM 210 Printer Roller Spindle
0211-1023
AFM 210/FM 260 Drive Gear
0211-1026
Idler Gear (small)
0211-1027
Paper Peel Bar (AFM 210)
1
1
1
1
1
1
1
2
1
1
1
1
1
File - Q:ethel.serve\qualsys\servman\210260.doc
1
1
1
1
9
1
1
9
1
2
260
Page 43
FETATRACK 210 / 260 Service Manual
0211-1028
0211-1029
0211-1030
0211-1031
0211-1032
0211-1039
0211-1040
0211-1041
0211-8205
0260-1034
0260-1038
3612-1001
5211-1010
5250-1000
5650-0250
5670-0004
6200-0803
7020-0300
7124-1300
7124-1500
7126-1300
7126-1500
7126-1800
7149-1306
7151-1306
7151-1510
7153-1306
7153-1310
7157-1300
7157-1500
7159-6040
7245-0004
7400-0001
7400-0028
7705-0032
Recorder Pivot Block LHS
Recorder Pivot Block RHS
Paper Guide Washer LHS
Paper Guide Washer RHS
AFM 210 Recorder Chassis
Spring Mounting Bar
Mounting Bar
Pressure Bar
Paper out sensor PCB assy
Printhead Pivot Block
Recorder Head Pressure Spring
Stepper Motor 12V and Gearbox
Harwin Housing 10 way
Harwin Crimps
Spade Crimp size 250
Eyelets Insulated Crimp M4
Thermal Printhead KE0803-A1
Wire 16/30 Single Y/Gn UL1007
Nut Stainless Full M3
Nut Stainless Full M4
Washer Stainless Plain M3
Washer Stainless Plain M4
Washer Stainless Plain M10 (Form B)
Screw Socket Set M3x6mm
Screw Stainless PAN M3x6mm
Screw Stainless PAN M4x10mm
Screw Stainless CSK M3x6mm
Screw Stainless CSK M3x10mm
M3 Shakeproof Washer
M4 Shakeproof Washer
2.5mm Nylon Roller
Spacer Brass Plain M4x4mm
Tyrap short Type PLT1M
Tyrap long Type TY28M (Bulk order code)
E Clip M3.2 (1500-3.2)
0215-8105
FETATRACK 210 CHASSIS ASSEMBLY
0215-1001
FETATRACK 210 Base
0211-1014
FETATRACK 210 Front Panel Bracket
0211-3001
Mains Transformer 240Vac
0211-3002
Mains Transformer for 110V Variant
0215-8101
FETATRACK 210 Front Panel Assembly
0215-8103
FETATRACK 210 Recorder Assembly
0215-8102
FETATRACK 210 Rear Panel Assembly
0211-8201
FETATRACK 210 Main PCB Assembly
5355-0025
“D” Type Cover (25 way)
5355-2130
Screwlock Assy (5mm Female)
5650-0187
Spade Crimp size 187
6410-0200
Fuse Time Delay 200mA
File - Q:ethel.serve\qualsys\servman\210260.doc
1
1
1
1
1
1
1
1
1
2
2
1
1
6
1
3
1
480
2
2
13
5
1
6
9
2
4
4
11
4
2
2
7
1
8
1
1
1
1
1
1
1
1
1
2
2
2
Page 44
6410-0500
7126-1300
7126-1500
7147-4425
7151-1306
7151-1308
7151-1312
7157-1300
7159-6032
7300-0211
7400-0001
7900-0011
FETATRACK 210 / 260 Service Manual
500mA Fuses for 110V Variant
2
Washer Stainless Plain M3
19
Washer Stainless Plain M4
2
Screw Stainless Pozi PAN UNC 4-40 x 1/4
2
Screw Stainless PAN M3x6mm
7
Screw Stainless PAN M3x8mm
6
Screw Stainless PAN M3x12mm
12
M3 Shakeproof Washer
17
M3 Nylon Washer
2
Feet Tilting (set 4)
1
Tyrap Short Type PLT1M
14
Double Sided Tape Pads
2
0215-8107
FETATRACK 210 REAR PANEL ASSEMBLY
0211-1002
FETATRACK 210 Rear Panel
0211-1048
Loudspeaker Gasket
0215-1502
Rear Panel Overlay - Multi Voltage
5110-0000
Inlet Mains IEC Dual Fused
5640-0250
Spade Terminal Post
5650-0187
Spade Crimp size 187
5660-0003
Eyelet Crimp M3
6111-0000
Switch Rocker Mains
6540-0077
Loudspeaker Round 80mm (ATO 80MO)
7020-0300
Wire 16/30 Single Y/Gn UL1007
7020-2000
Wire 16/30 Single Brown UL1007
7020-7000
Wire 16/30 Single Blue UL1007
7124-1300
Nut Stainless Full M3
7126-1300
Washer Stainless Plain M3
7151-1306
Screw Stainless PAN M3x6mm
7157-1300
M3 Shakeproof Washer
5
9
4
9
0215-8106
FETATRACK 210 FINAL ASSEMBLY
0215-0002
Ultrasound Transducer
0211-0003
External Toco Transducer
0215-8104
FETATRACK 210 Cover Assy
0215-8105
FETATRACK 210 Chassis Assy
7126-1500
Washer Stainless Plain M4
7151-1516
Screw Stainless PAN M4x16mm
7157-1500
M4 Shakeproof Washer
1
1
1
1
4
4
4
0211-0003
EXTERNAL TOCO TRANSDUCER
0210-3276
Cable Clamp
0210-3232
Transducer Housing
0211-1511
Serial Number Label
0211-1513
Transducer Label
0211-7001
TOCO Transducer Head Assembly
0211-8405
TOCO Transducer Cable Assembly
7153-1105
Screws Stainless M2 x 5mm CSK
1
1
1
1
1
1
2
File - Q:ethel.serve\qualsys\servman\210260.doc
1
1
1
1
2
5
1
1
1
160
105
100
Page 45
FETATRACK 210 / 260 Service Manual
0215-0003
FETATRACK 210 / 260 ULTRASOUND TRANSDUCER
0210-3232
Transducer Housing
1
0211-1510
Serial Number Label
1
0211-1512
Transducer Label
1
0211-7001
Ultrasound Transducer Head Assembly
1
0215-8401
FETATRACK 210/260 U/Sound Cable Assembly
1
0211-8201
FETATRACK 210 MAIN PCB ASSEMBLY
0200-1067
Rechargeable Battery 9.6V
BP1,2,3
0211-2001
FETATRACK 210 Main PCB
Issue 4
0211-8401
Printhead Ribbon Cable Assy
PL1
1101-0010
Resistor LR1 1% 1R
R70
1101-0100
Resistor LR1 1% 10R
R28,50,94
1101-0101
Resistor LR1 1% 100R
R53
1101-010
Resistor LR1 1% 1KO
R56,58,88,95
1101-0103
Resistor LR1 1% 10K
R16,17,22-24,36,41,42,47,60,61,72-4,81,85,89,90
1101-0104
Resistor LR1 1% 100K
R27,40,44,45,55
1101-0105
Resistor LR1 1% 1MO
R4,43,46,62,79,80,91,92
1101-0121
Resistor LR1 1% 120R
R11,68
1101-0122
Resistor LR1 1% 1K2
R12,82
1101-0124
Resistor LR1 1% 120K
R6
1101-0152
Resistor LR1 1% 1K5
R49,ZD1
1101-0153
Resistor LR1 1% 15K
R8,13,65
1101-0184
Resistor LR1 1% 180K
R5
1101-0203
Resistor LR1 1% 20K
R64
1101-0220
Resistor LR1 1% 22R
R71
1101-0223
Resistor LR1 1% 22K
R35,38
1101-0224
Resistor LR1 1% 220K
R51,52,54,57
File - Q:ethel.serve\qualsys\servman\210260.doc
3
1
1
1
3
1
4
18
5
8
2
2
1
2
3
1
1
1
2
4
Page 46
1101-0273
1101-0304
1101-0333
1101-0392
1101-0470
1101-0471
1101-0472
1101-0473
1101-0511
1101-0512
1101-0514
1101-0560
1101-0622
1101-0754
1101-3092
1430-0102
1430-0202
1500-0103
1903-0020
2230-0106
2230-0107
2230-0108
2230-0227
2230-0476
2230-0477
FETATRACK 210 / 260 Service Manual
Resistor LR1 1% 27K
2
R48,67
Resistor LR1 1% 300K
1
R26
Resistor LR1 1% 33K
1
R39
Resistor LR1 1% 3K9
1
R83
Resistor LR1 1% 47R
1
R1
Resistor LR1 1% 470R
1
R66
Resistor LR1 1% 4K7
3
R9,18,59
Resistor LR1 1% 47K
1
R37
Resistor LR1 1% 510R
2
R76,96
Resistor LR1 1% 5K1
1
R63
Resistor LR1 1% 510K
1
R19
Resistor LR1 1% 56R
1
R69
Resistor LR1 1% 6K2
1
R14
Resistor LR1 1% 750K
2
R2,3
Resistor LR1 1% 3k09
1
R15
Multiturn Pot. 1K
1
VR1
Multiturn Pot. 2K
1
VR2
Resistor Network SIL 10K
1
RP1
Resistor Hi-Watt 5% 2R
1
R10
Electrolytic 10uF 16V 509D
2
C60,86
Electrolytic 100uF 16V 509D
10
C7,21,27,28,35,65,69,71,81,82
Electrolytic 1000uF 16V 509D
1
C36
Electrolytic 220uF 16V 509D
3
C14,15,70
Electrolytic 47uF 16V 509D
C40,66
Electrolytic 470uF 16V 509D
File - Q:ethel.serve\qualsys\servman\210260.doc
2
2
Page 47
2250-0108
2250-0474
2250-0478
2260-0225
2330-0106
2350-0105
2564-0228
2564-0229
2564-0478
2770-0102
2770-0122
2770-0189
2770-0221
2770-0330
2770-0339
2770-0472
2770-0681
2870-0103
2870-0104
2870-0152
3005-0838
3005-0841
3005-0842
FETATRACK 210 / 260 Service Manual
C57,59
Electrolytic 1000uF 50V SU
3
C1,2,10
Electrolytic 0.47uF 50V
1
C55
Electrolytic 4700uF 50V TSU
1
C8
Electrolytic 2.2uF 63V 509D
3
C5,13,37
Tantalum 10uF 16V 499D
1
C44
Tantalum 1uF 35V 499D
2
C9,91
Polyester 10% 220nF
3
C62,63,68
Polyester 10% 22nF
3
C4,12,42
Polyester 10% 470nF
3
C16,39,41
Ceramic Axial 1000pF 50/100V
1
C58
Ceramic Axial 1200pF 50/100V
2
C45,48
Ceramic plate 18pF
4
C19,20,22,VC1
Ceramic Axial 220pF 50/100V
2
C46,52
Ceramic Axial 33pF 50/100
1
C75
Ceramic Plate 33pF
2
C23,24
Ceramic Axial 4700pF 50/100V
3
C38,54,67
Ceramic Axial 680pF 50/100V
2
C51,53
Ceramic Radial 10nF 100V
3
C17,18,47
Ceramic Radial 100nF 100V
25
C3,11,25-6,29,32-4,43,49,50,56,64,72-4,76,90,
DC1-2,4-7,12
Ceramic Radial 1n5 50V
1
C6
Inductor 5S 0838 Toko
1
L3
Inductor 5S 0841 Toko
L1
Inductor 5S 0842 Toko
L4
File - Q:ethel.serve\qualsys\servman\210260.doc
1
1
Page 48
3005-0876
3025-0625
4110-0085
4120-4148
4130-0027
4130-4000
4140-0047
4140-0051
4140-0120
4150-0202
4210-0182
4210-0183
4220-2955
4230-0256
4250-0810
4310-0071
4310-0072
4310-0820
4310-1455
4310-1458
4310-6270
4320-2003
4320-4013
4320-4049
4320-5406
FETATRACK 210 / 260 Service Manual
Inductor 5S 0876 Toko
1
L2
Ferrite Core (Ring) 25mm MM625T2/T3
2
T3=36T bifilar; T2=36T
Diode BAT85
1
D16
Diode 1N4148
12
D7,8,9,10,11,13,14,15,17,18,
Diode BYV27-50
3
D4,5,6
Diode 1N4000 Series
3
D1,2,12
Diode Zener BZX79 C4V7
1
ZD10
Diode Zener BZX79 B5V1 2%
6
ZD3,4,5,6,8,9
Diode Zener BZX79 C12V
2
ZD2,7
Diode Bridge SKB202L5A 1.6A
1
BR 1
Transistor BC182
2
TR1,5
Transistor BC183C
3
TR8
Transistor TIP2955
1
TR3
FET M-Type BF256A
3
TR4,6,7
FET V-Type MTP8P10
2
TR2,9
Analogue IC - TL071CP
2
IC24,32
Analogue IC - TL072CP
3
IC26,27,29
Analogue IC - TBA820M
1
IC31
Analogue IC - MC1455 P1
1
IC6
Analogue IC - MC1458 CP
1
IC30
Analogue IC - SL 6270C
1
IC25
High Current Driver ULN2003
1
IC8
CMOS D-Type Flip-Flop MC14013
IC2
CMOS Hex Buffer MC14049
IC7
CMOS RS232 Interface MC145406
File - Q:ethel.serve\qualsys\servman\210260.doc
1
1
1
Page 49
4321-0000
4321-0002
4321-0008
4321-0138
4330-0691
4330-6309
4330-6321
4330-6522
4330-6551
4330-7170
4340-2256
4340-7128
4350-4960
4360-0317
4360-7004
4360-7118
4360-7905
4370-0212
4510-0032
4510-0184
4510-0800
5212-1010
5313-0020
5354-0025
FETATRACK 210 / 260 Service Manual
IC16
CMOS Dual and Gate MC74HC00
1
IC14
CMOS Dual Nor Gate MC74HC02
1
IC15
CMOS Dual and Gate MC74HC08
1
IC19
CMOS 1-8 Decoder MC74HC138
1
IC18
Watch Dog I.C. MAX 691CPE
1
IC33
CMOS Microprocessor HD63BO9P
1
IC10
CMOS Microprocessor HD63B21P
1
IC21
Microprocessor - R65C22 AP
1
IC9
CMOS RS232 Controller MD65SC51
1
IC17
CMOS Real Time Clock ICM7170
1
IC13
CMOS Memory HM62256LP
1
IC12
CMOS EProm HM27C128 (Programmed)
1
IC11
Regulator Switch Mode L4960
2
IC3,5
Voltage Regulator LM 317T
2
IC1,4
A/D Converter uPD7004
1
IC22
Digital Audio Attenuator AD7118KN
1
IC23
Voltage Regulator MC 79L05
1
IC20
Analogue Switch DG212
1
IC28
Crystal Micro Watch 32.768kHz
1
XTL2
Crystal Micro H18U 1.843MHz
1
XTL3
Crystal Micro H18U 8MHz
1
XTL1
Harwin Wafer 10 Way
PL2,PL6
IDC Straight PCB Box Header 20 way
PL4
M50 'D' Connector Plastic 25way Female
PL3
File - Q:ethel.serve\qualsys\servman\210260.doc
2
1
1
Page 50
5404-2010
5650-0250
5910-0016
5910-0024
5910-0028
5910-0040
5910-1028
6310-2307
6420-2000
6610-0221
7000-1000
7000-3000
7000-9000
7124-1300
7126-1300
7151-1308
7151-1310
7157-1300
7159-6032
7400-0001
7400-0028
7500-0220
7900-0011
9020-4220
FETATRACK 210 / 260 Service Manual
Jack Socket 1/4 in Mono P.C.B.
1
PL7
Spade Crimp size 250
1
Signal Return
IC Socket Turn Pin 16 way
2
IC7,8
IC Socket Turn Pin 24 way
1
IC13
IC Socket Turn Pin 28 way
3
IC11,12,17
IC Socket Turn Pin 40 way
3
IC9,10,21
IC Socket Turn Pin 14 way strip
2
Fuse Clip P.C.B. 20mm
1
Fuse Fast Blow 2A
1
F1
Heatsink T0220 High Efficiency
1
I.C. 4 Mounting
Wire 7/0.2 Single Black
155mm
Wire 7/0.2 Single Red
90mm
Wire 7/0.2 Single Grey
105mm
Nut Stainless Full M3
3
Washer Stainless Plain M3
3
Screw Stainless PAN M3x8mm
1
Screw Stainless PAN M3x10mm
2
M3 Shakeproof Washer
3
M3 Nylon Washer
2
IC4 Mounting
Tyrap short Type PLT1M
1
0v strap
Tyrap long Type TY28M (Bulk order code)
3
BP1,2,3
Transistor Mounting Kit T0 220
1
I.C.4 mounting
Double Sided Tape Pads
9
BP1,2,3: Three per Battery Pack
Lithium Battery 40LH220
2
BP4,5
0211-8202
FETATRACK 210 DISPLAY PCB ASSEMBLY
0211-2002
FETATRACK 210 Display PCB
0211-8402
Display Ribbon Cable Assy
PL1
1101-0103
Resistor LR1 1% 10K
R4,5,6,7
1101-0105
Resistor LR1 1% 1MO
R8
File - Q:ethel.serve\qualsys\servman\210260.doc
1
1
4
1
Page 51
1101-0181
1101-0560
1101-0681
1101-0822
2230-0107
2870-0104
4120-4148
4220-0751
4320-2003
4410-2855
4410-3124
4410-4124
4420-5601
6120-0001
FETATRACK 210 / 260 Service Manual
Resistor LR1 1% 180R
7
R9,10,11,12,13,14,15
Resistor LR1 1% 56R
1
R17
Resistor LR1 1% 680R
1
R3
Resistor LR1 1% 8K2
3
R1,2,16
Electrolytic 100uF 16V 509D
1
C1
Ceramic Radial 100nF 100V
1
C2
Diode 1N4148
4
D1,2,3,4
Transistor ZTX 751
4
TR1,2,3,4
High Current Driver ULN2003
2
IC1,2
Led Single Green HLMP 2855
1
LED 1
Led Single Yellow HLMP-T300
2
LED 2,3
Led Single Green HLMP-T500
1
LED 9
LED 7 Segment - HDSP 5601
4
LED 5,6,7,8
PCB mount switch
5
Sw0,1,2,3,4
0211-8205
PAPER OUT SENSOR PCB ASSEMBLY
0211-2005
Paper Out Sensor PCB
1101-0103
Resistor LR1 1% 10K
R2
1101-0391
Resistor LR1 1% 390R
R1
4440-0900
SFH900-2 Reflection emitter/sensor
TR1
5250-1000
Harwin Crimps
7000-1000
Wire 7/0.2 Single Black
7000-3000
Wire 7/0.2 Single Red
7000-4000
Wire 7/0.2 Single Orange
1
1
1
1
3
180
180
180
FETATRACK 260 PARTS LISTS
0261-8101
FETATRACK 260 FRONT PANEL ASSEMBLY
0260-1001
Front Panel
0261-1501
FETATRACK 260 Front Overlay (Embossed)
0260-8202
Display pcb assy
5212-1010
Harwin Housing 10 Way
5250-1000
Harwin Crimps
File - Q:ethel.serve\qualsys\servman\210260.doc
1
1
1
2
16
Page 52
5621-4012
5621-6012
5631-5012
5640-0250
5650-0250
7000-0100
7000-1000
7000-3000
7000-4000
7000-5000
7000-7000
7000-9000
7020-0300
7064-0174
7072-0032
7124-1300
7126-1300
7157-1300
7159-6032
7213-0030
FETATRACK 210 / 260 Service Manual
Nicolet socket 12 way Yellow 202290
1
Nicolet Socket 12 way Blue 108510.16
1
Nicolay Contact Female (Skt) 320604
16
Spade Terminal Post
1
Spade Crimp size 250
2
Wire 7/0.2 Single White
470
Wire 7/0.2 Single Black
360
Wire 7/0.2 Single Red
230
Wire 7/0.2 Single Orange
125
Wire 7/0.2 Single Yellow
85
Wire 7/0.2 Single Blue
85
Wire 7/0.2 Single Grey
125
Wire 16/30 Single Y/Gn UL1007
640
Wire Coaxial RG174
175
Heatshrink tube 3.2mm diam.
100
Nut Stainless Full M3
13
Washer Stainless Plain M3
12
M3 Shakeproof Washer
13
M3 Nylon Washer
1
Spacer Plated Brass Plain M3x6
4
0261-8103
FETATRACK 260 COVER ASSEMBLY
0261-1002
FETATRACK 260 Cover
5650-0250
Spade Crimp size 250
5670-0004
Eyelets Insulated Crimp M4
7020-0300
Wire 16/30 Single Y/Gn UL1007
7124-1500
Nut Stainless Full M4
7157-1500
M4 Shakeproof Washer
1
1
1
200
1
1
0261-8104
FETATRACK 260 RECORDER ASSEMBLY
0211-1016
Gearbox Drive Gear
0211-1017
Recorder Drive Belt (short)
0211-1018
Recorder Drive Belt (long)
0211-1019
Pivot Pin
0211-1023
Drive Gear
0211-1026
Idler Gear (small)
0211-1028
Recorder Pivot Block LHS
0211-1029
Recorder Pivot Block RHS
0211-1030
Paper Guide Washer LHS
0211-1031
Paper Guide Washer RHS
1
1
1
2
1
1
1
1
1
1
0211-8205
0261-1003
0260-1008
0260-1010
0260-1015
0260-1021
0260-1022
0260-1027
0260-1032
Paper out sensor PCB assy
FETATRACK 260 Door
Papertray
Printhead Spring
Recorder Roller
Recorder Door Pivot Spindle
Roller Spindle
Paper Peel Bar
Recorder Chassis
File - Q:ethel.serve\qualsys\servman\210260.doc
1
1
1
1
1
1
1
1
1
Page 53
0260-1033
0260-1034
0260-1035
0260-1036
0260-1037
0260-1038
3612-1001
5211-1010
5250-1000
5650-0250
5670-0004
6200-2005
7020-0300
7124-1300
7124-1500
7126-1300
7126-1500
7126-1800
7149-1306
7151-1306
7151-1308
7151-1510
7153-1308
7153-1310
7157-1300
7157-1500
7159-6040
7245-0004
7400-0001
7400-0028
7705-0032
FETATRACK 210 / 260 Service Manual
Printhead Packing Piece
1
PrintheadPivot Block
2
Recorder Spring Mounting Bar
1
Recorder Mounting Bar
1
Recorder Pressure Bar
1
Recorder Head Pressure Spring
2
Stepper Motor 12V and Gearbox
1
Harwin Housing 10 way
1
Harwin Crimps
6
Spade Crimp size 250
1
Eyelets Insulated Crimp M4
2
Thermal Printhead KE2005-B1
1
Wire 16/30 Single Y/Gn UL1007
480
Nut Stainless Full M3
2
Nut Stainless Full M4
2
Washer Stainless Plain M3
11
Washer Stainless Plain M4
4
Washer Stainless Plain M10
1
Screw Socket Set M3x6mm
6
Screw Stainless PAN M3x6mm
2
Screw Stainless PAN M3x8mm
7
Screw Stainless PAN M4x10mm
2
Screw Stainless CSK M3x8mm
4
Screw Stainless CSK M3x10mm
4
M3 Shakeproof Washer
11
M4 Shakeproof Washer
4
2.5mm Nylon Roller
2
Spacer Brass Plain M4x4mm
2
Tyrap short Type PLT1M
7
Tyrap long Type TY28M (Bulk order code)
1
E Clip M3.2 (1500-3.2)
8
0261-8102
FETATRACK 260 REAR PANEL ASSEMBLY
0260-1002
Rear Panel
0261-1502
FETATRACK 260 Rear Overlay
5110-0000
Inlet Mains IEC Dual Fused
5640-0250
Spade Terminal Post
5650-0187
Spade Crimp size 187
5670-0003
Eyelet Insulated Crimp M3
6111-0000
6540-0077
7020-0300
7020-2000
7020-7000
7124-1300
7126-1300
71561-1306
7157-1300
Switch Rocker Mains
Loudspeaker round 80mm (AT080M)
Wire 16/30 Single Y/Gn UL1007
Wire 16/30 Single Brown UL1007
Wire 16/30 Single Blue UL1007
Nut Stainless Full M3
Washer Stainless Plain M3
Screw Stainless PAN M3x6mm
M3 Shakeproof Washer
File - Q:ethel.serve\qualsys\servman\210260.doc
1
1
1
2
5
1
1
1
160
105
100
5
9
4
9
Page 54
FETATRACK 210 / 260 Service Manual
0261-8105
FETATRACK 260 CHASSIS ASSEMBLY
0211-1014
Front Panel Bracket
1
0211-3001
Mains Transformer 240Vac
1
(0211-3002
Mains Transformer for 110V Versions)
0261-1001
FETATRACK 260 Base
1
0261-8101
FETATRACK 260 Front Panel Assy
1
0261-8103
FETATRACK 260 Recorder Assy
1
0261-8102
FETATRACK 260 Rear Panel Assy
1
0260-8201
Main PCB Assy
1
5355-0025
D Type Cover (25 way)
1
5355-2130
Screwlock Assy (5mm Female)
2
5640-0187
Spade Crimp Size 187
2
6410-0200
Fuse Time Delay 200mA
2
(6410-0500
Fuses for 110V Versions)
7124-1300
Nut Stainless Full M3
2
7126-1300
Washer Stainless Plain M3
19
7126-1500
Washer Stainless Plain M4
2
7147-4425
Screw Stainless Pozi PAN UNC 4-40 x 1/4
2
7151-1306
Screw Stainless PAN M3x6mm
7
7151-1308
Screw Stainless PAN M3x8mm
6
7151-1312
Screw Stainless PAN M3x12mm
12
7157-1300
M3 Shakeproof Washer
21
7159-6032
M3 Nylon Washer
2
7300-0211
Feet Tilting (set 4)
1
7400-0001
Tyrap short Type PLT1M
16
7400-0036
Cable Tie Base (self adhesive)
2
7612-0100
Card Guide 100mm M3 fixing
2
7900-0011
Double Sided Tape Pads
2
0261-8107
FETATRACK 260 ANTEPARTUM FINAL ASSEMBLY
0215-0002
Ultrasound Transducer
0211-0003
External Toco Transducer
0260-8104
FETATRACK 260 Cover Assy
0261-8105
Chassis Assy
7126-1500
Washer Stainless Plain M4
7151-1308
Screw Stainless PAN M3x8mm
7151-1516
Screw Stainless PAN M4x16mm
7157-1500
M4 Shakeproof Washer
1
1
1
1
4
2
4
4
0261-8109
FETATRACK 260 INTRAPARTUM FINAL ASSEMBLY
0215-0003
Ultrasound Transducer
0211-0003
External Toco Transducer
0261-8104
Cover Assy
0261-8105
Chassis Assy
0260-8203
E.C.G. PCB Assy
7124-1300
Nut Stainless Full M3
7126-1300
Washer Stainless Plain M3
7126-1500
Washer Stainless Plain M4
7151-1312
Screw Stainless PAN M3x12mm
7151-1516
Screw Stainless PAN M4x16mm
7157-1300
M3 Shakeproof Washer
1
1
1
1
1
1
1
4
1
4
1
File - Q:ethel.serve\qualsys\servman\210260.doc
Page 55
7157-1500
M4 Shakeproof Washer
FETATRACK 210 / 260 Service Manual
4
0211-0003
EXTERNAL TOCO TRANSDUCER
0210-3276
Cable Clamp
0210-3232
Transducer Housing
0211-1511
Serial Number Label
0211-1513
Transducer Label
0211-7001
TOCO Transducer Head Assembly
0211-8405
TOCO Transducer Cable Assembly
7153-1105
Screws Stainless M2 x 5mm CSK
1
1
1
1
1
1
2
0215-0003
FETATRACK 210 / 260 ULTRASOUND TRANSDUCER
0210-3232
Transducer Housing
0211-1510
Serial Number Label
0211-1512
Transducer Label
0211-7001
Ultrasound Transducer Head Assembly
0215-8401
FETATRACK 210/260 U/Sound Cable Assembly
1
1
1
1
1
0261-0005
FETATRACK 260 LEG PLATE
0260-1040
Plate
0260-1041
Connector Box
0260-1508
Label
5620-6012
Nocolay Free Plag 12 Way Blue
5630-4012
Nicolay Contact Male
5670-0003
Eyelet M3 Crimp
5710-0001
Spring Action Terminal - Black
5710-0002
Spring Action Terminal - Red
5900-0002
Patient Lead LL-2-3120-8
7071-0030
Helsin Sleeve 3mm
7124-1300
Full Nut M3
7126-1300
Washer Stainless Plain M3
7153-1310
Screw Stainless M3 x 10mm CSK
7153-1312
Screw Stainless M3 x 12mm CSK
7157-1300
M3 Shakeproff Washer
7441-3332
Grommet Extended Black
7711-3001
Sonicloc Brass Insert M3
1
1
1
1
4
1
1
1
1
2
1
1
2
4
1
1
2
0260-8201
MAIN PCB ASSEMBLY
0211-2001
Main PCB
Issue 4
0211-8401
Printhead Ribbon Cable Assy
0260-2004
Printhead Adapter PCB
PL1 when connected with 0211-8401 and 5344-0034
1101-0010
Resistor LR1 1% 1R
R70
1101-0100
Resistor LR1 1% 10R
R28,50,94
1101-0101
Resistor LR1 1% 100R
R53
1101-010
Resistor LR1 1% 1KO
File - Q:ethel.serve\qualsys\servman\210260.doc
1
1
1
1
3
1
5
Page 56
1101-0103
1101-0104
1101-0105
1101-0121
1101-0122
1101-0152
1101-0153
1101-0203
1101-0220
1101-0223
1101-0224
1101-0273
1101-0304
1101-0333
1101-0392
1101-0471
1101-0472
1101-0473
1101-0511
1101-0514
1101-0560
1101-0622
1101-0754
1101-3092
FETATRACK 210 / 260 Service Manual
R56,58,76,88,95
Resistor LR1 1% 10K
20
R5,16,17,22-24,36,41,42,47,60,61,72-4,81,85,86,89,90
Resistor LR1 1% 100K
6
R27,40,44,45,55,98
Resistor LR1 1% 1MO
8
R4,43,46,62,79,80,91,92
Resistor LR1 1% 120R
2
R11,68
Resistor LR1 1% 1K2
2
R12,82
Resistor LR1 1% 1K5
2
R49,ZD1
Resistor LR1 1% 15K
3
R8,13,65
Resistor LR1 1% 20K
1
R64
Resistor LR1 1% 22R
1
R71
Resistor LR1 1% 22K
2
R35,38
Resistor LR1 1% 220K
4
R51,52,54,57
Resistor LR1 1% 27K
2
R48,67
Resistor LR1 1% 300K
1
R26
Resistor LR1 1% 33K
2
R39,84
Resistor LR1 1% 3K9
1
R83
Resistor LR1 1% 470R
1
R66
Resistor LR1 1% 4K7
3
R9,18,59
Resistor LR1 1% 47K
R37
Resistor Metal Film 1% 510R
R76,96
Resistor LR1 1% 510K
R19
Resistor LR1 1% 56R
R69
Resistor LR1 1% 6K2
R14
Resistor LR1 1% 750K
R2,3
Resistor LR1 1% 3k09
R15,63
File - Q:ethel.serve\qualsys\servman\210260.doc
1
2
1
1
1
2
2
Page 57
1430-0102
1430-0202
1500-0103
1903-0020
2230-0106
2230-0107
2230-0108
2230-0227
2230-0476
2230-0477
2231-0477
2250-0108
2250-0474
2250-0478
2250-0109
2260-0225
2330-0106
2350-0105
2564-0228
2564-0229
2564-0478
2564-0479
2770-0102
2770-0122
2770-0189
FETATRACK 210 / 260 Service Manual
Multiturn Pot. 1K
1
VR1
Multiturn Pot. 2K
1
VR2
Resistor Network SIL 10K
1
RP1
Resistor Hi-Watt 5% 2R
1
R10
Electrolytic 10uF 16V 509D
2
C60,86
Electrolytic 100uF 16V 509D
9
C21,27,28,35,65,69,71,81,82
Electrolytic 1000uF 16V 509D
1
C36
Electrolytic 220uF 16V 509D
3
C14,15,70
Electrolytic 47uF 16V 509D
2
C40,66
Electrolytic 470uF 16V 509D
2
C57,59
Electrolytic 470uF 16V Low ESR
1
C7
Electrolytic 1000uF 50V SU
3
C1,2,10
Electrolytic 0.47uF 50V
1
C55
Electrolytic 4700uF 50V TSU
1
C8
Electrolytic 10000uF 50V
1
CX
Electrolytic 2.2uF 63V 509D
3
C5,13,37
Tantalum 10uF 16V 499D
1
C44
Tantalum 1uF 35V 499D
C9,91
Polyester 10% 220nF
C62,63,68
Polyester 10% 22nF
C4,12,42
Polyester 10% 470nF
C39,41
Polyester 10% 47nF
C80
Ceramic Axial 1000pF 50/100V
C58
Ceramic Axial 1200pF 50/100V
C45,48
Ceramic plate 18pF
File - Q:ethel.serve\qualsys\servman\210260.doc
2
3
3
2
1
1
2
4
Page 58
2770-0221
2770-0330
2770-0339
2770-0472
2770-0681
2870-0103
2870-0104
2870-0152
3005-0838
3005-0841
3005-0842
3005-0876
3025-0625
4110-0085
4120-4148
4130-0027
4140-0047
4140-0051
4140-0120
4150-0202
4210-0182
4210-0183
4220-2955
FETATRACK 210 / 260 Service Manual
C19,20,22,VC1
Ceramic Axial 220pF 50/100V
2
C46,52
Ceramic Axial 33pF 50/100
1
C75
Ceramic Plate 33pF
2
C23,24
Ceramic Axial 4700pF 50/100V
3
C38,54,67
Ceramic Axial 680pF 50/100V
2
C51,53
Ceramic Radial 10nF 100V
3
C17,18,47
Ceramic Radial 100nF 100V
24
C3,11,25-6,29,32-4,43,49,50,56,64,72-4,76,90,R87
DC1-2,4-7,12
Ceramic Radial 1n5 50V
1
C6
Inductor 5S 0838 Toko
1
L3
Inductor 5S 0841 Toko
1
L1
Inductor 5S 0842 Toko
1
L4
Inductor 5S 0876 Toko
1
L2
Ferrite Core (Ring) 25mm MM625T2/T3
2
T3=36T bifilar; T2=36T
Diode BAT85
1
D16
Diode 1N4148
12
D7,8,9,10,11,13,14,15,17,18,19,20
Diode BYV27-50
D4,5,6
Diode Zener BZX79 C4V7
ZD10
Diode Zener BZX79 B5V1 2%
ZD3,4,5,6,8,9,12
Diode Zener BZX79 C12V
ZD2,7
Diode Bridge SKB202L5A 1.6A
BR 1
Transistor BC182
TR5
Transistor BC183C
TR8
Transistor TIP2955
TR3
File - Q:ethel.serve\qualsys\servman\210260.doc
3
1
7
2
1
1
3
1
Page 59
4230-0256
4250-0810
4310-0071
4310-0072
4310-0820
4310-1455
4310-1458
4310-6270
4320-2003
4320-4013
4320-4049
4320-5406
4321-0000
4321-0002
4321-0008
4321-0138
4330-0691
4330-6309
4330-6321
4330-6522
4330-6551
4330-7170
4340-2256
4340-7128
4350-4960
FETATRACK 210 / 260 Service Manual
FET M-Type BF256A
3
TR4,6,7
FET V-Type MTP8P10
1
TR9
Analogue IC - TL071CP
2
IC24,32
Analogue IC - TL072CP
3
IC26,27,29
Analogue IC - TBA820M
1
IC31
Analogue IC - MC1455 P1
1
IC6
Analogue IC - MC1458 CP
1
IC30
Analogue IC - SL 6270C
1
IC25
High Current Driver ULN2003
1
IC8
CMOS D-Type Flip-Flop MC14013
1
IC2
CMOS Hex Buffer MC14049
1
IC7
CMOS RS232 Interface MC145406
1
IC16
CMOS Dual and Gate MC74HC00
1
IC14
CMOS Dual Nor Gate MC74HC02
1
IC15
CMOS Dual and Gate MC74HC08
1
IC19
CMOS 1-8 Decoder MC74HC138
1
IC18
Watch Dog I.C. MAX 691CPE
IC33
CMOS Microprocessor MC63BO9P
IC10
CMOS Microprocessor MC63B21P
IC21
Microprocessor - R65C22 AP
IC9
CMOS RS232 Controller MD65SC51
IC17
CMOS Real Time Clock ICM7170
IC13
CMOS Memory HM62256LP
IC12
CMOS EProm HM27C128
IC11
Regulator Switch Mode L4960
File - Q:ethel.serve\qualsys\servman\210260.doc
1
1
1
1
1
1
1
1
2
Page 60
4360-0317
4360-7004
4360-7118
4360-7905
4370-0212
4510-0032
4510-0184
4510-0800
5212-1010
5313-0020
5328-0032
5344-0034
5354-0025
5404-2010
5650-0250
5910-0016
5910-0024
5910-0028
5910-0040
5910-1028
6610-0220
6610-0221
7000-1000
7000-3000
7000-9000
7072-0032
FETATRACK 210 / 260 Service Manual
IC3,5
Voltage Regulator LM 317T
1
IC4
A/D Converter uPD7004
1
IC22
Digital Audio Attenuator AD7118KN
1
IC23
Voltage Regulator MC 79L05
1
IC20
Analogue Switch DG212
1
IC28
Crystal Micro Watch 32.768kHz
1
XTL2
Crystal Micro H18U 1.843MHz
1
XTL3
Crystal Micro H18U 8MHz
1
XTL1
Harwin Wafer 10 Way
2
PL2,PL6
IDC Straight PCB Box Header 20 way
1
PL4
DIN41612 Indirect 32way Female
1
PL5
34way Pin Header right angle
1
M50 'D' Connector Plastic 25way Female
1
PL3
Jack Socket 1/4 in Mono P.C.B.
1
PL7
Spade Crimp size 250
1
Signal Return
IC Socket Turn Pin 16 way
IC7,8
IC Socket Turn Pin 24 way
IC13
IC Socket Turn Pin 28 way
IC11,12,17
IC Socket Turn Pin 40 way
IC9,10,21
IC Socket Turn Pin 14 way strip
IC22 (issued as 2 strips of 14 ways)
Heatsink TO220 PCB Upright
IC3,5
Heatsink T0220 High Efficiency
IC 4
Wire 7/0.2 Single Black
Wire 7/0.2 Single Red
Wire 7/0.2 Single Grey
Heatshrink Tube 3.2mm diam.
File - Q:ethel.serve\qualsys\servman\210260.doc
2
1
3
3
2
2
1
355
255
90
30
Page 61
7124-1300
7126-1300
7151-1308
7151-1310
7157-1300
7159-6032
7400-0001
7500-0220
9020-4220
FETATRACK 210 / 260 Service Manual
Nut Stainless Full M3
7
Washer Stainless Plain M3
7
Screw Stainless PAN M3x8mm
5
Screw Stainless PAN M3x10mm
2
M3 Shakeproof Washer
7
M3 Nylon Washer
4
Tyrap short Type PLT1M
1
Transistor Mounting Kit T0 220
3
IC3,4,5
Lithium Battery 40LH220
2
BP4,5
0261-8202
DISPLAY PCB ASSEMBLY
0211-8402
Display Ribbon Cable Assy
PL 1
0260-2002
Display PCB
1101-0101
Resistor LR1 1% 100R
R2,3,4,5
1101-0103
Resistor LR1 1% 10K
R6,7
1101-0105
Resistor LR1 1% 1MO
R1
1101-0181
Resistor LR1 1% 180R
RP1
1101-0560
Resistor LR1 1% 56R
RP3
1500-0103
Resistor Network SIL 10K
RP1
2230-0107
Electrolytic 100uF 16V 509D
C1
2870-0104
4120-4148
4220-0751
4320-2003
4320-4028
4350-0293
4410-2965
4410-4124
4420-5601
4420-5701
Ceramic Radial 100nF 100V
C2
Diode 1N4148
D1,2,3,4
Transistor ZTX 751
TR1,2,3,4,5,6,7
High Current Driver ULN2003
IC1,2
CMOS 1-of-10 Decoder MC14028
IC3
Stepper Motor Driver L293B
IC4
LED Single Red/Yellow HLMP 2965
LED 12
Led Single Green HLMP-T500
LED 1
LED 7-Segment HDSP 5601
LED 2,3,4,5
LED 7-Segment HDSP 5701
File - Q:ethel.serve\qualsys\servman\210260.doc
1
1
4
2
1
7
7
1
1
1
4
7
2
1
1
1
1
4
3
Page 62
FETATRACK 210 / 260 Service Manual
6120-0001
0260-8203
LED 9,10,11
PCB Mount Switch
SW1,2,3,4
4
E.C.G PCB ASSEMBLY
0260-2001
1101-0100
1101-0101
1101-0102
1101-0103
1101-0104
1101-0105
1101-0123
1101-0153
1101-0156
1101-0203
1101-0204
1101-0221
1101-0222
1101-0272
1101-0334
1101-0432
1101-0472
1101-0511
1101-0512
1101-0514
PCB
Issue 6
Resistor LR1 1% 10R
R49,50
Resistor LR1 1% 100R
R14,37,58,59
Resistor LR1 1% 1K0
R25,29,35,36,44,46,61,65,66
Resistor LR1 1% 10K
R6,13,15,16,17,77,80
Resistor LR1 1% 100K
R22,43
Resistor LR1 1% 1M0
R72,73
Resistor LR1 1% 12K
R18,20
Resistor LR1 1% 15K
R75,78,79
Resistor LR1 1% 15M
R47,48,68,70
Resistor LR1 1% 20K
R53,54
Resistor LR1 1% 200K
R19,21
Resistor LR1 1% 220R
R74
Resistor LR1 1% 2K2
R26,27,30,31
Resistor LR1 1% 2K7
R1,4
Resistor LR1 1% 330K
R10,32,63
Resistor LR1 1% 4K3
R9
Resistor LR1 1% 4K7
R24,28,45,60
Resistor LR1 1% 510R
R51
Resistor LR1 1% 5K1
R2,5,7,12
Resistor LR1 1% 510K
R3,8,11
File - Q:ethel.serve\qualsys\servman\210260.doc
1
2
4
9
7
2
2
2
3
4
2
2
1
4
2
3
1
4
1
4
3
Page 63
1101-0512
1101-0562
1101-0622
1101-0681
1101-0683
1101-0684
1109-0102
1109-0103
1109-4752
1109-6041
1109-6811
1109-7150
1430-0101
1430-0501
1430-0503
2230-0107
2350-0105
2564-0228
2564-0478
2564-4710
2574-0016
2770-0222
2870-0103
2870-0104
2960-1502
FETATRACK 210 / 260 Service Manual
Resistor LR1 1% 5K1
4
R2,5,7,12
Resistor LR1 1% 5K6
1
R76
Resistor LR1 1% 6K2
1
R23
Resistor LR1 1% 680R
4
R38,38,40,41
Resistor LR 1% 68K
1
R42
Resistor LR 1% 680K
2
R33,34
Resistor H8 0.1% 1K0
2
R56,57
Resistor H8 0.1% 10K
2
R52,69
Resistor H8 0.1% 4K75
4
R62,64,67,71
Resistor H8 0.1% 6K04
1
R16A
Resistor H8 0.1% 6K81
1
R55
Resistor H8 0.1% 715R
1
R16B
Multiturn Pot. 100R Type 64Z-100R
1
VR1
Multiturn Pot. 500R Type 64Y-500R
2
VR2,VR3
Multiturn Pot. 50K Type 64Y-50K
VR4
Electrolytic 100uF 16V 509D
C17,22,23,24,33,34
Tantalum 1uF 35V 499D
C39,40
Polyester 10% 220nF
C4,5,11,19
Polyester 10% 470nF
C28
Polyester 10% 4n7
C7
Polyester 10% 1uF 63V
C1,2,3,10,15,41,42
Ceramic Axial 2200pF 50/100V
C13,14
Ceramic Radial 10nF 100V
C18
Ceramic Radial 100nF 100V
C12,16,21,25,26,27,29,30,31,32,35,36,43,44,45
Polystyrene 15nF Axial
File - Q:ethel.serve\qualsys\servman\210260.doc
1
6
2
4
1
1
7
2
1
15
2
Page 64
2960-3002
3006-0595
4110-0085
4140-0051
4140-0056
4310-0001
4310-0002
4310-0071
4310-0072
4310-0077
4310-0249
4360-0722
4361-7805
4370-9103
4430-1264
5212-1010
5328-0132
7124-1250
7151-1212
7157-1250
FETATRACK 210 / 260 Service Manual
C8,9
Polystyrene 30nF Axial
1
C6
Inductor - Radial Ferrite Bead
4
L1,2,3,4
Diode BAT85
3
D1,2,3
Diode Zener BZX79B 5V1 2%
2
ZD1,2
Diode Zener BZX79 C5V6
2
ZD4,5
Analogue IC - AMP01 FX
1
U11
Analogue IC - AMP02
1
U16
Analogue IC - TL071CP
4
U9,10,12,13
Analogue IC - TL072CP
6
U2,3,4,5,8,17
Analogue IC - OP77GP
2
U14,15
Analogue IC - OP249GP
2
U6,7
DC/DC Convertor 0722
1
PSU
Voltage Regulator TL780-05C
1
RV1
Digital Potentiometer X9103P 10K
U1
Opto Coupler OPI 1264 C - Optek
OP1,2,3,4
Harwin Wafer 10 Way
PL1
DIN 41612 Full Size 2 Row 32 way RA Male
PL2
Nut Stainless Full M2.5
Screw Stainless PAN M2.5x12mm
M2.5 Shakeproof Washer
File - Q:ethel.serve\qualsys\servman\210260.doc
1
4
1
1
2
2
2
Page 65
FETATRACK 210 / 260 Service Manual
SECTION 9
SERVICE INFORMATION
9.1
FETATRACK 210 Service Infomation
This section is designed to record modification detail or service information as it is released
from the factory.
ECN Ref NO.
9.2
Details
Effective From #
FETATRACK 260 Service Information
ECN Ref NO.
File - Q:ethel.serve\qualsys\servman\210260.doc
Details
Effective From #
Page 66
FETATRACK 210 / 260 Service Manual
SECTION 10
DRAWINGS
The following drawings and circuit diagrams are included in this section :DRAWINGS
General Assembly Fetatrack 210
General Assembly Fetatrack 260
Recorder Assembly
CIRCUIT DIAGRAMS & SCHEMATICS
Interconnection Diagram
Compute Circuit
Input / Output Circuit
Analogue Circuits
Power Supplies FETATRACK 210
Power Supplies FETATRACK 260
Display Circuits
Display Circuits
ECG Circuit
IUP Circuit
File - Q:ethel.serve\qualsys\servman\210260.doc
0211-0000
0211/0260-8201
0211/0260-8201
0211/0260-8201
0211-8201
0260-8201
0211-8202
0260-8202
0260-8203
0260-8203
Page 67