1
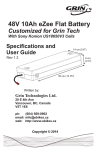
WWW. ZODIAC . NL
15-10-2008
25-01-2010
700852
6-SPEED CONVERSION KIT FOR BIG TWIN 5-SPEED TRANSMISSIONS
INSTALLATION
N INSTRUCTIONS
INTERNATIONAL HEAD OFFICE
THE NETHERLANDS
Zodiac International B.V.
Tel: +31 (0) 297 288 621
Fax: +31 (0) 297 288 226
[email protected]
www.zodiac.nl
FRANCE
Zodiac France
Tel.: 01 45 93 10 75
Fax: 01 45 93 18 41
[email protected]
NORWAY
Zodiac Scandinavia
Tel.: +46 (0) 1 71 47 32 40
Fax: +46 (0) 1 71 47 32 41
[email protected]
GERMANY
Zodiac Deutschland
Tel.: 021 54 42 88 28
Fax: 021 54 41 27 15
[email protected]
SPAIN
Zodiac España
Tel.: 96 81 42067
Fax: 96 81 42068
[email protected]
GREAT-BRITAIN
Zodiac U.K.
Tel.: 014 53 75 84 51
Fax: 014 53 75 29 39
[email protected]
ITALY
Zodiac Italia
Tel.: 02 64 72 287
Fax: 02 64 74 95 55
[email protected]
SWEDEN
Zodiac Scandinavia
Tel.: 01 71 47 32 40
Fax: 01 71 47 32 41
[email protected]
HUNGARY
Zodiac Hungary
Tel.: (+36) 30 217 18 32
Fax: (+36) 87 480 882
[email protected]
FRANCE
FC Parts
Tel.: 03 27 85 57 15
Fax: 03 27 85 96 50
[email protected]
SWITZERLAND
American Bike Shop
Tel: 07 17 61 26 78
Fax: 07 17 61 06 78
[email protected]
PERFORMANCE PRODUCTS FOR HARLEY-DAVIDSON®
WWW. ZODIAC . NL
15-10-2008
25-01-2010
INSTALLATION INSTRUCTIONS FOR 6 SPEED CONVERSION KIT AND 6 SPEED BUILDER KIT
We recommend the kits are installed by a qualified mechanic with knowledge of the Harley-Davidson 5
speed transmission. Also make sure you have a 1990 or later Factory Service Manual available. Tools
needed are the same as used for a 5 Speed transmission.
The conversion kit should only be used in new or low milage transmissions. If gears or bearings of a used
5 speed transmission are worn, new ones must be installed, or better, the builder kit should be used.
Gear set Removal
Refer to the Factory Service Manual Section for Mainshaft and Countershaft removal. When you get to
the point of actually sliding the gear set out make sure you properly mark the 5th gear set as described in
the Factory Service Manual (for used transmissions only). Further follow the factory removal procedure.
Clearance Checks
The 6 Speed conversion and builder kit will fit in most OEM or aftermarket transmission housings without
any modification of the housing. However due to casting differences, in some instances some modification
may be needed. The following clearances must be checked before assembling the 6 speed transmission.
5/16 Bolt hole boss clearance
This can easily be checked with the trap door
gasket. Put the gasket on the dowel pins. AII
material of the boss around the hole that “sticks
outside” the gasket (60 degrees forward to 60
degree backwards) must be removed
(see figure A).
Primary fork clearance
Place the gasket on the housing and remove
material as indicated for clearing the shifter fork
(see figure B).
PERFORMANCE PRODUCTS FOR HARLEY-DAVIDSON®
WWW. ZODIAC . NL
15-10-2008
25-01-2010
Pillow block clearance (right side)
Make sure there is clearance between the pillow
block and the housing. Any clearance is O.K.
(see figure C).
C
Fork shaft support clearance
Again use the gasket as the template and
remove the material as indicated
(see figure D).
Top cover clearance
Some aftermarket top covers are thicker than their OEM counter part. Clearance between the cover and
shift drum, shift ratchet and other parts should be checked.
Shift drum end play
The end play of the shift drum must be checked
prior to final installation. Install the shift drum.
Measure the end play with feeler gauges at the
right pillow block
(see figure E).
End play should be between .004" and .010",
some 1/2" X 7/8" 0.008" thick shims are included
to adjust the end play.
E
PERFORMANCE PRODUCTS FOR HARLEY-DAVIDSON®
WWW. ZODIAC . NL
15-10-2008
25-01-2010
YOU ARE NOW READY TO BEGIN THE FINAL INSTALLATION
Install the trap door bearings and install the bearing retainer plate using 2 1/4" UNC button head allen
screws (use Loctite to secure the screws). Install the auxiliary shifter shaft support using 2 1/4"
UNC button head allen screws (use Loctite to secure the screws). Install the gears on the main
and counter shaft using the washers, bearings and clips included in the kit and install the shafts in the
trap door. NOTE: Put the 3/4" X 1" X .040" steel bearing washer on the mainshaft (comes between the
needle bearing and trap door bearing) before installing the mainshaft in the trap door. There is no washer on the countershaft and the trap door. Install the main and counter shaft nuts and torque them to
factory specs.
When using the conversion kit, you must transfer some of the 5-speed gears to the 6 speed. Take
the 5th gear and the 2nd gear trom the countershaft and install them on to the 6 speed countershaft
(in the same direction as they were in the 5 speed, do not turn them around) using the new
bearing and thrust washer included in the kit. Use the new retaining ring that is provided and
install it after you put the 5th gear on the countershaft. Remove the 2nd gear from the mainshaft and reinstall it on to the 6 speed (in the same direction as it was in the 5 speed).
Put the trap door gasket on the case dowel pins. You can use same thick grease to make the gasket
stick to the housing.
Apply some oil to the gears and shafts and on to the main drive gear seal. Install the gear set by sliding
the mainshaft through the main drive gear and slowly pushing the whole trap door/gear set assembly
until the case dowel pins contact the dowel holes in the side door. (for used gears: line up the markings
on the 5th gears to re-establish the proper mesh of the gears). A teflon hammer is helpful to tab the
trap door.
Install the four 5/16" UNC socket head bolts in the lower 4 screw holes and torque them to factory
specs. Install the two 1/4" socket head bolts in the bolt holes above the dowel pin and torque them to
factory specs.
Put the shifter forks (3rd counter shaft, 2nd mainshaft and 1st mainshaft) on the shafts and slide the
shifter shaft in.
Put the 4th counter shaft shifter fork on the counter shaft, and slide the auxiliary shifter shaft in. The
head of the auxiliary fork shaft should be 1/2" below the surface. If needed tab the shaft until it properly
seats against the support. Put some Low grade Loctite on the 1/2-20 set screw and torque it to 2-4 ft-Ibs.
Check if all forks slide freely on the fork rods by moving them back and forwards. Check if forks have
enough clearance with the housing (as outlined in the Clearance Checks section).
Install the shift drum assembly, make sure the fork pins are in the grooves in which they belong.
Tighten down the four 7/16" hex head bolts in a circular pattern. Application of a light Loctite to the
four 7/16" hex head bolts is recommended. Re-check the end play on the shift drum.
Set the adjustment on the shifter pawl adjustment screw as per the Factory Service Manual.
PERFORMANCE PRODUCTS FOR HARLEY-DAVIDSON ®
WWW. ZODIAC . NL
15-10-2008
25-01-2010
Clutch Rod End
Remove the thrust bearing trom the 5 speed clutch rod end and re-install it on the extended rod end
provided with the kit. Install this rod end on the right side, at the end of the mainshaft, under the
clutch cover. Install the clutch release cover.
Speed Sensor Installation
If you have a transmission case with speed sensor, replace the speed sensor with the dummy plug (with
a ring), screw, and washer provided with your kit and install the speed sensor in the trap door. You
must space the sensor with 1/4'1 spacer washers between the speed sensor and the trap door for proper sensor spacing to the 6th mainshaft gear that is triggering the sensor (see figure F). You may need
a conversion box to correctly calibrate the speedo head (for example Dakota Digital speed re-calibration
unit, model SGI-6). Fill the transmission with 20 to 24 oz. transmission oil. We recommend the use of
a good 75W140 or similar transmission oil.
The installation of these parts may affect the factory warranty. It is the responsibility of the user to
determine the suitability of this product for his/her use, and the user shall assume all legal, personal
injury risk and liability and all other obligations, duties and risks associated there-with.
PERFORMANCE PRODUCTS FOR HARLEY-DAVIDSON ®
WWW. ZODIAC . NL
15-10-2008
25-01-2010
PERFORMANCE PRODUCTS FOR HARLEY-DAVIDSON®
WWW. ZODIAC . NL
15-10-2008
25-01-2010
WIRING FOR 6-SPEED CONVERSION KIT ON 1998 AND UP MODELS
WITH TWO CONNECTORS ON NEUTRAL SWITCH
+ THAT COMES ON
WHEN IGNITION IS
TURNED ON
NEUTRAL LIGHT
86
30
87
85
GROUND
RELAY
ZPN 721677 OR 231918
NEUTRAL SWITCH
30 and 87 are wires that are normally on Neutral Switch.
Find out which is positive and which is ground, then connect as in drawing above.
PERFORMANCE PRODUCTS FOR HARLEY-DAVIDSON®