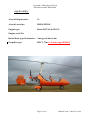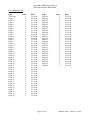
1
Copyright of RotorSport UK Ltd
Document number RSUK0044
Maintenance Manual
Gyroplane Type MTOsport (UK spec only)
RotorSport UK Ltd
Poplar Farm
Prolley Moor
Wentnor
Bishops Castle
SY9 5EJ
Company Reg No 5486550
Phone: +44 (0) 1588 650769
Fax: +44 (0) 1588 650769
Email: [email protected]
STATEMENT OF INITIAL CERTIFICATION
This manual complies with British Civil Airworthiness Requirements,
CAP553 Section A, Chapter A5–3.
Signed ...............................................................
Date ...................................................................
CAA Approval No: DAI/9917/06
Page 1 of 66
Manual issue 2, dated 21.12.09
Copyright of RotorSport UK Ltd
Document number RSUK0044
Applicability
Aircraft Registration:
G-
Aircraft serial no.
RSUK/MTOS/
Engine type:
Rotax 912ULS & 914UL
Engine serial No:
Rotor blade type & diameter: Autogyro 8,4m or 8m
Propeller type:
HTC 1,73m or Woodcomp SR3000/3
Page 2 of 66
Manual issue 2, dated 21.12.09
Copyright of RotorSport UK Ltd
Document number RSUK0044
CONTENTS AND CHECK LIST OF PAGES
Content
Cover page
Title page
Publishing details
Contents and checklist of pages
Section 1
Amendments to the schedule
Section 2
Foreword
Gyroplane Maintenance
Section 3
Owner/Operator responsibilities
Certifying persons responsibilities
General inspection standards
Airworthiness life limitations
Airworthiness Directives & Mandatory Permit Directives
Airworthiness Notices
Overhaul and test periods
Service information
Modifications
Duplicate inspections
Permit Maintenance Releases
Scheduled maintenance worksheets
Definitions
Section 4
Permit maintenance release
Section 5
The maintenance check cycle
Permitted variations
Notes
Section 6
Pilot's pre-flight check (Check A)
Section 7
Scheduled maintenance worksheets & permit renewal
Page No.
Section 8
Annual Inspection (Flight test)
Section 9
Aircraft systems description and maintenance methods
a) Airframe
b) Engine and controls
c) Electrical
d) Pneumatic
e) Rotor
f) Propeller (HTC)
g) Pre rotator
h) Rotor brake and trim
i) Enclosure, seats, harnesses
Page 3 of 66
Manual issue 2, dated 21.12.09
Copyright of RotorSport UK Ltd
Document number RSUK0044
j)
k)
l)
m)
n)
o)
p)
Instruments
Suspension, wheels and brakes
Rudder and rudder control
Rotor head and rotor head control
Fuel system
Roll trim
Propeller (Woodcomp SR3000/3) and controller
Section 10
Approved modifications to date
Service bulletins issued to date
Repair approval request form
Page 4 of 66
Manual issue 2, dated 21.12.09
Copyright of RotorSport UK Ltd
Document number RSUK0044
SECTION 1
AMENDMENTS TO THE SCHEDULE
1. Where & when necessary RotorSport UK Ltd (hereafter referred to as RSUK) will issue updates
to this maintenance standard, and will notify known owners to review the changes via the RSUK
website with changes appropriately identified by a strike in the margin.
2. Aircraft operators are responsible for ensuring that amendments to their publication are carried
out immediately and in accordance with instructions contained in amendment transmittal letters
(where issued).
ISSUE
NUMBER
Initial
1
2
3
DATE
INSERTED
BY
ISSUE
NUMBER
DATE
INSERTED
BY
4
5
6
7
26.3.09
21.12.09
This permanent revision/amendment complies with British Civil Airworthiness
Requirements, Section A, Chapter A5–3.
RotorSport UK Ltd approval signatures for the above manual issue.
Signature:
Signature:
Position:
Date:
Eng. Manager
Position: Inspector
Date:
(signatures on office reference copy)
Page 5 of 66
Manual issue 2, dated 21.12.09
Copyright of RotorSport UK Ltd
Document number RSUK0044
List Of Effective Pages
Page
Title Page
Page 1
Page 2
Page 3
Page 4
Page 5
Page 6
Page 7
Page 8
Page 9
Page 10
Page 11
Page 12
Page 13
Page 14
Page 15
Page 16
Page 17
Page 18
Page 19
Page 20
Page 21
Page 22
Page 23
Page 24
Page 25
Page 26
Page 27
Page 28
Page 29
Page 30
Page 31
Page 32
Page 33
Page 34
Page 35
Page 36
Page 37
Page 38
Page 39
Page 40
Issue
2
2
2
2
2
2
2
2
2
2
2
2
2
2
2
2
2
2
2
2
2
2
2
2
2
2
2
2
2
2
2
2
2
2
2
2
2
2
2
2
2
Date
21.12.09
21.12.09
21.12.09
21.12.09
21.12.09
21.12.09
21.12.09
21.12.09
21.12.09
21.12.09
21.12.09
21.12.09
21.12.09
21.12.09
21.12.09
21.12.09
21.12.09
21.12.09
21.12.09
21.12.09
21.12.09
21.12.09
21.12.09
21.12.09
21.12.09
21.12.09
21.12.09
21.12.09
21.12.09
21.12.09
21.12.09
21.12.09
21.12.09
21.12.09
21.12.09
21.12.09
21.12.09
21.12.09
21.12.09
21.12.09
21.12.09
Page
Page 41
Page 42
Page 43
Page 44
Page 45
Page 46
Page 47
Page 48
Page 49
Page 50
Page 51
Page 52
Page 53
Page 54
Page 55
Page 56
Page 57
Page 58
Page 59
Page 60
Page 61
Page 62
Page 63
Page 64
Page 65
Page 66
Page 6 of 66
Issue
2
2
2
2
2
2
2
2
2
2
2
2
2
2
2
2
2
2
2
2
2
2
2
2
2
2
Date
21.12.09
21.12.09
21.12.09
21.12.09
21.12.09
21.12.09
21.12.09
21.12.09
21.12.09
21.12.09
21.12.09
21.12.09
21.12.09
21.12.09
21.12.09
21.12.09
21.12.09
21.12.09
21.12.09
21.12.09
21.12.09
21.12.09
21.12.09
21.12.09
21.12.09
21.12.09
Manual issue 2, dated 21.12.09
Copyright of RotorSport UK Ltd
Document number RSUK0044
SECTION 2
FOREWORD
1. Applicability
This Schedule is intended for use on the MTOsport Gyroplane only, released on AAN29247.
Guidance
This aircraft may be being flown & operated under a CAA Permit to fly, and as such specific rules
exist to cover maintenance actions, such as the types of work allowed by owners on Permit aircraft
or CAP520 ‘Light Aircraft Maintenance’. It is the aircraft operators’ responsibility to ensure the
aircraft is operated within those rules and regulations.
3. Notes
RSUK provides this maintenance schedule so that, to the best of their knowledge, the operator is
able to maintain the aircraft in a manner that will preserve its airworthiness. The manufacturer is
unable to predict all operating conditions, and as such it is the operator’s ongoing responsibility to
assess the schedule for applicability to the environment operated within.
Note; check your Permit to Fly – if compliance to this schedule is stated as required, then
non-compliance will invalidate the Permit to Fly.
SECTION 3
OWNER/OPERATOR RESPONSIBILITIES
Operators are responsible for the accomplishment of the maintenance prescribed in the schedule.
CERTIFYING PERSONS RESPONSIBILITIES
Certifying persons must use their engineering skill and judgement in determining the depth of
inspection needed and other matters that could affect the airworthiness of the gyroplane. In order to
claim any alleviation on subsequent inspections, the gyroplane maintenance records must record
the extent of previous inspections upon which the alleviation is based.
Certifying persons are responsible for recording in the appropriate log book or worksheet, any
defects, deficiencies or additional maintenance required as a result of implementation of the
schedule.
GENERAL INSPECTION STANDARDS
The general inspection standards applied to individual task inspections must meet the
recommended standards and practices of RSUK.
In the absence of general inspection standards, refer to CAA CAP 562 Civil Aircraft Airworthiness
Information and Procedures (CAAIP) or other CAA recommended standards and practices, and/or
the LAA Gyroplane Maintenance manual.
Inspections may be carried out without component removal or dismantling unless considered
necessary or where required by the schedule.
AIRWORTHINESS LIFE LIMITATIONS (RETIREMENT/SCRAP LIVES)
Airworthiness life limitations shall be those published by the CAA, state of design and RSUK.
Airworthiness life limitations should be recorded in CAP 543 Time Limited Task Record, or an
appropriate equivalent.
The main rotor bearing has a planned life of 1000 service hours
AIRWORTHINESS DIRECTIVES
All applicable Airworthiness Directives or Mandatory Permit Directives issued by the CAA and the
state of design must be complied with. Compliance with AD’s or MPD’s should be recorded in Part
C of CAP'S 398, 399 or 400 (logbooks), or an approved equivalent.
Page 7 of 66
Manual issue 2, dated 21.12.09
Copyright of RotorSport UK Ltd
Document number RSUK0044
AIRWORTHINESS NOTICES
All applicable mandatory CAA Airworthiness Notices must be complied with. Compliance with
CAA Airworthiness Notices should be recorded in Part C of CAP'S 396, 399 or 400 (logbooks), or
an approved equivalent.
OVERHAUL AND TEST PERIODS
Overhaul and test periods shall be those shown & recommended by RSUK.
The CAA may vary or mandate overhaul and test periods by the issue of an Airworthiness
Directive or Airworthiness Notice.
The overhaul and test periods should be recorded in the appropriate aircraft worksheet
SERVICE INFORMATION
Service information (Service Bulletins, Service Letters, etc) published by RSUK should be
formally technically assessed by the Owner/Operator and adopted if required to ensure operational
safety and reliability, compliance with service information should be recorded in Part C of CAP
398, 399 or 400 (logbooks), or an approved equivalent.
MODIFICATIONS
Approved modifications which have been carried out to the gyroplane, engine, components and
radio after original manufacture, must be recorded in the appropriate log book(s).
Any recurring inspection or maintenance task resulting from approved modifications should be
recorded in the aircraft worksheets.
DUPLICATE INSPECTIONS
Following initial assembly or any disturbance of a control system or vital point, the procedures
outlined in British Civil Airworthiness Requirements (BCAR) Section A/8, Chapter A6-2/B6-2 and
A5-3 shall be applied. Certifications must be recorded in the appropriate worksheet, log book or
aircraft technical log. In summary, this procedure requires that all and any such changes be cross
checked by either a CAA approved Inspector or Certified or CAA Authorised Engineer prior to
first flight, and this cross check shall be as thorough as practical – including physical tests if
appropriate. In exceptional circumstances the CAA also allow another qualified gyroplane pilot to
cross check modifications – this person must sign the logbooks to certify their actions with their
pilots licence no.
SCHEDULED MAINTENANCE WORKSHEETS
Worksheets shown in Section 8 must be issued and the tasks certified for all scheduled maintenance
checks. These worksheets become part of the maintenance records required to be kept by the
operator.
All maintenance carried out in connection with a particular check should be certified on suitably
referenced worksheets (an example available from the RSUK website) and included in the
gyroplane records. These worksheets must be cross-referenced in the appropriate log book(s)
giving general details of the additional maintenance carried out.
DEFINITIONS
Throughout the schedule the following terms and abbreviations have the stated definitions;
SERVICE/LUBRICATION (SERVICE/LUB):
The term 'Service or Lubrication' requires that a component or system should be serviced and/or
replenished as necessary with fuel, oil, grease, water, etc., to the condition specified. The term
service may also be used to require filter cleaning or replacement.
INSPECT (INSP):
An ‘Inspection' is a visual check performed externally or internally in suitable lighting conditions
from a distance considered necessary to detect unsatisfactory conditions/discrepancies using, where
Page 8 of 66
Manual issue 2, dated 21.12.09
Copyright of RotorSport UK Ltd
Document number RSUK0044
necessary, inspection aids such as mirrors, torches, magnifying glass etc. Surface cleaning and
removal of detachable cowlings, panels, covers and fabric may be required to be able to satisfy the
inspection requirements.
OPERATIONAL CHECK (OP/C):
An 'Operational Check' is a test used to determine that a system or component or any function
thereof is operating normally.
FUNCTIONAL CHECK (F/C):
A 'Functional Check' is a detailed examination of a complete system, sub-system or component to
determine if operating parameters are within limits of range of movement, rate of flow,
temperature, pressure, revolutions per minute, degrees of travel, etc., as specified in the appropriate
maintenance manual. Measured parameters should be recorded.
CHECK (CHK):
A 'Check' is the verification of compliance with the type design organisation's recommendations.
SECTION 4
PERMIT MAINTENANCE RELEASE
This maintenance certification system is specific in accordance with BCAR A3-7.
Owner operators must ensure their airframe and engine logbooks either contain a sticker with the
wording ‘Any reference to a Certificate of Release to service in this logbook shall be construed as a
PMR’ & ‘The certification at the top of each page in Part A of this logbook is superseded by the
following statement; The work recorded below has been completed to my satisfaction and in that
respect the aircraft is considered fit for flight’, or have new logbooks containing this information.
For information on who can issue a PMR see CAP553; BCAR Section A, Chapter A3-7, Paragraph
12.5.
On completion of any check required (‘required’=stated in the Permit to Fly) by the schedule,
except pilot maintenance (see section 5) and Check A (see section 6), an entry shall be made in
Column 6 of CAP398 Aircraft Log Book, CAP399 Engine Log Book or an approved equivalent as
Section 4. The certifying person's signature, authority and date must be made in Column 7 against
the relevant category (Airframe, Engine, Radio).
The following is an example of an entry acceptable to the CAA, unless already pre printed on the
page:
Airframe
PERMIT MAINTENANCE RELEASE
Cross refer to workpack ref;
50 hr/100 hr/Annual Check (delete as appropriate)
has been carried out to my satisfaction at total airframe hours…….
and in that respect is considered fit for flight
Signed…………………...Authorisation ref………….Date……….
Maintenance Schedule Ref. RSUK0012 Issue 1
Engine
Radio
(Annual check only)
A signed PMR does not expire or is superseded by subsequent PMR’s, unless relating to a repeat of
the same activity. A PMR remains active as long as the activity it relates to remains part of the
aircraft.
Page 9 of 66
Manual issue 2, dated 21.12.09
Copyright of RotorSport UK Ltd
Document number RSUK0044
Pilot Maintenance
A licensed pilot who is the owner or operator of the gyroplane may carry out certain maintenance
tasks prescribed in Air Navigation (General) Regulation 16. The issue of a PMR is not required.
The pilot must include his pilot's licence number with his signature in the appropriate log book(s).
The permitted pilot maintenance is as below;
PERMITTED PILOT MAINTENANCE
This section defines the type and extent of maintenance that may be carried out and certified by a
pilot who is the owner of the aircraft and operates under a CAA Permit to Fly. Refer to CAA CAP
733 for more information. Some of the wording is adjusted to suit gyroplane terminology.
1. Replacement of landing gear tyres.
(Including removal and replacement of wheels, cleaning and servicing of wheel bearings,
application of creep marks, removal and refitting of brake units to the extent required for wheel
removal and the removal and the renewal of brake pads/linings when special tools are not
required. Replenishment of hydraulic brake system fluid level).
2. Replacement of defective safety wiring or split pins excluding those in engine, transmission,
flight control and rotor systems (but including those designed to be pilot maintainable and
shown in the pilots handbook, eg teeter bolt split pin).
3. Repairs to upholstery and decorative furnishing of the cabin or cockpit interior when repair
does not require dismantling of any structures or operating system or interfere with an
operating system or affect the structure of the aircraft.
4. Repairs, not requiring welding, to fairings, non-structural cover plates and cowlings.
5. Replacement of safety belts or safety harness.
6. Replacement of seats or seat parts not involving dismantling of any structure of any operating
system.
7. Replacement of bulbs, reflectors, glasses, lenses or lights.
8. Replacement of any cowling not requiring removal of the propeller, rotors or disconnection of
engine or flight controls.
9. Replacement of unserviceable sparking plugs.
(Including removal, cleaning, gaping, testing and refitting of all spark plugs).
10. Replacement of batteries.
(Including maintenance of lead acid batteries)
11. Replacement of wings (rotors) and tail surfaces and controls, the attachments of which are
designed to provide for assembly immediately before each flight and dismantling after each
flight.
12. Replacement of main rotor blades that are designed for removal where special tools are not
required (as is the case on the MT series).
13. Replacement of VHF communications equipment, only if is not combined with navigation
equipment.
14. Manufacture and installation of required cockpit placards and notices.
15. Lubrication of aircraft.
(Including prior cleaning of hinges)
16. Inspection of engine induction air filter.
(Including removal, cleaning and refitting (with wirelock)).
17. Inspection of fuel filters.
(Including removal, cleaning and refitting).
18. Changing of engine oil.
(Including removal, cleaning/replacement, refitting of oil filter, and wirelock of sump bolt).
Page 10 of 66
Manual issue 2, dated 21.12.09
Copyright of RotorSport UK Ltd
Document number RSUK0044
Annual Check
The annual check and all associated work must be accomplished under the supervision of an
organisation appropriately approved by the CAA (eg RSUK or other CAA Authorised engineer).
Use form F080 from the RSUK website
SECTION 5
THE MAINTENANCE CHECK CYCLE
Check title
Content
Period
Check A
Check A
Prior to the first flight of the day
First 25 hour check
25 hour check items (one time
check, after new build)
100 hour check items
Not exceeding 25 flying hours, or 1
year, whichever is the sooner
Not exceeding 100 flying hours
100 hour check
25, 100 hour and annual check Not exceeding 12 months (see Note 5)
& prior to renewal of Permit to Fly
items
Use forms F076 25hr and F071 100hr inspection/service records
Annual check
PERMITTED VARIATIONS (see Notes)
Tasks controlled by flying hours
25 hour
100 hour
Tasks controlled by calendar time
6 months
Annual
Maximum Variation
+/- 5hrs
+/- 10hrs
Maximum Variation
1 month
Prior to Permit renewal
(see 5. below)
Tasks controlled by more than one limit
The more restrictive limit shall be applied
Notes
1. Permitted variations may not be applied to applicable airworthiness life limitations,
airworthiness directives or overhaul and test periods.
2. Permitted variations for tasks controlled by flying hours should not be understood to be a
maintenance planning tool, but as an exceptional means to allow the operator to fly for a limited
period of time until the required maintenance is performed.
3. Any application of a permitted variation to the maintenance check cycle period must be
recorded in the appropriate log book(s) together with the reason for the variation by a person who is
authorised to sign the log book entry for that particular check. Details of the permitted variation
must be made visible to the pilot.
4. Permitted variations are not required to be deducted from the next scheduled check.
5. The annual check may be anticipated by a maximum period of 62 days without loss of the
continuity of the maintenance check cycle. Thus, for example, where the full 62 days is invoked,
the following annual check would become due 14 months after the completion of the annual check
that was anticipated. The period by which the annual check was anticipated and the date of the next
annual check shall be recorded in the appropriate log book(s).
Page 11 of 66
Manual issue 2, dated 21.12.09
Copyright of RotorSport UK Ltd
Document number RSUK0044
SECTION 6
PILOT'S PRE-FLIGHT CHECK
Pre-flight checks are to be carried out in accordance with the Gyroplane Flight Manual RSUK0043.
CHECK A - PRIOR TO FIRST FLIGHT OF THE DAY
For update control and one source of information, this check is not printed here. Refer to the Pilots
Handbook.
For all inspection checks reference must be made to RotorSport UK Ltd, either via the website
www.rotorsport.org or directly, for the latest schedule.
SECTION 7 - SCHEDULED MAINTENANCE WORKSHEETS
To allow ongoing updates of these service sheets with field service information received, they
are located on the RotorSport UK Ltd website www.rotorsport.org.
F076 issue 4, 25hr service worksheet
F071 issue 4, 100hr worksheet
F080 issue 3, Annual inspection
PERMIT RENEWAL
Over and above the annual inspection, the CAA have some specific requirements that must be
met/demonstrated during the permit renewal process. These are:
1) Demonstration of compliance with relevant AAN's (29247, downloadable from the CAA
website) at applicable issues and with any addendums. See the aircraft Certificate of Conformity
for details.
2) Demonstration of compliance with CAA Type Approval data sheet No. -BG-02 @ current Issue
(downloadable from CAA website)
3) Demonstration of Compliance with CAP 661 Mandatory Permit Directives - detailing the
Revision date/issue and stating relevant MPD's and method of compliance and location/page of
certification in log book. Achieved by checking the copy of the latest document on the CAA
website, and referencing it on the annual insp. Sheet.
4) Demonstration of Compliance with CAP 747 detailing the Revision date/issue and applicable
Generic Requirements. Achieved by checking the copy of the latest document on the CAA website,
and referencing it on the annual insp. Sheet.
5) Demonstration of Compliance with EASA AD's applicable to the Rotax 912/914 engine - claim
those for which are covered by mod state and detail those which are not relevant to UL/ULS.
Achieved by checking the copy of the latest document on the EASA website, and referencing it on
the annual insp. Sheet.
6) Demonstration of Last completed Scheduled Maintenance check - reference Maintenance
Manual, requirements and significant maintenance tasks/repairs completed. Achieved by showing
the signed, completed service worksheets, which must be referenced in the aircraft and engine
logbooks together with reference back to the manual used.
7) Flight test report - copy of report required for the CAA.
Page 12 of 66
Manual issue 2, dated 21.12.09
Copyright of RotorSport UK Ltd
Document number RSUK0044
8) Permit Flight Release Certificate, if previous Permit expired. Copy required.
9) Aircraft weighing report date and Cof G schedule - copy required if changed since last
renewal.
Note! There is no requirement to annually re weigh a gyroplane. If a re-assessment of the aircraft
CG is required, please contact RotorSport UK Ltd.
10) Check of Aircraft hours, Engine serial No and Propeller serial number.
11) Pilots Operating handbook Issue No. You will need to show your copy.
12) Modifications and service bulletins/MPDs. The logbook must show any incorporated, both in
the white pages and in the back pages showing the mod summary. Service bulletins and MPDs
must be shown in either ‘one time requirements’ or ‘Repetitive requirements’ if to be repeated at
certain intervals. In the latter case, the repeat checks must have been done.
They must be referenced with either CAA or RSUK mod numbers, and to their worksheets if used
to show embodiment – and to be available for review.
A well presented and completed document set as above will make the permit renewal process
relatively easy. See the RSUK website for further permit renewal guidance.
Page 13 of 66
Manual issue 2, dated 21.12.09
Copyright of RotorSport UK Ltd
Document number RSUK0044
SECTION 8 - ANNUAL INSPECTION
Annual Flight Test Schedule.
All tests are classified as Op/C. Note, these are transposed with type modifications from the PFA
Permit renewal application. The flight test required by the CAA may vary from that shown, always
check with the Flight Test Dept at CAA Aviation House, Gatwick
Task
Result
Initial
Test Test
No.
1.
Preparation
Load aircraft to normal maximum operating weight
– refer to Operating Limitations and hang check
data as cross check. Record all up weight, including
pilot.
2.
Engine run &
ground checks
3.
Taxying
4.
Pre spin
operation
5.
Take off
6.
Climb
Run engine to normal operating temperatures. If
practical tie down and record max rpm and thrust
achieved.
Check operation of engine/fuel controls, ignition
and carb heat (if fitted).
Check flying & trimming controls for full & free
movement, excess backlash and sense of operation.
Check for maneuvering ability, ie, turning radii,
directional stability under braking. Check braking
efficiency and operation and for absence of nosewheel shimmy at higher speeds.
Check functioning of rotor pre-rotator mechanism,
noting RPM achieved. Note rotor vibration level
during the ground-handling phase.
The take off is to be made at full power, using
standard technique as per flight manual. Note any
unusual characteristics.
The time taken to climb from 1,000 feet to 2,000
feet (QNH) should be recorded. Prior to reaching
1,000 feet, the aircraft must be established in the
climb at the normal best climb airspeed, with full
throttle set and zero sideslip.
Care must be taken to ensure the aircraft has settled
in the climb and the airspeed is kept within plus or
minus 2Kts/3mph of the selected speed throughout.
The climb should not be carried out near cloud or
turbulent air and a steady heading must be
maintained into wind to limit sideslip.
The aircraft should possess an adequate range of
control function to enable full control about its three
axes at all flight speeds. It must be operable without
a requirement for high piloting skills during any
maneuver. It should not exhibit any serious
tendency to enter pilot induced oscillation at any
power settings. Should this occur, it should remain
fully controllable using standard gyroplane-piloting
techniques. Control forces during all maneuvres
should be normal for a gyroplane. Monitor control
responses and rotor/airframe vibration levels
throughout all the following maneuvers.
Accomplish:
High speed flight up to published VNE speed
(100mph). Record engine rpm (not to exceed 5,800)
Minimum slow-speed flight using maximum
engine-power to sustain altitude.
Steep turns in each direction using sufficient power
7.
In Flight
maneuvering
Page 14 of 66
Fr Pilot wt:
Rr Pilot wt:
Fuel load:
Empty wt:
(inc rotors)
Rotor type:
Max rpm:
Thrust:
Comments
(acceptable/unacceptable)
Comments
(acceptable/unacceptable)
Rpm achieved:
Comments
(acceptable/unacceptable)
QNH:
Air temperature:
Climb airspeed kts/mph:
Climb engine RPM:
Time to climb
Comments
(acceptable/unacceptable)
Comments
(acceptable/unacceptable)
Manual issue 2, dated 21.12.09
Copyright of RotorSport UK Ltd
Document number RSUK0044
8.
Functional
checks
9.
Radio, where
fitted.
10.
Landing
to maintain altitude, flying at a constant bank-angle
of 45° (30° at Vmax, 10° at Vne) and at a constant
turn-rate.
Spiral descent at flight idle engine-RPM, using
minimum rate of descent airspeed with turns in each
direction; check directional stability.
Vertical descent at 25mph indicated airspeed using
standard entry and recovery techniques; (entry at
minimum of 1,500 feet AGL, power on).
Recovery to stable powered climb following a
baulked glide approach (Vmin, power off).
Control: during flight Op/C that all controls
including trimmer systems operate without
excessive friction and their operation does not
provide a distraction to the pilot.
Instruments: Inspect all instruments for correct
indications with particular emphasis on the flight
instruments, including ASI, Altimeter, Compass
and Rotor Tachometer.
Engine: Op/C all engine controls function in a
satisfactory manner and all indications are normal.
Op/C radio transmit/receive at 2,000 feet
(maximum) and 30 nautical miles distance from
ground station
(including hand held where using aircraft mounted
wiring)
Using standard flight manual technique for landing,
monitor any unusual handling or functioning
characteristics of the machine including the rotor
and rotor brake.
Comments
(acceptable/unacceptable)
Radio strength:
Comments
(acceptable/unacceptable)
Notes:
Test pilot full name ________________
PPL(G) No______________
Date of flight______________________
Place of flight____________
Page 15 of 66
Manual issue 2, dated 21.12.09
Copyright of RotorSport UK Ltd
Document number RSUK0044
SECTION 9 - Aircraft systems description and maintenance methods
General notes;
1. These instructions are not all encompassing, and should always be used in line with
good aircraft engineering practices, and manuals such as AC43.13. Repairs not shown
must be approved by either the CAA or RSUK in writing.
2. Safety; working on an aircraft brings many hazards. Always wear suitable personal
protective equipment such as overalls, safety glasses, safety shoes, gloves etc
appropriate for the maintenance task. If possible render the engine inoperable prior to
starting work.
3. Wherever possible SI units are used
4. Always use good quality tools appropriate for the task
5. Use of non standard or unauthorised parts or repairs will invalidate the warranty and
the Permit to Fly. Parts specifically designed for this aircraft and supplied by RSUK
will carry a certificate of conformity, which must be kept with the aircraft records.
6. Special tools (none at this time)
7. Lubricants. Use engine lubricants only as per Rotax instructions. Bearing grease or
moly filled grease is suitable for aircraft lubrication points, preferably water resistant.
8. Loctites and sealants. Loctite 243 is used where required.
9. General corrosion prevention. Keep the aircraft in a non humid, ventilated area. If
humidity is present, protect unplated components such as bolts etc with a proprietary
spray such as WD40 or ACF50.
10. Help protect our environment by disposing of parts and fluids properly.
11. Standard bolt torques are M6 15Nm+/-2Nm, M8 25Nm+/-3Nm, M10 35Nm +/-4Nm,
M12 100Nm +/-10Nm. Always assess the joint to be tightened and use engineering
judgement – do not overtighten plastic or unsupported tube joints!
12. Specific aircraft parts list available separately from RSUK website.
13. Remember, maintenance, modification, and bulletin/MPD incorporations must be
recorded on suitable worksheets and within the aircraft/engine logbooks – and signed
appropriately.
14. Refer also to the pilots handbook as well as the drawings quoted and service parts list,
all available from the RSUK website.
WARNING! PROPELLERS KILL! WHEN WORKING ON THE AIRCRAFT, UNLESS
THERE IS A SPECIFIC REQUIREMENT TO HAVE THE AIRCRAFT LIVE, ENSURE
THAT COILS ARE OFF AND KEYSWITCH OFF.
IF POSSIBLE DISCONNECT THE BATTERY, OR REMOVE THE SOLENOID
ACTUATOR WIRE FROM THE SOLENOID TO PREVENT POSSIBLE STARTING.
This statement is made here only, to avoid continued repetition. It is the engineer’s
responsibility to ensure a safe working environment.
Page 16 of 66
Manual issue 2, dated 21.12.09
Copyright of RotorSport UK Ltd
Document number RSUK0044
Primary and Secondary structure determination:
A primary structural part is one for which the failure would be catastrophic and would prevent
continued safe flight and landing.
All other structure can be considered as Secondary, thus failure of a Secondary structural part
would not be immediately catastrophic and with due care continued safe flight and/or a safe
precautionary landing could still be made.
Because of the simplicity of the aircraft structure some parts have a dual role – such as the
airframe. As an example, the core box section airframe is primary structure, but the attachment
points to the enclosure are not (they are multiple redundant due to the number of attachments).
The primary structural elements are considered to be:
Airframe box section joining the rotor head to the engine, seats, tail, and undercarriage.
Connection assemblies joining the rotor head to the airframe mast.
The rotor assembly and rotor head
The tail and rudder assy
The rudder and rotor control system
The main undercarriage and nosegear
Whilst other items may have an effect on flight safety, they are considered secondary to the above.
The undercarriage is included, as whilst it does not contribute to safe flight, it is difficult to make a
safe landing without it - inevitably an aircraft rollover would result, probably destroying the
aircraft.
Page 17 of 66
Manual issue 2, dated 21.12.09
Copyright of RotorSport UK Ltd
Document number RSUK0044
a) Airframe
Basic description
The airframe is made of 1.4301 stainless steel tube and laser cut brackets, jig welded together with
1.4571 wire. After assembly it is cleaned and electropolished.
Assembly methods
None – factory assembled only
Special setup instructions
None – factory assembled only
Repair methods
None. In the event of an accident damaging the airframe, then the only sensible action is to replace
the airframe. Do not take risks with the primary structure! Contact the manufacturer for more
information, such as key dimensions for checking straightness etc.
It is not permitted to weld the airframe unless via an RSUK approved repair scheme, using
Approved welders.
Page 18 of 66
Manual issue 2, dated 21.12.09
Copyright of RotorSport UK Ltd
Document number RSUK0044
b) Engine and controls
Basic description
Refer to RSDS71000 and 7099
Engine: The engine is either a Rotax 912 ULS or a 914UL. Both use the standard Rotax white
frame engine mounting. Reference must be made to the Rotax service manual supplied with the
aircraft.
912ULS engines are fitted with two separate air cleaners, with a vent from the float bowl to the
back of the filter. They are wirelocked to the carburettor.
912ULS Carburettor heat system: This engine is fitted with a water jacket warming collar between
the each carburettor and the inlet manifold. It is held in place with a grub screw, and is plumbed
into the engine water coolant system. It is only effective if the engine is warmed up. See water
coolant system drawing RSDS7097.
Materials used: See service parts list
Note engine components, including spark plugs and oil filters, are considered proprietary parts.
Provided the parts used are of genuine Rotax origin, they are not required to hold a RSUK
certificate of conformity. Parts unique to this application – eg 912ULS air filters – do require a
certificate of conformity.
Use of unleaded MOGAS is highly recommended. Leaded fuel contains additives (eg lead)
which have a detrimental affect on the engine spark plugs, pistons, and slipper clutch.
Use of leaded fuel changes the service schedule – refer to Rotax maintenance handbook.
Special setup instructions
Follow Rotax handbook instructions.
Each of the four engine mountings consists of two rubber elements, two face washers and one
internal sleeve, clamped between the airframe and engine mounting frame with an M10 cap head
bolt. The sleeve cannot be visually checked for presence after assembly other than it is not possible
to tighten the mounting bolt seurely, and that the engine may sag if all four are omitted.
Warning! Ensure all are present! Omitting them may lead to the prop striking the keel!
When refitting an engine, connect the ignition cut off wires early, and ensure they are earthed.
Engine idle setting is 1600rpm. Do not set higher, as extended taxying with a fast idling engine
stresses the brakes unnecessarily.
If the engine frame (the white frame) has been removed for any reason, ensure the connection bolts
from frame to the engine are re-fitted with loctite 243 or stronger.
Page 19 of 66
Manual issue 2, dated 21.12.09
Copyright of RotorSport UK Ltd
Document number RSUK0044
Repair methods
Removal and replacement of the engine is straightforward. The engine may be removed with sub
systems (propeller, pre rotator, water cooling and oil hose system less cooler and sump, and exhaust
system) still fitted. Or these can be removed.
Assuming these are to remain in place,
1. Disconnect battery, earth lead first.
2. Disconnect starter earth and live leads.
3. Disconnect fuel system from mechanical fuel pump and from electrical pump(s), or in the
case of the 914, disconnect the feed and return hoses to the fuel regulator on top of the
engine.
4. For 914UL disconnect cable to turbo waste gate.
5. Disconnect voltage regulator
6. Drain oil, and disconnect oil sump and radiator. Ensure suitable receptacles are there to
catch waste oil, and block/protect exposed oil orifices.
7. Disconnect choke and throttle cables. Marking the approximate positions will aid re
assembly.
8. Take weight of engine on suitable hoist, with straps either securely under the engine, or
through the inlet manifolds. Ensure the straps do not crush or foul other items!
9. Disconnect white ignition cables, and airbox temp sensor where fitted. If airbox fitted,
loosen clamps to carburettors to allow removal.
10. Disconnect or remove any remaining connections or cables as appropriate – eg 914 pressure
sensor and control unit, engine CHT, oil pressure and air hose to pre rotator.
11. Remove carefully the four engine mounting bolts/nuts.
12. The engine can no be moved rearward from the enclosure, and the pre rotator slider will
disconnect at the same time.
Repair/replace as required. On refitment reverse the above procedure, taking note of items in the
relevant sections below, and setup engine as per Rotax handbook, with engine controls as detailed
later.
Before releasing back to service ensure all tools etc are removed, perform a thorough ground test to
max power, and a full engine systems audit.
Some of the nuts that retain the engine frame to the aircraft are difficult to get access to and to
torque up. Always use new nylocks, and tighten to 35Nm. When tightening ensure the rubber
elements are seated correctly.
Engine servicing and repair
Follow the instructions given in the Rotax handbook for the engine, unless specifically shown
different in this manual
Basic Description - 914UL Exhaust system:
The silencer is supplied fitted to the engine by Rotax. The aftermuffler is an addition to reduce
noise, but may be removed if required.
Materials used
See service parts list
Page 20 of 66
Manual issue 2, dated 21.12.09
Copyright of RotorSport UK Ltd
Document number RSUK0044
After muffler installation with single band clamp around the silencer.
Special setup instructions
Tighten clamps securely.
Repair methods
This muffler is the service part available for repairs.
Basic description - 912ULS exhaust system:
Refer to RSDS7100.
This comprises a welded up specific assembly for the silencer for this application, and a separate
aftermuffler.
Materials used See service parts list
Special setup instructions
Ensure jubilee clips are securely wirelocked to prevent loss in case of failure.
Ensure clamps are tight
Page 21 of 66
Manual issue 2, dated 21.12.09
Copyright of RotorSport UK Ltd
Document number RSUK0044
Repair methods
Replace items if required.
Basic Description - Oil cooling system:
The oil system is a dry sump type. It comprises an oil sump mounted on the right of the mast, with
hoses connecting it to the engine and cooling radiator via a thermostat. Refer to RSDS7001 oil
system layout for crimped hoses.
Note that the 914UL engine has one additional hose, from the oil pump to the turbo bearing.
The oil dipstick is contained in the oil sump, accessible via a cap on the top. It is filled here (RSUK
stock an easy to use angled funnel), and drained from the wirelocked plug on the sump underside.
Because the oil from the sump will drain back into the engine to a certain degree it is very
important to turn the engine over by hand in the normal rotational direct before checking the oil –
otherwise the oil may be overfilled, and will then spill out extremely messily when the engine is
started. Remove the filler cap, and turn over until a bubbling noise is heard from the tank. Then
check the level.
Materials used: Refer to RSDS7001, and spare parts list.
Refill the oil system with oil in accordance with Rotax handbook. RSUK recommend, based on
service experience, Shell VSX.
Hoses are Trelleborg Hydro K. This hose is fire resistant and must not be changed for any other
type without approval.
Special setup instructions:
If the engine suffers a major repair, remove and flush the oil sump. The oil cooler should also be
removed and flushed. Take care to refit the sump at the correct height! (see drawing).
After draining the oil system, prime it in accordance with Rotax handbook procedures before
starting the engine.
Ensure sump drain plug, rear engine oil hose and oil pump plugs are wirelocked.
When tightening the hoses to the top of the radiator, ensure the nut on top of the radiator is held
securely in a spanner to prevent torque from being applied between the nut and the radiator – this
connection is not designed to take a torque load, and applying one may lead to oil leakage.
If hoses are removed or replaced, take care to tie wrap securely and as per the drawing. The oil
pipes pass close to hot points and edges, and are exposed to vibration. Loose pipes will cause
fretting and possible oil loss.
Ensure that the oil thermostat is not rubbing against the battery. Due to variation in hose length, and
actual positioning on the aircraft, it is possible that this item may be close to the rear of the battery.
In this case a length of hose fitted to the edge nearest the battery is permissible, held on with tie
wraps.
The oil thermostat is set at an optimum level to suit anticipated flight conditions, from full power
vertical descent on a hot summer day to winter lightweight cruising. As such there are times when
the engine oil may not reach temperature. If required the radiator may be blanked off either side
with a length of duct tape. Ensure the surface is clean first, and wrap the tape around the radiator
such that the ends overlap at least 50mm. Do this first on the water radiator, as the water
temperature will also be cool – and if then required on the oil radiator. Remove when the operating
conditions allow.
Page 22 of 66
Manual issue 2, dated 21.12.09
Copyright of RotorSport UK Ltd
Document number RSUK0044
Repair Methods
There is no repair method for the radiator, thermostat, sump, mountings or hoses other than direct
replacement. Crimped hose connections may be replaced by clamped connections – see parts
shown on the assembly drawing.
Basic description - Water cooling system, 914UL and 912ULS standard
Refer to RSDS7069, RSDS7097 and RSDS 7067
This comprises a Rotax standard radiator mounted on rubber isolators on brackets just in front of
the propeller, Hoses from/to the radiator go to the engine water pump and return, and via the T
pieces that provide hot water to the carburettor heat jackets.
Materials used: See RSDS7097 Water coolant system layout, and RSDS7067 for radiator system.
Fill with a mix of 50/50 water and EthyleneGlycol antifreeze suitable for aluminium engines. It is
highly recommended to use distilled water, as this will limit impurities in the engine.
Special setup instructions.
Follow Rotax instructions for change intervals, and for venting the system whilst refilling – see the
engine handbook.
If the radiator is removed, ensure that the rubber mountings are refitted with the safety straps in
case of bush failure. The screws retaining the brackets to the engine must be loctited with Loctite
648. This is a very secure loctite, and removal of these bolts may require heat to be applied to the
screw head via a suitable small flame torch.
Pay attention to hose routing and tie wraps, to ensure the hose cannot fret or contact hot points –
note that the 914 hose on the right of the engine carries a metal section to prevent contact to the
exhaust.
Ensure hose clamps are secure and correctly positioned.
There is no thermostat in the water coolant system. This can lead to a long warm up time, and cool
running when lightly loaded in cold operating conditions. If required the radiator may be blanked
off either side with a length of duct tape. Ensure the surface is clean first, and wrap the tape around
the radiator such that the ends overlap at least 50mm. Do one length first, fly and test, then another
if needed. Remove when the operating conditions allow.
Repair methods
There is no repair method for the radiator, brackets, mountings or hoses other than direct
replacement.
Basic Description – 914UL side scoop radiators
In order to cater for cooling in hot climates a radiator option exists where two scoops are fitted
either side of the enclosure over the suspension bow, and two standard radiators fitted behind them
This adds 2Kg to the aircraft weight, and two sets are in service in the UK at the time of writing.
The air scoops are composite parts. They are retained by rivnuts and/or standard fasteners to the
enclosure, and to the airframe. The radiators are mounted inside the scoop to bonded panels. The
scoops are non structural, and minor cosmetic repairs are acceptable.
Materials used: see RSD7120 Dual radiator configuration
Otherwise as single radiator.
Page 23 of 66
Manual issue 2, dated 21.12.09
Copyright of RotorSport UK Ltd
Document number RSUK0044
Special setup instructions
As single radiator, except that venting the two radiators is not easy. Squeeze the crossover tube
between the radiators to blow the bubbles out with one of the top hose disconnected. Ensure the
system is able to flow freely with no hose kinks.
Repair methods
There is no repair method for the radiator, brackets, mountings or hoses other than direct
replacement. Air scoops may be painted or minor repairs affected, if removed ensure all fastenings
are secure after refitment, and that edge trim is wirelocked.
Basic description - Throttle, turbo (where fitted) and choke controls
The system comprises a throttle body assembly that also carries the brake lever, on a single pivot
bolt connected to the airframe. On the same bolt is the choke lever, which if operated is
automatically pushed off by the throttle when pushed forward. The connection to the engine is via
Bowden cable, two separate cables to the throttles (linked at the throttle body) and one choke cable
split to two in a splitter mounted on the mast.
There is an eccentric bush on the throttle body to allow throttle idle adjustment.
Throttle body assy
Materials used See drawing RSD7098
Page 24 of 66
Manual issue 2, dated 21.12.09
Copyright of RotorSport UK Ltd
Document number RSUK0044
Special setup instructions
Basic carburettor control setup
Assumption: all cables are in place, and basic setup only is needed. Engine has run.
1. Ensure that the carburettor idle stops are screwed back to meet the throttle arm, and that the idle
is about 1600rpm.
2. Mark the cable position to the arm.
3. Set the throttle lever to the position shown on P26, about 60mm above the seat. Adjust the idle
cam on the throttle lever to stop in this position.
4. Loosen the cables in the carb arms, and allow the lever to return to the throttle stop. Maintain
tension and tighten, on both carbs. Adjust as required such that both arms lift simultaneously from
the stops.
5. Adjust choke so that the gap between the choke lever and the throttle arm is between 2 to 10mm
(choke full on, throttle shut). Adjustment may either be by using the adjuster on the end of the cable
on the lever, or by adjusting the connection to the carb choke lever. Ensure that both chokes open
as simultaneously as practical, and that both return to closed, and go fully open.
Carb idle and balance setup basics.
1. Fit balance kit either to crossover tube or with nipple to manifold points, with gauges visible to
aircraft operator .
2. Ensuring the prop is clear of loose tools or parts, start and warm up engine to 50deg C min.
3. At 2,000rpm confirm carbs are balance. adjust on LH carb ONLY if a 914 or either carb if a 912
by adjusting outer cable length at carburettor. Confirm balanced up to max power, and if needed
make the best compromise for balance at 5,000 rpm.
4. Bring engine back to idle, and adjust with cam on cockpit throttle body to achieve 1,600rpm.
5. Screw in carb throttle stop screws to just touch throttle arms - if too much then balance will be
affected (check on gauges).
6. Recheck balance, and if OK stop engine, and remove equipment/return to flight condition.
6. After setting run the engine up in accordance with PDCD-017, and set idle and carb balance. If
using that form record settings there, if not, record idle setting in logbook or worksheet.
Throttle connection to carb
Choke connection to carb
Carburettor
Page 25 of 66
Manual issue 2, dated 21.12.09
Copyright of RotorSport UK Ltd
Document number RSUK0044
Eccentric bush. Adjust position by loosening
fastening slightly, and turning.
Turbo detent screw
Throttle stop screw
Gap between throttle lever and seat approx
60mm when closed
Gap between choke lever and throttle 2 to 10mm with throttle closed, choke on (shown off)
Repair methods
Replace worn components. See drgs for reassembly.
Page 26 of 66
Manual issue 2, dated 21.12.09
Copyright of RotorSport UK Ltd
Document number RSUK0044
Basic description - Engine electrical system
There are three areas; Ignition system cut off, charging system, and starting system
The ignition system is cut off by earthing. There are two wires (one for each coil) located in the
connector block on top of the engine, as indicated in the Rotax handbook. The gyroplane harness
connects into this block with two white wires, and when the switches are OFF, the wires are
connected to ground.
WARNING! If these wires are disconnected the engine is LIVE. This will mean that it will not be
possible to stop the engine if started, other than via a fuel cutoff! Never turn the engine over
without these wires connected.
The charging system is via a Rotax standard regulator, located screwed to the LHS airframe engine
mounting. Power is fed from the engine alternator into this unit, and then out to the aircraft
systems. See the Rotax engine handbook for more details.
The starting system is via a Rotax standard solenoid, fed directly from the battery and to the starter
motor. The engine is earthed directly to the airframe via a short cable, bolted through the battery
earth cable. The solenoid is activated by the keyswitch on the instrument panel.
Materials used See service parts list
Special setup instructions
None
Repair methods
The regulator is not serviceable. The alternator is serviced as per the Rotax maintenance manual,
but requires engine removal.
Likely failures are cable end connections. Ensure the cables are secure and connections clean. A
generator warning lamp may mean that the connections to the regulator are not clean, so check
these first.
Materials used
See parts list
Special setup instructions
See Rotax handbook
Repair methods
For engine repairs see the Rotax service instructions
c) Electrical
Basic description
This is a 12volt DC system, supplied via the engine alternator.
For wiring diagram, see drawing RSDS7110, two sheets
There are two primary looms – the instrument panel, and main cable harness. Other items such as
the front stick and the rear seat instructor packs carry a suitable cable loom to connect into the rest.
Materials used
See parts list
Assembly methods
The harness is secured by plastic ties – see drgs for location. The main harness travels on the left of
the keel, and the stick on the right.
Page 27 of 66
Manual issue 2, dated 21.12.09
Copyright of RotorSport UK Ltd
Document number RSUK0044
Repair methods
In line with normal aircraft practice.
Fuses: Automotive type blade fuses are located behind the instrument panel. Access is gained by
removing either the left or right lower three screws holding the trim cover to the instrument panel,
and locating the fuse block in the loom. Ensure safety tie is fitted across fuses in the block prior to
refitting side panel screws. Ensure screws are tight.
d) Pneumatic
Basic description
Refer to RSDS7070.
MTOsport electrically operated pneumatic control system.
Principle of operation. Single electric pump feeds air into system via a water filter and electric and
mechanical control valves to three cylinders - a double acting cylinder operating the rotor brake and
trim, one single acting cylinder operating the pre rotator engagement, and an additional cylinder
that engages the bendix gear. Operation of nose up trim, rotor brake or pre rotator activates pump
for pressure, and appropriate valves. Activation of nose down trim releases air via a regulator, and
releasing of pre rotator button depressurises engagement air cylinders.
Pumps have a max pressure capability of 10 bar – but are limited via a pressure switch to 8bar, in
order to prevent premature pump burnout and system overpressurisation. This is adjustable via the
pressure cut off switch, located beside the trim/brake changeover switch. There is a slotted screw
on the end between the contacts that is screwed in or out.
Pre rotator operation
Turn mechanical panel valve to 'Flight' Press button on stick when stick is fully forward. Closes
circuit to switch V6 & V7 and turns on pump via a solenoid. Release of switch opens circuit, pump
stops and valves return to previous position, exhausting the system. If button pressed when not
fully forward, or stick pulled back during pre rotation, then a micro switch on base of front stick
opens the electrical circuit and the valves and pump return to standby.
This switch should be on when the stick is fully forward. Adjust bracket height to suit.
Valve V6 allows air either to enter the trim/rotor brake circuit OR the pre rotation circuit.
Valve V7 allows air either IN to the pre rotator activation cylinder OR out to exhaust for cylinder.
If there is pressure in the rotor brake system above 3 bar, there is a pressure switch prevents the pre
rotator from becoming engaged by cutting out the electrical circuit from the switch to the pump
solenoid. This switch is located with the solenoid valve cluster behind the engine gauges, and is
adjusted as per the 8bar switch.
Trim operation
Turn mechanical panel valve V1 to 'Flight'. Pull top hat button on the end of the stick towards pilot.
Closes electrical circuit to pump solenoid, which pressurises the trim/brake cylinder. Release of
switch turns off the pump, leaving the cylinder pressurised. Push the top hat button forwards.
Closes the electrical circuit to valve V2, which lets the cylinder exhaust via a regulator.
Rotor brake operation
Turn mechanical panel switch V1 to 'Brake'. Pull top hat button on top of switch rearwards. Closes
electrical circuit to pump to pressurise trim/brake cylinder, and also opens valve V2 to exhaust air
in opposite end of cylinder. Brake can be engaged in full range of stick pitch movement.
Page 28 of 66
Manual issue 2, dated 21.12.09
Copyright of RotorSport UK Ltd
Document number RSUK0044
Circuit diagram
Materials used (as per parts list)
Assembly methods
Hoses are all push type fitting, push on with wire lock, or with thumbscrew lock
Special setup instructions
Ensure system and air dryer (‘filter’) are water free. Dryer must be removed and either replaced or
dried out every 100hrs. Dried out means plastic pipe connections removed, and placed in an oven at
between 75 and 100degC for 2 hrs min. Take care not to burn hands when handling the hot dryer,
and leave to cool before refitting.
Page 29 of 66
Manual issue 2, dated 21.12.09
Copyright of RotorSport UK Ltd
Document number RSUK0044
Ensure the direction of flow arrow on the dryer is correct when re installing. It is recommended to
replace the dryer every 500hrs, or when the pump does not easily achieve full pressure. If a dirty
environment, change more frequently. The function of the dryer is to keep the compressed air free
of water – water in the pneumatic system will prevent correct operation. It is located behind the
instrument panel, either bolted to the trim panel or to the keel.
Functional check after any repair as per below:
Full functional check.
In ‘Brake’ position, engage brake, confirm operation, and that function is acceptable. Pressurise to maximum.
Tolerance is 7.5 to 8.5bar. Adjust pressure switch if required, or find the leak
Change to flight – check for 2 to 3 sec max to release air from brake system. If to slow/quick, adjust vent on side of
V1 changeover switch
In ‘Flight’ position check that trim goes on and off in same direction as button (inc rear switch if fitted).
In ‘Flight’ position, stick forward. Start pre rotator. Ensure cylinders (2) engage, and when the stick is pulled back
they disengage. If no disengagement adjust stick microswitch. Note that the head cylinder must engage prior to the
engine cylinder. If the head cylinder rises late, adjust the rate at which the engine cylinder engages by adjusting the
throttle on the cylinder.
Stick to front, release pre rotator and confirm that pressure is applied to trim and stick comes back slightly.
In ‘Brake’ position, put 3 bar pressure on and ensure pre rotator does not function. If it does, adjust the cut out
pressure switch.
Press the ‘Interlock release button’ and ensure that pre rotator functions (both cylinders, head and engine) with brake
engaged.
Repair methods
Water in the system will hamper valve operation. If water has entered the system, disconnect
affected pipes and blow through with dry compressed air. Ensure all valves are thoroughly dried
and reconnect. Replace or dry dryer. Confirm full pneumatic system operation, before returning to
service.
Possible problems and solution.
Pump does not run in any mode. Check fuse. If fuse OK, check electrical supply to pump. If none,
check supply at solenoid. If supply, but no energising of solenoid, check stick loom to main loom
connection, and or pressure switches.
Pump runs, but no or little pressure in any mode. Check hose from pump to filter for splits or poor
connection. Check filters connections for tightness and hose from filter to instrument panel.
Loss of rotor brake pressure overnight. Normally an air leak, check at the cylinder connection, the
changeover switch, & the pressure gauge – and the connections from the panel to the harness.
Pump runs, but the pre rotator fails to engage properly/slow pre rotation and/or the trim system
looses pressure. Check the front-most valve on the valve pack for correct function – dirt under the
valve face will allow leakage during trim and pre rotation. The valve is easily and quickly changed
via the two retaining screws.
Trim pressure loss in flight. Check cylinder and air pipe connections.
No trim pressure release. Blocked valve or no power supply to solenoid valve.
Pre rotator rattles at the rotor head when engaged. Throttle incorrectly set on engine cylinder – back
off so that rotor head cylinder is pressurised first.
Note that replacement seal kits are available for the pneumatic cylinders
Page 30 of 66
Manual issue 2, dated 21.12.09
Copyright of RotorSport UK Ltd
Document number RSUK0044
e) Rotor
Basic description
Refer to RSDS7040 (8.4m rotor) and 7139 (8m rotor)
The rotor is a pre coned two blade teetering design. Each blade is an extruded section, containing
tip weights and end closure plates or caps. The blades are stamped/etched to match the hub
assembly to prevent incorrect assembly. The nut torque to clamp the blades to the hub bar is 25Nm.
Materials used
The rotor is supplied as a complete assembly. Spares available are;
End cap inner
End cap outer with rivets
Teeter bolt and bush set
Bolt, plain, 9mm, M8
Bolt, plated, 9mm, M8
Bolt, plated, 9mm, M8 drilled
Washer, 9mm, thin
Washer, 8mm, thin
Nylock nut set of 18
Bolt, drilled, castellated.
M8 Castellated nut
Split pin
Grease nipple
Assembly methods
The rotor blades, spacer extrusion and hub are provided with numbers to define the installation
direction. By matching these numbers, put the blades into the hub. Fit the 9 bolts fitted with ‘thin’
9mm washers through the hub and blade assembly from the top, and fit an 8mm ‘thin’ washer and
M8 nyloc on the lower surface. The bolts are a close fit – and may need a light tap to push home.
Raise or lower the blade with respect to the hub to achieve this. DO NOT hammer them in! For
early blade sets (identified by square edges to the hub bar), hand tighten only, and adjust the
tracking. Do this with a taut string between the cutouts in the blade ends. Tap the blades in the hub
bar such that the string passes directly over the centre of the grease nipple in the centre block.
When satisfactory, tighten all 18 nuts to 25Nm. For later blade sets no tracking adjustment is
normally required. Simply tighten all bolts to 25Nm.
When assembling, or diss-assembling, do not remove or adjust any other nuts/bolts on the hub
assembly – the tracking is factory set, and adjusting may change these settings and adversely affect
rotor balance.
To fit the rotor to the aircraft proceed as follows:
1. Brake the aircraft securely.
2. Engage the rotor brake with the rotor hub set fore/aft.
3. With the aid of a helper, and some steps (or use the rear seat if tall enough), raise the rotor
assembly up into the rotor head.
4. Push through the teeter bolt (making sure the two spacers are greased and in place either side of
the hub block) and hand tighten. Note that these may be two different thickness spacers. Fit as dot
marked on the rotor and head hub.
Page 31 of 66
Manual issue 2, dated 21.12.09
Copyright of RotorSport UK Ltd
Document number RSUK0044
5. Tighten the nut to the required torque (hand tight, 1-2Nm, never tight), and fit a split pin through
the nut, and secure the pin appropriately.
6. Axial free play is pre set by the bushes provided the nut is not overtightened.
7. Grease the bolt via the grease nipple where fitted.
8. Ensure the rotor teeters to the stops freely.
View of rotor top
Hub bar assy
Blade
9 x Rotor blade attachment bolts with 9mm bore washer under head
Page 32 of 66
Manual issue 2, dated 21.12.09
Copyright of RotorSport UK Ltd
Document number RSUK0044
View of rotor bottom
Do not adjust these nuts/bolts
M8 Nylock nuts, 8mm thin washer under head
Spacer extrusion
View of rotor installed
Teeter bolt
Dot marks
Page 33 of 66
Teeter stops
Manual issue 2, dated 21.12.09
Copyright of RotorSport UK Ltd
Document number RSUK0044
Top view of rotor installed
Teeter bolt
Spacer
Rotor
Spacer
Washer, nut & split pin
Match parts using dot marks on tower, spacer and hub (normally one dot or two dots).
Special setup instructions
Ensure teeter stops (if adjustable stops are fitted) are correctly set to give approx 2” clearance to the
tail with rotor head fully rearwards and blade against the rear stops. Nominal height is 24mm for
Aircopter square edge hub bar and 18,8mm for AutoGyro hub bar. Check both sides. Note that non
adjustable black plastic ‘soft’ stops are available as an approved modification.
WARNING! Never remove the blade balance bars that are bonded inside the blades, or add extra
weights – it is an approved design standard and modification will invalidate the permit to fly – and
may have fatal consequences.
Repair methods
Nicks and small edge damage can be flattened back with very fine wet ‘n’ dry paper and polished
out. Dirt and insect debris should be removed prior to flight – the smoother the rotor surface, the
better the performance.
Damage resulting from impacting a fixed object hard, even if not visible to the naked eye, should
result in grounding the aircraft for a thorough inspection for mast torque twisting and blade root
stress. If in doubt, replace the rotors.
Blade damage above small nicks or minor edge damage, including deep scratches or dents, must
always be referred to a qualified inspector or RSUK for advice prior to further flight.
Bending of the trailing edge may result in increased rotor vibration.
Page 34 of 66
Manual issue 2, dated 21.12.09
Copyright of RotorSport UK Ltd
Document number RSUK0044
Rotor balance. The rotors are factory balanced for good performance. Sometimes they may require
in field balancing to improve performance. Before considering this step, ensure that the blades are
tracking properly by stringing a line from blade to tip, and ensuring the line passes over the centre
of the hub. Slackening and retightening the fastening bolts (blades to hub bar) may give a little
movement if needed. Also ensure the rotor parts are all assembled correctly, and serial nos
matched.
Balancing requires correct equipment for success.
Vertical plane balance is affected by shims between the hub block and the hub bar.
Tracking is affected by shims under one side between the hub block and hub bar.
Balance across the blades is affected by the thickness of the shim spacers between the hub bar and
the rotor tower.
Balance along the blades is affected by adding washers as weights inside the rotor blade.
DO NOT ATTEMPT TO BALANCE ROTORS UNLESS YOU HAVE APPROPRIATE
EQUIPMENT, TRAINING AND/OR EXPERIENCE!
NOTE! Wear in the PTFE lined bushes inside the hub block and towers will create rotor vibration,
which in turn will create more wear and so on. If more than 0.2mm side play, replace the bushes for
best performance. If the teeter bolt is grooved in any way beyond 0.1mm depth, replace the bolt.
Regular greasing and maintenance of this unit will prolong service life.
f) HTC Propeller (for Woodcomp SR3000/3 see section p)
Basic description
See RSDS7066
The HTC propeller is fitted as standard. This is a 3 bladed composite design with an aluminium 2
piece machined from solid hub. Each blade is a foam filled wet layup component in carbon and
glass fibre.
Materials used
1,73m diameter 3 blade HTC composite propeller assembly
Hub assembly (always a pair, and matched marked with numbers)
Blade assy (marked at the root with ‘A’ or ‘B’, and a week no./yr of manufacture. If replacing a
blade always ensure the A or B is matched to the original, as this denotes the blade weight.
Hub bolt and washer set
Hub to engine bolt and washer set
Engine flange nut set
Assembly methods
Bolt torque (M6 and M8) 15Nm. Take care not to overtighten, and pre coat M8 centre bolt threads
with loctite 243. Paint a torque stripe between each M8 centre bolt and the propeller hub.
912ULS Approx blade angle 19.5 deg, 12” from the end of the blade.
914 Turbo Approx blade angle 20.5 deg, 12” from the end of the blade.
Angle measured with respect to the hub face, see photos.
Balance propeller after fitting, unless not disassembled and refitted in original location.
Page 35 of 66
Manual issue 2, dated 21.12.09
Copyright of RotorSport UK Ltd
Document number RSUK0044
After any blade adjustment, ensure all blades have the same angle to within 0.5deg – recheck after
tightening the hub. Max ground rpm should be circa 5,500. Either flight test or ground test to
ensure the engine does not rev higher than the Rotax maximum, and adjust to suit. Note that the
maximum engine rpm is normally achieved in fast descent flight. If adjustment over 1degree is
needed, check engine performance! Note that the 914UL engine carries a datalogger, available for
interrogation of engine parameters by service engineers (with appropriate equipment).
ALWAYS recheck all the hub bolt torques after first flight after adjustment
Blade tracking is recommended as no more than 12mm deviation blade to blade, measured at the
blade tip, and is reset by slackening the hub bolts and pushing the affected blade forwards or
backwards, retightening and rechecking.
Special setup instructions
An RSUK gauge is available to aid blade setting.
Page 36 of 66
Manual issue 2, dated 21.12.09
Copyright of RotorSport UK Ltd
Document number RSUK0044
Repair methods
Surface damage not tearing through the glass or carbon fibre, or splitting through the mould line
(middle of the leading edge along the blade), may be repaired using suitable epoxy resin, or
superglue and carbon. The area must be thoroughly cleaned of insect debris and dirt, and abraded to
give a good fresh key to bond into. Mix and load the epoxy onto the blade as per the adhesive
instructions. Superglue repairs are built up in stages, a small drop of glue followed by a sprinkle of
carbon or charcoal (which instantly sets the adhesive). Build up in layers to the height required.
Once the adhesive is fully cured, flat back to the original blade profile and polished in for best
performance. If the surface is damaged from excess exposure to water (rain) in flight, then use of a
proprietary prop tape fitted to the leading edge may be considered. This must comply with the
modification approval MC-090, and may lead to a small performance deterioration. Heat on the
tape during fitment will allow easier fitting along the curved edge.
Propeller balance.
A well balanced propeller will significantly improve the engine and ancillary component service
life. The Rotax recommended maximum is 0.1ips.
Mass balance weights may either be washers fitted under the propeller fitment bolts, or self
adhesive aluminium wheel balance weights as used on car wheels, fitted inside the propeller hub to
a well cleaned, dry, surface. If using washers under the prop bolts, use no more than three 2mm
washers extra under each standard prop bolt, unless a minimum of 6 full threads of engagement are
obtained between the bolt and the flanged nut (measure by checking the depth of the bolt from the
flange –nut depth 9mm max). If more washers are required, and/or there is insufficient thread
engagement, fit a longer bolt to suit, and ensure no more than 8mm of thread is protruding beyond
the nut flange. For aircraft where the propeller has been dynamically balanced on the aircraft prior
to despatch (up to MT-03 serial number RSUK/MT-03/050) do not add more than two washers
without understanding the cause of the balance change, and consulting RSUK. Otherwise fit no
more than 10 x 2mm thick washers.
g) Pre rotator (mechanical system)
Basic description
A belt drive takes the power from the propeller disc to a simple drive shaft arrangement to the
rotorhead via small universal joints. Engagement to the toothed wheel attached to the rotor head is
through an ordinary centrifugal Bendix gear as used on car starter motors. This is engaged by a
single air piston which pushes the bendix upwards to that the gears mesh with the starter ring on the
head.
The vertical shaft slider is protected by a rubber bellows. This is because jamming of this shaft
would interfere with pilot controls. If split, replace. Lubricate slider shafts with regular LM grease,
and protect joints from corrosion with chain lube or similar spray-on protective lubricant
Materials used
See service parts list.
Parts available: Belt, engine pneumatic cylinder with safety wire, Engine side pre rotator assy,
propeller drive drum, small drive wheel, gearbox, UJ assies, upper and lower drive shafts, bendix
gear, bearings and shaft.
Page 37 of 66
Manual issue 2, dated 21.12.09
Copyright of RotorSport UK Ltd
Document number RSUK0044
Assembly methods
Special setup instructions
Only minimally lubricate the bendix with light oil; excess grease or oil may cause the unit to jam.
Loctite 243 for all fastenings in the system.
Page 38 of 66
Manual issue 2, dated 21.12.09
Copyright of RotorSport UK Ltd
Document number RSUK0044
Check for correct pneumatic function after assembly (see test in service sheets). Note that the pre
rotator head cylinder must drive the bendix upwards before full engagement at the propeller drive.
Adjust the flow valve on the prop cylinder pneumatic valve to achieve this.
The bolt holding the base vertical UJ to the gearbox has a short screw, and reduced thread
engagement in the nylock nut. This is to prevent contact with the seat belt, and the nut must be
loctited (243) during assembly.
When replacing the small drive wheel apply loctite bearing fit or equivalent between the shaft and
the bearing. This is to prevent shaft wear.
Repair methods Refer to drawings RSDS7070 and 7087
To replace the drive belt, remove the propeller (marking the radial position with respect to the
engine flange and pre rotator hub first), slip the belt off, and clean the drive wheels. Replace the
belt and propeller (Remember; loctite 243 on the propeller bolts). Lightly lubricate the belt with
PTFE spray, mould release agent or talcum powder (stops belt grab).
To change the rubber bellows, remove the two plastic ties. Cut off the existing bellows in situ.
Ensure the rotor brake is on so that the rotor head is pushed forwards, and remove the bolt
connecting the UJ to the gearbox., and lift off. Remove the shaft, clean as required and lubricate
with LM grease. Refit and push the replacement boot over the UJ. This can be awkward, and a little
grease helps. When in place refit the bolt with loctite 243 and a new nylock. NOTE! The bolt is
short on purpose to prevent fouling with the seat belt. Loctite will ensure a safe fit.
Fit a 2mm tie at the bottom of the gaitor, and a 4mm tie at the top – when tightening the top one,
extend the bellows with the head forwards, such that when fully back it is not over compressed.
To change the bendix gear shaft or bearings.
Ensure rotor head is braked forwards. This can be done without removing the rotors.
Page 39 of 66
Manual issue 2, dated 21.12.09
Copyright of RotorSport UK Ltd
Document number RSUK0044
Remove vertical drive shaft UJ bolt, and slip off UJ from the bendix shaft. The retaining strap will
stop it falling away. Remove the cap head screws retaining the bottom bearing plate, and remove
the plate, Slide out the bearing and shaft with bendix gear. Replace as required. If needed remove
the upper bearing as lower bearing.
When refiting use loctite 243 on the cap head screws, and lightly lubricate the bendix spiral. Use a
new nylock on the UK bolt.
To change the engine pre rotator, or components. Remove propeller and belt as in changing the
belt. Disconnect the drive shaft from the back of the small pre rotator pulley by removing the bolt
and nut. Disconnect the bolt connecting the air cylinder to the actuating arm. Remove ancillaries,
and disconnect the spring. Remove two mounting bolts and remove bracket and pully assy from
engine. Push the pulley through the bearing, undo the locknut on the back of the pivot bolt, and
remove the pivot bolt.
Replace with new parts as required and reassemble. Notes on re-assembly: Tighten the pivot bolt
(with loctite 243) up enough for free operation of the pivot arm (remember to put the plastic washer
between the bracket and the arm), and then tighten locknut in place. Check when all is tight for free
operation.
Remember to fit the small distance washer between the pulley wheel and bearing, and apply
bearing fit loctite between shaft and bearing
Check for free bearing operation before and after assembly.
Check for slider free movement – if needed re grease before reassembly
Apply loctite to bracket to engine bolts and tighten to 25 to 30Nm
Reassemble prop as prop section, and check pre rotator pneumatic function.
h) Rotor brake and trim (mechanical system)
Basic description
A simple pneumatic system using a two way cylinder actuates either the rotor brake by applying
upwards pressure to the rotor head, or the trim if in flight by pulling downwards. Because air is
compressible, the air in the cylinder acts like a spring, thus being able to be moved in flight. The
pneumatic function is covered elsewhere (see system diagram earlier in the manual).
Materials used
See parts list
Assembly methods
Changing the brake pad requires disassembly of the rotor head, and is a recommended to be
undertaken at a service facility.
Special setup instructions
After any work on the pneumatic system, check for correct system functionality.
Ensure brake pad assembly moves freely after refitment.
Repair methods
The brake pad is a service item.
Page 40 of 66
Manual issue 2, dated 21.12.09
Copyright of RotorSport UK Ltd
Document number RSUK0044
i) Enclosure, seats, harnesses
Basic description
Refer toRSDS7171 (enclosure), RSDS7092 and 7093 (seat belt installations)
Enclosure:
The pilot enclosure is manufactured from GRP (or if ordered specially, carbon fibre). Colour is
spray applied and oven cured. Outside colour is to customer order, inside grey, call RSUK for
original colour choice. It is fastened to the airframe under the front seat each side, left and right of
the rear seat, to the pre rotator gearbox and to the rear of the airframe. The nose gear cover is
attached to the inside of the enclosure. The edges are covered by a trim strip to prevent user harm,
wirelocked in place – the trim has a metal carrier inside, and if it enters the propeller significant
damage will result.
The enclosure is not a structural part of the aircraft in terms of flight, but does have significant
value in pilot injury prevention in accidents, and also carries a high proportion of load of the front
seat shoulder harness in forward or vertical loading. The fastenings between the front seat back and
enclosure, and to the airframe, must not be modified. General fastenings carry rubber washers to
allow vibrational movement.
Front seat: GRP, painted front to match enclosure, rear side grey. The rear edge and lower front
edge is covered by a trim strip to prevent user harm from fibreglass, and damage to shoulder straps.
The seat is retained to the airframe with four bolts through the base, and one either side to the
enclosure.
Front seat harness: Retained to the back of the front seat via a single M10 bolt/nut, and to the
airframe through holes in the base of the seat via M8 cap head bolts. Note that it is possible to
disconnect the shoulder harness from the lap strap – this is for ease of assembly only, and flight is
not to be undertaken with the belts disconnected.
Front seat cushions: Either standard cloth or sports type with energy absorbing Dynafoam core
(removable for washing). Both are retained by Velcro for easy removal.
Rear seat: GRP, painted black. This seat folds forwards for access behind. It is retained to two
hinges on the front edge via two fastenings per hinge. The seat is connected to the mast to stop it
moving forward in flight if the harness has been left undone via either an M6 bolt or a thumbnut
and rubber connection. The seat hole for the M6 bolt is generous, to prevent mast/airframe flexure
damaging the seat. The power supply for the heated clothing regulator and the helmet connection
pass thru the seat via a rubber grommet.
Rear seat harness: Wrapped around the back of the mast and retained in place by two rivets. Lap
belt bolted to airframe behind the seat with M8 cap head bolts. Trim pieces are fitted where the belt
passes the enclosure to prevent fretting.
Rear seat cushions: Either standard cloth or sports type with energy absorbing Dynafoam core
(removable for washing, and two layers - 0.5” soft, 1” firm). Both are retained by Velcro. The
standard cushions should not be left in for solo flight. If one passes through the propeller it will
damage it, possibly severely. The sports seat cushions are restrained by bolts through the back seat,
and also through straps on the base cushion.
Materials used
See parts list
Page 41 of 66
Manual issue 2, dated 21.12.09
Copyright of RotorSport UK Ltd
Document number RSUK0044
Assembly methods
Enclosure: Blind hole fastenings are fitted with loctite 243. No specific torque, other than tight and
secure.
Front seat: Base and side fastenings use nylock nuts. Do not overtighten otherwise you may crush
the composite.
Front harness: Shoulder harness attachment has a washer either side of the harness plate, and the
bolt head goes toward the pilot. M8 lap belt bolts require loctite 243. Ensure the regulator cable and
helmet connection is tied via a plastic tie to the outside of the left lap belt connecting bracket, and
that the edge of the seat hole is protected with trim to prevent cable damage.
Rear harness: Tighten bolts securely.
Special setup instructions
Ensure seat belts are not fraying on any sharp edges, and have a straight run from mounting to
mounting, in the line of normal operation.
Repair methods
Seat belts – none. Replace if damaged, worn or frayed.
Paint – contact RSUK for the paint specification used to allow accurate touch up.
GRP parts.
Front seat: small accident damage can be repaired using normal GRP techniques. No repairs
permissible to the front seat back, fastenings to frame, or upper edge (safety item, this is the front
seat belt shoulder harness mounting) without an approved repair scheme.
Rear seat: this is a non structural part, inasmuch as it is purely for the passenger seat to sit in. The
safety harness has no attachment to the seat. Cosmetic repairs accepted.
Windscreens. For views see RSDS7101.
Windscreens are manufactured from 2mm Makrolon. Cleaning can be undertaken with proprietary
cleaning agents such as Plexus, or simple soap and water. Never use petrols or such products on the
screens! They may shatter or suffer severe surface crazing.
Windscreens are a service item.
Front windscreen. Retained by M4 cap head screws, screwed into rubber mounted captive nuts.
Remove the screen by undoing the M4 screws, leaving the sideslip flag screw in place. The screen
can be lifted clear. This exposes the captive nuts. If the nut has to be replaced, simply pull it out,
and push in a new one. The side slip flag is retained by a single M4 screw, and screws through the
screen to the black plastic support block on the inside. This support block in turn is located on the
head of a cap head bolt mounted on top of the enclosure which prevents movement once fitted.
Fit the new screen by locating the rubber strop along the lower edge (prevents scuffing, and looks
better), and start fastening to the body from the middle outwards. Put the support block in place
after 3 or 4 screws, it’s easier. Once the lower screen screws are all located, tighten them all down.
Then fit the side slip flag – if no screen hole is present, carefully drill a 4mm hole in line with the
centre of the support block, and then fit the screw.
Rear windscreen.
Replacement is a straightforward removal of the fasteners, and replacement. Under the edges first
and work inwards to the centre screw, and reverse when refitting. Make sure the pilot shoulder
harness is in place before fitting outboard screws.
Page 42 of 66
Manual issue 2, dated 21.12.09
Copyright of RotorSport UK Ltd
Document number RSUK0044
j) Instruments
The cockpit layout is represented in fig. below. Differences may occur depending on the equipment
fitted.
1. Change over switch pneumatics (TRIM to ROTOR BRAKE)
2. Altimeter
3. Airspeed indicator
4. Engine rpm
5. Oil pressure
6. Cylinder Head temperature
7. Oil temperature
8. Ignition switch (one for each coil)
9. Charging (Gen) lamp
10. Main switch
11. Rotor rpm
12. Compass
13. Hour meter
14. Roll trim indicator where fitted
15. Rotor bearing temperature
16. Air pressure gauge for Trim and Rotor Brake
17. Accessory switches
18. Electric fuel pump switch
19. Radio (if fitted)
20. Fuel gauge
21. Rotax engine status lights
22. Pre-rotator & rotor brake interlock release
23. 12v Auxiliary socket
24. Transponder if fitted
25. Low fuel light
26 Low voltage lamp
Note that unused panel holes have blanking plates fitted to allow use at some other time if required.
Page 43 of 66
Manual issue 2, dated 21.12.09
Copyright of RotorSport UK Ltd
Document number RSUK0044
Slip indicator
3
20 Spare hole for full size or small vsi
19 5
7
6
12
2
26
11
1
4
22
9
21
23
25
4
13
24 or
vsi
10
14
8
15
16
17
18
Throttle
cluster
Heated clothing regulator
Fig 2, instrument panel (fixed pitch propeller)
Page 44 of 66
Manual issue 2, dated 21.12.09
Copyright of RotorSport UK Ltd
Document number RSUK0044
CSC-1 controller
Pop out circuit breaker
LED warning lamp (lights when pitch is changing)
View of left side of panel if fitted with Woodcomp propeller and CSC-1 controller
Basic description
Air Speed Indicator (ASI)
Always located in the centre of the panel. 0 to 140mph. Red line 120mph, green to 50mph. The
gauge is connected to a black 4mm airline via a length of silicon hose, which in turn goes to the
pitot port at the front of the aircraft. Never blow into the port to test the gauge! The pressure
required to operate it is small, and doing so will make the gauge, at best, inaccurate. Where a rear
seat ASI is fitted, a ‘T’ is put into the above airline. Another black line from here takes the pressure
to the rear seat ASI. Placarded as per the front seat. For fitment of rear seat instructor kit see
instructions with kit.
Altitude.
A standard commercial 0 to 20,000ft altimeter is used.
Engine rpm.
This gauge is unique to RotorSport UK, albeit a modified commercial gauge
Rotor rpm.
This gauge is unique to RotorSport UK, albeit a modified commercial gauge
Oil temp and Pressure
This gauge is unique to RotorSport UK, albeit a modified commercial gauge
Cylinder head temp
This gauge is unique to RotorSport UK, albeit a modified commercial gauge
Fuel level
This is Fozmula gauge, which works on pressure sensed at the tank. Due to the non linear shape of
the tank it has not been possible to match the two exactly, but at empty (‘E’ on the tank) the gauge
should read empty when the button is pressed. The gauge is connected to a 4mm pressure line,
which travels with the loom to the top of the left fuel tank. It is attached via a normal thumbscrew
to the level pipe in the tank. This is screwed into the top of the tank, and is simply a small bore
tube.
Pneumatic pressure
Two types are in use – 0 to 15bar, and in later types, 0 to 10bar. They are acceptable alternatives.
TRT800 Mode S transponder (where fitted) from Funkwerk
This device requires careful management – if used it transmits data about the aircraft, so accuracy
is important. There are three key parts –
The transponder panel mount unit.
The rear of transponder mounted dongle – this is where the hex code etc is stored – if the main unit
goes faulty, it may be replaced without having to reprogram the transponder system.
The antenna, cable and base plate.
Page 45 of 66
Manual issue 2, dated 21.12.09
Copyright of RotorSport UK Ltd
Document number RSUK0044
Hobbs meter.
Records the engine operational hours.
Temperature sensors
These are independent from the main harness, containing their own battery (LR44).They link
directly to their temperature sensors. Where fitted, the airbox sensor is plugged into the rear of the
airbox. The rotor brg sensor is pushed into the front of the rotor bearing spacer in the rotor head.
This sensor is also held in with hot melt adhesive.
Keyswitch. The keys are all the same across the aircraft.
Ignition switches. Note these always have guards to prevent inadvertent operation.
Vertical speed indicators (VSI). Optional fit, either 2 ¼” or 3 ½” units.
Compass (PAI-700 flat card type). This compass is used because the standard ball type compasses
tend to pick up on rotor vibration and oscillate to an extent that is unreadable.
Materials used
See parts list
Assembly methods
All instruments in the panel are fitted with M4 dome head screws, with plain nuts loctited on with
243 – unless specifically supplied with the instruments. The exception is the compass – these are
brass, to prevent magnetic effects. There are two levels of screw used – zinc plated and stainless
steel. Both are acceptable.
Radio antennas are located in three permissible locations;
Nose, mounted on the bottom of the enclosure. Lynx ¼ wave flexy. 1m cable.
Built into the tail. On a limited number of aircraft. No repairs possible.
Under the enclosure. Lynx ¼ wave flexy, 2m cable. Excellent results when airborne, can get
shielded when on the ground due to low height. Can be subject to ground damage so watch for this.
Special setup instructions
ASI should be calibrated as an installed instrument with suitable equipment.
Transponder. Follow the Funkwerk instructions for unit setup. Aircraft hex codes are available
from the CAA G-INFO website. After initial setup the unit function must be confirmed using
calibrated, proper equipment – transmitting incorrect codes is an offence. A transponder is also a
radio transmitter, so should be included on the aircraft radio licence. It is highly recommended that
the transponder is verified annually to ensure what the pilot thinks it is doing it actually is, and that
the codes transmitted are correct. This is not a legal requirement however.
Radio setup – follow Funkwerk handbook instructions.
Repair methods
Note that the pneumatic switches are mounted on the rear of the instrument panel behind the engine
gauges. The entire instrument panel may be removed by undoing the screws around the edge
(leaving the top centre until last) and then folding it forward (put a piece of waste cardboard under
the base edge to prevent damage). The wiring harness is disconnected by pulling the connector
plugs apart. The airline fittings are standard types where the collars are compressed into the middle
and the lines pulled out. The pressure supply to the ASI and fuel gauges are pulled out. The panel
can then be removed. Take care with any pneumatic fittings if removed – some contain one way
valves and must be replaced correctly orientated.
Page 46 of 66
Manual issue 2, dated 21.12.09
Copyright of RotorSport UK Ltd
Document number RSUK0044
WARNING! Once the panel is removed the engine kill switches are deactivated, and if started
cannot be stopped easily. Disconnect the battery earth for safety!
Refitting is a reverse of the above. The panel must be fully checked for equipment function
(pneumatic, electrical, pressure) after replacement!
Only repair instruments in accordance with manufacturer recommendations.
ASI gauge slow to respond: possibly a kinked pipe, especially if OK in the front, and not in the
rear. Poor response could be water or other blockage in the pressure feed at or near the nose.
Calibration. The unit cannot be user calibrated. If found to be in error more than 5%, replace.
Altimeter. This unit may be adjusted if required to match height indicated to pressure setting.
Remove the small screw beside the adjustment knob on the panel. This will allow the knob to be
pulled out slightly which will disengage from one scale. Adjust the two scales to suit a calibrated
gauge, push back in and replace the screw. Note the adjustment in the aircraft logbook!
RPM and engine gauges. Not user repairable, replace if faulty.
Transponder and radio. Neither unit is user serviceable. Return them to Filser via their aftersales
program – see the Funkwerke website.
Antennas and cables may be replaced if faulty or broken.
Temperature gauges. These are bonded to the rear face of the panel, so not easy to remove. The
battery can be replaced by sliding the small black cover off on the rear of the unit.
View of front, prior to panel fitment. Unit is bonded to panel. Switch should be down – this
changes the unit between deg C and deg F
View of rear, showing battery slot for LR44
Page 47 of 66
Manual issue 2, dated 21.12.09
Copyright of RotorSport UK Ltd
Document number RSUK0044
Compass. Calibrate compass according to the manufacturers instructions, lined with the aircraft
keel.
Notes: It is permissible to swop the engine and rotor tacho gauges, provided properly identified
with correct placards. This is useful for instructors to give improved visibility from the back seat.
GPS units are permissible to be fitted in line with RSUK approved mounting (Garmin GPSmap and
Flymap). Do not fit onto GPS’s to the instrument panel due to magnetic interference with the
compass! Only fit as per RSUK kit instructions.
Garmin
Flymap
k) Suspension, wheels and brakes
Basic description
Refer to RSDS7085 for nose gear, and RSDS7086 for main gear and suspension bow. RSDS7072
for the brakes
The main suspension spar is a GRP moulding (as are the wheel spats)
The brake system and wheels are manufactured by Autogyro Europe
Tyres are 400/100 2 ply (4.80/4.00-8) or heavy duty Heidenau 4.00-8 55M, normally fitted with an
inner tube. There is no tail wheel.
Brake pads are service items
Nosegear is pivots in bushes bonded inside the keel tube. Friction is controlled by the tightness of
the top castellated nut (behind the instrument panel).
Materials used
See parts list
Standard tyres are 400/100 2ply rating tyres, fitted with inner tubes (3.5-8). Heavy duty tyres as
above are optional fitment, and are recommended if operating in a stony or school environment.
Beware of fitting heavier duty tyres – they are generally much heavier in weight and will further
reduce the aircraft payload. A modification Approval must be obtained before using alternative
tyres. Knobbly tyres also pick up stones, which can enter the propeller arc.
Assembly methods
See drawings
Page 48 of 66
Manual issue 2, dated 21.12.09
Copyright of RotorSport UK Ltd
Document number RSUK0044
Special setup instructions
Tyre pressure 1,5 to 2,2bar main, 1,5 to 1,8bar nose
Nosegear centralisation setup. With rudder correctly set with the in flight offset (see below) the
nosegear must be set straight ahead.
Nosegear to pedal linkage setup
If the wheels are tubeless, take particular care not to damage the wheel rims when changing tyres.
Inner tubes may be fitted if needed.
Residual turning torque for the nose gear (without pedals connected) < 0.2Nm. Tighten nut to
achieve this, and fit split pin.
Repair methods
To change the front wheel the wheel must be removed. Tip the aircraft onto its tail, and remove the
wheel bolt. The wheel and spacers can be taken off, and the tyre changed using normal techniques.
It can be done by hand as the wheel centre groove is very generous. Remove the air, compress the
tyre into the wheel centre, and then pull off the rim. When refitting a little soap solution makes it
easier for the tyre bead to seat correctly on the rim. Check for the tyre properly seated after fitment,
and match mark the rim to the tyre. Use a new nylock nut when refitting the wheel, and check for
free rotation.
Main wheel tyres can be changed without taking the wheel off if required. Remove the wheel spat
(three screws). Jack the aircraft safely under the keel (under the prop, strongest area) and put a
ballast bag on the opposite wheel to keep that side on the ground. Make sure the aircraft is chocked
and unable to fall off the jack. Remove the tyre air, and remove or replace as nose wheel. When
refitting the spat ensure the screws are loctited.
If the wheel has to be removed, either remove the four screws securing the brake disc to the wheel,
and then the wheel nut, or remove the four bolts securing the brake pad assembly together and
remove.
Warning! When refitting these screws MUST be loctited with 243. If these screws come out in
flight then the wheel may not turn on landing!
Brake pad change. Change when 2mm or less remaining. These must be changed as a set for
effective operation. There is no need to remove any other item to do this change.
Remove the four cap head bolts holding the assembly together. The calliper will come off to the
inside of the wheel, and the two pads off separately. The pads slide on Teflon bushes, on short
hardened steel inserts. See picture below
Page 49 of 66
Manual issue 2, dated 21.12.09
Copyright of RotorSport UK Ltd
Document number RSUK0044
Remove these 4 bolts to remove brake pads
Outer pad
Bush
Inner pad
`
Calliper with piston
Replace parts as required. When refitting there is put a thin smear of Vaseline or grease around the
piston, and on the bushes. Loctite 243 MUST be put on the bolts, as a loose bolt could enter the
wheel and prevent it from turning!
Page 50 of 66
Manual issue 2, dated 21.12.09
Copyright of RotorSport UK Ltd
Document number RSUK0044
Note: sticking brakes are probably due to one of two causes.
1. The calliper piston is known to sometimes stick in the calliper bore is very dirty, or left with
salt corrosion. To repair, remove the calliper from the wheel (but do not disconnect from the
hydraulic line) and using the brake lever, push the piston out slowly and carefully until the
black O ring is just visible. Clean the piston, and cover with a smear of Vaseline or light
grease. Push it back in, if needed with a G clamp, and re assemble.
2. The brake lever is not returning properly to its stops. Ensure the lever returns – if not check
that the rear seat brake cable (if fitted) is adjusted correctly, and that the attachment between
the arm and brake cylinder is not too tight (the eyebolt from the arm into the cylinder must
be able to move on the bolt)
3. The brake pads are unable to move freely on their bushes, or the bushes are worn. Remove
the pads and clean the bushes, or replace the set.
l) Rudder and rudder control
Basic description
Refer to RSDS7163 rudder controls
The rudder is controlled via tubular linkages between the front and rear pedals (connected via the
nosegear), and from the rear pedals to the rudder via a cable. This cable is in three parts, two short
lengths connected to each rear pedal, two turnbuckles, and a single length from turnbuckle to
turnbuckle around the rudder culisse.The culisse is a plate and bearing assy, which in turn sits on a
welded pin on the keel. Each turnbuckle may be covered in shrink wrap sleeve, which protects the
passenger or luggage and aircraft from any snagging on split pins or wire locking.
The rudder itself is bolted to the culisse, and does not disturb the cable settings if removed for any
reason.
The rear tail assembly and rudder are GRP (or CRP) mouldings. The rudder has a simple top pivot
with a 12mm top hat bush and plastic spacer washer between the rudder and pivot plate bolted to
the rudder with a steel dome bolt, locked with Loctite 243.
Rudder position and cable tension with respect to the footpedals is adjusted via the turnbuckle in
each cable. Cable is supported on pulleys along the airframe. Pedal to pedal alignment is set by the
rod ends that connect the pedal pushrods to the pedals and nosegear.
There are three pilot pedal positions – short, medium or long leg. Each has a different pair of rods
to connect the pedals to the nose gear, and the pedals are mounted on a short, medium or long
extension tube. Each pedal has a nylon sleeve between the pedal and its mounting tube. Each pedal
is also retained on that tube by plastic bushes and a split pin. The tube end plug stops infestation.
Materials available
See parts list
Page 51 of 66
Manual issue 2, dated 21.12.09
Copyright of RotorSport UK Ltd
Document number RSUK0044
Assembly methods
System setup
1. Clamp a block across either the rear or front pedals so that they are in line.
2. Measure pedal angle to the ground with all wheels on the ground.
3. Adjust if required the non-clamped set of pedals to the angle required, making sure that they
are both at the same angle. Do this by removing the bolt connecting a rod end of the rod
connecting the pedal to be adjusted, and lengthening or shortening that connection. Take
care to ensure plenty of thread remains engaged after adjustment – both ends of the rod have
rod ends for adjustment.
4. Front foot pedals in mid position (central) are set 52deg +/-5 to the ground, and within 1 deg
to each other.
5. Rear foot pedals in mid position (central) are set 38deg +/-5 to the ground, and within 1 deg
to each other.
6. Pedal angles may be adjusted to suit individual occupants, but care must be taken to work
within these boundaries.
7. At the same time ensure that the nosegear link plate is straight ahead +/-1deg.
8. When satisfactory, tighten locknuts on pushrods, and replace any nylocks used more than
three times.
9. With pedals still clamped, check rudder alignment – should be 10degrees right, +/-1 deg.
The check rudder cable tension (see below). Adjust, if required, by adjusting the
turnbuckles, and if the tension is already correct, adjust each side the same amount to
maintain the same cable tension. Required cable tension is 25 to 40Kg.
10. Rudder movement should be 27 deg left, 47 deg right, +/-3deg. Check after adjustment. See
below for gauge drawing.
11. After any cable adjustment re wire lock the turnbuckle and cover with shrink sleeve.
Turnbuckle sleeve, part fitted.
Page 52 of 66
Manual issue 2, dated 21.12.09
Copyright of RotorSport UK Ltd
Document number RSUK0044
Rod ends connecting rods to rear pedals. Note snubbing washers under bolt cap head
Acceptable wire locking of turnbuckle
Rudder cable pulley assembly
Page 53 of 66
Manual issue 2, dated 21.12.09
Copyright of RotorSport UK Ltd
Document number RSUK0044
View of rudder mounted to culisse
Measure gap between cable and tail boom mid way between pulleys
Apply a tensile load of 2Kg, and re measure gap. Cable should move between 8 and 24mm. Adjust
turnbuckles as required.
Page 54 of 66
Manual issue 2, dated 21.12.09
Copyright of RotorSport UK Ltd
Document number RSUK0044
Top plate is bonded into the tail. This fastener is a failsafe
M8 screw
Pivot bush
(designed to rotate in bracket, clamped to rudder)
Plastic washer
(fits around bush, and free to rotate)
View of top pivot, installed.
The rudder top bolt torque is 15Nm, with loctite 243, as are the four bottom M6 bolts. There are
four spacers between the rudder and the culisse – take care, these are two different heights. The
short ones are at the rear. Washers may be placed between the spacers and rudder to allow for
height tolerance. The tail is mounted on the airframe via 4 x M6 bolts, 15Nm, with Loctite 243.
Washers may be added between the aluminium spacer and the airframe to centralise the fin
assembly with the mast (extra pair of washers on one side of the keel), and raise the tail clear of the
rudder cable. Ensure no more than two washer height difference between left and right side of the
keel.
Take care that the cable guides are correctly positioned over the pulleys to prevent cables jamming
and wearing.
Trim tab.
Trim tab may be positioned either side of the rudder, It is normally bent about 15 to 25deg to the
left of the aircraft, and is positioned 100mm from the bottom of the rudder, The tab is supplied with
a self adhesive tape – ensure the rudder surface is clean & degreased before fitment.
Page 55 of 66
Manual issue 2, dated 21.12.09
Copyright of RotorSport UK Ltd
Document number RSUK0044
Repair methods
If the M6 airframe mounting hole in the tail is stripped of its thread, remove the tail and carefully
drill and retap to M8. Drill the matching hole in the airframe to 8.5mm. Fit M8x35 cap head screw
with washer under the head.
Cable assies; No repairs
Composites; no repairs currently authorised
Paint; touch up and match as per normal automotive repair processes.
m) Rotor head and rotor head control
Basic description
See drgs RSDS7164
All rotor head parts (excepting bolts) are stainless steel or aircraft aluminium as per the airframe.
The roll and pitch stops are set with pins and are not adjustable
Grease nipples are fitted to the rotor, and pitch/roll block..
Materials used
Head bearing spec is SKF3206 A-RS1TN9/MT33. Otherwise see parts list
Assembly methods
Pitch/roll bolts, tighten to 15Nm, then back off such that the head moves freely, and that there is no
freeplay. Fit split pin. See drgs for detail.
Page 56 of 66
Manual issue 2, dated 21.12.09
Copyright of RotorSport UK Ltd
Document number RSUK0044
Rotor bearing nut, tighten to 160Nm+/-20Nm, backed off to next split pin hole.
The head is set so that with the stick in mid position, fully forward, the rotor head is set 1 deg to the
left.
Special setup instructions
Ensure that, after all setup, the rotor head is able to reach roll and pitch stops in both directions, and
that at the extremes of operation the vertical control rods are still free to rotate.
Ensure that the head rotates freely without any binding or bearing noise. Replace the bearing if any
doubt.
Ensure there is no freeplay in the control system by moving the stick(s) with the rotor head held
still. If found, locate the cause and rectify.
With the rear control stick in the mid roll, fully forwards position, there should be at least 25mm (0, +10) clearance to front seat. The stick should not use the front seat as a ‘stop’ in the any position.
The rotor head must be able to reach its limit stops in all control positions, and must not use the
lower rod ends as limit stops.
NOTE: the bushes within the rod ends on the vertical control tubes are specially relieved type to
enable the rod ends to go through the full articulation required. After assembly ensure these are in
the correct positions, and check that the rod ends are free on control extremes.
NOTE. The bolts used in the control system are cut down M6 bolts, to ensure the shank is in shear
load instead of the bolt threads. NEVER replace these with standard bolts, otherwise the system
strength will be degraded.
Repair methods
This is a primary control system – do not take chances!
Bent tubes must be replaced
Teeter bolt or pitch/roll bolts and bushes should be replaced if noticeable wear is found. Noticeable
means more than 0.2mm vertically.
n) Fuel system
Basic description
See fuel system drawings RSDS7160 912ULS and RSDS7161 914UL.
The fuel system is under the rear seat and has a capacity of 35 ltr per tank. The tank is ventilated by
a ventilation line above the tank to the rear of the mast. Tank level control is via sight lines on the
side of the tanks and a fuel gauge on the instrument panel (see instrument panel). Tanks are marked
at zero with 3.4ltr per tank, in line with the MT-03.
Page 57 of 66
Manual issue 2, dated 21.12.09
Copyright of RotorSport UK Ltd
Document number RSUK0044
Tanks are manufactured Polypropylene. Tanks are retained in the aircraft with two straps, holding
them tight to the airframe (see photo). They are located axially via welded on upstands on top of
the tank that locates in the airframe. These prevent tank forward detachment in an accident. The left
tank is always the master tank – feeding the engine, and taking the return feed from the turbo fuel
regulator. It also has the fuel level gauge capillary tube fitted from the top.
The right tank is the header tank, feeding the left via a crossover tube under the keel. This crossover
tube also carries a fuel drain.
Each tank is filled via the filler at the top of the tank. These filler caps are retained via a plastic loop
to the tank neck, with an additional plastic tie for added security.
Tank fittings: The exit fittings from the tanks carry gauzes to prevent large objects entering the
supply system. There are two feed supplies to the engine, comprising a rubber bushing and a push
in fitting (with a gauze filter). This allows increased use of fuel tank contents, particularly in a steep
nose down descent with low fuel.
Each fuel tank is also fitted with a fuel water check valve. This is fitted with a castellated nut inside
the tank, with the castellations facing DOWN so that they embed in the tank when tightened. The
unit is also wirelocked to the fuel crossover exit fitting.
Each tank is filled via the filler at the top of the tank. These filler caps are retained via a plastic loop
to the tank neck, with an additional plastic tie for added security.
The fuel hose is Trelleborg Hydro K. This 8mm hose is proven to be fire resistant, and is
mandatory fit in the engine bay.
The fuel supply from the tank to the 912ULS mechanical pump is from the front of the tank to the
fuel cutoff valve on the left side of the enclosure (where fitted), and then back under the left tank
to the filter mounted on the right of the mast (See installation drg). The filter is a mesh type, push
fit into the hose. The hose then continues to the mechanical pump, and then to both carburettors.
The fuel supply to the 912ULS backup electrical fuel pump is direct; there is no cut off valve, and
the fuel can be shut off by turning the switch off on the panel. The mesh filter is sited directly prior
to the pump, with an additional filter after the pump. This latter filter is to prevent pump debris (in
the event of pump component break up) entering the carburettors. The feed from here goes directly
into the crossover feed between the carburettors.
The 914UL carries two electrical pumps. One is isolated by the panel switch, the other by the
keyswitch when turned off. Both carry the same pre filter, and enter one common or two separate
post pump filters, feeding into the fuel regulator valve on top of the engine. The tank fittings are
identical to the 912ULS, and the keyswitch operated pump is fed from the front tank.
The return fuel bypass line from the regulator feed into the top of the left tank via a length of clear
hose. The clear hose is there so that fuel can be observed to be flowing. This hose must be Gutasyn
or equivalent fuel resistant hose – to comply with CAA MPD1998 019R1.
Page 58 of 66
Manual issue 2, dated 21.12.09
Copyright of RotorSport UK Ltd
Document number RSUK0044
Principle sketch fuel system 912S mechanical pump
The engine mechanical pump is backed up with an electrical fuel pump.
Return feed to fuel tank
Fuel tank
Post pump
filter
Fuel pumps
(2)
Tank gauze
filters
Pre filters
Principle fuel system 914T
The fuel system also has a low fuel level warning sensor, integrated with a low voltage sensor. The
electronics are contained in a grey control box located behind the instrument panel, supplied by
AVcomm. The warning lamps are 6v red leds, and the level sensor is an LED sensor fitted to the
rear of the left fuel tank. The height is such that it will switch on at around 5ltrs of fuel.
Materials used
All hoses within firewall area (rear of the battery) are Trelleborg HydroK, fire resistant hose.
See parts list.
Page 59 of 66
Manual issue 2, dated 21.12.09
Copyright of RotorSport UK Ltd
Document number RSUK0044
Assembly methods
All hoses are connected via snap over or side crimp fittings. See assy drawing.
Special setup instructions
Ensure that the crossover tube drain point is wirelocked after use, and is sealed with the minimum
amount of PTFE tape.
Tank fitting connections should not be made with PTFE tape – excess tape can block fittings and
cause system malfunction. Use Loctite 5331 on the threads.
Ensure tank straps are pulled tight if disturbed or replaced, without distorting the tanks. Cut off
excess.
If the hose runs are disturbed, check after replacement for possibility of fretting against objects that
would damage or cut the hoses. Use additional ties as required, with short lengths of hose on the
ties to act as distance pieces.
Repair methods
Individual hoses may be replaced from roll stock.
If the mesh filter is replaced, change the post pump filter at the same time.
There is no time interval specified for changing the fuel filters, as typical fuel stocks are very clean.
However, they are recommended to be changed after 500hrs/3yrs due to potential algae growth or
general deterioration.
Water in the tanks can be drained quickly by draining the crossover tube, or via the individual tank
drains. This is, however, a messy method if the fuel system is simply to be drained. In this case it is
easiest to disconnect the fuel return hose (on a 914) and use the electrical pump to pump the system
out into a suitable receptacle.
Use of unleaded MOGAS is highly recommended. Leaded fuel contains additives (eg lead) which
have a detrimental affect on the engine spark plugs, pistons, and slipper clutch.
o) Roll trim
Basic description
Roll trim is an option fitment. It comprises a panel mounted indicator fitted horizontally, with
placard indicating roll direction, and a servo actuator mounted under the RHS of the front seat. The
actuator is connected via a rigging link and a length of bungee to the upper horizontal control tube.
The bungee cord is wrapped twice around the tube such that there are four bands, and then knotted.
Spare bungee is tie wrapped to the rest.
The servo is retained to the seat support tube via a bracket. This is prevented from moving towards
the control tube by the seat bolt.
Operation of the trim is by pushing the top hat switch on top of the stick either right or left. Left
movement moves the servo towards the stick, reducing tension on the bungee.
Assembly methods
None specific
Materials used
Bungee cord 6mm
Special setup instructions
Tension the cord to give 1Kg of force to hold the stick central (measured on the hand grip) with the
roll on full right trim. Check that on full left trim there is no trim force with stick central.
Ensure that indicator direction matches direction of actuation.
Repair methods
Bungee may be replaced by removing and replacing cord, and re-tensioning as above.
Page 60 of 66
Manual issue 2, dated 21.12.09
Copyright of RotorSport UK Ltd
Document number RSUK0044
p) Woodcomp SR3000/3 propeller and Smart Avionics constant speed controller
Basic description
NOTE! Refer to the propeller manual RSUK0076!
The propeller is an SR3000/3/R/P/CS/C-****RS, specifically designed for the MT series
application. This means that there are internal designs that make the product unique, and it must not
be replaced by propeller other than the part supplied by RotorSport UK Ltd. The four ‘*’’s indicate
a three digit serial number plus the year of manufacture. At the root of each blade is a special self
adhesive label stamped with the propeller serial number, the order of the blade (A, B or C) and the
month/year of manufacture.
Construction: The blades comprise a wooden core, with layers of carbon fibre on top for protection.
The leading edge is protected on the outboard length by a moulded-in section of polyurethane, and
on the inboard area by a special tape(replaceable). Each blade has an aluminium hub, which locates
the blade into the propeller hub.
The hub is split into two halves for assembly. The blades are located in the hub in bearing bushes,
and have worm drive gears on the ends to allow adjustment in flight. The drive to those gears is
from a 12v DC motor, via a gearbox.
The motor unit is covered by a spinner, attached to the propeller backplate by 6 screws (loctited
with 243)
The hub is retained to the gearbox propeller flange via a unique pre rotator drive wheel.
The flanged nuts normally located in the propeller flange are removed, and replaced with top hat
bushes, which locate through the flange and wheel into the rear of the propeller hub. The
attachment bolts are pre fitted inside the propeller hub, & slide through the bushes. Nylock nuts
retain the bolts, together with a tabbed washer.
The Smart Avionics CSC-1/RS controller is a unique part for this aircraft, pre programmed to suit
the application. Do NOT fit any other controller
LED warning lamp
Continuous red = 5,800 reached
Continuous yellow = 5,500 reached
Yellow with red flashes = RPM has
been maintained for more than 4 mins
Flashing red = RPM is below 4000,
and cruise mode still selected.
RPM = engine rpm
MAP = Manifold Air Pressure “Hg
Alternatively, will show target rpm when
being adjusted.
MODE button, to change between
manual, cruise and take off (with sw in OK pos’n)
OK/Disable sw.
Disable = computer
disconnected, use
+/-sw to change
prop pitch
Current mode
+ pitch increase
- pitch decrease
Blade pitch change.
when in manual
mode or target
rpm in cruise or climb.
More information is provided in the CSC-1/RS controller handbook.
Pilots view of controller. This controller replaces the existing engine rpm gauge.
Adjacent to the controller is a single LED, which indicates when power is being supplied to the
propeller, and a pop out fuse, which protects the propeller power supply.
By the pilots hand is a rocker switch, which provides the same function as the ‘pitch’ sw on the
controller.
Page 61 of 66
Manual issue 2, dated 21.12.09
Copyright of RotorSport UK Ltd
Document number RSUK0044
Principles of operation.
The propeller assembly is an in flight variable pitch design. Pitch of the three blades is adjusted
simultaneously via a gear system inside the propeller. The gears are driven by a 12v motor. The
motor is supplied with current via two slip rings on the engine face of the propeller assembly.
The blade pitch angle is limited initially via microswitches driven on cams. In the event of a switch
failure, or incorrect cam setting, there are end stops in each propeller that prevent excess travel in
either direction. These end stops locate in machined stops inside the propeller.
The propeller pitch angle relationship to engine rpm is managed either manually by the pilot, or via
the constant speed controller. With the ‘mode’ sw in disable, the controller function is completely
bypassed, such that the pitch angle may be changed by the pilot by either using the rocker switch
(optional), or by using the controller ‘pitch’ sw.
With the controller sw in ‘OK’, there are three modes available; manual, climb, and cruise. The
basic rpm limit settings of the controller are set in the factory, and not user adjustable.
It is not possible to re programme the controller other than at RotorSport UK Ltd or Smart
Avionics.
Both the controller and the propeller are fed from the same 25A fuse, with a 10A pop out fuse for
the propeller actuation supply, and a 1A fuse for the controller itself.
The propeller will take up to 5seconds to cycle between fully fine and fully coarse.
Assembly methods
The propeller attachment bolts are tightened to 25Nm, and the locking tab washers bent over to
prevent rotation.
The controller requires an adjacent placard to identify the engine rpm and manifold pressure
(914UL only) limits.
Materials used
No consumable materials.
Special setup instructions
The propeller is electrically actuated via slip rings on the engine face.
WARNING! Cleanliness of this face is important, do NOT apply corrosion preventative substance
to the slip rings! It will prevent them from functioning!
When re-assembling the propeller it is very important to ensure the blades are set with the same
pitch angle, within 0.5deg of each other.
The screws fastening the brush box to the mounting plate, and the bolts fastening the plate to the
gearbox, and the screws retaining the cables to the brush box must be loctited with loctite 243.
The cable crossing the engine is protected with heat resistant sleeving.
After fitment, always check that the propeller pitch direction of operation matches the controller,
and that the seat switch (where fitted) also matches the controller - ie, forward or up is pitch
reduction.
The blade electrical pitch limit stop setting must be (+/-1deg)
Fine pitch 13.5 (912ULS) or 15.5 deg (914UL) deg
Coarse pitch 18.5deg in (912ULS) or 20.5deg (914UL).
Service and Repair methods
Refer to the Smart Avionics CSC-1 controller handbook for troubleshooting the controller.
Page 62 of 66
Manual issue 2, dated 21.12.09
Copyright of RotorSport UK Ltd
Document number RSUK0044
Refer to the F106 Woodcomp service sheet, and to the Woodcomp maintenance manual for the
methods and techniques of disassembly and re-assembly of the SR3000/3 prop, and of the brush
assembly.
Section 10
Modifications approved to date
Mod
No.
Description
Page 63 of 66
Use and comments
Manual issue 2, dated 21.12.09
Copyright of RotorSport UK Ltd
Document number RSUK0044
Service Bulletins issued to date
If in doubt about any service instruction, or service method,
then refer to RSUK on the form below.
Page 64 of 66
Manual issue 2, dated 21.12.09
Copyright of RotorSport UK Ltd
Document number RSUK0044
This form is Part 1 of 2. This is the customer request form, Part 2 is the reply
This form is supplied to enable the owner/operator/maintainer to request factory support for a repair not
documented in the maintenance manual supplied with the aircraft from RotorSport UK Ltd.
Depending on the problem identified, a corrective action is investigated and, if needed, CAA involvement and
approval obtained prior to repair authorisation.
The information given is stored on a computer, and is only used within RotorSport UK and the CAA for the
above purpose.
Return this form to:
RotorSport UK Ltd, Poplar Farm, Prolley Moor, Wentnor, Bishops Castle, Shropshire, SY9
5EJ. Or email [email protected], or fax 01588 650769
Aircraft type
Aircraft serial No.
Aircraft Registration No.
Aircraft Engine No.
Logbook Aircraft hours
Logbook Engine hours
Owner/operator name & contact detail
Maintenance organisation identified to carry out
repair & contact detail
Repair problem description & cause of problem if known
Name and address of contact person for this request
Sheet of
Signature & date
Telephone:
Email:
Date entered onto CCAR or
REPAIR database:
Acknowledgement sent (date)
Job opened by (name & sig)
CCAR No.:
REPAIR No.:
Final reply sent
Job closed by: (name, sig & date)
Form F023 Part 1 of 2
Page 65 of 66
Manual issue 2, dated 21.12.09
Copyright of RotorSport UK Ltd
Document number RSUK0044
This form (Part 2 of 2) is the response from RotorSport UK Ltd to a Service Repair and Evaluation/Approval
request, which specifies the company authorised repair method. Deviation from this method renders the
authorisation ineffective.
Upon completion of the repair the repairer must enter details into the logbook/worksheet with the repair number
and sign as normal.
If any problems with carrying out the work authorised, contact RSUK immediately on 44(0)1588 650769, or
email [email protected].
Repair No.:
CCAR No.:
Aircraft type
Aircraft serial No.
Repair
classification:
MAJOR or
MINOR
Repair problem description & cause of problem if known
Service repair authorised by RotorSport UK Ltd
Special tools & Health and Safety requirements, and/or components required for repair:
Quality Inspection requirements after repair:
Service repair authorised by: (name, signature, and date of signature)
Structures (where
Chief Test Pilot
Engineering
Quality
required)
(where an effect on
Manager
Conformance
flight performance
Manager
or safety)
Document
completion
date:
Issued to:
Internal
CAA
Owners
LAA/BMAA Inspectorate
When
Issuer name
Civil Aviation
Authority (if a major
repair)
Signature
Form F023 Part 2 of 2
Page 66 of 66
Manual issue 2, dated 21.12.09