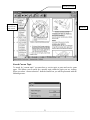
1
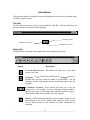
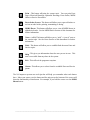
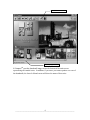
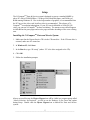
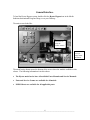
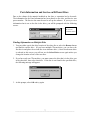
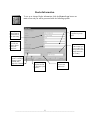
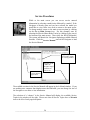
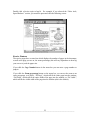
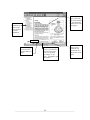
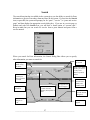
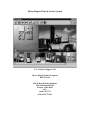
Hyster Hypass Parts & Service System For Technical Support Call Hyster Hypass Technical Support 800-723-6796 Bell & Howell Media Solutions 1909 Old Mansfield Rd. Wooster, Ohio 44691 USA 1-800-709-7773 (330) 659-1773 Fax Table of Contents Introduction .....................................................................................................2 Title Bar ................................ ................................ ................................ ................................ ............ 2 Button Bar ................................ ................................ ................................ ................................ ......... 2 Setup................................................................................................................5 Installing the N-Compass TM Parts and Service System ................................ ................................ .. 5 General Interface .............................................................................................6 Parts Information and Service on Different Discs...........................................7 Finding Information on Multiple Disks ................................ ................................ ............................ 7 Dealer Information ...........................................................................................8 Business System Setup ...................................................................................9 Navigator........................................................................................................10 Parts Manual ..................................................................................................12 Zooming on Parts Diagrams ................................ ................................ ................................ ........... 14 Advanced Users ................................ ................................ ................................ .............................. 17 Part Number Lookup and Ordering ...............................................................18 Updating Pricing Information ................................ ................................ ................................ ......... 22 Service Procedures........................................................................................24 Service Features ................................ ................................ ................................ ............................. 25 Search ............................................................................................................27 Search Current Topic ................................ ................................ ................................ ..................... 31 Advanced Searching ................................ ................................ ................................ ....................... 32 Notes..............................................................................................................33 MSDS Sheets .................................................................................................36 Parts and Service Gram.................................................................................38 ___________________________________________________________________ 1 Introduction This Operator Manual is designed to step you through the tasks you need to perform using the Hyster Hypass system. Title Bar The blue bar across the top of the screen is called the Title Bar. This bar will always be present, and has three buttons on the right side: Exit the program Minimize the window Maximize the window Button Bar The Button Bar is the main Functionality Bar used throughout the system: Button Description Go to the Main Screen - This button will return you to the main screen at any time. Navigator - (or F2) This button will launch the Navigator button at anytime after you have selected a model or serial number. See the Navigator section in this manual for more information about using the navigator. Go Back/Go Forward - These buttons will take you to the last viewed screen. For example, if you are viewing parts page number 1 and then go to page 2, the left blue arrow will take you back to page 1. Then, the blue right arrow will take you back to page 2. Search - (or F3) This button will allow you to conduct a Search in the Parts Manual or the Service Manual from anywhere in the system. See the Search section of this manual for further information on searching. ___________________________________________________________________ 2 Print - This button will print the current topic. You can print Parts Pages, Electrical Drawings, Hydraulic Drawings, Parts Orders, MSDS Sheets or Service Procedures. Parts Order Screen - This button will allow you to open old orders or review an order before printing, transmitting or faxing. MSDS Sheets - This button will allow you to view all MSDS sheets in alphabetical order. See the MSDS Sheets Section of this document for further information Notes - (or F6) This button will allow you to stick a post it note to the current topic. See the Notes Section of this document for further information. Link - This button will allow you to establish links between Parts and Service topics. Help - This gives you information about the area you are in now. This area is accessible from anywhere in the system. Exit - This will exit the program at anytime. Grams - This allows you to select from the available Parts and Service grams. TM The N-Compass system uses tool tips that will help you remember what each button does. Move your cursor over the button and the strip across the bottom of the screen will show the functionality of that button. For example, if you hold the cursor over the MSDS Sheets button: ___________________________________________________________________ 3 MSDS Sheet icon. Tool Tips appear here. N-CompassTM provides thumbnail images across the bottom of the main screen representing each model series. In addition, if you move your mouse pointer over one of the thumbnails, the lower left hand corner will show the name of that series. ___________________________________________________________________ 4 Setup The N-CompassTM Parts & Service system is designed to run on a standard 486DX or above PC with a CD-ROM Drive, 110 Meg of free Hard Disk Space, and 24 Meg of RAM running Windows 95. Due to the large number of graphics, it is recommended that the PC have a fast video card, local bus video is recommended. This release of NTM Compass is resolution independent. If your PC runs in 800x600 or 1024x768 256 TM color, you can run N-Compass in those resolutions. The startup screen will still appear in 640x480 but the parts pages and service pages will take advantage of the extra viewing area. Installing the N-CompassTM Parts and Service System 1. Make sure that the Hypass Service CD is in the CD-rom drive. If the CD-rom drive is external, make sure it is turned on. 2. In Windows 95, click Start. 3. In the Run box, type D:\setup (where D is the drive assigned to the CD). 4. Click OK . 5. Follow the installation prompts. After a successful setup, the Hyster Hypass icon will be visible in a program group called Media Solutions International, as well as on the Desktop, if you chose that option during Setup. Double click the Hyster Hypass icon to launch the Parts and Service system. ___________________________________________________________________ 5 General Interface To load the Hyster Hypass system, double click the Hyster Hypass icon in the Media Solutions International Program Group, or on your Desktop. The main screen looks like: Click a model series below to display the available models. Click this button to setup or change dealer information. The model series shown across the bottom of the screen show the models available in this release. The following information is in this release: x The Hyster model series have all available Parts Manuals and Service Manuals. x Parts and Service Grams are available for all models. x MSDS Sheets are available for all applicable parts. ___________________________________________________________________ 6 Parts Information and Service on Different Discs Due to the volume of the material included on the discs, a separation had to be made. The information for the Parts Information has been placed on one disc, and Service was put on another. The Service disc must be used to set up the software. If you try to view information that is not on the disc in the drive, you will be prompted with the following screen: Select Browse for a list of available drives. Finding Information on Multiple Disks 1. You can either type in the drive location of the other disc or select the Browse button and find the correct drive. (If you have multiple CD-rom drives, you can leave the first disc in and place the second disc in an alternate drive.) Once the alternate drive is selected at this screen, you will not see the Select Drive screen again unless you change the location of one of the two discs. 2. If you have only one CD-rom drive, you must remove the disc that is in the drive, put in the other disc, then select that drive. If the disc is not found in the specified drive, the following message will appear: 3. At this prompt, select OK and try again. ___________________________________________________________________ 7 Dealer Information the To set up or change Dealer information, click the Hyster Logo button on main screen and you will be presented with the following options: This is your mailing address and the name of your dealership. This is your dealer code as supplied to you by Hyster. This is your labor rate, the amount should match your hourly rate. The Hyster Hypass system is a multiple language system, currently only English is available. This is where you set the country you are in to allow for pricing and section changes based on your country. This is where you set up Recon and the business system interface. This button sets font size and zoom levels. ___________________________________________________________________ 8 Business System Setup To setup or change business system settings, click the Recon button from the Dealer Information screen. The Password dialog box appears: Enter a valid password and you will be presented with the following options: Ignore the top portion of the screen. This box should be checked if the business system is to be accessed. This is the branch number assigned to the dealer. This is the code used by the dealer to refer to Hyster parts. This is the IP address of the computer running the business system software. This is the port that the business system software is running on. When the Access Business System button is checked on the Recon screen, the # button appears on the toolbar at the top of the screen. This is the customer number button which allows you to enter the customer number if it is known. ___________________________________________________________________ 9 Navigator After selecting a Model series, the system will display a list of individual models associated with that model series. For example, if you click the Electric Motor Rider Trucks thumbnail, the model numbers will be displayed. Listing of models. After selecting a model, the system will launch the Navigator. The Navigator allows you get to any information stored in the system. It is very similar to the table of contents in the existing printed material. For example, if you select the J40-65XM truck, the Navigator will open and show: Click here to search for parts or service topics Click here to exit the Navigator and return to the main screen. Click here to view the selected models Service Manual. Click here to view the selected models Parts Manual. The three icons on the Navigator Button Bar will allow you to toggle between the Parts Manual and Service Manual available for the selected model, as well as the search tool. ___________________________________________________________________ 10 When viewing a Parts Manual, you can select a Chapter by clicking on the name in the left window. The available Parts Pages will appear in the right window. To load a parts page double click it. Parts Manuals will be discussed in more detail in the Parts Manual section of this document. Click on a Chapter in this window. The available Parts Pages appear in this window. When viewing Service Procedures, click the chapters in the left window. In some cases, sub-chapters will appear. The available Service Procedures will appear in the right window. Double click a Service Procedure in the right window to view the Procedure. ___________________________________________________________________ 11 Parts Manual Parts manuals are accessed from the main screen by selecting a model series, a model and then a page from the Navigator. To return to the main screen anytime, click the Go to Main Screen icon. If you were to select a model by clicking on the icon at the bottom of the main screen, followed by the model name, the system will launch the Navigator displaying available Parts Manual Sections for that model. The following sections are available: To see the available Parts Diagrams for the Drive Axle Section, click the Drive Axle chapter and the Parts Pages in the Drive Axle section will appear on the right side of the Navigator: ___________________________________________________________________ 12 Note that all Parts Pages have a Gear icon. This will allow you to identify what type of information is on a page is without loading it. To load a Parts Page double click the page name. For example, if you want to view the Drive Axle double click that description to view the parts page information. This includes the illustration or Exploded Parts Diagram, and the part number listing, or Bill of Materials. You can order parts, view any of the parts information, and get pricing information from this page. ___________________________________________________________________ 13 The Parts Diagram will appear on the top of your screen, the Parts Listing will appear on the bottom. If your PC runs 800*600 or higher resolution, you can use the Window Maximize button to view more of the Parts Diagram and Parts Listing. Please note that the Parts Manuals will display the Reference Number, Part Number, Description, Quantity, and Remarks field. Scroll left and right here if your display does not display all of the parts information. Scroll up or down through the parts list here. Zooming on Parts Diagrams You can zoom into the Parts Diagram by double clicking on the part of the drawing you wish to zoom in on. For example, if you were to click in the upper right section of the drawing on our page, you would see: ___________________________________________________________________ 14 Once you are zoomed into an image you can move the image around by clicking anywhere on the image and holding the mouse button down to grab and move the image. With your mouse button held down, you can drag the image around the screen to see other parts of it. When you start to drag the image, your cursor will change to a hand. You can drag the image in any direction. In addition, you can control how much of the parts list or parts drawing you see. You can drag the parts list bar up or down to view more or less of the parts drawing. If you move your mouse over the bar separator, you can drag it up or down. This functionality is illustrated below If you move your cursor over this bar and hold down your primary mouse button, you can move the parts listing up or down. ___________________________________________________________________ 15 In addition there are a few shortcut key commands to allow you to change the view very quickly. These are as follows. F9 will allow you to quickly view only the parts drawing. Press the F9 key again to return to normal mode. Be patient, it will take a few seconds for the system to refresh the screen. F8 will allow you to quickly view only the parts listing. Press the F8 key again to return to normal mode. Be patient, it will take a few seconds for the system to refresh the screen. If you have trouble returning to normal mode, hold down your Alt key and press F8 or F9 (ALT+F8 or ALT+F9). This will set the splitter bar in the middle of the viewing area. You can then move it up or down as discussed above. Be patient, it will take a few seconds for the system to refresh the screen. ___________________________________________________________________ 16 You can print the Parts Diagram and Parts List at any time by clicking the Print icon on the top button bar. The system will scale the drawing to the available paper size and print the parts listing on subsequent pages. It will take about 30 seconds for the system to complete the printing so be patient. Advanced Users In addition to scrolling right and left, you can control the width of the fields in the parts list. For example you can position your mouse over one of the columns as shown and drag it left or right by holding down your primary mouse button. When you place your mouse over the column edge, the pointer will turn to arrows. If you depress your primary mouse button you can drag that column to the width you would like. You can also move one column to another location by clicking on and holding down your mouse over a column name. You can then drag that column to another location. ___________________________________________________________________ 17 Part Number Lookup and Ordering After you have loaded a parts page, you can move your mouse over any number on the Parts Diagram and the cursor will change to a hand. If you click label number 13, the part will be highlighted below: Move your mouse over any label and it will change from a pointer to a hand. Click the label. That part becomes the highlighted part. In addition, if you double click a part in the parts listing, that part label will be centered on the screen. ___________________________________________________________________ 18 Once you have found a part, you can look up parts information or copy that part to an order or pick list. The icons used for manipulating a part are as follows: Review a parts order or create a new order. Look up information on the highlighted part. Click here to add the highlighted part to the order. If you click the right mouse button after highlighting a parts entry, you will be presented with a menu which gives you the options shown to the right. The Add to Order and Part Info options perform the same action as the buttons described above. The Jump to Link option allows you to instantly go to the Figure number mentioned in the Remarks column, if applicable. The Add to Pick List option allows you to add that part to a temporary list rather than adding a part straight to an order. ___________________________________________________________________ 19 Parts can be added to a pick list from multiple parts manuals. To view the pick list that you have created, press F4. Delete the current pick list. Save the current pick list. Open an existing pick list. Create a new pick list. Close the pick list window. Add parts in pick list to an order. While viewing the pick list screen you have the choice to create a new pick list, open an existing pick list, save the current pick list, delete the current pick list, add all the parts on the pick list to a new or existing order if an order is not currently open, or close the pick list window. The quantity field displays how many of each part should be ordered. The stock field represents how many of each part are actually in stock. If you would like to see additional information regarding the highlighted part, click the Parts Information icon or right click the mouse and select Part Info. To add this part to your order, click here. If you have not loaded or created a new order, the system will prompt you to create a new order or open an existing order. ___________________________________________________________________ 20 If you are creating a new order, the system will ask you for basic order information before proceeding. This order information will appear if you need to load an old order or an order in progress. If you Open an order, the system will show you all orders processed to date. You can select any order to load it. Select an order and click OK. After you have built an order, you can review your order at any time by clicking on your Parts Order screen icon. Your order will look like the following: ___________________________________________________________________ 21 To print the order, simply click the Print button. The following screen will be displayed: Select Print to print order. Updating Pricing Information If Hyster decides to change pricing information before the next release of the software, a floppy disk may be issued to dealers that contains the updated prices. ___________________________________________________________________ 22 New Order Pricing update icon on the Parts Order Screen. Open Existing Order Print Save Order Search Tool Delete Current Order Add Part to Order Remove Selected Part From Order When you receive a floppy, follow the instructions printed on the outside of the floppy. After completing this step, from the Parts order screen click the Update button, and follow the instructions for the update procedure. Please keep in mind that this process may take a while to complete. ___________________________________________________________________ 23 Service Procedures While at the main screen you can access service manual information by selecting a model series followed by a model. If the Navigator is already open and you have selected the model you would like to view, there is no need to return to the main screen. To change models, return to the main screen anytime by clicking on the Go to Main Screen icon. For this example, start by selecting the Electric Motor Rider Trucks by clicking on the icon at the bottom of the main screen. Then select the J40-65XM model. The system will launch the Navigator displaying available Manual Sections. Click the Service Manual icon on the Navigator to load the Service Manual. Drag this splitter bar left or right to adjust the viewing window. All available service chapters appear here. Drag this corner to make the Navigator larger or smaller on your screen. The available sections in the Service Manual will appear in the left hand window. If you are working on a computer that displays more than 640x480, you can change the size of the Navigator to see more or less information. The selection of a chapter in the Service Manual will display the available Service Topics in the window on the right. Please note that all Service Topics have a Wrench icon to the left of each page description: ___________________________________________________________________ 24 Double click a Service topic to load it. For example, if you selected the Drive Axle, Speed Reducer section, you would be presented with the following screen: Service Features The service pages have a status bar which displays the number of pages in the document, as well as the page you are on, the zoom percentage (this will vary dependent on how big your screen is), and the paper size. If you click the Page Number button in the status bar you can enter a page number to jump to. If you click the Zoom percentage button on the status bar, you can set the zoom to an exact percentage, as in 200%, Fit Page, which will fit the entire page into the window, Fit Width, which will fit the entire width of the page into the window, or Fit Visible, which will fit the visible width of the page into the window (this is the default). ___________________________________________________________________ 25 This is the service topic, to move the page click and drag the page under the cursor (exactly like parts pages). These are two bookmarks for the Service topic. Click on one to go to that information. Status bar. This is what page you are on out of the total number of pages. This is the percentage of zoom. If you click here you can set the zoom level to a specified percentage, or Fit Page, Fit Width, and Fit Visible. This area is the paper size (all documents will print on both A-4 and US letter sized paper.) ___________________________________________________________________ 26 Search The search function that is available in the system gives you the ability to search for Parts information or Service Procedures from anywhere in the system. If you select the Search icon (or press F3) the system will prompt you for parts, service, or parts and service gram and then display the appropriate search dialog box. If you are in a service page or bulletin and select the Search icon, you will have a fourth option of current topic. Keep in mind that you can search for service from a parts manual and parts from a service manual. When you search for Parts information, the Search Dialog Box allows you to specify what information you want to search for: Click here to start your search. Enter your part number or key word here. Allows you to define whether you want to see only exact matches or partial matches. Select the model in which you want to perform the search. Displays part information. Define what information to search for; Part Number, Description, or Other. Search results will appear here. (See next page.) Automatically adds part to order. ___________________________________________________________________ 27 Other will allow a search of all Quantity and Remarks fields. Click here to close the Search dialog box. Shows parts diagram. You can search for a Part Number looking for an exact match or partial match. You can also search the Remarks field and Quantity field by selecting Other. If we searched for an axle, selected Part Description, and Partial Match the system would return the following results: Displays what parts page this part appears on. Part Names that match your search. Will display the Parts Page the highlighted part appears on. Part Numbers of each part. Shows the models the part is in. The parts search results show the matches to your search, the part number, part name, model description, quantity fields, and Remarks. You can then double click that part to load the Exploded Parts Diagram (EPD) out of the Parts Manual that the part number appears in. If you load a Parts Page and it is the incorrect information, select the Search icon or press F3 to reload the search results from your last search. To start a new search, key in your new criteria and click the Start Search button. ___________________________________________________________________ 28 If you want to search for Service Procedures, click the Search icon or press F3 and select the Service option. The system will show the Service Manual Search Dialog Box: Type in your search criteria here. Click here to start your search. Search results will appear here. If you wanted to search for Service Procedures that reference the Axle, key in the word axle and click the Start Search button: The system will then search over 10,000 pages of Service Procedures and return every Service Procedure that references the word axle. ___________________________________________________________________ 29 The search results for the Axle are as follows: To view a Service Procedure click the name of that procedure and click Show Topic: The system will then load that service topic for viewing: ___________________________________________________________________ 30 Print this procedure. Search again or review the last search results. Search Current Topic To search by current topic you must have a service topic or parts and service gram open. This allows you to search for a specific topic within the topic you are viewing. When you select current selection from the Search box you will be presented with the following screen: ___________________________________________________________________ 31 Scroll bar. Enter the word you are trying to find in the Find Text field. If you would like, you can choose to have the search Match Whole Word, Match Case, or Start from Beginning, which will restart the search, by checking the appropriate box. Advanced Searching You can also use advanced search criteria in the Service Manual only. You can search for steering and axle and the system will show you Service Procedures that show the word steering and the word axle in the same procedure. You can also search for steering or axle and you will see every topic that contains the word steering or the word axle. Try it! It will help you find what you are looking for in seconds! ___________________________________________________________________ 32 Notes The blue notebook is the Notes icon. If notes are available where you are, the notebook will flash between an open blue notebook and an open yellow notebook. The Notes button will allow you to place Post it style notes on any screen or every screen in the system. For example, if you wanted to place a note on a particular screen, you would click the Notes icon (or F6) and see: Delete the Current Note: Click here to delete the current note. Exit: Click here to exit the notes screen and return to the Parts and Service System. New Note Open Notes: Click here to look at multiple notes or all notes in the system. Save: Click here to save your note. Click here to save your note. Type your note here... Status Bar: Provides Tool Tip as you move your mouse over the icons. Type in your note and press Save (the floppy disk). ___________________________________________________________________ 33 When saving your note, you can name and attach it to this page only or to all pages. To attach it only to the Current Location there must be an X in the box. (If there is not one there already then click the box once.) If you do not mark the Attach to Current Location button, the note will display on every page of the manual. After saving your note, each time you go back to that page, the Notebook icon will be flashing indicating that notes are available. When you click on the Notes icon, a list of available notes will appear: Turn this on to show all notes regardless of location. If you click in the Display ALL Notes box, the list will show all notes in the system regardless of location. This can be helpful in finding a lost note. If only one note is attached to the current page when you click the Notes icon, that note will automatically open: Using the F6 key will always launch a New note. If you want to delete a Note, simply load the note and click the Delete Current Note icon. This will permanently remove the note from the system. ___________________________________________________________________ 34 Delete Current Note: Click here to delete a note permanently. ___________________________________________________________________ 35 MSDS Sheets MSDS Sheets work like notes. Click the MSDS Sheets icon anytime to view available MSDS sheets. The MSDS Sheets Screen looks like the following: Every MSDS Sheet in the Hyster Hypass system is viewable from anywhere in the software. To load an MSDS sheet, double click the MSDS sheet to load or select an MSDS sheet and click OK . If we load an MSDS sheet, the screen would look like: ___________________________________________________________________ 36 Print the current MSDS sheet. Search for another MSDS sheet. View a current parts order. ___________________________________________________________________ 37 Parts and Service Gram To view a parts and service gram, click the Grams icon on the Toolbar. This will display a menu of all parts and service grams that apply to the model you are currently working in. Check the Display All box at the bottom of the screen to display a listing of all available parts and service grams. To open a parts and service gram, double-click on the desired entry. ___________________________________________________________________ 38