1
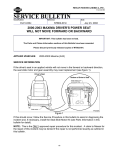
Classification:
Reference:
EC01-033
Date
NTB02-020
February 18, 2002
1999-02 FRONTIER AND 2000-02 XTERRA
KNOCKING NOISE ABOVE IDLE (800-1100 RPM)
APPLIED VEHICLES:
1999-2002 Frontier (D22) with VG33E - NOT Supercharged
2000-2002 Xterra (D22) with VG33E - NOT Supercharged
SERVICE INFORMATION
If an applied vehicle exhibits the following symptom:
•
Slight noise that sounds like engine "knock" is heard just above engine idle speed (8001100 rpm) with the engine under a slight load, and the noise cannot be detected over
1100 rpm.
The cause may be normal pulsating noise coming from the EVAP purge solenoid valve and
piping (in the engine compartment) transferring into the passenger cabin.
However, use the Service Procedure in this bulletin to reduce the noise, if it should occur.
SERVICE PROCEDURE
1. Start and run the engine for at least one minute.
2. Use CONSULT-II to view the status of the "Closed Throttle Position Switch" (CTPS).
3. Set the Parking Brake, then perform the following:
•
•
For vehicles with Automatic Transmission, with your foot on the brake, place the
A/T gear selector in “D.”
For vehicles with Manual Transmission, depress the clutch and select any gear.
4a. While viewing CTPS status, open the throttle just enough to change the CTPS status
from “On” to “Off.”
NOTE: This will allow the EVAP Purge Volume Control Solenoid Valve to begin
operating.
1/3
4b. Listen closely for a slight "knocking" noise.
•
If "knocking" noise is heard:
1) Put the transmission in “Neutral” (M/T) or “Park” (A/T).
2) Disconnect the electrical connector to the EVAP Purge Volume Control Solenoid
Valve (see Figure 1).
Brake Master
Cylinder
Reservoir
Cap
EVAP
Purge
Control
Solenoid
Valve
Electrical
Connector
EVAP
Purge Hose
TP020036
Figure 1
3) Listen again for "knocking" noise by repeating steps 3, 4a, and 4b (on pages
1 and 2).
•
•
If “knocking” noise is still heard, this Service Bulletin does not apply.
Consult the appropriate Service Manual for further diagnosis.
If "knocking" noise is now not heard, shut off the engine and proceed to
step 5.
5. Remove the Hose Clamps from the EVAP Purge Hose (see Figure 2).
Brake Master
Cylinder
Reservoir
Cap
1 Remove the
EVAP Purge
Hose Clamps.
Set aside for
re-use.
2 Remove
the EVAP
Purge Hose
Figure 2
6. Remove the EVAP Purge Hose (see Figure 2).
NOTE: Set aside the two Purge Hose Clamps for use in step 7 (page 3).
2/3
TP020037
7. Install the Vacuum Tank and Hose Kit listed in the PARTS INFORMATION section (see
Figure 3).
NOTE: Use the hose clamps set aside in step 6 to secure the replacement parts.
Brake
Master
Cylinder
Reservoir
Cap
Install the
Vacuum
Tank and
Hose Kit
TP020038
Figure 3
8. Reconnect the electrical connector to the EVAP Purge Volume Control Solenoid Valve
(see Figure 1, page 2).
9. Repeat steps 3, 4a, and 4b (on pages 1 and 2) to verify the slight “knocking” noise is
gone.
PARTS INFORMATION
DESCRIPTION
Vacuum Tank and Hose Kit
PART #
14958-5S625
QUANTITY
1
CLAIMS INFORMATION
Submit a Primary Failed Part (PP) line claim using the following claims coding:
DESCRIPTION
RPL Vacuum Delay Valve
PFP
14958-5S625
OP CODE
DE34AA
SYM
ZL
DIA
32
FRT
(1)
(1) Reference the current Nissan Warranty Flat Rate Manual and use the indicated FRT.
3/3