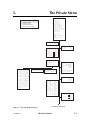
1
RLS-8000
Tape Library
Technical
Service Manual
501510 Rev. S
Important Manual/Firmware Revision Information
This manual and the operating firmware for the RLS are revised periodically as the
product is improved. This manual was revised to correspond with the firmware version indicated below. Do not use this manual with different part numbers or prior versions of the firmware. Check with Qualstar Technical Support about use of this manual with newer firmware.
Manual
Corresponding Firmware
RLS-8000 Tape Library Technical Service Manual
501510 Rev. S, Apr 15, 2011
RLS Executive Firmware
700118 Version 0.122
Copyright Notice
Copyright© 2011 by Qualstar Corporation — All Rights Reserved
Information contained in this document is copyrighted by Qualstar Corporation. It is
intended for use by Qualstar’s customers and prospective customers to evaluate, integrate, operate and maintain Qualstar products. Customers and prospective customers
may reproduce this document as needed for these uses. Reproduction in whole or in
part for any other use or by any other party is prohibited without prior written permission from Qualstar Corporation.
Every effort has been made to keep the information contained in this document current and accurate as of the date of publication or revision. However, no guarantee is
given or implied that the document is error-free or that it is accurate with regard to
any specification. Qualstar reserves the right to modify product designs and specifications without notice.
Qualstar and the Qualstar logo are registered trademarks of Qualstar Corporation.
Other trademarks are the property of their respective owners.
501510 Rev. S
iii
Notices
Qualstar products are covered by one or more of the following patents:
6,163,139 and 6,560,061. Other patents pending.
Qualstar equipment is manufactured from new parts, or new and used parts. In some
cases, Qualstar equipment may not be new and may have been previously installed.
Regardless, Qualstar’s warranty terms apply unless the equipment is specifically
identified by Qualstar as “used” or “refurbished”.
This equipment has been tested and found to comply with the limits for a Class A digital device, pursuant to Part 15 of the FCC Rules. These limits are designed to provide
reasonable protection against harmful interference when the equipment is operated in
a commercial environment. This equipment generates, uses, and can radiate radio
frequency energy and, if not installed and used in accordance with the instruction
manual, may cause harmful interference to radio communications. Operation of this
equipment in a residential area is likely to cause harmful interference in which case
the user will be required to correct the interference at his own expense. Shielded
cables are required for this device to comply with FCC Rules. Use shielded cables
when connecting this device to others.
European Union Directive 89/336/EEC and Standard EN55022
(Electromagnetic Compatibility)
Warning
This is a Class A product. In a domestic environment this product may cause radio
interference in which case the user may be required to take adequate measures.
European Directive on Waste Electrical and Electronic Equipment (WEEE)
Qualstar encourages its customers to use current recycling practices in order to reduce the burden that waste electronic products place on the environment.
If you are retiring a fully functional tape library, you are encouraged to transfer the
functional unit to a new user, thereby extending the useful life of the tape library. The
manufacture of all products requires the consumption of energy. By extending the life
of the tape library, energy is conserved.
In accordance with environmental directives that are being implemented in many
countries (refer to the European Directive on Waste Electrical and Electronic Equipment - WEEE) Qualstar provides customers with “End of Life Instructions” that iden-
iv
501510 Rev. S
tify the process for recycling the materials and components that make up a Qualstar
tape library.
End of Life Instructions
Tools required
•
P1 and P2 Phillips head screwdrivers
•
T20 Torx head screwdriver
•
Hex head (Allen) wrench/driver set
•
1/4-inch hex nut driver
Disassembly procedure
1.
Remove door.
2.
Remove top panel.
3.
Remove side external panels.
4.
Remove internal subassemblies.
Items recyclable using conventional methods
•
Aluminum: Door, exterior panels, frame, robotics
•
Stainless steel: Robot guides
•
Steel: Some frames, fasteners
•
Plastic: Window, cartridge magazines, tape cassettes
•
Copper: Internal wiring, motors, SCSI cables
•
Paper: Manuals
Items requiring special disposal due to lead-based solder
•
Printed Circuit Boards: Controller, miscellaneous small printed circuit
boards
Items that may have salvage or resale value
•
Tape drives
•
EMI line power filter
Reduction of Hazardous Substances (RoHS)
Qualstar is committed to the implementation of RoHS (Restriction of the use of certain hazardous substances in electrical and electronic equipment) in accordance with
501510 Rev. S
v
the European Directive. The effectivity date for compliance is July 1, 2006, at which
time Qualstar will certify that its Tape Library products are compliant with the RoHS
standard. With the exception of Lead Based Solder, Qualstar will certify that its
products are free of all other substances listed in the Directive.
Qualstar Tape Libraries fall under the category of “Information Technology Storage
Array Systems” for which the RoHS Directive provides for a lead solder exemption.
Insofar as lead free solders are new to the electronics industry and no quality or reliability data is available, Qualstar will invoke the lead based solder exemption until
such time as industry data verifies that lead free solders are capable of meeting or exceeding the documented reliability and quality standards achieved with lead based
solders.
Until such time as Qualstar replaces lead based solder with lead free solder, effected
subassemblies must be disposed of appropriately.
Technical Support Information
The best source for service-related information is your system reseller. Alternately,
the Qualstar Technical Support Department can be reached Monday through Friday,
between the hours of 6:30 A.M. and 5:00 P.M. Pacific Time, at:
Qualstar Corporation
3990-B Heritage Oak Court
Simi Valley, CA 93063
Attn: Technical Support
Fax: (805) 583-7749
Phone: (877) 444-1744
Monday – Friday 6:30 a.m. to 5:00 p.m. PST
After hours support: (805) 526-7480 or (805) 583-7748
E-Mail [email protected]
E-Mail: [email protected]
Web: www.qualstar.com
vi
501510 Rev. S
Table of Contents
1. Introduction ................................................................................................................... 1-1 1.1 Who Should Read This Manual ................................................................................... 1-1 1.2 Important Safety Information ..................................................................................... 1-2 1.3 Lithium Battery ............................................................................................................ 1-3 2. Description and Theory of Operation ..................................................................... 2-1 2.1 Models ........................................................................................................................... 2-1 2.2 General Description ..................................................................................................... 2-5 2.2.1 Motion Systems ..................................................................................................... 2-5 2.2.2 Sensors ................................................................................................................... 2-6 2.2.3 Barcode Reader...................................................................................................... 2-9 2.2.4 Barcode Labels ...................................................................................................... 2-9 2.2.5 Capacity on Demand (COD) ................................................................................. 2-9 2.3 Component Identification ............................................................................................ 2-9 2.3.1 RLS Models .......................................................................................................... 2-10 2.3.2 Handler ................................................................................................................ 2-11 2.3.3 Field-Replaceable Units (FRUs) ......................................................................... 2-12 3. The Operator Interface ............................................................................................... 3-1 3.1 The Door Lock ............................................................................................................... 3-1 3.2 Using the Menu System ............................................................................................... 3-1 3.2.1 The MENU Control Key ....................................................................................... 3-2 3.2.2 The
3.2.3 The ENTER Control Key ...................................................................................... 3-3 3.2.4 The EXIT Control Key .......................................................................................... 3-3 3.2.5 The
3.3 (UP) and
(DOWN) Control Keys........................................................... 3-2 (Daisy) Key ................................................................................................ 3-4 Quick Operation Menu ................................................................................................. 3-4 3.3.1 OPEN & PARK LEFT command .......................................................................... 3-4 3.3.2 OPEN & PARK RIGHT command ....................................................................... 3-4 3.3.3 OPEN VIOP (n) command .................................................................................... 3-5 3.3.4 PARK LEFT command.......................................................................................... 3-5 3.3.5 PARK RIGHT command ....................................................................................... 3-5 3.3.6 (UN)LOAD LIBRARY command .......................................................................... 3-5 3.3.7 The Status LEDs ................................................................................................... 3-6 3.4 The Top Menu ............................................................................................................... 3-6 3.5 Menu Elements ............................................................................................................. 3-7 3.5.1 Menu Items ............................................................................................................ 3-7 3.5.2 Values ..................................................................................................................... 3-8 3.5.3 Location Designators ............................................................................................ 3-9 501510 Rev. S
vii
3.5.4 Editing Values ..................................................................................................... 3-10 3.6 The Menu Hierarchy .................................................................................................. 3-12 3.7 Displaying the RLS Firmware Revision ................................................................... 3-13 3.8 Alerts/Faults ............................................................................................................... 3-13 3.9 Dynamic Menus and Menu Items ............................................................................. 3-13 4. The Maintenance Menu............................................................................................... 4-1 4.1 The Maintenance menu ............................................................................................... 4-3 4.2 The Maintenance\Display Prevents status screen .................................................... 4-3 4.3 The Maintenance\Display Revision status screen .................................................... 4-4 4.4 The Maintenance\Display Stats. status screen ......................................................... 4-4 4.5 The Maintenance\Display Voltage status screen ...................................................... 4-5 4.6 The Maintenance\Fibre Channel menu ..................................................................... 4-6 4.7 The Maintenance\Fibre Channel\Info status screen ............................................... 4-6 4.8 The Maintenance\Log menu ....................................................................................... 4-8 4.8.1 Introduction ........................................................................................................... 4-8 4.8.2 Data Logging – General Description.................................................................... 4-9 4.9 The Maintenance\Log\Display\Entry menu .......................................................... 4-10 4.10 The Maintenance\Test Inventory menu .................................................................. 4-11 4.11 The Maintenance\Test Keyboard status screen ...................................................... 4-11 4.12 The Maintenance\Test LC Display status screen ................................................... 4-13 5. The Private Menu ......................................................................................................... 5-1 5.1 Introduction .................................................................................................................. 5-3 5.2 Security Locks............................................................................................................... 5-3 5.2.1 Door Lock ............................................................................................................... 5-3 5.2.2 Master Lock ........................................................................................................... 5-4 5.2.3 Disabling the Master Security Lock .................................................................... 5-4 5.3 5.3.1 Access ..................................................................................................................... 5-5 5.3.2 Setting a Password ................................................................................................ 5-5 5.3.3 Clearing the Password .......................................................................................... 5-8 5.4 viii
Enabling the Private Menu ......................................................................................... 5-5 The Private Menu ......................................................................................................... 5-9 5.4.1 The Private\CALIBRATE command ................................................................... 5-9 5.4.2 The Private\CLEAR ACCESS command .......................................................... 5-11 5.4.3 The OPEN VIOP WINDOW command .............................................................. 5-11 5.4.4 The REBOOT command...................................................................................... 5-11 5.4.5 The RESET SCSI BUS command ...................................................................... 5-11 5.4.6 The Private\Cabling status screen .................................................................... 5-12 5.4.7 The Private\Calibration status screen .............................................................. 5-12 5.4.8 The Private\Configuration menu ...................................................................... 5-13 5.4.9 The Private\Control Panel status screen .......................................................... 5-15 501510 Rev. S
5.4.10 The Private\Display A/D status screen............................................................. 5-16 5.4.11 The Private\Display Locations Menu ............................................................... 5-16 5.4.12 The Private\Display Positions status screen .................................................... 5-17 5.4.13 The Private\DriveBay status screen ................................................................. 5-18 5.4.14 The Private\Drive Bay\Alarm Limits status screen ....................................... 5-19 5.4.15 The Private\Drive Bay\C? menu ...................................................................... 5-19 5.4.16 The Private\Drive Bay\C?\Carrier status screen ........................................... 5-21 5.4.17 The Private\Drive Bay\C?\DIA status screen ................................................ 5-22 5.4.18 The Private\Drive Bay\Power ? status screen ................................................. 5-23 5.4.19 The Private\Executive status screen ................................................................ 5-24 5.4.20 The Private\Magazine menu ............................................................................. 5-25 5.4.21 The Private\ Sensors status screen ................................................................... 5-26 6. Troubleshooting ............................................................................................................ 6-1 6.1 Faults without Fault Messages ................................................................................... 6-1 6.1.1 When the power is turned on: no motion occurs, the LCD does not illuminate,
the three power-indicating LEDs on the IPM (rear of RLS) are dark. ............................ 6-1 6.1.2 When the power is turned on: no motion occurs, the LCD does not illuminate,
the +24V LED on the IPM (rear of RLS) blinks. ............................................................... 6-1 6.1.3 When the power is turned on: the LCD is illuminated and shows the library
model number, no errors messages are displayed, and nothing moves. .......................... 6-1 6.1.4 When the power is turned on: the Handler moves normally and the LCD is
illuminated, but it does not show text. ............................................................................... 6-1 6.1.5 The Barcode Reader does not read barcode labels reliably. ............................... 6-2 6.1.6 After Installing a Tape Drive, it Fails to Appear in the Menu System. ............ 6-2 6.2 POST (Power On Self Test) Fault Messages .............................................................. 6-2 6.2.1 BCR Failed (BCR is the Barcode Reader) ........................................................... 6-2 6.2.2 BCR Misconfigured (BCR is the Barcode Reader) .............................................. 6-2 6.2.3 Calibration Req’d ................................................................................................... 6-3 6.2.4 Not Configured ...................................................................................................... 6-3 6.2.5 Carousel Failed, Carousel Jammed ..................................................................... 6-3 6.2.6 Array Failed, Array Jammed ............................................................................... 6-3 6.2.7 Gripper Homing Failed ......................................................................................... 6-3 6.2.8 X Failed to Home ................................................................................................... 6-3 6.2.9 Z Failed to Home ................................................................................................... 6-3 6.2.10 No Drivebay Found ............................................................................................... 6-4 6.2.11 No Carriage Found ................................................................................................ 6-4 6.2.12 No Sensor Pcb Found ............................................................................................ 6-4 6.2.13 No Carousel Found ................................................................................................ 6-4 6.2.14 No Storage Array ................................................................................................... 6-4 6.3 Operating Fault Messages ........................................................................................... 6-5 6.3.1 501510 Rev. S
Pick Failed ............................................................................................................. 6-5 ix
6.3.2 Place Failed ........................................................................................................... 6-5 6.3.3 Carousel Failed, Carousel Jammed ..................................................................... 6-5 6.3.4 Array Failed, Array Jammed ............................................................................... 6-5 6.3.5 X Axis Jammed ...................................................................................................... 6-5 6.3.6 X-Axis Obstructed ................................................................................................. 6-5 6.3.7 Z-Axis Jammed ...................................................................................................... 6-6 6.3.8 Z-Axis Obstructed .................................................................................................. 6-6 6.3.9 Handler Fault ........................................................................................................ 6-6 6.3.10 Left Fan Failed or Right Fan Failed .................................................................... 6-6 6.3.11 Left Supply Fail or Right Supply Fail ................................................................. 6-6 6.3.12 Fan Failed .............................................................................................................. 6-6 6.3.13 Supply Failed ......................................................................................................... 6-6 6.4 Operating Error Messages ........................................................................................... 6-7 6.4.1 Gripper Full ........................................................................................................... 6-7 6.4.2 No Target Magazine .............................................................................................. 6-7 6.4.3 No Target Drive ..................................................................................................... 6-7 6.4.4 Target Full ............................................................................................................. 6-7 6.4.5 Source Empty ........................................................................................................ 6-7 6.4.6 No Source Magazine .............................................................................................. 6-7 6.4.7 No Source Drive ..................................................................................................... 6-7 6.4.8 Tape Not Ejected ................................................................................................... 6-7 6.4.9 The Door is Locked ................................................................................................ 6-7 6.4.10 The Door is Open ................................................................................................... 6-8 6.5 Calibration Fault Messages ......................................................................................... 6-8 6.5.1 Calibration Fault ................................................................................................... 6-8 6.5.2 Failed No Magazine .............................................................................................. 6-8 6.5.3 Failed, Remove Cart.............................................................................................. 6-8 6.5.4 Failed Gripper Full ............................................................................................... 6-8 6.5.5 Calibration Failed ................................................................................................. 6-8 6.5.6 Opto Cal Failed...................................................................................................... 6-8 7. Field–Replaceable Units (FRUs) ............................................................................... 7-1 7.1 Introduction .................................................................................................................. 7-1 7.2 Field Upgrades ............................................................................................................. 7-4 7.3 Required Tools and Materials ..................................................................................... 7-6 7.4 Opening the Front Panel/Door .................................................................................... 7-7 7.5 Rack-Mounted Libraries .............................................................................................. 7-8 7.5.1 Extending the RLS from the Rack ....................................................................... 7-8 7.5.2 Retracting the RLS into the Rack ........................................................................ 7-9 7.6 Top Cover .................................................................................................................... 7-10 7.6.1 x
Opening the Top Cover ....................................................................................... 7-10 501510 Rev. S
7.6.2 7.7 Closing the Top Cover ......................................................................................... 7-10 Carriage Assembly ..................................................................................................... 7-11 7.7.1 Carriage Assembly Removal Procedure............................................................. 7-12 7.7.2 Carriage Assembly Replacement ....................................................................... 7-13 7.8 Carousel Assembly ..................................................................................................... 7-14 7.8.1 Carousel Removal................................................................................................ 7-14 7.8.2 Carousel Replacement ........................................................................................ 7-16 7.9 Storage Array.............................................................................................................. 7-16 7.9.1 Style A Chassis Storage Array Removal ........................................................... 7-17 7.9.2 Style A Chassis Storage Array Replacement .................................................... 7-22 7.9.3 Style B Chassis Storage Array Removal ........................................................... 7-23 7.9.4 Style B Chassis Storage Array Replacement .................................................... 7-25 7.10 Front Panel/Door Assembly (Bezel) .......................................................................... 7-26 7.10.1 Front Panel/Door Assembly Removal ................................................................ 7-26 7.10.2 Front Panel/Door Assembly Replacement ......................................................... 7-26 7.11 Tape Drive Assembly ................................................................................................. 7-29 7.11.1 Tape Drive Assembly Removal ........................................................................... 7-30 7.11.2 Tape Drive Assembly Replacement ................................................................... 7-30 7.11.3 Verifying a Tape Drive Assembly Installation .................................................. 7-32 7.11.4 Drive Fillers ......................................................................................................... 7-32 7.12 Serial Control Panel PCBA ........................................................................................ 7-33 7.12.1 Serial Control Panel PCBA Removal ................................................................. 7-33 7.12.2 Serial Control Panel PCBA Replacement .......................................................... 7-34 7.13 Drive Bay PCBA Assembly ........................................................................................ 7-35 7.13.1 Drive Bay PCBA Assembly Removal ................................................................. 7-36 7.13.2 Drive Bay Assembly Replacement ..................................................................... 7-42 7.14 Executive-XI PCBA .................................................................................................... 7-44 7.14.1 Executive-XI PCBA Removal ............................................................................. 7-44 7.14.2 Executive-XI PCBA Replacement ...................................................................... 7-46 7.15 Door Lock PCBA ......................................................................................................... 7-47 7.15.1 Door Lock PCBA Removal .................................................................................. 7-47 7.15.2 Door Lock PCBA Replacement ........................................................................... 7-48 7.16 X-Clear Emitter PCBA ............................................................................................... 7-48 7.16.1 X-Clear Emitter PCBA Removal ........................................................................ 7-48 7.16.2 X-Clear Emitter PCBA Replacement ................................................................. 7-49 7.17 Sensor Master and Slave Assemblies ....................................................................... 7-50 7.17.1 Sensor Master Assembly Removal ..................................................................... 7-51 7.17.2 Sensor Slave Assembly Removal ........................................................................ 7-52 7.17.3 Sensor Slave Assembly Replacement................................................................. 7-53 7.17.4 Sensor Master Assembly Replacement .............................................................. 7-53 501510 Rev. S
xi
7.18 Drive Interface Adapter (DIA) ................................................................................... 7-54 7.18.1 Drive Interface Adapter Removal ...................................................................... 7-54 7.18.2 Drive Interface Adapter (DIA) Replacement ..................................................... 7-55 7.19 DFA (Direct Fibre Attach) Duplex Cable.................................................................. 7-56 7.19.1 DFA Duplex Cable Removal ............................................................................... 7-56 7.19.2 DFA Duplex Cable Replacement ........................................................................ 7-57 7.20 Interface Personality Module (IPM).......................................................................... 7-58 7.20.1 IPM Removal ....................................................................................................... 7-58 7.20.2 IPM Replacement ................................................................................................ 7-59 7.21 Power Supplies ........................................................................................................... 7-59 7.21.1 Removal of a Single Power Supply Module ....................................................... 7-60 7.21.2 Replacement of a Single Power Supply Module ................................................ 7-60 7.21.3 Hot Removal of a Dual-Redundant Power Supply Module .............................. 7-61 7.21.4 Hot Replacement of a Dual-Redundant Power Supply Module ....................... 7-61 7.22 Fixed Slots................................................................................................................... 7-61 7.22.1 Fixed Slot Removal ............................................................................................. 7-62 7.22.2 Fixed Slot Replacement ...................................................................................... 7-62 7.23 Air Filter ..................................................................................................................... 7-63 7.23.1 Air Filter Inspection ............................................................................................ 7-63 7.23.2 Air Filter Replacement ....................................................................................... 7-64 7.24 Calibration .................................................................................................................. 7-65 7.24.1 Calibration Setup ................................................................................................ 7-65 7.24.2 Calibration Initialization .................................................................................... 7-66 7.24.3 Calibration Completion....................................................................................... 7-66 8. Firmware Updating ..................................................................................................... 8-1 8.1 Firmware Replacement ................................................................................................ 8-1 8.2 Determining the Current Firmware Revision ............................................................ 8-1 8.3 Firmware Update via the SCSI or Fibre Channel Interface ..................................... 8-2 8.4 Firmware Update via Q-Link ...................................................................................... 8-4 8.5 Firmware Update via Q-Conn ..................................................................................... 8-7 8.5.1 RS-232 Cable Wiring ............................................................................................. 8-7 8.5.2 RS-232 Serial Communications Parameters ....................................................... 8-7 8.5.3 User Terminal Software Setup Example ............................................................. 8-7 8.5.4 VT100 Terminal Emulation.................................................................................. 8-9 8.5.5 Remote Library Command Mode ....................................................................... 8-11 8.5.6 Xmodem Firmware Download <xdl> ................................................................. 8-11 9. RLS Expansions ............................................................................................................ 9-1 9.1 Introduction .................................................................................................................. 9-1 9.2 Model Expansions......................................................................................................... 9-2 9.2.1 xii
Installing a Model Expansion Kit ........................................................................ 9-2 501510 Rev. S
9.2.2 Style A Chassis Storage Array Removal ............................................................. 9-2 9.2.3 Style A Chassis Storage Array Expansion Kit Installation ............................... 9-6 9.2.4 Style B Chassis Storage Array Removal ............................................................. 9-7 9.2.5 Style B Chassis Storage Array Expansion Kit Installation ............................... 9-9 9.2.6 Entering the Update Password .......................................................................... 9-10 9.2.7 Reconfiguring the Model Number ...................................................................... 9-10 9.2.8 Recalibrating the Unit ........................................................................................ 9-11 9.2.9 Clearing the Password ........................................................................................ 9-11 501510 Rev. S
xiii
1.
Introduction
1.1 Who Should Read This Manual
This Technical Service Manual is for RLS service personnel. It describes the Maintenance Menu, the Private Menu and instructions for removing and replacing Field Replacement Units (FRU's). It also contains troubleshooting procedures and after–
maintenance testing procedures.
The following topics are covered in the RLS-8000 Tape Library Installation and Operation manual (Qualstar document number 501500):
•
Unpacking Instructions
•
Control Panel
•
Menu System
•
System Configuration
•
System Operation
•
Preventative Maintenance
•
Repacking Instructions
For information about the SCSI interface, or other information outside the scope of
this manual, please refer to the appropriate documents listed below.
Subject
Document
Qualstar
Document
Number
Specifications
RLS-8000 Product Specification
501490
Installation and Operation
RLS-8000 Installation and Operation Manual
501500
ADI Interface Quick Start
Product Application Note
PAN-025
Approved Data Cartridges
Product Information Note
PIN-038
Barcode Label Specifications
Product Information Note
PIN-040
Capacity on Demand
Ordering & Installing Capacity on Demand
PIN-044
SAS Cable and HBA Considerations
Product Information Note
PIN-046
SCSI Medium-changer Information
RLS SCSI-2 Interface Reference
501551
SCSI-2 Specification
ANSI X3.131-1994
N/A
SCSI SPI-3 Specification
NCITS T10 Project 1302D
N/A
Table 1-1 Applicable Documents
501510 Rev. S
Introduction
1-1
Although Qualstar has made every effort to insure the accuracy of the information
contained in this manual, no guarantee is expressed or implied that the manual is
error-free. Qualstar reserves the right to make changes at any time without prior notification.
The Qualstar RLS is a sophisticated, state-of-the-art computer peripheral. It may only
be serviced by an authorized service technician who is experienced with the operation
and maintenance of tape libraries, and only after reading and understanding this manual and the RLS Installation and Operation Manual.
1.2 Important Safety Information
All of the operating instructions and maintenance procedures in Qualstar manuals
must be followed to prevent personal injury or damage to the equipment. In the interests of safety, there are two kinds of warnings used in Qualstar documents, as shown
below.
DANGER
PERSONAL INJURY MAY RESULT IF YOU DO NOT FULLY COMPLY WITH THE
HANDLING, OPERATING, OR SERVICE INSTRUCTIONS FOUND IN A DANGER
PARAGRAPH.
GEFAHR
UNSACHGEMAESSE BENUTZUNG, BEDLENUNG ODER RAPARATUR
AUFGRUND VON NICHTBEGEFAHR DER SICHERHEITSANWEISUNG KANN ZU
VERIET-ZUNGEN FUEHREN.
CAUTION
EQUIPMENT DAMAGE OR LOSS OF DATA may result if you do not fully comply
with the handling, operating, or service instructions found in a CAUTION paragraph.
1-2
Introduction
501510 Rev. S
In addition, useful information and tips may be found throughout the document in the
following formats:
NOTE
SPECIAL ATTENTION to explanatory statements found in a NOTE paragraph will help you avoid
mistakes and/or save time.
NOTICE
A NOTICE box contains additional important information not covered by the
other three types of special text: DANGER, CAUTION, or NOTE.
1.3 Lithium Battery
Please observe the following information when repairing the unit.
DANGER
U9, A DALLAS SEMICONDUCTOR CORPORATION DS1225AB OR A SGSTHOMPSON MICROELECTRONICS M48258X IC ON THE EXECUTIVE PCBA
CONTAINS AN INTEGRAL LITHIUM BATTERY. AN EXPLOSION DANGER EXISTS
IF THE IC IS INCORRECTLY REPLACED. REPLACE THE IC ONLY WITH THE SAME
PART NUMBER, OR AN EQUIVALENT DESIGNATED BY THE MANUFACTURER.
DISPOSE OF THE USED IC ACCORDING TO THE MANUFACTURER'S
INSTRUCTIONS.
GEFAHR
DER U9, EIN DALLAS SEMICONDUCTOR CORPORATION DS1225AB ODER EIN
A SGS-THOMPSON MICROELECTRONICS M48258X IC AUF DEM EXECUTIVE
BOARD ENTHAELT EINE INTEGRIERTE LITHIUM BATTERIE. WENN DIESE
UNSACHGEMAESS AUSGETAUSCHT WIRD, BESTEHT EXPLOSIONS GEFAHR.
DER IC DARF NUR DURCH EINEN ARTIKEL MIT DER SELBEN ARTIKELNUMMER,
BZW, MIT EINEM VERGLEICHBAREN ARTIKEL LAUT HERSTELLER ANGABE
ERSETZT WERDEN. DIE ENTSORGUNG DES ALTEN IC’S DARF NUR GEMAESS
HERSTELLERANGABEN ERFOLGEN.
501510 Rev. S
Introduction
1-3
2. Description and Theory of Operation
2.1 Models
Qualstar
RLS-4221
R
EXIT
READY
ENTER
MENU
BUSY
FAULT
FEATURE/MODEL
4124
4221
4445
4470
AIT
AIT
AIT
AIT
Tape Technology
Maximum No. of Drives
1
2
4
4
24
22
45
70
Number of Magazines
4
4
9
14
Cartridges per Magazine
5
5
5
5
Total Cartridge Capacity
Barcode Reader
Optional
Optional
Optional
Optional
LVD/SE SCSI
Interface Personality Module (IPM)
N/A
Standard
Standard
Standard
2-GB Fibre Channel Interface (IPM)
N/A
Optional
Optional
Optional
Q-Link Remote Manager
Standard
Standard
Standard
Standard
Quick swap tape drive carriers
N/A
Standard
Standard
Standard
Buffered Drive Interface Adapters (BDIAs)
for Hot Swappable Tape Drives
N/A
Optional
Optional
Optional
Standard Power Module Output (watts)
125
125
250
250
Redundant, Hot-Swappable Power Modules
(Dual 250-watt modules)
N/A
N/A
Optional
Optional
Includes 4 fixed cartridge storage locations
Includes 2 fixed cartridge storage locations
Table 2-1 RLS-4000 Models, Features and Options
501510 Rev. S
Description and Theory of Operation
2-1
FEATURE/MODEL
5116
5244
6227
SAIT
SAIT
Super DLT
Tape Technology
Maximum No. of Drives
1
2
2
Total Cartridge Capacity
16
44
27
Number of Magazines
4
11
9
Cartridges per Magazine
4
4
3
Barcode Reader
Optional
Optional
Optional
LVD/SE SCSI
Interface Personality Module (IPM)
N/A
Standard
Standard
2-GB Fibre Channel Interface (IPM)
N/A
Optional
Optional
Q-Link Remote Manager
Standard
Standard
Standard
Quick swap tape drive carriers
N/A
Standard
Standard
Buffered Drive Interface Adapters
(BDIAs) for Hot Swappable Tape Drives
N/A
Optional
Optional
Standard Power Module Output (watts)
125
250
250
Redundant, Hot-Swappable Power Modules (Dual 250-watt modules)
N/A
Optional
Optional
Table 2-2 RLS-5/6000 Models, Features and Options
FEATURE/MODEL
8116
8202
8204
LTO
LTO
LTO
Maximum No. of Drives
1
2
Total Cartridge Capacity
1
Number of Magazines
16
Tape Technology
Cartridges per Magazine
Barcode Reader
LVD/SE SCSI
Interface Personality Module (IPM)
2-GB Fibre Channel Interface (IPM)
RLS-8204D
8216H
8236
8236D
LTO
LTO (HH)
LTO
LTO
2
2
2
2
2
12-36
12-44
12-44
16
36
36
3-9
3-11
3-11
4
9
9
4
4
4
4
4
4
4
Optional
Optional
Optional
Standard
Optional
Optional
Optional
N/A
Standard
Standard
Standard
Standard
Standard
Standard
N/A
Optional
Optional
Optional
Optional
Optional
Optional
Standard
Standard
Standard
Standard
Standard
Standard
Standard
Quick swap tape drive carriers
N/A
Standard
Standard
Standard
Standard
Standard
Standard
Standard Power Module Output (watts)
125
250
250
250
160
250
250
Redundant, Hot-Swappable Power
Modules (Dual 250-watt modules)
N/A
Optional
Optional
Optional
N/A
Optional
Optional
Q-Link Remote Manager
Features field-upgradeable Capacity on Demand
“D” models support LTO DFA fibre channel tape drives
HH = Half-High tape drives
Table 2-3 RLS-8000 Models, Features and Options (continued below)
2-2
Description and Theory of Operation
501510 Rev. S
FEATURE/MODEL
RLS-8216C
RLS-8216CD
RLS-8236C
RLS-8236CD
LTO
LTO
LTO
LTO
Tape Technology
Maximum No. of Drives
2
2
2
2
Total Cartridge Capacity
16
16
36
36
Number of Magazines
4
4
9
9
Cartridges per Magazine
4
4
4
4
Barcode Reader
Standard
Standard
Standard
Standard
Q-Link Remote Manager
Standard
Standard
Standard
Standard
Quick swap tape drive carriers
Standard
Standard
Standard
Standard
Standard Power Module Output
(watts)
160
160
160
160
“D” models support LTO DFA fibre channel tape drives
Table 2-4 RLS-8000 Models, Features and Options (continued below)
FEATURE/MODEL
8244
8244D
LTO
LTO
LTO (HH)
LTO
LTO (HH)
LTO
Maximum No. of Drives
2
2
4
4
4
4
Total Cartridge Capacity
44
44
44
44
12-44
12-44
Number of Magazines
11
11
11
11
3-11
11
Cartridges per Magazine
4
4
4
4
4
4
Barcode Reader
Optional
Optional
Standard
Standard
Optional
Standard
LVD/SE SCSI
Interface Personality Module (IPM)
Standard Standard
Standard
Standard
Standard
Standard
Tape Technology
RLS-8444H RLS-8444D
8404H
RLS-8404D
2-GB Fibre Channel Interface (IPM)
Optional
Optional
Optional
Optional
Optional
Optional
Q-Link Remote Manager
Standard Standard
Standard
Standard
Standard
Standard
Quick swap tape drive carriers
Standard Standard
Standard
Standard
Standard
Standard
Standard Power Module Output (watts)
Redundant, Hot-Swappable Power
Modules (Dual 250-watt modules)
250
250
250
250
250
250
Optional
Optional
Optional
Optional
Optional
Optional
Features field-upgradeable Capacity on Demand
“D” models support LTO DFA fibre channel tape drives
HH = Half-High tape drives
Table 2-5 RLS-8000 Models, Features and Options
Series Identifier
Maximum Number of Drives
Maximum Number of Cartridges in Magazines
RLS-0000
Figure 2-1 Model Number Identification Scheme
501510 Rev. S
Description and Theory of Operation
2-3
This manual applies to all models. The installation and operation of the various models is virtually identical. Differences among the models are noted where required.
A
Model
“A” Dimension
“B” Dimension
5116 &
XXX4
36.9” / 93.7 cm
34.9” / 88.6 cm
All Others
32.1” / 81.5 cm
30.1” / 76.4 cm
Model
“C” Dimension
“C” Dimension
Minimum
Maximum
5116 &
XXX4
27.5” / 69.9 cm
36.2” / 92.0 cm
All Others
22.0” / 55.9 cm
30.6” / 77.7 cm
2.0”
5.1 cm
.7”
1.8 cm
16.6”
42.2 cm
C
(Rail Spacing)
B
Dual-Redundant, Hot-Swappable
Power Supply Option
19.0”
48.3 cm
8.75”
22.2 cm
EXI T
RE ADY
ENTER
MENU
BUSY
FAULT
10.0”
25.4 cm
8.0”
20.3 cm
Figure 2-2 RLS External Dimensions
These tape libraries are not intended for use in mobile applications. They were designed for use in an office environment.
2-4
Description and Theory of Operation
501510 Rev. S
MODEL
NET WEIGHT
FULLY LOADED
(LBS / KG)
COMBINED
SHIPPING WEIGHT
(LBS / KG)
RLS-4124
61 / 28
81 / 37
RLS-4221
67 / 30
87 / 39
RLS-4445
87 / 39
107 / 49
RLS-4470
92 / 42
112 / 51
RLS-5116
108 / 49
138 / 63
RLS-5244
151 / 68
181 / 82
RLS-6227
97 / 44
119 / 54
RLS-8116
69 / 31
97 / 44
RLS-8202/8216C/8216CD
104 / 47
132 / 60
RLS-8236/8236C/8236CD/8236D
114 / 52
142 / 64
RLS-8204/8204D
147 / 67
177 / 80
RLS-8216H
70 / 32
98 / 44
RLS-8244/8244D
147 / 67
177 / 80
RLS-8404H/8404D
151 / 69
181 / 82
RLS-8444H/8444D
151 / 69
181 / 82
Includes a full complement of Tape Drives, magazines and tape cartridges
Not including tape cartridges
Table 2-6 RLS Weights
2.2 General Description
Models accommodate one or four tape drives and have removable magazines for tape
cartridge storage. There are models that utilize AIT, LTO, SDLT and SAIT tape technology. All units operate on internationally available AC power. Brushless motors are
used exclusively. All digital closed-loop servo systems use magnetic and optical position sensors. The servos automatically calibrate themselves, thus eliminating all electrical adjustments. Preventive maintenance is reduced to replacing the Air Filter,
when so prompted by the control panel display and removing debris inside the RLS.
2.2.1 Motion Systems
501510 Rev. S
•
On the RLS-4124, 4221, 5116, 8116 and 8216H a rotating carousel is utilized
to hold four magazines containing tape cartridges. The carousel rotates in
90-degree increments to present one magazine (or 5 tape cartridge slots)
to the robotic handler. The carousel rotates in either direction to minimize the access time to any data cartridge.
•
All other models utilize a patented storage array that holds 9 magazines in
a rectangular array that is 2 magazines wide and 5 magazines deep. One of
the possible 10 magazines is missing in order to facilitate movement of the
other 9. Due to its increased depth, the RLS-5244, 8204, 8204D, 8244, 8244D,
Description and Theory of Operation
2-5
8404, 8404D, 8444 and 8444D have two more magazines (11 magazines out
of 12 positions). The magazines are identified MA through MI or MK and
the magazine in the right front corner is accessible by the Handler.
The RLS-4470 utilizes a patented storage array that holds 14 magazines in
a rectangular array that is 2 magazines wide and 8 magazines deep. Two
of the possible 16 magazines are missing in order to facilitate movement of
the other 14. The 14 magazines are identified MA through MN and the
magazine in the right front corner is accessible by the Handler.
The magazines in the storage arrays are shuffled around the racetracklike array in either direction. The direction of movement is chosen to minimize the time to access the desired magazine.
•
The RLS utilizes a two-axis robotic cartridge handling mechanism that
moves cartridges between the storage slots and the Tape Drives. In the unlikely event this assembly ever needs replacing, it can be accomplished in
less than 5-minutes.
All motion is powered by brushless DC motors turning precision leadscrews and drive shafts. Magnetic sensors provide position and velocity
feedback to the motors, while optical sensors provide absolute positional
information. This unique design produces optimum positioning accuracy,
reliability and long life. The servo systems are digital, self-calibrating and
never require mechanical adjustments.
2.2.2 Sensors
Optoelectronic Interrupters Sensors
These consist of an LED emitter and a Schmidt trigger optoelectronic sensor, which
produces a digital output indicating if it is blocked or not. Some consist of two loose
parts, and others have both parts integrated into one housing. These can only be used
at very short ranges, and must either be protected from ambient light, or be designed
to be fail-safe.
2-6
•
X Home
This is an Opto switch pair located on the Carriage Emitter PCBA. The
signal feeds back to the Sensor Master PCBA. It is blocked when the carriage is far enough to the right of its travel to be in danger of actuating
the door-opening device. It is used for homing the X-axis during POST
(Power On Self Test), self-diagnostics, or calibration.
•
Door Latched
This indicates that the front door is closed and latched. The sensor is located on and read by the front panel PCBA.
•
IO Port Door Latched
This indicates that the IO Port door is closed and latched. The sensor is
located on and read by the front panel PCBA.
•
Door Locked
This indicates that the door lock is fully turned to the locked position. The
Description and Theory of Operation
501510 Rev. S
sensor is located on the Door Lock Sensor PCBA and feeds back to the
Sensor Master PCBA.
•
Carousel on Face
This indicates that the carousel is aligned on a face. The sensor is located
on the Carousel PCBA and it feeds back directly to the Executive PCBA.
•
Drive Locked1 and 2
Located on the Drive Bay PCBA, it is used to sense that a drive is installed. These devices do not have Schmidt triggers as the others do, but
rather they have a phototransistor output.
Hall Effect Sensors
These are simple three-lead devices, which indicate the presence or direction of a local
magnetic field.
•
Carousel Home
This sensor gives a once-around indication for the carousel, and is used to
find the home face of the carousel. It is located on the carousel PCBA, and
feeds back to the Executive PCBA. It looks for a magnet buried in the carousel platform.
•
X Motor Phase A, B & C
These sensors are integral to the Brushless DC motors, and provide the
Executive PCBA with feedback for both commutation and position. They
route through the Carriage PCBA, the Interconnect PCBA, and finally to
the Executive PCBA. These sensors provide continuous incremental position feedback so the library always knows where its carriage is.
•
Z Motor Phase A, B & C
These sensors are integral to the Brushless DC motors, and provide the
Executive PCBA with feedback for both commutation and position. They
route through the Carriage PCBA, the Interconnect PCBA, and finally to
the Executive PCBA.
•
Storage Array Index Sensor
This sensor is located on the Storage Array PCBA and senses a magnet
embedded in a cam to provide phasing information for the control system.
•
Storage Array Home Sensor
These two sensors are located on the Storage Array PCBA and sense a
magnet on the bottom of car “A”, so the control system can identify which
car is the first one.
Modulated Optoelectronic Sensors
These are used where the range is greater that allowed by simple optoelectronic sensor pairs. These sensors consist of an LED emitter, which is modulated, and a detector, which was designed for remote control of consumer products. The detector looks
for a particular carrier frequency, which is modulated by a sub-carrier that would
normally carry data. In our application, we use it to detect the presence of the modulated signal, but impose no data on it. The part features an infrared filter, carrier
and sub-carrier band selection, automatic gain control, and signal detection, which allow it to run directly off a processor.
501510 Rev. S
Description and Theory of Operation
2-7
2-8
•
Z Home
The detector is located on the Interconnect PCBA, and the emitter is located on the X Clear PCBA. Both devices are operated by the Sensor Master PCBA. The principle function is to detect when the Z axis of the carriage is back far enough to operate the door-opening mechanism, which is
very nearly all the way towards the front of the library. It is used for homing the Z-axis during POST (Power On Self Test), self-diagnostics, or calibration.
•
Gripper Home
The detector is located on the Interconnect PCBA, and the emitter is located on the X Clear PCBA. Both devices are operated by the Sensor Master PCBA. The principle function is to detect when the grippers are all the
way open while the carriage is at the back of its travel. It is used for homing the gripper during POST (Power On Self Test), self-diagnostics, or calibration, and various times during fault recovery and in normal operation. The grippers are driven by a step-motor, and there is no feedback to
determine their position except this sensor.
•
X Clear
The detector is located on the Interconnect PCBA, and the emitter is located on the X Clear PCBA. Both are operated by the Sensor Master PCBA.
The principle function is to detect an object unexpectedly obstructing the
“no man’s land” between the carriage and the cartridges. It is also used to
detect the presence of magazines in the carousel during inventory. The
other function is to sense if someone may have modified the inventory of
the library. If the front door or the IO Port access door is open, and the
beam becomes blocked, then the library assumes that the inventory information may have been compromised, so it will rescan the affected elements.
•
Magazine Cartridge 1, 2, 3, 4 & 5
The emitters are located on the Sensor Slave PCBA, and the detectors are
located on the Sensor Master PCBA. These are operated by the Sensor
Master PCBA. They are used to detect cartridges in the magazine facing
the front door. During inventory, each face is turned to the front to
present its cartridges to these sensors for detection. If a cartridge is
present, then the corresponding sensor beam will be blocked, and the library will mark the location as occupied in its inventory data base.
•
Fixed Cartridge 1, 2, 3 & 4
The emitters are located on the Sensor Slave PCBA, and the detectors are
located on the Sensor Master PCBA. These are operated by the Sensor
Master PCBA. They are used to detect cartridges in the fixed cartridge
storage slots. During inventory, if a cartridge is present, then the corresponding sensor beam will be blocked, and the library will mark the location as occupied in its inventory data base.
•
Drive Cartridge 1 & 2
The emitters are located on the Sensor Slave PCBA, and the detectors are
located on the Sensor Master PCBA. These are operated by the Sensor
Master PCBA. They are used to detect cartridges in the Tape Drives. Dur-
Description and Theory of Operation
501510 Rev. S
ing inventory, if a cartridge is present, then the corresponding sensor
beam will be blocked, and the library will mark the location as occupied in
its inventory data base.
2.2.3 Barcode Reader
An integrated Barcode Reader (BCR) is optional on all RLS models. The BCR can uniquely identify each barcode labeled cartridge, thus saving the system from reading
each cartridge in a Tape Drive. Preprinted barcode labels, which are both human- and
machine-readable, are available from a number of sources including Qualstar.
The Barcode Reader consists of an LED light source and a Charge-Coupled Device
(CCD) sensor (similar to that used in a video camera) and associated electronics. It is
mounted on the carriage and contains no moving parts. The Barcode Reader can scan
all cartridges within the RLS (except those loaded inside Tape Drives). Barcode data
is stored internally in the changer’s non-volatile RAM (the internal inventory database) and is available to the host computer upon request.
2.2.4 Barcode Labels
Pre-printed barcode labels, which are both human- and machine-readable, are available from a number of sources including Qualstar.
Barcode labels must conform to ANSI/AIM BCI-1995, Uniform Symbology Specification Code 39. Please refer to PIN-040 at www.qualstar.com (click on Support tab) for
more information.
By default, the RLS expects a modulus 43 check character at the end of each label.
The use of a check character helps assure that labels are read error-free. The RLS
configuration must be changed before using barcode labels without a check character.
All of the labels within the RLS must match the check character configuration: either
all with or all without a check character.
2.2.5 Capacity on Demand (COD)
The Capacity on Demand (COD) feature allows the storage capacity of RLS-8204,
8204D, 8404 and 8404D models to be field expanded from 12 tape cartridges up to 44
in increments of eight. The RLS-8202 may be expanded from 12 tape cartridges up to
36 in increments of eight. To order an upgrade kit, contact an authorized Reseller, or
Qualstar Sales at 805-583-7744 x 773. Necessary information about ordering and installing COD can be found in PIN-044 available at www.qualstar.com (click on the
Support tab).
2.3 Component Identification
Most of the major components are common to all models. The number of Tape Drives
depends upon the RLS model and the number of drives installed.
Optional, model-dependent features:
501510 Rev. S
Description and Theory of Operation
2-9
•
Barcode Scanner Assembly
•
2-Gigabit Fibre Channel Interface
•
Buffered Drive Interface Adapters
•
Dual, Redundant, Hot-Swappable Power Supply Modules
•
Rack Mount Slide Kit
The theory of operation is basically the same for all models, regardless of which hardware configuration is used.
2.3.1 RLS Models
Figure 2-3 and Figure 2-4 show the location of the major components in both types of
libraries: Carousel and Storage Array models.
Bezel/Front Door Assembly
Handler/Carriage Assembly
Executive PCBA
IPM PCBA
Interface Personality Module (IPM)
SCSI Connectors
from Tape Drives
Q-Link LAN Connector
Right Power
Supply Module
AC Power Cord
Receptacles
Left Power
Supply Module
SCSI Connectors
from Medium Changer
Figure 2-3 RLS – as seen from the rear
NOTE
Left and Right is defined when viewing the RLS from the front.
2-10
Description and Theory of Operation
501510 Rev. S
Handler/Carriage
Assembly
Cartridge
Magazines
Control Panel
Carriage
Bezel
Front Panel/Door
Assembly
VIOP Door
Tape Drives
Figure 2-4 RLS – as seen from the front
2.3.2 Handler
Figure 2-5 shows the major components of the RLS cartridge handler. All
RLS models use the same Handler.
Barcode Reader
Cartridge Presence
Sensors
Gripper Assembly
Z-Axis Motor
Z-Axis
X-Axis
Figure 2-5
501510 Rev. S
RLS Handler (some parts removed for clarity)
Description and Theory of Operation
2-11
2.3.3 Field-Replaceable Units (FRUs)
Many of the library's major components are available separately as Field-Replaceable
Units (FRUs). Sometimes referred to as spare parts. These components can be removed and replaced in the field by qualified personnel. See Chapter 7 for a complete
list of FRUs, their part numbers and removal/replacement instructions.
Some FRUs can be added to a unit as an expansion item. The instructions for installing an expansion FRU are contained in Chapter 7.
2-12
Description and Theory of Operation
501510 Rev. S
3.
The Operator Interface
3.1 The Door Lock
The Door lock is used to secure the RLS inventory and menu system. When in the
locked position, the Front Panel/Door cannot be opened under any conditions. When
in the unlocked position, the Front Panel/Door can be opened if the RLS has not received a Prevent Media Removal command from a host computer. The key can be removed from the door lock in either position. All Qualstar tape libraries use the same
key.
Figure 3-1 Door Lock Positions
3.2 Using the Menu System
The Control Panel shown in Figure 3-2 allows a qualified individual to make configuration changes to the RLS and to perform diagnostics. This chapter explains the menu
system, the types of information it presents, and how to use it. Specific information
about Configuration or Operation menu items can be found in the RLS-8000 Tape Library Installation and Operation Manual (Qualstar document number 501500).
The six control keys make it possible to point to a particular item and change or edit
its value, or to execute a command. The function of each control key is dependent
upon the location within the menu structure. The control keys are shown in Figure
3-2.
501510 Rev. S
The Operator Interface
3-1
Display
EXIT
Control Keys
READY
ENTER
MENU
BUSY
FAULT
Status LEDs
Figure 3-2 RLS Control Panel
3.2.1 The MENU Control Key
Press the MENU key to enable the menu system. The menu system can be used without interrupting ongoing changer operations. If the Top Menu is not displayed, pressing the MENU key at any time always returns control to the Top Menu (Figure 3-3). If
the Top Menu is displayed, press the MENU key to exit the menu system and return
to the Operating Display.
3.2.2 The
3-2
(UP) and
(DOWN) Control Keys
•
While navigating through the menu system, the (UP) and (DOWN)
keys move the item pointer (right-pointing arrow) up and down the left
column of the display. The display automatically scrolls when necessary.
The pointer identifies the current selection, as shown in Section 3.2.3 below.
•
If a value is highlighted, the (UP) and (DOWN) keys change the value
of the highlighted character or word. The DOWN key changes the character to the preceding character in the sequence (i.e., from B to A, or from 2
to 1). Pressing the (UP) key has the opposite effect.
•
If a multiple choice value is highlighted, the
cycle through the available choices.
•
If the (UP) or (DOWN) key is pressed and held down, the control key's
action repeats at a rapid rate.
The Operator Interface
(UP) and
(DOWN) keys
501510 Rev. S
3.2.3 The ENTER Control Key
The ENTER key behaves as follows:
•
If the item pointer is pointing at a sub-menu (indicated by a leading bullet), pressing ENTER will display the selected sub-menu.
O•••••Element Status
•Display
•Find Label
INITIALIZE
Skip Labels: NO
INVALIDATE
•
If the item pointer points to a command such as POSITION (commands are
always displayed in all upper case letters), pressing ENTER executes the
command.
O•••Position Handler
To Location:llllll
POSITION
•
When a command is executed, only the top line of the menu and the command name (centered on the third line) are displayed for the duration of
the command’s execution.
O•••Position Handler
POSITION
•
If a value contains an editable field, pressing ENTER highlights the first
character of the field by superimposing a flashing cursor over it. This indicates the Edit mode is active and the value of the highlighted character
can now be changed using the (UP) and (DOWN) keys.
•
In the Edit mode, pressing ENTER moves the cursor one character to the
right. If the cursor is over the rightmost character, pressing ENTER
moves it back around to the leftmost character. The action repeats if the
ENTER key is held down.
•
If a value contains a multiple-choice field, pressing ENTER highlights the
field by superimposing a flashing cursor over it. Pressing ENTER again
has no effect.
3.2.4 The EXIT Control Key
The EXIT key behaves as follows:
While editing a menu item’s value, pressing the EXIT key exits the editor and restores
the pointer to the menu item. Note that all values changed during editing are actually
changed, exiting does not undo those changes. Press the EXIT key, while pointing to
any item in a menu, to return to the next higher menu. Press the EXIT key while the
Top Menu is displayed to exit the Menu mode and return to the operating display.
501510 Rev. S
The Operator Interface
3-3
3.2.5 The
(Daisy) Key
If the menu system is not already active, pressing the (Daisy) key will open the
Quick Operation menu. Press the (Daisy) or MENU key twice to close the
menu system.
3.3 Quick Operation Menu
The Quick Operation menu is opened by pressing the (Daisy) key when the
RLS status screen is displayed it (cannot be opened while navigating the RLS menu
system).
The Quick Operation menu contains only commands and is not part of the general menu tree structure. It works differently in that it contains only commands and
dismisses itself after executing one of its commands. Simply point to one of the Quick
Operation commands and press the ENTER key to invoke the command and dismiss the Quick Operation menu. You can also exit the menu by pressing the EXIT, MENU or (Daisy) key.
OPEN & PARK LEFT
OPEN & PARK RIGHT
OPEN VIOP
OPEN VIOP n
PARK LEFT
PARK RIGHT
(UN)LOAD LIBRARY
3.3.1 OPEN & PARK LEFT command
NOTE
The OPEN & PARK LEFT command will not appear if the Front Panel/Door is locked by the Door
Lock or by a Prevent Media Removal command from a host computer.
The OPEN & PARK LEFT command will unlock the Front Panel/Door and move the
carriage to its far left position. This command should be used when accessing the Tape
Drives. After the carriage has stopped, gently pull the Front Panel/Door open.
3.3.2 OPEN & PARK RIGHT command
NOTE
The OPEN & PARK RIGHT command will not appear if the Front Panel/Door is locked by the
Door Lock or by a Prevent Media Removal command from a host computer.
The OPEN & PARK RIGHT command will unlock the Front Panel/Door and move
the carriage to its far right position. This command should be used when accessing the
3-4
The Operator Interface
501510 Rev. S
Carousel or Storage Array. After the carriage has stopped, gently pull the Front Panel/Door open.
3.3.3 OPEN VIOP (n) command
NOTE
The OPEN VIOP command will not appear if it is locked by a Prevent Media Removal command
from a host computer.
The OPEN VIOP command only appears in the menu when a Variable VIOP has been
configured. If the RLS has been configured for more than one logical library, then the
command appears for each logical library (ex. OPEN VIOP a, OPEN VIOP b for
an RLS configured for two logical libraries). Invoking this command causes the Carousel or Storage Array to position the VIOP magazine for the selected logical library
to the access position. It then opens the VIOP door.
The operator must manually close the VIOP door before the RLS can again execute
host commands.
3.3.4 PARK LEFT command
This command moves the carriage to its far left position. This is useful for observing
the Tape Drives.
3.3.5 PARK RIGHT command
This command moves the carriage to its far right position.
3.3.6 (UN)LOAD LIBRARY command
NOTE
The (UN)LOAD LIBRARY command will not appear if it is locked by the Door Lock or by a Prevent Media Removal command from a host computer.
This command unlocks the Front Panel/Door and allows the user to remove or install
any number of cartridges in the magazine or fixed slots (RLS-4124 and 4221 only).
The entire magazine may also be removed or replaced. Closing the Front Panel/Door
will cause the Carousel or Storage Array to move to the next magazine whereupon the
Front Panel/Door is again unlocked. This process continues until all magazines have
been presented.
501510 Rev. S
The Operator Interface
3-5
3.3.7 The Status LEDs
The three status LEDs display the current operational status of only the RLS Medium-changer. Only one of them is illuminated at a time and they have the following
significance:
NAME
COLOR
INDICATION
READY
GREEN
The RLS is ready to accept commands
BUSY
AMBER
The RLS is busy executing a command
FAULT
RED
A fault has occurred and the RLS cannot accept commands
Table 3-1 Status LEDs Descriptions
3.4 The Top Menu
To see the Top Menu, turn on the RLS, wait until it displays the date and time, then
press the MENU key. The operator should see a display like the one in Figure 3-3.
Display line one always
indicates the title (or its
abbreviation) of the
current menu or function.
The item pointer to the left of an
item indicates which item will be
acted upon when the ENTER key
is pressed. For example, press
ENTER when the arrow points to
Configuration and the display will
change to the Configuration menu.
A dot in front of an item indicates a
sub-menu. To go to the sub-menu,
press the ENTER key.
DOWN and UP arrows indicate
additional lines are to be seen by
scrolling the display with the UP
and DOWN key.
Figure 3-3 Top Menu Display
If the arrow is positioned next to Operation and then ENTER is pressed, a display
similar to that shown in Figure 3-4 will be observed.
The up and down arrows at the right edge of the display indicate that additional
choices are available. These additional choices can be viewed by using the (UP) and
(DOWN) keys to scroll the display.
To go back to the Top Menu from any point, press the EXIT key until the Top Menu is
displayed. The MENU key can also be pressed to accomplish the same result with a
single keystroke. To leave the menu system entirely, press the EXIT or MENU key
while the Top Menu is displayed.
3-6
The Operator Interface
501510 Rev. S
Display line one gives the title of the current menu or function.
The RLS will always try to spell out menu names as completely
as possible in the 20 characters available.
A series of leading dots
indicates that the next
higher menu is the Top
Menu.
Figure 3-4 The Operation Menu
3.5 Menu Elements
3.5.1 Menu Items
Line 1 of any menu display always indicates the name of the menu right justified,
with the exception of the Top Menu, where menu names are left justified. The name
of, or an acronym for, the parent menu will precede the menu name and will be left
justified. Bullets fill the space between the two menu names. Examples:
LINE 1 DISPLAY
INTERPRETATION
Top Menu
Top Menu
•••••••Configuration
Configuration Menu
CA•••••Control Panel
Configuration\Advanced\Control Panel Menu
CA•Changer•Inventory
Configuration\Advanced\Changer\Inventory Menu
OES••••••••••Display
Operation\Element Status\Display Menu
Lines 2 through 4 of any menu display may contain the following items:
Menu Name
A Menu Name is displayed with a single leading bullet
and an upper/lower case name. Example:
.Maintenance
Command Name
A Command Name is displayed in all upper case letters
without a bullet or colon. Example:
SET TO DEFAULTS
Value Name
A Value Name is displayed with an initial capital letter,
a colon after the name, followed by a right-justified value field. Example:
Contrast:
Menu Name
with Status
48
There are a few Menu Names that are followed by a
status message. This is indicated by colon after the
menu name followed by the status message, which
summarizes the state of the sub-menu about to be entered. The status message is not editable. Example:
.T1: Random
501510 Rev. S
04
The Operator Interface
3-7
In this example, Tape Drive T1 is in the Random mode
and is set to SCSI ID 4. Pressing the ENTER key when
selected will enter the Tape Drive T1 sub-menu.
3.5.2 Values
The data to the right of the colon after a value name represents the current value of
that item. There are several types of values:
3.5.2.1
Numeric Values
These values may contain leading zeros. Some leading zeros are displayed during editing, but are blank up to the first non-zero digit when the menu is exited. Valid values
are separately determined for each item and are always within a contiguous range.
All numeric values carry and borrow to or from their more significant digits. There
are three types of numeric values found within the system:
3.5.2.2
•
Unsigned Decimal Values
Examples:
23, 07, 123
•
Signed Decimal Values
These values are always indicated by the presence of a plus or minus sign
in front of the numeric value. The plus or minus signs are editable.
Examples:
+07, +7, -123
•
Hexadecimal Values
These values are always unsigned and consist of the digits 0-9, and upper
case letters A-F. Leading zeros are always indicated.
Examples:
003F, FE10
Alpha/Numeric Values
These values can contain up to 96 different characters including ten numerals (0-9),
upper and lower case letters and special characters, such as spaces, dashes, etc. There
is no roll-over between digits.
Example:
Qualstar RLS-8236
3.5.2.3
Multiple Choice Values
Each multiple-choice value has its own list of valid choices. These values are not editable. The choices available may vary with different system configurations.
Examples:
YES, NO, BOTH, FRONT, HOST
3-8
The Operator Interface
501510 Rev. S
NOTICE
The values displayed are always the actual values. If a displayed value is
changed in the display, it is immediately changed within the system. If it is
necessary to change back to an original value, the displayed value must be
changed back to the original value.
3.5.3 Location Designators
A Location Designator contains six characters used to describe any physical location.
A “p” in the first character signifies a physical location and then the five remaining
characters are defined below. When a character is not required to define a particular location, the character is replaced with a decimal point or dot.
Space
Primary Location
Secondary Location
a–d,p
F,H,IA…IZ,MA…MZ,T
•,1-5
Table 3-2 The physical Location Field
Character
Space
Primary
Location
Secondary
Location
Definition
This character is always a lower-case “p” when describing the physical space.
Characters a-d indicates logical libraries a-d element address space.
F: Fixed Slots (RLS-4124 and 4221 only)
H: Handler
MA.–MZ: Magazine A through Magazine Z (model dependent)
IA–IZ: VIOP Magazine A through VIOP Magazine Z (model dependent)
T: Tape Drive
This digit is used to locate a particular location within a primary group (all are model
dependent): Fixed Slots (1-4), Magazine Slot (1-5), Tape Drive (1-4)
Table 3-3 physical Character Definitions
Example
Definition
pH....
The Handler
pID1..
The first VIOP storage location: Magazine D, Slot 1 (must always be slot 1)
pID5..
The last VIOP storage location: Magazine D, Slot 5 (must be in same magazine as first
slot)
pMB3..
A magazine storage location: Magazine B, Slot 3
pT1...
The leftmost Tape Drive
pF1...
The leftmost Fixed location (RLS-4124 & 4221 only)
p.....
An unassigned location
Table 3-4 Location Designator Examples
501510 Rev. S
The Operator Interface
3-9
By changing the Space character from a “p” to an “a”, “b”, “c” or “d” you can view the
SCSI element address (0–65535) of a physical location described in the physical space
of logical libraries a, b, c, or d.
3.5.4 Editing Values
To change a displayed value, point to its name using the (UP) and (DOWN) keys,
then press ENTER. Not all values are editable. If a cursor does not appear over the
value when the ENTER key is pressed, then the value cannot be changed. If a cursor
appears over the first character only, the value is either numeric, alphanumeric, or a
cartridge location. If the cursor appears over the entire value, it is a multiple-choice
value.
3.5.4.1
Editing Multiple-Choice Values
If the item contains a multiple-choice value, the entire value will be overlaid with
flashing block cursors. Use the (UP) key to select the next value and the
(DOWN) key to select the previous value, then press EXIT when done. The list of
choices wraps around, so the operator can see all the choices by using just the (UP)
or (DOWN) key.
3.5.4.2
Editing non-Multiple-Choice Values
If only the first character of the value is highlighted with a flashing block cursor after
pressing the ENTER key, the value is either numeric, alphanumeric, or a cartridge location. These values may be edited one character at a time using the ENTER key to
select the character to be edited, and then using the (UP) or (DOWN) key to
change the character's value.
NOTE
The cursor wraps around from the last to the first character. Also, the ENTER,
(DOWN) keys automatically repeat when held down.
3.5.4.3
(UP) or
Editing Numeric Values
Numeric values may be edited one digit at a time, or the entire value may be changed,
by simply incrementing or decrementing the least significant digit (or any intermediate digit). When incrementing the digit 9, it goes to 0 and a carry is added to the
more significant digits. The opposite effect is true for decrementing. This process will
automatically stop at the upper and lower limits of the valid range for each item. Remember to take advantage of the automatic key repeat feature by holding down either
the (UP) or the (DOWN) key.
The system will never allow making any value invalid. The choice for each digit is limited to valid values. For example, valid values for SCSI ID’s range from 00 to 15.
The range of some valid values may change with a system's particular configuration.
In this example, if the X1 digit was selected, then the value can be incremented all the
way from 00 to 15 and rolling over to 00 again by simply holding down the (UP)
key. Holding the (DOWN) key will decrement the value to 00 and stop there.
3-10
The Operator Interface
501510 Rev. S
3.5.4.4
Editing Alphanumeric Values
Either the (UP) or the (DOWN) keys can be used to edit alphanumeric characters
one at a time. There are no carries or borrows to other characters. The choice for each
particular character will be limited to valid characters, which vary with the item and
the character’s position within it.
The following table shows the available alphanumeric characters (A/N) and their hexadecimal (hex) equivalents. The characters occur in the order shown in the table,
starting with the “space” character, followed by the “A” character and ending with the
“ ` ” character. The hex equivalents are those values sent over the SCSI interface in
response to SCSI commands.
A/N
hex
A/N
hex
A/N
hex
A/N
hex
A/N
hex
A/N
hex
A/N
hex
A/N
hex
(space)
20
L
4C
X
58
j
6A
v
76
7
37
*
2A
[
5B
A
41
M
4D
Y
59
k
6B
w
77
8
38
+
2B
¥
5C
B
42
N
4E
Z
5A
l
6C
x
78
9
39
,
2C
]
5D
C
43
O
4F
a
61
m
6D
y
79
!
21
-
2D
^
5E
D
44
P
50
b
62
n
6E
z
7A
“
22
.
2E
_
5F
E
45
Q
51
c
63
o
6F
0
30
#
23
/
2F
{
7B
F
46
R
52
d
64
p
70
1
31
$
24
:
3A
|
7C
G
47
S
53
e
65
q
71
2
32
%
25
;
3B
}
7D
H
48
T
54
f
66
r
72
3
33
&
26
<
3C
→
7E
I
49
U
55
g
67
s
73
4
34
‘
27
=
3D
←
7F
J
4A
V
56
h
68
t
74
5
35
(
28
>
3E
@
40
K
4B
W
57
i
69
u
75
6
36
)
29
?
3F
`
60
Table 3-5 Alphanumeric Characters and their “ACSII” Hexadecimal Equivalents
3.5.4.5
Editing Cartridge Location Values (Designators)
There are two ways to edit cartridge location values with either the (UP) or the
(DOWN) key. First, like an alpha/numeric value, a cartridge location value can be
edited one character at a time. Alternately, the entire cartridge location value can be
incremented or decremented, through a range of locations, by editing the least significant digit (or intermediate digits), in a manner similar to editing a numeric value. Refer to Section 3.5.4.3 for details about editing numeric values.
Cartridge location designators always contain one letter as follows:
501510 Rev. S
F
Fixed Slots (RLS-4124 & 4221 only)
H
Handler
MA-MZ
Magazine A through Magazine Z
IA-IZ
VIOP Magazine A through VIOP Magazine Z
T
Tape Drive
The Operator Interface
3-11
Refer to Chapter 6 in the RLS-8000 Tape Library Installation and Operation Manual
(Qualstar document number 501500) for the ranges of location values and their physical locations.
To select a different designator, place the cursor on the letter and use the (UP) or
the (DOWN) key to select a different letter. To further select a location that has digits, place the cursor over a digit. When magazine location digits are incremented or
decremented, the value rolls over to the next (or previous) magazine. Examples:
MA to MB or MA1 to MC5
3.6 The Menu Hierarchy
The hierarchical menu system is divided into three menus: Configuration, Maintenance and Operation. Each of these menus contains several sub-menus. Some of the
sub-menus may also contain more sub-menus beneath them.
The Top Menu is the highest level in the menu hierarchy. Press the MENU key to go
to the top level at any time and from any point within the menu system. When the
Top Menu is displayed, press the EXIT key to exit the menu mode. Figure 3-5 shows
the available menu items in the Top Menu. The line items in menus and sub-menus
are organized in alphabetical order.
Line 1
T
Line 2
Line 3
Line 4
Figure 3-5 Top Menu
The Configuration menu contains items that may need to be changed when the RLS is
installed. Once the configuration parameters have been correctly set for a given installation, they are not changed unless something in the system's configuration is
changed. The functions available under the Configuration menu are fully explained in
the RLS-8000 Tape Library Installation and Operation Manual (Qualstar document
number 501500).
NOTE
Be aware that the configuration parameters may also be set by the SCSI interface. A change may
have been caused by the host software.
The Maintenance menu is designed to help a qualified repair technician diagnose and
repair the RLS.
The Operation menu is designed for the user, and lets the user perform off-line tasks
associated with the operation of the RLS. The Operation menu is described in detail in
the RLS-8000 Tape Library Installation and Operation Manual (Qualstar document
number 501500).
3-12
The Operator Interface
501510 Rev. S
3.7 Displaying the RLS Firmware Revision
The revision of the RLS’ firmware may be displayed by using the Maintenance
menu. Press the MENU key to display the Top Menu. Press the (DOWN) key until
the arrow on the left side of the display points to MAINTENANCE, then press the ENTER key. Again, press the (DOWN) key until the arrow on the left side of the display points to the Display Revisions sub-menu. Press the ENTER key to view
the Date, Part Number, Revision and Checksum of the RLS’ operating firmware.
3.8 Alerts/Faults
Alert and Fault messages take over the entire display and remain visible until dismissed by the operator. If the message is longer than four lines, a down arrow in the
lower right corner indicates more text is visible by scrolling the display with the
(DOWN) key. The top line is always displayed in upper case letters and is centered
with bullets filling out the line. Alerts and Faults can always be dismissed by pressing
the EXIT or ENTER keys. Example:
Figure 3-6 Alert Example
Alerts can always be dismissed by pressing the EXIT key. When the EXIT key is
pressed while an alert message is visible, the unit returns to the state it was in before
the alert. The MENU key can also be used to dismiss alerts. When the MENU key is
pressed while an alert message is visible, the display returns to the Top Menu.
3.9 Dynamic Menus and Menu Items
Dynamic menus and menu items only appear if all the required conditions for the
menu have been configured and satisfied. For example, the Clean Drive menu only
appears when all conditions are correct. Additionally, the Operation\Sequential
menu will only appear when one or more Tape Drives are configured for Sequential
operation.
501510 Rev. S
The Operator Interface
3-13
4.
The Maintenance Menu
The Maintenance menu is used to display detailed information about the RLS and its
operating history, and to test the functionality of the liquid crystal display and menu
control keys. The Maintenance menu is available to the system user and is considered
safe. The user cannot break anything by using, or misusing, this menu. A diagram
showing the entire structure of the Maintenance menu system is shown in Figure 4-1
and Figure 4-2.
Continued in Figure 4-2
Figure 4-1 Maintenance Menu (Part 1)
501510 Rev. S
The Maintenance Menu
4-1
Continued from Figure 4-1
Maintenance......Log
.Display
BDC:
OFF
Carousel:
OFF
Carrier:
OFF
Clean
OFF
Configuration: OFF
Contend:
OFF
Control:
OFF
DriveBay:
OFF
FC Events:
OFF
FC Replies:
OFF
FC States:
OFF
I2c:
OFF
Inventory:
OFF
Pic:
OFF
RBT Actions:
OFF
RBT Activity: OFF
RBT Events:
OFF
RBT Isr:
OFF
RBT Job:
OFF
RBT Operation: OFF
RBT Results:
OFF
SCSI Commands: ON
SCSI Interrupt:OFF
SCSI Phases:
OFF
SCSI States:
OFF
Sensor:
OFF
Sequential:
OFF
Storage Array: OFF
CLEAR
LOCK
UNLOCK
M.....Test Inventory
# Cartridges: ddddd
# Labels:
ddddd
CLEAR
START
STOP
M......Test Keyboard
ENTER & EXIT to exit
Up? Ex? Re?
Do? En? Me? ddddd
M....Test LC Display
!"#$%&'()*+,-./
0123456789:;<=>?
@ABCDEFGHIJKLMNO
M....Test LC Display
PQRSTUVWXYZ[\]^_
`abcdefghijklmno
pqrstuvwxyz{|}~
.............Private
Private menu access
for setting passwords.
See Section 5.3.
~ displays as a right-pointing arrow.
displays as a left-pointing arrow.
\ displays as yen symbol.
(This screen blinks.)
ML.Display.....Entry
At:ddddddddd.ddddd
BDC:
OFF
Carousel:
OFF
Carrier:
OFF
Clean
OFF
Configuration: OFF
Contend:
OFF
Control:
OFF
DriveBay:
OFF
FC Events:
OFF
FC Replies:
OFF
FC States:
OFF
I2c:
OFF
Inventory:
OFF
Pic:
OFF
RBT Actions:
OFF
RBT Activity: OFF
RBT Events:
OFF
RBT Isr:
OFF
RBT Job:
OFF
RBT Operation: OFF
RBT Results:
OFF
SCSI Commands: ON
SCSI Interrupt:OFF
SCSI Phases:
OFF
SCSI States:
OFF
Sensor:
OFF
Sequential:
OFF
Storage Array: OFF
LOCK
Figure 4-2 Maintenance Menu (Part 2)
NOTE
The menus in this chapter reflect revision 0.122 of the operating firmware. If an earlier revision
of the firmware is being used, some menu items may not appear in the menus.
4-2
The Maintenance Menu
501510 Rev. S
4.1 The Maintenance menu
•••••••••Maintenance
•Display Prevents
•Display Revision
•Display Stats.
•Display Voltage
•Fibre Channel
•Log
SN:
dddddddddd
•Test Inventory
•Test Keyboard
•Test LC Display
The Maintenance menu contains many sub-menus that contain only displayable
items. Displayable items only inform, they contain no editable values or functions. We
prefer to call sub-menus containing only displayable items, status screens.
•
SN
This is the serial number of the RLS, which corresponds to the serial number
printed on the nameplate label located on the rear of the unit.
4.2 The Maintenance\Display Prevents status screen
M•••Display Prevents
Initiator 0
Initiator 1
Initiator 2
Initiator 3
Initiator 4
Initiator 5
Initiator 6
Initiator 7
Initiator 8
Initiator 9
Initiator 10
Initiator 11
Initiator 12
Initiator 13
Initiator 14
Initiator 15
The Display Prevents status screen displays the Initiator number (host SCSI
ID) of every host that has issued a Prevent/Allow Medium Removal SCSI command
with its Prevent Bit set. Setting this bit completely disables the VIOP and the Front
Panel/Door. This menu allows one to determine who disabled the VIOP.
501510 Rev. S
The Maintenance Menu
4-3
4.3 The Maintenance\Display Revision status screen
M•••Display Revision
Date:
mm/dd/yyyy
Part Number:700118
Revision:
d.dd
Checksum:
xxxx
The Display Revision status screen displays the current revision level of the operating firmware and the unique identification number of the RLS. The values displayed include:
•
Date
This date is the release date of the current firmware.
•
Part Number
This is the manufacturing part number of the current firmware.
•
Revision:
This is the revision number of the current firmware.
•
Checksum:
This is the checksum value of the current firmware.
4.4 The Maintenance\Display Stats. status screen
M•••••Display Stats.
Aborts: dddddddddd
DoorOpn:dddddddddd
Filter: dddddddddd
Grips: dddddddddd
Minutes:dddddddddd
Moves: dddddddddd
Picks: dddddddddd
Places: dddddddddd
PowerOn:dddddddddd
Resets: dddddddddd
S Cmnds:dddddddddd
The Display Statistics status screen displays a summary of events that have
occurred between the time the RLS was built and the current time. All values are decimal counts of the number of times an event has occurred. Displayed values include:
4-4
•
Aborts
This value is the number of times that a Handler movement has been aborted.
The most frequent cause for Handler aborts is opening the Front Panel/Door
without using the control panel.
•
DoorOpn
This value is the number of times that the Front Panel/Door has been opened.
•
Filter
This value is the number of minutes since the Air Filter was last changed.
The Maintenance Menu
501510 Rev. S
•
Grips
This value is the number of times that the cartridge Gripper mechanism has
been cycled.
•
Minutes
This value is the number of power-on minutes.
•
Moves
This value is the number of cartridge moves.
•
Picks
This value is the number of times that a cartridge has been removed from a
drive or storage location.
•
Places
This value is the number of times that a cartridge has been placed into a drive
or storage location.
•
PowerOn
This value is the number of times that the power has been turned on.
•
Resets
This value is the number of Executive CPU resets, including power-on resets
and SCSI bus resets.
•
S Cmnds
This value is the number of SCSI commands received by the RLS.
4.5 The Maintenance\Display Voltage status screen
M••••Display Voltage
+3.3V:
dd.dd
+5V:
dd.dd
+24V:
dd.dd
The Display Voltage status screen displays the current power supply voltages.
The +24V supply is the incoming voltage to the Executive PCBA from the power
supply module(s). The +5V and +3.3V supplies are the output of the switch-mode regulator on the Executive PCBA.
501510 Rev. S
The Maintenance Menu
4-5
4.6 The Maintenance\Fibre Channel menu
M••••••Fibre Channel
•Info
•Log
The Fibre Channel sub-menu contains two status screens, Info and Log. The Info
screen displays version and environmental information from the Fibre Channel Interface Personality Module (IPM). The Log screen accesses and displays the Fibre Channel IPM’s internal event log.
4.7 The Maintenance\Fibre Channel\Info status screen
MFC•••••••••••••Info
Backplane Id: ddd
Base Lvl: xxxxxxx
Board Rev:
a
CPLD Rev:
dd
Memory (MB): dddd
Daughtr Bd Id: ddd
FW Rev:
aaaa
Loader Rev: aaaaa
Prod. Id.: aaaaaa
S/N:
aaaaaa
+3.3V:
ddd
+5V:
ddd
+2.5V:
ddd
Air Temp (C): +ddd
CPU Temp (C): +ddd
UPDATE
The Fibre Channel Info status screen displays the Fibre Channel IPM’s configuration
and environmental information. The displayed information was obtained at power-on,
from the last configuration change, or from the last UPDATE request.
4-6
•
Backplane Id
This value displays the Fibre Channel bridge backplane type (typically 7).
•
Base Lvl
This value identifies the base-level revision.
•
Board Rev
This value identifies the board level revision.
•
CPLD Rev
This value identifies the CPLD revision.
•
Memory (MB)
This value specifies the amount of memory.
•
Daughtr Bd Id
This value identifies the type of daughter board.
The Maintenance Menu
501510 Rev. S
•
FW Rev
This value identifies the firmware revision.
•
Loader Rev
This value identifies the loader revision.
•
Prod. Id.
This value identifies the product model name.
•
S/N
This value identifies the board serial number.
•
+3.3V
This value displays the +3.3V regulator output.
•
+5V
This value displays the +5V regulator output.
•
+2.5V
This value displays the +2.5V regulator output.
•
Air Temp
This value displays the board’s temperature in degrees Celsius.
•
CPU Temp
This value displays the CPU’s temperature in degrees Celsius.
•
UPDATE command
This menu item is visible when communications to the Fibre Channel IPM is in
an idle state. Invoking this command will cause the Fibre Channel IPM to update the configuration and environmental information.
It takes approximately 35 seconds to obtain new information after the UPDATE
command has been invoked.
501510 Rev. S
The Maintenance Menu
4-7
4.8 The Maintenance\Log menu
Maintenance••••••Log
•Display
BDC:
OFF
Carousel:
OFF
Carrier:
OFF
Clean:
OFF
Configuration: OFF
Contend:
OFF
Control:
OFF
DriveBay:
OFF
FC Events:
OFF
FC Replies:
OFF
FC States:
OFF
I2c:
OFF
Inventory:
OFF
Pic:
OFF
RBT Actions:
OFF
RBT Activity: OFF
RBT Events:
OFF
RBT Isr:
OFF
RBT Job:
OFF
RBT Operation: OFF
RBT Results:
OFF
SCSI Commands: ON
SCSI Interrupt:OFF
SCSI Phases:
OFF
SCSI States:
OFF
Sensor:
OFF
Sequential:
OFF
Storage Array: OFF
CLEAR
LOCK
UNLOCK
4.8.1 Introduction
The RLS has a built-in logging facility that can keep track of various system activities. The settings made in the Configuration\Advanced\Log menu determine which
RLS activities are logged. (See the RLS-8000 Tape Library Installation and Operation
Manual – Qualstar document number 501500). This menu determines which of the
logged items are to be displayed. If an item is set ON, any of its logged data will be
displayed. If an item is set OFF, it will not be displayed. The logging facility is normally used to analyze complex SCSI interface or Handler operation problems.
The logging system is most effectively used by a field service person who is working
under the direction of a Qualstar Technical Support technician. First, the field service
person reports a problem's symptom(s) to a Qualstar Technical Support technician,
then the technician directs the field service person to look only at problem-specific
logged data. Finally, the logged data is evaluated to help determine the cause of the
problem.
The RLS logs so much data about its internal workings that the data can overwhelm
an inexperienced person. If intermittent or unusual system problems are encountered,
we recommend that the user contact Qualstar's Technical Support Department first,
before the user tries to analyze the problem using the logged activity information presented in this section.
4-8
The Maintenance Menu
501510 Rev. S
4.8.2 Data Logging – General Description
For display purposes only, each data class can be turned on or off from the Display
Log menu, depending upon the kind of problem the user is trying to solve. Since the
log may contain a great many items, it may be helpful to turn off the data categories
that the user is not interested in at the moment, so that there will be fewer log entries
to view. Turning a logged data class on or off using the Maintenance menu only affects
the display of data; it does not determine which data gets logged (see NOTE below).
NOTE
Use the Configuration menu to control which categories of information get logged. Since the data log memory size is fixed, turning off unwanted data categories frees up log memory space for
the data categories that the user wishes to log. Refer to the Configuration\Advanced\Log section
in the RLS-8000 Tape Library Installation and Operation Manual (Qualstar document number
501500) for details.
•
Maintenance\Log\CLEAR command
CAUTION
Invoking the CLEAR command clears the entire data log.
•
Maintenance\Log\LOCK command
This command locks the log so that no entries can be changed or new ones added.
•
Maintenance\Log\UNLOCK command
This command unlocks the log and allows data to be tabulated.
A complete description of all of the possible data logged by the RLS is beyond
the scope of field service requirements and is therefore not included in this manual. The logging system is most effectively used by a field service person who
is working under the direction of a Qualstar Technical Support technician.
501510 Rev. S
The Maintenance Menu
4-9
4.9 The Maintenance\Log\Display\Entry menu
ML.Display.....Entry
At:ddddddddd.ddddd
BDC:
OFF
Carousel:
OFF
Carrier:
OFF
Clean:
OFF
Configuration: OFF
Contend:
OFF
Control:
OFF
DriveBay:
OFF
FC Events:
OFF
FC Replies:
OFF
FC States:
OFF
I2c:
OFF
Inventory:
OFF
Pic:
OFF
RBT Actions:
OFF
RBT Activity: OFF
RBT Events:
OFF
RBT Isr:
OFF
RBT Job:
OFF
RBT Operation: OFF
RBT Results:
OFF
SCSI Commands: ON
SCSI Interrupt:OFF
SCSI Phases:
OFF
SCSI States:
OFF
Sensor:
OFF
Sequential:
OFF
Storage Array: OFF
LOCK
CAUTION
The information in the data log is frozen when the user enters the Entry menu.
No events are logged while the Entry menu is displayed. However, the system
does track the number of events that would have been logged, while the Entry
menu was displayed, and then adds that number as a log entry when the user exits the Entry menu. This tells the user how many events occurred while the Entry
menu was displayed.
1.
To view the Entry menu, press the ENTER key while the Maintenance\ Status
screen is displayed. The Log\Entry menu is the same as the Log menu, except
that the Entry and the At items have been added and the CLEAR and UNLOCK
commands have been deleted.
Each log entry is numbered. The Entry item in the Log\Entry menu allows the
user to see which numbered log entry is currently being viewed. Optionally, the
user may edit the Entry value to enter the number of the desired log entry and
display the corresponding log entry. Since the log may contain a great many entries, directly selecting a log entry by number can eliminate unnecessary scrolling through the data log.
4-10
The Maintenance Menu
501510 Rev. S
NOTE
Use the Configuration menu to control which classes of information get logged. Since the data
log memory size is fixed, turning off unwanted data classes frees up log memory space for the
data classes that the user wishes to log. Refer to the Configuration\Advanced\Log section in the
RLS-8000 Tape Library Installation and Operation Manual (Qualstar document number 501500)
for details.
The user can also use the Log\Entry menu to turn the data display class masks
on or off, as the user can do with the Log menu. The difference here is that logging activity is suspended when the user enters Status screen, and remains suspended while the Log\Entry menu is displayed. Logging activity is reactivated
when the user returns to the Maintenance\Log menu.
2.
Press the EXIT key twice to return to the Maintenance\Log menu.
4.10 The Maintenance\Test Inventory menu
M·····Test Inventory
# Cartridges: ddddd
# Labels:
ddddd
CLEAR
START
STOP
The Test Inventory menu is in essence a diagnostic function. Point to the START
function and press the ENTER key to start this endless test. The RLS will scan its entire inventory of tape cartridges and report the number of total cartridges found and
how many had readable barcode labels. It will then repeat the operation and add the
new counts to the total displayed. STOP ends the test and CLEAR resets the totals.
This test is useful to determine the reliability of the Barcode Reader. The Test Inventory menu is only visible if an access word has been entered into the RLS. (See
Sections 5.3.1 and 5.3.2)
4.11 The Maintenance\Test Keyboard status screen
M......Test Keyboard
ENTER & EXIT to exit
Up* Ex* Re*
Do* En* Me* ddddd
The Test Keyboard status screen provides a direct indication of menu control key
functionality. Whenever a key is pressed, its 2-character abbreviation appears on the
screen (Up, Ex, Re, Do, En, Me). If a key is pressed and held down, a blinking asterisk
(*) appears on the screen next to the key's abbreviation. If an asterisk does not appear
when a key is pressed and held down, it is probably because the key bounced when it
was pressed. In this case, press (and hold down) the key again.
501510 Rev. S
The Maintenance Menu
4-11
NOTE
During normal operation, pressing and holding a key down results in automatic repeat keystroke
activity.
The blinking asterisk always appears next to the abbreviation for the key that was
pressed last. Example: If a key is pressed and held down, and then another key is
pressed and held down without releasing the first key, the first key's abbreviation remains on the screen and the blinking asterisk appears next to the second key's abbreviation.
If one control key is pressed and held down, and then a second control key is pressed
and held down without releasing the first key, the blinking asterisk appears next to
the second key's abbreviation (as mentioned above). Then, if the first key is released,
its abbreviation and the blinking asterisk both disappear from the display.
When all keys are released, the bottom two lines of the Test Keyboard screen should
be blank, with the exception of the keystroke counter display in the lower-right corner
of the screen.
The keystroke counter display indicates the number of key presses that occur while
the Test Keyboard screen is in use. The keystroke count should increase by one and
only one number each time a control key is pressed. The keystroke count should not
increase while a key is held down or when a key is released. If the keystroke count
does increase while a key is held down, or when a key is released, a problem with a
control key switch or the keypad ground connection may exist. In this case, please refer to Chapter 6 of this manual for additional troubleshooting information.
To exit the Test Keyboard screen and return to the Maintenance menu, press the EXIT and ENTER keys at the same time.
4-12
The Maintenance Menu
501510 Rev. S
4.12 The Maintenance\Test LC Display status screen
The RLS uses a four-line Liquid Crystal Display that displays 20 characters per line.
This status screen uses three different test screens to check the operation of the display. After selecting the Maintenance\Test LC Display screen, use either the (UP)
or (DOWN) key to select any one of the three test screens.
The first two test screens display the character set used by the RLS. The third test
screen checks the operation of all display pixels, by turning them all on or all off at
the same time (the screen blinks). When all of the pixels are turned on, the user
should see four lines of 20 solid rectangles each. When all of the pixels are turned off,
all four lines should be blank.
Press the EXIT key to return to the Maintenance menu.
501510 Rev. S
The Maintenance Menu
4-13
5.
The Private Menu
.............Private
Access: ??????????
.Adapter
.Cabling
.Calibration
CALIBRATE
CLEAR ACCESS
.Configuration
.Control Panel
.Display A/D
.Display Locations
.Display Positions
.Drivebay
.Executive
.I2c
.Magazine
OPEN VIOP WINDOW
REBOOT
RESET SCSI BUS
.Sensor
LEGEND
l
d
x
?
=
=
=
=
cartridge location
decimal number
hexadecimal number
alphanumeric character
Private......Adapter
Type:
NONE
Private..Calibration
Calibrated:
NO
Valid:
NO
X Data:
ddddd
X Fixed 0:
ddddd
X Fixed 1:
ddddd
X Storage:
ddddd
Z Storage:
ddddd
P......Configuration
.Defaults
Demonstrations:YES
.Limits
.SCSI
PC..........Defaults
LCD Line 1:DEFAULT
1-10: ??????????
11-20: ??????????
LCD Line 2:DEFAULT
1-10: ??????????
11-20: ??????????
LCD Line 3:DEFAULT
1-10: ??????????
11-20: ??????????
LCD Line 4:DEFAULT
1-10: ??????????
11-20: ??????????
SCSI Vndr:????????
SCSI Prod:????????
????????
SCSI Revision:????
CLEAR
PC............Limits
Temperature: ddddd
Figure 5-1 The Private Menu (Part 1)
501510 Rev. S
P.Configuration.SCSI
PostPlaceDly:ddddd
PrePickRetries:ddd
P..Display Locations
Location:
llllll
Ejected:
FALSE
EjectedValid:FALSE
Label Error: FALSE
Label Valid: FALSE
Label: ??????????
Occupied:
FALSE
Occup.Valid: FALSE
Present:
FALSE
Pres. Valid: FALSE
Source Loc: llllll
Source Valid:FALSE
Type:
DRIVE
Private......Cabling
Carriage:
OK
Drivebay:
OK
Sensors:
OK
P......Control Panel
Address:
xx
Type:
dddddddddd
Rev: ddd.ddddd-ddd
Mode:
NORMAL
+5V:
dd.dd
Door Latch:
0
Temperature:ddd.dC
VIOP Door Latch: 0
Private..Display A/D
+24V
ddddd
+5V
ddddd
+3.3V
ddddd
P..Display Positions
Gripper:
ddddd
X:
ddddd
Period X:
ddddd
Z:
ddddd
Period Z:
ddddd
Continued in Figure 5-2
The Private Menu
5-1
Continued from Figure 5-1
Private....Executive
I2C Address:
xx
PCB Number: 501547
PCB Revision: ???
Private.....Magazine
Busy:
FALSE
Demand:
ddd
Idle:
FALSE
In Front:
ddd
Prs:??????????????
ABORT
MOVE TO FRONT
.Carousel
.Storage Array
P.............Sensor
Address:
xx
Type:
dddddddddd
Rev: ddd.ddddd-ddd
Mode:
NORMAL
Pcb:??????????????
.Burst Parameters
DoorLocked:
0
.Drive1:
0
.Drive2:
0
.Drive3:
0
.Drive4:
0
.Fixed1:
0
.Fixed2:
0
.Fixed4:
0
.GripperHome:
0
.Magazine:
0
.MagazineSlot1: 0
.MagazineSlot2: 0
.MagazineSlot3: 0
.MagazineSlot4: 0
.MagazineSlot5: 0
.MagazineSlot11: 0
.MagazineSlot02: 0
.MagazineSlot20: 0
.MagazineSlot03: 0
.MagazineSlot34: 0
.XClear:
0
XHome:
0
.ZHome:
0
SET TO DEFAULTS
Private.....DriveBay
Address:
xx
Type:
dddddddddd
Rev: ddd.ddddd-ddd
Mode:
NORMAL
+24V:
dd.dd
Alarm:
OFF
+5V:
dd.dd
Alarm:
OFF
.Alarm Limits
.C1:
NONE
.C2:
NONE
.C3:
NONE
.C4:
NONE
.Power Left
.Power Right
PD......Alarm Limits
24V Low:
ddddd
24V High:
ddddd
5V Low:
ddddd
5V High:
ddddd
PsLeft Low: ddddd
PsLeft High: ddddd
PsRight Low: ddddd
PsRight High:ddddd
Private.Drivebay..C?
.Carrier
.DIA:
NONE
PD.C?........Carrier
Address:
xx
Type:
dddddddddd
Rev: ddd.ddddd-ddd
Mode:
NORMAL
Mdl:??????????????
SN:???????????????
TapeInside: FALSE
+5V:
OFF
Alarm:
OFF
Voltage:
dd.ddd
+12V:
OFF
Alarm:
OFF
Voltage:
dd.ddd
Inrush Limiter: ON
Alarm:
OFF
SplVoltage:dd.ddd
Alarm:
OFF
LmtVoltage:dd.ddd
Termination:
OFF
Alarm:
OFF
Temperature:ddd.dC
Alarm:
OFF
PD........Power Left
PD.......Power Right
Type:?????????????
Alarm A:
OFF
Alarm B:
OFF
Alarm Fan:
OFF
Alarm Temp:
OFF
LED:
OFF
Temperature:ddd.dC
P.Drivebay.C?....DIA
Type:?????????????
Control:
d
Status:
d
Figure 5-2 The Private Menu (Part 2)
NOTE
The menus in this chapter reflect revision 0.122 of the Executive PCBA EPROM software. If the
user has an earlier revision of the software, some items may not appear in the menus. Also, not
all menu items appear all the time: Some menu items are model-dependent.
5-2
The Private Menu
501510 Rev. S
5.1 Introduction
The \Private menu, the root menu for the protected service menus, is also a privileged, password-protected menu. This means that a password must be set to gain
access to the items in the \Private menu. The password to the Private menu is
cleared before the RLS is shipped from the factory, because the menu is intended only
for use by field service personnel.
Passwords are used together with security locks to protect the RLS’ configuration
against unauthorized or unintentional changes, and unauthorized manual operations.
Therefore, the Master security lock must be disabled before a password can be set in
the \Private menu.
5.2 Security Locks
There are four types of security locks: Configuration, Inventory, Master and
Door. The \Configuration\Security menu (shown below) is used to set the
Configuration, Inventory, and Master security locks to ON or OFF (the default value is OFF). The Door lock is controlled by opening or closing the Front Panel/Door.
Refer to the RLS-8000 Tape Library Operation and Installation Manual (Qualstar
document number 501500) for a complete discussion of RLS security locks.
C•••••••••••Security
Configuration: ON
Inventory:
ON
Master:
ON
NOTE
All items in the \Configuration\Security menu are locked by the Door lock.
5.2.1 Door Lock
When the cabinet’s door is closed, the Door lock is ON, and the items in the Configuration\Security menu cannot be changed.
501510 Rev. S
The Private Menu
5-3
5.2.2 Master Lock
The Master lock provides the maximum system security. When the Master lock is
ON, the RLS’ control keys cannot be used to change the RLS’ configuration, initiate
any operations, or execute any commands. Only the host system can control the RLS,
which effectively configures the RLS for remote operation only.
5.2.3 Disabling the Master Security Lock
NOTE
See the RLS-8000 Tape Library Installation and Operation Manual (Qualstar document number
501500) for details about the RLS Security options.
Follow the instructions below, which assume that all RLS security locks are set to ON,
to disable the Master security lock.
1.
Open the Front Panel/Door (to disable the Door lock).
2.
Press the MENU key to display the Top Menu.
Top Menu
•Configuration
•Maintenance
•Operation
3.
Press the ENTER key once to enter the \Configuration menu.
•••••••Configuration
•Advanced
•Drive
SCSI ID:
dd
•Security
SET TO DEFAULTS
4.
Use the
(DOWN) key to move the pointer to Security.
5.
Press the ENTER key to enter the C\Security menu.
C•••••••••••Security
Configuration: ON
Inventory:
ON
Master:
ON
6.
Use the
7.
Press the ENTER key once to begin editing the Master value.
8.
Use the
9.
Press the MENU key twice to leave the menu system.
10.
5-4
(DOWN) key to move the pointer to Master.
(DOWN) key to change the Master value from ON to OFF.
Close the Front Panel/Door.
The Private Menu
501510 Rev. S
5.3 Enabling the Private Menu
NOTE
Not all items shown in the menu illustrations appear all the time. For example, some items (like
Carousel) are model-dependent. Carousel appears in the Private menu only if the unit’s model
number is set to a carousel model in the Configuration\Advanced\Changer\Mechanics menu.
5.3.1 Access
Access is a text string used to set a password, which unlocks the \Private menu.
It is easy to find out if a password is currently set. Just press the MENU key to display the Top Menu and then use the (DOWN) key to scroll down through all of the
menu items. If Private is visible in the menu, press ENTER to enter the
\Private Menu. If CLEAR ACCESS is visible in the \Private menu, a password
has been set.
•
Service is the password used by qualified service personnel to access
certain \Private menu items while servicing the RLS. Please note that
only the first letter is capitalized.
•
Update is the password used by qualified service personnel to access other \Private menu items while upgrading a RLS, adding or removing a
Barcode Reader, or replacing the Executive PCBA. Please note that only
the first letter is capitalized.
The current password should always be cleared (removed) after the user finishes servicing a unit to prevent unauthorized access to the \Private menu. Clearing a
password will also remove the \Private sub-menu from the top menu.
5.3.2 Setting a Password
Once set, a password remains set (even if the power is removed from the RLS), until it
is intentionally cleared (removed) by executing the Private menu’s
CLEAR ACCESS command.
Three things happen when a user sets a password:
501510 Rev. S
•
Private appears at the bottom of the Top Menu.
•
Access (shown in step 9 below) disappears from the Private menu.
•
CLEAR ACCESS (shown in Section 5.3.3) appears in the Private menu.
The Private Menu
5-5
Top Menu
•Configuration
•Maintenance
•Operation
•Private
NOTE
Passwords are case-sensitive. Be sure to use the correct capital and lower-case letters while
setting passwords.
1.
Turn the power on.
2.
Press the MENU key to display the Top Menu.
Top Menu
•Configuration
•Maintenance
•Operation
3.
Use the
(DOWN) key to move the pointer to Maintenance.
4.
Press the ENTER key to enter the Maintenance menu.
•••••••••Maintenance
•Display Log
•Display Prevents
•Display Reservs.
•Display Revision
•Display Sense
•Display Stats.
•Display Voltage
•Test Inventory
•Test Keyboard
•Test LC Display
5.
Use the
(DOWN) key to move the pointer to Test LC Display.
6.
Press the ENTER key to enter the
Maintenance\Test LC Display menu.
5-6
7.
Press and release the
(DOWN) key once.
8.
This step must be executed quickly (within 1.5 seconds). Sequentially press and
hold down the (DOWN), ENTER and MENU control keys, in the order shown
(Do not press all three control keys at the same time.)
9.
Simultaneously release the three control keys. If the Top Menu reappears at
this point, repeat steps 3-8 above to display the Private menu.
10.
The Private menu should now be displayed.
11.
If necessary, use the
12.
Press the ENTER key to start editing the Access value (entering a password).
A flashing cursor should appear at the first character's position.
(DOWN) key to move the pointer to Access.
The Private Menu
501510 Rev. S
•••••••••••••Private
Access: ??????????
•Adapter
•Cabling
•Calibration
CALIBRATE
CLEAR ACCESS
•Configuration
•Control Panel
•Display A/D
•Display Locations
•Display Positions
•Drivebay
•Executive
•I2c
•Magazine
OPEN VIOP WINDOW
REBOOT
RESET SCSI BUS
•Sensor
NOTE
If a MASTER SECURITY message appears, instead of a flashing cursor in step 11 above, follow the
instructions in Section 5.2.3 to disable the Master Security Lock, then repeat this section to set
the desired password.
13.
Press the (UP) or (DOWN) key repeatedly to select the desired character (be
sure to use the correct capital and lower-case letters), then press the ENTER key
once to shift the flashing cursor to the next character position.
14.
Repeat step 12 to finish entering the password.
15.
Press the MENU key repeatedly to leave the menu system and set the password.
501510 Rev. S
The Private Menu
5-7
5.3.3 Clearing the Password
Clearing (removing) the current password prevents unauthorized personnel from accessing the Private menu and accidentally disabling the RLS. The current password should always be removed after the service technician finishes using
the Private menu.
Three things happen when a user clears the password:
•
Private disappears from the Top Menu.
•
Access reappears in the Private menu.
•
CLEAR ACCESS (shown in Section 5.3.3) disappears from the Private
menu.
1.
Press the MENU key to open the Top Menu.
2.
Use the
3.
Press the ENTER key to enter the Private menu.
(DOWN) key to move the pointer to Private.
•••••••••••••Private
Access: ??????????
•Adapter
•Cabling
•Calibration
CALIBRATE
CLEAR ACCESS
•Configuration
•Control Panel
•Display A/D
•Display Locations
•Display Positions
•Drivebay
•Executive
•I2c
•Magazine
OPEN VIOP WINDOW
REBOOT
RESET SCSI BUS
•Sensor
4.
Use the
(DOWN) key to move the pointer to CLEAR ACCESS.
5.
Press the ENTER key to execute the CLEAR ACCESS command.
6.
Press the MENU key twice to exit the menu system.
The password is now cleared. Notice that Private is no longer visible in the
Top Menu.
5-8
The Private Menu
501510 Rev. S
5.4 The Private Menu
•••••••••••••Private
Access: ??????????
•Adapter
•Cabling
•Calibration
CALIBRATE
CLEAR ACCESS
•Configuration
•Control Panel
•Display A/D
•Display Locations
•Display Positions
•Drivebay
•Executive
•I2c
•Magazine
OPEN VIOP WINDOW
REBOOT
RESET SCSI BUS
•Sensor
The Private menu is only visible after the proper access word has been entered as described in Section 5.3. Menu items that are shaded are for Qualstar personnel use only and are not described within this manual. Remember that status screens are for
display purposes only and contain no editable items.
NOTE
Manu items in the Private menu are locked by a combination of the four RLS security locks. If a
SECURITY message appears, the user must first unlock the security locks before proceeding. Use
the procedure in section 5.2 to enter the Security menu and disable the Master Security Lock.
The user can also disable the Inventory Lock while the Security menu is displayed.
5.4.1 The Private\CALIBRATE command
The CALIBRATE command should not be executed without a specific reason for doing
so, because it involves risk. For example, if the CALIBRATE command is used incorrectly, improper Handler operation may result. Therefore, if the Handler is properly
picking and placing cartridges, and the user does not have a specific reason for using
the CALIBRATE command, recalibrating the RLS is not recommended.
Changing a Barcode Reader, Tape Drive Assembly or Power Supply module does not
require the RLS be calibrated. However the RLS must be calibrated whenever the following items are changed: Handler, Storage Array, Carousel, Executive PCBA or Sensor Master PCBA.
The CALIBRATE command causes the RLS to:
•
501510 Rev. S
Determine the Horizontal (X-Axis) position(s) of the magazine(s).
The Private Menu
5-9
•
Determine the Horizontal (X-Axis) positions of the fixed slots (RLS-4124
and 4221 only).
•
Verify that the Carriage can sense its horizontal (X-Axis) home position
(right end of horizontal travel), using the X-Axis Home Sensor.
•
Verify that the Handler can sense its Insertion (Z-Axis) home position
(Gripper fully retracted), using the Z-Axis Home Sensor.
•
Verify that the Carousel Home and Index sensors function correctly. (RLS4124, 4221, 5116, 8116 and 8116H only)
•
Verify that the Storage Array Home and Index sensors function correctly.
(Storage Array models only)
•
Calibrate the optical sensors by determining the optimal pulse width for
the modulation of the emitters.
All of these calibration steps are checked against acceptance range parameters. Each
position or optical output reading must fall within its acceptable range before subsequent positions and thresholds are determined.
CAUTION
If the RLS is not properly set up prior to invoking the CALIBRATE command, the
calibration process can result in invalid calibration data, which may prevent
Handler operation.
Using the CALIBRATE command
1.
Press the MENU key to open the Top Menu.
2.
Use the (DOWN) key to move the pointer in the left column to Private, then
press the ENTER key to open the Private menu.
3.
Use the
4.
Press the ENTER key to execute the CALIBRATE command.
5.
Follow the instructions that appear on the LCD display: remove all cartridges,
install all empty magazines, press the ENTER key. Use the (DOWN) key to
read the whole message.
(DOWN) key to move the pointer to CALIBRATE.
The calibration process takes about 80 seconds to complete. If the calibration
process does not succeed, an Alert message indicating that a fault occurred during calibration is displayed.
5-10
The Private Menu
501510 Rev. S
5.4.2 The Private\CLEAR ACCESS command
This command is used to clear the Access value (the active password) and defeat Private menu access, as explained in Section 5.3.3.
5.4.3 The OPEN VIOP WINDOW command
This command moves the Handler to unlatch the VIOP window. The window must be
manually closed before the Handler can be again moved.
5.4.4 The REBOOT command
This command resets the Executive microprocessor. The RLS behaves as though power were just applied.
5.4.5 The RESET SCSI BUS command
This command forces a BUS RESET command on the SCSI bus. It may be used with
caution to solve system development problems. However, using this command could
prove quite disruptive on a live system.
CAUTION
Executing a RESET SCSI BUS command could adversely affect another device or
host system that is connected to the same SCSI bus. Use this command with great
caution!
To Reset the SCSI Bus:
1.
Press the MENU key to open the Top Menu.
2.
Use the (DOWN) key to move the pointer to Private, then press the ENTER
key to open the Private menu.
3.
Use the
4.
Press the ENTER key to execute the RESET SCSI BUS command.
(UP) or
(DOWN) key to move the pointer to RESET SCSI BUS.
NOTE
This command is locked by both the Master Security Lock and the Inventory Lock.
Private••••••Adapter
Type: SCSI LVD/SE
Displays the type of Interface Personality Module installed in the RLS.
501510 Rev. S
The Private Menu
5-11
5.4.6 The Private\Cabling status screen
Private••••••Cabling
Carriage:
OK
Drivebay:
OK
Sensors:
OK
Indicates that the Carriage, Drivebay and Sensors ribbon cables are connected (OK)
or not connected (FAULT).
5.4.7 The Private\Calibration status screen
Private••Calibration
Calibrated:
NO
Valid:
NO
X Data:
±ddddd
X Fixed 0: ±ddddd
X Fixed 1: ±ddddd
X Storage: ±ddddd
Z Storage: ±ddddd
The Calibration Data Status screen displays the calibration data determined by the
CALIBRATION command. If, for example, the user encounters some particularly difficult Handler problem, it may become necessary to relay the data on this screen to a
Qualstar Technical Support technician.
The Calibrated value and the Valid value indicate whether or not the calibration data
determined by the CALIBRATION command is within acceptable limits. If the calibration data is not valid, the Handler will not operate.
The following calibration data is displayed on the Calibration Data Status screen:
5-12
•
Calibrated (YES/NO)
This value shows whether or not the calibration process was successfully completed.
•
Valid (YES/NO)
This value shows whether or not the calibration data has been initialized.
•
X Data
This value is the position of the first Tape Drive Assembly.
•
X Fixed 0
This value is the position of the Fixed0 slot.
•
X Fixed 1
This value is the position of the Fixed1 slot.
•
X Storage
This value is the position of the first magazine storage slot.
•
Z Storage
This value is the insertion distance for the magazine slots.
The Private Menu
501510 Rev. S
5.4.8 The Private\Configuration menu
P••••••Configuration
•Defaults
Demonstrations:YES
•Limits
•SCSI
5.4.8.1
Demonstrations
NOTE
This item is locked by both the Master Security Lock and the Configuration Lock.
This menu allows for the Operation\Demonstrations menu to be hidden.
5.4.8.2
YES
The Operation\Demonstrations menu is visible and allows
for the selection of Feature List or Random Moves. The Feature
List item is used to display messages about RLS features. The
Random Moves causes the changer to make continuous random
cartridge moves.
NO
The Operation\Demonstrations menu is hidden.
The Private\Configurations\Defaults status screen
PC••••••••••Defaults
LCD Line 1:DEFAULT
1-10: ??????????
11-20: ??????????
LCD Line 2:DEFAULT
1-10: ??????????
11-20: ??????????
LCD Line 3:DEFAULT
1-10: ??????????
11-20: ??????????
LCD Line 4:DEFAULT
1-10: ??????????
11-20: ??????????
SCSI Vndr:????????
SCSI Prod:????????
????????
SCSI Revision:????
CLEAR
NOTE
All items in this menu are locked by both the Master Security Lock and the Configuration Lock.
The items in this menu are used to create custom default data for various menu system items.
Example 1: The default text used on line 1 of the main display for an RLS-4221 is
Qualstar RLS-4221. However, an operator can enter custom data (e.g., different
text) for the main display line 1 over the SCSI bus, or by using the
Configuration\Advanced\Control Panel\Display menu. If either of
501510 Rev. S
The Private Menu
5-13
these methods is used, and the operator then executes the Configuration menu’s
SET TO DEFAULTS command, the custom text data is lost and the system’s default
text (Qualstar RLS-4221) is displayed again.
Example 2: The Private\Defaults\LCD Line 1 menu item, and its sub-items
1-10 and 11-20, can also be used to change the text used on line 1 of the main display. Unlike Example 1, text data entered in the Private\Defaults menu becomes the new system default data. Therefore, the custom data entered in this menu
is also used as the system’s default data when an operator executes the Configuration
menu’s SET TO DEFAULTS command.
5.4.8.3
•
SCSI Vndr
Allows for vendors or resellers name to be entered which will replace the system’s default menu display text (Qualstar).
•
SCSI Prod
Allows for vendors or resellers product name to be entered which will replace
the system’s default menu display text (RLS-4221).
•
SCSI Revision
Allows for vendors or resellers revision tracking name to be entered which will
replace the system’s default menu display text (X.XX).
•
CLEAR
Evoking the CLEAR command will eliminate all data entries in the Private/
Defaults menu and all the systems menu display text will return to the system
defaults.
The Private\Configuration\Limits status screen
PC••••••••••••Limits
Temperature:
ddddd
The Temperature limit indicates the upper temperature where the RLS will generate an “over-temperature” alarm. The value indicated is in tenths of Centigrade degree.
5.4.8.4
The Private\Configuration\SCSI menu
NOTE
All items in this menu are locked by both the Master Security Lock and the Configuration Lock.
The Private\Configuration\SCSI menu provides a means of fine-tuning the
time delay and number of retries used when moving cartridges in and out of Tape
Drives. Adjusting the values in this menu can help to reduce some of the problems associated with inflexible host software. Both decimal values are editable.
5-14
The Private Menu
501510 Rev. S
P•Configuration•SCSI
PostPlaceDly:ddddd
PrePickRetries:ddd
The PostPlaceDly value is a period of time, measured in 250ths of a second. It determines the delay from the physical insertion of a tape cartridge into a Tape Drive, to
the notification to the host computer that the cartridge movement has is completed. A
longer value gives the Tape Drive more time to change its status from “empty” to
“loading a tape.” The default value is 250 or one second.
Sometimes a Tape Drive is slow to eject a tape cartridge, after the Tape Drive notifies
the host computer that it has finished the ejection sequence. The PrePickRetries
value, measured at one retry per second, controls the number of times (and seconds)
the Handler will look for the ejected tape cartridge with its Cartridge Presence optosensor. The default value is 10 (or ten seconds). If the ejected cartridge is not detected
after the specified number of retries (and seconds), the RLS will issue an Alert message.
5.4.9 The Private\Control Panel status screen
P••••••Control Panel
Address:
xx
Type:
dddddddddd
Rev: ddd.ddddd-ddd
Mode:
NORMAL
+5V:
dd.dd
Door Latch:
0
Temperature:ddd.dC
VIOP Door Latch: 0
The following data is displayed on the Control Panel Status screen:
501510 Rev. S
•
Address
The I2C address of the Serial Control Panel microprocessor.
•
Type
The part number of the Serial Control Panel microprocessor’s firmware.
•
Rev
The revision of the Serial Control Panel microprocessor’s firmware. Leading zeroes are suppressed.
•
Mode
Normal or Boot modes are possible. Boot occurs during firmware uploading.
•
+5V
The +5V supply voltage to the Serial Control Panel.
•
Door Latch
A zero indicates the Door is unlatched. A 1 indicates the door is latched.
•
Temperature
The temperature in degrees C at the Serial Control Panel.
The Private Menu
5-15
•
VIOP Door Latch
A zero indicates the Door is unlatched. A 1 indicates the door is latched.
5.4.10 The Private\Display A/D status screen
Private••Display A/D
+24V
ddddd
+5V
ddddd
+3.3V
ddddd
The Display A/D Status screen displays the current analog to digital converter readings. Only three of the possible 8-channels are presently used. The signals are described in Table 5-1 below.
Input Signals
+24V
+5V
+3.3V
Description
The Regulated +24V System Power Supply
The Executive PCBA +5V Regulator Output
The Executive PCBA +3.3V Regulator Output
Table 5-1 A/D Converter Channels
5.4.11 The Private\Display Locations Menu
P••Display Locations
Location:
llllll
Ejected:
FALSE
EjectedValid:FALSE
Label Error: FALSE
Label Valid: FALSE
Label: ??????????
Occupied:
FALSE
Occup.Valid: FALSE
Present:
FALSE
Pres. Valid: FALSE
Source Loc.:llllll
Source Valid:FALSE
Type:
DRIVE
The Private\Display Locations menu contains data from the library’s internal inventory database. The data in this menu differs from the data found in the Operation\Element Status\Display menu, because it pertains to the library’s
physical world and does not contain references to SCSI element addresses.
The only editable value in this menu is the Location value, which corresponds to a
physical location. Once a Location is selected, all the internal database information
for that location is displayed as follows:
5-16
The Private Menu
501510 Rev. S
Value
Type
Description
Location
Location
Enter the location of the item you wish to query.
Ejected
TRUE/FALSE
A TRUE value indicates a tape is in the ejected position (Tape Drives
only).
EjectedValid
TRUE/FALSE
A TRUE indicates the Ejected value is known to be correct.
Label Error
TRUE/FALSE
A TRUE value indicates that no label was detected during scanning.
Label Valid
TRUE/FALSE
A TRUE value indicates the RLS attempted to read the barcode label.
Label
Data
Indicates the value read from the selected location’s barcode (if present)
Occupied
TRUE/FALSE
A TRUE value indicates that a cartridge occupies the selected location.
Occup.Valid
TRUE/FALSE
A TRUE value means the Occupied status for the selected location is
valid.
Present
TRUE/FALSE
A TRUE value indicates that a drive or other device is present at the selected location.
Pres. Valid
TRUE/FALSE
A TRUE value means the Present status for the selected location is valid.
Source Loc.
Data
The Source value indicates the prior location of the cartridge that is currently at the selected location. The Item value is an internal number.
Source Valid
TRUE/FALSE
A TRUE value means the Source Location data for the selected location
is valid.
Type
Data
This value indicates the type of element that is at the selected location:
DRIVE, HANDLER or magazine SLOT.
Table 5-2 Private\Display Locations Descriptions
5.4.12 The Private\Display Positions status screen
P••Display Positions
Gripper:
±ddddd
X:
±ddddd
Period X:
ddddd
Z:
±ddddd
Period Z:
ddddd
The Display Positions status screen displays the current position of the three carriage
motor-driven positioners. The positions are given in motor steps, counted from the
home position of each axis. There are 24 steps per revolution for the horizontal (X)
motor Axis and Insertion (Z) Axis motors. There are 200 steps per revolution for the
Gripper Axis motor.
501510 Rev. S
•
Gripper
This value indicates the current step position of the gripper stepper motor.
•
X
This value indicates the current position of the horizontal (X-Axis) motor. The
value decreases as the carriage moves to the left. When the carriage is all the
way to the right stop, after a successful POST, the position is zero.
•
Period X
Used primarily for diagnostics, this value represents the period of time that it
takes for the Hall-Effect sensors in the X-Axis brushless DC motor to move be-
The Private Menu
5-17
tween two points. The maximum value of 65,535 will be shown when the motor
is not moving.
•
Z
This value indicates the current position of the Z-Axis motor. The value decreases as the picker moves toward the storage slots. When the carriage is all
the way to the backstop, after a successful POST, the position is zero.
•
Period Z
Used primarily for diagnostics, this value represents the period of time that it
takes for the Hall-Effect sensors in the Z-Axis brushless DC motor to move between two points. The maximum value of 65,535 will be shown when the motor
is not moving.
5.4.13 The Private\DriveBay status screen
Private•••••DriveBay
Address:
xx
Type:
dddddddddd
Rev: ddd.ddddd-ddd
Mode:
NORMAL
+24V:
dd.dd
Alarm:
OFF
+5V:
dd.dd
Alarm:
OFF
•Alarm Limits
•C1:
NONE
•C2:
NONE
•C3:
NONE
•C4:
NONE
•Power Left
•Power Right
The Private\DriveBay status screen indicates the status of the Drive Bay board:
5-18
•
Address
The I2C address of the Drive Bay microprocessor.
•
Type
The part number of the Drive Bay microprocessor’s firmware.
•
Rev
The revision of the Drive Bay microprocessor’s firmware. Leading zeroes are
suppressed.
•
Mode
Normal or Boot modes are possible. Boot occurs during firmware uploading.
•
+24V
The +24V supply voltage to the Drive Bay.
•
Alarm
An alarm occurs when this value is ON and the +24V supply exceeds its limits.
•
+5V
The +5V supply voltage to the Drive Bay.
The Private Menu
501510 Rev. S
•
Alarm
An alarm occurs when this value is ON and the +5V supply exceeds its limits.
5.4.14 The Private\Drive Bay\Alarm Limits status screen
PD••••••Alarm Limits
24V Low:
ddddd
24V High:
ddddd
5V Low:
ddddd
5V High:
ddddd
PsLeft Low: ddddd
PsLeft High: ddddd
PsRight Low: ddddd
PsRight High:ddddd
•
24V Low:
The lower limit of acceptable +24V supply voltage to the Drive Bay.
•
24V High:
The upper limit of acceptable +24V supply voltage to the Drive Bay.
•
5V Low:
The lower limit of acceptable +5V supply voltage to the Drive Bay.
•
5V High:
The upper limit of acceptable +5V supply voltage to the Drive Bay.
•
PsLeft Low/High
The low and high operating temperature limits for all single-module and the
left side of dual-redundant power supply modules.
•
PsRight Low/High
The low and high operating temperature limits for the right side of dualredundant power supply modules.
5.4.15 The Private\Drive Bay\C? menu
Private•Drivebay••C?
•Carrier
•DIA: LVD/MSE-160
The Private\DriveBay\C? menu indicates what is plugged into the 4 possible
channels C1–C4 (drive positions) of the Drive Bay board with Channel 1 being the
leftmost Tape Drive position. Refer to Table 5-3 to determine the Tape Drive assignments.
501510 Rev. S
The Private Menu
5-19
Channel
Model
1
2
3
4
RLS-4124
N/A
N/A
N/A
T1
RLS-4221
N/A
N/A
T1
T2
RLS-4445
T1
T2
T3
T4
RLS-4470
T1
T2
T3
T4
RLS-5116
N/A
N/A
N/A
T1
RLS-5244
N/A
T1
N/A
T2
RLS-6227
N/A
T1
N/A
T2
RLS-8116
N/A
N/A
N/A
T1
RLS-8202
N/A
T1
N/A
T2
RLS-8204
N/A
T1
N/A
T2
RLS-8216H
N/A
N/A
T1
T2
RLS-8236
N/A
T1
N/A
T2
RLS-8244
N/A
T1
N/A
T2
RLS-8404H
T1
T2
T3
T4
Table 5-3 Tape Drive T? Channel Assignments by Model
Tape Drive Assemblies plug into the front of the Drive Bay board. Drive Interface
Adapter boards plug into the rear of the Drive Bay board. There are presently two
types of DIA boards as shown in Table 5-4 below.
Type
Purpose
Functionality
NONE
N/A
A Tape Drive cannot be supported by this channel.
PASSIVE
Hot-Pluggable
A drive may be changed while power is on but the connection between the rear pair of SCSI connectors is lost
while the drive is removed. Any SCSI termination power
supplied by the RLS to that pair of connectors is also
lost while the drive is removed.
Tape Drives
LVD/MSE-160
Hot-Swappable
Tape Drives
A drive may be changed while power is on and the connection between the rear pair of SCSI connectors will
remain intact while the drive is removed. Any SCSI termination power supplied by the RLS to that pair of connectors remains on while the drive is removed.
Table 5-4 Drive Interface Adapter (DIA) Types
5-20
The Private Menu
501510 Rev. S
5.4.16 The Private\Drive Bay\C?\Carrier status screen
PD•C?••••••••Carrier
Address:
xx
Type:
dddddddddd
Rev: ddd.ddddd-ddd
Mode:
NORMAL
Mdl:??????????????
SN:???????????????
TapeInside: FALSE
+5V:
ON
Alarm:
OFF
Voltage:
dd.ddd
+12V:
ON
Alarm:
OFF
Voltage:
dd.ddd
Inrush Limiter: ON
Alarm:
OFF
SplVoltage:dd.ddd
Alarm:
OFF
LmtVoltage:dd.ddd
Termination:
ON
Alarm:
OFF
Temperature:ddd.dC
Alarm:
OFF
The Private\DriveBay\C?\Carrier status screen displays all of the status for
the selected (?) Drive Carrier. The following data is displayed:
•
Address
The I2C address of the selected (?) Drive Carrier microprocessor.
•
Type
The part number of the (?) Drive Carrier microprocessor’s firmware.
•
Rev
The revision of the (?) Drive Carrier microprocessor’s firmware. Leading zeroes
are suppressed.
•
Mode
NORMAL or BOOT modes are possible. Boot occurs during firmware uploading.
501510 Rev. S
•
Model
The model number reported by the Tape Drive installed in the Tape Drive Assembly.
•
S/N
The serial number reported by the Tape Drive installed in the Drive Carrier.
•
Tape Inside
This value is TRUE/FALSE only during an inventory scan. It is otherwise
INVALID.
•
+5V
This value is ON if the RLS has commanded the Drive Carrier to turn on its
+5V switching regulator that supplies power to its Tape Drive.
The Private Menu
5-21
•
Alarm
This value is ON if the +5V-switching regulator’s output voltage is unacceptable.
•
Voltage
The +5V-switching regulator’s output voltage.
•
+12V
This value is ON if the RLS has commanded the Drive Carrier to turn on its
+12V switching regulator that supplies power to its Tape Drive.
•
Alarm
This value is ON if the +12V-switching regulator’s output voltage is unacceptable.
•
Voltage
The +12V-switching regulator’s output voltage.
•
Inrush Limiter
The Inrush Limiter must be ON for the +5V and +12V switching regulators to
operate.
•
Alarm
This value is ON if the Inrush Limiter’s output voltage is unacceptable.
•
Voltage
The Inrush Limiter’s output voltage.
•
Termination
This value is ON if the RLS has commanded the Drive Carrier to energize the
SCSI Termination Power signal.
•
Alarm
This value is ON if SCSI Termination Power voltage is unacceptable.
•
Temperature
The temperature inside the Drive Carrier in degrees Celsius.
•
Alarm
This value is ON if the temperature is unacceptable.
5.4.17 The Private\Drive Bay\C?\DIA status screen
P•Drivebay•C?••••DIA
Type:
dddddddddd
Control:
d
Status:
d
The Private\DriveBay\C?\DIA status screen displays all of the status for the
selected (C?) Drive Interface Adapter (DIA) board. The following data is displayed:
•
5-22
Type
Presently PASSIVE or LVD/MSE-160 Drive Interface Adapter boards are
available. Refer to Table 5-5.
The Private Menu
501510 Rev. S
•
Control
The control bits sent to the DIA board.
•
Status
The status bits reported by the DIA board.
Description
Module P/N
Remarks
PASSIVE
501677-01-7
Hot-pluggable - SCSI connections opened
when a drive is removed.
MLVD160
501687-01-6
Hot-swappable - SCSI connections remain
intact when a Tape Drive is removed.
Table 5-5 Drive Interface Adapter (DIA) Part Numbers
5.4.18 The Private\Drive Bay\Power ? status screen
PD••••••••Power Left
PD•••••••Power Right
Type:?????????????
Alarm A:
OFF
Alarm B:
OFF
Alarm Fan:
OFF
Alarm Temp:
OFF
LED:
OFF
Temperature:ddd.dC
The Private\DriveBay\Power Left or Right status screens display the status of all power supply modules. The right (as viewed from the front of the RLS) module is only found on models with dual-redundant power supply modules installed. The
left power supply status screen also covers all single module supplies. All 250-watt
modules contain two identical 24VDC, 125-watt power supplies called A and B and
thus the reasons for Alarms A & B.
All power supply modules are or’ed together so that it’s possible to have a power
supply fail and still have power to run the processors to get out an Alarm message
over e-mail using the Q-Link remote manager.
The following data is displayed on the Private\DriveBay\Power ? screens:
501510 Rev. S
•
Type
Description of the Power Supply Module(s) installed (see Table Table 5-6).
•
Alarm A or B
OFF is normal. ON indicates a failure of power supply A or B within the Left
or Right module.
•
Alarm FAN
OFF is normal. ON indicates the failure of the Left or Right fan. Note that
the two fans run off the shared +24V bus. Both fans continue to run when one
of the two Dual-Redundant Power Supply Modules fails.
The Private Menu
5-23
•
Alarm Temperature
OFF is normal. ON indicates higher than normal temperature in the Left or
Right power supply module.
•
LED
The LED on the Left or Right dual redundant power supply module has
been commanded ON or OFF. ON is normal and OFF indicates the failure of the
fan or either power supply within that module. Ignore the LED value for
FULLSIZE power supply modules.
•
Temperature
The temperature in degrees Centigrade in the Left or Right power supply
module.
Description
Module P/N
Remarks
FULLSIZE 125W
510170-01-2
Contains only power supply A and two fans.
FULL1FAN 125W
510170-01-2
Contains only power supply A and one fan.
FULLSIZE 250W
510170-02-0
HALFSIZE 250W
510170-03-8
FULLSIZE 160W
510170-04-6
Dual Redundant Modules
Table 5-6 Power Supply Module Part Numbers
5.4.19 The Private\Executive status screen
Private••••Executive
I2C Address:
xx
PCB Number: 501547
PCB Revision: ???
5-24
•
I2C Address
The address of the Executive PCBA on the I2C bus.
•
PCB Number
The part number of the Executive PCBA.
•
PCB Revision
The major revision letter of the Executive PCBA. A, B, C, etc.
The Private Menu
501510 Rev. S
5.4.20 The Private\Magazine menu
Private•••••Magazine
Busy:
FALSE
Demand:
ddd
Idle:
FALSE
In Front:
ddd
Prs:??????????????
ABORT
MOVE TO FRONT
•Carousel
•Storage Array
The Private\Magazine status screen shows the status of Carousel or Storage Array. Menu items that are shaded are for Qualstar personnel use only and are not described within this manual.
5.4.20.1
ABORT Command
This command will immediately stop Carousel or Storage Array motion.
5.4.20.2
MOVE TO FRONT Command
This command will move the magazine selected by the Demand value to the front of
the Carousel or Storage Array for access.
•
Busy
A TRUE value indicates the Carousel or Storage Array is moving.
•
Demand
Edit this value to select a magazine to be moved to the front for access. There is
a one-to-one mapping of this numerical value to the alphabetic magazines labels with zero equaling magazine A.
•
Idle
A TRUE indicates the Carousel or Storage Array is ready to accept a command.
•
In Front
The numerical value of the magazine positioned to the front for access. The
mapping is the same as the Demand value.
•
Prs
A single character for each possible magazine (0-n) indicates the presence of the
magazine on an RLS-4221 only. The possible values are described in Table 5-7.
Code
Means
Remarks
I
Invalid
The RLS is unsure of the inventory status
T
True
There is a magazine at this location
F
False
There is no magazine at this location
Table 5-7 Presents: Value Coding for RLS-4221 only
501510 Rev. S
The Private Menu
5-25
5.4.21 The Private\ Sensors status screen
P••••••••••••Sensors
Address:
xx
Type:
dddddddddd
Rev: dd.ddddd-ddd
Mode:
NORMAL
Pcb:??????????????
•Burst Parameters
DoorLocked:
0
•Drive1:
0
•Drive2:
0
•Drive3:
0
•Drive4:
0
•Fixed1:
0
•Fixed2:
0
•Fixed4:
0
•GripperHome:
0
•Magazine:
0
•MagazineSlot1: 0
•MagazineSlot2: 0
•MagazineSlot3: 0
•MagazineSlot4: 0
•MagazineSlot5: 0
•MagazineSlot11: 0
•MagazineSlot02: 0
•MagazineSlot20: 0
•MagazineSlot03: 0
•MagazineSlot34: 0
•XClear:
0
XHome:
0
•ZHome:
0
SET TO DEFAULTS
The Private\Sensors status screen displays the present state of all the RLS sensors as well as information about the model specific Sensor Master board.
5-26
•
SET TO DEFAULTS command
This command will reset the threshold of the analog sensors to their default
values. These are not necessarily the values obtained during calibration. Invoking this function will un-calibrate the sensors and may cause the RLS to malfunction.
•
Address
The I2C address of the Sensor Master board’s microprocessor.
•
Type
The part number of the Sensor Master board microprocessor’s firmware.
•
Rev
The revision of the Sensor Master board microprocessor’s firmware. Leading
zeroes are suppressed.
•
Mode
Normal or Boot modes are possible. Boot occurs during firmware uploading.
•
Pcb
The part number of the Sensor Master board (see Table 5-8).
The Private Menu
501510 Rev. S
•
DoorLocked
A value of 1 indicates the Front Panel/Door is locked by the keylock.
The following items are sub-menus with status values that indicate the sensor’s state.
The sub-menus are intended for use only by Qualstar personnel.
•
Drive?
A value of 0 indicates a tape is present in the mouth of the drive but not fully
inserted. This sensor detects the ejection of a tape by the drive.
•
Fixed?
A value of 0 indicates a tape is present in the indicated fixed slot if the Gripper
is in its home position.
•
Gripper Home
A value of 1 indicates the gripper jaws are closed.
•
Magazine??
A value of 0 indicates a magazine is present at the current access position of
the Carousel or Storage Array.
•
MagazineSlot? (1-5)
A value of 0 indicates a cartridge is present in the indicated magazine slot of
the currently accessible magazine of the Carousel or Storage Array. See Table
5-9.
•
Xclear
A value of 0 indicates the X-Axis path is blocked while a 1 indicates it is clear
to move the carriage horizontally.
•
Xhome
A value of 1 indicates the Handler’s carriage is at its fully right or home position.
•
Zhome
A value of 0 indicates the Handler’s gripper is fully retracted to its home position along the Z-Axis.
PCB P/N
Models Used On
501887
RLS-4124, 4221
501727
RLS-44xx
501867
RLS-5116, 8116, 8216H
501787
RLS-5244, 6227, 8236, 8236D, 8202, 8204, 8204D,
8244, 8244D, 8404, 8404D, 8444, 8444D
Table 5-8 Sensor Master board usage
501510 Rev. S
The Private Menu
5-27
Slot\Model:
RLS-4xxx
RLS-5xxx/8xxx
RLS-62xx
1
MagazineSlot1
MagazineSlot11
MagazineSlot11
2
MagazineSlot2
MagazineSlot02
MagazineSlot20
3
MagazineSlot3
MagazineSlot03
MagazineSlot34
4
MagazineSlot4
MagazineSlot34
N/A
5
MagazineSlot5
N/A
N/A
Table 5-9 Magazine Sensor Slot Assignments
5-28
The Private Menu
501510 Rev. S
6.
Troubleshooting
6.1 Faults without Fault Messages
There are several possible failure modes that render the Executive processor and the
Serial Control Panel inoperative. Failure of these systems will not result in any helpful hints about the possible source of failure. This section lists the known failures that
will render the RLS inoperative without telling you why.
6.1.1 When the power is turned on: no motion occurs, the LCD does not illuminate, the three power-indicating LEDs on the IPM (rear of RLS) are dark.
1.
Check that the power source is live.
2.
Check the line fuse in the Power Supply Module (remove power cord(s) first).
3.
Check the action of the Power Switch. It should possess a definite latching feel at
the end of its travel. The sliding linkage on the right inside of the RLS could be
binding due to shipping damage or a foreign object.
6.1.2 When the power is turned on: no motion occurs, the LCD does not
illuminate, the +24V LED on the IPM (rear of RLS) blinks.
1.
A component failure has occurred on a PCBA that causes an excessive load on
the power supply.
2.
The Power Supply Module has failed.
6.1.3 When the power is turned on: the LCD is illuminated and shows the library
model number, no errors messages are displayed, and nothing moves.
1.
The Front Panel/Door is ajar. It is not completely closed. It may appear to be
closed, but is not completely latched.
2.
The Door Latched Sensor is not functioning.
6.1.4 When the power is turned on: the Handler moves normally and the LCD is
illuminated, but it does not show text.
501510 Rev. S
1.
The LCD display cable is not properly connected or the cable is damaged.
2.
The LCD display has failed.
3.
The Control Panel microprocessor has failed.
Troubleshooting
6-1
6.1.5 The Barcode Reader does not read barcode labels reliably.
1.
The barcode labels are not of a high enough quality for reliable reading.
2.
The barcode labels are dirty or damaged.
3.
The barcode labels are printed in a code that the library configuration does not
understand.
4.
The lens on the face of the barcode reader is not clean.
5.
The configuration is set to the wrong type of barcode reader.
6.
The barcode reader has failed.
6.1.6 After Installing a Tape Drive, it Fails to Appear in the Menu System.
1.
The drive carrier has failed to seat properly. Using the lever, remove the drive
part way and reinsert it.
2.
The Tape Drive Assembly or Drive Bay PCBA has failed. Try swapping the positions of the Tape Drive Assemblies.
6.2 POST (Power On Self Test) Fault Messages
These fault messages occur during POST (Power On Self Test), and after a reset and
during recovery from a previous fault.
NOTE
Important: Some problems will result in an Alert Message on the LCD display, followed by
a number. Our technical support department will need this number to diagnose the problem if you contact them. So always, record this number, along with the full context of the
message.
Additionally, please provide technical support with the Model Number, Serial Number and
Firmware Revision level of the subject library when contacting them.
6.2.1 BCR Failed (BCR is the Barcode Reader)
During POST (Power On Self Test) the Barcode Reader failed, is installed improperly,
or is configured improperly. If there is no Barcode Reader, set the BCR value to None
in the Configuration\Advanced\Changer\Mechanics menu.
6.2.2 BCR Misconfigured (BCR is the Barcode Reader)
During POST (Power On Self Test) the system detected that the Barcode Reader is
configured improperly.
6-2
Troubleshooting
501510 Rev. S
6.2.3 Calibration Req’d
A change has been made to the RLS configuration that disabled the library pending
calibration. Re-calibration is required!
6.2.4 Not Configured
The library is not configured. Configure the library as described in the Installation
and Operation Manual (Qualstar document number 501500).
6.2.5 Carousel Failed, Carousel Jammed
The carousel mechanism failed to move successfully or is jammed. Open the Top Cover (see Section 7.6) and check that all the magazines and cartridges on the carousel
are properly seated. Verify the drive belt is in place and free of slack.
6.2.6 Array Failed, Array Jammed
The Storage Array mechanism has failed to move successfully. Open the Top Cover
(see Section 7.6) and check that all the magazines and cartridges on the Storage Array
are properly seated.
6.2.7 Gripper Homing Failed
During POST (Power On Self Test), the Gripper Home Sensor did not indicate the
gripping mechanism reached its home position. This could be caused by a failed infrared emitter or detector, requiring replacing the Carriage Assembly. A large piece of
dust or an errant barcode label in the Handler could also cause this failure.
6.2.8 X Failed to Home
During POST (Power On Self Test) the RLS did not detect that the Handler successfully reach its home position at the right side of the Carriage Assembly. Check that
there are no loose magazines or cartridges in the library. Check that the Tape Drives
are properly seated and their locking levers are fastened in the up position. Check
that there is not a loose cartridge in the Handler (if a cartridge is in the Handler, and
it is properly gripped, this will not cause a problem.) A failed infrared emitter or detector could also be responsible. A large piece of dust or an errant barcode label could
also cause this failure.
6.2.9 Z Failed to Home
During POST (Power On Self Test) the RLS did not detect that the Handler’s Z-Axis
(insertion) successfully found its home position. Check that there are no loose magazines or cartridges in the library. Check that the drives are properly seated and the
locking lever is fastened. Check that there is not a loose cartridge in the Handler (if a
cartridge is in the Handler, and it is properly gripped, this will not cause a problem.)
A failed infrared emitter or detector could also be responsible. A large piece of dust or
an errant barcode label could also cause this failure.
501510 Rev. S
Troubleshooting
6-3
6.2.10 No Drivebay Found
During POST (Power On Self Test) the Executive microprocessor could not communicate with Drive Bay microprocessor. Check that the 10-conductor ribbon cable between the Interconnect and Drive Bay PCBAs is properly installed. Go to the Private\Cabling menu to see if any cables are unplugged.
6.2.11 No Carriage Found
During POST (Power On Self Test) the Executive microprocessor could not detect the
presence of the Carriage Assembly. Check the 50-conductor cables between the Executive, Interconnect, and 2-Axis Carriage PCBAs. Go to the Private\Cabling menu
to see if any cables are unplugged.
6.2.12 No Sensor Pcb Found
During POST (Power On Self Test) the Executive microprocessor could not detect the
presence of the Sensor Master PCBA. Check the cable from the Interconnect PCBA to
the Sensor Master PCBA. Go to the Private\Cabling menu to see if any cables
are unplugged.
6.2.13 No Carousel Found
During POST (Power On Self Test the Executive microprocessor could not detect the
presence of the Carousel PCBA or could not communicate with its microprocessor.
Check the cable between the Drive Bay and the Carousel PCBAs. Go to the Private\Cabling menu to see if any cables are unplugged.
6.2.14 No Storage Array
During POST (Power On Self Test) the Executive microprocessor could not detect the
presence of the Storage Array or could not communicate with its microprocessor.
Check the cable between the Storage Array and the Drive Bay PCBAs. Go to the
Private\Cabling menu to see if any cables are unplugged.
6-4
Troubleshooting
501510 Rev. S
6.3 Operating Fault Messages
These Fault Messages will occur during normal operation of the library.
6.3.1 Pick Failed
The library failed to pick a cartridge from a Magazine Slot or Tape Drive. Check that
there are no loose magazines or cartridges in the library. Check that the drives are
properly seated and the locking lever is fastened. Check that there is not a loose cartridge in the Handler (if a cartridge is in the Handler, and it is properly gripped, this
will not cause a problem.)
6.3.2 Place Failed
The library failed to place a cartridge into a Magazine Slot or Tape Drive. Check that
there are no loose magazines or cartridges in the library. Check that the drives are
properly seated and the locking lever is fastened. Check that there is not a loose cartridge in the Handler (if a cartridge is in the Handler, and it is properly gripped, this
will not cause a problem.)
6.3.3 Carousel Failed, Carousel Jammed
The carousel mechanism failed to move successfully. Check that there are no loose
magazines or cartridges in the Carousel or Handler. If there is a cartridge is in the
Handler, and it is properly gripped, this will not cause a problem.
6.3.4 Array Failed, Array Jammed
The Storage Array mechanism has failed to move successfully. Check that there are
no loose magazines or cartridges in the Storage Array or Handler. If there is a cartridge is in the Handler, and it is properly gripped, this will not cause a problem.
6.3.5 X Axis Jammed
The Handler’s X-Axis (horizontal) is unable to move freely. Check that there are no
loose magazines or cartridges in the library. Check that all Tape Drives are properly
seated and their locking levers are fastened. If there is a cartridge is in the Handler,
and it is properly gripped, this will not cause a problem.
6.3.6 X-Axis Obstructed
The XCLEAR sensor is indicating that it is unsafe to move the Handler horizontally.
Check that there are no loose magazines or cartridges in the library. Check that all
Tape Drives are properly seated and their locking levers are fastened. Check that
there is not a loose cartridge in the Handler. If there is a cartridge is in the Handler,
and it is properly gripped, this will not cause a problem.
501510 Rev. S
Troubleshooting
6-5
6.3.7 Z-Axis Jammed
The Handler’s Z-Axis (insertion) is unable to move freely. Check that there are no
loose magazines or cartridges in the library. Check that all Tape Drives are properly
seated and their locking levers are fastened. If there is a cartridge is in the Handler,
and it is properly gripped, this will not cause a problem.
6.3.8 Z-Axis Obstructed
The XClear sensor is indicating that it is unsafe to move the Handler in the Z-Axis
(insertion). Check that there are no loose magazines or cartridges in the library.
Check that all Tape Drives are properly seated and their locking levers are fastened.
If there is a cartridge is in the Handler, and it is properly gripped, this will not cause
a problem.
6.3.9 Handler Fault
Check that there are no loose magazines or cartridges in the library.
6.3.10 Left Fan Failed or Right Fan Failed
The fan in the left or right Dual-Redundant Power Supply Module is not turning at
full speed. If the fan is not obstructed (by cable ties, etc.), replace the entire Power
Supply Module. This can be accomplished while the RLS continues to function. See
Section 7.21. Note that left and right are defined when viewing the RLS from the
front. When addressing the power supplies from the rear of the unit, the left module
will be on your right. Also note that the two fans run off the shared +24V bus. Both
fans continue to run when one of the two Dual-Redundant Power Supply Modules
fails.
6.3.11 Left Supply Fail or Right Supply Fail
The left or right Dual-Redundant Power Supply Module has failed. Replace the Power
Supply Module, which can be accomplished while the RLS continues to function. See
Section 7.21. Note that left and right are defined when viewing the RLS from the
front. When addressing the power supplies from the rear of the unit, the left module
will be on your right. Also note that the two fans run off the shared +24V bus. Both
fans continue to run when one of the two Dual-Redundant Power Supply Modules
fails.
6.3.12 Fan Failed
One of the two fans in the Power Supply Module is not turning at full speed. If the fan
is not obstructed (by cable ties, etc.), replace the entire Power Supply Module. The
RLS must be powered down to accomplish this task.
6.3.13 Supply Failed
This message should never occur with a 125 or 160-watt Power Supply Module. The
message indicates that one of the two power supplies within a 250-watt module has
6-6
Troubleshooting
501510 Rev. S
failed and that only 125-watts of power is available. The RLS can generally function
on this limited power when only one or two drives are running. It may intermittently
fail when all drives are simultaneously busy loading, unloading or rewinding. Replace
the entire Power Supply Module. The RLS must be powered down to accomplish this
task.
6.4 Operating Error Messages
These error messages are caused by improper use of the library.
6.4.1 Gripper Full
The command failed because a move command was initiated that needed the Handler
empty but the Handler was full.
6.4.2 No Target Magazine
A move was initiated to a magazine that is not installed.
6.4.3 No Target Drive
A move was initiated to a cartridge Tape Drive that is not installed.
6.4.4 Target Full
A move was initiated to a destination that is already occupied.
6.4.5 Source Empty
A move was initiated from an empty source.
6.4.6 No Source Magazine
A move was initiated from a magazine that is not installed.
6.4.7 No Source Drive
A move was initiated from a Tape Drive that is not installed.
6.4.8 Tape Not Ejected
A move was initiated from a Tape Drive that has not yet ejected its cartridge.
6.4.9 The Door is Locked
A command was given to open the Front Panel/Door but it is physically locked.
501510 Rev. S
Troubleshooting
6-7
6.4.10 The Door is Open
A command was issued but cannot be completed because the Front Panel/Door is
open.
6.5 Calibration Fault Messages
These occur during calibration, which should only be done after certain upgrades and
servicing. In addition to these, any of the POST (Power On Self Test) faults can happen during calibration.
6.5.1 Calibration Fault
A motion fault happened during calibration. Make sure the motors turn freely and the
library is set up properly for calibration.
6.5.2 Failed No Magazine
Calibration has failed because no magazine was installed in position MA.
6.5.3 Failed, Remove Cart
Calibration has failed because there is a cartridge in MA. Calibration requires that
the first magazine be installed and empty.
6.5.4 Failed Gripper Full
Calibration has failed because there is a cartridge in the Handler. Calibration requires that there be no cartridge in the Handler.
6.5.5 Calibration Failed
Calibration has failed. Make sure the library is set up correctly for calibration and retry.
6.5.6 Opto Cal Failed
One or more of the optical sensors failed to calibrate properly. Make sure the library is
set up correctly for calibration and retry. Make sure there is no debris blocking any of
the optical sensors or emitters.
6-8
Troubleshooting
501510 Rev. S
7.
Field–Replaceable Units (FRUs)
7.1 Introduction
Many of the major components in the RLS are available from Qualstar as separate
Field-Replaceable Units (FRUs). Each FRU can be removed and replaced on-site by
qualified personnel. Some of the FRUs are mechanical assemblies while others are
Printed Circuit Board Assemblies (PCBAs).
Table 7-1 lists all of the RLS FRUs, their Qualstar part numbers and the time estimated for an experienced technician to remove and replace a FRU for the first time.
The last column indicates if it is required to calibrate the RLS after changing a FRU.
The RLS can be commanded to calibrate itself automatically, which takes approximately 5-minutes.
DANGER
TO AVOID THE RISK OF PERSONAL INJURY: TURN OFF ALL POWER TO THE
TAPE LIBRARY SYSTEM, THEN REMOVE THE POWER CORD, BEFORE
ATTEMPTING ANY OF THE PROCEDURES IN THIS CHAPTER.
NEVER OPERATE THE LIBRARY WHILE THE DOOR OR TOP PANEL ARE OPEN.
GEFAHR
UM VERIETZUNGEN ZU VERHINDEM: SCHALTEN SIE ALLE STROMSCHALTER
AN DER RLS AUS UND ENTFERNEN SIE DAS STROMKABEL, BEVOR SIE MIT DER
SERVICE-ARBEIT BEGINNEN.
BENUTZEN SIE DIE RLS NIE WENN DIE TUERE OFFEN IST, ODER DIE DECK-,
BZW. SEITENPLATTE ENTFERNT SIND.
CAUTION
Static electricity can permanently damage the integrated circuits on all RLS
PCBAs. Standard ANTI-STATIC practices should be employed when working on
the RLS. At a minimum, touch an unpainted portion of the RLS chassis before
handling any PCBAs.
NOTE
Left and right sides of the RLS are referred to throughout this chapter. Left and right are defined
when viewing the RLS from the front. Please remember this important concept.
501510 Rev. S
Field–Replaceable Units (FRUs)
7-1
FRU Description
FRU Part
Number
Section
Time*
Calibration
Required
Carriage Assembly (4124/4221)
510180-01-1
7.7
10
Yes
Carriage Assembly (4445/4470)
510180-14-4
7.7
10
Yes
Carriage Assembly
(5116/8116/8202/8216H/8236/8236D)
510180-12-8
7.7
10
Yes
Carriage Assembly
(52/62/8204/8204D/8244/8244D/8244D/8404/
8404D/8444/8444D)
510180-15-1
7.7
10
Yes
Carriage Assembly with Barcode Reader
Assembly (4124/4221)
Please contact
technical support.
7.7
10
Yes
Carriage Assembly with Barcode Reader
Assembly (4445/4470)
Please contact
technical support.
7.7
10
Yes
Carriage Assembly with Barcode Reader
Assembly (5116/8116/8216H)
Please contact
technical support.
7.7
10
Yes
Carriage Assembly with Barcode Reader
Assembly (52/62/82xx/8404H/8444H)
Please contact
technical support.
7.7
10
Yes
Carousel (4124/4221)
510171-01-0
7.8
10
Yes
Carousel (5116/8116/8216C/8216CD/8216H)
510171-02-8
7.8
10
Yes
Storage Array (8mm x 45)
510172-01-8
7.9
30
Yes
Storage Array (8mm x 70)
510173-01-6
7.9
30
Yes
Storage Array (LTO x 36)
510172-02-6
7.9
30
Yes
Storage Array (SDLT x 27)
510172-02-6
7.9
30
Yes
Storage Array (SAIT x 44, LTO x 44)
510172-03-4
7.9
30
Yes
Front Panel/Door Assembly (Bezel)
510179-01-3
7.10
30
No
Front Panel/Door Assembly (Bezel)
(4124/5116/8116/8216C/8216CD/8236C/8236CD)
510179-02-1
7.10
30
No
Tape Drive Assembly (AIT-2, LVD)
501903-10-8
7.11
2
No
Tape Drive Assembly (AIT-3, LVD)
501903-11-6
7.11
2
No
Tape Drive Assembly (AIT-4, LVD)
501903-14-0
7.11
2
No
Tape Drive Assembly (AIT-5, LVD)
501903-15-7
7.11
2
No
Tape Drive Assembly (HP LTO-2, HH LVD)
501903-55-3
7.11
2
No
Tape Drive Assembly (IBM LTO-1, LVD)
501903-60-3
7.11
2
No
Tape Drive Assembly (IBM LTO-2, LVD)
501903-61-1
7.11
2
No
Tape Drive Assembly (IBM LTO-3, LVD)
501903-62-9
7.11
2
No
Tape Drive Assembly (IBM LTO-3, LVD, Ext)
501903-66-0
7.11
2
No
Tape Drive Assembly (IBM LTO-3, HH LVD)
501903-81-9
7.11
2
No
Tape Drive Assembly (IBM LTO-4, LVD)
501903-73-6
7.11
2
No
Tape Drive Assembly (IBM LTO-4, LVD, Ext)
501903-74-4
7.11
2
No
Tape Drive Assembly (IBM LTO-4, HH LVD)
501903-83-5
7.11
2
No
Tape Drive Assembly (IBM LTO-3, DFA)
501903-63-7
7.11
2
No
Tape Drive Assembly (IBM LTO-3, DFA, Ext)
501903-67-8
7.11
2
No
Tape Drive Assembly (IBM LTO-4, DFA)
501903-64-5
7.11
2
No
Tape Drive Assembly (IBM LTO-4, DFA, Ext)
501903-69-4
7.11
2
No
7-2
Field–Replaceable Units (FRUs)
501510 Rev. S
FRU Description
FRU Part
Number
Section
Time*
Calibration
Required
Tape Drive Assembly (IBM LTO 5, DFA)
501903-84-3
7.11
2
No
Tape Drive Assembly (IBM LTO 5, DFA, Ext)
501903-85-0
7.11
2
No
Tape Drive Assembly (IBM LTO 5, SAS)
501903-86-8
7.11
2
No
Tape Drive Assembly (IBM LTO 5, SAS, Ext)
501903-87-6
7.11
2
No
Tape Drive Assembly (IBM LTO 5, HH DFA)
501903-88-4
7.11
2
No
Tape Drive Assembly (IBM LTO 5, SAS, HH Ext)
501903-89-2
7.11
2
No
Tape Drive Assembly (IBM LTO 5, HH DFA)
501903-92-6
7.11
2
No
Tape Drive Assembly (IBM LTO 5, HH SAS)
501903-93-4
7.11
2
No
Tape Drive Assembly (IBM LTO 5, HH DFA)
501903-95-9
7.11
2
No
Tape Drive Assembly (IBM LTO 5, HH SAS)
501903-96-7
7.11
2
No
Tape Drive Assembly (SDLT 320, LVD)
501903-70-2
7.11
2
No
Tape Drive Assembly (SDLT 640, LVD)
501903-71-0
7.11
2
No
Tape Drive Assembly (SAIT 1, LVD)
501903-90-0
7.11
2
No
Serial Control Panel PCBA
501507-01-6
7.12
15
No
Drive Bay PCBA Assembly (4124)
501537-05-4
7.13
60
No
Drive Bay PCBA Assembly (4221/8216H)
501537-01-3
7.13
60
No
Drive Bay PCBA Assembly (4445/4470/8404/8444)
501537-02-1
7.13
60
No
Drive Bay PCBA Assembly (8236D/8204D/8244D)
501957-01-3
7.13
60
No
Drive Bay PCBA Assembly (5116/8116)
501537-04-7
7.13
60
No
Drive Bay PCBA Assembly (52/62/82xx)
501537-03-9
7.13
60
No
Drive Bay PCBA Assembly (8404D/8444D)
502117-01-3
7.13
60
No
Executive XI PCBA
501547-01-2
7.14
15
Yes
Door Lock PCBA
501587-01-8
7.15
30
No
X-Clear Emitter PCBA
501597-01-7
7.16
30
Yes
Sensor Master and Slave (4124)
Please contact
technical support.
7.17
30
Yes
Sensor Master and Slave (4221)
Please contact
technical support.
7.17
30
Yes
Sensor Master and Slave (4445/4470)
Please contact
technical support.
7.17
30
Yes
Sensor Master and Slave (5116/8116)
Please contact
technical support.
7.17
30
Yes
Sensor Master and Slave (8216H)
Please contact
technical support.
7.17
30
Yes
Sensor Master and Slave
(52/62/82xx/82xxD/8404/8404D/8444/8444D)
Please contact
technical support.
7.17
30
Yes
Drive Interface Adapter, Passive
501677-01-7
7.18
15
No
Drive Interface Adapter, Active
501687-01-6
7.18
15
No
Drive Interface Adapter, SAS
502087-01-8
7.18
15
No
DFA (Direct Fibre Attach) Duplex Cable
510463-01-1
7.19
15
No
IPM (SCSI)
501567-01-0
7.20
2
No
IPM (SCSI with Q-Link)
501567-02-8
7.20
2
No
IPM (Fibre channel with Q-Link)
501697-01-5
7.20
2
No
Power Supply (125W)
510170-01-2
7.21
2
No
501510 Rev. S
Field–Replaceable Units (FRUs)
7-3
FRU Description
FRU Part
Number
Section
Time*
Calibration
Required
Power Supply (250W)
510170-02-0
7.21
2
No
Power Supply (250W, Dual Redundant)
510170-03-8
7.21
2
No
Power Supply (160W)
510170-04-6
7.21
2
No
Fixed Slots (RLS-4124 & 4221 only)
500712-01-3
7.22
20
Yes
Air Filter
510096-01-9
7.23
2
No
* The estimated time in minutes to remove and replace the FRU for the first time by an experienced technician.
Table 7-1 Field-Replaceable Units (FRUs)
7.2 Field Upgrades
There are several RLS upgrades possible. They are listed in Table 7-2. Installing an upgrade is essentially the same as replacing the like FRU as described in this chapter.
Name
P/N
Section
Carriage Assembly with Barcode Reader Assembly (4124/4221)
Please contact
technical support.
7.7
Carriage Assembly with Barcode Reader Assembly (4445/4470)
Please contact
technical support.
7.7
Carriage Assembly with Barcode Reader Assembly (5116/8116/8216H)
Please contact
technical support.
7.7
Carriage Assembly with Barcode Reader Assembly
(52/62/82xx/8404H/8444H)
Please contact
technical support.
7.7
SCSI Interface Personality Module (IPM) with Q-Link
501567-02-8
7.20
Fibre Channel Interface Personality Module (IPM) with Q-Link
501697-01-5
7.20
Dual Redundant Power Supply Modules 2 x 250W
510170-03-8
7.21
Active Drive Interface Adapters (DIAs) for Hot-Swappable Tape Drives
501687-01-6
7.18
Tape Drive Assembly (AIT-2, LVD)
501903-10-8
7.11
Tape Drive Assembly (AIT-3, LVD)
501903-11-6
7.11
Tape Drive Assembly (AIT-4, LVD)
501903-14-0
7.11
Tape Drive Assembly (AIT-5 LVD)
501903-15-7
7.11
Tape Drive Assembly (IBM LTO-1, LVD)
501903-60-3
7.11
Tape Drive Assembly (IBM LTO-2, LVD)
501903-61-1
7.11
Tape Drive Assembly (HP LTO-2, HH LVD)
501903-55-3
7.11
Tape Drive Assembly (IBM LTO-3, LVD)
501903-62-9
7.11
Tape Drive Assembly (IBM LTO-3, LVD, Ext)
501903-66-0
7.11
Tape Drive Assembly (IBM LTO-3, HH LVD)
501903-81-9
7.11
Tape Drive Assembly (IBM LTO-4, LVD)
501903-73-6
7.11
Tape Drive Assembly (IBM LTO-4, LVD, Ext)
501903-74-4
7.11
Tape Drive Assembly (IBM LTO-4, HH LVD)
501903-83-5
7.11
Tape Drive Assembly (IBM LTO-3, DFA)
501903-63-7
7.11
Tape Drive Assembly (IBM LTO-3, DFA, Ext)
501903-67-8
7.11
7-4
Field–Replaceable Units (FRUs)
501510 Rev. S
Name
P/N
Section
Tape Drive Assembly (IBM LTO-4, DFA)
501903-64-5
7.11
Tape Drive Assembly (IBM LTO-4, DFA, Ext)
501903-69-4
7.11
Tape Drive Assembly (IBM LTO 5, DFA)
501903-84-3
7.11
Tape Drive Assembly (IBM LTO 5, DFA, Ext)
501903-85-0
7.11
Tape Drive Assembly (IBM LTO 5, SAS)
501903-86-8
7.11
Tape Drive Assembly (IBM LTO 5, SAS, Ext)
501903-87-6
7.11
Tape Drive Assembly (IBM LTO 5, HH DFA)
501903-88-4
7.11
Tape Drive Assembly (IBM LTO 5, SAS, HH Ext)
501903-89-2
7.11
Tape Drive Assembly (IBM LTO 5, HH DFA)
501903-92-6
7.11
Tape Drive Assembly (IBM LTO 5, HH SAS)
501903-93-4
7.11
Tape Drive Assembly (IBM LTO 5, HH DFA)
501903-95-9
7.11
Tape Drive Assembly (IBM LTO 5, HH SAS)
501903-96-7
7.11
Tape Drive Assembly (SDLT 320, LVD)
501903-70-2
7.11
Tape Drive Assembly (SDLT 640, LVD)
501903-71-0
7.11
Tape Drive Assembly (SAIT 1, LVD)
501903-90-0
7.11
Table 7-2 RLS Field Upgrade List
501510 Rev. S
Field–Replaceable Units (FRUs)
7-5
7.3 Required Tools and Materials
Table 7-3 is a complete list of the tools that would be required to replace every RLS
FRU. See individual FRU sections of this chapter for the tool needed to replace just
that FRU.
Required Tools
No. 1 Phillips Screwdriver
No. 2 Phillips Screwdriver
5/64-inch Allen (Hex) Driver/Wrench
1/4-inch Nutdriver or Open-Ended Wrench
Diagonal Cutters
Long Nose Pliers
Small Mirror (optional)
Flashlight (optional)
Table 7-3 Required Tools
The materials listed in Table 7-4 are required when replacing the indicated FRUs.
Qualstar
P/N
669-1001-9
730-0017-6
Manufacturer
Mfgr’s P/N
Description
Tyton
T18R0
Dennison
08-433
Power Cable between Drive Bay PCBA
and Executive PCBA – 2 places.
Dennison
08-404
FRUs: 510172, 510183
Panduit
PLT1M-M30
Loctite 242
24077
Threadlocker
3-inch Cable Tie
Where Used
Thread Locking
Adhesive
Front Panel/Door (Bezel) Linkage
Screws FRU: 510179
Table 7-4 Replacement Materials
7-6
Field–Replaceable Units (FRUs)
501510 Rev. S
7.4 Opening the Front Panel/Door
When the RLS is powered-on, the Front Panel/Door can be opened as follows:
1.
Unlock the Front Panel/Door by turning the key clockwise.
See Section 3.1.
2.
Press the key to open the Quick Menu. The key only works when the RLS is
not already in the menu system. To exit the menu system (from any menu), press
the MENU key twice.
NOTE
There are two choices when opening the Front Panel/Door. The OPEN & PARK LEFT command
unlocks the Front Panel/Door and moves the carriage to its far left position. This command
should be used when accessing the Tape Drives. The OPEN & PARK RIGHT command unlocks
the Front Panel/Door and moves the carriage to its far right position. This command should be
used when accessing the Carousel or Storage Array.
3.
If the OPEN & PARK LEFT command is desired, simply press the ENTER key.
4.
If the OPEN & PARK RIGHT command is desired, press the
OPEN & PARK RIGHT, then press the ENTER key.
5.
After either command terminates, the Front Panel/Door will unlock automatically and pop open a fraction of an inch.
6.
After the carriage has stopped, gently pull the Front Panel/Door open.
key to select
If the RLS is not powered-on or is malfunctioning the Front Panel/Door can be opened
by following the steps below:
1.
Unlock the Front Panel/Door by turning the key clockwise. See Section
3.1.
2.
Insert the straightened end of a paper clip into the Emergency Unlatch Hole in
the Front Panel/Door as shown in Figure 7-1. Push on the latch tab to unlatch it.
The Front Panel/Door will pop open slightly when unlatched.
3.
Gently pull the Front Panel/Door open.
CAUTION
Do not place anything on the open Front Panel/Door as it is not designed to support additional
weight. Be careful never to lean on the Front Panel/Door, pull on it or lift the RLS by it.
501510 Rev. S
Field–Replaceable Units (FRUs)
7-7
Emergency Unlatch Hole
Paper Clip
Window
Display
Figure 7-1 View of the Emergency Unlatch Hole in the Front Panel/Door
7.5 Rack-Mounted Libraries
Rack-mounted RLS libraries must be extended from their racks for replacing any internal FRUs. Only front- or rear-mounted FRUs can be replaced without first extending the RLS out from the rack. Assemblies that can be replaced without extending the
RLS or opening its Top Cover include: Power Supply Module(s), Interface Personality
Module (IPM), Tape Drives and the Air Filter.
DANGER
Extending a rack-mounted RLS causes a dramatic shift in the center-of-gravity of the rack system.
If the system is not securely fastened to the floor or other permanent structure, it can very possibly tip over when the RLS is extended causing great bodily harm and damaging all the equipment.
Tips for safely extending and RLS include locking any casters on moveable racks and having a
second person help extend the RLS. While you are pulling the RLS out from the rack and if you
feel the rack tipping stop immediately! Push the RLS back into the rack and call for assistance.
7.5.1 Extending the RLS from the Rack
1.
7-8
Remove power from the RLS by first pressing the power switch off and then removing the power cord (two power cords if dual-redundant power supply modules
are installed).
Field–Replaceable Units (FRUs)
501510 Rev. S
2.
Disconnect any cables that may prevent the library from being extended fully.
3.
Open the Front Panel/Door as described in Section 7.4.
4.
Use a No. 2 Phillips screwdriver to remove the two screws that secure the RLS to
the front rack posts. See Figure 7-2.
5.
Carefully extend the RLS outward from the rack until its slides lock in the extended position.
Front Rack Rails
Hinged Top Cover
Retract
Extend
Front Panel/Door
Screws to secure the RLS to
the front rack posts.
Figure 7-2 Detail of the Extension Prevention Screws
7.5.2 Retracting the RLS into the Rack
501510 Rev. S
1.
Unlock the latches found on each rack slide by lifting slightly and pushing the
RLS inward slightly.
2.
Carefully push the RLS into the rack until seated.
3.
With the Front Panel/Door open, use a No. 2 Phillips screwdriver to reinstall the
two screws that secure the RLS to the front rack posts. See Figure 7-2.
4.
Gently lift and push the Front Panel/Door until it latches shut.
5.
Reconnect any cables that were disconnected in of Section 7.5.1.
Field–Replaceable Units (FRUs)
7-9
7.6 Top Cover
Tools Required: No. 2 Phillips Screwdriver
Top Cover
in open position.
Support Arm
Right Side of RLS
Figure 7-3 The Top Cover
7.6.1 Opening the Top Cover
1.
Remove power from the RLS by first pressing the power switch off and then removing the power cord (two power cords if dual-redundant power supply modules
are installed).
2.
If the RLS is rack-mounted, extend it from the rack by following Section 7.5.1.
3.
Use a No. 2 Phillips screwdriver to remove the four screws from the right (as
viewed from the front) edge of the Top Cover as shown in Figure 7-3.
4.
Lift the Top Cover until the support arm locks in its open position.
7.6.2 Closing the Top Cover
7-10
1.
Lift the Top Cover all the way up, and then pull the support arm outwards to unlatch it. Gently lower the Top Cover.
2.
Reinstall the four pan-head screws removed in Section 7.6.1 using a No. 2 Phillips screwdriver.
Field–Replaceable Units (FRUs)
501510 Rev. S
7.7 Carriage Assembly
RLS-4124/4221
(8mm) P/N 510180-01-1
RLS-4445/4470
(8mm) P/N 510180-14-4
RLS-5116
(SAIT) P/N 510180-12-8
RLS-5244
(SAIT) P/N 510180-15-1
RLS-6227
(SDLT) P/N 510180-15-1
RLS-8116/8216H/8236/8236D
(LTO)
P/N 510180-12-8
RLS-8216C/8216CD/8236C/8236CD
(LTO)
P/N 510180-02-9
RLS-8202/8204/8204D/8244/8244D/8404/
(LTO)
P/N 510180-15-1
8404D/8444/8444D
Please contact Technical Support for additional information about Carriage Assemblies with the Barcode Reader Assemblies installed.
NOTE
Before replacing the Carriage Assembly, open the library’s Top Cover and read the RLS Carriage
Assembly Label located on the top of the Carriage Assembly to determine which model of Carriage Assembly is installed in the library. See Figure 7-4. The label will read 510180-xx-x. If the
part number does not match those listed above, please contact Qualstar Technical Support to
obtain the correct replacement Carriage Assembly.
The Carriage Assembly contains the Handler that moves laterally and carries the Gripper
Assembly and the optional Barcode Reader Assembly. The Gripper Assembly grasps the
tape cartridges and moves fore and aft to insert or remove tape cartridges. The Barcode
Reader Assembly is an option on RLS models and may be added by replacing the existing
Carriage Assembly with one containing a Barcode Reader Assembly.
Tools Required: No. 2 Phillips Screwdriver
Use these holes for lifting
the Carriage Assembly.
Carriage Assembly
Control Panel
Front Panel/Door
Assembly
Handler
Figure 7-4 Carriage Assembly shown with Front Panel/Door Top Cover Open
501510 Rev. S
Field–Replaceable Units (FRUs)
7-11
7.7.1 Carriage Assembly Removal Procedure
1.
Remove power from the RLS by first pressing the power switch off and then removing the power cord (two power cords if dual-redundant power supply modules
are installed).
2.
If the RLS is rack-mounted, follow the steps in Section 7.5.1 to extend the RLS
out of the rack.
3.
Follow the steps in Section 7.6.1 to open the library’s Top Cover.
4.
If the RLS is not rack-mounted, slide it forward far enough over the edge of the
table so that the Carriage Assembly screws located on the bottom of the library
can be accessed. See Figure 7-5.
5.
There are only two screws on the bottom of the RLS that secure the Carriage Assembly. Use a No. 2 Phillips screwdriver to remove the rear screw on the right
side and front screw on the left side as shown in Figure 7-5.
Front
Left
Right
Remove these 2 Screws
Figure 7-5 Bottom View of the RLS showing the Carriage Assembly Screws
CAUTION
Only use the holes in its top of the Carriage Assembly to lift it. Reaching underneath
its top plate may damage the assembly by bending the delicate drive shafts.
6.
7-12
Place the thumb and second finger of each hand into the pair of grip holes on the
left and right sides of the Carriage Assembly top plate. If the slider is blocking a
pair of holes, gently push it out of the way. Lift the Carriage Assembly straight
up and out. When the assembly has cleared the chassis, rotate it and place its
backside on top of the chassis. See Figure 7-6.
Field–Replaceable Units (FRUs)
501510 Rev. S
CARAGE Connector
Ribbon Cable
Bottom View of the
Handler/Carriage Assembly
RLS Chassis
Figure 7-6 Carriage Assembly on the Chassis with a Detail of the Ribbon Cable
7.
Disconnect the wide ribbon cable from the bottom, left side of the Carriage Assembly. The assembly may now be set aside. See Figure 7-6.
7.7.2 Carriage Assembly Replacement
CAUTION
Only use the holes in the top of the Carriage Assembly to lift it. Reaching underneath its top plate may damage the assembly by bending the delicate drive shafts.
This procedure assumes that the Carriage Assembly was removed in Section 7.7.1.
501510 Rev. S
1.
Place the Carriage Assembly on its backside on top of the chassis and then position it so that the ribbon cable can reach its mating connector. See Figure 7-6.
2.
Connect the ribbon cable to the CARAGE connector. See Figure 7-6.
3.
Place your thumb and second finger of each hand into the pair of grip holes on
the left and right sides of the Carriage Assembly top plate. If the slider is blocking a pair of holes, gently push it out of the way. Lower the Carriage Assembly
into the chassis. See Figure 7-4.
4.
Using a No. 2 Phillips screwdriver, replace the two Carriage Assembly flat-head
screws removed earlier from the bottom of the chassis. See Figure 7-5. The heads
of these screws must be flush with the chassis bottom.
5.
Follow the steps in Section 7.6.2 to close the library’s Top Cover.
6.
If the RLS is rack-mounted, follow Section 7.5.2 to retract the RLS into the rack.
Field–Replaceable Units (FRUs)
7-13
7.
If the RLS is not rack-mounted, reposition it to its original location on the table.
8.
If the Carriage Assembly was replaced with a different unit, proceed to Section
7.24 to calibrate the RLS.
7.8 Carousel Assembly
RLS-4124/4221
P/N 510171-01-0
RLS-5116/8116/8216/8216C/8216CD/8216H
P/N 510171-02-8
Care must be exercised to protect any tape cartridges still in the Carousel Assembly
from getting damaged when removing this FRU. Magazines and cartridges should be
reinstalled only after this procedure is completed.
Tools Required: No. 2 Phillips Screwdriver
7.8.1 Carousel Removal
7-14
1.
Remove power from the RLS by first pressing the power switch off and then removing the power cord (two power cords if dual-redundant power supply modules
are installed).
2.
If the RLS is rack-mounted, follow the steps in Section 7.5.1 to extend the RLS
out of the rack.
3.
Follow the steps in Section 7.6.1 to open the library’s Top Cover.
4.
If possible, remove all magazines in order to protect the tape cartridges from
possibly being dropped during this procedure. The Carousel can be rotated by
manually moving its drive belt or drive wheel.
5.
Disconnect the ribbon cable from the DRVBAY connector on the 8mm Carousel
PCBA. See Figure 7-7. Slip the ribbon cable out from under the two plastic retainer clips.
6.
If the RLS is a tabletop model, carefully turn the RLS on its left side (as seem
from the front) so that the Carousel Assembly mounting screws located on the
bottom of the chassis can be accessed.
Field–Replaceable Units (FRUs)
501510 Rev. S
8mm Carousel PCBA
DRVBAY
Connector
Carousel
Assembly
Ribbon
Cable
Figure 7-7 Carousel Assembly in the RLS
7.
There are four Carousel mounting-screws located on the bottom of the library.
Using a No. 2 Phillips screwdriver, remove the screws as shown in Figure 7-8. If
the library is on its side, hold the Carousel with one hand while removing the
last screw to prevent it from falling and getting damaged.
8.
If the RLS is a tabletop model, carefully turn the RLS back to its normal position, resting on its mounting feet.
9.
Lift the Carousel Assembly out towards the rear end of the chassis.
Carousel Mounting Screws (4)
Figure 7-8 Carousel Mounting Screws Located on the Bottom of the RLS
501510 Rev. S
Field–Replaceable Units (FRUs)
7-15
7.8.2 Carousel Replacement
This procedure assumes the carousel was removed in Section 7.8.1.
1.
Place the carousel assembly into the chassis and align its threaded mounting
holes with the holes in the bottom of the chassis.
2.
If the RLS is not rack-mounted, carefully turn it upright.
3.
Using a No. 2 Phillips screwdriver, replace the four Carousel mounting flat-head
screws that were removed in Section 7.8.1. See Figure 7-8.
4.
Tuck the ribbon cable under the plastic retainer clips and reconnect it to the
DRVBAY connector on the 8mm Carousel PCBA. See Figure 7-7.
5.
Proceed to Section 7.24 to calibrate the RLS.
7.9 Storage Array
RLS-4445
(8mm) P/N 510172-01-8
RLS-4470
(8mm) P/N 510173-01-6
RLS-5244
(SAIT) P/N 510172-03-4
RLS-6227
(SDLT) P/N 510172-02-6
RLS-8202/8236/8236C/8236CD/8236D
(LTO)
P/N 510172-02-6
RLS-8204/8204D/8244/8244D/8404/
(LTO)
P/N 510172-03-4
8404D/8444/8444D
Cars of the Storage Array
Figure 7-9 The Storage Array
RLS libraries will have one of two differing chassis configurations. Check the rear of
the library to determine which style it is. See Figure 7-10.
7-16
Field–Replaceable Units (FRUs)
501510 Rev. S
Style A
Style B
Solid Rear
Access Panel
Figure 7-10 RLS Chassis Styles
A style chassis have a solid rear, while style B has an access plate that is secured to
the library with six screws. Follow the appropriate Storage Array Removal / Replacement instructions after determining if the library has a style A or B chassis.
7.9.1 Style A Chassis Storage Array Removal
The Top Cover must be opened and the following FRUs must be removed to gain
access to the Storage Array: the Tape Drives in the left half of the Drive Bay, the Carriage Assembly, the Sensor Master Assembly, the Sensor Slave Assembly and finally
the Interconnect PCBA.
Tools Required:
501510 Rev. S
•
No. 1 Phillips Screwdriver
•
No. 2 Phillips Screwdriver
•
5/64ths-inch Hex Driver
•
Small Mirror (optional)
•
Small Flashlight (optional)
1.
Remove the Carriage Assembly as described in Section 7.7.1
2.
If possible, remove all magazines or tapes from the magazines in order to protect
the tape cartridges from possibly being dropped during this procedure. The cars
of RLS-44xx, 5244, 6227, 8202, 8204, 8204D, 8236, 8236C, 8236CD, 8236D, 8244,
8244D, 8404, 8404D, 8444 and 8444D storage arrays move freely and can easily
be arranged so that magazines can be removed. The RLS-4470 storage array
must be aligned with the wide end of its cams facing towards the front of the library before the cars will move freely. This can be done by using a flat blade
screwdriver to turn the storage array motor from below. See Figure 7-14 for the
location of the motors access hole.
Field–Replaceable Units (FRUs)
7-17
3.
Remove the Tape Drive(s) currently installed in the left half of the Drive Bay
(the left drive for all models except the RLS-44xx where the two left drives must
be removed – see Section 7.11.1 for details).
NOTE
In the next step a small mirror and flashlight may be helpful to see the ribbon cable connection.
4.
In the rear left corner of the Drive Bay, just past the drive platform, is a ribbon
cable running from left to right. Pull that cable to the right to unplug it from the
Storage Array Assembly. See Figure 7-11.
Ribbon Cable Connector
Storage Array
Drive Platform
Ribbon Cable
Figure 7-11 Detailed view of the Ribbon Cable attached to the Storage Array Assembly
7-18
5.
On the Interconnect PCBA, unplug the three ribbon cables. Refer to Figure 7-12.
6.
Use diagonal cutters to cut the cable tie nearest the Executive PCBA that secures the round power cable going to the Executive PCBA.
7.
Remove the Sensor Master Assembly by removing the two No. 1 Phillips screws
on the right side and the two 5/64ths hex-head screws on the left side. Refer to
Figure 7-37. Lift the assembly straight up and place in a safe location.
Field–Replaceable Units (FRUs)
501510 Rev. S
EXEC Connector
SENSOR Connector
DRVBAY
Connector
Figure 7-12 Top Connectors on the Interconnect PCBA
Interconnect PCBA Mounting Screws (8)
Front of RLS
Figure 7-13 Interconnect PCBA Mounting Screws (Left Side)
501510 Rev. S
8.
Remove the eight No. 1 Phillips screws that secure the Interconnect PCBA from
the left side of the chassis as shown in Figure 7-13.
9.
Lift the Interconnect PCBA up and out slightly to gain access to the cable connecting it to the Control Panel. Unplug the Control Panel cable and lift the Interconnect PCBA out of the chassis.
Field–Replaceable Units (FRUs)
7-19
7-20
10.
Unplug the cable at the right end of the Sensor Slave Assembly as shown in
Figure 7-38.
11.
If the RLS is not rack-mounted, carefully turn it on its left side (as seen from the
front) so that the Storage Array mounting screws located on the bottom of the library can be accessed.
12.
Using a No. 2 Phillips screwdriver, remove the lower or left two screws from the
chassis bottom that hold the Sensor Slave Assembly in place (see Figure 7-39).
Grasp the assembly before removing the top (last) screw and then gently pull it
out through the Front Panel/Door.
13.
There are three or five (model dependent) Storage Array mounting screws located on the bottom of the chassis. Using a No. 2 Phillips screwdriver, remove
the screws as shown in Figure 7-14. If the RLS is on its side, hold the Storage
Array Assembly in place with one hand while removing the final screw.
14.
Set the RLS chassis upright. Grasp the front and the rear of the Storage Array
Assembly and gently lift it up and then out through the front of the chassis.
Field–Replaceable Units (FRUs)
501510 Rev. S
Storage Array Motor Access Hole
*
Front of RLS
*
Rear of RLS
*
Storage Array Mounting Screws
(5) for RLS-42xx, 6227, 8202, 8236, 8236C, 8236CD & 8236D
(3) for RLS-4470 shown with the *
Front of RLS
Rear of RLS
RLS-5244, 8204, 8204D, 8244,8244D, 8404, 8404D, 8444 & 8444D
Storage Array Mounting Screws
Figure 7-14 Storage Array Mounting Screws located on the Bottom of the RLS
501510 Rev. S
Field–Replaceable Units (FRUs)
7-21
7.9.2 Style A Chassis Storage Array Replacement
This procedure assumes that the Storage Array was removed in Section 7.9.1.
1.
If the RLS is not rack-mounted, carefully turn it on its left side (as seen from the
front) so that the Storage Array mounting screws located on the bottom of the library can be accessed.
2.
While grasping the front and rear of the Storage Array, guide the rear of the array into the chassis. Orient the array such that the connector is facing the drive
bay or inside of the chassis.
3.
Maneuver the rear of the Storage Array into the left rear corner of the chassis
and then align its threaded mounting holes with the holes in the bottom of the
chassis.
4.
Using a No. 2 Phillips screwdriver, replace the three or five (model dependent)
mounting flat-head screws that were removed earlier as shown in Figure 7-14.
5.
Inspect the Sensor Slave Assembly to be sure the LED at its edge is perpendicular to the plane of the board. If it is not perpendicular, the Sensor Slave Assembly should be replaced.
6.
Align the Sensor Slave Assembly to its mounting holes on the chassis bottom and
re-install the three flat-head screws with a No. 2 Phillips screwdriver. See Figure
7-39.
7.
If the RLS is not rack-mounted, carefully turn it back to its upright position.
8.
Reconnect the cable to the right side of the Sensor Slave Assembly as shown in
Figure 7-38.
NOTE
In the next step a small mirror and flashlight may be helpful to see the ribbon cable connection.
9.
7-22
Reach into the back, left corner of the drive bay and reconnect the ribbon cable
that was detached from the connector on the Storage Array. The connector’s keying bump must be pointed down or against the chassis. The connector on the Storage Array nearly touches the chassis bottom and is centered in the opening.
Press firmly on the back of the connector to assure it’s fully inserted into the Storage Array. See Figure 7-11.
10.
Once the Storage Array cable is connected, give the cable a light tug to confirm
it’s firmly attached.
11.
Follow Section 7.11.2 to reinstall the Tape Drive(s) that were removed from in
Section 7.9.1. If the drives are identical, it doesn’t matter to the RLS, which one
is installed at the T1 position.
Field–Replaceable Units (FRUs)
501510 Rev. S
12.
Plug the cable from the Control Panel into the CNTPNL connector on the Interconnect PCBA. Fasten the PCBA to the left side of the chassis with the eight flathead screws previously removed using a No. 1 Phillips screwdriver.
13.
Reinstall the Sensor Master Assembly using the two 5/64ths hex-head screws on
the left side and two flat-head screws on the right side. Tighten the screws with
a 5/64-inch hex driver (Allen wrench) and a No. 1 Phillips screwdriver. See
Figure 7-37. Plug all three ribbon cables back into the Interconnect PCBA as
shown in Figure 7-12.
14.
Place an empty Magazine on Magazine Mount MA (needed for calibration).
15.
Install the Carriage Assembly by following the instructions in Section 7.7.
16.
Proceed to Section 7.24 to calibrate the RLS.
7.9.3 Style B Chassis Storage Array Removal
The Top Cover must be opened and the Carriage Assembly FRU must be removed to
gain access to the Storage Array:
Tools Required:
•
No. 2 Phillips Screwdriver
•
Small Mirror (optional)
•
Small Flashlight (optional)
1.
Remove the Carriage Assembly as described in Section 7.7.1
2.
Remove all magazines or tapes from the magazines in order to protect the tape
cartridges from possibly being dropped during this procedure. The cars of RLS44xx, 5244, 6227, 8202, 8204, 8204D, 8236, 8236C, 8236CD, 8236D, 8244, 8244D,
8404, 8404D, 8444 and 8444D storage arrays move freely and can easily be arranged so that magazines can be removed. The RLS-4470 storage array must be
aligned with the wide end of its cams facing towards the front of the library before the cars will move freely. This can be done by using a flat blade screwdriver
to turn the storage array motor from below. See Figure 7-14 for the location of
the motors access hole.
3.
Remove the Tape Drive(s) currently installed in the left half of the Drive Bay
(the left drive for all models except the RLS-44xx where the two left drives must
be removed – see Section 7.11.1 for details).
NOTE
In the next step a small mirror and flashlight may be helpful to see the ribbon cable connection.
4.
501510 Rev. S
In the rear left corner of the Drive Bay, just past the drive platform, is a ribbon
cable running from left to right. Pull that cable to the right to unplug it from the
Storage Array Assembly. See Figure 7-11.
Field–Replaceable Units (FRUs)
7-23
5.
Using a No. 2 Phillips screwdriver, carefully remove the six screws that secure
the access panel to the rear of the library. See Figure 7-15.
Storage Array removed
from the Library.
Rear of Library
Access Panel
Figure 7-15 Access Panel on Rear of the Library and Storage Array Removed from Library
7-24
6.
If the RLS is not rack-mounted, carefully turn it on its left side (as seen from the
front) so that the Storage Array mounting screws located on the bottom of the library can be accessed.
7.
There are three or five (model dependent) Storage Array mounting screws located on the bottom of the chassis. Using a No. 2 Phillips screwdriver, remove
the screws as shown in Figure 7-14. If the RLS is on its side, hold the Storage
Array Assembly in place with one hand while removing the final screw.
8.
Set the RLS chassis upright. Grasp the front and the rear of the Storage Array
Assembly and gently lift it up and then out through the rear of the chassis. See
Figure 7-15.
Field–Replaceable Units (FRUs)
501510 Rev. S
7.9.4 Style B Chassis Storage Array Replacement
This procedure assumes that the Storage Array was removed in Section 7.9.3.
1.
If the RLS is not rack-mounted, carefully turn it on its left side (as seen from the
front) so that the Storage Array mounting screws located on the bottom of the library can be accessed.
2.
While grasping the front and rear of the Storage Array, guide the front of the array into the chassis. Orient the array such that the connector is facing the drive
bay or inside of the chassis.
3.
Maneuver the rear of the Storage Array into the left rear corner of the chassis
and then align its threaded mounting holes with the holes in the bottom of the
chassis.
4.
Using a No. 2 Phillips screwdriver, replace the three or five (model dependent)
mounting flat-head screws that were removed earlier as shown in Figure 7-14.
5.
If the RLS is not rack-mounted, carefully turn it back to its upright position.
NOTE
In the next step a small mirror and flashlight may be helpful to see the ribbon cable connection.
6.
Reach into the back, left corner of the drive bay and reconnect the ribbon cable
that was detached from the connector on the Storage Array. The connector’s keying bump must be pointed down or against the chassis. The connector on the Storage Array nearly touches the chassis bottom and is centered in the opening.
Press firmly on the back of the connector to assure it’s fully inserted into the Storage Array. See Figure 7-11.
7.
Once the Storage Array cable is connected, give the cable a light tug to confirm
it’s firmly attached.
8.
Align the Access Panels holes with the mounting screw holes in the rear of the
RLS, then reinstall all six of the Access Panels mounting screws. See Figure
7-15.
9.
Follow Section 7.11.2 to reinstall the Tape Drive(s) that were removed from the
RLS in Section 7.9.3 If the drives are identical, it doesn’t matter to the RLS,
which one is installed at the T1 position.
10.
Place an empty Magazine on Magazine Mount MA (needed for calibration).
11.
Install the Carriage Assembly by following the instructions in Section 7.7.
12.
Proceed to Section 7.24 to calibrate the RLS.
501510 Rev. S
Field–Replaceable Units (FRUs)
7-25
7.10 Front Panel/Door Assembly (Bezel)
RLS-4124
(8mm)
P/N 510179-02-1
RLS-42/44xx
(8mm)
P/N 510179-01-3
RLS-5116
(SAIT)
P/N 510179-02-1
RLS-5244
(SAIT)
P/N 510179-01-3
RLS-6227
(SDLT)
P/N 510179-01-3
RLS-8116
(LTO)
P/N 510179-02-1
8236D/8244/8244D
(LTO)
P/N 510179-01-3
RLS-8216C/8216CD/8236C/8236CD
(LTO)
P/N 510179-02-1
RLS-84xx
(LTO)
P/N 510179-01-3
RLS-8202/8204/8204D/8236/
The Carriage Assembly must be removed from the RLS before the Front Panel/Door
assembly can be replaced.
Tools and Materials Required:
•
No. 1 Phillips Screwdriver
•
No. 2 Phillips Screwdriver
•
Loctite 242 Threadlocker P/N 730-0017-6
7.10.1 Front Panel/Door Assembly Removal
1.
Remove the Carriage Assembly by following Section 7.7.1.
2.
Use a No. 2 Phillips screwdriver to remove the three screws that secure both
rack-mounting bracket to the sides of the RLS. See Figure 7-17.
3.
Slide the rack mounting brackets back to remove them from the library and set
them aside.
4.
Using a No. 1 Phillips screwdriver, remove the rear screw from the small link on
both sides. See Figure 7-18. These screws were installed with Loctite 242 and
will require more torque than normal to remove them.
5.
While supporting the Front Panel/Door assembly with one hand, use a No. 1
Phillips screwdriver to remove the upper screw from the large link on both sides.
See Figure 7-18. These screws were installed with Loctite 242 and will require
more torque than normal to remove them.
6.
Carefully remove the Front Panel/Door assembly from its threaded mounts and
set it aside.
7.10.2 Front Panel/Door Assembly Replacement
This procedure assumes that the Front Panel/Door Assembly was removed in Section
7.10.1. The four pan-head screws that held the large and small links were originally
installed with Loctite 242 thread locking adhesive. These screws should again be
7-26
Field–Replaceable Units (FRUs)
501510 Rev. S
locked in place when replacing the Front Panel/Door Assembly. There are three acceptable choices in order of preference:
•
Place a small drop of Loctite 242 on four new pan-head screws supplied
with the replacement assembly. The screws are 4-40 x 3/16” Pan Heads.
•
Place a small drop of Loctite 242 on the four original pan-head screws that
were just removed.
•
Use the original pan-head screws as is. The Loctite residue is better than
nothing.
1.
While supporting the Front Panel/Door assembly with one hand, slide the large
link over the threaded standoff and using a No. 1 Phillips screwdriver, install a
4-40 x 3/16” pan-head screw with Loctite. See Figure 7-18. Repeat for the other
side.
2.
Slide the small link over its threaded standoff and using a No. 1 Phillips screwdriver, install a 4-40 x 3/16” pan-head screws with Loctite. See Figure 7-18. Repeat for the other side.
3.
Slide one of the rack mounting brackets along the side of the Library and align
the three threaded holes in the bracket with the screw holes in the side of the library’s chassis. Using a No. 2 Phillips screwdriver, install the three flat-head
screws that were removed earlier. See Figure 7-17. Repeat for the other side.
4.
Reinstall the Carriage Assembly into the RLS as described in Section 7.
Rack Mounting Brackets
Front Panel/Door
Linkage (2 sets)
Front Panel/Door
Figure 7-16 Front Panel/Door Assembly in the opened position
501510 Rev. S
Field–Replaceable Units (FRUs)
7-27
Left Side
3 Screws
Right Side
3 Screws
Figure 7-17 The Rack Mounting Bracket Screws
Large Link Screw (Loctite)
Large Link
Small Link Screw
(Loctite)
Small Link
Front Panel/Door
Figure 7-18 Front Panel/Door Linkage
7-28
Field–Replaceable Units (FRUs)
501510 Rev. S
7.11 Tape Drive Assembly
P/N
Description
501903-10-8
Tape Drive Assembly, AIT-2, LVD
501903-11-6
Tape Drive Assembly, AIT-3, LVD
501903-14-0
Tape Drive Assembly, AIT-4, LVD
501903-15-7
Tape Drive Assembly, AIT-5 LVD
501903-55-3
Tape Drive Assembly, HP LTO 2, HH LVD
501903-60-3
Tape Drive Assembly, IBM LTO 1, LVD
501903-61-1
Tape Drive Assembly, IBM LTO 2, LVD
501903-62-9
Tape Drive Assembly, IBM LTO 3, LVD
501903-81-9
Tape Drive Assembly, IBM LTO-3, HH LVD
501903-66-0
Tape Drive Assembly, IBM LTO 3, LVD, Ext
501903-73-6
Tape Drive Assembly, IBM LTO 4, LVD
501903-83-5
Tape Drive Assembly, IBM LTO-4, HH LVD
501903-74-4
Tape Drive Assembly, IBM LTO 4, LVD, Ext
501903-63-7
Tape Drive Assembly, IBM LTO 3, DFA
501903-67-8
Tape Drive Assembly, IBM LTO 3, DFA, Ext
501903-64-5
Tape Drive Assembly, IBM LTO 4, DFA
501903-69-4
Tape Drive Assembly, IBM LTO 4, DFA, Ext
501903-84-3
Tape Drive Assembly, IBM LTO 5, DFA
501903-85-0
Tape Drive Assembly, IBM LTO 5, DFA, Ext
501903-86-8
Tape Drive Assembly, IBM LTO 5, SAS
501903-87-6
Tape Drive Assembly, IBM LTO 5, SAS, Ext
501903-88-4
Tape Drive Assembly, IBM LTO 5, HH DFA
501903-89-2
Tape Drive Assembly, IBM LTO 5, SAS, HH Ext
501903-92-6
Tape Drive Assembly (IBM LTO 5, HH DFA)
501903-93-4
Tape Drive Assembly (IBM LTO 5, HH SAS)
501903-95-9
Tape Drive Assembly (IBM LTO 5, HH DFA)
501903-96-7
Tape Drive Assembly (IBM LTO 5, HH SAS)
501903-70-2
Tape Drive Assembly, SDLT 320, LVD
501903-71-0
Tape Drive Assembly, SDLT 640, LVD
501903-90-0
Tape Drive Assembly, SAIT 1, LVD
Table 7-5 Tape Drive Assembly Descriptions
NOTE
Tape Drives can be removed/installed with the RLS powered on or off. If the RLS is not powered
on or if it is malfunctioning, the Front Panel/Door may be opened by inserting a straightened
paper clip into the hole in the Front Panel/Door. See Figure 7-1 in Section 7.4.
501510 Rev. S
Field–Replaceable Units (FRUs)
7-29
7.11.1 Tape Drive Assembly Removal
1.
Open the Front Panel/Door using the OPEN & PARK LEFT command as described in Section 7.4. If the RLS is not powered, push on the right side of the
carriage to move it to the left and out of the way of the Tape Drives.
2.
Rotate the thumbscrew fastener counter-clockwise until the upper end of the
Drive Latch Lever freed. Disregard the Inventory Sentry alarm if it sounds, as
the inventory will be rescanned when the Front Panel/Door is closed.
3.
Gently move the lever down to the bottom of its travel (horizontal position).
4.
Pull the drive all the way out and set it down gently.
5.
If the Tape Drive Assembly will not be replaced immediately, use both hands to
close the Front Panel/Door.
7.11.2 Tape Drive Assembly Replacement
1.
If needed, open the Front Panel/Door using the OPEN & PARK LEFT command
as described in Section 7.4. If the RLS is not powered, push on the right side of
the carriage to move it to the left and out of the way of the Tape Drives.
2.
Orient the Tape Drive Assembly as shown in Figure 7-20. Make sure that the
guiding features located on the bottom of the drive are aligned with the correct
slot in the RLS.
Drive Slot
Drive Lever Latch
Thumbscrew Fastener
AIT Tape Drive
Front Panel/Door
Figure 7-19 Drive Carrier Removal/Insertion
7-30
Field–Replaceable Units (FRUs)
501510 Rev. S
Drive Latch Lever
AIT Tape Drive Carrier
Guiding Features (4)
Drive Latch Lever
Thumbscrew Fastener
Front Panel/Door
Slots for Drives
Figure 7-20 Drive Carrier Orientation – AIT type shown
3.
With the Drive Latch Lever in its fully down position, slide the Tape Drive Assembly into its slot while gliding on the bottom of the carrier. Push gently until it
stops moving. Disregard the Inventory Sentry alarm if it sounds, as the inventory will be rescanned when the Front Panel/Door is closed.
CAUTION
The RLS can be damaged by operating the Drive Latch Lever prematurely or by using excessive
force.
501510 Rev. S
4.
Lift the Drive Latch Lever up, but do not use force. A detent should be felt about
half way through the lever’s travel.
5.
Engage the thumbscrew fastener and turn it clockwise until tight.
6.
Using both hands, close the Front Panel/Door.
7.
Proceed to the next section (7.11.3) to verify the new drive carrier is responding.
Field–Replaceable Units (FRUs)
7-31
7.11.3 Verifying a Tape Drive Assembly Installation
Follow this procedure to verify a newly installed Tape Drive Assembly is recognized
by the RLS:
1.
Press the MENU key.
2.
Press the ENTER key to enter the Configuration menu.
3.
Press the
4.
The drive numbers (model dependent) will be displayed along with the drive’s
status on the right. A status of NONE indicates an empty Tape Drive Assembly
position or the failure of the RLS to recognize the Tape Drive Assembly. You will
have to press the key twice to see drives T3 and T4 with an RLS-44xx or 84xx.
A properly installed drive will indicate a status of RANDOM or DISABLED.
key to select Drive, then press the ENTER key.
7.11.4 Drive Fillers
If an RLS does not have all of its tape drives installed, drive fillers must be installed
in the empty drive bays. The appropriate amount of drive fillers for empty drive bays
were included with the RLS if it was ordered without a full compliment of tape drives.
Please contact Qualstar Technical Support if additional drive fillers are required.
There are two sizes of drive fillers designed to match the width of the various tape
drives. See Figure 7-21.
Drive Filler installed in an RLS.
Drive Filler
RLS-4 221, 4445 , 4470, 82 16, 8216C, 821 6CD, 821 6H, 8 236C, 8236CD, 8404, 84 04D, 8444 & 8 444D = P/N 5104 37-01-5
Tab
RLS-5 244, 6227 , 8202, 82 04, 8204D, 823 6, 8236D, 824 4 & 8244D = P/N 5 10430-01 -0
Figure 7-21 Drive Filler Installation
Follow this procedure to install drive fillers in empty drive bays:
1.
7-32
Open the front panel/door as described in Section 7.4.
Field–Replaceable Units (FRUs)
501510 Rev. S
2.
Insert the drive filler into the empty drive bay making sure that the tab is inserted into the drive slot. See Figure 7-19 for a view of the drive slot location.
3.
Tilt the drive filler upwards and back towards the rear of the library until it is
vertical and fits securely in the drive bay.
4.
To remove a drive filler gently pull it backwards and downward until it is free
from the drive bay.
7.12 Serial Control Panel PCBA
P/N 501507-01-6
The Carriage Assembly must be removed from the RLS before the Serial Control Panel PCBA can be replaced. No calibration is required after replacing the Serial Control
Panel PCBA.
Tools Required:
•
No. 1 Phillips Screwdriver
•
No. 2 Phillips Screwdriver
Chassis
EXIT
READY
6 Mounting Screws
ENTER
MENU
BUSY
FAULT
Figure 7-22 Serial Control Panel PCBA
7.12.1 Serial Control Panel PCBA Removal
501510 Rev. S
1.
Open the Front Panel/Door as described in Section 7.4.
2.
Remove the Carriage Assembly from the RLS (Section 7.7.1).
Field–Replaceable Units (FRUs)
7-33
3.
Disconnect the ribbon cable located on the rear of the Serial Control Panel
PCBA. See Figure 7-23.
4.
Using a No. 1 Phillips screwdriver, remove the six screws that hold the PCBA in
place. See Figure 7-22.
5.
Gently push the PCBA backwards and to the right to remove it.
Serial Control Panel PCBA
INTER Connector on rear of
Serial Control Panel PCBA
Figure 7-23 INTER Connector and Cable
7.12.2 Serial Control Panel PCBA Replacement
This procedure assumes that the Serial Control Panel PCBA was removed in Section
7.12.1.
7-34
1.
Locate the PCBA in place behind the panel and align its mounting holes with
those in the panel.
2.
Using a No. 1 Phillips screwdriver, reinstall the six flat-head screws that were
previously removed. See Figure 7-22.
3.
Dress the ribbon cable under the plastic retainer clip as shown and then reconnect the cable to the INTER connector. See Figure 7-23.
4.
Reinstall the Carriage Assembly into the RLS as described in Section 7.
Field–Replaceable Units (FRUs)
501510 Rev. S
7.13 Drive Bay PCBA Assembly
RLS-4124
(8mm) P/N 501537-05-4
RLS-4221
(8mm) P/N 501537-01-3
RLS-44xx
(8mm) P/N 501537-02-1
RLS-5116
(SAIT) P/N 501537-04-7
RLS-5244
(SAIT) P/N 501537-03-9
RLS-62xx
(SDLT) P/N 501537-03-9
RLS-8116
(LTO)
P/N 501537-04-7
RLS-8216H
(LTO)
P/N 501537-01-3
RLS-8216C/8216CD/8236C/8236CD
(LTO)
P/N 502117-02-1
RLS-8202/8204/8236/8244
(LTO)
P/N 501537-03-9
RLS-8204D/8236D/8244D
(LTO)
P/N 501957-01-3
RLS-8404/8444
(LTO)
P/N 501537-02-1
RLS-8404D/8444D
(LTO)
P/N 502117-01-3
The Power Supply Module(s), all Tape Drives, all Drive Interface Adapters (DIAs), the
Sensor Master Assembly and the X-Clear Emitter PCBA must be removed from the
RLS before the drive bay PCBA can be replaced. No calibration is required after replacing the Drive Bay PCBA FRU.
CAUTION
The pins of the four Channel (1-4) connectors on both sides of SCSI Drive Bay
PCBA Assemblies are easily bent while handling the board. If a bent pin is not
straightened perfectly before a Tape Drive or DIAs is installed, it is quite likely
that the pin will get permanently damaged during the insertion of the mating
connector.
The DFA Drive Bay PCBA Assemblies (P/N 501957-01-3) only have connectors
with pins on the side that faces the Tape Drives, but equal care should be given
when handling. A bent pin that is not straightened perfectly before a Tape Drive
is installed is quite likely to get permanently damaged during the insertion of the
mating connector.
Static electricity can permanently damage the integrated circuits on all RLS
PCBAs. There are several CMOS chips on the Drive Bay PCBA Assembly between
the board and the mounting bracket (not visible while assembled). Standard ANTI-STATIC practices should be employed when working on the RLS. At a minimum, touch an unpainted portion of the RLS chassis before handling any PCBAs.
Required Tools and Supplies:
501510 Rev. S
•
No. 1 Phillips Screwdriver
•
No. 2 Phillips Screwdriver
Field–Replaceable Units (FRUs)
7-35
•
5/64-inch Allen (Hex) Wrench
•
3-inch Cable Tie (P/N 669-1001-9)
•
1/4-inch Hex Nut driver or Wrench
7.13.1 Drive Bay PCBA Assembly Removal
7-36
1.
Remove power from the RLS by first pressing the power switch off and then removing the power cord (two power cords if dual-redundant power supply modules
are installed).
2.
Follow the instructions in Section 7.21 to remove the Power Supply Module(s).
3.
Remove all the Tape Drives as described in Section 7.11.1.
4.
If the RLS is rack-mounted, follow the steps in Section 7.5.1 to extend the RLS
out of the rack.
5.
Open the Top Cover of the RLS as described in Section 7.6.1.
6.
Follow the instructions in Section 7.19 to remove all of the DFA Duplex Cables in
RLS-8236D and 8244D libraries.
7.
Follow the instructions in Section 7.18 to remove all of the Drive Interface Adapters (DIAs) in all other RLSmodels.
8.
Follow the instructions in Section 7.17 to remove the Sensor Master Assembly.
9.
Follow the instructions in Section 7.16 to remove the X-Clear Emitter PCBA.
10.
Disconnect the ribbon cable from the STORAG connector on the Drive Bay PCBA
Assembly. See Figure 7-24. Although shown from the left side, it’s easiest to remove the cable by reaching into the lower-right corner of the space once occupied
by the Power Supply Module(s). The ribbon cable for the Storage Array is shorter
and routed differently than the cable for the Carousel.
11.
Disconnect the ribbon cable from the INTER connector on the Drive Bay PCBA
Assembly. See Figure 7-26.
12.
Disconnect the cable from the POWER1 connector on the PCBA. If present, also
remove the plug with no cable on the POWER2 connector. This plug is required
to insulate the power pins that would otherwise be exposed. See Figure 7-26.
13.
Cut and remove the cable tie holding the power cable to the Drive Bay Assembly.
See Figure 7-25.
14.
Slide the ribbon cable out from under the hold down clamp on the Drive Bay Assembly. See Figure 7-25.
15.
Using a No. 2 Phillips screwdriver and a 1/4-inch hex nut driver or wrench if
needed, remove the three screws and nuts from the top of the PCBA mounting
bracket. See Figure 7-26.
Field–Replaceable Units (FRUs)
501510 Rev. S
16.
Using a No. 2 Phillips screwdriver and a 1/4-inch hex nut driver or wrench if
needed, remove the two screws and nuts from the right side of the chassis that
retain the Drive Bay Assembly. See Figure 7-27.
17.
If the RLS is not rack-mounted, carefully turn it on its left side (as seem from the
front) so that the seven or eight (model specific) Drive Bay Assembly screws located on the bottom of the library can be accessed.
18.
Using a No. 1 Phillips screwdriver, remove the seven or eight screws (model specific) that secure the Drive Bay Assembly to the bottom of the chassis. Note that
Carousel models use seven screws to secure the Drive Bay Assembly and Storage
Array models use eight. See Figure 7-28.
19.
If the RLS is not rack-mounted, carefully turn it back to its upright position.
20.
Using a 1/4-inch hex nut driver or wrench, remove the two nuts that secure the
Top Cover Support Arm to the Drive Bay Assembly. See Figure 7-25.
21.
With the help of an assistant, carefully guide the Top Cover to the left, stopping
before the Top Cover makes contact with the library. DO NOT allow the Top
Cover to rest against the library. Doing so can cause damage to the Top Cover.
22.
On the right (as seen from the front) inside wall of the RLS, there is a bar that
extends from the power switch towards the rear of the library. Press this bar
against the wall just in front of the Drive Bay Assembly and then lift the Drive
Bay Assembly up and out of the library.
23.
Use a number one Phillips screwdriver to remove the 13 screws that secure the
Drive Bay PCBA to its mounting bracket. Do not remove the screws that secure
the plastic shield to the circuit board. See Figure 7-29. Do not remove the screws
that secure the bracket to the cabinet bottom and sides.
24.
Carefully lift the Drive Bay PCBA off its mounting bracket, left side first.
STORAG connector
and cable
Cable on models with a
Storage Array
Figure 7-24 Drive Bay STORAG Connector and Cable
501510 Rev. S
Field–Replaceable Units (FRUs)
7-37
Top Cover
Top Cover Support Arm
Power Cable
Ribbon Cable
Cable Tie
Drive Bay Assembly
Hold Down Clamp
Top Cover Support Arm Nuts (2)
Figure 7-25 Drive Bay Assembly and Drive Bay PCBA Assembly
Assembly Mounting Screws (3)
POWER2 Connector
POWER1 Connector
INTER Connector
Drive Bay PCBA
Assembly Mounting Bracket
Figure 7-26 Drive Bay PCBA Assembly Connectors
7-38
Field–Replaceable Units (FRUs)
501510 Rev. S
Drive Bay Assembly
Mounting Screws (2)
Rear of RLS
RLS 4000/6000/8116/8202/8216H/8236/8236D/8402H Models
Drive Bay Assembly
Mounting Screws (3)
Rear of RLS
RLS 5116/5244/8204/8204D/8244/8244D/8404/8404D/8444/8444D Models
501510 Rev. S
Field–Replaceable Units (FRUs)
7-39
Drive Bay Assembly
Mounting Screws (2)
Rear of RLS
RLS 4000/6000/8116/8202/8216C/8216CD/8216H/8236/8236C/8236CD/8236D/8402H Models
Drive Bay Assembly
Mounting Screws (3)
Rear of RLS
RLS 5116/5244/8204/8204D/8244/8244D/8404/8404D/8444/8444D Models
Figure 7-27 Right Side Drive Bay Assembly Mounting Screws
7-40
Field–Replaceable Units (FRUs)
501510 Rev. S
Drive Bay Assembly
Mounting Screws (7)
RLS-41/42xx Models
Rear of RLS
Drive Bay Assembly
Mounting Screws (8)
RLS-44xx/62xx/8116/8202/8216C/81216CD/8216H/
8236/8236C/8236CD/8236D/8402H Models
Rear of RLS
Drive Bay Assembly
Mounting Screws (4)
RLS 5116/5244/8204/8204D/8244/8244D/
8404/8404D/8444/8444D Models
Rear of RLS
Figure 7-28 Bottom Mounting Screws of the Drive Bay Assembly
501510 Rev. S
Field–Replaceable Units (FRUs)
7-41
Drive Bay PCBA Mounting Screws (13)
Drive Bay PCBA Assembly
Do Not Remove these Screws (5)
A SCSI PCBA is shown, but the screw locations are identical for DFA PCBA’s.
Figure 7-29 Drive Bay PCBA Assembly in Library and Front Side Detailed View
7.13.2 Drive Bay Assembly Replacement
This procedure assumes the Drive Bay PCBA Assembly was removed in Section
7.13.1. There are three different versions of the Drive Bay PCBA Assembly. Make certain the replacement FRU bears the same part number as the removed assembly.
7-42
1.
Position the Drive Bay PCBA on its mounting bracket with its front side (Figure
7-29) facing the Front Panel/Door and the POWERx headers at the top as shown
in Figure 7-26.
2.
Align the 13 mounting holes in the PCBA with those in its bracket and replace
the 13 screws removed earlier using a number one Phillips screwdriver. See
Figure 7-29.
3.
Reconnect the ribbon cable to the STORAG connector on the Drive Bay PCBA
Assembly. See Figure 7-24. Although shown from the left side, it’s easiest to
access the cable by reaching into the lower-right corner of the space once occupied by the Power Supply Module(s). The ribbon cable for the Storage Array is
shorter and routed differently than the cable for the Carousel.
4.
Carefully lower the Drive Bay Assembly into the library and align its mounting
holes with those in the bottom of the library.
Field–Replaceable Units (FRUs)
501510 Rev. S
5.
Using a No. 2 Phillips screwdriver and a 1/4-inch hex nut driver or wrench if
needed, replace the two pan-head screws and nuts that were removed earlier
from the right side of the chassis. See Figure 7-27.
6.
Using a No. 2 Phillips screwdriver and a 1/4-inch hex nut driver or wrench if needed,
replace the three pan-head screws and nuts that were removed earlier from the top
of the Drive Bay PCBA Assembly mounting bracket. See Figure 7-26.
7.
If the RLS is not rack-mounted, carefully turn it on its left side (as seen from the
front) so that the Drive Bay Assembly mounting holes located on the bottom of
the library can be accessed.
8.
Using a No. 1 Phillips screwdriver, replace the seven or eight (model specific)
Drive Bay Assembly mounting flat-head screws that were removed earlier from
the bottom of the library. Note that Carousel models use seven screws to secure
the Drive Bay Assembly and Storage Array models use eight. See Figure 7-28.
9.
If the RLS is not rack-mounted, carefully turn it back to its upright position.
10.
Move the Top cover into position so that its Support Arm bracket fits over the
two threaded posts in the top of the Drive Bay Assembly. See Figure 7-25.
11.
Using a 1/4-inch hex nut driver or wrench, replace the two nuts that secure the
Top Cover Support Arm to the Drive Bay Assembly.
12.
Reconnect the cable to the POWER1 connector and the plug without a cable (if
present) to the POWER2 connector on the Drive Bay PCBA Assembly. See
Figure 7-26.
13.
Install a cable tie to hold the power cable to the bracket on the top of the Drive
Bay PCBA Assembly. See Figure 7-25.
14.
Reconnect the ribbon cable to the INTER connector on the Drive Bay PCBA Assembly. See Figure 7-26.
15.
Slide the ribbon cable under the hold down clamp on the drive Bay Assembly.
See Figure 7-25.
16.
Remove the protective inserts (and any tape holding them in place) from both
sides (front & rear) of all the Channel connectors on the Drive Bay PCBA Assembly. Install these on the PCBA that was just removed.
17.
Follow the instructions in Section 7.16 to reinstall the X-Clear Emitter PCBA.
18.
Follow the instructions in Section 7.17 to reinstall the Sensor Master Assembly.
19.
Follow the instructions in Section 7.19 to reinstall all of the DFA Duplex Cables
in RLS-8236D and 8244D libraries.
20.
Follow the instructions in Section 7.18 to reinstall all of the SCSI Drive Interface
Adapters (DIAs) in all other RLS models.
21.
Follow the instructions in Section 7.21 to reinstall the Power Supply Module(s).
501510 Rev. S
Field–Replaceable Units (FRUs)
7-43
22.
If the RLS is rack-mounted, retract it back into the rack by following Section
7.5.2.
23.
Re-install all of the Tape Drives as described in Section 7.11.2
7.14 Executive-XI PCBA
P/N 501547-01-2
The Top Cover must be opened and the IPM must be removed from the RLS before the
Executive XI PCBA can be replaced.
Tools Required: No. 2 Phillips Screwdriver
7.14.1 Executive-XI PCBA Removal
7-44
1.
Remove power from the RLS by first pressing the power switch off and then removing the power cord (two power cords if dual-redundant power supply modules
are installed).
2.
If the RLS is rack-mounted, follow the steps in Section 7.5.1 to extend the RLS
out of the rack.
3.
Using a No. 2 Phillips screwdriver, remove the three screws that retain the Executive Chassis to the Top Cover. See Figure 7-30.
4.
Use a No. 2 Phillips screwdriver to remove the four screws from the right (as
viewed from the front) edge of the Top Cover as shown in Figure 7-3.
5.
Lift the Top Cover until the support arm locks in its open position.
6.
Follow the steps in Section 7.20 to remove the library’s IPM.
7.
Disconnect the INTER and POWER connectors from the Executive PCBA. See
Figure 7-31.
8.
Lift the Executive Chassis vertically and using a No. 1 Phillips screwdriver, remove the two Executive PCBA mounting screws. See Figure 7-32.
9.
Lower the chassis back down and slide the Executive board out of the chassis.
Field–Replaceable Units (FRUs)
501510 Rev. S
3 Screws
Figure 7-30 Executive Chassis Retaining Screws
SENSOR Connector
DRIVEBAY Connector
Interconnect PCBA
POWER
Connector
INTER
Connector
Executive PCBA
Figure 7-31 The Executive and Interconnect PCBA Connectors
501510 Rev. S
Field–Replaceable Units (FRUs)
7-45
Remove these 2 PCBA
Mounting Screws
Executive Chassis
Figure 7-32 The Executive PCBA Mounting Screws
7.14.2 Executive-XI PCBA Replacement
This procedure assumes the Executive-XI PCBA was removed in Section 7.14.1.
7-46
1.
Carefully slide the replacement Executive PCBA into its chassis and engage the
slot in the board with the plastic rail in the middle of its chassis. Align its two
threaded inserts with the holes in the chassis.
2.
While holding the board so it won’t shift, lift the Executive Chassis vertically and
using a No. 1 Phillips screwdriver, replace the two flat-head mounting screws.
See Figure 7-32. Lower the Executive Chassis back down.
3.
Reconnect the SENSOR and DRIVEBAY connectors to the Interconnect PCBA.
See Figure 7-31.
4.
Reconnect the INTER and POWER cables to the Executive PCBA (Figure 7-31).
5.
Follow the steps in Section 7.20 to reinstall the library’s IPM.
6.
Follow the steps in Section 7.6.2 to close the library’s Top Cover.
7.
Using a No. 2 Phillips screwdriver, install the three flat-head screws that retain
the Executive chassis to the Top Cover as shown in Figure 7-30.
Field–Replaceable Units (FRUs)
501510 Rev. S
8.
If the RLS is rack-mounted, retract it back into the rack by following Section
7.5.2.
9.
Proceed to Section 7.24 to calibrate the RLS
7.15 Door Lock PCBA
P/N 501587-01-8
The Front Panel/Door Assembly must be removed from the RLS before the Door Lock
PCBA can be replaced. The RLS does not need to be calibrated after replacing the
Door Lock PCBA FRU.
Tools Required:
•
No. 1 Phillips Screwdriver
•
No. 2 Phillips Screwdriver
Chassis Screws (4)
Door Lock PCBA
Mounting Screws (2)
Figure 7-33 Door Lock PCBA and Chassis Screws
7.15.1 Door Lock PCBA Removal
501510 Rev. S
1.
Remove the Carriage Assembly as described in Section 7.7.1
2.
Remove the Front Panel/Door Assembly from the RLS as described in Section
7.10.1.
3.
Disconnect the ribbon cable from the SENSOR connector on the rear of the Door
Lock PCBA.
4.
Using a No. 1 Phillips screwdriver, remove the two Door Lock PCBA mounting
screws. See Figure 7-33.
5.
Using a No. 2 Phillips screwdriver, remove the four chassis screws to allow for
PCBA removal. See Figure 7-33.
Field–Replaceable Units (FRUs)
7-47
6.
Carefully pull on the front, right side of the chassis to create enough space for
the PCBA to be removed.
7.
Carefully remove the Door Lock PCBA from the library.
7.15.2 Door Lock PCBA Replacement
This procedure assumes that the Door Lock PCBA was removed in Section 7.15.1.
1.
Carefully pull on the front, right side of the chassis to create enough space for
the PCBA to be inserted.
2.
Insert the PCBA into the RLS with the SENSOR connector towards the top and
turn it so that the two mounting screw threaded inserts are aligned with the
screw holes in the front of the chassis. See Figure 7-33.
3.
Using a No. 1 Phillips screwdriver, reinstall the two door lock PCBA mounting
screws that were removed earlier. See Figure 7-33.
4.
Reconnect the ribbon cable to the SENSOR connector on the rear of the PCBA.
5.
Using a No. 2 Phillips screwdriver, reinstall the four chassis screws that were
removed earlier. See Figure 7-33.
6.
Reinstall the Front Panel/Door Assembly onto the RLS as described in Section
7.10.2.
7.
Reinstall the Carriage Assembly as described in Section 7.
7.16 X-Clear Emitter PCBA
P/N 501597-01-7
The Carriage Assembly must be removed from the RLS before the X-Clear Emitter
PCBA can be replaced.
Tools Required:
•
No. 1 Phillips Screwdriver
•
No. 2 Phillips Screwdriver
7.16.1 X-Clear Emitter PCBA Removal
7-48
1.
Remove the Carriage Assembly from the RLS (Section 7.7.1).
2.
Using a No. 2 Phillips screwdriver, remove the five screws from the right side of
the RLS that hold the Cover Bracket in place. Remove the cover and set it aside.
See Figure 7-35.
3.
Disconnect the ribbon cable from the X-Clear Emitter PCBA. See Figure 7-34.
4.
Using a No. 1 Phillips screwdriver, remove the two screws from the right side of
the RLS that hold the PCBA in place. See Figure 7-35.
Field–Replaceable Units (FRUs)
501510 Rev. S
5.
Remove the X-Clear Emitter PCBA form the RLS.
X-Clear Emitter PCBA
Right Side of the
RLS Chassis
Ribbon Cable
Connector
Figure 7-34 X-Clear Emitter PCBA shown with Cover Removed
5 Cover Bracket Screws
Front of RLS
2 X-Clear Emitter PCBA
Mounting Screws
Figure 7-35 The X-Clear Emitter PCBA Screws on the Right Side of the RLS
7.16.2 X-Clear Emitter PCBA Replacement
This procedure assumes that the X-Clear Emitter PCBA was removed in Section
7.16.1. The RLS must be calibrated after replacing the X-Clear Emitter PCBA FRU.
501510 Rev. S
1.
Align the threaded inserts in the PCBA with the mounting holes in the right side
of the library’s chassis and use a No. 1 Phillips screwdriver to reinstall the two
flat-head mounting screws. See Figure 7-35.
2.
Reconnect the ribbon cable to the X-Clear Emitter PCBA. See Figure 7-34.
Field–Replaceable Units (FRUs)
7-49
3.
Align the mounting screw threaded inserts in the cover with the mounting holes
in the right side of the library’s chassis and use a No. 2 Phillips screwdriver to
reinstall the Cover Bracket with five flat-head screws. See Figure 7-35.
4.
Reinstall the Carriage Assembly into the RLS (Section 7).
5.
Proceed to Section 7.24 to calibrate the RLS.
7.17 Sensor Master and Slave Assemblies
RLS-4124
(8mm)
Please contact Technical Support
RLS-4221
(8mm)
Please contact Technical Support
RLS-44XX
(8mm)
Please contact Technical Support
RLS-5116
(SAIT)
Please contact Technical Support
RLS-52XX
(SAIT)
Please contact Technical Support
RLS-62XX
(SDLT)
Please contact Technical Support
RLS-8116
(LTO)
Please contact Technical Support
RLS-8216H
(LTO)
Please contact Technical Support
RLS-82XX/82XXD
(LTO)
Please contact Technical Support
RLS-8404/8404D
(LTO)
Please contact Technical Support
RLS-8444/8444D
(LTO)
Please contact Technical Support
Sensor Master and Slave Assemblies are always replaced in pairs and the Carriage
Assembly must be removed from the RLS before the FRU can be replaced. The RLS
must be calibrated after replacing the Sensor Master and Slave Assemblies FRU.
Required Tools and Supplies:
•
No. 1 Phillips Screwdriver
•
No. 2 Phillips Screwdriver
•
5/64-inch Allen (Hex) Wrench
•
3-inch Cable Tie (P/N 669-1001-9)
Sensor Master PCBA Bracket
Interconnect PCBA
INTER Connector
located here
SENSOR Connector
located here
2 Bracket Screws
on right side of chassis
7-50
Field–Replaceable Units (FRUs)
501510 Rev. S
Figure 7-36 The Sensor Master PCBA Bracket
7.17.1 Sensor Master Assembly Removal
1.
Remove the Carriage Assembly from the RLS as described in Section 7.7.1.
2.
Remove the rightmost Tape Drive Assembly as described in Section 7.11.1
3.
Disconnect the ribbon cable from the INTER connector on the left side of the
PCBA as seen from the front of the RLS. See Figure 7-36.
4.
Disconnect the ribbon cable from the SENSOR connector on the right side of the
PCBA as seen from the front of the RLS. See Figure 7-36.
5.
Cut and remove the two cable ties holding the power cable that runs between the
Drive Bay and Executive PCBAs.
6.
Using a No. 2 Phillips screwdriver, remove the two screws from the right side of the
RLS that hold the Sensor Master PCBA bracket in place. See Figure 7-37.
Front
Front
2 Phillips Flat-Head Screws
on the Right Side of the Chassis
2 Allen Head Screws
on the Left Side of the Chassis
Figure 7-37 Screws that secure the Sensor Master PCBA Bracket in place
501510 Rev. S
7.
Using a 5/64-inch Allen (hex) wrench, remove the two Allen-head screws from
the left side of the RLS that hold the Sensor Master PCBA bracket in place. See
Figure 7-37.
8.
Dip the left side of the bracket down so that it clears the Interconnect PCBA and
then remove it from the chassis.
Field–Replaceable Units (FRUs)
7-51
7.17.2 Sensor Slave Assembly Removal
SENSOR Connector
Sensor Slave PCBA Bracket
Figure 7-38 The Sensor Slave PCBA Bracket and SENSOR Connector
1.
Disconnect the ribbon cable from the SENSOR connector on the right side of the
PCBA as seen from the front of the RLS. See Figure 7-38.
2.
If the RLS is a tabletop model, slide the RLS forward far enough over the edge of
the table so that the Sensor Slave PCBA bracket screws located on the bottom of
the library can be accessed. See Figure 7-39.
3.
There are three bracket screws located on the bottom of the library. Using a No.
1 Phillips screwdriver, remove the screws as shown in See Figure 7-39.
4.
Remove the Sensor Slave PCBA bracket from the chassis.
Front of RLS
Remove these 3 screws
Figure 7-39 Bottom View of the RLS showing the Sensor Slave PCBA Bracket Screws
7-52
Field–Replaceable Units (FRUs)
501510 Rev. S
7.17.3 Sensor Slave Assembly Replacement
This procedure assumes that the Sensor Slave Assembly was removed in Section
7.17.2.
1.
Position the bracket inside of the library’s chassis, aligning the three threaded
holes with the screw holes in the bottom of the RLS.
2.
Using a No. 1 Phillips screwdriver, replace the three 6-32 x 1/4 flat-head screws
on the bottom of the RLS that hold the Sensor Master PCBA bracket in place.
See Figure 7-39.
3.
Reconnect the ribbon cable to the SENSOR connector on the right side of the
PCBA as seen from the front of the RLS. See Figure 7-38.
7.17.4 Sensor Master Assembly Replacement
This procedure assumes the Sensor Master Assembly was removed in Section 7.17.1.
501510 Rev. S
1.
Carefully position the bracket in between the left and right sides of the chassis,
aligning the threaded holes with the screw holes on the sides of the RLS. See
Figure 7-37.
2.
Using a 5/64-inch Allen (hex) wrench, replace the two Allen-head screws that
were removed earlier from the left side of the RLS that hold the Sensor Master
PCBA bracket in place. See Figure 7-37.
3.
Using a No. 2 Phillips screwdriver, replace the two flat-head screws that were
removed earlier from the right side of the RLS that hold the Sensor Master
PCBA bracket in place. See Figure 7-37.
4.
Reconnect the ribbon cable to the INTER connector on the left side of the PCBA
as seen from the front of the RLS. See Figure 7-36.
5.
Reconnect the ribbon cable to the SENSOR connector on the right side of the
PCBA as seen from the front of the RLS. See Figure 7-36.
6.
Install two cable ties to hold the power cable that runs between the Drive Bay
and Executive PCBAs.
7.
Reinstall the rightmost Tape Drive Assembly as described in Section 7.11.2.
8.
Reinstall the Carriage Assembly into the RLS as described in Section 7.7.2.
9.
Proceed to Section 7.24 to calibrate the RLS.
Field–Replaceable Units (FRUs)
7-53
7.18 Drive Interface Adapter (DIA)
Passive Adapter
P/N 501677-01-7
Quick-swappable Tape Drive Assemblies
Active Adapter
P/N 501687-01-6
Hot-swappable Tape Drive Assemblies
SAS Adapter
P/N 502087-01-8
The RLS Power Supply Module(s) must be removed before a DIA can be replaced. The
DIA type (Quick / Hot swappable) installed can be changed at this time. No calibration is required after replacing/changing a DIA.
Tools Required: No. 2 Phillips Screwdriver
CAUTION
The pins of the four Channel(1-4) connectors on both sides of the Drive Bay PCBA
Assembly are easily bent while working around the PCBA. If a bent pin is not
straightened perfectly before a Tape Drive or DIA PCBA is installed, it is quite
likely that the pin will get permanently damaged during the insertion of the mating connector.
7.18.1 Drive Interface Adapter Removal
7-54
1.
Remove power from the RLS by first pressing the power switch off and then removing the power cord (two power cords if dual-redundant power supply modules
are installed).
2.
Disconnect all SCSI cables from the Tape Drives (T1-T4). Note how they were
connected so they can be reconnected in the same manner.
3.
Follow the instructions in Section 7.21 to remove the Power Supply Module(s).
4.
Open the Top Cover of the RLS as described in Section 7.6.1.
5.
Using a No. 2 Phillips screwdriver, remove the drive interface adapter screw located to the left of the SCSI connectors for each adapter that is installed. See
Figure 7-40.
6.
Using a No. 2 Phillips screwdriver, remove the three screws that secure the retaining bracket to the library’s chassis. See Figure 7-40.
7.
Carefully lift the retaining bracket away from the library’s chassis and set it
aside.
8.
Carefully pull the DIA(s) straight back to disconnect it/them from the connector(s) on the Drive Bay PCBA Assembly. Exercise extreme caution to prevent
bending any of the pins on the Drive Bay PCBA Assembly.
9.
Remove the DIA(s) from the RLS.
Field–Replaceable Units (FRUs)
501510 Rev. S
Drive Interface Adapter Screws
(1 per Adapter)
Drive Interface Adapter
Retaining Bracket
3 Screws that secure the
Retaining Bracket to the RLS Chassis
Figure 7-40 Drive Interface Adapters shown at the rear of the RLS
7.18.2 Drive Interface Adapter (DIA) Replacement
501510 Rev. S
1.
Check that all the pins on the Drive Bay PCBA Assembly Channel connectors
are perfectly straight before installing a DIA. If not, use long nose pliers to
straighten the bent pins. Failure to have all pins straight, may result in permanent damage to the pins.
2.
Carefully align the Channel mating connector on the DIA with its mate on the Drive
Bay PCBA Assembly. Slowly and gently push the DIA into the Drive Bay PCBA Assembly Channel connector. DO NOT FORCE this mating. If significant resistance is
met, pull the DIA off and check for bent pins on the Drive Bay PCBA Assembly. Repeat this step for each DIA that is being replaced/changed.
3.
Position the retaining bracket on the library’s chassis, so that the three screw
holes are aligned with the threaded holes of the chassis.
4.
Using a No. 2 Phillips screwdriver, replace the three flat-head screws that secure
the retaining bracket to the library. See Figure 7-40.
5.
Carefully align the threaded hole in each Drive Interface Adapter with the screw
holes in the retaining bracket.
6.
Using a No. 2 Phillips screwdriver, replace each of the Drive Interface Adapter
flat-head screws that secure the DIAs to the retaining bracket. See Figure 7-40.
7.
Follow the instructions in Section 7.21 to reinstall the Power Supply Module(s).
Field–Replaceable Units (FRUs)
7-55
8.
Reconnect the SCSI cables to the Tape Drives (T1-T4) as they were originally
connected.
7.19 DFA (Direct Fibre Attach) Duplex Cable
RLS-8216CD/8236CD/8236D/
8204D/8244D/8404D/8444D
(LTO)
P/N 510463-01-1
The RLS Power Supply Module(s) must be removed before a DFA Duplex Cable can be
replaced. No calibration is required after replacing a DFA Duplex Cable.
Tools Required: No. 2 Phillips Screwdriver
CAUTION
The DFA Duplex Cables are sensitive to bending so care must be taken when
handling the cables. Do not allow them to be bent, crimped or pinched during
the replacement process.
7.19.1 DFA Duplex Cable Removal
7-56
1.
Remove power from the RLS by first pressing the power switch off and then removing the power cord (two power cords if dual-redundant power supply modules
are installed).
2.
Disconnect all fibre cables from the Tape Drives (T1, T2, T3 & T4). Note how
they were connected so they can be reconnected in the same manner.
3.
Follow the instructions in Section 7.21 to remove the Power Supply Module(s).
4.
Open the Top Cover of the RLS as described in Section 7.6.1.
5.
Steps 6 through 8 only apply to RLS-8204D, 8244D, 8404D & 8444D libraries.
Skip to step 9 for RLS-8216CD, 8236CD & 8236D libraries.
6.
Using a No. 2 Phillips screwdriver, remove the screw located to the left of the fibre channel connectors for each adapter that is installed. See Figure 7-41. Carefully push the fibre channel connector and its bracket into the library.
7.
Using a No. 2 Phillips screwdriver, remove the three screws that secure the retaining bracket to the library’s chassis. See Figure 7-41.
8.
Carefully lift the retaining bracket away from the library’s chassis and set it
aside.
9.
Carefully pull the DFA Duplex Cables black connector straight back from the
rear of the Drive Bay PCBA Assembly to disconnect it from the connector on the
PCBA. Press the top and bottom of the DFA Duplex Cables connector attached to
the rear of the fibre channel connector and pull straight back to disconnect it.
Repeat this step for each cable that is being replaced.
Field–Replaceable Units (FRUs)
501510 Rev. S
10.
Remove the DFA Duplex Cable(s) from the RLS.
Fibre Channel Connector Screws
(1 per Connector)
Fibre Channel Connectors & Brackets
DFA Duplex Cable
Retaining Bracket
3 Screws that secure the
Retaining Bracket to the RLS Chassis
Figure 7-41 DFA Duplex Cables shown at the rear of an RLS-8236D
7.19.2 DFA Duplex Cable Replacement
501510 Rev. S
1.
Carefully align the black connector on the DFA Duplex Cable with its mate on the
Drive Bay PCBA Assembly. Note that the connector is keyed. Slowly and gently
push the cables connector into the PCBA connector. Carefully take the other end of
the DFA Duplex Cable and insert it into its mating connector on the rear of the fibre
channel connector. Note that the connector is also keyed Repeat this step for each
cable that is being replaced.
2.
Steps 3 through 6 only apply to RLS-8204D, 8244D, 8404D & 8444D libraries.
Skip to step 7 for RLS-8236D libraries.
3.
Position the retaining bracket on the library’s chassis, so that the three screw
holes are aligned with the threaded holes of the chassis.
4.
Using a No. 2 Phillips screwdriver, replace the three flat-head screws that secure
the retaining bracket to the library. See Figure 7-41.
5.
Carefully align the threaded hole in each fibre channel connectors bracket with
the screw holes in the retaining bracket.
Field–Replaceable Units (FRUs)
7-57
6.
Using a No. 2 Phillips screwdriver, replace each of the fibre channel connectors
flat-head screws that secure the connectors to the retaining bracket. See Figure
7-41.
7.
Follow the instructions in Section 7.21 to reinstall the Power Supply Module(s).
8.
Reconnect the fibre channel cables to the Tape Drives (T1, T2, T3 & T4) as they
were originally connected.
7.20 Interface Personality Module (IPM)
SCSI
P/N 501567-01-0
SCSI with Q-Link
P/N 501567-02-8
Fibre Channel with Q-Link P/N 501697-01-5
The Interface Personality Module (IPM) plugs into the rear of the RLS and provides
the system interface to the Medium-changer. The type of IPM can be changed with
this procedure. No calibration is required after replacing/changing an IPM.
Thumbscrew Fasters (2)
IPM (Interface Personality Module)
Figure 7-42 IPM Location on the rear of the RLS
7.20.1 IPM Removal
7-58
1.
Remove power from the RLS by first pressing the power switch off and then removing the power cord (two power cords if Dual-Redundant Power Supply Modules are installed).
2.
Detach all cables connected to the IPM except for the COMM-LINK cable on Fibre Channel IPMs. Note how the cables were connected so they can be reconnected in the same manner upon completion of this procedure.
Field–Replaceable Units (FRUs)
501510 Rev. S
3.
Unfasten the IPM by turning its two thumbscrew fasteners counter-clockwise
until the threads are fully disengaged.
4.
Grasp the bottom tabs and gently pull the IPM straight out the back of the RLS.
7.20.2 IPM Replacement
This procedure assumes that the IPM was removed in Section 7.20.1.
1.
Carefully align the IPM board with the slide rails inside the IPM opening in the
rear of the RLS.
2.
Gently push on the bottom tabs. The IPM will slide easily until its connector
makes contact with its mate. Now push firmly until a snap is felt indicating the
mating connectors are fully seated.
3.
Rotate the two thumbscrew fasteners clockwise until they are fully engaged.
4.
Reattach all cables that were removed above.
7.21 Power Supplies
The four types of RLS Power Supply Modules available are described in Table 7-6.
The type of Power Supply Module can be changed in this procedure except a 125W
supply can only be installed in an RLS-4124, 4221, 5116 or an 8116 without a Fibre
Channel IPM and RLS-8216C, 8216CD, 8236C, 8236CD & 8216H libraries only accept
the 160W supply. Two half-sized modules are used in parallel to form a dualredundant power supply system. No calibration is required after changing any Power
Supply Module.
P/N
Description
Package
Qty
Model Usage
510170-01-2
Power Supply 125W
Full-sized module
1
RLS-4124, 4221 5116, 8116 & 8216H
only without Fibre Channel
510170-02-0
Power Supply 250W
Full-sized module
1
All models, except
RLS-4124, 4221, 5116, 8116, 8216C,
8216CD, 8236C, 8236CD & 8216H
510170-03-8
Power Supply 250W
Half-sized module
2
All models, except
RLS-4124, 4221, 5116, 8116, 8216C,
8216CD, 8236C, 8236CD & 8216H
510170-04-6
Power Supply 160W
Full-sized module
1
RLS-8216C, 8216CD, 8236C, 8236CD
& 8216H only
Table 7-6 Power Supply Module Descriptions
501510 Rev. S
Field–Replaceable Units (FRUs)
7-59
Thumbscrew Fastener
Power Supply Module
(1 of 2)
Handle
Figure 7-43 Power Supply Module Location (Dual 510170-03-8 modules shown)
CAUTION
Only dual-redundant Power Supply Modules (P/N 510170-03-8) can be replaced
while the RLS is powered on. Do not attempt to replace Power Supply Modules
(P/N 510170-01-2 or 510170-02-0) with power applied to the RLS.
7.21.1 Removal of a Single Power Supply Module
1.
Push the Power Switch on the Front Panel/Door until its button is in the out position.
2.
Remove the power cord from the Power Supply Module.
3.
Turn the two thumbscrew fasteners counter-clockwise until they’re fully disengaged.
4.
Grasp the handle and gently pull the Power Supply Module out of the RLS.
7.21.2 Replacement of a Single Power Supply Module
This procedure assumes the Power Supply Module was removed in Section 7.21.1.
7-60
1.
Carefully align the Power Supply Module with its opening.
2.
Push the Power Supply Module into the rear of the library until you feel it snap
into place.
3.
Engage the two thumbscrew fastener(s) and turn them clockwise until they’re
fully engaged.
Field–Replaceable Units (FRUs)
501510 Rev. S
4.
Reattach the power cord.
5.
Push the Power Switch on the Front Panel/Door to restore power to the RLS.
7.21.3 Hot Removal of a Dual-Redundant Power Supply Module
1.
DO NOT push the Power Switch as this will turn off the RLS.
2.
IDENTITY THE FAILED module! An alert on the LCD should indicate if the left
or right module failed. Remember that left and right are backwards when addressing the Power Supply Modules from the rear of the library. The failed module’s LED will not be illuminated.
3.
Remove the power cord from the FAILED Power Supply Module.
4.
Turn the thumbscrew fastener counter-clockwise until it’s fully disengaged.
5.
Grasp the handle and gently pull the Power Supply Module backwards out of the
RLS.
7.21.4 Hot Replacement of a Dual-Redundant Power Supply Module
This procedure assumes that one of the Dual-Redundant Power Supply Modules was
removed in Section 7.21.3.
1.
DO NOT push the Power Switch as this will turn off the RLS.
2.
Carefully align the Power Supply Module with its opening.
3.
Push the Power Supply Module into the rear of the library until you feel it snap
into place.
4.
Engage the thumbscrew fastener and turn it clockwise until it’s fully engaged.
5.
Reattach the power cord.
6.
DO NOT push the Power Switch as this will turn off the RLS.
7.22 Fixed Slots
P/N 500712-01-3
The Fixed Slots in RLS-4116 and 4221 libraries should be inspected and cleaned at
least once per year and replaced if any broken parts are noticed. Also, each Fixed Slot
should be routinely replaced every five years. All Fixed Slots should be changed together.
Tools Required:
501510 Rev. S
•
No. 1 Phillips Screwdriver
•
No. 2 Phillips Screwdriver
Field–Replaceable Units (FRUs)
7-61
Fixed Slots
Notches in the
Fixed Slots
Fixed Slot
Mounting Screws
(2 per slot)
Figure 7-44 Fixed Slots as seen through the Front Panel/Door of an RLS-4221
7.22.1 Fixed Slot Removal
1.
Remove the Carriage Assembly from the RLS as described in Section 7.7.1.
2.
Using a No. 1 Phillips screwdriver, remove the two Fixed Slots mounting screws.
Remove the Fixed Slot. Repeat this step for the remaining Fixed Slots.
7.22.2 Fixed Slot Replacement
7-62
1.
Position the Fixed Slot in the library so that the end of the Fixed Slot with the
notches is facing up.
2.
Align the mounting holes in the Fixed Slot with the threaded holes in the RLS
and using a No. 1 Phillips screwdriver, replace the two pan-head screws that
were removed earlier. Repeat this step for the remaining Fixed Slots.
3.
Reinstall the Carriage Assembly into the RLS as described in Section 7.
4.
Proceed to Section 7.24 to calibrate the RLS.
Field–Replaceable Units (FRUs)
501510 Rev. S
7.23 Air Filter
P/N 510096-01-9
Center Rib
Notch in
Air Filter
Air Filter Element
Left Side Slot
Lip in
Front Panel/Door
Front Panel/Door
Right Side Slot
Figure 7-45 Air Filter with the Front Panel/Door Open
7.23.1 Air Filter Inspection
The RLS and the Tape Drives are cooled by outside air that is drawn into the RLS enclosure through an Air Filter. This filter keeps dust and dirt from entering the enclosure, as its presence could degrade the reliability of the Tape Drives and media. If the
filter becomes clogged with dust and dirt, the amount of airflow will be diminished.
Diminished airflow could cause the Tape Drives to run hotter, again degrading their
reliability. Therefore, it is important to periodically check the Air Filter and replace it
when it becomes dirty.
The time between filter changes is very dependent upon the local environment. Inspect the filter frequently when the RLS is first installed. Then, when the effects of
the local environment become known, adjust the inspection schedule accordingly.
•••••••••••••••••••
Check the air
filter.
ENTER when done
Figure 7-46 Air Filter Alert
The RLS automatically keeps track of its power-on time. The Filter Days value in
the Configuration\Advanced\Changer menu determines how often the user
501510 Rev. S
Field–Replaceable Units (FRUs)
7-63
will be reminded to check the Air Filter. New units are set to 120 days. An alert will
be displayed when the operating time exceeds the Filter Days value provided the
menu system is not active. When the Check the Air Filter alert displays
(Figure 7-46 above), follow the steps below:
NOTE
New Air Filters are black. A color change indicates the presence of some dirt, which is acceptable. However, if dirt is clinging to the outside filter surface, it is time to replace the filter.
1.
Visually inspect the Air Filter element at the bottom of the Front Panel/Door
(Figure 7-45).
2.
When the Air Filter alert appears, if the filter does not need replacing, press the EXIT key. This will dismiss the alert, but will not reset the Filter Days timer.
3.
Next, increase the Filter Days value in the Configuration\Advanced\Changer menu. If it is estimated that the filter could go an
additional 90 days, increase the Filter Days value accordingly.
Example: Change the value from 120 to 210 days.
Since pressing the EXIT key to dismiss the Air Filter alert message does not reset the power-on-days timer, the timer continues counting from its present value
and the next alert will occur in 90 power-on days.
When the next Air Filter alert occurs, if the filter needs replacing, leave the
Filter Days value at 210 days. If the filter still does not need replacing, press
the EXIT key, then increase the Filter Days value again. Keep increasing
the Filter Days value each time the Air Filter alert appears until the maximum value for the given environment is determined.
4.
If the filter does need replacing when the Air Filter alert message appears, press
the ENTER key to dismiss the alert and reset the Filter Days timer. Then, follow
the procedure in Section 7.23.2 to replace the Air Filter.
7.23.2 Air Filter Replacement
7-64
1.
Open the Front Panel/Door as described in Section 7.4.
2.
Grasp the center rib of the Air Filter element and pull it up and slightly rearward to clear the lip built into the Front Panel/Door.
3.
Pull the right side of the filter towards the center of the Front Panel/Door to
clear the right side slot.
4.
Pull the left side of the filter towards the center of the Front Panel/Door clear the
left side slot.
5.
Take a new Air Filter element and turn it so that the ribs are facing up and the
end with the notch is pointing towards the left side of the RLS.
Field–Replaceable Units (FRUs)
501510 Rev. S
6.
Fully insert the right side of the filter into the right side slot.
7.
Fully insert the left side of the filter into the left side slot.
8.
Tuck the center portion of the filter under the lip built into the Front Panel/Door.
9.
Push down and flatten any portion of the filter may be above the edge of the
Front Panel/Door.
10.
Close the Front Panel/Door.
7.24 Calibration
The RLS will automatically recalibrate itself when commanded. It should be recalibrated after changing a critical FRU. All FRUs and the need to recalibrate them are
listed in Table 7-1. The RLS must first be properly setup before invoking the Calibrate command.
7.24.1 Calibration Setup
The following conditions must be met before initiating a Calibration command:
Required Conditions
Remove tapes from all Tape Drives
Remove tapes from any Fixed Slots
Install an empty magazine at MA
Make sure there is no magazine at MB
Make sure there is to tape in the Handler
Don’t Care Conditions
Which magazine is at the front of the Carousel/Storage Array
If there are any magazines installed at MC-MZ
If there are any tapes installed in magazines at MC-MZ
501510 Rev. S
Field–Replaceable Units (FRUs)
7-65
7.24.2 Calibration Initialization
Apply power to the RLS.
The RLS must have been given a “Service” or “Update” password for the Private
Menu to appear. If the Private Menu is not included in the Top Menu, follow the instructions in Section 5.3.2 to set the “Service” or “Update” passwords.
Initiate the Calibration Command as described in Section 5.4.1.
The Carousel or Storage Array and the Handler will all move from time to time. It will
display a series of status messages as the calibration process progresses.
7.24.3 Calibration Completion
If the calibration completed without a problem, the RLS illuminates the green READY
(LED) and no messages are displayed. If you’re all done for the day, clear the password as described in Section 5.3.3.
If the RLS failed to calibrate properly, then an error message indicating the possible
reason for the failure will be displayed and the red FAULT LED will illuminate. Remedy the reason for failure and repeat the Calibrate command.
7-66
Field–Replaceable Units (FRUs)
501510 Rev. S
8.
Firmware Updating
8.1 Firmware Replacement
The RLS utilizes a main microprocessor (called the Executive) and several smaller satellite microprocessors that are found in some Field Replaceable Units (FRUs). Each
microprocessor (aka processor) needs its own firmware to function and that firmware
is stored in Flash memory dedicated to each microprocessor.
There is only one firmware set for the entire RLS and it is the Executive firmware
(700118). This set contains the firmware sets for all satellite processors within the
RLS except for the Q-Link Web Interface and the Fibre Channel bridge. The Executive firmware does not contain any firmware for the Tape Drives.
It’s the Executive processors task to check the revision and integrity of each satellite
processor’s firmware whenever RLS power is applied. If the Executive processor has
just been revised (as described above), it will then immediately revise any satellite
processor’s firmware that is outdated. Changing a FRU may also cause the Executive
processor to update the firmware in the new FRU. It’s conceivable that installing a
FRU that is newer than the Executive firmware may require updating the Executive
firmware.
If the Executive processor is functioning, its firmware may be uploaded through the
Medium changer’s interface (SCSI or optional Fibre Channel), the Q-Conn RS-232 interface (using XMODEM file transfer) or the Q-Link Web Interface. The Q-Link Web
Interface firmware can only be uploaded through its LAN or Internet connection.
NOTE
Firmware should only be updated after consulting with Qualstar’s Technical Support Department.
They can be reached at (805) 583-7744 or E-mail them at [email protected]
8.2 Determining the Current Firmware Revision
The current Executive firmware part number and revision can be determined by viewing the Display Revision status screen under the Maintenance menu. Follow the steps
in Table 8-1.
501510 Rev. S
Firmware Updating
8-1
Service Technician Action:
Press the MENU key followed by the
Press the ENTER key followed by the
Display:
key.
key.
Press the ENTER key.
In this example, the firmware part number is
700118 and the revision is 0.42
Top Menu
•Configuration
•Maintenance
•••••••••Maintenance
•Display Log
•Display Prevents
•Display Reservs.
•Display Revision
M•••Display Revision
Date:
mm/dd/yy
Part Number:700118
Revision:
0.42
Checksum:
xxxx
Id:
xxxxxxxx
Press the MENU key to return to the top menu.
Table 8-1 Steps to View the Display Revision Status Screen
8.3 Firmware Update via the SCSI or Fibre Channel Interface
A working SCSI or fibre channel interface to the RLS’ Medium changer is required. To
update via the SCSI interface a PC compatible computer running DOS, Windows 95,
98, XP, NT, or 2000 is required. To update via the fibre channel interface a PC compatible computer running Windows NT or Windows 2000 is required.
NOTE
Using a DOS system requires the use of Adaptec’s ASPI interface for SCSI.
1.
The RLS must be powered on and connected to the host computer prior to booting the host computer.
2.
The Windows console program upload.exe is used to upload firmware to the
library. These files are contained in a self-extracting zip file UploadUtil.exe.
3.
Execute the UploadUtil.exe to extract the following ZIPed files:
4.
• Upload.exe
- Qualstar’s RLS Library firmware upload program.
• Scanscsi.exe
- Utility to search the bus for SCSI devices.
Execute the program scanscsi.exe from a Windows command prompt or
“DOS box”. This program will perform a SCSI Inquiry operation on Ids (0-15),
Luns (0-7) and Hosts (0-15). If a device is found, it will display the general information obtained from the inquiry response.
Example of scanscsi execution and response.
>scanscsi *,*,*
8-2
Firmware Updating
501510 Rev. S
Id,Lun,Host
0, 0, 1
1, 0, 1
2, 0, 1
Device Type
Medium-changer
Sequential-access
Sequential-access
Vendor
QUALSTAR
SONY
SONY
Product
RLS-4222
SDX-700C
SDX-700C
Revision
042A
0102
0102
In this example, the SCSI bus scan found three devices. The first device is a
Qualstar RLS-4222, followed by two Sony Tape Drives.
NOTE
Upload.exe will not work if the Id is greater than 15, or the Lun is greater than 7 when updating
the firmware in a fibre channel environment.
5.
The upload console program is executed from a Windows command prompt or
“DOS box”. The program’s command syntax is as follows:
Upload Id,[Lun[,Host]] f:<filename>
Command Parameters:
Id,Lun,Host - RLS Library SCSI address. This address can be found using the
scanscsi utility program. The default Id, Lun and Host is 0.
Filename - Filename of the new firmware update. This file is provided by Qualstar Technical Support.
Upload program example:
6.
Update the RLS Library with firmware file 700118.000.00042. The scanscsi
program was used to locate the RLS Library is on SCSI Address : Id 0, Lun 0,
and Host 1. Note that the firmware filename may contain a sub revision letter as
shown in this example.
Upload 0,0,1 f: 700118.000.00042
The program will display the upload transfers:
700118 0.42
### Packets
7.
Do not turn off RLS power while the update is on progress. The last packet is
number 512.
8.
The RLS will begin the firmware update process. Wait for the following message
to appear on the library’s Front Panel/Door display:
FIRMWARE UPGRADE
501510 Rev. S
Firmware Updating
8-3
System Firmware
is being changed;
DO NOT POWER-OFF
9.
It is very important not to power off the RLS while reprogramming is in
progress. Doing so can cause the library to lose all of its program contents.
10.
Following the upgrade, the RLS will perform an internal initialization function
followed by a scanning of the RLS inventory.
11.
The FIRMWARE UPGRADE message will be cleared when the process has completed.
12.
Go to the Maintenance\Display Revision menu. The displayed Part
Number and Revision must correlate with the firmware just uploaded.
8.4 Firmware Update via Q-Link
Q-Link allows for the uploading of library firmware using your web browser. Please
see the Click on the Library menu item under the Upload Firmware folder in the
menu tree to access the Private\Firmware Upload\Library screen and follow the instructions below.
1.
Access the firmware file by either clicking on the Browse button or typing the file
path to the firmware file.
Figure 8-1 Sample of the Library Firmware Upload Screen
8-4
Firmware Updating
501510 Rev. S
2.
Press the enter key or click on the Upload Firmware button to begin the uploading process.
3.
Note that after the upload begins browsing to another page will stop the
firmware uploading process.
4.
Two different screens will appear as the uploading process proceeds. See Figure
8-2 and Figure 8-3.
Figure 8-2 Sample of the Library Firmware Upload Progress Screen
501510 Rev. S
Firmware Updating
8-5
Figure 8-3 Sample of the Library Firmware Reprogramming Progress Screen
5.
When the Q-Link uploading\programming is complete a screen will appear that
shows the old and new firmware information. See Figure 8-4.
Library uploading/programming has finished.
Old firmware information:
Date: 1/15/2003
Part number: 700118
Revision: 0.42
New firmware information:
Date: 1/30/2003
Part number: 700118
Revision: 0.45
Figure 8-4 Sample of the Library Uploading/Programming Has Finished Screen
8-6
Firmware Updating
501510 Rev. S
8.5 Firmware Update via Q-Conn
The user’s host computer and the RLS are connected together using a NULL modem
serial cable. This cable must have female DB-9 connectors at each end and “straightthrough” wiring such that pins, 2, 3 and 5 are connected to each other at both ends.
User’s
Host
Computer
Qualstar
RLS
Library
Serial
Port
Serial Port
on the IPM
RS-232 Serial Cable
Figure 8-5 Host Computer Connected to RLS
8.5.1 RS-232 Cable Wiring
User Host or PC
RS232 Serial Female DB-9 Connector
RLS Library
RS232 Serial Female DB-9 Connector
Signal Name
Pin
Pin
Signal Name
Receive Data
2
3
Transmit Data
Transmit Data
3
2
Receive Data
Ground
5
5
Ground
Table 8-2 RS-232 Cable Wiring Requirements
8.5.2 RS-232 Serial Communications Parameters
Communication Parameter
Setting
Baud Rate
38400
Parity
None
Data Bits
8
Stop Bits
1
Table 8-3 RS-232 Serial Communication Parameters
8.5.3 User Terminal Software Setup Example
Windows 9x and NT users can use the Communications accessory program, HyperTerminal.
501510 Rev. S
Firmware Updating
8-7
Figure 8-6 RLS Remote Front Panel Program Displayed in HyperTerminal
Use the File\Properties menu selection to configure the application for direct
communications. Select the appropriate communications port. See Figure 8-7.
Figure 8-7 Properties Screen
8-8
Firmware Updating
501510 Rev. S
Select the Configure button to set the communications parameters for a baud-rate
of 38400, with 8 data bits, no parity, one stop bit and no flow control. See Figure 8-8.
Figure 8-8 Configure Screen Under the Properties Menu
8.5.4 VT100 Terminal Emulation
Use the File\Properties Settings dialog tab to configure the application for
VT100 terminal emulation.
501510 Rev. S
Firmware Updating
8-9
Figure 8-9 Settings Screen Under the Properties Menu
You may also consider ASCII Setup parameters to satisfy your display requirements.
Figure 8-10 ASCII Setup Screen under Settings Screen
8-10
Firmware Updating
501510 Rev. S
8.5.5 Remote Library Command Mode
To access the Remote Library Command Mode, press the ESC key and type “cmd” followed by the <Enter> key. This will display the Command Help screen depicted in
Figure 8-11 followed by a DOS-like command prompt “>”. Commands may now be entered in lower case text. All commands must end with the <Enter> key. Most terminal emulators support the backspace key for correcting typing errors. Quotation
marks are shown for clarity and are not to be typed in the actual command line.
Figure 8-11 Remote Library Commands
8.5.6 Xmodem Firmware Download <xdl>
The “xdl” command instructs the library to receive new RLS firmware via an object
file on the remoter terminal computer using the XMODEM communications protocol.
If the transmission is terminated at the terminal emulator, the RLS will ignore the
partial download. Do not turn off RLS power while the update is on progress. If the
entire firmware object file is successfully downloaded, the RLS will reprogram itself
and then restart automatically.
Once the library restarts, the user will see the Qualstar Remote Library Control Panel.
8.5.6.1
Example of a download session
Enter the command “xdl”. The application will respond “Receiving RLS Firmware”, to indicate it is waiting for the user’s xmodem data.
501510 Rev. S
Firmware Updating
8-11
Figure 8-12 Example of Xmodem Firmware Download
Use the HyperTerminal menu function Transfer->Send File, to download the
RLS firmware file to the library. RLS firmware object files are typically named
700118.000.00044 where 700118 represents the code-set name and .00044 is the Version (Version 0.44 in this example). A revision letter may follow the code-set name.
Note
It is very important not to power off the RLS Library while reprogramming is in progress. Powering off the RLS Library is not necessary and can cause the RLS Library to lose its program contents.
Figure 8-13 Send File Screen Under Transfer
8-12
Firmware Updating
501510 Rev. S
9.
RLS Expansions
DANGER
TO AVOID THE RISK OF PERSONAL INJURY: TURN OFF ALL POWER TO THE
TAPE LIBRARY SYSTEM, THEN REMOVE THE POWER CORD, BEFORE
ATTEMPTING ANY OF THE PROCEDURES IN THIS CHAPTER.
NEVER OPERATE THE LIBRARY WHILE THE DOOR OR TOP PANEL ARE OPEN.
GEFAHR
UM VERIETZUNGEN ZU VERHINDEM: SCHALTEN SIE ALLE STROMSCHALTER
AN DER RLS AUS UND ENTFERNEN SIE DAS STROMKABEL, BEVOR SIE MIT DER
SERVICE-ARBEIT BEGINNEN.
BENUTZEN SIE DIE RLS NIE WENN DIE TUERE OFFEN IST, ODER DIE DECK-,
BZW. SEITENPLATTE ENTFERNT SIND.
9.1 Introduction
This chapter contains installation instructions for the RLS expansion kit, which allows for an RLS-4445 to be expanded to an RLS-4470. To replace an existing FRU
(Field-Replaceable Unit), follow the instructions in Chapter 7.
Installing or removing an expansion kit changes the configuration of a unit. Therefore, after an expansion kit is installed, the unit must be reconfigured and recalibrated.
501510 Rev. S
RLS Expansions
9-1
9.2 Model Expansions
The expansion kit P/N 500829-07-2 should take less than 30 minutes to install.
Installing an expansion kit is a five–step procedure:
1.
Install the new hardware.
2.
Enter Update for the password in the Private menu. (Reconfiguring the RLS
model number and recalibrating the RLS are password-protected procedures.)
3.
Reconfigure the library's model number to reflect the hardware changes.
4.
Recalibrate the library.
5.
Clear the password (Update) to prevent unauthorized access to the Private
menu.
9.2.1 Installing a Model Expansion Kit
This procedure requires one expansion kit (P/N 500829-07-2), which includes a Storage Array and Sensor Slave Assembly. RLS libraries will have one of two differing
chassis configurations. Check the rear of the library to determine which style it is. See
Figure 9-1.
Style A
Style B
Solid Rear
Access Panel
Figure 9-1 RLS Chassis Styles
A style chassis have a solid rear, while style B has an access plate that is secured to
the library with six screws. Follow the appropriate Storage Array Removal / Expansion instructions after determining if the library has a style A or B chassis.
9.2.2 Style A Chassis Storage Array Removal
The Top Cover must be opened and the following FRUs must be removed to gain
access to the Storage Array: the Tape Drives, the Carriage Assembly, the Sensor Master Assembly, the Sensor Slave Assembly and finally the Interconnect PCBA.
9-2
RLS Expansions
501510 Rev. S
NOTE
The old Sensor Slave Assembly will be replaced by the new one that has been included with the
expansion kit.
Tools Required:
•
No. 1 Phillips Screwdriver
•
No. 2 Phillips Screwdriver
•
5/64ths-inch Hex Driver
•
Diagonal Cutters
•
Small Mirror (optional)
•
Small Flashlight (optional)
1.
Remove the Carriage Assembly as described in Section 7.7.1.
2.
If possible, remove all magazines or tapes from the magazines in order to protect
the tape cartridges from possibly being dropped during this procedure. The cars
of the storage array move freely and can easily be arranged so that magazines
can be removed.
3.
Remove the Tape Drive(s) currently installed in the RLS – see Section 7.11.1 for
details).
NOTE
In the next step a small mirror and flashlight may be helpful to see the ribbon cable connection.
4.
In the rear left corner of the Drive Bay, just past the drive platform, is a ribbon
cable running from left to right. Pull that cable to the right to unplug it from the
Storage Array Assembly. See Figure 9-2.
Ribbon Cable Connector
Storage Array
Drive Platform
Ribbon Cable
501510 Rev. S
RLS Expansions
9-3
Figure 9-2 Detailed view of the Ribbon Cable attached to the Storage Array Assembly
5.
On the Interconnect PCBA, unplug the three ribbon cables. Refer to Figure 9-3.
6.
Use diagonal cutters to cut the cable tie nearest the Executive PCBA that secures the round power cable going to the Executive PCBA.
7.
Remove the Sensor Master Assembly by removing the two No. 1 Phillips screws
on the right side and the two 5/64ths hex-head screws on the left side. Refer to
Figure 7-37. Lift the assembly straight up and place in a safe location.
EXEC Connector
SENSOR Connector
DRVBAY
Connector
Figure 9-3 Top Connectors on the Interconnect PCBA
Interconnect PCBA Mounting Screws (8)
Front of RLS
Figure 9-4 Interconnect PCBA Mounting Screws (Left Side)
9-4
RLS Expansions
501510 Rev. S
8.
Remove the eight No. 1 Phillips screws that secure the Interconnect PCBA from
the left side of the chassis as shown in Figure 9-4.
9.
Lift the Interconnect PCBA up and out slightly to gain access to the cable connecting it to the Control Panel. Unplug the Control Panel cable and lift the Interconnect PCBA out of the chassis.
10.
Unplug the cable at the right end of the Sensor Slave Assembly as shown in
Figure 7-38.
11.
If the RLS is not rack-mounted, carefully turn it on its left side (as seen from the
front) so that the Storage Array mounting screws located on the bottom of the library can be accessed.
12.
Using a No. 2 Phillips screwdriver, remove the lower or left two screws from the
chassis bottom that hold the Sensor Slave Assembly in place (see Figure 7-39).
Grasp the assembly before removing the top (last) screw and then gently pull it
out through the Front Panel/Door.
13.
There are five Storage Array mounting screws located on the bottom of the chassis. Using a No. 2 Phillips screwdriver, remove the screws as shown in Figure
9-5. If the RLS is on its side, hold the Storage Array Assembly in place with one
hand while removing the final screw.
14.
Set the RLS chassis upright. Grasp the front and the rear of the Storage Array
Assembly and gently lift it up and then out through the front of the chassis.
Storage Array Motor Access Hole
*
Front of RLS
*
Rear of RLS
*
Storage Array Mounting Screws
(5) for RLS-4445
(3) for RLS-4470 shown with the *
Figure 9-5 Storage Array Mounting Screws located on the Bottom of the RLS
501510 Rev. S
RLS Expansions
9-5
9.2.3 Style A Chassis Storage Array Expansion Kit Installation
This procedure assumes that the 4445 Storage Array was removed in Section 9.2.2.
1.
If the RLS is not rack-mounted, carefully turn it on its left side (as seen from the
front) so that the Storage Array mounting screws located on the bottom of the library can be accessed.
2.
While grasping the front and rear of the Storage Array, guide the rear of the array into the chassis. Orient the array such that the connector is facing the drive
bay or inside of the chassis.
3.
Maneuver the rear of the Storage Array into the left rear corner of the chassis
and then align its threaded mounting holes with the holes in the bottom of the
chassis.
4.
Using a No. 2 Phillips screwdriver, install three of the five mounting flat-head
screws that were removed earlier to secure the 4470 Storage Array as shown in
Figure 9-5.
5.
Inspect the new Sensor Slave Assembly that came with the expansion kit to be
sure the LED at its edge is perpendicular to the plane of the board. If it is not
perpendicular, the Sensor Slave Assembly should be replaced.
6.
Align the new Sensor Slave Assembly to its mounting holes on the chassis bottom and re-install the three flat-head screws removed earlier with a No. 2 Phillips screwdriver. See Figure 7-39.
7.
If the RLS is not rack-mounted, carefully turn it back to its upright position.
8.
Reconnect the cable to the right side of the Sensor Slave Assembly as shown in
Figure 7-38.
NOTE
In the next step a small mirror and flashlight may be helpful to see the ribbon cable connection.
9.
9-6
Reach into the back, left corner of the drive bay and reconnect the ribbon cable
that was detached from the connector on the Storage Array. The connector’s keying bump must be pointed down or against the chassis. The connector on the Storage Array nearly touches the chassis bottom and is centered in the opening.
Press firmly on the back of the connector to assure it’s fully inserted into the Storage Array. See Figure 9-2.
10.
Once the Storage Array cable is connected, give the cable a light tug to confirm
it’s firmly attached.
11.
Follow Section 7.11.2 to reinstall the Tape Drive(s) that were removed from the
RLS. If the drives are identical, it doesn’t matter to the RLS, which one is installed at the T1 position.
RLS Expansions
501510 Rev. S
12.
Plug the cable from the Control Panel into the CNTPNL connector on the Interconnect PCBA. Fasten the PCBA to the left side of the chassis with the eight flathead screws previously removed using a No. 1 Phillips screwdriver.
13.
Reinstall the Sensor Master Assembly using the two 5/64ths hex-head screws on
the left side and two flat-head screws on the right side. Tighten the screws with
a 5/64-inch hex driver (Allen wrench) and a No. 1 Phillips screwdriver. See
Figure 7-37. Plug all three ribbon cables back into the Interconnect PCBA as
shown in Figure 9-3.
14.
Install the Carriage Assembly by following the instructions in Section 7.7.2.
15.
Proceed to Section 9.2.6 of this chapter.
9.2.4 Style B Chassis Storage Array Removal
The Top Cover must be opened and the Carriage Assembly FRU must be removed to
gain access to the Storage Array.
NOTE
The old Sensor Slave Assembly will be replaced by the new one that has been included with the
expansion kit.
Tools Required:
501510 Rev. S
•
No. 2 Phillips Screwdriver
•
Small Mirror (optional)
•
Small Flashlight (optional)
1.
Remove the Carriage Assembly as described in Section 7.7.1.
2.
If possible, remove all magazines or tapes from the magazines in order to protect
the tape cartridges from possibly being dropped during this procedure. The cars
of the storage array move freely and can easily be arranged so that magazines
can be removed.
3.
Remove the Tape Drive(s) currently installed in the RLS – see Section 7.11.1 for
details).
4.
Unplug the cable at the right end of the Sensor Slave Assembly as shown in
Figure 7-38.
5.
If the RLS is not rack-mounted, carefully turn it on its left side (as seen from the
front) so that the Storage Array mounting screws located on the bottom of the library can be accessed.
6.
Using a No. 2 Phillips screwdriver, remove the lower or left two screws from the
chassis bottom that hold the Sensor Slave Assembly in place (see Figure 7-39).
Grasp the assembly before removing the top (last) screw and then gently pull it
out through the Front Panel/Door.
RLS Expansions
9-7
NOTE
In the next step a small mirror and flashlight may be helpful to see the ribbon cable connection.
7.
In the rear left corner of the Drive Bay, just past the drive platform, is a ribbon
cable running from left to right. Pull that cable to the right to unplug it from the
Storage Array Assembly. See Figure 9-2.
8.
Using a No. 2 Phillips screwdriver, carefully remove the six screws that secure
the access panel to the rear of the library. See Figure 9-6.
Storage Array removed
from the Library.
Rear of Library
Access Panel
Figure 9-6 Access Panel on Rear of the Library and Storage Array Removed from Library
9-8
9.
If the RLS is not rack-mounted, carefully turn it on its left side (as seen from the
front) so that the Storage Array mounting screws located on the bottom of the library can be accessed.
10.
There are five Storage Array mounting screws located on the bottom of the chassis. Using a No. 2 Phillips screwdriver, remove the screws as shown in Figure
9-5. If the RLS is on its side, hold the Storage Array Assembly in place with one
hand while removing the final screw.
RLS Expansions
501510 Rev. S
11.
Set the RLS chassis upright. Grasp the front and the rear of the Storage Array
Assembly and gently lift it up and then out through the rear of the chassis. See
Figure 9-6.
9.2.5 Style B Chassis Storage Array Expansion Kit Installation
This procedure assumes that the 4445 Storage Array was removed in Section 9.2.4.
1.
If the RLS is not rack-mounted, carefully turn it on its left side (as seen from the
front) so that the Storage Array mounting screws located on the bottom of the library can be accessed.
2.
While grasping the front and rear of the Storage Array, guide the front of the array into the chassis. Orient the array such that the connector is facing the drive
bay or inside of the chassis.
3.
Maneuver the rear of the Storage Array into the left rear corner of the chassis
and then align its threaded mounting holes with the holes in the bottom of the
chassis.
4.
Using a No. 2 Phillips screwdriver, install three of the five mounting flat-head
screws that were removed earlier to secure the Storage Array as shown in Figure
9-5.
5.
Inspect the new Sensor Slave Assembly that came with the expansion kit to be
sure the LED at its edge is perpendicular to the plane of the board. If it is not
perpendicular, the Sensor Slave Assembly should be replaced.
6.
Align the new Sensor Slave Assembly to its mounting holes on the chassis bottom and re-install the three flat-head screws removed earlier with a No. 2 Phillips screwdriver. See Figure 7-39.
7.
If the RLS is not rack-mounted, carefully turn it back to its upright position.
8.
Reconnect the cable to the right side of the Sensor Slave Assembly as shown in
Figure 7-38.
NOTE
In the next step a small mirror and flashlight may be helpful to see the ribbon cable connection.
9.
10.
501510 Rev. S
Reach into the back, left corner of the drive bay and reconnect the ribbon cable
that was detached from the connector on the Storage Array. The connector’s keying bump must be pointed down or against the chassis. The connector on the Storage Array nearly touches the chassis bottom and is centered in the opening.
Press firmly on the back of the connector to assure it’s fully inserted into the Storage Array. See Figure 9-2.
Once the Storage Array cable is connected, give the cable a light tug to confirm
it’s firmly attached.
RLS Expansions
9-9
11.
Align the Access Panels holes with the mounting screw holes in the rear of the
RLS, then reinstall all six of the Access Panels mounting screws. See Figure 9-6.
12.
Follow Section 7.11.2 to reinstall the Tape Drive(s) that were removed from the
RLS. If the drives are identical, it doesn’t matter to the RLS, which one is installed at the T1 position.
13.
Install the Carriage Assembly by following the instructions in Section 7.7.2.
14.
Proceed to Section 9.2.6 of this chapter.
9.2.6 Entering the Update Password
CAUTION
After installing new hardware to change the configuration of an RLS, to prevent
possible damage to the unit, open the Front Panel/Door before applying power.
When the Front Panel/Door is open, the carriage will not move when power is
applied. The unit must be reconfigured for the new hardware, before the carriage
is allowed to move under its own power.
1.
Open the Front Panel/Door if it is not currently opened.
2.
Reconnect the power cord and turn on the RLS power.
3.
Follow the instructions in Section 5.3.1 to enter Update as the password.
4.
Follow the instructions in Section 9.2.7 to reconfigure the RLS.
9.2.7 Reconfiguring the Model Number
NOTE
If the RLS is restricted, it may not be possible to change the RLS model number in the
Configuration\Advanced\Changer\Mechanics menu. See Section 5.1 for details about restricted units.
1.
Press the MENU key once to display the Top Menu, with the pointer in the left
margin of the LCD pointing to Configuration.
2.
Press the ENTER key to enter the Configuration menu.
NOTE
See the RLS Installation and Operation Manual (Qualstar document number 501500) for complete details about the Configuration menu.
3.
9-10
Press the ENTER key to enter the Configuration\Advanced menu.
RLS Expansions
501510 Rev. S
4.
Press the ENTER key to enter the Configuration\Advanced\Changer
menu.
5.
Press the (DOWN) key repeatedly to move the pointer to Mechanics, then
press the ENTER key to enter the Configuration\Advanced\Changer\
Mechanics menu. If necessary, press the (DOWN) key to move the pointer to
Model.
6.
Make sure that the Front Panel/Door is open, then press the ENTER key to begin editing the model number.
7.
Press the (UP) or (DOWN) key repeatedly to change the model number to
match the new hardware configuration (e.g. from RLS-4445 to RLS-4470).
8.
Close the Front Panel/Door. (The Carriage remains stationary.)
9.
Press the MENU key, then press the EXIT key to exit the menu system. (The
display indicates that the unit must be recalibrated.)
Press the MENU key to return to the Top Menu.
9.2.8 Recalibrating the Unit
1.
Place an empty Magazine on Magazine Mount MA (needed for calibration).
2.
Refer to Section 7.24 to calibrate the RLS.
9.2.9 Clearing the Password
Follow the instructions in Section 5.3.3 to execute the Private menu's CLEAR
ACCESS command, to remove the password (Update) and prevent unauthorized
access to the Private menu.
501510 Rev. S
RLS Expansions
9-11