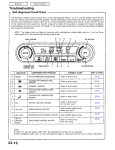
1
1956 AMC-Hudson
Groups 1.000 thru 13.000
INDEX
Group 1.000 - Engine
HZ 56-1 - Vibration Damper - 1956 Rambler Series
HZ 56-2 - Timing Cover Oil Seal Leakage - V-8 Series
HZ 56-3 - Engine Rear Support Reinf. - 1956 Rambler
Series
HZ 56-4 - Engine Rear Crossmember Brace - 1956 40
Series
HZ 56-6 - Valve Spring Baffles - 1955-56 80 Series
HZ 56-8 - Rear Main Bearing Torque Specs - 1956 Special
V-8 50 Series
HZ 56-9 - Cyl. Head Corrosion & Leakage - 1955-56 Hornet 6 Series
Group 2.000 - Cooling System
HZ 56-1 - Water Pump Cartridge Lube. - 35610 Series
Group 3.000 - Electrical - Wiring - Lamps
HZ 56-1 - Ignition Timing - 1956 Rambler Series
HZ 56-2 - Generator Armature Shaft - 1956 Rambler Series
HZ 56-3 - Spark Plugs - V-8 Hornet Series
HZ 56-4 - Coil Polarity - 1956 Hornet 6 & Wasp Series
HZ 56-5 - Back-up Lights Incorrectly Wired - 1956 Models
HZ 56-6 - Ignition Coil Unit - Rambler & Hornet V-8
HZ 56-7 - Generator Volt. Regulator - Rambler with OD
HZ 56-8 - Clock Noise in Radio - 1956 Rambler
HZ 56-9 - Radio Panelescent Dial Light - 1956 Rambler
HZ 56-10 - Distributor Assy. - 1956 80 Series
HZ 56-11 - Inst. Panel Cluster Remove. - 1956 Rambler
HZ 56-14 - Dist. Changes in ID & Specs - 80 Series
Group 4.000 - Fuel - Carburetion - Exhaust
HZ 56-1 - Starting & Cold Weather Warm up - 80 Series
HZ 56-2 - 1956 Rambler Carb. Specs AS-2349-S
HZ 56-4 - Rough Engine Idle, Wipers Operating - Rambler
HZ 56-5 - Carb. Flooding - Rambler AS-2349-S Carburetor
HZ 56-6 - Carb. Fuel Economy - Rambler AS-2349-S
Carburetor
HZ 56-10 - Intake Manifold - 1955-56 80 Series
Group 6.000 - Transmission
HZ 56-1 - Ultramatic Trans Throttle Valve
HZ 56-2 - Front Pump Kits - Ultramatic Transmission
Group 6.000 (Cont’d)
HZ 56-3 - Hydra-Matic Trans.
HZ 56-9 - T. V. Linkage Rod Measure. & Adjustment
HZ 56-10 - Slipping in Reverse - Flashaway
HZ 56-11 - Oil Leaks & Torus Drainback - Flashaway
HZ 56-12 - Flashaway Hydramatic Transmission
HZ 56-13 - Rear Brg. Retainer Oil Seal - Hydramatic
HZ 56-14 - Rear Brg. Snap Ring Fail - Stand. Transmission
HZ 56-20 - Modified 5610 Series Trans. Shift Pattern
HZ 56-21 - Automatic Transmission Fluids
HZ 56-22 - Scraping Noise in Reverse - 1956 Flashaway
Transmission
Group 8.000 - Brakes & Wheels - Hub & Drum
HZ 56-1 - Hydrovac Power Brake Unit
HZ 56-2 - Rear Wheel Brake Cylinder - 1956 Hornet &
Wasp
HZ 56-3 - Clutch & Brake Pedal Shaft Lube. Fitting
Group 9.000 - Rear Axle - Propeller Shaft
HZ 56-1 - Rear Axle Pinion Seal - 51-55 Rambler Series
HZ 56-4 - Rear Axle Pinion Cone Setting
Group 10.000 - Front Axle - Front Suspension - Steering Gear
HZ 56-1 - Toe-In Adjustment
HZ 56-2 - Steer Gear Filler Plug
HZ 56-3 - Damaged Front Tires - Mod 80
Group 11.000 - Frame Springs - Shock Absorber Mud Pans
HZ 56-1 - Upper & Lower Shock Mounting
HZ 56-2 - Rear Shock Absorber Noise
HZ 56-3 - Rear Shock Absorbers
HZ 56-4 - Front Shock Lower Anchor Bolt
Group 13.000 - Weather Eye, Speedometer, Instrument
Panel
HZ 56-1 - Weather Eye Install. Instructions
HZ 56-2 - Weather Eye Circ. w/o AC
HZ 56-4 - Speedometer Noise - 1956 Rambler
HZ 56-5 - Install. Inst. Weather Eye Form I-477
HZ 56-6 - Belt Misalighnment - Idler Pulley
HZ 56-1
HD 56-1
File Under:
GROUP 1.000
ENGINE
December 12, 1955
ALL HUDSON DEALERS, ZONES AND DISTRIBUTORS
VIBRATION DAMPER - 1956
"RAMBLER" SERIES
A knocking noise, which may be diagnosed as bearing noise, may exist on cars built prior to Engine
B-3597 on the "Rambler" Series.
This noise may be due to faulty vibration damper cushions as a result of improper assembly.
Where an engine noise similar to a bearing rap occurs on cars built prior to the above engine number,
the vibration damper should be checked before any major disassembly of the engine.
Correction would involve correct installation of cushions (#28576), disc (#3110580), and rubber
(#3110597). Refer to the Technical Service Manual for correct assembly of parts.
Yours very truly,
F. H. Brodek
Technical Service Manager
F. H. Brodek
ctp
PRINTED IN U.S.A.
HZ 56-2
HD 56-2
File Under: GROUP 1.000
ENGINE
December 13, 1955
ALL HUDSON DEALERS, ZONES AND DISTRIBUTORS
TIMING COVER OIL SEAL LEAKAGE V-8 SERIES "HORNET"
An oil leak at the front timing chain cover oil seal may result from a lack of an interference fit of the seal
in the cover. This would permit the seal to turn with the crankshaft,
To effect a correction for this condition, the following procedure is recommended:
Remove timing chain from engine. Pry out old seal assembly from engine side of cover. Drill two 11/64"
holes at location illustrated in Figure 1, American Motors Technical Service Att. #56-2.
Install new oil seal with Tool J-5983. Upset the seal material into holes with a blunt pointed punch as
shown in Figure 2.
A correction is being incorporated in production.
Yours very truly,
F. H. Brodek
Technical Service Manager
F.H.Brodek
ctp
Attach.
PRINTED IN U. S. A.
HZ 56-3
HD 56-3
File Under: GROUP 1.000
ENGINE
December 23, 1955
ALL HUDSON DEALERS, ZONES AND DISTRIBUTORS
ATT: SERVICE DEPT.
ENGINE REAR SUPPORT HANGER REINFORCEMENT 1956 "RAMBLER" SERIES
CAMPAIGN: "Rambler" Series Prior to Serial Number D-278100
Effective at car serial number D-278100, a rear engine support hanger reinforcement, Part Number
3415464, is being welded to the body side sill and hanger.
This reinforcement (two per car) MUST be installed on all "Rambler" models prior to the above serial
number.
Support the engine and disconnect the crossmember at the side sills; lower sufficiently to install the reinforcements between the crossmember and side sill. Arc weld edges of the reinforcement to the side sill
and support hanger.
The installation of this reinforcement should be performed in conjunction with
the installation of the rear shook absorber upper reinforcement and lower mounting bracket brace as outlined in Service Letter HZ-56-1 and HD-56-1 filed under Group 11.000.
Credit will be allowed for material at Dealer not plus 10 per cent and labor at 65 per cent of the Flat Rate
Time listed below based on the Dealer Labor Multiple on record with each Zone.
NUMBER
SH-101
OPERATION
INSTALL REAR SHOCK ABSORBER UPPER
MOUNTING AND ENGINE REAR SUPPORT
HANGER REINFORCEMENTS - Includes
shock absorber R. & R .
SERIES
10
TIME
1.6 Hr.
-2NUMBER
SH-102
OPERATION
INSTALL REAR SHOCK ABSORBER UPPER
MOUNTING REINFORCEMENTS, LOWER
SHOCK ABSORBER BRACKET BRACES, AND
ENGINE REAR SUPPORT HANGER REINFORCEMENTS - Includes shock absorber
R. & R
SERIES
10
TIME
1.8 Hr.
Yours very truly,
F. H. Brodek
Technical Service Manager
F.H.Brodek
ctp
PRINTED IN U.S.A..
HZ 56-4
HD 56-4
File Under:
GROUP 1.000
ENGINE
January 9, 1956
ALL HUDSON DEALERS, ZONES AND DISTRIBUTORS
ATT: SERVICE DEPT.
ENGINE REAR CROSSMEMBER BRACE 1956 40 SERIES
Effective at "Wasp" car serial number W-9443, Part Numbers 314201.5 and 3142016, Engine Rear Crossmember Brace has been eliminated on all Hydra-Matic equipped cars without power steering.
These therefore, should not be considered as car shortage material.
Yours very truly,
F. H. Brodek
Technical Service Manager
F.H.Brodek
ctp
PRINTED IN U.S.A.
HZ 56-6
HD 56-6
File Under:
ALL HUDSON DEALERS, ZONES AND DISTRIBUTORS
GROUP 1.000
ENGINE
February 7, 1956
ATTN: SERVICE DEPARTMENT
VALVE SPRING BAFFLES 1955-56 80 SERIES
Valve spring baffles, Part Number 6480914, became effective at Engine Number P-25889. These baffles
are installed under the valve springs with a flange extending upwards to the high side of the spring for
improved oil control. The rubber intake valve oil deflectors continue in effect.
For service installation, WHERE VALVE GRINDING IS NOT REQUIRED, a special baffle kit, Part
Number 6484396, consisting of 4 pieces valve spring baffle, Part Number 6489127, and 8 lockwashers,
Part Number 6489048, may be installed without necessity of valve spring removal.
American Motors Technical Service Att. #56-8 illustrates the installation of the baffle contained in Part
Number 6484396, Service Kit.
These baffles may be installed as follows:
Remove the cylinder head covers.
Loosen the rocker arm shaft bolts and lift off the rocker arm shaft assemblies.
Place the baffles in position on the rocker arm assembly as shown in Figure 2. Install the assembly
on the cylinder head. Replace the original rocker arm shaft bolt lockwashers with the square type
lookwashers.
Install the rocker arm shaft bolts. Make sure that the push rods are in the sockets of the levers and
the dowel sleeves at the end support blocks are properly located.
Torque tighten the rocker arm shaft bolts 55 to 60 Ft. Lbs. Be sure that the square lockwashers do
not turn with the bolts as the baffles might be distorted.
-2-
Check the clearance between the baffles and the valve springs. If touching, bend the baffle away slightly with a
screw driver. Install the cylinder head covers using new gaskets.
NOTE: Do not remove the intake valve rubber oil deflectors.
Suggested Installation Time:
NUMBER
EN-200
OPERATION
INSTALL PART NUMBER 6484396 BAFFLE KIT
TIME
1.6 Hr.
Part Number 6480914 Baffle (8 required per car) should be installed below the valve spring, on cars built prior to Engine
Number P-25889, when a valve grind operation is being performed.
Yours very truly,
F. H. Brodek
Technical Service Manager
F.H.Brodek
ctp
Attach.
PRINTED IN U. S. A.
HZ 56-8
HD 56-8
File Under:
GROUP 1.000
ENGINE
May 21, 1956
ALL HUDSON DEALERS, ZONES AND DISTRIBUTORS
ATTN: SERVICE DEPARTMENT
REAR MAIN BEARING TORQUE SPECIFICATIONS 1956 SPECIAL V-8 “50” SERIES
A change in the rear main bearing cap torque has been made to reduce the possibility of the cap being
distorted.
The Technical Service Manual Supplement states 80-85 Foot Pounds torque for all main bearing cap
screws. The rear main bearing cap torque only has been changed to 50-55 Foot Pounds torque.
Please note this revision in your copies of the 1956 Special V-8 Technical Service Manual Supplement.
Yours very truly,
F. H. Brodek
Technical Service Manager
F.H.Brodek
ctp
PRINTED IN U.S.A.
HZ 56-9
HD 56-9
File Under:
GROUP 1.000
ENGINE
May 18, 1956
ALL HUDSON DEALERS, ZONES AND DISTRIBUTORS
ATTN: SERVICE DEPARTMENT
CYLINDER HEAD CORROSION AND LEAKAGE 1955-56 "HORNET" 6 SERIES
Evidence indicates that a great share of aluminum cylinder head leakage and corrosion is caused by
improper sealing at the cylinder head to block parting surface.
A most important factor in the New, Car Get--Ready Inspection is the proper tightening of the cylinder
head.
Note this new cylinder head torque value as it applies to the 1/2" cap screws used in 1955-56 Series
production: 85-90 Foot Pounds cold.
The cylinder head should be tightened with engine at room temperature 70º.
Yours very truly,
F. H. Brodek
Technical Service Manager
F.H.Brodek
ctp
PRINTED IN USA
AMERICAN MOTORS CORPORATION
HUDSON AUTOMOBILES
NASH AUTOMOBILES
K E L V I N A T O R
AUTOMOTIVE TECHNICAL SERVICE
SPECIAL PRODUCTS
AN D L E O N A R D
3280 SOUTH CLEMENT AVENUE
A P P L I A N C E S
MILWAUKEE 7 WISCONSIN
HZ 56-11
HD 56-11
File Under: GROUP 1.000
ENGINE
July 30, 1956
ALL DEALERS, ZONES AND DISTRIBUTORS
ATTN: SERVICE DEPARTMENT
INTAKE VALVE SPRING SEAT 80 SERIES
In a few cases, the valve spring retainer (split lock) has pulled into or through the intake valve spring upper seat.
A new Carbo-Nitrate hardened spring seat, Part Number 6492077 (Group 1.084), identified with a daub
of red paint is available from the Milwaukee Parts Plant for service replacement particularly in those
cases where the car is operated at extreme high speeds.
Part Number 6440511, valve spring seat, will continue to be supplied for the exhaust valves.
Yours very truly,
F. H. Brodek
Technical Service Manager
F.H. Brodek
ctp
PRINTED IN USA
HZ 56-1
HD 56-1
File Under:
GROUP 2.000
COOLING SYSTEM
December 22, 1955
ALL HUDSON DEALERS, ZONES AND DISTRIBUTORS
ATT: SERVICE DEPT.
WATER PUMP SEAL CARTRIDGE LUBRICATION 35610 SERIES
An external lubrication fitting has been reinstalled in recent production water pump seal assemblies. Effective car serial numbers are not available.
Lubricate with Water Pump Lubricant at 5000 mile intervals. USE HAND GUN ONLY.
Yours very truly,
F. H. Brodek
Technical Service Manager
F.H.Brodek
ctp
PRINTED IN U. S. A.
HZ 56-1
HD 56-1
File Under:
GROUP 3.000
ELECTRICAL-WIRING
LAMPS
November 15, 1955
ALL HUDSON DEALERS, ZONES AND DISTRIBUTORS
IGNITION TIMING - 1956
"RAMBLER" SERIES
Effective at Engine Number B-2461 "Rambler" Series ignition timing has been revised to T.D.C.
This will result in improved low speed engine performance.
Prior to the above engine numbers, paint mark the vibration dampers and set ignition timing to the new
specification "T.D.C.".
Yours very truly,
F. H. Brodek
Technical Service Manager
F.H.Brodek
ctp
PRINTED IN U.S.A.
HZ 56-2
HD 56-2
File Under:
GROUP 3.000
ELECTRICAL-WIRING
LAMPS
November 15, 1955
ALL HUDSON DEALERS, ZONES AND DISTRIBUTORS
SPARK PLUGS - V-8 SERIES "HORNET"
Changes in spark plug heat range and gap settings have been made in the 1956 V-8 Series.
Prior to Engine Number P-21543, Champion N-8 spark plugs were used. Gap setting was .035"-.037".
At Engine Number P-21543, Champion N-18 spark plugs became effective. Cap setting is .033"-.037".
Champion N-18 spark plugs will be supplied for service replacement in all 1956 "Hornet" V-8 Series
engines.
Please note the above in the V-8 Series Engine Section and Electrical Section of your copies of the 1956
Technical Service Manual Supplements.
Yours very truly,
F. H. Brodek
Technical Service Manager
F.H.Brodek
ctp
PRINTED IN U. S. A.
HZ 56-3
HD 56-3
File Under: GROUP 3.000
ELECTRICAL-WIRING
LAMPS
December 12, 1955
ALL HUDSON DEALERS, ZONES AND DISTRIBUTORS
GENERATOR ARMATURE SHAFT 1956 "RAMBLER" SERIES
Improper bonding may exist on some early generator armatures at the point where the water pump drive
extension is brazed to the hollow section of the shaft. Therefore, a check should be made to determine
the condition of armature shaft brazing.
This can be done by loosening the fan belt and applying 25 foot pounds torque to the generator fan
pulley retaining nut while holding the shaft at the water Dump shaft coupling area. If the brazing withstands this torque, satisfactory service can be expected.
A car or engine serial number check point is not available. However, the manufacturer assures correct
brazing after date code 5K-20 stamped on the generator identification tag.
The Number 5 identifies 1955 production, "K" indicates October, and the Number 20 represents the day
of the month which the generator was built.
Yours very truly,
F. H. Brodek
Technical Service Manager
F.H.Brodek
ctp
PRINTED IN U. S. A.
HZ 56-4
HD 56-4
File Under: GROUP 3.000
ELECTRICAL-WIRING
LAMPS
December 30, 1955
ALL HUDSON DEALERS, ZONES AND DISTRIBUTORS
ATT: SERVICE DEPT.
COIL POLARITY - 1956
"HORNET" 6 AND "WASP" SERIES
A number of 1956 "Hornet" 6 and "Wasp" Series were assembled with improper ignition coil polarity.
The (+) positive primary coil terminal was attached to the distributor insulated contact in error.
The (-) negative primary coil terminal should be attached to the distributor insulated contact.
The coils are clearly marked (+) or (-) on the primary coil terminals.
Improper coil polarity will reduce the efficiency of the ignition secondary coil circuit causing high speed
misfiring. Distributor point life will also be reduced.
Please inspect and correct this condition on all cars as required.
Yours very truly,
F. H. Brodek
Technical Service Manager
F.H.Brodek
ctp
PRINTED IN U.S.A.
HZ 56-5
HD 56-5
File Under: GROUP 3.000
ELECTRICAL-WIRINGLAMPS
ALL HUDSON DEALERS, ZONES AND DISTRIBUTORS
January 20, 1956
ATTN: SERVICE DEPT.
BACK-UP LIGHTS INCORRECTLY WIRED 1956 MODELS
Prior to the week of January 7, 1956 the back-up light circuit may have been wired incorrectly.
All models should be wired with the circuit feed wire attached to the (Aux) terminal of the 30 ampere
circuit breaker behind the instrument panel (left side). The circuit breaker is controlled by the ignition
switch making it impossible for back-up lights to operate with ignition switch in "Off" position.
Some cars may have the back-up light feed wire attached to the red wires on the center terminal of the
body junction block behind the battery. This energizes the circuit at all times when the shift lever is in
reverse with the ignition switch "On" or "Off". This condition is found mostly on overdrive and standard
transmission equipped cars.
To correct, remove the red wire from back-up light switch connected to the center terminal of body
junction block and cut off the eye terminal and replace it with a Douglas terminal. Check to see if
back-up light switch wire extension (red #18 wire) with Douglas terminal connection on engine side
of dash, and eye terminal connection inside of car is attached to (Aux) terminal of circuit breaker and
routed through main wiring harness grommet on dash. If this wire is missing, install Part Number
3415469 "Rambler" Series and 4392421 on all other models. Install, connecting Douglas terminal end
of back-up light switch wire to it.
On automatic transmission cars, the back-up light switch wire may be found connected to the right hand
terminal of the body junction block with green colored wires. Disconnect and install Douglas terminal in
place of eye terminal and proceed as above for the overdrive and standard transmission cars.
Yours very truly,
F.H.Brodek
Technical Service Manager
F. H. Brodek
ctp
PRINTED IN U. S. A.
HZ 56-6
HD 56-6
File Under: GROUP 3.000
ELECTRICAL-WIRINGLAMPS
February 6, 1955
ALL HUDSON DEALERS, ZONES AND DISTRIBUTORS
SERVICE DEPARTMENT
IGNITION COIL PRIMARY RESISTANCE
UNIT - 1956 "RAMBLER" AND "HORNET"
V-8 SERIES
It is possible that an interchange of ignition primary circuit resistors occurred in production on some
units and may also occur during field service replacement.
The use of an incorrect resistor will result in either a miss at high speed or a burning of breaker points
with resultant short life depending on how the resistors are used. The identification and model application of the resistors are listed below:
"Rambler" Series
Delco-Remy, Part Number 1927809, American Motors, Part Number 3145124, 1.40-1.62 ohms resistance. Delco-Remy trade mark stamped on attaching screw lug of resistor.
"Hornet" V-8 Series
Auto-lite, Part Number PU-4001, American Motors, Part Number 3146659, .665-.735 ohms resistance.
Stamped with the Auto-lite trade mark.
Yours very truly,
F.H.Brodek
Technical Service Manager
F. H. Brodek
ctp
PRINTED IN U. S. A.
HZ 56-7
HD 56-7
File Under: GROUP 3.000
ELECTRICAL-WIRINGLAMPS
February 10, 1956
ALL HUDSON DEALERS, ZONES AND DISTRIBUTORS
ATTN: SERVICE DEPARTMENT
GENERATOR VOLTAGE REGULATOR
WIRING -- 1956 "RAMBLER" SERIES
WITH OVERDRIVE TRANSMISSION
A number of 1956 "Ramblers" with overdrive transmission equipment may have been incorrectly wired
at the generator voltage regulator during production. The wire to the overdrive governor circuit terminal
on the overdrive relay is to be connected to the generator armature "G" or "A" terminal. of the generator
voltage regulator. In error, some were connected to the field or "F" terminal of the voltage regulator.
This incorrect connection would result in intermittent overdrive operation and poor control of battery
charging causing battery over-charge.
The correction connections are shown in the 1956 "Rambler" Series Technical Service Manual wiring
diagram.
Yours very truly,
F.H.Brodek
Technical Service Manager
F. H. Brodek
ctp
PRINTED IN U. S. A.
HZ 56-8
HD 56-8
File Under: GROUP 3.000
ELECTRICAL-WIRINGLAMPS
February 10, 1956
ALL HUDSON DEALERS, ZONES AND DISTRIBUTORS
ATTN: SERVICE DEPARTMENT
CLOCK NOISE PICKED UP IN RADIO 1956 "RAMBLER" SERIES
A clock ticking noise picked up in the radio can be attributed to the routing of either the radio power
lead-in cable or the antenna lead-in cable.
Correction involves the routing of the radio power lead-in cable below the radio chassis. Clip, Part
Number 3126393, can be retained to the bottom of the chassis with one of the screws used to route the
power lead.
The antenna lead should be routed as far from the clock as slack permits.
Where the rerouting of the wire is not completely effective, condenser, Part Number 3112728, installed
from the clock power lead to ground at the rear of the clock will completely filter the clock noise from
the radio.
Yours very truly,
F.H.Brodek
Technical Service Manager
F. H. Brodek
ctp
PRINTED IN U. S. A.
HZ 56-9
HD 56-9
File Under: GROUP 3.000
ELECTRICAL-WIRINGLAMPS
February 13, 1956
ALL HUDSON DEALERS, ZONES AND DISTRIBUTORS
ATTN: SERVICE DEPARTMENT
RADIO PANELESCENT DIAL LIGHT 1956 "RAMBLER" SERIES
The panelescent dial light is operated on alternating current from a winding of the power transformer
stage of the radio receiver.
A correction has been made at time of manufacture of the radio to reduce this voltage with a resistor installed in series with the dial light.
The dash panel opening for the panel light plug-in contact has been enlarged to prevent shorting at that
point.
At time of service, the radio receiver should be removed by the servicing dealer and taken to the nearest
authorized Motorola Service Outlet. They have been informed of the problem and are instructed to check
the receiver, install the 270,000 ohm resistor, if not so equipped, and replace the panel light dial unit.
Upon reinstallation of the dial, observe caution that the insulating sleeve on the panel light plug-in contact be in good condition and located in such a manner as to prevent a short circuit at the dash opening.
Yours very truly,
F.H.Brodek
Technical Service Manager
F. H. Brodek
ctp
PRINTED IN U. S. A.
HZ 56-10
HD 56-10
File Under: GROUP 3.000
ELECTRICAL-WIRINGLAMPS
February 13, 1956
ALL HUDSON DEALERS, ZONES AND DISTRIBUTORS
ATTN: SERVICE DEPARTMENT
DISTRIBUTOR ASSEMBLY 1956 80 SERIES
The dual contact distributor, Part Number 6471072, Auto-lite IBK-4001-B, 6-volt type and Part Number
6480362, Auto-lite IBJ-4001-D, 12-volt type are so similar in centrifugal and vacuum ignition advance
curves that they could be interchanged without a noticeable effect on vehicle performance.
For this reason, a number of 1956 Series were built with the IBK-4001-B distributors before the later
IBJ-4001-D distributors were incorporated at Engine Serial P-25306.
For service testing specifications, consult the 1956 Technical Service Supplement when working
with distributor IBJ-4001-D and the 1955 Technical Service Manual when servicing the IBK-4001-B
distributor.
Yours very truly,
F.H.Brodek
Technical Service Manager
F. H. Brodek
ctp
PRINTED IN U. S. A.
HZ 56-11
HD 56-11
File Under:
ALL HUDSON DEALERS, ZONES AND DISTRIBUTORS
GROUP 3.000
ELECTRICAL-WIRINGLAMPS
February 21, 1956
ATTENTION: SERVICE DEPARTMENT
INSTRUMENT PANEL CLUSTER REMOVAL - 1956 "RAMBLER" SERIES (REFER
TO BULLETIN HZ AND HD 56-1 FILED UNDER SERVICE GENERAL)
The following procedure is suggested for Instrument Panel Cluster Removal on the 1956
"Rambler" Series:
Air Conditioning Equipped
Disconnect battery.
If car is equipped with overdrive, remove bolt holding control cable bracket to dash and place cable out of the way.
Remove ash tray and its retaining frame (3 screws).
Disconnect speedometer cable and wires to gauges; remove all light sockets from instrument housing and
remove mounting screw from retaining ears at both sides of housing.
(Considerable freedom from wire entanglement can be easily secured at this point by removing the ignition lock, with all
wires still attached, over the steering column.)
Pull instrument cluster forward at its bottom edge and lower it slightly to disengage the retaining ear at top of cluster. Slide
unit toward center of car.
Tilt unit face upward and remove the gauge voltage regulator from back of housing (one screw). Wiring from regulator to
gauges can be left attached.
Instrument housing can now be rotated to a vertical position with the dial facing the rear of the car and be lowered between
the glove box and steering column for removal.
Without Air Conditioning
There is no need to remove ash tray or ignition lock. When the wiring and mounting bolts are removed, the instrument assembly may be removed by lowering it on other side of
steering column.
Yours very truly,
F. H. Brodek
ctp
PRINTED IN U. S. A.
F.H.Brodek
Technical Service Manager
HZ 56-14
HD 56-14
File Under: GROUP 3.000
ELECTRICAL-WIRINGLAMPS
ALL HUDSON DEALERS, ZONES AND DISTRIBUTORS
May 25, 1956
ATTN: SERVICE DEPARTMENT
DISTRIBUTOR CHANGES IN IDENTIFICATION
AND SPECIFICATIONS - 1956 "80" SERIES
Part Number 6480362 (Auto-Lite Model IBJ-4001-D) single contact entered production at Engine
Number 25306. At this point the following specifications were effective:
Centrifugal Advance
(Engine Degrees and
R. P. M.
0º @ 600
2º @ 700
20º @ 1700
26º @ 2970
28º @ 3400
Vacuum Advance
(Engine Degrees and
Inches Mercury)
0º @ 6"
2º @ 6-3/8"
12º @ 8-5/6"
22º @ 11-5/8"
24º @ 12-1/2"
In those cases where pre-ignition with the use of premium grade gasolines, and where satisfactory results
have not been obtained by retarding ignition timing or removal of carbon or other irregularities from
combustion chamber areas, a conversion kit package, Part Number 648460 7, (consisting of the vacuum
chamber, governor weight springs, and vacuum spring together with small miscellaneous parts) is available for installation in Distributor, Part 6480362.
The installation of Part Number 6484607 will convert Distributor, Part 6480362, into Part Number
6489834 (Auto-Lite Model IBJ-4001-E).
-2-
Distributor, Part Number 6480751 (Auto-Lite Model IDJ-4001-C), became effective at Engine Number P-28609. The
following specifications apply:
Governor Advance
(Engine Degrees and
R. P. M.)
Vacuum Advance
(Engine Degrees and
Inches Mercury)
0º @ 600 RPM.
20º @ 1700 RPM.
30º @ 4000 RPM.
0º @ 7"
20º @ 13"
Conversion kit package, Part Number 6484609, (consisting of distributor stop and cam plate, governor weight springs,
vacuum spring, and small miscellaneous parts) is available for installation in Distributor, Part 6480751.
The installation of Part 6484609 will convert Distributor, Part 6480751, into Part 6489834 (Auto-Lite Model IBJ-4001-E).
(Specifications below.)
Part Number 6489834 (Auto-Lite Model IBJ-4001-E) Distributor assembly is also available for future service replacement
on all 1956 "80" Series when a complete unit is required. The following specifications apply:
Governor Advance
(Engine Degrees and
RPM.)
0º @ 600 RPM.
2º @ 750 RPM.
16º @ 1600 RPM.
24º @ 4000 RPM.
28º @ 5100 RPM.
Vacuum Advance
(Engine Degrees and
Inches Mercury)
0º @ 8”
2º @ 8-5/8”
12º @ 12”
18º @ 14-3/4"
20º @ 16”
At time of installation of the conversion kits, the new name plates (included in package) must also be installed to correctly
identify the Distributor as Model IBJ-4001-E for future service operations.
A suggested Flat Rate Operational Time of 1.2 Hours has been established for the installation of Part 6484607 and
6484609 (Includes R. & R. Distributor).
Yours very truly,
F. H. Brodek
ctp
PRINTED IN U. S. A.
F.H.Brodek
Technical Service Manager
HZ 56-1
HD 56-1
File Under:
ALL HUDSON DEALERS, ZONES AND DISTRIBUTORS
GROUP 4.000
FUEL-CARBURETIONEXHAUST SYSTEM
December 27, 1955
ATT: SERVICE DEPT.
STARTING AND COLD WEATHER
WARM-UP - 1955-56 80 SERIES
As automatic choke operation affects cold starting, warm-up, and at normal operating temperatures, it is
important that the following items be checked and corrected as required to provide satisfactory engine
operation.
The choke valve must be inspected for fit in air horn. It must not bind in the carburetor air horn, There
must be a clearance of .005” between either side of the choke valve and the air horn to insure freedom
from binding. Remove and file the choke valve sides if necessary to obtain the correct clearance.
Use new valve retaining screws upon reinstallation. Upset the end of the screws when the valve has been
tightened in the correct position.
Inspect the Choke valve shaft for sticking in the air horn. This may be due to misaligned shaft bores or
gum deposits on the shaft and in the bores.
The unloader arm of the choke shaft may also bind on the fast idle link inside the choke housing. Bend
the unloader arm away from the fast idle link to obtain clearance.
Inspect the baffle for binding and correct installation. The choke shaft arm must extend through the small
circular hole in the outer revolving baffle.
The choke piston must be free fit in its bore.
The air horn may be distorted due to over-tightening the carburetor air cleaner. The air horn may become
distorted in either the "full" open or closed position depending on the choke valve position at the time of
installation of the air cleaner.
Inspect the choke heat tube for obstruction which will prevent or reduce the volume of warm air from
circulating in the coil housing.
HZ 56-2
HD 56-2
File Under:
GROUP 4.000
FUEL-CARBURETIONEXHAUST SYSTEM
December 29, 1955
ALL HUDSON DEALERS, ZONES AND DISTRIBUTORS
ATT: SERVICE DEPT.
1956 "RAMBLER" SERIES CARBURETOR
SPECIFICATIONS MODEL AS-2349-S
The fast idle adjustment as measured between the throttle valve and the carburetor bore must be .043”
(Gauge T-109-158).
The unloader adjustment must be 3/16".
Please note the above in your 1956 Series "Rambler" Technical Service Manual.
Yours very truly,
F. H. Brodek
ctp
PRINTED IN U. S. A.
F.H.Brodek
Technical Service Manager
-2-
Be sure the coil is set properly to the index specifications. In some instances, deviating approximately one notch
either rich or lean may provide slight improvement for starting and warm-up performance on individual engines.
To improve the Model WGD-2231-S carburetor warm-up characteristics, the vacuum piston spring, Carter #61-226,
has been superseded by spring, Part #61-332, which has an increased tension. The metering rods, Carter #75-1166,
have also been revised incorporating a .003" smaller power step. The revised rods are identified by the letter “R”
embossed on the flat surface below the eye of the rod.
The above spring change was incorporated in the WGD-2231-SA carburetors with the code letters M-5 or higher
on the brass identification tag. The metering rod change was incorporated in all WGD-2231 carburetors effective
at Engine Number P-24900.
A.M.C. Part Number 3119697, Carter Part Number 75-1271-U, consisting of one vacuum piston spring and two
revised metering rods may be installed in the WGD-2231-S carburetors which were used prior to Engine Number
P-24900.
Yours very truly,
F. H. Brodek
ctp
PRINTED IN U. S. A.
F.H.Brodek
Technical Service Manager
HZ 56-4
HD 56-4
File Under:
GROUP 4.000
FUEL-CARBURETIONEXHAUST SYSTEM
January 19, 1956
ALL HUDSON DEALERS, ZONES AND DISTRIBUTORS
ATTN: SERVICE DEPARTMENT
ROUGH ENGINE IDLE WHILE WINDSHIELD WIPERS ARE OPERATING - 1956 "RAMBLER"
SERIES
Rough engine idle caused by windshield wiper operation may be improved by relocating the vacuum
booster pump outlet connection to the left rear side of the intake manifold cover carburetor mounting pad.
American Motors Technical Service Att. #56-5 outlines the procedure for relocating the vacuum pump
outlet fitting in the intake manifold cover.
Yours very truly,
F. H. Brodek
Technical Service Manager
F.H.Brodek
ctp
Attach.
PRINTED IN USA
American Motors
Technical Service Att. #56-5
Remove the carburetor and plug the opening with a greased shop cloth to prevent drill chips from
entering the intake manifold.
Mark and drill a 21/64” hole in the left rear side of the carburetor mounting pad as shown in the
illustration.
Tap the hole with a 1/8” standard tapered pipe thread.
NOTE: Coat the drill and tap with grease before drilling and tapping to prevent chips from falling
into the manifold.
Remove the vacuum pump outlet fitting from the rear end of the intake manifold cover and reinstall in
the new location. Install a 1/8” pipe plug in the former opening.
Cut the vacuum pump line approximately four inches from the flared end and install the cut section in
the fitting.
Connect the ends of the vacuum pump line with a ten inch section of 3/16” inside diameter windshield
wiper hose.
Reinstall the carburetor and route the line for clearance with the throttle linkage.
HZ 56-5
HD 56-5
File Under:
GROUP 4.000
FUEL-CARBURETIONEXHAUST SYSTEM
January 23, 1956
ALL HUDSON DEALERS, ZONES AND DISTRIBUTORS
ATTN: SERVICE DEPT.
CARBURETOR FLOODING - 1956
"RAMBLER" SERIES AS-2349-S
CARBURETOR
In some cases carburetors may flood even though the normal causes such as dirt or foreign material under
the needle, defective needle and seat, or incorrect float level adjustment have been inspected. This may
be due to interference between the float hinge and needle seat.
Inspect the float for binding caused by interference between the inner end of the needle seat and the float
hinge. If the binding is relieved by loosening the needle seat, then -the seat must be removed and 1/32"
cut from the inner end.
Reinspect the float level when reinstalling the needle seat as retightening on the original gasket may decrease the float height setting.
This condition should not occur on Model AS-2349-S carburetors with date code B-6 or higher on the
brass tag.
Yours very truly,
F. H. Brodek
Technical Service Manager
F.H.Brodek
ctp
PRINTED IN U S A
HZ 56-6
HD 56-6
File Under:
GROUP 4.000
FUEL-CARBURETIONEXHAUST SYSTEM
February 23, 1956
ALL HUDSON DEALERS, ZONES AND DISTRIBUTORS
ATTN: SERVICE DEPARTMENT
1956 "RAMBLER" SERIES AS-2349-S
CARBURETOR FUEL ECONOMY
Reports have been received on poor fuel economy on some of the first production “Rambler” Series.
Improved production quality effective with the AS-2349-S carburetor, bearing Date Code B-6 will insure
maximum fuel economy.
Serious consideration should be given to owner complaints of unreasonably low fuel mileage where
the carburetor has been inspected and the engine tuned to specifications without any improvement. In
these cases, it is recommended that a new carburetor, Part Number 31,~5128, (B-6 Code) be installed
inasmuch as it is impractical to fully detect manufacturing imperfections.
The original carburetor must be carefully packaged in the. container in which the new part was received
and returned to American Motors Claims Dept., in accordance with established R.F.C. procedure.
Yours very truly,
F. H. Brodek
Technical Service Manager
F.H.Brodek
ctp
PRINTED IN U. S. A.
HZ 56-10
HD 56-9
File Under:
ALL HUDSON DEALERS, ZONES AND DISTRIBUTORS
GROUP 4.000
FUEL-CARBURETIONEXHAUST SYSTEM
April 25, 1956
ATTN: SERVICE DEPARTMENT
INTAKE MANIFOLD - 1955-56
"80" SERIES
There is a possibility of casting fins extending into the exhaust passage of the intake manifold. These
fins will reduce the flow of exhaust gas through the passage resulting in reduced manifold heat which
will affect the climatic control operation.
On engines that have been operated in service for a period of time, the paint on the center section of the
intake manifold will become discolored slightly due to the heat of the exhaust gas.
In cases where unsatisfactory engine performance is encountered and does not respond to a thorough
engine tune-up, it is suggested the manifold be inspected for discoloration. If none exists, an obstructed
exhaust passage is indicated requiring intake manifold removal for a complete inspection.
The fin obstruction in the passage may be broken out with a rod. It is important that all obstructions be
cleared from the passage to insure maximum exhaust gas flow.
The operation of the exhaust damper valve must also be inspected as a damper valve may become stuck
in the open position which will reduce the flow of exhaust gases through the intake manifold.
Yours very truly,
F.H.Brodek
ctp
PRINTED IN U.S.A.
F. H. Brodek
Technical Service Manager
HZ 56-1
HD 56-1
File Under:
GROUP 6.000
TRANSMISSION
February 3, 1956
ALL HUDSON DEALERS, ZONES AND DISTRIBUTORS
ATTN: SERVICE DEPT.
ULTRAMATIC TRANSMISSION THROTTLE VALVE
LINKAGE ADJUSTMENT - 1955-56 80 SERIES
To insure proper shift pattern on the 1955-5680 Series Ultramatic transmission, throttle linkage
measurement and adjustment of rods and levers must be correctly set to factory specifications.
American Motors Technical Service Att. #56-6 illustrates the dimensions of the rod.
The carburetor throttle rod from the carburetor to the lever at the vertical rod must be 15-1/2" from
center of ball pivot at carburetor to "L" bend at rear and of rod (Fig. 1).
The adjuster rod that is connected to the carburetor throttle rod and to the lever of the cross shaft must
be 6-9/16" from center to center of ends of rod. If the rod is either too long or too short, bend rod at
present bend to obtain the correct length of 6-9/16".
The T.V. rod from the cross shaft lever to the T.V. lever at the transmission must be 26-1/8" from
center of pins, This rod must also be bent to obtain the correct measurement (Fig. 2).
The T.V. lever must be adjusted so that the taper on the end of the lever should contact a straight
edge held against the machined surface at the rear of the transmission case. This adjustment is outlined
in the 1955 Automatic Transmission Technical Service Manual, Ultramatic Section, Page 40, Figure
147.
After measurement, have been corrected, warm up engine and set carburetor idle at 400 RPM. Stop
the engine and loosen the two lock nuts at the front and rear end of the adjuster on the rod. PLACE
THE REAR END OF THE ROD IN THE CENTER HOLE OF THE CROSS SHAFT LEVER.
Finger tighten the two look nuts so that the adjuster rod fits freely in the lever.
-2-
NOTE: The adjuster rod has been located in the bottom hole of the cross shaft lever on first
1956 V-8 production cars. The relocation to the center hole in the lever will improve
shift characteristics.
Yours very truly,
F. H. Brodek
Technical Service Manager
F.H.Brodek
ctp
Attach.
PRINTED IN U. S. A.
HZ 56-2
HD 56-2
File Under:
GROUP 6.000
TRANSMISSION
February 3, 1956
ALL HUDSON DEALERS, ZONES AND DISTRIBUTORS
ATTN: SERVICE DEPT.
1955-56 SERIES ULTRAMATIC TRANSMISSION FRONT
PUMP KITS AND ASSEMBLIES
The following kits and assemblies are being released as Zone Stock items for installation where wear is
encountered in the converter pump shaft.
The new pump rotor incorporates a forty (40) tooth spline, the same as the forty (40) tooth spline in the
converter pump shaft.
For, all 1955 Series transmissions, the following kits and assemblies are to be used. They are not interchangeable with the 1956 Series with the exception of Part Number 6489367, Rotor Assembly. This is
due to a change in the 1956 pump body effective with the first 1956
production which provides an oil circuit to the high range clutch.
Where it is found necessary to replace a new pump assembly, Part Number 6484527, or a new rotor assembly, Part Number 6469367, in the 1955 Series, the original converter pump shaft MUST be drilled
with six 1/8" holes properly indexed in six places in the groove behind the splines as illustrated in
American Motors Technical Service Att. #56-7. After drilling, all burrs and sharp edges must be removed.
PART NUMBER
6489367
6484527
6484522
6484530
DESCRIPTION
Rotor Assembly
Pump Assembly
Converter Shaft Assembly (Drilled)
Pump Assembly and Converter Shaft Kit
A new drilled converter shaft assembly is included in all kits for the 1955 series transmissions. This
converter shaft, Part Number 6484522, MUST be used when a new pump or a new forty (40) tooth
-2-
spline rotor set is to be used in an original pump body to insure proper oil supply to the high range
clutch.
For all 1956 Series transmissions, prior to transmission Serial Number P-6969 at which point the forty
(40) tooth spline shaft and pump rotor became effective, the following parts are to be used and are not
interchangeable with the 1955 Series transmissions with the exception of Part Number 6489367, rotor
assembly.
PART NUMBER
6489367
6489366
6489467
6484524
DESCRIPTION
Rotor Assembly
Pump Assembly
Converter Shaft Assembly
Pump Assembly and Converter Shaft Kit
Yours very truly,
F. H. Brodek
Technical Service Manager
F.H.Brodek
ctp
Attach.
PRINTED IN USA
HZ 56-3
HD 56-3
File Under:
GROUP 6.000
TRANSMISSION
February 8, 1956
ALL HUDSON DEALERS, ZONES AND DISTRIBUTORS
ATTN: SERVICE DEPARTMENT
HYDRA-MATIC TRANSMISSION
COMING OUT OF REVERSE
Misadjustment of the manual control linkage or the back up light switch, if so equipped, may result in
the Hydra-Matic transmission coming out of reverse.
On cars equipped with back up lights, do not attempt to change the control linkage before checking the
adjustment of the switch.
Loosen or disconnect the switch at the manual control lever on the side of the transmission. Then operate
the car in reverse several times to ascertain the condition.
If loosening up or disconnecting the back up light switch corrects the condition, readjust the switch to
the proper spring tension.
This can be best accomplished by placing the control lever in reverse and adjusting the switch cable just
enough to allow the spring to pull the switch rod to the contact position.
Yours very truly,
F. H. Brodek
Technical Service Manager
F.H.Brodek
ctp
PRINTED IN USA
HZ 56-4
HD 56-4
File Under:
GROUP 6.000
TRANSMISSION
February 13, 1956
ALL HUDSON DEALERS, ZONES & DISTRIBUTORS
ATTN: SERVICE DEPARTMENT
REAR OIL PUMP DRIVER - 1955-56
ULTRAMATIC TRANSMISSION
A now machined type rear oil pump driver, Part Number 6480,292, became effective in production
beginning with Ultramatic transmission serial number P-6492.
This driver is designed to pilot both in the rear pump rotor and on the planetary shaft eliminating
brinnelling of the shaft by the rotor lugs and also shearing the driver lugs.
The brinnelling marks which may be evident on the shaft will not effect the physical properties of the
metal or the strength of the shaft. Therefore, it will. not be necessary to replace the rear planetary assembly where the new driver is installed as it will prevent contact of the rotor drive lugs and shaft.
The following Flat Rate Operation for installation of the rear oil pump driver applies:
NUMBER
TRU-34
OPERATION
SERIES
PARKING BRAKE AND GOVERNOR ASSEMBLY - R. & R Includes remove and replace rear transmission
housing. Make all necessary adjustments
80
Yours very truly,
F.H.Brodek
ctp
PRINTED IN U. S. A.
F. H. Brodek
Technical Service Manager
TIME
2.2 Hrs.
HZ 56-9
HD 56-9
File Under: GROUP 6.000
TRANSMISSION
April 25, 1956 ALL HUDSON DEALERS, ZONES AND DISTRIBUTORS
ATTN: SERVICE DEPARTMENT
T,V. LINKAGE ROD MEASUREMENT AND ADJUSTMENT - 1956 FLASHAWAY TRANSMISSION
Reports have been received from the field that an improper shift pattern on the Flashaway transmission
has been encountered.
The 1956 Technical Service Manual Special V-8 Supplement, Page 100, Figure 145, shows the lower
T.V rod measurement as 15-1/4" from center of holes at each end of rod.
Prior to final release for production, the T.V. lever was changed from a forging to a metal stamping.
Therefore, please correct the measurement shown in Figure 145 to read 16-1/8", plus .000", minus 1/32".
The T,V, lever should measure 5-9/15" as shown in Figure 144.
After checking the measurement of the lower T.V. rod and the T.V. lever, follow the instructions as outlined in the Manual under the heading of Throttle Linkage Adjustment.
If shift pattern is too high or low after correcting the T.V. linkage, refer to Diagnosis Guide for possible
cause.
Yours very truly,
F. H. Brodek
Technical Service Manager
F.H.Brodek
ctp
PRINTED IN U.S.A.
HZ 56-10
HD 56-10
File Under: GROUP 6.000
TRANSMISSION
ALL HUDSON DEALERS, ZONES AND DISTRIBUTORS
April 26, 1956
ATTN: SERVICE DEPARTMENT
SLIPPING IN REVERSE - 1956
FLASHAWAY TRANSMISSION
It has been found that under certain conditions, a slip in reverse can occur in the 1956 Flashaway
transmission. This can be caused by lack of reverse oil pressure. When this condition is encountered,
the following is recommended:
REVERSE PRESSURE
Check reverse pressure with selector lever placed in the “R” position. With hot oil,
pressure should be a minimum of 145 P.S.I. at approximately half throttle.
INTERNAL LEAKS OR RESTRICTIONS
Check the passages to the reverse piston for leaks or restrictions.
Check the passages to the overrun piston for leaks or restrictions.
When an internal leak or a restricted passage is indicated, repair, or replace the defective parts and
recheck reverse pressure. When a low pressure front pump is found, it should be replaced.
Yours very truly,
F.H.Brodek
ctp
PRINTED IN U.S.A.
F. H. Brodek
Technical Service Manager
HZ 56-12
HD 56-12
File Under: GROUP 6.000
TRANSMISSION
ALL HUDSON DEALERS, ZONES AND DISTRIBUTORS
May 8, 1956
ATTN: SERVICE DEPARTMENT
FLASHAWAY HYDRA-MATIC TRANSMISSION 1956 "50" SERIES
Improved service recommendations and identification of parts now incorporated in production are listed below to insure
proper assembly of the Flashaway Transmission:
FRONT UNIT COUPLING ASSEMBLY
Upon disassembly of the front unit coupling, mark the cover and driving torus shell with a fine punch at the snap
ring gap.
Reassemble the parts indexing the punch marks with the snap ring gap.
This procedure is necessary to keep the factory balance of this part and to insure the rivets in the driving torus
member are properly indexed with the notches in the cover.
REAR INTERNAL GEAR
A 15º chamfer has been added to the front leading edge of the rear internal gear as illustrated in American Motors
Technical Service Att. #56-17.
This has been done for identification purposes and to facilitate assembly.
When assembling the rear internal gear into the rear unit drum, the chamfered edge should be inserted first and be
positioned next to the clutch backing plate.
REAR SUN GEAR
A .25 drill point has been added to the rearward side of the rear sun gear. This has been done for identification
purposes.
If the main shaft and sun gear are disassembled for any reason, care should be exercised in reassembly to position
the side of the rear sun gear with the drill mark towards the rear of the main shaft as illustrated in American Motors
Technical Service Att. #56-17.
If the gear is of the early type, not incorporating the drill point, it should be marked and reassembled in the
same position as it was removed.
-2-
REAR UNIT SPRAG ASSEMBLY
Prior to installing the rear sprag and outer race, liberally coat with petrolatum the rear sprag inner race and flange to
insure adequate lubrication during the first miles of transmission operation.
FRONT PUMP INSTALLATION
To insure that the front pump and case center support are correctly aligned in the case Install the front pump into transmission.
Tighten the three front pump to case center support bolts. Then back off 1/4 turn.
Apply air in the neutral clutch hole in case to position case center support against the snap ring.
With air still applied, tighten case to front pump lock screw and torque 22-27 foot pounds.
Torque the three front pump to case center support bolts 25-30 foot pounds.
FRONT SEAL INSTALLATION
Care should be exercised in the installation of the front seal assembly into the flywheel housing as illustrated
in American Motors Technical Service Att. #56-17.
The recommended procedure is as follows:
Position the flywheel housing on a wooden block so as to support -the housing at the oil seal hole instead of
at the outer rim.
Install the front seal into the flywheel housing using KMO Tool, J-6118.
With the front, seal secure in the housing, stake the flywheel housing using a standard screw driver as illustrated
in American Motors Technical Service Att. #56-17.
The machined finished hub area of the torus cover must be free of nicks and scratches to insure proper seal.
The above recommendations are made in order to insure that the housing is not damaged when the seal is installed.
FRONT UNIT SELECTIVE SPACER
The front unit selective spacers now have an optional method of manufacture on all 1956 Flashaway transmissions.
The optional spacers incorporate an open end and are used interchangeably with the solid type.
-3-
The bright finish specification on both type spacers has been removed.
Yours very truly,
F. H. Brodek
Technical Service Manager
F.H.Brodek
ctp
Attach.
PRINTED IN U.S.A.
HZ 56-13
HD 56-13
File Under:
GROUP 6.000
TRANSMISSION
May 16, 1956
ALL HUDSON DEALERS, ZONES AND DISTRIBUTORS
ATTN: SERVICE DEPARTMENT
REAR BEARING RETAINER OIL SEAL HYDRA-MATIC TRANSMISSION
Rear Bearing Retainer Oil. Seal, Part Number 311,4778, (Group 6.650) manufactured by Chicago
Rawhide Mfg. Co. and National Mfg. Co. is being supplied for all Hydra-Matic transmissions.
1950 through and including 1956.
The assembly of these seals by the vendors differ, when installing the rubber, spring, and felt in the
outer shell. American Motors Technical Service Att. #56-19 illustrates both seals.
Therefore, when replacing oil seals, the felt portion should always be positioned towards the rear of
the transmission.
Yours very truly,
F. H. Brodek
Technical Service Manager
F.H.Brodek
ctp
Attach.
PRINTED IN U.S.A.
HZ 56-14
HD 56-14
File Under:
ALL HUDSON DEALERS, ZONES AND DISTRIBUTORS
GROUP 6.000
TRANSMISSION
May 17, 1956
ATTN: SERVICE DEPARTMENT
REAR BEARING SNAP RING FAILURE,
STANDARD TRANSMISSION - 1955-56
"40" SERIES
Exceptional heavy duty operation and/or misadjustment of the torque tube trunnion may result in breakage of the transmission rear bearing snap ring on standard transmission equipped units.
The adjustment of the torque tube trunnion is outlined in the 1955 Technical Service Manual, Rear Axle
and Propeller Shaft Section, Figure 49.
Where failure of this nature is encountered, install sleeve, Part Number 3149883, (supplied for service
only) by removing the rear extension housing, three snap rings, and speedometer drive gear.
Install the sleeve against the bearing and replace the Woodruff key and speedometer drive gear. Select
fit one snap ring in the groove at the rear of the speedometer drive gear to provide zero end clearance.
Part Number 3149883 (Group 6.240) is illustrated in American Motors Technical Service Att. #56-20.
When the sleeve is installed only one snap ring is required.
Production will incorporate a steel washer between the rear bearing and rear bearing snap ring at a later
date.
Yours very truly,
F.H.Brodek
ctp
Attach.
PRINTED IN USA
F. H. Brodek
Technical Service Manager
AMERICAN MOTORS CORPORATION
HUDSON AUTOMOBILES
NASH AUTOMOBILES
AUTOMOTIVE TECHNICAL SERVICE
K E L V I N A T O R
3280 SOUTH CLEMENT AVENUE
AN D L E O N A R D
SPECIAL PRODUCTS
A P P L I A N C E S
MILWAUKEE 7 WISCONSIN
HZ 56-20
HD 56-20
File Under: GROUP 6.000
TRANSMISSION
July 13, 1956
ALL DEALERS, ZONES AND DISTRIBUTORS
ATTN: SERVICE DEPARTMENT
MODIFIED 5610 SERIES TRANSMISSION
IMPROVED THROTTLE SHIFT PATTERN
Please refer to Service Letter HZ and HD 56-18, dated June 15, 1956, filed under Group 6.000.
It has now been determined that the changes outlined therein for the 5610 Series equipped with "E-56"
Hydra-Matic transmission will also improve the light throttle upshift pattern on the "E-55" and "Y-55"
transmissions.
While the changes as outlined for improved shift points prior to serial number D-331043 continue in effect, Part Number 3149854, Accelerator Shaft Assembly, 3149851, Rod, and 3131562, Clip, did not actually enter production until serial number D-332793. The T.V. bellcrank rod lever located on accelerator
shaft assembly, Part Number 3146959, was relocated 400 upward and became effective at D-331043.
Your Parts Warehouse Manager will be advised when Part Number 3200110, Carburetor Control Shaft
Kit (Group 4.070), will be available.
Yours very truly,
F. H. Brodek
Technical Service Manager
F.H.Brodek
ctp
PRINTED IN USA
AMERICAN MOTORS CORPORATION
HUDSON AUTOMOBILES
NASH AUTOMOBILES
SPECIAL PRODUCTS
K E L V I N A T O R
AUTOMOTIVE TECHNICAL SERVICE
A N D L E O N A R D
3280 SOUTH CLEMENT AVENUE
A P P L I A N C E S
MILWAUKEE 7 WISCONSIN
HZ 56-21
HD 56-21
File Under: GROUP 6.000
TRANSMISSION
September 21, 1956
ALL DEALERS, ZONES AND DISTRIBUTORS
ATTN: SERVICE DEPARTMENT
AUTOMATIC TRANSMISSION FLUIDS
Only qualified Automatic Transmission Fluids, "Type All, such as American Motors Automatic Drive Fluid, should
be used in all Automatic Transmissions.'
Qualified fluids will have "Type All plus the Armour Identification Number (AQ-ATF) plainly marked on the containers. Unqualified fluids which do not have this identification may be of inferior quality and their use may seriously
damage an Automatic Transmission.
The warranty on Automatic Transmissions is predicated on the use of original equipment fluids or other Automatic
Transmission Fluids, "Type A", qualified by the Armour Research Foundation.
A number of fluid additives for Automatic Transmissions have been offered on the retail market. These fluids could
reduce the coefficient of friction of the clutch plates causing a slippage and premature failures. Also, these fluids may
contain compounds that could cause the formation of varnish or corrosive agents.
Therefore, we strongly advise against the use of any fluid additives in Automatic Transmissions.
Yours very truly,
F. H. Brodek
Technical Service Manager
F.H.Brodek
ctp
PRINTED IN U.S.A.
AMERICAN MOTORS CORPORATION
HUDSON AUTOMOBILES
NASH AUTOMOBILES
AUTOMOTIVE TECHNICAL SERVICE
SPECIAL PRODUCTS
3280 SOUTH CLEMENT AVENUE
MILWAUKEE 7 WISCONSIN
K E L V I N A T O R
A N D L E O N A R D
A P P L I A N C E S
HZ 56-22
HD 56-22
File Under: GROUP 6.000
TRANSMISSION
November 26, 1956
ALL HUDSON DEALERS, ZONES, AND DISTRIBUTORS
ATTENTION: SERVICE DEPARTMENT
SCRAPING NOISE IN REVERSE 1956 FLASHAWAY TRANSMISSION
Service Part Number 3200399, Rear Pump Intake Pipe Kit, is available to eliminate a rattling or scraping noise
occuring during reverse operation of the Flashaway transmission.
Procedure for installing the rear pump intake assembly is as follows:
Drain and remove oil pan. Discard the gasket.
Remove the rear pump intake pipe, 11011 ring seal, and oil screen. Discard the pipe and 11011 ring seal.
NOTE: If the front pump intake pipe "O" seal ring is disturbed during oil screen removal, it should be replaced.
Install the bolt contained in the kit 1/2" into the counterbore end of the sleeve. Then using the bolt as a driver, install the sleeve into the canted hole adjacent to the rear pump intake hole until the sleeve is flush or within 1/16"
below the machined face of the case. Then remove the bolt from the sleeve.
Assemble the rear pump intake pipe as an assembly as follows:
Install steel retaining washer on pump end of pipe.
Install new "O" ring seal next to retaining washer on pipe.
Install check valve into pump end of pipe.
Install pipe assembly into case.
Install pipe retainer with the raised edge out and the open end of the retainer toward the rear of the transmission.
Secure the retainer with bolt and lockwasher.
-2NOTE: Torque the bolt to 5-6 Foot Pounds.
Install the oil screen.
Install oil pan using new gasket.
Refill transmission with Hydra-Matic fluid.
Flat Rate Operation TRF-16 will apply.
Yours very truly,
F. H. Brodek
Technical Service Manager
F.H.Brodek
ctp
PRINTED IN U.S.A.
HZ 56-1
HD 56-1
File Under:
GROUP 8.000
BRAKES AND WHEELSHUB AND DRUM
January 11, 1956
ALL HUDSON DEALERS, ZONES AND DISTRIBUTORS
ATT: SERVICE DEPT.
HYDROVAC POWER BRAKE UNIT,
PART NUMBER 3117316
American Motors Technical Service Att. #56-4 outlines complete servicing recommendations
for Hydrovac Power Brake Unit, Part Number 3117316.
Yours very truly,
F. H. Brodek
Technical Service Manager
F.H.Brodek
ctp Attach.
PRINTED IN U. S. A.
American Motors
Technical Service. Att. #56-4
HYDROVAC POWER BRAKE UNIT,
PART NUMBER 3117316
The Hydrovac is of the vacuum suspended type (vacuum on both sides of the power piston in the
released position) and utilizes the original equipped master cylinder and pedal linkage.
The power assistance is provided through a pressure differential created across the power piston. In the
applied position, one side is connected to vacuum from the engine intake manifold and the other side is
open -to atmospheric pressure thus creating a pressure differential and providing the operator with a
power assist.
DESCRIPTION OF OPERATION
The Hydrovac operation has three basic controls (Fig. 1).
Hydraulically Actuated Control Valve
The control valve contains a piston, diaphragm, vacuum and atmospheric poppets. Hydraulic pressure
from the master cylinder controls the piston movement which in turn regulates the position of the vacuum and atmospheric poppets.
Vacuum Power Cylinder
The power cylinder consists of a piston, piston return spring, and push rod which is pinned to the
hydraulic piston of the slave cylinder. Power piston movement is a result of a pressure differential
across the piston. The amount of pressure differential is governed by control valve piston movement and
vacuum and atmospheric poppet positions. The Hydrovac is hydraulically connected between the master
cylinder and wheel cylinders. Therefore, as additional pedal pressure is exerted, the master cylinder
output pressure is increased. This increase in pressure will cause a greater pressure differential across the
power piston and provide a proportioned increase in power assist.
Hydraulic Slave Cylinder
The slave cylinder consists of a piston which is pinned to the push rod. The piston has a ball check
valve assembly mounted integrally. Movement of the piston is controlled by two forces: Movement of
the vacuum power piston and hydraulic pressure from the master cylinder.
During operation, these three basic controls function as one single unit, all of which are controlled by
hydraulic pressure developed within the master cylinder. The hydraulic pressure at the wheel cylinders
is the sum of the pressure developed by vacuum power piston movement and the pressure received by
the Hydrovac from the master cylinder.
American Motors
Technical Service Att. #56-4
Page 2
1 . Power Piston
2. Piston Return Spring
3. End Plate
4. Control Valve Bleeder Screw
5. Control Valve Piston
6. Diaphragm
7. Vacuum Poppet
8. Atmospheric Poppet
9. Poppet Spring
10. Air Cleaner Atmospheric
Pressure Inlet
11. Slave Cylinder Bleeder Screw
12. Hydraulic Port to Wheel
Cylinders
13. Check Valve Ball
14. Slave Cylinder Piston
15. Hydraulic Port From Master
Cylinder
16. Push Rod
17. Vacuum Port and Check Valve
18. Push Rod Seal
FIGURE 1
Sectional View of Hydrovac Unit
OPERATION
Released Position
In the released position (Fig. 2) with the engine operating, both sides of the power piston are open to engine vacuum. Vacuum enters the power cylinder through the vacuum check valve. In this position, the vacuum poppet is
off its seat, therefore, vacuum may pass through the center of the diaphragm into the valve chamber. The atmospheric poppet is held closed by spring pressure. Vacuum is then transmitted through the exterior mounted vacuum tube to the opposite side of the power piston.
American Motors
Technical Service Att. #56-4
Page 3
1 Tube
2. End Plate Internal Passage
3. Control Valve Piston
4. Diaphragm
5. Vacuum Poppet
6. Atmospheric Poppet
7. Spring
8. Air Cleaner
9. Power Piston
10. Spring
11. Push Rod
12. Vacuum Check Valve
13. Hydraulic Port From Master
Cylinder
14. Slave Cylinder Operating
Yoke
15. Slave Cylinder Piston
16. Slave Cylinder Ball Check
Valve
17. Hydraulic Port to Wheel
Cyl inders
FIGURE 2
Hydrovac in the Released Position
The power piston is now balanced in vacuum and is held in the released position by the power piston
return spring.
The slave cylinder hydraulic piston is pinned to the power piston push rod, therefore, in the released
position, it is held against the piston stop washer. In this position, the operating yoke of the hydraulic
piston moves the ball check valve off its seat (Fig. 3).
American Motors
Technical Service Att. #56-4
Page 4
FIGURE 3
Slave Cylinder Hydraulic Check Valve
in Released Position
In this position, hydraulic brake fluid under released residual line pressure from the master cylinder is ported to both
sides of the slave cylinder and internally ported through a passage in the end plate up to the control valve piston.
Applied Position
In the applied position (Fig. 4), brake fluid under pressure from the master cylinder enters the slave cylinder and is
ported through the open ball check valve and out to the wheel cylinders. At the same time, this fluid is being ported internally to the control valve. As this pressure increases, it moves the control valve piston contacting the diaphragm seat
against the vacuum poppet closing off the vacuum supply. This movement automatically opens the atmospheric poppet
and allows atmosphere to pass into the valve chamber and through the externally mounted tube to the opposite side of the
power piston. This creates a pressure differential across the power piston which causes the power piston to move against
the slave cylinder piston. Initial movement of the slave cylinder piston causes the operating yoke to seat the ball check
valve trapping fluid in the outlet side of the slave cylinder (Fig. 5). The fluid now under pressure from the master cylinder and from movement of the power piston is transmitted to the wheel cylinders.
American Motors
Technical Service Att. 156-4
Page 5
I Tube
2. End Plate Internal Passage
3. Control Valve Piston
4. Diaphragm
5. Vacuum Poppet
6. Atmospheric Poppet
7. Spring
8. Air Cleaner
9. Power Piston
10. Spring
11. Vacuum Check Valve
12. Hydraulic Port From Master
Cylinder
13. Slave Cylinder Operating Yoke
14. Slave Cylinder Piston
15. Slave Cylinder Ball Check Valve
16. Hydraulic Port to Wheel Cylinders
FIGURE 4
Hydrovac in Applied Position
FIGURE 5
Slave Cylinder Hydraulic Check Valve
in Applied Position
American Motors
Technical Service Att. #56-4
Page 6
HOLDING POSITION
During any phase of a brake application when the desired braking effect has been obtained, the hydraulically actuated
control valve will go into a holding position. In this position, hydraulic pressure against the control valve piston is
balanced by the pressure differential across the diaphragm thereby seating both atmospheric and vacuum poppets.
Any increase or decrease in hydraulic input pressure will cause a corresponding change in the pressure differential
across the diaphragm in addition to causing a change in the Hydrovac hydraulic output pressure.
BRAKE APPLICATION WITHOUT A
POWER ASSIST
If the vacuum supply fails, the brakes may be applied in a fully conventional manner. As stated previously, the
Hydrovac is hydraulically connected between the master cylinder and wheel cylinders. In the released position,
the ball check valve in the slave cylinder hydraulic piston is off its seat; if the vacuum supply fails, the fluid under
pressure from the master cylinder will by-pass directly through the ball check valve to the wheel cylinders.
DISASSEMBLY OF THE HYDROVAC
NOTE: Always use extreme care in handling hydraulic system parts to prevent their
coming in contact with mineral oil, gasoline, or kerosene. When overhauling
the unit, always use repair kits.
Removing Vacuum Cylinder From
End Plate
To insure proper reassembly, scribe alignment marks on the end plate and cylinder shell. Slide hose off vacuum tube.
Remove the nuts and lockwashers from the hook bolts and disengage them from cylinder shell. Remove cylinder shell
and rubber gasket from end plate. If shell sticks to end plate, a fibre or plastic mallet may be used to tap the end plate
loose. Do not tap the cylinder shell.
Removing Slave Cylinder and Vacuum
Check From End Plate
With a 1-1/4" end wrench, loosen the slave cylinder tube nut and unscrew slave cylinder tube assembly from the end
plate. Remove the vacuum check valve from end plate with a 1-1/8" wrench.
Disassembly of Slave Cylinder
Remove slave cylinder tube nut from tube. Clamp end plug in vise and with end wrench on fiats of cylinder tube,
remove tube and gasket. Remove bleeder screw from end plug (Fig. 6).
American Motors
Technical Service Att. #56-4
Page 7
1 . Bleeder Screw
2. End Plug
3. Gasket
4. Tube
5. Tube Nut
FIGURE 6
Slave Cylinder Disassembly
Disassembly of Vacuum Check Valve
Remove snap ring from valve body and lift out spring retainer, spring, and check valve ball (Fig. 7).
1. Snap Ring
2. Retainer
3. Spring
4. Bal
5. Valve Body
FIGURE 7
Vacuum Check Valve Disassembly
American Motors
Technical Service Att. #56-4
Page 8
Removal of Slave Cylinder Piston and
Power Piston From End Plate
Compress the power piston return spring as shown in Figure 8 so that the slave cylinder piston protrudes from the end
plate. With the use of two "C" clamps, lock the power piston in this position. Pull back spring on slave cylinder piston
and remove the retaining pin. Remove the "C" clamps and separate the power piston and return spring from end plate.
1 . Piston
2. Pin
3. Push Rod
4. End Plate
5. "C" Clamps
6. Power Piston
FIGURE 8
Removal of Slave Cylinder Piston
and Power Piston From End Plate
American Motors
Technical Service Att. #56-4
Page 9
Disassembly of Slave Cylinder
Hydraulic Piston
Remove rubber cup from piston. Disengage snap ring and remove retainer, spring, and check valve bal I. The remainder
of the piston is serviced as an assembly, therefore, no further disassembly is necessary (Fig. 9).
1. Snap Ring
2. Retainer
3. Spring
4. Ball
5. Cup
6. Piston
FIGURE 9
Disassembly of Slave Cylinder Hydraulic Piston
Disassembly of Power Piston
Being careful not to damage the finish of the push rod, clamp the hex of the push rod in a vise and remove the retaining
nut. Remove the wick retainer plate, packing ring, packing wick, rear packing plate, piston packing, push rod seal, front
piston plate, and washer (Fig. 10).
American Motors
Technical Service Att. #56-4
Page 10
1 Push Rod
2. Washer
3. Front Packing Plate
4. Seal
5. Packing
6. Rear Packing Plate
7. Wick
8. Ring
9. Retainer Plate
10. Nut
FIGURE 10
Disassembly of Power Piston
Removal of Air Cleaner, Valve Cover,
and Diaphragm From End Plate
Disengage outer snap ring and remove retainer and air cleaner hair. Disengage inner snap ring and remove spring retainer and atmospheric poppet spring. To insure proper reassembly, scribe alignment marks between valve cover and
end plate. Remove valve cover retaining screws and separate valve cover, diaphragm assembly, and gaskets from end
plate. Remove hose and elbow assembly from valve cover (Fig. 11).
American Motors
Technical Service Att.
Page 11
1 . Outer Snap Ring
2. Retainer
3. Hair
4. Inner Snap Ring
5. Spring Retainer
6. Spring
7. Screw
156-4
8. Valve Cover Assembly
9. End Plate
10. Diaphragm Assembly
11. Gasket
12. External Tube
13. External Hose
FIGURE 11
Removal of Air Cleaner, Valve Cover,
and Diaphragm From End Plate
Disassembly of End Plate
Remove seal from slave cylinder bore in end plate (Fig. 12). Remove snap ring, stop washer, retainer, cup, and push rod
washer. Remove leather seal and bleeder screw from end plate. With a 1-1/8" socket, remove control valve fitting assembly from end plate.
Disassembly of Control Valve Filling
Remove fitting seal from control valve fitting. Using pliers J-5403, disengage snap ring and remove piston stop washer.
Push piston out of bore of fitting and remove hydraulic cup from piston.
American Motors
Technical Service Att. 156-4
Page 12
1. Snap Ring
2. Stop Washer
3. Valve Fitting
4. Seal
5. Piston
6. Cup
7. Control Valve Fitting
Assembly
8. Bleeder Screw
9. Seal
10. Snap Ring
11. Stop Washer
12. Retainer
13. Cup
14. Push Rod Washer
15. End Plate
16. End Plate Leather
Seal
FIGURE 12
Disassembly of End Plate and
Control Valve Fitting
CLEANING AND INSPECTION
Thoroughly wash al I parts in alcohol. Use air pressure to remove fluid from all internal passages. Inspect the
following parts for wear or damage:
Vacuum cylinder shell . If rust or corrosion is found in bore, it can be removed with fine emery cloth.
Slave cylinder tube bore.
Vacuum check valve ball seat.
Power piston push rod.
Slave cylinder piston check valve ball seat.
Vacuum and atmospheric rubber poppets in valve cover.
Control valve fitting.
End plate bore.
All seal and gasket surface areas to insure proper seal upon reassembly.
American Motors
Technical Service Att. #56-4
Page 13
REASSEMBLY OF HYDROVAC
Basically the reassembly of the Hydrovac is the exact reverse of the disassembly procedure outlined on previous pages.
However, to insure proper reassembly, additional information is listed on the following pages.
All hydraulically operated parts should be coated with hydraulic brake fluid prior to
assembly.
When installing a new push rod leather seal in the end plate, a 3/4" outer diameter punch
may be used. The lip of the seal should point into the end plate.
REASSEMBLY OF THE POWER PISTON
Figure 13 illustrates a power piston assembly ring which can be made from a 24-13/64" x 1-1/4" x .035" section of strap
steel . Refer to Figure 10 for proper parts assembly sequence.
FIGURE 13
Power Piston Assembly Ring
American Motors
Technical Service Att. 156-4
Page 14
When installing a new packing wick, it must be cut to size and prior to assembly should be dipped in a
suitable vacuum cylinder oil . The packing ring should be installed so the prongs are pointing up into
the wick.
Apply vacuum cylinder oil to the bore of the cylinder prior to installing the power piston.
MAINTENANCE
1,000 Miles - Check the master cylinder brake fluid level . Fill to 1/2" of filler opening.
5,000 Miles - Check all vacuum and brake fluid connections for leakage.
10,000 Miles - Check broke pedal linkage, check linings, and drum condition. Clean air cleaner.
BLEEDING SYSTEM
Bleeding the Hydrovac power brake system may be done manually or with a pressure type bleeder.
The proper procedure for bleeding this system is to first bleed off from the control valve bleeder screw and
secondly the slave cylinder bleeder screw and from there bleed each individual wheel cylinder starting with
the one furthest away from the master cylinder.
LUBRICATION
Ordinarily additional lubrication beyond that provided in the manufacturing of the Hydrovac is not
required. However, it is advisable that after an initial installation is made in a normal horizontal position
the oil level should be checked in the vacuum cylinder. Remove 1/8" pipe plug from the end of the cylinder.
The oil level should be up to the bottom of the pipe plug hole. If low, fill to the proper level with a suitable
vacuum cylinder oil.
When overhauling a Hydrovac, it will be necessary to perform the above procedure prior to operation.
POSSIBLE DIFFICULTIES AND CORRECTIONS
CONDITIONS
Hard Pedal
PROBABLE CAUSE
CORRECTION
Glazed Linings
Clean up Linings and Adjust.
Grease or Brake Fluid
on Linings
Find Cause of Leak and
Correct. Reline Brakes
and Adjust.
Bind in Pedal Linkage
Free up Linkage.
American Motors
Technical Service Att. #56-4
Page 15
CONDITIONS
Grabbing Action in
Brakes
Pedal Goes to Floor
PROBABLE CAUSE
CORRECTION
Vacuum Check Valve Not
Functioning Properly
Clean or Replace as
Necessary.
Collapsed Vacuum Hose
Replace Hose
Plugged Vacuum Fittings
Clean.
Hydrovac Control Valve Not
Functioning Properly
Remove Valve Cover.
Inspect Diaphragm,
Poppets, and Air
Cleaner for Proper
Operation.
Power Piston Binding
Remove Cylinder Shell
and Check Power
Piston Stroke.
Grease or Brake Fluid on
Linings
Find Cause of Leak
and Correct. Re-line
Brakes and Adjust.
Rough or Scored Drums
Clean or Turn the
Drum.
Hydrovac Control Valve
Piston Friction
Remove and Inspect
Make Necessary Part
Replacements.
Power Piston Binding
Remove Cylinder Shell
and Check Power
Piston Stroke.
Brake Adjustment
Inspect Lining Condition
and Make Necessary
Correction.
Air in Hydraulic System
Bleed System and Refill
Master Cylinder
Brake Fluid Leak
Locate Source and
Correct. Bleed System
and Refill Master
Cylinder.
Brake Drum Cracked
Replace Drum.
American Motors
Technical Service Att. #56-4
Page 16
CONDITIONS
Brakes Do Not
Release Properly
PROBABLE CAUSE
CORRECTION
Hydrovac Internal
Hydraulic Broke
Fluid Leaks
If No Exterior
Hydraulic Brake
Fluid Leaks are
Visible, Remove
Hydrovac From Car,
Disassemble and
Inspect all Cups and
Seals for Possible
Leakage. Replace
Necessary Parts.
Improper Brake Shoe
Adjustment
Perform Major Brake
Adjustment.
Brake Shoe Return Springs
Broken
Replace Springs.
Brake Shoe Binding on
Backing Plate
Lubriplate Points of
Contact on Backing
Plate.
Pedal Linkage Binding
Free Up Linkage.
Master Cylinder
Compensating Port
Plugged or Covered
Inspect Bore and
Reservoir for Dirt.
Check Pedal Linkage
for Proper Adjustment.
Hydrovac Control Valve
Not Functioning
Properly
Inspect for Dirt Under
Atmospheric Poppet
or Control Valve
Piston Friction.
Slave Cylinder Hydraulic
Piston Check Ball
Not Functioning
Properly
Inspect Operating Yoke
of Piston to Insure
Proper Operation of
Check Ball
Power Piston Binding
Remove Cylinder Shell
and Check Power
Piston Stroke
HZ 56-2
HD 56-2
File Under: GROUP 8.000
BRAKES AND WHEELSHUB AND DRUM
February 1, 1956
ALL HUDSON DEALERS, ZONES AND DISTRIBUTORS
ATTN: SERVICE DEPARTMENT
REAR WHEEL BRAKE CYLINDERS 1956 "HORNET" AND "WASP" SERIES
Effective at car Serial Numbers Y-2019, X-9204, and W-9403, a 7/8" diameter rear wheel brake
cylinder was incorporated in production to improve wheel brake distribution.
The previous cylinders were 15/16” diameter.
Yours very truly,
F. H. Brodek
Technical Service Manager
F.H.Brodek
ctp
PRINTED IN USA
HZ 56-3
HD 56-3
File Under:
GROUP 8.000
BRAKES AND WHEELSHUB AND DRUM
May 22, 1956
ALL HUDSON DEALERS, ZONES AND DISTRIBUTORS
ATTN: SERVICE DEPARTMENT
CLUTCH AND BRAKE PEDAL SHAFT LUBRICATION
FITTING - 1956 “40” AND “60” SERIES
Production has recently incorporated a new heavier lubrication fitting on the clutch and brake pedals.
Effective car serial numbers are not available.
Where breakage of the original small press type fitting occurs, a correction can be attained by drilling
out the remaining portion of the fitting with a No. 3 drill .213". Thread approximately 3/16" of predrilled
portion of hole with a 1/4728 tap and install lubrication fitting, Part Number G-271287.
The pedals do not have to be removed to perform this operation.
Yours very truly,
F. H. Brodek
Technical Service Manager
F.H.Brodek
ctp
PRINTED IN USA
HZ 56-1
HD 56-1
File Under:
GROUP 9.000
REAR AXLE-PROPELLER
SHAFT
February 13, 1956
ALL HUDSON DEALERS, ZONES & DISTRIBUTORS
ATTN: SERVICE DEPARTMENT
REAR AXLE PINION OIL SEAL, PART
NUMBER 3128171, "RAMBLER" SERIES
1951 TO 1955 INCLUSIVE
An improved rear axle pinion oil seal is available for parts service replacement.
The part number of the oil seal has not been changed. The improvement has been accomplished in
the fabrication of the seal together with changes in the curing of the rubber.
The new seal is identified by the letters “CR” stamped on the metal retainer.
Yours very truly,
F. H. Brodek
Technical Service Manager
F.H.Brodek
ctp
PRINTED IN U.S.A.
HZ 56-4
HD 56-3
File Under:
GROUP 9.000
REAR AXLE-PROPELLER
SHAFT
April 25, 1956
ALL HUDSON DEALERS, ZONES AND DISTRIBUTORS
ATTN: SERVICE DEPARTMENT
REAR AXLE PINION CONE SETTING 1956 10, 40, 60, AND 80 SERIES
The method of adjusting the rear axle pinion gear has been revised in production on all rear axle ratios.
The previous method of installing pinion depth adjusting washers directly behind the pinion gear has
been changed. The pinion depth adjusting washer is now installed in the rear axle housing behind the
rear pinion bearing cup. The rear face of the pinion gear is also machine ground to enable a pinion depth
adjustment check after assembly.
Effective serial number points are not available.
Disassembly and location of adjusting shim will determine the procedure required to perform pinion
depth adjustment.
The method of adjusting the pinion depth is outlined in the 1955 Technical Service Manual when the
adjustment washer is located behind the pinion gear.
The method of adjusting the pinion depth, outlined in the 1956 "Hornet" Special V-8 Series Technical
Service Manual Supplement, is used when the adjusting washer is located behind the rear pinion bearing
cup.
The following are the center line of rear axle to the rear face of the pinion gear measurements. These
measurements are to be used when checking pinion gear depth adjustment and apply to a correctly
adjusted pinion marked “0”. On a pinion marked +2, the measurements should be .002” less than this
figure and with a pinion marked -3, the reading should be 003” greater.
-2-
“10” Series, Standard or Overdrive Equipped
Hydra-Matic Equipped
“40” Series, All Ratios
“50” Series, All Ratios
“60” and “80” Series, All Ratios
2.095”
2.098”
2.094”
2.625”
2.547”
Yours very truly,
F. H. Brodek
Technical Service Manager
F.H.Brodek
ctp
PRINTED IN U.S.A.
HZ 56-1
HD 56-1
File Under:
GROUP 10.000
FRONT AXLE-FRONT SUSPENSION
STEERING GEAR
February 1, 1956
ALL HUDSON DEALERS, ZONES AND DISTRIBUTORS
ATTN: SERVICE DEPARTMENT
TOE-IN ADJUSTMENT ON POWER STEERING EQUIPPED CARS - ALL SERIES
When adjusting toe-in on power steering equipped cars, operate the engine. This will permit oil pressure
supplied by the power steering pump to center the valve spool in the power cylinder control valve. The
steering wheel spoke may then be readily adjusted to the desired center position.
Yours very truly,
F. H. Brodek
Technical Service Manager
F.H.Brodek
ctp
PRINTED IN USA
HZ 56-2
HD 56-2
File Under:
GROUP 10.000
FRONT AXLE-FRONT SUSPENSIONSTEERING GEAR
April 23, 1956
ALL HUDSON DEALERS, ZONES AND DISTRIBUTORS
ATTN: SERVICE DEPARTMENT
STEERING GEAR FILLER PLUG REMOVAL
FOR LUBRICANT LEVEL INSPECTION
1956 "50" SERIES
Requests have been received for a suggested procedure for removing the steering gear filler plug for
lubricant level inspection on the 1956 "50" Series as a result of minor clearance provided.
With the car elevated on a hoist, the filler plug is accessible from below the front of the car. A 5/8"
ratcheting box socket (similar to Snap-On Tool Number 76 or 77) is suggested for removal of the filler
plug. Lubricant may be added with use of a hand gun provided with a long (solid or flexible) nozzle.
Yours very truly,
F. H. Brodek
Technical Service Manager
F.H.Brodek
ctp
PRINTED IN U.S.A.
HZ 56-3
HD 56-3
File Under:
GROUP 10.000
FRONT AXLE-FRONT SUSPENSIONSTEERING GEAR
May 18, 1956
ALL HUDSON DEALERS, ZONES AND DISTRIBUTORS
ATTN: SERVICE DEPARTMENT
DAMAGED FRONT TIRES DUE TO IMPROPER
TURNING RADIUS - MODELS 35660-80
In order to avoid the possibility of damaging front tires as a result of tires contacting the brake hose
bracket during tight right or left turn, the turning radius should be checked as noted on New Car Delivery
Inspection Form No. F-1942. The inside wheel on right or left turns should be adjusted to a maximum
turn angle, of 38º on "Rambler" Series and 36º on all other Series.
In addition to adjusting the turn angle to the specified limits, it is recommended to trim the rear corner
of the brake hose brackets approximately 1/8" to prevent possible tire damage under abnormal turning
conditions such as steep driveways.
Effective April 11th, the front brake hose brackets have been reworked in production. Serial Numbers
are not available.
Yours very truly,
F. H. Brodek
Technical Service Manager
F.H.Brodek
ctp
PRINTED IN U.S.A.
HZ 55-1
HD 56-1
File Under: GROUP 11.000
FRAME SPRINGS-SHOCK
ABSORBER-MUD PANS
All HUDSON DEALERS, ZONES AND DISTRIBUTORS
December 26, 1955
ATT: SERVICE DEPT.
UPPER AND LOWER SHOCK ABSORBER MOUNTING
REINFORCEMENTS - 1956 "RAMBLER" SERIES
CAMPAIGN
Effective at car serial number D-277527, a brace, Part Number 3148777, was added to the rear axle
truss rod and shook absorber bracket to prevent bending of the bracket and resultant shook absorber
damage.
On cars built after car serial number D-277527, up to and including car serial number D-27047, the
brace was incorporated but only welded on one side.
The addition of the brace, one per bracket, and the completion of the welding on braces already installed can be performed on the car.
Figure 1, American Motors Technical Service Att. #56-3 outlines the welding location of the brace.
A reinforcement, Part Number 3415299, has also been added to the body crossmember at the point
where the upper end of the rear shook absorber is attached. This reinforcement was added in production
at car serial number D-279100.
The brace (two per oar) and reinforcement (two per car) most be installed on all, cars built prior to the
above car serial numbers.
To install the shock absorber upper mounting reinforcement, remove the rear shock absorbers.
Remove the original shock absorber grommet retainer welded to the underside of the crossmember,
The reinforcement is formed to take the place of the lower grommet retainer.
Use a bolt and nut through the shook absorber bayonet hole to hold the reinforcement in place while
arc welding. Figure 2 outlines the location and welding of the reinforcement.
The installation of the braces and reinforcements should be performed at the same time as the installation of the engine rear support hanger reinforcement, Part Number 3415464, required prior to serial
2
number D-278100- Service Letter HZ-56-3 and HD 56-3, filed under Group 1.000, outlines required
installation procedure.
Initial shipments of the parts involved will be forwarded to all field warehouses.
Credit will be allowed for material at dealer net plus 10 per cent and labor at 65 per cent of the Flat Rate
Time listed below based on the Dealer Labor Multiple on record at each Zone.
NUMBER
SH-100
SH-101
SH-102
OPERATION
SERIES
TIME
INSTALL REAR SHOCK ABSORBER UPPER MOUNTING
REINFORCEMENTS - Weld reinforcement (both
sides). Includes shock absorber R. & R
10
1.2 Hr.
INSTALL REAR SHOCK ABSORBER UPPER MOUNTING
AND ENGINE REAR SUPPORT HANGER REINFORCE-MENTS - Includes shock absorber R. & R
10
1.6 Hr.
INSTALL REAR SHOCK ABSORBER UPPER MOUNTING
REINFORCEMENTS, LOWER SHOCK ABSORBER
BRACKET BRACES, AND ENGINE REAR SUPPORT
HANGER REINFORCEMENTS - Includes shock
absorber R. & R
10
1.8 Hr.
Yours very truly,
F. H. Brodek
Technical Service Manager
F.H.Brodek
ctp
Attach.
PRINTED IN USA
HZ 56-2
HD 56-2
File Under: GROUP 11.000
FRAME SPRINGS-SHOCK
ABSORBER-MUD PANS
January 9, 1956
ALL HUDSON DEALERS, ZONES AND DISTRIBUTORS
ATT:
SERVICE DEPT.
REAR SHOCK ABSORBER NOISE 40-60-80 SERIES
Production inadvertently installed an incorrect rear shock absorber retainer in an undetermined
number of cars.
The incorrect retainer, Part Number 3146309, has a .447”-.457” approximately 15/32”, and the correct
retainer, Part Number 3136432, has a .380”-.395” diameter hole, approximately 25/64”.
The larger hole in the retainer results in damage to the shock absorber grommet spacer or limit sleeve,
Part Number 3126324, and over-tightening of the grommets.
Before condemning the shock absorber as being noisy when actually the noise is probably due to the
above mentioned condition, discard the shock absorber grommet spacer or limit sleeve. When tightening the assembly after the sleeve has been eliminated, do not compress the shock absorber grommets.
Where the spacer has been discarded in service, it is not necessary to install retainer, Part Number
3136432.
This condition has been corrected in production in cars built after car serial numbers W-9223, X-8850,
and Y-8764.
Yours very truly,
F.H.Brodek
ctp
PRINTED IN U. S. A.
F. H. Brodek
Technical Service Manager
HZ 56-3
HD 56-3
File Under: GROUP 11.000
FRAME SPRINGS-SHOCK
ABSORBERS-MUD PANS
February 1, 1956
ALL HUDSON DEALERS, ZONES AND DISTRIBUTORS
ATTN: SERVICE DEPARTMENT
REAR SHOCK ABSORBERS 1956 "RAMBLER" SERIES
Effective at car serial number D-287222, a revised shock absorber mounting bracket was incorporated in
production. A longer shock absorber, Part Number 3119822, is required with the use of this bracket.
The new shock absorber incorporates a shoulder on the bayonet end to prevent over-tightening the shock
absorber grommets.
The first type shook absorber should not be used on cars built after the aforementioned serial number.
Yours very truly,
F. H. Brodek
Technical Service Manager
F.H.Brodek
ctp
PRINTED IN U. S. A.
HZ 56-4
HD 56-4
File Under: GROUP 11.000
FRAME SPRINGS-SHOCK
ABSORBER-MUD PANS
February 7, 1956
ALL HUDSON DEALERS, ZONES AND DISTRIBUTORS
ATTN: SERVICE DEPARTMENT
FRONT SHOCK ABSORBER LOWER
ANCHOR BOLT TORQUE - 1956
"RAMBLER" SERIES
Please refer to Page 5, Front Suspension-Steering Gear Section of the 1956 "Rambler" Series Technical
Service Manual.
The "Rambler" Series front shock absorber lower anchor bolt nut torque has been revised to 90-100 Foot
Pounds.
Previously 150-175 Foot Pounds torque was specified for all 10, 40, 60, and 80 Series.
Yours very truly,
F. H. Brodek
Technical Service Manager
F.H.Brodek
ctp
PRINTED IN U. S. A,
HZ 56-1
HD 56-1
File Under:
GROUP 13.000
WEATHER EYE-SPEEDOMETER
INSTRUMENT PANEL
January 19, 1956
ALL HUDSON DEALERS, ZONES AND DISTRIBUTORS
ATTN: SERVICE DEPARTMENT
INSTALLATION INSTRUCTIONS FORM 1-492 WEATHER EYE INSTALLATION KIT, PART
NUMBER 3119719 - 1956 "RAMBLER" SERIES
As a matter of information and record, we are attaching a copy of Form Number 1-492 Weather Eye Installation Instructions.
Yours very truly,
F. H. Brodek
Technical Service Manager
F.H.Brodek
ctp
Attach.
PRINTED IN USA
1-492
INSTALLATION INSTRUCTIONS
WEATHER EYE "RAMBLER" PART #3119719
1956 "RAMBLER" SERIES
Material List:
QUANTITY
PART NUMBER
1
2
1
3
6
6
1
1
3410147
8000091
3411927
3411873
3411872
GM-161376
3146696
3146751
1
1
1
8
2
3147290
3147289
3147026
3147299
3146619
2
3125432
1
1
2
1
1
1
1
1
1
2
3146518
3146319
8000099
GM-111684
3146672
3146570
3410148
3147277
3147288
3147287
1
1
1
2
2
2
5
1
1
1
6
1
1
3146695
3148510
3147293
GM-131096
GM-120614
8000139
8000093
3146892
3147239
3147238
3122345
3142368
3142364
DESCRIPTION
Support Heater Core, R. H.
Screw, Heater Core Support
Duct Assembly, Air Defroster
Seal, Air Duct to Instrument Panel
Speed Nut, Defroster Nozzle to Air Duct
Screw, Air Duct and Defroster Nozzle to Instrument Panel
Filter
Cover (Incl . Filter Retainer Spring and Upper and Lower
Bracket)
Insulation Left Side (8-3/10" length - 1/2" thick)
Insulation Front (19-3/4" length - 1/2" thick)
Heater Core
Fastener - Heater Core Insulation
Gasket, Heater Core (Lower End) (4-31/32"
length - 3/16" thick)
Seal, Heater Core Inlet and Outlet Tube
(5/8" I.D. - 3-1/2" thick)
Valve
Seal (3/8" I.D. - 9/32" thick)
Screw, Heater Water Valve
Screw, Heater Water Valve Capillary Tube
Motor
Wheel, Heater and Defroster Motor
Plate, Heater and Defroster Motor Mounting
Gasket, Heater and Defroster Motor Mounting (Round 5” I. D.)
Insulator, Heater and Defroster Motor (1-5/8" 1 D.) 3/32” thick)
Grommet, Heater and Defroster Motor Support
(3/16” I.D. - 7/64" thick)
Resistor., Heater and Defroster Motor Speed Control
Strap, Heater and Defroster Motor Ground
Wires, Heater and Defroster Motor to Heater Switch
Washer, Heater and Defroster Motor to Mounting Plate Lock
Nut, Heater and Defroster Motor to Mounting Plate
Washer, Heater and Defroster Motor Mounting Grommet
Screw, Heater and Defroster Motor Mounting Plate to Blower
Hose, Heater Core to Heater Valve
Hose, Cylinder Head to Control Valve
Hose, Heater Core to Water Pump
Clamp, Heater Hose
Nipple (Water Pump)
Nipple (Cylinder Head)
1-492
Page 2
QUANTITY
PART NUMBER
DESCRIPTION
1
3146524
Switch
1
1
1
2
2
2
2
2
2
1
1
1
2
2
1
1
1
2
2
1
1
2
2
2
1
1
1
2
4
4
1
3128826
3411554
3146673
3146671
3146238
GM-125591
8000093
8000145
4386559
3146781
3146412
3411553
GM-181561
GM-121753
3146538
GM-272123
GM-114607
3130267
GM-163985
3147729
3146473
GM-174964
GM-131096
4386559
3146786
3146746
3146747
3411858
8000091
GM-162013
1-492
Nut, Heater and Defroster Switch
Knob, Heater Switch
Damper (Less Rod) Inc. Rubber Insert
Rod
Bracket
Screw
Screw, Rod Bracket to Dash
Washer, Grommet
Grommet, Damper Rod
Hose Defroster 4-7/16" Length
Lever (Incl. Cable) Less Knob
Knob, Water Valve Control Lever
Screw, Heater Control Lever Assembly
Washer, Heater Control Lever Assembly
Cable, 59-1/2" Length Defroster Air Damper
Nut! Defroster Air Damper Cable Jam
Washer, Defroster Air Damper
Clamp, Damper Cable
Screw, Damper Cable Clamp
Damper, Defroster Air
Rod, Damper Defroster Air
Screw, Defroster Air Damper
Washer, Defroster Air Damper Lock
Grommet, Defroster Air Rod
Duct, Heater Distribution
Gasket, Heater Distribution (Upper)
Gasket, Heater Distribution (Lower)
Brace, Heater Distribution to Instrument Panel
Screw, Heater Distribution to Instrument Panel
Screw, Heater Distribution to Instrument Panel
Instruction Sheet
Installation Procedure
Drain the cooling system.
Disconnect the battery.
Remove the heater housing cover and discard.
Install right hand heater core support with Screws, Part Number 8000091. Seal, Part Number
3146319, is installed into the large hole in the center of the right hand heater core support.
Cement heater core gaskets, Part Number 3146619, on each heater core support flange.
Install heater core, Part Number 3147026, into heater core housing with the outlet and inlet tubes located to the left.
The heater core should be supported by the two flanges.
1-492
Page 3
Install seals, Part Number 3125432, on the heater core inlet and outlet tubes.
Install filter, Part Number 3146696.
Cement heater housing side insulation, Part Number 3147290, to the left side of the housing.
Install cover, Part Number 3146751, on heater housing using screws removed when removing original cover which
was discarded.
Install front insulation, Part Number 3147289, on cover using fasteners, Part Number 3147299.
Install heater and defroster insulator, Part Number 3147288, on heater motor.
Install grommets, Part Number 3147287, on each bolt of the heater and defroster motor, Part Number 3146672.
Install heater and defroster motor ground strap with the round hole to one of the motor bolts. The heater and
defroster motor is then installed on the mounting plate, Part Number 3410148, with lockwasher, Part Number
GM-131096, and nuts, Part Number GM-120614.
Install heater and defroster motor wheel, Part Number 3146570, on the heater and defroster motor shaft .
Cement the heater and defroster mounting plate gasket, Part Number 3147277, to the blower housing. Line up the
holes of the gasket with the holes in the housing.
Install the motor and mounting plate to the blower housing with screws, Part Number 8000093. Install heater and
defroster motor speed control resistor, Part Number 3146695, beneath one of the screws used to mount the blower
motor and plate to the housing. The elongated hole of the ground strap is also secured with this screw. The other
end
of the resistor is secured with screw, Part Number 8000093, to the existing hole in the blower housing. Install the
motor lead into the outside terminal of the two on one end of the resistor.
Remove and discard the cover and gasket over the water control valve opening on the dash panel . Install water
control valve, Part Number 3146518, by inserting from inside of car through the opening in the dash panel; it is
held in place by two screws, Part Number 8000099. The capillary tube sensing coil is held in place by screw, Part
Number GM-1 11684, on one of the webs of the inlet opening in the dash panel .
Remove the pipe plug in the water pump body and install nipple, Part Number 3142368, in place of the plug.
Remove the pipe plug from the top left side of the cylinder head and install nipple, Part Number 3142364. To perform this operation, it is necessary to remove the carburetor air cleaner and the cylinder head cover.
Use two heater hose clamps, Part Number 3122345, and install cylinder head to control valve hose, Part Number
3147239, to the lower pipe of the control valve.
Use two heater hose clamps, Part Number 3122345, and install heater valve to heater core hose, Part Number
3146892. The hose attaches to the remaining pipe of the control valve and to the top pipe of the heater core.
Use two heater hose clamps, Part Number 3122345, and install heater core to water pump hose, Part Number
3147238.
1-492
Page 4
Part Number GM-161376, installed through two holes in defroster outlets.
Install damper, Part Number 3146673, to rod, Part Number 3146671, with screws, Part Number
GM-125591 . Install grommets, Part Number 4386559, into brackets, Part Number 3146238. Grommet
washers, Part Number 8000145, are installed on each end of the damper rod. Install brackets on damper
rod and install brackets to the dash panel with screws, Part Number 8000093.
Install grommets, Part Number 4386559, into the defroster damper rod holes in the heat distribution duct,
Part Number 3146786. Install washers, Part Number GM-131096, on defroster air damper rod, Part
Number 3146473, and install damper rod into heat distribution duct. Install defroster air damper, Part
Number 3147729, to damper rod with screws, Part Number GM-174964.
Cement heat distribution duct upper and lower gaskets, Part Number 3146746 and 3146747, to blower
opening on heat distribution duct. Install braces, Part Number 3411858, to heater distribution duct with
screws, Part Number 8000091. Install heater distribution duct to dash panel with screws, Part Number
GM-162013, and attach braces to rear of glove box mounting panel with screws, Part Number 8000091 .
Install defroster hose, Part Number 3146781, from heater distribution duct opening to the defroster air
duct.
Remove plug from center opening in the control panel on left hand side of instrument panel . Install
switch and heater air damper control, Part Number 3146524, into center opening. Insert from the rear.
The switch is held in place with French mounting nut, Part Number 3128826. Install heater switch knob,
Part Number 3411554. Route the cable housing over the steering column to the bracket on the left hand
side of the heat distribution duct. The knob of the switch and damper control is pushed "IN" and the
damper is placed in the forward position and the Boden wire loop is installed on the damper rod. The
cable housing is secured in the bracket with cable clamp, Part Number 3130267, and screw, Part Number
GM-163985.
Install existing black lead of wire harness under instrument panel into "B" terminal of switch. Install
leads of harness, Part Number 3147293, into "L" and "H" terminals of switch. Route wires along top of
glove box and through existing hole on right hand side of dash panel to the resistor on blower motor
housing. The wire lead installed into the "H" terminal is installed ahead of the resistor; the lead installed
into the "L" terminal is installed behind the resistor.
Remove the plug from the right hand hole of the control panel on the left hand side of the instrument
panel . Slide defroster air damper cable washer, Part Number GM-1 14607, and jam nut onto the cable of
the defroster air damper control after the cable has been inserted from the front through the above mentioned hole. Tighten the nut on the cable housing. Route the cable below the steering column and along
the toe panel above the floor mat to the bracket on the right hand side of the heat distribution duct. Push
in the control knob, place the defroster air damper rod in the upper most position, and install the Boden
wire loop on the damper rod and secure the cable housing in the bracket with damper cable clamp, Part
Number 3130267, and screw Part Number GM-163985.
Install the water control valve lever assembly, Part Number 3146412, by inserting into slot in control
panel from the rear of the instrument panel. Use screws, Part Number GM-181561, and lockwashers,
Part Number GM-121753, to install the lever assembly to the lower edge of the instrument panel; the
cage nuts are already installed in the instrument panel.
1-492
Page 5
Install knob, Part Number 3411553, on the lever, place the lever in the "OFF" position, place the water
control valve in the "OFF" position, and install the Baden Wire loop on the water control valve bell
crank. The cable housing is held in place by the clamp and screw on the water control valve bracket.
Check the operation by moving t e control from left to right to be certain that the water valve is off when
the lever is in the "OFF" position.
Fill the radiator and connect the battery. Start the engine and with water valve open and radiator cap
removed, run until air is bled from cooling system. Top off radiator to full capacity and install cap.
Check operation of heater and blower and check for leaks.
Suggested Flat Rate Time - 3.0 Hours.
HZ 56-2
HD 56-2
File Under: GROUP 13.000
WEATHER EYE - SPEEDOMETER INSTRUMENT PANEL
ALL HUDSON DEALERS, ZONES AND DISTRIBUTORS
January 20, 1956
ATTN: SERVICE DEPT.
WEATHER EYE CIRCULATION WITHOUT
AIR CONDITIONING - 1955 "WASP",
"HORNET" 6, AND V-8 SERIES
Improvement in circulation of heated ram air and fresh vent air in Weather Eye operation can be gained
by altering the damper valves in the following manner:
Remove the right hand heater duct assembly from the dash panel. Remove the damper valve assembly
from the mounting plate of the heater duct.
Cut the entire inlet damper from damper rod. The inlet damper portion is the forward damper as it is installed in the mounting plate.
Reinstall the damper assembly and the heater duct. Adjust the damper assembly so that when the control
is in the "VENT-HEAT" position the defroster damper is flush in the opening in the mounting panel.
This operation eliminates restriction of air flow caused by the inlet damper. It will increase ram air
velocity, consequently an appreciable increase in heat and fresh air venting is gained.
In certain localities where an additional increase of ram air is desired, the opening in the right hand side
of the mounting plate may be closed off with tape or other suitable means. However, when this is done, a
loss in ram air defroster action occurs. It then may be necessary to operate the blower fan to efficiently
defog or de-ice the windshield.
Forced beat continues to be accomplished in the "FORCED HEAT" control position with the use of the
blower fan.
Suggested alteration time .5 Hours. Includes removal of right hand heater duct.
Yours very truly,
F.H.Brodek
Technical Service Manager
F. H. Brodek
ctp
PRINTED IN U.S.A.
HZ 56-4
HD 56-4
File Under:
ALL HUDSON DEALERS, ZONES AND DISTRIBUTORS
GROUP 13.000
WEATHER EYE-SPEEDOMETERINSTRUMENT PANEL
January 27, 1956
ATTN: SERVICE DEPARTMENT
SPEEDOMETER NOISE - 1956
"RAMBLER" SERIES
The clicking or oscillating noise found in a speedometer assembly is the result of a bent (kinked) cable
core and/or housing conduit. A sharp curve in the routing of the speedometer cable conduit assembly will
also cause the clicking or oscillating noise. These clicking noises are usually at certain fixed speeds and
do not follow the speed changes of the vehicle.
However, on Hydra-Matic equipped cars, the steel driven gear transmits a gear or machinery noise. This
is unlike the clicking condition as it changes with car speed.
You will be advised in the near future regarding service correction as it applies to the gear or machinery
noise.
Always inspect the speedometer cable housing for kinks or sharp bends in the housing. Make sure that
the cable is of the correct length for the series required.
To insure the use of speedometer cable cores which will give quiet and satisfactory service, locate the
cable core on a flat surface in the form of an inverted "U" and then cross the open ends. Hold one end in
the left hand, the other in the right hand.
Twist one end, applying light finger pressure to the other end. If the core is satisfactory, the turning
action will be smooth.
On a damaged core, although not noticeable by visual inspection, the turning action will be jerky and, in
a severe case, the core will leap or jump.
The speedometer cable requires no lubrication but as a sound deadener, it is beneficial to coat the cable
with a light coating of high melting point grease.
Yours very truly,
F.H.Brodek
ctp
PRINTED IN U S A
F. H. Brodek
Technical Service Manager
HZ 56-5
HD 56-5
File Under: GROUP 13.000
WEATHER EYE-SPEEDOMETERINSTRUMENT PANEL
February 1, 1956
ALL HUDSON DEALERS, ZONES AND DISTRIBUTORS
ATTN: SERVICE DEPT.
INSTALLATION INSTRUCTIONS FORM 1-477 WEATHER EYE INSTALLATION KIT, PART
NUMBER 3119723 - 1956 "WASP", "HORNET" 6, "HORNET" SPECIAL V-8, and "HORNET" V-8
SERIES
As a matter of information and record, we are attaching a copy of Form Number I-477 Weather Eye Installation instructions,
Yours very truly,
F. H. Brodek
Technical Service Manager
F.H.Brodek
ctp
Attach.
PRINTED IN USA
1-477
INSTALLATION INSTRUCTIONS
WEATHER EYE PART NUMBER 3119723
1956 HUDSON "WASP" SERIES
1956 HUDSON *'HORNET" SIX SERIES
V-8 SERIES
1956 HUDSON "HORNET" V-8 SERIES
Material List:
QUANTITY
1
1
1
1
2
2
2
1
1
1
1
1
1
2
2
1
1
2
3
1
2
1
6
1
1
1
1
8
1
1
1
1
1
1
1
1
2
1
1
1
1
4
4
1
2
PART NUMBER
4386072
4386365
4386256
4386255
4386367
GM-178781
GM-187483
4386074
GM-271085
3130267
Gm-163985
4387327
4390404
4386041
4386559
4386331
43,86332
GM-186469
4388008
4385974
GM-161648
4390402
GM-443946
3138385
3143050
3143069
3143045
3122345
3142364
4390689
3134802
4371932
4371931
GM-447119
4386046
4386130
GM-449346
4386039
4386040
4386053
4386054
4385923
8000305
4390278
8000015
DESCRIPTION
Heater Switch Escutcheon
Heater, Control Assembly
Heater, Defroster Air Damper Control Cable
Cowl Vent Damper Control Cable
Control Cable Clamp
Control Cable Clamp Screw
Control and Escutcheon Fastening Screw
Heater Control Knob
Heater Control Knob Screw
Heater Defroster Cable Clamp
Heater and Defroster Cable Screw
Heater and Defroster Damper Mounting Plate
Heater and Defroster Damper (Incl. Rod)
Heater and Defroster Damper Rod Washer
Heater and Defroster Damper Rod Grommet
Heater and Defroster Damper Rod Bracket
Heater and Defroster Damper Rod Bracket
Heater and Defroster Damper Rod Bracket Screw
Heater and Defroster Damper Mounting Plate Screw
Heater and Defroster Damper Cable Guide Plate
Heater and Defroster Damper Guide Screw
Heater and Defroster Duct
Heater and Defroster Duct Fastening Screw
Air Filter
Heater Core
Gasket Heater Core Inlet and Outlet
Hose, Control Valve to Core
Clamp., Heater Hose
Nipple (Wasp)
Heater Motor Switch
Heater Motor Switch Cable
Clamp - Heater Control Cable
Screw - Heater Control Cable Clamp
Screw - Heater Control Cable Clamp
Heater Control Valve
Gasket, Heater Control Valve
Screw., Heater Control Valve to Dash
Defroster - Hose - Left
Defroster - Hose - Right
Nozzle Assembly Defroster - Left
Nozzle Assembly Defroster - Right
Bracket Defroster Nozzle Mounting
Screw., Defroster Mounting Bracket to Nozzle
Knob, Heater Control
Screw, Heater Control Switch to Bracket
1-477
Page 2
QUANTITY
1
1
1
2
2
1
1
1
7
2
1
1
1
1
1
1
1
1
1
1
5 Ft.
2
1
1
1
1
1
1
1
3
1
4
1
1
1
1
4
4
4
2
2
1
1
1
1
1
1
1
1
PART NUMBER
3127171
3145960
3143070
GM-120622
GM-131095
3143096
3143924
3143077
8000091
3143196
3143195
3143047
3143738
3143737
3143876
3143877
171586
3143936
3143875
3143878
3750497
15898
3135396
3143830
3142368
31-42364
3142369
3126330
4386403
4387764
GM-9406242
GM-161643
3143735
3143114
3143128
3413129
8000095
GM-120391
3143660
3143661
8000107
3143199
3142366
3142367
3143736
3147731
GM-180116
GM-120382
1-477
DESCRIPTION
Connector Heater Motor Extension Wire
Motor Heater and Defroster
Insulator - Heater and Defroster Motor to Housing
Nut Heater and Defroster Motor to Housing
L/W Heater and Defroster to Motor to Housing Nut
Wheel, Heater and Defroster Motor Blower
Gasket, Heater and Defroster Motor Blower Plate
Plate Heater and Defroster Motor Mounting
Screw Heater and Defroster Mounting Plate
Cushion, Heater Core Support - Upper
Cushion, Heater Core Support - Lower
Inlet Blower Housing
Pipe Water Pump to Heater Hose (60)
Pipe Water Pump to Heater Hose (40)
Hose, Control Valve to Cylinder Head
Hose, Heater Core to Water Pump Pipe (60)
Fitting, Heater Hose Nipple (40 & 60)
Pipe (Heater Hose 80)
Hose, Control Valve to Cylinder Head (80)
Hose, Heater Pipe to Heater Core
Hose
Clip, Heater Motor Wire to Housing
Elbow
Grommet
Nipple
Nipple
Nipple (80)
Hose*, Control Valve to Cylinder Head
Duct-Heat
Screw
Screw
Screw
Clip, Heater Pipe
Housing Heater Core (CP)
Cover Assembly Heater Core Housing
Gasket Heater Core Housing
Screw Heater Core to Dash
Washer Heater Core to Dash
Nut Speed
Nut Speed
Screw - Heater Blower Housing
Gasket - Heater Blower Housing to Dash
Nipple
Nipple
Clip, Heater Pipe
Clamp
Screw
Lockwasher
Instruction Sheet
1-477
Page 3
INSTALLATION PROCEDURE
Drain cooling system.
Disconnect battery.
Remove existing cowl ventilator control assembly, including knob and bracket on instrument panel., cable.,
and housing, and discard.
Remove the heater core housing from the dash panel. Remove the cowl ventilator damper., damper rod, and
grommets. These are installed in the heater core housing #3143114. Discard the housing removed from the
car.
Cement the heater blower housing to dash gasket #3143199 to the dash panel at the blower opening.
Prior to installing the heater core housing, coat the entire outside with a suitable sound deadener and insulator.
Install the heater core housing assembly on the dash panel using the four screws #800095 and washers
GM-120391. The two screws #8000107 are used to attach the blower housing to the dash panel. The screws
used to retain the original heater core housing in place may be used when installing the new assembly.
Cement upper heater support cushion #3143196 to lower side of upper heater core support flange on the inside
of the heater hopper box. Cement #3143195 lower heater core support cushion to the top side of the lower
support flange.
Remove glove box and mounting panel.
Remove the plastic louvre assembly from the heater inlet opening on the inside of the dash panel and discard.
Drill through spot welds of plate covering blower opening; remove and discard plate.
Assemble the heater and defroster motor to housing insulator #3143070 on the heater and defroster motor
#3145960.
Use two lockwashers GM-131095 and two nuts GM-120622 and assemble the heater and defroster motor
mounting plate #3143077 to the motor.
Install heater and defroster blower plate gasket #3143924 between the motor mounting plate and the heater
blower housing and install heater and defroster assembly and plate using four screws #8000091. To facilitate
mounting of this assembly, insert assembly through heater hopper box cover opening and install screws
through inlet opening in dash panel from inside of car.
The same procedure is followed to install the heater and defroster motor blower wheel #3143096. Insert the
wheel through the heater hopper box cover opening. Install on motor shaft. Tighten the allen screw in the
b~ower wheel hub on the flat portion of the motor shaft. This can be done through the blower motor opening
in the dash panel from the inside of the car.
Install the blower housing inlet #3143047 in the heater hopper box with three screws #8000091. This can be
done through the inlet opening in the dash panel from inside of the car.
Install heater core inlet and outlet gasket #3143069 on the heater core. Install heater core #3143050 into the
heater hopper box. Be certain the rear tank is in between the support flanges on the inside of the heater hopper
box.
1-477
Page 4
Install air filter #3138385 on top of the heater core.
Install heater hopper box cover #31-43128 with gasket #3143129 cemented in place on cover to heater hopper
box. Use speed nuts #3143660 provided and screws from original cover. When installing two top screws, use
two clips #15898 to hold heater motor wire in place. Install heater motor extension wire connector #3127171
to heater motor wire.
Install grommet #3143830 in the hole in the dash panel to the left of the cowl ventilator damper control hole.
Install heater motor extension wire-#4390858 to the connector on the heater motor wire lead and insert into
grommet and push wire to inside of car.
Install heater motor switch assembly #4390689 from the rear of the instrument panel indexing shaft tube
through a slot on instrument panel overlay. Use two screws #8000015 to fasten switch to instrument panel.
Insert knob assembly #4390278 through a slot of overlay and in-to shaft tube-of switch assembly.
Twist and mesh with rheostat hub while depressing wire spring retainer at rheostat end of switch. Wire spring,
when released, should then locate itself in groove of knob shaft to secure it into switch assembly.
The existing black wire lead in the harness from the circuit breaker is installed into the battery terminal of the
switch.
Remove dummy plate used on dash panel in place of water control valve.
Install water control valve #4386583 and water control valve gasket #4386130 to dash panel with two screws
GM-443946.
Install heater switch cable #3134802, the loop end in the clamp #4371932. Use screw #4371931 to attach the
loop in the clamp.
Install glove box mounting panel and route heater motor wire and control switch cable over and to the left side
of the glove box mounting panel.
Route the control switch cable through the clip provided on the rear left hand corner of mounting panel and
install and adjust to water valve.
NOTE:
Be certain that with the switch in the “Off” position, the water valve is in the fully closed
position.
Install right and left hand defroster nozzles (4386054 and 4386053) with brackets #4385923 and screws
#8000305 to the underside of the instrument panel. The defroster instrument panel inlay plates must be removed to accomplish this operation. It is also necessary to peel the rubber overlay back to remove the three
screws holding plate in place. When the assemblies are reinstalled, cement rubber overlay back in place.
Install heater and defroster damper mounting plate #4387327 into heater and defroster duct #4390402 using
screws #4388008.
Install heater and defroster damper cable guide plate #4385974 with screws GM-161648 on the left hand side
of the heater and defroster duct.
Install heater and defroster damper #4390404 (incl. rod) on mounting plate in heater and defroster duct. The
following parts are used in the assembly of the damper:
1-477
Page 5
2
4386041
2
4386559
1
1
2
4386331
4386332
GM-186469
Heater and Defroster Damper
Rod Washer
Heater and Defroster Damper
Rod Grommet
Bracket
Bracket
Bracket Screw
Install heater and defroster duct assembly to dash panel with screws GM-443946.
NOTE: It may be necessary to trim away portions of dash insulation to properly mount
heater and defroster duct and water control valve assembly.
Install right and left hand defroster tubes to the defroster nozzles and right hand heater duct.
Place heater damper control assembly #4386365 with the mounting bracket up (which is the position when
installed on instrument panel). Move the control lever to the extreme left position.
Install cowl vent control cable #4386255 to heater damper control assembly.
Use control cable clamp #4386367 and screw GM-178781. The loop of the cable is attached to the single pin
on the underside of the control and the cable housing is clamped to the bracket on the underside that lines up
with the pin. Heater and defroster air damper control cable #4386256 is installed to the right hand pin (single
pin) on the upper side of the control. The cable loop is installed on the pin and the housing is clamped with
control cable clamp #4386367 and screw GM-178781 to the bracket welded on the upper side of the control.
NOTE: The loops of both cables are installed with the cable next to the control and the three
loop windings to the outside of the pins. The housings are clamped in the brackets with
about 1/4” of the housing projecting from the bracket toward the pins.
Install control and cable assembly by inserting from the rear through the opening on the left hand side of the
instrument panel. The control lever will project through the slotted opening.
Install heater and defroster damper control escutcheon #4386072 on instrument panel. The screws for the escutcheon are also used to retain the damper control assembly. Use screws GM-187483.
Install control knob #4386074 with screw GM-271085 on the control assembly lever.
Route the control cables and housings through to behind the glove box mounting panel. The cowl vent cable is
routed through the grommet in the dash panel where the original cable was routed. The heater air and defroster damper cable is routed down to the guide bracket on the left hand side of the heater duct.
The control lever is placed in the "Air Condition" position. Close the ventilator damper by moving the control
arm of the damper to the upper movement of its travel. The loop of the Boden wire is placed on the control
arm of the damper and the cable housing fastened to the bracket allowing enough room for control arm movement. Use the clamp and screw to fasten the cable housing from the original housing.
The heater air and defroster damper control rod is placed in the upper position of its travel. The Boden
wire loop is placed on the control arm of the damper and the cable housing is installed in the bracket on
the heater duct and secured by clamp #3130267 and screw GM-163985 allowing enough room for control
arm movement.
1-477
Page 6
Install heat distribution duct #4386403 to toe panel and heater duct using screws #4387764, GM-9406242,
and GM-161643.
Install glove box.
"Wasp" Series
Remove pipe plug from top rear central area of cylinder head.
Remove pipe plug from water pump.
Install heater hose pipe water pump fitting #171586.
Install water pump to heater hose pipe #3143737 into water pump fitting. Route along right hand side of
engine above manifolds. Install clip #3143735 to cylinder head bolt to hold pipe in place.
Install cylinder head heater nose nipple #3142364 into location where pipe plug was previously removed.
Install control valve to lower heater core outlet hose #3143045 with hose clamps #31221,
Install heater core to water pump pipe hose #3143877 to the upper heater outlet with hose clamps #3122345.
Install control valve to cylinder head hose #31-26330 with clamps #3122345.
"Hornet" Six Series
Remove pipe plug from rear right hand side of cylinder head.
Remove pipe plug from water pump.
Install heater pipe water pump fitting #171586.
Install water pump to heater hose pipe #3143738 into water pump fitting and route along right hand side of the
engine and over manifolds to rear of engine.
Install clip #3143736 on heater pipe and attach to one of the cylinder head bolts to retain pipe in place.
Install heater core to water pump pipe hose #3143877 with hose clamps #3122345.
Install control valve to lower heater core outlet hose #3143045 with clamps #3122345.
Install cylinder head elbow #3135396 into right hand side of cylinder head.
Install cylinder head nipple #-3142368 into cylinder head elbow. The elbow and fitting should face toward the
rear when installed.
Install control valve to cylinder head nipple hose #3143876 with hose clamps #3122345.
1-477
Page 7
“Hornet” Special V-8 Series
Remove pipe plug from water pump.
Install heater hose water pump nipple #3142366.
Remove pipe plug and install cylinder head heater hose nipple #3142367 in rear of right cylinder head at the
throttle mounting bracket.
Install control valve to upper heater outlet hose #3143045 with clamps #3122345.
Cut a piece of bulk hose to fit from control valve to fitting in rear of right hand cylinder head and install with
clamps #3122345.
Cut a piece of bulk hose to a length to fit from the water pump to the heater core. Route the hose along the
right hand side of the intake manifold. Use clamp #3147731 to secure hose.
The clamps are installed under the nut holding the pad of intake manifold. Also install clamp #3147731 with
screw GM-180116 and lockwasher GM-120382 on hose and attach to heater hopper box. Install the hose with
clamp #3122345.
“Hornet” V-8 Series
Remove pipe plug from water pump.
Remove the-plug located in the rear of the right bank cylinder head in the right hand throttle mounting
bracket.
Install heater hose water pump nipple #3142364.
Gut a piece of bulk hose about 2-1/2" long and attach to water pump nipple with hose clamps.
Install heater hose pipe #3143936 into the short piece of hose attached to water pump nipple and secure with
hose clamp. The pipe is routed below the manifolds to the rear of the engine.
Install cylinder head heater hose nipple #3142369 in rear right hand cylinder head at the throttle mounting
bracket.
Install control valve to upper heater outlet hose #3143045 with clamps #3122345.
Install control valve to cylinder head hose #3143875 with clamps #3122345.
Install heater pipe to heater core hose #3143878 with clamps #3122345.
1-477
Page 8
Fill radiator and connect battery. Start engine and with heater valve open and radiator cap removed,, run until
air is bled from cooling system. Top off radiator to full capacity and install cap.
Check operation of heater and blower and check for leaks.
Suggested Flat Rate Time - 3.0 Hours
3.0 Hours
3.4 Hours
3.4 Hours
3.4 Hours
“Wasp” Series
“Hornet” 6 Series
“Hornet” Twin H-Power 6 Series
“Hornet” Special V-8 Series
“Hornet” V-8 Series
HZ 56-6
HD 56-6
File Under:
GROUP 13.000
WEATHER EYE-SPEEDOMETER
INSTRUMENT PANEL
February 23, 1956
ALL HUDSON DEALERS, ZONES & DISTRIBUTORS
ATTN: SERVICE DEPARTMENT
BELT MISALIGNMENT ON IDLER PULLEY 1956 "RAMBLER" SERIES - ALL SEASON
AIR CONDITION EQUIPPED
There may be some cases where belt misalignment may be caused by the cast aluminum adjusting plate
bracket not being correctly finished. The two 1-3/411 diameter bosses on the front of this bracket may
not be flat; consequently, the idler pulley mounting bracket, or if equipped with power steering, the idler
and power steering pump pulley bracket is misaligned in turn misaligning the belts.
Filing the bosses flat would correct this problem of misalignment.
This is considered under control in production effective with Engine Numbers B-23035 and
DB-5886. This will not necessarily apply to all cars with engines built prior to the aforementioned serial
numbers as the condition was the result of a change in manufacturing procedures.
Yours very truly,
F.H.Brodek
ctp
PRINTED IN U. S. A.
F. H. Brodek
Technical Service Manager