1
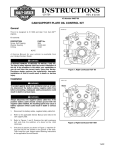
Service manual for
L197LED3-K PHANTOM™
and L197LED20-K PHANTOM™
dive lights.
To begin the assembly process,
epoxy the magnet into the Actuator Switch, and
let harden for 8 hours.
Place the flat washer over the hose
support standoff, and apply grease to the
washer.
Then, place the actuator switch over the
hose support standoff, and push down
using a twisting motion until the switch
bottoms out. Next, insert the small thin
White Nylon Washer on top.
You will now be assembling the hose to the
Light Head and the metal Canister End Cap.
Before you start, apply a small amount of
grease to the Light Head and End Cap ORing seating areas. These areas are where
Hose O-Rings will seal. Lubricate both hose
O-Rings, and then apply a small amount of
Loctite #242 Blue (thread-locking fluid) to
the threads. Do not get any on the O-Rings !
(If you do, replace the O-Ring) and repeat
the previous steps.
Remember to
secure the light
head.
4” length
Next, place a lightly lubricated O-Ring in the
groove of the metal end cap as shown.
Apply a light coat silicone grease on the
canister area where this O-Ring will seat
(above the canister threads) before screwing
in the End Cap.
Now troubleshoot to see if you have a good
electrical connection.
Test the light by plugging the connector into a
power supply or battery. If it does not light up,
this may indicate the following: a bad
connection between wires and pins, the wire
leads may not have been stripped correctly,
pins may not be in the proper holes, wires may
be inserted backwards, or the pins may not be
properly crimped to the wire leads.
Install the Lens and Front Lens Retainer Ring.
The following picture shows the
order of the parts.
Congratulations! You have now successfully completed
assembly of your OMS L197LED3-K or L197LED20-K
PHANTOM Light!
PARTS DIAGRAM 1
Return
TOOLS REQUIRED