1
DatamedFT™
Service Manual
Datamed LLC
DatamedFT™ v2.2
Doc ID DMD-10100-00800 Rev A
3/2014
DatamedFT Service Manual
COPYRIGHT
Copyright © 1996-2014 Datamed LLC. All rights reserved. Reproduction in whole or in part is prohibited
without the prior written consent of the copyright holder.
WARRANTY
Datamed LLC (“DLLC”) makes no warranty of any kind with regard to this material, included, but not
limited to, the implied warranties of merchantability and fitness for a particular purpose. The software
described herein is covered by DLLC’s standard EULA, which is available on DLLC’s website
(www.datamed.com) and in Appendix C of this manual.
CAUTIONS
This product is not intended for home use.
REGULATORY
This product is registered with the US FDA as a Class 1 medical device (MDDS). This product complies
with the regulator requirements of European Directive 93/42/EEC.
Manufactured and Distributed by:
Datamed LLC
7755 Hunters Run Drive
Germantown, TN 38138-2204
USA
US: +1 800 601-3361
Int’l: +1 901 672 6225
Fax: +1 901 672 6331
www.datamed.com
European Authorized Representation
EMERGO EUROPE
Molenstraat 15
2513 BH, The Hague
The Netherlands
Telephone: +31.70.345.8570
Fax: +31.70.346.7299
2
Datamed LLC
DatamedFT Service Manual
TRADEMARKS
The following marks are the registered trademarks of their respective owners.
Owner
Trademark(s)
Agfa HealthCare N.V.
AMEDTEC Medizintechnik Aue GmbH
Aprima Medical Software, Inc.
Carestream Health, Inc.
Carl E Osborne Jr
Cerner Innovation, Inc
Custo med GmbH
Digi International, Inc.
Dräger
Edan Instruments, Inc.
Epiphany Healthcare
Esaote, S.p.A.
et medical devices SpA.
Fujifilm Medical Systems USA Inc
Gem-Med S.L.
GE Medical Systems Information
Technologies, Inc
General Electric Company
Heartscape Technologies, Inc
INFINITT Company
Koninklijke Philips Electronics
McKesson Corporation
McKesson Information Solutions, Inc
Medimatic S.r.l.
Medtronic, Inc
HeartStation
AMEDTEC ECGPro
Aprima
Carestream
Datamed
PowerChart ECG
Custo med
AnywhereUSB
Infinity
Edan
Cardio Server
Esaote, and Org@nizer
Cardioline
Synapse
Gem Heart
Microsoft Corporation
Mortara Instrument, Inc
National Electrical Manufacturers
Association Corporation
Nihon Kohden Corporation
Ortivus AB Corporation
SafeNet Data Security Ltd.
Schiller Holding AG
ScImage, Inc
SEIVA s.r.o.
Shenzhen Mindray Bio-Medical Electronics,
Inc.
Spacelabs Healthcare, LLC
VectraCor, Inc.
VidiStar
VISUS Technology Transfer GmbH
VMWare, Inc.
Welch Allyn, Inc
ZOLL Medical Corporation
MAC, Marquette, MUSE, SOLAR, and DASH
GE
Prime ECG
INFINITT
IntelliVue, HeartStart, PageWriter, and Calysto for Cardiology
McKesson
Horizon Clinicals
ComPACS
Physio-Control, LIFEPAK, and LIFENET
Microsoft, Microsoft Windows XP, Microsoft Windows Server, Microsoft Windows
Vista and Internet Explorer
ELI, Burdick, Quinton, Atria, and Pyramis
DICOM
Cardiofax, Lifescope, and Nihon Kohden
Mobimed
HASP
CARDIOVIT
ScImage and PICOM
SEIVA
Mindray, Passport, and Spectrum
CardioExpress, qube, Sentinel, UltraView, UltraViewSL, and XPREZZON
VectraCor, VectraPlex
VidiStar LLC
JiveX
VMWare and vMotion
CardioPerfect and Welch Allyn
ZOLL, E Series, M Series, and X Series
Datamed LLC | Table of Contents
3
DatamedFT Service Manual
INTENDED USE
This product is a software application intended to convert EKG data from the format
of one manufacturer to the format of another. It is intended to be used in the data
flow between a device that acquires and analyzes a Resting EKG, and a
storage/management system that stores the EKGs for viewing, editing, and printing.
This product does not perform any analysis, measuring, or filtering. It is not intended
to be used for any other purpose than converting the data in the file from source
format to destination format.
PROTECTED HEALTH INFORMATION (PHI) CONSIDERATIONS
This product is an online converter and does not store data in a database, but certain
information can be stored locally, including PHI. When planning the physical and
electronic security of the installation, it is important to be aware of this data and
plan accordingly. PHI may appear in the following locations (Note that most of these
are optional settings):
•
•
•
•
•
4
Input folder – During processing or if the Output System is not available, the incoming
source files are queued here.
Log Folder – If Logging is enabled, the log files are not encrypted and will contain
Patient ID and Name.
Archive Folder – If Archiving is enabled, the source files will be moved here after
processing and they contain all of the data.
Debug Folder – If Debugging is enabled, the debug files are written here. Most of the
data is encrypted, but record summary data is in plaintext.
Windows® Registry - When combined with DatamedWL™, context information (which
may contain PHI) can be stored in the registry in the DynamicFieldMappingByOrderID
subkey off the Process key.
Datamed LLC
DatamedFT Service Manual
TABLE OF CONTENTS
Table of Contents......................................................................................................... 5
Chapter 1 – Getting Started ............................................................................................ 8
Chapter 2 – Installation.................................................................................................. 9
Requirements ................................................................................................... 9
New Installation............................................................................................... 10
Updating ........................................................................................................ 15
Uninstalling .................................................................................................... 15
Post-Installation Notes ...................................................................................... 16
Chapter 3 – Configuring DatamedFT™ .............................................................................. 17
Window Settings .............................................................................................. 17
Menu Options .................................................................................................. 18
General Setup Tab............................................................................................ 19
Options Tab .................................................................................................... 22
Field Mapping.................................................................................................. 26
Advanced Tab ................................................................................................. 27
Chapter 4 – Field Mapping ............................................................................................ 30
Chapter 5 – Input Formats ............................................................................................ 39
AMEDTEC Medizintechnik Aue GmbH .................................................................... 39
Cardiolex ....................................................................................................... 39
Cardioline SpA (formerly et medical devices SpA) ................................................... 39
corpuls® GS Elektromedizinische Geräte G. Stemple GmbH ........................................ 40
custo med® GmbH ............................................................................................ 40
Diagnostica AS (formerly MedIT AS)...................................................................... 40
DICOM® .......................................................................................................... 40
Dräger ........................................................................................................... 40
EB Neuro SpA (formerly Ates Medica Device S.r.l.) .................................................. 41
Edan Instruments, Inc. ...................................................................................... 41
Esaote® .......................................................................................................... 41
Fukuda Denshi ................................................................................................ 42
GE® Healthcare ................................................................................................ 42
Gem-Med, s.l. ................................................................................................. 45
HP (Philips)..................................................................................................... 45
Mindray® ........................................................................................................ 46
Mortara Instrument, Inc. (including Cardiac Science Corporation)............................... 46
Nihon Kohden Corporation ................................................................................. 48
Norav Medical™ Ltd .......................................................................................... 50
Datamed LLC | Table of Contents
5
DatamedFT Service Manual
Ortivus AB ...................................................................................................... 50
Philips Healthcare ............................................................................................ 50
Physio-Control® ............................................................................................... 53
QRS Diagnostic ................................................................................................ 53
SCHILLER AG ................................................................................................... 53
SEIVA® s.r.o. ................................................................................................... 54
Spacelabs Healthcare ........................................................................................ 54
VectraCor®, Inc................................................................................................ 55
Verathon® Inc (formerly HeartScape Technologies, Inc.) ........................................... 55
Welch Allyn, Inc............................................................................................... 55
ZOLL® Medical Corporation ................................................................................. 56
Chapter 6 – Output Formats.......................................................................................... 57
ACK IT Solutions .............................................................................................. 57
Agfa HealthCare Corporation .............................................................................. 57
AMEDTEC Medizintechnik Aue GmbH .................................................................... 58
Aprima Medical Software ................................................................................... 58
Cardiolex ....................................................................................................... 58
Carestream Health, Inc...................................................................................... 58
Cerner Corporation .......................................................................................... 59
custo med® GmbH ............................................................................................ 59
DICOM® .......................................................................................................... 59
Dräger ........................................................................................................... 60
Epiphany Healthcare......................................................................................... 60
Esaote® .......................................................................................................... 60
Fujifilm Medical Systems ................................................................................... 61
GE® Healthcare ................................................................................................ 61
HD Clinical ..................................................................................................... 63
Huahai Medical Info-Tech Co............................................................................... 63
INFINITT Healthcare Co ..................................................................................... 64
Judex A/S....................................................................................................... 64
Kibi Software Solutions...................................................................................... 64
LUMEDX Corporation ......................................................................................... 65
McKesson Corporation ....................................................................................... 65
MedEx Tech Trade Corp..................................................................................... 65
Medical Micrographics ....................................................................................... 66
Medimatic ...................................................................................................... 66
Mortara Instrument, Inc. (including Cardiac Science Corporation)............................... 66
Novarad™ Corporation ....................................................................................... 67
Philips Healthcare ............................................................................................ 67
RVC BV .......................................................................................................... 69
Schiller AG ..................................................................................................... 69
ScImage® ........................................................................................................ 69
6
Table of Contents | Datamed LLC
DatamedFT Service Manual
Spacelabs Healthcare ........................................................................................ 70
TriKardia LLC .................................................................................................. 70
VidiStar® LLC .................................................................................................. 70
VISUS Technology Transfer GmbH ........................................................................ 70
Welch Allyn, Inc............................................................................................... 71
Witt (Philips)................................................................................................... 71
Chapter 7 – Troubleshooting ......................................................................................... 72
Appendix A – Updating the License Key ........................................................................... 77
Appendix B – Registry Settings....................................................................................... 78
Appendix C – End User License Agreement and Limited Warranty.......................................... 79
Datamed LLC | Table of Contents
7
DatamedFT Service Manual
CHAPTER 1 – GETTING STARTED
he DatamedFT™ application is an EKG format translator that accepts EKGs from any one of a
number of supported proprietary or public input file formats and translates them into any of
the support output formats. The application is installed as a system service and deals
exclusively with files, both input and output. For communication with cardiographs and other
acquisition equipment that require specialized transmissions protocols (e.g. serial, modem, or LAN),
several Receiver Modules are available from Datamed LLC (“DLLC”) to handle these inputs.
DatamedFT™ supports multiple simultaneous processes, each normally handling a different format
conversion. The output format should always be the same for each process, with the input format
being different. This allows custom option settings and field mapping for each distinct input.
T
Depending on when and where you purchased the software, DatamedFT™ will either be licensed by
format or per device. If additional devices are added, the license will need to be updated, which may
or may not be an additional charge. Contact DLLC if you have any questions.
8
Chapter 1 – Getting Started | Datamed LLC
DatamedFT Service Manual
CHAPTER 2 – INSTALLATION
Requirements
License Key. You will receive a License Key (HASP) with the software. This key is
required for the software to run and it controls the licensing of the software, including
the number and type of licensed translators. If the key needs to be updated (e.g. if
additional licenses are purchased), see Appendix A for instructions on how to do so.
Software. CD or installation package from DLLC.
Computer. DatamedFT™ is independent of the destination host system and can be
installed either on the host system or anywhere with network access to the host
system. Some host system vendors prefer that no additional software is installed on the
host server, so DatamedFT™ will be installed on a separate adjacent computer (Format
Translator PC or FTPC). The minimum specifications for this computer are: 1 GB RAM,
40 GB HD, one unused USB Port for the Hardware Security Key, and a LAN connection
for file transmission. The following operating systems are supported: Windows XP SP3
x86 and x64, Windows Vista x86 and x64, Windows 7 x86 and x64, Windows Server 2003
SP1/R2 x86 and x64, Windows Server 2008 x86 and x64, Windows Server 2008 R2, and
Windows Server 2012. See Chapter 7 for additional information about running on
64-bit operating systems.
LAN considerations. The DatamedFT™ software only reads and writes files. These files
may be either local to the FTPC or on remote computers. If the FTPC is not the same
physical computer as the destination host system, then DatamedFT™ will be configured
to write output files across the network to the host system. This requires proper filesharing network permissions to be set up. Also, if there is a firewall on either side of
the FTPC then a rule must be set up to allow Windows file-sharing traffic (TCP port
445) to pass.
VM considerations. The DatamedFT™ software can be run on virtual machines. The
primary consideration is access to the USB key. For single-server installations the key
can be plugged into the host computer and assigned to the VM. For fault-tolerant
configurations including vMotion®, a USB-to-Ethernet adapter such as AnywhereUSB can
be used. Note that using AnywhereUSB with a modem can affect the connectivity to the
License Key (http://www.digi.com/support/kbase/kbaseresultdetl?id=3039).
.NET. This application requires the Microsoft .NET 2.0 Framework. The setup program
will install the appropriate software; however it is important to note that if .NET is not
already installed then an internet connection will be necessary during installation so
that the .NET drivers can be retrieved from Microsoft.
Datamed LLC | Chapter 2 – Installation
9
DatamedFT Service Manual
New Installation
These instructions are for a new installation where there is no prior version of DatamedFT™
installed. This can also be used if DatamedFT™ was uninstalled. A configuration file with
initial settings may or may not be supplied. If the initial configuration file is not supplied,
DatamedFTConfig will need to be run after installation to update the settings.
Install the hardware License Key
Insert the hardware key into the USB port. The basic driver should be installed
automatically by the operating system. We recommend using the full driver
package provided by the manufacturer. The drivers that were current as of the
release date are provided and can be installed manually after the installation of
DatamedFT™ by using the shortcut under Start All Programs Datamed
DatamedFT Install HASP Security Key Drivers. This driver package includes
important tools used to diagnose issues. The latest driver from the manufacturer
for Sentinel HASP may be downloaded directly from the SafeNet website at:
http://sentinelcustomer.safenet-inc.com/sentineldownloads/.
When the driver is properly installed the LED in the hardware key will light up.
NOTE: A standard hardware key is dark purple and a network key is red. If this is a
network key installation, the SafeNet HASP License Manager software must be
installed or the key will not work. This software is on the installation CD.
10
Chapter 2 – Installation | Datamed LLC
DatamedFT Service Manual
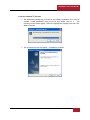
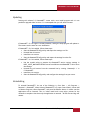
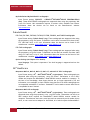
Install the DatamedFT™ Software
The installation package can be found on the software installation CD or may be
emailed. Locate DatamedFT_Setup_v2.x.x.exe and double click on it.
The
following screen should appear. Select the appropriate language and then click
Next to continue.
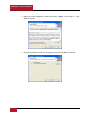
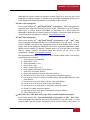
The introduction screen will appear. Click Next to continue.
Datamed LLC | Chapter 2 – Installation
11
DatamedFT Service Manual
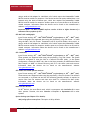
Read the License Agreement carefully and select I Agree if you accept it. Click
Next to continue.
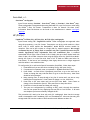
Select the installation folder for the program and then click Next to continue.
12
Chapter 2 – Installation | Datamed LLC
DatamedFT Service Manual
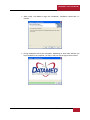
When ready, click Next to begin the installation. Installation should take 1-2
minutes.
During installation this screen will appear. Depending on what other software you
have installed on the computer, you may or may not see the logo as shown below.
Datamed LLC | Chapter 2 – Installation
13
DatamedFT Service Manual
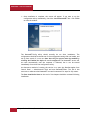
Once installation is complete, this screen will appear. If you want to run the
configuration utility immediately, check the Launch DatamedFT box. Click Finish
to close the window.
The DatamedFTConfig utility should normally be run after installation. The
configuration should be reviewed even if the configuration settings file was loaded, and
set up from scratch if it was not. Note that the first process must be enabled by
checking the Enabled box before it can be configured. The DatamedFT service will
not start automatically until the computer is rebooted, but it can be started
immediately from within the configuration utility.
An alternative method of starting the service is to open the Services applet from
Control Panel → Administrative Tools and start DatamedFTStart. The job of this
service is to make sure that DatamedFT runs and is restarted if it stops for any reason.
The Post Installation Notes at the end of this chapter should be reviewed following
installation.
14
Chapter 2 – Installation | Datamed LLC
DatamedFT Service Manual
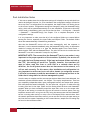
Updating
Starting with release 2.2, DatamedFT™ comes with a new install program and it is not
possible to upgrade older versions. If it is attempted then you will see this screen:
If DatamedFT™ v2.2 or higher is already installed, running the setup program will update it.
The screens are the same as a new installation.
If DatamedFT™ v2.0 is installed, follow these steps:
• Start the DatamedFTConfig utility and export the settings to a file.
• Uninstall the old version.
• Install the new version.
• Start the DatamedFTConfig utility and import the settings from the file.
If DatamedFT™ v1.0 is installed, follow these steps:
• Use the regedit utility to examine the DatamedFT service registry settings in
HKEY_LOCAL_MACHINE\SYSTEM\CurrentControlSet\services\DatamedFT. Write down
the settings.
• Uninstall the old version from the command line by running “datamedft –r” in
C:\DatamedFT.
• Install the new version.
• Start the DatamedFTConfig utility and configure the settings from your notes.
Uninstalling
To uninstall DatamedFT™, do one of the following: 1) from Start → All Programs →
Datamed → DatamedFT, select Uninstall DatamedFT; or 2) open Control Panel, choose Add
or Remove Programs, select DatamedFT, and press the Remove button. In either case the
application will be removed. This is a silent install and it may take a minute for the
uninstall to complete. Note that only the application is removed – all EKG files and logs will
remain.
Datamed LLC | Chapter 2 – Installation
15
DatamedFT Service Manual
Post-Installation Notes
If this was an update then the configuration settings will already be set up and should not
need to be changed. However, for a new installation the configuration settings will need to
be set up. Even if a configuration file was supplied, the Output Folder will need to be set
to the correct location. Configuration settings are changed by using the DatamedFTConfig
utility, which will be opened automatically for a new installation. A shortcut to this utility
will be found on the desktop, and it can also be found at Start → All Programs → Datamed
→ DatamedFT → DatamedFTConfig. See Chapter 3 for a complete description of the
configuration settings.
It is very important to make sure that all of the configured folders are created before
starting the service, especially the Input Folder and Output Folder. The default folders
shown are not automatically created during installation.
Note that the DatamedFT service will not start automatically until the computer is
rebooted. It can be started immediately using the DatamedFTConfig utility. An alternative
method of starting the service is to open the Services applet from Control Panel →
Administrative Tools and start DatamedFTStart. The job of this service is to make sure that
DatamedFT™ runs and is restarted if it stops for any reason.
IMPORTANT NOTE: The account that the DatamedFT service runs under is very
important to the proper operation of the translator. By default, the service will
run under the Local System account. If the input and output folders are both on
the FTPC, this setting will work fine. Typically, however, the translator will
need to either read files from or write files to a network share and by
definition, the Local System account does not have access to the network, so it
will not work correctly. For this reason, after installation and configuration it is
very important to set the service to run with a domain (or workgroup) account.
It will also be necessary to add the same domain (or workgroup) account to the
folder that is being shared on the host management system.
Once the setup is complete and the accounts/permissions/shares have been addressed, the
translation process should be tested – see Chapter 7 for step-by-step directions. There are
two completely independent sides: input (cardiograph/monitor) and output (host system).
Each side should be tested individually. For the input side, the goal is to make sure that
incoming files land in the Input Folder and this testing should be done with DatamedFT
stopped. When you have successfully tested the input side, move on to the output side.
The goal of this testing is to make sure files can be written to the host system. One very
important network test is to log into the FTPC using the same account that the DatamedFT
service is running under and try to write a file to the Output Folder network share. Once
the network permissions have been verified, you can use the files from the input testing to
send into the host system. Depending on the licensed devices, sample files for testing may
be found on the installation media.
16
Chapter 2 – Installation | Datamed LLC
DatamedFT Service Manual
CHAPTER 3 – CONFIGURING DATAMEDFT™
O
nce DatamedFT™ is installed, changes to the configuration settings can be done using the
DatamedFTConfig utility that is installed along with the service. Open the utility from the
desktop shortcut or from the Windows™ Start menu and it will automatically read the current
configuration settings from the registry. As DatamedFT™ supports multiple simultaneous processes;
settings for each process are configured separately. Note that more processes can be configured than
are licensed; however only the number of licenses and formats actually purchased will run. When
configuration changes are made, they must be saved and then the service must be restarted for them
to take effect. NOTE: Depending on the security settings (especially in Windows™ Server
2008/2012), extra permissions may be required to write to the registry. An error saving changes
will indicate that this is necessary. For these installations the configuration utility must be run
as an Administrator. This is possible from the right-click menu on the shortcut, or by editing the
shortcut properties (CompatibilityPrivilege Level).
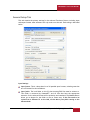
Window Settings
At the top of the window there are three items:
Translator Process. This selection box indicates which process is currently displayed
in the detail tabs. Clicking a different process number in the drop-down list will display
the settings for that process.
Enable this process. Normally all configured processes are enabled, however it may be
desirable to temporarily disable a process. Consider the following example: a customer
has purchased a single translator license and has configured it. If they would like to
test some settings and be able to switch back and forth, they could set up Process #2
with the new settings, and then enable first one and then another. Note that since they
have one license, if both processes are enabled then only the first (Process #1) would
run.
Total configured processes. This controls the number of processes in the drop-down
list for Translator Process. It is normally the same as the number of translator licenses,
but the previous example shows that this may be altered as needed.
At the bottom of the window there is a status indicator and four buttons:
Service Status. This shows the current status of the DatamedFT and DatamedFTStart
services. There are three possible values: Stopped – indicates that both services are
not running; Running – indicates that both services are running; and Unknown – which
indicates that one of the two services is running and the other is not. The Unknown
status is a normal transition between Stopped and Running, however if the status
Datamed LLC | Chapter 3 – Configuring DatamedFT™
17
DatamedFT Service Manual
remains in this status then there is a problem. The most common reason for this
condition is that the security key is not present or accessible.
Start. This button will start the services. Since DatamedFTStart is responsible for
bringing DatamedFT up, this button actually starts DatamedFTStart first, and then
DatamedFT if it isn’t started.
Stop. This button will stop the services. Since DatamedFTStart is responsible for
bringing DatamedFT down, this button actually only stops DatamedFTStart first, and
then DatamedFT if it isn’t stopped.
Save Changes. This button will cause all configuration changes to be saved to the
registry. Previous settings will be discarded.
Close. This button closes the window. Any unsaved changes will be discarded.
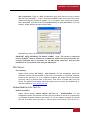
Menu Options
The following menu options are available:
File Reload from registry. Selecting this will cause any changes to be discarded and
the settings on the screen reset to the saved values.
File Save to registry. This is the same as clicking the Save Changes button.
File Import settings from file. This will load configuration settings from a
DatamedFT Settings (.dft) file. This file is created by exporting the settings. Note that
the settings are loaded into the window, but are not saved to the registry until the
Save Changes button is clicked.
File Export settings to file. This will save the configuration settings as they exist in
the window (possibly edited) to a DatamedFT Settings (.dft) file. This file should not be
edited manually. Typically this functionality is used to send the configuration settings
to DLLC for troubleshooting.
File Exit. This is the same as clicking the Close button.
License Create License Update Request File. If the security key license needs to
be updated, a license update request file (.c2v) must be created and sent to DLLC for
updating. This menu option allows the file to be created directly. When you select this
and confirm, you can select a folder and filename to write the file. See Appendix A for
more details.
License Load License Update. To complete the update of the security key license,
use this option to select the license update file (.v2c) received from DLLC and the
update will be applied. See Appendix A for more details.
Help About. This will open a window that displays the program version, security key
serial number, and copyright information.
18
Chapter 3 – Configuring DatamedFT™ | Datamed LLC
DatamedFT Service Manual
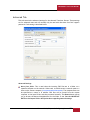
General Setup Tab
This tab contains the primary settings for the selected Translator Process, including input
and output formats. Most customers will only need to use this tab. Each setting is described
below.
Input Settings:
Input format. This is a drop-down list of all possible input formats, including ones that
are not licensed for this installation.
Input folder. The local folder on this PC that incoming EKG files must be written to.
This folder is monitored by DatamedFT™ and all files that have the appropriate
extension for the selected format will be picked up and translated. The Browse button
allows you to browse for the folder to use (or create one). If the files need to be
copied from a different PC on the LAN, use the Move from folder setting on the
Advanced tab.
Datamed LLC | Chapter 3 – Configuring DatamedFT™
19
DatamedFT Service Manual
Look in subfolders for files. Normally only files in the Input Folder are picked up for
translation, however if this box is checked then all folders below it are searched as
well.
Output Settings:
Output format. This is a drop-down list of all possible output formats, only one of
which will be licensed for this installation. All processes should have the same output
format.
Output folder. The folder that translated EKG files are written to. This folder can be
local on the PC, but it is typically a network path to a share on the host system
(\\computername\sharename). The computername can be specified as a name or IP
address. The Browse button allows you to browse for the folder to use (or create one).
IMPORTANT NOTE: If the Output Folder is on a network share, the account that the
DatamedFT service is running under must have permissions to access that share.
The default account for services is the System Account, which does not have
network access permissions. The account can be changed by opening the Services
applet and changing the properties for the DatamedFT service.
Use Acquisition Date as output subfolder. If this is checked, output files will be
written into subfolders of the Output Folder using the year and month of the
Acquisition Date. The folder will be named using this pattern: YYYY-MM.
File naming. This setting controls the naming convention of the files that are written
to the Output Folder. Note that Philips XML and HP File formats require a specific
filename so this setting will be disabled. The file extension (.xml, .ecg, etc.) will
always be the one appropriate for the Output Format. This can be one of three
possible values:
a. Normal. The default setting is to name the files using a combination of the
Input Format acronym (4 characters), the original filename, and a sequence
number. The format of the filename is: FormatAcronym_OrigFilename_
OrigFileExtension_Number.
b. Original Filename. This setting will result in the output file being named
exactly the same as the input file except with the appropriate file extension. If
the filename is not unique and another file is translated that will result in
the same name, it will fail.
c. Formatted Filename. This setting will create the filename using the
Acquisition Date and Time and the Patient ID. The format of the filename is:
YYYYMMDD_HHMMSS_PID.Index. The Index value is a sequence number used to
make sure the filenames are unique.
20
Chapter 3 – Configuring DatamedFT™ | Datamed LLC
DatamedFT Service Manual
Post Processing Settings:
Archive original EKGs after processing. The default behavior is to delete the
incoming EKG files after they are translated and successfully written to the Output
Folder. The alternative is to move them to a folder to be archived. There is no
automatic purge process for the archived EKGs, so the user is responsible for
monitoring the storage space. If this setting is checked, the Archive Folder must be
filled in. It is recommended that archiving be turned on.
Archive folder. The folder that the original EKG files are archived to. The Browse
button allows you to browse for the folder to use (or create one).
Logging Settings:
Log incoming transmissions. This setting enables the collection of information about
the file translations in a log file. This file is user-readable and contains time-stamped
entries for each file that is received and translated, including the Patient ID and
Patient Name. If there is a problem with a file translation then it will be noted in this
log. It is recommended that logging be turned on.
Write index log. When this setting is enabled a compact index file will be created that
has a single entry for each successfully translated EKG. The index file will be written to
the Logging folder, but the other log file settings do not apply. The format of the index
log file is:
"PatientID","PatientLName","PatientFName",AcqDate(MM/DD/YYYY),AcqTime(HH:MM:SS),"File Name"
Logging folder. The folder that the log files are created in. The Browse button allows
you to browse for the folder to use (or create one).
Max number of log files to keep (0 = unlimited). This is used to control the amount of
disk space used for log files. Each time the DatamedFT service is started or when the
maximum size is reached (see below) a new log file is created. As each new file is
created, a check is made to make sure the total number of files does not exceed this
value. If it does, the oldest file is aged out (deleted). The default setting is to disable
the checking, which (as indicated by the label) is a setting of zero (0).
Max size (in K bytes) of each log (0 = unlimited). This is also used to control the
amount of disk space used for log files. As entries are written to the current log file,
the size is checked to make sure it does not exceed the maximum. If it does, the file is
closed and new file is created. The file size is specified in kilobytes (1,024 bytes) and
the default setting is 256K. As indicated by the label, setting this to zero (0) will
disable the checking.
Datamed LLC | Chapter 3 – Configuring DatamedFT™
21
DatamedFT Service Manual
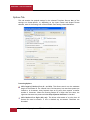
Options Tab
This tab contains the optional settings for the selected Translator Process. Many of the
settings are format-specific, so depending on the Input Format and Output Format
selected, some of the settings will not be available. Each setting is described below.
Processing Options:
Limit length of Patient ID to (0 = no limit). This allows control over the maximum
length of the Patient ID. The internal limit is 64 characters, but most host systems are
limited to 16 characters. Many hospitals have an ID policy that requires a smaller
number of characters. When the incoming Patient ID is longer than this value, the
rightmost characters are preserved unless Keep leftmost characters is checked.
Limit Patient ID to digits (0-9) only. This allows enforcement of a policy that all
Patient IDs must be numeric. If this is checked any non-numeric characters are
discarded.
22
Chapter 3 – Configuring DatamedFT™ | Datamed LLC
DatamedFT Service Manual
Upsample 250Hz EKGs to 500Hz. Most host systems accept only 250Hz or 500Hz data
(some are 1000Hz). When this setting is used, any EKGs that contain 250Hz data will be
upsampled to be at 500Hz.
Sanity check lead data values. Lead data values are defined as 12-bit (+/- 2048)
values. When this setting is on, a “sanity check” of the lead data is performed to
eliminate corrupt values. First, any values outside the 12-bit range are clipped to be
within the range. Next, if more than 25% of the values for any given lead were outside
the 12-bit range, or if more than 50% of the values are outside an 11-bit range (these
will be off the page), the data for that lead is blanked out (set to 0) to remove the
corrupted data. The default for this setting is OFF.
Add a statement to indicate the Severity Code. Checking this setting will cause a
statement to be added that states the severity. The following severity statements are
defined: “Normal ECG”, “Otherwise Normal ECG”, “Borderline ECG”, “Abnormal ECG”,
or “Defective ECG”, or “No Severity Defined”.
Remove interpretive statements. Checking this will cause all diagnostic/interpretive
statements to be discarded. It should be used with extreme caution.
Clear the rhythm leads (13, 14, 15). Checking this setting will cause all leads beyond
the first twelve to be discarded. Some cardiographs (e.g. HP PageWriter® XLi) put the
rhythm (10sec) leads in these places, but note that pediatric EKGs contain valid data
here.
Create rhythm leads from the primary leads. This setting allows specific leads to be
copied to the 13th, 14th, and 15th positions. For some host systems this will show as
3x4+1R or 3x4+3R. The Rhythm Lead 1, Lead 2, and Lead 3 settings allow you to select
what lead will be in each spot. Note that these additional leads are copies of the
selected leads and do not replace the display format on the system – this setting
should not be used without a specific reason.
Force height/weight units to. By default, the unit of measure for Height and Weight is
carried from the source to the destination format. For example, if a cardiograph sends
an EKG with Height in inches and Weight in pounds (Imperial), then those same units
will be sent to the host system. If the hospital wants all incoming EKGs to have the
same units, this setting will cause the values to be converted appropriately. The
possible settings are “Imperial” (in/lbs) or “Metric” (cm/kg).
Format-Specific Options:
Add pacing spikes to waveform. This is enabled for GE® MUSE® (.ecg) input only. If
this setting is checked and the source EKG contains pacing spike locations, the sample
value at each location will be increased by a specific amount. This spike is not in the
raw data but is added by MUSE®, and it is also added by the cart for GE XML format.
NOTE: With this setting TRUE, the waveform data exactly matches the raw waveform
data created by MUSE®.
Datamed LLC | Chapter 3 – Configuring DatamedFT™
23
DatamedFT Service Manual
Use Physician Name IDs if possible. This applies to GE® MUSE® (.ecg) output only. If
this option is checked, any doctor name field that is numeric will be treated as an id
instead of a name.
Suppress right-hand (diagnostic) statements. This applies to HP PageWriter® M17xx
and Philips XML input only. Philips cardiographs and monitors add special statements
that appear on the right side of the paper when printed and indicate the details that
led to the diagnosis statement that appears on the left. Most hospitals do not want to
see these statements, so by default they will be removed during translation.
Custom statement lib. This applies to HP PageWriter® M17xx input only. Some HP
cardiographs have a custom statement library that was set up on the TraceMaster
system. If that is the case, the statement library can be substituted for the standard
HP statement library in DatamedFT™. This setting specifies the complete pathname to
a file that contains the customer-specific statement library, which must be created by
DLLC. Contact DLLC support if this setting is needed.
Center source sample. This applies to Philips TraceMaster NT output only. If checked,
this specifies that each data segment of the 3x4 or 6x2 data will be pulled from the
middle of the source data instead of the normal time-spaced positions. For 3x4 EKGs
each of the four groups of three leads is 2.5 seconds long, so with this setting each lead
will contain the middle 2.5 seconds of data – 3.75 seconds in from the start. For 6x2
EKGs each of the two groups of six leads are 5 seconds long which means each lead
would be pulled from 2.5 seconds in from the start.
Add rate statement. This applies to Philips TraceMaster NT output only. If checked, a
statement showing the Ventricular Rate will be added.
Add buzz marks on output. This applies to Philips TraceMaster NT output only. If
checked, the start and end of each lead will contain “buzz marks”, which are brief
(0.1s) bursts of noisy data. These are used as markers.
Set output lead format. This applies to Lumedx - ECG-MS, Philips TraceMaster NT,
and Philips TraceMasterVue outputs only. If this option is checked, the selection box
allows you to specify the report lead format of the output. The choices for Lumedx ECG-MS output are: “3x4”, “3x4+1R”, “3x4+3R”, “3x5”, “3x5+1R”, “3x5+3R”, “4x4”,
“4x4+1R”, “6x2”, “12x1”, and “1x12+3R”. The choices for Philips TraceMaster NT
output are: “3x4”, “3x4+1R”, “3x4+3R”, and “6x2”. The choices for Philips
TraceMasterVue outputs are: “3x4”, “3x4+1R”, “3x4+3R”, “3x5”, “3x5+1R”, “3x5+3R”,
“4x4”, “4x4+1R”, “6x2”, “12x1”, “1x12+3R”, “Cabrera 3x4”, “Cabrera 3x4+1R”,
“Cabrera 3x4+3R”, “Cabrera 3x5”, “Cabrera 3x5+1R”, “Cabrera 3x5+3R”, “Cabrera
4x4”, “Cabrera 4x4+1R”, “Cabrera 6x2”, “Cabrera 12x1”, and “Cabrera 1x12+3R”.
AC line frequency (Hz). This applies to HP PageWriter® M17xx and Nihon Kohden
inputs only. These two formats do not contain the frequency of the AC line, so this
setting specifies the AC Frequency that will be used as the AC Filter if it is on. The
default is 60Hz.
24
Chapter 3 – Configuring DatamedFT™ | Datamed LLC
DatamedFT Service Manual
Local language. This applies to Fukuda Denshi (ecg), Nihon Kohden, and Spacelabs
Ultraview®/UltraviewSL® w/ICS inputs only. If the source EKGs are not in English, this
setting is required so that the dates and coded statements may be converted using the
appropriate statement library (where available). Note that this setting only affects the
dates and coded statements – not any text statements. The choices for Fukuda Denshi
(ecg) input are: “English” (default), “French”, “German”, “Spanish”, and “Italian”.
The choices for Nihon Kohden input are: “English” (default) and “Italian”. The choices
for Spacelabs Ultraview®/UltraviewSL® w/ICS input are: “English” (default), “German”,
“French”, “Spanish”, “Italian”, “Swedish”, “Dutch”, “Polish”, “Czech”, “Brazilian”,
“Portuguese”, and “Hungarian”.
DICOM: SOP Class. This applies to DICOM® outputs only. It is used to specify what the
SOP Class will be set to in the output: “12-Lead ECG Waveform”, “General ECG
Waveform”, “Based on lead count” (default). There are two SOP Classes for ECG: 12Lead ECG Waveform Storage and General ECG Waveform Storage. The 12-Lead ECG
Waveform Storage SOP Class has been widely used but is limited to 12 leads.
Forthcoming IHE standards will dictate that the General ECG Waveform Storage SOP
Class be used for all ECGs. However many existing systems do not have the ability to
read this SOP Class. This setting gives fine control over what SOP Class will be set.
When set to “12-Lead ECG Waveform”, the SOP Class will always be set to 12 Lead ECG
Waveform Storage regardless of the number of leads. Note that any leads over 12 will
not be removed, so if the receiving system cannot handle them then a field mapping
must be used to clear the extra leads. When set to “General ECG Waveform”, the SOP
Class will always be set to General ECG Waveform Storage regardless of the number of
leads. When set to “Based on lead count”, the SOP Class will be set to 12 Lead ECG
Waveform Storage if there are 12 leads or less, and General ECG Waveform Storage if
there are more than 12 leads.
Transfer Syntax. This applies to DICOM® outputs only. It is used to specify what
Transfer Syntax will be used in the output: “Explicit VR Little Endian” (default) or
“Implicit VR Little Endian”.
Nomenclature. This applies to DICOM® outputs only. It is used to specify what
nomenclature codes to use for measurement values in the output: “SCPECG” (default)
or “MDC”.
Datamed LLC | Chapter 3 – Configuring DatamedFT™
25
DatamedFT Service Manual
Field Mapping
This tab contains the field mapping entries for the selected Translator Process. Each
mapping entry must be on a separate line. See Chapter 4 for a complete description of the
field mapping and syntax.
Field Mapping Settings:
Allow multiple field mapping entries for a single destination field. By default,
mapping a new value to a destination field that is already used will replace the
previous mapping. In almost every case there is no benefit gained by storing a value in
a field and then storing another value in the same destination. However if this is
necessary for some specific reason, checking this option will allow multiple mappings
to the same destination field.
26
Chapter 3 – Configuring DatamedFT™ | Datamed LLC
DatamedFT Service Manual
Advanced Tab
This tab contains the advanced settings for the selected Translator Process. These settings
are for advanced users and will normally only be used with directions from DLLC support
personnel. Each setting is described below.
Advanced Settings:
Move from folder. This is used when the incoming EKG files are in a folder on a
separate computer on the network. When used, it should contain a network path to a
share on the remote computer (\\computername\sharename). The computername can
be specified as a name or IP address. EKG files will be moved from the remote
computer to the Input Folder and then processed normally. The Browse button allows
you to browse the Network Neighborhood for the folder to use. See the IMPORTANT
NOTE on the Output Folder description above regarding network settings.
Datamed LLC | Chapter 3 – Configuring DatamedFT™
27
DatamedFT Service Manual
Input File Extension(s). Each input format has one or more default file extensions
which are the only file extensions being monitored. In certain cases it may be required
to handle more than one extension with a single process. For example, most Burdick
cardiographs write files with an extension of “.raw”, however the Atria cardiographs
write “.ecg” files. In a hospital with a mix of these carts, files with both extensions will
be written to the Input Folder and must be handled with a single process. To handle
this situation, when Cardiac Science Quinton® Eclipse™/Burdick® Atria is selected as
the Input Format, this setting will be filled in with “.raw;.ecg”. Note that the
extensions should be separated by a semicolon and be prefaced with the dot “.”. The
following wildcard characters are allowed in the extension: # will match a single
numeric digit; ? will match any single character; and * will match the rest of the
characters. For example “.e?g” would match .ekg or .ecg.
Output File Extension. Each output format has a default file extension. This setting
allows the default to be overridden. Note that for most host systems, the extension is
critical and the file will not be read if it is not the right extension. For that reason, this
setting should be used with care.
Output folder max files. Changing this setting to a number greater than 0 will cause
the translator to monitor the number of files in the Output Folder. If the number of
files reaches the maximum limit, the translator will pause until the number of files
falls to the threshold specified by Min files and then continue processing. These two
settings allow the output to be throttled when the incoming files are outpacing the
downstream processing of the output files.
Delay (ms) between files. Increasing this setting from 0 will cause the translator to
pause between EKGs for the specified time period (in milliseconds). This can be used to
slow down processing if desired.
Append this statement to each EKG record. This setting allows a specific text
statement to be added to each translated EKG.
HP Statement Type. This applies to Philips TraceMaster NT output only. It specifies
how statements are treated by the TraceMaster system. The choices are “0” which
means standard, “1” which means text (default), or “2” which means remarks. This
setting should not be changed without consulting DLLC support personnel.
HP Version Signature. This applies to Philips TraceMaster NT output only. It specifies
the Statement Library version. This setting should not be changed without consulting
DLLC support personnel.
Debugging:
Enable debugging. In the event that there is a problem with the translator, DLLC
support personnel may want to collect detailed technical information. After checking
this option and restarting the service, a file (or files) containing debugging information
will be written to the Debug Folder. This information is encrypted and should be sent
28
Chapter 3 – Configuring DatamedFT™ | Datamed LLC
DatamedFT Service Manual
to DLLC support for analysis. Enabling debugging will significantly reduce the
processing speed. See Chapter 7 for more details.
Debug folder. The folder where the debug files will be created. The Browse button
allows you to browse for the folder to use (or create one).
Max number of debug files to keep (0 = unlimited). This is used to control the
amount of disk space used for debug files. Each time the DatamedFT service is started
or when the maximum size is reached (see below) a new debug file is created. As each
new file is created, a check is made to make sure the total number of files does not
exceed this value. If it does, the oldest file is aged out (deleted). The default setting is
to keep the last ten (10) files. As indicated by the label, setting this to zero (0) will
disable the checking.
Max size (in K bytes) of each debug file (0 = unlimited). This is also used to control
the amount of disk space used for debug files. As entries are written to the current
debug file, the size is checked to make sure it does not exceed the maximum. If it
does, the file is closed and new file is created. The file size is specified in kilobytes
(1,024 bytes) and the default setting is 256K. As indicated by the label, setting this to
zero (0) will disable the checking.
Datamed LLC | Chapter 3 – Configuring DatamedFT™
29
DatamedFT Service Manual
CHAPTER 4 – FIELD MAPPING
T
he DatamedFT™ Configuration utility provides for extensive field mapping to control the data as
it is translated. Fields can be set to specific values, to values from other fields, or to pieces
from other fields. Simple math functionality (addition only) is available for numeric fields. And
registry mapping functionality is provided for any field.
To use the field mapping, open the DatamedFT™ Configuration utility, select the process (number) that
needs to be configured, and select the Field Mapping tab. This is a text edit area that allows for
multiple field mapping entries. Note that the order is important and the mapping is done sequentially.
This allows for complex data manipulation, especially in conjunction with the TMPINT and TMPSTR
temporary fields (see the example section below). To make a field mapping entry, enter it on a single
line as: Destination=Source
Note that date fields must be MMDDYYYY and time fields must be HHMMSS.
Field Mapping Syntax
The format of the source and destination for field mapping is different. The following describes the
format of the source data:
FieldName
Value Types: String/Integer/FloatingPoint/Code
FieldName(ArrayIndex)
Value Types: String/Integer/FloatingPoint/Code
ArrayIndex is 1-n
FieldName{StartPos,Length}
Value Types: String
FieldName(ArrayIndex){StartPos,Length} is allowed
StartPos is the starting character position - positive starts from the left and negative starts
from the right (1 is 1st character, -1 is the last character).
Length is required (0 = to the end of the string, otherwise 1-n)
FieldName{Action, Parameter}
Value Types: String
FieldName(ArrayIndex){Action, Parameter} is allowed
Action specifies the type of action to take using the supplied character(s):
• “STRIPLEADING” - Remove any of the specified characters from the beginning of the
string (e.g. “{STRIPLEADING,0}”).
• “STRIPTRAILING” - Remove any of the specified characters from the end of the string.
30
Chapter 4 – Field Mapping | Datamed LLC
DatamedFT Service Manual
•
“STRIPFIRST” - Remove the first character of the string if it is one of the specified
characters.
• “STRIPLAST” - Remove the last character of the string if it is one of the specified
characters.
• “STRIPALL” - Remove all of the specified characters from the string.
• “STRIPSUBSTRING” - Scans the string for groups of the complete set of characters in
order (substring) and removes them (e.g. “{STRIPSTRING,Test}” will remove
occurrences of the word "Test").
• “NULLIFFIRST” - Returns an empty string if the first character of the string is one of the
specified characters - this is a type of conditional expression.
• “NULLIFLAST” - Returns an empty string if the last character of the string is one of the
specified characters - this is a type of conditional expression.
• “NULLIFSUBSTRING” - Returns an empty string if the specified substring is in the string
- this is a type of conditional expression.
• “UPPERCASE” – Converts the source field to upper case. The Parameter is not used and
may be blank, however the comma must be present (i.e. “{UPPERCASE,}”).
• “LOWERCASE” – Converts the source field to lower case. The Parameter is not used and
may be blank, however the comma must be present (i.e. “{LOWERCASE,}”).
• “PRESUBSTRING” – Scans the string for first occurrence of the specified substring and
returns the string up to that point.
• “POSTSUBSTRING” – Scans the string for first occurrence of the specified substring and
returns the string after that point.
• “SPLITNAME” – Splits a name string into First and Last Name and returns the value
based on the Parameter: ‘F’ for First Name or ‘L’ for Last Name (e.g.
“AttendingDoctorName{SPLITNAME,L}” will return the last name of the Attending
Doctor).
Parameter is one or more ASCII characters to use for the selected action and can represent
individual characters or a substring. Up to 32 characters are allowed including a space.
FieldName{Format,Length}
Value types: Integer (destination is a string field)
FieldName(ArrayIndex){Format,Length} is allowed
Format is V|F and L|R and S|Z (e.g. "FLS" or "FRZ")
V = Variable length - Length is a maximum, no padding
F = Fixed length - Length is fixed, value will be padded or truncated
L = Left justify - only valid for Fixed-length
R = Right justify - only valid for Fixed-length
S = Pad with spaces - only valid for Fixed-length
Z = Pad with zeros - only valid for Fixed-length
Length is required (1-20) - NOTE: any truncation will occur in the left-most digits (e.g. 12345 ->
345) INCLUDING any minus sign.
Datamed LLC | Chapter 4 – Field Mapping
31
DatamedFT Service Manual
FieldName{REGMAP,RegistryKey}
Value Types: String/Integer/FloatingPoint/Code
RegistryKey is a full path to a registry key. By default the HKEY_LOCAL_MACHINE hive is used
and the hive name is not required (see the examples at the end of the chapter),
however if desired the hive name can be entered. The following hives are supported:
HKEY_LOCAL_MACHINE, HKEY_CURRENT_USER, HKEY_USERS, and HKEY_CURRENT_
CONFIG. Values must be either REG_SZ or REG_DWORD.
TMPSTR(ArrayIndex 1-10)
Value Types: String
These are temporary holding locations for values - they must have been used as a destination
field first or they will be blank (256 chars).
TMPINT(ArrayIndex 1-10)
Value Types: Integer
These are temporary holding locations for values - they must have been used as a destination
field first or they will be blank.
"FixedText"
Value Types: String/Integer/FloatingPoint/Code
Text in double quotes will be used as written. For numbers the text will be converted to a
number. For destination fields that are codes, use the appropriate code text (“Yes”,
“No”, etc.).
+
Value Types: String/Integer
Concatenate strings or add numbers. Up to ten (10) items are allowed.
Value Types: Integer
Subtract this number from the previous number. Up to ten (10) items are allowed.
32
Chapter 4 – Field Mapping | Datamed LLC
DatamedFT Service Manual
The following describes the format of the destination data:
FieldName
Value Types: String/Integer/FloatingPoint/Code
FieldName(ArrayIndex)
Value Types: String/Integer/FloatingPoint/Code
TMPSTR(ArrayIndex 1-10)
Value Types: String
These are temporary holding locations for values (max 256 characters). Integer and Floating
Point types will be converted to their String equivalent. Codes will be converted to
strings.
TMPINT(ArrayIndex 1-10)
Value Types: Integer
These are temporary holding locations for values.
?
Value Types: String/Integer
This character is used as a prefix to the FieldName. If present, it will only perform the mapping
if the destination field is empty (blank or 0).
!
Value Types: String/Integer
This character is used as a prefix to the FieldName. If present, it will only perform the mapping
if the source data is NOT empty (blank or 0).
{Action,Parameter}
Value Types: String/Integer
This sequence is used as a prefix to the FieldName. If present, it will only perform the
specified action on the field.
Action specifies the type of activity to perform:
• “INSERTSTMT” – This may only be used with the TextStatement field and no array
indicator should be used. It will move all of the statements down one and copy the
source
data
to
the
index
specified
by
the
parameter
(e.g.
“{INSERTSTMT,3}TextStatement” will copy the source data to the 3rd statement and
move any existing statements down).
• “APPENDSTMT” – This may only be used with the TextStatement field and no array
indicator should be used. It will copy the source data to end of the statement list. The
parameter
indicates
how
many
blank
lines
to
skip
(e.g.
“{APPENDSTMT,1}TextStatement” will copy the source data to bottom of the
statements, skipping 1 blank line).
Datamed LLC | Chapter 4 – Field Mapping
33
DatamedFT Service Manual
Field List
Field Name
Data Type / Values
Test Location Information
InstitutionID
String (Max 32 characters)
InstitutionName
FacilityID
String (Max 64 characters)
String (Max 32 characters)
FacilityName
DepartmentID
String (Max 64 characters)
String (Max 32 characters)
DepartmentName
Room
String (Max 64 characters)
String (Max 32 characters)
Bed
String (Max 32 characters)
Patient Information
PatientID
SecondaryPatientID
PatientMRN
SSNumber
PatientFName
PatientMName
PatientLName
DateOfBirth
AgeUnits
AgeValue
HeightValue
HeightUnits
WeightValue
WeightUnits
Sex
Race
DrugLabel
DrugCode
DiagnosisLabel
DiagnosisCode
ReferringDoctorName
ReferringDoctorID
AttendingDoctorName
34
String (Max 64 characters)
String (Max 64 characters)
String (Max 64 characters)
String (Max 16 characters)
String (Max 64 characters)
String (Max 32 characters)
String (Max 64 characters)
String (Max 8 characters)
Coded List -- Values: "Hours", "Days", "Weeks", "Months", "Years"
Integer
Integer
Coded List -- Values: "Imperial", "Metric"
Integer
Coded List -- Values: "Imperial", "Metric"
Coded List -- Values: "Male", "Female"
Coded List -- Values: "Unknown", "Eskimo", "American Indian",
"Black", "Hawaiian", "Hispanic", "Oriental", "Pacific Islander",
"Caucasian", "Other race"
String Array (10 elements, 32 characters each)
Integer Array (10 elements)
String Array (10 elements, 32 characters each)
Integer Array (10 elements)
String (Max 128 characters)
String (Max 32 characters)
String (Max 128 characters)
Chapter 4 – Field Mapping | Datamed LLC
DatamedFT Service Manual
AttendingDoctorID
ConsultingDoctorName
ConsultingDoctorID
FellowName
FellowID
FinancialClass
EncounterNumber
ClassCode
String (Max 32 characters)
String (Max 128 characters)
String (Max 32 characters)
String (Max 128 characters)
String (Max 32 characters)
String (Max 32 characters)
String (Max 64 characters)
String (Max 32 characters)
Order Information
OrderNumber
RequestingDoctorName
RequestingDoctorID
String (Max 64 characters)
String (Max 128 characters)
String (Max 32 characters)
ProcedureBillCode
DiagnosisBillCode
String (Max 64 characters)
String (Max 64 characters)
Equipment Information
ManufacturerID
ManufacturerName
String (Max 2 characters)
String (Max 64 characters)
CartModel
CartSerialNum
String (Max 32 characters)
String (Max 64 characters)
CartVersion
CartID
String (Max 32 characters)
String (Max 32 characters)
Test Information
EKGUniqueID
AcqDate
String (Max 64 characters)
String (Max 8 characters)
AcqTime
TestReason
StatEKG
SeverityCode
String (Max 6 characters)
String (Max 64 characters)
Coded List -- Values: "No", "Yes"
Coded List -- Values: "Unknown", "Normal ECG", "Otherwise Normal
ECG", "Borderline ECG", "Abnormal ECG", "Defective ECG"
Integer (mmHg)
Integer (mmHg)
String (Max 128 characters)
String (Max 32 characters)
String (Max 128 characters)
String (Max 32 characters)
Systolic
Diastolic
TechnicianName
TechnicianID
PerformingDoctorName
PerformingDoctorID
Datamed LLC | Chapter 4 – Field Mapping
35
DatamedFT Service Manual
Confirmed
ConfirmingDoctorName
ConfirmingDoctorID
ConfirmDate
ConfirmTime
EditorName
EditorID
EditDate
EditTime
Coded List -- Values: "No", "Yes"
String (Max 128 characters)
String (Max 32 characters)
String (Max 8 characters)
String (Max 6 characters)
String (Max 128 characters)
String (Max 32 characters)
String (Max 8 characters)
String (Max 6 characters)
Global Measurements
FiltersNotApplied
ArtifactFilter
Coded List -- Values: "No", "Yes"
Coded List -- Values: "No", "Yes"
BaselineWanderFilter
ACFilter
Coded List -- Values: "No", "Yes"
Coded List -- Values: "None", "60", "50"
LowPassFilter
HighPassFilter
Integer (Hz)
Integer (hundredths of Hz – e.g. 15 = 0.15Hz)
VLeadAmplitude
TraceSensitivity
Coded List -- Values: "Normal", "Half"
Integer (mm/mV)
PaperSpeed
VRate
Integer (mm/sec)
Integer (bpm)
ARate
POnset
Integer (bpm)
Integer (msec)
POffset
PDuration
Integer (msec)
Integer (msec)
QOnset
QOffset
Integer (msec)
Integer (msec)
QRSDuration
TOnset
TOffset
TDuration
PRInterval
RRInterval
PPInterval
QTInterval
QTDispersion
QTCorrected
QTCFridericia
Integer (msec)
Integer (msec)
Integer (msec)
Integer (msec)
Integer (msec)
Integer (msec)
Integer (msec)
Integer (msec)
Integer (msec)
Integer (msec)
Integer (msec)
36
Chapter 4 – Field Mapping | Datamed LLC
DatamedFT Service Manual
FrontalPAxis
FrontalQRSI40Axis
FrontalQRSAxis
FrontalQRST40Axis
FrontalSTAxis
FrontalTAxis
HorizontalPAxis
HorizontalQRSI40Axis
HorizontalQRSAxis
HorizontalQRST40Axis
HorizontalSTAxis
HorizontalTAxis
FiducialPoint
Integer (degrees)
Integer (degrees)
Integer (degrees)
Integer (degrees)
Integer (degrees)
Integer (degrees)
Integer (degrees)
Integer (degrees)
Integer (degrees)
Integer (degrees)
Integer (degrees)
Integer (degrees)
Integer (msec)
PValid
ArrhythmiaFlag
Coded List -- Values: "No", "Yes"
Coded List -- Values: "No", "Yes"
PaceEnhancement
QRSCount
Coded List -- Values: "No", "Yes"
Integer
Miscellaneous Information
UserLabel
UserText
String Array (10 elements, 64 characters each)
String Array (10 elements, 64 characters each)
Statements
NumberOfStatements
TextStatement
Integer
String Array (50 elements, 127 characters each)
Waveform Data
SampleRate
LeadSampleCount
LeadLSB
LeadID
LeadIsDerived
MedianSampleRate
MedianSampleCount
MedianLSB
MedianLeadID
PaceSpikeCount
Integer
Integer
FloatingPoint
Integer Array (16 elements)
Integer Array (16 elements)
Integer
Integer
FloatingPoint
Integer Array (16 elements)
Integer
Datamed LLC | Chapter 4 – Field Mapping
37
DatamedFT Service Manual
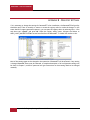
Field Mapping Examples
The following examples demonstrate the use of the field mapping to achieve specific goals:
•
To hardcode the Institution ID as “1” (typical for output to GE® MUSE®):
InstitutionID=”1”
•
To copy Department Name to Department ID only if Department ID is empty:
?DepartmentID=DepartmentName
•
To strip off leading zeros from the Patient ID:
PatientID=PatientID{STRIPLEADING,0}
•
To create a Secondary Patient ID using the patient’s initials following by 12 digits of the
numeric Patient ID, right justified with leading zeros:
TMPSTR(1)=PatientFName{1,1}+PatientLName{1,1}
TMPINT(1)=PatientID
SecondaryPatientID=TMPSTR(1)+TMPINT(1){FRZ,12}
•
To make a (numeric) Patient ID always 9 digits padded with zeros:
TMPINT(1)=PatientID
PatientID=TMPINT(1){FRZ,9}
•
To create a registry mappings to translate the Department Name to a new Department Name
and Department ID.
First create the registry mapping. This can be anywhere in the registry, but is typically in
the DatamedFT registry Key. The values can be REG_DWORD or REG_SZ data types. Here is
the sample mapping data:
Cart Dept Name
ICU1
Emergency
Pediatrics
Server Dept Name
ICU
ER
PED
Server Dept ID
13
15
7
Here are the registry entries for this sample:
[HKEY_LOCAL_MACHINE\SYSTEM\CurrentControlSet\Services\DatamedFT\DeptNameMapping]
"ICU1"="ICU"
" Emergency "=" ER "
" Pediatrics "="PED"
[HKEY_LOCAL_MACHINE\SYSTEM\CurrentControlSet\Services\DatamedFT\DeptIDMapping]
"ICU1"=dword:0000000d
" Emergency "=dword:0000000f
" Pediatrics "=dword:00000007
And here are the field mapping entries – note that the Department ID mapping must be
done first because we need the unmapped Department Name for the lookup:
DepartmentID=DepartmentName{REGMAP, SYSTEM\CurrentControlSet\Services\DatamedFT\DeptIDMapping}
DepartmentName=DepartmentName{REGMAP,
SYSTEM\CurrentControlSet\Services\DatamedFT\DeptNameMapping}
38
Chapter 4 – Field Mapping | Datamed LLC
DatamedFT Service Manual
CHAPTER 5 – INPUT FORMATS
T
he DatamedFT™ application will read files from a number of cardiographs and other input
devices. Some of these write files directly, and others utilize separate accessory software from
DLLC to receive the data and write files. The following information is organized by
manufacturer/device and it describes the format(s) used for that device as well as any special
installation/configuration requirements. Combining the Input Format along with the Output Format
(Chapter 6), any possible configuration of the translator can be set up. Format names are
descriptive labels for convenience only and do not represent trademarks or imply
endorsement of the referenced vendor.
AMEDTEC Medizintechnik Aue GmbH
AMEDTEC ECGPro®
Input Format setting: AMEDTEC - ECGPro® (scp). When used as an acquisition device, this
system is supported using the AMEDTEC SCP (.scp) file format. Transmission is done via
network file share (LAN). For additional information about this system you can contact the
manufacturer or visit their website at: www.amedtec.de.
Cardiolex
EC Sense
Input Format setting: Cardiolex - EC Sense. These PC-based systems are supported when
using the proprietary (.xml) file format. Transmission is done via network file share (LAN)
from the ECWSDB utility provided by Cardiolex. Information about the devices can be found
on the manufacturer’s website: www.cardiolex.se.
Cardioline SpA (formerly et medical devices SpA)
Cardioline® Rest ECG cardiographs (including ClickECG)
Input Format setting: Cardioline® SpA - Cardioline® Rest ECG. These cardiographs are
supported when using the Cardioline SCP (.scp) file format. Transmission is done via
network file share (LAN). Note that some models write files with no file extension, but
these are picked up with the default setting. Information about the devices can be found
on the manufacturer’s website: www.cardioline.it.
Datamed LLC | Chapter 5 – Input Formats
39
DatamedFT Service Manual
corpuls® GS Elektromedizinische Geräte G. Stemple GmbH
corpuls3 defibrillator/monitors
Input Format setting: Corpuls® GS Elektromedizinische - Corpuls3. These devices are
supported when using the corpuls® SCP (.scp) file format. Transmission is by proprietary
cellular to the corpuls.web receiving station which writes them to the shared folder.
Information about the devices can be found on the manufacturer’s website:
www.corpuls.com
custo med® GmbH
custo diagnostic, cardio 100, cardio110, cardio 100BT, cardio 110BT, cardio 130, cardio
200BT
Input Format setting: custo med® GmbH - custo diagnostic. These cardiographs are
supported when using the DICOM® (.dcm) file format. Transmission is done via network file
share (LAN). Information about the devices can be found on the manufacturer’s website:
www.customed.de.
Diagnostica AS (formerly MedIT AS)
MeditConcept cardiographs
Input Format setting: Diagnostica AS (MedIT) - MeditConcept. These cardiographs are
supported when using the proprietary (.med) file format. Transmission is done via network
file share (LAN). Note that the MeditSense/Spirare devices are not compatible at this time.
Information about the devices can be found on the manufacturer’s website:
www.medit.no.
DICOM®
Input Format setting: DICOM®. Cardiographs and other devices that output resting ECGs
using the 12-Lead ECG Waveform SOP Class or the General ECG Waveform SOP Class are
compatible input formats. DLLC’s DICOM Conformance Statement can be found on the
website: www.datamed.com/docs/DICOM_Conformance_Statement.pdf.
Dräger
Infinity® patient monitors
Input Format setting: Dräger - Infinity® (si4). These monitors are supported when using
the proprietary SIFOR (.si4) file format. The proprietary (.ekg) file format is no longer
accessible because it may not contain the interpretive statements. DatamedRcv™ DRCV05 is
required and is typically installed on the Dräger gateway server. Information about the
devices can be found on the manufacturer’s website: www.draeger.com.
40
Chapter 5 – Input Formats | Datamed LLC
DatamedFT Service Manual
EB Neuro SpA (formerly Ates Medica Device S.r.l.)
Easy ECG series cardiographs
Input Format setting: EB Neuro (Ates Medica Device) - Easy ECG. These cardiographs are
supported when using the DICOM® (.dcm) file format. Transmission is done via network file
share (LAN). Information about the devices can be found on the manufacturer’s website:
www.ebneuro.com.
Edan Instruments, Inc.
SE-601 series, SE-12, SE-12 Express, SE-1200, SE-1200 Express, SE-1201, SE-3 series, SE300 series, SE-1010 cardiographs
Input Format setting: Edan - SE (dcm) or Edan - SE (scp). These cardiographs are
supported when using the DICOM® (.dcm) file format or the Edan SCP (.scp) file format.
Transmission is done via FTP to an FTP server (such as the FTP service in IIS) that is running
on the FTPC. Instructions for setting up the cart and the FTP service are available.
Information about the devices can be found on the manufacturer’s website:
www.edan.com.cn.
Esaote®
P80, P80 Power, P8000, and P8000 Power Cardiographs
Input Format setting: Esaote® - P80. These cardiographs are supported when using the
proprietary (.esa) file format or the proprietary XML (.xml) file format. Transmission is
done via network file share (LAN). Information about the devices can be found on the
manufacturer’s website: www.esaote.com.
AT-10 plus cardiographs
Input Format setting: SCHILLER - CARDIOVIT®/DEFIGARD®/ARGUS PRO/SEMA/SEMA3
(xml). These OEM SCHILLER cardiographs are supported when using the proprietary XML
(.xml) file format. Serial or LAN transmission requires a receiver utility available from
Esaote. Information about the devices can be found on the manufacturer’s website:
www.esaote.com.
MyTrace 16 cardiographs
Input Format setting: SCHILLER - CARDIOVIT®/DEFIGARD®/ARGUS PRO/SEMA/SEMA3
(xml). These OEM SCHILLER cardiographs are supported when using the proprietary XML
(.xml) file format. Transmission is done via network file share (LAN). Information about the
devices can be found on the manufacturer’s website: www.esaote.com.
Datamed LLC | Chapter 5 – Input Formats
41
DatamedFT Service Manual
MyCardioPad and MyCardioPad XL cardiographs
Input Format setting: SCHILLER - CARDIOVIT®/DEFIGARD®/ARGUS PRO/SEMA/SEMA3
(xml). These OEM SCHILLER cardiographs are supported when using the proprietary XML
(.xml) file format. LAN transmission requires a receiver utility available from Esaote.
Information about the devices can be found on the manufacturer’s website:
www.esaote.com.
Fukuda Denshi
FCP-7101, FX-7102, FX-7202, FX-7302, FX-7542, FX-8222, and FX-8322 cardiographs
Input Format setting: Fukuda Denshi (ecg). These cardiographs are supported when using
the proprietary (.ecg) file format. Transmission can be done via network file share (LAN),
FTP, USB flash drive, or PC card. Information about the devices can be found on the
manufacturer’s website: www.fukuda.com or www.fukuda.co.jp.
FCP-7402 cardiographs
Input Format setting: Fukuda Denshi (ecg). These cardiographs are supported when using
the proprietary (.ecg) file format. Transmission can be done via network file share (LAN)
using a PC LAN card, or by PC card. Information about the devices can be found on the
manufacturer’s website: www.fukuda.com or www.fukuda.co.jp.
Option Settings (see Chapter 3 for details):
Local language. This option is important if the local language is supported and not the
default.
GE® Healthcare
Marquette® MAC®-6, MAC®-8, MAC®-12, MAC®-15, and MAC®-PC SDLC cardiographs
Input Format setting: GE® - MAC®/DASH®/SOLAR® (ecg/acq/mon). These cardiographs are
supported when using the proprietary (.acq) file format. Transmission is via an SDLC
modem and requires the DatamedRcv™ Model DRCV04 receiver module for reception. To
the best of our knowledge, these legacy devices are no longer supported by GE and
information is not available on their website. Note that files from these cardiographs are
not compatible with MUSE® v7 and later – DatamedFT™ can be used to convert these files to
a compatible format if desired.
Marquette® MAC®-VU cardiograph
Input Format setting: GE® - MAC®/DASH®/SOLAR® (ecg/acq/mon). These cardiographs are
supported when using the proprietary (.acq, .ecg) file format. Transmission can be via an
SDLC modem which requires the DatamedRcv™ Model DRCV04 receiver module for
reception. These devices also have a serial port and can transmit by serial modem, direct
serial, or use a serial-to-LAN adapter for LAN/WLAN, all of which require the DatamedRcv™
42
Chapter 5 – Input Formats | Datamed LLC
DatamedFT Service Manual
Model DRCV01 receiver module for reception. Another option is to write the files to the
floppy disk for manual transport. To the best of our knowledge, these legacy devices are no
longer supported by GE and information is not available on their website.
GE® MAC®-1200 cardiographs
Input Format setting: GE® - MAC®/DASH®/SOLAR® (ecg/acq/mon). These cardiographs are
supported when using the proprietary (.ecg) file format. Transmission is by serial modem,
direct serial, or using a serial-to-LAN adapter for LAN/WLAN, all of which require the
DatamedRcv™ Model DRCV01 receiver module for reception. Information about the devices
can be found on the manufacturer’s website: www.gehealthcare.com.
GE® MAC®-5000 cardiographs
Input Format setting: GE® - MAC®/DASH®/SOLAR® (ecg/acq/mon) or GE® - MAC® (xml).
These cardiographs are supported when using the proprietary (.ecg) file format – or when
using the GE XML (.xml) file format. Transmission can be by serial modem, direct serial, or
using a serial-to-LAN adapter for LAN/WLAN, all of which require the DatamedRcv™ Model
DRCV01 receiver module for reception. Another option is to write the files to the floppy
disk for manual transport. Information about the devices can be found on the
manufacturer’s website: www.gehealthcare.com.
We recommended that these cardiographs be set to produce 500Hz output. The following
steps describe how to do this:
1. Turn on power to the MAC5000
2. Select "More" (<F6>)
3. Select "Main Menu" (<F2>)
4. Select "More" (<F6>)
5. Select "System Setup" (<F1>)
6. Enter System Password then press <Return>
7. Select "ECG" then press <Return>
8. Select "ECG Acquisition/Analysis" then press <Return>
9. Use down arrow to move down to "Storage Format" then press <Return>
10. Use up/down arrows to choose the middle setting "500 Hz (MUSE Network)" then
press <Return>
11. Use down arrow to move down to "Return" then press <Return>
12. Use up arrow to move up to "Return" then press <Return>
13. Use down arrow to move down to "Save Setup" then press <Return>
14. Choose "To system" then press <Return>
15. Use down arrow to move down to "Main Menu" then press <Return>
16. Select "Resting ECG" (<F1>)
GE® MAC®-800, MAC®-1600, MAC®-3500, MAC®-5500, and MAC®-5500HD cardiographs
Input Format setting: GE® - MAC®/DASH®/SOLAR® (ecg/acq/mon) or GE® - MAC® (xml).
These cardiographs are supported when using the proprietary (.ecg) file format – or when
using the XML (.xml) file format. Transmission can be by serial modem, direct serial, or
Datamed LLC | Chapter 5 – Input Formats
43
DatamedFT Service Manual
using a serial-to-LAN adapter for LAN/WLAN, all of which require the DatamedRcv™ Model
DRCV01 receiver module for reception. If the device has the LAN option enabled then it can
transmit using the built-in Ethernet port, which also requires the DatamedRcv™ Model
DRCV01 receiver module for reception. Another option is to write the files to an SD card for
manual transport. Information about the devices can be found on the manufacturer’s
website: www.gehealthcare.com.
Important Note: The MAC® 5500HD requires version v2.0.14 or higher because of a
statement library update by GE®.
GE® MAC®-600 cardiographs
Input Format setting: GE® - MAC®/DASH®/SOLAR® (ecg/acq/mon) or GE® - MAC® (xml).
These cardiographs are supported when using the proprietary (.ecg) file format – or when
using the XML (.xml) file format. Transmission can be by serial modem, direct serial, or
using a serial-to-LAN adapter for LAN/WLAN, all of which require the DatamedRcv™ Model
DRCV01 receiver module for reception. Another option is to write the files to an SD card for
manual transport. Information about the devices can be found on the manufacturer’s
website: www.gehealthcare.com.
GE® CardioSoft™
Input Format setting: GE® - MAC®/DASH®/SOLAR® (ecg/acq/mon) or GE® - MAC® (xml).
These systems are supported when using the proprietary (.ecg) file format. The system
should be configured to write the files to a network file share (LAN). In the System
Configuration, choose the “MUSE” tab, then in the Store procedure for MUSE section select
Data transfer to MUSE via Shared Directory and fill in the share name and account.
Information about the devices can be found on the manufacturer’s website:
www.gehealthcare.com.
GE® DASH® and SOLAR® patient monitors
Input Format setting: GE® - MAC®/DASH®/SOLAR® (ecg/acq/mon) or GE® - MAC® (xml).
These monitors are supported when using the proprietary (.mon) file format. The monitors
are connected to a private LAN and the GE monitoring gateway software is required to
receive files from the monitors and then write them to a network file share (LAN).
Information about the devices can be found on the manufacturer’s website:
www.gehealthcare.com.
Notes for GE® devices:
On GE® devices, the term Site is used, which is synonymous with Institution ID in most
other systems. Likewise, the term Location corresponds to Department ID in other
systems.
Option Settings (see Chapter 3 for details):
Add pacing spikes to waveform. This option is ON by default.
44
Chapter 5 – Input Formats | Datamed LLC
DatamedFT Service Manual
Gem-Med, s.l.
Gem Heart® cardiographs
Input Format setting: Gem-Med - Gem Heart® (dcm) or Gem-Med - Gem Heart® (scp).
These cardiographs are supported when using Gem Med SCP (.scp) file format or when using
the DICOM® (.dcm) file format. Transmission is done via network file share (LAN).
Information about the devices can be found on the manufacturer’s website: www.gemmed.com.
HP (Philips)
PageWriter® M1700A (XLi), M1701A (XLs), M1702A (XLe) cardiographs
Input Format setting: HP - PageWriter® M17xx. These cardiographs are supported when
using the proprietary (.nnn) file format. Transmission can be by serial modem or direct
serial, both of which require the DatamedRcv™ Model DRCV03 receiver module for
reception. Files can be also written to a floppy disk for manual transport. We strongly
recommend the use of floppy disks to transport the files if possible because the files
contain significantly more information than the transmitted files. A standard
transmitted file will have 2.5sec of each of the 12 leads, plus up to three rhythm leads with
10sec of data, all at 250Hz. However when using the floppy drive the “Special Store Mode”
setting will cause it to write files with 10sec of all 12 leads at 500Hz (see below for
instructions). To the best of our knowledge, these legacy devices are no longer supported
and information is not available online.
To configure the XLi to utilize the Special Store Mode (12x10x500), follow these steps:
1. Press MENU until you see the choice including Config, then press Config.
2. If a password is requested, enter your password. (BioMed should know this).
3. Press Global. As each choice is presented, press Enter to go to the next step or
Choose to change the entry and then Enter to go on to the next entry. Most items
should be left unchanged.
4. Keep pressing Enter to step through a long list of entries until you see an entry
labeled Special Applications. Press Choose to change it to Yes, then Enter.
5. Press Enter a few more times until you see ECG Store Mode. Press Choose to
change it from Standard to Special. Then press Enter to keep the choice.
6. Press Exit to leave the menu and keep your settings.
7. Test your new configuration by recording an EKG, send it through the translator
into the host system and try displaying this test EKG in 12x10 format. If all leads
are complete you have successfully changed the XLi.
This procedure will need to be done with each XLi cardiograph. Note that this storage
mode is incompatible with TraceMaster OS/2 and TraceMaster NT. Also note that using this
storage mode will limit the number of EKGs stored on each diskette to about 30.
Datamed LLC | Chapter 5 – Input Formats
45
DatamedFT Service Manual
PageWriter® M1770A
cardiographs
(100/100i),
M1771A
(200/200i),
M1772A
(300/300i/300pi)
Input Format setting: HP - PageWriter® M17xx. These cardiographs are supported when
using the proprietary (.nnn) file format. Transmission can be by serial modem or direct
serial, both of which require the DatamedRcv™ Model DRCV03 receiver module for
reception. Floppy drives are not present on these models so the “Special Store Mode” as
described above is not available. To the best of our knowledge, these legacy devices are no
longer supported and information is not available online.
Option Settings (see Chapter 3 for details):
Suppress right-hand (diagnostic) statements. This option is ON by default.
Custom statement lib. This option is not typically used.
AC line frequency (Hz). This option is important and should always be set correctly.
Notes for HP devices:
The term Location on these cardiographs is 5-digit field that combines two discrete
elements: a 3 digit Institution ID and a two digit Department ID. During translation these
two elements are separated.
Mindray®
Patient monitors and defibrillators with 12 ECG Module connected to Hypervisor Central
Station (v6.6 or higher)
Input Format setting: Mindray - Hypervisor or Panorama Central Station. These
cardiographs are supported when using the Mindray XML (.xml) file format. Transmission is
done via network file share (LAN). Information about the devices can be found on the
manufacturer’s website: www.mindray.com.
Passport 2 and Spectrum monitors with View 12 ECG Module connected to Panorama
Central Station (v10.1 or higher)
Input Format setting: Mindray - Hypervisor or Panorama Central Station. These
cardiographs are supported when using the Mindray XML (.xml) file format. Transmission is
done via network file share (LAN). Information about the devices can be found on the
manufacturer’s website: www.mindray.com.
Mortara Instrument, Inc. (including Cardiac Science Corporation)
Quinton® Eclipse™ 850, Quinton® Eclipse™ Plus, and Quinton® Eclipse™ Premier
Input Format setting: Mortara - Burdick® Atria®/Quinton® Eclipse™. These cardiographs
are supported when using Burdick custom SCP (.raw) file format. Transmission is by serial
modem or direct serial cable and requires CSC’s ECLIO utility (supplied by DLLC).
46
Chapter 5 – Input Formats | Datamed LLC
DatamedFT Service Manual
Information about
www.mortara.com.
the
devices can
be
found on
the
manufacturer’s
website:
Burdick® Atria® 3100, Atria® 6100, Atria® 8300, and Atria® 8500 cardiographs
Input Format setting: Mortara - Burdick® Atria®/Quinton® Eclipse™. These cardiographs
are supported when using Burdick custom SCP (.raw, .ecg) file format. Transmission can be
by serial modem or direct serial cable which requires CSC’s ECLIO utility (supplied by
DLLC). These devices can also transmit over a network file share (LAN). Note that this
device will output a file with the extension .raw unless the LAN connection is used, in
which case it will have the extension .ecg. Information about the devices can be found on
the manufacturer’s website: www.mortara.com.
Notes for Quinton®/Burdick® devices:
When using serial transmission the typical workflow for these cardiographs is to record
EKGs in its internal memory, then to take the cart to a PC on the hospital LAN for
downloading via a serial cable into the FTPC’s Input Folder. We recommend this directory
be shared so a remote PC can be mapped to \\<FTPCname>\<ShareName>. This will make it
easier for an EKG tech to copy their EKG files to the FTPC. The communication utility ECLIO
is used on each PC that will connect to an Eclipse cart. This CSC utility is distributed by
DLLC and can be used on multiple computers in conjunction with a DatamedFT™
installation. Be sure to configure the MapFile to point to \\<FTPCname>\<ShareName> on
each Eclipse-compatible PC so the EKGs will reach DatamedFT™. On our website is a
drawing of a Null-Modem cable for a direct serial connection to these cardiographs
(http://datamed.com/docs/DatamedFT_Null_Modem_Cable.pdf). An asynchronous modem
can also be used to send EKGs from a remote location via a dial up telephone line.
Burdick® CareCenter MD™ cardiographs
Input Format setting: Mortara - Burdick® CareCenter MD™ (xml). These cardiographs are
supported when using Burdick custom XML (.xml) file format. Only the ECG Modality is
supported. These devices write to a network file share (LAN). Select XML (discrete) export
to write the files to the shared folder. Information about the devices can be found on the
manufacturer’s website: www.mortara.com.
ELI®-series cardiographs
Input Format setting: Mortara - ELI®-series (dcm) or Mortara - ELI®-series (xml). These
cardiographs are supported when using the DICOM® (.dcm) file format or the Mortara XML
(.xml) file format. Transmission requires the ELI-Link utility (available from Mortara).
Information about the devices can be found on the manufacturer’s website:
www.mortara.com.
The ELI-Link utility can be installed on the FTPC or on a separate computer. It receives
incoming transmissions and can write out either XML or DICOM files. When configuring ELILink, set the XML-MI folder (for XML format) or the DICOM folder (for DICOM format) to the
same as the Input folder in DatamedFTConfig (typically C:\DatamedFT\EKGsfromMortara).
Datamed LLC | Chapter 5 – Input Formats
47
DatamedFT Service Manual
For version 2.20 of ELI-Link, set the EXPORT folder to an unused folder. This folder will
accumulate small (4KB) files that must be removed periodically. Version 3.00 of ELI-Link
allows you to specify that those files are not created.
Note for XML transmissions: By default the Site field is split into Department ID and
Institution ID. Department ID is the first four bits and can be from 0-15. Institution ID is
the next 5 bits (0-32). The original Site value from the cart is put in UserText(1) and can
retrieved from there if desired.
Nihon Kohden Corporation
Cardiofax® ECG-1250A/K, ECG-1350A/K, ECG-1550A/K, and ECG-2550 cardiographs
Input Format setting: Nihon Kohden Cardiofax® ECG/Lifescope® BSM. These cardiographs
are supported when using the proprietary (.dat) file format. Transmission is done by LAN
and requires the NK receiver utility (supplied by DLLC). Note that the Sub ID field from the
device will be copied to the Order Number field. Information about the devices can be
found on the manufacturer’s website: www.nihonkohden.com.
Here are the steps necessary to set up communications for a NK 1550-A Cardiograph:
1. The Nihon Kohden software provided by DLLC will consist of four files:
ECTPSET.exe, ECTP.exe, FTSVR.exe, and ECTPRcv.dll. On the FTPC, create a folder
named C:\DatamedFT\NKRcv and put these files there.
2. To configure the software, run ECTPSet.exe. On the configuration screen enter the
IP address of the FTPC (this computer), and also set both Directory fields to the
Input Folder setting for DatamedFT (C:\DatamedFT\EKGsfromNK). When the
configuration is saved, two files will be created: ECTP.ini and FTP.ini.
3. Start the listener applications ECTP.exe and FTPSvr.exe. These two programs run in
the background, but they can be seen in Task Manager. Note that these programs
must be manually restarted if the FTPC is restarted. Also note that
FTPSvr.exe will not run if IIS is running on the computer.
4. Turn on the Nihon Kohden Cart. There is a power supply switch on the back and a
power button on the top.
5. Connect an Ethernet cable to the LAN port in the back.
6. The screen will default to a Resting ECG View. On the bottom left of the screen
there will be a button labeled Menu. This cardiograph uses a touch screen so gently
touch Menu.
7. The next screen is the Main Menu where system settings are configured. The first
one you will set up is in the System Test menu, so touch that button in the lower
right hand corner.
8. Next touch Network Setting. This should be in the third column, near the bottom of
your screen.
9. Touch the icon labeled PCI-DP838151 (or similar) that represents the installed NIC.
If there is no NIC you will need to contact Nihon Kohden. On the IP Address tab
either select DHCP or enter the IP Address, Subnet Mask, and Default Gateway that
48
Chapter 5 – Input Formats | Datamed LLC
DatamedFT Service Manual
10.
11.
12.
13.
14.
are assigned to this cart. After entering the appropriate settings, touch OK (top
right), then File, then Close. To test LAN connectivity, use the ping utility from
another PC on the network.
After closing that screen, touch End on the bottom of the menu screen, and OK to
go back to the main default screen.
Touch Menu to go back to the Main Menu screen, then touch System Settings, then
Communication Settings, and finally Ethernet Settings.
On this screen enter the (static) IP address of the FTPC in the Ordering Server
Address and File Server Address fields. The defaults for the other fields should be
correct. The FTPC will run the ECTP/FTP communication software provided by
Nihon Kohden which receives files sent from the cardiograph. The settings on this
screen must match the settings configured with ECTPSET (above). When the
information is correct, touch Register to save your settings. Touch Register on
each screen to save and return to the previous screen.
After an EKG is taken, the buttons on your screen will change. Touch File and then
Transfer to transmit the EKG to the FTPC. EKGs that are saved on the cardiograph
can be transmitted by touching Menu, then Data Management, then selecting the
desired EKG(s), touching Process, and finally Transfer.
The EKG data will be written to a .dat file, which DatamedFT will process. There
will also be a small .req file which is not needed and must be manually removed
periodically.
Cardiofax® ECG-1150A/K, 9130K cardiographs
Input Format setting: Nihon Kohden Cardiofax® ECG/Lifescope® BSM. These cardiographs
are supported when using the proprietary (.dat) file format. Transmission is done manually
using an SD card to transfer the files. Note that the Sub ID field from the device will be
copied to the Order Number field. Information about the devices can be found on the
manufacturer’s website: www.nihonkohden.com.
Lifescope® BSM-series patient monitors
Input Format setting: Nihon Kohden Cardiofax® ECG/Lifescope® BSM. These monitors are
supported when using the proprietary (.dat) file format. The monitors are connected to a
private LAN and the NK monitoring gateway transmits them by LAN to the NK receiver
utility (supplied by DLLC or NK). NK may install the receiver utility on the monitoring
gateway(s). If it is not installed on the management/storage system server, it is
recommended that DatamedFT™ be installed on a standalone computer in case multiple
gateway servers are needed. Note that the Sub ID field from the device will be copied to
the Order Number field. Information about the devices can be found on the
manufacturer’s website: www.nihonkohden.com.
Option Settings (see Chapter 3 for details):
AC line frequency (Hz). This option is important and should always be set correctly.
Datamed LLC | Chapter 5 – Input Formats
49
DatamedFT Service Manual
Local language. This option is important if the local language is supported and not the
default.
Norav Medical™ Ltd
PC ECG 1200™ family (1200M™, 1200HR™, 1200S™, 1200W™, Blue-ECG™), Green ECG LAN™,
NHH 1200™, NECG-3™, NECG-12™, and NECG-12C™ cardiographs
Input Format setting: Norav - 1200 family (dcm) or Norav - 1200 family (scp). These
cardiographs are supported when using the DICOM® (.dcm) file format or the Norav SCP
(.scp) file format. Transmission is done via network file share (LAN). Information about the
devices can be found on the manufacturer’s website: www.norav.com.
Ortivus AB
Mobimed® cardiographs, CoroNet patient monitors
Input Format setting: Ortivus - Mobimed®/CoroNet. These cardiographs and monitors are
supported when using the proprietary (.ort) file format. Transmission is done via network
file share (LAN). The monitors are connected to a private LAN and the Coronet gateway is
required to receive files from the monitors and then write them to the shared folder.
Information about the devices can be found on the manufacturer’s website:
www.ortivus.com.
Philips Healthcare
PageWriter® Touch, PageWriter® Trim II, PageWriter® Trim III, and PageWriter® TC
cardiographs
Input Format setting: Philips - PageWriter®/IntelliVue®/HeartStart® MRx. These
cardiographs are supported when using the Philips XML (.xml) file format. Transmission is a
web-based protocol and requires the DatamedRcv™ Model DRCV02 receiver module for
reception. For some of these devices it is possible to transmit over serial modem to a RAS
Server, where it becomes a standard network transmission (to the receiver). Note that
DLLC does not provide configuration support for RAS servers. Information about the devices
can be found on the manufacturer’s website: www.medical.philips.com.
By default these devices output unfiltered data, so non-Philips management systems will
show data that does not match the source device. In current software releases, the
PageWriter® TC cardiographs and some of the older devices contain a setting that will force
filtered data to be exported. It is very important that this is configured appropriately.
Follow these steps to turn on filtered output and the Baseline Wander filter in the TC and
some Touch models:
1. On the main screen touch Setup.
2. Touch Configure Cardiograph Default Settings.
50
Chapter 5 – Input Formats | Datamed LLC
DatamedFT Service Manual
3. Touch the Algorithm/Pacing button at the top.
4. Under Algorithm there are two choices and the selection depends on the number of
leads you will be recording. For 12 leads, select PH090A. For 13 or more leads,
select PH100B.
5. Touch the Filter button at the top.
6. Under Optional Filter make sure the Baseline Wander filter is ON.
7. Touch Exit, and then Yes in the message screen to save these changes.
8. Touch Configure ECG Network Settings.
9. Touch the LAN/WLAN Settings button at the top. Check these settings and update
them as appropriate.
10. Touch the ECG Mgmt Systems button at the top.
11. Touch the Edit/Delete TraceMaster button in the second row.
12. In the Select TraceMaster Server picklist, choose the default entry (typically
TMVUE) and touch Edit. If there are no entries in the picklist, touch the Create
TraceMaster button in the second row. The setup will be the same except you will
name the entry when you save.
13. Set or update the following settings:
a. Set System Type to ECG Management.
b. Set Connectivity Settings to Server Settings.
c. Set the Server URL to http://<IPAddress>/emscomm, where <IPAddress> is
the address of the computer running DRCV02 or DatamedWL™.
d. The User Name and Password are not used. Computer Name should be set
to the name of the computer running DRCV02 or DatamedWL™.
e. The four buttons on the right should all be OFF.
f. Under ECG Mgmt Version – Filtered ECG, choose Other EMS – XML 1.04 if
the algorithm was set to PH090A above; or choose Other EMS – XML
1.04.01 if the algorithm was set to PH100B above. These pairings are
critical for proper operation. NOTE: If you are using DatamedWL™, the
worklist functionality will not work with either Other EMS selection – it
must be set to one of the TraceMasterVue selections (typically
TraceMasterVue C.02). This means that the ECGs will not be filtered and
so the filter settings should be set to .05 – 150Hz.
14. Touch Save Settings to save the changes. Touch Exit and then Exit again to return
to the main screen.
IntelliVue® (MP5/MP30/MP50/MP70/MP90/X2) patient monitors with 12-Lead option
Input Format setting: Philips - PageWriter®/IntelliVue®/HeartStart® MRx. These monitors
are supported when using the Philips XML (.xml) file format. For PIIC Classic prior to Rev G
there must be a Philips Database Server because the LAN connection is from the DB Server.
For PIIC Classic Rev G and later, the Philips IntelliVue Information Central (“PIIC”) will
support the LAN connection. The IntelliVue® monitors are on a private LAN with the
Database Server/PIIC, which has a second NIC to connect to the hospital’s LAN. The typical
use is to store EKGs at each bedside, then review the stored EKGs at the PIC to select
Datamed LLC | Chapter 5 – Input Formats
51
DatamedFT Service Manual
which EKGs are to be exported to the management system. Once EKGs are selected and
“tagged” for export, a soft button “Export” is pressed to send the EKG files via LAN to the
FTPC. Information about the devices can be found on the manufacturer’s website:
www.medical.philips.com.
For PIIC Classic the files will be written to a shared folder on the FTPC. For PIIC iX the files
are transmitted to DatamedRcv™ DRCV02.
If the EKG contains HEXAD data a statement will be added to indicate that some leads are
derived: “**** The following leads are derived: <lead names> ****”.
By default these devices output unfiltered data, so non-Philips management systems will
show data that does not match the source device. The current software release contains a
setting that will force filtered data to be exported (Config Wizard Network Configuration
Network Device 12 Lead ECG Management Filter Before Export). It is very
important that this is configured appropriately.
Here are additional notes about installation for IntelliVue with PIIC Classic:
1. Philips will configure the PIIC/Central Station. The Philips technician will need the
IP Address where DatamedFT™ is installed, and the username/password of the
account with write access to the shared folder.
2. If the PIIC is software revision “L” or later, any account name and share name can
be used for access. For previous revisions the account name must be “PMDExport”
and the share name must also be “PMDExport” – contact DLLC or Philips for the
password.
3. On the FTPC, the DatamedFT™ Input Folder must be shared with access for the
account that was set up on the PIC. When setting up the share, make sure to
review the properties to make sure that the account has Full Access permissions for
this share.
HeartStart® MRx monitor/defibrillators
Input Format setting: Philips - PageWriter®/IntelliVue®/HeartStart® MRx. These devices
are supported when using the Philips XML (.xml) file format. Transmission is by cellular to
the 12-Lead Transfer Station (available from Philips) which writes them to the shared
folder. Information about the devices can be found on the manufacturer’s website:
www.medical.philips.com.
Option Settings:
Suppress right-hand (diagnostic) statements. This option is ON by default.
52
Chapter 5 – Input Formats | Datamed LLC
DatamedFT Service Manual
Physio-Control®
LIFEPAK® 12 and 15 defibrillator/monitors
Input Format setting: Physio-Control® - LIFEPAK® 12/15. These devices are supported
when using the XML (.xml) file format. Transmission is by cellular to the LIFENET® RS
Receiving Station which writes them to the shared folder. Information about the devices
can be found on the manufacturer’s website: www.physio-control.com.
QRS Diagnostic
Office Medic™
Input Format setting: QRS Diagnostic - Office Medic™ (scp). These PC-based cardiographs
are supported when using the QRS SCP (.scp) file format. Transmission is done via network
file share (LAN). Information about the devices can be found on the manufacturer’s
website: www.qrsdiagnostic.com.
SCHILLER AG
CARDIOVIT® CS-6/12, AT-3, AT-4, AT-5, AT-6, AT-60, CS-100, AT-10, and AT-2 plus
cardiographs
Input Format setting: SCHILLER - CARDIOVIT® (rst). These cardiographs are supported
when using the proprietary (.rst) file format. Serial transmission requires the SemaComm
utility (available from SCHILLER). Information about the devices can be found on the
manufacturer’s website: www.schiller.ch.
CARDIOVIT® AT-101 series, CARDIOVIT® AT-102, and CARDIOVIT® AT-10 plus cardiographs
Input Format setting: SCHILLER - CARDIOVIT® (rst) or SCHILLER - CARDIOVIT®/
DEFIGARD®/ARGUS PRO/SEMA/SEMA3 (xml). These cardiographs are supported when using
the proprietary (.rst) file format or the SCHILLER XML (.xml) file format. Serial transmission
requires the SemaComm utility (available from SCHILLER). LAN transmission requires the
SCS utility (available from SCHILLER). Information about the devices can be found on the
manufacturer’s website: www.schiller.ch.
Note: LAN transmission in AT-101 requires the built-in SCM option (included in AT-101
Tele). LAN/WLAN transmission in AT-102 requires the built-in SCM option.
CARDIOVIT® AT-104 PC, CardioLaptop AT-110, and CARDIOVIT® CS-200 cardiographs
Input Format setting: SCHILLER - CARDIOVIT® (rst). These cardiographs are supported
when using the proprietary (.rst) file format. Transmission is done via network file share.
Information about the devices can be found on the manufacturer’s website:
www.schiller.ch.
Datamed LLC | Chapter 5 – Input Formats
53
DatamedFT Service Manual
CARDIOVIT® CS-200 Excellence cardiographs
Input Format setting: SCHILLER - CARDIOVIT®/DEFIGARD®/ARGUS PRO/SEMA/SEMA3
(xml). These cardiographs are supported when using the SCHILLER XML (.xml) file format.
LAN transmission requires the SCS utility or SEMA3 gateway (available from SCHILLER).
Transmission can also be done via network file share. Information about the devices can be
found on the manufacturer’s website: www.schiller.ch.
CARDIOVIT® AT-102 Plus, MS-2007, MS-2010, and MS-2015 cardiographs; DEFIGARD® DG5000, ARGUS PRO LifeCare, and ARGUS PRO LifeCare2 with ARGUS PRO Transport
defibrillator/monitors
Input Format setting: SCHILLER - CARDIOVIT®/DEFIGARD®/ARGUS PRO/SEMA/SEMA3
(xml). These devices are supported when using the SCHILLER XML (.xml) file format. LAN
transmission requires the SCS utility or SEMA3 gateway (available from SCHILLER).
Information about the devices can be found on the manufacturer’s website:
www.schiller.ch.
SEMA® ECG Management System
Input Format setting: SCHILLER - CARDIOVIT®/DEFIGARD®/ARGUS PRO/SEMA/SEMA3
(xml). This system is supported as an input device using the SCHILLER XML (.xml) file
format. Transmission is done via network file share. Information about the system can be
found on the manufacturer’s website: www.schiller.ch.
SEMA3 ECG Management System
Input Format setting: SCHILLER - CARDIOVIT®/DEFIGARD®/ARGUS PRO/SEMA/SEMA3 (xml)
or SCHILLER - CARDIOVIT®/SEMA3 (dcm). This system is supported as an input device using
the SCHILLER XML (.xml) file format or the DICOM® (.dcm) file format. Transmission is done
via network file share. Information about the system can be found on the manufacturer’s
website: www.schiller.ch.
SEIVA® s.r.o.
ECG Praktik, ECG Praktik Portable, ECG Cardio Writer, ECG Cardio Touch cardiographs
Input Format setting: SEIVA® - ECG Praktik/ECG Cardio. These cardiographs are supported
when using the DICOM® (.dcm) file format. Transmission is done via network file share
(LAN) or FTP transfer. Information about the devices can be found on the manufacturer’s
website: www.seiva.com.
Spacelabs Healthcare
CardioExpress® cardiographs
Input Format setting: Spacelabs - CardioExpress®. These cardiographs are supported when
using the Spacelabs SCP (.scp) file format. Transmission is done via network file share
54
Chapter 5 – Input Formats | Datamed LLC
DatamedFT Service Manual
(LAN). Information about the devices can be found on the manufacturer’s website:
www.spacelabshealthcare.com.
Ultraview® and UltraviewSL® patient monitors with ICS and ICS G2
These monitors are available with Datamed® translation technology embedded. Contact
Spacelabs Healthcare or visit their website (www.spacelabshealthcare.com) for more
information. Note that monitoring systems prior to ICS are also compatible. Contact DLLC if
you are setting up DatamedFT™ with one of these systems.
Option Settings (see Chapter 3 for details):
Local language. This option is set internally in the ICS configuration.
VectraCor®, Inc.
VectraplexECG™ System
Input Format setting: VectraCor®, Inc. - VectraplexECG™ System. These PC-based
cardiographs are supported when using the VectraCor SCP (.scp) file format. Transmission
is done via network file share (LAN). Information about the devices can be found on the
manufacturer’s website: www.vectracor.com.
Verathon® Inc (formerly HeartScape Technologies, Inc.)
Heartscape™ 3D ECG System, Prime® ECG cardiographs
Input Format setting: Verathon® Inc. (HeartScape) - Heartscape™ 3D ECG/Prime ECG®.
These cardiographs are supported when using the proprietary (.hsp) file format. This
system acquires an 80-lead ECG and can export 12 or 15-lead “slices” of the data to a host
system. Transmission is done via network file share (LAN). Information about the devices
can be found on the manufacturer’s website: verathon.com/products/heartscapeesc.
Welch Allyn, Inc
CP-series cardiographs with CardioPerfect® Workstation
Input Format setting: Welch Allyn - CP/CardioPerfect® Workstation. These cardiographs
are supported when using the Welch Allyn SCP (.scp) file format. Files from the CP-series
cardiographs are loaded into CPWS and exported over the LAN to DatamedFT™. The
Connectivity Kit is required – contact Welch Allyn for this module. Model CP-100 writes files
to an SD card or USB memory stick. Model CP-200 can write files to an SD card/USB memory
stick or communicate directly with CPWS over a USB cable. Model CP-50 can write files to
an SD card/USB memory stick or communicate directly with CPWS over a USB cable or
Ethernet connection. Model CP-20 can communicate directly with CPWS over a serial or WiFi connection. Information about the devices can be found on the manufacturer’s website:
www.welchallyn.com.
Datamed LLC | Chapter 5 – Input Formats
55
DatamedFT Service Manual
ZOLL® Medical Corporation
E-Series® (prior to rev 4.01) and M-Series® defibrillator/monitors
Input Format setting: ZOLL® - E-Series®/M-Series® (ecg). These devices are supported
when using a proprietary (.ecg) file format. Transmission is by serial modem, direct serial,
or using a serial-to-LAN adapter for LAN/WLAN, all of which require the DatamedRcv™
Model DRCV01 receiver module for reception. Information about the devices can be found
on the manufacturer’s website: www.zoll.com.
X-Series® defibrillator/monitors
Input Format setting: ZOLL® - X-Series® (xml). These devices are supported when using
ZOLL XML (.xml) file format. The devices will transmit to RescueNet® 12-Lead and then
export to a Network file share (LAN). Information about the devices can be found on the
manufacturer’s website: www.zoll.com.
56
Chapter 5 – Input Formats | Datamed LLC
DatamedFT Service Manual
CHAPTER 6 – OUTPUT FORMATS
T
he DatamedFT™ application will write files to a number of host systems. The following sections
describe each supported format and detail any special installation/configuration requirements.
Combining the Input Format (Chapter 5) along with the Output Format, any possible
configuration of the translator can be set up. Format names are descriptive labels for
convenience only and do not represent trademarks or imply endorsement of the
referenced vendor.
ACK IT Solutions
ACK Medical Integration
Output Format setting: ACK IT Solutions - ACK Medical Integration. For this management
system the translator software may be installed on the server (if permitted) or on another
computer located on the network. If it is on a separate computer, the output files will be
written across the LAN to a network share on the server. When DatamedFT™ writes the
output files to the ACK server, a utility provided by ACK will pick up the file and load it
into the database. Files will be in DICOM® (.dcm) file format. For additional information
about this system you can contact the manufacturer or visit their website at:
www.ack.co.kr.
Option Settings (see Chapter 3 for details):
DICOM: SOP Class. This option should be checked against the system capability.
Transfer Syntax. This option is rarely changed.
Nomenclature. This option is rarely changed.
Agfa HealthCare Corporation
HeartStation®
Output Format setting: Agfa - HeartStation®. The DatamedFT™ translator is available as a
manufacturer option for this management system. Additional licenses may be added by
contacting your Agfa representative. Files will be in a proprietary (.hli) file format. For
additional information about this system you can contact the manufacturer or visit their
website at: www.agfa.com/healthcare.
Datamed LLC | Chapter 6 – Output Formats
57
DatamedFT Service Manual
AMEDTEC Medizintechnik Aue GmbH
AMEDTEC ECGPro®
Output Format setting: AMEDTEC - ECGPro®. This management system is compatible with
DatamedFT™ starting with AMEDTEC ECGPro® version 3.20. The translator software may be
installed on the server (if permitted) or on another computer located on the network. If it
is on a separate computer, the output files will be written across the LAN to a network
share on the server. Files will be in a proprietary (.atc) file format. For additional
information about this system you can contact the manufacturer or visit their website at:
www.amedtec.de.
Aprima Medical Software
Aprima® 2011
Output Format setting: Aprima - Aprima® 2011. For this management system the
translator software may be installed on the server (if permitted) or on another computer
located on the network. If it is on a separate computer, the output files will be written
across the LAN to a network share on the server. When DatamedFT™ writes the output files
to the Aprima server, a utility provided by Aprima will pick up the file and load it into the
database. Files will be in DICOM® (.dcm) file format. For additional information about this
system you can contact the manufacturer or visit their website at: www.aprima.com.
Option Settings (see Chapter 3 for details):
DICOM: SOP Class. This option should be checked against the system capability.
Transfer Syntax. This option is rarely changed.
Nomenclature. This option is rarely changed.
Cardiolex
EC Sense
Output Format setting: Cardiolex - EC Sense. For this system the translator software may
be installed on the server (if permitted) or on another computer located on the network. If
it is on a separate computer, the output files will be written across the LAN to a network
share on the server. Files will be in a custom XML (.xml) file format. For additional
information about this system you can contact the manufacturer or visit their website at:
www.cardiolex.se.
Carestream Health, Inc.
Carestream® Cardiology PACS
Output Format setting: Carestream® - Cardiology PACS. For this management system the
translator software may be installed on the server (if permitted) or on another computer
58
Chapter 6 – Output Formats | Datamed LLC
DatamedFT Service Manual
located on the network. If it is on a separate computer, the output files will be written
across the LAN to a network share on the server. When DatamedFT™ writes the output files
to the Aprima server, a utility provided by Carestream will pick up the file and load it into
the database. Files will be in DICOM® (.dcm) file format. For additional information about
this system you can contact the manufacturer or visit their website at:
www.carestream.com/cardiopacs.
Option Settings (see Chapter 3 for details):
DICOM: SOP Class. This option should be checked against the system capability.
Transfer Syntax. This option is rarely changed.
Nomenclature. This option is rarely changed.
Cerner Corporation
Powerchart ECG®
Output Format setting: Cerner - Powerchart ECG®. For this management system the
translator software will normally be installed on the server by the manufacturer. When
DatamedFT™ writes the output files to the Cerner server, a utility provided by Cerner will
pick up the file and load it into the database. Files will be in DICOM® (.dcm) file format.
For additional information about this system you can contact the manufacturer or visit
their website at: www.cerner.com.
Option Settings (see Chapter 3 for details):
DICOM: SOP Class. This option should be checked against the system capability.
Transfer Syntax. This option is rarely changed.
Nomenclature. This option is rarely changed.
custo med® GmbH
custo diagnostic
Output Format setting: custo med® GmbH - custo diagnostic (scp) or custo med® GmbH custo diagnostic (xml). For this management system the translator software may be
installed on the server (if permitted) or on another computer located on the network. If it
is on a separate computer, the output files will be written across the LAN to a network
share on the server. There are two file formats that can be used depending on the
configuration of the system: SCP (.scp) file format or XML (.xml) file format. For additional
information about this system you can contact the manufacturer or visit their website at:
www.customed.de.
DICOM®
Output Format setting: DICOM® (generic). EKG management systems or PACS systems that
can take in resting ECGs using the 12-Lead ECG Waveform SOP Class or the General ECG
Datamed LLC | Chapter 6 – Output Formats
59
DatamedFT Service Manual
Waveform SOP Class are generally compatible. Note that the system must be able to read
the data from a file – it is not transmitted. DLLC’s DICOM Conformance Statement can be
found on the website: www.datamed.com/docs/DICOM_Conformance_Statement.pdf.
Option Settings (see Chapter 3 for details):
DICOM: SOP Class. This option should be checked against the system capability.
Transfer Syntax. This option is rarely changed.
Nomenclature. This option is rarely changed.
Dräger
Megacare®
Output Format setting: Dräger - Megacare® (sie). Dräger has validated certain input
formats and for these supported formats the DatamedFT™ translator is available as a
manufacturer option. Additional licenses may be added by contacting your Dräger
representative. Files will be in a proprietary (.sie) file format. For additional information
about this system you can contact the manufacturer or visit their website at:
www.draeger.com.
For formats that are not validated and supported by Dräger, the software may be
purchased directly from DLLC or through another supplier and it must be installed on a
separate computer located on the network. The output files will be written across the LAN
to a network share on the server. Note that for this type of installation, support is from
DLLC directly and not from Dräger.
Epiphany Healthcare
Cardio Server®
Output Format setting: Epiphany - Cardio Server®. The DatamedFT™ translator is
available as a manufacturer option for this management system. Additional licenses may be
added by contacting your Epiphany representative. Files will be in a proprietary (.esi) file
format. For additional information about this system you can contact the manufacturer or
visit their website at: www.epiphanyhealthdata.com.
Esaote®
Suitestensa
Output Format setting: Esaote® - Suitestensa™ / Cardiology Org@nizer® (esa) or Esaote®
- Suitestensa™ (dcm). For this management system the translator software may be
installed on the server (if permitted) or on another computer located on the network. If it
is on a separate computer, the output files will be written across the LAN to a network
share on the server. Files can be either in a proprietary (.esa) file format or in DICOM®
60
Chapter 6 – Output Formats | Datamed LLC
DatamedFT Service Manual
(.dcm) format. For additional information about this system you can contact the
manufacturer or visit their website at: www.esaote.com.
Cardiology Org@nizer®
Output Format setting: Esaote® - Suitestensa™ / Cardiology Org@nizer® (esa). For this
management system the translator software may be installed on the server (if permitted)
or on another computer located on the network. If it is on a separate computer, the output
files will be written across the LAN to a network share on the server. Files will be in a
proprietary (.esa) file format. For additional information about this system you can contact
the manufacturer or visit their website at: www.esaote.com.
Option Settings when using DICOM® output (see Chapter 3 for details):
DICOM: SOP Class. This option should be checked against the system capability.
Transfer Syntax. This option is rarely changed.
Nomenclature. This option is rarely changed.
Fujifilm Medical Systems
Synapse® Cardiovascular
Output Format setting: Fujifilm Medical Systems - Synapse® Cardiovascular. The
DatamedFT™ translator is available as a manufacturer option for this management system.
Additional licenses may be added by contacting your Fujifilm representative. Files will be
in a proprietary (.esi) file format. For additional information about this system you can
contact the manufacturer or visit their website at: cardiovascular.fujimed.com.
GE® Healthcare
MUSE® version 7 or 8
Output Format setting: GE® - MUSE® (xml). For this management system the translator
software will be installed on a separate computer located on the network. The output files
will be written across the LAN to a network share on the server. The MUSE® should have the
XML option, which is obtained from GE®. Files will be in custom XML (.xml) file format. For
additional information about this system you can contact the manufacturer or visit their
website at: www.gehealthcare.com.
The translated EKG files will be dropped into the “xml” folder (typically D:\muse\xml),
where the MUSE® will pick them up automatically and load them into the database. This
folder must be shared, and the network share must have full-control permissions for
the account under which the DatamedFT service is running or the files will not be able
to be written. If not running in a domain environment, a local account can be added
on the FTPC that exactly matches a local account on the MUSE® system and the
service can run under this account. The Output Folder configuration setting for
DatamedFT™ should point to this network share.
Datamed LLC | Chapter 6 – Output Formats
61
DatamedFT Service Manual
MUSE® versions 4B – 5E
Output Format setting: GE® - MUSE® (xml) or GE® - MUSE® (ecg). For this management
system the translator software will be installed on a separate computer located on the
network. The output files will be written across the LAN to a network share on the server.
If available, the MUSE® should have the XML input option (version 5D and higher) and the
files will be in custom XML (.xml) file format. If that option is not available for your
version, the files can be in a proprietary (.ecg) file format. For additional information
about this system you can contact the manufacturer or visit their website at:
www.gehealthcare.com.
For XML format (.xml), the translated EKG files will be dropped into the “xml” folder
(typically D:\vol000\tmp\xml), where the MUSE® will pick them up automatically and load
them into the database. For proprietary format (.ecg), the translated EKG files will be
dropped into the “mlab” folder (typically D:\vol000\tmp\mlab), where the MUSE® will pick
them up automatically and load them into the database. This folder must be shared, and
the network share must have full-control permissions for the account under which the
DatamedFT service is running or the files will not be able to be written. If not running
in a domain environment, a local account can be added on the FTPC that exactly
matches a local account on the MUSE® system and the service can run under this
account. The Output Folder configuration setting for DatamedFT™ should point to this
network share.
Option Settings (see Chapter 3 for details):
Use Physician Name IDs if possible. This option can be used for all MUSE versions.
Notes:
Serial Comparison: The Serial Comparison (SC) functionality uses a combination of various
information including codes statements to automatically compare two EKGs for a patient.
The comparison can only be valid if the analysis algorithm on the source device(s) and the
one in MUSE is identical. For that reason, SC can never be done using the analysis sent from
a non-GE device. The XML file contains an indicator to tell MUSE not to attempt SC.
However if the binary format is used (for an older version) then the SC functionality must
be turned OFF for the Location used with the non-GE devices. If SC is ON for that Location,
incoming files may have all statements removed and replaced with the severity code
statement and one other statement: No previous ECGs available. Keep in mind that Serial
Presentation (showing multiple EKGs on the screen or printout) will work just fine with
translated EKGs.
Site (Institution) Setting: If the incoming source file does not set Institution ID correctly, it
will need to be set with a field mapping (in the Field Mapping tab). For most customers
(using Site 1 in MUSE®), the following entry will be sufficient (change the 1 as necessary):
InstitutionID=”1”
62
Chapter 6 – Output Formats | Datamed LLC
DatamedFT Service Manual
XML Configuration: There is a MUSE configuration utility that must be set up to process
XML files from DatamedFT™. In the C:\Program Files\MUSE\ folder there should be a utility
named xmlconfig.exe (contact GE support if it is not there). After starting the program,
select DatamedFT from the list and click Update Device (or press New Device if it is not
present). Adjust/add the settings to match these:
The MUSE may need to be restarted after updating the settings.
IMPORTANT NOTE REGARDING THE BINARY FORMAT (.ecg): This format is supported
natively by MUSE®, however GE does not recommend or support the use of this format. We
strongly recommend that all customers use the XML format exclusively. Also note that
median data is only available when using the XML format.
HD Clinical
Solus Gateway
Output Format setting: HD Clinical - Solus Gateway. For this management system the
translator software may be installed on the server (if permitted) or on another computer
located on the network. If it is on a separate computer, the output files will be written
across the LAN to a network share on the server. Files will be in custom XML (.xml) file
format. For additional information about this system you can contact the manufacturer or
visit their website at: www.hd-clinical.com.
Huahai Medical Info-Tech Co
MedECG and HHECG
Output Format setting: Huahai Medical Info-Tech Co – MedECG/HHECG. For this
management system the translator software may be installed on the server (if permitted)
or on another computer located on the network. If it is on a separate computer, the output
files will be written across the LAN to a network share on the server. Files will be in a
Datamed LLC | Chapter 6 – Output Formats
63
DatamedFT Service Manual
proprietary (.ecg) file format. For additional information about this system you can contact
the manufacturer or visit their website at: www.huahai.com.cn.
INFINITT Healthcare Co
INFINITT® Cardiology PACS
Output Format setting: INFINITT Cardiology PACS (dcm) or INFINITT Cardiology PACS
(xml). For this management system the translator software will normally be installed on
the server by the manufacturer. When DatamedFT™ writes the output files to the INFINITT
server, a utility provided by INFINITT will pick up the file and load it into the database.
There are two file formats that can be used depending on the configuration of the system:
DICOM® (.dcm) file format or XML (.xml) file format. For additional information about this
system you can contact the manufacturer or visit their website at: www.infinitt.com.
Option Settings when using DICOM® output (see Chapter 3 for details):
DICOM: SOP Class. This option should be checked against the system capability.
Transfer Syntax. This option is rarely changed.
Nomenclature. This option is rarely changed.
Judex A/S
MEDtalk
Output Format setting: Judex - MEDtalk. For this management system the translator
software may be installed on the server (if permitted) or on another computer located on
the network. If it is on a separate computer, the output files will be written across the LAN
to a network share on the server. Files will be in SCP (.scp) file format. For additional
information about this system you can contact the manufacturer or visit their website at:
www.judex.dk.
Kibi Software Solutions
Ki:view ECG; Kibi Forte LIFE ECG Viewer
Output Format setting: Kibi Software – Ki:view ECG / Kibi Forte LIFE ECG Viewer. For
these management systems the translator software may be installed on the server (if
permitted) or on another computer located on the network. If it is on a separate computer,
the output files will be written across the LAN to a network share on the server. Files will
be in custom XML (.xml) file format. For additional information about this system you can
contact the manufacturer or visit their website at: www.kibi.fi.
64
Chapter 6 – Output Formats | Datamed LLC
DatamedFT Service Manual
LUMEDX Corporation
CardioECG™
Output Format setting: Lumedx - CardioECG™. For this management system the translator
software will normally be installed on the server. Files will be in a custom XML (.xml) file
format. For additional information about this system you can contact the manufacturer or
visit their website at: www.lumedx.com.
Option Settings (see Chapter 3 for details):
Set output lead format. This option can be used to specific the display/print format.
McKesson Corporation
Horizon Cardiology™
Output Format setting: McKesson - Horizon Cardiology™. For this management system the
translator software will normally be installed on the server by the manufacturer. Files will
be in the proprietary (.mck) file format, or in special circumstances McKesson may
configure it to use the DICOM® (.dcm) file format using the DICOM® (generic) setting. For
additional information about this system you can contact the manufacturer or visit their
website at: www.mckesson.com.
Field mapping should be used to get fields that are not showing up in the system. McKesson
support will normally set these up during the initial configuration. For example, this field
mapping is commonly used to make sure the Order Number shows up:
UserText(2)=OrderNumber
Option Settings when using DICOM® output (see Chapter 3 for details):
Clear the Rhythm Leads. This option MUST be enabled.
DICOM: SOP Class. This option should be checked against the system capability.
Transfer Syntax. This option is rarely changed.
Nomenclature. This option is rarely changed.
MedEx Tech Trade Corp
MEMRS
Output Format setting: MedEx Tech Trade Corp - MEMRS. For this management system
the translator software may be installed on the server (if permitted) or on another
computer located on the network. If it is on a separate computer, the output files will be
written across the LAN to a network share on the server. When DatamedFT™ writes the
output files to the MEMRS server, a utility provided by MedEx Tech will pick up the file and
load it into the database. Files will be in DICOM® (.dcm) file format. For additional
information about this system you can contact the manufacturer or visit their website at:
www.medextech.com.
Datamed LLC | Chapter 6 – Output Formats
65
DatamedFT Service Manual
Option Settings (see Chapter 3 for details):
DICOM: SOP Class. This option should be checked against the system capability.
Transfer Syntax. This option is rarely changed.
Nomenclature. This option is rarely changed.
Medical Micrographics
Cardiac Profiler
Output Format setting: Medical Micrographics - Cardiac Profiler. The DatamedFT™
translator is available as a manufacturer option for this management system. Additional
licenses may be added by contacting your Medical Micrographics representative. Files will
be in a proprietary (.phc) file format. For additional information about this system you can
contact the manufacturer or visit their website at: www.medicalmicrographics.com.
Medimatic
ComPACS™
Output Format setting: Medimatic - ComPACS™. For this management system the
translator software may be installed on the server (if permitted) or on another computer
located on the network. If it is on a separate computer, the output files will be written
across the LAN to a network share on the server. Files will be in the DICOM® (.dcm) file
format. For additional information about this system you can contact the manufacturer or
visit their website at: www.medimatic.com.
Option Settings (see Chapter 3 for details):
DICOM: SOP Class. This option should be checked against the system capability.
Transfer Syntax. This option is rarely changed.
Nomenclature. This option is rarely changed.
Mortara Instrument, Inc. (including Cardiac Science Corporation)
Pyramis®
Output Format setting: Mortara (Cardiac Science Corporation) - Pyramis®. For this
management system the translator software may be installed on the server (if permitted)
or on another computer located on the network. If it is on a separate computer, the output
files will be written across the LAN to a network share on the server. Files will be in
Burdick custom SCP (.raw) file format. For additional information about this system you can
contact the manufacturer or visit their website at: www.mortara.com. IMPORTANT NOTE:
Files going into Pyramis must not have a filename longer than 80 characters or it can cause
the system to crash. Some incoming formats (e.g. Mortara XML) produce files with long
names, so for those inputs it is important to use the Original Filename or Formatted
Filename setting.
66
Chapter 6 – Output Formats | Datamed LLC
DatamedFT Service Manual
Novarad™ Corporation
NovaCardio™ ECG
Output Format setting: Novarad® - NovaCardio™ ECG. For this management system the
translator software may be installed on the server (if permitted) or on another computer
located on the network. If it is on a separate computer, the output files will be written
across the LAN to a network share on the server. Files will be in the DICOM® (.dcm) file
format. For additional information about this system you can contact the manufacturer or
visit their website at: www.novarad.com.
Option Settings (see Chapter 3 for details):
DICOM: SOP Class. This option should be checked against the system capability.
Transfer Syntax. This option is rarely changed.
Nomenclature. This option is rarely changed.
Philips Healthcare
IntelliSpace® ECG; TraceMasterVue Release C.02 and later
Output Format setting: Philips - IntelliSpace® ECG / TraceMasterVue (xml 1.04). Philips
has validated certain input formats and for these supported formats the DatamedFT™
translator is available as a manufacturer option. Additional licenses may be added by
contacting your Philips representative. Files will be in XML (.xml) file format. For
additional information about this system you can contact the manufacturer or visit their
website at: www.medical.philips.com.
For formats that are not validated and supported by Philips, the software may be
purchased directly from DLLC or through another supplier and it must be installed on a
separate computer located on the network. The output files will be written across the LAN
to a network share on the server. Note that for this type of installation, support is from
DLLC directly and not from Philips.
The translated EKG files will be dropped into the “inbound” folder (typically
C:\TraceMasterVue\inbound), where the TraceMasterVue will pick them up automatically
and load them into the database. This folder must be shared, and the network share
must have full-control permissions for the account under which the DatamedFT service
is running or the files will not be able to be written. If not running in a domain
environment, a local account can be added on the FTPC that exactly matches a local
account on the iECG/TraceMasterVue system and the service can run under this
account. The Output Folder configuration setting for DatamedFT™ should point to this
network share.
TraceMasterVue Release A - C.01
Output Format setting: Philips - TraceMasterVue (xml 1.03) or Philips - IntelliSpace®
ECG / TraceMasterVue (xml 1.04). For this management system the translator software
Datamed LLC | Chapter 6 – Output Formats
67
DatamedFT Service Manual
will be installed on a separate computer located on the network. The output files will be
written across the LAN to a network share on the server. Files will be in XML (.xml) file
format and the Output format must be set to the “1.04” selection for release B.02 and
later, or to the “1.03” selection for older releases. For additional information about this
system you can contact the manufacturer or visit their website at:
www.medical.philips.com.
The translated EKG files will be dropped into the “inbound” folder (typically
C:\TraceMasterVue\inbound), where the TraceMasterVue will pick them up automatically
and load them into the database. This folder must be shared, and the network share
must have full-control permissions for the account under which the DatamedFT service
is running or the files will not be able to be written. If not running in a domain
environment, a local account can be added on the FTPC that exactly matches a local
account on the TraceMasterVue system and the service can run under this account.
The Output Folder configuration setting for DatamedFT™ should point to this network
share.
TraceMaster (NT or OS/2)
Output Format setting: Philips - TraceMaster NT. For this management system the
translator software will be installed on a separate computer located on the network. The
output files will be written across the LAN to a network share on the server. Files will be in
a proprietary file format (with an 8.3 filename). For additional information about this
system you can contact the manufacturer or visit their website at:
www.medical.philips.com.
The translated EKG files will be dropped into the “inbound” folder (typically
C:\ems\inbound), where the TraceMaster will pick them up automatically and load them
into the database. This folder must be shared, and the network share must have fullcontrol permissions for the account under which the DatamedFT service is running or
the files will not be able to be written. If not running in a domain environment, a local
account can be added on the FTPC that exactly matches a local account on the
TraceMaster system and the service can run under this account. The Output Folder
configuration setting for DatamedFT™ should point to this network share.
Option Settings (see Chapter 3 for details):
Center source sample. This option is rarely used and applies only to TraceMaster NT or
OS/2.
Add rate statement. This option is ON by default and applies only to TraceMaster NT or
OS/2.
Add buzz marks on output. This option is ON by default and applies only to TraceMaster
NT or OS/2.
Set output lead format. This option applies to all TraceMaster versions. It is important
when Cabrera output is desired.
HP Statement Type. This option is rarely used and applies only to TraceMaster NT or OS/2.
68
Chapter 6 – Output Formats | Datamed LLC
DatamedFT Service Manual
HP Version Signature. This option is rarely used and applies only to TraceMaster NT or
OS/2.
RVC BV
RVC Clinical Assistant
Output Format setting: RVC BV - RVC Clinical Assistant. For this management system the
translator software may be installed on the server (if permitted) or on another computer
located on the network. If it is on a separate computer, the output files will be written
across the LAN to a network share on the server. Files will be in the DICOM® (.dcm) file
format. For additional information about this system you can contact the manufacturer or
visit their website at: www.rvc-software.com.
Option Settings (see Chapter 3 for details):
DICOM: SOP Class. This option should be checked against the system capability.
Transfer Syntax. This option is rarely changed.
Nomenclature. This option is rarely changed.
Schiller AG
SEMA® ECG Management System
Output Format setting: SCHILLER - SEMA®. For this management system the translator
software may be installed on the server (if permitted) or on another computer located on
the network. If it is on a separate computer, the output files will be written across the LAN
to a network share on the server. Files will be in XML (.xml) file format. For additional
information about this system you can contact the manufacturer or visit their website at:
www.schiller.ch.
ScImage®
PicomEnterprise™
Output Format setting: ScImage® - PicomEnterprise™ (dcm) or ScImage® PicomEnterprise™ (sci). The DatamedFT™ translator is available as a manufacturer option
for this management system. Additional licenses may be added by contacting your
ScImage® representative. Files can either be in a proprietary (.sci) file format, or they can
be in DICOM® (.dcm) file format. For additional information about this system you can
contact the manufacturer or visit their website at: www.scimage.com.
Option Settings when using DICOM® output (see Chapter 3 for details):
DICOM: SOP Class. This option should be checked against the system capability.
Transfer Syntax. This option is rarely changed.
Nomenclature. This option is rarely changed.
Datamed LLC | Chapter 6 – Output Formats
69
DatamedFT Service Manual
Spacelabs Healthcare
®
Sentinel
Output Format setting: Spacelabs - Sentinel® (sdif) or Spacelabs - Sentinel® (dmr). For
this management system the translator software will normally be installed on the server by
the manufacturer. Files will use the proprietary (.sdif) format (for newer systems) or the
proprietary (.dmr) file format (for older systems). For additional information about this
system you can contact the manufacturer or visit their website at:
www.spacelabshealthcare.com.
TriKardia LLC
CardioCenter™
Output Format setting: TriKardia - CardioCenter. For this management system the
translator software will normally be installed on the server by the manufacturer. Files will
use the proprietary XML (.xml) format. For additional information about this system you
can contact the manufacturer or visit their website at: www.trikardia.com.
VidiStar® LLC
VidiStar® PACS and Online Reporting Software
Output Format setting: VidiStar® PACS. For this management system the translator
software may be installed on the server (if permitted) or on another computer located on
the network. If it is on a separate computer, the output files will be written across the LAN
to a network share on the server. Files will be in the DICOM® (.dcm) file format. For
additional information about this system you can contact the manufacturer or visit their
website at: www.vidistar.com.
Option Settings (see Chapter 3 for details):
DICOM: SOP Class. This option should be checked against the system capability.
Transfer Syntax. This option is rarely changed.
Nomenclature. This option is rarely changed.
VISUS Technology Transfer GmbH
JiveX® ECG
Output Format setting: VISUS - JiveX® ECG. For this management system the translator
software may be installed on the server (if permitted) or on another computer located on
the network. If it is on a separate computer, the output files will be written across the LAN
to a network share on the server. Files will be in the DICOM® (.dcm) file format. For
additional information about this system you can contact the manufacturer or visit their
website at: www.visus.com.
70
Chapter 6 – Output Formats | Datamed LLC
DatamedFT Service Manual
Option Settings (see Chapter 3 for details):
DICOM: SOP Class. This option should be checked against the system capability.
Transfer Syntax. This option is rarely changed.
Nomenclature. This option is rarely changed.
Welch Allyn, Inc
®
CardioPerfect Workstation
Output Format setting: Welch Allyn - CardioPerfect® Workstation. For this management
system the translator software may be installed on the server (if permitted) or on another
computer located on the network. If it is on a separate computer, the output files will be
written across the LAN to a network share on the server. Files will be in the SCP (.scp) file
format. For additional information about this system you can contact the manufacturer or
visit their website at: www.welchallyn.com.
Witt (Philips)
Calysto for Cardiology®
Output Format setting: Philips - Calysto for Cardiology® [Witt]. The DatamedFT™
translator is available as a manufacturer option for this management system. Additional
licenses may be added by contacting your Philips representative. Files will be in a
proprietary (.wit) file format. For additional information about this system you can contact
the manufacturer or visit their website at: www.medical.philips.com.
Datamed LLC | Chapter 6 – Output Formats
71
DatamedFT Service Manual
CHAPTER 7 – T ROUBLESHOOTING
W
hen DatamedFT™ is installed, two new Windows™ services are created: DatamedFT and
DatamedFTStart. The functions of DatamedFTStart are to start and stop DatamedFT, as well
as to monitor it. If DatamedFT stops for some reason unrelated to the hardware security key,
DatamedFTStart will restart it. During installation DatamedFT’s startup type will be set to Manual, and
DatamedFTStart’s startup type will be set to Automatic. DatamedFT should never be started or
stopped directly. When DatamedFTStart is started or stopped it will take care of DatamedFT. The
DatamedFTConfig utility should be used to start, stop, and monitor the services.
If there is a problem, the first place to look is the Event Viewer, which can be accessed from Control
Panel → Administrative Tools. Once the viewer is open, select Application from the left side menu
and the right side will be filled with the application event log. Double-clicking on any entry in the log
will open a window that shows the details for the event. The Type column in the log will indicate
whether this is an Information or Error message, and the Source column will indicate what service
logged the entry. The Information messages are normal and for a normal startup there will be one from
DatamedFTStart (Service started successfully), and then several from DatamedFT depending on the
number of processes that are set up. The Error messages describe problems that have occurred.
Reviewing the log entries will give insight into what is working and what is a problem. If the hardware
key could not be contacted, both DatamedFT and DatamedFTStart will log Error messages describing
the condition. In this case make sure that the key is inserted properly and the red light is on.
The other reason that the services can fail to access the key is due to a licensing problem. In this case
see Appendix A for instructions for updating the key.
There should be one message for each process that gives the process number and the input and output
formats. Make sure each one says that it has started. There should also be a message that says how
many processes there are and gives the code version and security key serial number. This shows that
the hardware security key is installed properly and the proper license was obtained.
When working with DLLC support personnel, a key piece of information is the configuration settings. To
export these to a file to email DLLC, start the DatamedFT™ Configuration Utility and select File →
Export settings to file on the menu.
Troubleshooting Steps
When files are not appearing in the destination system a step-by-step approach is the best way to
narrow down the problem. Follow these steps to test each “leg” of the process:
1. Confirm that the files are arriving:
a. Stop the DatamedFT services.
b. Send a test ECG and check to see if it appears in the Input Folder.
72
Chapter 7 – Troubleshooting | Datamed LLC
DatamedFT Service Manual
c. If it does not appear then the problem is occurring prior to DatamedFT™ and the search
should move upstream.
2. Confirm that the conversion is successful:
a. In the configuration utility, change the Output Folder to a local folder that is not being
used (e.g. C:\Temp).
b. Save the settings and start the DatamedFT service, then check to see if a converted
file appears in the local folder.
c. If it does not appear then there is a problem in the conversion. Check the log file and
Application Event Log. This is a good time to turn on debugging and try it again to
capture the debug file for DLLC to analyze.
3. When the Output folder is a network share, the most common reason for failure is that the
service is not set up to run under an account with access to the share. Confirm that the output
file can be written:
a. Log into the computer using the same account that the DatamedFT service is
configured to run as. To find out what that is, open the Services applet, right-click on
the DatamedFT service and select Properties, then check the Log On tab.
b. Open Windows Explorer and copy the path from the Output Folder setting to the
address bar. Press Enter and confirm that Explorer can access the share.
c. Copy the converted file from step 2.b to the shared folder. Note that b and c can also
be done from a command prompt.
d. Because the file will probably be loaded and deleted from the Output Folder by the
management system, it may not be possible to observe the file in that folder, even
briefly. If the copy is not successful there will normally be an error message shown.
e. On some systems, files that don’t load successfully will be renamed, while on others
they are always deleted. Check the shared folder for any remaining files (such as files
with an extension of .BAD).
4. Locate the test ECG in the management system.
a. On some systems, files that don’t load successfully will be renamed, while on others
they are always deleted. Check the shared folder for any remaining files (such as files
with an extension of .BAD).
b. If the file was converted and written successfully but you can’t locate it in the
management system, contact the manufacturer for assistance.
Commons Issues
Here are some common issues and answers:
•
Symptom: The Security Key cannot be located
o
The Security Key is required for the DatamedFT service to run. Whether the Security
Key is attached to the computer directly, attached to the VM’s host computer, or
connected by network, it must be accessible and a local driver must be installed. To
verify that the key is connected, do one (or both) of the following:
Datamed LLC | Chapter 7 – Troubleshooting
73
DatamedFT Service Manual
Start the DatamedFT™ Configuration Utility and select Help → About on the
menu. After a moment it should show the Security Key serial number.
Open a browser and connecting to this address: http://localhost:1947. If the
complete driver package is properly installed you should see the HASP Admin
Control Center. If you do not see this, use the shortcut under Start All
Programs Datamed DatamedFT Install HASP Security Key Drivers or
download and install the latest driver, which can be found at:
ftp://ftp.aladdin.com/pub/hasp/Sentinel_HASP/Runtime_%28Drivers%29/S
entinel_LDK_Run-time_setup.zip
•
o
On the key is a light that should be on if the driver is working.
o
A standard hardware key is dark purple and a network key is red. If this is a network
key installation, the Safenet HASP License Manager software must be installed or the
key will not work. This software is on the installation CD. Contact DLLC if you need
assistance with this.
o
If the Security Key still can’t be located, please contact DLLC support.
Symptom: The Service Status is stuck on Unknown
o
•
•
Symptom: The DatamedFT service is stopping and restarting continuously
o
This condition is very rare, however it is almost always caused by a file in the Input
folder that is causing the DatamedFT service to crash. Check the Input folder for files
and move them to a temporary folder to see if that resolves the restarting issue. There
should be at least one file with an extension of .ip, which is the most likely culprit. If
there are additional files, they can be moved back to the Input folder one at a time. If
they become “stuck” again, move them back to the temp folder. The file(s) that cause
the problem should be uploaded to DLLC for analysis and resolution.
o
Another condition that can cause this is if Visual Studio or another debugger program is
running on the FTPC. If that is the case, simply close the program.
Symptom: File(s) in the Input Folder with the extension .UnknownFormat
o
•
74
This status is displayed when the DatamedFTStart service is running and the DatamedFT
service is not running. Check the Application Event Log to see what messages are there
to explain why DatamedFT won’t start. The most likely cause is that it cannot connect
to the Security Key. See the previous note for steps to make sure the key is working. If
running on a 64 bit operating system, see the notes at the end of this chapter.
This indicates that the file format cannot be processed by DatamedFT™. If this file is
supposed to be a compatible EKG record, contact DLLC.
Symptom: File(s) in the Input Folder with the extension .FormatNotAvailable
Chapter 7 – Troubleshooting | Datamed LLC
DatamedFT Service Manual
o
•
Symptom: File(s) in the Input Folder with the extension .FromFmtFailed
o
•
This indicates that there is a fatal problem converting the data to the output format.
You will need to contact DLLC support and send this file to them for analysis.
Symptom: File(s) in the Input Folder with the extension .OutputFailed
o
•
This can only happen for Output format “Pyramis” and it indicates that the file is
marked as Confirmed but there is no Confirm Date.
Symptom: File(s) in the Input Folder with the extension .ToFmtFailed
o
•
This indicates that there was a fatal error during internal data validation. You will need
to contact DLLC support and send this file to them for analysis.
Symptom: File(s) in the Input Folder with the extension .MissingConfDate
o
•
This indicates that there is a fatal error with the source data. You will need to contact
DLLC support and send this file to them for analysis.
Symptom: File(s) in the Input Folder with the extension .InvalidData
o
•
This indicates that the file format is not licensed for processing. Contact DLLC if you
think you should be able to process this type of file.
This indicates that the output file could not be written to the Output folder. This is
nearly always caused by a network permissions problem. You can confirm this by
changing the Output folder to a local folder on the FTPC and re-running the file. As
stated earlier, the account that the DatamedFT service runs under MUST have
permissions to the network and to the remote share. To re-run the file, rename it to
the original filename or at least the original extension.
Symptom: EKG records are going through but can’t be found in the management system
o
The first thing to look at here is the management system’s logs to see if the record was
imported but may have had a problem. Also check the Output folder to see if the file is
waiting to be loaded. If you find files there make sure you are putting them in the right
location for that system.
o
For a MUSE® system, one common problem is that the Institution ID (Site) is not
correct. For most systems, the Site is fixed for all incoming translated EKGs, so it can
be set to a fixed value using field mapping. Contact the BioMed department or GE
representative to get the appropriate value. The syntax for the field mapping (for Site
1) is: InstitutionID=”1”.
Important note regarding 64 bit operating systems: There are known issues that may appear when
running on 64 bit operating systems other than Windows XP. On these systems the DatamedFTStart
service may not be able to start and stop the DatamedFT service. If this occurs then it also means that
Datamed LLC | Chapter 7 – Troubleshooting
75
DatamedFT Service Manual
the DatamedFT service will not start automatically when rebooting. If this behavior is observed, make
the following changes to work around the problem:
•
In the Services applet modify DatamedFTStart to change the startup type to Manual.
•
In the Services applet modify DatamedFT to (1) change the startup type to Automatic, and (2)
on the Recovery Tab set all three failure selections to Restart the Service.
•
Another step may be necessary if the DatamedFT service still doesn’t start automatically after
a reboot (typically only the Windows Server x64). This can be because the service is trying to
start before the HASP driver is fully loaded. To fix this you will need to make the DatamedFT
service depend on the HASP driver to load. Details about this can be found in the following
Microsoft Knowledge article: http://support.microsoft.com/kb/193888. The following steps
will set the dependency:
a. Make sure you see Sentinel HASP License Manager in the Services applet. If not,
ensure that the HASP driver is installed properly.
b. Open the registry editor (regedit) and go to HKEY_LOCAL_MACHINE\SYSTEM\
CurrentControlSet\Services\DatamedFT. Add a Multi-String value (REG_MULTI_SZ)
named “DependOnService” and set the value to “hasplms”.
DLLC support can be reached by email at [email protected] or by phone at
either (800) 601-3361 ext 2 (within the US) or +1 901 672 6225 ext 2 (outside the
US).
76
Chapter 7 – Troubleshooting | Datamed LLC
DatamedFT Service Manual
APPENDIX A – UPDATING THE LICENSE KEY
L
icensing for Datamed® software applications is controlled using a hardware or software license
key. The advantage of the hardware key is that the software can be moved to another computer
easily; however a USB port is required. In contrast, a software key is tied to a specific computer
and cannot easily be moved, however there is no hardware involved. At the time of this writing
software keys are not yet available, but when they are the update procedures will be the same.
Upon delivery of the Datamed® software, the license key will already be programmed with the
appropriate licensing information. If additional connection licenses are purchased, the key can be
updated remotely to activate the new licenses. A single license key (hardware or software) may be
used for any number of licenses for Datamed® software applications on a single computer (physical or
virtual). Previous versions used a separate update utility, however starting with version 2.0.6 the
update functionality is built into the Configuration Utility. On the License menu there are two options:
one to create a license update request file, and one to apply the update. The license update request
file must be emailed to DLLC so that an update can be created and sent back. The following is a stepby-step procedure:
Step 1:
Start the DatamedFT Configuration Utility and select License Create License
Update Request File on the menu. You will be able to select a folder and filename to
write the file to. Note that the license key must be present on this computer.
Step 2:
A file will be created in the location specified with an extension of ".c2v". Email this
file to DLLC at [email protected].
Step 3:
DLLC will generate an update file (with an extension of ".v2c") and email it back.
Save this file.
Step 4:
In the DatamedFT Configuration Utility select License Load License Update on the
menu. Navigate to the saved update file and press Open to load the license.
Step 5:
When the update is complete a success message will be displayed. The update files
can be discarded. Stop and restart the service to allow the new license to take
effect.
Instead of the loading the license update file, DLLC will (on request) create a small update executable
program that will do perform the update. This .exe can simply be clicked to update the key.
Datamed LLC | Appendix A – Updating the License Key
77
DatamedFT Service Manual
APPENDIX B – REGISTRY SETTINGS
If it is necessary to change the settings for DatamedFT™ after installation, the DatamedFTConfig utility
should be used. There is normally no reason to access the registry editor to make the changes. In the
event that DLLC support personnel request it, you can open the registry editor by selecting Start → Run
and then type “regedit” and press OK. When the registry editor opens, navigate the folders to
HKEY_LOCAL_MACHINE\SYSTEM\CurrentControlSet\Services\DatamedFT. It should look similar to this:
Most of the settings must not be changed or the operation of DatamedFT will be affected. If any setting
is changed DatamedFTStart must be restarted. A complete description of all configuration settings can
be found in Chapter 3, and DLLC personnel will give instructions on what setting needs to be changed
manually.
78
Appendix B – Registry Settings | Datamed LLC
DatamedFT Service Manual
APPENDIX C – END USER LICENSE AGREEMENT AND LIMITED WARRANTY
The current End User License Agreement and Limited Warranty (EULA) can be found on DLLC’s web site
(www.datamed.com). The following EULA was current at the time of this printing.
End-User License Agreement for Datamed® Software
IMPORTANT—READ CAREFULLY: This End-User License Agreement ("EULA") is a legal agreement
between you (either an individual or a single entity) and Datamed LLC (“Licensor”) for the Datamed®
software that accompanies this EULA, which may include associated media and printed and/or electronic
documentation ("Product"). An amendment or addendum to this EULA may accompany the Product. YOU
AGREE TO BE BOUND BY THE TERMS OF THIS EULA BY INSTALLING, COPYING, OR USING THE
PRODUCT.
1. LICENSE AND USE.
1.1 Grant of License. In consideration for your agreement to the terms and conditions of this EULA,
Licensor hereby grants to you a limited, non-exclusive, non-transferable, non-sublicensable license to
use, and allow your employees (“Authorized Users”) to use, the Product, in object code form only, for
your own internal business purposes and subject to the terms and conditions contained herein.
1.2 Installation and Use for Protected Products. For each valid license purchased, you may install
and use a single copy of the Product on a single computer (actual or virtual). The Product is protected
by either a Hardware Security Key or a Software Activation Code to prevent the operation of the
Product on more than one computer. By installing the Product you expressly agree to the installation
of the appropriate drivers for the Hardware or Software protection mechanism.
You may physically
transfer the Product between computers provided that it is used on only one computer owned and
controlled by you at any given time for each license purchased. You acknowledge and agree that any
Hardware Security Key or Software Activation Code that is lost will not be replaced under any
circumstances.
1.3 Installation and Use for Accessory Products. For each valid license of Datamed® Format
Translator Software purchased, you may install and use a single copy of the Product on a single
computer (actual or virtual). The Product is designed to work only in conjunction with and as an
accessory to properly licensed Datamed® Format Translator Software.
1.4 License Grant for Documentation. Any documentation that accompanies the Product is subject
to the license set forth in Section 1.1 and may only be used for internal, non-commercial reference
purposes only.
Datamed LLC | Appendix C – End User License Agreement and Limited Warranty
79
DatamedFT Service Manual
1.5 Use of the Product. You and Your Authorized Users agree to use the Product in compliance with
all applicable federal, state, and local laws, rules, and regulations. You are solely responsible for the
adequacy and accuracy of all data, programs, procedures, and other information that you and/or your
Authorized Users input into the Software and the results obtained therefrom.
2. RESERVATION OF RIGHTS AND OWNERSHIP. Licensor reserves all rights not expressly granted to
you in this EULA. The Product is protected by copyright and other intellectual property laws and treaties.
Licensor or its Representatives own the title, copyright, and other intellectual property rights in the Product
and any copies thereof or derivative works thereto. The Product is licensed, not sold. This EULA does not
grant you any rights to trademarks or service marks of Licensor. Notwithstanding anything herein to the
contrary, you agree to not use or exploit the Product as a source or reference to conceive, create, develop
or offer any product or service similar in form, function or concept to the Product.
3. FEEDBACK. Licensor may provide you with a mechanism to provide feedback, suggestions and ideas, if
you choose, about its products and services (“Feedback”).
You agree that Licensor may, in its sole
discretion, use the Feedback you provide to Licensor in any way, including in future modifications of the
Product.
You hereby grant Licensor a perpetual, worldwide, fully transferable, irrevocable, royalty free
license to use, modify, create derivative works from, distribute and display any information you provide to
Licensor in the Feedback.
4.
RESTRICTIONS;
LIMITATIONS
ON
REVERSE
ENGINEERING,
DECOMPILATION,
AND
DISASSEMBLY. You are not licensed or permitted to do, nor may you permit your Authorized Users to:
(i) make additional copies of the Product except as provided herein;
(ii) enable others to use your registration code(s) or serial numbers (if any);
(iii) give copies to another person who has not purchased a license for the Product from Licensor;
(iv) duplicate the Licensor Product by any other means including electronic transmission;
(v) copy the printed materials or user documentation accompanying the Product, if any;
(vi) reverse engineer, decompile, or disassemble the Product, except and only to the extent that
such activity is expressly permitted by this EULA or applicable law notwithstanding this limitation;
(vii) transfer or assign the license and your rights to the Product under any circumstances including
to an affiliate or any other entity under common ownership with you or under your control or upon a
merger, change of control, reorganization, consolidation or sale of all or substantially all of your assets or
seek to sublicense or assign the license of your rights hereunder;
(viii) Distribute, rent, sell, loan, lease, sublicense, provide commercial hosting services or otherwise
deal in the Product and or any other component elements of the Product;
80
Appendix C – End User License Agreement and Limited Warranty | Datamed LLC
DatamedFT Service Manual
(ix) use the Product to facilitate or perform bulk translations of any electrocardiogram data or any
other data that may be processed through the Product; and/or
(x)
use the Product on or in connection with an application service provider platform or other
hosted website, application or platform or as a software as a service.
You agree that in the event of actual or threatened breach of this Section by you, Licensor will have no
adequate remedy at law and will be entitled to immediate and injunctive and other equitable relief, without
bond and without the necessity of showing actual money damages.
5. TERMINATION. Without prejudice to any other rights, Licensor may terminate this EULA immediately
and without notice if you fail to comply with any term or condition of this Agreement.
Upon such
termination, you must immediately destroy all complete and partial copies of the Product, including all
backup copies. Sections 8, 9, 10, 11, 13, 14 and this Section 5 shall survive any expiration or termination
of this Agreement.
6. LIMITED WARRANTY FOR PRODUCT. Licensor warrants that the Product will perform substantially in
accordance with the documentation thereof for a period of ninety (90) days from the date of receipt.
Extended warranty support may be available for purchase from Licensor.
If an implied warranty or condition is created by your state/jurisdiction and federal or
state/provincial law prohibits disclaimer of it, you also have an implied warranty or condition,
BUT ONLY AS TO DEFECTS DISCOVERED DURING THE PERIOD OF THIS LIMITED WARRANTY
(NINETY DAYS). AS TO ANY DEFECTS DISCOVERED AFTER THE NINETY DAY PERIOD, THERE IS
NO WARRANTY OR CONDITION OF ANY KIND. Some states/jurisdictions do not allow limitations on how
long an implied warranty or condition lasts, so the above limitation may not apply to you.
Any supplements or updates to the Product, including without limitation, any updates provided to you after
the expiration of the ninety day Limited Warranty period are not covered by any warranty or condition,
express, implied or statutory.
7. YOUR EXCLUSIVE REMEDY. Licensor’s entire liability and your exclusive remedy for any breach of this
Limited Warranty or for any other breach of this EULA or for any other liability relating to the Product shall
be, at Licensor’s option from time to time exercised subject to applicable law, (a) return of the amount paid
(if any) for the Product, or (b) repair or replacement of the Product, that does not meet this Limited
Warranty and that is returned to Licensor. You will receive the remedy elected by Licensor without charge,
except that you are responsible for any expenses you may incur (e.g. cost of shipping the Product to
Licensor). This Limited Warranty is void if failure of the Product has resulted from accident, abuse,
misapplication, abnormal use or a virus. Any replacement Product will be warranted for the remainder of the
original warranty period or thirty (30) days, whichever is longer, and Licensor will use commercially
reasonable efforts to provide your remedy within a commercially reasonable time of your compliance with
Licensor’s warranty remedy procedures. Licensor may use electronic means to deliver the product. To
Datamed LLC | Appendix C – End User License Agreement and Limited Warranty
81
DatamedFT Service Manual
exercise your remedy, contact: Datamed LLC, Inc., 7755 Hunters Run Drive, Germantown, TN, 38138, USA,
(800) 601-3361 or +1 901 672 6225.
8. DISCLAIMER OF WARRANTIES. The Limited Warranty above is the only warranty made to you and is
provided in lieu of any other warranties or similar obligations (if any) created by any advertising,
documentation, packaging, or other communications. No employee, agent, representative or affiliate of
Licensor has authority to bind Licensor to any oral representations or warranty concerning the Product. Any
written representation or warranty not expressly contained in this EULA will not be enforceable. EXCEPT FOR
THE LIMITED WARRANTY, THE PRODUCT, SOFTWARE, RELATED MATERIALS, DOCUMENTATION AND/OR
ANY SERVICES RELATED TO THE PRODUCT, ARE PROVIDED "AS-IS, WITH ALL FAULTS," AND TO THE
MAXIMUM EXTENT PERMITTED BY APPLICABLE LAW, LICENSOR AND ITS SUBSIDIARIES, AFFILIATES,
LICENSORS, DISTRIBUTORS, DEALERS OR SUPPLIERS ("REPRESENTATIVES") DISCLAIM ALL OTHER
REPRESENTATIONS AND WARRANTIES, EXPRESS OR IMPLIED, REGARDING THE
PRODUCT, SOFTWARE,
RELATED MATERIALS, CONTENT AND ANY SERVICES, INCLUDING FITNESS FOR A PARTICULAR PURPOSE,
SECURITY,
QUALITY,
MERCHANTABILITY,
AND
THEIR
NON-INFRINGEMENT.
LICENSOR
EXPRESSLY
DISCLAIMS ANY REPRESENTATIONS OR WARRANTIES THAT YOUR USE OF THE PRODUCT WILL SATISFY
ANY STATUTORY OR REGULATORY OBLIGATIONS, OR WILL ASSIST WITH, GUARANTEE OR OTHERWISE
ENSURE COMPLIANCE WITH ANY APPLICABLE LAWS OR REGULATIONS, INCLUDING BUT NOT LIMITED TO
THE HEALTH INSURANCE PORTABILITY AND ACCOUNTABILITY ACT OF 1996 (“HIPAA”) OR OTHER FEDERAL
OR STATE STATUTES OR REGULATIONS. YOU ARE SOLELY RESPONSIBLE FOR ENSURING THAT YOUR USE
OF THE PRODUCT, RELATED SERVICES OR CONTENT IS IN ACCORDANCE WITH APPLICABLE LAW.
IT IS
YOUR RESPONSIBILITY TO KEEP ABREAST OF CHANGES IN LAWS, REGULATIONS AND HEALTHCARE
PRACTICES THAT AFFECT YOU AND YOUR BUSINESS. You shall indemnify and hold Licensor harmless from
and against any costs, losses, liabilities and expenses (including reasonable attorneys’ fees) arising out of
any claims related to your use of the Product or violation of this EULA.
9. EXCLUSION OF INCIDENTAL, CONSEQUENTIAL AND CERTAIN OTHER DAMAGES. TO THE
MAXIMUM EXTENT PERMITTED BY APPLICABLE LAW, IN NO EVENT SHALL LICENSOR OR ITS
REPRESENTATIVES BE LIABLE FOR ANY SPECIAL, INCIDENTAL, PUNITIVE, EXPECTATION,
INDIRECT, OR CONSEQUENTIAL DAMAGES WHATSOEVER (INCLUDING, BUT NOT LIMITED TO,
DAMAGES FOR LOSS OF PROFITS OR CONFIDENTIAL OR OTHER INFORMATION, FOR BUSINESS
INTERRUPTION, FOR PERSONAL INJURY, FOR LOSS OF PRIVACY, FOR FAILURE TO MEET ANY
DUTY INCLUDING OF GOOD FAITH OR OF REASONABLE CARE, FOR NEGLIGENCE, AND FOR ANY
OTHER PECUNIARY OR OTHER LOSS WHATSOEVER) ARISING OUT OF OR IN ANY WAY RELATED
TO THE USE OF OR INABILITY TO USE THE PRODUCT, THE PROVISION OF OR FAILURE TO
PROVIDE SUPPORT OR OTHER SERVICES, INFORMATION, SOFTWARE, AND RELATED CONTENT
THROUGH THE PRODUCT OR OTHERWISE ARISING OUT OF THE USE OF THE PRODUCT, OR
OTHERWISE UNDER OR IN CONNECTION WITH ANY PROVISION OF THIS EULA, EVEN IN THE
EVENT
OF
LIABILITY,
82
THE
FAULT,
BREACH
OF
TORT
(INCLUDING
CONTRACT
OR
NEGLIGENCE),
BREACH
OF
MISREPRESENTATION,
WARRANTY
OF
LICENSOR
Appendix C – End User License Agreement and Limited Warranty | Datamed LLC
STRICT
OR
ANY
DatamedFT Service Manual
REPRESENTATIVE, AND EVEN IF LICENSOR OR ANY REPRESENTATIVE HAS BEEN ADVISED OF
THE POSSIBILITY OF SUCH DAMAGES.
10. LIMITATION OF LIABILITY AND REMEDIES. Notwithstanding any damages that you might
incur for any reason whatsoever (including, without limitation, all damages referenced herein
and all direct or general damages in contract or anything else), the entire liability of Licensor and
any of its Representatives under any provision of this EULA and your exclusive remedy hereunder
(except for any remedy of repair or replacement elected by Licensor with respect to any breach
of the Limited Warranty) shall be limited to the lesser of (i) the actual damages you incur in
reasonable reliance on the Product or (ii) the license fees actually paid by you for the Product.
The foregoing limitations, exclusions and disclaimers (including Sections 8, 9, 10 and 11) shall
apply to the maximum extent permitted by applicable law, even if any remedy fails its essential
purpose. The disclaimers and limitations on liability set forth above are fundamental elements of
the basis of the agreement between Licensor and you.
11. Export Restrictions. You acknowledge and agree that the Product is subject to restrictions and
controls imposed by the Export Administration Act of 1979, as amended, and the Export Administration
Regulations thereunder ("the Acts"). You agree and certify that neither the Product nor any direct product
thereof is being or will be used for any purpose prohibited by the Acts. You further agree and certify that
neither the Licensor Product nor any direct product thereof will be exported to (i) the following countries
which are currently subject to U.S. trade embargoes: Cuba, Iran, Libya, North Korea, Sudan and Syria or (ii)
persons or entities on the U.S. "Denied Persons List", "Specially Designated Nationals List" and "Entities
List".
12.
U.S. GOVERNMENT LICENSE RIGHTS. All Product provided to the U.S. Government pursuant to
solicitations issued on or after December 1, 1995 is provided with the commercial license rights and
restrictions described elsewhere herein. All Product provided to the U.S. Government pursuant to
solicitations issued prior to December 1, 1995 is provided with "Restricted Rights" as provided for in FAR, 48
CFR 52.227-14 (JUNE 1987) or DFAR, 48 CFR 252.227-7013 (OCT 1988), as applicable.
13. APPLICABLE LAW. This EULA is governed exclusively by the laws of the State of Tennessee, USA. The
state and federal courts located in Shelby County, Tennessee shall have exclusive jurisdiction to adjudicate
any dispute arising out of or relating to this Agreement.
14. ENTIRE AGREEMENT; SEVERABILITY. This EULA (including any addendum or amendment to this
EULA which is included with the Product) is the entire agreement between you and Licensor relating to the
Product and the support services (if any) and they supersede all prior or contemporaneous oral or written
communications, proposals and representations with respect to the Product or any other subject matter
covered by this EULA. This EULA sets forth the entire liability of Licensor and its representatives and your
exclusive remedy with respect to the Product and services and their use. To the extent the terms of any
Licensor policies or programs for support services conflict with the terms of this EULA, the terms of this
EULA shall control. Any waiver of the terms herein by Licensor must be in a writing signed by an authorized
Datamed LLC | Appendix C – End User License Agreement and Limited Warranty
83
DatamedFT Service Manual
officer of Licensor and expressly referencing the applicable provisions of this EULA. If any provision of this
EULA is held to be void, invalid, unenforceable or illegal, it shall be enforced to the extent permissible and all
other provisions shall continue in full force and effect. Headings are included for convenience only, and shall
not be considered in interpreting this Agreement.
This EULA does not limit any rights that Licensor may
have under trade secret, copyright, patent or other laws.
The following Licensor GUARANTEE applies to you if you acquired this Product in any country
other than the United States:
Statutory rights not affected - The following guarantee is not restricted to any territory and does not affect
any statutory rights that you may have from your reseller or from Licensor if you acquired the Product
directly from Licensor. If you acquired the Product or any support services in Australia, New Zealand or
Malaysia, please see the "Consumer rights" section below.
The Guarantee - The Product is designed and offered as one of Licensor’s Datamed® products. You accept
that no Product is error free and you are strongly advised to back-up your files regularly. Provided that you
have a valid license, Licensor guarantees that a) for a period of 90 days from the date of receipt of your
license to use the Product or the shortest period permitted by applicable law it will perform substantially in
accordance with any written materials that accompany the Product; and b) any support services provided by
Licensor shall be substantially as described in applicable written materials provided to you by Licensor and
Licensor’s support engineers will use reasonable efforts, care and skill to solve any problem issues.
Acknowledging that Licensor has limited support resources, all support will be done remotely from Licensor’s
home location. In the event that the Product fails to comply with this guarantee, Licensor will either (a)
repair or replace the Product or (b) return the price you paid. This guarantee is void if failure of the Product
results from accident, abuse or misapplication. Any replacement Product will be guaranteed for the
remainder of the original guarantee period or 30 days, whichever period is longer. You agree that the above
guarantee is your sole guarantee in relation to the Product and any support services.
Exclusion of All Other Terms - To the maximum extent permitted by applicable law and subject to the
guarantee above, Licensor disclaims all warranties, conditions and other terms, either express or implied
(whether by statute, common law, collaterally or otherwise) including but not limited to implied warranties
of satisfactory quality and fitness for particular purpose with respect to the Product and any written
materials that accompany the Product. Any implied warranties that cannot be excluded are limited to 90
days or to the shortest period permitted by applicable law, whichever is greater.
Limitation of Liability - To the maximum extent permitted by applicable law and except as provided in the
Licensor Guarantee, Licensor and its Representatives shall not be liable for any damages whatsoever
(including without limitation, damages for loss of business profits, business interruption, loss of business
information or other pecuniary loss) arising out of the use or inability to use the Product, even if Licensor
has been advised of the possibility of such damages. In any case Licensor’s entire liability under any
84
Appendix C – End User License Agreement and Limited Warranty | Datamed LLC
DatamedFT Service Manual
provision of this EULA shall be limited to the amount actually paid by you for the Product. These limitations
do not apply to any liabilities that cannot be excluded or limited by applicable laws.
Consumer Rights - Consumers in Australia, New Zealand or Malaysia may have the benefit of certain rights
and remedies by reason of the Trade Practices Act and similar state and territory laws in Australia, the
Consumer Guarantees Act in New Zealand and the Consumer Protection Act in Malaysia in respect of which
liability cannot lawfully be modified or excluded. If you acquired the Product in New Zealand for the
purposes of a business, you confirm that the Consumer Guarantees Act does not apply. If you acquired the
Product in Australia and if Licensor breaches a condition or warranty implied under any law which cannot
lawfully be modified or excluded by this agreement then, to the extent permitted by law, Licensor’s liability
is limited, at Licensor’s option, to: (i) in the case of the Product: a) repairing or replacing the Product; or b)
the cost of such repair or replacement; and (ii) in the case of support services: a) re-supply of the services;
or b) the cost of having the services supplied again.
Should you have any questions concerning this EULA, or if you desire to contact Licensor for any reason,
please use the address information enclosed in this Product to contact Licensor directly or visit Licensor on
the World Wide Web at http://www.datamed.com.
Datamed LLC | Appendix C – End User License Agreement and Limited Warranty
85