1
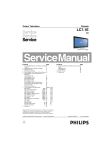
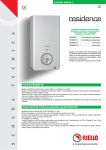
PS-416M
User & Service Manual
PATIENT SIMULATOR
1-1
Copyright © 1997 by METRON. All rights reserved.
METRON:
USA
1345 Monroe NW, Suite 255A
Grand Rapids, MI 49505
Phone: (+1) 888 863-8766
Fax:
(+1) 616 454-3350
E-mail: [email protected]
FRANCE
30, rue Paul Claudel
91000 Evry, France
Phone: (+33) 1 6078 8899
Fax:
(+33) 1 6078 6839
E-mail: [email protected]
NORWAY
Travbaneveien 1
N-7044 Trondheim, Norway
Phone: (+47) 7382 8500
Fax:
(+47) 7391 7009
E-mail: [email protected]
Disclaimer
METRON provides this publication as is without warranty of any kind, either express or implied, including but not
limited to the implied warranties of merchantability or fitness for any particular purpose. Further, METRON reserves the
right to revise this publication and to make changes from time to time to the content hereof, without obligation to METRON or its local representatives to notify any person of such revision or changes. Some jurisdictions do not allow disclaimers of expressed or implied warranties in certain transactions; therefore, this statement may not apply to you.
Limited Warranty
METRON warrants that the PS-416M Patient Simulator will substantially conform to published specifications and to the
documentation, provided that it is used for the purpose for which it was designed. METRON will, for a period of twelve (12)
months from date of purchase, replace or repair any defective analyzer, if the fault is due to a manufacturing defect. In no
event will METRON or its local representatives be liable for direct, indirect, special, incidental, or consequential damages
arising out of the use of or inability to use the PS-416M Patient Simulator, even if advised of the possibility of such damages. METRON or its local representatives are not responsible for any costs, loss of profits, loss of data, or claims by third
parties due to use of, or inability to use the PS-416M Patient Simulator. Neither METRON nor its local representatives will
accept, nor be bound by any other form of guarantee concerning the PS-416M Patient Simulator other than this guarantee.
Some jurisdictions do not allow disclaimers of expressed or implied warranties in certain transactions; therefore, this
statement may not apply to you.
Trademarks
Duracell is a registered trademark of Duracell, Inc.
1-2
Table of Contents
MANUAL REVISION RECORD ...................................................................................................... 1-5
1.
INTRODUCTION ........................................................................................................................ 1-7
1.1 PS-416M Features ................................................................................................................. 1-7
1.2 Specifications......................................................................................................................... 1-7
1.3 General Information .............................................................................................................. 1-9
2.
INSTALLATION ....................................................................................................................... 2-11
2.1 Receipt, Inspection and Return............................................................................................ 2-11
3.
OPERATING PS-416M ............................................................................................................. 3-13
3.1 Control Switches and Terminals.......................................................................................... 3-13
3.2 Use....................................................................................................................................... 3-14
4.
CONTROL AND CALIBRATION........................................................................................... 4-17
4.1 Required Equipment ............................................................................................................ 4-17
4.2 Preparation........................................................................................................................... 4-17
4.3 Function Testing .................................................................................................................. 4-17
5.
COMPONENT FUNCTIONS AND PARTS ........................................................................... 5-21
5.1 Theory of Operation ............................................................................................................ 5-21
5.2 Functions Description.......................................................................................................... 5-21
5.3 Component Parts.................................................................................................................. 5-23
APPENDIX A: DIAGRAMS ........................................................................................................... 5-27
Component Location .................................................................................................................... 5-29
Schematic Diagram Part 1 ........................................................................................................... 5-30
Schematic Diagram Part 2 ........................................................................................................... 5-31
APPENDIX B: ERROR REPORT FORM, PS-416M .................................................................. 5-33
APPENDIX C: SUGGESTION FORM, PS-416M........................................................................ 5-35
1-3
This page intentionally left blank.
1-4
Manual Revision Record
This record page is for recording revisions to your PS-416M User and Service Manual that have been published by METRON or its authorized representavtives. We recommend that only the management or facility representative authorized to process changes and revisions to publications:
•
make the pen changes or insert the revised pages;
•
ensure that obsolete pages are withdrawn and either disposed of immediately, or marked as superseded
and placed in a superseded document file, and;
•
enter the information below reflecting that the revisions have been entered.
Rev No
Date Entered
Reason
0
-
Initial Release
Signature of Person Entering Change
1-5
This page intentionally left blank.
1-6
1. Introduction
This chapter describes the METRON PS-416M Patient Simulator’s features
and specifications.
1.1 PS-416M Features
METRON’s PS-416M is a high performance simulator designed to simplify
patient monitor testing, and is designed to be used by trained service technicians. It simulates electrocardiogram, respiration, dynamic blood pressure
and static temperature.
It offers three preprogrammed automatic test modes (ECG rate, ECG performance rate, and BP level), plus a built-in ECG lead continuity test. Arrhythmia selection includes two supraventricular, two-conduction; eight ventricular, one paced; and one fetal/maternal ECG simulation.
1.2 Specifications
1.
ECG General
Lead Configuration:
12-lead simulation derived from one resistively
divided analog signal.
RL, RA, LA, LL, V1-6
Output Impedance
Limb leads:
500 or 1000 ohms to RL
V Leads:
1000 ohms to RL
High Level Output:
2.
0.5 V/mV of low level (Lead II)
Normal Sinus
Rates:
30, 60, 80, 120, 180, and 300 BPM
Rate Accuracy:
± 1% of selection
Amplitudes:
0.5mV, 1.0mV, 1.5mV and 2.0mV (Lead II)
Amplitude Accuracy:
± 5%. (Lead II 1.0mV)
Automatic ECG Rate Test
3.
4.
Manual ECG Performance Test
Square Wave:
2.0Hz 1.0 V p-p biphasic
DC pulse:
4.0 sec. 1.0 mV
Sine Waves:
0.1, 0.5, 10, 40, 50, 60 and 100 Hz
Triangle Wave:
2.0 Hz
Amplitude:
0.5mV, 1.0mV, 1.5mV and 2.0mV (Lead II)
Amplitude Accuracy:
± 5%. (Lead II 1.0mV)
Automatic ECG Performance Test
1-7
Gain/Damping:
2 Hz square wave
Frequency Response
Low Frequency:
4 second DC pulse
Band Pass:
10 Hz sine
Monitor:
5.
-3dB point: 40 Hz sine
Power Line Notch Filter:
50 Hz sine
Linearity:
2 Hz triangle wave
ECG Lead Test
Display flashes if lead resistance is <3 kOhms (DC lead wire only)
6.
Blood Pressure General
Input/Output Impedance:
7.
8.
300 Ohms
Exciter Voltage Range:
2 to 16 volts
Exciter Frequency Range:
DC to 4000 Hz
Output Sensitivity:
5 or 40 µV/V/mmHg
Accuracy:
± 1% full scale 1 mmHg
Calibrated Rate:
80 BPM
Dynamic Blood Pressure Selections
Atmosphere:
0 mmHg
Arterial:
120/80 mmHg
Left Ventricle:
20/0
mmHg
Right Ventricle:
25/0
mmHg
Pulmonary Artery:
25/10 mmHg
Pulmonary Wedge:
10/2
Static Levels:
0, 20, 40, 80, 100, 200, 250, 300 mmHg
mmHg
Arrhythmia Selections
Atrial Fibrillation 1 & 2
Premature Atrial Contraction
Premature Ventricular Contraction (PVC)
Early PVC
R on T PVC
Multifocal PVCs
Bigeminy
Bigeminy Run of 5 PVCs
Ventricular Tachycardia
Ventricular Fibrillation
Second Degree Type 2
Right Bundle Branch Block
Asynchronous Pacemaker
Fetal/Maternal ECG
1-8
9.
Respiration
Normal Physiological Simulation
Baseline Impedances:
500 to 1000 Ohms
Impedance Variations:
0.1, 0.2, 0.5, 1.0, and 3.0 Ohms
Rates:
0 (Apnea), 15, 20, 30, 40, 60, 120 BPM
Output Configuration:
Lead 1, 11, RL-LL
10. Temperature
30°C / 86°F, 37°C / 98.6°F, 40°C / 104°F
Compatible with YSI 400/700 series.
Accuracy:
± 0.25°C
1.3 General Information
Display/Control:
2-digit numeric display keys
5 switches for BP, respiration, temperature and
Power On/Off
ECG Output Connectors
High Level:
Low level:
Standard phone jack
10 AHA color-coded standard safety banana connectors with detachable banana to snap adapter.
Power:
9 V alkaline battery or battery eliminator
Case:
High impact plastic
Weight:
0.5 kg / 1.1 lbs.
Dimensions:
Height:
47 mm / 1.8 in.
Width:
138 mm / 5.4 in.
Length:
190 mm / 7.5 in.
Standard Accessories:
PS-416M Patient Simulator
(P.N. 17020)
110 V or 220 V AC Adapter
(P.N. 17021)
Carrying Case
(P.N. 17022)
Snap-to-Banana Adapters (10pk)
(P.N. 17023)
User and Service Manual PS-416M (P.N. 17025)
Optional Accessories:
Unterminated or prewired BP Cable (P.N. 17440)
Unterminated or prewired 400/700
YSI-series Temperature Cable
(P.N. 17443)
1-9
This page intentionally left blank.
1-10
2. Installation
This chapter explains unpacking, receipt inspection and claims, and the general procedures for PS-416M setup.
2.1 Receipt, Inspection and Return
1. Inspect the outer box for damage.
2.
Carefully unpack all items from the box and check to see that you have
the following items:
•
PS 416M Patient Simulator (P.N. 17020)
•
Battery Eliminator (P.N. 17021)
•
Carrying Case (P.N. 17022)
•
10 Pack, Snap-to-Banana Adapters (P.N. 17023)
•
PS-416M User and Service Manual (P.N. 17025)
3.
If you note physical damage, or if the unit fails to function according to
specification, inform the supplier immediately. When METRON AS or
the company’s representative, is informed, measures will be taken to either repair the unit or dispatch a replacement. The customer will not
have to wait for a claim to be investigated by the supplier. The customer
should place a new purchase order to ensure delivery.
4.
When returning an instrument to METRON AS, or the company representative, fill out the address label, describe what is wrong with the instrument, and provide the model and serial numbers. If possible, use the
original packaging material for return shipping. Otherwise, repack the
unit using:
•
a reinforced cardboard box, strong enough to carry the weight of the
unit.
•
at least 5 cm of shock-absorbing material around the unit.
•
nonabrasive dust-free material for the other parts.
Repack the unit in a manner to ensure that it cannot shift in the box during shipment.
METRON’s product warranty is on page ii of this manual. The warranty
does not cover freight charges. C.O.D. will not be accepted without authorization from METRON A.S or its representative.
2-11
This page intentionally left blank.
2-12
3. Operating PS-416M
This chapter explains the PS-416M operating controls and terminals.
3.1 Control Switches and Terminals
Front Panel
1.
Power Switch
Turns the power on and off.
2.
LCD Display Keys
3.
Enter
4.
High Level ECG
Connector
BASE 6 (Baseline
Impedance) Slide
Switch
LEAD Slide Switch
Sets LCD display waveform values. Use the right
key to enter units, and the left key to enter tens.
Press the top of the key to increase the value.
Press the bottom of the key to decrease the value.
Pressing this stores newly specified waveform
value set by the keys.
Standard phone jack connecting the high level
ECG output signal.
Sets the impedance between each lead. The respiration parameter (breathing rate/min) is selected
and stored in the display.
Determines which lead is in use. The position of
5.
6.
3-13
7.
Blood Pressure
Slide Switch
(µV/V/mmHg)
8.
Temperature Slide
Switch
Lead Test
Terminals
9.
the switch must correspond to the type of patient
monitor in use.
Sets the sensitivity to match the input sensitivity of
the patient monitor (either 5 or 40 )V/V/mmHg).
The waveform is selected and stored in the display.
Sets the temperature to be used.
For testing ECG leads. Connect each end of the
lead to one of the two Lead Test Terminals. The
LCD display will flash if the lead is OK.
Rear Panel
NOTE
Use only METRON’s AC
Adapter plug-in power supply transformer supplied with
the unit.
10.
Low level ECG
Connectors
11.
Battery Eliminator
10 AHA color-coded 4mm safety terminals. Snapto-banana adapters for the terminals are supplied
with the PS-416M.
Micro jack for connecting the 9V plug-in power
supply transformer for use in operating the unit
from any standard electrical outlet.
3.2 Use
NOTE
Do not use mercury, air or
carbon-zinc batteries.
1.
Power. The power switch is the slide-switch situated at the bottom
right-hand corner of the panel. The instrument should be switched off
when not in use, to save the battery. A flashing display indicates low
battery power.
2.
Battery Replacement The battery is situated in the base of the instrument. Use a 9 volt alkaline battery (Duracell® MN1604 or equivalent).
3.
Top Panel Controls and Connectors
Display and Keyboard
The PS-416M has a two-digit display. To the left of the LCD display is a
listing of available waveforms and two-digit codes. Access a waveform
by displaying its corresponding two-digit code. Use the two keys below
the LCD display to enter units and tens (the right key is for units; the left
is for tens). Pressing the top of the keys increases the values, while
pressing the bottom of the keys decreases the values. The selected waveform is stored by pressing Enter. Repeat the above procedure if you de-
3-14
sire to store several waveforms.
By using the left-hand key (tens),
you can switch between waveforms stored in the instrument.
NOTE
When the instrument is
switched off, all stored
information will be canceled.
When the apparatus is switched on, the display will show the program
version for a short period before switching into standard mode.
Manual ECG, High Level Output
The high level ECG output signal is a Lead II waveform with 0.5V/mV
of low level Lead II. The high level ECG connection (standard phone
jack) is situated in the upper left-hand corner of the instrument.
Respiration
The respiration signal is transferred via ECG connections. The position
of the LEAD switch determines which lead is in use. The position of the
switch must correspond to the type of patient monitor being used. The
BASE (baseline impedance) switch sets the impedance between each
lead. The respiration parameter (breathing rate/min.) is selected and
stored in the display.
Blood Pressure
The sensitivity switch (pVN/mmHg) must be set to match the input sensitivity of the patient monitor (either 5 or 40 pVN/ mmHg). The waveform is selected and stored in the display. Prewired cables (P.N. 17440)
and diagrams for connecting various types of monitors are available
from Metron AS. Unterminated cables are also available.
CABLE CONNECTION MATRIX
BLOOD PRESSURE CABLE
DIN Plug Pin No.
Color
Function
4
Black
Output (+)
1
Red
Output (-)
3
White
Exciter (+)
5
Green
Exciter (-)
2
Blue
ECG ref
Temperature
(See below). The type of cable used determines the type of probe simulated, either 400 or 700 series YSI probes. Temperature is selected by a
slide switch. Prewired 400/700 YSI-series temperature cables to connect
to the temperature connector are available from Metron AS (P.N.
17443). Unterminated cables are also available.
CABLE CONNECTION MATRIX
UNIVERSAL TEMPERATURE CABLES
OUTPUT 1
OUTPUT 2
DIN Plug Pin No.
Color
400 Series
700 Series
1
Green
Tip
No conn.
2
Red
No conn.
Tip
3
White
No conn.
Ring
4
Black
Barrel
Barrel
3-15
Lead Testing
ECG leads should be tested regularly. Connect each end of a lead to one
of the two Lead Test terminals. The display will flash if the lead is OK.
4.
Rear Panel Connectors
Low-Level ECG Leads
There are ten AHA color-coded 4mm safety terminals located on the rear
panel. Snap-to-banana adapters for the terminals are supplied with the
PS-416M (P.N. 17023).
Battery Eliminator
METRON’s AC Adapter plug-in power supply transformer allows you
to use the PS-416M anywhere a standard electrical outlet is available. To
attach the AC Adapter insert the adapter’s small connector into the micro
jack labeled “Batt. Elim. 9V DC” on the right rear of the unit. Plug the
large connector into the nearest standard electrical outlet.
NOTE
Remove the batteries and
disconnect the AC Adapter
if you do not intend to use
the PS-416M for an extended period of time.
3-16
4. Control and Calibration
This chapter explains PS-416M maintenance procedures, including testing
and calibration.
4.1 Required Equipment
•
Digital multimeter, 10pV resolution, 0.1% accuracy.
•
Frequency counter
•
Oscilloscope
•
Power supply variable V/A
1.
Set the switches on PS-416M as follows:
4.2 Preparation
Power:
Off
Base:
1K
Lead:
II
Sensitivity:
40
Temperature:
30ºC
2.
Connect a current to the battery contact. Adjust the voltage from 9V ±
0.2V with a power limitation of 70mA ± 20mA.
1.
Turn the Power Switch on. The LCD display will briefly show the software version number, before showing the active ECG function (03).
Press the Key Switches beneath the display and check that the number
displayed increases or decreases with each press. Press Enter and check
that the display flashes once.
2.
Measure the current consumption from the power supply.
4.3 Function Testing
Requirement: 19mA ± 2mA.
3.
Measure the operating voltage in PS-416M with the multimeter. The following values are acceptable:
Testpoints
+
TP10 - TP4
TP10 - TP5
TP10 - TP9
TP14 - TP11
TP14 - TP12
TP14 - TP13
Value
+5V
-5V
+1.24V
+7V
-7V
+5V
Maximum
Deviation
± 0.2V
± 0.4V
± 0.03V
+6 - 1V
+1 - 6V
± 0.2V
4-17
4.
Connect the frequency meter to TP1 and read the frequency. Requirement: 2MHz ± 0.002MHz.
5.
Connect the frequency meter to TP2 and read the frequency. Requirement: 100Hz ± lHz.
6.
Short circuit the 'Lead Test' terminals and check that the display is flashing. Remove the short circuit.
7.
Slowly reduce the voltage from the power supply until the display just
begins to flash. Measure the operating voltage with the multimeter. Requirement: 6.2V ± 0.3V. Measure also the voltage between TP-13 and
TP-14. If the voltage is lower than 4.8V, adjust TR1 until the voltage is
4.8V. Turn the current up again to 9V.
8.
Connect the oscilloscope to the High Level ECG contact and check that
there is a 80BPM ECG signal when function 03 is activated. The Rimpulse will have an amplitude of approximately 0.5V.
9.
Set the power switch to Off. Measure the resistance from the RL output
to the RA, LA and LL outputs. To measure LA, the Lead switch must be
in position II. To measure LL, the Lead switch must be in position I. Requirement: 1000 ohms ± 30 ohms.
10. Repeat test 9, only this time with Base-ohms in position 500. To measure
LA, the Lead switch must be in position II. To measure LL, the Lead
switch must be in position I.
Requirement: 500 ohms ± 15 ohms.
11. Measure the resistance from the V1 output to the V2,V3,V4,V5 and V6
outputs.
Requirement: 1000 ohms ± 30 ohms.
12. Measure the resistance between TP10 and TP14 with the multimeter.
Requirement: >10 Mohms.
13. Measure the resistance between the connections on the temperature contact. The following table shows the required parameters:
Pin4-Pin 1
Pin4-Pin 2
Pin4-Pin 3
TEMP 30°C
Min. - Max.
1k8-1k83
4k79-4k88
24k0-24k5
TEMP 37°C
Min. - Max.
1k34-1k37
3k57-3k65
18k0-18k4
TEMP 40°C
Min. - Max.
1k19-1k21
3k16-3k23
16k0-16k3
14. Set the power switch in position while momentarily holding down Enter. The display will only show 0 in the right-hand column (the left column will be blank). PS-416M is now in
test/calibration mode. Connect a 10V ± 10mV voltage to J9 (the BP contact), pins 3 and 5. Minus to pin 5. Check the voltage after connecting
the power.
4-18
15. Measure and note the voltage between TP14 and TP16 (typ. <1mV). Set
the display at 1 and press Enter. Measure the voltage once more and
adjust P5 until the difference between the voltages is 120mV ± 200)V.
16. Repeat the previous instruction, only this time with the Sensitivity
switch set to position 5. Check that the voltage between TP14 and TP16
is 15mV ± 40)V. If necessary, adjust P5 and repeat operation 15.
17. Set the display at 2 and press Enter. Measure the resistance between
TP7 and TP10 with the multimeter. Adjust P1 until the voltage is half
the reference voltage between TP10 and TP9 (nom. -0.62v) ± lmV.
18. Measure the voltage between TP6 and TP10 with the multimeter. Adjust
P2 until the voltage is half the reference current between TP10 and TP9
(nom. 0.62v) +lmV.
19. Measure and note the voltage between LL(+) and RA(-) (typ. <
100)V). Set the display at 3 and press Enter. Measure the voltage once
more and adjust P4 until the difference between the voltages is 2mV ±
20)V. Measure the voltages between the outputs and check that they
are within the limits in the following table:
Connectors
RL - RA
RL-LA
RL-LL
RL-V1
RL-V2
RL-V3
RL-V4
RL-V5
RL-V6
Low limit
1.20 mV
2.40mV
3.00 mV
2.70 mV
3.30 mV
4.00 mV
4.50 mV
4.00 mV
3.30 mV
Nom. Value
1.35 mV
2.65mV
3.35 mV
3.02 mV
3.72 mV
4.49 mV
5.06 mV
4.49 mV
3.72 mV
High limit
1.50 mV
2.90mV
3.70 mV
3.30 mV
4.10 mV
5.00 mV
5.60 mV
5.00 mV
4.10 mV
20. Set the display at 4. Set the Base-ohms switch to 500 and the Lead
switch to II. Measure the resistance between LL and RA. Move between
test functions 4 and 5 on the display (remember to press Enter), and adjust P3 until the difference is 3 ohms ± 0.03 ohms.
4-19
This page intentionally left blank.
4-20
5. Component Functions and Parts
This chapter provides a detailed description of the functions of the main
components of the PS-416M, as well as a parts list for cross reference. Reference is made to the component location and circuit diagrams to assist servicing personnel. These diagrams are foldouts, and located in Appendix A.
5.1 Theory of Operation
The PS-416M Patient Simulator is battery driven, and based on a Motorola
microprocessor. The unit is operated from a control panel, and generates
simulated signals for testing ECGs and patient monitors. The signals are sent
from the PS-416M via contacts situated on the front and top of the unit. The
status of the signals is then displayed on an LCD panel.
The unit is illustrated by a component location diagram and two circuit diagrams. The first circuit diagram 1 includes the microprocessor, operating
elements, display, power supply and circuits for simulating temperature
measurements. The second circuit diagram comprises mainly analogue amplifiers and circuits for generating waveforms for blood pressure and ECG.
5.2 Functions Description
1.
Power Supply
The unit is powered from either an internal 9 V battery or an external
battery eliminator. Diode D1 protects against a wrong polarization.
Power switch SW1 takes the 9V current to the power supply circuits. A
serial voltage regulator (IC5) supplies the circuits with +5V. The circuit
has an output that resets the microprocessor when the +5V supply falls
below 4.75V. A capacitive switch regulator (IC6) generates -5V from
the +5V current.
At the upper left of Circuit Diagram 1 is a DC/DC converter, which
generates ± 7V to the blood pressure output. The converter is galvanically shielded from the transformer (TR1). The timer (IC7) generates a
rectangular current of approximately 30KHz, which is amplified by transistors Q1 and Q2. The primary development at TR1 is a resonance with
a multilayer capacitor (C26). The secondary AC signal is equalized by
diodes D2, D3, D7 and D8, and smoothed out by tantalum capacitors
C15 and C16. Voltage Regulator IC20 regulates the +5V power that is
used by the D/A converter on the blood pressure output.
2.
Microprocessor
The microprocessor (IC1) contains: CPU, ROM, RAM ND converter,
parallel I/O and serial I/O. Y1 functions as a clock and timer for the
processor. The frequency at pin TP1 is the crystal frequency / 4 = 2MHz.
5-21
Ports E0 to E4 are connected to the switches on the control panel. These
are read 50 times per second. If a switch changes its status from off to
on, the program in the processor will execute the function that was
linked to the operation.
The LCD display is controlled through Port B via the LCD drivers IC2
and IC3. The processor's timer generates a 100Hz rectangular signal
(output A3), which drives the rear panel of the display. This signal can
be monitored at pin TP2. The processor controls three D/A converters.
Two of these are situated in IC8, while the third is situated in IC15. IC8
is loaded in parallel through Port C, with control signals at Port A 4-6.
IC15 is loaded in series, because this is easier when the signal is to be
led through optical connectors to obtain galvanic separation.
The A/D converter in the processor is used to monitor the current from
the battery. The voltage is reduced by resistors R2 and R3, and led to the
ND converter via port E5. The +5V power is used as a reference by the
ND converter at VRH.
IC-21 is a serial EEPROM, which is set aside for future use.
3.
Lead Test
The resistance between test plugs J4 and J5 is determined by measuring
the voltage drop over R4. The current from R4 is led to the processor input E6 via resistor R88. If the power falls below the threshold internally
in the processor), the program in the processor will cause the display to
flash.
4.
Temperature Output
The temperature output comprises a 3-way slide switch with a resistance
array that simulates thermistors, which are used for measuring temperatures. The resistances are precise and designed to give accurate values.
By varying the position of the switch, the ohm values for the 3 different
positions can be entered.
5.
ECG Outputs
The ECG waves are generated from matrices in the processor. The processor updates the 8-bit D/A converter in IC8 (channel A) 500 times per
second. IC-10 amplifies the signal and the amplitude is set by P4. P1 adjusts the amplification in the D/A converter. From pin 7 at IC10 (TP-8),
the ECG signal is led to the resistive power elements. These organize the
correct amplitude levels on all the ECG contacts. The output impedance
for 4 of the outputs can be set at 500 ohms or 1000 ohms by slide switch
SW7. The impedance can also be modulated at the LL or LA output, depending on the position of slide switch SW6. Refer to section on respiration.
IC19 sets the voltage reference level for the two D/A converters in IC8.
The reference voltage is amplified in the first half of the microprocessor
(IC1). The second half of the microprocessor is used to drive the high
level output for the ECG signal. The amplification is not adjustable.
5-22
Output A7 on the processor is connected to the amplifier chain so that a
short impulse here will simulate a pace-impulse at the ECG output. Resistors R36, R37, R38 and R39 set the level for the pace-impulse.
6.
Respiration
The other A/D channel in IC8 (Channel B) is used to generate the respiration signal. This is generated according to the same principle as the
ECG signal, and is amplified in IC9. P2 adjusts the amplification in the
D/A converter, while P3 adjusts the rate of modulation at the ECG output. The signal controls the resistance in two matching resistive optical
connectors. One of these is used for feedback, while the other simulates
respiration by modulating the output impedance for the ECG signal.
7.
Blood Pressure
The blood pressure output is isolated from the rest of the equipment to
separate several connected instruments galvanically. Blood pressure data
is transferred serially from the processor to voltage regulator IC5, a 12bit D/A converter. The interface has optical separation via the optical
connectors IC12, IC13, and IC14. Statistical values or waveforms for
blood pressure are generated from matrices in the processor. The D/A
converter is updated by new amplitude values 500 times per second. The
signal is amplified in IC16, and the level adjusted by P5. Slide switch
SW8 sets two fixed sensitivity levels at the output. The exciter signal
from the blood pressure meter is used as a reference for the D/A converter.
5.3 Component Parts
COMPONENT PART
TYPE/VALUE
Board
Microprocessor
LCD-driver
Display
Volt. regulator
Volt. converter
Timer
D/A-converter
AR-048
MC68HC711E9CFN
74HC4543P
NCno SP530P
LP2951CN
MAX1044CPA
ICM7555CN
AD7528JN
QTY
.
1
1
2
1
2
1
1
1
DIAGRAM REFERENCE
IC1
IC2, 1C3
IC4
IC5, 1C20
IC6
IC7
IC8
5-23
5-24
COMPONENT PART
TYPE/VALUE
Op.ampl
Opto coupler
DIA-converter
Opto coupler
V-ref.
Transistor
Diode
Diode
Zenerdiode
Krystall
Resistor
Resistor
Resistor
Resistor
Resistor
Resistor
Resistor
Resistor
Resistor
Resistor
Resistor
Resistor
Resistor
Resistor
LT1013DN8
6N136HP
DAC8043FP
VTL5C7
LM-385Z 1V2
BC547C
1N4002
1N4148
17Vbip. BZW06-17B
8 MHz HC-18/U
20R 1% 0.5W
24R9 1% 0.5W
34R8 1% 0.5W
35R7 1% 0.5W
40R2 1% 0.5W
56R2 1% 0.5W
75R 1% 0.5W
84R5 1% 0.5W
93R1 1% 0.5W
100R 1% 0.5W
150R 1% 0.5W
174R 1% 0.5W
200R 1% 0.5W
249R 1% 0.5W
4
3
1
2
1
2
1
4
1
1
1
1
1
1
1
1
3
1
1
1
1
2
1
8
Resistor
Resistor
Resistor
Resistor
Resistor
332R
348R
365R
412R
499R
I
1
3
1
6
Resistor
Resistor
Resistor
Resistor
Resistor
Resistor
Resistor
Resistor
Resistor
Resistor
Resistor
576R 1% 0.5W
1K18 0.50% 0.5W
1K33 0.50% 0.5W
1K78 0.50% 0.5W
2K0
1% 0.5W
2K32
0.10% 0.5W
3K16
0.50% 0.5W
3K57
0.50% 0.5W
3K74
1% 0.5W
4K75
0.50% 0.5W
4K99 1% 0.5W
0.10 % 0.5W
1% 0.5W
1% 0.5W
1% 0.5W
1% 0.5W
QTY
.
1
1
1
1
4
1
1
1
1
1
2
DIAGRAM REFERENCE
IC9, 1C10, 1Cl1, 1C16
IC12, 1C13, 1C14
IC15,
IC17, 1C18
IC19,
Q1, Q20
D1
D2, D3, D7, D8
D4
Y1
R7
R9
Rll
R13
R15
R75
R46, R47, R48
R17
R79
R29
R85
R50, R76
R49
R63, R64, R65, R66, R67,
R69, R70, R71
R84
R19
R82, R86, R87
R21
R52, R54, R56, R58, R60,
R62
R23
R8
R10
R12
R28, R72, R73, R74
R83
R14
R16
R80
R18
R4, R68
COMPONENT PART
TYPE/VALUE
Resistor
Resistor
Resistor
Resistor
Resistor
Resistor
Resistor
Resistor
Resistor
Resistor
Resistor
Resistor
Resistor
Resistor
Resistor
Resistor
Resistor
Resistor
Resistor
Resistor
Resistor nettv.
Potmeter
Potmeter
Potmeter
Potmeter
Cer. capacitor
Multilay. cap.
Multilay. cap.
Multilay. cap.
5K6 1% 0.5W
11K 1% 0.5W
14K 1% 0.5W
15K8 0.50% 0.5W
17K8 0.50% 0.5W
18K 1% 0.5W
20K 1% 0.5W
23K7 0.50% 0.5W
28K 1% 0.5W
40K2 1% 0.5W
47K5 1% 0.5W
53K6 1% 0.5W
61K9 1% 0.5W
64K9 1% 0.5W
75K 1% 0.5W
76K8 1% 0.5W
80K6 1% 0.5W
97K6 1% 0.5W
165K 1% 0.5W
10M 5% 0.5W
47Kx 8
1K0 1 turn
1K 20 turn
10K
20 turn
100K 20 turn
22pF 100V
1n 100V X7R
10nF 50V X7R
22nF 50V X7R
2
4
4
1
1
1
1
1
1
3
2
2
1
2
1
1
4
1
2
1
2
2
1
1
1
2
2
1
1
R37, R39
R42, R45, R77, R78
R5, R44, R26, R35
R20
R22
R3
R6
R24
R43
R31, R33, R36
R2, R57
R55, R59
R30
R53, R61
R38
R34
R25, R32, R40, R51
R27
R41, R88
R1
RP1, RP2
P1, P2
P5
P4
P3
Cl, C20
C20, C24
C26
C21
Multilay. cap.
100nF 50V X7R
20
Tantalum cap.
Electrolyte Capacitor
Transformer
Slide Switch
Slide Switch
Switch
10)F 25V
100)F 16V rad.
CAN1979A
4PDT MSS4200
4P3T MSS4300
ET05J 1V3BE (on) off
(on)
15 501
16.300.09
5
1
1
4
1
2
C5, C6, C7, C8, C9, C12,
C25, C13, C14, C17, C18,
C19, C22
C3, C4, C10, C15, C16
Cll
TR1
SW1, SW6, SW7, SW8
SW5
SW2, SW3
Switch
Nut to Switch
QTY
.
1
1
DIAGRAM REFERENCE
SW4
5-25
COMPONENT PART
TYPE/VALUE
IC-socket
IC-socket
IC-socket
Space bar
Battery el.cont
Test plug
Test plug
Phono-socket
8-pin DIL
20 pin SIL 48-157-42
52 pin PLCC 48-109-41
Ritcho SRS4-4-0
S-G9312#01 Female
Male
Female
LPV1120-01(black)
Female
2 pol 5046
4-pol
6-pol
180°
270° 691-0400
Header
Header
Header
Din 5 pole
Din 4 pole
5-26
QTY
.
DIAGRAM REFERENCE
1
2
1
4
1
1
1
1
J1
J4
J5
J6
1
1
1
1
1
J2
J8
J7
J9
J3
APPENDIX A: DIAGRAMS
Component Location Diagram .............................................................................................................
Schematic Diagram Part 1 ....................................................................................................................
Schematic Diagram Part 2 ....................................................................................................................
5-27
This page intentionally left blank.
5-28
Component Location
5-29
Schematic Diagram Part 1
5-30
Schematic Diagram Part 2
5-31
This page intentionally left blank.
5-32
APPENDIX B: ERROR REPORT FORM, PS-416M
PS-416M PATIENT SIMULATOR ERROR REPORT FORM
USA
1345 Monroe NW, Suite 255A
Grand Rapids, MI 49505
Phone: (+1) 888 863-8766
Fax:
(+1) 616 454-3350
E-mail: [email protected]
FRANCE
30, rue Paul Claudel
91000 Evry, France
Phone: (+33) 1 6078 8899
Fax:
(+33) 1 6078 6839
E-mail: [email protected]
NORWAY
Travbaneveien 1
N-7044 Trondheim, Norway
Phone: (+47) 7382 8500
Fax:
(+47) 7391 7009
E-mail: [email protected]
From: (name)
Address:
Phone:
Fax:
PS-416M Error Report
Date:
Product:
Version:
Type
Wrong results
Error messages, without reason
Program stops, no reaction
Wrong responses on commands.
Other
Description of the situation prior to the error:
Description of the error:
(METRON use internally)
Received date:
Comments:
Critical
Correction date:
Minor
Ref No.
Normal
5-33
This page intentionally left blank.
5-34
APPENDIX C: Suggestion Form, PS-416M
PS-416M PATIENT SIMULATOR SUGGESTION FORM
USA
1345 Monroe NW, Suite 255A
Grand Rapids, MI 49505
Phone: (+1) 888 863-8766
Fax:
(+1) 616 454-3350
E-mail: [email protected]
FRANCE
30, rue Paul Claudel
91000 Evry, France
Phone: (+33) 1 6078 8899
Fax:
(+33) 1 6078 6839
E-mail: [email protected]
NORWAY
Travbaneveien 1
N-7044 Trondheim, Norway
Phone: (+47) 7382 8500
Fax:
(+47) 7391 7009
E-mail: [email protected]
From: (name)
Address:
Phone:
Fax:
PS-416M Improvement Suggestion
Date:
Product:
Version:
Type
One window
Presentation
Several windows
Options, configuration possibilities
Documentation
Description of the suggested improvement:
Other
(METRON use internally)
Received date:
Comments:
Correction date:
Ref No.
5-35
5-36