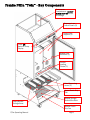
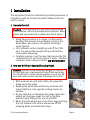
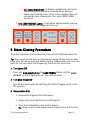
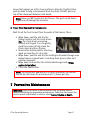
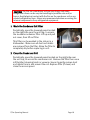
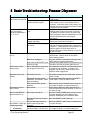
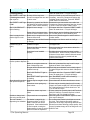
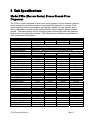
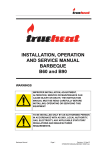
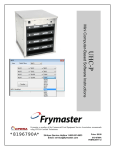
1
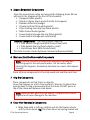
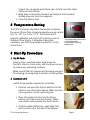
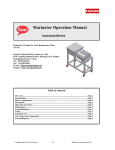
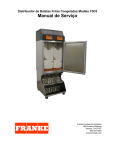
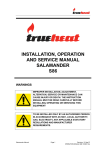
F3Dn “Twin” Frozen French Fries Dispenser Operating Manual [P/N 19000794] Important READ FIRST General: 1. This Operating Manual contains important instructions and safety information on the F3Dn Frozen French Fries Dispenser. Read and understand the contents of this manual before attempting to: Uncrate, Install, Operate, Clean or perform routine Maintenance. 2. The F3Dn Freezer/Dispenser is designed for the temporary frozen storage and batch dispensing of French Fries at commercial restaurants only. Franke authorizes no other use. 3. The F3D Freezer/Dispenser may NOT be used for long term storage, only temporary storage of frozen product between walk-in freezer and fry station. The unit may only be used for its intended purpose. 4. The F3Dn Freezer/Dispenser is designed for installation and operation indoors, in a restaurant kitchen area protected from weather, excessive heat, excessive humidity and corrosive salt air. 5. All unit casters must be locked when unit is operating. Casters are provided for moving unit out of operating position for cleaning or maintenance only. 6. Only persons over 15 years old may operate this equipment, following all safety and operating instructions. 7. The A-rated equivalent continuous sound [pressure] level at the [fries dispenser] workstation for operating personnel is below 70 decibels. 8. This unit cannot get wet at any time. If it does get wet, the unit must be unplugged. For this reason, access to the unit plug must be available at all times. Read, understand and obey all WARNINGS, CAUTIONS and NOTES: During Installation 1. This equipment must be installed by qualified personnel, in compliance with all manufacturer’s instructions and local building, food safety and electric codes. 2. Refrigeration ventilation openings in the enclosure have to be kept clear of obstruction. Caution! The shipping carton and pallet have banding under tension, nails and possibly wood splinters. When uncrating, wear gloves and eye protection to reduce the risk of injury. Caution! This unit is top-heavy and weighs 475 lbs. or 218 kg. Ask one or two people to help finish uncrating. Do not attempt to finish uncrating alone or unit may tip over and cause serious injury or damage to the unit. Caution! The crate is built to allow the unit to slide out from the front ONLY, using the two extending metal ramps provided. Pushing toward the rear or sides may cause the unit to fall off the shipping pallet or tip over. Note! Use only warm water, not hot water, when cleaning the hoppers. Excessively hot water can cause the hoppers to warp. F3Dn Operating Manual Page 2 Note! Never put wet parts back into the freezer. The parts could freeze together and cause damage to the machine. During Store Closing Procedure 1. Before closing, all remaining frozen product must be returned to long-term freezer storage. 2. This equipment must not be cleaned with a high-pressure water jet or steam cleaner. 3. Use only Cleaning and Sanitizing Agents approved by customer headquarters and specified for this application and use in their restaurants. Note! Never defrost the freezer by scraping the inside walls, regardless of how much ice is present. The only proper method for defrosting is to turn the freezer off, open the door and allow frost or ice to melt. Do not damage the refrigerant circuit. Note! Use only warm water, not hot water, when cleaning the hoppers. Excessively hot water can cause the hopper to warp. Note! Never put wet parts into the freezer. The parts could freeze together and cause damage to the machine. During Preventative Maintenance – WARNING! Verify the freezer is disconnected from the power source before attempting any preventive maintenance. Failure to disconnect the electric power could result in electric shock, burns, injuries or death. CAUTION! The fins on a condenser coil are very sharp, and some refrigeration lines can be very hot resulting in possible cuts and/or burns. Avoid physical contact with the fins on the condenser coil or any related refrigeration lines. Gloves are recommended when accessing the internal components of any refrigerated equipment. When Troubleshooting & Providing Service – 1. Store Personnel authorized “troubleshooting” of the freezer and dispenser are limited to the steps and procedures outlined in this manual in Section 8. 2. For any other service or performance problem not covered or corrected by Basic Troubleshooting procedures contact: Franke Technical Support at the numbers listed in Section 11: Service Commitment/Contact Information 3. All service or repair work must be done by a licensed professional trained and authorized to perform service on Franke products. 4. Any work performed on the cooling system or coolant, including: testing, routine maintenance and repairs, must be done by a licensed refrigeration professional. 5. If the power cord is damaged, the unit has to be unplugged immediately and the damaged power cord replaced by a qualified electrician, before returning the freezer/dispenser to service. 6. Only factory authorized repair parts may be used when servicing this unit. F3Dn Operating Manual Page 3 Table of Contents Important CAUTIONS & WARNINGS Page 2 Diagram: Key Components Page 5 1 Installation Page 6 2 Temperature Setting Page 9 3 Start-Up Procedure Page 9 4 Using the Control Panel Page 11 5 Dispensing Frozen Fries Page 12 6 Store-Closing Procedure Page 15 7 Preventive Maintenance Page 17 8 Basic Troubleshooting: Freezer - Dispenser Page 19 9 Unit Specifications Page 21 10 Product Warranty Page 22 11 Service Commitment/Contact Information Page 22 F3Dn Operating Manual Page 4 Franke F3Dn “Twin” - Key Components Compressor Compartment - DO NOT BLOCK UNIT TOP or use for storage Dispenser Lane Control Panels (2) Frozen Fries Hoppers (2) Power ON Switch & Temp. Display Rubber Fries Deflectors (2) Product Loading Chutes (2) Fries Dispensing Lanes (2) Upper Plastic Drip Pan Empty Basket Storage Areas Bottom Storage Basket Wire Rack Bottom Plastic Drip Pan F3Dn Operating Manual Page 5 1 Installation This equipment must be installed by qualified personnel, in compliance with all instructions which follow and local electric codes. 1 Uncrate the Unit Caution! The shipping carton and pallet have banding under tension, nails and possibly wood splinters. Wear gloves and eye protection to reduce the risk of injury. Using heavy scissors or tin snips, cut the plastic banding that secures the cardboard carton to the pallet base. Use caution, the plastic banding is under tension. Lift cardboard carton straight up and off the F3Dn unit. It is easier if two people lift up and hold the carton when removing. Carefully remove or cut the tape that secures the flat cardboard box to unit front and set it aside. This box contains loose component parts. DO NOT DISCARD. 2 Remove Unit From Special Shipping Pallet Caution! This unit is top-heavy and weighs 475 lbs. or 218 kg. Ask one or two people to help finish uncrating. Do not attempt to finish uncrating alone or unit may tip over and cause serious injuries or damage to the unit. With a person on each side of the unit, grasp the dispenser at the sides. Keeping the pallet base stationary, slide the unit toward the front. Use a gentle rocking motion as needed. As you slide the unit forward, two metal ramps will extend and help you lower the unit to the floor, without heavy lifting or the use of a forklift. When the front wheels are on the floor, keep pushing the unit forward until all four wheels are off the shipping pallet and extended ramps. F3Dn Operating Manual Page 6 Caution! The crate is built to allow the unit to roll out from the front ONLY, using two metal ramps. Pushing toward the rear or sides may cause the unit to fall off pallet or tip over. Peel off protective white adhesive film from all stainless steel surfaces. 3 Position the Unit The F3Dn should be installed on a level and flat floor, which allows it to be rolled out for cleaning or rear service access. It can be positioned on the right-hand or left-hand side of the fry station. The fry station line-up can be [from left-to-right]: Fry Bagging Station Æ Fryers Æ F3Dn Dispenser (or) F3Dn Dispenser Æ Fryers Æ Fry Bagging Station Roll the unit into place and plug in to a grounded 120-volt/60 Hz or 230-volt/50 Hz electric power outlet, per the unit data plate requirements. A ten-foot [3 meter] power cord with voltage-specific plug is provided. Lock two front caster brakes to secure unit in position. NOTE: This unit is designed for indoor use only, in a kitchen area protected from weather, excess heat, excess humidity and corrosive salt air. 4 Check Door Swing - Hinge Location The F3Dn refrigerated compartment hinges should be on the side of the dispenser farthest from the fryers, to speed and simplify loading. All F3Dn units ship from Franke with the hinges mounted on the right. You may need to remove the hinges and change the door swing for easier access. (See Service Manual Section 3.2 for instructions.) F3Dn Operating Manual Right-side mounted upper refrigerator door hinge. Page 7 5 Unpack Removable Components Open the accessories carton and unpack the following items (All are pictured in the diagram at the front of this booklet): 2 Hoppers (white plastic) 2 Product chutes (steel; packed inside the hoppers) 2 Rubber deflectors (orange) 1 Freezer bottom (thick white plastic) 1 Fries loading area drip tray (black plastic) 2 Wire formed basket guides 1 Lower basket storage drip tray (black plastic) 1 Lower basket storage wire rack (metal) Optional Components – Typically shipped separate: 1 Side basket storage rack (Wire formed steel) with 1 Side basket drip tray (black plastic; small) 1 Hash Brown Rack (Wire formed steel) [To Order Contact: Franke Systems Commercial Representative] 6 Wash and Sanitize Removable Components Note! Use only customer headquarters approved cleaning and sanitizing agents. Use only warm water, not hot water, when cleaning the hoppers. Excessively hot water can cause the hoppers to warp. Place all loose components in the sink; wash and sanitize each item. 7 Drip-Dry Components Place components so that they can drip-dry. Leave the hoppers on a flat, clean surface to drip-dry. Position them upside-down to help remove water from the drum. Do NOT place on top of the sharp wall between sink bowls. Note! Never put wet parts into the freezer. The parts could freeze together and cause damage to the machine. 8 Clean Non-Removable Components Wipe down with a soft rag, sanitize and dry the freezer interior and the chute doors. Tip: The chute doors are spring-loaded and F3Dn Operating Manual Page 8 hinged. You can gently push them open to fully clean the chute doors and door frames. Wipe down and sanitize the back and sides of the fry basket loading area and cross-bar supports. Close the freezer door. 2 Temperature Setting The F3Dn’s internal, adjustable thermostat maintains the correct frozen fries storage temperature range, which is 0° to –10° F or -18 to -23° C. This thermostat is properly calibrated and tested at the factory, prior to shipment from Franke. If adjustment becomes necessary, see F3Dn Service Manual Section 3.8 for instructions. The digital display shows the actual refrigeration compartment operating temperature. 3 Start-Up Procedure 1 Dry All Parts Using a clean, sanitized towel, wipe down the freezer’s interior, chute doors, and the dispense area to remove any remaining moisture. Make sure all that all components that were removed for cleaning are completely dry before installing them. 2 Assemble Unit Install all removable components as follows: Position and press the freezer bottom into the cabinet, over chute door frames. Make sure the corner grooves or slots are facing you. Place the product chutes into the freezer bottom, onto the chute door frames. Make sure chutes seat properly into their frames. Push the rubber deflectors, small edge first, into the slots cut in the side of the hopper. F3Dn Operating Manual Page 9 Place the fry hoppers in the freezer, making sure drive hub fully engages the drum. Tip: You may need to turn the drum slightly-using the round turn handle on the front--while pushing the hopper in place to engage the hub. Note! If not fully engaged, the hopper will not seat properly on the center hanger and the freezer door will not close.) • Place the black plastic drip pan (without fry basket guides) on the cross bar supports at bottom of unit. • Place large (fry basket storage) wire rack on top of bottom drip pan. • Place black plastic drip pan with lane dividers on two stainless steel support bars. • Position the two (asymmetrical) fry basket wire guides on the upper plastic drip pan. They can only go on one way, with the longer section for the fry loading chute (right) and the short side (left), for additional empty basket parking. Optional Component Assembly (If Ordered): • Hang the side basket storage rack onto supports on the cabinet’s side. • Place the narrow plastic side drip tray at the bottom of basket storage rack. • Place hash browns rack on top of the fry hoppers, for use during breakfast hours. F3Dn Operating Manual Page 10 3 Bring Freezer Down to Operating Temperature Close the freezer door. Turn the main power switch (below temperature display) on the control panel to “ON.” Run the freezer at least 3 hours before loading any French fries. NOTE: It can take more than 3 hours to reach target temperature [0° to –10° F or -18 to -23° C], depending on kitchen temperature and humidity. 4 The Control Panel Each lane has a panel with these controls: LANE POWER – Turns individual lane ON and OFF: o Press and Hold touch pad to activate. o Press again to change to AUTO from MANUAL. (MANUAL dispensing is the default setting.) NOTE: Do not turn ON until hopper is filled with fries. PRESS FOR MANUAL DISPENSE – When in MANUAL Mode, press touch pad to dispense a single load of fries. o Three GREEN lights indicate lane is ready for manual dispensing. NOTE: A basket must be in position to dispensing fries. LOAD READY Lights - The lane is ready to dispense, if lit. LOAD SIZE – Press touch pad to change load size. NOTE: Load size can only be changed when the “LOAD READY” lights are on. A change in the load size setting takes effect after the next dispense cycle. RESET LANE F3Dn Operating Manual Page 11 o Steady Flashing Red Lights - indicate selected load size has not been met. Hopper is either out of fries or a bridge has formed in hopper, preventing fries from dropping. Add fries or shake and break up the fries bridge, then press RESET LANE touch pad. o Three Quick Flashing Red Lights (Repeated)- indicate a drum rotor motor jam that likely is caused by a clump of frozen fries that stops rotation of the rotor/motor. Clear frozen fries jam and press RESET. o Red Lights Steady ON - indicates a weight error and most likely a hopper/chute/door assembly issue. Remove hopper and loading chute, clean out any broken fries and reassemble lane components, then press RESET LANE touch pad. LOW PRODUCT Light – Flashes when approximately one bag of fries remains in the hopper for this lane. 5 Dispensing Frozen Fries 1 Remove (Optional) Hash Brown Rack Once the freezer has reached 0° F or -18° C or lower, open the freezer door and remove the optional hash brown storage rack from the top of the hoppers. (Tip: Use this optional rack to store bagged hash browns in the freezer during breakfast hours.) 2 Check the Hoppers Check that the hoppers are empty. Discard any fries left in the hoppers. 3 Open Frozen Fries Box & Individual Bags Open the frozen fries case and gently remove one of the bags. Pull the bag’s top seam apart completely. Be careful not to break or crush the fries. F3Dn Operating Manual Page 12 4 Fill Hoppers Place the bag at the top of the hopper inside the freezer. NOTE: To minimize fry breakage, orient bag so that most fries align parallel to the hopper rotor or perpendicular to the dispenser front. Gently pour the fries from the bag into the hopper. Repeat this process until full. Each hopper can hold up to 30-36 lbs. or 14-17 kg. of fries. 5 Power ON Lanes Press and momentarily hold the “LANE POWER” touch pad until the “MANUAL” light illuminates. Turn on both lanes. 6 Set Load Size (SMALL is the default) Press the LOAD SIZE touch pad repeatedly until the light illuminates next to your load size selection. NOTE: Load size changes can only be made when the green LOAD READY lights are on. Load Size* SMALL MEDIUM LARGE For US Calibration .5 lb. [227 gm.] 1.0 lb. [454 gm.] 1.5 lb. [680 gm.] EU/Int. Calibration .7 lb. [312 gm.] .9 lb. [418 gm.] 1.3 lb. [625 gm.] NOTE: The first load dispensed is always the default [Small] size. * Standard Load Size [calibration] can be adjusted. See Service Manual Section 3.4. 7 Dispense Fries When the system is ready, indicated by the green “LOAD READY” light, the machine will rapidly dispense a load of fries: In MANUAL Mode: Insert a fry basket all the way into the filling lane basket guide, with the bottom resting on the metal rack and hold it steady. Press the PRESS FOR MANUAL DISPENSE touch pad to fill. F3Dn Operating Manual Page 13 In AUTO Mode: Insert a fry basket all the way into the filling lane basket guide, with the bottom resting on the metal rack and hold it steady. When basket is properly positioned near sensor, a load will automatically dispense. 8 Remove Loaded Basket Pull the basket out of the fill lane and move it to the fryer. Important! Only dispense fries when you are ready to cook them. Never store a full basket in the dispenser, on the basket rack or over a fryer. This will cause fries to rapidly thaw, which can hurt fry quality. 9 Storing Empty Fries Baskets (Eight Baskets TOTAL) Empty baskets can be stored until needed, after they are removed from the fryer, on: The bottom basket storage rack (Capacity four baskets) The left side storage position and each filling lane, when unit is set for MANUAL fill. (Capacity four baskets) Caution! The storage racks should only used for empty fry baskets. Storing heavier items may damage the plastic drip trays. Drip trays and storage racks are excluded from warranty coverage. Empty baskets can also be stored in fill lanes when in MANUAL Mode. 10 Watch for System Warning Lights RESET LANE Lights o Steady Flashing Red Lights - indicate selected load size has not been met. Hopper is either out of fries or a bridge has formed in hopper, preventing fries from dropping. Add fries or shake and break up the fries bridge, then press RESET LANE touch pad. o Three Quick Flashing Red Lights (Repeated)- indicate a drum rotor motor jam that likely is caused by a clump of frozen fries that stops rotation of the rotor/motor. Clear frozen fries jam and press RESET. F3Dn Operating Manual Page 14 o Red Lights Steady ON - indicates a weight error and most likely a hopper/chute/door assembly issue. Remove hopper and loading chute, clean out any broken fries and reassemble lane components, then press RESET LANE touch pad. Red LOW PRODUCT Lights – Flash when approximately one bag of fries remains in the hopper for this lane. 6 Store-Closing Procedure The F3Dn dispenser must be emptied, cleaned and defrosted every day. Tip: You can get a head start on cleaning by turning off one lane at some point after the dinner rush, but before closing. Disassemble and clean the parts for this lane while still dispensing fries from the other lane. 1 Turn Lanes Off Press and momentarily hold the LANE POWER button until the green [MANUAL or AUTO] light goes off. Turn off both lanes. 2 Turn Main Power Off Turn off the main power by switching the ON/OFF toggle switch to the OFF position. 3 Disassemble Unit Remove the hoppers from the freezer. Empty any remaining fries into a holding bin. Store the holding bin in the walk-in freezer. Tip: Keep an eye on the hopper levels toward the end of the day, F3Dn Operating Manual Page 15 to minimize the amount of fries you will need to store overnight. Remove orange rubber deflectors from hoppers. Remove product chutes from chute door frames. Remove freezer bottom from cabinet. Remove both metal basket lane guides from upper drip tray. Remove upper plastic drip tray from cross-bar supports. Remover lower basket storage area wire rack Leave the lower drip tray in place for now, to collect dripping water while the freezer defrosts. Leave freezer door open to allow frost to melt. Note! Never defrost the freezer by using mechanical devices or other means to scrape the inside walls, regardless of how much ice is present. The only proper method of defrosting is to turn the freezer off, open the door and allow frost to melt. If Optional (Side) Fryer Basket Storage Rack is installed: Remove plastic side basket drip tray. 4 Wash and Sanitize Removable Components Place all removed components in the sink; wash and sanitize. Note! Use only customer headquarters approved cleaning and sanitizing agents, according to instructions. Use only warm water, not hot water, when cleaning the hoppers. Excessively hot water can cause the hopper to warp. 5 Drip-Dry Components Place components so that they will drip-dry overnight. F3Dn Operating Manual Page 16 Leave the hoppers on a flat, clean surface to drip-dry. Position them upside-down to help remove water from the drum. Do NOT place on top of the sharp wall between sink bowls. Note! Never put WET parts into the freezer. The parts could freeze together and damage the machine. 6 Clean Non-Removable Components Wait for all the frost to melt from the walls of the freezer. Then: Wipe down, sanitize and dry the freezer interior and the chute doors. Tip: The chute doors are springloaded and hinged. You can gently push them open to fully clean the chute doors and door frames. Remove the bottom plastic drip tray; wash and sanitize it in the sink. Wipe down, sanitize and dry the loading and basket storage area below freezer compartment, including: back panel, sides and crossbar supports. Wipe down and sanitize the side basket hanger rack, if this option is installed. Close the freezer door. Note! For stores that operate on a 24-hour schedule, the freezer should be shut down for a minimum of 2-3 hours per day. 7 Preventive Maintenance WARNING! Verify the freezer is disconnected from the power source before attempting any preventive maintenance. Failure to disconnect the electric power could result in electric shock burns, injuries or death. F3Dn Operating Manual Page 17 CAUTION! The fins on a condenser coil are very sharp, and some refrigeration lines can be very hot resulting in possible cuts and/or burns. Avoid physical contact with the fins on the condenser coil or any related refrigeration lines. Gloves are recommended when accessing the internal components of any refrigerated equipment. 1 Wash the Condenser Coil Filter Periodically, open the louvered panel located on the right side near the unit top, to access the reusable condenser filter. Lift up and pull out cover, then lift out filter. This filter can be washed in the sink or in a dishwasher. Make sure all dust and debris are removed from the filter. Allow the filter to completely dry before replacing in unit. 2 Clean the Condenser Coil Periodically, open the louvered panel located on the right side near the unit top, to access the condenser coil. Remove the filter then use a soft-bristled cleaning brush or vacuum cleaner to gently remove dust and debris from in and around the coil. Replace filter (if clean) and close the access panel. F3Dn Operating Manual Page 18 8 Basic Troubleshooting: Freezer-Dispenser PROBLEM POSSIBLE CAUSE Freezer won’t run when Unit not plugged in. main power is turned ON. Wall outlet isn’t working or circuit breaker has been tripped. WHAT TO DO Verify unit is plugged in and main power switch is in ON position. Plug freezer into another nearby outlet. Check circuit breaker to see if it has tripped. Reset if necessary. If individual outlet is not working, use alternate and contact licensed electrician to repair or replace outlet, as needed. Freezer is running but it Ice buildup on internal Evaporator Verify freezer is has been recently defrosted won’t reach target Coils following Store Closing Procedures in Section 6. operating temperature of If ice buildup is present, remove all product and loose components, defrost, reassemble, turn ON 0° F or -18° C. and allow sufficient time to reach target temperature. Condenser Coil Filter is dirty or Remove and clean filter per Preventive clogged with debris. Maintenance instructions in Section 7. Condenser Coil is dirty or clogged Use a vacuum cleaner or soft brush to clean with debris. coils, per Preventative Maintenance instructions in Section 7. If these steps do not fix problem, call Franke at (800) 537-2653 and press 5 for Technical Services in North America or +49 7761 52 400 in Europe. Individual lanes will not Main power is off. Flip power switch to “ON” position. Toggle switch turn on. will illuminate. Allow 3 hours for cool-down before adding product. Machine is unplugged. Freezer door will not close properly. Dispenser Drum is not rotating. Lift Assembly will not raise or lower. Green "LOAD READY" lights will not turn on. Plug into 120VAC or 230V/50Hz outlet [per data plate] and turn on main power switch. Didn’t hold LANE ON/OFF touch Push and hold LANE ON/OFF touch pad for three pad long enough. seconds or until the two green lights come on. One or both hoppers may not be Push hoppers into freezer until center hanger tab fully engaged in drive hub. protrudes in front of hopper. If hopper is not engaged with drive hub, rotate the drum’s turn handle to allow engagement. The load chute is full. The dispense drum will only rotate when the load chute is empty. The hopper is empty, "LOW Fill the hopper with fries and push the "RESET PRODUCT" and "RESET LANE' LANE" button. Drum will start to rotate. lights are flashing. Fries have formed a "bridge" Shake hopper and re-distribute fries to break up condition. the bridge. Be gentle, to avoid breaking fries. Motor failure. Call Franke at (800) 537-2653 and press 5 for Technical Services in North America or +49 7761 52 400 in Europe. Lane may be turned off. Press the "LANE POWER" button to turn on lane. Fill cycle will begin if in AUTO Mode. Press MANUAL DISPENSE pad in MANUAL Mode. Desired load size has not been achieved. Fill cycle may have timed out Red "RESET LANE" light before proper weight was is flashing steadily. achieved. Frozen fries in the hopper have [Continued] formed a "bridge" over the drum. F3Dn Operating Manual See "Red RESET LANE is flashing." Press the "RESET LANE" button to restart drum. Fill cycle will begin. Shake hopper and re-distribute fries to break up the bridge. Be gentle, to avoid breaking fries. Page 19 PROBLEM Red "RESET LANE" light is flashing steadily. Red "RESET LANE" light is flashing three times, than a pause. POSSIBLE CAUSE Hopper is empty. A clump of fries may have jammed or stopped the rotor and its drive motor. Red "RESET LANE" light Dispensing systems has failed to is ON tare because of problem with the hopper, chute or door assembly. Red "LOW PRODUCT" Hopper is low or empty. light is flashing. Lane is empty but low product light is not on. Basket loads are consistently light or heavy. Frozen fries in the hopper have formed a void around the sensor. Debris may be caught in the Low Product sensor hole. WHAT TO DO Fill hopper with fries. Press the "RESET LANE" button to restart drum. Fill cycle will begin. Clear jam. Break up any solid clumps of fries. If necessary, remove fry clumps and replace with individual loose frozen fries. Press the "RESET LANE" button to restart drum. Disassemble and reassemble removable lane components. Remove any stray fries from hopper or chute. Press the "RESET LANE" button Fill hopper with fries. Press the "RESET LANE" button to restart drum. Fill cycle will begin. Shake hopper and re-distribute fries to break up the void. Be gentle, to avoid breaking fries. Remove any debris trapped in and around low product sensor. Hopper may have shifted forward Push hopper into freezer as far as it will go. on hanger. Orange silicone baffle is not Remove product from hopper and install Baffle installed in hopper. into hopper slot. Product has fallen into bottom area around chute. Load chute is not installed properly. Remove product from chute area to allow free movement of chute. Re-align chute so it drops into cutout in white freezer bottom. When correctly installed, there is minimum front-to-back or side-to-side movement and the top of the chute is parallel with the surface of the bottom. Chute door will not open Green "LOAD READY" light is not Wait until ready light is on, product will dispense. to allow product dispense. on. Basket is not against sensor at Slide the fry basket all the way in until it stops back of dispensing area. against the back of the dispenser. Drip pan and/or basket rack is not Install drip pan and basket rack so back edge of installed correctly. fry basket aligns with sensor at back of dispense areas. Red "LOW PRODUCT" light is Fill hopper with fries. Press the "RESET LANE" flashing. button to restart drum. Fill cycle will begin. Red "RESET LANE" light is ON See "Red RESET LANE is ON or flashing" or flashing. Troubleshooting Options. Chute door will not close Product may be caught in chute Clear obstruction to allow chute doors to close. after product dispense. door. Chute door return spring may If doors can be closed by hand but will not stay have broken. closed, call Franke at (800) 537-2653 and press 5 for Technical Services in North America or *49 7761 52 400 in Europe. Chute door sensor may have If doors cannot be closed by hand, call Franke at failed. (800) 537-2653 for Technical Services in North America or *49 7761 52 400 in Europe. Unable to change load Fill process has not completed. When the green "LOAD READY" light is lit, load size using control panel. size may be changed. The unit is double The basket is staged in the Do not stage the basket in the dispense area at dispensing into a basket. dispense position. In AUTO any time. Only dispense fries when ready to Mode, a load of fries will be place them in the fryer. Dispensing ahead of time dispensed. If the basket handle allows fries to thaw, affecting product quality. Use is then bumped, causing the empty fry basket storage to left of filling lane or at basket sensor to reset, a second bottom of unit. load of fries will be dispensed. F3Dn Operating Manual Page 20 9 Unit Specifications Model F3Dn (Narrow Series) Frozen French Fries Dispenser The F3Dn is custom designed for short-term frozen storage of fries to maintain optimum frozen temperature and semi-automatic fryer basket filling just prior to cooking. Dual dispensing lanes and storage hoppers provide high capacity for peak periods, plus a built-in redundant or backup system and the ability to reduce capacity during off-peak periods. This space saving “narrow” model provides extra storage under the dispensearea for up to four empty fryer baskets. F3Dn Models have the following specifications, utility requirements and options: Key Performance Specifications Product Model: 120V/60Hz 230V/50Hz 240V/50Hz Aus 230V/60Hz Part Number: 18001165 18001526 18001527 18001968 Up to 72 lbs. or 32 kg. Fries Capacity:* Up to 700 basket loads per hour Dispensing Rate*: Plus/minus 10% by weight Dispense Accuracy*: 8 total: 2 in, 2 adjacent to & 4 below lane dispense areas Fry Basket Storage*: Self-contained, cold wall construction, using R-404A Refrigerant Refrigeration/Type:* CULUS & NSF CULUS & NSF Agency Listings: CE CE Key Dimensions & Weights 27.5” 698 mm 698 mm 698 mm Unit Width: Unit Depth [front-to-back]: 30.75” 781 mm 781 mm 781 mm 77.375” 1965 mm 1965 mm 1965 mm Unit Height: 57.5” 1461 mm 1461 mm 1461 mm Prodoct Loading Height: +29” +736 mm +736 mm +736 mm Minimum Door Swing: 530 lbs. 240 kg 240 kg 240 kg Shipping Weight: 475 lbs. 215 kg 215 kg 215 kg Unit Weight: 547 lbs 248 kg 248 kg 248 kg Max. Loaded Weight: Electric/Utility Requirements 120 VAC 230 VAC 240 VAC 230 VAC Voltage [VAC] 1-phase 1-phase 1-phase 1-phase Phase [PH] 60 Hz 50 Hz 50 Hz 60 Hz Cycles [Hz] 9 AMP 5.5 AMP 5.4 AMP 5.5 AMP Amperage [AMP] 1100 1300 1300 1300 Watts 10-foot 3-meter 3-meter 3-meter Power Cord Provided Straight Blade Pin & Sleeve Clipsall Straight Blade Plug Provided Available Options 18001528 18001528 18001528 18001528 Hash Brown Rack K502565 K502565 K502565 K502565 Side Basket Storage Kit** Operating Conditions & Installation Requirements Max. Room Temp. 82° F 27° C 27° C 27° C 60% 60% 60% 60% Max. Room Humidity none none none none Min. Left Side Clearance 6” [at top] 153 mm [Top] 153 mm [Top] 153 mm [at top] Min. Right Side Clearance none none none none Min. Rear Clearance * All models, unless otherwise noted F3Dn Operating Manual ** Stores 5 additional empty fry baskets Page 21 10 Franke New Equipment Limited Warranty Franke Foodservice Systems (“Franke”) warrants new equipment manufactured in Franke’s own facilities to be free of defects due to poor materials or workmanship for the period of time listed below (following the date of original installation): Franke Frozen Fry Dispenser Type F3Dn • • • • Stainless Steel Surfaces – Life of the equipment Compressor -- 5 Year Extended Warranty, as detailed below All Other Components – 2 Years Parts and Labor Replacement (authorized service) parts – 90 Days Parts and Labor 5-Year Extended Compressor Warranty For F3Dn • Two Years from Date of Installation – Parts & Labor • 3rd through 5th Year from Date of Installation – Parts only In accordance with the compressor manufacturer’s policy, the serial number plate affixed to the compressor must be returned with the service invoice before reimbursement will be made. Exclusions. Certain Franke parts that are expendable by nature and that need to be replaced frequently may not be covered. Franke is not liable under these warranties for repairs or damages due to improper operation, attempted repairs or installation by unauthorized persons, alterations, poor water quality, abuse, fire, flood or acts of God. All fry basket storage racks and drip trays are not covered. Additionally, this warranty may be voided in the case of: • Failure to follow Franke instructions for use, care or maintenance • Removal, alteration or defacing of the Franke-affixed serial number • Service by a non-authorized service company This warranty is conditional upon Franke receiving notice of any defect subject to this warranty within thirty (30) days of its original discovery by the Buyer. Other Equipment (Not Manufactured by Franke) Equipment not manufactured by Franke (commonly known as “buyouts” or purchased goods) and manufactured by other entities is covered by the warranties, if any, of such third-party manufacturers. Where such third party manufacturers provide warranties on any or all portions of said “buyouts,” Franke agrees to transfer all such warranties to the Buyer. 11 Franke Service Commitment Franke Foodservice Systems’ Technical Support Department and its third-party Service Network are committed to meeting the unique service needs of restaurant operators worldwide. Accordingly, we strive to provide the following response times to service requests for Frankemanufactured equipment: 1. Provide contact with the customer: – Within 30 minutes of request for service during normal business hours – Within 90 minutes after normal business hours (including weekends) 2. Perform service visit: F3Dn Operating Manual Page 22 – The same day for emergency service* – Within 24 hours for standard service 3. Target a 90% “first call” fix rate 4. Provide 90-day warranty on the service performed *An “emergency” is defined as an equipment operating condition that poses an immediate risk to the safety of restaurant workers or customers. This response time breakdown applies throughout the week and weekend. Due to varying customer locations, and varying service agent locations and schedules, response rates may occasionally be extended. In these situations, Franke Technical Support will work directly with the customer to find mutually acceptable options. Franke reserves the right to use service agents outside of the stated Service Network. Service Network - United States & Canada Franke fully supports and is a member of the National Service Cooperative (“NSC”), the leading independent provider of factoryauthorized service in North America. Franke provides 24-hour, 7days-a- week response to customer service requests, through its own Call Center and that of the NSC. Whenever possible, Franke selects service agents who belong to the Commercial Food Equipment Service Association (CFESA). This trade association currently has more than 450 members in the United States, Canada, Mexico and Puerto Rico. When Franke cannot select a CFESA member, it nonetheless adheres to the CFESA standards for qualified service agents in North America. Among them are: • 24 Hour emergency service • Factory authorized warranty service • Factory trained and certified technicians • OEM parts availability • System for communication with field technicians Performance of service agents, including their parts stocking abilities, call response time, service rates and customer satisfaction are monitored by the Franke Field Service Department via online, written and phone surveys. Franke Technical Support updates this Service Network list annually. Contact Information: Franke Technical Services 1-800-5FRANKE (1-800-537-2653); select option 5 Email: [email protected] Service Network - Australia Franke fully supports Comcater, the leading independent provider of factory-authorized service in Australia. Comcater provides 24-hour, 7-days-a-week response to customer service requests through its own Call Center. F3Dn Operating Manual Page 23 Comcater adheres to the Franke standard for qualified service agents in Australia. Among them are: • 24 Hour emergency service • Factory authorized warranty service • Factory trained and certified technicians • OEM parts availability • System for communication with field technicians Performance of service agents, including their parts stocking abilities, call response time, service rates and customer satisfaction are monitored by Comcater. This Service Network list is updated annually by Comcater. Contact Information: Comcater Foodservice Equipment Phone: 1800 810 161 Email: [email protected] Service Network - Europe In Europe, Franke provides service through our own service subsidiary: Franke Foodservice Systems GmbH based in Bad Saeckingen, Germany. They provide 24-hour, 7-days-a-week response to customer service requests through their Call Center. Our European Service Group adheres to the Franke standard for service support, providing: • 24 Hour emergency service • Factory authorized warranty service • Factory trained and certified technicians • OEM parts availability • A system for communication with field technicians Contact Information: Franke Technical Services Franke Foodservice Systems GmbH Jurastrasse 3 79713 Bad Saeckingen Germany Switchboard: +49 7761 52 400 Fax: +49 7761 52 408 Franke Foodservice Systems 305 Tech Park Drive LaVergne, TN 37086 USA 800-537-2653 www.frankefs.com [P/N 19000794] F3Dn Operating Manual (Revised 06/2007) F3Dn Operating Manual Page 24