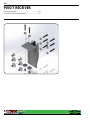
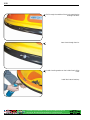
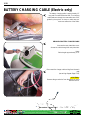
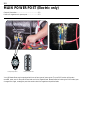
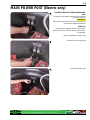
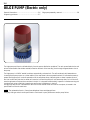
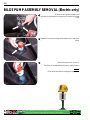
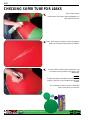
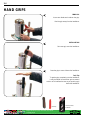
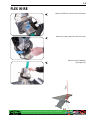
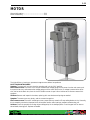
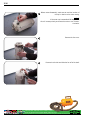
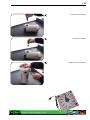
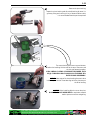
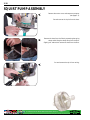
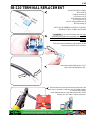
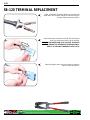
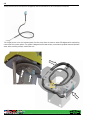
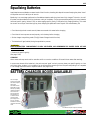
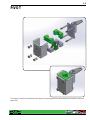
1
G T A P E RB O S BU M A O-K RTS Service Manual Bumper Boat 2014 © 2014 J&J Amusements Inc. - All Rights Reserved Published by J&J Amusements, Inc. A Corporation of Oregon & JJ Amusements, Inc. 4897 Indian School Rd NE Suite 150 Salem Oregon 97305-1126 www.jjamusements.com Phone: 503-304-8899 Toll Free Phone: 800-854-3140 Fax: 503-304-1899 Toll Free Fax: 800-366-7505 Technical Contact Information We value your feedback; technical comments and suggestions are helpful to us. Please e-mail your comments to [email protected]. From time to time, updates may be made to this manual. For the latest updates, please visit our technical website at http://jjamusements.com/technical/index.htm. WARNING - Important Safety Notice Proper service and repair procedures are vital to safe, reliable operation of J&J bumper boats, as well as to the personal safety of those performing the repairs. This manual outlines procedures for servicing and repairing J&J bumper boats using safe, effective methods. The procedures contain many NOTES, CAUTIONS and WARNINGS which should be followed (along with standard safety procedures) to eliminate the possibility of personal injury or improper service, which could damage the bumper boat or compromise its safety. It is important to note that repair procedures, techniques, tools and parts for servicing J&J bumper boats, as well as the skill and experience of the individual performing the work, vary widely. It is not possible to anticipate all conceivable ways or conditions under which J&J bumper boats may be serviced, or to provide cautions to all possible hazards that may result. Standard precautions should be used when handling toxic or flammable fluids, and safety goggles or other protection should be used during cutting, grinding, chiseling, prying or any other process that can cause material removal or projectiles. J&J recommends the use of safety goggles or approved glasses during all servicing of J&J bumper boats. All information contained in this manual is based on the latest product information available at the time of printing. We reserve the right to make changes at any time without notice. All rights reserved. Except as expressly provided herein, no part of the manual may be reproduced, copied, transmitted, disseminated, downloaded or stored in any storage medium, for any purpose, without prior written consent of J&J Amusements, Inc. A Corporation of Oregon. J&J Amusements, Inc. grants permission to download a single copy of this manual onto a hard drive or other electronic storage medium to be viewed for personal use, provided that such electronic or printed copy of this manual contains the complete text of this copyright notice. Any unauthorized commercial distribution of this manual is strictly prohibited. As you read this manual, you will find information that is preceded by a NOTICE symbol. The purpose of this message is to prevent damage to the bumper boat, other property, or the environment. SAFETY MESSAGES Your safety and the safety of others are very important. To help you make informed decisions, we have provided safety messages and other information throughout this manual. Of course, it is not practical or possible to warn you about all the hazards associated with servicing a bumper boat. You must use your own good judgement. You will find important safety information in a variety of forms, including: SAFETY MESSAGES - preceded by a safety alert symbol and one of four signal words: DANGER, WARNING, CAUTION, or SAFETY ITEM. These signal words mean: ‹ DANGER › You WILL be KILLED or SERIOUSLY INJURED if you do not follow the subsequent instructions. ‹ WARNING › You CAN be KILLED or SERIOUSLY INJURED if you do not follow the subsequent instructions. ‹ CAUTION › You WILL be INJURED if you do not follow the subsequent instructions. ‹ SAFETY ITEM › This safety device was installed at the factory and may be required by state, local, or ASTM standards. INSTRUCTIONS To eliminate unnecessary work, careful reading of the applicable section is recommended before starting to service a bumper boat. Photographs, diagrams, notes, cautions, warnings, and detailed descriptions have been included wherever necessary. Nevertheless, even a detailed account has limitations; a certain amount of basic knowledge is also required for successful work. ESPECIALLY NOTE THE FOLLOWING: DIRT Before removal and disassembly, clean the bumper boat. Any dirt entering the engine or other parts will work as an abrasive and shorten the life of these parts. For the same reason, before installing a new part, clean off any dust or metal filings. TIGHTENING SEQUENCE Generally, when installing a part with several bolts, nuts or screws, start them all in their appropriate holes and tighten them to a snug fit. Then tighten them evenly in a cross pattern. This will avoid distortion of the part. Conversely, when loosening the bolts, nuts or screws, loosen by a quarter turn, and then remove. Where there is a tightening sequence indication in this Service Manual, the bolts, nuts or screws must be tightened in the order and method indicated. TORQUE When torque values are given in this Service Manual, use them. Either too little or too much torque may lead to serious damage. Use a good quality, reliable torque wrench. FORCE Common sense should dictate how much force is necessary in assembly and disassembly. If a part seems especially difficult to remove or install, stop and examine what may be causing the problem. Whenever tapping is necessary, tap lightly using a wooden or plastic-faced mallet. Use an impact driver for screws (particularly for the removal of screws held by a locking agent) in order to avoid damaging the screw heads. It may also be necessary to apply heat to some parts that are held with locking compound. EDGES Watch for sharp edges, especially during major motor/engine disassembly and assembly. Protect your hands with gloves or a piece of thick cloth when lifting the motor/engine, or when turning it over. HIGH-FLASH-POINT SOLVENT A high-flash-point solvent is recommended to reduce fire danger. A commercial solvent commonly available in North America is “Standard solvent” (generic name). Always follow manufacturer and container directions regarding the use of any solvent. GASKET, O-RING Do not reuse a gasket or O-ring once it has been in service. The mating surfaces around the new gasket should be free of foreign matter and perfectly smooth. LIQUID GASKET, NON-PERMANENT LOCKING AGENT Follow manufacturer’s directions for cleaning and preparing surfaces where these compounds will be used. Apply sparingly, As excessive amounts may cause serious damage. An example of a non-permanent locking agent commonly available in North America is Loctite® Lock’n Seal (Blue). PRESS A part installed using a press or driver, such as a wheel bearing, should first be coated with oil on its outer or inner circumference so that it will go into place smoothly. OIL SEAL AND GREASE SEAL Replace any oil or grease seals that were removed with new parts, since removal generally damages seals. When pressing in a seal containing manufacturer’s marks, press it in with the marks facing out. Seals should be pressed into place using a suitable driver (which contacts evenly with the side of the seal) until the face of the seal is even with the end of the hole. Always use assembly oil or grease on the lip (sealing edge) of any seal prior to assembly. CIRCLIP, RETAINING RING Replace any removed circlips and retaining rings with new ones, as removal weakens and deforms them. When installing circlips and retaining rings, take care to compress or expand them only enough to install them and no more. COTTER PIN Replace any cotter pins that were removed with new ones, since removal deforms and breaks them. REPLACEMENT PARTS When there is a replacement instruction, replace these parts with new ones every time they are removed. Removed parts will be damaged and/or lose their original function. INSPECTION When parts have been disassembled, visually inspect these parts for the following conditions or other damage (If there is any doubt as to their condition, replace them with new parts): abrasions, cracks, hardening, warping, bends, dents, scratches, wear, color change, deterioration, or seizure. SPECIFICATIONS Specification terms are defined as follows: “Standards”: show dimensions or performances which brand-new parts or systems have. “Service Limits”: indicate the usable limits. If measurement shows excessive wear or deteriorated performance, replace the damaged parts. 0 1 2 3 4 5 6 7 0-7 0-9 0-13 0-17 0-18 0-19 0-20 0-21 Specifications Monthly maintenance chart Pre-opening daily checklist Bumper boat area checklist Printable work order tags How a warranty is processed Product return procedures Limited warranty-bumper boat 0-22 0-23 0-25 0-26 0-27 0-31 0-32 Limited warranty-super tube II Unpacking & setup Tube setup Boat assembly Battery installation Boat launch procedure Motor installation 1-2 1-5 1-7 1-8 1-10 1-12 Breaker/main cutoff switch Volt meter Bilge pump Pivot receiver Safety & dock rail hooks Dock rail rope installation 1-18 1-21 1-23 1-27 1-30 1-31 Trim Vent plate Reinforced rubber hinge Battery charging cable Battery-fill quick-release coupler Motor power supply cable 2-1 2-2 2-4 2-6 2-11 General boat hull assembly Main power post Boat half protector Bilge pump Battery-full kit 2-13 2-14 2-16 2-17 2-19 Super tube Super tube inflation Checking super tube for leaks Patching super tube Super tube valve replacement Motor Assembly (Electric-powered) 3-1 3-2 3-4 3-8 3-11 3-19 3-21 General information Motor cover Control rods/grips/handle bar Flex wire Motor Magnetic trigger Motor relay 3-25 3-27 3-29 3-33 3-37 3-42 Solid State Switch Boat captain Pivot Lower unit assembly Squirt pump Assembly SB-120 terninal Basic Electrical Troubleshooting 4-1 4-2 4-4 4-6 4-7 4-13 General information Basic electrical troubleshooting Voltage drop test Testing fuse Major electrical components Specific gravity test 4-15 4-16 4-17 4-18 4-19 4-20 Equalizing batteries Battery maintenance - winter Master charger Wiring schematic Motor wiring schematic Boat Captain Wiring Schematic Pivot Prop guard General Data and Maintenance. Boat Top Assembly Boat Hull Lower Assembly 5-1 5-2 General information Handle bar 5-3 5-4 Decals 6-1 6-2 General information Motor cover decals 6-3 6-5 Care & Storage 7-1 7-2 Engine assembly (Gas-powered) General information Fiberglass care & maintenance 7-4 7-6 Boat top decals Decal removal/installation 303 Aerospace protectant Storage 0-6 NOTES: 0-7 SPECIFICATIONS: ELECTRIC-POWERED BLASTER BOAT. DIMENSIONS: Overall diameter .......................................................................................................................................72”(182 cm) Overall height ...........................................................................................................................................40”(101 cm) Wet weight ............................................................................................................................................. 488lbs(222kg) Total battery weight ................................................................................................................................ 248lbs(113kg) Super Tube II weight................................................................................................................................... 23lbs(11kg) Hull & deck weight .................................................................................................................................. 139lbs(63kg) Minimum water depth .................................................................................................................................... 3ft(.91m) MOTOR: Model..................................................................................................................................................... 24v 1750 rpm Type ......................................................................................Continuous duty 3/4 hp(1118w) 24v, permanent magnet Motor weight .............................................................................................................................................. 78lbs(36kg) Cooling system ........................................................................................................................................................ Air Maximum horsepower.......................................................................................................................3/4 hp(1750 rpm) Maximum speed .............................................................................................................................. 3.5 mph(4.8 km/h) Throttle........................................................................................................................Green rod / push button (on/off) Squirt............................................................................................................................. Blue rod / push button (on/off) Squirter Type .......................................................................................................................................24v submersible BATTERY: Type ................................................................................................................................... 6 volt deep cycle (225 AH) Weight .................................................................................................................................................... 62 lbs (28 kg) Length ................................................................................................................................................. 10 3/8(264 mm) LOWER UNIT: Gear ratio ................................................................................................................................................................ 1:1 Propeller......................................................................................................................3-7.2 x 4.7 in(3-184 x 120 mm) Rotating direction ............................................................................................................Clockwise (viewed from rear) 0-8 SPECIFICATIONS: GAS-POWERED WATER BUG. DIMENSIONS: Overall diameter .......................................................................................................................................72”(182 cm) Overall height ...........................................................................................................................................40”(101 cm) Wet weight ............................................................................................................................................... 194lbs(88kg) Super Tube II weight................................................................................................................................... 23lbs(11kg) Hull & deck weight .................................................................................................................................. 139lbs(63kg) Minimum water depth .................................................................................................................................... 3ft(.91m) ENGINE: Model.............................................................................................................................. J&J equipped Honda BF2.3D Type ............................................................................................................. 4-stroke, overhead valve, single cylinder Engine weight.......................................................................................................................................................32.0 lbs (14.6kg) Cooling system ............................................................................................................................................. Forced air Starting system.................................................................................................................................................... Recoil Lubrication system.............................................................................................................................................. Splash Fuel capacity ........................................................................................................................................1.16 US qt (1L) LOWER UNIT: Gear ratio ................................................................................................................................................... 2.42(29/12) Gear case oil capacity ................................................................................................................................. 0.05 US qt Propeller......................................................................................................................3-7.2 x 4.7 in(3-184 x 120 mm) Rotating direction ............................................................................................................Clockwise (viewed from rear) 0-9 MONTHLY SERVICE SCHEDULE (Electric) Item # Item Service type Check Frequency 1st 20 hrs Every 50 hrs Monthly or every 200 hrs Log hours of operation to determine proper maintenance intervals. Check 1 SB-120 Plug(s) 2 Motor 3 Batteries Replace Daily When damaged Grease terminals (2) Check condition Check wires Check water level Weekly Check electrolyte level Clean connections 4 Pivot (1) 5 Motor & charger power cables 6 Sump pump (1) 7 Propeller guard 8 Hull 9 General wires & connections Check Daily Grease (3) Check for damage Clean and grease terminals (2) Replace When damaged Clean strainer Inspect Replace When damaged Inspect & clean Safety decals Polish Check for damage Clean connections Replace When necessary Spay corrosion protectant 10 Anode Clean Replace Replace filter 11 12 Squirter Tubes When damaged When needed Check for damage Check hose & fitting Clean & grease terminals Clean Check pressure Weekly Check visually Daily (1) Service more frequently when used in dusty areas. (2) Use dielectric grease only. (3) Use marine grease only. NOTE: This is a sample form. Your checklist should include but not be limited to these items. Make extra copies for future use. 0-10 MONTHLY SERVICE SCHEDULE (Electric) Below are explanations of service listed in the monthly maintenance charts on previous page. Explanations of monthly maintenance shall include, but are not limited to the following: 1. SB-120 PLUG(S): Make sure that the plug is lubed with dielectric grease. Inspect the plug for deep grooving or signs of arcing. 2. MOTOR: Remove hood and check connections. Spray motor and wiring with corrosion block (J&J #99101). 3. BATTERIES: Check for corrosion, and spray terminals with battery protectant (J&J #99101). Fill batteries with distilled water weekly, or as needed. Make sure compartment is ventilated. ‹ DANGER › : ***READ BATTERY SAFETY PRECAUTIONS BEFORE HANDLING BATTERIES*** 4. PIVOT: Turn motor and check for smooth operation. If motor doesn’t turn easily, visually inspect pivot and grease if necessary. Electric motor can turn 270°. Motor stops must be in place and in working order. 5. MOTOR /CHARGER POWER CABLES: Disconnect and grease terminals. Look for signs of wear (Replace as needed). 6. SUMP PUMP: Clean strainer as needed. Check pump operation. If pump is not cycled periodically, check all wiring connections. Repair or replace pump as needed. 7. PROPELLER GUARD: Inspect for damage or foreign materials. Replace if damaged. ‹ SAFETY ITEM › ***WARNING: DO NOT OPERATE IF PROPELLER GUARD IS DAMAGED OR MISSING*** 8. HULL: Keep clean and wax every 200 hours or every 2 months. Use a UV protectant weekly to reduce color fading (J&J part # 3-60-0034). 9. GENERAL WIRES & CONNECTIONS: Check all wires and connections for damage and corrosion. Clean or replace as needed. 10. ANODE: Clean monthly. For year-round parks, replace anode every 6 months. For seasonal parks, replace anode at end of the season. 11. SQUIRTER: Replace filter if necessary. Check integrity of hose, mount and pump. Check pump inlet for obstructions. Replace as needed. 12. TUBE: Clean with mild detergent. Check condition of tube daily. Check tube pressure weekly using low pressure gauge (J&J #3-96-0024) and set pressure to 2-3 PSI. NOTE: ALL NECESSARY REPAIRS NEED TO BE DONE BEFORE BOAT IS OPERATED. USE J&J AMUSEMENTS OR EQUIVALENT REPLACEMENT PARTS. INSPECTIONS SHOULD BE DONE BY TRAINED AND QUALIFIED PERSONNEL. 0-11 MONTHLY SERVICE SCHEDULE (Gas) Item # Item Service type Check Frequency 1st 20 hrs Every 50 hrs Every 150 hrs Monthly or every 200 hrs Log hours of operation to determine proper maintenance intervals. Check level Daily 1 Engine(*) 2 Gear case(*) 3 Spark plug(*) 4 Valve clearance(*) Check-adjust 5 Idle speed(*) Check-adjust 6 Carburetor linkage(*) Check-adjust 7 Fuel tank & tank filter(*) Clean 8 Fuel line(*) 9 Starter rope(*) 10 Propeller guard 11 Hull 12 13 14 Anode Pivot(1) Tubes Change oil Check level Change oil Check-adjust Replace Check Replace When needed Check Inspect Replace When damaged Inspect & clean Safety decals Polish Clean Replace Check When damaged Daily Grease (3) Clean Check pressure Weekly Check visually Daily (1) Service more frequently when used in dusty areas. (*) See Honda Shop Manual NOTE: This is a sample form. Your checklist should include but not be limited to these items. Make extra copies for future use. 0-12 MONTHLY SERVICE SCHEDULE (Gas) Below are explanations of service listed in the monthly maintenance charts on previous page. Explanations of monthly maintenance shall include, but are not limited to the following: 1. ENGINE: Always use API service SG.SF/CC.CD. designation shown on the container; see “Engine Oil” in the Honda Shop Manual. 2. GEAR CASE: Always use API service SG.SF/CC.CD. designation shown on the container; see “Engine Oil” in the Honda Shop Manual. 3. SPARK PLUG: Clean and replace spark plugs with the type listed in the Honda Shop Manual. 4. VALVE CLEARANCE: Check and adjust at the specified intervals; see the Honda Shop Manual. 5. IDLE SPEED: Check and adjust at the specified intervals; see the Honda Shop Manual. 6. CARBURETOR LINKAGE: Check and adjust at the specified intervals; see the Honda Shop Manual. 7. FUEL TANK & TANK FILTER: Check and replace at the specified intervals; see the Honda Shop Manual. 8. FUEL LINE: Check and replace at the specified intervals; see the Honda Shop Manual. 9. STARTER ROPE: Check and replace at the specified intervals; see the Honda Shop Manual. 10. PROPELLER GUARD: Inspect for damage or foreign materials. Replace if damaged. ‹ SAFETY ITEM › ***WARNING: DO NOT OPERATE IF PROPELLER GUARD IS DAMAGED OR MISSING*** 11. HULL: Keep clean and wax every 200 hours or every 2 months. Use a UV protectant weekly to reduce color fading (J&J part # 3-60-0034). 12. ANODE: Clean monthly. For year-round parks, replace anode every 6 months. For seasonal parks, replace anode at end of the season. 13. PIVOT: Turn motor and check for smooth operation. If motor doesn’t turn easily, visually inspect pivot and grease if necessary. Electric motor can turn 270°. Motor stops must be in place and in working order. 14. TUBE: Clean with mild detergent. Check condition of tube daily. Check tube pressure weekly using low pressure gauge (J&J #3-96-0024) and set pressure to 2-3 PSI. NOTE: ALL NECESSARY REPAIRS NEED TO BE DONE BEFORE BOAT IS OPERATED. USE J&J AMUSEMENTS OR EQUIVALENT REPLACEMENT PARTS. INSPECTIONS SHOULD BE DONE BY TRAINED AND QUALIFIED PERSONNEL. 0-13 Pre-Opening Daily Checklist (Electric)Week of Bumper boat ID# / Attendant must initial each empty box every day. If anything is not OK, see a supervisor. Body color Item / Service type Mon Tues Wed Thu Fri Sat BOAT Tube - Check pressure Hull - Visually inspect Receiver - Visually inspect Handrails & hardware - Visually inspect Sump pump - Visually inspect Batteries - Visually inspect volt meter MOTOR Motor -Physically inspect Motor & charger cables - Visually inspect Pivot -Physically inspect Prop guard - Visually inspect **See explanation of check procedure** **Download extra copies of this and other check list on our web site at www.jjamusements.com** Sun 0-14 Pre-Opening Checklist - Explanation (Electric) Below are explanations of service listed in the Pre-Opening Checklist chart on previous page. Explanations of Pre-Opening Checklist shall include, but are not limited to the following: BOATS: TUBE - Check air pressure using a high-quality, low-pressure gauge. Super Tube should be inflated to 2-3 PSI. HULL - Check for cracks and missing hardware. . RECEIVER - Check for loosening or missing hardware, and cracking around mount. HANDRAILS & HARDWARE - Check for loosening and missing hardware. SUMP PUMP - View through hull vent to check for excessive water. BATTERIES - Check volt meter for full charge of 24-26 volts. Viewing through hull vent, check battery terminals for visible corrosion. MOTOR: MOTOR - Visually and physically check motor operation, “go” and “squirt” function, loose hardware, grips, handlebar condition and abnormal noises during operation. MOTOR POWER CABLE - Check for bare wires, proper connection, and any signs of excessive heat or melting. ‹ WARNING › ***DO NOT OPERATE UNTIL DAMAGED CONNECTORS AND/ OR CABLE ARE REPLACED*** PIVOT - Check for smooth operation by rotating motor lock to lock. PROP GUARD - Check for damage and foreign material. ‹ WARNING › ***DO NOT OPERATE IF PROPELLER GUARD IS DAMAGED OR MISSING*** NOTICE: ALL NECESSARY REPAIRS NEED TO BE DONE BEFORE BOAT IS OPERATED. USE OF J&J AMUSEMENTS OR EQUIVALENT REPLACEMENT PARTS IS RECOMMENDED. INSPECTIONS SHOULD BE DONE BY QUALIFIED PERSONNEL. 0-15 Pre-Opening Daily Checklist (Gas) Bumper boat ID# Attendant must initial each empty box every day. If anything is not OK, see a supervisor. Body color Item Service type BOAT Tube - Check pressure. Hull - Visually inspect. Receiver - Visually inspect. Handrails & hardware - Visually inspect. Water in hull - Drain if needed. ENGINE Engine & gear case - Check oil Level. Throttle - Check operation. Fuel system - Visually inspect. Pivot -Physically inspect. Prop guard - Visually inspect. Mon Tues Wed Thu Fri Sat Sun 0-16 Pre-Opening Checklist - Explanation (Gas) Below are explanations of service listed in the Pre-Opening Checklist chart on previous page. Explanations of Pre-Opening Checklist shall include, but are not limited to the following: BOATS: TUBE - Check air pressure using a high-quality, low-pressure gauge. Super Tube should be inflated to 2-3 PSI. HULL - Check for cracks and missing hardware. . RECEIVER - Check for loosening or missing hardware, and cracking around mount. HANDRAILS & HARDWARE - Check for loosening and missing hardware. WATER IN HULL - Drain if excessive water is present inside hull. ENGINE: ENGINE & GEAR CASE - Visually and physically check engine operation, grips, handlebar condition and abnormal noises during operation. THROTTLE: Check for smooth operation and full return when released. FUEL SYSTEM: Check for any signs of fuel leaks from the tank, cap, fuel filter, etc. If no leakage, top off fuel tank. PIVOT - Check for smooth operation by rotating motor. PROP GUARD - Check for damage and foreign material. ‹ WARNING › ***DO NOT OPERATE IF PROPELLER GUARD IS DAMAGED OR MISSING*** NOTICE: ALL NECESSARY REPAIRS NEED TO BE DONE BEFORE BOAT IS OPERATED. USE OF J&J AMUSEMENTS OR EQUIVALENT REPLACEMENT PARTS IS RECOMMENDED. INSPECTIONS SHOULD BE DONE BY QUALIFIED PERSONNEL. 0-17 Bumper Boat Area Checklist Week of / / Attendant must initial each empty box every day. If anything is not OK, see a supervisor. Item Service type Mon Tues Wed Thu Fri Sat POND Boat rope & hooks -Check for broken hooks and unsafe ropes. Dock Rail -Check for cracks or loose hardware. Pond Water -Check chemical condition and clarity. FILTRATION Pump -Follow manufacturer’s recommendation. SAFETY Equipment - Visually inspect Signage - Visually inspect Fencing - Visually inspect Dock area - Visually inspect **Download extra copies of this and other checklists on our website at www.jjamusements.com** Sun 0-18 Printable Work Order Tags FOLD HERE This sample maintenance work order tag can be copied for use in your facility. Copy and cut tag along dashed line and fold along the fold line indicated. Simply attach a maintenance work order tag to a machine in need of repair. When maintenance is complete, file with other service and maintenance information. MAINTENANCE WORK ORDER Description of Work Performed: GO-KART # BUMPERBOAT # Explanation of problem: FOLD HERE Parts Used: Employee Name: Front Date/Time: Mechanic: Manager: Back HOW A WARRANTY IS PROCESSED 0-19 1. The customer contacts J&J with the warranty problem. The product warranty department or parts department gathers information and makes arrangements to send the needed replacement to the customer. The parts department also gives the customer an RMA # (Return Merchandise Authorization) at that time. (Please note: RMA # must appear on returned goods package. Goods may be refused if no RMA# is present.) 2. Replacement goods are shipped AND ACCOUNT IS CHARGED according to established account terms, i.e. net 30, credit card, C.O.D. etc. J&J pays for the most economical shipping method. If the customer desires faster service, the customer account will be billed for the price difference. 3. The customer returns the warantied parts at their expense to J&J with RMA # on the outside of package. The warranty manager inspects the goods and one of two things will happen: a. Credit will be authorized to the customer’s account in the amount charged for the replacement. Note: Cash refunds are not given on warranty items. b. If part is not warrantable because of normal wear and tear, damage by accident, etc, the warranty will be denied and no credit will be issued; shipping charges will be billed. **See limited warranty for details** Please make sure goods are returned using a traceable and insured method. Items lost or damaged in transit cannot be the responsibility of J&J. If this simple procedure is followed, the warranty usually goes smoothly. We seldom refuse to warranty an item. Problems come from short-paying statements or refusing to pay for new replacement items. The most common reason for a customer to not receive credit is failure to return the warranty item to J&J. If we do not receive the item, we cannot get credit from our vendors, and therefore cannot issue credit to the customer. 0-20 PRODUCT RETURN PROCEDURES RETURNED GOODS POLICY: No merchandise may be returned, nor any account adjustments made, unless authorized by J&J Amusements, Inc. A Return Merchandise Authorization (RMA#) is required for all returns. Only items authorized (listed) on an RMA# may be returned. Obsolete and discontinued merchandise may not be returned (current merchandise is that which appears in the current annual parts catalog). A 15% restocking fee will be charged on all returns except for errors caused by J&J Amusements, Inc. The customer (except for errors caused by J&J Amusements, Inc) will pay freight. Returned merchandise must be in good condition, in the original package (where applicable), and cannot be altered with custom labels, stickers, numbers, etc. Merchandise that is returned without an RMA# will be refused. WARRANTY RETURN POLICY: All warranty item returns must be authorized by the Warranty Department and have an assigned RMA number before any adjustment or credit will be given. All merchandise that is returned to J&J and is proven defective in manufacture or workmanship upon examination will be replaced or repaired. THE RMA NUMBER MUST APPEAR NEXT TO THE SHIPPING LABEL ON ALL RETURNED ITEMS FOR PROPER CREDIT TO BE ISSUED. IF THERE IS NO RMA NUMBER ON THE BOX/CARTON, IT WILL BE REFUSED AND RETURNED TO SHIPPER. BE ADVISED THAT RMA’S ARE VALID FOR 15 DAYS FROM DATE OF ISSUE. AFTER 15 DAYS, ALL RMA’S ARE VOID AND FURTHER RETURN ATTEMPTS WILL REQUIRE RE-ISSUE OF A NEW RMA#. 0-21 LIMITED WARRANTY - BUMPER BOAT This warranty is limited to J&J Amusements, Inc. products, parts and accessories when distributed by J&J Amusements, Inc., 4897 Indian School Road NE, Suite 150, Salem, Oregon 97305-1126 USA, hereinafter referred to as (J&J). Products Covered By This Warranty: Bumper Boat hull (excluding Honda motors) Bumper Boat tubes (textured) Bumper Boat tubes (super tube II) Parts and accessories Honda BF2A gas powered motor Electric motor Battery charger Battery **See specific exclusions Length Of Warranty: 1 year** 90 days** 5 year prorated 90 days** 1 year - by Honda Marine* 1 year 1 year - by manufacturer* By manufacturer To qualify for this warranty: 1. The accessories, products, or replacement parts must be purchased from J&J Amusements, Inc. 2. You must be the first retail purchaser. This warranty is not transferable to subsequent owners. 3. You must provide proof of original purchase. What J&J Amusements, Inc. will repair or replace under warranty: J&J will repair or replace, at their option, any product, accessory or replacement parts that are proven to be defective in material or workmanship, under normal use, during the applicable warranty time period. Anything replaced under warranty becomes the property of J&J. All parts replaced under warranty will be considered as part of the original product and any warranty of those parts will expire concurrent with the original product warranty. Accessories and replacement parts, installed by J&J, will be repaired or replaced under warranty without charge for parts. If installed by anyone else, charges will be the responsibility of the purchaser. To obtain warranty service: You must obtain a Return Merchandise Authorization (RMA) number from J&J, (phone number 800-854-3140 or 503- 304-8899). Return the accessory, product or part and proof of purchase, at your expense, to J&J. If the accessories, products or parts are returned to J&J without both an RMA and proof of purchase, J&J may void the warranty at its discretion. Exclusions: This warranty does not extend to products, accessories or parts affected or damaged by accident and/or collision, normal wear, fuel contamination, or those not sold by J&J. It also does not extend to those items used in applications for which the product was not designed, any other misuse, neglect, incorporation or use of unsuitable attachments or parts, nor any unauthorized alteration, improper installation, or any causes other than defects in material or workmanship of the product. J&J reserves the right, before having any obligations under this limited warranty, to inspect the damaged goods in order to determine compliance with this paragraph. This warranty does not extend to products, accessories or parts purchased for use outside of the United States and Canada (contact us for warranty questions regarding your country). *Honda motor warranty is only covered by American Honda Motor Co., Inc. *Electric battery charger is only covered by manufacturer. **Specific exclusions: Normal wear and tear items, such as: throttle cables, spark plugs, fuel filers, hand grips, throttle levers,over-inflated tubes, tube wear from rough pool walls, shear pins, pivot bushings, starter rope, switches, relays and brush or communicator wear. Appearance-related damage, including but not limited to; scratches, nicks, dents, fading paint/trim and corrosion. A Magnehelic Low Pressure Gauge (part#013510) or equivalent must be used for consideration of Bumper boat tube warranty. (The customer must also use maintenance logs provided from J&J . Items will not be covered by warranty if you cannot provide these records). Disclaimer of consequential damage and limitation of implied warranties: J&J disclaims any responsibility for any consequential damages of any kind or nature, including but not limited to; loss of time or loss of use of the product, or transportation, commercial loss or any other incidental or consequential damage arising out of any theory of recovery, including warranty, contract, statutory or tort. Notwithstanding the term of any limited warranty or any warranty implied by law (or in the event that any limited warranty fails its essential purpose) in no event will J&J’s entire liability exceed the purchase price of the particular good sold. Some states/ provinces do not allow the exclusion or limitation of incidental or consequential damages, so the above limitation or exclusion may not apply to you. This warranty gives specific legal rights, and you may also have other rights which vary from state to state. Disclaimer of warranty Except for the limited warranty provided herein, to the extent permitted by law, J&J disclaims all warranties, expressed or implied, including all warranties of merchantability and/or fitness for a particular purpose. To the extent that any implied warranties may nonetheless exist by operation of law, any such warranties are limited to the duration of this warranty. Some states/provinces do not allow limitations on how long an implied warranty lasts, so the above limitations may not apply to you. Any legal action arising from claims against this warranty shall be governed by and construed in accordance with the laws of Oregon, and the exclusive forum for disputes arising out of or relating to this warranty shall be the Marion County Circuit Court for the State of Oregon, and no other state or Federal Court. Any party bringing a claim under this warranty consents to jurisdiction of such court, waives any objection to venue, and further agrees that in the event of litigation, such party shall, at its own expense, provide discovery and appear for depositions in Marion County, Oregon. Not available in all states or regions. Contact J&J for information on your area. 0-22 LIMITED WARRANTY - SUPER TUBE II This warranty is limited to J&J Amusements, Inc. products, parts and accessories when distributed by J&J Amusements, Inc., 4897 Indian School Road NE, Suite 150, Salem, Oregon 97305-1126 USA, hereinafter referred to as (J&J). Products Covered By This Warranty: Super tube II Length Of Warranty: 1st year full replacement (prorate charge will increase by twenty percent for each subsequent year of the prorated period. Charge will be based on original purchase price). To qualify for this warranty: The product or replacement part must have been purchased from J&J. You must be the first retail purchaser. This warranty is not transferable to subsequent owners and you must provide proof of original purchase. What J&J will repair or replace under warranty: J&J will repair or replace, at their option, any Super Tube 2 that is proven to be defective in material or workmanship, under normal use, during the applicable warranty time period. Anything replaced under warranty becomes the property of J&J. All parts replaced under warranty will be considered as part of the original product and any warranty of those parts will expire concurrent with the original product warranty. To obtain warranty service: You must obtain a Return Merchandise Authorization (RMA) number from J&J. (phone number 800-854-3140 or 503-304-8899). Return the accessory, product or part and proof of purchase, at your expense, to J&J. If the accessories, products or parts are returned to J&J without both an RMA # and proof of purchase, J&J may void the warranty at its discretion. Exclusions: This warranty does not extend to products, accessories or parts affected, or damaged by, accident and/or collision, normal wear, fuel contamination, or over-inflation, nor does it extend to those tubes not sold by J&J, used in applications for which the product was not designed, or any other misuse, neglect, incorporation or use of unsuitable attachments or parts, unauthorized alteration, improper installation, or any causes other than defects in material or workmanship of the product. J&J reserves the right, before having any obligations under this limited warranty, to inspect the damaged goods in order to determine compliance with this paragraph. This warranty does not extend to products, accessories or parts purchased for use outside of the United States and Canada. Disclaimer of consequential damage and limitation of implied warranties: J&J DISCLAIMS ANY RESPONSIBILITY FOR ANY CONSEQUENTIAL DAMAGES OF ANY KIND OR NATURE, INCLUDING, BUT NOT LIMITED TO; LOSS OF TIME OR USE OF THE PRODUCT, TRANSPORTATION, COMMERCIAL LOSS, OR ANY OTHER INCIDENTAL OR CONSEQUENTIAL DAMAGE ARISING OUT OF ANY THEORY OF RECOVERY, INCLUDING WARRANTY, CONTRACT, STATUTORY OR TORT. NOTWITHSTANDING THE TERM OF ANY LIMITED WARRANTY OR ANY WARRANTY IMPLIED BY LAW. (OR IN THE EVENT THAT ANY LIMITED WARRANTY FAILS ITS ESSENTIAL PURPOSE), IN NO EVENT WILL J&J’S ENTIRE LIABILITY EXCEED THE PURCHASE PRICE OF THE PARTICULAR GOOD SOLD. SOME STATES/PROVINCES DO NOT ALLOW THE EXCLUSION OR LIMITATION OF INCIDENTAL OR CONSEQUENTIAL DAMAGES, SO THE ABOVE LIMITATION OR EXCLUSION MAY NOT APPLY TO YOU. THIS WARRANTY GIVES SPECIFIC LEGAL RIGHTS, AND YOU MAY ALSO HAVE OTHER RIGHTS WHICH VARY FROM STATE TO STATE. Disclaimer of warranty EXCEPT FOR THE LIMITED WARRANTY PROVIDED HEREIN, TO THE EXTENT PERMITTED BY LAW, J&J DISCLAIMS ALL WARRANTIES, EXPRESS OR IMPLIED, INCLUDING ALL WARRANTIES OF MERCHANTABILITY AND/OR FITNESS FOR A PARTICULAR PURPOSE. TO THE EXTENT THAT ANY IMPLIED WARRANTIES MAY NONETHELESS EXIST BY OPERATION OF LAW, ANY SUCH WARRANTIES ARE LIMITED TO THE DURATION OF THIS WARRANTY. SOME STATES/PROVINCES DO NOT ALLOW LIMITATIONS ON HOW LONG AN IMPLIED WARRANTY LASTS, SO THE ABOVE LIMITATIONS MAY NOT APPLY TO YOU. Any legal action arising from claims against this warranty shall be governed by and construed in accordance with the laws of Oregon, and the exclusive forum for disputes arising out of, or relating to, this warranty shall be the Marion County Circuit Court for the State of Oregon, and no other state or Federal Court. Any party bringing a claim under this warranty consents to jurisdiction of such court, waives any objection to venue, and further agrees that in the event of litigation such party shall, at its own expense, provide discovery and appear for depositions in Marion County, Oregon. Not available in all states or regions. Contact J&J for information on your area. 0-23 UNPACKING & SETUP General Information ..................................................1-19 Unpacking.................................................................1-20 Tube Setup ................................................................1-21 Boat Assembly ...........................................................1-22 Battery Installation (electric only)...............................1-23 Battery Fill Kit Installation (electric only)....................1-24 Battery Wiring (electric only) .....................................1-25 Boat Launch Procedure .............................................1-27 Motor Installation............................................................. 1-28 Your new J&J bumper boat is shipped in a heavy-duty cardboard box. This section of the Service Manual describes the process to get your new bumper boat(s) unpacked and ready for service. G RANC E BU ENDU Specifications subject to change without notice - Check our website for valuable information including videos, workshop and operations manuals. www.jjamusements.com M A O-K RTS T PERBOA S TM ATES CH PL CLUT 503-304-8899 0-24 UNPACKING Cut and remove the metal packing straps. Remove the box top and place it aside for later use. Remove the box sides and discard. Remove the tube and place it aside with the box top. Remove plastic wrap from the boat hull and discard. Leave the boat hull on the cardboard base for protection from scratches. CLEANERS AND PROTECTANTS J&J carries many cleaning and protection products to keep your go-karts in top condition. From smaller spray bottles to 5 gallon containers of product, we’ve got you covered. Give us a call! G TM T PERBOA S BU M A O-K RTS RA ENDU NCE AT CH PL CLUT ES Protect your boat from harmful ULTRA-VIOLET rays and keep it looking like new with 303 Aerospace Protectant! 503-304-8899 Specifications subject to change without notice - Check our website for valuable information including videos, workshop and operations manuals. www.jjamusements.com 0-25 TUBE SETUP Carefully unfold the tube and lay it flat on the boat box top. Note: Boat hulls are normally packaged with their correctly color-coordinated tube. Fill the tube with a Super Tube fill adapter (#00367) as shown in figures 1 & 2, a Super Tube pressure test adapter/filler (#2-60-A0006) as shown in figures 3 & 4, or a vacuum/blower (J&J #2-60-0124) as shown in figure 5. Carefully inflate the tube to the recommended 3 PSI. Always use a low-pressure gauge, such as J&J #3-96-0024, to accurately measure tube pressure. NOTICE: TUBES SHOULD BE FILLED COLD AS AIR PRESSURE CHANGES WHEN HOT. (See Super Tube Inflation on page 2-14). Fig. 2 Fig. 1 Fig. 3 Fig. 4 Fig. 5 After inflating, make sure the valve is closed by pushing the valve in and turning it clockwise. Check the valve for leaks by applying a solution of soapy water. If bubbles form, the valve needs to be tightened. With the tube inflated, insert Super Tube valve tightening tool (J&J #2-60-0123). Turn nut 1/8th turn. Recheck with soapy water solution. Repeat as needed until no bubbles form. G ENDU RANC E Specifications subject to change without notice - Check our website for valuable information including videos, workshop and operations manuals. www.jjamusements.com M A O-K RTS T PERBOA S TM ATES CH PL CLUT BU Inflate and deflate boat tubes quickly with this 4hp vacuum/blower! J&J# 2-60-0124 503-304-8899 0-26 BOAT ASSEMBLY Lift the hull assembly and carefully place it inside the tube. ‹ CAUTION › The hull is heavy. Use two people when lifting the hull assembly. Make sure to grab the lip of the boat bottom when lifting the assembly. USE WORK GLOVES TO PROTECT HANDS FROM FIBERGLASS EDGES. Rotate the boat hull inside of the tube so the air valve on the tube is located at the back of the hull. This allows simple maintenance to be performed from one direction on the bumper boat, as well as reducing the risks posed by guests accessing the valve. SUPERTUBE PRESSURE TEST ADAPTER AND FILLER This adapter makes it easy to fill your supertube and check pressure. J&J # 2-60-A0006 G TM T PERBOA S BU M A O-K RTS RA ENDU NCE AT CH PL CLUT ES 503-304-8899 Specifications subject to change without notice - Check our website for valuable information including videos, workshop and operations manuals. www.jjamusements.com 0-27 BATTERY INSTALLATION (Electric only) Open the boat top and use the wooden prop rod to hold the top up. ‹ CAUTION › Place the wooden prop rod so it does not become dislodged while holding the boat top in “up” position. • • • • • • Remove items provided inside boat: Wooden prop rod (qty 1) Battery cables (qty 3) Battery fill kit (qty 1) Wiring schematic (qty 1) Battery fill kit instructions ‹ CAUTION › Proper lifting procedures must be followed. Carefully place batteries in the battery trays located inside the bottom hull. NOTICE J&J recommends using a battery carrier (J&J #2-60-0034) when installing/moving heavy batteries. + Battery 1 - - + - Battery 4 + Batteries should be placed in such a position as to allow ease of wiring. Place the batteries with terminals as shown in Figure 1. Place battery #1 in the hull first, followed by battery #4, #2, and finally, #3. This sequence helps keep the boat balanced during battery installation. - Battery 3 + Battery 2 Fig. 1 G ENDU RANC E Specifications subject to change without notice - Check our website for valuable information including videos, workshop and operations manuals. www.jjamusements.com M A O-K RTS T PERBOA S TM ATES CH PL CLUT BU SAFELY REMOVE, LIFT, AND adjust HEAVY BATTERIES WITH THIS BATTERY CARRIER, j&j # 2-60-0034 503-304-8899 0-28 BATTERY FILL KIT INSTALLATION (Electric only) Remove the caps from the batteries and place aside for later use. ‹ WARNING › Wear protective (rubberized) gloves when handling batteries. Avoid contact with battery acid. Remove the manifold valves from the hose T-fittings. g tin fit T- Loosely install the manifold valves into the batteries. Make sure the manifold valves are flush with the batteries before tightening. Manifold Valve Push the hose T-fittings into the manifolds. Use equal pressure until the fittings snap into place. ks ve o em R kin NOTICE Be careful not to damage the T-fitting o-ring. TECH TIP: Wet the T-Fitting with distilled water to help it slip into the manifold more easily. NOTICE Twist the manifolds slightly to remove any kinks in the water lines. All kinks must be removed for the watering system to function correctly. Install the filler tube from the boat hull to the fill system. Push and slightly twist the hose to install. G TM T PERBOA S BU M A O-K RTS RA ENDU NCE AT CH PL CLUT ES visit www.jjamusements.com and download a copy of our complete accessory catalog! 503-304-8899 Specifications subject to change without notice - Check our website for valuable information including videos, workshop and operations manuals. www.jjamusements.com 0-29 BATTERY WIRING (Electric only) NOTICE See the battery wiring diagram on page 4-18. Po siti ve Battery 1 Ba t1 + Locate battery #1. Install a cable from the positive post of battery #1 to the negative post of battery #2. - Battery 2 Nega tive B at 3 + Install a cable from the positive post of battery #2 to the negative post of battery #3. Battery 4 + - + Battery 1 3 - N - - at eB tiv a eg + + Battery 3 Battery 2 Install a cable from the positive post of battery #3 to the negative post of battery #4. Battery 1 e Ba t4 + + Battery 3 Po Battery 2 N iv - 4 - - - at eB tiv a eg sit + Battery 4 + BATTERY FILL KIT Save time topping off the water in your batteries with the complete battery fill kit. Easy installation that saves time when performing routine battery maintenance. J&J #2-70-0034 G RANC E BU ENDU Specifications subject to change without notice - Check our website for valuable information including videos, workshop and operations manuals. www.jjamusements.com M A O-K RTS T PERBOA S TM ATES CH PL CLUT 503-304-8899 0-30 Install the “RED” cable from the breaker to the positive post of battery #4. Battery 4 + Battery 1 - Battery 2 Battery 3 Install the “BLACK” cable from the negative main power post to the negative post of battery #1. Battery 1 Battery 3 Battery 2 Carefully remove the wooden prop rod, place inside the hull, and lower the boat top until it’s fully closed. Check the volt meter display. If the meter is not displaying 24 volts, check the breaker. If the breaker is “on”, then the battery wiring will need to be rechecked. G TM T PERBOA S BU M A O-K RTS RA ENDU NCE AT CH PL CLUT ES 503-304-8899 Specifications subject to change without notice - Check our website for valuable information including videos, workshop and operations manuals. www.jjamusements.com 0-31 BOAT LAUNCH PROCEDURE Install the boat & dock rail hooks as described in the dock rope installation on page 1-12. Carefully move the boat to the edge of the pond. NOTICE Make sure to move the boat with the box lid underneath it to prevent damage. ‹ CAUTION › This is a two-person job. Do not try to launch a bumper boat with only one person. Carefully slide the boat assembly (without the motor) into the pond. Inspect the boat and latch the boat hooks to the dock rails. Latch the dock ropes to the dock rails and the boat to secure the boat to the dock rails. There should be two ropes and two dock rails per boat. G ENDU RANC E Specifications subject to change without notice - Check our website for valuable information including videos, workshop and operations manuals. www.jjamusements.com M A O-K RTS T PERBOA S TM ATES CH PL CLUT BU CHECK TUBE PRESSURE EASILY & ACCURATELY WITH THE LOW-PRESSURE GAUGE #3-96-0024 503-304-8899 0-32 MOTOR INSTALLATION Have a helper carefully pass the motor assembly to the person in the boat. GAS ENGINE Check the engine and gear box oil level before installing. “Refer to the Honda owner’s manual “ Position the lower unit of the motor so the prop guard will clear the motor pivot. Carefully lower the motor through the hole. Align the motor to the motor pivot and slide down into place. There is an index hole and pin that need to be aligned for proper positioning. Inde NOTE: For electric powered boats only. x po int Treat all SB120 plug terminals with corrosion block (J&J part #99109). Connect the blue SB120 plug from the boat hull into the blue SB120 plug on the motor. NOTICE Boats equipped with remote shut down (Boat Captain system) will need the system to be activated from the transmitter before the boat can operate. G TM T PERBOA S BU M A O-K RTS RA ENDU NCE AT CH PL CLUT ES CORROSION SOLUTION! CORROSION BLOCK PRODUCTS AVAILABLE AT J&J. 503-304-8899 Specifications subject to change without notice - Check our website for valuable information including videos, workshop and operations manuals. www.jjamusements.com 0-33 WARNING DECALS (TYPICAL LOCATIONS) Go-karts are terribly unforgiving of carelessness or neglet. To help avoid incidents and accidents, it is imperative that warning decals are legible and in place. The following outlines the typical locations of particular warning decals on bodied and non-bodied go-karts, as installed at the time of manufacture. Inspect and replace them as needed; see the maintenance and daily checklist schedules located in section 0 of this manual. WARNING WARNING Keep Hands And Feet In Boat At All Times. Never Stand Up While Boat is Operating. DO NOT REMOVE THIS DECAL DO NOT REMOVE THIS DECAL 00170 00170S - Spanish weight limit 450 lbs. S Q U I R T G O 0097102 0097101 G TM RANC E Specifications subject to change without notice - Check our website for valuable information including videos, workshop and operations manuals. www.jjamusements.com BU ENDU ATES CH PL CLUT M A O-K RTS T PERBOA S 00169 503-304-8899 0-34 001688 001686 2-40-0001 001681 www.jjamusements.com 00156 009800 G TM T PERBOA S BU M A O-K RTS RA ENDU NCE AT CH PL CLUT ES 503-304-8899 Specifications subject to change without notice - Check our website for valuable information including videos, workshop and operations manuals. www.jjamusements.com BOAT TOP ASSEMBLY General boat top information ......................................1-1 Breaker/main cutoff switch (electric only) ...................1-2 Volt meter (electric only) .............................................1-5 Bilge pump fuse (electric only) ....................................1-7 Pivot receiver ..............................................................1-8 Safety & dock rail hooks ............................................1-10 Dock rope installation ...............................................1-12 1-1 Trim ..........................................................................1-18 Vent plate (electric only)............................................1-21 Reinforced rubber hinge (electric only) ......................1-23 Battery charging cable (electric only) .........................1-27 Battery-fill quick-release coupler (electric only) .........1-30 Motor power supply cable .........................................1-31 This section of the Service Manual describes the various components of the boat top assembly, how to diagnose problems, and the removal and replacement of parts associated with the boat top. NOTE: The top and hull assembly for the gas bumper boat is permanently attached. Some if the information in this section will not apply. 1-2 BREAKER/MAIN CUTOFF SWITCH (Electric only) General Information ....................................................1-2 Removal/Replacement .................................................1-3 The safety switch/breaker is a marine-grade unit that combines switching and circuit protection into a single device, which meets SAE J1171 requirements for marine application. All power out to the boat is routed through here, as well as all incoming power from the charging device and wire leads. NOTICE: If there is high resistance in the system, heat and possible fire can occur without tripping the breaker; this is why the switch/breaker is located in an easily-accessible position on the outside of the hull. The charge line and charger feed current through the SB-120 connector, breaker and main buss to the battery pack. Keep in mind that even when disconnected, the charge line has current available at the SB-120 connector from the battery pack. <CAUTION> Do not short across these terminals or allow the connector to hang into the water. G TM T PERBOA S BU M A O-K RTS ENDU RANC PLAT UTCH E CL ES 503-304-8899 Specifications subject to change without notice - Check our website for valuable information including videos, workshop and operations manuals. www.jjamusements.com 1-3 BREAKER SWITCH (Electric only) NOTICE: All power goes through breaker. When breaker is in the off position, there will be no reading displayed on volt meter, (The volt meter will display 0 volts) and the batteries cannot be charged. Disconnect negative REMOVAL/INSTALLATION. Disconnect the (-) negative cable from battery #1. Disconnect the (+) positive cable leading to the breaker from battery #4. Battery 4 Di sco Battery 1 Battery 2 nn ec tp osi tiv e Battery 3 Disconnect the (+) positive cable leading to the breaker from the power post. Note: Your J&J Blaster Boat may be equipped with one of two types of power posts. The Pre-2012 version utilizes two rounded-style posts; one for the positive feed and one for the negative feed. Blaster Boats built during the 2012 model year changed to a single, rectangular-style post that contains both the negative and positive feeds. Power post, post-2012 G TM ENDU RA AT CH PL CLUT NCE ES Specifications subject to change without notice - Check our website for valuable information including videos, workshop and operations manuals. www.jjamusements.com BU 2 unit fiberglass CHARGER ENCLOSURES. part # 2-80-A00062. M A O-K RTS T PERBOA S Power post, pre -2012 503-304-8899 1-4 Hold the inside nylock nut during the next step. Remove the bolts. Carefully remove the breaker. NOTICE: Inspect wires and connections for corrosion/ damage. Clean off any corrosion from cable ends, and apply corrosion block on the cable ends before re-installing. Replace as needed. G TM T PERBOA S BU M A O-K RTS ENDU RANC PLAT UTCH E CL ES VISIT WWW.JJAMUSEMENTS.COM/TECHNICAL/INDEX.HTM FOR TECHNICAL INFORMATION RELATED TO OUR PRODUCTS. 503-304-8899 Specifications subject to change without notice - Check our website for valuable information including videos, workshop and operations manuals. www.jjamusements.com 1-5 VOLT METER (Electric only) General Information ....................................................1-5 Removal/Installation ....................................................1-6 The built-in volt meter constantly monitors the overall condition of the battery pack. When in “charge mode” the typical volt meter reading will be approximately 27.6 VDC. The table below indicates load readings, showing the representative system condition of the batteries. The volt meter is a sealed unit and therefore not serviceable. If the unit shows zero voltage, the systems breaker switch may be in the “OFF” position, the meter is inoperative, or the batteries’ charge is very low. Limit discharging the batteries beyond 1.75 volts per cell (1.125 specific gravity per cell). 1.75 volts per cell corresponds to end-point voltages of 5.25 volts for 6-volt batteries (readings obtained at 80 degrees F). State of Open Circuit Voltage 6.30 or greater 6.16 - 6.30 6.00 - 6.16 5.90 - 6.00 5.80 - 5.9 5.80 or less 6 Volt Battery Charge Level 100% 75% - 100% 50% - 75% 25% - 50% 0% - 25% 0% (4) Battery Pack 25.2 24.64 - 25.20 24.00 - 24.64 23.60 - 24.00 23.20 - 23.60 23.20 1-6 VOLT METER (Electric only) The volt meter is located on the back of the boat top, to the left of the vent plate. REMOVAL/INSTALLATION. Remove the two nuts that hold the bracket to the boat top. Remove the volt meter from the outside of the boat top. (See the wiring diagram for volt meter connections on page 4-18). G TM T PERBOA S BU M A O-K RTS ENDU RANC PLAT UTCH E CL ES VISIT WWW.JJAMUSEMENTS.COM/TECHNICAL/INDEX.HTM FOR TECHNICAL INFORMATION RELATED TO OUR PRODUCTS. 503-304-8899 Specifications subject to change without notice - Check our website for valuable information including videos, workshop and operations manuals. www.jjamusements.com 1-7 BILGE PUMP FUSE (Electric only) REMOVAL/INSTALLATION The bilge pump fuse is located on the back of the boat top to the left of the vent plate. With a flat screwdriver, push and turn counterclockwise 1/4 turn. Remove the fuse and holder by pulling outward. Remove the fuse from the holder. Check for continuity through the fuse with a multimeter (see page 4-6 for a fuse test). NOTE: The replaceable fuse is a 3-amp time-delay/slow-blow cartridge-style fuse. Using any fuse type other than this specification could result in poor performance and/or pump failure. Replace as needed. G ENDU RA ES Specifications subject to change without notice - Check our website for valuable information including videos, workshop and operations manuals. www.jjamusements.com M A O-K RTS T PERBOA S TM AT CH PL CLUT NCE BU REPLACEMENT 3 AMP FUSES, J&J # 2-70-0104 503-304-8899 1-8 PIVOT RECEIVER General Information ....................................................1-8 Pivot Receiver Removal/Installation .............................1-9 G TM T PERBOA S BU M A O-K RTS ENDU RANC PLAT UTCH E CL ES 503-304-8899 Specifications subject to change without notice - Check our website for valuable information including videos, workshop and operations manuals. www.jjamusements.com 1-9 PIVOT RECEIVER REMOVE/INSTALLATION The pivot is attached with 8 bolts and nylock nuts, and 16 flat washers. REMOVAL/INSTALLATION Remove the bolts, nylock nuts and washers. Install a new pivot by using the existing holes. Replace the hardware with new hardware as needed. ID PLATE: Remove the ID plate from the old pivot. Install the ID plate to the new pivot with 4 stainless steel rivets. G ENDU RA ES Specifications subject to change without notice - Check our website for valuable information including videos, workshop and operations manuals. www.jjamusements.com M A O-K RTS T PERBOA S TM AT CH PL CLUT NCE BU VISIT WWW.JJAMUSEMENTS.COM/TECHNICAL/INDEX.HTM FOR TECHNICAL INFORMATION RELATED TO OUR PRODUCTS. 503-304-8899 1-10 SAFETY RAILS & DOCK RAIL HOOKS General Information ..................................................1-10 Safety Rails & Dock Rail Hooks ................................1-11 Dock Rail Rope Installation .......................................1-12 Dock rails are now fully stainless steel with blue powder coat. J&J Dockrails are made from stainless steel and powder coated for ultra protection. We have dockrails available for both concrete or wood docks. G TM T PERBOA S BU M A O-K RTS ENDU RANC PLAT UTCH E CL ES 503-304-8899 Specifications subject to change without notice - Check our website for valuable information including videos, workshop and operations manuals. www.jjamusements.com 1-11 SAFETY RAILS & DOCK RAIL HOOKS The safety rails are mounted with 6 phillips head bolts, 6 nylock nuts and 6 flat washers. REMOVAL/INSTALLATION Hold each screw from the outside of the boat top. Remove the nylock nuts and flat washers. Replace the hardware as needed. Each dock rail hook is mounted with 1 U-bolt, 1 outside plate, 1 inside plate, 4 nylock nuts and 4 lock washers. REMOVAL/INSTALLATION Remove the nylock nuts and the inside plate. Replace the hardware as needed. BOAT HOOKS & ROPE Each boat should have two Boat Hooks and 3 to 5 feet of bumper boat rope. (Note: Bumper boat rope is determined by how far dockrails are spaced from edge of pool.) G TM RA ES BU ENDU AT CH PL CLUT NCE M A O-K RTS T PERBOA S REPLACEMENT BOAT HOOKS AND ROPE AVAILABLE. ROPE BY THE FOOT - #00388 BOAT HOOK(HEAVY STYLE) -including #00036 Specifications subject to change without notice - Check our website forDUTY valuable information videos, workshop and operations manuals. www.jjamusements.com 503-304-8899 1-12 DOCK RAIL ROPE INSTALLATION The length of rope needed varies depending on dock rail placement and water level. TECH TIP: After cutting the rope, lightly singe and melt one end of the rope; form a point using a folded piece of cardboard (matchbook cover, for example), and cover the end to form the point while insulating your fingers from the heat. Insert a fid through the rope about 10 inches from the end. Fid Next, insert the rope through the eye of the boat hook. G TM T PERBOA S BU M A O-K RTS ENDU RANC PLAT UTCH E CL ES STAINLESS STEEL DOCK RAILS available WITH BLUE POWDER COAT. J&J # 00716SS CALL FOR FITMENT INFORMATION. 503-304-8899 Specifications subject to change without notice - Check our website for valuable information including videos, workshop and operations manuals. www.jjamusements.com 1-13 To make the loop, insert the rope through the end of the fid and the thread the fid through the rope. Pull the rope, making a small loop at the hook. Insert the fid at the first rope thread under the loop. Thread the fid back through each side of the loop. G RA Specifications subject to change without notice - Check our website for valuable information including videos, workshop and operations manuals. www.jjamusements.com BU ENDU ES M A O-K RTS T PERBOA S TM AT CH PL CLUT NCE 503-304-8899 1-14 Pass the fid down through the hollow core of the rope just below the loop. Run the fid down the hollow center of the rope for approximately six inches. Bring the fid out through the stitching. Tuck any excess back inside the hollow core of the rope. G TM T PERBOA S BU M A O-K RTS ENDU RANC PLAT UTCH E CL ES 503-304-8899 Specifications subject to change without notice - Check our website for valuable information including videos, workshop and operations manuals. www.jjamusements.com 1-15 With the other end of the rope, repeat the previous steps, without the boat hook, to permanently attach the rope to the dock rails. Insert the rope through the eye of the dock rail. Insert the fid through the rope about 10 inches down. Insert the rope through the end of the fid and thread the fid through the rope. Pull the rope, making a small loop at the dock rail. G RA Specifications subject to change without notice - Check our website for valuable information including videos, workshop and operations manuals. www.jjamusements.com BU ENDU ES M A O-K RTS T PERBOA S TM AT CH PL CLUT NCE 503-304-8899 1-16 Thread the fid back through each side of the loop. Pass the fid down the hollow core of the rope just below the loop. Run the fid through the penetrated rope and continue down the hollow center for approximately six inches. G TM T PERBOA S BU M A O-K RTS ENDU RANC PLAT UTCH E CL ES 503-304-8899 Specifications subject to change without notice - Check our website for valuable information including videos, workshop and operations manuals. www.jjamusements.com 1-17 Bring the fid out through the stitching. Tuck the excess back inside the hollow core of the rope. The dock rail rope should have about 2 inches of slack when attached to the boat so the hooks can be easily connected. G RA Specifications subject to change without notice - Check our website for valuable information including videos, workshop and operations manuals. www.jjamusements.com BU ENDU ES M A O-K RTS T PERBOA S TM AT CH PL CLUT NCE 503-304-8899 1-18 TRIM General Information ..................................................1-18 Trim Installation/Removal ..........................................1-19 The boat trim serves to protect the tube and your hands from the exposed fiberglass edge on the bottom of the boat top. G TM T PERBOA S BU M A O-K RTS ENDU RANC PLAT UTCH E CL ES 503-304-8899 Specifications subject to change without notice - Check our website for valuable information including videos, workshop and operations manuals. www.jjamusements.com 1-19 TRIM INSTALLATION/REMOVAL The boat trim is mounted with 9 stainless steel rivets and double-sided tape. REMOVAL To remove the old trim, first drill out the rivets and pull the trim off of the fiberglass. Make sure to remove any trim adhesive and thoroughly clean off the surface of the fiberglass before installing the new boat trim. INSTALLATION Heat trim before installing. Peel off 2”of tape backing. Line up the trim with the center of the vent plate. Carefully wrap the trim around the boat top, pulling the tape backing off in 2 inch sections at a time. Cut off any excess trim. G RA Specifications subject to change without notice - Check our website for valuable information including videos, workshop and operations manuals. www.jjamusements.com BU ENDU ES M A O-K RTS T PERBOA S TM AT CH PL CLUT NCE 503-304-8899 1-20 Drill through the outside of the trim by matching the existing rivet holes. Insert rivets through the trim. Install a backing washer on the inside of each of the rivets. Install the rivets to boat top. G TM T PERBOA S BU M A O-K RTS ENDU RANC PLAT UTCH E CL ES VISIT WWW.JJAMUSEMENTS.COM/TECHNICAL/INDEX.HTM FOR TECHNICAL INFORMATION RELATED TO OUR PRODUCTS. 503-304-8899 Specifications subject to change without notice - Check our website for valuable information including videos, workshop and operations manuals. www.jjamusements.com 1-21 VENT PLATE (Electric only) General Information ..................................................1-21 Vent Plate Assembly ..................................................1-22 Vent Plate The vent plate is a multi-purpose access port into the boat hull. It acts as a vent for the hull and also allows easy access to the charge cable. 1-22 VENT PLATE ASSEMBLY (Electric only) The vent plate is located at the rear of the boat top. Open the vent plate to access the charging cable, and to perform visual inspections. te t Pla Ven To open, turn counterclockwise. The vent plate assembly is mounted with six 10-32 phillips-head screws with six 10-32 nylock nuts. To replace the vent plate assembly, remove the six screws. Inspect the gasket for damage and replace as needed. G TM T PERBOA S BU M A O-K RTS ENDU RANC PLAT UTCH E CL ES Protect your boat from harmful ULTRA VIOLET rays and keep it looking like new with 303 Aerospace Protectant! 503-304-8899 Specifications subject to change without notice - Check our website for valuable information including videos, workshop and operations manuals. www.jjamusements.com 1-23 REINFORCED RUBBER HINGE (Electric only) General Information ..................................................1-23 Reinforced Rubber Hinge ..........................................1-24 The reinforced rubber hinge connects the boat top to the hull. 1-24 REINFORCED RUBBER HINGE (Electric only) REMOVAL/INSTALLATION Disconnect wiring from the boat hull to the boat top (see wiring diagram on page 4-18). Close the boat top. From the rear, drill out the six rivets from the hull. Remove the top from the hull. Place the top upright on a soft surface. G TM T PERBOA S BU M A O-K RTS ENDU RANC PLAT UTCH E CL ES Who would have thought? J&J sells mini golf and batting cage supplies 503-304-8899 Specifications subject to change without notice - Check our website for valuable information including videos, workshop and operations manuals. www.jjamusements.com 1-25 Drill out the rivets and remove the rubber hinge. Insert five 3/16”x 3/4” aluminum rivets (J&J#002473) through the bracket and rubber hinge. Install the rivets through the backing plate of the rubber hinge and the boat top. G TM RA ES Specifications subject to change without notice - Check our website for valuable information including videos, workshop and operations manuals. www.jjamusements.com BU ENDU AT CH PL CLUT NCE M A O-K RTS T PERBOA S J&J carries all locktite brand threadlocker and other sealants. 503-304-8899 1-26 Place the boat top on the hull. Open the vent plate to access the rubber hinge. Pre-drill through the rubber hinge. Insert six rivets through the hull and rubber hinge. Insert a backing washer on inside of each rivet. Holding the backing plate, insert the rivets. Connect all wiring connections (see wiring diagram on page 4-18). G TM T PERBOA S BU M A O-K RTS ENDU RANC PLAT UTCH E CL ES VISIT WWW.JJAMUSEMENTS.COM/TECHNICAL/INDEX.HTM FOR TECHNICAL INFORMATION RELATED TO OUR PRODUCTS. 503-304-8899 Specifications subject to change without notice - Check our website for valuable information including videos, workshop and operations manuals. www.jjamusements.com 1-27 BATTERY CHARGING CABLE (Electric only) General Information ..................................................1-27 Battery Charging Cable ..............................................1-28 The battery charging cable is approximately 15’ long and is located inside the boat. It is easily accessed through the vent plate access cover located on the back of the boat top. 1-28 BATTERY CHARGING CABLE (Electric only) The battery charging cable is approximately 15’ long and is located inside the boat. The charging cable feeds out through the removable vent cover, guided by the eye bolt. A clamp-on cable stop prevents over-extension of the cable. Ch eye bo arg ing lt guid e cab le REMOVING BATTERY CHARGER CABLE nt Ve e lat Unscrew the vent plate hole cover. Access the cable through the vent plate hole. le ho p Note: Cable length approximately 15 ft. Disconnect the charger cable wiring from the main post (see wiring diagram Page 4-18). <CAUTION> Remove the ground wire from the battery to avoid electrical shock. G TM T PERBOA S BU M A O-K RTS ENDU RANC PLAT UTCH E CL ES worn out cables? we’ve got the replacements you need to get up and running quickly. 503-304-8899 Specifications subject to change without notice - Check our website for valuable information including videos, workshop and operations manuals. www.jjamusements.com 1-29 Pull the charging cable out through the inside of the boat top. Ch arg ing cab le Loosen the rubber cable stop. Remove the cable stop from the cable. Close the boat top. Pull the cable out through the vent plate hole. G TM ENDU RA AT CH PL CLUT NCE ES Specifications subject to change without notice - Check our website for valuable information including videos, workshop and operations manuals. www.jjamusements.com BU THE RIGHT TOOL FOR THE JOB: HexCrimp jr terminal crimping tool. J&J #2-70-0073-120 M A O-K RTS T PERBOA S Pull 503-304-8899 1-30 BATTERY-FILL QUICK-RELEASE COUPLER The battery filling system allows easy top-off of the battery water level from the outside of the boat. Simply attach the battery fill squeeze bulb (J&J#2-70-A0021C) to the access port on the back of the boat top to fill all the batteries to equal levels. Hold the quick-release coupler from outside so it doesn’t spin while loosening the inside nut. Loosen the hose clamp. Remove the hose from the coupler. Loosen and remove the plastic nut. Remove the coupler from the outside of the boat top. (J&J #2-70-0108) STRAIN RELIEF This combination strain relief and plug end protector has an easy to grab hand hold for connecting and disconnecting SB-120 charger plugs from your bumperboats. No more broken plug ends from charger leads being dropped on the ground. G TM T PERBOA S BU M A O-K RTS ENDU RANC PLAT UTCH E CL ES 2-70-0211 VISIT WWW.JJAMUSEMENTS.COM/TECHNICAL/INDEX.HTM FOR TECHNICAL INFORMATION RELATED TO OUR PRODUCTS. 503-304-8899 Specifications subject to change without notice - Check our website for valuable information including videos, workshop and operations manuals. www.jjamusements.com 1-31 MOTOR POWER SUPPLY CABLE (Electric only) General Information ..................................................1-31 Motor Power Supply Cable ........................................1-32 J&J # 2-70-A0011 1-32 MOTOR POWER SUPPLY CABLE (Electric only) REMOVAL/INSTALLATION Disconnect wiring at the main post (see wiring diagram page 4-18). <<CAUTION>> Remove the ground wire from the battery to avoid electrical shock. Loosen the plastic cable clamp. Slide the cable through the loosened plastic “Adel”-style clamp. G TM T PERBOA S BU M A O-K RTS ENDU RANC PLAT UTCH E CL ES THE RIGHT TOOL FOR THE JOB: HexCrimp jr terminal crimping tool. J&J #2-70-0073-120 503-304-8899 Specifications subject to change without notice - Check our website for valuable information including videos, workshop and operations manuals. www.jjamusements.com 1-33 Carefully loosen the nut from the plastic strain relief elbow. Remove the nut by sliding it to the cable end. Remove the cable through the boat top. (Note the location of the elbow for installation. See Figure 1.) ion tat n rie O Figure 1 G ENDU RA ES Specifications subject to change without notice - Check our website for valuable information including videos, workshop and operations manuals. www.jjamusements.com M A O-K RTS T PERBOA S TM AT CH PL CLUT NCE BU VISIT WWW.JJAMUSEMENTS.COM/TECHNICAL/INDEX.HTM FOR TECHNICAL INFORMATION RELATED TO OUR PRODUCTS. 503-304-8899 1-34 REV 3/27/2012 A Division of J&J Amusements, Inc. Bumper Boat Motor Work Bench Mount 800-854-3140 / 503-304-8899 www.FunPartsXpress.com A Receiver mounted to your work bench will make servicing your fleet of bumper boat motors SAFER and QUICKER. There’s no better way to hold your motors steady while servicing. Maximize efficiency in your shop; add two or three receivers to your work bench today. Receiver, Socket Type Part# 50011 2-1 BOAT HULL - LOWER ASSEMBLY General boat hull assembly .........................................2-1 Main power post (electric only) ...................................2-2 Boat half protector (electric only).................................2-4 Bilge pump (electric only) .........................................2.6 Battery-full kit (electric only) .....................................2-11 Super tube .................................................................2-13 This section of the Service Manual describes the various components of the boat hull assembly, how to diagnose problems and the removal and replacement of parts associated with the boat hull. NOTE: The top and hull assembly for the gas bumper boat is permanently attached. Super tube information only applies in this section. 2-2 MAIN POWER POST (Electric only) General information ....................................................2-2 Positive & negative main power post ...........................2-3 Power post, pre-2012 Power post, post-2012 Your J&J Blaster Boat may be equipped with one of two types of power posts. The pre-2012 version utilizes two rounded posts; one for the positive feed and one for the negative feed. Blaster Boats built during the 2012 model year changed to a single, rectangular post that contains both the negative and positive feeds. 2-3 MAIN POWER POST (Electric only) (FOR BOATS MANUFACTURED BETWEEN 20082011) The positive and negative main posts are located at the rear of boat hull. <WARNING> Before removing wires, disconnect the main ground wire from the negative power post. REMOVAL: Disconnect the negative cable from the battery. Remove all wiring to the main power post that is being replaced. (See wiring diagram on page 4-18.) Remove the mounting screws. Remove the power post. G ENDU RA ES Specifications subject to change without notice - Check our website for valuable information including videos, workshop and operations manuals. www.jjamusements.com M A O-K RTS T PERBOA S TM AT CH PL CLUT NCE BU VISIT WWW.JJAMUSEMENTS.COM/TECHNICAL/INDEX.HTM FOR TECHNICAL INFORMATION RELATED TO OUR PRODUCTS. 503-304-8899 2-4 BOAT HALF PROTECTOR (Electric only) General information ....................................................2-4 Boat half protector .......................................................2-5 The boat half protector acts as a seal for the motor cavity in the hull, preventing any water from entering the hull. 2-5 BOAT HALF PROTECTOR (Electric only) Unscrew the clamps and remove the protector. Carefully remove and clean any silicone from the boat hull. Install the protector and tighten the clamps securely. Apply silicone between the boat hull and protector. (For best results, use J&J #013331.) Let the silicone cure before putting the boat back in service. Note: Curing time varies depending on outside temperature and amount of silicone used (see silicone instructions for details). G TM ENDU RA AT CH PL CLUT NCE ES Specifications subject to change without notice - Check our website for valuable information including videos, workshop and operations manuals. www.jjamusements.com BU MARINE GOOP ADHESIVE #013331; the PERFECT SOLUTION TO ATTACH BOAT HALF PROTECTOR. M A O-K RTS T PERBOA S Silicone 503-304-8899 2-6 BILGE PUMP (Electric only) General information ....................................................2-6 Diagnosing problems...................................................2-7 Bilge pump assembly removal .....................................2-8 The bilge pump and fuse circuit feeds directly from the power distribution post/buss. The main power feeds via the red wire to the accessible fuse holder outside (located on the back of the boat top), then through the green/brown wire to the pump. The bilge pump is a 24VDC sealed, brushless, automatically-activated unit. The self-contained, solid-state electronics energize the pump motor on a pulse method; if the amp draw is above a preset threshold, it indicates that water is present and the pump will continue operation until the amp draw drops, indicating that no water is present. Note: If the inlet is sufficiently blocked, no water will enter the inlet and the pump will not sense amp draw, so it will shut off, even though water continues to accumulate in the hull. It is imperative that the daily inspection includes removing the vent plate and, using a flashlight, inspecting to see if water is building up in the hull. A bilge pump fuse, which is accessible for service from the outside of the hull near the vent plate, is located in the power feed line from the main buss. NOTE: The replaceable fuse is a 3-amp time-delay/slow-blow cartridge-style fuse. Using any fuse type other than this specification could result in poor performance and/or pump failure. 2-7 DIAGNOSING PROBLEMS (Electric only) Most bilge pump problems are mechanical; ie: plugged screen, blocked impellor or foreign material causing impellor drag. PROBLEM: Pump does not work, and daily inspection shows standing water in the hull. Solution: Remove water from the hull. Use a pump and discharge hose from spare parts and clip the leads to the battery pack. The new pump will have 3 leads. (The brown wire is normal “intermittent” operation, the brown/yellow wire is “pump on” constantly). With the discharge hose exiting to the pond, clip the brown/yellow wire to the positive post of the battery pack, then clip the black wire (ground) to the negative post of the battery pack. Tip: Replace/ re-charge batteries prior to testing. If the battery pack is discharged, pull up another boat with a charged system and pull the charge lead out. Use this as your power source to evacuate the water from the inoperative unit. Remove the bilge pump from the holder clips, and clean the screen and back flush the intake with a water hose. Inspect the wires for corrosion and/or damage. (You cannot test voltage drop unless current is flowing in the circuit). Replace the pump using the brown wire as the main power feed. This provides the proper “amp load” for function of the pump. PROBLEM: Pump runs constantly. This is caused most often by a load/drag against the impellor, tricking the system into pumping all the time. Small amounts of foreign material can cause this. In some cases, a worn impellor shaft can cause excess drag. Clean/replace as needed. G ENDU RA ES Specifications subject to change without notice - Check our website for valuable information including videos, workshop and operations manuals. www.jjamusements.com M A O-K RTS T PERBOA S TM AT CH PL CLUT NCE BU VISIT WWW.JJAMUSEMENTS.COM/TECHNICAL/INDEX.HTM FOR TECHNICAL INFORMATION RELATED TO OUR PRODUCTS. 503-304-8899 2-8 BILGE PUMP ASSEMBLY REMOVAL (Electric only) Disconnect wiring from the main post (see the wiring diagram for bilge pump connections on page 4-18). Squeeze the (blue) mounting tabs located on each side of the pump. Remove the pump from its mount. The screen is located between the pump and the mount. NOTICE Clean the screen before installing the bilge pump. G TM T PERBOA S BU M A O-K RTS ENDU RANC PLAT UTCH E CL ES ADD ANOTHER SOURCE OF REVENUE TO YOUR BUMPER BOAT POND. THE COIN OPERATED POND SIDE SQUIRTER. J&J #2-60-A0008 503-304-8899 Specifications subject to change without notice - Check our website for valuable information including videos, workshop and operations manuals. www.jjamusements.com 2-9 Remove the two 10-24 nylock nuts. NOTICE: Replacement of the pump mount and screen is needed only if damaged. Remove the bilge pump mount from the hull. To disconnect the output hose, remove/loosen the plastic hose clamp. Pull and slightly twist the hose to remove it from the pump. G ENDU RA ES Specifications subject to change without notice - Check our website for valuable information including videos, workshop and operations manuals. www.jjamusements.com M A O-K RTS T PERBOA S TM AT CH PL CLUT NCE BU VISIT WWW.JJAMUSEMENTS.COM/TECHNICAL/INDEX.HTM FOR TECHNICAL INFORMATION RELATED TO OUR PRODUCTS. 503-304-8899 2-10 Remove/loosen the plastic hose clamp. Pull and slightly twist the hose to remove it from the fitting. To remove the hose fitting, carefully hold the inside plastic nut. Remove the outside plastic nut. Remove the fitting from the inside of the hull. G TM T PERBOA S BU M A O-K RTS ENDU RANC PLAT UTCH E CL ES KEEPING YOUR BUMPER BOAT POOL CLEAN & PERFECT HAS NEVER BEEN SO EASY. 503-304-8899 Specifications subject to change without notice - Check our website for valuable information including videos, workshop and operations manuals. www.jjamusements.com 2-11 BATTERY-FILL KIT (Electric only) General information ..................................................2-11 Battery-Full kit installation .........................................2-12 The battery filling system allows easy top-off of the battery water level from the outside of the boat. Simply attach the battery fill squeeze bulb (J&J#2-70-A0021C) to the access port on the back of the boat top to fill all the batteries to equal levels. 2-12 BATTERY-FILL KIT INSTALLATION (Electric only) Remove the caps from the batteries and place aside for later use. Remove the manifold valves from the hose T-fittings. T- Loosely install the manifold valves into the batteries. Make sure the manifold valves are flush with the battery before tightening. g tin fit Manifold Valve Push the hose T-fittings into the manifolds. Use equal pressure until the fittings snap into place. Re s ink ek v mo NOTICE Be careful not to damage the T-fitting o-ring. TECH TIP: Wet the T-Fitting with distilled water to help it slip more easily into the manifold. NOTICE Twist the manifolds slightly to remove any kinks in the water lines. All kinks must be removed for the watering system to function correctly. Install the filler tube from the boat hull to fill the system. Push and slightly twist the hose to install. G TM T PERBOA S BU M A O-K RTS ENDU RANC PLAT UTCH E CL ES 503-304-8899 Specifications subject to change without notice - Check our website for valuable information including videos, workshop and operations manuals. www.jjamusements.com 2-13 SUPER TUBE General information ..................................................2-13 Super tube inflation ...................................................2-14 The Super Tube II is built with a urethane-coated fabric. Checking super tube for leaks ....................................2-16 Patching super tube ...................................................2-17 2-14 SUPER TUBE INFLATION FILL ADAPTER Insert a fill adaptor and turn clockwise 1/2 turn. Use a rubber-tip blow gun to fill the tube. VALVE FILL ADAPTER Insert a valve fill adaptor and turn clockwise 1/2 turn. G TM T PERBOA S BU M A O-K RTS ENDU RANC PLAT UTCH E CL ES Supertube fill adapter & pressure Test adapter & filler 2-60-A0006 00367 503-304-8899 Specifications subject to change without notice - Check our website for valuable information including videos, workshop and operations manuals. www.jjamusements.com 2-15 Use a tire inflator to fill the tube. VACUUM/BLOWER INFLATOR Open the tube valve and cover it with an inflator hose. Turn the blower on to fill. Inflate the tube to the recommended 3 PSI. Check it with a low-pressure gauge. Before returning the boat to service, check the valve for leaks by applying a solution of soapy water. If bubbles form, valve needs to be tightened. With the tube inflated, insert the valve tighter and turn the nut 1/8th turn. Re-check with the soapy water solution. Repeat as needed until no bubbles form. G RA Specifications subject to change without notice - Check our website for valuable information including videos, workshop and operations manuals. www.jjamusements.com BU ENDU ES M A O-K RTS T PERBOA S TM AT CH PL CLUT NCE 503-304-8899 2-16 CHECKING SUPER TUBE FOR LEAKS Fully inflate the tube. Place three to four drops of washing detergent in a spray bottle with water. Check small areas of the tube at a time, spraying the surface of the tube and looking for any bubbles. Draw a small circle around any punctures or rips in the tube (for easy location of the repair), then deflate tube. NOTICE: The glue and patch will bubble up and fail to bond properly if the tube is fully inflated when the repair is made. Do not attempt to patch around or near a tube seam, as the patch will not bond. G TM T PERBOA S BU M A O-K RTS ENDU RANC PLAT UTCH E CL ES SUPERTUBE PATCH KIT #003370 503-304-8899 Specifications subject to change without notice - Check our website for valuable information including videos, workshop and operations manuals. www.jjamusements.com 2-17 PATCHING SUPER TUBE Completely clean the surface of the tube to be patched before applying glue. Remove any 303 or other silicone/petroleum-based product from the tube surface. Follow the gluing instructions closely. Use or cut a vinyl patch from the repair kit making sure it is large enough to cover the damaged area with at least 1 to 2 inches of extra vinyl on all sides. Round off any corners. (Patch kit: J&J #003371, 003370). (Recommended vinyl cement: J&J #2-60-0072) Apply an even coat of cement to both of the surfaces to be joined, and let it dry only 2-5 minutes. G TM RA ES Specifications subject to change without notice - Check our website for valuable information including videos, workshop and operations manuals. www.jjamusements.com BU ENDU AT CH PL CLUT NCE M A O-K RTS T PERBOA S VINYL CEMENT #2-60-0072 503-304-8899 2-18 Place the patch over the damaged tube surface and use roller or old spoon to squeeze any air out of the patch, pressing the material together. Wait at least 24 to 48 hours before reinflating the tube. Pressure test the tube by inflating it and checking the patch with soapy water. If desired, leave the tube inflated overnight and recheck it before putting it back into service. NOTICE: When patching, the relative humidity must be less than 70%, preferably as low as 40%. Temperature should be 64°C to 77°C ( 147.2°F. to 170.6°F.). Bond strength drops very rapidly with heat or high humidity. Don’t patch the tube near water or in direct sunlight. J&J Supertube II on electric powered Blaster boat J&J’s Supertube is a great eye pleaser for your boat pond. The Supertube is constructed of a UV resistant Urethane material. The Supertube’s material allows for easy storage, it can be folded and boxed up and then re-inflated in the spring. Patching this tube is easy with J&J’s tube patch kit. Unprecedented guarantee on seam breakage for 3 years. Individual panels can be replaced at the factory. And best of all, the Supertube only weighs 12 pounds! 003370, Supertube repair kit G 003371, Supertube maintenance & repair kit TM T PERBOA S BU M 2-60-0072, 4OZ glue A O-K RTS ENDU RANC PLAT UTCH E CL ES 503-304-8899 Specifications subject to change without notice - Check our website for valuable information including videos, workshop and operations manuals. www.jjamusements.com 2-19 SUPER TUBE VALVE REPLACEMENT Insert a valve removal tool by lining up the prongs on the tool with the corresponding slots in the valve. With tube deflated, grasp the female fitting through tube. Once you have a solid grip, unscrew the valve by turning counterclockwise. Remove the male portion and install the replacement. The replacement procedure is same as loosening, only the valve is turned clockwise. The valve needs to be hand tightened. G ENDU RA ES Specifications subject to change without notice - Check our website for valuable information including videos, workshop and operations manuals. www.jjamusements.com M A O-K RTS T PERBOA S TM AT CH PL CLUT NCE BU Tool, supertube valve tightener (plastic style) part # 2-60-0123 503-304-8899 2-20 Fill the tube using the Super Tube fill adapter and an air-filler nozzle. Inflate the tube to the recommended PSI of 3 lbs. Before returning the boat to service, check the valve for leaks by applying a solution of soapy water. If bubbles form, the valve needs to be tightened. With the tube inflated, insert the valve tightener and turn the nut 1/8th turn. Re-check with soapy water solution. Repeat as needed until no bubbles form. G TM T PERBOA S BU M A O-K RTS ENDU RANC PLAT UTCH E CL ES iNFLATE AND DEFLATE BOAT TUBES QUICKLY WITH THIS 4HP VACUUM/BLOWER! J&J# 2-60-0124 503-304-8899 Specifications subject to change without notice - Check our website for valuable information including videos, workshop and operations manuals. www.jjamusements.com 3-1 Motor Assembly (Electric only) General information ....................................................3-1 Motor cover.................................................................3-2 Control rods/grips/handlebars ......................................3-4 Flex wire .....................................................................3-8 Motor ........................................................................3-11 Magnetic trigger ........................................................3-19 Motor relay................................................................3-21 Solid state switch .......................................................3-25 Boat captain ..............................................................3-27 Pivot ..........................................................................3-29 Lower unit assembly ..................................................3-33 Squirt pump assembly ...............................................3-37 SB-120 Terminal replacement ...................................3-42 This section of the Service Manual describes the various components of the electric motor assembly, how to diagnose problems, and the removal and replacement of parts associated with the motor. TECH TIP: While working on the boat motor, an easy way to make your own motor stand is to mount a pivot receiver (J&J #50011) to a sturdy work bench. 3-2 MOTOR COVER General Information ....................................................3-2 Motor Cover And Neoprene Protector .........................3-3 3-3 MOTOR COVER AND NEOPRENE PROTECTOR Remove the four 1/4” screws and washers to remove the motor cover. Lift the motor cover to gain access to the squirter hose. Disconnect the squirter hose by pushing the gray tab on the quick-release coupler. Lift Carefully remove the motor cover. Remove the neoprene protector by sliding it up the handlebars. It will be a little snug as it passes the hand grips. G ENDU RANC E ES Specifications subject to change without notice - Check our website for valuable information including videos, workshop and operations manuals. www.jjamusements.com M A O-K RTS T PERBOA S TM AT CH PL CLUT BU VISIT WWW.JJAMUSEMENTS.COM/TECHNICAL/INDEX.HTM FOR TECHNICAL INFORMATION RELATED TO OUR PRODUCTS. 503-304-8899 3-4 CONTROL RODS/GRIPS/HANDLEBARS General Information ....................................................3-4 Control Rods ...............................................................3-5 Hand Grips..................................................................3-6 Handlebar Assembly ...................................................3-7 The control rods are color coded, anodized aluminum rods that activate the motor and squirt pump functions. The green rod controls the motor power and the blue rod controls the squirt pump. 3-5 CONTROL RODS Each control rod has a spring located between the rod and the bottom of the tube. If the rod doesn’t return to the fully raised position, the spring will need to be replaced. Unbolt the magnetic trigger to remove the control rod. Use a magnet to remove the spring. Spring The countersink hole in the control rod faces the slot on the handlebar. Line up the countersink hole on the control rod with the slot in the handlebar. Install the magnetic trigger and make sure to orient the trigger with the magnet facing down, so the trigger can function properly. NOTICE: Apply anti-seize to the threads on the shoulder bolt. G ENDU RANC E ES Specifications subject to change without notice - Check our website for valuable information including videos, workshop and operations manuals. www.jjamusements.com M A O-K RTS T PERBOA S TM AT CH PL CLUT BU VISIT WWW.JJAMUSEMENTS.COM/TECHNICAL/INDEX.HTM FOR TECHNICAL INFORMATION RELATED TO OUR PRODUCTS. 503-304-8899 3-6 HAND GRIPS REMOVAL Use a razor blade and cut down the grip. Peel the grip away from the handlebar. INSTALLATION Set a new grip over the handlebar. Press the grip to move it down the handlebar. Tech Tip: To get the grip completely onto the handlebar, it may be helpful to use a blow gun to create a cushion of air between the two as you push the grip down the handlebar. Hand Grips G TM T PERBOA S BU M A O-K RTS ENDU RANC PLAT UTCH E CL ES Replacement hand grips and hand grip cement available at J&J Hand Grip Cement, #2963874 503-304-8899 Specifications subject to change without notice - Check our website for valuable information including videos, workshop and operations manuals. www.jjamusements.com 3-7 HANDLEBAR ASSEMBLY The handlebar assembly has two parts and is mounted on the motor with four 3/8” hex-head-mount bolts. (Part # 2-10-0003 handlebar mount plate ) (Part # 2-10-0002 handlebar ) Remove the gear box (see page 3-33). Remove the hex-head motor-mount bolts. After the bolts are removed, slide the plate up the drive shaft housing. Note The drive shaft housing will be loose from the motor. The handlebar is now free from the motor and can be removed. G ENDU RANC E ES Specifications subject to change without notice - Check our website for valuable information including videos, workshop and operations manuals. www.jjamusements.com M A O-K RTS T PERBOA S TM AT CH PL CLUT BU visit www.jjamusements.com and download a copy of our complete accessory catalog! 503-304-8899 3-8 FLEX WIRE General Information ....................................................3-8 Flex Wire Removal/Installation ...................................3-9 Fle xW J&J# 2-70-A0038 SB-1 20 Flex Wire ire 20 -1 SB The flex wire consists of a 10/2 gauge wire that feeds power from the main distribution post through the hull to the SB120 connector located at the motor pivot. Simple voltage drop tests can verify the condition of this harness. NOTICE: SHOULD THERE BE ANY PROBLEMS WITH THIS HARNESS, IT IS RECOMMENDED THAT THE ENTIRE HARNESS BE REPLACED. The 10/2 gauge wire harness for the flex wire is unique in that it must provide power to the motor and yet allow the motor 320 degrees of rotation. This movement can eventually cause flex wire failure and must be monitored for high resistance and/or breaks in the circuit. From the motor pivot SB-120 connector, the 10/2 gauge wire uses its OEM shielding and insulation, then transitions to an extreme wear “gorilla” loom that covers the wires where it must coil and uncoil to allow motor rotation. The wires are connected through the plates via brass bolts to feed the motor relay/squirt pump system. A voltage drop test and/or visual inspection are easily performed here. 3-9 FLEX WIRE Remove the SB-120 connector from the bracket. Remove the cable clamps from the pivot cover. Remove the pivot assembly. (see page 3-29). G TM RANC E ES Specifications subject to change without notice - Check our website for valuable information including videos, workshop and operations manuals. www.jjamusements.com BU ENDU AT CH PL CLUT M A O-K RTS T PERBOA S Looking for that elusive tool or shop accessory? call j&J, we’ve got them. 503-304-8899 3-10 Lift and rotate the UHMW disk up over the steering stop. This will help with further disassembly. Remove the flex cable from the UHMW disk. Remove the wire from the handlebar assembly. Inspect all fiber washers and bushings, as they act as an insulator for the flex wires. If they look compressed, heat damaged, or show signs of material loss, replace them. 2 3 1 g Bushin 4 11 10 5 5 Fib 5 er w 6 ash er 7 8 Bu ing sh 9 12 5 G TM T PERBOA S BU M A O-K RTS ENDU RANC PLAT UTCH E CL ES VISIT WWW.JJAMUSEMENTS.COM/TECHNICAL/INDEX.HTM FOR TECHNICAL INFORMATION RELATED TO OUR PRODUCTS. 13 503-304-8899 Specifications subject to change without notice - Check our website for valuable information including videos, workshop and operations manuals. www.jjamusements.com 3-11 MOTOR General Information ..................................................3-11 Motor Disassembly ....................................................3-12 The high-efficiency, brush-type, permanent magnet motor seldom has problems. MOST COMMON PROBLEMS: Symptom: The motor will not turn when the actuating rod is in the “ON” position. Most common cause: The motor circuit is open. Measure the voltage going into the motor from the main motor positive post (white wire), and measure the voltage going out of the motor (black wire). If voltage is present at the white wire, but not at the black wire, then the circuit inside the motor is open. Worn brushes are a common cause of this symptom. Solutions: Remove and inspect the brushes, replacing with new brushes and springs as needed. Symptom: The motor turns very slowly, and the connections get hot. Most common cause: The motor is drawing too many amps and may cause the 50 amp safety/breaker to trip. Normally this is caused by mechanical issues with the drive system and/or motor bearings, resultant armature drag, etc. Solutions: Check the propeller for foreign objects wrapped up in the shaft/propeller. Check the gear box for wear or seized shafts, bearings, etc. Replace as needed. G RANC E Specifications subject to change without notice - Check our website for valuable information including videos, workshop and operations manuals. www.jjamusements.com BU ENDU ES M A O-K RTS T PERBOA S TM AT CH PL CLUT 503-304-8899 3-12 MOTOR DISASSEMBLY Remove the motor cover and neoprene protector (see page 3-3). Remove the magnetic triggers (see page 3-25). Disconnect wiring connections at the power post (see wiring diagram on page 4-18). Remove the relay (see page 3-21). G TM T PERBOA S BU M A O-K RTS ENDU RANC PLAT UTCH E CL ES Add another fun feature to your bumper boat pond and generate more revenue! Pondside squirter #2-60-a0008 503-304-8899 Specifications subject to change without notice - Check our website for valuable information including videos, workshop and operations manuals. www.jjamusements.com 3-13 Remove the squirter assembly (see page 3-37). Remove the solid state switches (see page 3-25). Remove the flex wire assembly (see page 3-8). G ENDU RANC E ES Specifications subject to change without notice - Check our website for valuable information including videos, workshop and operations manuals. www.jjamusements.com M A O-K RTS T PERBOA S TM AT CH PL CLUT BU Specialty tools available at j&j. Call us to find that elusive tool. 503-304-8899 3-14 Remove the gearbox assembly and drive shaft (see page 3-34). Remove the pivot assembly (see page 3-29). Remove the UHMW lower disk. G TM T PERBOA S BU M A O-K RTS ENDU RANC PLAT UTCH E CL ES VISIT WWW.JJAMUSEMENTS.COM/TECHNICAL/INDEX.HTM FOR TECHNICAL INFORMATION RELATED TO OUR PRODUCTS. 503-304-8899 Specifications subject to change without notice - Check our website for valuable information including videos, workshop and operations manuals. www.jjamusements.com 3-15 Remove the power post (see motor wiring schematic on page 4-19). Remove the four 3/8” hex-head motor mount bolts. Remove the handle bar assembly (see page 3-7). Remove the drive shaft housing. G ENDU RANC E ES Specifications subject to change without notice - Check our website for valuable information including videos, workshop and operations manuals. www.jjamusements.com M A O-K RTS T PERBOA S TM AT CH PL CLUT BU Dielectric grease and other grease Products available at j&j! 503-304-8899 3-16 Before motor disassembly, make sure to mark the location of the cap in relation to the motor casing. NOTICE If the motor cap is assembled 180 degrees off, this will reverse polarity and cause the motor to turn counterclockwise. Remove the fan cover. Remove the fan bolt and slide the fan off of the shaft. G TM T PERBOA S BU M A O-K RTS ENDU RANC PLAT UTCH E CL ES INFLATE AND DEFLATE BOAT TUBES QUICKLY WITH THIS 4HP VACUUM/BLOWER! J&J# 2-60-0124 503-304-8899 Specifications subject to change without notice - Check our website for valuable information including videos, workshop and operations manuals. www.jjamusements.com 3-17 Remove the brush caps. Remove the brushes. Remove the four cap bolts. G ENDU RANC E ES Specifications subject to change without notice - Check our website for valuable information including videos, workshop and operations manuals. www.jjamusements.com M A O-K RTS T PERBOA S TM AT CH PL CLUT BU BASIC RIDE TIMER; SIMPLE AND EFFECTIVE WITH LIGHT AND BUZZER TO ALERT ATTENDANT. #01328 503-304-8899 3-18 To remove the motor cap, tap off by using a rubber mallet or soft-blow hammer. Remove the cap. NOTICE Clean the commutator with an emory cloth and electric motor cleaner, if needed. Clean off only the carbon build-up. Try not to remove any brass material. <CAUTION> Be careful when assembling the motor, as the magnetism will pull the pieces together. Keep fingers clear. Se ts cr ew NOTICE The brush holders are plastic and held in place with a set screw. Be careful to not over-tighten the set screws; just snug them up. Set screw G TM T PERBOA S BU M A O-K RTS ENDU RANC PLAT UTCH E CL ES VISIT WWW.JJAMUSEMENTS.COM/TECHNICAL/INDEX.HTM FOR TECHNICAL INFORMATION RELATED TO OUR PRODUCTS. 503-304-8899 Specifications subject to change without notice - Check our website for valuable information including videos, workshop and operations manuals. www.jjamusements.com 3-19 MAGNETIC TRIGGER (J&J# 2-30-0005) Bo tto m General Information ..................................................3-19 Magnetic Trigger .......................................................3-20 The magnetic trigger is a high-quality, neodymium magnet housed in an injection-molded holder that is designed to be “loose” when properly mounted, but not able to rotate because of the ears on the injection-molded part. The “down” side must face toward the solid state switch. Use Anti-Seize when installing the shoulder bolt to the actuator rod(s). NOTICE: Early versions of this trigger did not have the ears molded into the trigger, allowing it to rotate upside down. Mounting the magnet “up” side down will result in a poor or non-functioning sold state switch. G RANC E Specifications subject to change without notice - Check our website for valuable information including videos, workshop and operations manuals. www.jjamusements.com BU ENDU ES M A O-K RTS T PERBOA S TM AT CH PL CLUT 503-304-8899 3-20 MAGNETIC TRIGGER Remove the motor cover and neoprene protector (see page 3-3). Remove the magnetic trigger by removing the 1/4” shoulder bolt with an allen wrench. Inspect the nylon bushing and shoulder bolt. Replace as needed. Align the rode with the slot in the handlebars. Make sure the magnet in the trigger is pointed down, facing the solid state switch. Tighten the shoulder bolt. Bo tto m NOTICE: Mounting the magnet upside down will result in a poor or nonfunctional sold state switch. Tighten the shoulder bolt. G TM T PERBOA S BU M A O-K RTS ENDU RANC PLAT UTCH E CL ES VISIT WWW.JJAMUSEMENTS.COM/TECHNICAL/INDEX.HTM FOR TECHNICAL INFORMATION RELATED TO OUR PRODUCTS. 503-304-8899 Specifications subject to change without notice - Check our website for valuable information including videos, workshop and operations manuals. www.jjamusements.com 3-21 MOTOR RELAY (J&J# 2-70-0033) General Relay Information.........................................3-21 Testing the Relay .......................................................3-22 Relay - Removal & Replacement ...............................3-23 The relay (J&J# 2-70-0033) is a simple 24VDC marine-style unit. It consists of a spring-loaded plunger that is moved via an electromagnet. This magnet is created when the control circuit (two small contact posts) is energized via the micro/ solid state switch circuit. When the control circuit is energized, the plunger moves up and a large contact washer makes the connection between the input and output (large) terminals, thus allowing high amperage current to flow to the motor. To verify that the relay is functioning properly (without replacing it with a unit that is known to be so), perform the following simple tests. Before beginning, first verify the voltage at the main power post of motor. The voltage should match the battery voltage (same as voltmeter reading on back of boat). G RANC E Specifications subject to change without notice - Check our website for valuable information including videos, workshop and operations manuals. www.jjamusements.com BU ENDU ES M A O-K RTS T PERBOA S TM AT CH PL CLUT 503-304-8899 3-22 TESTING THE RELAY (-) Ac t. c ircu it it ircu t. c Ac (+) Negative input Negative output Symptom: The relay clicks, but the motor does not run or turns slowly. Most common causes: A faulty relay, battery or damaged wire. Measure the voltage at the negative input post (black 10-gauge wire). The voltage should match the battery voltage (same as the voltmeter reading on the back of the boat). If the voltage is good, measure the voltage at the negative output post (black 10-gauge wire), with the motor switch in the “ON” position. The voltage should match the battery voltage (same as the voltmeter reading on the back of the boat). NOTE: The relay controls the ground side of the motor circuit. Positiv e pos t ive at Neg Pos itiv post Symptom: The relay does not click and the motor does not run. Most common causes: A faulty relay or solid-state switch. Check the power to the relay input post (black 10-gauge wire). The voltage should match the battery voltage (same as the voltmeter reading on the back of the boat). Check the voltage at the relay activation circuit (white, 18-gauge wire (+) act. circuit). The voltage should match the battery voltage (same as the voltmeter reading on the back of the boat). e in put Negative post If the activation circuit is verified and the power side (18gauge white wire (+) act. circuit ) is verified, then jumper the yellow wire side directly ( (-) act. circuit on relay), to the main motor ground post. The relay should function. A quick ohm meter check across the two small posts should verify the activation windings - values should be 67-71 ohms. G TM T PERBOA S BU M A O-K RTS ENDU RANC PLAT UTCH E CL ES 503-304-8899 Specifications subject to change without notice - Check our website for valuable information including videos, workshop and operations manuals. www.jjamusements.com 3-23 RELAY - REMOVAL & REPLACEMENT Remove the motor cover and neoprene protector (see page 3-3). Remove the black and white wire lead from the power post. Disconnect the yellow wire lead from the relay. Cut the black wire lead above the yellow, 10-gauge butt connector. G RANC E Specifications subject to change without notice - Check our website for valuable information including videos, workshop and operations manuals. www.jjamusements.com BU ENDU ES M A O-K RTS T PERBOA S TM AT CH PL CLUT 503-304-8899 3-24 Remove the 5/16” bolt that secures the relay to the motor housing and remove the relay. Install the new relay. <CAUTION> Use only a 5/16” x 1/2” bolt with; lock and a flat washer. This is necessary in order to keep the bolt from causing internal damage to the motor. Crimp the 10-gauge butt connector to the black wire lead. Install the leads to the corresponding negative and positive posts (see wiring diagram on page 4-19). G TM T PERBOA S BU M A O-K RTS ENDU RANC PLAT UTCH E CL ES VISIT WWW.JJAMUSEMENTS.COM/TECHNICAL/INDEX.HTM FOR TECHNICAL INFORMATION RELATED TO OUR PRODUCTS. 503-304-8899 Specifications subject to change without notice - Check our website for valuable information including videos, workshop and operations manuals. www.jjamusements.com 3-25 SOLID STATE SWITCH General Information ..................................................3-25 Solid State Switch ......................................................3-26 The solid state switches are completely sealed and utilize magnetic triggers to turn on a low-amperage circuit and energize the pull-in windings of the motor relay, or activate the squirt pump. These have a built-in LED light that serves as a self-diagnostic tool to aid in troubleshooting these devices. This sealed solid state switch is triggered on and off by the proximity of a neodymium magnet located in the magnetic trigger housing (see page 3-19). The function of the solid state switch is dependent upon the proximity of the magnet to the switch. NOTICE: When replacing the magnetic trigger or anything else in this area, be sure to orient the magnet trigger magnet side down so it can function properly. During normal operation, the LED will light when the switch is “ON”. Symptom: The light is on all the time, even when the switch is not activated. Most common cause: The solid state switch is wired incorrectly, or the magnetic trigger is too close to the switch, not allowing the switch to turn off. NOTICE: If the solid state switch has been wired incorrectly, major damage will occur. Solutions: The switch is defective and must be replaced. Symptom: The light is off all the time, even when the switch is in the “ON” position. Most common cause: No voltage to the switch. Solutions: Verify that there is voltage the to switch. G RANC E Specifications subject to change without notice - Check our website for valuable information including videos, workshop and operations manuals. www.jjamusements.com BU ENDU ES M A O-K RTS T PERBOA S TM AT CH PL CLUT 503-304-8899 3-26 SOLID STATE SWITCH Remove the magnetic trigger (see page 3-19). Remove the wire leads from the power post (see wiring diagram on page 4-19). On the under-side of the motor, remove the solid state switch mounting nuts. Remove the solid state switch. Note: There is NO left or right solid state switch; it can be installed on the squirt (blue rod) or motor (green rod) side. The LED light on the switch must face the inside of the control rods (solid state switch part # 2-30-A0002). G TM T PERBOA S BU M A O-K RTS ENDU RANC PLAT UTCH E CL ES 503-304-8899 Specifications subject to change without notice - Check our website for valuable information including videos, workshop and operations manuals. www.jjamusements.com 3-27 BOAT CAPTAIN (Standard equipment on U.S. models only) General Information ..................................................3-27 Testing the Boat Captain ............................................3-28 This device individually controls the motor via the motor solid state switch and/or the squirt pump via its solid state switch. Like the switch, it controls the ground side of the circuit. G ENDU RANC E ES Specifications subject to change without notice - Check our website for valuable information including videos, workshop and operations manuals. www.jjamusements.com M A O-K RTS T PERBOA S TM AT CH PL CLUT BU Attach the j&j pivot receiver to a sturdy workbench To secure a boat motor to a work bench. #50011 503-304-8899 3-28 TESTING THE BOAT CAPTAIN To bypass the remote control for the squirt pump, disconnect the orange lead from the remote to the black lead of the switch. Jumper the switch’s black lead to the ground post. The squirt pump and the switch should now work normally. To bypass the remote control for the motor, disconnect the white lead from the remote to the black lead of the motor solid state switch. Jumper the switch black lead to the ground post. The motor should work normally. If testing indicates a problem with the boat captain module, always make sure the transmitter is functioning properly. NOTICE: The J&J bumper boat conforms to ASTM standards. These standards require that a device be in place to prevent inadvertent motor actuation by the rider when entering or exiting the boat. The boat captain is installed to allow the ride operator to disable the motor during loading and unloading of the boat. Boat Captain - Wiring (Retro-fit) Connect red wire to positive terminal. Connect black & yellow wires to gound terminal. Positive terminal Ground terminal (negative) On/Off switch Connect orange wire to black wire from squirter switch. Squirter switch Connect white wire to black wire from On/Off switch. G A O-K RTS TM T PERBOA S BU M Remove black switch wires from ground terminal. Cut off ring terminals and replace with female end spade terminals. ENDU RANC PLAT UTCH E CL ES 503-304-8899 Specifications subject to change without notice - Check our website for valuable information including videos, workshop and operations manuals. www.jjamusements.com 3-29 PIVOT General Information ..................................................3-29 Pivot ..........................................................................3-30 G RANC E Specifications subject to change without notice - Check our website for valuable information including videos, workshop and operations manuals. www.jjamusements.com BU ENDU ES M A O-K RTS T PERBOA S TM AT CH PL CLUT 503-304-8899 3-30 PIVOT Place the motor upside down with the motor cover removed. Remove the six allen-cap screws. Next, remove the four 5/16” nuts. Note the placement and use of the flat washers and spacer sleeves. Make sure that all threads are treated with anti- galling and corrosion resistant thread compound, such as Loctite® Marine Grade Anti-Seize. Remove the pivot shield. Remove the pivot bracket. NOTICE: The UHMW plastic split insert has index tabs; this is done so it remains static, and the pivot turns, plastic-onplastic, during operation. Index tabs Insert bushing Index tabs Index tabs Remove the pivot and insert bushings. In se G TM T PERBOA S BU M A O-K RTS ENDU RA AT CH PL CLUT NCE ES rt bu sh in g CORROSION SOLUTION: CORROSION BLOCK PRODUCTS AVAILABLE AT J&J. 12 OUNCE AEROSOL - #99101 503-304-8899 Specifications subject to change without notice - Check our website for valuable information including videos, workshop and operations manuals. www.jjamusements.com 3-31 Remove the pivot bushing. Inspect the pivot bushing and drive shaft bushing for wear (i.e. grooves, pitting and cracking). If any of these conditions exist, it is recommended that the part be replaced. g in sh Bu ck Thi b we Thin web ck Thi b we Thin web The mount bushings do have a top and bottom. Position the bushings’ thicker web to the top of the motor and the thin web toward propeller. USE A LIBERAL COATING OF MARINE-TYPE GREASE, SUCH AS J&J CORROSION BLOCK # 99109, ON THE WEAR SURFACES DURING REASSEMBLY. NOTICE: Index tabs of the insert bushing face each other inside the pivot shield. These tabs align with the pivot stop on the drive housing. NOTICE: When installing Nylock nuts on the pivot, MARINERS CHOICE NEVER SEEZ® or equivalent must be used to prevent corrosion and galling. G ENDU RANC E ES Specifications subject to change without notice - Check our website for valuable information including videos, workshop and operations manuals. www.jjamusements.com M A O-K RTS T PERBOA S TM AT CH PL CLUT BU VISIT WWW.JJAMUSEMENTS.COM/TECHNICAL/INDEX.HTM FOR TECHNICAL INFORMATION RELATED TO OUR PRODUCTS. 503-304-8899 3-32 Install the drive shaft housing bushings. Install the pivot and bushings. Install the pivot shield. Install and tighten the pivot bracket nuts to 20 ft. lbs. <WARNING> If the pivot bracket nuts are over-tightened, binding of the pivot assembly may occur. Finish by installing the allen-cap-headed screws. Make sure to have the flex wire cable clamps in the correct position (see flex wire removal on page 3-8). KNEE PADS BACK SUPPORT BELTS GLOVES WE HAVE MANY OF THE PROTECTIVE CLOTHING ITEMS YOU NEED IN STOCK! G TM T PERBOA S BU M A O-K RTS ENDU RANC PLAT UTCH E CL ES Protect yourself with the right protective wear. Mechanix wear: it’s what the mechanics wear! 503-304-8899 Specifications subject to change without notice - Check our website for valuable information including videos, workshop and operations manuals. www.jjamusements.com 3-33 LOWER UNIT ASSEMBLY Prop & Guard ............................................................3-35 Anode .......................................................................3-36 G TM RANC E ES Specifications subject to change without notice - Check our website for valuable information including videos, workshop and operations manuals. www.jjamusements.com BU ENDU AT CH PL CLUT M A O-K RTS T PERBOA S General Information ..................................................3-33 Gearbox/Drive Shaft ..................................................3-34 503-304-8899 3-34 GEARBOX AND DRIVE SHAFT Remove the gearbox assembly. Next, remove the gasket and discard, as this item will be replaced with a new gasket. (J&J #01981). Grasp the end of the shaft and remove. NOTICE: The keyway is welded in place on both ends of the drive shaft. If the keyway is damaged or worn, the drive shaft must be replaced. The drive shaft can be installed in either direction. Before installing the shaft, coat both ends with MARINERS CHOICE NEVER SEEZ®. Lower the shaft into the housing. When the shaft contacts the motor output shaft, rotate the shaft in order to align the motor shaft slot and the drive shaft keyway; you will feel the drive shaft move toward the motor when this occurs. Coat both sides of the new gasket with a thin coating of silicone sealant and install on the housing. Make sure to align the key slot on the gearbox shaft with the keyway on the drive shaft. Tighten the mounting bolts. G TM T PERBOA S BU M A O-K RTS ENDU RANC PLAT UTCH E CL ES Visit www.Jjamusements.Com and download a copy of our complete accessory catalog! 503-304-8899 Specifications subject to change without notice - Check our website for valuable information including videos, workshop and operations manuals. www.jjamusements.com 3-35 PROP AND GUARD Remove the prop guard cover. With a punch, carefully remove the roll pin from the prop. Pull the prop off of the shaft. Remove the prop guard backing plate. Reinstall the prop guard backing plate. Slide the prop onto the shaft, taking care to line up the prop holes with the corresponding holes on the shaft. Use an awl or suitable drift pin to help align the holes. Using a new, stainless steel roll pin, tap in with a hammer and punch until it is flush with the prop. Install the prop guard. G ENDU RANC E ES Specifications subject to change without notice - Check our website for valuable information including videos, workshop and operations manuals. www.jjamusements.com M A O-K RTS T PERBOA S TM AT CH PL CLUT BU VISIT WWW.JJAMUSEMENTS.COM/TECHNICAL/INDEX.HTM FOR TECHNICAL INFORMATION RELATED TO OUR PRODUCTS. 503-304-8899 3-36 ANODE A galvanic anode is the main component of a galvanic cathodic protection (CP) system used to protect buried or submerged metal structures from corrosion. Anodes are made from a metal alloy with a more “active” voltage (more negative electrochemical potential) than the metal of the structure. The difference in potential between the two metals means that the galvanic anode corrodes, so that the anode material is consumed in preference to the structure. Anode The loss (or sacrifice) of the anode material gives rise to the alternative name of sacrificial anode. As this device is made to deteriorate, it begins to “die” the minute it is placed in the water. To be effective, it must have good contact with the material you are protecting, and have good exposure to the water. With this in mind, remove and clean the contact surfaces. A wire brush works well for this. If the anode looks like swiss cheese, it has lived its useful life and needs to be replaced. To remove, clean, or replace the anode, remove the bolts from the squirt pump. NOTICE Apply silicone to the bolt threads before installing anode. (For best results, use J&J #013331.) G TM T PERBOA S BU M A O-K RTS ENDU RANC PLAT UTCH E CL Replacement anodes available at j&j. # 37398101 ES 503-304-8899 Specifications subject to change without notice - Check our website for valuable information including videos, workshop and operations manuals. www.jjamusements.com 3-37 SQUIRT PUMP ASSEMBLY (J&J# 2-60-A0014) General Information ..................................................3-37 Squirt Pump Assembly ...............................................3-38 Squirt Nozzle ............................................................3-41 The squirt pump is a sealed, 24VDC, brushless, submersible-style pump that is powered through the same type of solid state switch and magnetic trigger system that operates the motor relay. The squirt pump is a sealed unit, and repairable problems center around debris in the impeller. The output water tube feeds through an in-line filter, then a quick-release coupler (to allow motor cover removal; see page 3-2) to the squirt nozzle. The electrical supply feeds from the main motor power posts, through the fuse holder (the slow-blow fuse is the same that is used by the bilge pump), is located in the front of the motor just under the motor cover, and can be removed and checked without removing the motor cover. The squirt pump is controlled by interrupting the ground side of the circuit, via the solid state switch or the boat captain remote control unit (standard equipment on U.S. models only). To isolate the pump from the solid state switch and boat captain, disconnect the yellow lead that goes from the fuse holder to the micro-switch and jumper it directly to the ground post. The pump should run continuously; if not, double-check the fuse by disconnecting the fuse holder wires and use DVOM to test for continuity through the fuse. If the pump runs when the micro-switch and boat captain are bypassed, then the circuits must be tested. G RANC E Specifications subject to change without notice - Check our website for valuable information including videos, workshop and operations manuals. www.jjamusements.com BU ENDU ES M A O-K RTS T PERBOA S TM AT CH PL CLUT 503-304-8899 3-38 SQUIRT PUMP ASSEMBLY Remove the motor cover and neoprene protector (see page 3-3). Cut and remove the zip tie from the hose. Remove the hose from the filter by squeezing the spring clamp and sliding the clamp away from the filter. Slightly pull and twist to remove the hose from the filter. Cut and remove the zip tie from wiring. G TM T PERBOA S BU M A O-K RTS ENDU RANC PLAT UTCH E CL ES IN-LINE SQUIRT PUMP FILTERS AVAILABLE. #001772 503-304-8899 Specifications subject to change without notice - Check our website for valuable information including videos, workshop and operations manuals. www.jjamusements.com 3-39 Disconnect the wire from the squirt switch (see wiring diagram on page 4-19). The squirt pump fuse is located on the side opposite the handle bars. (Refer to page 4-6 for fuse testing procedures.) n se Fu io at c lo Disconnect the wire from the fuse holder. NOTICE Carefully pry the connector from the fuse holder by using a flat-blade screwdriver. Place the wiring and hose aside. G ENDU RANC E ES Specifications subject to change without notice - Check our website for valuable information including videos, workshop and operations manuals. www.jjamusements.com M A O-K RTS T PERBOA S TM AT CH PL CLUT BU Visit www.Jjamusements.Com and download a copy of our complete accessory catalog! 503-304-8899 3-40 Cut the zip tie to remove the hose from the handle bar base. Carefully remove the wiring and hose from the handlebar plate. Remove the two bolts from the drive shaft housing. Note A metal anode is mounted between the squirt pump and driveshaft housing. When installing the anode, apply a small amount of silicone on each bolt. A O-K RTS CORROSION SOLUTION! CORROSION BLOCK PRODUCTS AVAILABLE AT J&J. OUNCE AEROSOL #99101 503-304-8899 Specifications subject to12 change without notice - Check our -website for valuable information including videos, workshop and operations manuals. www.jjamusements.com G TM T PERBOA S BU M ENDU RANC PLAT UTCH E CL ES 3-41 SQUIRT NOZZLE The squirt nozzle is attached to the motor cover. Use an adjustable wrench and squeeze the spring clamp. Slide the clamp down the hose. Pull and slightly twist the hose to remove. Use a flat-blade screwdriver and turn clockwise to remove the nozzle from the motor cover. NOTICE The nozzle is threaded opposite of standard screws- tighten and loosen with this in mind. G ENDU RANC E ES Specifications subject to change without notice - Check our website for valuable information including videos, workshop and operations manuals. www.jjamusements.com M A O-K RTS T PERBOA S TM AT CH PL CLUT BU VISIT WWW.JJAMUSEMENTS.COM/TECHNICAL/INDEX.HTM FOR TECHNICAL INFORMATION RELATED TO OUR PRODUCTS. 503-304-8899 3-42 SB-120 TERMINAL General Information ..................................................3-42 SB-120 Terminal Replacement ..................................3-43 NOTICE It is very important that the SB-120 plug connections be solid and secure. This section of the manual describes the correct installation procedures, however, if you have any doubt about the connection and your abilities to perform the task correctly, J&J does sell complete cable assemblies with all connectors in place. Battery-to-battery charger part # 2-70-A0017 Battery-to-motor part # 2-70-A0011 G TM T PERBOA S BU M A O-K RTS ENDU RANC PLAT UTCH E CL ES 503-304-8899 Specifications subject to change without notice - Check our website for valuable information including videos, workshop and operations manuals. www.jjamusements.com 3-43 SB-120 TERMINAL REPLACEMENT Part # 2-70-A0022 includes: Strain relief (2) Terminal contacts (2) 6-32 nylock nut (1) 6-32 machine screw (1) 10-32 nylock nut (2) 10-32 x 3/4 pan head screw (2) SB-120 housing (1) NOTE: SB-120 ASSEMBLY DOES NOT CONTAIN CLEAR POLY VINYL TUBING # 2-60-0094 <<WARNING>> You must first disconnect the negative battery pack cable from the power post. DO NOT WORK ON CABLES THAT ARE STILL CONNECTED TO POWER. Terminals can be removed by pushing down on the housing clips and pulling on the cable. Remove the cable shielding back 1-1/2” Strip the wire shielding back 3/4”. lding shie Cable ire g in eld i Sh W Insert the terminal contacts and crimp the terminal to the wire using a hydraulic crimp tool, such as Central Hydraulics from Harbor Freight. Note: Attempting to to crimp new terminals with a vise/ hammer, etc. will result in a poor connection. G ENDU RANC E ES Specifications subject to change without notice - Check our website for valuable information including videos, workshop and operations manuals. www.jjamusements.com M A O-K RTS T PERBOA S TM AT CH PL CLUT BU CORROSION SOLUTION! CORROSION BLOCK PRODUCTS AVAILABLE AT J&J. 12 OUNCE AEROSOL - #99101 503-304-8899 3-44 SB-120 TERMINAL REPLACEMENT Install a clear tube (J&J #2-60-0094) over the cable and install strain relief on both sides of the cable utilizing the two pan head-screws and nylocks. Insert the terminal contacts into the SB-120 housing and push until the terminal snaps into the housing. NOTICE: THE WHITE WIRE IS TO POSITIVE, THE BLACK WIRE IS NEGATIVE. REVERSING THESE LEADS WILL RESULT IN A BLOWN CHARGER OUTPUT FUSE. Install and tighten strain relief to the housing using the machine screw and nylock. G TM T PERBOA S BU M A O-K RTS ENDU RANC PLAT UTCH E CL ES THE RIGHT TOOL FOR THE JOB. CRIMP WITH EASE! J&J #2-70-0073-120 503-304-8899 Specifications subject to change without notice - Check our website for valuable information including videos, workshop and operations manuals. www.jjamusements.com 4-1 BASIC Electrical Troubleshooting General Information....................................................4-1 Basic Electrical Troubleshooting .................................4-2 Voltage Drop Test...................................................... 4-4 Testing Fuse .............................................................. 4-6 Major Electrical Components .....................................4-7 Specific Gravity Test ................................................. 4-13 Equalizing Batteries .................................................. 4-15 Battery Maintenance-Winter Storage ........................ 4-16 Master Charger......................................................... 4-17 Wiring Schematic ..................................................... 4-18 Motor Wiring Schematic .......................................... 4-19 Boat Captain Wiring Schematic ................................4-20 This section of the Service Manual describes basic electrical troubleshooting and testing procedures to help you correctly diagnose electrical problems that may arise. This section also contains the complete wiring schematics of the J&J Blaster Bumper Boat. 4-2 BASIC Electrical Troubleshooting Whenever testing for power (voltage) flow in the circuit, the FIRST order of business is to establish and verify the test unit is functioning properly and has a solid ground. When possible, attach the ground lead of the tester directly to the ground post of the battery pack. Using the positive lead of the tester, probe the positive terminal of the battery pack and “verify” that the tester, and your connections, are working properly. Single battery test (6 plus volts reading) Battery pack test (24 plus volts reading) We are about to provide you with a simple, step-by-step process that will let you divide and conquer common DC circuit problems. It is called a voltage drop test, and it works! Voltage drop tests are an effective way to test an electrical circuit’s ability to deliver power to electrical loads. THE NATURE OF CIRCUITS Circuits and power supplies exist for one reason: to supply electrical power to operate loads. Voltage drop causes countless unsolved electrical mysteries, especially when it infects the ground side of a circuit. It can also trick you into replacing parts that are not in need of replacement. The more connections and wiring a unit has, the more vulnerable the electrical system is to voltage drop. VOLTAGE DROPS-GOOD OR BAD? Voltage drop tests are usually performed to test loads and locate circuit problems. As a result, we may have a tendency to think of voltage drops as bad things. But voltage drops can be good or bad; it all depends on where they occur in the circuit, and whether they operate loads or simply waste energy. GOOD voltage drops are essential. Loads won’t work without them. Available voltage must be dropped across the load, or it cannot work. BAD voltage drops allow available voltage to be “dropped” at a high resistance elsewhere in the circuit; this steals electrical energy from the load. A bad voltage drop in a circuit converts electrical energy into heat. RULES OF CIRCUITS Let’s agree on the following rules: 1) CIRCUIT CURRENT IS DETERMINED BY THE LOAD(S). A 75-watt bulb demands less current than a 100-watt bulb screwed into the same socket. Installing a higher wattage bulb increases the circuit load. Adding a second light to a circuit also increases the circuit load. Adding loads increases circuit current. Circuits are designed to supply a specified amount of current. Fuses are designed to protect wiring from excessive current. G TM T PERBOA S BU M A O-K RTS ENDU RANC PLAT UTCH E CL ES 503-304-8899 Specifications subject to change without notice - Check our website for valuable information including videos, workshop and operations manuals. www.jjamusements.com 4-3 2) EVERYTHING HAS RESISTANCE. The wires, connectors, and switch contacts that make up a circuit all have some resistance and, as its name implies, resistance opposes (resists) current. In an undamaged, properly designed circuit, normal resistance is small enough that it doesn’t keep the load from working. UNWANTED RESISTANCE IN THE CIRCUIT REDUCES THE AMOUNT OF ELECTRICAL ENERGY DELIVERED TO THE LOAD. Causes of unwanted resistance include: loose connections, corroded connections, broken wire strands, pitted relay contacts, and other physical damage that resists current. SOME CIRCUIT PROBLEMS CAN BE SPOTTED QUICKLY WITH THE NAKED EYE. Some won’t be so easy to identify. Even if you cannot see visible causes for unwanted circuit resistance, the voltage drop test will find them. Symptoms of unwanted resistance are problems like a light bulb that glows dimly instead of shining brightly, or a motor that turns too slowly. CURRENT THROUGH RESISTANCE RELEASES HEAT. (Remember this the next time you toast a slice of bread!) If we want heat to defrost a piece of glass or warm our leather seats with an electrical heater, resistance is a good thing; a desirable voltage drop. On the other hand, a hot battery cable and slow-turning motor indicate wasted electrical energy. VOLTAGE DROP TEST EQUIPMENT Voltage drops are tested with a voltmeter or scope. (A test light indicates whether voltage is present, but it doesn’t measure the amount of voltage.) • Voltmeters measure and display the difference in voltage levels between the voltmeter test leads. • The black test lead connected to the meter COM port should be considered the “reference.” This is the baseline; it is the starting point for the measurement. Voltage at the red probe tip connected to the meter VOLT port is compared to this starting point and displayed on the meter as a number. (Reversing the test leads won’t hurt a digital meter, but we may see a negative voltage value displayed.) VOLTAGE DROP TESTS The voltage drop test has incredible advantages over testing resistance with an ohmmeter. A test with an ohmmeter may show continuity, but will not indicate if a damaged wire is capable of carrying the needed current. A similar situation would occur with a wire that is too small to conduct the needed flow of electrons. Such an undersized wire would show perfect continuity with an ohmmeter, yet become a restriction in a circuit with heavy current. Due to the inconclusive results and the need to disconnect the components, many consider troubleshooting with an ohmmeter a potentially misleading waste of time. Ohmmeters do have their place, like testing the resistance of the motor relay pull in windings, but for most troubleshooting, the voltage drop test is the way to go. Electrical voltage drop varies according to current flow. Unless you operate the circuit so current flows through it, you can’t measure voltage drop. Because an ohmmeter’s battery can’t supply the current that normally flows through most circuits, ohmmeter tests usually can’t detect restrictions as accurately as a voltage drop test. G BU RA ENDU Specifications subject to change without notice - Check our website for valuable information including videos, workshop and operations manuals. www.jjamusements.com M A O-K RTS T PERBOA S TM ES AT CH PL CLUT NCE 503-304-8899 4-4 Voltage Drop Testing Co ct or Post Use the voltage drop test to check the battery-terminalto-cable-end and battery-pack-to-breaker-switch for excessive resistance. The voltage drop should be very small on this type of large-wire, short-run connection. Typical readings would be .008 to .030. Any reading of .200 or higher indicates severe resistance problems in the circut section being tested. From the post/buss distribution block, power flows in from the charge circut and out to all load devices, as well as the volt meter system monitor located on the back of the boat top near the vent access cover. Note: All power in or out flows through the breaker. If the volt meter reading is indicating zero, make sure the switch is “ON”. back of Breaker Te r e nn The battery pack contains four 6-volt, deep-cycle lead-acid flooded-type batteries connected in series to produce a 24vdc “pack.” 4-gauge copper cables are used to connect the pack and furnish power through the main breaker switch to the main distribution buss. The charge system lead is a 15’ long, 10-gauge cable connected to the post/buss. The SB-120 connector on the cable end mates with the SB-120 connector on the charger lead. This lead and connector receives a high degree of punishment and wear. Use the voltage drop test across the connector while the charger is on to determine the resistance of the connection. m in al A reading of .200 volts or above indicates that repair to the connection is required. NOTICE: The terminal ends of the SB-120 connector can be unloaded from the connector and repaired/replaced. During reinstallation, make sure the wires are properly loaded in the connector. The black wire from the charger cable goes to the black wire from the charger. If these are reversed, it will “blow” the output fuse in the charger. G TM T PERBOA S BU M A O-K RTS ENDU RANC PLAT UTCH E CL ES 503-304-8899 Specifications subject to change without notice - Check our website for valuable information including videos, workshop and operations manuals. www.jjamusements.com 4-5 Open-circuit problems such as broken, disconnected wires and/or connections stop current flow. After you fix an open circuit, switch the circuit on again and check for lingering voltage drop. Until you get current flowing and check the circuit again, you can’t know if the entire circuit is healthy. Although resistance-free connections, wires and cables would be ideal, most of them will contain at least some voltage drop. MAXIMUM LIMITS • 0.00V across a connection • 0.20V across a wire or cable • 0.30V across a switch • 0.10V at a ground G BU RA ENDU Specifications subject to change without notice - Check our website for valuable information including videos, workshop and operations manuals. www.jjamusements.com M A O-K RTS T PERBOA S TM ES AT CH PL CLUT NCE 503-304-8899 4-6 TESTING FUSE TESTING PROCEDURE FOR FUSE It is extremely important to understand that if a fuse looks good, it might not in fact be good! Fuses can appear to be fine and have a break in them so small that it cannot be seen by the naked eye. Therefore, it is important to check a fuse with an ohmmeter or a continuity tester instead of assuming that it is good. Use a multi-meter and set the range switch to the lowest resistance range to check the fuse. A good fuse will read 0 ohms (depending on what the meter reads when the leads are held together), and a bad fuse will read the same as holding the leads in the air. The illustration below shows how to test a fuse, with the picture’s readout showing the fuse as good. There is no gray area; the fuse is either good or it is not. G TM T PERBOA S BU M A O-K RTS ENDU RANC PLAT UTCH E CL ES 503-304-8899 Specifications subject to change without notice - Check our website for valuable information including videos, workshop and operations manuals. www.jjamusements.com 4-7 MAJOR ELECTRICAL COMPONENTS J&J battery-powered bumper boats utilize a simple 24VDC circuit containing the power pack, consisting of four 6VDC deep-cycle, 225 amp hour batteries wired in a series. 50 amp breaker/switch #2-60-0102 Power post, negative junction - P J B O E F + + Battery Battery - - Battery + + Battery The cables and wire harnesses connect the components in the circuit. NOTICE: Any replacement cables or wiring must meet or exceed OEM standards for wire gauge and quality. When replacing connectors, it is always best to use heat-sealing items. Due to the size and difficulty of effectively crimping the SB terminal lugs, J&J recommends replacement of the entire harness end that is affected by the problem. VOLT METER VOLTS #2-70-0103 (Fuse holder) #2-70-0104 (Fuse) Green White to positive (+) 50 amp breaker/switch Red Volt meter & fuse cable #2-70-A0045 #2-60-0102 #2-70-A0017 White Power ower post #2-70-0153 Black 10/2 0/2 Cable to o motor Red #2 R -70-A004 6 10/2 Cable to charger g - P J B O E F #2 70 A0011 #2-70-A0011 Black to negative (-) 2-70-A0011 Fuse #2-70-0149 046 -A0 2-70 Red # Black #A109 White Black Female connector male connector + + Battery Brown - #A108 - Black Battery Bilge pump (24V) 08 #A1 Battery G TM RA ENDU Specifications subject to change without notice - Check our website for valuable information including videos, workshop and operations manuals. www.jjamusements.com BU ES AT CH PL CLUT NCE M A O-K RTS T PERBOA S + Battery + - #A108 #2-70-A0044 503-304-8899 4-8 Testing: Use the DVOM and perform voltage drop tests to troubleshoot the wire harness and connectors. The unique portion of the wire harness system, the flex wires, allow the motor to rotate 320 degrees while maintaining current flow to the motor system. The system is designed to eliminate as many connectors as possible and avoid problem areas, while providing a simple, trouble-free unit. wir e SB -1 20 Flex w ire Fle x SB 20 -1 G TM T PERBOA S BU M A O-K RTS ENDU RANC PLAT UTCH E CL ES 503-304-8899 Specifications subject to change without notice - Check our website for valuable information including videos, workshop and operations manuals. www.jjamusements.com 4-9 The motor portion of the wire harness connects the solid state, magnetically-triggered on/off switches to the power relay, motor and squirt pump with a corresponding ground wire circuit to complete the loop. 2 White lead from Kartrol unit Fuse #2-70-0104 Fuse holder #2-70-0103 Black lead to negative post Yellow lead to negative post Red lead to positive post Motor 3 #2-70-0051 Brown 5 “Go” switch #2-30-A0002 10 “Squirt” switch #2-30-A0002 Positive connection Black Negative connection Black lead 9 Black Squirt pump #2-60-0086 White White lead from Kartrol unit e) hit (w 0030 re Wi -70-A #2 Yellow lead 10 Black lead to negative post 8 7 Yellow lead to negative post Relay #2-70-0033 Red lead to positive post White lead to positive post 6 Wire (black) #2-70-A0031 Orange lead from Kartrol Micro to black lead on squirt pump switch Yellow lead from fuse to yellow lead on squirt pump switch Blue lead from squirt pump to positive post 4 k) lac 29 (b 00 ri e 0-A W -7 #2 Wi #2 re (w -70 hit -A0 e) 02 5 1 Kartrol Micro #1-60-8000 White White lead Yellow lead The solid-state switches are completely sealed, and utilize magnetic triggers to turn on a low-amperage circuit and energize the pull-in windings of the motor relay, or activate the squirt pump. These have a built-in LED light that serves as a selfdiagnostic tool to aid in troubleshooting these devices. G BU RA ENDU Specifications subject to change without notice - Check our website for valuable information including videos, workshop and operations manuals. www.jjamusements.com M A O-K RTS T PERBOA S TM ES AT CH PL CLUT NCE 503-304-8899 4-10 Bo t to m The magnetic trigger is a high-quality, neodymium magnet housed in an injection-molded holder that is designed to be loose when properly mounted, but not able to rotate. This is required, as there is top side and a bottom side to the unit. The bottom side must face toward the solid state switch. NOTICE: Mounting the magnet “up” side down will result in a poor or non-functioning solid state switch. The J&J relay (J&J #2-70-0037) is a simple 24VDC, marine-style unit. It consists of a spring-loaded plunger that is moved via an electromagnet. This magnet is created when the control circuit (two small contact posts) is energized via the micro solid state switch circuit. When the pull in circuit is energized, the plunger moves up and a large contact washer makes the connection between the input and output (large) terminals, thus allowing high-amperage current to flow to the motor. G TM T PERBOA S BU M A O-K RTS ENDU RANC PLAT UTCH E CL ES 503-304-8899 Specifications subject to change without notice - Check our website for valuable information including videos, workshop and operations manuals. www.jjamusements.com 4-11 J&J’s exclusive high-efficiency, brush-type, permanent magnet motor is directly activated through the relay; because this outboard-style unit operates in water, no “ramp up” is required. How a simple DC electric motor operates: When the coil is powered, a magnetic field is generated around the armature. The left side of the armature is pushed away from the left magnet and drawn toward the right, causing rotation. Sub-systems: The squirt pump is a sealed, 24VDC, brushless, submersible-style pump that is powered through the same type of solidstate switch and magnetic trigger system that operates the motor relay. The bilge pump is a 24VDC, sealed, brushless, automatically-activated unit. The self-contained solid-state electronics energize the pump motor on a pulse method; if the amp draw is above a preset threshold, it indicates that water is present and the pump will continue operation until the amp draw drops, indicating that no water is present. NOTICE: If the inlet is sufficiently blocked, no water will enter the inlet and the pump will not sense amp draw, so it will shut off, even though water continues to accumulate in the hull. It is imperative that the daily inspection includes removing the vent plate and, with a flashlight, inspecting to see if water is building up in the hull. A bilge pump fuse, which is accessible for service from the outside of the hull near the vent plate, is located in the power feed line from the main buss. (See Bilge Pump, page 2-40.) The volt meter is the overall monitor of the electrical condition of the system. It is tied in at the major distribution buss at the rear/side of the hull. This is a 24VDC, brass-bezel, sealed unit. (See Volt Meter and wiring, page 2-35.) The safety switch/breaker is a marine-grade unit that combines switching and circuit protection into a single device which meets SAE J1171 requirements for marine application. All power out to the boat is routed through here, as well as all incoming power from the charging device and wire leads. Note: If there is high resistance in the system, heat and possible fire can occur without tripping the breaker; this is why the switch/breaker is located in an easily accessible position on the outside of the hull. (See breaker and wiring, page 2-31.) The charge line and charger feeds current through the SB connector, breaker and main buss to the battery pack. Keep in mind that a charge line will always have available current at the SB connector from the battery pack, even when disconnected from the charger. Do not short across these terminals or allow the connector to hang into the water. (See charger, charger lead and charger box, page 2-63.) G BU RA ENDU Specifications subject to change without notice - Check our website for valuable information including videos, workshop and operations manuals. www.jjamusements.com M A O-K RTS T PERBOA S TM ES AT CH PL CLUT NCE 503-304-8899 4-12 A SIMPLE, EFFECTIVE AND PROVEN SYSTEM The J&J electric bumper boat utilizes four Trojan T-105, 6V Batteries rated at 225AH, and connected in series. This battery pack was chosen to provide the best performance-to-weight ratio and has proven, since its introduction in 1996, to have an excellent record of performance and durability. INSPECTION One of the top five service call questions is: “The relay clicks, but motor does not turn or turns slowly”. Another is: “Why won’t my boats last all day?” Or: “They start out fine, but quickly start getting slower.” THE MOST COMMON CAUSE OF THESE TOP ISSUES ARE RELATED TO THE BATTERY PACK. LEARNING TO TEST BATTERIES WILL SAVE YOU A LOT OF HEADACHE. This test assumes that battery fluid levels have been maintained; note that adding water prior to testing will result in bogus readings. If possible, charge the boat overnight prior to testing; batteries that have bad plates will still take a “surface” charge and appear to be good, so let the pack sit for an hour after disconnecting the charger, then put a load on the system by turning on the motor and taping the plunger down for 15 minutes (while in the water). Shortcut Tip: At this point, back probe the charger lead with your DVOM and read the DC volts. Compare with chart (page 5-149), to give you a quick check of the overall charge condition of the battery pack. If “charged voltage” is not good, you can proceed with the specific gravity testing to determine which battery(ies) are causing the poor performance. A battery cell’s specific gravity is a great way of measuring a battery’s state of charge. This is because during a discharge, the specific gravity decreases relative to the ampere-hours discharged. The specific gravity also increases as the battery is recharged. Use a hydrometer to measure the specific gravity of the electrolyte solution in each cell. A hydrometer is a tool used to measure the density or weight of a liquid compared to the density of an equal amount of water. A lead acid battery cell is fully charged with a specific gravity of 1.265 at 80° F. For temperature adjustments, get a specific gravity reading and adjust to temperature by adding .004 for every ten degrees above 80° F and subtracting .004 for every 10 degrees below 80° F. HYDROMETER BATTERY TESTER Draw up fluid to fill line. Tap lightly to remove any air bubbles. Top pointer must be vertical. Large pointer shows specific gravity. Check every cell recharge if reading is less than 1.210 specific gravity. Battery replacement indicated if more than 30 point difference between cells. Flush with hot soapy water to clean and rise with clean, warm water. G TM T PERBOA S BU M A O-K RTS ENDU RANC PLAT UTCH E CL ES 503-304-8899 Specifications subject to change without notice - Check our website for valuable information including videos, workshop and operations manuals. www.jjamusements.com 4-13 SPECIFIC GRAVITY TEST <CAUTION> MAKE SURE YOU WEAR GLOVES AND EYE PROTECTION WHILE PERFORMING THESE TESTS. 1. Do not add water at this time. 2. Fill and drain the hydrometer with electrolyte from battery cell 2 to 4 times before pulling out a sample. (See the Hydrometer battery tester on page 5-148) 3. There should be enough sample electrolyte in the hydrometer to completely support the float. Tap the unit to remove bubbles and hold it vertically to get accurate readings. 4. Take a reading, record it, and return the electrolyte back to the cell. 5. To check another cell, repeat the 3 steps above. 6. Check all cells in the battery. 7. Replace the vent caps and wipe off any electrolyte that might have been spilled. II. OPEN-CIRCUIT VOLTAGE TEST For accurate voltage readings, batteries must remain idle (no charging, no discharging) for at least 6 hrs, preferably 24 hrs. 1. Disconnect all loads from the batteries. 2. Measure the voltage using a DC voltmeter. 3. Check the state of charge with table bellow. LIMIT DISCHARGING THE BATTERIES BEYOND 1.75 VOLTS PER CELL – OR 1.125 SPECIFIC GRAVITY PER CELL. 1.75 VOLTS PER CELL CORRESPONDS TO END-POINT VOLTAGES OF 5.25 VOLTS FOR 6 VOLT BATTERIES State of Open Circuit Voltage 6 Volt Battery Charge Level Four Battery Pack 6.30 or Greater 100% 25.2 6.16 - 6.30 75% - 100% 24.64 – 25.20 6.00 - 6.16 50% - 75% 24.00 – 24.64 5.90- 6.00 25% - 50% 23.60 – 24.00 5.80 - 5.90 0 - 25% 23.20 – 23.60 5.80 or Less 0% 23.20 Readings obtained at 80 Degrees F Maintenance: WHEN SHOULD I WATER MY BATTERIES? Water is lost during charging. Therefore, the best time to water your batteries is always at the end of the charge cycle. However, if the electrolyte level is extremely low, or the plates are exposed to air, add some water to cover the plates before starting the charge cycle. HOW OFTEN SHOULD I WATER MY BATTERIES? How often you use your batteries will determine the frequency of watering. For example, the weekend fisherman may find he only needs to water the batteries in his boat once a month, while a maintenance supervisor for a bumper boat ride might need to service the batteries in his bumper boats every week. Also, using batteries in a hot climate may require more frequent watering. It is best to check your new batteries regularly, as this will give you a good feel for how often your application will require battery watering. G BU RA ENDU Specifications subject to change without notice - Check our website for valuable information including videos, workshop and operations manuals. www.jjamusements.com M A O-K RTS T PERBOA S TM ES AT CH PL CLUT NCE 503-304-8899 4-14 <WARNING> A brand-new battery may have a low electrolyte level. Charge the battery first, and then add water if needed. Adding water to a battery before charging may result in overflow of the electrolyte. J&J recommends topping off the batteries once a week; with the J&J fill kit working properly, you cannot overfill the cells. WHAT IS THE PROPER ELECTROLYTE LEVEL? (IF YOU ARE USING J&J FILL KIT, THE FLOAT VALVES WILL SHUT OFF AUTOMATICALLY AT THE PROPER LEVEL) Liquid levels should be 1/8 inch below the bottom of the vent well (the plastic tube that extends into the battery). The electrolyte level should not drop below the top of the plates. DO YOU EVER ADD ACID TO A BATTERY? Under normal operating conditions, you never need to add acid. Only distilled, deionized, or approved water should be added to achieve the recommended levels mentioned above. When a battery is shipped in a dry state, or accidental spillage occurs, electrolyte should be added to the battery. Once filled, a battery should only need periodic water addition. WE CARRY ALL YOUR BATTERY AND ELECTRICAL NEEDS. 2-70-0149 2-60-0102 1-80-0003 30 Amp Master Charger by FPX 2-70-A0009 2-70-A0018 2-70-A0022 2-70-0211 2-70-0073-120 This combination strain relief and plug end protector has an easy to grab hand hold for connecting and disconnecting SB-120 charger plugs from your bumperboats. No more broken plug ends from charger leads being dropped on the ground. G Call FPX today to find a local battery dealer. A O-K RTS TM T PERBOA S BU M Have the old style SB-50 connectors and need to match them up to SB-120 connectors. We've got the solution. This SB-50 to 120 plug adapter will do the trick. ENDU RANC PLAT UTCH E CL ES 503-304-8899 Specifications subject to change without notice - Check our website for valuable information including videos, workshop and operations manuals. www.jjamusements.com 4-15 Equalizing Batteries Lead plates become sulfated as a natural result of their function; breaking this deposit loose and keeping the plates “clean” will equalize each cell’s ability to do its work. Equalizing is an overcharge performed on flooded/wet batteries after they have been fully charged. This action “scrubs” the plates, and the sulfates will fall to the bottom cavity of the battery. Trojan recommends equalizing only when batteries have low specific gravity, (below 1.250), or wide-ranging specific gravity, (0.030) after fully charging a battery. This could be as much as once per month during busy times. Keeping the plates active and “equal” will extend battery life. • Check electrolyte level to make sure all plates are covered with water before charging • Check that all vent caps are secured properly on the battery before charging • Set the charger to equalizing mode (The J&J Master Charger has this function) • The batteries will gas (bubble) during the equalization process. <WARNING> MAKE SURE BATTERY COMPARTMENT IS WELL VENTILATED, AND REMEMBER THE GASSES GIVEN OFF ARE HIGHLY EXPLOSIVE! • Measure the specific gravity (See page 5-149). CLEANING Warm water and soap works well to neutralize acidic or corrosive conditions. Rinse with clean water after washing. In some cases, almost all the batteries in the pack may test “good” and only one may show poor specific gravity or a low cell. Many times, a battery in this condition can be recovered by removing it from the pack and putting it on a separate 6- volt charger that has a boost or equalize feature. (See page 5-153) BATTERY CHARGER BOXES AVAILABLE! This slick charger enclosure can hold two FPX Master Chargers or other brands. The vented enclosure allows heat to escape and keeps your battery chargers high and dry. This enclosure will have a simple white finish and will look un-obtrusive around your bumper boat pond. Simply anchor it to your concrete or wood deck. All electricl connections are hidden inside. 2-80-A0006 Complete charger box assembly. G BU RA ENDU Specifications subject to change without notice - Check our website for valuable information including videos, workshop and operations manuals. www.jjamusements.com M A O-K RTS T PERBOA S TM ES AT CH PL CLUT NCE 503-304-8899 4-16 Battery Maintenance - Winter Storage 1. On the days before leaving, do a thorough cleanup of connections and batteries. A mechanical inspection will help you to identify what terminals need replacement, and maximize the recharge rate. 2. Fully charge your battery systems. If possible, use your chargers in a low-amperage mode. It will take longer to fully charge the batteries, but will do a much better job. Batteries are recharged at higher amperage rates mostly for practical reasons, but if you are not using the systems, you can take your time recharging the batteries. Once you have fully charged your batteries, disconnect them from each other. (That will reduce the discharge rate.). Store your batteries away from the elements like rain and snow. NOTICE Discharged batteries can more easily freeze, destroying plates and cracking the housing, leaving them useless. 3. If you live in an area where extreme freezing tends to happen, insulated storage is recommended. 4. If you are nearby, or have a person taking care of your place during the winter, recharge your systems at least once every month. 5. If you own a Battery Life Saver™ electronic device, you do not need to disconnect the batteries from each other. You can leave the BLS connected and, with a timer, program your charger to go on and off on a weekly basis. NOTICE: Do not leave the BLS connected if you are not programming the system to be recharged. 6. When you are back, reconnect the batteries and recharge them as usual. If your charger does not recognize them and will not charge, you can use a simple manual charger and recharge them. Again, recharging in a low-amperage mode is the best way to get your batteries going. If you own a BLS, reconnect it while recharging. This will dissolve the lead sulfate crystals that are reducing your battery life and thus extend the life of your batteries. If you own several 12-volt pieces of equipment, you can use the BLS 12/24 B and rotate it on the different systems while charging. Xpress Flow battery water fill system fills 10 Boats in about 15 minutes! The new Xpress Flow battery watering system is a new accessory that makes the difficult task of watering vehicle batteries elementary. The entire topping process takes just 20 seconds or less per battery. Hook this system up to your electric bumper boat fleet and keeping your batteries in top condition will be a snap. Xpress Flow has also made this process even easier with the Portable distilled water cart. Why mess around with transporting your batteries to the water location when you can easily cart the water to the batteries.. Its simple, just wheel the cart over to your bumper boat pond, and Quick Connect the water coupler. Never before has operating a fleet of electric bumper boats been easier. From battery water maintenance to charging FPX has all the answers. G TM T PERBOA S BU M A O-K RTS ENDU RANC PLAT UTCH E CL ES 503-304-8899 Specifications subject to change without notice - Check our website for valuable information including videos, workshop and operations manuals. www.jjamusements.com 4-17 MASTER CHARGER 24-VOLT/30-AMP OUTPUT BATTERY CHARGER WITH SWITCHABLE 120/240 VAC INPUT SELECTOR. 1. This micro-processor-controlled charger utilizes full-wave rectification. 2. Safety functions include: a. It will not turn on unless voltage is present at the charge lead (minimum 2 volts). b. It will not turn on if lead polarity is reversed. 3. The Master Charger is fully automatic and utilizes “average” and “float” functions to sense the state of charge of the battery to guard against over-charge. 4. Protect Setting a. The transformer uses a temperature fuse to protect the unit against overheating. b. The DC output also has a fuse. USAGE: 1. Before plugging the unit into the main power source, connect the SB connector to the battery charge lead. 2. Insert the main power input cable into the power source socket. 3. When the charger starts, there is a delay of about 5 seconds as the unit senses the battery connection. 4. Using equalizing charge method: a. After the initial charge circuit is established, press “EQU/DAI”. This feature will attempt to equalize the charge between batteries. (See equalizing batteries, page 5-151) 5. Make sure that battery fluid levels are checked on a regular basis and topped off in accordance with battery manufacturers recommendations. (See battery fill kit, page 2-67) FRONT PANEL INDICATORS 1. AC power indicator continuously on means the unit is connected and ready for use. 2. AC power indicator flickering means the positive and negative cables are reversed (reverse polarity), the lead is not connected, the DC output fuse is burned out, or the battery voltage is under 2 volts. 3. EQUAL light flickering means the unit is in the process of equal charging. 4. DAILY light flickering means the unit is in the process of generally charging. 5. 80% CHARGE light flickering means charging has reached 80% capacity. 6. FULL CHARGE indicator light: a. Constantly lit means the charge is complete. b. Flickering means charging has failed, possibly because of a bad battery. Consult the battery manufacturer’s guidelines for battery testing. NOTICE: Before connecting the battery, confirm the output voltage of the charger is the same as that of the battery. *Before inserting the power AC plug, confirm that the voltage to be required of the charger is the same as that of the local power supply. *Cut off the main power source before removing the battery to prevent the danger of a gas explosion. *Do not operate the accessories of the battery during charging. 24V180A - 24V240AH Charger input voltage AC120V/220V 50/60Hz 720VA Charger AC amp draw 6 amps AC Output voltage DC24V Output current DC30A Insulated endurance AC1500V/1AMIN Insulated resistance UP TO DC500V/10M Security setting Input AC input, safety fuse by 15A Output DC output, safety fuse by SW50A Power code SJT2.0AMG*3C (USA standard) Output code 8mm Dimension 14.3 x 8.5 x 10.4 in (36.5x21.8x26.5 cm) Weight 48.5lbs (22Kg) G TM RA ENDU Specifications subject to change without notice - Check our website for valuable information including videos, workshop and operations manuals. www.jjamusements.com BU ES AT CH PL CLUT NCE M A O-K RTS T PERBOA S Type of battery for use 503-304-8899 4-18 Electric Bumper Boat - 24 Volt Wiring Schematic - 2012 VOLT METER VOLTS Fuse #2-70-0103 (Fuse holder) #2-70-0104 (Fuse) #2-70-0149 White to positive (+) 50 amp breaker/switch Red Green Volt meter & fuse cable #2-70-A0045 #2-60-0102 #2-70-A0017 White Power ower post #2-70-0153 Green Black 10/2 Cable to motor Red #2 -70-A00 46 10/2 Cable to charger g - P J B O E F #2-70-A0011 #2 70 A0011 Black to negative (-) 6 004 0-A 7 2 Red # Black #A109 White Black Female connector male connector + + Battery Battery Brown Black - #A108 Bilge pump (24V) 8 A10 Battery + # G A O-K RTS TM T PERBOA S BU M Battery + - #A108 #2-70-A0044 ENDU RANC PLAT UTCH E CL ES 503-304-8899 Specifications subject to change without notice - Check our website for valuable information including videos, workshop and operations manuals. www.jjamusements.com 4-19 MOTOR WIRING SCHEMATIC White lead from Kartrol unit Black lead to negative post “Go” switch #2-30-A0002 10 Yellow lead to negative post 8 Yellow lead White lead White Black 10 White “Squirt” switch #2-30-A0002 Wire (black) #2-70-A0031 2 Orange lead from Kartrol Micro to black lead on squirt pump switch 9 Squirt pump #2-60-0086 Brown Yellow lead from fuse to yellow lead on squirt pump switch 1 Fuse #2-70-0104 Fuse holder #2-70-0103 Black Positive connection Yellow lead 7 Relay #2-70-0033 ) ite wh 030 ( 0 re Wi -70-A #2 6 Kartrol Micro #1-60-8000 Black lead Negative connection 5 4 k) lac 29 (b 00 ire -A W -70 #2 Motor 3 #2-70-0051 Red lead to positive post Yellow lead to negative post Black lead to negative post White lead to positive post Wi #2 re (w -7 h 0 -A0 ite) 02 5 White lead from Kartrol unit Red lead to positive post Blue lead from squirt pump to positive post G BU RA ENDU Specifications subject to change without notice - Check our website for valuable information including videos, workshop and operations manuals. www.jjamusements.com M A O-K RTS T PERBOA S TM ES AT CH PL CLUT NCE 503-304-8899 G BU 503-304-8899 Specifications subject to change without notice - Check our website for valuable information including videos, workshop and operations manuals. www.jjamusements.com M T PERBOA S ENDU RANC PLAT UTCH E CL Connect white wire to black wire from On/Off switch. Connect orange wire to black wire from squirter switch. Connect black & yellow wires to gound terminal. Connect red wire to positive terminal. Squirter switch On/Off switch Ground terminal (negative) Remove black switch wires from ground terminal. Cut off ring terminals and replace with female end spade terminals. Positive terminal 4-20 BOAT CAPTAIN WIRING SCHEMATIC A O-K RTS ES TM 5-1 ENGINE ASSEMBLY General Information ....................................................5-1 Handle bar ..................................................................5-2 Pivot.......................................................................... 5-3 Prop guard................................................................. 5-4 The Honda BF2.3D engine was chosen for its reputation for dependable service and its reduced emissions (less smoke and less oil in the water), this motor quietly performs. Initially designed for use in the corrosive marine environment, this dependable unit has been modified to be controlled from behind and transformed to operate in the bumper boat. This section will go over the components that J&J installs only. “Refer to the Honda shop manual for repairing, troubleshooting and maintaning the engine.” G BU RA ENDU Specifications subject to change without notice - Check our website for valuable information including videos, workshop and operations manuals. www.jjamusements.com M A O-K RTS T PERBOA S TM ES AT CH PL CLUT NCE 503-304-8899 5-2 HANDLE BAR The Honda steering handle, throttle assembly and hardware is removed from the engine. The three stock extension case bolts (30mm) are removed and replaced with longer bolts (35mm) to mount the J&J handle bar. Also the handle bar is bolted to the stock steering handle mount with a shorter bolt (20mm) and a rubber cover ziped tied to the handle bar. The Honda throttle assembly is reused and installed to the J&J handle bar, “Refer to the Honda shop manual for repairing, troubleshooting and maintaining the throttle system”. ELIMINATE WATER/FUEL PROBLEMS Whether you are storing fuel, operating a boat, motorcycle, lawn mower, ATV, personal watercraft, snow blower, generator, or other machinery, you need the Water Eliminator, the most cost effective way to remove water from gasoline, diesel, fuel oil, kerosene or hydraulic fluid. Easy to use, just clip the Water Eliminator to your fuel cap and lower it into the tank. The unit will remove any water it contacts, leaving you with dry fuel. By removing water directly from fuel, it helps to prevent many service problems related to water contamination including: Plugged fuel filters, fuel line freeze up, carburetor icing, damaged fuel pumps and injectors, growth of algae, corrosion, loss of power and down time. Requires a 1.15” fuel filler opening. G TM T PERBOA S BU M A O-K RTS ENDU RANC PLAT UTCH E CL ES 503-304-8899 Specifications subject to change without notice - Check our website for valuable information including videos, workshop and operations manuals. www.jjamusements.com 5-3 PIVOT The removal, installion and maintenance for the pivot is performed with the same steps as for the electric motor (see page 3-29). G BU RA ENDU Specifications subject to change without notice - Check our website for valuable information including videos, workshop and operations manuals. www.jjamusements.com M A O-K RTS T PERBOA S TM ES AT CH PL CLUT NCE 503-304-8899 5-4 PROP GUARD The prop guard used on the gas engine is also used for the electric motor (see page 3-25 for removal and installation). “Refer to the Honda shop manual for repairing, troubleshooting and maintaining the extension case.” G TM T PERBOA S BU M A O-K RTS ENDU RANC PLAT UTCH E CL ES 503-304-8899 Specifications subject to change without notice - Check our website for valuable information including videos, workshop and operations manuals. www.jjamusements.com 6-1 DECALS General Information ....................................................6-1 Motor Cover Decals ....................................................6-2 Boat Top Decals ......................................................6-161 Decal Removal and Installation...............................6-163 This section of the Service Manual depicts the location of various decals on the bumper boat and how to remove and replace them. 6-2 MOTOR COVER DECALS (elecric only) “Arrow” and “Blaster Boat” motor decal are located on the top of the motor cover. (“Arrow decal” J&J #2-40-0001) (“Blaster Boat decal” J&J #001687) NOTE: The arrow decal indicates forward direction the boat will travel when motor is activated. “Blaster Boat” decal is located on each side of the motor cover. (8” Blaster Boat decal” J&J #001686) “Squirt” and “Go” decals are located on the motor cover next to the control rods. (“Squirt decal” J&J #0097102) (“Go decal” J&J #0097101) NOTE: These decals indicate the function of the control rods. The blue rod activates the “squirt” function. The green rod activates the motor “Go” function. Mus t Shoe meet po st ! W s All lo and sh ed height ARN irt ose ING clothi must be require Hair men lo ng m wor t. Keep nger th an sh ust be se n. bo th ha othe ould cure nd rw er d. One ise inst s on stee length ru m pe Restra rson pe cted by ring whe ust be se at el an cure Do no int mus r restrain tendan d bo d ab t. t t. th fe ove Rider t bump, be worn et in shou sk at al kart ld l tim at al er leng No on s must re id or sl es w l tim ide main es, unth. hen This e under seat karts. in ka th rid less rt. or ba e is no e influen ed at all t reco times ck pr ce of Parti cipa oblems, mmende drugs or unless in te at or pr d for st al ruct co egna your nt w individual hol is allo ed by at own DO NO om ris te s who wed k. en. T RE to rid ndant. MOVE have e. he THIS art pr DECA oble L. ms, neck WARNING G TM T PERBOA S BU M A O-K RTS ENDU RANC PLAT UTCH E CL ES Keep your boats looking new with Replacement decals available at j&j Never Stand Up While Boat is Operating. Part Numb 0017 er 12R DO NOT REMOVE THIS DECAL 503-304-8899 Specifications subject to change without notice - Check our website for valuable information including videos, workshop and operations manuals. www.jjamusements.com 6-3 BOAT TOP DECALS J&J Amusements website decal is located at the right rear of the boat top under the vent plate. (J&J #009800) “Blaster Boat” decal is located on the boat top above the vent plate on the electric bumper boat. (J&J #001688) “Water Bug” decal is located on the boat top above the water drain plug on the gas bumper boat. (J&J #00168) “Warning-Keep Hands And Feet In Boat At All Times” decal is located on the right inboard side of the boat top. (J&J #00169) <SAFETY ITEM> This decal must be readable at all times to operate the boat. Replace as needed. G ENDU RANC E ES Specifications subject to change without notice - Check our website for valuable information including videos, workshop and operations manuals. www.jjamusements.com M A O-K RTS T PERBOA S TM AT CH PL CLUT BU Keep your boats looking new with Replacement decals available at j&j 503-304-8899 6-4 BOAT TOP DECALS “Weight Limit 450 lbs” decal is located on the rear inboard side of the boat top. (J&J #2-40-0006) <SAFETY ITEM> This decal must be readable at all times to operate the boat. Replace as needed. “Warning-Never Stand Up While Boat Is Operating” decal is located on the left inboard side of the boat top. (J&J #00170) <SAFETY ITEM> This decal must be readable at all times to operate the boat. Replace as needed. “Star & Stripes” decal is located at the rear of the gas bumper boat top. (J&J #00156) WARNING Keep Hands And Feet In Boat At All Times. S Q G U O I R T DO NOT REMOVE THIS DECAL G TM T PERBOA S BU M A O-K RTS ENDU RANC PLAT UTCH E CL ES Keep your boats looking new with Replacement decals available at j&j 503-304-8899 Specifications subject to change without notice - Check our website for valuable information including videos, workshop and operations manuals. www.jjamusements.com 6-5 DECAL REMOVAL AND INSTALLATION REMOVAL Use a hot air gun to heat the decal. The heat is not for melting away the decal, but to heat the adhesive enough to removal the decal. Repeat until the decal is completely removed. Apply a small amount of WD-40 to a clean cloth (the cloth should be damp, but not soaked). Wipe away the glue on the fiberglass using the moistened cloth. INSTALLATION Clean the surface with a grease-cutting liquid detergent and water. Rinse with fresh water, then dry with a lint-free cloth. Peel the backing paper from the new decal starting at the edge (be careful not to touch the decal adhesive). Using a spray bottle filled with water, spray the glue side of the decal before applying. This will allow a bubble-and wrinkle-free application. Wet the fiberglass with the spray bottle and place the decal in position . Hold a squeegee in such a way that you will be able to make easy, overlapping strokes. Begin in the center and squeegee the entire decal, working from the center to outer edges to remove all air from under the decal. G RANC E Specifications subject to change without notice - Check our website for valuable information including videos, workshop and operations manuals. www.jjamusements.com BU ENDU ES M A O-K RTS T PERBOA S TM AT CH PL CLUT 503-304-8899 Decades of evolution have created the highest quality, best performing go-karts & bumperboats in the industry. Are you looking for a way to make more money? Here’s an easy way. Just mount a few of the Master Blaster Water Squirters around your bumperboat pond and voila! A simple, rugged money maker. Quick payout on this attraction. Easy installation, Four 1/2” anchor bolts on 10-1/2” centers. One half inch NPT nipple to interface with park fresh water supply system. 24VAC Ground fault interrupter circuit required. (check local electrical codes). Metal parts protected by special double coating process for corrosion protection. Each unit can be adjusted (both height and water flow) to meet your needs. Fitted with a quick change coin/token mechanism. Master Blaster Base: 12”x12”x3/8” Steel Mounting Holes (4) 1/2” Diameter:10.5” Center to center Center Column: 3.5” Steel Pipe Adjustable Height: 40” to 48” Adjustable Rotation Arc:0 to 120 in 15 degree increments Adjustable Squirter Distance: 10 to 25 feet Replaceable Rotation Bushings: UHMW Water Supply: 30 to 80 PSI (City or Park System) Paint: Double coating - Special process Cover: Fiberglass Top with Choice of Color. Control System Cabinet: NEMA/EEMAC Type 4 Cabinet Size: 13.78”x11.81”x7.87” Coin Mechanism: Quarter Size Coin Coin Box: 6”x7”x4” Setable Coin Amount: 1 to 7 coins Adjustable “On” Time: .1 to 12.7 Minutes Power: 24VAC @ 2 amps Power Source: GFI Breaker Required Internal Fuse:2 Amp Coin Operated “Pond Side” Water Squirter G 4897 Indian School Road NE Salem, Or. U.S.A. 97305 1-800-854-3140 or 1-50-304-8899 www.jjamusements.com T PERBOA S BU M A O-K RTS 7-1 CARE & STORAGE General Information..................................................... 7-1 Fiberglass care & Maintenance ..................................... 7-2 303 Aerospace Protectant ............................................7-4 Storage ........................................................................7-6 PROPER CARE IN THE “OFF SEASON”: Some bumper boat ponds do not operate all year long. For this reason, J&J Inc. has prepared this information on how to properly condition your bumper boat fleet for periods of storage or inactivity. We urge you to follow the simple instructions and advice contained here, referencing specific information from your Owner’s\Service Manual, to maintain the highest level of safety, and to preserve the value of your investment. 7-2 FIBERGLASS CARE AND MAINTENANCE WHAT IS FIBERGLASS? Fiberglass is a common term for fiber-reinforced plastic, or FRP, which is a plastic material strengthened using a fiber cloth. Most boats these days are made from fiberglass, along with pickup truck caps, motorhomes and even bathtubs! To give the fiberglass a smooth, shiny surface, a material called gelcoat is applied to the outer surface. For the most part, when you’re looking at a fiberglass boat, you’re really seeing the gelcoat surface on top of the fiberglass itself. However, most people refer to gelcoat as fiberglass, so we use the terms fiberglass and gelcoat interchangeably. Gelcoat is available in many colors and is fairly durable, but it can become dull or faded as it weathers. Sunlight and air combine to oxidize the gelcoat surface, fading it and making the surface cloudy. The oxidation process for gelcoat is similar to how metals rust or corrode. So how do you keep your gelcoat looking good? Simple: you coat the surface with either wax or a sealer. FADED AND DULL FIBERGLASS For boats that have been oxidized and have some fading or dullness, waxes and polishes may restore the shine, but often don’t maintain it for more than a month or so. This is because the gelcoat surface has microscopic pits and crevices in it from the oxidation, even after you have rubbed off the oxidized layer. When you apply wax over the surface, the wax is too thick to penetrate into the pits and crevices. This is why oxidized boats usually never shine like they did when new, and more importantly, why wax doesn’t last long. Because air is trapped in the holes and crevices under the wax, the gelcoat can oxidize underneath the wax! Fiberglass sealers like Vertglas avoid this problem by filling in all the holes, pits and crevices in the gelcoat surface. FIBERGLASS SEALERS Unlike wax, a fiberglass sealer penetrates into the gelcoat surface, filling in the microscopic holes and crevices to prevent future oxidation. The sealer provides a barrier between the environment and the gelcoat, cutting off the chemical reaction which creates oxidation. Because it fills in the surface so well, a sealer can provide a brighter shine than wax. Sealers also provide a much harder surface than wax, so they last much longer and don’t require maintenance as frequently. FIBERGLASS WAX Historically, boats have been maintained using either wax or polish. Waxes cover the surface and provide a barrier between the elements and the gelcoat surface. Waxes work well for boats in good condition, but not so well for older boats which have weathered a bit. After a while, the wax wears off and the elements oxidize the surface of the gelcoat (similar to how rust occurs on steel or iron), resulting in a faded or dull appearance. You can remove the oxidation and reapply wax, but the wax simply covers over the pits and holes in the gelcoat surface, trapping air under the wax and starting the oxidation process again. Typically, using wax on gelcoat which has been oxidized before will only last about a month before the shine fades again. FIBERGLASS POLISH Polish products are similar to waxes, but they also contain a small amount of abrasive which rubs off some of the oxidation and can restore a shine to the surface. These products work best for boats which are only slightly oxidized. Polishing compounds are a similar product which have more abrasives and can remove heavier oxidation, but do not provide any protection afterwards, so you will need to apply some protective coating after cleaning (preferably a sealer so the process doesn’t begin again.) G TM T PERBOA S BU M A O-K RTS ENDU RANC PLAT UTCH E CL ES 503-304-8899 Specifications subject to change without notice - Check our website for valuable information including videos, workshop and operations manuals. www.jjamusements.com 7-3 CLEANING FADED OR OXIDIZED FIBERGLASS There really isn’t any secret to cleaning faded or dull fiberglass; you just need some elbow grease and something to remove the oxidation. The application varies for different products, but in general, you need to rub the surface with the oxidation remover or polishing compound to remove the oxidized layer. You then let the product dry to a haze and buff it off to reveal the clean (but not necessarily shiny) surface. If your boat isn’t shiny at this point, it’s because the clean gelcoat surface is pitted and is dissipating the light instead of reflecting it. By filling in the microscopic pits, you can restore the shine. To prove this, just apply some water to the surface and see if it becomes shiny. If so, you then need to apply something which will fill in the pores and maintain the shine. To use oxidation remover, first wet the gelcoat surface and apply the oxidation remover using a white Scotch-brite pad or sponge. Rub the surface either until you see color in the pad or sponge (indicating you’ve rubbed off all the oxidation and are now into the colored gelcoat), or until the surface no longer feels rough. At this point, you simply rinse off the surface and wash away the oxidation residue. G BU RA ENDU Specifications subject to change without notice - Check our website for valuable information including videos, workshop and operations manuals. www.jjamusements.com M A O-K RTS T PERBOA S TM ES AT CH PL CLUT NCE 503-304-8899 7-4 303 AEROSPACE PROTECTANT BUMPER BOATS - MAKE THEM LOOK BETTER AND LAST LONGER WITH 303 An enlarged side view of common vinyl fabric would show raw PVC (polyvinyl chloride) covered by a thin layer of plastic called the “topcoat”. The topcoat is the part of the vinyl you can see and touch. To keep vinyl fabric soft and flexible, manufacturers add agents known as plasticizers to the raw PVC. A major function of the topcoat is to hold in these plasticizers, which otherwise would quickly evaporate. If the topcoat is damaged or degraded, plasticizers begin to escape leading to embitterment, cracking, and failure. Protecting the topcoat, then, is the most crucial aspect of properly maintaining vinyl, and is the subject with which vinyl manufacturers are most concerned. Vinyl manufacturers agree on and recommend the following: GENERAL CLEANING: Never use household cleaners, powdered or other abrasives, steel wool or industrial cleaners, dry cleaning fluids, solvents (petroleum distillates), bleach or detergents. Use a medium-soft brush, warm soapy water, (such as Ivory soap), rinse with cool water and then dry. MILDEW STAINS: To kill the bacteria creating the mildew, use a medium-soft brush and vigorously brush the stained area with a 4-to-1 mixture of water and ammonia; rinse with cool water. TOUGH MILDEW STAINS: Apply a mixture of one (1) teaspoon ammonia, one-fourth (1/4) cup of hydrogen peroxide and three-fourths (3/4) cup of distilled water; rinse with cool water. Note: All cleaning methods must be followed by a thorough rinse with water. Obviously abrasives should never be used on vinyl. Petroleum distillates are a universal “no no” for both vinyl and rubber. Waxes should never be used on vinyl because (a) Most waxes contain petroleum distillates; (b) Wax is a build-up product, holding in the heat absorbed from the sun and accelerating heat damage. Virtually all vinyl manufacturers agree that no type of oil should be used on vinyl. Silicone oil vinyl treatments should not be used for several reasons: 1) They typically attack the vinyl topcoat. 2) They usually contain no effective UV screening ingredients. 3) They are build-up products which accelerate heat damage. 4) Silicone oil formulations are greasy and oily, attracting dust and soil more quickly. READ THE LABEL! Product directions suggesting more than one coat for better cosmetic enhancement are build-up products and are not recommended by vinyl manufacturers. 303 FOR VINYL: 303 Protectant is a beautifying liquid sunscreen, the routine use of which keeps vinyl looking like new while dramatically extending its useful life. 303 contains no petrochemicals, silicone oils or petroleum distillates. 303 is not a build-up product, so treated surfaces dissipate heat normally. 303 is not oily or greasy and does not attract dust. In fact, 303 treated vinyl repels dust, dirt and stains, stays cleaner longer, and is much easier to clean when finally soiled. Since 303 contains a tested-safe-for-vinyl cleaner and is a cleaner and protector combined, precleaners and precleaning usually are not required. 303 has been tested and is recommended by major vinyl and vinyl accessory manufacturers. As the leader in UV screening technology since 1980, 303 is the most powerful UV screening treatment available for vinyl, leather, rubber, gelcoat fiberglass and most plastics. Regular use of 303 can reduce UV-caused slow-fade up to 100%. G TM T PERBOA S BU M A O-K RTS ENDU RANC PLAT UTCH E CL ES 503-304-8899 Specifications subject to change without notice - Check our website for valuable information including videos, workshop and operations manuals. www.jjamusements.com 7-5 303 FOR FIBERGLASS: Never buff or wax again! Like vinyl, gelcoat fiberglass (polyester resin) is a UV-sensitive plastic. Though manufacturers add UV stabilizers to vinyl and gelcoat fiberglass in the manufacturing process, these protective agents weaken over time and must be replenished if continuing UV protection is desired. Colored gelcoat fiberglass is particularly sensitive to UV degradation, and 303 Protectant is by far the easiest way to make colored fiberglass look like new again, and to keep it that way. 303 Protectant works by penetrating to restore like-new color and gloss. Spray on enough 303 to thoroughly wet the surface (303 goes farther if it’s sprayed on and then rubbed around & in). Wipe away excess with a soft, absorbent cloth. Wipe until completely dry, changing cloths as they become damp. Unlike wax, 303 is not left to dry before it is wiped off. If 303 has dried on the surface, it is easily removed by spraying the area with more 303, then wiping dry. For best results, apply 303 out of direct sunlight so fiberglass surface is not overly warm. A hot surface causes 303 to evaporate before it can do its job. About 2% of the time, prebuffing (compounding) is required. When required, be sure to use a rubbing compound that does not leave a coating or sealant. Use pure rubbing compound with only the finest abrasive. REAPPLYING: Reapply by spraying 303 on the surface and wiping dry with a soft, absorbent cloth...very much like dusting furniture, and just as easy! Mist it lightly first with 303, then towel dry...takes an extra 3040 seconds. This is an excellent way to keep up the UV screen and totally prevent UV caused slow-fade. WHEN TO REAPPLY: 303 is water-repellent (beads water). When the water repellency begins to diminish, it’s time to reapply. If you think it may be time to reapply but don’t know for sure, test small spot with 303. If any of the color or luster comes back, reapply. Usually, a simple spray on/wipe off reapplication for every 30 to 80 days of exposure is sufficient. DOES 303 ALWAYS WORK? 303 always works unless there is something on the surface keeping 303 away from the fiberglass: teflon, silicone, polymer sealants or fresh wax. If the surface has been freshly waxed, it is not necessary to remove the wax; Just wait a few weeks and try again. Wax does not last long enough to warrant the effort required to remove it. OLDER SURFACES: Even after a few years without care, it may be unnecessary to compound before using 303. To find out for sure, first apply 303 normally. If this does not restore the like-new color and gloss typical with 303, try this: In the shade (or just before dark), spray a basketball-sized spot with 303. Rub it in and spray again to make sure the spot is thoroughly wet with 303. Let set for a few hours or overnight. Spray the spot again with 303 and wipe dry. This is often all it takes to make gelcoat look like new again without compounding. G BU RA ENDU Specifications subject to change without notice - Check our website for valuable information including videos, workshop and operations manuals. www.jjamusements.com M A O-K RTS T PERBOA S TM ES AT CH PL CLUT NCE 503-304-8899 7-6 STORAGE BATTERIES When your boats are not in use and your park is closing for the season, it is a good idea to winterize your bumper boat batteries. To do this, there are a few steps to follow in order to maximize your batteries’ life. The first is to fill each battery up with water and fully charge each battery; this is to keep the batteries from freezing, because a fully charged battery typically won’t freeze. The next step is to keep that battery fully charged; how cold your winter gets determines when you recharge your battery. Over time, the battery self-discharges and 5-6 weeks (3-4 weeks if your area is really cold) is a good period of time in between each recharge until a battery goes back into use. When storing your batteries, it is a good idea to keep them in a cool, dry place, away from the elements, to keep from damaging the shell. When you’re ready for spring, just recharge the batteries a day before and reconnect them to your boats (making sure everything checks out). MOTOR Inspect all electrical connections and seal them with corrosion block. Thoroughly wash and dry the motor cover. Polish and wax the surface of the gelcoat. You can store motors upright or flat, but make sure motors are stored free from moisture and high humidity. TUBE Thoroughly wash and dry the tube. Deflate tubes and store them flat. In time, folds will damage the tube surface and cause leaks, so if there is a lack of storage space, try to minimize the number of folds. CLEANING AND WAXING Storing a dirty bumper boat can lead to corrosion, since dirt retains moisture. Thoroughly wash and dry the bumper boat. Polish and wax all painted/gelcoat surfaces. Spray corrosion block on all electrical connections. What do you clean your boat tubes with if you have hard water buildup as well as liquid chlorine on your boats? 303 Cleaner & Spot Remover utilizes a proprietary blend of sequester agents, surfactants, and hyper-wetting agents to lift and suspend oil, grease and dirt to be easily wiped/rinsed away. It is extremely safe and may be used on all water-safe fabrics and surfaces. The cleaning action increases with warm water, agitation and a longer “dwell time.” STORAGE AREA AND COVERING Select a storage area, such as a garage or storage room, that is free from moisture and high humidity. The daily temperature change should be minimal. Do not store boats in direct sunlight or near open flames or sparks. Selecting the proper cover is important. An unvented, airtight cover may lead to corrosion and rust due to trapped moisture/vapor. Use a vented cover, which will allow moisture to escape rather than retaining it. G TM T PERBOA S BU M A O-K RTS ENDU RANC PLAT UTCH E CL ES 503-304-8899 Specifications subject to change without notice - Check our website for valuable information including videos, workshop and operations manuals. www.jjamusements.com