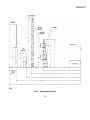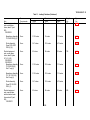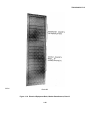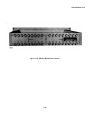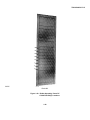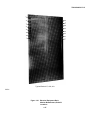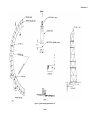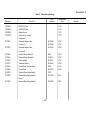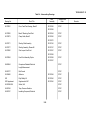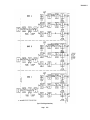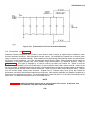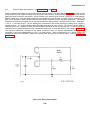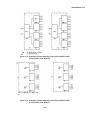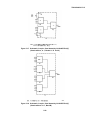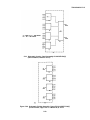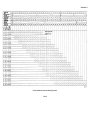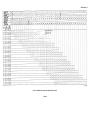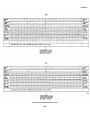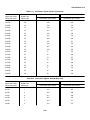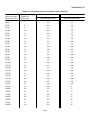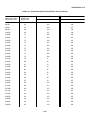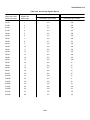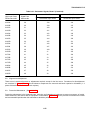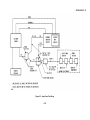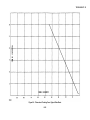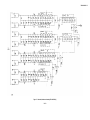
1
TM 32-5985-217-15
TECHNICAL MANUAL
OPERATOR'S, ORGANIZATIONAL,
DIRECT SUPPORT, GENERAL SUPPORT, AND
DEPOT MAINTENANCE MANUAL
FOR
ANTENNA GROUP
COUNTERMEASURES RECEIVING SET
AN/FLR-9(V7)/(V8)
This publication is not available through AG publications
Center. Requisition through Commander, US Army Security
Agency, Materiel Support Command, Vint Hill Farms,
Warrenton, VA 22186.
HEADQUARTERS, DEPARTMENT OF THE ARMY
JUNE 1976
TM 32-5985-217-15
HEADQUARTERS
DEPARTMENT OF THE ARMY
Washington, DC, 25 June 1976
TM 32-5985-217-15, a reprint of ASA Instruction Manual 32-5985-217-15, 1 November 1972, is published for the use of
all concerned.
By Order of the Secretary of the Army:
Official:
PAUL T. SMITH
Major General, United States Army
The Adjutant General
FRED C. WEYAND
General, United States Army
Chief of Staff
TM 32-5985-217-15
TECHNICAL MANUAL
OPERATOR'S, ORGANIZATIONAL,
DIRECT SUPPORT, GENERAL SUPPORT, AND
DEPOT MAINTENANCE MANUAL
FOR
ANTENNA GROUP
COUNTERMEASURES RECEIVING SET
AN/FLR-9(V7)/(V8)
F & M SYSTEMS CO.
DEPARTMENT OF THE ARMY
1 NOVEMBER 1972
Change 1
DECEMBER 1975
TM 32-5985-217-15
Change 1 A
TM 32-5985-217-15
TABLE OF CONTENTS
Section
VOLUME 1
Page
CHAPTER 1
GENERAL INFORMATION
1-1.
1-2.
1-3.
1-4.
1-5.
1-6.
1-7.
1-8.
Description and Purpose
Equipment Description
Leading Particulars
Capabilities and Limitations
Equipment Supplied
Related Technical Manuals
Equipment Required But Not Supplied
Equipment Supplied Cross-Reference Index
1-1
1-1
1-10
1-10
1-10
1-10
1-10
1-11
CHAPTER 2
INSTALLATION
I
INSTALLATION LOGISTICS
2-1
2-1.
2-2.
2-3.
2-4.
2-5.
2-6.
2-1
2-1
2-1
2-3
2-10
2-22
Scope
Unpacking
Inspection
Cables
Antenna Installation Guidelines
Central Building
CHAPTER 3
PREPARATION FOR USE AND RESHIPMENT
I
II
PREPARATION FOR USE
3-1
3-1.
3-2.
3-3.
3-4.
3-5.
3-6.
3-1
3-1
3-1
3-1
3-2
3-2
General
Rf Amplifiers
Test Description
Duration of Tests
Test Sequence
Test Criteria
PREPARATION FOR RESHIPMENT
3-2
3-7.
3-2
Conditions and Methods for Reshipment
CHAPTER 4
OPERATION
I
II
CONTROLS AND INDICATORS
4-1
4-1.
4-1
Operating Controls and Indicators
OPERATING INSTRUCTIONS
4-1
4-2.
4-3.
4-1
4-1
Preoperational Radio Frequency Amplifier Checklist
Radio Frequency Amplifier Starting Procedures
i
TM 32-5985-217-15
TABLE OF CONTENTS (Continued)
Section
Page
4-4.
III
Software Assignments
4-3
EMERGENCY OPERATION
4-3
4-5.
4-6.
4-7.
4-3
4-4
4-4
Blower Failure, Rf Amplifier Cabinets
Equipment Failure
Jamming
CHAPTER 5
THEORY OF OPERATION
I
II
FACILITY FUNCTIONAL OPERATION
5-1
5-1.
5-2.
5-3.
5-4.
5-1
5-1
5-6
5-7
Scope
General
Functional Description
Beam Formation
FUNCTIONAL OPERATION OF ELECTRONIC CIRCUITS
5-5.
5-6.
5-7.
5-8.
5-9.
5-10.
5-11.
5-12.
5-13.
5-14.
Band A Antenna Elements (02-720246) and Band B Antenna
Elements (02-720248).
Bands A and B Reflecting Screen (3300-31000) and
Ground Screen (81-720001).
Band C Antenna Elements (02-720268).
Band C Reflecting Screen (02-720272)
Transmission Line Tuners
Rf Amplifiers
Power Dividers and Combiners
Beamformers
Directional Couplers
Blower Assembly
5-22
5-22
5-24
5-24
5-24
5-24
5-26
5-29
5-34
5-34
5-37
CHAPTER 6
MAINTENANCE
I
ORGANIZATIONAL AND INTERMEDIATE MAINTENANCE
6-1
6-1.
6-2.
6-3.
6-4.
6-5.
6-6.
6-7.
6-8.
6-9.
6-10.
6-1
6-2
6-2
6-2
6-8
6-8
6-23
6-75
6-75
6-77
Scope
Servicing
Maintenance Support Equipment
Performance Test Standards and Tables
Voltage Requirements and Sources
Checkout
Troubleshooting
Alignment and Adjustment
Preventive Maintenance
Antenna Electronics Input Vswr Check
ii
TM 32-5985-217-15
TABLE OF CONTENTS (Continued)
Section
Page
6-11.
6-12.
6-13.
6-14.
II
Antenna Electronics Phase and Amplitude Tracking Test Check
Transmission Line Phase Tracking Measurement Test Check
Swept-Frequency Vswr (Singly Driven Elements) Test Check
Single Antenna Impedance Measurement Test Check
6-80
6-84
6-85
6-87
SPECIAL MAINTENANCE
6-91
6-15. Removal and Replacement Procedures
6-16. Bench Test Procedures
6-91
6-91
CHAPTER 7
CIRCUIT DIAGRAMS
7-1.
General
7-1
GLOSSARY
INDEX
VOLUME 2
CHAPTER 8
PARTS LISTS
8-1.
I
General
8-1
INTRODUCTION
8-3
8-2.
8-3
IPB Description
II
GROUP ASSEMBLY PARTS LIST
8-7
III
NUMERICAL INDEX
8-65
IV
REFERENCE DESIGNATOR INDEX
8-77
V
PARTS LISTING
8-83
8-3.
8-83
Parts List Description
CHAPTER 9
WIRE LISTS
9-1.
General
9-1
iii
TM 32-5985-217-15
LIST OF ILLUSTRATIONS
Number
1-1.
1-2.
1-3.
1-4.
1-5.
1-6.
1-7.
1-8.
1-9.
1-10.
1-11.
1-12.
1-13.
1-14.
1-15.
1-16.
1-17.
1-18.
1-19.
1-20.
1-21.
1-22.
1-23.
2-1.
2-2.
2-3.
2-4.
2-5.
4-1.
5-1.
5-2.
5-3.
5-4.
5-5.
5-6.
5-7.
5-8.
Title
Page
Antenna Group (2 Sheets)
Antenna Array General Arrangement
Antenna Array Cross-Section
Transmission Line Tuner
Electrical Equipment Rack, Rf Amplifiers, Typical
Amplifier, Radio Frequency AM-6533/FLR-9(V)
Blower Assembly
Electrical Equipment Rack, Power.Dividers and Omni/
Sector Beamformers, Band A
Coupler Omni Assembly CU-2054/FLR-9(V) Locations
Equipment Rack, Divider Assembly, Power Rf CU-2052/FLR-9(V)
and Coupler, Omni Assembly CU-2049/FLR-9(V) Locations
Equipment Rack, Divider Assembly, Power Rf CU-2052/FLR-9(V)
and Coupler, Omni Assembly CU-2049/FLR-9(V) Locations
Electrical Equipment Rack, Power Dividers and Omni/
Sector Beamformers, Band B
Coupler, Omni Assembly CU-2055/FLR-9(V) Locations
Electrical Equipment Rack, Power Dividers and Omni
Beamformers, Band B
Electrical Equipment Rack, Monitor Beamformers, Band A
Monitor Beamformer, Typical of Bands A and B
Divider Assembly, Power Rf CU-2050/FLR-9(V) Locations
Electrical Equipment Rack, Monitor Beamformers Band C
Monitor Beamformer, Band C
Divider Assembly, Power Rf CU-2051/FLR-9(V) Locations
Electrical Equipment Rack, Monitor Beamformers, Band B
Locations
Divider Assembly, Power Rf CU-2053/FLR-9(V) Locations
Electrical Equipment Rack, Power Dividers and Omni/Sector
Beamformers, Band C
Antenna Array Cross-Section
Typical Grounding Arrangement (2 Sheets)
Antenna Array General Arrangement
Cable Assembly, Rf Transmission Band A, B & C
Central Building - Antenna Group, AN/FLR-9(V7 & V8)
Amplifier, Radio Frequency AM-6533/FLR-9(V)
Block Diagram, Antenna Group
Typical Spectrum Analyzer Display Intermodulation Distortion
Products
Simplified Block Diagram of Beamforming Process
Beam Parameter Identification
Block Diagram, Beamformer Assembly TD-1055/FLR-9(V)
(Sector Beamformer A)
Block Diagram, Beamformer Assembly TD-1056/FLR-9(V)
(Sector Beamformer B)
Block Diagram, Beamformer Assembly TD-1057/FLR-9(V)
(Sector Beamformer C)
Band A or Band B Antenna Element, Electrical Configuration
Diagram
iv
1-2
1-5
1-6
1-20
1-21
1-22
1-23
1-24
1-25
1-26
1-27
1-28
1-29
1-30
1-31
1-32
1-33
1-34
1-35
1-36
1-37
1-38
1-39
2-11
2-13
2-17
2-19
2-38
4-2
5-3
5-5
5-8
5-8
5-12
5-14
5-21
5-23
TM 32-5985-217-15
LIST OF ILLUSTRATIONS (Continued)
Number
5-9.
5-10.
5-11.
5-12.
5-13.
5-14.
5-15.
5-16.
5-17.
5-18.
5-19.
5-20.
5-21.
5-22.
5-23.
5-24.
5-25.
5-26.
6-1.
6-2.
6-3.
6-4.
6-5.
6-6.
6-7.
6-8.
6-9.
6-10.
7-1.
7-2.
7-3.
7-4.
7-5.
7-6.
7-7.
7-8.
7-9.
Title
Page
Band C Antenna and Feed Configuration
Transmission Line Tuner Functional Schematic
Block Diagram, Amplifier, Radio Frequency AN-6533/FLR-9(V)
Basic Power Splitter
Typical Schematic, Divider Assemblies 1:4
Schematic, Divider Assembly, Power Rf CU-2050/FLR-9(V)
(Power Divider, 2:32, Band A)
Schematic, Divider Assembly, Power Rf CU-2053/FLR-9(V)
(Power Divider, 4:32, Band B)
Schematic, Divider Assembly, Power Rf CU-2051/FLR-9(V)
(Power Divider, 6:24, Band C)
Schematic, Coupler, Omni Assembly CU-2049/FLR-9(V)
(Omnicombiner, 6:1, Bands A, B, and C)
Schematic, Coupler, Omni Assembly CU-2055/FLR-9(V)
(Omnicombiner 16:1, Band B)
Schematic Coupler, Omni Assembly CU-2054/FLR-9(V)
(Omnicombiner, Bands A and C)
Schematic, Divider Assembly, Power Rf CU-2052/FLR-9(V)
(Power Divider, High Level 1:4 Bands A, B, and C
Simplified Schematic, Band C Monitor Beamformers
Simplified Schematic, Bands A and B Monitor Beamformers
Simplified Pictorial Diagram, Monitor Beam Formation Band B
Schematic, Directional Couplers (All)
Air Flow Alarm Wiring Interface to Monitor and Test Group
Cabinet Blower Assembly Ac Wiring Schematic
Simplified Block Diagram Olm&t Test Signals Through Antenna Group
Beamforming Network Simplified Block Diagram
Input Vswr Test Setup
Phase/Amplitude Test Setup
Phase Tracking and Swept Frequency
Band A & B Antenna & Feed Configuration
Band C Antenna & Feed Configuration
Power Divider/Combiners Test Setup
Phase Level Tracking Curve Typical Data Sheet
Beamformer Phase and Amplitude Test Setup
Schematic, Beamformer Assembly TD-1050/FLR-9(V)
Schematic, Beamformer Assembly TD-1051/FLR-9(V)
Schematic, Beamformer Assembly TD-1054/FLR-9(V)
Schematic, Beamformer Assembly TD-1052/FLR-9(V)
Schematic, Beamformer Assembly TD-1053/FLR-9(V)
Schematic, Beamformer Assembly TD-1055/FLR-9(V)
Schematic, Beamformer Assembly TD-1056/FLR-9(V)
Schematic, Beamformer Assembly TD-1057/FLR-9(V)
Antenna Group Cabling Diagram
v
5-25
5-26
5-27
5-29
5-30
5-30
5-31
5-31
5-32
5-32
5-33
5-33
5-35
5-35
5-36
5-37
5-38
5-38
6-9
6-15
6-79
6-81
6-86
6-88
6-89
6-93
6-95
6-105
7-2
7-4
7-6
7-8
7-10
7-12
7-14
7-14
7-16
TM 32-5985-217-15
LIST OF ILLUSTRATIONS (Continued)
Number
1-1.
1-2.
1-3.
1-4.
1-5.
1-6.
1-7.
1-8.
1-9.
1-10.
1-11.
1-12.
1-13.
1-14.
1-15.
1-16.
1-17.
1-18.
1-19.
1-20.
1-21.
1-22.
1-23.
1-24.
Title
Page
Leading Particulars
Bands A and B Antenna Array (3300-31001), Capabilities
and Limitations
Band A Antenna Element (Sylvania 02-720246) Capabilities
and Limitations
Band B Antenna Element (Sylvania 02-720248) Capabilities
and Limitations
Bands A and B Reflecting Screen (Sylvania 02-720172)
Capabilities and Limitations
Bands A and B Ground Screen (Sylvania 02-720247)
Capabilities and Limitations
Band C Antenna Array (Sylvania 02-720268;) Capabilities
and Limitations
Band A Antenna Feed Cable Assembly (3300-81000),
Capabilities and Limitations
Band B Antenna Feed Cable Assembly (3300-81000),
Capabilities and Limitations
Band C Antenna Feed Cable Assembly (3300-81000), Cap
Capabilities and Limitations
Transmission Line Tuner (3300-40005-1), Capabilities
and Limitations
Amplifier, Radio Frequency AM-6533/FLR-9(V) Capabilities
and Limitations
Directional Couplers (Olektron Corp. TD4-102-1, TD4-102-2,
and TD4-102-3; Types I, II, and III), Capabilities and
Limitations
Divider Assembly, Power Rf CU-2052/FLR-9(V), Capabilities
and Limitations
Divider Assembly, Power Rf CU-2050/FLR-9(V), Capabilities
and Limitations
Divider Assembly, Power Rf CU-2053/FLR-9(V), Capabilities
and Limitations
Divider Assembly, Power Rf CU-2051/FLR-9(V), Capabilities
and Limitations
Coupler, Omni Assembly CU-2054/FLR-9(V), Capabilities
and Limitations
Coupler, Omni Assembly CU-2055/FLR-9(V), Capabilities
and Limitations
Coupler, Omni Assembly CU-2049/FLR-9(V), Capabilities
and Limitations
Beamformer Assembly TD-1052/FLR-9(V) (V7 Only),
Capabilities and Limitations
Beamformer Assembly TD-1050/FLR-9(V) (V8 Only),
Capabilities and Limitations
Beamformer Assembly TD-1053/FLR-9(V) (V7 Only),
Capabilities and Limitations
Beamformer Assembly TD-1051/FLR-9(V), (V8 Only)
Capabilities and Limitations
vi
1-12
1-40
1-41
1-42
1-43
1-43
1-43
1-45
1-45
1-46
1-47
1-47
1-49
1-50
1-51
1-52
1-54
1-55
1-57
1-58
1-59
1-61
1-63
1-65
TM 32-5985-217-15
LIST OF ILLUSTRATIONS (Continued)
Number
1-25.
1-26.
1-27.
1-28.
1-29.
1-30.
2-1.
2-2.
2-3.
2-4.
2-5.
2-6.
4-1.
5-1.
5-2.
5-3.
5-4.
5-5.
5-6.
5-7.
6-1.
6-2.
6-3.
6-4.
6-5.
6-6.
6-7.
6-8.
6-9.
6-10.
6-11.
6-12.
6-13.
6-14.
6-15.
6-16.
Title
Page
Beamformer Assembly TD-1054/FLR-9(V), Capabilities
and Limitations
Beamformer Assembly TD-1055/FLR-9(V), Capabilities
and Limitations
Beamformer Assembly TD-1056/FLR-9(V), Capabilities
and Limiations
Beamformer Assembly TD-1057/FLR-9(V), Capabilities
and Limitations
Directional Couplers (Olektron TD4-101-1, TD4-101-2, and
TD4-101-3; Types I, II, and III) Capabilities and
Limitations
Equipment Supplied Cross Reference Index
Installation Inspection
Rf Cables Identification, Antenna Group
AN/FLR-9(V7 and V8) Antenna Installation Criteria
Antenna Array Drawings
Central Building (Roundhouse) Engineering and Associated
Drawings
Antenna Group Electronic Equipment Reference Designator
Assignments
Amplifier, Radio Frequency AM-6533/FLR-9(V) Controls and
Indicators
Monitor Beam Formation, Beam Boresight, Band A
Sector Beam Formation, Beam Boresight, Band A
Monitor Beam Formation, Beam Boresight, Band B
Sector Beam Formation, Boresight, Band B (V7)
Sector Beam Formation, Boresight, Band B (V8)
Monitor Beam Formation, Boresight, Band C
Sector Beam Formation, Boresight, Band C
Maintenance Support Equipment
Antenna Group Circuit Breakers
Test Frequencies
Monitor Beam Formation Chart, Band A, (V7)
Monitor Beam Formation Chart, Band A, (V8)
Monitor Beam Formation Chart, Band B, (V7)
Monitor Beam Formation Chart, Band B, (V8)
Monitor Beam Formation Chart, Band C, (V7)
Monitor Beam Formation Chart, Band C, (V8)
Sector Beam Formation Charts, Bands A and C, (V7 and V8)
Sector Beam Formation Chart, Band B, (V7 and V8)
Omni Beam Formation Charts, Bands A and C, (V7 and V8)
Omni Beam Formation Chart, Band B, (V7 and V8)
Antenna Elements To Transmission Line Tuners Band A, V7
and V8
Antenna Elements to Transmission Line Tuners Band B,
V7 and V8
Antenna Elements To Transmission Line Tuners Band C, V7
and V8
vii
1-67
1-68
1-70
1-72
1-73
1-74
2-1
2-3
2-10
2-23
2-39
2-41
4-1
5-9
5-12
5-18
5-19
5-20
5-21
6-2
6-8
6-11
6-25
6-29
6-33
6-41
6-49
6-53
6-57
6-59
6-61
6-63
6-65
6-66
6-68
TM 32-5985-217-15
LIST OF ILLUSTRATIONS (Continued)
Number
6-17.
6-18.
6-19.
6-20.
6-21.
6-22.
6-23.
6-24.
6-25.
Title
Page
Goniometer Signals, Band A
Goniometer Signals, Band B (Rack 422)
Goniometer Signals, Band B (Rack 423)
Goniometer Signals, Band C
Preventive Maintenance Schedule
Reference Beam Numbers
Amplitude and Phase Tracking Limits
Power Divider/Combiner Amplitude and Phase Requirements
Phase and Amplitude Data For Beamformers
viii
6-69
6-70
6-72
6-74
6-76
6-83
6-84
6-96
6-107
TM 32-5985-217-15
CHAPTER 1
GENERAL INFORMATION
1-1. Description and Purpose.
a. Scope. The AN/FLR-9(V7)/(V8) Antenna Group of Countermeasures Receiving Set AN/FLR-9(V7)/(V8)
includes the antenna system and associated electronic equipment. This group extends to the input maintenance patch
panel of the AN/FLR-9(V7)/(V8) Rf Matrix Group (rf matrix group) and AN/FLR-9(V7)/(V8) Df Group (df group). This
manual is presented in two volumes; Volume 1 contains the operation and maintenance instructions and Volume 2
contains the parts lists and wire lists.
b. General. Principal items of the antenna group are a passive, circular, high frequency three-band antenna array,
rf tuners, directional couplers, rf amplifiers, power dividers, beamformers, and power combiners. The antenna group
Intercepts and processes signals In the 1.5 to 30-MHz range with reduced performance between 1.5 and 2.0 MHz. The
three-band antenna array receives signals from any azimuth. The electronic equipment processes signals from
individual elements so that omnidirectional or directional beam-formed signals are obtained. These signals are
forwarded to the rf matrix group and df group. All beams including omnidirectional in all three arrays are simultaneously
available at the inputs of the rf matrix group.
c. Equipment Location. (See figure 1-1.) The three-band antenna array consists of three concentric rings of
antenna elements with associated reflectors. All electronic equipment used in the antenna group is located in a (circular)
central building in the center of the antenna array.
NOTE
For brevity, items that have official nomenclature are generally referred to by their
common names in text descriptions. See table 1-30 which contains a crossreference between common names and official nomenclature.
1-2. Equipment Description.
NOTE
Equipment descriptions in this section begin at the antenna array and follow a
typical signal path(s) through the antenna group.
a. Antenna Array. (See figures 1-2 and 1-3.) The antenna array is composed of three concentric rings of antenna
elements. Each ring of elements receives rf signals for an assigned portion of the 1.5to 30-MHz radio spectrum. The
outer ring normally covers the 2to 6-MHz range (band A), but also provides reduced coverage down to 1.5 MHz. The
center ring covers the 6 to 18-MHz range (band B) and the inner ring covers the 18 to 30-MHz range (band C). Band A
contains 48 sleeve monopole elements spaced 78.4 feet apart (7.5 degrees). Band B contains 96 sleeve monopole
elements spaced 37.5 feet apart (3.75 degrees). Band C contains 48 antenna elements mounted on wooden structures
placed in a circle around the central building. Bands A and B elements are vertically polarized. Band C elements consist
of two horizontally polarized dipole antenna subelements electrically tied together, and positioned one above the other.
1-1
TM 32-5985-217-15
Figure 1-1. Antenna Group (Sheet 1 of 2)
1-2
TM 32-5985-217-15
Figure 1-1. Antenna Group (sheet 2 of 2)
1-3/1-4
TM 32-5985-217-15
Figure 1-2. Antenna Array General Arrangement
1-5
TM 32-5985-217-15
Figure 1-3. Antenna Array Cross-Section
1-6
TM 32-5985-217-15
1. Antenna Elements. Bands A and B antenna elements are sleeve monopole antennas. They are large in
diameter compared to simple monopole antennas and provide wide bandwidth performance. In both bands, the top of
the sleeve is protected from the weather by a conical weather cap. The weather cap is made from fiberglass and
polyester resin. The top of the mast is sealed with a welded plate. A door in the sleeve permits entry to make electrical
adjustments and inspections. Each band C antenna element consists of two bow-tie planar dipoles placed one above the
other on the band C support structure. The bow-tie type of construction also aids in wideband performance of the band C
elements. The center lines of the upper and lower dipoles are 53.33 and 24.67 feet above the bottom of the base plate,
respectively.
2. Reflecting Screens. The antenna group contains two reflecting screens, one for bands A and B, and one for
band C. The screens operate as reflectors to increase the power gain of individual antenna elements and aid in the
formation of specific beam patterns. The screen for bands A and B is located inside and concentric to the band B
antenna array. The screen is constructed of 1056 vertical steel wires supported by a structure 120.3 feet high. The
structure consists of four sets of horizontal timber beams mounted to 96 steel support towers. The beams are equally
spaced from top to bottom. The vertical reflecting screen wires are spaced approximately 1.5 feet apart directly in front
of each support tower, and are attached to the horizontal beams. On either side of the support towers (between support
towers) the wires are spaced approximately 3 feet apart. The support towers are spaced 35.2 feet (3.75 degrees) apart,
and form a ring 3375.5 feet in circumference. Each reflecting screen wire is grounded directly to a ground screen and is
electrically insulated from the support structure, except at ground level. The steel support towers are grounded directly
together by a buried copper wire. Copper-clad ground rods are connected to the copper wire at each tower base, and
halfway between each tower. A lightning rod is attached to each support tower for additional protection. An access door
in the reflecting screen support structure permits entry of vehicles to the center of the antenna array. The band C
reflecting screen supported by the band C antenna support structure consists of 44 galvanized steel wires strung
horizontally 1.5 feet apart, with each wire held under spring tension. The lowest wire of the screen is 2.5 feet above the
base of the support structure. The screen is grounded at every sixth main truss (vertical wooden support) in band C.
See figure 2-2 in Chapter 2. The associated ground rods are imbedded in the ground beneath the support structure.
Fortyeight lightning rods, each 102 inches long, are placed along the top periphery of the support structure at equal
intervals (one to every main truss). Each lightning rod is connected by wire to a ground rod, and also to a continuous
horizontal bus (buried in the ground at the base of the support structure), which acts as a common tie for all the lightning
rods. An access gate in the band C support structure permits vehicles to enter the interior of the antenna array
assembly.
3. Ground Screen. The antenna group contains a ground screen for bands A and B. The ground screen helps to
stabilize the antenna element impedance characteristic, and to provide uniform impedance from element to element,
regardless of variation in the electrical properties of the soil. The ground screen for bands A and B consists of
prefabricated stainless steel grid wire mats, which are placed along the entire base circumference of the bands A and B
reflecting screen. Each mat is 96 feet long and 12 feet wide. The ground screen extends outward from the base of the
bands A and B reflecting screen. Wires extend radically for 88 feet from the outside edge of the ground screen, where
they are secured to ground rods. Each ground rod is 10 feet long
1-7
TM 32-5985-217-15
and is entirely imbedded a minimum of 12 inches below ground level. The antenna elements of bands A and B are
connected to the ground screen by wires extending radically from the base of each antenna element. There is no ground
screen associated with band C.
b. Central Building. The central building houses 'all antenna group equipment other than the antenna array and
feed cables, and also houses components of other equipment groups of the AN/FLR-9(V7)/(V8). The central building is a
cylindrical structure situated at the center of the antenna array. The circumference of the central building is
approximately 282.7 feet and has a radius of 45 feet. The equipment in the central building is connected to elements of
the antenna array by antenna feed cables which enter the building by means of eight cable wells installed at eight points
along the circumference of the building. The cables pass through sleeves in the foundation wall of the well; 6 band A
cables, 12 band B cables, and 6 band C cables enter through each sleeve. The cable wells are covered by removable
access grates. Within the central building, cable trays distribute the cables to the equipment cabinets and racks. There
are three levels of cable trays; the second and third level cable trays are arranged along the radius of the building, and
the first level trays are arranged circumferentially. Connections are made by cable drops from the trays through the tops
of the racks. Electrical connections between the central building and the operations building, situated outside of the
antenna array, are made by beam-output cables, which pass through a tunnel connecting the two buildings.
1. The Cable Tunnel. The cable tunnel provides a cable route between the central building and the operations
building. Built of reinforced concrete, the tunnel lengths are 1180 feet (V8), 960 feet (V7), 6.5 feet high, and 4 feet wide.
The cables lie in brackets mounted on one side of the tunnel.
2. Antenna Feed Cables. The antenna feed cables connect the elements of the antenna array with equipment in
the central building. The cables are fabricated from lowloss 7/8 inch, 75-ohm foamed dielectric cable with solid copper
inner conductor. Each cable is buried approximately 42 inches below ground level and is imbedded in 1 foot of sand
covered with a layer of bricks. The remaining area within the trench is filled with compacted earth. Underground feed
cable locations are indicated by white markers located over the trench center line. The nominal lengths of the cables are
603 feet for band A, 567 feet for band B, and 155 feet for band C.
3. Transmission Line Tuners. Transmission line tuners are low-loss coaxial line devices that compensate for
variations in electrical lengths of the antenna feed cables. The effective electrical lengths are varied by a mechanical
adjustment of the tuner. These tuners are used in all antenna leads. They also provide for electrically compensating
apparent cable length variations due to aging and seasonal temperature variations.
4. Directional Couplers. Each antenna lead in all bands contains a directional coupler located between the line
tuner and rf preamplifier. The couplers provide a means for injecting test signals toward an antenna element, or in the
opposite direction toward a beamformer for the purpose of quickly locating inoperative circuits. These test signals are
originated in the AN/FLR-9(V7)/(V8) Monitor and Test Group (monitor and test group) which is computer controlled. A
directional coupler is also placed at the output of each beamformer. This coupler directs a test signal (injected in the
above couplers) into the monitor and test group equipment. The directional
1-8
TM 32-5985-217-15
couplers at the input provide more than 20-dB signal isolation between the desired and undesired direction of the test
signal. Those used for receiving the test signal for monitor and test group use provide 10-dB isolation. Refer to the
Monitor and Test Group Manual IM 32-4940-201-15 for details of system malfunction detection and isolation.
5. Rf Amplifiers. The input from each antenna element passes through the line tuner and directional coupler to an
rf amplifier. These amplifiers have a nominal 19-dB gain for bands A and B and 21-dB gain for band C. This gain
compensates for losses in subsequent power divisions and beamforming processes and consequently improves the
system noise figure. The amplifiers provide two output jacks for a signal path to the df group and a separate signal path
to the monitor beamforming equipment. An rf amplifier assembly is composed of two amplifier subassemblies and a
common power supply.
NOTE
The rf amplifiers are capable of performing as a band A, band B, or band C
amplifier depending upon the setting of an internal switch which changes the gain
from 19 to 21 dB. The 21-dB position is used for band C only. An incorrect switch
setting results In degraded performance of the associated circuits..
6. Power Dividers. Output signals from each rf amplifier are fed to two power dividers. One unit (1:4 power
divider), referred to as a high-level divider, provides outputs for omnicombiners, sector beam formation, goniometer
inputs and a 75-ohm (spare) termination. The other unit (1:16 power divider) provides the signals for monitor beam
formation. Refer to paragraph 5-11.
NOTE
The terminology, high-level divider, does not infer a difference in signal level
input from the divider described below. Both dividers, in a given band, have the
same level input signals. However, the high-level divider divides the signal only
four ways and consequently has higher output levels than the 1:16 power divider
which provides signals for monitor beams.
7. Outputs. Output signals from each of the three bands are as follows.
Sector Beams
Omnibeams
Monitor Beams
Goniometer Input Signals
Band A
6
1
48
48
Band B
6
1
48
96
Band C
6
1
24
48
The preceding signals, except for those to the goniometers, are sent via the cable tunnel to the operations building and
terminate on the input maintenance patch panel in the rf matrix group. This is the interface boundary between the
antenna group and the rf matrix group. Goniometer input signals are routed directly to the goniometers in the central
building which is the interface boundary between the antenna group and the df group.
Change 1 1-9
TM 32-5985-217-15
1-3. Leading Particulars. (See table 1-1.)
The leading particulars for all of the components in the antenna group are listed in table 1-1. Data consists of power
requirements and the physical characteristics of each component. See also paragraph 1-5. References to appropriate
illustrations are included. Leading particulars that include transportability, storage conditions, and setup time are not
applicable to this installation. Other pertinent data is included, as applicable.
1-4. Capabilities and Limitations. (See tables 1-2 through 1-29.)
The capabilities and limitations of various components of the antenna group are listed in tables 1-2 through 1-29.
Complete capabilities and limitations of the countermeasures receiving set are included in IM 32-5895-231-15 and IM 325895-231-15/1 manuals.
1-5. Equipment Supplied.
Equipment supplied is also included in table 1-1. Numbers or statements in parentheses ( ) following an entry indicate
quantities over one. Following each rack of electrical equipment listings are the components and assemblies mounted in
these racks. Indented component or assembly listings contain quantities for one unit (such as a rack or major equipment
not indented). Power requirements, dimensions, and weights listed are for one equipment only. Blank panels and
hardware items are not included. F & M Systems Co. part numbers appear as 3300-xxxxx or 3300-xxxxx-x. Numbers
(3300xxxxx) without a final -x number indicate a series of racks which are functionally identical, but have only minor
mechanical differences. Differences between sites V7 and V8 exist only in monitor beamformers supplied in bands A
and B. These differences are indicated in the table. Weights are listed for large items such as racks and antenna
components where identifiable. For equipment location, rack identification, and reference designator assignments, see
figure 2-5 and table 2-6 in Chapter 2.
1-6. Related Technical Manuals.
The following manual is related to the Amplifier, Radio Frequency AM-6533/FLR-9(V):
CM 32-5895-236-14.
The following manuals contain related interface and automated testing information in that order:
IM 32-5895-232-15
IM 32-4940-201-15.
The following manuals contain Information relating this group to the set:
IM 32-5895-231-15
IM 32-5895-231-15/1.
1-7. Equipment Required But Not Supplied.
Equipment required but not supplied consists of test equipment. See Chapter 6 for test equipment requirements.
1-10
TM 32-5985-217-15
1-8. Equipment Supplied Cross-Reference Index. (See table 1-30.)
Only equipment items that carry an official nomenclature are cross-referenced to manufacturer's part number, common
name, and the appropriate table of capabilities and limitations.
1-11
TM 32-5985-217-15
Table 1-1. Leading Particulars
Item
Power
Requirements
Height
Dimensions
Width
Depth
Weight
(lb)
Bands A and B
antenna array
3300-31001 -1
02-720247
Figure
No.
1-3
Band A antenna
element (48 total)
02-720246-
None
105 feet
16,000
Sleeve section
None
48 feet,
9 inches
Mast section
None
57 feet,
10 inches
Band B antenna
element (96 total)
02-720248-1
None
35 feet
Sleeve section
None
15 feet,
outside
diameter
2 feet, 0 inch,
outside dimensions
1 foot, 11 inches
inside dimensions
Mast section
None
22 feet,
4.75 inches
3.5 inches, outside dimensions
2.3 inches, inside
dimensions
1-3
7 feet, 4.5 inches,
outside dimensions
7 feet, 4 inches
inside dimensions
1,500
1-3
1-12
TM 32-5985-217-15
Table 1-1. Leading Particulars (Continued)
Item
Bands A and B
reflecting screen
and supporting
structure assembly
3300-31000-1
Power
Requirements
None
4800 watts
Dimensions
Width
Height
137 feet,
6 inches
(including
lightning
rod)
Depth
Weight
(lb)
Figure
No.
1075 feet diameter
1-3
1276 feet, outside
dimensions; 1075
feet, inside
dimensions
1-2
1-3
(Note: when required, includes
aircraft warning
lights.)
Bands A and B
ground screen
81-720001-1
None
Band C antenna
array (48)
02-720268 -1
None
Band C antenna
structure
00-720203-1
None
1-3
68 feet
(not including base or
335.22 feet
diameter
lightning
rod)
Upper dipole
frame (band C)
81-720219-1
None
53.33 feet
above
ground
10 feet
2.5 inches
6 feet, 11.75
inches
3 inches
1-13
TM 32-5985-217-15
Table 1-1. Leading Particulars (Continued)
Item
Power
Requirements
Lowker Dipole
frame
81-720219-1
24 feet,
8 inches
above
ground
10 feet
2.5 inches
Band C reflecting
screen and lightning rod assembly
None
Band C lightning
rod assembly
Entire antenna group
of electronic equipment when installed
in racks. This includes all items
listed in the central building portion of figure 1-1,
sheet 2.
None
Transmission line
tuner panel assemblies
3300-40004-1
(total of 8)
Transmission line
tuners (total of
192)
See requirements
for racks containing rf amplifiers. All
others: None
Dimensions
Width
Height
70 feet,
0 inch
(not including lightning rod)
6 feet, 11.75
inches
Depth
Weight
(lb)
Figure
No.
3 inches
314 feet, 8 inches
diameter
Comprises 19 racks of equipment and 2700 phase
matched cables for each site, V7 and V8. Requires approximately 780 square feet of floor
space, each site. Note: For cabling particulars, see chapter 6 of this manual. For
reference designator assignments, see table 2-1.
None
22 inches
60 inches
2.75
inches
None
27.5 inches
closed,
37.5 inches
extended
2 inches
2.5
inches
1-14
1-4
TM 32-5985-217-15
Table 1-1. Leading Particulars (Continued)
Item
Electrical equipment
rack rf amplifiers
(racks 401, 403, 404,
408, 415, 416, 420,
421)
3300-32002-1
Power
Requirements
1000 watts
Dimensions
Width
Height
83 inches
24 inches
Weight
(lb)
Depth
30 inches
740
Figure
No.
1-5
NOTE: for directional coupler information, see note at end of this table.
Amplifier, Radio
Frequency AM-6533/
FLR-9(V) (12)
100 watts
3.47 inches
19.0 inches
19.75
inches
1-6
Blower assembly
3300-40015-1
200 watts
6.97 inches
19.0 inches
15.25
inches
1-7
Electrical equipment
rack, power dividers
and omni sector beamformer, band A (rack
410)
3300-32000-1
None
83 inches
24 inches
30
inches
Coupler-Omni
Assembly
CU-2054/FLR-9 (V)
(3)
None
3.47 inches
19.0 inches
4.75
inches
1-9
Coupler, Omni
Assembly
CU-2049/FLR-9(V)
None
3.47 inches
19.0 inches
4.75
inches
1-10
and
1-11
Divider Assembly,
Power Rf
CU-2052/FLR-9(V)
None
1.72 inches
19.0 inches
3.02
inches
1-11
and
1-10
1-15
610
1-8
TM 32-5985-217-15
Table 1-1. Leading Particulars (Continued)
Item
Power
Requirements
Height
Dimensions
Width
Beamformer
Assembly
TD-1055/FLR-9 (V)
None
3.75 inches
19.0 inches
Panel, Patching,
Antenna
SB-3666/FLR-9 (V)
None
10.47 inches
19.0 inches
Weight
(lb)
Depth
8.95
inches
Figure
No.
1-8
1-8
inches
Electrical equipment
rack, power dividers
and omni/sector beamformers band B (rack
423)
3300-3200 1-1
None
83 inches
24 inches
30
inches
Divider Assembly,
Power Rf CU-2052/
FLR-9(V) (12)
None
1.72 inches
19.0 inches
3.02
inches
1-11
and
1-10
Coupler, Omni
Assembly CU-2049/
FLR-9 (V)
None
3.47 inches
19.0 inches
4.75
inches
1-10
and
1-11
Coupler, Omni
Assembly CU-2055/
FLR-9(V) (3)
None
3.47 inches
19.0 inches
4.75
inches
1-13
Panel, Patching,
Antenna SB-3663/
FLR-9 (V)
None
10.47 inches
19.0 inches
0.125
inches
1-12
Electrical equipment
rack, power dividers
and omni/sector beamformers band B (rack
422)
3300-32003-1
None
83 inches
24 inches
30
inches
750
1-16
700
1-12
1-14
1-14
TM 32-5985-217-15
Table 1-1. Leading Particulars (Continued)
Power
Requirements
None
inches
Height
3.47 inches
Dimensions
Width
19.0 inches
Divider Assembly,
Power Rf CU-2052/
FLR-9(V) (12)
None
1.72 inches
19.0 inches
3.02
inches
1-11
and
1-10
Beamformer
Assembly,
TD- 1056/FLR-9 (V)
None
3.75
19.0 inches
8.95
inches
1-14
Panel, Patching,
Antenna SB-3664/
FLR-9 (V)
None
10.47 inches
19.0 inches
Electrical equipment
rack, monitor beamformers, band A (racks
405, 406, 407)
3300-32004-1
3300-32004-2
Beamformer
Assembly
TD- 1052/FLR-9 (V)
Site V7 only (8)
None
83 inches
24 inches
30.
inches
None
3.125 inches
19.0 inches
17.5
inches
1-16
Beamformer
Assembly
TD-1050/FLR-9 (V)
Site V8 only 18)
None
3.125 inches
19.0 inches
17.5
inches
1-16
Divider Assembly,
Power Rf CU-2050/
FLR-9(V) (8)
None
3.47 inches
19.0 inches
4.75
inches
1-17
Item
Coupler, Omni
Assembly CU-2055/
FLR-9(V) (3)
1-17
Depth
4.75
Weight
(lb)
Figure
No.
1-13
1-14
740
1-15
TM 32-5985-217-15
Table 1-1. Leading Particulars (Continued)
Power
Requirements
None
Height
83 inches
Dimensions
Width
24 inches
Depth
30 inches
Beamformer Assembly
TD-1054/FLR-9(V) (6)
None
3.125 inches
19 inches
17.5 inches
1-19
Divider Assembly,
Power Rf CU-2051/
FLR-9(V) (8)
None
3.47 inches
19.0 inches
4.75 inches
1-20
Electrical equipment
rack, monitor beamformer, band B (racks
417, 418, 419)
3300-32006-1
3300-32006-2
Beamformer Assembly
TD-1053/FLR-9(V)
Site V7 only (8)
None
83 inches
24 inches
30 inches
None
3.125 inches
19.0 inches
17.5 inches
1-16
Beamformer Assembly
TD- 105 1/FLR-9 (V)
Site V8 only (8)
None
3.125 inches
19.0 inches
17.5 inches
1-16
Divider Assembly,
Power RF CU-2053/
FLR-9 (V)
None
3.47 inches
19.0 inches
4.75 inches
1-22
None
83 inches
24 inches
30 inches
Item
Electrical equipment
rack monitor beamformer, band C (rack
402)
3300-32005-1
Electrical equipment
rack, power dividers,
and omni/sector beamformers band C (rack
409)
3300-32007-1
1-18
Weight
(lb)
640
750
650
Figure
No.
1-18
1-21
1-23
TM 32-5985-217-15
Table 1-1. Leading Particulars (Continued)
Power
Requirements
None
Height
3.47 inches
Dimensions
Width
19.0 inches
Depth
4.75 inches
None
3.47 inches
19.0 inches
4.75 inches
1-10
and
1-11
None
1.72 inches
19.0 inches
3.02 inches
1-11
and
1-10
Beamformer Assembly
TD-1057/FLR-9 (V)
None
3.47 inches
19.0 inches
10 inches
1-23
Panel, Patching,
Antenna SB-3662/
FLR-9 (V)
None
inches
10.47
19.0 inches
0.125 inches
1-23
Item
Coupler, Omni
Assembly CU-2054/
FLR-9(V) (3)
Coupler, Omni
Assembly CU-2049/
FLR-9(V)
Divider Assembly,
Power Rf CU-2052/
FLR-9(V) (12)
Weight
(lb)
Figure
No.
1-9
NOTE
All eight electrical equipment racks, rf amplifiers contain directional couplers as follows. All below have dimensions 1 3/4 by 2 by 3/4 inches.
Olektron Part No.
T-D4-102-1
T-D4-102-2
T-D4-102- 3
Rack
404, 408
415, 416, 420, 421
401, 403
Band
A
B
C
Quantity Per Rack
24
24
24
The following directional couplers are located in monitor and test group rack no. 412.
T-D4-101-1
T-D4-101-2
T-D4-101-3
A
B
C
Signals leave antenna group from rack 412 via the tunnel to the operations building.
Change 1 1-19
55
55
31
TM 32-5985-217-15
Figure 1-4. Transmission Line Tuner
1-20
TM 32-5985-217-15
Figure 1-5. Electrical Equipment Rack, Rf Amplifiers, Typical
1-21
TM 32-5985-217-15
Figure 1-6. Amplifier, Radio Frequency AM-6533/FLR-9(V)
1-22
TM 32-5985-217-15
Figure 1-7. Blower Assembly
1-23
TM 32-5985-217-15
FIGURE 1-8. ELECTRICAL EQUIPMENT RACK, POWER DIVIDERS
AND OMNI/SECTOR BEAMFORMERS, BAND A
Change 1 1-24
TM 32-5985-217-15
NOTE: COUPLER OMNI ASSEMBLIES DENOTED BY ARROWS.
FIGURE 1-9. COUPLER OMNI ASSEMBLY CU-2054/FLR-9 (V) LOCATIONS
Change 1
1-25
TM 32-5985-217-15
FIGURE 1-10. Equipment Rack, Divider Assembly, Power RF CU-2052/FLR-9 (V), Coupler, Omni Assembly CU2049/FLR-9 (V),and Beamformer Assembly, TD-1056/FL R-9 (V) Locations
Change 1 1-26
TM 32-5985-217-15
FIGURE 1-11. EQUIPMENT RACK, DIVIDER ASSEMBLY, POWER RF CU-2052/FLR-9 (V) AND COUPLER, OMNI
ASSEMBLY CU-2049/FLR-9 (V) LOCATIONS
Change 1
1-27
TM 32-5985-217-15
Figure 1-12. Electrical Equipment Rack, Power Dividers
and Omni/Sector Beamformers, Band B
Change 1 1-28
TM 32-5985-217-15
Figure 1-13. Coupler, Omni Assembly CU-2055/FLR-9(V) Beamformer Assembly TD-1056/FLR-9(V) Locations
Change 1
1-29
TM 32-5985-217-15
Figure 1-14. Electrical Equipment Rack, Power Dividers and Omni Beamformers, Band B
Change 1 1-30
TM 32-5985-217-15
36082
Units.
NOTE:
Beamformers Top Eight
Units; Divider
Assemblies Lower Eight
Racks 405, 406, 407
Figure 1-15. Electrical Equipment Rack, Monitor Beamformers, Band A
1-31
TM 32-5985-217-15
Figure 1-16. Monitor Beamformer, Typical of Bands A and B
TM 32-5985-217-15
36133
Racks: 405, 406, 407
Figure 1-17. Divider Assembly, Power Rf
CU-2050/FLR-9(V) Locations
1-33
TM 32-5985-217-15
36134
Rack 402
Figure 1-18. Electrical Equipment Rack, Monitor Beamformers, Band C
1-34
TM 32-5985-217-15
Figure 1-19. Monitor Beamformer, Band C
1-35
TM 32-5985-217-15
36135
Rack 402
Figure 1-20. Divider Assembly, Power Rf
CU-2051/FLR-9(V) Locations
1-36
TM 32-5985-217-15
Typical Racks 417, 418, 419
36131
Figure 1-21. Electrical Equipment Rack,
Monitor Beamformers, Band B
Locations
1-37
TM 32-5985-217-15
Typical Racks 417, 418, 419
36136
Figure 1-22. Divider Assembly, Power Rf
CU-2053/FLR-9(V) Locations
1-38
TM 32-5985-217-15
Figure 1-23. Electrical Equipment Rack, Power Dividers
and Omni/Sector Beamformers, Band C
Change 1
1-39
TM 32-5985-217-15
Table 1-2. Bands A and B Antenna Array (3300-31001),
Capabilities and Limitations
Equipment Characteristics
Capability/Limitation
Frequency range
2 to 18 MHz (down to 1.5 MHz with
reduced performance)
Detection range
O to 4000 nautical miles
Polarization
Vertical
Azimuth coverage
360 degrees
Directional gain
15 dB minimum (average for monitor beams)
10 dB minimum (at any frequency in band)
Horizontal sidelobes
18 dB minimum (below main beam)
Nominal azimuth beamwldth
11 degrees (band A)
4 degrees (band B)
Nominal elevation angle
Up to 30 degrees (band A)
Up to 40 degrees (band B)
1-40
TM 32-5985-217-15
Table 1-3. Band A Antenna Element (Sylvania 02-720246)
Capabilities and Limitations
Equipment Characteristics
Capability/Limitation
Frequency range
2 to 6 MHz
Polarization
Vertical
Vswr
5:1 maximum
Inductance ZO
172.5 ohms
Inductance length
11.2 feet
Rotation length (ZO=75 ohms)
19.2 feet
Jumper length
19.5 feet
Shorted shunt stub
(ZO=75 ohms)
31 feet
Temperature range
Operating
Non-operating
-20 to +125°F (-28.9 to +51.7°C)
-20 to +125°F (-28.9 to +51.7°C)
Relative humidity
95 percent maximum
Barometric pressure
Operating
Non-operating
31.0 down to 20.58 inches of mercury
29.9 down to 5.54 inches of mercury
Wind and ice loading
Operating and non-operating
(worst condition)
75 mph, 1-inch radial
ice, -0.4°F (-18°C)
Survival limits: 150 m8h maximum peak
gust wind (no ice), +40 F (4.4°C);
100 mph maximum peak gust, 1.5 inches
radial ice, 0.4°F (-18°C); 3 inches
radial ice (no wind), -O.4°F (-18°C)
Distance from reflecting screen
61.5 feet
Distance from adjacent elements
Angular
Straight line
7.5 degrees
78.4 feet
Mast impedance
126 ohms
Output impedance
75 ohms
1-41
TM 32-5985-217-15
Table 1-4. Band B Antenna Element (Sylvania 02-720248)
Capabilities and Limitations
Equipment Characteristics
Capability/Limitation
Frequency range
6 to 18 MHz
Polarization
Vertical
Vswr
5:1 maximum
Inductance ZO
175 ohms
Inductance length
6.54 feet
Rotation length (ZO=75 ohms)
8 feet
Jumper length
3.25 feet
Shorted shunt stub
12.5 feet
Temperature range
Operating
Non-operating
-20 to +125°F (-28.9 to +51.7°C)
-20 to +125°F (-28.9 to +51.7°C)
Relative humidity
95 percent maximum
Barometric pressure
Operating
Non-operating
31.0 down to 20.58 inches of mercury
29.9 down to 20.58 inches of mercury
Wind and ice loading
Operating and non-operating
(worst condition)
75 mph, 1 inch radial
ice, -0.4°F (-18°C)
Survival limits: 150 mgh maximum peak
gust wind (no ice), +40°F (4.4°C);
100 mph maximum peak gust, 1.5 inches
radial ice, 0.4°F (-18°C);-3 inches
radial ice (no wind), -0.4°F (-18°C)
Distance from reflecting screen
20.5 feet
Distance from adjacent elements
Angular
Straight line
3.75 degrees
36.5 feet
Mast impedance
126 ohms
Output impedance
75 ohms
1-42
TM 32-5985-217-15
Table 1-5. Bands A and B Reflecting Screen (Sylvania 02-720172)
Capabilities and Limitations
Equipment Characteristics
Capability/Limitation
Wire spacing
3 feet apart (average) (no wires in
center of bay)
Polarization
Vertical
Wind and ice loading
Operating and non-operating
(worst condition)
75 mph, 1 inch radial
ice, -0.4°F (-18°C)
Survival limits: 150 moh maximum peak
gust wind (no ice), +40°F (4.4°C);
100 mph maximum peak gust, 1.5-inch
radial ice, 0.4°F (-18°C); 3-inch
radial ice (no wind), -0.4°F (-18°C)
Wire tension, each wire
150 pounds
Table 1-6. Bands A and B Ground Screen (Sylvania 02-720247)
Capabilities and Limitations
Equipment Characteristics
Capability/Limitation
Mesh dimensions
2 feet by 2 feet
Distance from reflecting screen
96 feet
Table 1-7. Band C Antenna Array (Sylvania 02-720268;) (See note at end of table.),
Capabilities and Limitations
Equipment Characteristics
Capability/Limitation
Frequency range
18 to 30 MHz
Detection range
0 to 4000 nautical miles
Polarization
Horizontal
Cross polarization
-20 dB minimum
Azimuth coverage
360 degrees
Vswr
3:1 maximum
Wire spacing
18 inches
1-43
TM 32-5985-217-15
Table 1-7. Band C Antenna Array (Sylvania 02-720268;) (See note at end of table.),
Capabilities and Limitations (Continued)
Equipment Characteristics
Capability/Limitation
Wire tension (each wire)
100 pounds
Directional gain
15 dB minimum (for monitor beams)
10 dB minimum (anywhere in band)
Horizontal sidelobes
18 dB minimum (below main beam)
Nominal azimuth beamwidth
15 degrees (half-power points)
Nominal elevation pattern
Up to 26 degrees (low end of band)
Up to 17 degrees (high end of band)
Temperature range
Operating
Non-operating
-20 to +125°F (-28.9 to +51.7°C)
-20 to +125°F (-28.9 to +51.7°C)
Relative humidity
95 percent maximum
Barometric pressure
Operating
Non-operating
31.0 down to 20.58 inches of mercury
29.9 down to 5.54 inches of mercury
Wind and ice loading
Operating and non-operating
(worst condition)
75 mgh, I-inch radial ice,
-0.4°F (-18°C)
Survival limits: 150 mph maximum peak
gust wind (no ice), +40 F (4.4°C);
100 mph maximum peak gust, 1.5-inch
radial ice, 0.4°F (-18°C); 3-inch
radial ice (no wind), -0.4°F (-18°C)
Element distance from
reflecting screen
10.3 feet, approximate
Distance from adjacent elements
Angular
Straight line
7.5 degrees
21 feet, 11 1/8 inches
Impedance
75 ohms
NOTE
Refer also to site installation drawings 3300-31002, 3300-41034, 3300-41035, and 300-41041 (see
table 2-4).
1-44
TM 32-5985-217-15
Table 1-8. Band A Antenna Feed Cable Assembly (3300-81000),
Capabilities and Limitations
Equipment Characteristics
Capability/Limitation
Characteristic impedance
75 +2 ohms
Attenuation
-0.8 dB maximum (at 6 MHz), 68°F (20°C)
Temperature range
Operating
Non-operating
-65 to +160 F (-54 to +71°C)
-65 to +160 F (-54 to +71°C)
Resistivity
Inner- conductor
Outer Conductor
2 maximum at 68°F
0.158 ohm-cm/m2 maximum at 68 F (20°C)
0.077 ohm-cm/m maximum at 680F (20°C)
Velocity of propagation
82 ±2 percent of free space
Rough cut length
610 feet ±1 foot
Nominal capacitance
17 pf per foot
Dielectric strength
8200 volts peak minimum
Corona extinction point
4000 volts rms minimum
Change in electrical length
0.10 cm/100 ft/°F maximum
Bend radius
9 inches minimum
Table 1-9.. Band B Antenna Feed Cable Assembly (3300-81000),
Capabilities and Limitations
Equipment Characteristics
Capability/Limitation
Characteristic impedance
75 ±2 ohms
Attenuation
-1.2 dB maximum (at 18 MHz), 68°F (20°C)
Temperature range
Operating
Non-operating
-65 to +160°F (-54 to +71°C)
-65 to +160°F (-54 to +71°C)
Resistivity
Inner conductor
Outer conductor
0.158 ohm-cm/m2
0.077 ohm-cm/m2
1-45
maximum at 68°F (20°C)
maximum at 68°F (20°C)
TM 32-5985-217-15
Table 1-9. Band B Antenna Feed Cable Assembly (3300-81000),
Capabilities and Limitations (Continued)
Equipment Characteristics
Capability/Limitation
Velocity of propagation
82 ±2 percent of free space
Rough cut length
578 feet ±1 foot
Nominal capacitance
17 pf per foot
Dielectric strength
8200 volts peak minimum
Corona extinction point
4000 volts rms minimum
Change in electrical length
0.10 cm/100 ft/°F maximum
Bend radius
9 inches minimum
Table 1-10. Band C Antenna Feed Cable Assembly (3300-81000),
Capabilities and Limitations
Equipment Characteristics
Capability/Limitation
Characteristic impedance
Attenuation
75 ±2 ohms
-0.6 dB maximum (at 18 MHz), 68°F (20°C)
Temperature range
Operating
Non-operating
-65 to +160 F (-54 to +71°C)
-65 to +160 F (-54 to +71°C)
Resistivity
Inner conductor
Outer conductor
0.158 ohm-cm/m2
0.077 ohm-cm/m2
Velocity of propagation
Rough cut length
82 ±2 percent of free space
158 ±2 feet
Nominal capacitance
17 pf per foot
Dielectric strength
8200 volts peak minimum
Corona extinction point
4000 volts rms minimum
Change in electrical length
0.10 cm/100 feet/OF maximum
Bend radius
9 inches minimum
1-46
maximum 68 F (20 C)
maximum 68 F (20°C)
TM 32-5985-217-15
Table 1-11. Transmission Line Tuner (3300-40005-1),
Capabilities and Limitations
Equipment Characteristics
Capability/Limitation
Characteristic impedance
75 ohms
Frequency range
1 to 50 MHz
Vswr
1.05 to I maximum
Insertion loss
0.05 dB (at 50 MHz), maximum
(fully extended)
Range of adjustment
25 cm minimum
Service conditions
Operating
+60°F (+15.6°C) to +80°F (+26.7°C)
meeting full performance requirements.
Non-operating
Temperature extremes with equipment
continuing to perform basic function
without interruption or causing permanent damage to itself or interconnected unit.
Lower limit: +32°F (0°C) to +60°F
(+15.6°c)
Upper limit: +80 F (26.7 0C to
+125°F (+51.7 °C)
-65°F (-54°C) to 160°F (+71°C)
Humidity
95 percent
Altitude
Withstands air shipment at 40,000
feet
Table 1-12. Amplifier, Radio Frequency AM-6533/FLR-9(V),
Capabilities and Limitations
NOTE
Data is for one amplifier; there are two per assembly.
Equipment Characteristics
Band A
Band B
Band C
Frequency range
In band
Low range
2 to 6 MHz
1.5 to 2 MHz
6 to 18 MHz
18 to 30 MHz
1-47
TM 32-5985-217-15
Table 1-12. Amplifier, Radio Frequency AM-6533/FLR-9(V),
Capabilities and Limitations (Continued)
Equipment Characteristics
Band A
Band B
Band C
Gain each channel
In band
Low range
19.25 ±0.2 dB
19.25 ±1 dB
19.25 ± 0.2 dB
21.25 ±0.2 dB
±5 degrees
maximum
±5 degrees
maximum
±1 degree
maximum
± degree
maximum
Input impedance
75 ohms
75 ohms
75 ohms
Input signal level (rms)
Input impedance tracking
100 millivolts
maximum
±1.7 ± j1.1
100 millivolts
maximum
±2.9 ± j1.4
100 millivolts
maximum
±2.5 ±j2.5
Output impedance
75 ohms
75 ohms
75 ohms
Vswr
Input
Output
1.25:1
1.25:1
1.25:1
1.25:1
1.25:1
1.25:1
Number of outputs
2
2
2
Noise figure
7.0 dB maximum
7.0 dB maximum
7.0 dB maximum
Intermodulation distortion
at outputs
2nd order (at least)
3rd order (at least)
-85 dB
-82 dB
-85 dB
-82 dB
-85 dB
-82 dB
Phase tracking
In band
Low range
Out-of-band frequency
rejection
Compared to 1.5 to 30.0 MHz operation, signals below
1.0 MHz and above 60.0 MHz are attenuated at least
35 dB.
Power requirements,
both units
120 ±12 volts, single phase, 48 to 63 Hz, 90 watts
Miscellaneous service
conditions
Ambient operating temperature for full performance requirements
+60°F to +80°F (15.6°C to 26.7°C)
1-48
TM 32-5985-217-15
Table 1-12. Amplifier, Radio Frequency AM-6533/FLR-9(V),
Capabilities and Limitations, (Continued)
Equipment Characteristics
Band A
Band B
Non-operating temperature
-65°F to -160°F (-54°C to 71°C)
Altitude
Withstands air shipment at 40,000 feet
Band C
Table 1-13. Directional Couplers (Olektron Corp. TD4-102-1,
TD4-102-2, and TD4-102-3; Types I, II, and III),
Capabilities and Limitations
Equipment
Capability/Limitation
Frequency range - types
Type I
Type II
Type III
1.5 MHz to 6 MHz (band A)
6 MHz to 18 MHz (band B)
18 MHz to 30 MHz (band C)
All types
Maximum input power level
(100-percent duty cycle)
+20 dBm (total power)
Directivity
range; power level +20 dBm maximum
More than 25 dB in applicable frequency
Vswr
1.2:1 maximum in applicable frequency
range; power level +20 dBm maximum
Intermodulation distortion
Two in-band cw signals
(arithmetic sum) +20 dBm
maximum input
Output intermodulation products power
content equal to or less that 100 dB
below input power
Single signal harmonic
generation
A +20-dBm test signal does not produce
harmonic or spurious signal(s) greater
that 100 dB below input reference.
Nominal impedance
(all ports)
Unit-to-unit phase angle
variation
75 ±5 ohms
For all frequencies of 1.5 to 30 MHz
and power levels to +20 dBm, the unitto-unit phase angle variation of θ 1-2'
θ 1-3' or θ 4-2 does not exceed
0.4 degree
1-49
TM 32-5985-217-15
Table 1-13. Directional Couplers (Olektron Corp. TD4-102-1,
TD4-102-2, and TD4-102-3; Types I, II, and I11),
Capabilities and Limitations (Continued)
Equipment Characteristics
Capability/Limitation
Service conditions
Operating temperature
Non-operating temperature
+60°F (15.6°C) to +80°F (26.7°C)
-65°F (-54°C) to +160°F (71°C)
Table 1-14. Divider Assembly, Power Rf CU-2052/FLR-9(V),
Capabilities and Limitations
Equipment Characteristics
In Band
Low Range
NOTE
Data is for one unit; there are four per assembly (4:16)
Frequency range
2 to 30 MHz
1.5 to 2 MHz
Input impedance
75 ohms
75 ohms
Output impedance
75 ohms
75 ohms
Input/output vswr
1.25:1 maximum
1.5:1 maximum
Phase tracking
±0.75 degrees
+1.5 degrees maximum
Amplitude tracking
±0.10 dB maximum
±0.3 dB maximum
Single channel
insertion loss
6.4 dB maximum
(at 2 to 6 MHz)
6.6 dB maximum
(at 6 to 30 MHz)
6.6 dB maximum
Number of inputs
1
Number of outputs
4
Output-to-output
isolation
30 dB minimum
30 dB minimum
-95 dB
-95 dB
Intermodulation distortion (second and third
order for two, 2.0-volt
rms input signals)
(at least)
1-50
TM 32-5985-217-15
Table 1-14. Divider Assembly, Power Rf CU-2052/FLR-9(V),
Capabilities and Limitations (Continued)
Equipment Characteristics
In Band
Low Range
NOTE
Second and third order intermodulation products at any output are below
the output level of either test signal as specified above.
Application: Power divider used in bands A, B, and C.
Miscellaneous service
conditions
Relative humidity
95 percent
Operating temperature
for full performance
requirements
+60°F (15.6°C) to +80°F (26.7°C)
Non-operating
temperature
-65°F (-54°C) to +160°F (+71°C)
Altitude
Withstands air shipment at
40,000 feet
Table 1-15. Divider Assembly, Power Rf CU-2050/FLR-9(V),
Capabilities and Limitations
Equipment Characteristics
In Band
Extended Range
Low Range
NOTE
Data is for one unit (1:16); there are two per assembly (2:32).
Frequency range
2 to 6 MHz
2 to 30 MHz
1.5 to 2 MHz
Input impedance
75 ohms
75 ohms
75 ohms
Output impedance
75 ohms
75 ohms
75 ohms
Input/output vswr
1.25:1 maximum
1.25:1 maximum
1.5:1 maximum
Phase tracking
±1.5 degrees
maximum
±2.0 degrees
maxi mum
± 3.0 degrees
maximum
Amplitude tracking
±0.2 dB maximum
±0.2 dB maximum
±0.4 dB maximum
1-51
TM 32-5985-217-15
Table 1-15. Divider Assembly, Power Rf CU-2050/FLR-9(V),
Capabilities and Limitations (Continued)
Equipment Characteristics
In Band
Extended Range
Low Range
Single channel insertion
loss
12.8 dB maximum
13.2 dB maximum
12.8 dB maximum
Number of inputs
1
Number of outputs
16
Output-to-output isolation
(30 dB minimum at 20 MHz and below) (26 dB minimum
above 20 MHz)
Intermodulation distortion
(second and third order for
two, 2.0-volt rms signals)
(1.5 to 30 MHz) (at least)
-95 dB
-95 dB
-95 dB
NOTE
Second and third order intermodulation products at any output are below
the output level of either test signal as specified above.
Miscellaneous service conditions
Relative humidity
95 percent
Operating temperature for full
performance requirements
+60°F (+15.6°C) to +80°F (+26.7°C)
Non-operating temperature
-65°F (-54°C) to +160°F (+71°C)
Altitude
Withstands air shipment at 40,000
feet.
Application: Power divider. band A only,
Table 1-16. Divider Assembly, Power Rf CU-2053/FLR-9(V),
Capabilities and Limitations
Equipment Characteristics
Extended Range
In Band
NOTE
Data is for one unit (1:8); there are four per assembly (4:32).
Frequency range
2 to 30 MHz
6 to 18 MHz
Input impedance
75 ohms
75 ohms
1-52
TM 32-5985-217-15
Table 1-16. Divider Assembly, Power Rf CU-2053/FLR-9(V),
Capabilities and Limitations (Continued)
Equipment Characteristics
Extended Range
In Band
Output impedance
75 ohms
75 ohms
Input/output vswr
75 ohms
75 ohms
Phase tracking
±2.0 degrees maximum
10.0 degrees maximum
Amplitude tracking
±0.2 dB maximum
0.15 dB maximum
Single channel insertion loss
10.0 dB maximum
10.0 dB maximum
Number of inputs
1
1
Number of outputs
8
Output-to-output isolation
30 dB minimum
30 dB minimum
Intermodulation distortion
(second and third order for two
2.0-volt rms input signals)
-95 dB
-95 dB
8
NOTE
Levels of -90 dB are acceptable for third order products produced by fundamentals below 6 MHz.
Second and third order intermodulation products at any output are below the output level of either test
signal as specified above.
Miscellaneous service
conditions
Relative humidity
95 percent
Operating temperature for
full performance requirements
+60°F (+15.6°C) to +80°F (+26.7°C)
Non-operating temperature
-65°F (-54°C) to +160°F (+71°C)
Altitude
Withstands air shipment at 40,000 feet
Application: Power divider, band B only.
1-53
TM 32-5985-217-15
Table 1-17. Divider Assembly, Power Rf CU-2051/FLR-9(V),
Capabilities and Limitations
Equipment Characteristics
Extended Range
In Band
NOTE
Data is for one unit (1:4); there are six per assembly (6:24).
Frequency range
2 to 30 MHz
18 to 30 MHz
Input impedance
75 ohms
75 ohms
Output impedance
75 ohms
75 ohms
Input/output vswr
1.25:1 maximum
1.25:1 maximum
Phase tracking
±1.0 degrees maximum.
±0.75 degrees maximum
Amplitude tracking
±0.15 dB maximum
±0.1 dB maximum
Single-channel insertion loss
6.6 dB maximum
6.6 dB maximum
Number of outputs
4
4
Number of inputs
1
1
Output-to-output isolation
30 dB minimum
30 dB minimum
Intermodulation distortion
(second and third order for two,
2.0-volt rms input signals)
(at least)
-95 dB
-95 dB
NOTE
Second and third order intermodulation products at any output are below the output level of either test
signal as specified above.
Miscellaneous service conditions
Relative humidity
95 percent
Operating temperature for
full performance requirements +60°F (+15.6°C) to +80°F (26.7°C)
Non-operating temperature
-65°F (-54°C) to +160°F (+71°C)
Altitude
Withstands air shipment at 40,000 feet.
Application: Power divider, band C only.
1-54
TM 32-5985-217-15
Table 1-18. Coupler, Omni Assembly CU-2054/FLR-9(V),
Capabilities and Limitations
Equipment Characteristics
In Band
Extended Range
Low Range
Frequency range
18 to 30 MHz
2 to 6 MHz
2 to 30 MHz
1.5 to 2 MHz
Input impedance
75 ohms
75 ohms
75 ohms
Output impedance
75 ohms
75 ohms
75 ohms
Input/output vswr
1.25:1 maximum
1.25:1 maximum
1.4:1 maximum
Phase tracking
±1.0 degrees
maximum
±1.5 degrees
maximum
±3.0 degrees
maximum
Amplitude tracking
±0.15 dB maximum
±0.2 dB maximum
±0.3 dB maximum
Single channel insertion loss
10.0 dB maximum
10.0 dB maximum
10.0 maximum
Number of inputs
16
Number of outputs
2
Output-to-output isolation
30 dB minimum
30 dB minimum
30 dB minimum
Intermodulation distortion
(second and third order for
two, 2.0-volt rms input
signals)
-95 dB
-95 dB
-95 dB
NOTE
Levels of -90 dB are acceptable for third order products produced by fundamentals below 6 MHz.
Second and third order intermodulation products at any output are below the output level of either test
signal as specified above.
Miscellaneous service conditions
Relative humidity
95 percent
Operating temperature for full
performance requirements
Non-operating temperature
+60°F (+15.6°C) to +80°F (+26.7°C)
-65°F (-54°C) to +160°F (+71°C)
Altitude
Withstands air shipment at
40,000 feet.
Application: Omnicombiner, used in bands A and C.
1-55
TM 32-5985-217-15
Table 1-18. Coupler, Omni Assembly CU-2054/FLR-9(V),
Capabilities and Limitations
Equipment Characteristics
In Band
Extended Range
Low Range
Frequency range
2 to 6 MHz,
18 to 30 MHz
2 to 30 MHz
1.5 to 2 MHz
Input impedance
75 ohms
75 ohms
75 ohms
Output impedance
75 ohms
75 ohms
75 ohms
Input/output vswr
1.25:1 maximum
1.25:1 maximum
1.4:1 maximum
Phase tracking
±1.0 degrees
maximum
± 1.5 degrees
maximum
±3.0 degrees
maximum
Amplitude tracking
±0.15 dB maximum
±0.2 dB maximum
±0.3 dB maximum
Single channel insertion loss
10.0 dB maximum
10.0 dB maximum
10.0 dB maximum
Number of inputs
16
Number of outputs
2
Output-to-output isolation
30 dB minimum
30 dB minimum
30 dB minimum
Intermodulation distortion
(second and third order for
two, 2.0-volt rms input
signals)
-95 dB
-95 dB
-95 dB
NOTE
Levels of -90 dB are acceptable for third order products produced by fundamentals below 6 MHz.
Second and third order intermodulation products at any output are below the output level of either test
signal as specified above.
Miscellaneous service conditions
Relative humidity
95 percent
Operating temperature for full
performance requirements
Non-operating temperature
+60°F (+15.6°C) to +80°F (+26.7°C)
-65°F (-54°C) to +160°F (+71°C)
Altitude
Withstands air shipment at
40,000 feet.
Application: Omnicombiner, used In bands A and C.
1-56
TM 32-5985-217-15
Table 1-19. Coupler, Omni Assembly CU-2055/FLR-9(V),
Capabilities and Limitations
Equipment Characteristics
In Band
Extended Range
Frequency range
6 to 18 MHz
2 to 30 MHz
Input impedance
75 ohms
75 ohms
Output impedance
75 ohms
75 ohms
Input/output vswr
1.25:1 maximum
1.25:1 maximum
Phase tracking ±1.5 degrees
max i mum
±2.0 degrees
max i mum
Amplitude tracking
0O.15 dB maximum
f0.2 dB maximum
Single channel insertion loss
12.8 dB maximum
13.2 dB maximum
Number of inputs
16
Number of outputs
1
Output-to-output isolation
30 dB minimum
Intermodulation distortion (second
and third order for two, 2.0-volt
rms input signals) (at least)
NOTE
-95 dB
30 dB minimum
-95 dB
Levels of -90 dB are acceptable for third order products produced by fundamentals below 6 MHz. Second and third order intermodulation products at any
output are below the output level of either test signal as specified above.
Miscellaneous service conditions
Relative humidity
95 percent
Operating temperature for full
performance requirements
+60°F (+15.6°C) to +80°F (+26.7°C)
Non-operating temperature
-65°F (-54°C) to +160°F (+71°C)
Altitude
Application:
Withstands air shipment at 40,000 feet
Omnicombiner, band B only.
1-57
TM 32-5985-217-15
Table 1-20. Coupler, Omni Assembly CU-2049/FLR-9(V),
Capabilities and Limitations
Equipment Characteristics
In Band
Extended Range
Frequency range
2 to 30 MHz
1.5 to 2 MHz
Input impedance
75 ohms
75 ohms
Output impedance
75 ohms
75 ohms
Input/output vswr
1.25:1 maximum
1.4:1 maximum
Phase tracking
±1.0 degrees
maximum
± 2.0 degrees
maximum
Amplitude tracking
±0.15 dB maximum
±0.3 dB maximum
Single channel insertion loss
10 dB maximum
10 dB maximum
Number of inputs
6
Number of outputs
1
Output-to-output isolation
30 dB minimum
30 dB minimum
Intermodulation distortion (second
and third order for two, 2.0-volt
rms input signals) (at least)
-95 dB
-95 dB
NOTE
Levels of -90 dB are acceptable for third order products produced by fundamentals below 6 MHz.
Second and third order intermodulation products at any output are below the output level of either test
signal as specified above.
Miscellaneous service conditions
Relative humidity
95 percent
Operating temperature for full
performance requirements
+60°F (+15.6°C) to +80°F (+26.7°C)
Non-operating temperature
-65± F (-54 C) to +160 F (+71°C)
Altitude
Withstand air shipment at 40,000 feet.
Application: Omnicombiner, bands A, B, and C.
1-58
TM 32-5985-217-15
Table 1-21. Beamformer Assembly TD-1052/FLR-9(V) (V7 Only),
Capabilities and Limitations
Equipment Characteristics
In Band
Extended Range
NOTE
Data is for one unit (16:1), there are two per assembly.
Frequency range
2 to 6 MHz
1.5 to 2 MHz
Input impedance
75 ohms
75 ohms
Output impedance
75 ohms
75 ohms
Input vswr
1.25:1
1.25:1
Output vswr
1.25:1
1.25:1
Number of inputs
16
16
Number of outputs
1
1
Maximum insertion loss of zero
taper channels (the zero taper
channels are the two center antenna channels requiring zero
illumination taper)
10.5 dB maximum
10.5 dB maximum
Input-to-input isolation
30 dB minimum
30 dB minimum
Maximum amplitude deviation
(from theoretical)
±0.2 dB maximum
±0.3 dB maximum
Amplitude tracking
±0.2 dB maximum
±0.3 dB maximum
Maximum phase deviation
±2 degrees maximum
±5 degrees maximum
Phase tracking
±2 degrees maximum
±3 degrees maximum
Intermodulation distortion (for
two, 2.0-volt rms inputs introduced at output of beamformer)
-95 dB maximum with respect to fundamentals
Application: Monitor beamformer, band A, site V7 only.
1-59
TM 32-5985-217-15
Table 1-21. Beamformer Assembly TD-1052/FLR-9(V) (V7 Only),
Capabilities and Limitations, (Continued)
Relative Attenuation
(In dB)
Channel
Channel 1
Channel 2
Channel 3
Channel 4
Channel 5
Channel 6
Channel 7
Channel 8
Channel 9
Channel 10
Channel 11
Channel 12
Channel 13
Channel 14
Channel 15
Channel 16
0
0
-1.1
-1.1
-2.9
-2.9
-5.6
-5.6
-8.7
-8.7
-12.6
-12.6
-13.7
-13.7
-12.1
-12.1
Channel
Required Time Delay, Nanoseconds
Channel 1 and 2 (Center)
Channel 3 and 4
Channel 5 and 6
Channel 7 and 8
Channel 9 and 10
Channel 11 and 12
Channel 13 and 14
Channel 15 and 16
Miscellaneous service conditions
Relative humidity
Operating temperature for full
performance requirements
Non-operating temperature
Altitude
194.0
186.5
171.7
149.7
121.0
86.1
45.5
0
95 percent
+60°F (+15.6°C) to +80°F (+26.7°C)
-65°F (-54°C) to +160°F (+71°C)
Withstands air shipment at 40,000 feet
1-60
TM 32-5985-217-15
Table 1-22. Beamformer Assembly TD-1050/FLR-9(V) (V8 Only),
Capabilities and Limitations
Equipment Characteristics
In Band
Extended Range
NOTE
Data is for one unit (16:), there are two per assembly.
Frequency rarge
2 to 6 MHz
1.5 to 2 MHz
Input impedance
75 ohms
75 ohms
Output impedance
75 ohms
75 ohms
Input vswr
1.25:1
1.25:1
Output vswr
1.25:1
1.25:1
Number of inputs
16
16
Number of outputs
1
1
Maximum insertion loss of zero
taper channels (the zero taper
channels are the two center antenna channels requiring zero
illumination taper)
10.5 dB maximum
10.5 dB maximum
Input-to-input isolation
30 dB minimum
30 dB minimum
Maximum amplitude deviation
(from theoretical)
±0.2 dB maximum
±0.3 dB maximum
Amplitude tracking
±0.2 dB maximum
±0.3 dB maximum
Maximum phase deviation
±2 degrees maximum
± 5 degrees maximum
Phase tracking
±2 degrees maximum
± 3 degrees maximum
Intermodulation distortion (for
two, 2.0-volt rms inputs introduced at output of beamformer)
-95 dB maximum with respect to fundamentals
Application: Monitor beamformer, band A, site V8 only.
Relative Attenuation
(In dB)
Channel
Channel 1
Channel 2
0
0
1-61
TM 32-5985-217-15
Table 1-22. Beamformer Assembly TD-1O5O/FLR-9(V) (V8 Only),
Capabilities and Limitations (Continued)
Channel
Relative Attenuation
(In dB)
Channel 3
Channel 4
Channel 5
Channel 6
Channel 7
Channel 8
Channel 9
Channel 10
Channel 11
Channel 12
Channel 13
Channel 14
Channel 15
Channel 16
Channel
Channel 1 and 2 (Center)
Channel 3 and 4
Channel 5 and 6
Channel 7 and 8
Channel 9 and 10
Channel 11 and 12
Channel 13 and 14
Channel 15 and 16
Miscellaneous service conditions
Relative humidity
Operating temperature for full
performance requirements
Non-operating temperature
Altitude
-1.1
-1.1
-2.9
-2.9
-5.6
-5.6
-8.7
-8, 7
-12.6
-12.6
-13.7
-13.7
-12.1
-12.1
Required Time Delay, Nanoseconds
155.4
149.4
137.5
119.9
96.9
68.9
36.5
0
95 percent
+60°F (+15.6°C) to +80°F (+26.7°C)
-65°F (-54°C) to +160°F (+71°C)
Withstands air shipment at 40,000 feet
1-62
TM 32-5985-217-15
Table 1-23. Beamformer Assembly TD-1053/FLR-9(V) (V7 Only),
Capabilities and Limitations
Equipment Characteristics
In Band
Extended Range
NOTE
Data is for one unit (16:1); there are two per assembly.
Frequency range
6 to 18 MHz
18 to 30 MHz
Input impedance
75 ohms
75 ohms
Output impedance
75 ohms
75 ohms
Input vswr
1.25:1
1.4:1
Output vswr
1.25:1
1.4:1
Number of inputs
16
16
Number of outputs
1
1
Maximum insertion loss of zero
taper channels (the zero taper
channels are the two center antenna channels requiring zero
illumination taper)
10.3 dB maximum
11.0 dB maximum
Input-to-input isolation
Maximum amplitude deviation
(from theoretical)
30 dB minimum
20 dB minimum
±02. dB maximum
±1.0 dB maximum
Amplitude tracking
±0.2 dB maximum
±0.5 dB maximum
Maximum phase deviation
±2 degrees maximum
±8 degrees maximum
Phase tracking
±2 degrees maximum
±3 degrees maximum
Intermodulation distortion (for
two, 2.0-volt rms inputs introduced at output of beamformer)
-95 dB maximum with respect to fundamentals
from 6 to 30 MHz
NOTE
Intermodulation distortion in the frequency range of 1.5 to 6 MHz also is -95 dB with respect to the
fundamentals. For this specification the input signal levels are 2.0 volt rms at 6 MHz varying linearly to
0.7 volt rms at 1.5 MHz.
Application: Monitor beamformer, band B, site V7 only.
1-63
TM 32-6985-217-15
Table 1-23. Beamformer Assembly TD-1053/FLR-9(V) (V7 Only)
Capabilities and Limitations (Continued)
Relative Attenuation
(In dB)
Channel
Channel 1
Channel 2
Channel 3
Channel 4
Channel 5
Channel 6
Channel 7
Channel 8
Channel 9
Channel 10
Channel 11
Channel 12
Channel 13
Channel 14
Channel 15
Channel 16
0
0
-1.1
-1.1
-2.9
-2.9
-5.6
-5.6
-8-.7
-8.7
-12.6
-12.6
-13.7
-13.7
-12.1
-12.1
Channel
Required Time Delay, Nanoseconds
Channel 1 and 2 (Center)
Channel 3 and 4
Channel 5 and 6
Channel 7 and 8
Channel 9 and 10
Channel 11 and 12
Channel 13 and 14
Channel 15 and 16
Miscellaneous service conditions
Relative humidity
Operating temperature for full
performance requirements
Non-operating temperature
Altitude
58.59
56.46
52.20
45.85
37.39
26.91
14.43
0
95 percent
+60°F (+15.6°C) to +80°F (+26.7°C)
-65°F (-54°C) to +160°F (+71°C)
Withstands air shipment at 40,000 feet
1-64
TM 32-5985-217-15
Table 1-24. Beamformer Assembly TD-1051/FLR-9(V), (V8 Only)
Capabilities and Limitations
Equipment Characteristics
In Band
Extended Range
NOTE
Data is for one unit (16:1); there are two per assembly.
Frequency range
6 to 18 MHz
18 to 30 MHz
Input impedance
75 ohms
75 ohms
Output impedance
75 ohms
75 ohms
Input vswr
1.25:1
1.4:1
Output vswr
1.25:1
1.4:1
Number of inputs
16
16
Number of outputs
1
1
Maximum insertion loss of zero
taper channels (the zero taper
channels are the two center antenna channels requiring zero
illumination taper)
10.3 dB maximum
11.0 dB maximum
Input-to-input isolation
30 dB minimum
20 dB minimum
Maximum amplitude deviation.
(from theoretical)
±0.2 dB maximum
±1.0 dB maximum
Amplitude tracking
±0.2 dB maximum
±0.5 dB maximum
Maximum phase deviation
±2 degrees maximum
±8 degrees maximum
Phase tracking
±2 degrees maximum
±3 degrees maximum
Intermodulation distortion (for
two 2.0-volt rms inputs introduced at output of beamformer)
-95 dB maximum with respect to fundamentals
from 6 to 30 MHz
NOTE
Intermodulation distortion in the frequency range of 1.5 to 6 MHz is -95 dB with respect to the
fundamentals. For this specification the input signal levels will be 2.0 volt rms at 6 MHz varying linearly
to 0.7 volt rms at 1.5 MHz.
Application: Monitor beamformer, band B, site V8 only.
1-65
TM 32-5985-217-15
Table 1-24. Beamformer Assembly TD-1051/FLR-9(V) (V8 Only)
Capabilities and Limitations (Continued)
Relative Attenuation
(In dB)
Channel
Channel 1
Channel 2
Channel 3
Channel 4
Channel 5
Channel 6
Channel 7
Channel 8
Channel 9
Channel 10
Channel 11
Channel 12
Channel 13
Channel 14
Channel 15
Channel 16
0
0
-1.1
-1.1
-2.9
-2.9
-5.6
-5.6
-8.7
-8.7
-12.6
-12.6
-13.7
-13.7
-12.1
-12.1
Channel
Required Time Delay, Nanoseconds
Channel 1 and 2 (Center)
Channel 3 and 4
Channel 5 and 6
Channel 7 and 8
Channel 9 and 10
Channel 11 and 12
Channel 13 and 14
Channel 15 and 16
Miscellaneous service conditions
Relative humidity
Operating temperature for full
performance requirements
Non-operating temperature
Altitude
41.29
39.79
36.79
32.30
26.35
18.96
10.17
0
95 percent
+60°F (+15.6°C) to +80°F (+26.7°C)
-65°F (-54°C) to +160°F (+71°C)
Withstands air shipment at 40,000 feet
1-66
TM 32-5985-217-15
Table 1-25. Beamformer Assembly TD-1054/FLR-9(V),
Capabilities and Limitations
Equipment Characteristics
In Band
Extended Range
NOTE
Data is for one unit (8:1); there are four per assembly.
Frequency range
18 to 30 MHz
6 to 18 MHz
Input impedance
75 ohms
75 ohms
Output impedance
75 ohms
75 ohms
Input vswr
1.25:1
1.25:1
Output vswr
1.25:1
1.25:1
Number of inputs
8
8
Number of outputs
1
1
Maximum insertion loss of zero
taper channels (the zero taper
channels are the two center antenna channels requiring zero
illumination taper)
8 dB maximum
8 dB maximum
Input-to-input isolation
30 dB minimum
30 dB minimum
Maximum amplitude deviation
(from theoretical)
±0.2 dB maximum
±0.3 dB maximum
Amplitude tracking
±0.2 dB maximum
±0.3 dB maximum
Maximum phase deviation
±2 degrees maximum
±3 degrees maximum
Phase tracking
±2 degrees maximum
±3 degrees maximum
Intermodulation distortion (for
two, 2.0-volt rms inputs introduced at output of beamformer)
-95 dB maximum with respect to fundamentals
NOTE
Intermodulation distortion in the frequency range of 1.5 to 6 MHz is -95 dB with respect to the
fundamentals. For this specification the input signal levels are 2.0 volt rms at 6 MHz varying linearly to
0.7 volt rms at 1.5 MHz.
Application: Monitor beamformer, band C.
1-67
TM 32-5985-217-15
Table 1-25. Beamformer Assembly TD-1054/FLR-9(V),
Capabilities and Limitations (Continued)
Relative Attenuation
(In dB)
Channel
Channel I
Channel 2
Channel 3
Channel 4
Channel 5
Channel 6
Channel 7
Channel 8
0
0
-2.0
-2.0
-6.6
-6.6
-7.9
-7.9
Channel
Required Time Delay, Nanoseconds
Channel 1 and 2 (Center)
Channel 3 and 4
Channel 5 and 6
Channel 7 and 8
16.12
13.39
7.99
0
Miscellaneous service conditions
Relative humidity
95 percent
Operating temperature for full
performance requirements
Non-operating temperature
+60°F (+15.6°C) to +80°F (26.7°C)
-65°F (-54°C) to +160°F (+71°C)
Altitude
Withstands air shipment at 40,000 feet
Table 1-26. Beamformer Assembly TD-1055/FLR-9(V),
Capabilities and Limitations
Equipment Characteristics
In Band
NOTE
Data is for one unit (4:1); there are three per assembly.
Frequency range
1.5 to 6 MHz
Input impedance
75 ohms
Output impedance
75 ohms
1-68
TM 32-5985-217-15
Table 1-26. Beamformer Assembly TD-1055/FLR-9(V),
Capabilities and Limitations (Continued)
Equipment Characteristics
In Band
Input vswr
1.25:1 maximum
Output vswr
1.25:1 maximum
Number of inputs
4
Number of outputs
1
Insertion loss balance
0.2 dB maximum
Input-to-input isolation
30 dB minimum
Phase difference
1 degree maximum
Intermodulation distortion (for
two, 2.O-volt rms inputs introduced at output of beamformer)
-95 dB maximum with respect to fundamentals
Application: Sector beamformer, band A.
Channel
Relative Insertion Loss
Channel 2 JI to J5
Channel 3 J2 to J5
Channel 1 J3 to J5
Channel 4 J4 to J5
0
0
8.5 ±0.2 dB
8.5 ±0.2 dB
NOTE
The insertion loss of channels 2 and 3 and that of channels 1 and 4 is balanced within 0.2 dB. The
maximum insertion loss of channels 2 and 3 is 6.5 dB.
Channel
Required Time Delay, Nanoseconds
Channel 2 and 3 (Center
9.3
Channel 1 and 4
0
NOTE
The phase delay must be within 1.0 degree of the amount specified above at any frequency between 1.6
and 6 MHz.
1-69
TM 32-5985-217-15
Table 1-26. Beamformer Assembly TD-1055/FLR-9(V),
Capabilities and Limitations (Continued)
Channel
Required Time Delay, Nanoseconds
Miscellaneous service conditions
Relative humidity
95 percent
Operating temperature for full
performance requirements
+60°F (+15.6°C) to +80°F (+26.7°C)
Non-operating temperature
-65°F (-54°C) to +160°F (+71°C)
Altitude
Withstands air shipment at 40,000 feet
Table 1-27. Beamformer Assembly TD-1056./FLR-9(V), Capabilities and Limitations
Equipment Characteristics
In Band
NOTE
Data is for one unit (3:1); there are three per assembly.
Frequency range
6 to 30 MHz
Input impedance
75 ohms
Output impedance
75 ohms
Input vswr
1.25:1 maximum
Output vswr
1.25:1 maximum
Number of inputs
3
Number of outputs
1
Insertion loss balance
0.2 dB maximum
Input-to-input isolation
30 dB minimum
Phase difference
1 degree maximum
Intermodulation distortion (for
two, 2.0-volt rms inputs introduced at output of beamformer)
-95 dB maximum with respect to fundamentals
Application: Sector beamformer, band B
1-70
TM 32-5985-217-15
Table 1-27. Beamformer Assembly TD-1056/FLR-9(V) Capabilities and Limitations (Continued)
Channel
Relative Insertion Loss
Channel 1 J2 to J4
11 ±0.2 dB
Channel 3 J3 to J4
11 ±0.2 dB
Channel 2 J1 to J4
0
NOTE
The insertion loss of channels I and 3 must be balanced within 0.2 dB; the maximum insertion loss of channel 2 is 3.5 dB.
Channel
Required Time Delay, Nanoseconds
Channel 2 (Center)
1.2
Channels I and 3
0
NOTE
The phase delay must be within 1.0 degree of the amount specified above at any frequency between 6
and 30 MHz.
Miscellaneous service conditions
Relative humidity
95 percent
Operating temperature for full
performance requirements
+60°F (+15.6°C) to +80°F (+26.7°C)
Non-operating temperature
-65°F (-54°C) to +160°F (+71°C)
Altitude
Withstands air shipment at 40,000 feet
1-71
TM 32-5985-217-15
Table 1-28. Beamformer Assembly TD-1057/FLR-9(V), Capabilities and Limitations
Characteristics
In Band
NOTE
Data is for one unit (2:1); there are three per assembly.
Frequency range
6 to 30 MHz
Input impedance
75 ohms
Output impedance
75 ohms
Input vswr
1.25:1 maximum
Output vswr
1.25:1 maximum
Number of inputs
2
Number of outputs
1
Maximum insertion loss of
either channel
3.5 dB
Insertion loss balance
0.2 dB maximum
Input-to-input isolation
30 dB minimum
Phase difference
1.0 degree maximum
Intermodulation distortion (for
two 2.0-volt rms inputs introduced at output to beamformer)
-95 dB maximum with respect to fundamentals
Miscellaneous service conditions
Relative humidity
Operating temperature for full
performance requirements
Non-operating temperature
Altitude
95 percent
+60°F (+15.6°C) to +80°F (+26.7°C)
-65°F (-54°C) to +160°F (+71°C)
Withstands air shipment at 40,000 feet
Application: Sector beamformer, band C.
1-72
TM 32-5985-217-15
Table 1-29. Directional Couplers (Olektron TD4-101-1, TD4-101-2, and TD4-101-3; Types I, II, and III) Capabilities and
Limitations
Characteristics
Capability/Limitation
Frequency range - types:
Type I
Type 11
Type I1
1.5 MHz to 6 MHz (Band A)
6 MHz to 18 MHz (Band B)
18 MHz to 30 MHz (Band C)
All types
Maximum input power level
(100-percent duty cycle)
+20 dBm (total power)
Directivity
range; power level +20 dBm maximum
More than 25 dB in applicable frequency
Vswr
range; power level +20 dB maximum
1.2:1 maximum in applicable frequency
Intermodulation distortion
Two in-band cw signals
(arithmetic sum) +20-dBm
maximum input
Single signal harmonic generation
Nominal impedance
(all ports)
Unit-to-unit phase angle variation
Service conditions
Operating temperature
Non-operating temperature
Output intermodulation products power
content equal to or less than 100 dB
below input power.
a +20-dBm test signal does not produce
harmonic or spurious signal(s) greater
than 100 dB below input reference.
75 ±5 ohms
For all frequencies of 1.5 to 30 MHz
and power levels to +20 dBm, the unitto-unit phase angle variation of θ 1-2,
θ 1-3, or θ 4-2 does not exceed 0.4
de1gee.
+60°F (15.6°'C) to +80°F (26.7°C)
-65°F (-54°C) to +160°F (71°C)
1-73
TM 32-5985-217-15
Table 1-30. Equipment Supplied Cross Reference Index
Official Nomenclature
Common Name
Manufacturer's
Part No.
Code
Ident.
Capabilities and
Limitations
Table Ref. No.
Amplifier, Radio
Frequency
AN -6533/FL R-9 (V)
Rf amplifier
3300-42899-1
15770
1-12
Divider Assembly,
Power Rf
CU-2052/FLR-9(V)
A, B, and C
Power divider,
high level
(1:4) bands
3300-42840-1
15770
1-14
Divider Assembly,
Power Rf
CU-205 1 /FL R-9 (V)
Power divider
(6:24)
band C
3300-42841-1
15770
1-17
Divider Assembly,
Power Rf
CU-2053/FLR-9(V)
Power divider
(4:32)
band B
3300-42842-1
15770
1-16
Divider Assembly,
Power Rf
CU-2050/FLR-9
Power divider
(2:32)
band A
3300-42843-1
15770
1-15
Panel, Patching,
Antenna
SB-3666/FLR-9(V)
Sector beam
patch panel,
band A
3300-42000-1
15770
None
Panel, Patching,
Antenna
SB-3664/FLR-9(V)
Sector beam
patch panel,
band 8
3300-42002-2
15770
None
Panel, Patching,
Antenna
SB-3663/FLR-9(V)
Sector beam
patch panel,
band B
3300-42000-3
15770
None
Panel, Patching,
Antenna
SB-3662/FLR-9(V)
Sector beam
patch panel,
band C
3300-42000-4
15770
None
Coupler, Omni
Assembly
CU-2054/FLR-9(V)
Omnicombiner,
(16:2)
bands A and C
3300-42844-1
15770
1-18
Coupler, Omni
Assembly
CU-2049/FLR-9(V)
Omnicombiner,
(6:1) bands
A, B, and C
3300-42845-1
15770
1-20
1-74
TM 32-5985-217-15
Table 1-30. Equipment Supplied Cross-Reference Index (Continued)
Official Nomenclature
Common Name
Manufacturer's
Part No.
Code
Ident.
Capabilities and
Limitations
Table Ref. No.
Coupler, Omni
Assembly
CU-2055/FLR-9(V)
Omnicombiner,
(16:1)
band B
3300-42846-1
15770
1-19
Beamformer Assembly
TD- 1050/FLR-9(V)
(site V8 only)
Monitor
beamformer A
2165-8000
11556
1-22
Beamformer Assembly
TD-1052/FLR-9(V)
(site V7 only)
Monitor
beamformer A'
2165-8001
11556
1-21
Beamformer Assembly
TD-1051/FLR-9(V)
(site V8 only)
Monitor
beamformer B
2165-8002
11556
1-24
Beamformer Assembly
TD-1053/FLR-9(V)
Monitor
beamformer B'
(site V7 only)
2165-8003
11556
1-23
Beamformer Assembly
TD- 1054/FLR-9 (V)
Monitor
beamformer C
2165-8004
11556
1-25
Beamformer Assembly
TD-1055/FLR-9(V)
Sector
beamformer A
2176-8000
11556
1-26
Beamformer Assembly
TD-1056/FLR-9(V)
Sector
beamformer B
2176-8001
11556
1-27
Beamformer Assembly
TD-1057/FLR-9(V)
Sector
beamformer C
2176-8002
11556
1-28
Manufacturer
Code Identification
F & M Systems Co.
2525 Walnut Hill Lane
Dallas, Texas 75220
15770
Adams-Russell Co., Inc.
280 Bear Hill Road
Waltham, Massachusetts 02154
11556
1-75/1-76
TM 32-5985-217-15
CHAPTER 2
INSTALLATION
SECTION I. INSTALLATION LOGISTICS
2-1. Scope.
This chapter contains unpacking, inspection, location, and installation data for the electronic and electrical equipment of
the antenna group. Equipment covered by this manual is delivered to the user installed as a complete group. The
information presented is to support installation in the event of site relocation. The circular antenna array is, in general,
not subject to relocation as most of the components would become scrap material (ground screen, reflecting screens,
feed cables, timbers, etc).
2-2. Unpacking.
Upon receipt of the unit, Inspect the shipping container for damage. Check that the container is upright, then carefully
remove the contents.
2-3. Inspection. (See table 2-1.)
After the shipping containers have been unpacked, visually inspect the cabinet and all assemblies for defects listed in
table 2-1. Repair or replace all defective items before placing unit in operation.
Table 2-1. Installation Inspection
Inspection Item
Procedures
Antenna elements
Check for bends, dents, and cracks Check for rust or corrosion and cracked or chipped
paint
Cabinets and racks
Check for bent or cracked frame, rust or corrosion, cracked or chipped paint, dented or
warped panels or doors, and cracked or otherwise damaged hinges
Check all connectors for damage
Check for damaged or missing parts and mountings
Check for damaged or missing nameplates
Cables
Check foamed dielectric cables for cuts, perforations, or abrasions of the polyethylene
jacket or deformations which may have caused denting of the aluminum outer
conductor
2-1
TM 32-5985-217-15
Table 2-1. Installation Inspection (Continued)
Inspection Item
Procedures
Check coaxial cables for kinks and other deformation or damage to insulation Check all
other cables for cut or otherwise damaged insulation or evidence of broken conductors
Capacitors
Check for defective solder connections, discoloration, splits, or bulge
Chassis
Check for bent or dented frame and front panel Check for rust or corrosion, and cracked
or chipped protective finish
Check for damaged, loose, or missing parts and mountings
Check for marred or otherwise damaged front and rear panel nomenclature
Check for damaged or missing nameplates
Connectors
Check for bent, broken, or missing pins, distorted barrels and damaged threads, broken
or discolored inserts, and damaged potting compound
Check for loose mountings
Controls
Check for damaged, loose, or missing knobs and for bent shafts
Interconnecting rf cables
Check for cut or abraded cable jacket, looseness of cable connections, absence or
looseness of center contact pins, and missing or damaged cable marker bands
Resistors
Check for defective solder connections, discoloration, and cracks
Slides
Check for loose mountings and ease of operation
Switches
Check for loose mountings, ease of operation, detent or return action, and signs of
arcing or overheating
Terminal boards
Check for loose, damaged, and missing terminal screws or posts
Transformers
Check for loose mountings, defective solder connections, and signs of overheating
2-2
TM 32-5985-217-15
Table 2-1. Installation Inspection (Continued)
Inspection Item
Procedures
Transistors
Check for defective connections and signs of overheating
Wiring
Check for cut or abraded insulation, broken wires, faulty connections, and discoloration
Check for damaged lacing and loose or missing cable clamps
2-4. Cables. (See table 2-2.)
Rf cables used in the Installation of the antenna group equipment are listed in table 2-2. When unpacking, identify
groups of cables and transfer to appropriate location for installation as Indicated in table 2-2. Additional cable
information may be found by referring to table 9-1. Goniometer cables (df group) are also listed for convenience.
Table 2-2. Rf Cables Identification, Antenna Group
Function
Cable
No.
Wire List Dwg. No.
AN/FLR-9 (V7)
AN/FLR-9 (V8)
Antenna elements to
transmission line turners
Band A
W0001 to
W00048 incl.
3300 - 81000
3300 - 81000
Band B
Wooo49 to
W00144 incl.
3300 - 81000
3300 - 81000
Band C
W00145 to
W00192 incl.
3300 - 81000
3300 - 81000
Band A
W20201 to
W20248 incl.
3300 - 82000
3300 - 82000
Band B
W20249 to
W20344 incl.
3300 - 82000
3300 - 82000
Band C
W20345 to
W20392 incl.
3300 - 82000
3300 - 82000
Transmission line tuners
to directional couplers
2-3
TM 32-5985-217-15
Table 2-2. Rf Cables Identification, Antenna Group (Continued)
Function
Cable
No.
Wire List Dwg. No.
AN/FLR-9 (V7)
AN/FLR-9 (V8)
Directional couplers to
rf preamplifiers
Band A
W20401 to
W20448 incl.
3300 - 82001
3300 - 82001
Band B
W20451 to
W20546 incl.
3300 - 82002
3300 - 82002
Band C
W20551 to
W20598 incl.
3300 - 82003
3300 - 82003
W22535 to
W22582 incl.
3300 - 82004
3300 - 82004
Band B
W22585 to
W22680 incl.
3300 - 82005
3300 - 82005
Band C
W22685 to
W22732 incl.
3300 - 82006
3300 - 82006
W20601 to
W20648 incl.
3300 - 82039
3300 - 82007
Band B
W20651 to
W20746 incl.
3300 - 82040
3300 - 82008
Band C
W20751 to
W20798 incl.
3300 - 82041
3300 - 82009
W22735 to
W22782 incl.
3300 - 82036
3300 - 82010
W22785 to
W22880 incl.
3300 - 82037
3300 - 82011
Rf amplifier outputs
to (high level) power
divider inputs
Band A
Rf amplifier output to
power divider input
Band A
High level power divider
to goniometer rf input
Band A
Band B
2-4
TM 32-5985-217-15
Table 2-2. Rf Cables Identification, Antenna Group (Continued)
Function
Band C
Cable
No.
Wire List Dwg. No.
AN/FLR-9 (V7)
AN/FLR-9 (V8)
W22885 to
W22932 incl.
3300 - 82038
3300 - 82012
Band A
W23135 to
W23182 incl.
3300 - 82013
3300 - 82013
Band B
W23185 to
W23280 incl.
3300 - 82014
3300 - 82014
Band C
W23285 to
W23332 incl.
3300 - 82015
3300 - 82015
Band A
W22935 to
W22982 incl.
3300 - 82016
3300 - 82016
Band B
W22985 to
W23080 incl.
3300 - 82017
3300 - 82017
Band C
W23085 to
W23132 incl.
3300 - 82018
3300 - 82018
Band A
W20801 to
W21568 incl.
3300 - 82033
3300 - 82019
Band B
W21571 to
W22338 incl.
3300 - 82034
3300 - 82020
Band C
W22341 to
W22532 incl.
3300 - 82035
3300 - 82021
W23335 to
W23340 (A)
3300 - 82022
3300 - 82022
High level power divider
to sector beam
patch panel
High level power dividers
to omnicombiners
Power dividers to
monitor beamformers
Omnibeam forming bands A,
B, and C (from omnicombiners
16:2 to omnicombiners 6:1,
bands A and C; omnicombiners
16:1 to omnicombiners 6:1, band B)
W23341 to
W23346 (B)
W23347 to
W23352 (C)
2-5
TM 32-5985-217-15
Table 2-2. Rf Cables Identification, Antenna Group (Continued)
Function
Cable
No.
Wire List Dwg. No.
AN/FLR-9 (V7)
AN/FLR-9 (V8)
High level dividers spare
port termination
Band A
N/A
3300 - 82023
3300 - 82023
Band B
N/A
3300 - 82024
3300 - 82024
Band C
N/A
3300 - 82032
3300 - 82032
Band A
W23355 to
W23402 incl.
3300 - 82044
3300 - 82025
Band B
W23405 to
W23452 incl.
3300 - 82045
3300 - 82026
Band C
W23455 to
W23478 incl.
3300 - 82046
3300 - 82027
Omni/sector beams to
directional couplers
Band A omnibeam
W23605
3300 - 82028
3300 - 82028
Band B omnibeam
W23606
3300 - 82028
3300 - 82028
Band C omnibeam
W23607
3300 - 82028
3300 - 82028
Band A sector beam
No. 1 , 2, and 3
Band A sector beam
No. 4, 5, and 6
W23610 to
W23612 incl.
W23632 to
W23634 incl.
3300 - 82028
3300 - 82028
3300 - 82028
3300 - 82028
Band B sector beam
No. 1, 2, and 3
Band B sector beam
No. 4, 5, and 6
W23613 to
W23615 incl.
W23635 to
W23637 incl.
3300 - 82028
3300 - 82028
3300 - 82028
3300 - 82028
Band C sector beam
No. 1, 2, and 3
Band C sector beam
No. 4, 5, and 6
W23616 to
W23618 incl.
W23638 to
W23640 incl.
3300 - 82028
3300 - 82028
3300 - 82028
3300 - 82028
Monitor beamformers to
directional couplers
Change 1 2-6
TM 32-5985-217-15
Table 2-2. Rf Cables Identification, Antenna Group (Continued)
Function
Cable
No.
Wire List Dwg. No.
AN/FLR-9 (V7)
AN/FLR-9 (V8)
Monitor beams, directional couplers to tunnel cables
Band A
W23480 to
W23527 incl.
3300 - 82029
3300 - 82029
Band B
W23530 to
W23577
3300 - 82042
3300 - 82042
Band C
W23580 to
W23603
3300 - 82043
3300 - 82043
Band A sector beam
No. 1, 2, and 3
Band A sector beam
No. 4, 5, and 6
W23620 to
W23622 incl.
W23641 to
W23643 incl.
3300 - 82047
3300 - 82047
3300 - 82047
3300 - 82047
Band A omnibeam
W23623
3300 - 82047
3300 - 82047
Band B sector beam
No. 1, 2, and 3
Band B sector beam
No. 4, 5, and 6
W23624 to
W23626 incl.
W23644 to
W23646 incl.
3300 - 82047
3300 - 82047
3300 - 82047
3300 - 82047
Band B omnibeam
W23627
3300 - 82047
3300 - 82047
Band C sector beam
No. 1, 2, and 3
Band C sector beam
No. 4, 5, and 6
W23628 to
W23630 incl.
W23647 to
W23649 incl.
3300 - 82047
3300 - 82047
3300 - 82047
3300 - 82047
Band C omnibeam
W23631
3300 - 82047
3300 - 82047
W24001 to
W24021 incl.
3300 - 82030
3300 - 82030
W24023 to
W24049
3300 - 82030
3300 - 82030
Sector/omnibeams, directional couplers to
tunnel cables
Tunnel cables
Band A monitor beams No.
1 through 21 and
22 through 48
Change 1 2-7
TM 32-5985-217-15
Table 2-2. Rf Cables Identification, Antenna Group (Continued)
Function
Cable
No.
Wire List Dwg. No.
AN/FLR-9 (V7)
AN/FLR-9 (V8)
Tunnel cables
Band A monitor beams No
1 through 21 and
22 through 48
W24001 to
W24021 incl.
W24023 to
W24049incl.
3300 - 82030
3300 - 82030
3300 - 82030
3300 - 82030
Spare cable No. 1
W24022
3300 - 82030
3300 - 82030
Band A sector beams
Nos 1, 2, and 3 and
Nos 4, 5, and 6
W24050 to
W24052 incl.
W24153 to
W24155 incl.
3300 - 82030
3300 - 82030
3300 - 82030
3300 - 82030
Band A omnibeam
W24053
3300 - 82030
3300 - 82030
Band B monitor beams No.
1 through 12 and
13 through 48
W24054 to
W24065 incl.
W24067 to
W24102 incl.
3300 - 82030
3300 - 82030
3300 - 82030
3300 - 82030
Spare cable No. 2
W24066
3300 - 82030
3300 - 82030
Band B sector beams
Nos 1, 2, and 3 and
Nos 4, 5, and 6
W24103 to
W24105 incl.
W24156 to
W24158 incl.
3300 - 82030
3300 - 82030
3300 - 82030
3300 - 82030
Band B omnibeam
W24106
3300 - 82030
3300 - 82030
Band C monitor beams
1 through 3
4 through 24
W24107 to
W24109 incl.
W24111 to
W24131 incl.
3300 - 82030
3300 - 82030
3300 - 82030
3300 - 82030
Spare cable No. 3
W24110
3300 - 82030
3300 - 82030
Band C sector beams
Nos 1, 2, and 3 and
Nos 4, 5, and 6
W24132 to
W24134 incl.
W24159 to
W24161 incl.
3300 - 82030
3300 - 82030
3300 - 82030
3300 - 82030
Band C omnibeam
W24135
3300 - 82030
3300 - 82030
Change 1 2-8
TM 32-5985-217-15
Table 2-2. Rf Cables Identification, Antenna Group (Continued)
Function
Cable
No.
Wire List Dwg. No.
AN/FLR-9 (V7)
AN/FLR-9 (V8)
Goniometer signals
Band A test output
W24136
3300-82030
3300-82030
Band A low angle sum output
W24137
3300-82030
3300-82030
Band A low angle null output
W24138
3300-82030
3300-82030
Band A high angle sum
output
W24139
3300-82030
3300-82030
Band A high angle null
output
W24140
3300-82030
3300-82030
Band B test output
W24141
3300-82030
3300-82030
Band B low angle sum output
W24142
3300-82030
3300-82030
Band B low angle null output
W24143
3300-82030
3300-82030
Band B high angle sum
output
W24144
3300-82030
3300-82030
Band B high angle null
output
W24145
3300-82030
3300-82030
Band C test output
W24146
3300-82030
3300-82030
Band C low angle sum output
W24147
3300-82030
3300-82030
Band C low angle null output
W24148
3300-82030
3300-82030
Band C high angle sum
output
W24149
3300-82030
3300-82030
Band C high angle null
output
W24150
3300-82030
3300-82030
On-line monitor and
test
W24151
3300-82030
3300-82030
Spare cable No. 4
W24152
3300-82030
3300-82030
Air-flow alarms
W28000
3300-82048
3300-82048
Air-flow switch
N/A
3300-82049
3300-82049
2-9
TM 32-5985-217-15
2-5. Antenna Installation Guidelines. (See tables 2-3 and 2-4.)
a.
General. The antenna installation must be performed by skilled personnel familiar with operating heavy
construction equipment. Additionally, civil engineering techniques are required for planning, locating, and subsequent
installation. Certain criteria exist for the antenna site location, but final determination rests with the user.
b.
Site Location Criteria. Site location with respect to propagation, electromagnetic interference and climate is
the responsibility of the using agency. Table 2-3 lists general requirements that should exist for installation and selection
of a site. Whenever applicable, appropriate figures (with notes) are referenced. Engineering drawings associated with
the antenna array are listed in table 2-4. This table is a compilation of the drawings necessary for the complete antenna
installation. As indicated in a few entries, certain drawings are referenced to altered item drawings. The latter illustrate
changed portions of the drawings they reference.
Table 2-3. AN/FLR-9(V7 and V8) Antenna Installation Criteria
Requirement
Remarks
See Figure No.
Area (excluding clear
zones)
Circular, 1460 feet in diameter
2-1
Maximum height
Bands A and B reflecting screens, 120 feet above concrete piers
2-1
Bands A and B
Tilt not to exceed one degree from true horizontal. Grading antenna
plane tolerance +6 inches for drainage ditches and access roads. The
downward tilt, if existing, should be in the general direction which
bisects the major sector of interest. Antenna elements are vertically
plumb regardless of plane tilt.
Band C antenna
plane
The band C maximum elevation may exceed the bands A and B
plane by as much as 20 feet. The surfaces of band C antenna
pedestals lie within +1/4 inch in a common plane, This plane must be
T foot, 10-3/4 inches above the C antenna plane.
Antenna clear zone
Area within a 900-foot radius circle concentric with the antenna planes
is the clear zone. See the following:
In the sector of primary interest, the clear zone extends to 5,000 feet.
Above areas are to be totally clear of all above ground structures that
are not part of the antenna system.
2-10
TM 32-5985-217-15
Figure 2-1. Antenna Array Cross-Section
2-11
TM 32-5985-217-15
Table 2-3. AN/FLR-9(V7 and V8) Antenna Installation Criteria (Continued)
Requirement
Remarks
See Figure No.
Beyond the antenna clear zone, land masses or other obstructions of
significant size that extend above the band C antenna plane should be
avoided, particularly in the sector of major interest.
Clearing and
grubbing
Remove timber, snags, brush, fences, and poles down to ground
level.
Drainage
Where drainage ditches are necessary, it is preferable to use
underground drainage.
Fills
Fill construction should correspond to the shape and grades of the
antenna clear zone. Fill is compacted to at least 90 percent of
maximum density of optimum moisture content. Fills under slabs and
footings to be compacted to 95 percent.
Grounding of
equipment
Neutral conductors, cable shields, metallic conduits, lightning
arrestors, fence enclosures, and all non-carrying parts of nonelectronic equipment are grounded. Ground resistance is less than 25
ohms.
2-2,
Sheets 1
and 2
Orientation of
external structures
The general antenna arrangement consists of bands A and B
antennas and a band C antenna array. Forty-eight band A antenna
elements are located 7.5 degrees apart about the circumference of a
circle, the radius of which is 599 feet. Ninety-six band B antenna
elements are erected inside the band A ring, located 3.75 degrees
apart about the circumference of a circle, the radius of which is 558
feet. All antenna elements are numbered in a clockwise direction
from the location of the underground tunnel connecting the central
building (within the array) to the operations building outside the array.
Band B element number 96 is located directly behind band A element
number 48. A vertically polarized reflecting screen is required for the
A and B antenna elements. This screen is located 20.5 feet inside the
band B antenna ring, and is mounted on a support structure. A
common ground screen is provided for the A and B antenna array.
This screen projects approximately 96 feet out from the reflecting
screen
2-2
2-3
2-12
TM 32-5985-217-15
Figure 2-2. Typical Grounding Arrangement (Sheet 1 of 2)
2-13/2-14
TM 32-5985-217-15
Figure 2-2. Typical Grounding Arrangement (Sheet 2 of 2)
2-15/2-16
TM 32-5985-217-15
Figure 2-3. Antenna Array General Arrangement
2-17
TM 32-5985-217-15
Table 2-3. AN/FLR-9(V7 and V8) Antenna Installation Criteria (Continued)
Requirement
Remarks
Orientation of
external structures
(continued)
support structure. Radial wires extend outward an additional 88 feet
from the end of the ground screen. Forty-eight band C antenna
elements are located 7.5 degrees apart about the circumference of a
circle whose radius is 167.25 feet. These elements are mounted on a
support structure, and protrude away from the center of the array a
distance of 10.25 feet from the support structure. A horizontallypolarized reflecting screen is mounted on the same band C support
structure. This screen has a working radius of 157.33 feet.
Antenna feed
cables
Transmitted to center building via 7/8-inch coaxial cable.
Antenna feed cable
installation
The cable trenches are dug to a depth of 4 feet +0.24 foot and are
backfilled to the required depth.
See Figure No.
2-4
NOTE
Refer to plant in place records and table 2-5 for central building construction and installation details.
Central
Size Is user determined according to the quantity of equipment to be
installed.
Walls
Walls are of:
1.
2.
3.
4.
5.
Reinforced concrete
Composite reinforced concrete
Masonry blocks with brick facing
Masonry block with joint reinforcing
Industrial metal insulated panels.
All reinforcing rods, metal laths or industrial metal wall panels are
electrically connected to the grounding system. Interior walls are
exposed finish except where insulation is applied. Insulation is
protected by a wainscot finish. Exterior walls and footings normally
are carried below frost depth. A seal is provided at the external
entrance to each of the cable wells through which the feed cables
enter the building.
Roof
The roof is of:
1.
Reinforced concrete, insulated, and provided with a membrane
waterproof surfacing, or
2-18
TM 32-5985-217-15
Figure 2-4. Cable Assembly, Rf Transmission Band A, B, & C
2-19/2-20
TM 32-5985-217-15
Table 2-3. AN/FLR-9(V7 and V8) Antenna Installation Criteria (Continued)
Requirement
Roof
(continued)
Remarks
2. Steel frame on reinforced concrete columns,
steel or other deck and waterproof surfacing.
Columns are located so as not to interfere with
equipment or overload cable trays.
All steel of any type of construction is bonded
and grounded at the outside perimeter to the
grounding grid. The roof preferably is flat, but
a conical or domed shape is deemed acceptable.
Ceiling and
floor
The ceiling is a minimum height of 12 feet in the
center of the building; however, in conical or
dome-shaped configurations, the ceiling may slope
to a minimum of 11 feet 4 inches at the perimeter
where it joins the wall. The floor is of reinforced concrete on drainage fill, where practicable. Ceiling and floor is provided with a proven
dustproof finish to minimize effect on electrical
equipment. Wall and roof live loads are designed
to resist wind and snow loads for the locale in
which the facility is located. The floor is designed for a uniform live load of 150 pounds per
square foot. Allowable soil bearing pressure is
determined for each site by the design agency.
Primary power
The primary power supply is underground in ducts.
The transformer installation meets strict interference standards. The secondary voltage is
three-phase, four-wire, 120/208 volts, 50 Hz or
60 Hz as required, with a capacity to be determined by equipment lighting, and air conditioning requirements. All lighting is of the
incandescent type; however, fluorescent type may
be used if the interference requirements
specified in MIL-1-26600 are met. Suitable
equipment is provided to maintain an environmental temperature of 70°F (+100F) inside the
central building. Air conditioning units are
uniformly spaced on the building perimeter.
Cable trays
Overhead cable trays are provided in the central
building for the rf and control cabling.
Equipment
racks
The antenna group equipment racks and configuration must be located for optimum use
of phased (timed) cables.
2-21
See Figure No.
TM 32-5985-217-15
Table 2-3. AN/FLR-9(V7 and V8) Antenna Installation Criteria (Continued)
Requirement
Cable tunnel
Remarks
See Figure No.
A cable tunnel is provided to house cables carrying signals between the central building and the
operations building outside the perimeter of the
antenna array. The cable tunnel is located so
that, starting in a clockwise direction from true
north, the center line is located at such angles
that describe arcs of 5 degrees, 37 minutes, 30
seconds, plus any integral multiple of 7 degrees,
30 minutes. The antenna cable trench pattern
provides straight alignment through the antenna
array without conflicting with the antenna feed
cables.
2-6. Central Building. (See figure 2-5 and table 2-5.)
a.
Equipment Location. All of the antenna group equipment is located in the central building except the actual
antenna array. Other equipment in the central building that is not a part of the antenna group consists of goniometers
105A2, A3, and A4 (df group), power control rack for goniometers 105A1 (df group), and equipment racks 411, 412, 413,
and 414 (monitor and test group).
b.
Equipment Identification. (See table 2-6.) Antenna group electronic equipment is identified in table 2-6 and
illustrated in figure 2-5.
c.
Equipment Floor Space. (See figure 2-5.) The antenna group electronic equipment is housed in 19 racks
that occupy approximately 780 square feet of floor space. This does not Include the space occupied by the wall-mounted
transmission line tuner assemblies.
d.
Maintenance Floor Space. Individual rack-mounted assemblies cannot be serviced while mounted in the
rack. The maintenance floor space required should be sufficient for cabinet door openings (minimum 2 feet). Additional
space should be allowed if two people are working back-to-back. The maintenance floor space at sites V7 and V8
greatly exceeds the minimum requirements.
e.
Minimum Ceiling Heights. A 4-foot area should exist between the top of equipment cabinets and the ceiling.
f.
Floor Loading. Antenna group equipment presents no loading problems on tile covered concrete floors.
g.
Heating and Ventilating. The antenna group equipment is designed to operate properly in temperature and
humidity controlled areas suitable for people. This includes operating temperatures between +60°F to +80°F and up to
95-percent relative humidity for full performance requirements.
2-22
TM 32-5985-217-15
Table 2-4. Antenna Array Drawings
Drawing No.
Next
Assembly
Short Title
Manufacturers
Code
3300-00001
AN/FLR-9(V7) Set
15770
3300-00002
AN/FLR-9(V8) Set
15770
3300-00003
Antenna Group
15770
3300-01000
Antenna Array, General
15770
Arrangement
00-720074
00-720075
Schematic Diagram Cable
02-720022
07397
Connector-A
02-720246
07397
Schematic Diagram Cable
02-720023
07397
Connector-B
00-720166
Structural Design Element-A
97006
07397
00-720167
Structural Design Element-B
00-720215
07397
00-720172
Tower Hardware
02-720247
07397
00-720175
Woodbeam Details
02-720240
07397
00-720179
General Notes Structural Design
97006
07397
00-720180
General Notes
00-720215
07397
00-720201
Structural Wood Support Band-C
07397
00-720202
Structural Wood Support Band-C
02-720268
07397
02-720268
07397
Design
00-720203
Structural Wood Support Band-C
2-23
Remarks
TM 32-5985-217-15
Table 2-4. Antenna Array Drawings
Drawing No.
00-720204
Next
Assembly
Short Title
Structural Wood Support Band C
Manufacturers
Code
02-720268
07397
DetaiIs
00-720243
Weather Cap
00-720215
07397
00-728519
Wire List Panel Power
02-727827
07397
Distribution
00-501079
Cover Antenna Element
85-720042
07397
00-801474
Support Structural Wood Portion
02-720268
07397
00-801475
Support Structure C Steel
07397
Portion
00-801479
Special Element-A
00-720213
07397
00-801480
Element Structural Specification
00-720215
07397
00-801506
Band-AB Woodbeams
00-720215
07397
3300-01402
Cable Timing Procedure Antenna
15770
Impedance
02-720246
Antenna Element-A
97006
07397
02-720247
Bands A and B Antenna Array
01000
07397
02-720248
Antenna Element-B
02-720247
07397
02-720266
Balun Assembly Band-C
02-720268
07397
02-720268
Band-C Antenna Array
01000
07397
02-720272
Reflecting Screen Lightning Rod
02-720268
07397
2-24
Remarks
-
TM 32-5985-217-15
Table 2-4. Antenna Array Drawings
Drawing No.
Next
Assembly
Short Title
Manufacturers
Code
19-290290-295
Wire Electrical Copper
07397
19-801090
Wire Electrical
07397
19-801236
Cable Radio Frequency
07397
19-801237
Cable Radio Frequency
07397
19-801524
Cable Assembly Rf
07397
27-801234
Antenna
07397
29-801063
Arrestor Electrical Surge
3300-31001
Band-A and B Antenna Array
15770
3300-31002
Band-C Antenna Array
15770
3300-31003
Antenna Element Assembly,
15770
02-720248
07397
Band-A
3300-31004
Antenna Element Assembly,
15770
Band-B
3300-41027
Structure Design Antenna
15770
Element-A
3300-41028
Structure Design Antenna
15770
Element-B
3300-41029
Hardware, Tower
15770
3300-41030
Primary Supporting Structure
15770
3300-41031
Wood Beam Details
15770
2-25
Remarks
TM 32-5985-217-15
Table 2-4. Antenna Array Drawings
Drawing No.
3300-41032
Next
Assembly
Short Title
General Notes, Antenna Element-A
Manufacturers
Code
15770
Structure Design
3300-41033
Structure, Wood Support Band-C,
15770
General Notes
3300-41034
Structure, Wood Support, Band-C
15770
3300-41035
Structure, Wood Support, Band-C,
15770
Main Truss Gussets
3300-41036
Cap, Weather Element-B
15770
3300-41037
Core, Antenna Element
15770
3300-41038
Support Structure, Band-C
15770
(wood portion)
3300-41039
Element Support-A
15770
3300-41040
Balun Assembly, Band-C
15770
3300-41001
Plate, Identification, Antenna
02-720246
15770
02-720248
3300-41021
NC Insulator, Bushing
02-720268
15770
3300-41022
NC Insulator Washer
02-720268
15770
3300-41025
Marker Tags, Band A, B, and C
3300-61002
15770
3300-41026
Marker Tags, Transmission Line
3300-01000
15770
A, B, and C
3300-41041
Reflecting Screen and Lightning
Rod Assembly, Band-C
15770
2-26
Remarks
TM 32-5985-217-15
Table 2-4. Antenna Array Drawings
Drawing No.
Next
Assembly
Short Title
Manufacturers
Code
3300-41042
Spring, Helical, Extension
15770
3300-41044
Bracket, Weather Cap, Element-B
15770
3300-41047
Plate, Shorting, Element-B
15770
3300-41048
Cap, Weather, Element-A
15770
3300-41049
Seal, Weather Cap, Element-A
15770
3300-41050
Disc Conductor, Retaining,
15770
Element-A
3300-41051
Feed Point Assembly, Dipole
3300-61000
Schematic Diagram Cable
15770
02-720268
15770
3300-01000
15770
Cable Assembly, Bands A and B
02-720246
15770
Matching Network
02-720248
Cable Assembly, Band-C Antenna
02-720266
Connection, Band-C
3300-61001
Cable Assembly, Rf Transmission,
Bands-A, B, and C
3300-61002
3300-61003
15770
02-720268
65B16064
Plate Backing Ladder Tie
02-720268
13035
Bracket
65B16074
Block Spacer
02-720268
13035
65B16075
Beam - Balun End Support
02-720268
13035
65B16076
Plate Nut, U-Bolt
02-720268
13035
2-27
Remarks
TM 32-5985-217-15
Table 2-4. Antenna Array Drawings
Drawing No.
Next
Assembly
Short Title
Manufacturers
Code
65B16077
U-Bolt, No. 1
02-720268
13035
65B16078
U-Bolt, Flat
02-720268
13035
65B16079
U-Bolt, No. 2
02-720268
13035
65B16080
Bolt, Special
02-720268
13035
65B16081
Bolt, Machine Square Head
02-720268
13035
65C16056
Bracket Cable Support
02-720268
13035
65C16058
Support End Panel, Lower Balun
02-720268
13035
65C16059
Support Upright, Lower Balun
02-720268
13035
65C16060
Block Plate, Upper Tie Balun
02-720268
13035
65C16061
Block, Upper Balun Plate
02-720268
13035
65C16062
Rung Ladder
02-720268
13035
65C16063
Bracket Ladder Tie
02-720268
13035
65C16065
Plate Clamping
02-720268
13035
65C16066
Plate, Clamping, Back Up
02-720268
13035
65C16067
Ladder, Removable
02-720268
13035
65C16068
Plate, Removable Ladder
02-720268
13035
65C16070
Platform Ladder Junction
02-720268
13035
65C16071
Bracket Platform Ladder Junction
02-720268
13035
2-28
Remarks
TM 32-5985-217-15
Table 2-4. Antenna Array Drawings
Drawing No.
Next
Assembly
Short Title
Manufacturers
Code
65C16073
Block Tie, Lower Balun
02-720268
13035
65C16086
B-lock Platform Tie Perimeter
02-720268
13035
65D16032
Site Plan, Scaffolding and
02-720268
13035
02-720268
13035
Access, Band-C
65D016033
Scaffolding and Access, Band-C
Array
65D016034
Lines Safety Elevation
02-720268
13035
65016035
Platform Radial and Perimeter
02-720268
13035
Installation
65D16036
Line Safety Ladder, Upper Balun
02-720268
13035
65D16037
Platform Installation
02-720268
13035
02-720268
13035
02-720268
13035
Perimeter
65D16038
Platform Installation, Upper
Balun
65D16039
Platform Installation, Lower
Balun
65D16040
Platform Radial Walkway
02-720268
13035
65D16041
Platform Perimeter
02-720268
13035
65D016042
Platform, Lower Balun
02-720268
13035
65016043
Platform, Upper Balun
02-720268
13035
65016049
Support, End Lower Balun
02-720268
13035
2-29
Remarks
TM 32-5985-217-15
Table 2-4. Antenna Array Drawings
Drawing No.
Next
Assembly
Short Title
Manufacturers
Code
65D16050
Ladder, Upper and Lower
02-720268
13035
65D16051
Ladder, Junction Access
02-720268
13035
65D16052
Ladder, Upper Balun
02-720268
13035
65D16055
Bracket Platform, Radial
02-720268
13035
02-720268
13035
Perimeter
65D16083
Platform, Lower, Balun,
Heavy Duty
70-201500-501
Clamp, Plastic
07397
70-201520-521
Clamp Loop, Cushioned
02-720272
07397
70-201680-699
Screw, Drive
02-720246
07397
70-801074
Clamp, Electrical
07397
70-801096
Bolt, Machine
07397
70-801158
Strap, Retaining
07397
70-801186
Clamp, Loop
07397
70-801289
Staple, Cable
07397
70-801298
Clamp, Ground Rod
07397
70-801515
Ring, Retaining
70-803374
Shackle, Anchor
07397
70-803376
Bolt, Eye
07397
89-720177
2-30
07397
Remarks
TM 32-5985-217-15
Table 2-4. Antenna Array Drawings
Drawing No.
Next
Assembly
Short Title
Manufacturers
Code
70A
Screw
02-720246
07397
70A1
Screws, Machine
Varied
07397
70A2
Screws, Assembled Seams
Varied
07397
70A3
Screw Tapping and Threading,
Varied
07397
Varied
07397
Forming and Cutting
70A4
Screw Tapping and Threading,
Forming and Cutting
70A5
Screw, Wood
Varied
07397
70A6
Screw Set
Varied
07397
70A7
Screw Cap, Socket Head
Varied
07397
70B
Bolt
02-720246
07397
70C
Nuts
02-720246
07397
70D
Washers
02-720246
07397
73-32676
Terminal Lug
73-801083
07397
73-801052
Adapter, Rf Cable
72-801087
07397
73-801053
Adapter, Rf Cable
02-720248
:07397
73-801069
Terminal Lug
07397
73-801071
Splice Conductor
07397
73-801073
Terminal Block
73-801085
73-801087
2-31
07397
Remarks
TM 32-5985-217-15
Table 2-4. Antenna Array Drawings
Drawing No.
Next
Assembly
Short Title
Manufacturers
Code
73-801081
Dummy Connector Plug
07397
73-801083
Lead, Electrical
07397
73-801O84
Lead, Electrical
02-720248
07397
73-801085
Lead, Electrical
02-720248
07397
73-801097
Cable Assembly, Rf
07397
73-801088
Wire Jumper
02-720248
07397
73-801092
Lug
Varied
07397
73-801093
Lug
00-720213
07397
73-801095
Holder Arrester
07397
73-801185
Cover, Electrical Connector
07397
73-801534
Connector, Plug Electrical
07397
73-803216
Terminal Lug
07397
73-803274
Connectors, Electrical
07397
73D
Connector, Electrical Rf UG Type
07397
74-720057
Plate Unit Identification,
02-720246
07397
02-720248
07397
02-720268
07397
Element-A
74-720058
Plate Unit Identification,
Element-B
74-720059
Plate Unit Identification,
Element-C
2-32
Remarks
TM 32-5985-217-15
Table 2-4. Antenna Array Drawings
Drawing No.
Next
Assembly
Short Title
81-720274
Extension Lightning Rod, Band-C
81-801267
Wire Rope, Steel
82-720257
Angle Connector Mounting, Band-C
02-720272
Manufacturers
Code
07397
07397
02-720266
07397
02-720270
84-801290
Socket Wire Rope
07397
84-801291
Socket Wire Rope
07397
85-720042
Seal, Weather Cap
02-720246
07397
86-720052
Seal, Weather Cap
02-720246
07397
86-720064
Gasket, Head Seal
02-720246
07397
86-720170
Retainer Conductor
89-720171
07397
86-720178
Disc Retainer
89-720177
07397
86-720249
Seal Compound
02-720248
07397
86-720254
Cover Feed Point, Band-C
02-720268
07397
86-720255
Shroud Dipole, Feed Point
02-720268
07397
86-720256
Cover Dipole, Feed Point, Band-C
02-720267
07397
86-720258
Shroud Assembly Feed Point,
02-720267
07397
Band-C
02-720268
86-720259
Housing Feed Point
86-720258
07397
86-720261
Cover Feed Point Housing, Band-C
02-720268
07397
02-720268
2-33
Remarks
TM 32-5985-217-15
Table 2-4. Antenna Array Drawings
Drawing No.
74-752242
Next
Assembly
Short Title
Plate Identification, Reference
02-72068
Manufacturers
Code
07397
Designation
77-801288
Spring, Helical Compression
07397
77-803375
Spring, Helical Extension
07397
81-720001
Screen Grounding
02-720247
07397
81-720036
Conductor Center, Element-B
89-720177
07397
81-720043
Bracket, Weather Cap
00-720246
07397
81-720044
Clip Bracket
02-720246
07397
81-720045
Bracket, Weather Cap
02-720248
07397
81-720046
Spacer
02-720248
07397
81-720116
Guard Cable
02-720268
07397
81-720117
Bracket, Guard Cable
02-720268
07397
81-720169
Plate Shorting
98-720171
07397
81-720176
Bolt, Special
89-720177
07397
81-720181
Conductor Center, Element-A
89-720171
07397
81-720187
Plate Shorting, A
89-720177
07397
81-720217
Plate Base, Band-C
02-720268
07397
81-720219
Frame, Dipole
02-720268
07397
81-720263
Lug, Feed Point
89-720264
07397
2-34
Remarks
TM 32-5985-217-15
Table 2-4. Antenna Array Drawings
Drawing No.
Next
Assembly
Short Title
81-720274
Extension Lightning Rod, Band-C
81-801267
Wire Rope, Steel
82-720257
Angle Connector Mounting, Band-C
02-720272
Manufacturers
Code
07397
07397
02-720266
07397
02-720270
84-801290
Socket Wire Rope
07397
84-801291
Socket Wire Rope
07397
85-720042
Seal, Weather Cap
02-720246
07397
86-720052
Seal, Weather Cap
02-720246
07397
86-720064
Gasket, Head Seal
02-720246
07397
86-720170
Retainer Conductor
89-720171
07397
86-720178
Disc Retainer
89-720177
07397
86-720249
Seal Compound
02-720248
07397
86-720254
Cover Feed Point, Band-C
02-720268
07397
86-720255
Shroud Dipole, Feed Point
02-720268
07397
86-720256
Cover Dipole, Feed Point, Band-C
02-720267
07397
86-720258
Shroud Assembly Feed Point,
02-720267
07397
Band-C
02-720268
Housing Feed Point
86-720258
86-720259
07397
07397
2-35
Remarks
TM 32-5985-217-15
Table 2-4. Antenna Array Drawings
Drawing No.
86-720261
Next
Assembly
Short Title
Cover Feed Point Housing, Band-C
02-720268
Manufacturers
Code
07397
02-720268
86-720262
Band-C Mounting Feed Point
89-720264
07397
86-720273
Clamp Cable, Band-C
02-720266
07397
02-720270
89-720171
Shorting Plate Assembly
00-720166
07397
89-720177
Shorting Assembly, Element-B
00-720167
07397
89-720260
Wire Jumper Feed Point
02-720267
07397
02-720268
89-720264
Feed Point Assembly, Dipole
02-720268
07397
02-720267
89-803464
Comparison Standard Electrical
07397
Length Measurement
90-801077
Rod Ground
07397
95-204682
Adhesive
02-720248
07397
95C
Ethyl Methyl Kit
02-720246
07397
95C Supplement
Supplement to 95C
02-720246
07397
96-201880-899
Solder, Soft
07397
96-801248
Tape, Pressure Sensitive
07397
96-801257
Insulating Compound, Electrical
07397
2-36
Remarks
TM 32-5985-217-15
Table 2-4. Antenna Array Drawings
Drawing No.
Next
Assembly
Short Title
Manufacturers
Code
97002
Antenna, Element-B,
Specification Control
15770
97003
Antenna, Element, Band C,
Specification Control
15770
97006
Antenna, Element, Band A,
Specification Control
15770
2-37
Remarks
TM 32-5985-217-15
Figure 2-5. Central Building - Antenna group, AN/FLR-9(V7 & V8)
2-38
TM 32-5985-217-15
h.
Air Conditioning and Heat Dissipation. The antenna group dissipates 38000 btu per hour in normal
operation. This heat is dissipated from the eight rf amplifier cabinets 401, 403, 404, 408, 415, 416, 420, and 421. Other
cabinets contain passive equipment that is not powered.
Table 2-5. Central Building (Roundhouse) Engineering and Associated Drawings
Drawing
No.
Next
Assembly
Short Title
Manufacturer's Code
50401
Cover Sheet Roundhouse Antenna
00002
15770
50402
Soil Test, Location
50401
15770
50403
Soil Borings
50401
15770
50404
Layout Plans
50401
15770
50405
Antenna Foundation Elevation
50401
15770
50407
Grading, Utilities Plan
50401
15770
50408
Grading, Utilities Plan
50401
15770
50409
Access Road Plan, Profile
50401
15770
50410
Utilidor Plan, Profile
50401
15770
50411
Cross Section 1
50401
15770
50412
Cross Section 2
50401
15770
50413
Miscellaneous Details, Diverse Details
50401
15770
50414
50415
Plans and Schedules
Elevations and 'Sections
50401
50401
15770
15770
50416
Door and Louver Details
50401
15770
50417
Details
Miscellaneous Details and Diverse
50401
15770
50418
Foundation and Ground Floor Plan
50401
15770
50419
Grace Beams, Footing Details
50401
15770
50420
Roof Plan and Details
50401
15770
2-39
TM 32-5985-217-15
Table 2-5. Central Building (Roundhouse) Engineering and Associated Drawings (Continued)
Drawing
No.
Next
Assembly
Short Title
Manufacturer's Code
50421
Roof Beams, Building Section
50401
15770
50422
Roundhouse Antenna Array
50401
15770
50423
Foundations
50401
15770
50424
Foundations
50401
15770
50425
Foundations
50401
15770
j-0426
Air Condition and Equipment Schedule
50401
15770
50427
Plumbing and Air Condition Control System
50401
15770
50428
H T Feeder Plan
50401
15770
50429
One Line Diagonal and Panel Schedule
50401
15770
50430
Lighting Plan
50401
15770
50431
Power Plan
50401
15770
50432
Grounding Plan
50401
15770
50433
Legend and Lighting Fixture Details
50401
15770
50434
Electrical Installation
50401
15770
50435
N C Trays, Cable Roundhouse V8
50401
15770
2-40
TM 32-5985-217-15
Table 2-6. Antenna Group Electronic Equipment Reference Designator Assignments
Reference
Designator
Description
Racks 401, 403, 404, 408, 415, 416, 420 and 421
Amplifier, Radio Frequency AM 6533/FLR-9(V)
A1
A2
A3
A4
A5
A6
A7
A8
A9
A10
A11
Amplifier, Radio Frequency AM 6533/FLR-9(V)
A12
Blower Assembly, 3300-40015-1
A13
Rack 402 (band C)
Beamformer Assembly TD 1054/FLR-9(V)
A1
A2
A3
A4
A5
Beamformer Assembly TD 1054/FLR-9(V)
A6
2-41
TM 32-5985-217-15
Table 2-6. Antenna Group Electronic Equipment Reference Designator Assignments (Continued)
Reference
Designator
Description
Rack 402 (band C) (Continued)
Divider Assembly, Power Rf CU 2051/FLR-9(V)
A7
A8
A9
A10
A11
A12
A13
Divider Assembly, Power RF CU 2051/FLR-9(V)
A14
Racks 405, 406 and 407 (Site V7 only) (band A)
Beamformer Assembly TD 1052/FLR-9(V)
A1
A2
A3
A4
A5
A6
A7
Beamformer Assembly TD 1052/FLR-9(V)
A8
2-42
TM 32-5985-217-15
Table 2-6. Antenna Group Electronic Equipment Reference Designator Assignments (Continued)
Reference
Designator
Description
Racks 405, 406 and 407 (Site V7 only) (band A)
(Continued)
Divider Assembly, Power Rf CU 2050/FLR-9(V)
A9
A10
A11
A12
A13
A14
A15
Divider Assembly, Power Rf CU 2050/FLR-9(V)
A16
Racks 405, 406 and 407 (V8 only) (band A)
Beamformer Assembly TD 1050/FLR-9(V)
A1
A2
A3
A4
A5
A6
A7
Beamformer Assembly TD 1050/FLR-9(V)
A8
2-43
TM 32-5985-217-15
Table 2-6. Antenna Group Electronic Equipment Reference Designator Assignments (Continued)
Reference
Designator
Description
Racks 405, 406 and 407 (V8 only) (band A)
(Continued)
Divider Assembly, Power Rf CU 2050/FLR-9(V)
A9
A10
A11
A12
A13
A14
A15
Divider Assembly, Power Rf CU 2050/FLR-9(V)
A16
Rack 409 (band C)
Divider Assembly, Power Rf CU 2052/FLR-9(V)
A1
Divider Assembly, Power-Rf CU 2052/FLR-9(V)
A2
Coupler, Omni Assembly CU 2054/FLR-9(V)
A3
Divider Assembly, Power Rf CU 2052/FLR-9(V)
A4
Divider Assembly, Power Rf CU 2052/FLR-9(V)
A5
Coupler, Omni Assembly CU 2049/FLR-9(V)
A6
Panel, Patching, Antenna SB 3662/FLR-9(V)
A7
Beamformer Assembly TD 1057/FLR-9(V)
A8
Divider Assembly, Power Rf CU 2052/FLR-9(V)
A9
Divider Assembly, Power Rf CU 2052/FLR-9(V)
A10
Coupler, Omni Assembly CU 2054/FLR-9(V)
A11
Divider Assembly, Power Rf CU 2052/FLR-9(V)
A12
Divider Assembly, Power Rf CU 2052/FLR-9(V)
A13
2-44
TM 32-5985-217-15
Table 2-6. Antenna Group Electronic Equipment Reference Designator Assignments (Continued)
Reference
Designator
Description
Rack 409. (band C) (Continued)
Divider Assembly, Power Rf CU 2052/FLR-9(V)
A14
Divider Assembly, Power Rf CU 2052/FLR-9(V)
A15
Coupler, Omni Assembly CU 2054/FLR-9(V)
A16
Divider Assembly, Power Rf CU 2052/FLR-9(V)
A17
Divider Assembly, Power Rf CU 2052/FLR-9(V)
A18
Beamformer Assembly TD 1057/FLR-9(V)
A19
Rack 410 (band A)
Divider Assembly, Power Rf CU 2052/FLR-9(V)
A1
Divider Assembly, Power Rf CU 2052/FLR-9(V)
A2
Coupler, Omni Assembly CU 2054/FLR-9(V)
A3
Divider Assembly, Power Rf CU 2052/FLR-9(V)
A4
Divider Assembly, Power Rf CU 2052/FLR-9(V)
A5
Coupler, Omni Assembly CU 2049/FLR-9(V)
A6
Panel, Patching, Antenna SB 3666/FLR-9(V)
A7
Beamformer Assembly TD 1055/FLR-9(V)
A8
Divider Assembly, Power Rf CU 2052/FLR-9(V)
A9
Divider Assembly, Power Rf CU 2052/FLR-9(V)
A10
Coupler, Omni Assembly CU 2054/FLR-9(V)
A11
Divider Assembly, Power Rf CU 2052/FLR-9(V)
A12
Divider Assembly, Power Rf CU 2052/FLR-9(V)
A13
Divider Assembly, Power Rf CU 2052/FLR-9(V)
A14
Divider Assembly, Power Rf CU 2052/FLR-9(V)
A15
Coupler, Omni Assembly CU 2054/FLR-9(V)
A16
Change 1 2-45
TM 32-5985-217-15
Table 2-6. Antenna Group Electronic Equipment Reference Designator Assignments (Continued)
Reference
Designator
Description
Rack 410 (band A) (Continued)
Divider Assembly, Power Rf CU 2052/FLR-9(V)
A17
Divider Assembly, Power Rf CU 2052/FLR-9(V)
A18
Beamformer Assembly TD 1055/FLR-9(V)
A19
Racks 417, 418, 419 (site V7 only) (band B)
Beamformer Assembly TD 1053/FLR-9(V)
A1
A2
A3
A4
A5
A6
A7
Beamformer Assembly TD 1053/FLR-9(V)
A8
Divider Assembly, Power Rf CU 2053/FLR-9(V)
A9
A10
A11
A12
A13
A14
A15
Divider Assembly, Power Rf CU 2053/FLR-9(V)
A16
Change 1 2-46
TM 32-5985-217-15
Table 2-6. Antenna Group Electronic Equipment Reference Designator Assignments (Continued)
Reference
Designator
Description
Racks 417, 418, 419 (site V8 only) (band B)
Beamformer Assembly TD 1051/FLR-9(V)
A1
A2
A3
A4
A5
A6
A7
Beamformer Assembly TD 1051/FLR-9(V)
A8
Divider Assembly, Power Rf CU 2053/FLR-9(V)
A9
A10
A11
A12
A13
A14
A15
Divider Assembly, Power Rf CU 2053/FLR-9(V)
A16
Rack 422 (band B)
Divider Assembly, Power Rf CU 2052/FLR-9(V)
A1
Divider Assembly, Power Rf CU 2052/FLR-9(V)
A2
Coupler, Omni Assembly, CU 2055/FLR-9(V)
A3
Divider Assembly, Power Rf CU 2052/FLR-9(V)
A4
Divider Assembly, Power Rf CU 2052/FLR-9(V)
A5
2-47
TM 32-5985-217-15
Table 2-6. Antenna Group Electronic Equipment Reference Designator Assignments (Continued)
Reference
Designator
Description
Rack 422 (band B) (Continued)
Panel, Patching, Antenna SB 3664/FLR-9(V)
A7
Beamformer Assembly TD 1056/FLR-9(V)
A8
Divider Assembly, Power Rf CU 2052/FLR-9(V)
A9
Divider Assembly, Power Rf CU 2052/FLR-9(V)
A10
Coupler, Omni Assembly, CU 2055/FLR-9(V)
A11
Divider Assembly, Power Rf CU 2052/FLR-9(V)
A12
Divider Assembly, Power Rf CU 2052/FLR-9(V)
A13
Divider Assembly, Power Rf CU 2052/FLR-9(V)
A14
Divider Assembly, Power Rf CU 2052/FLR-9(V)
A15
Coupler, Omni Assembly CU 2055/FLR-9(V)
A16
Divider Assembly, Power Rf CU 2052/FLR-9(V)
A17
Divider Assembly, Power Rf CU 2052/FLR-9(V)
A18
Rack 423 (band B)
Divider Assembly, Power Rf CU 2052/FLR-9(V)
A1
Divider Assembly, Power Rf CU 2052/FLR-9(V)
A2
Coupler, Omni Assembly CU 2055/FLR-9(V)
A3
Divider Assembly, Power Rf CU 2052/FLR-9(V)
A4
Divider Assembly, Power Rf CU 2052/FLR-9(V)
A5
Beamformer Assembly TD 1056/FLR-9(V)
A6
Panel, Patching, Antenna SB 3663/FLR-9(V)
A7
Coupler, Omni Assembly CU 2049/FLR-9(V)
A8
Divider Assembly, Power Rf CU 2052/FLR-9(V)
A9
Divider Assembly, Power Rf CU 2052/FLR-9(V)
A10
Change 1 2-48
TM 32-5985-217-15
Table 2-6. Antenna Group Electronic Equipment Reference Designator Assignments (Continued)
Reference
Designator
Description
Rack 423 (band B) (Continued)
Coupler, Omni Assembly CU 2055/FLR-9(V)
A11
Divider Assembly, Power Rf CU 2052/FLR-9(V)
A12
Divider Assembly, Power Rf CU 2052/FLR-9(V)
A13
Divider Assembly, Power Rf CU 2052/FLR-9(V)
A14
Divider Assembly, Power Rf CU 2052/FLR-9(V)
A15
Coupler, Omni Assembly CU 2055/FLR-9(V)
A16
Divider Assembly, Power Rf CU 2052/FLR-9(V)
A17
Divider Assembly, Power Rf CU 2052/FLR-9(V)
A18
2-49/2-50
TM 32-5985-217-15
CHAPTER 3
PREPARATION FOR USE AND RESHIPMENT
SECTION I. PREPARATION FOR USE
3-1. General.
The antenna group requires no special tuneup, testing, or adjusting after installation except that which is necessary to
confirm proper operation. Refer to Chapter 6 for antenna group tests and maintenance procedures. In the event that the
equipment has been relocated and does not perform satisfactorily in a given area, check the rf cabling for possible
connection errors.
3-2. Rf Amplifiers.
All components of the antenna group are passive devices except the eight racks of rf amplifiers. Therefore,
preoperational procedures for the antenna rf amplifiers consist of assuring that the fuse is good, the power switch Is In
the OFF position, and the ac power cable is connected. The HI-LOW switches on each motherboard (Al and A2) should
be in the LOW position for bands A and B, and in the HI position for band C. Energize and determine that each rack
blower assembly is functioning. Place each amplifier assembly ON-OFF switch in the ON position. Allow at least a 30minute warm-up time before performing group level tests.
3-3. Test Description.
All of the tests to demonstrate that functional requirements have been met are described in Chapter 6. The antenna
group has performance criteria in the following categories:
a.
Single channel amplitude and phase tracking
b.
Input vswr
c.
Intermodulation distortion
d.
Single channel noise figure.
Other tests to localize troubles are also described in Chapter 6.
3-4. Duration of Tests.
There are no tests in the antenna group that require monitoring for extended periods, e.g., tests wherein the data must be
recorded or monitored for several hours.
NOTE
Test signals are provided and monitored by the monitor and test group on a continuous basis.
These signals are compared In amplitude and phase, the latter where applicable, to a memory
standard.
3-1
TM 32-5985-217-15
3-5. Test Sequence.
There is no particular sequence of testing; however, an unsatisfactory single channel amplitude and phase tracking test
would likely result in one or more succeeding test failures. See paragraph 3-3.
3-6. Test Criteria.
Test criteria for the antenna group including test equipment, test configurations, and diagrams are contained in Chapter
6.
SECTION II. PREPARATION FOR RESHIPMENT
3-7. Conditions and Methods for Reshipment.
a.
Conditions. With the possible exception of the antenna elements, antenna array materials become scrap.
Disassembly of reflecting screens, removal of ground screens, feed cables, timbers, and steel structures does not appear
to be economical. However, final determination of scrap materials is a user function.
b.
practices.
Methods. Electronic Equipment from the central building is shipped in accordance with the best commercial
c.
Disassembly. There are no special disassembly techniques required for antenna group equipment. There
are no special plug-in units to be removed before shipment. Racks may be shipped with internal cabling connected and
in place.
d.
Reusable Containers. There are no reusable containers in the antenna group equipment.
3-2
TM 32-5985-217-15
CHAPTER 4
OPERATION
SECTION I. CONTROLS AND INDICATORS
4-1. Operating Controls and Indicators. (See table 4-1 and figure 4-1.)
The only controls and indicators in the antenna group are those on the rf amplifiers. See figure 4-1. Table 4-1 lists
control and indicator functions of the rf amplifiers.
Table 4-1. Amplifier, Radio Frequency AM-6533/FLR-9(V)
Controls and Indicators
Control or Indicator
Reference
Designator
ON-OFF Switch
Function
S1
Applies power to unit in ON position
POWER lamp
DS1
Lights when power is applied to unit
1 AMP FUSE
F1
Fuses one side of ac line
SECTION II. OPERATING INSTRUCTIONS
4-2. Preoperational Radio Frequency Amplifier Checklist.
a.
Power switch should be in OFF position.
b.
Check for known good fuse.
c.
Check that power cable is connected at rear of unit.
4-3. Radio Frequency Amplifier Starting Procedures.
If not known, check the HI-LOW switches inside the unit (on motherboards A1 and A2) for proper position. The switch
should be in LOW position for bands A and B; HI for band C. Remove assembly from the rack and remove the top cover
by loosening the two rear quick-disconnect screws and sliding the cover toward the rear. Position HI-LOW switch and
reassemble. Replace in rack and reconnect cables and power cord. Place ON-OFF switch to ON. Determine that the
cabinet blowers are operating and allow a 30-minute warm-up time. For additional information refer to paragraph 1-6.
4-1
TM 32-5985-217-15
Figure 4-1. Amplifier, Radio Frequency AM-6533/FLR-9 (V)
4-2
TM 32-5985-217-15
4-4. Software Assignments.
When initially starting the system, the software must be notified of user determined sector beam assignments by the
somc operator. Monitor and test group functions and sector beam selection functions provide misleading symptoms for
maintenance personnel. if this is not accomplished. The software must also be notified when sector beams are changed
from an existing assignment to a new assignment for these same reasons. See Chapter 5, tables 5-2, 5-4, 5-5, and 5-6
for azimuth/sector beam assignments. The following information is entered via the teletypewriter.
SECTOR X,Y,ZZ,WWW
Where:
X is band A, B, or C
Y is sector beam number 1, 2, or 3
Z is right boresight antenna number band A, 1-48; band B, 1-96; band C, 1-48
W is azimuth.
There are four antennas per sector beam in band A, three in band B, and two in band C. Boresight antenna is defined in
paragraph 5-4.
EXAMPLE: SECTOR A,1,41,7
The above example can be found from table 5-2 and is a band A sector beam, patched to the No. 1 band A sector
beamformer position with boresight azimuth of 7.5 degrees, site V7. When entering azimuth enter only the numbers to
the left of the decimal point. EXAMPLE: for 7.5 degrees enter 7; for 322.5 degrees enter 322. Do not confuse the
beam No. listing in table 5-2 with the 1 to 3 assignment to sector beams on the sector beamformer assembly. See figure
5-5 for patching scheme. Beamformer inputs suffixed A, B, and C correspond to sector beams numbered 1, 2, and 3.
Since there are a total of three sector beams in each band, there will have to be a total of nine entries made in Initial
system start-up. When a sector beam is changed, the new entry is entered on the teletypewriter. As soon as the
carriage return is pressed, the new entry becomes effective. It is not necessary to re-enter the existing, unchanged,
sector beams.
SECTION III. EMERGENCY OPERATION
4-5. Blower Failure, Rf Amplifier Cabinets.
In the event of blower failure, open the rear door of the affected cabinet. Do not turn off any of the rf amplifiers. Replace
blower assembly with a spare. This can be accomplished in 20 minutes or less. If the cabinet is operated more than 20
minutes without the blower, an increasing risk of damage occurs. To remove the blower assembly, unplug line cord and
disconnect sensing leads from TB1. Remove two filter retaining nuts and the filter. Remove screws holding blower
assembly. Slide the blower assembly out from the front of the rack.
4-3
TM 32-5985-217-15
4-6. Equipment Failure.
The individual in charge of the site has the responsibility of determining the primary sectors of Interest and their priorities.
Equipment failures in high priority areas may be replaced with identical units borrowed from other locations. This
procedure would be followed in an emergency when no spares were available.
4-7. Jamming.
Refer to IM 32-5895-231-15 and IM 32-5895-231-15/1 manuals.
4-4
TM 32-5985-217-15
CHAPTER 5
THEORY OF OPERATION
SECTION I. FACILITY FUNCTIONAL OPERATION
5-1. Scope.
This section contains theory and facility functional information of the antenna group. A short discussion of
intermodulation distortion, noise, and phase requirements is included. It is important that these factors are understood as
they relate to system performance.
5-2. General. (See figure 5-1.)
The antenna group is a high frequency antenna system that provides processed (beamformed and omnidirectional)
signals for ultimate use and detection in other system locations. The three antenna group bands are designated band A
(2 to 6 MHz), band B (6 to 18 MHz), and band C (18 to 30 MHz). With the exception of frequency coverage, the
functional operation of each band is essentially the same.
NOTE
The entire Countermeasures Receiving Set AN/FLR-9(V7)/(V8) system is a wideband receiving
system. Ultimately, individual signals are detected at terminal locations by tuned receivers.
Performance characteristics of an untuned, wideband system have parameters that must be
understood for proper operation and maintenance. These parameters are intermodulation,
distortion, noise, and phase shift requirements. The following subparagraphs explain the
importance of these parameters as related to wideband systems and should be understood as
related to the functional description.
a.
Intermodulation distortion. (See figure 5-2.) Intermodulation distortion, in the general case, results when two
or more signals are sent through a nonlinear device. In a Countermeasures Receiving Set AN/FLR-9(V7)/(V8) system
the principal sources of intermodulation distortion occur in the active devices (transistors). In the antenna group, the
antenna preamplifiers are the principal source of this distortion. An overloaded or incorrectly adjusted amplifier may
produce excessive numbers and/or amplitudes of intermodulation distortion products. These appear at the amplifier
output as signals. In relation to the input signals, the intermodulation products are spurious signals, and can be detected
by system receivers. The spurious signals contain modulation components of the original signals and may likely be
garbled. The obvious objection to these spurious signals is that they may exist on the same frequencies as legitimate
signals of interest. How severe the interference between the two becomes depends on the relative magnitude of the two
signals. Every signal handling component in the system has been designed to minimize intermodulation distortion.
Refer to the tables of capabilities and limitations in Chapter 1 of this manual. An example of intermodulation distortion is
shown in figure 5-2. This is a graphic representation from a spectrum analyzer of the output from a transistor amplifier
whose input has equal 10-MHz and 12-MHz
5-1/5-2
TM 32-5985-217-15
Figure 5-1. Block Diagram, Antenna Group
Change 1
5-3/5-4
TM 32-5985-217-15
Figure 5-2. Typical Spectrum Analyzer Display Intermodulation Distortion Products
signals applied. The amplifier output contains the original 10-MHz and 12-MHz signals, as well as the following
significant intermodulation and harmonic distortion products:
2-MHz
24-MHz
8-MHz
30-MHz
14-MHz
32-MHz
20-MHz
34-MHz
22-MHz
36-MHz
If more than two input signals were present at the input, as in the preceding case, the number of intermodulation
distortion products increases by many times. An analysis
5-5
TM 32-5985-217-15
of the number generated from more than two input signals involves complex mathematics beyond the scope of this
manual. In figure 5-2, the input signals are of relatively large magnitude (300 millivolts) so that the distortion products
are within the display capabilities of the spectrum analyzer. Note that a radio receiver could detect any of the ten
spurious signals at the amplifier output of, the example shown.
b. Noise. Total system noise results from addition of noise powers generated principally from the active devices
(transistors) in the system and that delivered to the system by the antennas. When a particular signal-to-noise ratio
becomes small enough, then at some point the signal becomes undetectable by the operator at a radio receiver. The
signal-to-noise ratio from the antenna is determined by atmospheric conditions and the received signal strength. It is
important that the noise contributed by the active devices in the system does not further deteriorate the signal-to-noise
ratio. The antenna preamplifiers provide the necessary gain ahead of the power dividers so that weak signals are not lost
in system generated noise.
c. Phase. in order to form beams and furnish the goniometers with usable signals, the signal phase relationships
are carefully controlled. Antenna cable lengths at the time of installation were cut to the same electrical length for a
given band. Small differences in electrical lengths are adjusted by the line tuners to compensate for cable aging or
seasonal temperature variations. Additionally, subsequent cables up to beamformers, omnicombiners, and patch panels
are controlled in length for equal phase shifts within a band. These are sometimes referred to as timed or phased cables.
5-3. Functional Description. (See figure 5-1.) The rf energy received by an antenna element is fed into a high gain rf
amplifier.
One rf amplifier is provided for each antenna element in each band. The preamplification overcomes signal losses due
to subsequent power divisions for beamformers and omnicombiners. Power divisions without preamplification would
result in the weaker signals being lost in the noise as described in paragraph 5.2.b. The preamplifiers are capable of
handling relatively large input signals (100 millivolts) with low noise contribution and low intermodulation distortion. The
preamplifiers for all three bands are identical; however, an internal switch is provided that selects either a 19-dB or 21-dB
gain position. Bands A and B preamplifiers operate at a nominal 19-dB gain, whereas band C preamplifiers operate at
21-dB gain. Each preamplifier has two outputs. Signal distribution from the preamplifier outputs are discussed in the
following paragraphs.
a. Band A. Forty-eight rf amplifiers (24 assemblies, 2 amplifiers per assembly) furnish two outputs each. One
output feeds a 1: 4 power divider. The four outputs of the power divider are connected one each to the band A
goniometer, sector beam patch panel, omnicombiner, and a spare output.
NOTE
All rf outputs in the system that are not being actively used, such as the preceding spare, are
terminated with a coaxial termination (75 ohms). Failure to do this may result in an excessive
vswr at the other power divider outputs and degrade beam formations.
5-6
TM 32-5985-217-15
The other rf amplifier output feeds a 1: 16 power divider that provides inputs for the monitor beams. Each monitor beam
consists of inputs from 16 antennas. Refer to paragraph 5-4 for a description of the various beam formations.
b. Band B. Ninety-six rf amplifiers, one for each antenna element, furnish two outputs each. One output feeds a 1:
4 power divider, as mentioned previously. The four outputs are connected-one each to band-B goniometer, sector beam
patch panel, omnicombiner, and a spare output. The other preamplifier output feeds two 1: 8 power dividers that
provide Inputs for the monitor beamformers. Each monitor beam consists of inputs from 16 antenna elements.
c. Band C. Forty-eight rf amplifiers, one for each antenna element, furnish two outputs each. These amplifiers are
used in the nominal 21-dB gain position. One output feeds a 1: 4 power divider. The four outputs are connected, one
each to band C goniometer, sector beam patch panel, omnicombiner, and a spare output. The other amplifier output
feeds a 1: 4 power divider that provides inputs for the monitor beamformers.
5-4. Beam Formation. (See figures 5-3 and 5-4.)
If signals from several antenna elements in a given band are combined in phase, the total signal strength is increased
and a beam is formed. As an example, a wavefront arriving as shown at position I (figure 5-3) intersects the first two
antenna elements. A short time later, the wavefront intersects the next two elements, shown at position 2 and finally at
position 3. Signals from the first pair (position 1) enter the delay line and travel as indicated. By the time the signals
reach the line connections for the next pair (position 2), the time delay is such that they add in phase. The resultant
signals continue and add in phase to those from the last pair of elements. Outputs from both legs of the delay line are
combined in phase in the power combiner to further Increase the signal power. Signals arriving from directions other
than the one shown caused the phase relationships to be less than optimum in the beamformer. The overall beam
formed by this configuration is similar to that of other high gain types such as yagi or log periodic antennas. Directional
beams in bands A, B, and C consist of the sector and monitor beams. The principles Involved in beam formation are the
same for all three bands regardless of the number of elements used in forming each beam.
a. Band A Monitor Beam Formation. (Refer to table 5-1.) Forty-eight monitor beams are formed in band A using a
consecutive combination of 16 elements around the 360-degree circle. Table 5-1 lists the band A elements associated
with each of the 48 beams. Antenna elements are numbered consecutively In a clockwise direction from the tunnel. The
center line In each listing for each beam boresight is referenced from true North (zero degrees). The element numbers
immediately adjacent to the boresight line are listed.
NOTE
As an example, table 5-1 shows element no. 1 positions in beams 3 through 18 of site V7.
Sixteen separate rf inputs from each antenna element are required for the various beamformer
inputs. Refer to the block diagram, figure 5-1, which shows how 16 separate signals are obtained
from power dividers.
5-7
TM 32-5985-217-15
Figure 5-3. Simplified Block Diagram of Beamforming Process
Figure 5-4. Beam Parameter Identification
5-8
TM 32-5985-217-15
Table 5-1. Monitor Beam Formation,
Beam Boresight, Band A
Beam
No.
V7 Elements
1
2
3
4
5
6
7
8
9
10
11
12
13
14
15
16
17
18
19
20
21
22
32 33 34 35 36 37 38 39
33
40
34
41
35
42
36
43
37
44
3'
45
39
46
40
47
41
48
42
1
43
1 2
44
1
3
45
1
4
46
1
5
47
1
6
48 1
7
1
8
2
9
3
10
4
11
5
12
Azimuth
Degrees
In Use
40 41 42 43 44 45 46 47
41
48
42
1
43
1 2
44
1
3
45
1
4
46
1
5
47
1
6
48 1
7
1
8
2
9
3
10
4
11
5
12
6
13
7
14
8
15,
9
16
10
17
11
18
12
19
13
20
5-9
0
7.5
15.0
22.5
30.0
37.5
45.0
52.5
60.0
67.5
75.0
82.5
90.0
97.5
105.0
112.5
120.0
127.5
135.0
142.5
150.0
157.5
V8 Elements
8 9
9
10
11
12
13
14
15
16
17
18
19
20
21
22
23
24
25
26
27
28
29
10 11 12 13 14 15
16
17
18
19
20
21
22
23
24
25
26
27
28
29
30
31
32
33
34
35
36
In Use
16 17 18 19 20 21 22 23
17
24
18
25
19
26
20
27
21
28
22
29
23
30
24
31
25
32
26
33
27
34
28
35
29
36
30
37
31
38
32
39
33
40
34
41
35
42
36
43
37
44
TM 32-5985-217-15
Table 5-1. Monitor Beam Formation (Continued)
Beam Boresight, Band A
Beam
No.
23
24
25
26
27
28
29
30
31
32
33
34
35
36
37
38
39
40
41
42
43
44
45
V7 Elements
6
7
8
9
10
11
12
13
14
15
16
17
18
19
20
21
22
23
24
25
26
27
28
Azimuth
Degrees
In Use
13
14
15
16
17
18
19
20
21
22
23
24
25
26
27
28
29
30
31
32
33
34
35
14
15
16
17
18
19
20
21
22
23
24
25
26
27
28
29
30
31
32
33
34
35
36
21
12
23'
24
25
26
27
28
29
30
31
32
33
34
35
36
37
38
39
40
41
42
43
5-10
165.0
172.5
180.0
187.5
195.0
202.5
210.0
217.5
225.0
232.5
240.0
247.5
255.0
262.5
270.0
277.5
285.0
292.5
300.0
307.5
315.0
322.5
330.0
V8 Elements
30
31
32
33
34
35
36
37
38
39
40
41
42
43
44
45
46
47
48
1
2
3
4
In Use
37
38
39
40
41
42
43
44
45
46
47
48
I
2
3
4
5
6
7
8
9
10
11
38
39
40
41
42
43
44
45
46
47
48
1
2
3
4
5
6
7
8
9
10
11
12
45
46
47
48
2
3
4
5
6
7
8
9
11
12
13
14
15
6
17
18
19
TM 32-5985-217-15
Table 5-1. Monitor Beam Formation (Continued)
Beam Boresight, Band A
Beam
No.
46
47
48
V7 Elements
29
30
31
Azimuth
Degrees
In Use
36
37
38
37
38
39
44
45
46
5-11
337.5
345.0
352.5
V8 Elements
5
6
7
In Use
12
13
14
13
14
15
20
21
22
TM 32-5985-217-15
b. Band A Sector Beam Formation. (See figure 5-5 and table 5-2.) Sector beam formation involves the same
principles as monitor beam formation, but only four consecutive antenna element signals are used at any one time.
Sector signals are terminated on an antenna patch panel assembly. Patch cables are inserted in four consecutive
antenna outputs for the desired beam direction. The beam boresight exists as shown in table 5-2 centered between the
two inner elements. Attenuation in the beamformer of the two outer element signals reduces the magnitude of the side
lobes. A total of six sector beams may be in use at any one time. The patching scheme for patching at the sector
beamformers is shown in figure 5-5.
NOTE
See paragraph 4-4.a. for precautions in sector beam selection.
Figure 5-5. Block Diagram, Beamformer Assembly TD-1055/FLR-9(V) (Sector Beamformer A)
Table 5-2. Sector Beam Formation,
Beam Boresight, Band A
Item
1
2
3
4
Azimuth
Degrees
V7 Elements
38 39
39 40
40 41
41 42
40 41
41 42
42 43
43 44
0
7.5
15
22.5
Change 1
5-12
V8 Elements
14 15
15 16
16 17
17 18
16 17
17 18
18 19
19 20
TM 32-5985-217-15
Table 5-2. Sector Beam Formation, (Continued)
Beam Boresight, Band A
Item
5
6
7
8
9
10
11
12
13
14
15
16
17
18
19
20
21
22
23
24
25
26
27
28
29
30
31
32
33
34
35
36
37
38
39
40
41
42
43
44
45
46
47
48
42
43
44
45
46
47
48
1
2
3
4
5
6
7
8
9
10
11
12
13
14
15
16
17
18
19
20
21
22
23
24
25
26
27
28
29
30
31
32
33
34
35
36
37
V7 Elements
Azimuth
Degrees
43
44
45
46
47
48
1
2
3
4
5
6
7
8
9
10
11
12
13
14
15
16
17
18
19
20
21
22
23
24
25
26
27
28
29
30
31
32
33
34
35
36
37
38
30
37.5
45
52.5
60
67.5
75
82.5
90
97.5
105
112.5
120
127.5
135
142.5
150
157.5
165
172.5
180
187.5
195
202.5
210
217.5
225
232.5
240
247.5
255
262.5
270
277.5
285
292.5
300
307.5
315
322.5
330
337.5
345
352.5
44
45
46
47
48
1
2
3
4
5
6
7
8
9
10
11
12
13
14
15
16
17
18
19
20
21
22
23
24
25
26
27
28
29
30
31
32
33
34
35
36
37
38
39
45
46
47
48
1
2
3
4
5
6
7
8
9
10
11
12
13
14
15
16
17
18
19
20
21
22
23
24
25
26
27
28
29
30
31
32
33
34
35
36
37
38
39
40
5-13
V8 Elements
18
19
20
21
22
23
24
25
26
27
28
29
30
31
32
33
34
35
36
37
38
39
40
41
42
43
44
45
46
47
48
1
2
3
4
5
6
7
8
91
10
11
12
13
19
20
21
22
23
24
25
26
27
28
29
30
31
32
33
34
35
36
37
38
39
40
41
42
43
44
45
46
47
48
1
2
3
5
5
6
7
8
9
0
11
12
13
14
20
21
22
23
24
25
26
27
28
29
30
30
32
33
34
35
36
37
38
39
40
41
42
43
44
45
46
47
48
1
2
3
4
4
6
7
8
9
10
11
12
13
14
15
21
22
23
24
25
26
27
28
29
30
31
31
33
34
35
36
37
38
39
40
41
42
43
44
45
46
47
48
1
2
3
4
5
6
7
8
9
10
11
12
13
14
15
16
TM 32-5985-217-15
c. Band A Omnidirectional Beam Formation. An omnidirectional beam is nondirectional; signals from all directions
are received equally well. Refer to figure 5-1. Forty-eight outputs, one each from the 1: 4 power dividers, are connected
to the omnicombiner assemblies. These assemblies are essentially power dividers connected in reverse. Each
omnicombiner assembly consists of two 8: 1 (eight inputs, one output) units to give an effective 16: 2 combination.
Three of the latter assemblies are required to combine 48 input signals into 6 output signals. These six signals are
further combined in a 6: 1 omnicombiner that provides a single omnibeam output. This output is sent through a
directional coupler via the tunnel cable to the input, maintenance patch panel associated with the rf matrix group.
d. Band B Monitor Beam Formation. (See table 5-3.) Band B monitor beam formation involves the same principles
as band A. Band B has 96 antenna elements with any I beam formed from 16 consecutive antenna elements.
Only 48
beams are formed in progressing around the complete circle of elements.
Note that adjacent beams listed in table
5-3 are separated by 1 antenna element which results in only 48 beams being formed from 96 elements.
e. Band B Sector Beam Formation. (See figure 5-6 and tables 5-4 and 5-5.) Three consecutive antenna elements
form a band B sector beam. The boresight bisects *the center antenna element in the combination chosen. A total of
six sector beams may be in use at any one time.
NOTE
See paragraph 4-4.a. for precautions in sector beam selection.
Figure 5-6. Block Diagram, Beamformer Assembly TD-1056/FLR-9(V) (Sector Beamformer B)
Change 1
5-14
TM 32-5985-217-15
Table 5-3. Monitor Beam Formation,
Beam Boresight, Band B
Beam
No.
V7 Elements
1
2
3
4
5
6
7
8
9
10
11
12
13
14
15
16
17
18
19
20
21
22
72 73 74 75 76 77 78 79
74
81
76
83
78
85
80
87
82
89
84
91
86
93
88
95
90
1
92
3
94
5
96
7
2
9
4
11
6
13
8
15
10
17
12
19
14
21
16
23
18
25
In Use
Azimuth
Degrees
V8 Elements
1.875
9.357
16.875
24.375
31.875
39.375
46.875
54.375
61.875
69.375
76.875
84.375
91.875
99.375
106.875
114.375
121.875
129.375
136.875
144.375
151.875
159.375
24 25 26 27 28 29 30 31
26
33
28
35
30
37
32
39
34
41
36
43
38
45
40
47
42
49
44
51
46
53
48
55
50
57
52
59
54
61
56
63
58
65
60
67
62
69
64
71
66
73
80 81 82 83 84 85 86 87
82
89
84
91
86
93
88
95
90
1
92
3
94
5
96
7
2
9
4
11
6
13
8
15
10
17
12
19
14
21
16
23
18
25
20
27
22
29
24
31
26
33
5-15
In Use
32 33 34 35 36 37 38 39
34
41
36
43
38
45
40
47
42
49
44
51
46
53
48
55
50
57
52
59
54
61
56
63
5S
65
60
67
62
69
64
1
66
73
68
75
70
77
72
79
74
81
TM 32-5985-217-15
Table 5-3. Monitor Beam Formation, (Continued)
Beam Boresight, Band B
Beam
No.
23
24
25
26
27
28
29
30
31
32
33
34
35
36
37
38
39
40
41
42
43
44
45
V7 Elements
20
22
24
26
28
30
32
34
36
38
40
42
44
46
48
50
52
54
56
58
60
62
64
Azimuth
Degrees
In Use
27
29
31
33
35
37
39
41
43
45
47
49
51
53
55
57
59
61
63
65
67
69
71
28
30
32
34
36
38
40
42
44
46
48
50
52
54
56
58
60
62
64
66
68
70
72
35
37
39
41
43
45
47
49
51
53
55
57
59
61
63
65
67
69
71
73
75
77
79
5-16
166.875
174.375
181.875
189.375
196.875
204.375
211.875
219.375
226.875
234.375
241.875
249.375
256.875
264.375
271.875
279.375
286.875
294.375
301.875
309.375
316.875
324.375
331.875
V8 Elements
68
70
72
74
76
78
80
82
84
86
88
90
92
94
96
2
4
6
8
10
12
14
16
In Use
75
77
79
81
83
85
87
89
91
93
95
1
3
5
7
9
11
13
15
17
19
21
23
76
78
80
82
84
86
88
90
92
94
96
2
4
6
8
10
12
14
16
18
20
22
24
83
85
87
89
91
93
95
1
3
5
7
9
11
13
15
17
19
21
23
25
27
29
31
TM 32-5985-217-15
Table 5-3. Monitor Beam Formation, (Continued)
Beam Boresight, Band B
Beam
No.
46
47
48
V7 Elements
66
68
70
Azimuth
Degrees
In Use
73
75
77
74
76
78
81
83
85
5-17
339.375
346.875
354.375
V8 Elements
18
20
22
In Use
25
27
29
26
28
30
33
35
37
TM 32-5985-217-15
Table 5-4. Sector Beam Formation, Boresight, Band B (V7)
Item
Azimuth
Degrees
1
2
3
4
5
6
7
8
9
10
11
12
13
14
15
16
17
18
19
20
21
22
23
24
25
26
27
28
29
30
31
32
33
34
35
36
37
38
39
40
41
42
43
44
45
46
47
48
0
3.75
7.5
11.25
15
18.75
22.5
26.25
30
33.75
37.5
41.25
45
48.75
52.5
56.25
60
63.75
67.5
71.25
75
78.75
82.5
86.25
90
93.75
97.5
101.25
105
108.75
112.5
116.25
120
123.75
127.5
131.25
135
138.75
142.5
146.25
150
153.75
157.5
161.25
165
168.75
172.5
176.25
Elements
In Use
78
79
80
81
82
83
84
85
86
87
88
89
90
91
92
93
94
95
96
1
2
3
4
5
6
7
8
9
10
11
12
13
14
15
16
17
18
19
20
21
22
23
24
25
26
27
28
29
79
80
81
82
83
84
85
86
87
88
89
90
91
92
93
94
95
96
1
2
3
4
5
6
7
8
9
10
11
12
13
14
15
16
17
18
19
20
21
22
23
24
25
26
27
28
29
30
80
81
82
83
84
85
86
87
88
89
90
91
92
93
94
95
96
1
2
3
4
5
6
7
8
9
10
11
12
13
14
15
16
17
18
19
20
21
22
23
24
25
26
27
28
29
30
31
Item
49
50
51
52
53
54
55
56
57
58
59
60
61
62
63
64
65
66
67
68
69
70
71
72
73
74
75
76
77
78
79
80
81
82
83
84
85
86
87
88
89
90
91
92
93
94
95
96
5-18
Azimuth
Degrees
180
183.75
187.5
191.25
195
198.75
202.5
206.25
210
213.75
217.5
221.25
225
228.75
232.5
236.25
240
243.75
247.5
251.25
255
258.75
262.5
266.25
270
273.75
277.5
281.25
285.75
288.75
292.5
296.25
300
303.75
307.5
311.25
315
318.75
322.5
326.25
330
333.75
337.5
341.25
345
348.75
352.5
356.25
Elements
In Use
30
31
32
33
34
35
36
37
38
39
40
41
42
43
44
45
46
47
48
49
50
51
52
53
54
55
56
57
58
59
60
61
62
63
64
65
66
67
68
69
70
71
72
73
74
75
76
77
31
32
33
34
35
36
37
38
39
40
41
42
43
44
45
46
47
48
49
50
51
52
53
54
55
56
57
58
59
60
61
62
63
64
65
66
67
68
69
70
71
72
73
74
75
76
77
78
32
33
34
35
36
37
38
39
40
41
42
43
44
45
46
47
48
49
50
51
52
53
54
55
56
57
58
59
60
61
62
63
64
65
66
67
68
69
70
71
72
73
74
75
76
77
78
79
TM 32-5985-217-15
Table 5-5. Sector Beam Formation,
Boresight, Band B (V8)
Item
Azimuth
Degrees
1
2
3
4
5
6
7
8
9
10
11
12
13
14
15
16
17
18
19
20
21
22
23
24
25
26
27
28
29
30
31
32
33
34
35
36
37
38
39
40
41
42
43
44
45
46
47
48
0
3.75
7.5
11.25
15
18.75
22.5
26.25
30
33.75
37.5
41.25
45
48.75
52.5
56.25
60
63.75
67.5
71.25
75
78.75
82.5
86.25
90
93.75
97.5
101.25
105
108.75
112.5
116.25
120
123.75
127.5
131.25
135
138.75
142.5
146.25
150
153.75
157.5
161.25
165
168.75
172.5
176.25
Elements
In Use
30
31
32
33
34
35
36
37
38
39
40
41
42
43
44
45
46
47
48
49
50
51
52
53
54
55
56
57
58
59
60
61
62
63
64
65
66
67
68
69
70
71
72
73
74
75
76
77
31
32
33
34
35
36
37
38
39
40
41
42
43
44
45
46
47
48
49
50
51
52
53
54
55
56
57
58
59
60
61
62
63
64
65
66
67
68
69
70
71
72
73
74
75
76
77
78
32
33
34
35
36
37
38
39
40
41
42
43
44
45
46
47
48
49
50
51
52
53
54
55
56
57
58
59
60
61
62
63
64
65
66
67
68
69
70
71
72
73
74
75
76
77
78
79
Item
49
50
51
52
53
54
55
56
57
58
59
60
61
62
63
64
65
66
67
68
69
70
71
72
73
74
75
76
77
78
79
80
81
82
83
84
85
86
87
88
89
90
91
92
93
94
95
96
5-19
Azimuth
Degrees
180
183.75
187.5
191.25
195
198.75
202.5
206.25
210
213.75
217.5
221.25
225
228.75
232.5
236.25
240
243.75
247.5
251.25
255
258.75
262.5
266.25
270
273.75
277.5
281.25
285
288.75
292.5
296.25
300
303.75
307.5
311.25
315
318.75
322.5
326.25
330
333.75
337.5
341.25
345
348.75
352.5
356.25
Elements
In Use
78
79
80
81
82
83
84
85
86
87
88
89
90
91
92
93
94
95
96
1
2
3
4
5
6
7
8
9
10
11
12
13
14
15
16
17
18
19
20
21
22
23
24
25
26
27
28
29
79
80
81
82
83
84
85
86
87
88
89
90
91
92
93
94
95
96
1
2
3
4
5
6
7
8
9
10
11
12
13
14
15
16
17
18
19
20
21
22
23
24
25
26
27
28
29
30
80
81
82
83
84
85
86
87
88
89
90
91
92
93
94
95
96
1
2
3
4
5
6
7
8
9
10
11
12
13
14
15
16
17
18
19
20
21
22
23
24
25
26
27
28
29
30
31
TM 32-5985-217-15
f. Band B Omnidirectional Beam Formation. (See figure 5-1.) The omnidirectional beam is formed from 96 band
B antenna signals that are combined in six )6: 1 omnicombiner assemblies. These six outputs are further combined in a
6:1 omnicombiner for the single omnidirectional beam output.
g. Band C Monitor Beam Formation. (See figure 5-1 and table 5-6.) Twenty-four monitor beams are formed in
band C using eight elements for each beam.
Adjacent beams are separated by I antenna element so that a total of 24
beams are formed. Each antenna signal goes through a 1: 4 power division making 192 signals available for 8: 1
beamformers (24 total). The beam boresight exists between the two center elements.
Table 5-6. Monitor Beam Formation,
Boresight, Band C
Beam No.
1
2
3
4
5
6
7
8
9
10
11
12
13
14
15
16
17
18
19
20
21
22
23
24
V7 Elements in Use
Azimuth Degrees
37 38 39 40 41 42 43 44
39
42 43
46
41
44 45
48
43
46 47
2
45
48 1
4
47
2 3
6
1
4 5
8
3
6 7
10
5
8 9
12
7
10 11
14
9
12 13
16
11
14 15
18
13
16 17
20
15
18 19
22
17
20 21
24
19
22 23
26
21
24 25
28
23
26 27
30
25
28 29
32
27
30 31
34
29
32 33
36
31
34 35
38
33
36 37
40
35
38 39
42
7.5
22.5
37.5
52.5
67.5
82.5
997.5
112.5
127.5
142.5
157.5
172.5
187.5
202.5
217.5
232.5
247.5
262.5
277.5
292.5
307.5
322.5
337.5
352.5
V8 Elements in Use
13 14 15 16 17 18 19 20
15
18 19
22
17
20 21
24
19
22 23
26
21
24 25
28
23
26 27
30
25
28 29
32
27
30 31
34
29
32 33
36
31
34 35
38
33
36 37
40
35
38 39
42
37
40 41
44
39
42 43
46
41
44 45
48
43
46 47
2
45
48 1
4
47
2 3
6
1
4 5
8
3
6 7
10
5
8 9
12
7
10 11
14
9
12 13
16
11
14 15
18
h. Band C Sector Beam Formation. (See figure 5-7 and table 5-7.) Sector beams in band C are formed from only
two antenna elements. Antenna signals from all 48 elements are terminated on the band C antenna patch panel. Three
beamformers are *available so that a total of six sector beams may be in use at any one time. The beam boresight
exists between the two beam elements.
NOTE
See paragraph 4-4 for precautions in sector beam selection.
Change 1
5-20
TM 32-5985-217-15
Figure 5-7. Block Diagram, Beamformer Assembly TD-1057/FLR-9(V) (Sector Beamformer C)
Table 5-7. Sector Beam Formation,
Boresight, Band C
Beam No.
1
2
3
4
5
6
7
8
9
10
11
12
13
14
15
16
17
18
19
V7 Elements in Use
40
41
42
43
44
45
46
47
48
1
2
3
4
5
6
7
8
9
10
Azimuth Degrees
41
42
43
44
45
46
47
48
49
2
3
4
5
6
7
8
9
10
11
7.5
15
22.5
30
37.5
45
52.5
60
67.5
75
82.5
90
97.5
105
112.5
120
127.5
135
142.5
5-21
V8 Elements in Use
16
17
18
19
20
21
22
23
24
25
26
27
28
29
30
31
32
33
34
17
18
19
20
21
22
23
24
25
26
27
28
29
30
31
32
33
34
35
TM 32-5985-217-15
Table 5-7. Sector Beam Formation, (Continued)
Boresight, Band C
Beam No.
20
21
22
23
24
25
26
27
28
29
30
31
32
33
34
35
36
37
38
39
40
41
42
43
44
45
46
47
48
V7 Elements in Use
11
12
13
14
15
16
17
18
19
20
21
22
23
24
25
26
27
28
29
30
31
32
33
34
35
36
37
38
39
Azimuth Degrees
12
13
14
15
16
17
18
19
20
21
22
23
24
25
26
27
28
29
30
31
32
33
34
35
36
37
38
39
40
150
157.5
165
172.5
180
187.5
195
202.5
210
217.5
225
232.5
240
247.5
255
262.5
270
277.5
285
292.5
300
307.5
315
322.5
330
337.5
345
352.5
0
V8 Elements in Use
35
36
37
38
39
40
41
42
43
44
45
46
47
48
1
2
3
4
5
6
7
8
9
10
11
12
13
14
15
36
37
38
39
40
41
42
43
44
45
46
47
48
1
2
3
4
5
6
7
8
9
10
11
12
13
14
15
16
i. Band C Omnibeam Formation. The omnidirectional beam in band C is formed in the same manner as the band
A omnidirectional beam.
Sector, omni-, and monitor beam signals for all bands are patched through the input maintenance patch panel in the rf
matrix group to the used locations. At this point, signal lines may be opened for troubleshooting operations. Coverage of
the input maintenance patch panel and signal flow beyond this point may be found in the rf matrix group instruction
manual.
SECTION II. FUNCTIONAL OPERATION OF ELECTRONIC CIRCUITS
5-5. Band A Antenna Elements (02-720246) and Band B Antenna Elements (02-720248). (See figure 5-8.)
The band A and band B antenna elements receive vertically polarized rf signals in the ranges of 2 to 6 MHz (band A) and
6 to 18 MHz (band B). Each antenna element
5-22
TM 32-5985-217-15
Figure 5-8. Band A or Band B Antenna Element, Electrical Configuration Diagram
is a sleeve monopole. This consists of a mast, a support sleeve, and an impedance matching network. The feed point of
each element is on the mast near the top of the sleeve. The fixed impedance matching network matches the Impedance
of the mast to the antenna feed cable. The impedance matching network consists of a shorted series stub, a phase
rotation line, and a shorted shunt stub. The shorted series stub, formed by a shorting disc and a rod centered inside the
mast, has an electrical length of less than 90 degrees throughout the operating frequency range. It acts as an inductance
in series with the center conductor of the feed cable. A coaxial cable, located between the series inductance and one
end of a coaxial tee connector, rotates the phase of the incoming signals to obtain the desired current and voltage
relationship. The shorted shunt stub, attached to the center of the coaxial tee, 1is one-quarter wavelength long (90degrees) at a given frequency within the band
5-23
TM 32-5985-217-15
of operation, but acts as a shunt inductance when less than one-quarter wavelength long. A coaxial jumper line conducts
the signals from the remaining end of the tee connector to the antenna feed cable.
5-6. Bands A and B Reflecting Screen (3300-31000) and Ground Screen (81-720001).
The bands A and B reflecting screen provides some directional sensitivity to the individual antenna elements which is
independent of the other beamforming processes. The ground screen provides a uniform ground plane for the bands A
and B antenna elements. This results in more uniform characteristics between antenna elements 4 within a band.
5-7. Band C Antenna Elements (02-720268). (See figure 5-9.)
The band C antenna elements are horizontally polarized and receive signals in the 18to 30-MHz range. Each element
consists of two dipoles, two dipole feed points, two sets of balun cables, two terminating points, two junction cables, a tee
junction, and a length of cable which acts as a quarter-wave transformer. These components operate not only as a feed
mechanism, but also as a matching network that matches the input of the dipole subelements (in parallel) to the 75-ohm
feed cables. A balance-to-unbalanced match between the dipole subelements is provided by a balun at each dipole feed
point. The balun consists of two parallel 75-ohm coaxial cables whose inner conductors form a twin-conductor
transmission line, which is shorted one-quarter wavelength (at the center frequency) from the dipole feed points. One of
these cables functions as the coaxial feed to the dipole feed point. A complete band C element consists of an upper and
lower dipole subelement. The coaxial feed side from each dipole is connected with 75-ohm junction arms to the
symmetrical arms of a coaxial tee junction. This tee is positioned half way between the upper and lower dipoles. The
output of the tee passes through a quarter-wave transformer that matches the impedance to the 75-ohm feed cable. The
matching section is a quarterwave length of 50-ohm cable (at the center frequency).
5-8. Band C Reflecting Screen (02-720272).
The band C reflecting screen provides each horizontally polarized antenna element with an appreciable forward gain.
This gain is Independent of any that is obtained in subsequent beamforming processes.
5-9. Transmission Line Tuners. (See figure 5-10.)
The transmission line tuner is a sliding coaxial line stretcher that compensates for variations in the electrical length of
the antenna feed cable. Two closely machined transmission lines, one inside of the other and adjustable in length,
provide a capability to change the electrical length of the cable. This capability provides a means to compensate for the
effective electrical length changes due to cable aging or seasonal temperature variations. This is necessary to maintain
the same transmission line delay from each antenna element within a band. Any cable length that deviates from others
has an undesired phase shift that Is ultimately introduced into the affected beamformers and degrades beam formation.
5-24
TM 32-5985-217-15
Figure 5-9. Band C Antenna and Feed Configuration
5-25
TM 32-5985-217-15
Figure 5-10. Transmission Line Tuner Functional Schematic
5-10. Rf Amplifiers. (See figure 5-11.)
Wideband antenna preamplifiers are provided in each antenna lead to amplify all signals before subsequent power
divisions and beam formations. Each preamplifier has two outputs. Two preamplifiers, supplied from a common power
supply, comprise an rf amplifier assembly. Each amplifier has a gas discharge tube lightning arrestor connected across
the input for overload protection. An rf filter (A2) attenuates signals below 1.5-MHz. Strong broadcast station signals are
undesirable in the system because they could possibly cause intermodulation (im) distortion products. Refer to
paragraph 5-2.a. This signal is amplified by a nominal 16-dB by the basic amp module A3. Switch S1 and the
associated resistor network provide a 2-dB attenuation for the preamplifier when used in bands A and B. In band C the
full gain is utilized. A wideband transformer provides a center-tapped output so that two separate signals are available to
drive separate emitter-follower isolator modules A4 and A6. These in turn drive basic amp modules A5 and A7. Outputs
from A5 modules supply monitor beam channels. Outputs from A7 modules supply the df group and include the
goniometers, and sector and omnibeam beamforming equipment. Each amplifier assembly (two separate rf amplifiers) is
powered by one regulated power supply. The 60-Hz power input is filtered by filter FLI to exclude noise entering via the
power lines. For additional information refer to CM 32-5895-236-14.
NOTE
Figure 5-11 contains the nominal signal levels at various places in the circuit. A reference level
of 0 dB equals 100 millivolts (rms) at the input to the amplifier.
5-26
TM 32-5985-217-15
Figure 5-11. Block Diagram, Amplifier,
Radio Frequency AN-6533/
FLR-9(V)
5-27/5-28
TM 32-5985-217-15
5-11.
Power Dividers and Combiners. (See figures 5-12 through 5-20.)
Power dividers and combiners are used in the antenna group as shown in the block diagram, figure 5-1. A power divider
and a transformer with multiple windings could perform the same function, except that the transformer does not provide
significant isolation between output ports. Power dividers in the antenna group provide a minimum of 30-dB isolation
between output ports. Note that these units are two-way devices; they may be used in reverse as power combiners. The
basic circuit elements in these dividers/combiners are a splitter transformer and a step-down transformer. The splitter
transformer divides an input signal into two equal parts which are approximately 3 dB lower than the input. Windings 11' and 2 - 2' are bifilar wound. The two windings are connected so that mutual inductance is aiding when a signal is
applied as shown. The 75-ohm resistors shown represent terminations of ports A and B. The 150-ohm resistor assists in
maintaining low vswr. Capacitor C helps maintain broadband operation as well as improving vswr. In order to match the
impedance at the splitter transformer input, a step-down transformer is connected ahead of it as shown in figure 5-13.
The step-down transformer connected to the splitter transformer forms an electrical subassembly which is in turn
connected to two more subassemblies to form a 1:4 power divider. Various combinations of 1:4 power dividers are
mounted on printed circuit boards to obtain the required power divisions for the various beams. Refer to figures 5-14
through 5-20.
Figure 5-12. Basic Power Splitter
5-29
TM 32-5985-217-15
Figure 5-13. Typical Schematic, Divider Assemblies 1:4
Figure 5-14. Schematic, Divider Assembly, Power Rf CU-2050/FLR-9(V)
(Power Divider, 2:32, Band A)
5-30
TM 32-5985-217-15
Figure 5-15. Schematic, Divider Assembly, Power Rf CU-2053/FLR-9(V)
(Power Divider, 4:32, Band B)
Figure 5-16. Schematic, Divider Assembly, Power Rf CU-2051/FLR-9(V)
(Power Divider, 6:24, Band C)
5-31
TM 32-5985-217-15
Figure 5-17. Schematic, Coupler, Omni Assembly CU-2049/FLR-9(V)
(Omnicombiner, 6: 1, Bands A. B. and C)
Figure 5-18. Schematic, Coupler, Omni Assembly CU-2055/FLR-9(V)
(Omnicombiner 16: 1, Band B)
5-32
TM 32-5985-217-15
5-19. Schematic Coupler, Omni Assembly CU-2054/FLR-9(V)
(Omnicombiner, Bands A and C)
Figure 5-20. Schematic, Divider Assembly, Power Rf CU-2052/FLR-9(V)
(Power Divider, High Level 1: 4 Bands A, B, and C
5-33
TM 32-5985-217-15
5-12. Beamformers. (See figures 5-21 and 5-22.)
a.
General. Simple beam formation has previously been described. The beamformers consist of balanced
delay lines with varying rates of delay and attenuation. In figure 5-21 antenna element signals from the power dividers
are connected to the beamformer as indicated. The center element signals that are connected to inputs 1 and 2 are
delayed the most, with the delay decreasing for pairs 3-4, 5-6, and 7-8, respectively. The attenuation increases in the
same manner so that the outside antenna signals (7-8) are attenuated the most. This results in lower side lobes.
Element pairs, as illustrated, are connected to a balanced input impedance matching network. Small variable capacitors
and inductors provide fine adjustment of phasing of the individual delay lines based on extremely accurate comparison
standards during manufacture. These adjustments also optimize the isolation between signal pairs. Figure 5-22
illustrates a beamformer with 16 inputs that operates on the same principle, except that more signals form the desired
beam. In each case the delayed signals are fed into impedance matching and combining networks so that a single 75ohm beam output is obtained. Sector beamformers also operate on the same principle, except band C where only two
antenna signals are used to form the beam. Because the electrical lengths of cable have been carefully controlled to this
point, a 2: 1 power combiner is all that is necessary for band C sector beam formation.
b.
Power Divider and Beamformer Interconnection. (See figure 5-23.) Interconnection between power dividers
may be better understood by referring to figure 5-23 and the beam selection charts in Chapter 6. Figure 5-23 Illustrates
antenna elements 72 through 89 connected through directional couplers to the rf amplifier assemblies and 1:8 power
dividers. (Band B power divider assemblies consist of four each 1:8 power dividers.) The fan-out of power divider signals
is shown without regard to specific part connections. It illustrates the overlapping of antenna element signals from one
beam to the next, so that in the band B example shown, a total of 768 signals are required for formation of 48 monitor
beams. Bands A and C are formed in a similar manner, except that only 24 beams are formed in band C.
5-13.
Directional Coupler. (See figure 5-24.)
Directional couplers are used as points of test signal injection and retrieval In each rf signal path of the antenna group as
shown in figure 5-1. Test signals are applied to the signal paths through the appropriate port of the 20-dB four-port
directional couplers and retrieved through the output port of the 10-dB three-port directional couplers. The directional
couplers enable conduct of the beamformer and antenna tests through use of short duration test signals under computer
control as described in paragraph 6-6 and figure 6-1. The directional couplers consist of two identical wideband
transformers T1 and T2 connected as shown In figure 5-24. Note the winding polarities indicated by the dots adjacent to
the windings. The normal rf signal path with minimum attenuation is from J1 to J2. This is because the reflected
impedance into L1 from L2 (T2) is very low as L2 is effectively shunted by ZO at J3. When a test signal (antenna
element test) is injected at J3, a voltage appears at the J1 input through the transformer action of T1. However, a
voltage of opposite polarity is induced onto the line by transformer T2 so that very little signal appears at J2. The output
at J1 is approximately 20 dB lower than the signal applied at J3. A beamformer test signal applied at J4 appears at J2 in
the signal path in the same manner and with the same attenuation through the directional coupler. It is necessary for all
directional coupler ports to be properly terminated
5-34
TM 32-5985-217-15
Figure 5-21. Simplified Schematic, Band C Monitor Beamformers
Figure 5-22. Simplified Schematic, Bands A and B Monitor Beamformers
5-35
TM 32-5985-217-15
Figure 5-23. Simplified Pictorial Diagram, Monitor Beam Formation Band B
TM 32-5985-217-15
in 75 ohms to function correctly. The three-port directional couplers employed at the end of the antenna group are
constructed in a similar manner, with the unused port terminated in 75 ohms. The loss through the cross path in this
case is only 10 dB instead of 20 dB and results from different transformer characteristics.
5-14.
Blower Assembly (3300-40015).
a.
General. One blower assembly is used in each of the eight racks containing rf amplifiers. The blower
assemblies are located in the bottom of each rack. Each assembly has a 200-cfm capacity and operates on 120 volts
(+10 percent), 2 amperes, 48 to 63 Hz at a nominal 3200 rpm. Each is equipped with a permanent, washable metal
mesh filter. These assemblies have permanently sealed bearings for extended life. Lubrication is not required. The only
maintenance required is filter cleaning on a periodic basis.
b.
Blower Assembly Fault Indication. Each blower assembly is equipped with an air flow switch which closes in
the event of blower failure. This is indicated on the somc in the operations building. Grouped under the PREAMPLIFIER
AIR FLOW panel nomenclature are the individual rf amplifier rack numbers and associated indicators (RH 401, RH 403,
etc). A flashing indicator indicates a blower failure or severe air flow restriction sufficient to allow the switch to close.
Wiring between the rf amplifier cabinets and the monitor and test group is shown in figure 5-25. Ac wiring to blower
assemblies is shown in figure 5-26.
Figure 5-24. Schematic, Directional Couplers (All)
5-37
TM 32-5985-217-15
Figure 5-25. Air Flow Alarm Wiring Interface to Monitor and Test Group
Figure 5-26. Cabinet Blower Assembly Ac Wiring Schematic
5-38
TM 32-5985-217-15
CHAPTER 6
MAINTENANCE
SECTION I
ORGANIZATIONAL AND INTERMEDIATE MAINTENANCE
6-1.
Scope.
This chapter presents detailed maintenance procedures necessary to maintain the AN/ FLR-9(V7)/(V8) Antenna Group
equipment. The antenna group consists of the antenna array and 19 racks of electronic equipment in the central
building. Additionally, approximately 2700 cables are used which cannot be arbitrarily replaced or exchanged with other
random length cables.
a.
Maintenance Concept. The primary functions of the antenna group are to receive and amplify the rf signal,
and form monitor, sector, and omni beams for the user. The only manual operation involved is patching the antenna
signal inputs to the sector beamformers as directed by mission requirements. Refer to paragraph 4-4 for precautions
regarding sector beams. Verification of proper operation is normally accomplished by the monitor and test group on an
as-requested basis. The direction finding group can also verify performance, up to the power dividers, by use of the
goniometer test. Alarm indicators on the monitor and test group supervisory operation and maintenance console (somc)
will alert maintenance personnel In the event of an rf amplifier rack cooling blower failure. In the event of monitor and
test group failure, the first Indication of possible antenna group malfunction would probably be an operator report. If it is
determined that there is an antenna or beamformer problem, the performance test check procedures in this chapter may
be used to isolate the failure.
b.
Interface Requirements. The antenna group interfaces with the df group (goniometers), rf matrix group
(Input maintenance patch panel), and the monitor and test group (directional couplers). These are the signal boundaries
for the antenna group. The input maintenance patch panel, in the operations building, makes possible opening of all
monitor, sector, and omni beam signal paths for maintenance purposes. The following paragraphs explain the scope of
performance test checks necessary to verify antenna group performance.
1.
Antenna Array. Two series of tests are necessary for the antenna array, single antenna Impedance
and swept frequency vswr. The impedance test involves four groups of antenna elements: band A, band B, (behind band
A), band B (between band A), and band C. Band B Is broken Into two groups because the physical arrangement places
half of the elements between band A elements and the other half behind band A elements. As a result, each group will
have different impedance characteristics. The impedance tests will verify uniform impedance of all elements in a group.
The measurements are performed on each element individually, with the impedance measured at the feedpoint. Swept
frequency vswr measurements are performed from inside the central building.
6-1
TM 32-5985-217-15
2.
Antenna Electronics. The equipment involved consists of transmission line tuners (including the
transmission lines), directional couplers, rf amplifiers, power dividers and beamformers. The following are required tests:
(a) Single channel amplitude and phase tracking
(b) Input vswr
(c)
Single element swept frequency vswr
(d) Single antenna impedance measurement
(e) Transmission line phase tracking
3.
Cable Tests. The antenna group has approximately 2700 phase-matched cable assemblies for each
site, V7 and V8. The cables are grouped into 12 different lengths from 18 inches to 52 feet. Phased cables are
fabricated by alternately trimming and comparing to a standard electrical length cable. The new cable is checked for
electrical characteristics that should duplicate the standard reference cable.
6-2.
Servicing.
a.
Non-Repairable Items. Power dividers/combiners are built from a basic 1:4 unit. The latter is in a metal
case completely soldered around the seams. Repair of these units is not feasible. This also applies to directional
couplers. Transmission line tuners are also non-repairable items, except that coaxial connectors can be replaced by
standard procedures in the event of physical damage.
b.
Items Most Subject to Failure. The antenna group electronic equipment is passive except for rf amplifiers. It
is probable that these units will require the most servicing.
6-3.
Maintenance Support Equipment. (See table 6-1.)
Test equipment required for maintenance and performance test checks of the antenna group Is listed in table 6-1. This
equipment is in addition to that included in the Analog Test Station for individual card/unit repair and checkout.
6-4.
Performance Test Standards and Tables.
Performance test standards and tables are not included in this manual because of system configuration and the on-line
monitor and test (olm&t) procedures described in paragraph 6-6. Performance test checks are included in paragraphs 610 through 6-14. The performance test checks are to ensure that the system is operating above the olm&t system
performance standards. The transmission line phase tracking check (see paragraph 6-12) must always be performed if a
line tuner is replaced or adjusted.
Table 6-1. Maintenance Support Equipment
Equipment Identification
HP 8610A Generator/Sweeper
Characteristics
Frequency Coverage: 1.5 to 110 MHz110 MHz
Frequency Accuracy: ±1 percent of frequency ±100 kHz
Frequency Linearity: ± 0.5 percent of full sweep
6-2
TM 32-5985-217-15
Table 6-1. Maintenance Support Equipment
Equipment Identification
Characteristics
Frequency Stability: (0.005 percent ±500 Hz)/5 minutes
Harmonic Suppression: (cw output level below +10 dBm).at
least 35 dB below carrier; spurious signals at least 40 dB below
carrier
Rf output level: +20 to -100 dBm
Flatness: ±0.1 dB over any 10-MHz portion of coverage
Sweep: Manual sweep, continuous tuning over preset limits;
sweep from low to high preset frequency
Sweep Output: to 7 volts
VTO Output: 200.1 to 310 MHz at -25 dBm minimum
Blanking: -4-volt pulse concurrent with rf blanking
Auxiliary Output: For frequency counter monitoring
HP8407A Network Analyzer and
HP8412A Phase-Magnitude
Display with Accessory Kit
11652A
8407A
Test Input:
Direct: -10 to -90 dBm
Attenuated: +20 to -50 dBm
Impedance: 50 ohms
Reference Input:
Direct: level required is -10 to -60 dBm.
Attenuated: level required is +20 to -30 dBm
Impedance: 50 ohms
Amplitude accuracy:
Frequency response: ±0.3 dB, 0.1 to 116 MHz; ±0.1 dB
over any 10-MHz portion
Display reference: 0.05 dB/1-dB step, total error does not
exceed 0.1 dB; 0.1-dB/10-dB step, total error does not
exceed 0.25 dB
6-3
TM 32-5985-217-15
Table 6-1. Maintenance Support Equipment (Continued)
Equipment Identification
Characteristics
Reference channel level variation: 0.5 dB/10 dB over 30dB operating range
Phase accuracy (amplitude reading must be on-scale at the 10dB/division setting):
Frequency response: ± degrees 0.1 to 116 MHz; ±2
degrees over any 10-MHz portion
Display reference: 0.1 degree/1-dB step, total error does
not exceed 0.2 degree; 0.5 degree/ 10-dB step, total error
does not exceed 1 percent
Reference channel level variation: 0.4 degree/10dB, I
degree total error over 40-dB operating range
8412A
Amplitude accuracy:
Display: 0.08 dB/dB
Rear output: 0.03 dB/dB
Phase accuracy:
Display: 0.065 degree/degree
Rear output: 0.015 degree/degree
Phase offset: 0.3-degree/20-degree step, not to exceed total
error of 3 degree for 360 degrees of change, positive or
negative direction
Phase versus displayed amplitude: 1 degree/10 dB, 4 degrees
total error for 80 dB
11652A
General: Reflection-Transmission Kit, contains power splitter,
directional bridge, two precision 50 ohm terminations, calibrating
short, bnc adapters and matched, low-leakage cables
Directional bridge: 6-dB coupling in main and auxiliary arm;
frequency response ±0.5 dB, 0.1 to 110 MHz; directivity 40 dB, 1
to 110 MHz
6-4
TM 32-5985-217-15
Table 6-1. Maintenance Support Equipment (Continued)
Equipment Identification
Characteristics
Power splitter: 6-dB loss through each arm
50-ohm termination: return loss 43 dB
HP8600A Digital Marker
Frequency measurements:
Range: 0.1 kHz to 15 MHz
Gate time: 10 millisecond (100-Hz resolution)
Accuracy: ±1 count ± time base accuracy
Readout: 6 digit with automatic blanking of leading zeros;
least significant digit may be suppressed.
Input Sensitivity: 100 millivolts rms to 10 volts rms. (Do
not exceed 10 volts rms.)
Sample rate: 5/sec
Reset: Automatic
HP5245M Electronic Counter
Frequency measurements:
Range: dc coupled, 0 to 50 MHz; ac coupled, 25 Hz to 50
MHz
Gate time: 1 microsecond to 10 seconds in decade steps
Accuracy: ± 1 count ± time base accuracy
Readout: kHz or MHz with positioned decimal point; units
annunciator in line with digital display
Display: 8 digits in-line with rectangular Nixie tubes; 99,999,999
maximum display; including units annunciator and autopositioned decimal point indication
Display storage: holds reading between samples; rear panel
switch overrides storage
Attenuation: step attenuator (SENSITIVITY switch) provides
nominal sensitivities of 0.1, 1, and 10 volts rms
6-5
TM 32-5985-217-15
Table 6-1. Maintenance Support Equipment (Continued)
Equipment Identification
Characteristics
Trigger level adjustment (minimum): front panel control has
±0.3-volt trigger level range on 0.1volt position, ±3-volt range on
]-volt position, ±30-volt range on 10-volt position. A PRESET
position automatically centers trigger level at 0 volt
Overload protection: diodes protect input circuit for up to 120
volts rms (500 Hz) on 0.1-volt range, 240 volts rms on 1-volt
range, 500 volts rms on 10-volt range
Pulse measurement: front panel TRIGGER LEVEL adjustment
allows counting positive or negative pulses
HP7035B X-Y Recorder
Input ranges: English: 1, 10, 100 millivolts/inch; I and 10
volts/inch; Metric: 0.4, 4, 40, 400 millivolts/cm and 4 volts/cm;
continuous vernier between ranges
Type of inputs: floated and guarded signal pair; ,i rear input
connector
Accuracy: ±0.2 percent of full scale
Linearity: ±0.1 percent of full scale
Resettability: ±0.1 percent of full scale
Zero set: zero may be set up to one full scale in any direction
from zero index; lockable zero controls
Paper holddown: Autogrip electric: will grip any chart up to size
of platen
Pen lift: Electric
HP4815A Rf Vector Impedance
Meter
Frequency range: 500 kHz to 108 MHz
Accuracy: ±2 percent of reading, ±1 percent of reading at 1.59
and 15.92 MHz
Impedance magnitude measurement range: 1 ohm to 10K ohms
in 9 ranges
Accuracy: ±4 percent of full scale ±[(f/30 MHz) + (Z/25 Kohms)]
percent of reading
6-6
TM 32-5985-217-15
Table 6-1. Maintenance Support Equipment (Continued)
Equipment Identification
Characteristics
Calibration: Linear meter scale with increments 2 percent of full
scale
HP606B Hf Signal Generator
Frequency range: 50 kHz to 65 MHz in 6 bands
Accuracy: ±1 percent
Output level: Adjustable from 0.1 microvolt to 3 volts. Direct
reading rf output meter calibrated 0 to 3 volts and -10 dBm to
+30 dBm
Harmonic output: Minimum 30 dB below carrier frequency
SKTU Noise Generator
BN4151/2/75
Frequency range: 1 to 1000 MHz
Vswr: Less than 1.1
Noise power: Continuously adjustable from 0 to 16 dB
USVH Selective Microvoltmeter
BN1521/2
Frequency range: 10 kHz to 30 MHz
Frequency accurage: 10 kHz to 1 MHz, ± 2 percent ±2.5 kHz; 1
MHz to 30 MHz ±2 percent ±50 kHz
Voltage and level ranges: 0.2 microvolt to 1 volt or -134 dB to
+2 dB
Image frequency rejection: Greater than 60 dB
Boonton 91H Sensitive Rf
Voltmeter
Voltage range: 100 microvolts to 3 volts in 8
ranges
Frequency range: 20 kHz to 1200 MHz
Accuracy (full scale): 3 percent from 150 kHz to 100 MHz; 5
percent from 50 kHz to 400 MHz; 10 percent from 20 kHz to
1200 MHz
Noise: Indicator un-rest less than 2 percent full scale on most
sensitive range (0.001 volt); essentially zero on all other ranges
dB range: 80 dB (70 dB in 10-dB steps plus 10 dB on meter
scale)
6-7
TM 32-5985-217-15
Table 6-1. Maintenance Support Equipment (Continued)
Equipment Identification
Characteristics
Tektronics 453A 60-MHz Dual
Trace Oscilloscope
Bandwidth: 60 MHz at 20 millivolts/division
Deflection: 20 millivolts/Division to 10 volts/ division at full
bandwidth
X-Y Display: 5 millivolts/Division to 10 volts/ division in 11 steps
Trigger modes: Automatic or Normal on time base A;
Normal triggering only on time base B
Simpson 260-5 Multimeter
Kings KA-99-69
6-5.
Rf feed through.
Voltage Requirements and Sources. (See table 6-2.)
The majority of equipment in the antenna group is passive and requires no power. The rf amplifiers and cooling blowers
in racks 401, 403, 404, 408, 415, 416, 420 and 421 are supplied 120 volts ac via an individual convenience bus in each
rack. Circuit breaker assignments are shown in table 6-2. Power cord entry is through the top of the rack.
Table 6-2. Antenna Group Circuit Breakers
Circuit Breaker
Number
6-6.
Power To
Circuit Type
CB1
Rack 401
3-wire, single phase, 15 amperes
CB2
Racks 403 and 404
3-wire, single phase, 15 amperes
CB3
Rack 408
3-wire, single phase, 15 amperes
CB6
Racks 415 and 416
3-wire, single phase, 15 amperes
CB7
Racks 420 and 421
3-wire, single phase, 15 amperes
Checkout (See figure 6-1.)
Under normal operating conditions, the system is operating under the control of the system control group on-line
computer. A major function of the computer is to control the on-line monitor and test subgroup (olm&t) in its routine
monitoring of system performance and operator requested testing and troubleshooting of various portions of the system.
In either case, teletype printouts identify the failure parameters.
6-8
TM 32-5985-217-15
Figure 6-1. Simplified Block Diagram Olm&t Test Signals Through Antenna Group
6-9
TM 32-5985-217-1'5
In most cases, the printout will also Identify the faulty equipment group and unit or assembly within the equipment group.
The maintenance routines are performed by the monitor and test group equipment under the control of the system
control group computer. As a general rule, the routines are conducted by routing a selected test oscillator signal through
a selected path and comparing the resultant output signal to the original test oscillator signal for phase shift or amplitude
difference or both where applicable. The tests are selected by the maintenance operator by initiating the required test
message to the computer from the teletype (tty) keyboard or by the test switch indicators on the supervisory operation
and maintenance console (somc). The selected path and oscillator Is then automatically selected by the program and
the two signals are compared in a vector voltmeter. The amplitude and phase comparison is made only in circuits with
timed cables where this parameter affects system performance. The results of these comparisons are coupled to the
computer. The computer then compares these figures to a tolerance level which has been previously established. Outof-tolerance signals are output to the tty machine in a message format that defines the reference signal parameters as
stored in memory the allowable tolerance as stored in memory, and the measured signal amplitude, phase, or frequency.
The antenna group is checked on a go/no-go basis by the online monitor and test equipment (olm&t) in the monitor and
test group. There are two tests performed: a check of all beamformer circuits (except nine sector beamformers), and an
antenna continuity test. These tests are initiated by pressing the BEAM FORM or ANT TEST switch indicators on the
somc in the operations building. The computer controlled tests check the rf paths on a time shared basis with the other
portions of the operational program. The beamformer test inserts a test signal via the directional coupler as shown In
figure 6-1. The outputs of the beamformers are sequentially measured and compared with programmed amplitude and
phase reference and tolerance values. In the antenna continuity test, the oscillator test signal is transmitted through the
input directional coupler to the antenna element under test. The reflected wave developed by this element is coupled
back through the directional coupler to the monitor beamformer network and then to the vector voltmeter as indicated by
the arrows. If the reflected wave amplitude as relayed to the computer is out of tolerance, the antenna or transmission
line is defective. The antenna continuity test does not provide a close tolerance analysis of the antenna elements as
changes in ground conductivity due to rain and other changing environmental factors precludes close limits. These tests,
when initiated will use one of six test oscillator frequencies available in each band. The test frequencies available are
shown in table 6-3. Each band (A,R,C) has six reference oscillators, one of which must be assigned for these tests In
each band. Band A has 1 through 6; band B has 7 through 12; and band C, 13 through 18. In order to select an
oscillator, the operator enters the following message via the tty keyboard:
OSCILLATOR XX
followed by pressing carriage return bar.
Where:
XX is number of oscillator.
Until another oscillator is selected for this band either manually or as a result of the Interference test, all olm&t operations
use this oscillator.
Change 1 6-10
TM 32-5985-217-15
Table 6-3. Test Frequencies
Band A
Test
Frequency
Band B
MHz
Test
Frequency
Band C
MHz
Test
Frequency
MHz
1
1.5
7
6.0
13
18.0
2
2.0
8
7.5
14
19.0
3
3.0
9
9.0
15
22.0
4
3.5
10
12.0
16
24.0
5
4.5
11
14.0
17
27.0
6
6.0
12
18.0
18
30.0
a.
Olm&t Test Select Operation. Three antenna group test routines can be selected from the four tests on the
somc panel. These are: BEAM FORM (beamformer delay verification), ANT TEST (antenna amplitude verification), and
OSC TEST (oscillator frequency verification). The following is general information applicable to sites V7 and V8.
Detailed information is provided in paragraphs 6-6.b. through 6-6.g.
1.
If all test results are to be printed on the tty, press OLM&T PRINT switch on the somc, otherwise only
out-of-tolerance test results will be printed.
2.
Select the desired test by selecting the OLM&T TEST SELECT BEAM FORM, ANT TEST, or OSC
TEST switch on the somc. The test is repeated until the switch is reset. Two or more tests may be selected
simultaneously, but this is not recommended.
3.
The tty prints the following message followed by the time and date to show acceptance of the test.
OLMT XXXX TEST START
DAY HH MM SS Z
Where:
X is name of test selected. (BMFR: ANT: OSC)
4.
After the test is complete, the tty prints the following message.
OLMT XXXX TEST FINISHED
Where:
X is the name of the test. (BMFR: ANT: OSC)
5.
If a fault is located in the beamformer or antenna amplitude verification tests one of the following
amplitude or phase messages is printed on the tty to identify the reference, tolerance, and actual levels involved in the
test.
REF XXX.X TOL Y.Y AMPZZZ.Z
or
REF +XXX.X TOL Y.Y PHS +ZZZ.Z
An oscillator fault is identified by the following frequency message: REF YYYYYYYY TOL ZZ FREQ
WWWWWWW
6.
To terminate these tests, again press the previously selected test switch. To momentarily suspend the
beamformer or antenna amplitude verification test, press
6-11
TM 32-5985-217-15
the OLM&T FAULT switch (switch-indicator lights). To resume these tests where halted, press the OLM&T FAULT switch
again (switch extinguishes).
b.
General Olm&t Test Select Output Messages. The previous paragraph described in general terms three
types of tests initiated at the somc. The following information further correlates output messages and activities
associated with these tests.
1.
General. Each time an olm&t test is requested from the somc or the tty operator enters data or
commands via the tty, the computer outputs the time in order to indicate that the input was valid and that the command
was honored. The format is as follows:
DAY HH MM SS Z
For example:
365 12 59 59 Z
means day of year 365, 12 hour, 59 minutes, and 59 seconds Greenwich mean time.
2.
Commence Olm&t Tests. Each time the somc operator initiates an olm&t test from the somc console,
the program identifies the test using the following format.
OLMT XXX TEST START
Where XXXX is:
BMFR
Beamformer delay verification test
ANT Antenna amplitude verification test
OSC Oscillator frequency test This message is followed by the time message.
3.
Completion of Olm&t Tests. When the olm&t test has completely cycled through its assignments, the
computer outputs the teletype message.
OLMT XXXX TEST FINISHED
The value of X being the same as in paragraph c. above.
4.
Teletype Input Error Message. When the tty operator attempts to enter a command which does not
agree with the format or data limits specified, an error output message results. Its format is as follows:
ILLEGAL FORMAT
In this case, input the command again being sure to use the proper format.
c.
Test Operation. Tests previously described, initiated from the somc, perform programmed operational
procedures described in the following paragraphs.
1.
Beamformer Test. To initiate the beamformer test, press the BEAM FORM switch on the somc. The
following messages are printed on the tty.
OLMT BMFR TEST START
DAY HH MM SS Z
(a) Cable Test. At the beginning of the beamformer test, the program performs an olm&t system
test (cable test). The cable test involves three reference paths (one per band) through the olm&t network only. The
paths are checked with the selected test oscillator in each band. As a result of these tests the following message are
printed:
(1)
TEST CABLES OK. This message is printed if the reference paths are satisfactory. It is an indication
that olm&t is functioning properly.
(2)
TEST CABLE FAULT BAND W.
Where:
W is band A, B, or C.
6-12
TM 32-5985-217-15
This message is printed when one of the reference cables is found to be out of tolerance. It will be followed immediately
by one of the following two messages indicating the fault of the oscillator used in the test or the involved circuits in the
monitor and test group. In this case the olm&t circuit is assumed to be faulty and the monitor and test group oscillator
and measuring circuits are to be investigated for fault isolation and repair.
(3)
Amplitude Message.
REF XXX.X TOL YY.Y AMP ZZZ.Z
Where:
X is reference amplitude in millivolts
Y is tolerance allowed in millivolts
Z is measured amplitude in millivolts.
(4)
Phase Message.
REF ±XXX.X TOL Y.Y PHS ±ZZZ.Z
Where:
X is reference phase stored in memory
Y is tolerance allowed in degrees
Z is measured phase in degrees.
These messages give the parameters of a failure. Low amplitude readings may be assumed to be O because the
voltmeter measures noise.
(5)
Print Test Results. If test results are desired for each cable test, press the PRINT switch.
following message will appear if the PRINT switch is activated during cable test.
CABLE X AMP YYY.Y PHS ±ZZZ.Z
Where:
X is band
Y is amplitude millivolts
Z is phase degrees.
The
(b) Interference Test. The interference test is performed after the cable test and before testing the
beamformers or antenna elements. The oscillators which pass the interference test will be used for all subsequent olm&t
tests. The interference test connects the vector voltmeter through a frequency filter to an omni beamformer at the
frequency of the selected test oscillator. If the measured signal exceeds the amplitude limit (interference limit) then the
test oscillator number for that band will be incremented by one and the test repeated. If interference is excessive at all
oscillator frequencies in a band, the originally selected oscillator is used. The following message will be output to the tty.
INT OSC XX
If interference is not excessive, the following message appears once for each band indicating oscillator in use.
OSC XX
Where:
X is oscillator number 1-18.
(c)
Beamformer Test Routines. After performing routines in paragraphs (a). and (b). described
previously, the actual beamformer testing occurs. The test was initiated by pressing the BEAM FORM switch, which
lights white when activated. The test runs until the switch is again pressed which extinguishes the indicator. If allowed,
these tests continue and repeat unless terminated. With only the BEAM FORM switch pressed, only faulty conditions are
printed by the tty. If all test results
6-13
TM 32-5985-217-15
are desired, the PRINT switch must also be pressed. In this condition, all measurements taken are printed by the tty. In
conducting the beamformer test, the program conducts the previously described cable test and interference test;
additionally, monitor beamformer tests, omni beamformer tests and 9 sector beamformer tests are performed. In the
cable test, the three in-use oscillator frequencies are coupled directly to the olm&t measuring equipment through the A
and B test select matrix (see figure 6-1). The measured amplitude and phase of this signal is compared to values
contained in the reference table of the program. If within tolerance, the cable test is considered good; a message
indicating this is printed by the tty, and the test next sequences to the interference test. In the interference test, the
vector voltmeter is connected to the omni beamformer in each band through a frequency filter at the-frequency of the
test oscillator. The measured signal amplitude is compared to reference tables in the program. If the amplitude is
excessive, it is assumed that an interfering signal at the same frequency of the test oscillator is being received by the
antenna group. In this case the oscillator is incremented by one and the test repeated. When a test oscillator for each
band has been selected, the test sequences to the monitor beamformer test. In this test the selected oscillator frequency
is input to the antenna group amplifier/power divider and monitor beamformer circuit through the directional coupler on
each antenna element. The injected test signal is monitored for amplitude and phase at the output of the monitor
beamformer. If this test is out-of-tolerance, the program selects a different monitor beamformer attached to the same
amplifier/power divider. The injected test signal through this path is monitored for amplitude and phase. If this test fails,
the amplifier/power divider is considered faulty. If this test is good, the original beamformer is considered faulty. As a
result, two fault message types may be printed by the tty. Each input port of every beamformer is tested. Therefore, a
faulty amplifier/power divider or faulty monitor beamformer will cause a number of out-of-tolerance conditions. These
numerous conditions are printed by the tty using shorthand messages. At the conclusion of this test, the program
sequences to the omni beamformer test. In this test, the single output port of the three omni beamformers are monitored
while the oscillator signal is injected into the directional coupler associated with each amplifier/power divider. The output
is measured for both amplitude and phase. At the conclusion of this test. the program sequences to the sector
beamformer test. In this test, the output of each of three sector beamformers In each band is monitored while the
oscillator signal is injected Into the directional coupler associated with each amplifier/power divider connected to the
sector beamformer under test. The output Is measured for both amplitude and phase. The beamformers are tested as
described In the following paragraphs.
(1)
Amplifier/Power Divider Monitor Beamformer Test.
Amplifiers, power dividers and monitor
beamformers combine to provide the various monitor beams used In the set. A block diagram showing a simplified
amplifier/power divider and monitor beamformer network is shown in figure 6-2. In this simplified block diagram, an eight
antenna element array is shown with 1: 4 power dividers. The antenna elements drive the associated amplifier which
provide the received signal to the power dividers. The power dividers route signals to beamformers as indicated. Note
that if the diagram was completed for the full circle, all power divide ports would be connected to beamformers in the
same scheme as illustrated. The beamformer provides the attenuation and delay necessary to form a typical beam. The
monitor beam signal is then routed to the rf matrix group and to the olm&t monitoring equipment through the directional
coupler. In testing the amplifier/power divider and beamformers, the test oscillator signal is injected into the circuit path
at the directional coupler associated with the amplifier/power divider. This signal is routed to the amplifier and then to the
power divider. The power divider in turn routes the test signal to the input ports of the associated beamformers. The
directional coupler at the
Change 1 6-14
Figure 6-2. Beamforming Network Simplified Block Diagram
6-15
TM 32-5985-217-15
output of the beamformer routes this test signal to the olm&t monitoring equipment. The beamformer output is measured
and compared against the reference standard in the computer memory. The test begins by selecting the rf path through
the amplifier/ power divider and outer channel of the beamformer under test. If this test measurement is within tolerance,
the test sequences to the next input to the beamformer under test. In this test, the test signal is injected to the directional
coupler associated with the amplifier which is the next input to the beamformer under test. This sequence continues until
all inputs to the beamformer under test have been checked. The program then steps to the next beamformer and
repeats the cycle. This cycle is repeated until all inputs to all monitor beamformers have been checked. When any
measurement is out of tolerance, a fault isolation test is conducted to determine the faulty component. Note that the fault
could be the beamformer under test, the power divider, or the amplifier. To localize the fault, a different beamformer
associated with the same power divider is selected for a comparison test. This new beamformer uses the same antenna
element as the original beamformer where the antenna element has approximately the same electrical displacement
from boresight. This comparison test reveals one of two things, the two tested signals are both out of tolerance or the
comparison test signal is within tolerance. If both test signals are out of tolerance, the amplifier/power divider circuit is
assumed to be faulty. If the comparison test signal is within tolerance, the beamformer is assumed to be faulty. Note
that an amplifier failure will cause a fault each time it is used as an input to a beamformer; a beamformer fault or a power
divider fault may cause any number of faults to appear. This is due to the construction of these circuits. Therefore, in
any one of these three circumstances a number of faults may be noted which are produced by a single faulty circuit
amplifier, power divider, or beamformer. Note that the rf amplifier is the only active device in the circuit, and will likely
be subject to the most failures.
(2)
Test Messages. The amplifier/power divider, beamformer tests develop several messages in defining
a faulty circuit. As previously described, the test isolates a fault to either a beamformer or a combination of
amplifier/power divider. In testing the amplifier/power divider beamformer path, the output of a beamformer is monitored
while the input is sequenced from one antenna element directional coupler to the next. In this manner each input and
associated path in the beamformer is monitored. In this testing procedure a number of fault messages may be generated
due to a single malfunctioning circuit.
(3)
Beamformer Fault Sequence. When the fault isolation test identifies a beamformer fault, the program
will print a tty message. The first fault message during a test cycle associated with a particular beamformer is printed
using the longhand message of paragraph 6-6.c.1.(d). Amplitude and phase are considered separately and may result in
a longhand message for each type of fault. Subsequent faults during one test cycle associated with this beamformer
may result in either longhand or shorthand messages. When the program determines that a subsequent fault is identified
for this beamformer, the antenna element number associated with the input directional coupler used in the measurement
is examined. If this element number is one greater than the element number found in the previous fault condition for this
beamformer, the shorthand beamformer fault messages is printed. This identifies a fault sequence for one beamformer
in which two or more sequential inputs to the beamformer result in faults. The beamformer identified in a longhand or
shorthand fault message should be investigated for problems using the special monitor beamformer test (see paragraph
6-6.f.1.). If the element number for the current fault condition is more than one greater than the element number
associated with the previous fault condition, another longhand message is output.
6 -16
TM 32-5985-217-15
Thus, if a beamformer is marginal, shorthand or longhand output messages may result depending on whether the faults
are associated with sequential inputs or not. Since all input ports to a beamformer are checked sequentially, a
beamformer with a total failure results in one longhand amplitude fault message, one longhand phase fault message and
a series of shorthand amplitude and phase beamformer fault messages.
(4)
Amplifier/Power Divider Fault Sequence. When the fault isolation test identifies power divider fault, an
amplifier/power divider fault message is printed by the tty. The first fault message during a test cycle associated with a
particular amplifier/power divider is output using the longhand format of paragraph 6-6.c.1.(g) as follows. As with
beamformer faults, amplitude and phase are considered separately and may each result in a longhand message. When
the program determines that a subsequent fault is identified for this particular amplifier/power divider, the beamformer
number used in the measurement is examined. If this beamformer number is one greater than the beamformer number
found in the previous fault condition for this amplifier/power divider, the shorthand amplifier/power divider fault message
is printed. This identifies a fault sequence for one amplifier/power divider in which the test fails each time the
amplifier/power divider is used as input to a series of beamformers. Note that the beamformer test sequence tests all
inputs to a single beamformer before proceding to the next beamformer. Thus, several paths will be tested between any
two test measurements involving a particular amplifier/power divider. These path tests do not have any effect on the
longhand/shorthand determination for a particular amplifier/power divider fault. The amplifier/power divider associated
with the antenna element identified in a longhand or shorthand amplifier/ power divider fault message may be
investigated by using the special monitor beamformer test on any beam in which the amplifier/power divider is used as
an input. If the beamformer number associated with a fault condition for a particular amplifier/ power divider is more
than one greater than the beamformer number associated with the previous fault condition for this amplifier/power
divider, another longhand message is printed. The sequence of longhand and/or shorthand messages for either a
beamformer or amplifier/power divider fault is not critical. Any fault message is sufficient to identify a component to be
investigated further using the special beamformer test tty command.
(d)
Beamformer Longhand Messages. Beamformer failure message is defined as follows.
(1) BMFR FAILURE BAND X BEAM YY
(2) BAND X BEAM YY PORT ZZ FAULT
(3) REF XXX.X TOL Y.Y AMP ZZZ.Z
(4) REF ±XXX.X TOL Y.Y PHS ±ZZZ.Z
The first message defines the band as A, B, or C and the monitor beam found to be out of tolerance; the second
message again defines the band and monitor beam plus the input port of the monitor beamformer under test; the last two
messages define the amplitude or phase measurement which was out of tolerance, the reference value, and the
tolerance. Only one message, (3) or (4), will appear on the tty at any one time.
(e) Beamformer Shorthand Amplitude Message. The beamformer amplitude shorthand message is
the shorthand form of the data in the preceding paragraph (d) (1), (2), and (3). This message is as follows.
BM XX AM
Where:
XX is the beamformer under test.
6-17
TM 32-5985-217-15
(f)
Beamformer Shorthand Phase Message. The beamformer phase shorthand message is the
shorthand form of the data in the preceding paragraph (d)(4). This message is as follows.
BM XX PH
Where:
XX is the beamformer under test.
(g)
defined as follows.
Amplifier/Power Divider Longhand Messages.
Amplifier/power divider failure message is
(1) AMP/PWR DIV FAILURE BAND X ANT Z
(2) BAND X BEAM YY PORT ZZ FAULT
(3) REF XXX.X TOL Y.Y AMP ZZZ.Z
(4) REF +XXX.X TOL Y.Y AMP +ZZZ.Z
The first message defines the band as A, B, or C and the antenna element connected to the faulty amplifier; the second
message again defines the band plus the monitor beam where the test signal is measured and the input port of the
beamformer where the signal is injected; the last two messages, only one appearing at any one time, defines the
amplitude or phase measurement which was out of tolerance, the reference value, and the tolerance.
(h) Amplifier/Power Divider Shorthand Amplitude Message. The amplifier/power divider amplitude
message is the shorthand form of the data in the preceding paragraph (g) (1), (2), and (3). This message is as follows.
ANT XX AM
Where:
XX is the antenna element number connected to the amplifier under test.
(i)
Amplifier/Power Divider Shorthand Phase Message.
The amplifier/power divider phase
message is the shorthand form of the data in the preceding paragraph (g)(1), (2), and (4). This message is as follows.
ANT XX PH
Where:
XX is the antenna element number connected to the amplifier under test.
(j)
Print Test Results. If test results are desired for each beamformer test press the PRINT switch.
The following message results if the PRINT switch is activated during beamformer test.
MONI BEAM XX BAND Y
Where:
X is beam under test Y is band under test
It appears as each new beam is tested. It is followed by the following message.
ANT XX AMP YYY.Y PHS +ZZZ.Z
Where:
X is antenna number
Y is measured amplitude in millivolts
Z is measured phase in degrees.
This message appears 16 times for each beam in bands A and B and 8 times for band C.
(k)
Omni Beamformer Test.
(1) Omni Test. Immediately following the monitor beamformer test, the program tests the
omni beamformers. In this test the output port of the omni beamformer is monitored while the test signal is injected in
each applicable input port from the antenna element directional coupler. The following message is printed to denote a
fault.
6-18
TM 32-5985-217-15
BAND X OMNI PORT YY FAULT
Where:
X is band A, B, or C Y is antenna number for omni input.
This message appears when an omni beamformer measurement is out of tolerance. No fault isolation is done. This
message is followed by the amplitude or phase message previously described. The omni beamformer portion of the
antenna group should be investigated for fault isolation and repair when this message appears.
(2)
Print Test Results. If test results are desired for each omni input port press the PRINT switch. The
following message appears at the beginning of each omni beam tested if the PRINT switch is on.
OMNI BEAM BAND X
Where:
X is band A, B, or C.
This message is followed by the following message a total of 48 times for band A or C and 96 times for band B to define
the measured values of each input port.
ANT XX AMP YYY.Y PHS ± ZZZ. Z
Where:
X is antenna element input number Y is measured amplitude in millivolts Z is measured phase in degrees.
(I)
Sector Beamformer Tests.
(1) Sector Tests. Immediately following the omni beamformer tests, the program tests sector
beamformers Nos. 1 through 6 In each band. In this test the outputs of the sector beamformers are monitored while the
test signal is injected in each applicable input port from the antenna element directional coupler. Four antenna elements
are used per beam in band A, three in band B, and two in band C. The following message is printed to denote a fault.
BAND X SECT Y ANT ZZ FAULT
Where:
X is band A, B, or C
Y is sector beamformer 1, 2, 3, 4, 5, or 6
Z is antenna number for sector input.
This message appears when a sector beamformer is out of tolerance. No fault isolation is done. This message is
followed by the amplitude or phase message previously described. The sector beamformer portion of the antenna group
should be investigated for fault isolation and repair when this message appears.
(2) Print Test Results. If test results are desired for each sector input port, press the PRINT
switch. The following message appears at the beginning of a sector beamformer test when the PRINT switch is on.
SECT BEAM X BAND Y
Where:
X is sector beam 1, 2, 3, 4, 5, or 6
Y is band A, B, or C.
This message is followed by the following message a total of four times for each beam in band A, three times for each
beam in band B, and two times for each beam in band C to define the measured values of each input port.
ANT XX AMP YYY.Y PHS ± ZZZ.Z
Change 1 6-19
TM 32-5985-217-15
Where:
X, Y, and Z is the same as in preceding paragraph (k)(2).
The following message appears at the end of each monitor, omni, or sector beam test result when the PRINT switch is on
to specify the tolerance limits on which the tests are made.
AMP TOL X.X PHS TOL Y.Y
Where:
X is amplitude tolerance in millivolts Y is phase tolerance in millivolts.
(m)
Beamformer Test Complete. At the conclusion of the beamformer test, the following message is
printed by the tty.
OLMT BMFR TEST FINISHED
The program will cycle through another beamformer test if the BEAM FORM switch remains set (lamp lit). Reset the
BEAM FORM switch (lamp extinguished) to terminate the test.
NOTE
After terminating somc beamformer tests, tests of individual monitor, sector, or omni
beamformers may be accomplished using tty commands defined in paragraph 6-6.f.
d.
Antenna Element Tests.
1.
General. The antenna element test is controlled from the somc. The test is initiated by pressing the
ANT TEST switch, which lights when activated. The test runs until the switch is again pressed, repeating the antenna
element test if allowed. If only the ANT TEST switch is pressed only faulty conditions are printed by the tty. If all test
results are desired the PRINT switch must also be pressed. In conducting the antenna element test, the test oscillator
signal is coupled through the input directional coupler to the antenna element under test (see figure 6-1). The reflected
wave developed by the element under test is coupled back through the same directional coupler to the antenna group
monitor beamformer network. The signal is monitored at the beamformer which has the antenna element as a boresight
element. The amplitude of this signal is compared to the reference amplitude as stored in memory. This procedure is
repeated once for all elements in each band.
2.
Antenna Element Test Start. To initiate the antenna element test, press the ANT TEST switch on the
somc. The following messages are printed on the tty.
OLMT ANT TEST START
DAY HH MM SS Z
3.
Interference Tests. The same interference test used in the beamformer test is conducted prior to
conducting the antenna element test. Note that the cable test is not conducted prior to this test.
4.
Element Tests. The antenna element test uses the same networks as the beamformer test except that
the test signal is injected through the directional coupler to the antenna element rather than to the beamformer network.
The reflected wave is then coupled back through the same directional coupler through the boresight input port of the
beamformer for measurement. If a faulty antenna element is located, the following message is printed on the tty.
ANT X YY FAULT
6-20
TM 32-5985-217-15
Where:
X is band A, B, or C YY is antenna element number.
This message is followed by the amplitude message previously described to further define the fault. In such cases the
antenna group antenna elements and transmission lines are to be investigated for fault isolation and repair.
5.
Print Test Results. If test results are desired for each antenna element test, press the PRINT switch.
The following message results when PRINT switch is on during antenna test.
ANT TST X YY AMP ZZZ.Z
Where:
X is band A, B, or C
Y is antenna number
Z is measured amplitude in millivolts.
6.
Antenna Element Test Complete. At the conclusion of the antenna element test, the following
message is printed on the tty.
OLMT ANT TEST FINISHED
To terminate test, reset the ANT TEST switch (lamp extinguished).
NOTE
After terminating somc antenna tests, tests of individual antenna elements may be accomplished
using tty commands defined in paragraph 6-6.f.2.
e.
Oscillator Test Procedures. The oscillator test is designed to test the frequency of each of the 18 olm&t
oscillators. To initiate this test, momentarily press OSC TEST. The following messages are printed each time the
oscillator test starts.
OLMT OSC TEST START DAY
HH MM SS Z
The following message is printed for each oscillator with a frequency which is out of tolerance.
OSC XX FREQ FAULT
REF YYYYYYYY TOL ZZ FREQ WWWWWWWW
Where:
X is oscillator number 1-18
Y is reference frequency in Hz
Z is tolerance for oscillator XX
W is measured frequency in Hz.
1.
Print Test Results. The following message is printed for each oscillator if the PRINT switch is
activated at the somc during the oscillator test.
OSC XX FREQ YYYYYYYY
Where:
X is oscillator 1-18
Y is measured frequency in Hz.
2.
Oscillator Test Complete.
This message is printed each time the oscillator test cycle is
completed.
OLMT OSC TEST FINISHED
To terminate the test, reset the OSC TEST switch (lamp extinguished).
6-21
TM 32-5985-217-15
NOTE
After terminating the somc oscillator test, tests of individual oscillators may be accomplished
using the commands defined in paragraphs 6-6.f.3. and 6-6.g.3.
f.
Teletype Test Select Operation. The previously described tests initiated from the somc panel are relatively
time consuming particularly if full printouts are desired when the somc PRINT switch is activated. After a repair is
completed, the affected circuit may be individually checked from the tty console by using the following described
commands. The only circuit checked is the one specifically entered via the tty machine. If the operator makes an error,
pressing the rubout key removes the last character input. Inputting a slash (/) deletes an entire input line. The tty inputs
have the same basic format. It consists of a command followed by a carriage return which indicates the end of the input
message. Each message is checked for format errors and indicated to the operator that the command is accepted by
printing day of year and time of day or rejected by an ILLEGAL FORMAT message. Commas and spaces are used as
field separators. The following paragraphs define applicable antenna group input messages. In each case, after the
command is entered, the carriage return bar must be pressed to initiate the test.
1.
Special Beamformer Tests. To initiate a special beamformer test using the olm&t network, the
operator enters the parameters specifying the network to be tested. The operator enters one of the following messages:
(a) TEST OMNI X to test the omni beam for band X, where X is A, B, or C
(b) TEST SECT X,Y to test a sector beam where X is band A, B, or C and Y is sector 1, 2, or 3
(c)
TEST MONI X,YY to test a monitor beam where X is band A, B, or C and Y is the beam number
2.
Special Antenna Element Test. To initiate a special antenna element test, the operator enters the
following message: TEST ANT X,YY Where: X is band A, B, or C YY is the antenna number.
3.
Special Oscillator Test. To initiate a special oscillator test using the olm&t network, the operator enters
the following message:
TEST OSC FREQ XX
Where:
X is oscillator 1-18. (See table 6-3.)
g.
Teletype Selected Test Output Messages. Special beamformer, antenna element, and oscillator tests use
the same test routines used in the somc olm&t tests; however, the cable and interference tests are not used in these
tests. The tests are initiated by inputting one of the single element test messages defined in the previous subparagraphs.
If the test measurements are within tolerance and if the PRINT switch is off, the single word message DONE is output. If
the test measurements are not within tolerance, a fault message is output regardless of the PRINT switch setting to
define the fault. These fault messages are identical to the fault messages output during the somc olm&t tests. If the
PRINT switch is ON, test results
6-22
TM 32-5985-217-15
are output as defined in paragraph 6-6.c.1.(j), (k)(2), (1)(2), 6-6.d.5, and 6-6.e.1. The test is terminated in all cases with
the message DONE.
1.
Beamformer Test Output Messages. The beamformer test printout is the format as described in
paragraph 6-6.c.1(d) through (m). Shorthand messages are obtained sequential when consecutive ports in a
beamformer are proven to be defective. Only the beamformer circuit requested is checked. The somc PRINT switch will
initiate phase and amplitude printouts as previously described.
2.
Special Antenna Element Test Output Messages. The antenna element test will contain the format
contained in paragraphs 6-6.d.4 and 5. Only the antenna element entered is tested. The somc PRINT switch will
activate amplitude printouts.
3.
Oscillator Test Output Messages. Refer to paragraph 6-6.e. for messages printed for each oscillator
with a frequency which is out of tolerance.
6-7.
Troubleshooting.
Antenna group troubleshooting requires rapid identification of circuits, their location, and the associated group
components. Tables 6-4 through 6-20 provide quick identification of all rf paths. The tables present wiring information in
a form that enables rapid identification and location of all rf paths. The tables for the monitor, sector, and omni beam
formation (tables 6-4 through 6-13) do not reference the associated line tuners with antenna elements. These tables can
be read from the top (antenna element) down, and then to the left on the horizontal line for the beam of concern. The
tables can also be read from the left (beam number) right to the vertical column for the antenna element of concern. In
either method, each component and port will be identified. Separate tables (tables 6-14 through 6-20) list-line tuners to
antenna elements and goniometer inputs because these references are used the least. Due to the large number of signal
paths, it is not considered feasible as a routine procedure to manually open a path, inject a signal, and look for it in
another location for test purposes. Additionally, this procedure will degrade performance of receiving locations in the
system as a result of disabling a signal path. These tables are useful in locating and identifying the to-from connections
of cables without resorting to wire lists.
a.
Troubleshooting Cables. Visually inspect suspected defective cables, particularly for bent pins in connectors.
The timed cables that have been subjected to mechanical abuse may have to be rechecked for the correct electrical
length (paragraph 6-11). It is essential when disconnecting or connecting these cables that they are not forced, bent or
subjected to any more strain than is absolutely necessary. The preferred continuity check for cables consists of the
following:
1.
Insert a 200to 300-millivolt rf signal at one end of the cable. Use a low frequency that will not disturb
receiving activities and is low enough to be accepted by the vertical amplifier of the oscilloscope (see next step).
2.
Terminate the cable in 75 ohms (noninductive resistor) at the other end. Connect the terminated end
to a general-purpose oscilloscope and view amplitude. Use enough vertical gain so that small changes in display are
visible. While viewing the oscilloscope, flex the cables at the connectors and at any other locations where damage is
suspected. Any intermittent connections are easily observed on the oscilloscope waveform. This procedure is preferable
to simple ohmmeter checks.
6-23/6-24
TM 32-5985-217-15
Table 6-4. Monitor Beam Formation Chart, Band, A, (V7)
6-25/6-26
TM 32-5985-217-15
Table 6-4. Monitor Beam Formation Chart, Band A, (V7) (Continued)
6-27/6-28
TM 32-5985-217-15
Table 6-5. Monitor Beam Formation Chart, Band A, (V8)
6-29/6-30
TM 32-5985-217-15
Table 6-5. Monitor Beam Formation Chart, Band A, (V8) (Continued)
6-31/6-32
TM 32-5985-217-15
Table 6-6. Monitor Beam Formation Chart, Band B, (V7)
6-33/6-34
TM 32-5985-217-15
Table 6-6. Monitor Beam Formation Chart, Band B, (V7) (Continued)
6-35/6-36
TM 32-5985-217-15
Table 6-6. Monitor Beam Formation Chart, Band B, (V7) (Continued)
6-37/6-38
TM 32-5985-217-15
Table 6-6. Monitor Beam Formation Chart, Band B, (V7) (Continued)
6-39/6-40
TM 32-5985-217-15
Table 6-7. Monitor Beam Formation Chart, Band B, (V8)
6-41/6-42
TM 32-5985-217-15
Table 6-7. Monitor Beam Formation Chart, Band B, (V8) (Continued)
6-43/6-44
TM 32-5985-217-15
Table 6-7. Monitor Beam Formation Chart, Band B, (V8) (Continued)
6-45/6-46
TM 32-5985-217-15
Table 6-7. Monitor Beam Formation Chart, Band B, (V8) (Continued)
6-47/6-48
TM 32-5985-217-15
Table 6-8. Monitor Beam Formation Chart, Band C, (V7)
6-49/6-50
TM 32-5985-217-15
Table 6-8. Monitor Beam Formation Chart, Band C, (V7) (Continued)
6-51/6-52
TM 32-5985-217-15
Table 6-9. Monitor Beam Formation Chart, Band C, (V8)
6-53/6-54
TM 32-5985-217-15
Table 6-9. Monitor Beam Formation Chart, Band C, (V8) (Continued)
6-55/6-56
TM 32-5985-217-15
Table 6-10. Sector Beam Formation Charts, Bands A and C, (V7 and V8)
6-57/6-58
TM 32-5985-217-15
Table 6-11. Sector Beam Formation Chart, Band B, (V7 and V8)
6-59/6-60
TM 32-5985-217-15
Table 6-12. Omni Beam Formation Charts, Bands A and C, (V7 and V8)
6-61/6-62
TM 32-5985-217-15
Table 6-13. Omni Beam Formation Chart, Band B, (V7 and V8)
6-63/6-64
TM 32-5985-217-15
b.
Routine Troubleshooting. Routine troubleshooting consists of a daily checkout of the monitor, sector and
omnibeam circuits via the tty. Individual tests can be requested when trouble is suspected. Complete antenna group
checkout may be scheduled when least likely to interfere with other activities involving the tty.
c.
Emergency Troubleshooting. There are no specific emergency procedures. Logical interpretation of olm&t
printouts will isolate most failures to the component level. Performance test checks (paragraphs 6-10 through 6-14) may
be used as required.
Table 6-14. Antenna Elements To Transmission Line Tuners Band A, V7 and V8
Antenna
Element No.
Transmission
Line Tuner
Antenna
Element No.
Transmission
Line Tuner
501A1
424A1A4
501A18
424A3A21
501A2
424A1A8
501A19
424A4A4
501A3
424A1A10
501A20
424A4A8
501A4
424A1A15
501A21
424A4A10
501A5
424A1A19
501A22
424A4A15
501A6
424A1A21
501A23
424A4A19
501A7
424A2A4
501A24
424A4A21
501A8
424A2A8
501A25
424A5A4
501A9
424A2A10
501A26
424A5A8
501A10
424A2A15
501A27
424A5A10
501A11
424A2A19
501A28
424A5A15
501A12
424A2A21
501A29
424A5A19
501A13
424A3A4
501A30
424A5A21
501A14
424A3A8
501A31
424A6A4
501A15
424A3A10
501A32
525A6A8
501A16
424A3A15
501A33
424A6A10
501A17
424A3A19
501A34
424A6A15
6-65
TM 32-5985-217-15
Table 6-14. Antenna Elements To Transmission Line Tuners Band A, V7 and V8 (Continued)
Antenna
Element No.
Transmission
Line Tuner
Antenna
Element No.
Transmission
Line Tuner
501A35
424A6A19
501A42
424A7A21
501A36
424A6A21
501A43
424A8A4
501A37
424A7A
501A44
424A8A8
501A38
424A7A8
501A45
424A8A10
501A39
424A7A10
501A46
424A8A15
501A40
424A7A15
501A47
424A8A19
501A41
424A7A19
501A48
424A8A21
Table 6-15. Antenna Elements To Transmission Line Tuners Band B, V7 and V8
Antenna
Element No.
Transmission
Line Tuner
Antenna
Element No.
Transmission
Line Tuner
502A1
424A1A3
502A20
424A2A16
502A2
424A1A5
502A21
424A2A17
502A3
424A1A6
502A22
424A2A18
502A4
424A1A7
502A23
424A2A20
502A5
424A1A9
502A24
424A2A22
502A6
424A1A1l
502A25
424A3A3
502A7
424A1A14
502A26
424A3A5
502A8
424A1A16
502A27
424A3A6
502A9
424A1A17
502A28
424A3A7
502A10
424AA1I8
502A29
424A3A9
502A11
424A1A20
502A30
424A3A11
502A12
424A1A22
502A31
424A3A14
502A13
424A2A3
502A32
424A3A16
502A14
424A2A5
502A33
424A3A17
502A15
424A2A6
502A34
424A3A18
502A16
424A2A7
502A35
424A3A20
502A17
424A2A9
502A36
424A3A22
502A18
424A2A11
502A37
424A4A3
502A19
424A2A14
502A38
424A4A5
6-66
TM 32-5985-217-15
Table 6-15. Antenna Elements To Transmission Line Tuners Band B, V7 and V8 (Continued)
Antenna
Element No.
Transmission
Line Tuner
Antenna
Element No.
Transmission
Line Tuner
502A39
424A4A6
502A69
424A6A17
502A40
424A4A7
502A70
424A6A18
502A41
424A4A9
502A71
424A6A20
502A42
424A4A11
502A72
424A6A22
502A43
424A4A14
502A73
424A7A3
502A44
424A4A16
502A74
424A7A5
502A45
424A4A17
502A75
424A7A6
502A46
424A4A18
502A76
424A7A7
502A47
424A4A20
502A77
424A7A9
502A48
424A4A22
502A78
424A7A11
502A49
424A5A3
502A79
424A7A14
502A50
424A5A5
502A80
424A7A16
502A51
424A5A6
502A81
424A7A17
502A52
424A5A7
502A82
424A7A18
502A53
424A5A9
502A83
424A7A20
502A54
424A5A11
502A84
424A7A22
502A55
424A5A14
502A85
424A8A3
502A56
424A5A16
502A86
424A8A5
502A57
424A5A17
502A87
424A8A6
502A58
424A5A18
502A88
424A8A7
502A59
424A5A20
502A89
424A8A9
502A60
424A5A22
502A90
424A8A11
502A61
424A6A3
502A91
424A8A14
502A62
424A6A5
502A92
424A8A16
502A63
424A6A6
502A93
424A8A17
502A64
424A6A7
502A94
424A8A18
502A65
424A6A9
502A95
424A8A20
502A66
424A6A11
502A96
424A8A22
502A67
424A6A14
502A68
424A6A16
6-67
TM 32-5985-217-15
Table 6-16. Antenna Elements To Transmission Line Tuners Band C, V7 and V8
Antenna
Element No.
Transmission
Line Tuner
Antenna
Element No.
Transmission
Line Tuner
503A1
424A1A1
503A25
424A5A1
503A2
424A1A2
503A26
424A5A2
503A3
424A1A12
503A27
424A5A12
503A4
424A1A13
503A28
424A5A13
503A5
424A1A23
503A29
424A5A23
503A6
424A1A24
503A30
424A5A24
503A7
424A2A1
503A31
424A6A1
503A8
424A2A2
503A32
424A6A2
503A9
424A2A12
503A33
424A6A12
503A10
424A2A13
503A34
424A6A13
503A11
424A2A23
503A35
424A6A23
503A12
424A2A24
503A36
424A6A24
503A13
424A3A1
503A37
424A7A1
503A14
424A3A2
503A38
424A7A2
503A15
424A3A12
503A39
424A7A12
503A16
424A3A13
503A40
424A7A13
503A17
424A3A23
503A41
424A7A23
503A18
424A3A24
503A42
424A7A24
503A19
424A4A1
503A43
424A8A1
503A20
424A4A2
503A44
424A8A2
503A21
424A4Al2
503A45
424A8A12
503A22
424A4A13
503A46
424A8A13
503A23
424A4A23
503A47
424A8A23
503A24
424A4A24
503A48
424A8A24
6-68
TM 32-5985-217-15
Table 6-17. Goniometer Signals, Band A
Site V7
Site V8
Signal From
Antenna No.
Goniometer Input 105A2
Goniometer Input 105A2
A1J3A
1
J10
J34
A1J3B
2
J11
J35
A1J3C
3
J12
J36
A1J3D
4
J13
J37
A2J3A
5
J14
J38
A2J3B
6
J15
J39
A2J3C
7
J16
J40
A2J3D
8
J17
J41
A4J3A
9
J18
J42
A4J3B
10
J19
J43
A4J3C
11
J20
J44
J4J3D
12
J21
J45
A5J3A
13
J22
J46
A5J3B
14
J23
J47
A5J3C
15
J24
J48
A5J3D
16
J25
J1
A9J3A
17
J26
J2
A9J3B
18
J27
J3
A9J3C
19
J28
J4
A9J3D
20
J29
J5
A10J3A
21
J30
J6
A10J3B
22
J31
J7
A10J3C
23
J32
J8
A10J3D
24
J33
J9
A12J3A
25
J34
J10
A12J3B
26
J35
J11
A12J3C
27
J36
J12
A12J3D
28
J37
J13
High Level Power
Divider Rack 410
6-69
TM 32-5985-217-15
Table 6-17. Goniometer Signals, Band A (Continued)
Site V7
Site V8
Signal From
Antenna No.
Goniometer Input 105A2
Goniometer Input 105A2
A13J3A
29
J38
J14
A13J3B
30
J39
J15
A13J3C
31
J40
J16
A13J3D
32
J41
J17
A14J3A
33
J42
J18
A14J3B
34
J43
J19
A14J3C
35
J44
J20
A14J3D
36
J45
J21
A15J3A
37
J46
J22
A15J3B
38
J47
J23
A15J3C
39
J48
J24
A15J3D
40
J1
J25
A17J3A
41
J2
J26
A17J3B
42
J3
J27
A17J3C
43
J4
J28
A17J3D
44
J5
J29
A18J3A
45
J6
J30
A18J3B
46
J7
J31
A18J3C
47
J8
J32
A18J3D
48
J9
J32
High Level Power
Divider Rack 410
Table 6-18. Goniometer Signals, Band B (Rack 422)
Site V7
Site V8
Signal From
Antenna to.
Goniometer Input 105A3
Goniometer Input 105A3
A1J3A
1
J19
J67
A1J3B
2
J20
J68
A1J3C
3
J21
J69
A1J3D
4
J22
J70
A2J3A
5
J23
J71
A2J3B
6
J24
J72
High Level Power
Divider Rack 422
6-70
TM 32-5985-217-15
Table 6-18. Goniometer Signals, Band B (Rack 422) (Continued)
Site V7
Site V8
Signal From
Antenna No.
Goniometer Input 105A3
Goniometer Input 105A3
A2J3C
7
J25
J73
A2J3D
8
J26
J74
A4J3A
9
J27
J75
A4J3B
10
J28
J76
A4J3C
11
J29
J77
A4J3D
12
J30
J78
A5J3A
13
J31
J79
A5J3B
14
J32
J80
A5J3C
15
J33
J81
A5J3D
16
J34
J82
A9J3A
17
J35
J83
A9J3B
18
J36
J84
A9J3C
19
J37
J85
A9J3D
20
J38
J86
A10J3A
21
J39
J87
A10J3B
22
J40
J88
A10J3C
23
J41
J89
A1OJ3D
24
J42
J90
A12J3A
25
J43
J91
A12J3B
26
J44
J92
A12J3C
27
J45
J93
A12J3D
28
J46
J94
A13J3A
29
J47
J95
A13J3B
30
J48
J96
A13J3C
31
J49
J1
A13J3D
32
J50
J2
A14J3A
33
J51
J3
J14J3B
34
J52
J4
A14J3C
35
J53
J5
A14J3D
36
J54
J6
A15J3A
37
J55
J7
A15J3B
38
J56
J8
High Level Power
Divider Rack 422
6-71
TM 32-5985-217-15
Table 6-18. Goniometer Signals, Band B (Rack 422) (Continued)
Site V7
Site V8
Signal From
Antenna No.
Goniometer Input 105A3
Goniometer Input 105A3
A15J3C
39
J57
J9
A15J3D
40
J58
J10
A17J3A
41
J59
J11
A17J3B
42
J60
J12
A17J3C
43
J61
J13
A17J3D
44
J62
J14
A18J3A
45
J63
J15
A18J3B
46
J64
J16
A18J3C
47
J65
J17
A18J3D
48
J66
J18
High Level Power
Divider Rack 422
Table 6-19. Goniometer Signals, Band B (Rack 423)
Site V7
Site V8
Signal From
Antenna No.
Goniometer Input 105A3
Goniometer Input 105A3
A1J3A
49
J67
J19
A1J3B
50
J68
J20
A1J3C
51
J69
J21
A1J3D
52
J70
J22
A2J3A
53
J71
J23
A2J3B
54
J72
J24
A2J3C
55
J73
J25
A2J3D
56
J74
J26
A4J3A
57
J75
J27
A4J3B
58
J76
J28
A4J3C
59
J77
J29
A4J3D
60
J78
J30
A5J3A
61
J79
J31
A5J3B
62
J80
J32
A5J3C
63
J81
J33
A5J3D
64
J82
J34
A9J3A
65
J83
J35
High Level Power
Divider Rack 423
6-72
TM 32-5985-217-15
Table 6-19. Goniometer Signals, Band B (Rack 423) (Continued)
Site V7
Site V8
Signal From
Antenna No.
Goniometer Input 105A3
Goniometer Input 105A3
A9J3B
66
J84
J36
A9J3C
67
J85
J37
A9J3D
68
J86
J38
A10J3A
69
J87
J39
A10J3B
70
J88
J40
A10J3C
71
J89
J41
A10J3D
72
J90
J42
A12J3A
73
J91
J43
A12J3B
74
J92
J44
A12J3C
75
J93
J45
A12J3D
76
J94
J46
A13J3A
77
J95
J47
A13J3B
78
J96
J48
A13J3C
79
J1
J49
A13J3D
80
J2
J50
A14J3A
81
J3
J51
A14J3B
82
J4
J52
A14J3C
83
J5
J53
A14J3D
84
J6
J54
A15J3A
85
J7
J55
A15J3B
86
J8
J56
A15J3C
87
J9
J57
A15J3D
88
J10
J58
A17J3A
89
J11
J59
A17J3B
90
J12
J60
A17J3C
91
J13
J61
A17J3D
92
J14
J62
A18J3A
93
J15
J63
A18J3B
94
J16
J64
A18J3C
95
J17
J65
A18J3D
96
J18
J66
High Level Power
Divider Rack 423
6-73
TM 32-5985-217-15
Table 6-20. Goniometer Signals, Band C
Site V7
Site V8
Signal From
Antenna No.
Goniometer Input 105A4
Goniometer Input 105A4
A1J3A
1
J10
J34
A1J3B
2
J11
J35
A1J3C
3
J12
J36
A1J3D
4
J13
J37
A2J3A
5
J14
J38
A2J3B
6
J15
J39
A2J3C
7
J16
J40
A2J3D
8
J17
J41
A4J3A
9
J18
J42
A4J3B
10
J19
J43
A4J3C
11
J20
J44
A4J3D
12
J21
J45
A5J3A
13
J22
J46
A5J3B
14
J23
J47
A5J3C
15
J24
J48
A5J3D
16
J25
J1
A9J3A
17
J26
J2
A9J3B
18
J27
J3
A9J3C
19
J28
J4
A9J3D
20
J29
J5
A10J3A
21
J30
J6
A10J3B
22
J31
J7
A10J3C
23
J32
J8
A10J3D
24
J33
J9
A12J3A
25
J34
J10
A12J3B
26
J35
J11
A12J3C
27
J36
J12
A12J3D
28
J37
J13
High Level Power
Divider Rack 409
6-74
TM 32-5985-217-15
Table 6-20. Goniometer Signals, Band C (Continued)
Site V7
Site V8
Signal From
Antenna No.
Goniometer Input 105A4
Goniometer Input 105A4
A13J3A
29
J38
J14
A13J3B
30
J39
J15
A13J3C
31
J40
J16
A13J3D
32
J41
J17
A14J3A
33
J42
J18
A14J3B
34
J43
J19
A14J3C
35
J44
J20
A14J3D
36
J45
J21
A15J3A
37
J46
J22
A15J38
38
J47
J23
A15J3C
39
J48
J24
A15J3D
40
J1
J25
A17J3A
41
J2
J26
A17J3B
42
J3
J27
A17J3C
43
J4
J28
A17J3D
44
J5
J29
A18J3A
45
J6
J30
A18J3B
46
J7
J31
A18J3C
47
J8
J32
A18J3D
48
J9
J33
High Level Power
Divider Rack 409
6-8.
Alignment and Adjustment.
There are no in-system alignments or adjustments required, except for the line tuners. Procedures for this adjustment
are contained in paragraph 6-14. Out-of-tolerance components are removed and bench repaired or discarded (1: 4
power dividers/combiners and directional couplers).
6-9.
Preventive Maintenance. (See table 6-21.)
Preventive maintenance is the systematic care, servicing, and inspecting of equipment to prevent occurrence of trouble,
reduce downtime, and ensure that the equipment is serviceable. Table 6-21 lists the preventive maintenance routines
and recommended periods when this maintenance should be performed.
6-75
TM 32-5985-217-15
Table 6-21. Preventive Maintenance Schedule
Period
Daily
Weekly
Quarterly
Annually (or as
required)
Procedure
1.
Visually inspect ac power cords and sense
leads in racks 401, 403, 404, 408, 415,
416, 420 and 421 for:
a.
Firm physical connection.
b.
Signs of overheating, blistering,
fraying, etc.
discoloration,
2.
Cycle Beamformer and Antenna tests from somc (do not
press PRINT button).
3.
Visually check sector beam patch panels to ensure all
ports are terminated with 75-ohm terminators and sector
beam patch cables are secure.
4.
Visually check that all aircraft warning lights are
illuminated (if installed).
1.
Clean air filters in racks 401, 403, 404, 408, 415, 416, 420
and 421.
2.
Visually inspect antenna ground connections, ground
screen, and reflecting screens for loose connections or
wires.
Visually inspect the rubber strip between the weather cap and
the head seal gasket on the intermediate mast (A and B band
antennas) for sealing in both places. Check that upper portions
of the weather cap are concentric about the mast, providing
uniform space between the mast and weather cap.
1.
Perform Input Vswr Performance Test Check (paragraph
6-10).
2.
Perform Single Channel Amplitude and Phase tracking
Performance Test Check (paragraph 6-11).
6-76
TM 32-5985-217-15
Table 6-21. Preventive Maintenance Schedule (Continued)
Period
Procedure
Annually (Cont)
3.
Perform Transmission Line Phase Tracking Performance
Test Check (paragraph 6-12).
4.
Perform Swept Frequency Vswr Performance Test Check
(Singly driven elements) (paragraph 6-13).
5.
Perform Single Antenna Impedance Performance Test
Check (paragraph 6-14).
6.
Perform operational check of Aiken Rf Amplifier (See CM
32-5895-236-14).
NOTE
The following paragraphs, 6-10 to 6-14 inclusive, contain antenna group test procedures used to
isolate a particular problem not identified by any other method. In general, performance of these
procedures will either degrade system performance or suspend operations within an affected
band. The nature of antenna elements, transmission lines, and associated components, along
with available testing techniques, makes these tests time consuming. The accuracy of
measurements at rf frequencies generally is less than those made at lower frequencies or dc with
comparable equipment. Data evaluation from several measurements over a long period of time
may be necessary to observe long term performance characteristics.
6-10.
Antenna Electronics Input Vswr Check
a.
Purpose. The purpose of this check is to verify that the input vswr of the antenna electronics does not
exceed 2:1 for in-band frequencies as measured at the input directional couplers. The in-band frequencies are:
Band A 2-6 MHz
Band B 6-18 MHz
Band C 18-30 MHz
6-77
TM 32-5985-217-15
NOTE
The input being checked will degrade the associated beams which this input normally supplies.
Coordination is required in accordance with local procedures.
This test may prove useful in determining if a path fault exists since an unsatisfactory vswr will affect phase relationships
and amplitudes at various frequencies in the pass band. The tests will provide an indication of problems that may exist
from the directional coupler input up to and including the rf amplifier input.
1.
Procedure
(a)
Connect the equipment as shown in figure 6-3. Apply power and allow at least 30 minutes for
warmup.
(b)
Set 8601A generator/sweeper as follows:
(1) Set OUTPUT LEVEL range switch to -10 dB.
(2) Set level to zero as shown on the meter using OUTPUT LEVEL VERNIER.
(3) Set SWEEP to VIDEO.
(4) Set SWEEP MODE to MANUAL.
(5) Turn manual sweep control fully clockwise.
(c)
While observing the 5245M frequency counter, set the upper frequency of the 8601A
generator/sweeper. The frequency is 6 MHz band A, 18 MHz band B, and 30 MHz band C.
(d) Place a TNC female short circuit at POINT A.
(e) Set MODE switch on the 8407A to AMPL. Use DISPLAY REFERENCE switch and AMPL
VERNIER to set the beam on the center horizontal line. Using the HORIZONTAL CENTERING and GA1N controls,
move the beam on the extreme right vertical line of the graticule. (When testing band C, the 30-MHz point is to the left
of this point due to the horizontal gain of the 8407A.)
(f)
Set the lower frequency of the 8601 sweep by turning the MANUAL SWEEP control
counterclockwise until the lower frequency is displayed on the frequency counter as follows:
Band A 1.5 MHz
Band B 6.0 MHz
Band C 18.0 MHz
(g) Use the HORIZONTAL centering control on the 8412A and place the beam on the extreme left
vertical line of the scope graticule.
(h) Repeat steps c. through 9. until the beam tracks with the MANUAL SWEEP control. The sweep
is properly adjusted when the beam travels from the left vertical line to the right vertical line on the scope graticule as the
MANUAL SWEEP control varies the frequency from the low to upper end of the frequency band of interest.
(i)
On the 8407A, set MODE to PHASE and PHASE DEG/DIV to 90. Adjust PHASE VERNIER to
move trace to center line.
(j)
Set PHASE DEG/DIV to 1.0 and adjust PHASE VERNIER to center trace.
(k)
Set MODE to AMP and AMP db/DIV to 0.25 adjust AMPL VERNIER and DISPLAY
REFERENCE as necessary to center sweep.
(l)
Remove short circuit from point A and connect cable at point A to the input directional coupler
for the channel being tested.
(m) Observe the amplitude display on the 8412A. The display should never indicate less than 9.5 db
(2:1 vswr) for the in-band frequencies. An indication between 15 dB and 30 dB can be expected.
6-78
TM 32-5985-217-15
Figure 6-3. Input Vswr Test Setup
6-79
TM 32-5985-217-15
2.
Repair Procedures. If the vswr exceeds 2:1, replace the associated rf amplifier and repeat steps 1.
and m. above. If the vswr remains excessive, change the test input to the individual units in the antenna electronic
circuits. Isolation to an individual unit may be accomplished in this manner.
6-11. Antenna Electronics Phase and Amplitude Tracking Test Check.
a.
Purpose. The purpose of the phase and amplitude tracking checks is to verify that rf signals reach the
beamformers and goniometers through paths having the same phase delay and attenuation (within tolerance), thus
allowing the beamformers to form an undistorted beam.
NOTE
The band being checked will be degraded while the check is in progress.
required in accordance with local procedures.
Coordination is
Phase and amplitude tracking measurements are made from input directional couplers to the monitor beamformer
outputs. Paths will also be checked from input directional couplers to the inputs of the goniometers. Relative
measurements are made between identical paths, i.e., a reference path is chosen for each type of path and other paths
of the same type compared to it.
NOTE
The reference channel should always be in a path like the one being checked. For example,
assume that an outer channel is being checked, then the reference path must be in an outer
channel. If a center channel is being checked then the reference path must be a center channel.
In addition, the test path and the reference path must not feed the same beamformer. The phase
and amplitude tracking test equipment should be left ON at all times. Changing the signal
insertion and measuring points for both the reference and test paths will allow rapid isolation of
faults in any component from the input directional coupler through the antenna electronics. Use
of the X-Y recorder is optional under these conditions.
1.
Procedures.
(a)
Connect equipment as shown in figure 6-4. Apply power and allow at least 30 minutes for
(b)
Set the 8601A Generator/Sweeper as follows:
warmup.
(1)
(2)
(3)
(4)
(5)
Set OUTPUT LEVEL range switch to 0 dB.
Use OUTPUT RANGE vernier to set output level to 0 dB as shown on the meter.
Set SWEEP selector to VIDEO.
Set SWEEP MODE to MANUAL.
Turn MANUAL SWEEP control fully clockwise.
(c)
While observing the 5245M Frequency Counter, set the upper frequency of the 8601A
Generator/Sweeper. The frequency is as follows:
Band A 6 MHz
Band B 18 MHz
Band C 30 MHz
6-80
TM 32-5985-217-15
Figure 6-4. Phase/Amplitude Test Setup.
6-81
TM 32-5985-217-15
(d)
Use two Kings KA-99-69 feedthroughs to connect POINT A to POINT B and POINT C to POINT
D.
(e) Set the MODE switch on the 8412A Display to AMPL. Use the DISPLAY REFERENCE switches
and AMPL VERNIER to set the beam on the 8412A Display on the center horizontal line. With the display unit's
HORIZONTAL CENTERING and HORIZONTAL GA1N controls, move the beam to the extreme right vertical line of the
scope graticule. (When testing Band C, the 30-MHz point is to the left of this point due to the horizontal gain of the
8412A.)
(f)
While observing the 5245M, slowly turn the 8601A MANUAL SWEEP control counterclockwise
until the frequency is displayed on the frequency counter as follows:
Band A
1.5 MHz
Band B
6.0 MHz
Band C
18.0 MHz
(g) Use the 8412A HORIZONTAL CENTERING control to place the beam on the extreme left
vertical line of the scope graticule.
(h) Repeat steps (c) through (g) until the beam tracks with the MANUAL SWEEP control. The
sweep is properly adjusted when the beam travels from the left vertical line to the right vertical line on the scope graticule
as the MANUAL SWEEP control is rotated from the low frequency to the upper frequency of the band of interest.
(i)
On the 8407A set MODE to PHASE and PHAZE DEG/DIV to 90. Adjust PHASE VERNIER to
move trace to center line.
(j)
Set PHASE DEG/DIV to 1.0 and adjust PHASE VERNIER to center trace.
(k)
Set MODE to AMPL and AMPL dB/DIV to 0.25. Adjust AMPL VERNIER and DISPLAY
REFERENCE as necessary to center sweep.
NOTE
If recorder is not used, proceed to step t.
(l)
Place a data sheet on the 7035B X-Y Recorder. Move the chart HOLD/ RELEASE switch to the
HOLD position. Set the MANUAL SWEEP control of the 8601A so that the frequency counter indicates near the center
frequency between those frequencies set in steps (c) and (f). Set the OFF/ON/SERVO switch to SERVO. Change the X
and Y RANGE switches until the pen is near the center of the data sheet.
(m) Slowly turn the MANUAL SWEEP control of the 8601A fully clockwise. Adjust the X RANGE and
VERNIER gain controls until the pen stops at the upper frequency end of the data sheet.
(n) Turn the 8601A MANUAL SWEEP control counterclockwise until the frequency counter indicates
the low frequency of the band of interest. Turn the X ZERO control of the X-Y recorder until the pen stops on the low
frequency end of the data sheet.
(o) Repeat steps (j) and (k) until the pen of the X-Y recorder tracks precisely with 8412A Scope.
(p) With the beam of the 8412A resting on the zero line of the graticule, adjust the Y RANGE and
GA1N controls until the pen rests over the zero line of the data sheet. With the AMPL dB/DIV switch of the 8412A in the
.25 dB/DIV position, move the 8407A DISPLAY REFERENCE 1 dB/step switch down on step, introducing 1 dB of
attenuation into the circuit. The beam should move down exactly 4 cm on the scope graticule; if not, adjust the 8407A
AMPL VERNIER to place the beam on the bottom line of the scope graticule. With the beam of the 8412A at this
position, the pen of the S-Y recorder should be resting over the -I-dB line of the data sheet. If not, adjust the Y RANGE
and GAIN VERNIER controls to position the pen.
6-82
TM 32-5985-217-15
(q) Move the 8407A DISPLAY REFERENCE 1 dB/step switch up two steps, removing 2-dB
attenuation from the circuit. The recorder pen should move past the O-dB line of the data sheet and stop on the +]-dB
line.
(r)
Repeat steps (m) and (n) until the pen of the X-Y recorder tracks with the beam of the 8412A
Scope.
(s)
Set COAXIAL switch SI to the PHASE position. Move the 8412A MODE switch to the PHASE
position. Adjust the 8407A PHASE VERNIER control to place the beam of the 8412A Scope on the center horizontal line
of the scope. The pen of the X-Y recorder should rest on the zero line of the data sheet. Turn the 8407A PHASE
VERNIER control clockwise to introduce 4 degrees positive phase shift on the face of the 8412A Scope. The pen of the
X-Y recorder should shift to the +4-degree line of the data sheet. Move the PHASE VERNIER control counterclockwise
past zero to the -4degree line on the 8412A. The X-Y recorder pen should stop on the -4-degree line of the data sheet. If
necessary, adjust the Y VERNIER gain and ZERO controls until the recorder tracks the scope. Place OFF/ON/SERVO
switch in the OFF position.
(t)
Select a reference path from table 6-22. This must be a path identical to the path to be tested.
See tables 6-4 through 6-13 to determine the input/output jacks.
Table 6-22. Reference Beam Numbers
Band A
20
36
2
Band B
10
23
44
Band C
9
18
1
NOTE
When testing paths routed through the beamformer, the two beamformers containing the test
path and reference path must not be fed by a common power divider.
(u) Connect POINT A of the test setup to the input of the device or devices in the reference path.
(v) Connect POINT C to the input of the device or devices under test. Connect POINT D to the
output of the device or devices under test. See tables 6-4 through 6-13 to determine input/output jacks.
(w) The 8407A display (with MODE switch set to AMPL or PHASE) is the difference between the two
chambers. The difference should never exceed values shown in table 6-23.
NOTE
If X-Y recorder is used, perform the following steps.
(x) Rotate the MANUAL SWEEP control of the 8601A fully clockwise. Place a fresh data sheet on
the X-Y recorder and place CHART HOLD/RELEASE switch in the HOLD position. Switch OFF/ON/SERVO switch on
recorder to SERVO. Rotate MANUAL SWEEP control counterclockwise until pen rests over the low frequency end line
of the chart. Move PEN UP/DOWN switch to DOWN. Slowly rotate MANUAL SWEEP control fully clockwise. Move
PEN UP/DOWN switch to UP. Mark the trace just recorded with a for phase. Phase tracking is listed in table 6-23.
(y)
Set SI to the AMPLITUDE position and the 8412A MODE to AMP. Rotate MANUAL SWEEP
control on 8601A counterclockwise until pen rests over the low frequency
6-83
TM 32-5985-217-15
Table 6-23. Amplitude and Phase Tracking Limits
Unit
Total Path
Directional Coupler
Rf Amplifier
Monitor Beamformer
Sector Beamformer
}
Amplitude (±dB)
Phase (±Degrees)
0.5
3.0
See tables of Capabilities and
Limitations in Chapter 1 for
Specifications.
end line of the chart. Place pen in the DOWN position. Slowly rotate the MANUAL SWEEP control fully clockwise to
record swept frequency amplitude. Mark this trace with an A, denoting amplitude. Amplitude tracking limits are listed in
table 6-23.
(z)
Repeat steps (v) through (y) for remaining tests of the same type, changing only POINTS C and
D of the test setup as required.
NOTE
Ensure that all rf paths not being tested are terminated in the system configuration.
2.
Isolation Procedure. If the total path is out of tolerance, change both reference and test paths to a
partial path and repeat the test. This can be repeated, following the rf path, until the faulty unit is isolated.
6-12.
Transmission Line Phase Tracking Measurement Test Check.
a.
Purpose. The purpose of these measurements is to verify that all transmission lines (from antenna element
to input directional coupler, including the transmission line tuner) phase track within the required tolerance. The relative
electrical length of all transmission lines within each band will be determined at one frequency and adjustments made as
required to meet tolerance specifications. These measurements must be performed if a line tuner is replaced for any
reason.
NOTE
One antenna line is selected as a reference to adjust the line under consideration. The band
being checked will be degraded while the check is in progress. Coordination is required in
accordance with local procedures.
1.
Procedures.
(a) Disconnect all transmission lines to be measured from the antennas at the point of connection of
the foamflex cable to antenna.
(b) Select one transmission line as a reference and terminate it with a short circuit at the antenna.
Set up the test equipment (allow at least one hour for
6-84
TM 32-5985-217-15
warmup) at the input directional couplers, for the band being measured, as shown in figure 6-5 (use cable lengths as
shown) connect cable at POINT A to the reference transmission line to be measured using KA-99-69 Kings connector.
(c)
While observing the HP5245, set the HP8601 FREQUENCY control to the highest in-band
frequency (6 MHz for band A, 18 MHz for band B, 30 MHz for band C).
(d) Set CW/SWEEP switch to CW.
(e) Set OUTPUT LEVEL control to -10 dBm.
(f)
On the 8412A, set MODE to PHASE, PHASE DEG/DIV to 1.0.
(g) Using the PHASE VERNIER control on the HP8407A and the PHASE OFFSET control on the
HP8412A, adjust the phase reading for a O-degree reference.
(h) Disconnect POINT A from the reference transmission line and connect to the transmission line to
be tested. Connect a short circuit termination (at the antenna) on the transmission line to be tested.
(i)
Read and record the transmission line phase tracking error.
NOTE
The transmission line phase tracking error is one-half of the phase reading.
(j)
Repeat steps (h) and (i) for the remaining transmission lines in the band being measured.
NOTE
The O-degree reference should be rechecked occasionally to determine whether or not
measuring equipment has drifted. If drift has occurred, those measurements affected should be
rechecked.
2.
Repair Procedure. The maximum allowable phase tracking deviation from the mean is +0.5 degree.
After all cables are measured on a given band, determine the mean phase error and check to see that no cable deviates
from the mean by more than +0.5 degree. If any transmission line is out of tolerance, adjust the transmission line tuner
to correct it.
6-13.
Swept-Frequency Vswr (Singly Driven Elements) Test Check.
a.
Purpose. The purpose of this test is to determine the input vswr of each antenna element as measured at
the point of connection between the transmission line and the input directional coupler. All antenna elements are
measured. Swept frequency plots will be recorded over the following frequency ranges for each band:
Band A 1.5 - 12 MHz
Band B 4 - 24 MHz
Band C 12 - 30 MHz
NOTE
The band being checked will be degraded while the check is in progress.
required in accordance with local procedures.
6-85
Coordination is
TM 32-5985-217-15
Figure 6-5. Phase Tracking and Swept Frequency
6-86
TM 32-5985-217-15
1.
Procedures.
NOTE
For this test, all transmission lines and antenna elements, except for the one under test, will be
connected in the system configuration. Do not conduct these measurements during rain.
(a)
(b)
Connect the equipment as shown in figure 6-5. (Use cable lengths as shown.)
Set 8601A Generator/Sweeper as follows:
(1) Set OUTPUT LEVEL range switch to -10 dB.
(2) Set level to zero as shown on the meter using OUTPUT LEVEL vernier.
(3) Set SWEEP to VIDEO (4)
Set SWEEP MODE to MANUAL.
(5) Turn MANUAL SWEEP control fully clockwise.
(c)
While observing the 5245M Frequency Counter, set the frequency of the 8601A
Generator/Sweeper to the highest frequency on the band of interest.
(d) Place a tnc female short circuit at POINT A of figure 6-5. Next, set MODE switch on the 8407A
to AMPL. Use AMPLITUDE RANGE switch and AMPLITUDE VERNIER to set the beam on the center horizontal line.
Using the HORIZONTAL POSITION and GA1N controls, set the beam on the extreme right vertical line of the graticule.
(e) Set the lower frequency of the band of interest by observing the frequency counter while slowly
turning the MANUAL SWEEP control of the 8601A counterclockwise.
(f)
Use the HORIZONTAL POSITION control on the 8412A and place the beam on the extreme left
vertical line of the scope graticule.
(g) Repeat steps (c) through (f) until beam will track with the MANUAL SWEEP control. The sweep
is properly adjusted when the beam travels from the left vertical line to the right vertical line on the scope graticule as the
MANUAL SWEEP control is rotated from the low frequency to the high frequency of the band of interest.
(h) Remove short circuit and connect cable at POINT A to the antenna element being tested using
KA 99-69 Kings adapter. (The transmission line is considered a part of the element.)
(i)
Check to see that the recorder vswr is no greater than 5: 1 in bands A and B; 3: 1 in band C.
(j)
Repeat steps (o) through (q) for each antenna element.
NOTE
Variations in ground conductivity and other environmental conditions may result in moderate
vswr differences between antenna elements within a band. Any one or two elements deviating
considerably from the average should be inspected carefully for defects. Specific limits are
impossible to define, due to the above mentioned undefinable variables.
2.
Repair Procedures. If an antenna element is found to exceed the vswr limits specified, check all
connections and grounding. Ensure that other elements are terminated in the system configuration. Repeat the
measurement after the defect is corrected.
6-14. Single Antenna Impedance Measurement Test Check.
a.
Purpose. The purpose of this measurement is to verify the impedance of each antenna element, as
measured at its feedpoint (POINT A on figures 6-6 and 6-7).
6-87
TM 32-5985-217-15
Figure 6-6. Band A & B Antenna & Feed Configuration
6-88
TM 32-5985-217-15
Figure 6-7. Band C Antenna & Feed Configuration
6-89
TM 32-5985-217-15
NOTE
The band being checked will be degraded while the check is in progress.
required in accordance with local procedures.
Coordination is
Antenna impedance measurements can be affected by the terrain in the near field of the antenna, large objects (such as
buildings, machinery and utility lines), the presence of strong radio frequency signals in the band of interest, and
variations in the moisture content of the ground. Do not perform these measurements during rain. Due to these factors,
it will be necessary to establish mean values of impedance for the antennas in each group. This is done by measuring all
antennas in each group. By analysis of this data, the mean values and allowable deviations from this mean are
determined. Antennas whose impedances deviate grossly from the majority are considered faulty. If a defective
antenna is found, its impedance and that of the two adjacent antennas must be remeasured after repair since mutual
coupling may cause it to affect the others. Impedance measurements will involve four distinct groups of elements:
Band A
Band B (behind Band A)
Band B (between Band A)
Band C
Band B must be broken into two groups because the physical layout places half of the elements between band A
elements and the other half behind band A elements. Thus, each group will have somewhat different impedance
characteristics. This measurement will verify impedance uniformity of all elements in each group. It is performed on
each element individually, and the impedance is measured at the feedpoint. Band C is measured at the input to the 50ohm cable (X/4 transformer).
NOTE
It is important that all band A and band B antennas be terminated in the system configuration
when either band is under test. Band C antennas must all be terminated when band C is under
test.
Antennas in any one of the bands under test may appear to be questionable or unsatisfactory if there is any strong
incoming interference at the frequency of the checkout. Any antennas which seem to be questionable or unsatisfactory
should be retested later in the day or at another time before being given an unsatisfactory rating. Excessive irregularities
in the element near fields (due to buildings and the immediate terrain) can cause minor variations in element
impedances. Such variations will be gradual and systematic among adjacent elements (adjacent alternate elements in
band B). There should be no sudden change in impedance between adjacent elements.
NOTE
All antennas in a given band must be checked at the same frequencies to establish a mean
impedance value for the band. The following frequencies are typical for each band. These may
be changed to avoid interference from external signals.
Band A 2.0 MHz and 6.0 MHz
Band B 6.0 MHz and 18.0 MHz
Band C 18.0 MHz and 30.0 MHz
6-90
TM 32-5985-217-15
1.
Procedures.
(a)
Connect HP4815A Vector Impedance Meter to ac power source and allow 30 minutes of warmup
before operating.
(b) Set test RANGE and FREQUENCY to the lower frequency specified for the band under test.
(c)
Connect probe to POINT A of the antenna. (Refer to figures 6-6 and 6-7.) (d)
Adjust
MAGNITUDE RANGE for an on-scale reading on the OHMS meter and record reading.
(e) Set test RANGE and FREQUENCY to the upper frequency specified for the band under test.
(f)
Repeat step (d).
(g) Repeat steps (b) through (f) for each antenna to be tested.
(h) Record impedance and phase angle for all antennas in the band.
2.
Repair Procedure. If an element is found which is defective, check all electrical connections, including
the grounding. Also, ensure that proper test procedures were followed for that antenna group. When the defect is
corrected, repeat the measurements on the adjacent elements as well as the one repaired.
SECTION II
SPECIAL MA1NTENANCE
6-15.
Removal and Replacement Procedures.
a.
Procedures for removal of rf amplifiers, power dividers, or beamformers are as follows:
NOTE
For an rf amplifier, turn unit OFF and unplug ac line cord before proceeding with step 1.
1.
Disconnect the required coaxial cables. Be sure all are properly tagged for proper replacement.
2.
Remove the retaining screws on the front of the rack, and remove the unit from the front.
b.
A directional coupler is replaced as follows:
1.
Attach the coaxial connectors to the new coupler.
2.
Disconnect the old coupler from the mounting rack and attach the new one.
c.
Transmission line tuners can be replaced without observing any special precautions. The new line tuner
must be adjusted to the proper electrical length using the procedures in paragraph 6-12.
d.
Antenna array components can also be replaced without observing any special precautions. Care must be
taken to verify performance with the performance test procedures.
6-16. Bench Test Procedures
a.
General. In the antenna group, beamformers, power dividers/combiners, directional couplers and rf
amplifiers cannot be checked or serviced while mounted in their normal operating locations. Power dividers and
combiners are repairable
6-91
TM 32-5985-217-15
only by replacing the 1: 4 sealed units of which the various units are constructed. Directional couplers are sealed units
which are non-repairable. Beamformers, directional couplers, and power dividers/combiners are passive devices. As
such, they are subjected to relatively small rf signal voltages (as opposed to power devices) and normally are the most
reliable elements in the signal chain. The tests that follow will provide data on individual components to indicate whether
they are suitable for use. In any event, a suspect beamformer, directional coupler, power divider/combiner or rf amplifier
should be replaced with a spare. The olm&t test that originally detected the out-of-tolerance condition should be
repeated. This test should confirm whether the removed item was, in fact, defective.
b.
Power Dividers/Omni Combiners. The following equipment is tested for phase and amplitude performance
using the same test equipment setup: (See figure 6-8.)
Divider Assembly Power Rf CU-2052/FLR-9(V) (1:4 power divider, 3300-42840-1) all bands
Divider Assembly Power Rf CU-2051/FLR-9(V) (6:24 power divider, 3300-42841-1) C band
Divider Assembly Power Rf CU-2053/FLR-9(V) (4:32 power divider, 3300-42842-1) B band
Divider Assembly Power Rf CU-2050/FLR-9(V) (2:32 power divider, 3300-42843-1) A band
Coupler, Omni Assembly CU-2054/FLR-9(V) (16:2 omnicombiner, 3300-42844-1) Bands A and C
Coupler, Omni Assembly CU-2049/FLR-9(V) (6:1 omnicombiner, 3300-42845-1) all bands
Coupler, Omni Assembly CU-2055/FLR-9(V) (16:1 omnicombiner, 3300-42846-1) Band B
1.
Test Equipment Required. The following equipment is required for power divider and omni combiner
testing:
Type
2.
transformers.
3.
Nomenclature
HP8601A
Generator Sweeper
HP8600A
Digital Marker
Microlab/FXR SR-05B
Line Stretcher
HP8407A with 1165A kit containing
HP11851-80001 power splitter
Network Analyzer
F & M Systems 3300-48185-1
50/75-ohm transformers (2)
KA-99-51
Adapter, TNC to TNC, 75 ohm (2)
KA-89-19
75-ohm terminations
Connect test equipment as shown in figure 6-8 using the 75-ohm TNC to TNC adapter between the two
Initial Setup of 8601A
(a) Set SWEEP switch to VIDEO
(b) Set RANGE switch to 110.
(c)
Set OUTPUT LEVEL to dBm as read on meter.
(d) Set I kHz MOD switch and CRYSTAL CAL switch to OFF.
(e) Set SWEEP MODE to MANUAL
(f)
Set RIG-LINE-FREE to LINE
6-92
TM 32-5985-217-15
Figure 6-8. Power Divider/Combiners Test Setup
6-93
TM 32-5985-217-15
(g)
(h)
Set FREQUENCY to 30 MHz.
OUTPUT LEVEL to -20 dB.
4.
Initial Setup of 8600A. Press CW COUNTER.
5.
Initial Setup of 8407A/8412A
(a) Set PHASE OFFSET switch to +.
(b) Set PHASE OFFSET DEGREES switch to 0 (zero) degrees.
(c)
Set MODE switch to DUAL.
(d) Adjust REF CHAN LEVEL ADJ until meter indicates at upper end of OPERATE range.
(e) Adjust DISPLAY REFERENCE switches until spot can be centered (0.0 volts) using AMPL
VERNIER with AMPL dB/DIV switch set at 0.25 position. AMPL VERNIER should fall in mid-range to allow for later
adjustments.
(f)
Using DISPLAY REFERENCE CAL thumb-wheels, adjust DISPLAY REFERENCE readout to 0
dB on 10 dB steps and 0 dB on 1 dB steps.
(g) Set PHASE DEG/DIV switch to 1.0.
(h) Adjust PHASE VERNIER until display spot is centered.
(i)
On the HP8601A adjust SWEEP MODE control through 1.5 to 30 MHz to check that amplitude
and phase are reasonable flat.
(j)
Adjust line stretcher and/or check test setup if phase and amplitude are not flat
6.
Phase Measurement Procedures.
(a) Place the data sheet as illustrated in figure 6-9 on the 7035B X-Y Recorder, move the chart
HOLD/RELEASE switch to the HOLD position.
(b) Set the SWEEP control of the 8601A so that the frequency counter indicates near 15 MHz. Set
8412A MODE switch to PHASE, VERNIER, and ZERO controls for full deflection of stylus (zero through ten) while trace
on HP8407A travels through ten degrees. Slowly turn the MANUAL SWEEP control of the 8601A fully clockwise. Adjust
the RANGE and VERNIER gain controls until the pen stops at the upper frequency end of the data sheet.
(c)
Turn the 8601A MANUAL SWEEP control counterclockwise until the frequency counter indicates
the low frequency of the band of interest. Turn the Y ZERO control of the X-Y recorder until the pen stops on the low
frequency end of the data sheet.
(d) Repeat steps (b) and (c) until the pen of the X-Y recorder tracks precisely with 8412A Scope.
(e) With the beam of the 8412A resting on the zero line of the graticule, adjust the X ZERO control
until the pen rests over the zero line of the data sheet.
(f)
Set the PHASE OFFSET DEGREES switch of the 8412A to 80. Adjust the RANGE and GA1N
VERNIER controls to position the pen over the 80 dB line of the data sheet.
(g) Repeat steps (e) and (f) until the pen tracks precisely.
(h) Replace TNC to TNC adapter with device to be tested.
(i)
Rotate the MANUAL SWEEP control of the 8601A fully clockwise. Switch OFF/ON/SERVO
switch on recorder to SERVO. Rotate MANUAL SWEEP control counterclockwise until pen rests over the low frequency
end line of the chart. Move PEN UP/DOWN switch to DOWN. Slowly rotate MANUAL SWEEP control fully clockwise.
Move PEN UP/ DOWN switch to UP. Compare tracking curve with phase levels listed in figure 6-9. If tracking accuracy
exceeds ±1.75 degrees, replace faulty component.
6-94
TM 32-5985-217-15
Figure 6-9. Phase Level Tracking Curve Typical Data Sheet
6-95
TM 32-5985-217-15
7.
Amplitude Measurement Procedures
(a) Use bnc to bnc adapter to connect test leads.
(b) Set 8412A AMPL dB/DIV switch to 0.25
(c)
Use 8407A AMPL VERNIER to adjust the zero display sweep to the center gratical.
(d) Adjust DISPLAY REFERENCE 1O-dB steps to +10 and 1-dB steps to -4 for 6 dB amplitude; 10dB step to +10 and l-dB steps to 0 for 9-dB and 12-dB amplitudes, See table 6-23 for amplitudes.
(e) Remove bnc to bnc adapter and connect test leads to unit under test.
(f)
Observe the maximum dB deflection on the 8412A between the minimum and maximum
frequencies as listed in table 6-24. If deflection exceeds +0.5 dB, replace the faulty component.
Table 6-24. Power Divider/Combiner Amplitude and Phase Requirements
Divider, Power Rf, CU-2052/FLR-9(V)
3300-42840-1 (1:4 Power Divider)
Frequency
Amplitude dB
1.5 MHz
2.0
2.5
3.0
3.5
4.0
4.5
5.0
5.5
6.0
7.5
9.0
10.5
12.0
13.5
15.0
16.5
18.0
19.5
21.0
22.5
24.0
25.5
27.0
28.5
30.0
-6.16 dB
-6.16
-6.16
-6.17
-6.17
-6.18
-6.19
-6.19
-6.20
-6.21
-6.22
-6.24
-6.26
-6.28
-6.29
-6.30
-6.31
-6.33
-6.34
-6.35
-6.36
-6.37
-6.38
-6.39
-6.40
-6.41
6-96
TM 32-5985-217-15
Table 6-24. Power Divider/Combiner Amplitude and Phase Requirements (Continued)
Divider, Power Rf, CU-2052/FLR-9(V) 3300-42840-1 (1:4 Power Divider)
Frequency
Phase
1.5 MHz
2.0
2.5
3.0
3.5
4.0
4.5
5.0
5.5
6.0
7.5
9.0
10.5
12.0
13.5
15.0
16.5
18.0
19.5
21.0
22.5
24.0
25.5
27.0
28.5
30.0
-2.5
-3.3
-4.2
-5.0
-5.8
-6.6
-7.4
-8.2
-9.0
-9.8
-12.1
-14.4
-16.7
-19.0
-21.3
-23.5
-25.8
-28.1
-30.3
-32.6
-34.9
-37.1
-39.3
-41.6
-43.9
-46.2
Divider Assembly, Power Rf CU-2051/FLR-9(V) 3300-42841-1 (6:24 Power Divider)
Frequency
Phase
18.0
19.5
21.0
22.5
24.0
25.5
27.0
28.5
30.0
-28.4 degrees
-30.7
-33.0
-35.3
-37.6
-39.2
-42.2
-44.6
-46.9
6-97
TM 32-5985-217-15
Table 6-24. Power Divider/Combiner Amplitude and Phase Requirements (Continued)
Divider Assembly, Power Rf CU-2051/FLR-9(V) 3300-42841-1 (6:24 Power Divider)
Frequency
Amplitude dB
18.0
19.5
21.0
22.5
24.0
25.5
27.0
28.5
30.0
-6.28
-6.29
-6.30
-6.31
-6.32
-6.33
-6.35
-6.35
-6.37
Divider Assembly, Power Rf CU-2053/FLR-9(V) 3300-42842-1 (4:32 Power Divider)
Frequency
Phase
6.0 MHz
7.5
9.0
10.5
12.0
13.5
15.0
16.5
18.0
-17.3 degrees
-21.5
-25.7
-29.8
-33.9
-38.0
-42.1
-46.2
-50.4
Frequency
Amplitude dB
6.0 MHz
7.5
9.0
10.5
12.0
13.5
15.0
16.5
18.0
-9.25
-9.29
-9.31
-9.34
-9.36
-9.39
-9.41
-9.43
-9.45
Divider Assembly, Power Rf CU-2050/FLR-9(V) 3300-42843-1 (2:32) Power Divider)
Frequency
Phase
2.0 MHz
2.5
3.0
-8.0 degrees
-10.0
-12.0
6-98
TM 32-5985-217-15
Table 6-24. Power Divider/Combiner Amplitude and Phase Requirements (Continued)
Divider Assembly, Power Rf CU-2050/FLR-9(V) 3300-42843-1 (2:32) Power Divider) (Continued)
Frequency
Phase
3.5
4.0
4.5
5.0
5.5
6.0
-14.0 degrees
-16.0
-17.8
-20.3
-21.5
-23.5
Frequency
Amplitude dB
2.0
2.5
3.0
3.5
4.0
4.5
5.0
5.5
6.0
-12.19
-12.21
-12.23
-12.24
-12.26
-12.28
-12.30
-12.31
-12.33
Coupler, Omni Assembly CU-2054/FLR-9(V) 3300-42844-1 (16:2 Omnicombiner)
Frequency
Phase
2.0 MHz
2.5
3.0
3.5
4.0
4.5
5.0
5.5
6.0
7.5
9.0
10.5
12.0
13.5
15.0
16.5
18.0
19.5
21.0
22.5
24.0
25.5
- 5.8 degrees
- 7.2
- 8.7
-10.1
-11.6
-13.0
-14.4
-15.8
-17.3
-21.4
-25.6
-29.7
-33.8
-37.9
-42.0
-46.1
-50.2
-54.3
-58.4
-62.4
-66.4
-70.6
6-99
TM 32-5985-217-15
Table 6-24. Power Divider/Combiner Amplitude and Phase Requirements (Continued)
Coupler, Omni Assembly CU-2054/FLR-9(V) 3300-42844-1 (16:2 Omnicombiner)
Frequency
Phase
27.0
28.5
30.0
-74.7
-78.8
-82.9
Frequency
Amplitude dB
2.0 MHz
2.0 MHz
2.5
3.0
3.5
4.0
4.5
5.0
5.5
6.0
7.5
9.0
10.5
12.0
13.5
15.0
16.5
18.0
19.5
21.0
22.5
24.0
25.5
27.0
28.5
30.0
-9.18
-9.18
-9.19
-9.19
-9.20
-9.21
-9.22
-9.23
-9.24
-9.25
-9.28
-9.31
-9.33
-9.36
-9.38
-9.40
-9.42
-9.44
-9.46
-9.48
-9.51
-9.53
-9.53
-9.55
-9.57
-9.59
Coupler, Omni Assembly CU-2049/FLR-9(V) 3300-42845-1 (6:1 Omnicombiner)
Frequency
Phase
2.0 MHz
2.5
3.0
3.5
4.0
4.5
5.0
5.5
-5.8 degrees
-7.3
-8.7
-10.2
-11.6
-13.1
-14.5
-15.9
6-100
TM 32-5985-217-15
Table 6-24. Power Divider/Combiner Amplitude and Phase Requirements (Continued)
Coupler, Omni Assembly CU-2049/FLR-9(V) 3300-42845-1 (6:1 Omnicombiner) (Continued)
Frequency
Phase
6.0
7.5
9.o
10.5
12.0
13.5
15.0
16.5
18.0
19.5
21.0
22.5
24.0
25.5
27.0
28.5
30.0
-17.3
-21.5
-25.6
-29.8
-33.9
-38.0
-42.1
-46.2
-50.3
-54.4
-58.5
-62.6
-66.4
-70.7
-74.8
-78.9
-83.0
Coupler, Omni Assembly CU-2049/FLR-9(V) 3300-42845-1 (6:1 Omnicombiner) (Continued)
Frequency
Amplitude dB
2.0 MHz
2.5
3.0
3.5
4.0
4.5
5.0
5.5
6.0
7.5
9.0
10.5
12.0
13.5
15.0
16.5
18.o
19.5
21.0
22.5
24.0
25.5
27.0
-9.18
-9.19
-9.20
-9.21
-9.22
-9.23
-9.24
-9.25
-9.26
-9.29
-9.32
-9.35
-9.37
-9.39
-9.42
-9.44
-9.46
-9.48
-9.5
-9.53
-9.53
-9.55
-9.57
6-101
TM 32-5985-217-15
Table 6-24. Power Divider/Combiner Amplitude and Phase Requirements (Continued)
Coupler, Omni Assembly CU-2049/FLR-9(V) 3300-42845-1 (6:1 Omnicombiner) (Continued)
Frequency
Amplitude dB
28.5
30.0
-9.59
-9.61
Coupler, Omni Assembly CU-2055/FLR-9(V) 3300-42846-1 (16:1 Omnicombiner)
Frequency
Phase
6.0 MHz
7.5
9.0
10.5
12.0
13.5
15.0
16.5
18.0
-21.7 degrees
-27.0
-32.1
-37.3
-42.5
-47.6
-52.8
-57.9
-63.0
Frequency
Amplitude dB
6.0 MHz
7.5
9.0
10.5
12.0
13.5
15.0
16.5
18.0
-12.45
-12.49
-12.52
-12.56
-12.59
-12.62
-12.65
-12.68
-12.71
c. Directional Couplers. Directional couplers, in all cases, consist of two transformers enclosed in a sealed box.
Repair of these units is not feasible. Extensive testing for all published characteristics is unnecessary since one set of
measurements, as described below, will identify defective units. The units can develop only an open circuit, a short
circuit, a cracked toroid transformer core, or one or more shorted turns in a transformer. There are no other components
inside other than the two transformers. Any of the above defects will cause an unsatisfactory impedance to be reflected
at one or more ports.
1. Test Equipment Required.
HP4815 Rf Vector Impedance
Meter KA-89-19 75-ohm termination (3)
2. Directional Coupler Operating Frequencies. The following directional couplers operate as listed in the
frequency bands A, B, and C.
6-102
TM 32-5985-217-15
Olektron Type
Frequency
T-D4-101-1; T-D4-102-1
T-D4-lOl-1; T-D4-102-11
T-D4-101-111; T-D4-102-111
A.
B.
C.
1.5 to 6 MHz
6 to 18 MHz
18 to 30 MHz
3. Directional Coupler Tests.
(a)
Terminate all ports except the one being checked with KA-89-19 terminations.
(b) Connect impedance meter probe to port under test. Use impedance meter frequencies as determined from
type of coupler and band of operation as determined from preceding step 2.
NOTE
An adapter containing a TNC connector is furnished as an accessory with the impedance meter.
This facilitates probe connection to the directional coupler.
(c) The impedance of any port, when checked at any frequency within the appropriate band, should read 75 ±5
ohms. The upper and lower and two or three in-band frequency checks should confirm proper impedance.
NOTE
In all cases, all ports except the one being checked must be terminated in 75 ohms. Check all
ports so that each side is tested.
d. Beamformers. Beamformers consist of artificial delay lines, attenuators, and power combiners. It is necessary
to determine the phase delay and attenuation of the various input ports, relative to the output port, to confirm proper
operation. Internal trimming adjustments are provided that make small changes of inductance and capacitance in the
individual delay lines. Normally, these adjustments will retain their electrical parameters over the life of the beamformer.
Only infrequently should it become necessary to make readjustments. When a port or ports contain an apparent out oftolerance condition, recheck the test setup to positively identify that the beamformer is, in fact, at fault. Rf adjustments
on artificial delay lines are critical, and experience with these devices and their measurement must be accomplished only
by qualified personnel.
1. Test Equipment Required
Type
Description
HP8601A Generator/Sweeper
Signal Generator
HP11652A Transmission Kit
Power Splitter
Variable Time Delay Type 2081
Continuously Variable Delay Line
Time Delay Standard Model 20A2C
Decade Line Delay
SR-05B
Line Stretcher
6-103
TM 32-5985-217-15
Type
Description
F & M 3300-48185-1
50- to 75-ohm transformers (2)
HP8407A
Network analyzer
Weinschel Precision Attenuator
Set Model AS-9146
Selected attenuators in three bands
KA-99-19
75-ohm termination (quantity as required)
Electronic Counter HP5245
Determines accuracy of test frequency
KC-99-70
TNC to TNC adapter (Female)
Rotary Step Assembly Attenuator
0-to 1-dB attenuator in 0.1-dB steps.
2. Test Setup. Figure 6-10 illustrates the test setup for beamformer phase tracking tests.
3. Test Procedure.
(a) Initially, connect bnc to bnc adapter between points 1 and 2. Do not use cables; the adapter should be the
only connection between points 1 and 2.
(b) Set line stretcher SR-05B and adjustable delay lines 201B and 20A2C to minimum delay.
(c) Use HP5245 to set signal generator to within 100 cycles of frequency for beamformer to be tested. (See
table 6-25), the generator output level is not critical; use approximately 100 mv output level.
(d) Adjust line stretcher SR-05B for 0 degrees phase shift on network analyzer.
NOTE
It may be necessary to add a short length of cable between the power divider and one side or the
other in order to adjust phasing to 0 degrees. A positive phase shift indicates additional line is
required.
(e)
(f)
(g)
(h)
Adjust HP8407A DISPLAY REFERENCE and AMPL VERNIER for 0-dB indication.
Repeat steps d. and e. for 0 phase and amplitude.
Set DISPLAY REFERENCE CAL for 00 indication on DISPLAY REFERENCE.
Remove adapter connected in step (a) and replace with desired beamformer.
NOTE
All unused ports must be terminated in 75 ohms.
(i) Adjust the decade line delay and, using the continuously variable line as a vernier, insert a total
nanosecond delay as determined from table 6-25 for the port and beamformer under test.
(j) Set DISPLAY REFERENCE to relative attenuation for port and beamformer under test as listed in table 625.
(k) Phase shift should be no more than 2 degrees as indicated on the HP8407A
6-104
TM 32-5985-217-15
Figure 6-10. Beamformer Phase and Amplitude Test Setup
6-105
TM 32-5985-217-15
(l) Repeat steps (g), (h), and (i) to check other ports in the same manner, being certain that all others not
under test are terminated in 75 ohms.
(m) Connect the rotary step assembly attenuator (variable attenuator) between the variable time delay and
power divider.
(n) Use bnc to bnc adapter to connect points 1 and 2.
(o) Set HP8407A DISPLAY REFERENCE TO 00.
(p) Repeat steps b, d and e for 0 phase and amplitude.
(q) Remove adapter connected in step (m) and replace with beamformer port under test.
(r) Determine amount of attenuation required for beamformer port under test from attenuation listed in table 625.
(s) Select the attenuator from the Weinschel Precision Attenuator Set approximating the required attenuation
and connect between the input (E1IN) of the variable time delay unit and the variable attenuator.
(t) Adjust the variable attenuator to provide total attenuation determined in step (r).
(u) Adjust decode line delay and variable time delay for total nanosecond delay from table 6-25 for
beamformer port under test.
4. Beamformer Adjustments. If all readings taken are consistently high or low, carefully check test setup before
making adjustments inside beamformers. Refer to section 7 for beamformer schematics. Remove top and bottom cover
plates. With the test equipment operating observe the out-of-tolerance channel.
(a) Phase Adjustments. The variable L and C adjustments shown on schematics are clearly indicated in the
beamformer. Place a finger lightly on the various variable capacitors or inductors associated with the out-of-tolerance
port. If additional capacitance indicates the reading may fall in, adjust the associated capacitor. Do likewise with the
variable inductors. If the beamformer channel comes within tolerance, recheck adjacent channels to see what effect, if
any, the adjustment made.
(b)
Amplitude Adjustments. These are critical adjustments, since they can only be accomplished by
removing existing resistors and trimming with replacement resistors. Selected resistors used to adjust amplitude during
manufacture are indicated on the schematics as -;. Replacement of any resistors will necessitate complete recheck of
phase and amplitude of the beamformer. A representative set of trimming resistors are available as spares at both sites.
Artificial transmission lines, as used in beamformers, are critical in adjustment and have interlocking effects in phase and
amplitude. Only personnel with a background in transmission line theory should attempt adjustments.
NOTE
In the following table, ns = nanoseconds.
6-106
TM 32-5985-217-15
Table 6-25. Phase and Amplitude Data For Beamformers
Beamformer Assembly TD-1050/FLR-9(V) (V8 only.)
Input Jack
Number
At 4 MHz, Phase
Deviation ±2°Max (±1.4 ns)
Attenuation, Input to
Output ±0.5 dB
1
189.8 ns
-10.0 dB
2
189.8
-10.0
3
183.8
-11.1
4
183.8
-11.1
5
171.9
-12.9
6
171.9
-12.9
7
154.3
-15.6
8
154.3
-15.6
9
131.3
-18.7
10
131.3
-18.7
11
103.3
-22.6
12
103.3
-22.6
13
70.9
-23.7
14
70.9
-23.7
15
34.4
-22.1
16
34.4
-22.1
Beamformer Assembly TD-1052/FLR-9(V) (V7 only)
Input Jack
Number
At 4 MHz, Phase
Deviation ±2°Max (±1.4 ns)
Attenuation, Input to
Output ±0.5 dB
1
229.2 ns
-10.0 dB
2
229.2
-10.0
3
221.7
-11.1
4
221.7
-1.1
6-107
TM 32-5985-217-15
Table 6-25. Phase and Amplitude Data For Beamformers (Continued)
Beamformer Assembly TD-1052/FLR-9(V) (V7 only.) (Continued)
Input Jack
Number
At 4 MHz, Phase
Deviation ± 2°Max (±1.4 ns)
Attenuation, Input to
Output ±0.5 dB
5
206.9 ns
-12.9 dB
6
206.9
-12,9
7
184.9
-15.6
8
184.9
-15.6
9
156.2
-18.7
10
156.2
-18.7
11
121.3
-22.6
12
121.3
-22.6
13
80.7
-23.7
14
80.7
-23.7
15
35.2
-22.1
16
35.2
-22.1
Beamformer Assembly TD-1051/FLR-9(V) (V8 only)
Input Jack
Number
At 12 MHz6 Phase
Deviation ±2°Max (+0.46 ns)
Attenuation, Input to
Output ±0.5 dB
1
63.69 ns
-10.0 dB
2
63.69
-10.0
3
62.19
-11.1
4
62.19
-11.1
5
59.19
-12.9
6
59.19
-12.9
7
54.70
-15.6
8
54.70
-15.6
6-108
TM 32-5985-217-15
Table 6-25. Phase and Amplitude Data For Beamformers (Continued)
Beamformer Assembly TD-1051/FLR-9(V) (V8 only) (Continued)
Input Jack
Number
At 12 MHz6 Phase
Deviation ±2°Max (+0.46 ns)
Attenuation, Input to
Output ±0.5 dB
9
48.75 ns
-18.7 dB
10
48.75
-18.7
11
41.36
-22.6
12
41.36
-22.6
13
32.57
-23.7
14
32.57
-23.7
15
22.40
-22.1
16
22.40
-22.1
Beamformer Assembly TD-1053/FLR-9(V) (V7 only.)
Input Jack
Number
At 12 MHz, Phase
Deviation ±2°Max (+0.46 ns)
Attenuation, Input to
Output ± 0.5 dB
1
81.77 ns
-10.0 dB
2
81.77
-10.0
3
79.64
-1.1
4
79.64
-11.1
5
75.38
-12.9
6
75.38
-12.9
7
69.02
-15.6
8
69.02
-15.6
9
60.57
-18.7
10
60.57
-18.7
11
50.09
-22.6
12
50.09
-22.6
6-109
TM 32-5985-217-15
Table 6-25. Phase and Amplitude Data For Beamformers (Continued)
Beamformer Assembly TD-1053/FLR-9(V) (V7 only.) (Continued)
Input Jack
Number
At 12 MHz, Phase
Deviation ±2°Max (+0.46 ns)
Attenuation, Input to
Output ±0.5 dB
13
37.61
-23.7
14
37.61
-23.7
15
23.18
-22.1
16
23.18
-22.1
Beamformer Assembly TD-1054/FLR-9(V)
Input Jack
Number
At 24 MHz, Phase
Deviation ± 2°Max (+0.23 ns)
Attenuation, Input to
Output ± 0.5 dB
1
31.48 ns
-7.8 dB
2
31.48
-7.8
3
28.75
-9.8
4
28.75
-9.8
5
23.35
-14.4
6
23.35
-14.4
7
15.36
-15.7
8
15.36
-15.7
Beamformer Assembly TD-1055/FLR-9(V)
Test Frequence: 4 MHz at 100 mv
Procedure (See figure 6-10)
NOTE
All ports not under test must be terminated in 75 ohms. See figure 5-5.
Step a.
Step b.
Step c.
Step d.
Check phase delay between J1 and J5.
Check phase delay between J2 and J5. Step a. and b. should agree within ± 1 degree as read on
network analyzer.
Check phase delay between J3 and J5.
Check phase delay between J4 and J5. C and d. should agree within ±1 degree as read on vector
voltmeter. The delay path through a. b. should be 9.3 nanoseconds greather than paths c. or d.
above
6-110
TM 32-5985-217-15
Table 6-25. Phase and Amplitude Data For Beamformers (Continued)
within ±2 degrees as read on network analyzer. At 4 MHz. 9.3 nanoseconds equals 13.5 degrees
Step e.
Insert 100-mV signal at each input port separately and note output reading (at J5)
Step f.
Level at J5 should be 8.5 ±0.2 dB greater than J1 and J2 than from J3 or J4.
Beamformer Assembly TD-1056/FLR-9(V)
Test Frequency: 12 MHz at 100 mV
Procedure (See figure 6-10)
NOTE
All ports not under test must be terminated in 75 ohms. See figure 5-6.
Step a.
Step b.
Step c.
Step d.
Step e.
Check phase delay between J1 and J4.
Check phase delay between J2 and J4. Steps a. and b. should agree within ±1 degree as read on
network analyzer
Check phase delay between J3 and J4. The delay through c., above, should b 1.2 nanoseconds
greater than that of steps a. or b. within ±2 degrees as read on vector voltmeter. At 12 MHz, 1.2
nanoseconds equals 5.2 degrees.
Insert 100-mV signal at each input port and note output reading (at J4)
Level at J4 should be 8.0 ±0.2 dB greater from J2 than from J1 or J3.
Beamformer Assembly TD-1057/FLR-9(V)
Test Frequency: 24 MHz at 100 mV
Procedure (See figure 6-10)
NOTE
Port not under test must be terminated in 75 ohms. See figure 5-7.
Step a.
Step b.
Step c.
e.
checkout.
Insert test frequency in J1 and measure phase delay to J3.
Repeat using the J2 port. The phase delay between ports should agree within ±1 degree as read on
the network analyzer.
Insert 100-mV signal at each input port separately and note output reading. The maximum insertion
loss should not exceed 3.5 dB and both channels should agree within ±0.2 dB.
Radio Frequency Amplifier.
Refer to CM 32-5895-236-14 and associated supplement for servicing and
6-111/6-112
TM 32-5985-217-15
CHAPTER 7
CIRCUIT DIAGRAMS
7-1. General.
Circuit diagrams contained in this chapter are presented to aid in maintenance operations and consist of all beamformers
used in the antenna group. Components that are non-repairable are sealed 1:4 power dividers and directional couplers.
Refer to Chapter 1, paragraph 1-6. for a listing of related manuals that contain maintenance information and schematics.
A schematic of the blower assembly used in all antenna amplifier racks may be found in Chapter 5, figure 5-26. Figures
7-1 through 7-9 consist of the following
Figure 7-1. Schematic, 8eamformer Assembly TD-1050/FLR-9(V)
Figure 7-2. Schematic, Beamformer Assembly TD-1051/FLR-9(V)
Figure 7-3. Schematic, Beamformer Assembly TD-1054/FLR-9(V)
Figure 7-4. Schematic, Beamformer Assembly TD-1052/FLR-9(V)
Figure 7-5. Schematic, Beamformer Assembly TD-1053/FLR-9(V)
Figure 7-6. Schematic, Beamformer Assembly TD-1055/FLR-9(V)
Figure 7-7. Schematic, Beamformer Assembly TD-1056/FLR-9(V)
Figure 7-8. Schematic, Beamformer Assembly TD-1057/FLR-9(V)
Figure 7-9. Antenna Group Cabling Diagram
7-1
TM 32-5985-217-15
Figure 7-1. Schematic, Beamformer Assembly TD-1050/FLR-9(V)
7-2/7-3
TM 32-5985-217-15
Figure 7-2. Schematic, Beamformer Assembly TD-1051/FLR-9(V)
7-4/7-5
TM 32-5985-217-15
NOTES:
1. PARTIAL REF DESIGNATIONS ARE SHOWN;
FOR COMPLETE DESIGNATION PREFIX
WITH UNIT NO. OR SUBASSEMBLY
DESIGNATION.
2. ALL RESISTORS ARE IN OHMS, 1/8 W ± 2 %
UNLESS OTHERWISE SPECIFIED.
3. ALL CAPACITORS ARE IN PF, ± 5 % UNLESS
OTHERWISE SPECIFIED.
4. ** INDICATORS VALUE TO BE DETERMINED
AT ASSY TO TRIM ATTENUATION, IF
REQUIRED.
Figure 7-3. Schematic, Beamformer Assembly TD-1054/FLR-9(V)
7-6/7-7
TM 32-5985-217-15
Figure 7-4. Schematic, Beamformer Assembly TD-1052/FLR-9(V)
7-8/7-9
TM 32-5985-217-15
Figure 7-5. Schematic, Beamformer Assembly TD-1053/FLR-9(V)
7-10/7-11
TM 32-5985-217-15
Figure 7-6. Schematic, Beamformer Assembly TD-1055/FLR-9(V)
7-12/7-13
TM 32-5985-217-15
Figure 7-7. Schematic, Beamformer Assembly TD-1056/FLR-9(V)
Figure 7-8. Schematic, Beamformer Assembly TD-1057/FLR-9(V)
7-14/7-15
TM 32-5985-217-15
Figure 7-9. Antenna Group Cabling Diagram
7-16/7-17
TM 32-5985-217-15
INDEX
Paragraphs
A
Alignment and adjustment.......................................................................................................
6-8
Antenna electronics input vswr check......................................................................................
6-10
Antenna electronics phase and amplitude tracking
test check .........................................................................................................................
6-11
Antenna group description and purpose...................................................................................
1-1
Antenna installation guidelines ................................................................................................
2-5
B
Band A and band B antenna elements, description..................................................................
5-5
Bands A and B reflecting screen and ground screen,
description ........................................................................................................................
5-6
Band C antenna elements, description ....................................................................................
5-7
Band C reflecting screen, description ......................................................................................
5-8
Beam formation ......................................................................................................................
5-4
Beamformers, description .......................................................................................................
5-12
Bench test procedures.............................................................................................................
6-16
Blower circuits, description ......................................................................................................
5-14
C
Capabilities and limitations......................................................................................................
1-4
Central building, installation ....................................................................................................
2-6
Circuit diagrams ......................................................................................................................
7-1
Cross reference index, equipment supplied .............................................................................
1-8
D
Directional couplers, description..............................................................................................
Index 1
5-13
Pages
TM 32-5985-217-15
INDEX (Continued)
Paragraphs
E
Electronic circuits, functional operation ............................................................................
section 2
Band A and band B antenna elements ...........................................................................
5-5
Bands A and B reflecting screen and ground
screen ........................................................................................................................
5-6
Band C antenna elements..............................................................................................
5-7
Band C reflecting screen................................................................................................
5-8
Transmission line tuners ................................................................................................
5-9
Rf amplifiers ..................................................................................................................
5-10
Power dividers and combiners .......................................................................................
5-11
Beamformers.................................................................................................................
5-12
Directional couplers .......................................................................................................
5-13
Blowers..........................................................................................................................
5-14
Emergency operation ..............................................................................................................
4-5
Blower failure r f amplifier cabinets ................................................................................
4-5
Equipment failure ..........................................................................................................
4-6
Jamming........................................................................................................................
4-7
Equipment description.............................................................................................................
1-2
Antenna array ................................................................................................................
1-2.a
Central building..............................................................................................................
1-2.b
Equipment supplied.................................................................................................................
1-5
F
Functional description .............................................................................................................
5-3
I
Installation...............................................................................................................................
2-1
Unpacking .....................................................................................................................
2-2
Index 2
Pages
TM 32-5985-217-15
INDEX (Continued)
Paragraphs
I
Inspection ......................................................................................................................
2-3
Cables, identification .....................................................................................................
2-4
Antenna installation guidelines.......................................................................................
2-5
Central building..............................................................................................................
2-6
L
Leading particulars..................................................................................................................
1-3
List of related technical manuals .............................................................................................
1-6
M
Maintenance interface requirements........................................................................................
6-1.b
Maintenance, non-repairable items..........................................................................................
6-2.a
Maintenance, organization and intermediate ...........................................................................
6-1
Maintenance support equipment..............................................................................................
6-3
O
Operating instructions .............................................................................................................
4-2
Rf amplifier starting procedures .....................................................................................
4-3
Software assignments....................................................................................................
4-4
Operation
Section 1 controls and indicators ...................................................................................
4-1
Section 2. operating instructions ...................................................................................
4-2
Section 3. emergency operation....................................................................................
4-5
P
Performance test standards and tables....................................................................................
6-4
Power dividers and combiners, description..............................................................................
5-11
Preparation for use, antenna group .........................................................................................
3-1
Index 3
Pages
TM 32-5985-217-15
INDEX (Continued)
Preventive maintenance .........................................................................................................
Primary power circuit breakers ................................................................................................
Paragraphs
6-9
6-5
R
Removal and replacement procedures ....................................................................................
6-15
Rf amplifiers, description.........................................................................................................
5-10
Rf cables, identification ..........................................................................................................
2-4
S
Single antenna impedance measurement test check ...............................................................
6-14
Swept-frequency vswr (singly driven elements)
test check .........................................................................................................................
6-13
System checkout.....................................................................................................................
6-6
T
Theory of operation .................................................................................................................
5-2
Facility functional operation ...........................................................................................
section 1
Functional operation of electronic circuits ......................................................................
section 2
Transmission line phase tracking measurement
test check .........................................................................................................................
6-12
Transmission line tuners..........................................................................................................
5-9
Troubleshooting cables ...........................................................................................................
6-7.a
Troubleshooting, system .........................................................................................................
6-7
Index 4
Pages
TM 32-5985-217-15
GLOSSARY
A
A/D - Analog-to-digital,
ANTENNA ARRAY - Circular disposed antenna elements tuned to a particular band of frequencies.
ANTENNA ELEMENT - A single element used in an antenna array.
ASCII - American Standard code for information interchange (See LEC Leap Assembler Manual).
ASR - Automatic send/receive.
AZIMUTH - Angular direction clockwise from true north.
B
BCD - Binary coded decimal In which lines are weighted 8, 4, 2, and 1.
BEAM ASSIGNMENT TABLE - A table contained in the computer program which defines rf beams available to a radio
receiver as selected by a bsu/biu.
BEAMFORMER - A device which forms a directional broadband rf signal.
BLOCKING - Inhibiting use of paths between A1 and A2 or A2 and A3 switch matrix submatrices.
BOOTSTRAP - Simple initial computer routine which enables the computer to initiate loading of larger program from an
external device.
BORESIGHT ELEMENT - Antenna element to the right of (even elements) or on (odd elements) the received radio beam
center line.
BSU/BIU - Beam select unit/Beam Identification unit.
BUFFER - Circuit which stores data or provides load isolation for signal lines.
C
CABLE SCANNER - Multiplexer which routes input signals to the computer.
CARD FILE - Assembly containing circuit cards, card jacks and interconnecting wiring.
Glossary 1
TM 32-5985-217-15
CCD - Cyclic coded decimal in which the bits change In segments of one each per word.
CENTRAL BUILDING - Building located In center of antenna array.
CPU - Central processing unit; the computer minus input/output accessories.
COUPLING - Connection of the same rf input beam to two or more receivers that are connected to the output ports in a
common A3 submatrix.
D
DECOUPLING - Use of STAGE REMOVED command to clear switch map table of paths of receivers who are coupled to
the same faulty rf beam in the A3 submatrlx to allow the operator to obtain an alternate path to the receiver.
DECODER - Circuit for conversion between numerical systems (such as bcd to decimal).
DFG - Direction finding group
DIAGNOSTIC ROUTINE - Special computer program which senses and defines faults.
DIRECTIONAL COUPLER - Passive device which provides low Impedance In the desired direction and high Impedance
in all other directions to rf signal Inputs.
DIU - Digital interface unit.
DOT-OR - Logical OR function not present in any one circuit; occurs because of the nature of connected outputs from
other circuits.
DAUGHTER BOARD - Pcb which mounts on a motherboard.
DUMP - Output computer memory contents to some output device such as a tty.
E
EAI - External address in; computer output signal which enables transfer of address between two computers.
ECI - External command input; computer output signal which enables routing of a command to the computer.
ECO - External command output computer output signal which defines the nature of i/o bus signal.
EDI - External data input; computer output signal which enables routing of data to the computer.
Glossary 2
TM 32-5985-217-15
EDO - External data output; computer output signal which defines the nature of i/o bus signal.
EMI - Electromagnetic interference.
ESI - External status input; computer output signal which enables routing of status signal to the computer.
EXCLUSIVE-OR - Logic circuit which produces a high output when one (not more than one) input is high.
G
Goniometer - Rotating device which forms a directional rf beam from received signals.
H
HANDOVER - Occurs when the primary computer relinquishes control of the system to the on-line standby computer.
HEXADECIMAL - The numbering system in the computer program which uses 16 as a radix. The 16 combination of bits
in a 4-bit group provides decimal digits of 0 through 9 and A through F.
I
INTERFACE - Circuits between the computer and other equipment necessary for routing, storage, format/level
conversion, or special processing.
INTERRUPT - Causes computer to stop doing a relatively unimportant routine and perform one of higher priority; after
interrupt, computer returns to previous task.
I/0 - Input and output.
I/O BUS - Computer's connection to external equipment.
I/O BUS SWITCH - Routes signals from/to active computer to/from external devices.
I/O DRIVER RECEIVER - Line driver and signal converter.
IPDC - Internal programmed data channel.
Glossary 3
TM 32-5985-217-15
J
J-K FLIP-FLOP - Flip-flop which can be operated asynchronously, like an R-S flip-flop, and/or synchronously with a clock,
J, and K inputs. The J and K Inputs are sometimes provided with AND gates.
L
LATCH - Storage register.
LEC - Lockheed Electronics Company
LINE DRIVER - Circuit which produces balanced signals in response to single-ended logic signal.
LINE RECEIVER - Circuit which produces a single-ended logic signal in response to a balanced input signal.
LOAD - To enter the program into the computer.
LOGIC - Electronic circuits or groups of circuits designed to make a discrete response to a particular combination of input
signal levels.
LOGIC ERROR - Program detects that set is executing at an Illegal location or detects that a cpu controlled parameter is
out of limits.
M
MAGNETIC TAPE CONTROLLER - Electrical interface between computer and tape unit; it provides buffering, motion
control, and error control.
MATRIX - An array of crosspoints in which any point may be addressed by a system of coordinates.
MATRIX MULTIPLEXER - Multiplexer which routes computer outputs to external equipment.
MCC - Memory control chassis associated with MAC 16 computer.
MDC - Multiplex data channel; a high-speed portion of the computer pdc i/o structure.
MEMORY EXPANSION CHASSIS - Holds all computer memory in excess of 8192 words, and also interface logic
circuits.
MONITOR BEAM - A directional beam, selected with automatic selected directivity.
Glossary 4
TM 32-5985-217-15
MOTHERBOARD - A circuit card where other circuit cards are physically mounted.
MULTIPLEXER - Signal selector or router which acts as a multiple-pole rotary switch, under external (computer) control.
MUX - Multiplexer.
N
NAND - Circuit which produces a low output only when all inputs are high.
NOR - Circuit which produces a low output when any (one or more) inputs (including all inputs) are high.
O
OLM&T - On-line monitor and test function of the monitor and test group.
OMNIBEAM - A non-directional beam.
OPTICAL ENCODER - Produces a ccd output to define the direction of the goniometer beam.
P
PDC - Programmed data channel; part of computer i/o structure.
PERIPHERAL EQUIPMENT - Equipments interfacing with a single unit of equipment for control or signal application
purposes.
PROGRAM - Set of instructions, constraints, and information stored in computer memory which enables a computer to
perform a particular task (or series of tasks).
PROGRAM AZIMUTH SHEET - List of beams assigned to a given bsu/biu.
R
REDUNDANT (MUX, CPU, etc) - Energized standby equipment identical to that equipment presently in control.
REED SWITCH MATRIX - Any of three test matrices in the monitor and test group designated matrix A, matrix B, and
matrix C and the special project switch matrix.
RFI - Radio frequency interference.
Glossary 5
TM 32-5985-217-15
RFSM - Radio frequency switch matrix; a part of the rf matrix group.
ROUTINE - A particular part of an overall program which performs a certain function within the program.
S
SAMPLING MATRIX, OLM&T - A reed switch mounting assembly contained as a part of, or all of, an olm&t test matrix
designated matrix A, matrix B, or matrix C.
SECTOR BEAM - A directional beam with manually selected directivity.
SINGLE-SHOT - Circuit which produces a single fixed duration pulse in response to an input signal.
SOMC - Supervisory operation maintenance console.
SPECIAL PROJECT BSU/BIU - A beam select unit which selects any bands and beams without requiring a beam
assignment table.
STANDBY - The non-controlling computer of the two provided. When on-line, it is continuously accepting data from the
primary computer; can assume control immediately upon request.
SUBMATRIX - Consists of a number of circuit cards, each with multiple inputs and a single output, arranged in such a
manner as to provide a two-dimensional (X, Y) array of switchable rf crosspoints.
T
TABLE - An array of data, constraints, or references in the computer program.
TELETYPE CONTROLLER - LEC provided circuit card which provides signal buffering for a teletype under computer
control.
TRANSMISSION LINE TUNERS - Coaxial line stretcher.
TSA - Computer program instruction.
TTY - Teletypewriter.
TUNNEL - Underground access between operating building and central building housing connecting cables.
Glossary 6
TM 32-5985-217-15
V
VVM - Vector voltmeter.
W
WATCHDOG TIMER - A periodically reset counter which provides an interrupt to the opposite computer if not reset
within 150 milliseconds.
X
X-PT - A crosspoint in the switch matrix.
U.S. GOVERNMENT PRINTING OFFICE. 1976-211-340/3326A
GLOSSARY 7
PIN: 017643-000